
By Dillion Megida
In this article, I’ll explain how you can install NVM, or Node Version Manager, on Windows, Linux, and Mac.
What is NVM?
Node Version Manager (NVM), as the name implies, is a tool for managing Node versions on your device.
Different projects on your device may be using different versions of Node. Using only one version (the one installed by npm) for these different projects may not give you accurate execution results.
For example, if you use a Node version of 10.0.0 for a project that uses 12.0.0, you may get some errors. And if you update the Node version to 12.0.0 with npm, and you use it for a project that uses 10.0.0, you may not get the expected experience.
In fact, you would most likely get a warning that says:
This project requires Node version X
Instead of using npm to install and uninstall Node versions for your different projects, you can use nvm, which helps you effectively manage your node versions for each project.
NVM allows you to install different versions of Node, and switch between these versions depending on the project that you’re working on via the command line.
In the next sections, I’ll show you how to install NVM on your Windows, Linux, or Mac device.
Before proceeding, I also recommend that you uninstall Node.js if you have it installed already so that you do not have any conflicts with Node.js and nvm.
How to Install NVM on Windows
NVM is mostly supported on Linux and Mac. It doesn’t have support for Windows. But there’s a similar tool created by coreybutler to provide an nvm experience in Windows called nvm-windows.
nvm-windows provides a management utility for managing Node.js versions in Windows. Here’s how to install it:
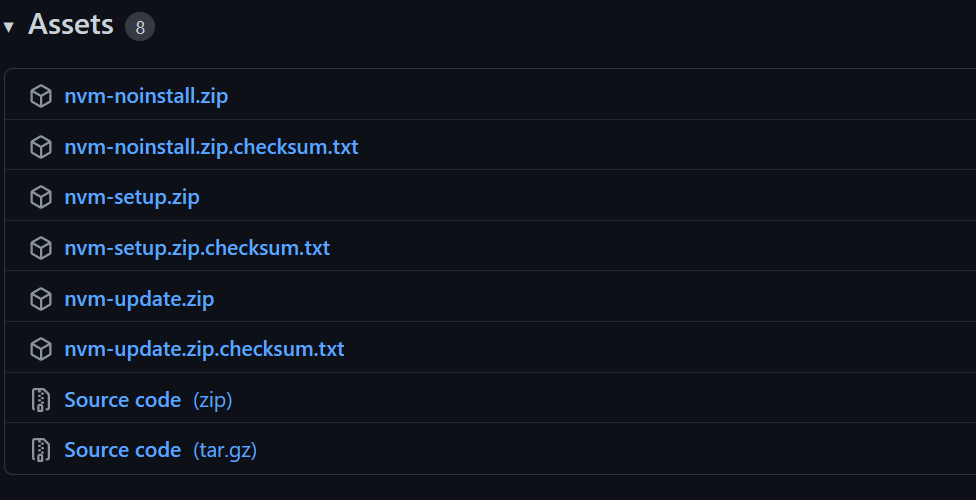
1. Click on «Download Now»
In the nvm-windows repository Readme, click on «Download Now!»:
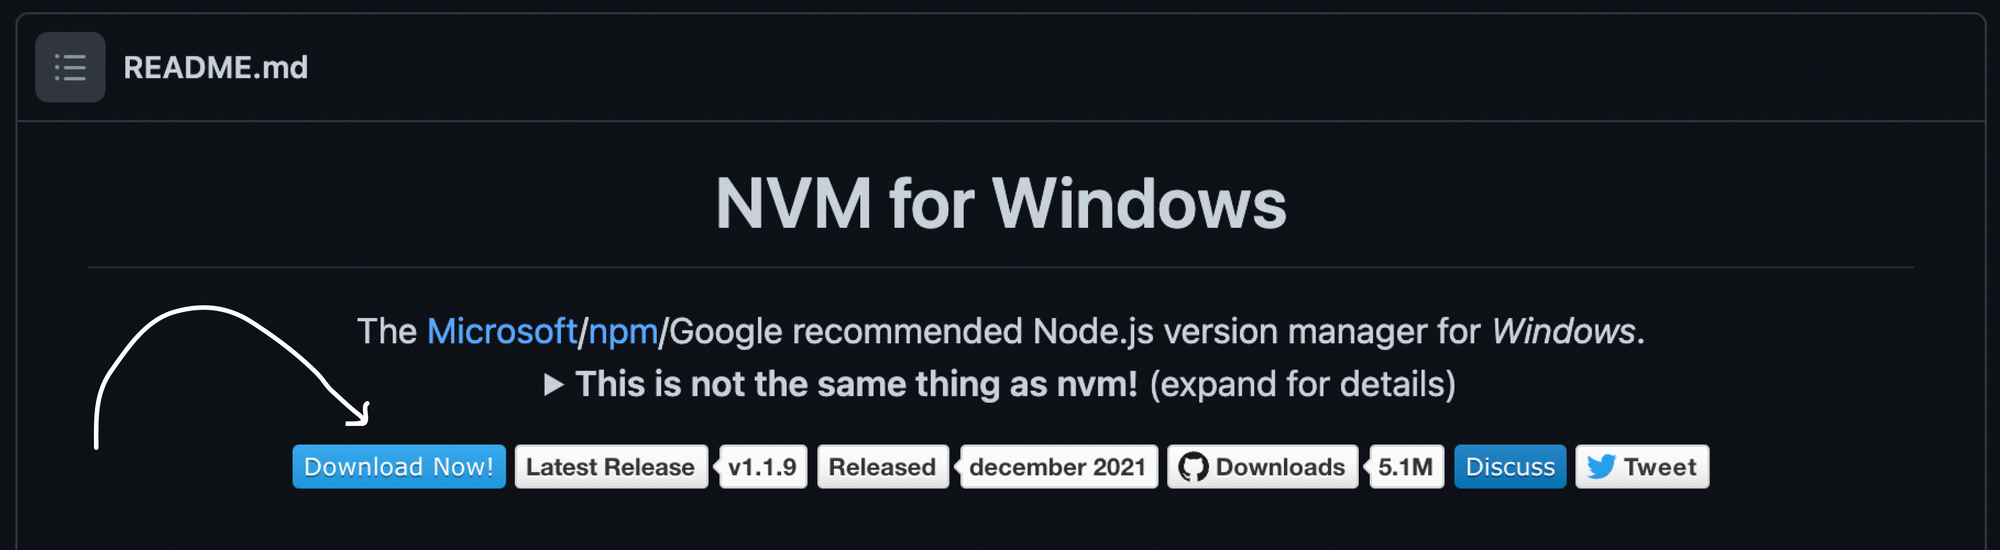
This will open a page showing different NVM releases.
2. Install the .exe file of the latest release
In the latest release (which as of the time of writing this is 1.1.9), you’ll find different assets. Click on the nvm-setup.exe asset which is the installation file for the tool:

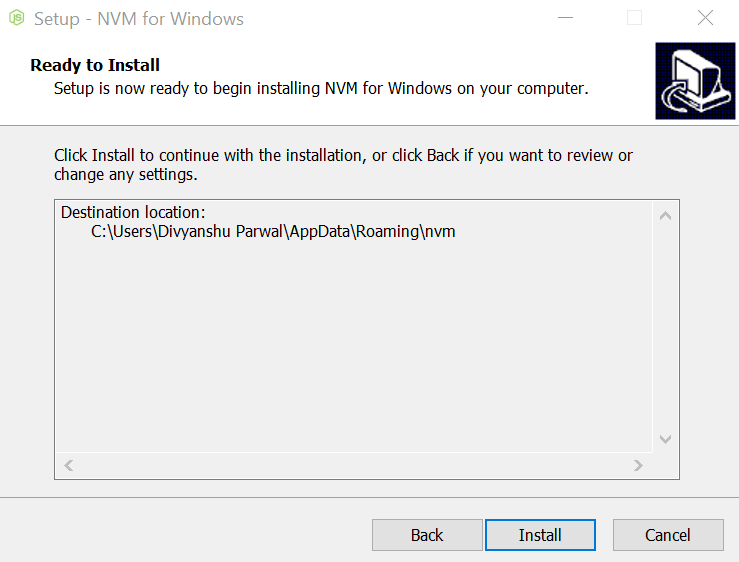
3. Complete the Installation Wizard
Open the file that you have downloaded, and complete the installation wizard.
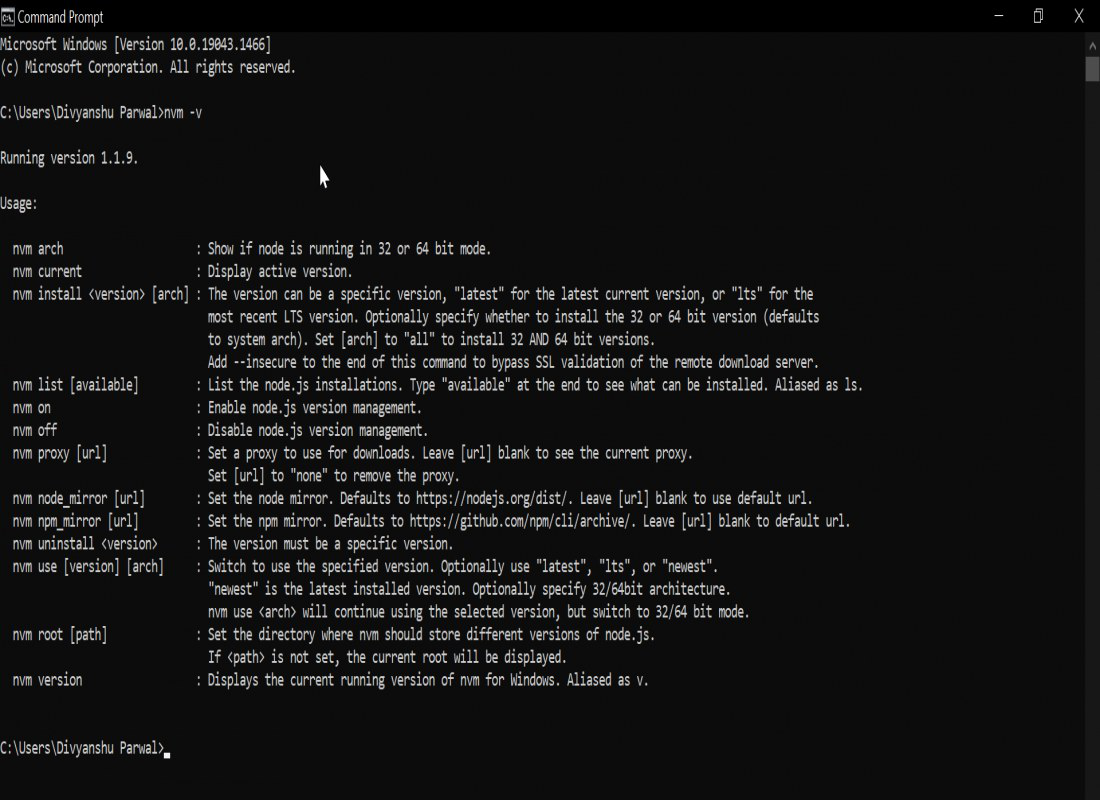
When done, you can confirm that nvm has been installed by running:
nvm -v
If nvm was installed correctly, this command will show you the nvm version installed.
How to Install NVM on Linux and Mac
Since Linux and Mac have some similarities (they are both UNIX-based OSes), you can install nvm on them in similar ways.
1. Run the nvm installer
In your terminal, run the nvm installer like this:
curl -o- https://raw.githubusercontent.com/nvm-sh/nvm/v0.39.1/install.sh | bash

# or

wget -qO- https://raw.githubusercontent.com/nvm-sh/nvm/v0.39.1/install.sh | bash
You can use curl or bash depending on the command available on your device.
These commands will clone the nvm repository to a ~/.nvm directory on your device.
2. Update your profile configuration
The installation process from step 1 should also automatically add the nvm configuration to your profile. If you’re using zsh, that would be ~/.zshrc. If you’re using bash, that would be ~/.bash_profile…or some other profile.
If it doesn’t automatically add nvm configuration, you can add it yourself to your profile file:
export NVM_DIR="$([ -z "${XDG_CONFIG_HOME-}" ] && printf %s "${HOME}/.nvm" || printf %s "${XDG_CONFIG_HOME}/nvm")"
[ -s "$NVM_DIR/nvm.sh" ] && \. "$NVM_DIR/nvm.sh"
This command above loads nvm for use.
3. Reload the shell configuration
With your profile configuration updated, now you will reload the configuration for your terminal to use:
source ~/.bashrc
With this command executed, nvm is ready for you to use. You can confirm that nvm is installed correctly by running:
nvm -v
This should show the version of nvm installed.
Wrapping up
With nvm installed, you can now install, uninstall, and switch between different Node versions in your Windows, Linux, or Mac device.
You can install Node versions like this:
nvm install latest
This command will install the last version of Node:
nvm install vX.Y.Z
This will install the X.Y.Z Node version.
You can also make a version your default by running:
nvm alias default vX.Y.Z
And if you want to use a specific version at any point, you can run the following in your terminal:
nvm use vA.B.C
NVM makes it easier to manage multiple versions of Node.js across different projects that require different versions.
Learn to code for free. freeCodeCamp’s open source curriculum has helped more than 40,000 people get jobs as developers. Get started
Notice: We are working full time work on Runtime, the successor to NVM for Windows.
Complete this form to provide your thoughts and sign up for progress updates.
Updates will also be posted on the Author Software LinkedIn Page.
NVM for Windows
The Microsoft/npm/Google recommended Node.js version manager for Windows.
This is not the same thing as nvm! (expand for details)
The original nvm is a completely separate project for Mac/Linux only. This project uses an entirely different philosophy and is not just a clone of nvm. Details are listed in Why another version manager? and what’s the big difference?.
Sponsors
Seeking Feedback:
We’re working on Runtime (rt), the successor to NVM For Windows. Please contribute by taking a minute to complete this form. Thank you!
Overview
Manage multiple installations of node.js on a Windows computer.
tl;dr Similar (not identical) to nvm, but for Windows. Has an installer. Download Now!
This has always been a node version manager, not an io.js manager, so there is no back-support for io.js. Node 4+ is supported. Remember when running nvm install or nvm use, Windows usually requires administrative rights (to create symlinks). To install the latest version of Node.js, run nvm install latest. To install the latest stable version, run nvm install lts.

There are situations where the ability to switch between different versions of Node.js can be very useful. For example, if you want to test a module you’re developing with the latest bleeding edge version without uninstalling the stable version of node, this utility can help.

Installation & Upgrades
⭐ ⭐ Uninstall any pre-existing Node installations!! ⭐ ⭐
The simplest (recommended) way to get NVM for Windows running properly is to uninstall any prior Node installation before installing NVM for Windows. It avoids all of the pitfalls listed below. However; you may not wish to nuke your Node installation if you’ve highly customized it. NVM for Windows can assume management of an existing installation, but there are nuances to this (dependent entirely on the permissions of the user running the installation). If you have an administrative account, it’s relatively safe to install NVM for Windows before uninstalling the original Node version. If you are working in a closed environment, such as a corporate Active Directory environment where installations/uninstallations are controlled by group policy, you should really consider removing the original version of Node before installing NVM4W.
Permission Problems
For security reasons, Windows will not allow an application from one vendor to «uninstall» an application from a different vendor. The official NVM4W installer will attempt assume management of an existing installation of Node., but it cannot actually uninstall the original Node.js version. To work around this, NVM for Windows installer attempts to copy the original Node.js installation files to the NVM root. This includes global npm modules and configurations. Once this process is complete, the original Node.js installation can be uninstalled without losing data.
PATH Installation Problems
If you attempt to configure the NVM_SYMLINK to use an existing directory (like C:\Program Files\nodejs), it will fail because a symlink cannot overwrite a physical directory. This is not a problem if you choose a different symlink path (such as C:\nvm\node).
PATH Conflicts
If you do not uninstall the original version, running nvm use may appear to do nothing at all. Running node -v will always show the original installation version. This is due to a PATH conflict that presents when the same application is installed multiple times. In NVM4W 1.1.11+, run nvm debug to determine if you have a PATH conflict.
For simpliciy, we recommend uninstalling any existing versions of Node.js before using NVM for Windows. Delete any existing Node.js installation directories (e.g., %ProgramFiles%\nodejs) that might remain. NVM’s generated symlink will not overwrite an existing (even empty) installation directory.
👀 Backup any global npmrc config 👀
(e.g. %AppData%\npm\etc\npmrc)
Alternatively, copy the settings to the user config %UserProfile%\.npmrc. Delete the existing npm install location (e.g. %AppData%\npm) to prevent global module conflicts.
Install nvm-windows
Use the latest installer (comes with an uninstaller). Alternatively, follow the manual installation guide.
If NVM4W doesn’t appear to work immediately after installation, restart the terminal/powershell (not the whole computer).

Reinstall any global utilities
After install, reinstalling global utilities (e.g. yarn) will have to be done for each installed version of node:
nvm use 14.0.0
npm install -g yarn
nvm use 12.0.1
npm install -g yarn
Upgrading nvm-windows
💡 As of v1.1.8, there is an upgrade utility that will automate the upgrade process.
To upgrade nvm-windows, run the new installer. It will safely overwrite the files it needs to update without touching your node.js installations. Make sure you use the same installation and symlink folder. If you originally installed to the default locations, you just need to click «next» on each window until it finishes.
Usage
nvm-windows runs in an Admin shell. You’ll need to start powershell or Command Prompt as Administrator to use nvm-windows
NVM for Windows is a command line tool. Simply type nvm in the console for help. The basic commands are:
nvm arch [32|64]: Show if node is running in 32 or 64 bit mode. Specify 32 or 64 to override the default architecture.nvm debug: Check the NVM4W process for known problems.nvm current: Display active version.nvm install <version> [arch]: The version can be a specific version, «latest» for the latest current version, or «lts» for the most recent LTS version. Optionally specify whether to install the 32 or 64 bit version (defaults to system arch). Set [arch] to «all» to install 32 AND 64 bit versions. Add--insecureto the end of this command to bypass SSL validation of the remote download server.nvm list [available]: List the node.js installations. Typeavailableat the end to show a list of versions available for download.nvm on: Enable node.js version management.nvm off: Disable node.js version management (does not uninstall anything).nvm proxy [url]: Set a proxy to use for downloads. Leave[url]blank to see the current proxy. Set[url]to «none» to remove the proxy.nvm uninstall <version>: Uninstall a specific version.nvm use <version> [arch]: Switch to use the specified version. Optionally uselatest,lts, ornewest.newestis the latest installed version. Optionally specify 32/64bit architecture.nvm use <arch>will continue using the selected version, but switch to 32/64 bit mode. For information about usingusein a specific directory (or using.nvmrc), please refer to issue #16.nvm root <path>: Set the directory where nvm should store different versions of node.js. If<path>is not set, the current root will be displayed.nvm version: Displays the current running version of NVM for Windows.nvm node_mirror <node_mirror_url>: Set the node mirror.People in China can use https://npmmirror.com/mirrors/node/nvm npm_mirror <npm_mirror_url>: Set the npm mirror.People in China can use https://npmmirror.com/mirrors/npm/
⚠️ Gotcha!
Please note that any global npm modules you may have installed are not shared between the various versions of node.js you have installed. Additionally, some npm modules may not be supported in the version of node you’re using, so be aware of your environment as you work.
📛 Antivirus
Users have reported some problems using antivirus, specifically McAfee. It appears the antivirus software is manipulating access to the VBScript engine. See issue #133 for details and resolution.
v1.1.8 is not code signed, but all other versions are signed by Ecor Ventures LLC/Author.io. This should help prevent false positives with most antivirus software.
v1.1.8+ was not code signed due to an expired certificate (see the release notes for reasons). v1.1.9 is code signed thanks to ajyong, who sponsored the new certificate.
Using Yarn
tldr; npm i -g yarn
See the wiki for details.
Build from source
- Install go from http://golang.org
- Download source / Git Clone the repo
- Change GOARCH to amd64 in build.bat if you feel like building a 64-bit executable
- Fire up a Windows command prompt and change directory to project dir
- Execute
go get github.com/blang/semver - Execute
go get github.com/olekukonko/tablewriter - Execute
build.bat - Check the
distdirectory for generated setup program.
💡 Why another version manager?
There are several version managers for node.js. Tools like nvm and n
only run on Mac OSX and Linux. Windows users are left in the cold? No. nvmw and nodist
are both designed for Windows. So, why another version manager for Windows?
The architecture of most node version managers for Windows rely on .bat files, which do some clever tricks to set or mimic environment variables. Some of them use node itself (once it’s downloaded), which is admirable, but prone to problems. Right around node 0.10.30, the installation structure changed a little, causing some of these to just stop working with anything new.
Additionally, some users struggle to install these modules since it requires a little more knowledge of node’s installation structure. I believe if it were easier for people to switch between versions, people might take the time to test their code on back and future versions… which is just good practice.
💡 What’s the big difference?
First and foremost, this version of nvm has no dependency on node. It’s written in Go, which is a much more structured approach than hacking around a limited .bat file. It does not rely on having an existing node installation. Go offers the ability to create a Mac/Linux version on the same code base. In fact, this is already underway.
The control mechanism is also quite different. There are two general ways to support multiple node installations with hot switching capabilities. The first is to modify the system PATH any time you switch versions, or bypass it by using a .bat file to mimic the node executable and redirect accordingly. This always seemed a little hackish to me, and there are some quirks as a result of this implementation.
The second option is to use a symlink. This concept requires putting the symlink in the system PATH, then updating its target to the node installation directory you want to use. This is a straightforward approach, and seems to be what people recommend…. until they realize just how much of a pain symlinks are on Windows. This is why it hasn’t happened before.
In order to create/modify a symlink, you must be running as an admin, and you must get around Windows UAC (that annoying prompt). Luckily, this is a challenge I already solved with some helper scripts in node-windows. As a result, NVM for Windows maintains a single symlink that is put in the system PATH during installation only. Switching to different versions of node is a matter of switching the symlink target. As a result, this utility does not require you to run nvm use x.x.x every time you open a console window. When you do run nvm use x.x.x, the active version of node is automatically updated across all open console windows. It also persists between system reboots, so you only need to use nvm when you want to make a change.
NVM for Windows comes with an installer, courtesy of a byproduct of my work on Fenix Web Server.
Overall, this project brings together some ideas, a few battle-hardened pieces of other modules, and support for newer versions of node.
NVM for Windows recognizes the «latest» versions using a list provided by the Node project. Version 1.1.1+ use this list. Before this list existed, I was scraping releases and serving it as a standalone data feed. This list was used in versions 1.1.0 and prior, but is now deprecated.
Motivation
I needed it, plain and simple. Additionally, it’s apparent that support for multiple versions is not coming to node core. It was also an excuse to play with Go.
Why Go? Why not Node?
I chose Go because it is cross-platform, felt like less overhead than Java, has been around longer than most people think. Plus, I wanted to experiment with it. I’ve been asked why I didn’t write it with Node. Trying to write a tool with the tool you’re trying to install doesn’t make sense to me. As a result, my project requirements for this were simple… something that’s not Node. Node will continue to evolve and change. If you need a reminder of that, remember io.js, Ayo, all the breaking changes between 4.x.x and 6.x.x, and the shift to ES Modules in 12+. Change is inevitable in the world of software. JavaScript is extremely dynamic.
🙏 Thanks
Thanks to everyone who has submitted issues on and off Github, made suggestions, and generally helped make this a better project. Special thanks to
- @vkbansal, who provided significant early feedback throughout the early releases.
- @rainabba and @sullivanpt for getting Node v4 support integrated.
- @s-h-a-d-o-w who resolved the longstanding space escaping issue in path names (#355).
- ajyong who sponsored the code signing certificate in late 2021.

Last Updated :
04 Feb, 2025
NVM or Node Version Manager is a command-line tool that allows developers to manage multiple versions of Node.js on a single machine. This function offers the flexibility to work on different projects and versions of Node.js. In this guide, we’ll walk you through the steps to install and use NVM on Windows OS.
Prerequisites:
- Windows 11, 10, 8, or 7
- Administrative Rights
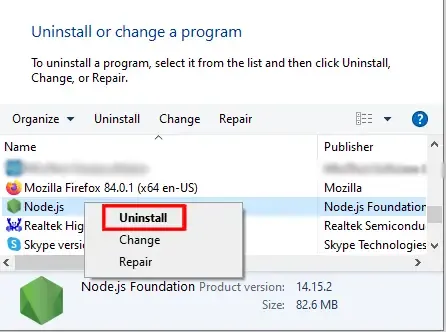
Note: It is recommended to uninstall Node.js if your system already has one.
Uninstall Node.js from Windows
This will ensure that there will not be any conflict while performing a clean installation of Node.js
Step 1: Uninstall Node.js
Navigate to Control Panel > Programs > Programs and Features and locate Node.js, select it, and click to Uninstall the files.
Uninstall Node.js – older versions
Step 2: Remove Residual Files
Delete the Node.js folder from C:\Program Files\ and remove the npm and npm-cache folders from C:\Users\ThisPC\AppData\Roaming\
Remove Residual Files
Installing NVM in Windows
In this article, we will learn how to install NVM for Windows. Follow the below steps:
Step 1: Download the Installer
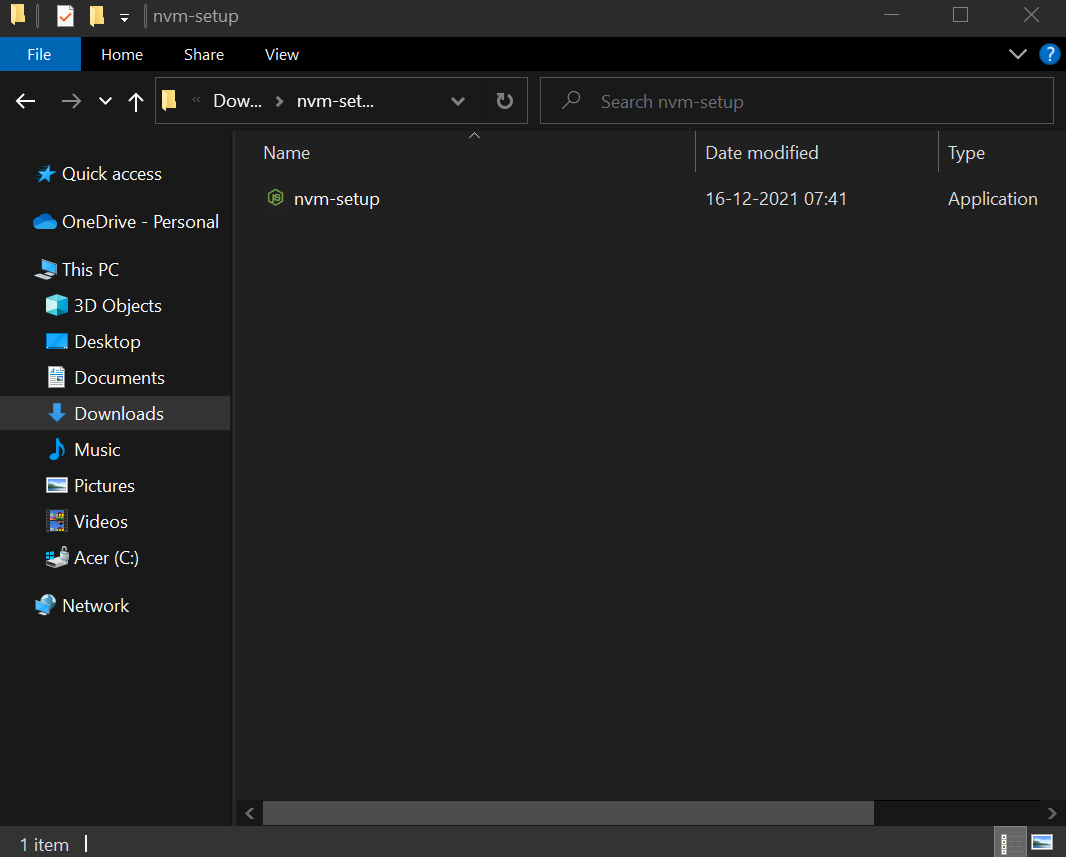
Download the nvm-setup.zip from the assets table located over here. Unzip/Extract the contents (The Zip file should be present in the Downloads folder or the destination you choose to download) by extracting it to nvm-setup.
Step 2: Open the Downloaded File
In the nvm-setup folder, double-click on the file named nvm-setup.exe as shown below.
Step 3: Read & Accept the License Agreement
Choose the I accept the agreement option and click on Next to proceed further with the installation.

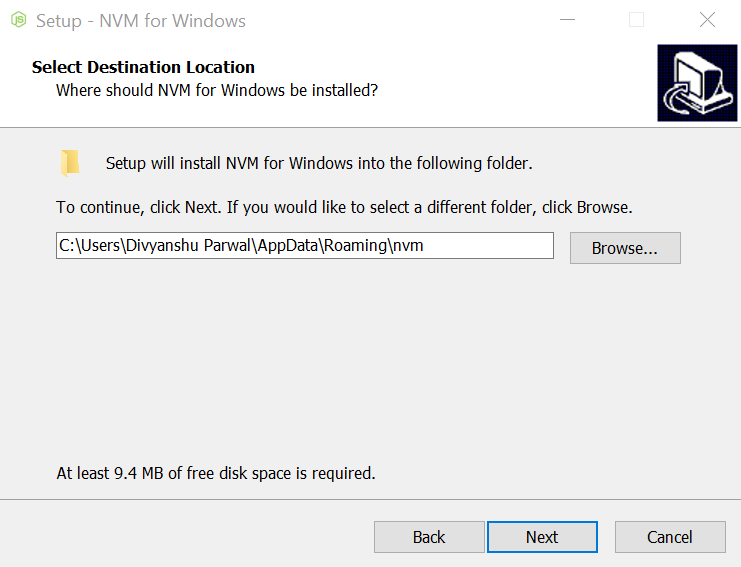
Step 4: Choose the Path to Finish the Installation Process
Now, select the destination to install and click on Next.
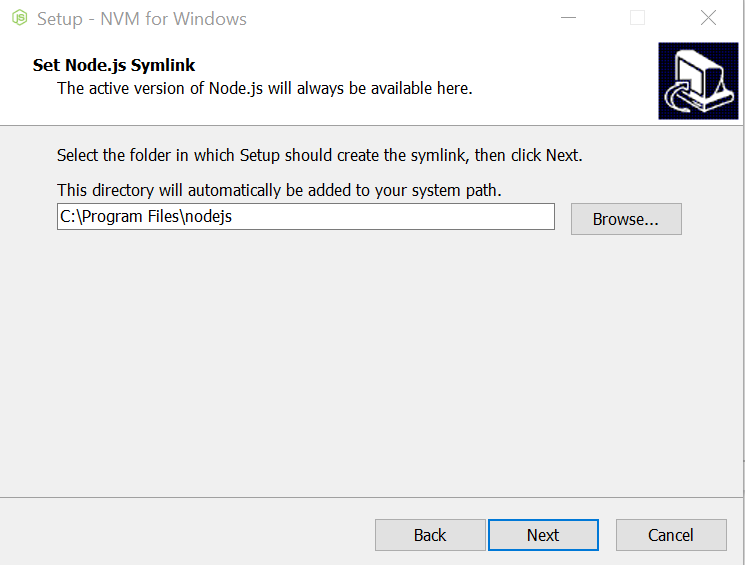
Step 5: Choose a Extraction Folder
Select the folder in which setup should create the Node.js symlink, then click Next.
Step 6: Ready to Install
Click on the Install button and once it completes, click on the Finish button.
Step 7: Verify the Installation
Confirm NVM is installed successfully by typing the following command in the terminal
nvm -v
Output:
Install Node.js Versions Using NVM
Now, we will Install node.js versions using NVM for Windows OS.
1. List all Available Versions
This command will provide the list of all available Node.js versions:
nvm list available
2. Install Any Specific Versions
If you want to install any specific Nodejs version, run this command:
nvm install 21.7.3
3. Use any Specific Version
If you wish to work on any specific Node.js version, use this command:
nvm use 23.7.0
4. Set a Default Version
Use the following command to set a default Node.js version:
nvm alias default 23.7.0
Verify the Node.js Versions Using NVM
1. Check Node.js Version
This command will display the current Node.js version that you’re using:
node -v
2. Check NPM Version
The following command will display the NPM version associated with the current Node.js version.
npm -v
Conclusion
By following this guide, you can easily manage multiple Node.js versions on your Windows computer using NVM. In this guide, we’ve installation, uninstallation, verify the NPM for Windows. This guide is helpful especially for those who are looking to work on different Node.js versions.
NVM is a Node Version Manager used to manage multiple Node.js versions on systems.
Why NVM Need?
NVM makes it easy to install and manage different Node versions on your machine or laptop, and you can switch between them whenever you need it from one node version to another based on your need. To switch to another version of node.js, you have to run a few commands, which I will explain in the below sections.
Suppose you have installed the specific version of node 18.0.0 on your machine, and you will get another project that project needs a higher or lower version of node.js (either node version 20.0.0 or 16.0.0 )to run the project on your machine but your system has node 18.0.0. So when you try to install packages and run the project you will get the Node version.
In the following sections, I’ll guide you through installing NVM on your Windows, Linux, or Mac device.
Before proceeding, I recommend uninstalling Node.js if you installed it to avoid conflicts between Node.js and NVM.

Installing NVM on Windows
NVM is primarily supported on Linux and Mac, but not on Windows. However, there’s a similar tool called nvm-windows created by Corey Butler, which provides a similar experience for managing Node.js versions on Windows.
Below are the steps on how to install nvm-windows:
1. Download nvm-windows:
Go to the nvm-windows repository README file and click on the Download Now button, Or you can click here to Download. This will take you to a page with various NVM releases.

Download the NVM for Windows
-
Install the .exe file:
Once you are redirected to the release page (currently version 1.1.12) click on nvm-setup.exe and it downloads the nvm-windows on your machine.

-
Run the installer:
Open the downloaded file and follow the prompts to complete the installation wizard. -
Verify the installation:
After installation, open a command prompt and run:
nvm -v
Enter fullscreen mode
Exit fullscreen mode
If everything is installed correctly, this command will display the installed NVM version.
NVM Commands for switching between Node versions:
To view available Node versions, run the following command:
nvm list
Enter fullscreen mode
Exit fullscreen mode
Now you can see what the list of node versions available in the machine looks like,

If you want to select a specific version of the node.js that version is in the above list (screenshot image). Then run the below commands to select the particular node version and press enter.
Here I am selecting node version 14.17.1
nvm use v14.17.1
Enter fullscreen mode
Exit fullscreen mode
Verified selected node version:
node -v
Enter fullscreen mode
Exit fullscreen mode
then you will see the selected node version instead of the default one, here I have selected node 14 so it will show nod 14 for me.
What happens if the specified version of the node is not available then we have to install it using nvm command and then select it from the above steps.
To install a specific node version:
nvm install 20.0.0
Enter fullscreen mode
Exit fullscreen mode
Thank you for reading our article, I have tried to cover the all-important command and steps for more details visit the nvm-windows
Please like follow and share, I need your support!!
Thank you!!
Follow Me on:
Linkedin
Medium
X(formally known as Twitter)
NVM, or Node Version Manager, is a command-line tool that simplifies the process of managing multiple active Node.js versions. It lets you install, switch between, and manage different Node.js installations without conflicts.

Managing Node.js versions can be challenging, especially when different projects require different Node.js versions. Directly installing Node.js globally can lead to conflicts and broken projects. NVM solves this by providing isolated Node.js environments for each project.
Installing NVM
Before installing NVM, it’s recommended that any existing Node.js or npm installations be removed to avoid potential conflicts.
Installing NVM on macOS and Linux
The NVM install process on Unix-based systems is straightforward:
- Open your terminal and run the following command:
curl -o- https://raw.githubusercontent.com/nvm-sh/nvm/v0.40.1/install.sh | bash
(Replace v0.40.1 with the latest version number if needed. Check the NVM GitHub page for the latest version.)
- After the NVM install completes, either restart your terminal or run these commands:
export NVM_DIR="$HOME/.nvm"
[ -s "$NVM_DIR/nvm.sh" ] && \. "$NVM_DIR/nvm.sh"  # This loads nvm
[ -s "$NVM_DIR/bash_completion" ] && \. "$NVM_DIR/bash_completion"  # This loads nvm bash_completion
Installing NVM on Windows
NVM also supports Windows, but it’s typically through WSL (Windows Subsystem for Linux), depending on the version of WSL. If that doesn’t work, you can try a separate project called NVM for Windows (nvm-windows):
- Download the latest NVM for Windows installer from the official GitHub repository — NVM Windows releases
- Run the installer and follow the on-screen instructions. The setup wizard will guide you through the process, allowing you to choose the installation directory
Using NVM
Now that NVM is installed, let’s explore how to use it to manage your Node.js versions:
Listing available Node.js versions
Before installing any Node.js versions, it’s helpful to see what’s available. You can do this by using the following command:
nvm ls-remote  # On Unix systems
nvm list available  # On Windows ( nvm-windows )
The command will return a list of all the Node.js versions that NVM can install, including stable releases, LTS versions, and even older, less common versions.
If you are using nvm-windows make sure you run all nvm-windows commands in an Admin shell.
Installing Node.js versions
NVM makes installing Node.js versions a breeze. You have several options, depending on your needs.
Installing the latest version
To install the absolute latest version of Node.js, use the following command:
nvm install node  # Unix
nvm install latest  # Windows ( nvm-windows )
At the time of writing, the latest version of Node.js is 23.7.0.
Installing the latest LTS version
For production environments, stability is key. Long Term Support (LTS) versions of Node.js are recommended for their extended support and reliability. To install the latest LTS version, use :
nvm install lts/*  # Unix
nvm install --lts  # Unix
nvm install lts  # Windows ( nvm-windows )
At the time of writing, the latest LTS version of Node.js is 22.14.0 .
Installing a specific version
If your project requires a very specific Node.js version, NVM allows you to install any available version by specifying the version number. For example, to install version 18.12.0, you would use the following command :
nvm install 18.12.0 # Works on both nvm and nvm-windows
Listing installed versions
To see which versions you have installed, run the following command:
nvm list # Works on both nvm and nvm-windows
The command will return the installed versions, such as:
       v18.12.0
       v22.14.0
->      v23.7.0
default -> lts/* (-> v22.14.0)
iojs -> N/A (default)
unstable -> N/A (default)
node -> stable (-> v23.7.0) (default)
stable -> 23.7 (-> v23.7.0) (default)
lts/* -> lts/jod (-> v22.14.0)
...
The output above shows that the following versions of node were installed: 18.12.0, 22.14.0, 23.7.0 . It also shows that the current version of Node.js being used in this shell is v23.7.0, and the default version is v23.7.0. The nvm and nvm-windows output should be somewhat similar.
Switching to a specific version
To switch to a specific installed version, use the nvm use <version> command, replacing <version> with the desired version number. For instance, to switch to version 18.12.0, you would run the following command:
nvm use 18.12.0 # Works on both nvm and nvm-windows
To switch to the LTS version, you would run the following command instead:
nvm use lts/*  # Unix
nvm use lts  # Windows ( nvm-windows )
Advanced NVM usage
Beyond the basic installation and usage, NVM offers advanced features that streamline your Node.js version management even further. These features allow you to fine-tune your NVM setup and customize it to fit your development workflow perfectly.
Let’s explore some of these more advanced capabilities:
Setting a default Node.js version
Beyond simply switching between versions, you can configure NVM to automatically use a specific Node.js version as the default for all new terminal sessions. This is particularly useful for streamlining your workflow and ensuring that your projects always use the correct Node.js version.
To achieve this, use the nvm alias default <version> command. Replace <version> with the version number or alias (like lts/* for the latest LTS) you want to use. For example:
nvm alias default 18.12.0
Or, for the latest LTS version:
nvm alias default lts/*
After setting the default, new terminal windows or tabs will automatically use the specified Node.js version. Existing terminals might need to be restarted or sourced again for the change to take effect.
Please note that the nvm alias command isn’t available in nvm-windows.
Uninstalling Node.js versions
If you need to remove a Node.js version that you no longer use, NVM makes this easy.
Use the nvm uninstall <version> command, replacing <version> with the version number you wish to remove. For example, to uninstall the Node.js version 23.7.0 using both NVM and nvm-windows you would run:
nvm uninstall 23.7.0 # Works on both nvm and nvm-windows
Project-specific versions
Managing Node.js versions on a per-project basis is crucial for ensuring compatibility and avoiding conflicts. NVM simplifies this with the .nvmrc file. By placing a .nvmrc file in the root directory of your project, you can specify the required Node.js version for that project.
To use this feature, simply create a file named .nvmrc in your project’s root directory. Inside this file, put the Node.js version you need. For example, if your project requires Node.js 18.12.0, your .nvmrc file would contain:
18.12.0
Or, if you prefer to use the latest LTS version:
lts/*
When you navigate into a directory containing a .nvmrc file, you can then run nvm use. NVM will read the .nvmrc file and automatically switch to the specified Node.js version. This makes collaboration easier, as anyone cloning the project can simply run nvm useto use the correct Node.js version.
Please note that this feature isn’t available in nvm-windows.
Custom download sources
In situations where the default Node.js download server is slow, unavailable, or you have specific mirroring requirements, the NVM_NODE_MIRROR environment variable comes in handy. This variable allows you to specify an alternative URL from which NVM will download Node.js releases.
To use this, set the NVM_NODEJS_ORG_MIRROR environment variable before installing Node.js versions. For example, in your shell configuration file (e.g., .bashrc, .zshrc), you might add:
export NVM_NODE_MIRROR=https://your-mirror.example.com/node/
Replace https://your-mirror.example.com/node/ with the actual URL of your preferred mirror. After setting this variable, NVM will use the specified mirror when downloading Node.js versions.
If you are using nvm-windows run the following command instead:
nvm node_mirror https://your-mirror.example.com/node/
Running commands in a specific context
Sometimes, you might need to run a single command in the context of a specific Node.js version without changing the default version for your current shell. The nvm exec command is designed for this purpose.
More great articles from LogRocket:
- Don’t miss a moment with The Replay, a curated newsletter from LogRocket
- Learn how LogRocket’s Galileo cuts through the noise to proactively resolve issues in your app
- Use React’s useEffect to optimize your application’s performance
- Switch between multiple versions of Node
- Discover how to use the React children prop with TypeScript
- Explore creating a custom mouse cursor with CSS
- Advisory boards aren’t just for executives. Join LogRocket’s Content Advisory Board. You’ll help inform the type of content we create and get access to exclusive meetups, social accreditation, and swag.
The syntax is as follows:
nvm exec <version> -- <command>
Replace <version> with the Node.js version you want to use, and <command> with the command you want to execute. For example, to install project dependencies using npm with Node.js version 23.7.0, you could use:
nvm exec v23.7.0 -- npm install
This will run npm install using Node.js 23.7.0, without affecting the Node.js version used by your current shell for other commands. This is very useful for running specific scripts or tools that require a different Node.js version than your project’s primary one.
Please note that the nvm exec command isn’t available in nvm-windows.
Troubleshooting
While NVM generally works smoothly, you might occasionally encounter some issues. This section covers common problems and provides solutions to help you get NVM working correctly.
Conflicts with existing installations
Before installing NVM, it’s crucial to remove any existing Node.js and npm installations. These pre-existing installations can conflict with NVM, leading to unexpected behavior and errors.
On Unix systems, this might involve using your distribution’s package manager (e.g., apt, yum, pacman, Homebrew) to remove Node.js and npm.
On Windows, uninstall via the Control Panel.
NVM not recognized
If the nvm command isn’t recognized after installation, it usually means that NVM’s directory isn’t in your system’s PATH. To fix that:
- For Linux/macOS — First, restart the terminal and then try running the
nvmcommand again. If that does not work, run the following commands for the different shells on the command line:source ~/.bashrc(bash),source ~/.zshrc(zhs). If the issue persists on macOS, check this link - For Windows — The NVM for Windows installer should handle adding NVM to the PATH. If it’s still not recognized, you may need to add it manually via the System Properties
Permission issues
Occasionally, you might encounter permission issues during NVM installation or when installing Node.js versions:
- Linux — Here the issue might lie with how you installed curl. If you installed curl using
snap, you will have to uninstall it and install it usingapt - Windows — Ensure you’re running the installer with administrator privileges
Version not found
If you try to install or use a version of Node.js that NVM can’t find, it means that version isn’t available in the NVM repository.
Use nvm ls-remote to see the complete list of available versions. Double-check the version number for typos.
Best practices for using NVM
To ensure a smooth and efficient experience with NVM, it’s helpful to follow some best practices. These guidelines will help you avoid potential problems and make the most of NVM’s features:
Install NVM per-user
It’s strongly recommended that NVM be installed on a per-user basis, rather than globally on a shared system. This helps to isolate Node.js environments for different users and avoid conflicts.
Avoid shared scenarios
Avoid using NVM in shared environments or on build servers where multiple users or processes might be using the same NVM installation. This can lead to issues with symbolic links and unpredictable behavior.
Consider using containerization technologies like Docker to manage Node.js versions in shared or automated environments.
Keep NVM updated
Keeping NVM updated is important. New versions often include bug fixes, performance improvements, and support for the latest Node.js releases.
You can typically update NVM itself using a similar process to the initial installation. Consult the NVM GitHub page for update instructions.
Use LTS versions
For production environments, it’s generally best to use LTS versions of Node.js. LTS versions are supported for an extended period and receive critical bug fixes and security updates, ensuring stability for your applications.
Use nvm install lts/* to install the latest LTS.
Conclusion
NVM simplifies Node.js version management, allowing you to switch between different versions and avoid conflicts easily. By following this tutorial, you can effectively manage your Node.js environments and ensure your projects run smoothly.
Explore the NVM git repository for more advanced features and options.
200s only

Monitor failed and slow network requests in production
Deploying a Node-based web app or website is the easy part. Making sure your Node instance continues to serve resources to your app is where things get tougher. If you’re interested in ensuring requests to the backend or third-party services are successful, try LogRocket.

LogRocket is like a DVR for web and mobile apps, recording literally everything that happens while a user interacts with your app. Instead of guessing why problems happen, you can aggregate and report on problematic network requests to quickly understand the root cause.
LogRocket instruments your app to record baseline performance timings such as page load time, time to first byte, slow network requests, and also logs Redux, NgRx, and Vuex actions/state. Start monitoring for free.