
MySQL — это бесплатная реляционная система управления базами данных, разработанная компанией Oracle. Популярность ей принесли доступность, простота и многофункциональность. Разработка множества функций выполнена не только разработчиками ПО, но и пользователями, благодаря исходному коду, который опубликован в свободном доступе.
В данной статье будет подробно рассказано, как установить MySQL на Windows и произвести ее базовую настройку. В инструкции будет рассмотрена установка программы на ОС Windows 10.
Чтобы установить MySQL на Windows 10, понадобится компьютер с установленной операционной системой.
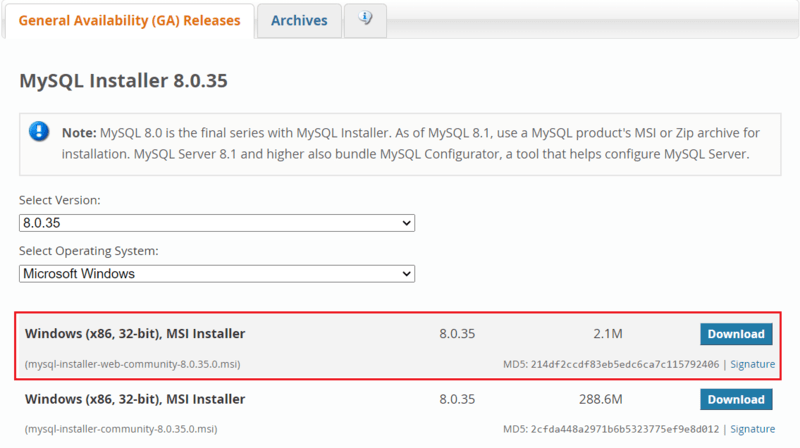
Скачивание дистрибутива
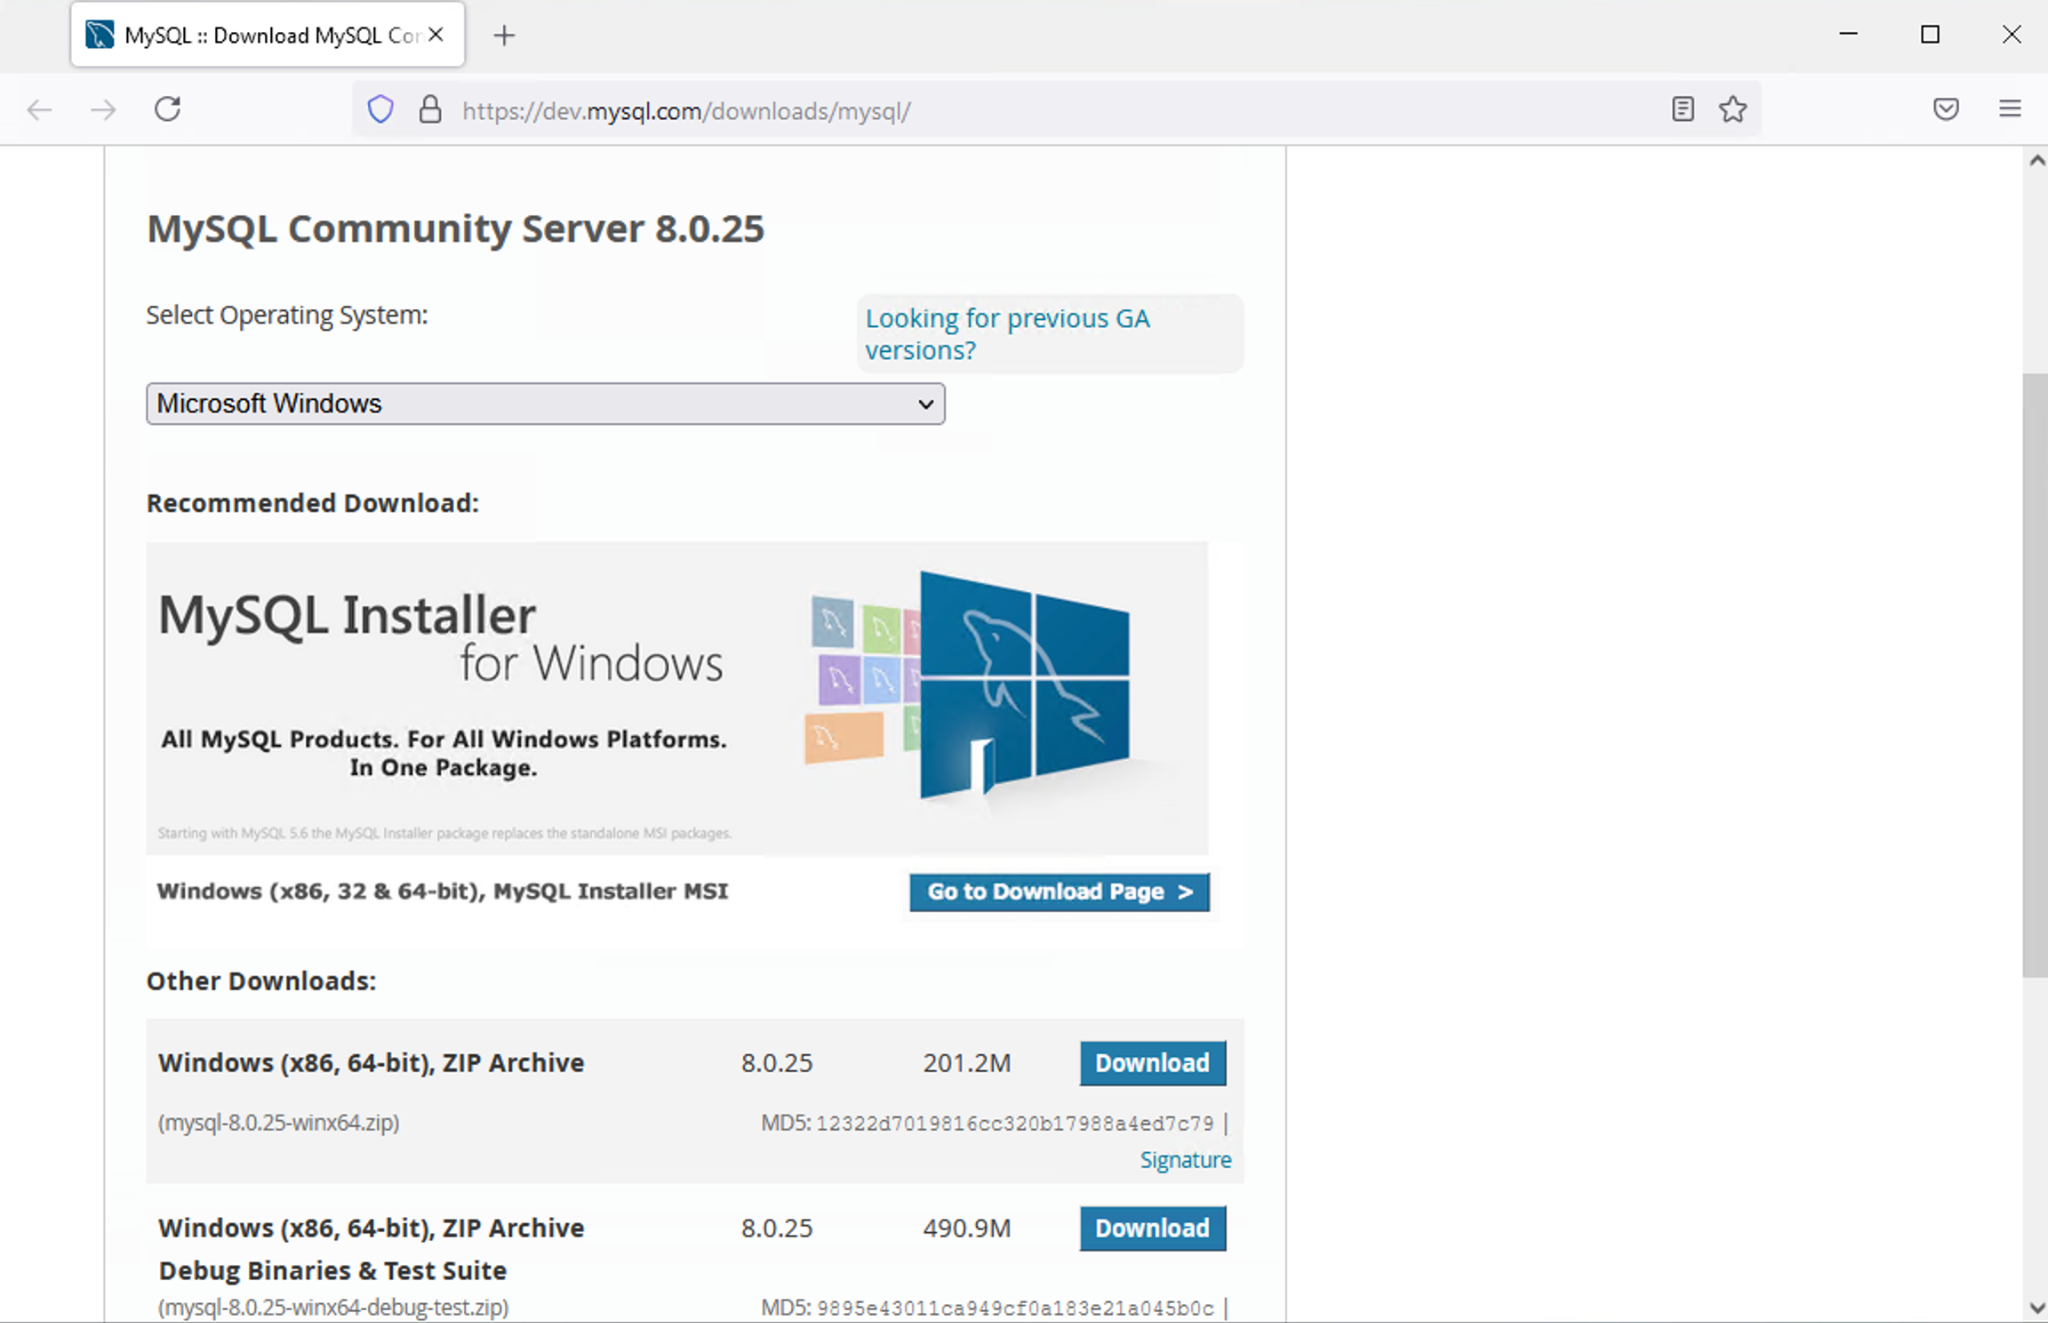
Для начала необходимо установить дистрибутив программы MySQL с официального сайта разработчика. Пользователю будет предложено два варианта загрузки:
- Первый вариант — скачать загрузочный файл версии
mysql-installer-web-community.msi. Он произведет автоматическую установку всех необходимых компонентов. Важно уточнить, что данный вариант установки предполагает обязательное наличие подключения сервера к интернету. - Второй вариант — скачать загрузочный файл версии
mysql-installer-community.msi. Он позволит установить все компоненты СУБД даже при отсутствии интернет-соединения у сервера.
В данной инструкции будем использовать второй вариант загрузки.

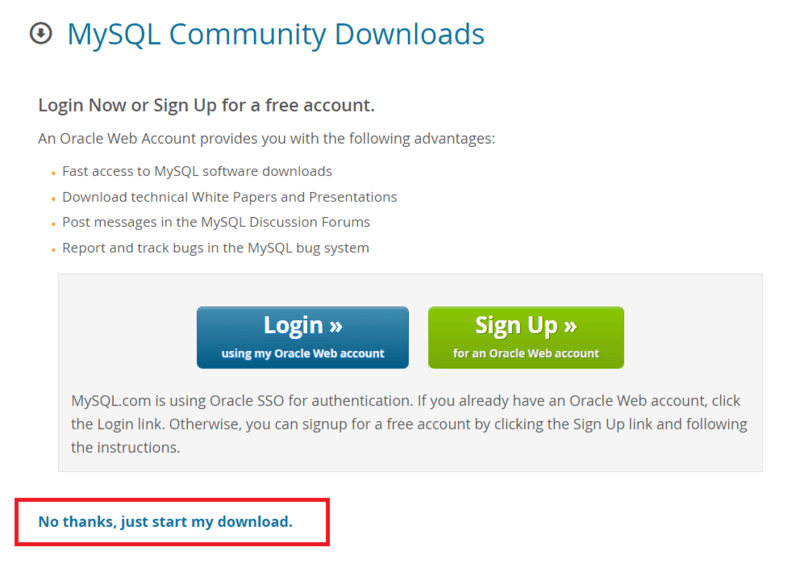
После выбора варианта скачивания программы сервис предложит зарегистрировать веб-аккаунт Oracle либо войти под существующими данными. Этот этап можно пропустить. Для этого нужно нажать на соответствующую ссылку, как показано на картинке ниже.
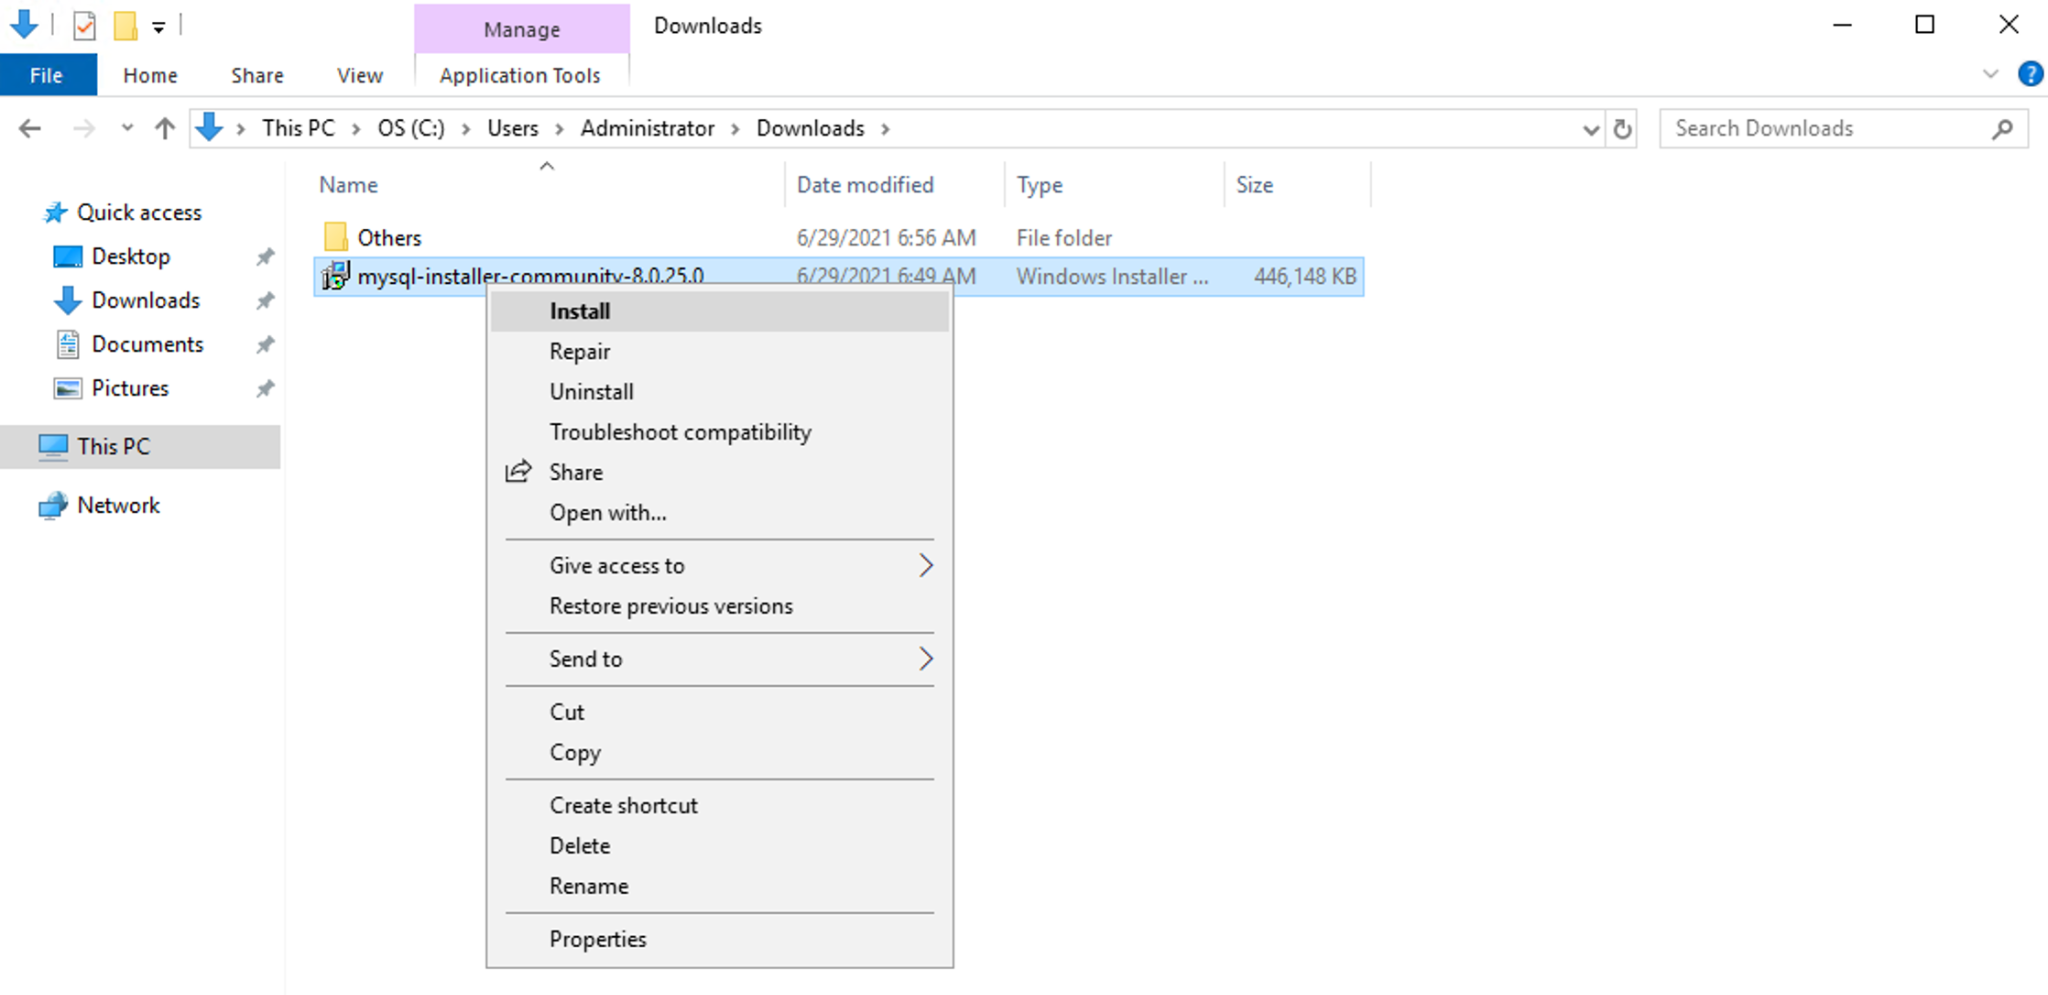
Установка MySQL
После успешного скачивания загрузочного файла, его нужно будет запустить. Далее должна открыться программа установки.
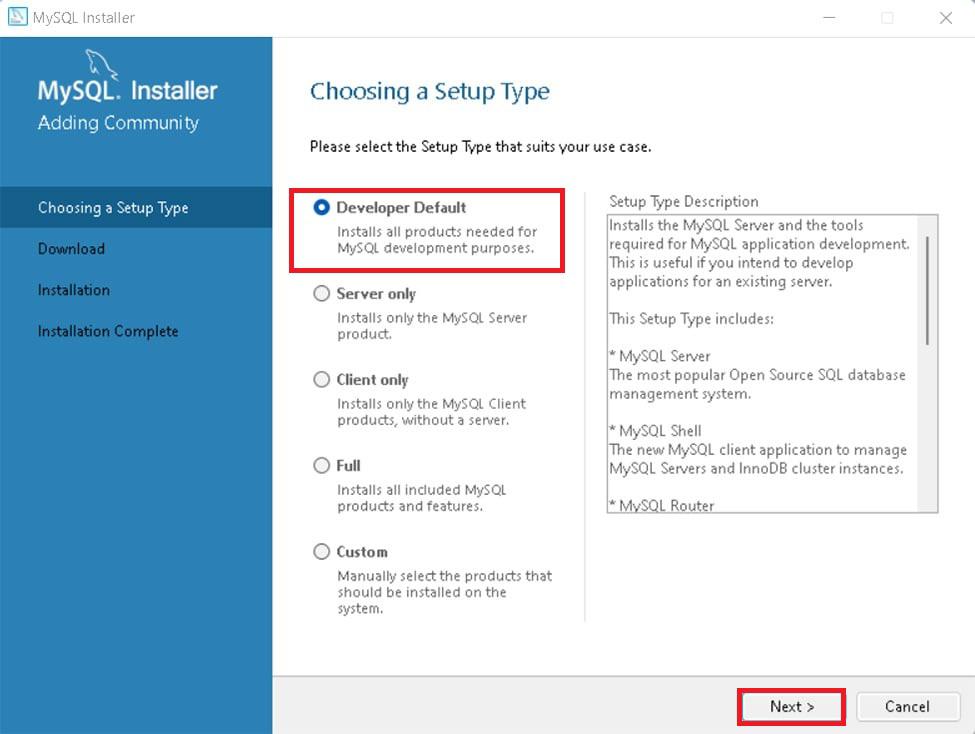
В самом начале пользователю будут предложено несколько вариантов установки. Среди них:
- Developer Default — вариант по умолчанию. Он подразумевает установку всех необходимых компонентов для разработчика.
- Server only — установка только сервера СУБД.
- Client only — установка только клиентской части СУБД.
- Full — установка всех компонентов скачанного дистрибутива.
- Custom — установка с возможностью выбора только необходимых пользователю компонентов.
Выбираем полную установку («Full»). Для начинающих пользователей это будет лучший вариант. После выбора нажимаем кнопку «Next».
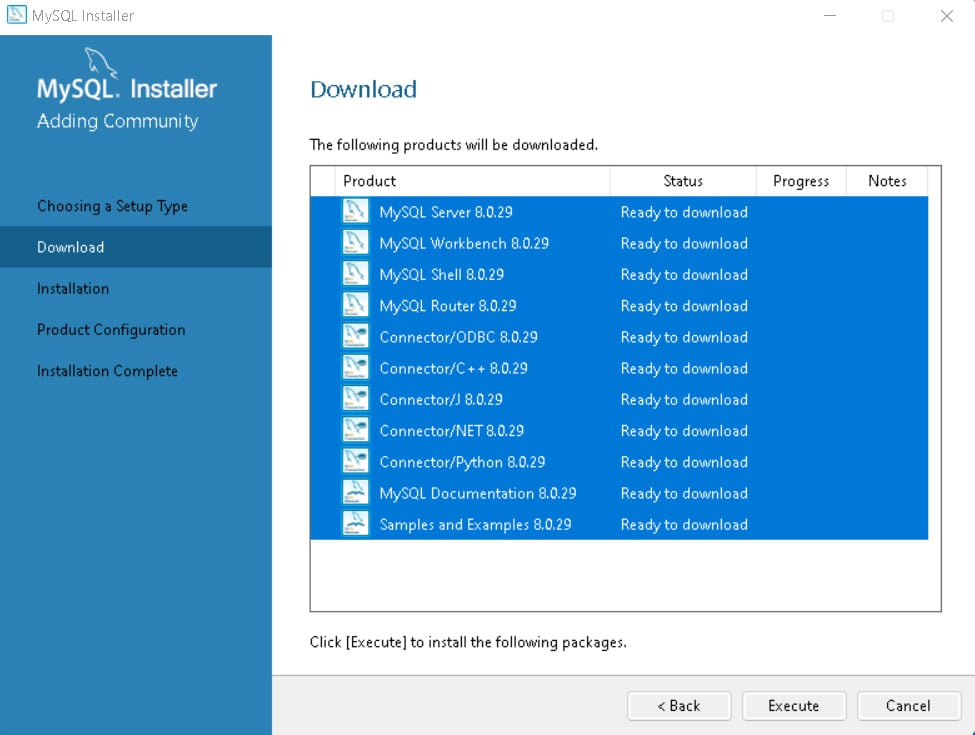
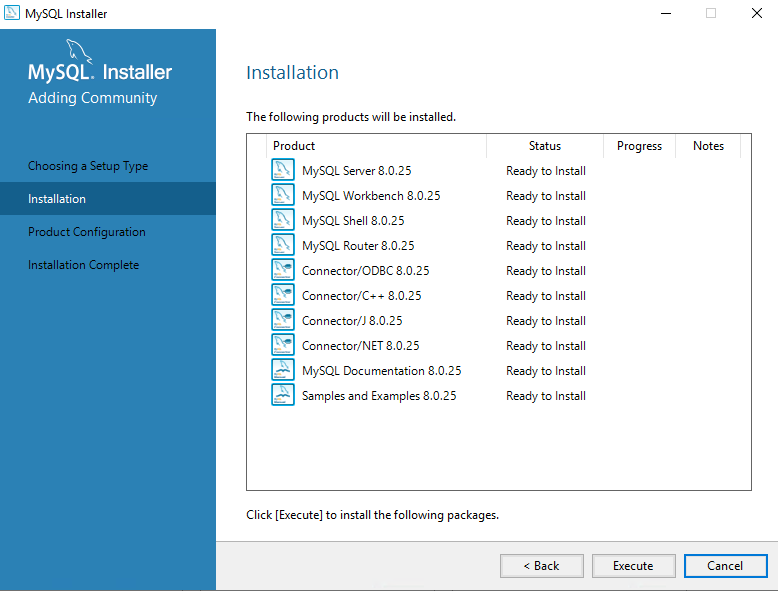
Теперь программа установки предложит пользователю установить все необходимые компоненты для работы расширений СУБД. Если у них есть статус Manual, то они никак не будут мешать программе стабильно выполнять задачи. Можно выбрать необходимые из списка компоненты, затем нажать кнопку «Execute» и установить их, либо пропустить данный шаг и нажать кнопку «Next». Если пользователь выбрал второй вариант, то ему будет выведено на экран уведомление об отсутствии некоторых компонентов. Нужно нажать «Yes», чтобы подтвердить свой выбор.
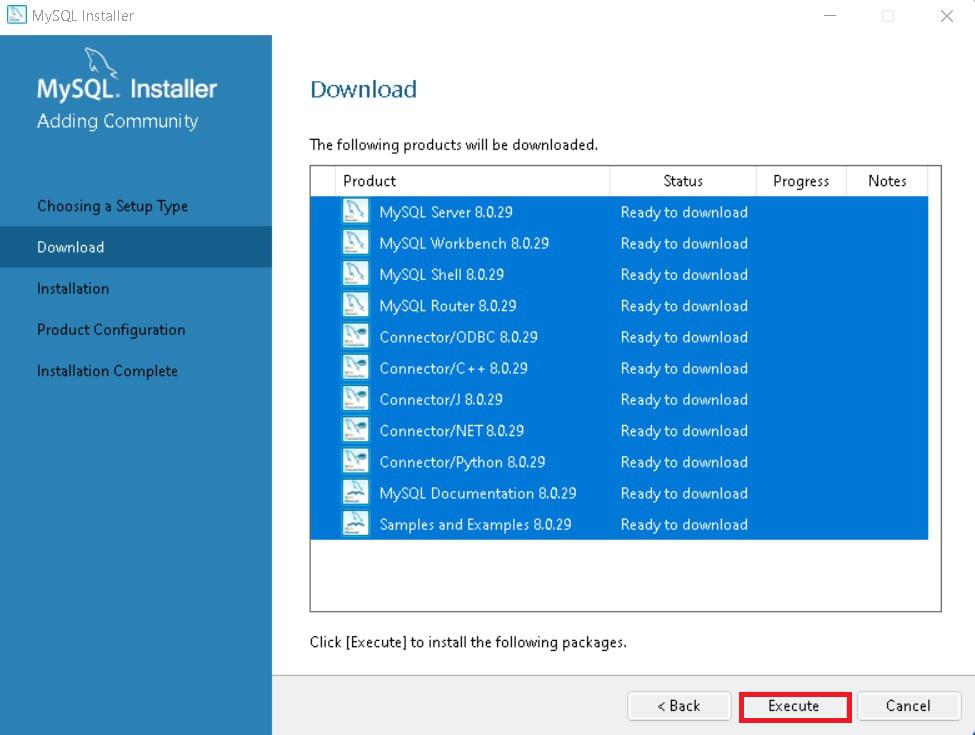
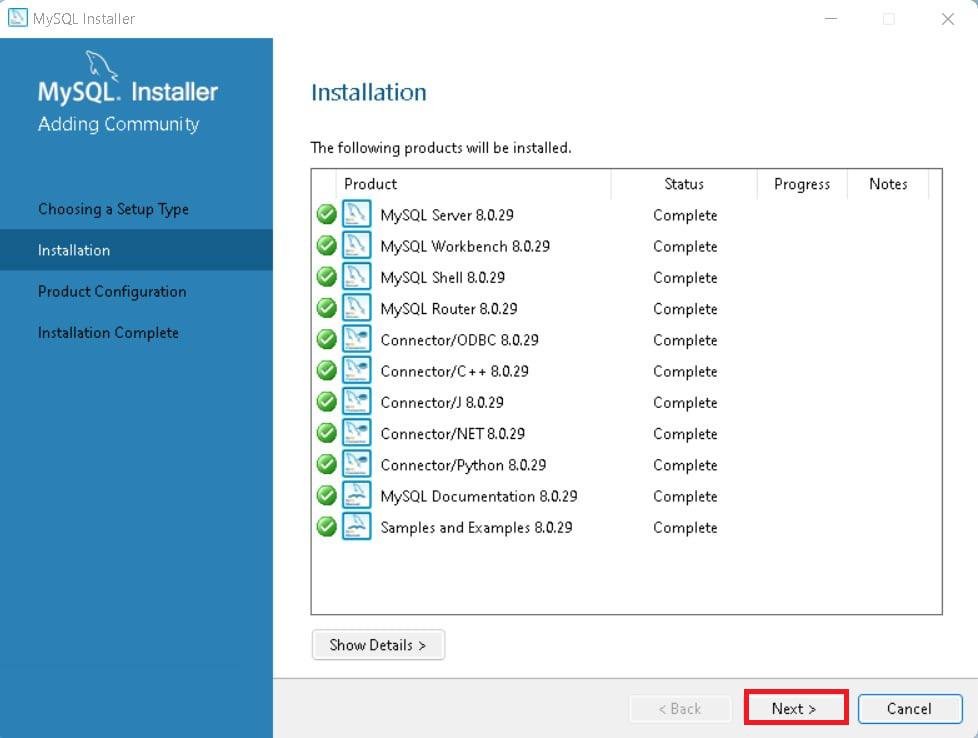
Следующим шагом будет последовательная установка всех компонентов СУБД. Для этого нажимаем кнопку «Execute».
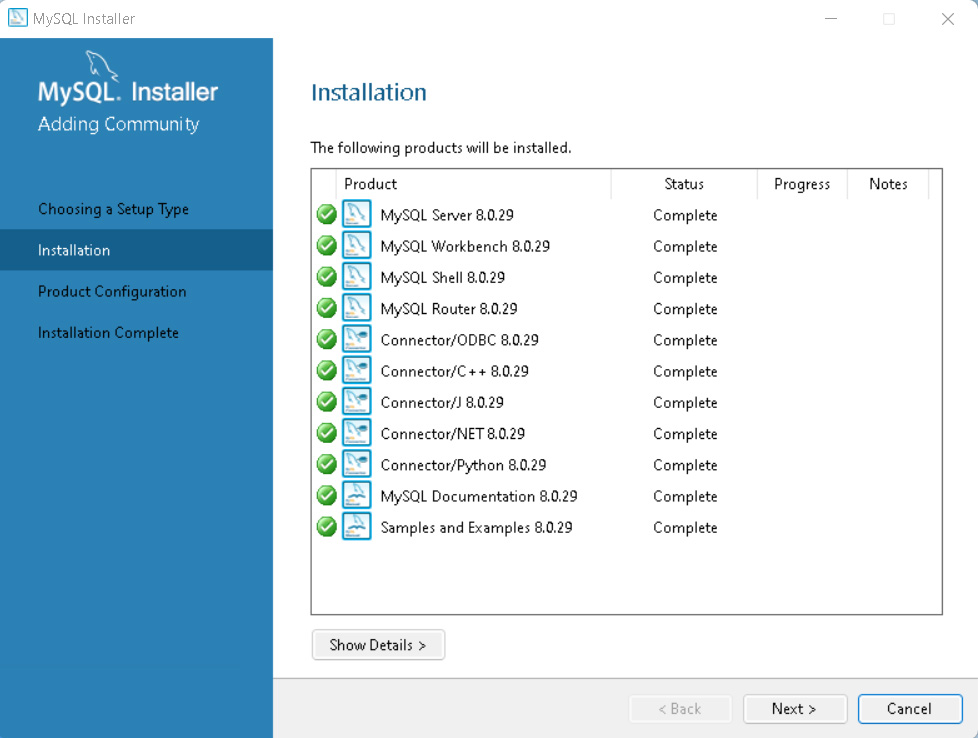
Как только все файлы будут успешно загружены, слева от каждого компонента появится зеленая галочка, а статус поменяется на «Complete». Нажимаем «Next».
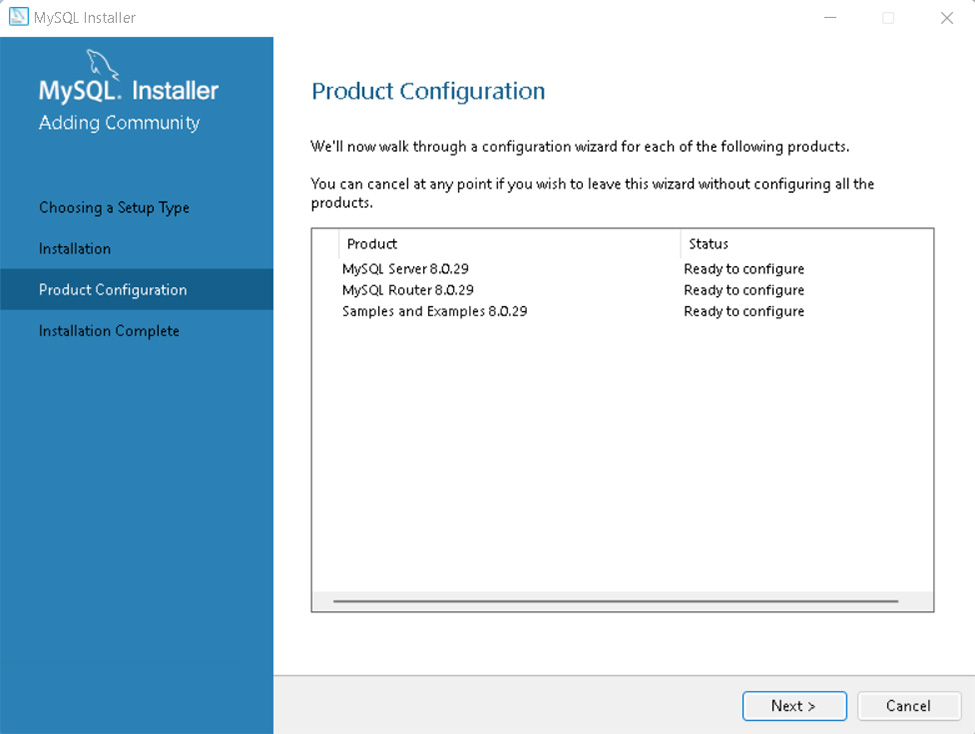
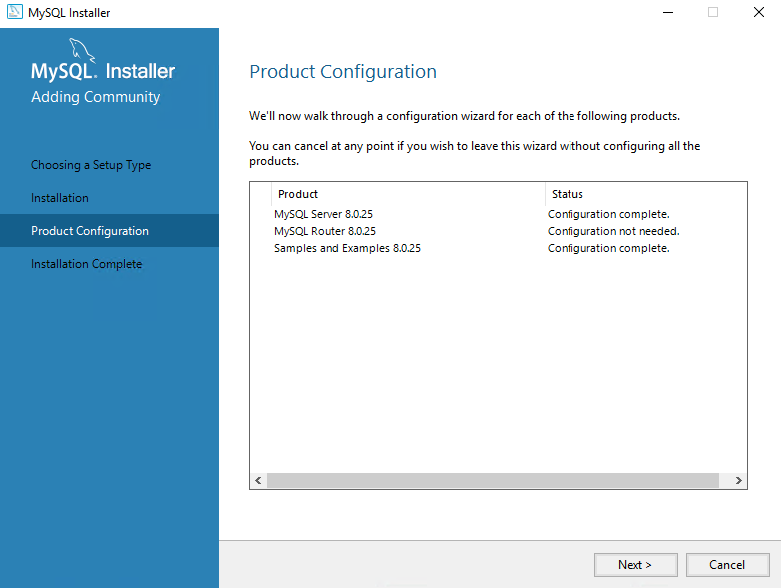
Далее установочная программа предложит настроить конфигурацию некоторых компонентов. Нажимаем «Next» и переходим к настройке.
Настройка конфигурации MySQL Server
MySQL Server уже установлен на Windows 10. В первую очередь нужно произвести настройку его конфигурации. В открывшемся окне уже будут выставлены все нужные параметры по умолчанию, поэтому нажимаем «Next».
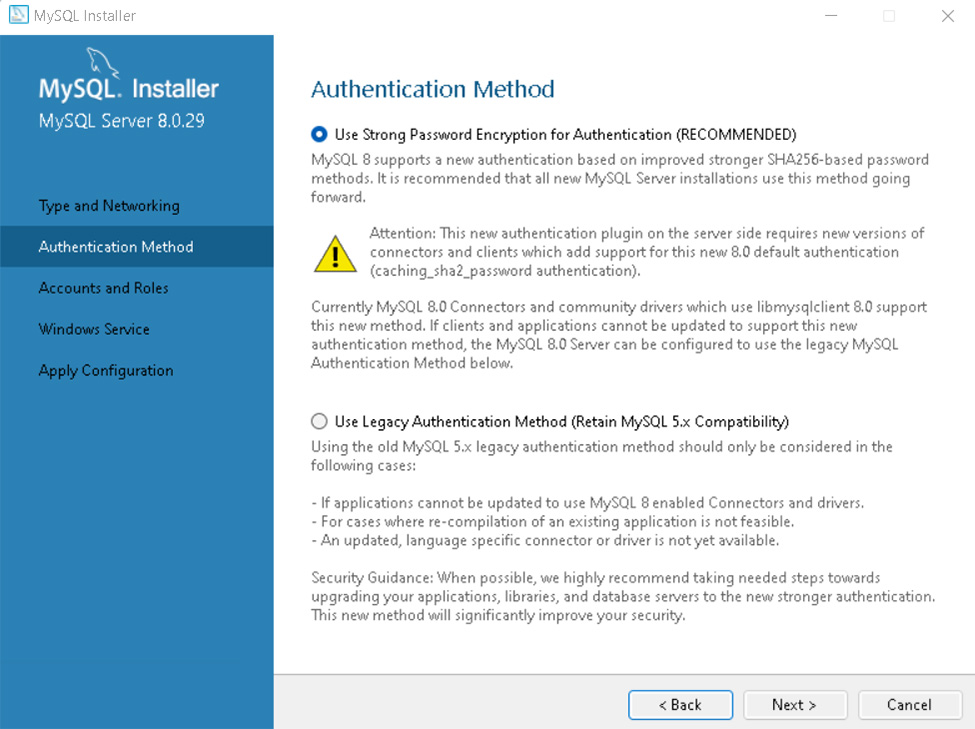
После будет предложено выбрать тип аутентификации. Оставим рекомендованный и переходим к следующему этапу.
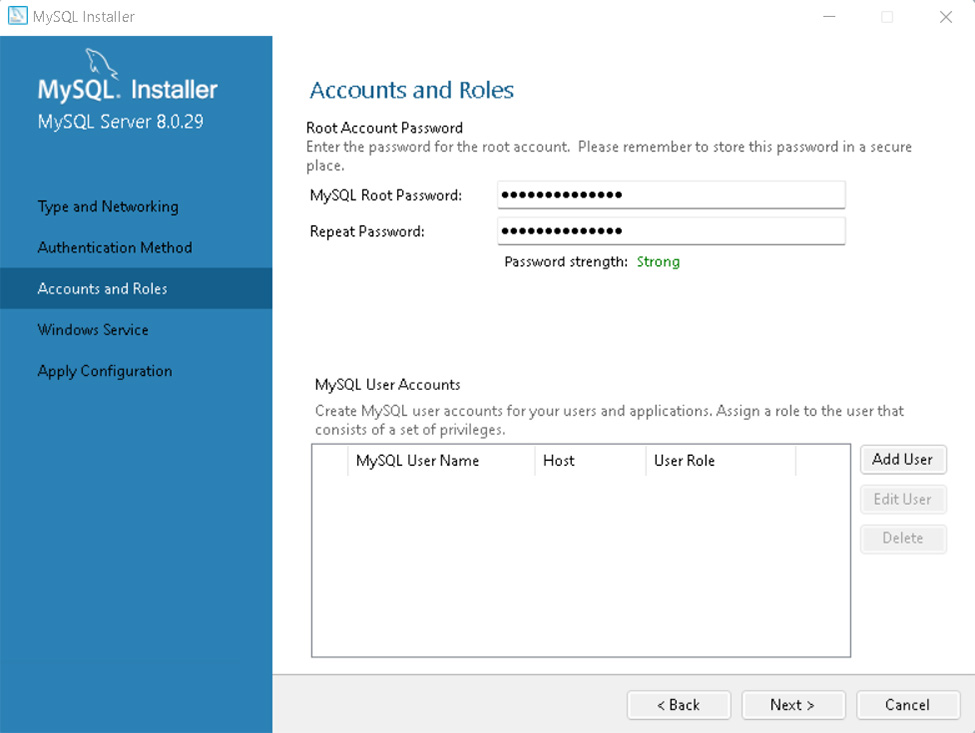
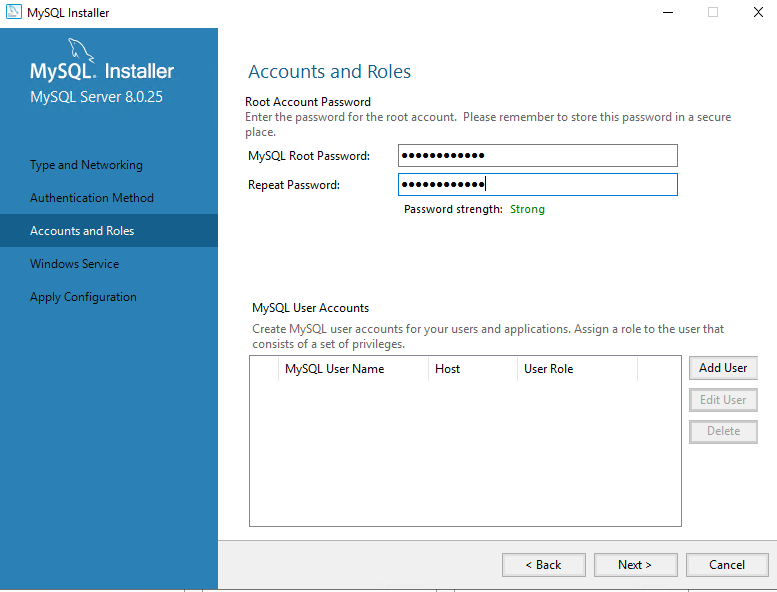
В открывшемся окне нужно задать пароль суперпользователя (root). Кроме того, на данном этапе можно добавить других пользователей. Для этого нужно нажать кнопку «Add User» и заполнить необходимые поля:
- Поле «User Name» — имя пользователя.
- Поле «Host”» — хост, с которого пользователь будет авторизовываться.
- Поле «Role» — роль пользователя для работы в СУБД.
- Поля «Password» и «Confirm Password» — пароль и подтверждение пароля для создаваемого пользователя.
Выполним все необходимые действия.
Нажимаем «OK» в окне создания пользователя. Он будет создан, а пароль суперпользователю задан. Нажимаем «Next».
Далее установщик предложит запускать MySQL Server как Windows-сервис. Если убрать в данном пункте галочку, то запускать его нужно будет из командной строки.
dbaas
По усмотрению пользователя, предложенное имя Windows-сервиса можно оставить либо изменить на иное.
Следующий чекбокс отвечает за запуск службы и сервера одновременно.
Пункт Run Windows Service предлагает выбрать учетную запись, от которой будет запускаться служба.
Никаких изменений в предложенный установщиком вариант вносить не будем. Перейдем к следующему этапу.
Нужно применить измененные параметры конфигурации. Для этого нажимаем кнопку «Execute».
Как только все зеленые галочки рядом с пунктами будут выставлены — нажимаем «Finish».
Теперь статус конфигурации MySQL Server помечен как завершенный. Нажимаем кнопку «Next».
Настройка конфигурации MySQL Router
В открывшемся окне не будем вносить никаких изменений, а просто нажимаем «Finish». Все представленные настройки нужны для распределения нагрузки между программами MySQL в кластере.
Настройка завершена. Переходим к настройке Samples and Examples.
Настройка конфигурации Samples and Examples
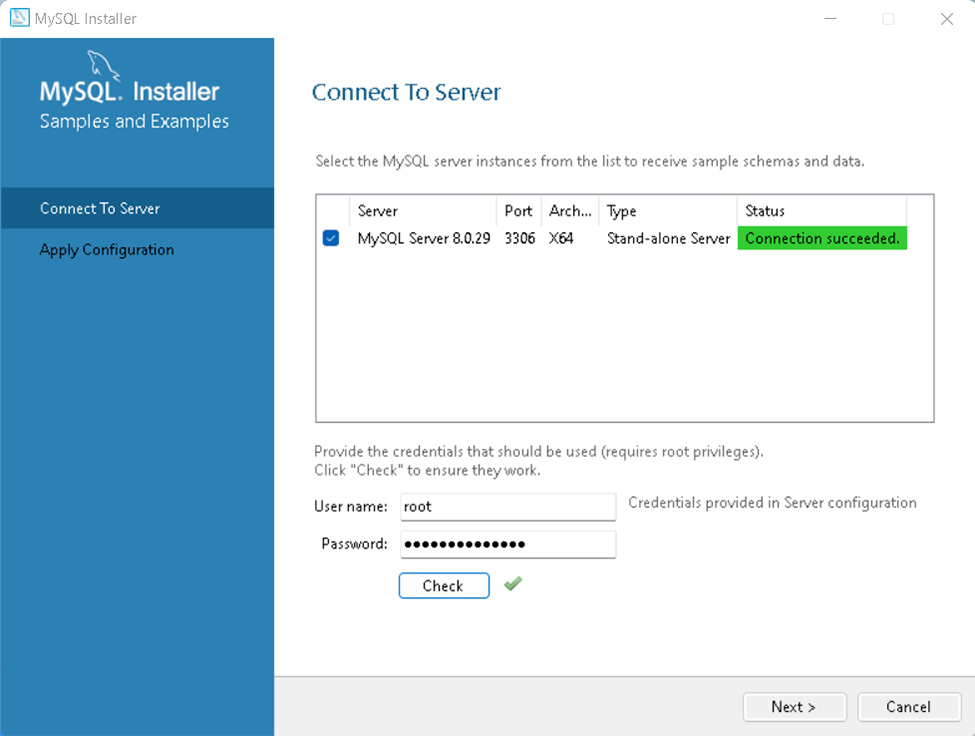
В открывшемся экране нужно будет заполнить ранее заданные логин и пароль для пользователя root и нажать кнопку «Check» для проверки соединения.
Как видно по картинке, соединение успешно установлено. Нажимаем «Next» и применяем все параметры кнопкой «Execute». Начнется установка необходимых компонентов раздела Samples and Examples на сервер СУБД.
Как только установка будет завершена — нажимаем «Finish».
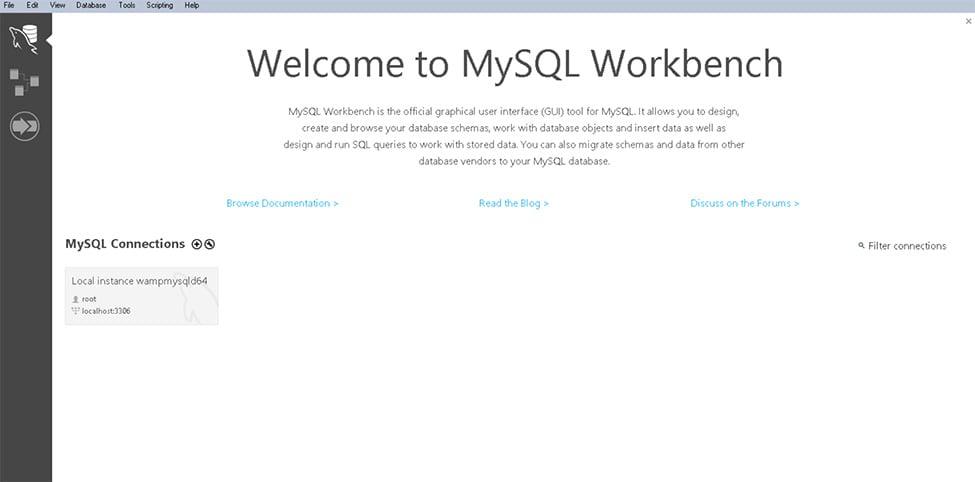
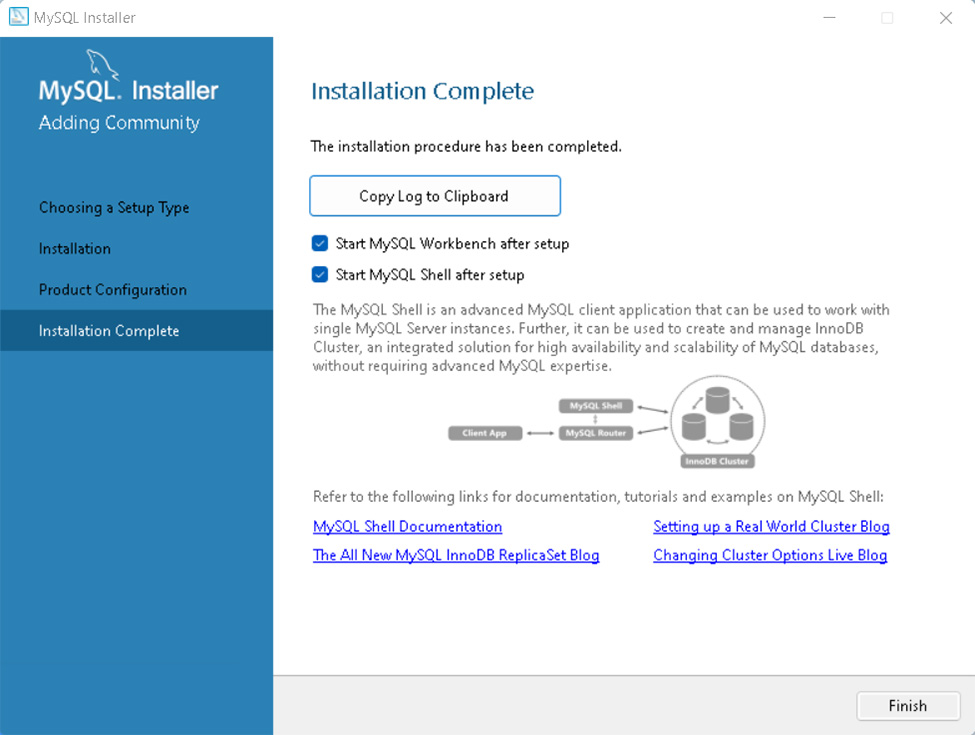
Установка СУБД завершена. Для её дальнейшей работы и настройки запустим MySQL Workbench. Для этого установим галочку в соответствующем чекбоксе и нажмем «Finish».
Проверка работоспособности MySQL
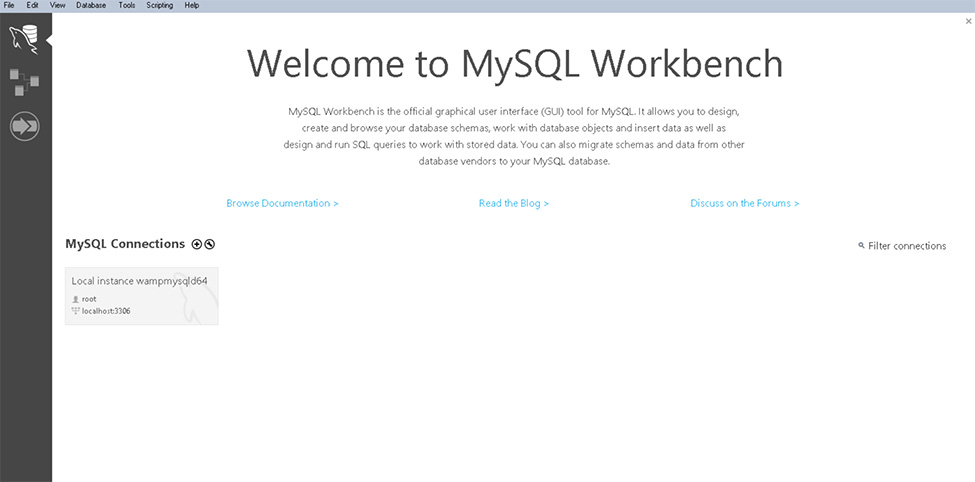
После завершения загрузки откроется установленный на Windows 10 MySQL Workbench. В стартовом окне программы содержится одно подключение от пользователя root. Кликаем на него и вводим пароль, заданный ранее.
После этого выполнится подключение к серверу и откроется рабочая область среды MySQL Workbench.
Теперь откроем вкладку «Schemas» в левой части рабочей области и развернем список таблиц в схеме «sakila». Здесь будут представлены тестовые данные, которые мы устанавливали ранее.
Попробуем сделать первый запрос SELECT, который представит все данные из таблицы actor. Он будет выглядеть следующим образом:
SELECT *FROM sakila.actorРезультат запроса будет представлен на картинке ниже.
Заключение
В данной статье была представлена инструкция по правильной установке MySQL на Windows 10. Также, во время нее была произведена настройка конфигураций MySQL Server, MySQL Routers и Samples and Examples. Этого будет достаточно для работы с небольшими проектами в MySQL. Для более серьёзных проектов необходимо сделать еще ряд действий, помимо тех, что были представлены в данной статье. В том числе правильно настроить конфигурацию MySQL Routers для работы кластерной СУБД.
Last Updated :
16 Aug, 2024
Installing MySQL on your Windows PC is a straightforward process, but it requires ensuring that your system meets specific hardware and software prerequisites.
In this article, We will learn about How to Install MySQL on Windows by understanding each step in detail.
What is MySQL?
- MySQL is an open-source relational database management system (RDBMS) that uses Structured Query Language (SQL) to manage and manipulate databases.
- It is widely used for storing, retrieving, and managing data in applications ranging from small-scale projects to large enterprise systems.
- MySQL is known for its reliability, scalability, and ease of use, making it a popular choice for web developers and organizations worldwide.
Note: Uninstall any previous MySQL versions to avoid potential conflicts during the new installation.
Hardware and Software Requirements to Install MySQL
Before installing MySQL to your PC, ensure your system has a capable processor (like Intel Core), a minimum of 4 GB RAM (or 6 GB), a compatible graphics card, and a display with at least 1024×768 resolution.
Download and Install MySQL for Windows Steps
Now, Let’ ‘s break down MySQL software downloading steps for a better understanding and see install MySQL on Windows 10 step by step.
Step 1: Visit the Official MySQL Website
Open your preferred web browser and navigate to the official MySQL website. Now, Simple click on first download button.
Step 2: Go to the Downloads Section
On the MySQL homepage, Click on the ” No thanks, just start my download” link to proceed MySql downloading.
Step 3: Run the Installer
After MySQL downloading MySQL.exe file , go to your Downloads folder, find the file, and double-click to run the installer.

Step 4: Choose Setup Type
The installer will instruct you to choose the setup type. For most users, the “Developer Default” is suitable. Click “Next” to proceed.
Step 5: Check Requirements
You might be prompted to install necessary MySQL software, typically Visual Code. The installer can auto-resolve some issues, but not in this case.

Step 6: MySQL Downloading
Now that you’re in the download section, click “Execute” to start downloading the components you selected. Wait a few minutes until all items show tick marks, indicating completion, before moving forward.
Step 7: MySqL Installation
Now the downloaded components will be installed. Click “Execute” to start the installation process. MySQL will be installed on your Windows system. Then click Next to proceed
Step 8: Navigate to Few Configuration Pages
Proceed to “Product Configuration” > “Type and Networking” > “Authentication Method” Pages by clicking the “Next” button.
Step 9: Create MySQL Accounts
Create a password for the MySQL root user. Ensure it’s strong and memorable. Click “Next” to proceed.

Step 10: Connect To Server
Enter the root password, click Check. If it says “Connection succeed,” you’ve successfully connected to the server.
.png)
Step 11: Complete Installation
Once the installation is complete, click “Finish.” Congratulations! MySQL is now installed on your Windows system.

Step 12: Verify Installation
To ensure a successful installation of MySQL, open the MySQL Command Line Client or MySQL Workbench, both available in your Start Menu. Log in using the root user credentials you set during installation.
MySQL Workbench Is Ready To Use
MySQL is an open-source relational database management system that is based on SQL queries. MySQL is used for data operations like querying, filtering, sorting, grouping, modifying, and joining the tables present in the database.
Read more: MySQL and its working
Conclusion
By following the detailed steps outlined in this guide, you should now have a fully functional MySQL installation on your Windows system. MySQL, being a robust and widely-used database management system, will now allow you to efficiently handle data operations such as querying, filtering, and modifying your databases.
Also Read
- Difference between MongoDB and MySQL
- MySQL | Common MySQL Queries
- Top 50 MySQL Interview Questions (2023)
- How to Install MySQL on Windows?
MySQL is one of the most popular database management systems (DBMS) available. It’s light, open-source, and easy to install and use, which makes it a good choice for those starting to learn and work with relational databases.
Although it’s a good option for beginners, MySQL is also robust enough to support larger production applications, with multi-users and multithreading support.
In this article, we’ll cover the process of installing MySQL on your local Windows machine, from downloading to creating and using your first database. When you’re done, you’ll have a completely functional MySQL server running and ready to use locally.
Installation Process
Let’s get straight to the point. Installing MySQL on Windows is a very easy but long process. In this article, we’ll follow step-by-step how to do it using the MySQL installer, which is the recommended method by the database documentation.
First of all, you need to download the installer. Click here, choose the version compatible with your operating system (32-bit or 64-bit), and hit Download. Notice that you can also choose the web installer or offline installer. The last one is much heavier while the first will be faster to download.
When you try to start the download, the website will ask you to log in or create an account, but you don’t have to do so. Note the No thanks, just start my download button.
When you open the installer, it will first configure the installation and then ask for the user’s permission to proceed:
When this is over, we’ll finally see the installer interface. As you can see in the image below, the process consists of four steps:
- Choosing a setup type
- Downloading the files
- Installing the software
- Finishing the installation

There are five types of setups available in this first step and you can check the side box to see what each of them will install. However, we strongly recommend, especially if you’re just getting started with SQL, to select the default option.
The most important features, among others, this setup will install are:
- MySQL Server: the database server itself
- MySQL Workbench: an application to manage the server
- MySQL for Visual Studio: this feature enables the users to use MySQL from Visual Studio
- The documentation and tutorials
It’s also ok to choose the full setup as this will install all MySQL resources available.
After you choose the setup option, click Next.
Requirements
At this point, there’s a chance you’ll be asked to install some required software, the most common being the Visual Code. The installer can automatically solve some requirement issues, however, this is not the case here:
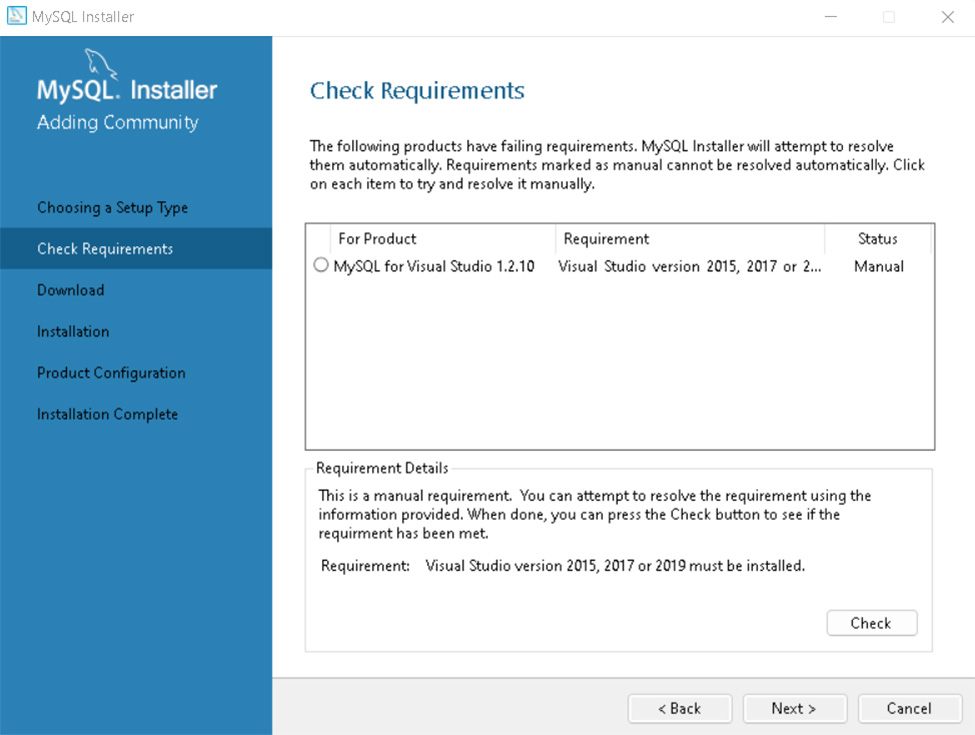
If you run into this, you can find one of the required versions of Visual Code here. This issue won’t stop from proceeding with the installation, though.
Download & Install
You have now reached the download section. The section name is self-explanatory: you’ll download all the components in the setup option you selected.
Click on Execute and the download will start. This might take a few minutes to be concluded.
When it’s done, you should see tick marks on every item. Then you can proceed.

The next screen you’ll see is almost the same as the last one, but now it will install all the components you’ve just downloaded. This step will take significantly longer than the previous one.
When it’s over, you’ll see all the ticks marks again:
Configuration
The next step is to configure the server. You’ll see the following screen. Hit Next.
First, the installer will ask you to configure the network:

It’s important to keep Development Computer in the Config Type field as you’re probably installing this on your personal computer and not on a dedicated machine. You can choose the port, but the default will work just fine. Click Next.
For the authentication method, let’s stick with the recommended option and click Next:
Now it’s time to create the root account. You’ll be asked to set a password. Remember to use a strong one.
On this same screen, you can create other users and set their passwords and permissions. You just have to click on Add User and fill in the blanks. Then, click Next.
Now you can choose the Windows service details, such as the service name, account type, and if you want to start MySQL when you turn on your computer. Again, the default options will work in most cases:

The next screen applies the configuration. Execute it. This step also takes a while to be concluded.
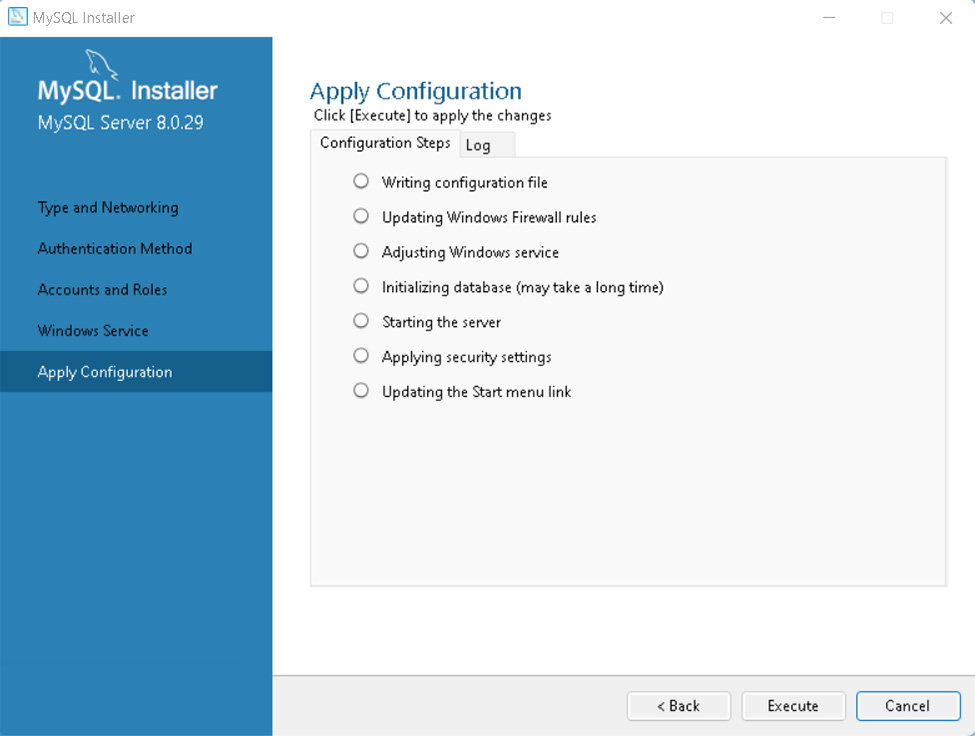
After it ends, just finish the process.

Final Steps
We’re almost there! The next step is to connect to the server. Type the root account’s password and click Check. You’ll see the Connection succeed status:
This screen is followed by another one asking to apply the configuration. Just execute it and click Finish.
We have finally reached the last screen.
Here, you can choose whether or not to start the Workbench and Shell, and check on the documentation or other examples.
Creating your first Database using MySQL Workbench
If you chose to start the Workbench after finishing the installation, you’ll see the following screen:
Choose the connection to the server you created and log into it.
This is your working space:

Notice in the SCHEMAS window that you already have a few sample databases to play with. In the Information window, you can see the database you have selected. Of course, you have the main window to write SQL code.
Use this window to run the following command to create your first database:
CREATE DATABASE my_first_database
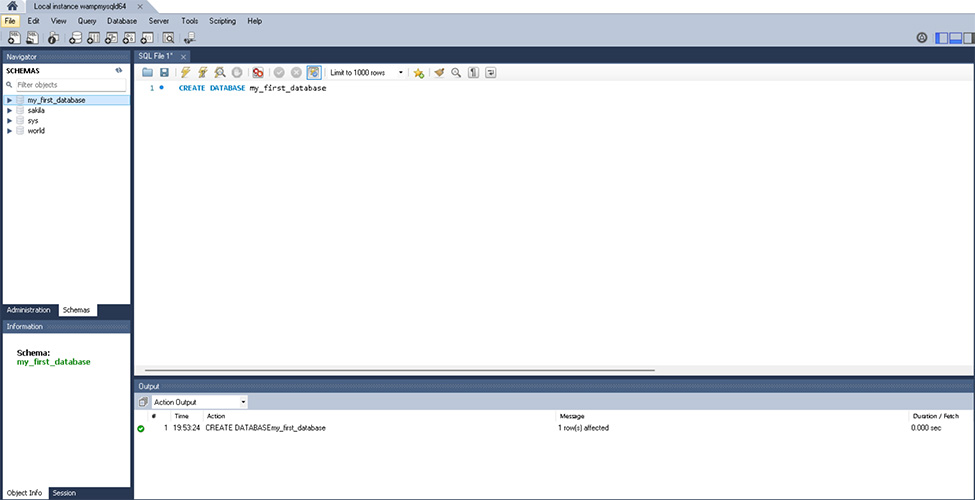
Use the lightning icon to run the command and then click the Refresh button in the SCHEMAS window. The new database should be there.
Note that there’s a message in the Output window to show that the command was successfully executed.
You’ll now have a fully functional database. You can start to create tables, insert data, and build your own applications.
Summary
MySQL can be a very helpful tool not only for those who are learning about relational databases and SQL but also for creating real-world, production-level applications.
In this article, we covered the following topics.
- Download the MySQL Windows installer
- Install and configure MySQL server and tools
- Create your first database using MySQL Workbench
Введение
MySQL — реляционная система управления базами данных с открытым исходным. Простота использования и низкий порог входа сделал ее одной из популярных свободно распространяемых систем управления базами данных. MySQL используется как во многих небольших проектах (например, сайтах на WordPress), так и в высоконагруженных корпоративных системах.
В этой статье мы рассмотрим особенности установки MySQL на операционную систему Windows и расскажем о создании пользователей, оптимальной настройке производительности, устранении неполадок и о многом другом.
Подготовка Windows-сервера к установке MySQL
Перед началом подготовки сервера, закажем лицензию для Windows. Без этого создать сервер не получится. Для этого перейдем на экран «Лицензии» и нажмем кнопку «Купить лицензию».

В открывшемся выпадающем меню выберем соответствующий типа лицензии Windows Server 2019 Standard и нажмем кнопку «Оплатить».

После этого в списке лицензий появится лицензия Windows Server 2019 Standard.

Теперь можно приступать к подготовке сервера на базе ОС Windows Server 2019. Для этого в панели управления Selectel перейдем на экран «Облачная платформа» и нажмем на кнопку «Создать сервер».
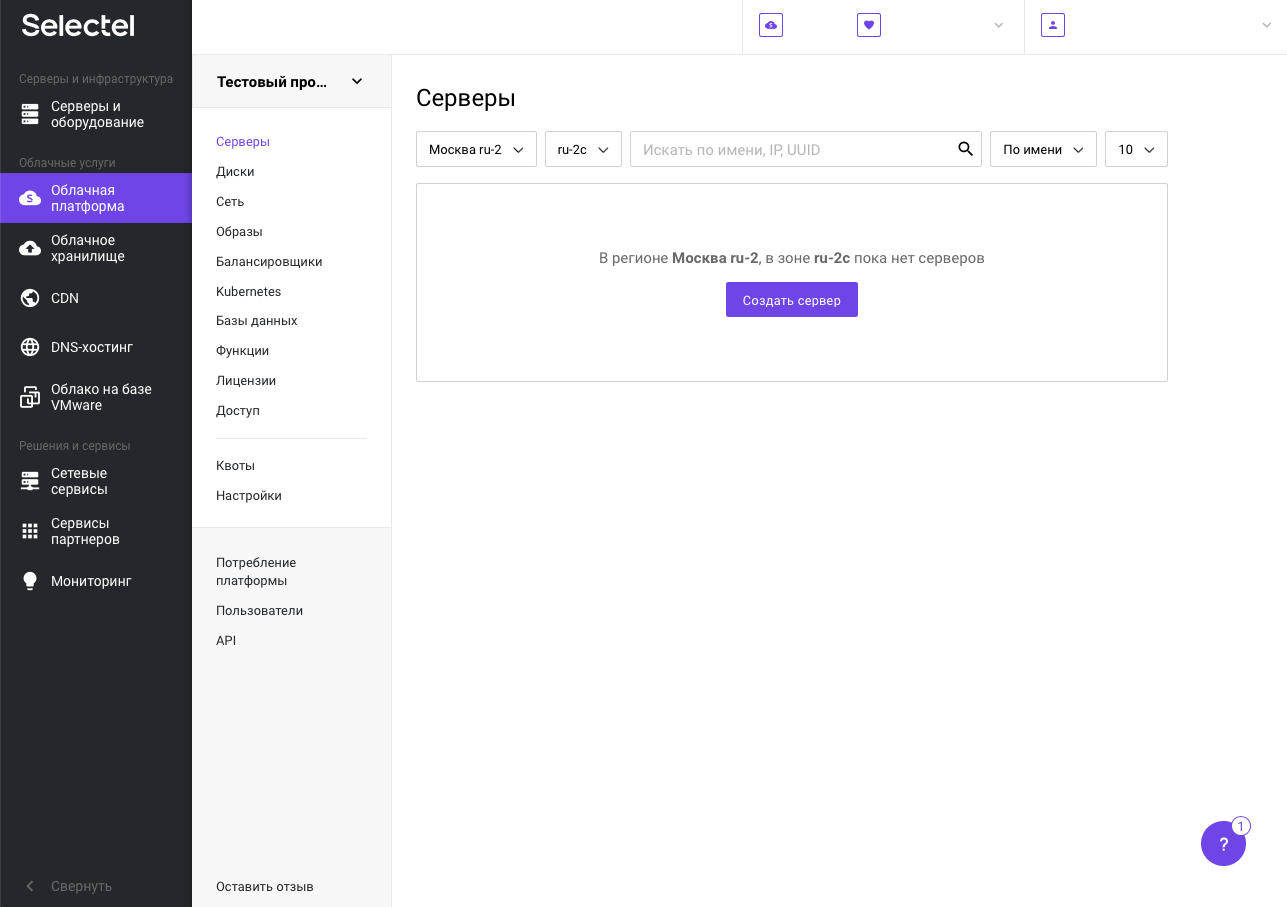
В качестве образа операционной системы необходимо выбрать образ операционной системы Windows. Для этого нажмем на кнопку «Выбрать другой источник».
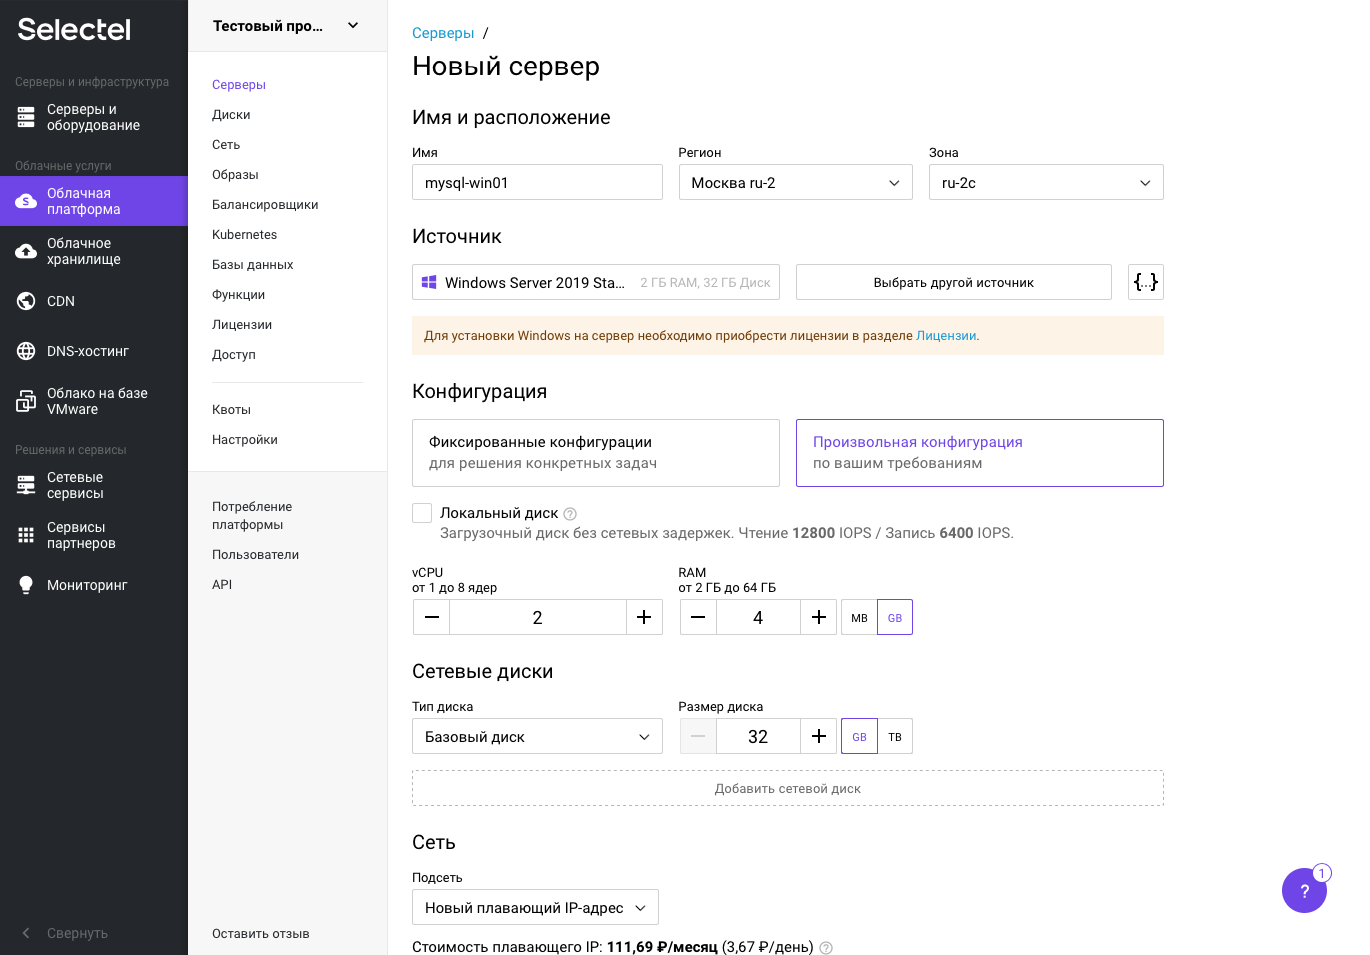
В появившемся всплывающем меню выберем готовый образ операционной системы Windows Server 2019 Standard Legacy BIOS и нажмем на кнопку «Выбрать».

В разделе «Серверы» и привязываем к серверу созданную лицензию. После выполненных действий нажимаем на кнопку «Создать».

Через несколько минут сервер перейдет в состояние Active и к нему можно будет подключиться по протоколу RDP.

После создания сервера, ему автоматически присваивается пароль учетной записи Administrator. Под этой учетной записью мы и подключаемся по RDP.

После выполненных подготовительных действий, можно приступать к установке MySQL на Windows-сервер.
Установка MySQL
Перед началом установки скачаем дистрибутив из специального раздела на официальном сайте MySQL. Нажимаем кнопку Go to Download Page.
После перехода на страницу загрузки выбираем опцию Windows (x86, 32-bit), MSI Installer (mysql-installer-community) и нажимаем на кнопку Download. Это на самом деле 64-битная версия СУБД, которая отмечена вендором как 32-битная. В результате мы получим установочный пакет, который затем можно установить на сервер даже без подключения к интернету.
Также можно скачать версию mysql-installer-web-community, которая представляет собой автоматический установщик и работает при наличии подключения сервера к интернету. На серверах все же не часто можно встретить свободный доступ к интернету. После загрузки дистрибутива приступим к его установке.

Дистрибутив должен появиться в папке с загрузками. Теперь можем его выполнить из контекстного меню и начать установку.
В появившемся представлении выбираем в меню Full для установки всех компонентов СУБД. Для работы с базой данных будет достаточно установить Server Only. В примере мы выбрали Full, т.к. считаем, что для знакомства с базой данных дополнительно понадобится визуальная консоль для управления MySQL Workbench. Также будут полезны примеры данных, с которыми можно сразу начинать работу для эффективного изучения работы СУБД. Также есть возможность выбрать для установки отдельные элементы, выбрав в меню пункт Custom. Нажимаем кнопку Next.

На следующем экране появятся системные требования к установке, выполнив которые, установщик приведет систему в соответствие с ними. Нажмем на кнопку Execute.

После установки дополнительных пакетов нажимаем кнопку Next. Пакеты в статусе Manual являются опциональными и не будут препятствовать нормальной работе СУБД.

На следующем экране будут показаны устанавливаемые компоненты. Проверяем статус готовности к установке каждого компонента и нажимаем на кнопку Execute.
После установки компонентов убедимся в наличии статуса Complete по каждому из них. После этого нажмем на кнопку Next для перехода к следующему экрану.

На следующем представлении установщик предлагает выполнить конфигурацию компонентов MySQL Server, MySQL Router и Samples and Examples. Нажимаем кнопку Next.

В выпадающем меню Config Type выбираем Development Computer, т.к. установка выполняется в целях демонстрации. Для подключения к базе данных будем использовать протокол TCP/IP. Другие два варианта подключения, помимо TCP/IP, лучше использовать при локальном подключении, т.е. когда приложение установлено на том же сервере, что и база данных.
Например, метод подключения Shared Memory более производителен, он помогает избегать использование сетевого стека. Заметим, что в производственных средах метод подключения через TCP/IP более предпочтителен, т.к. приложение может иметь тенденцию к росту. Использование этого протокола в распределенной среде упрощает выявление и диагностику нештатного взаимодействия базы данных и приложения. Остальное оставляем по умолчанию и нажимаем кнопку Next.

На следующем экране выбираем тип аутентификации. Воспользуемся рекомендацией вендора, выберем пункт Use Strong Password Encryption for Authentication. Переключение на Use Legacy Authentication Method можем рассматривать только если драйвера приложения не поддерживают подключение к 8 версии MySQL. Нажимаем кнопку Next и переходим к следующему экрану.

На следующем экране установим пароль суперпользователя. Чтобы он был устойчивым к взлому, необходимо использовать символы в верхнем и нижнем регистрах, цифры и спецсимволы. Длина пароля должна быть не менее 8 символов. На этом же экране можно создать и другие пользовательские учетные записи. Созданием новых пользователей займемся после полной установки базы данных MySQL и ее компонентов. Далее нажимаем кнопку Next.
На следующем экране установщик предлагает запускать MySQL Server в виде Windows-сервиса и установить его имя. Это самый приемлемый вариант, т.к. в противном случае запуск MySQL придется выполнять из командной строки. Чекбокс Start the MySQL Server at System Startup оставляем по умолчанию, чтобы база данных запускалась вместе с запуском сервера. В разделе Run Windows Service as… оставим значение Standard System Account, т.к. нет никаких причин запускать сервис MySQL от специализированной учетной записи. В некоторых случаях это бывает необходимо. Нажимаем кнопку Next.

Следующий этап — выполнение конфигурации в автоматическом режиме. Нажимаем кнопку Execute.

После выполнения конфигурации в автоматическом режиме все этапы должны быть помечены зеленой галочкой. Нажимаем кнопку Finish.

Следующий этап — конфигурирование MySQL Router и встроенных примеров. Нажимаем Next.

На экране с конфигурацией MySQL Router оставляем все по умолчанию и нажимаем кнопку Finish. Это функционал позволяет распределять нагрузку между экземплярами MySQL в рамках кластера. В нашем случае при установке единственного экземпляра базы данных этот функционал не имеет смысла.

На следующем экране установщик предложит выполнить конфигурирование примеров — их загрузку в БД. Нажимаем Next.

После этого появится экран с полем для ввода реквизитов доступа к БД и кнопкой для тестирования подключения — Check. Вводим логин и пароль, которые задавали ранее и нажмем кнопку. После подтверждения успешного подключения нажмем на кнопку Next.

На следующем экране будет предложено проверить уже установленных в БД примеров и установить их (запустить скрипты). Нажимаем кнопку Execute.

После успешной проверки и установки нажимаем кнопку Finish.

На следующем экране будет выдано сообщение об успешной установке примеров в БД. Нажимаем кнопку Next.
На этом установка завершена. Перед нажатием на кнопку Finish выберем чекбокс напротив Start MySQL Workbench after setup, что позволит автоматически запустить соответствующую консоль управления.

Консоль запущена и можно переходить к работе с СУБД MySQL Server и ее дополнительной настройке.

Проверка работоспособности MySQL
После подключения к БД MySQL в окне для ввода запроса введем select 1 from dual и в результате в ответе получим 1. В нижней части рабочей области в поле Output зеленой галочкой отмечен успешный статус выполнения запроса.

Также мы можем перейти на вкладку Schemas и обнаружим тестовые данные, которые были загружены в базу данных во время установки. Из контекстного меню выполним запрос в таблицу film_actor. В ответе получим значения столбцов actor_id, film_id и last_update.

Базовая настройка MySQL
После проверки корректности исполнения запросов, добавим новую пользовательскую учетную запись. Для этого на вкладке Administration перейдем в представление Users and Privileges. Нажмем на кнопку Add Account и заполним поля Login Name, Password и Confirm Password. Остальное оставим без изменений.

Еще один важный экран — Options File. Располагается также на вкладке Administration. Здесь можно в графическом интерфейсе изменять переменные, которые задаются в конфигурационном файле my.ini.

В MySQL Workbench можно также следить за производительностью базы данных. Отдельные метрики сгруппированы для удобства просмотра. Здесь присутствуют следующие группы: Memory Usage, Hot Spots for I/O, High Cost SQL Statements, Database Schema Statistics, Wait Event Times, InnoDB Statistics и User Resource Use.

Заключение
В статье мы рассмотрели установку и базовую настройку MySQL Server. Этого достаточно для запуска простого проекта, например, блога на WordPress. При необходимости MySQL может поддерживать высоконагруженные проекты за счет возможности работы в режиме кластера высокой доступности.
In this post, you’ll learn how to install a MySQL database on Windows and connect to it using MySQL Workbench.
Let’s get started.
Download MySQL Installer
The first step is to visit the MySQL website at mysql.com.
Once this page loads, click on Downloads at the top.

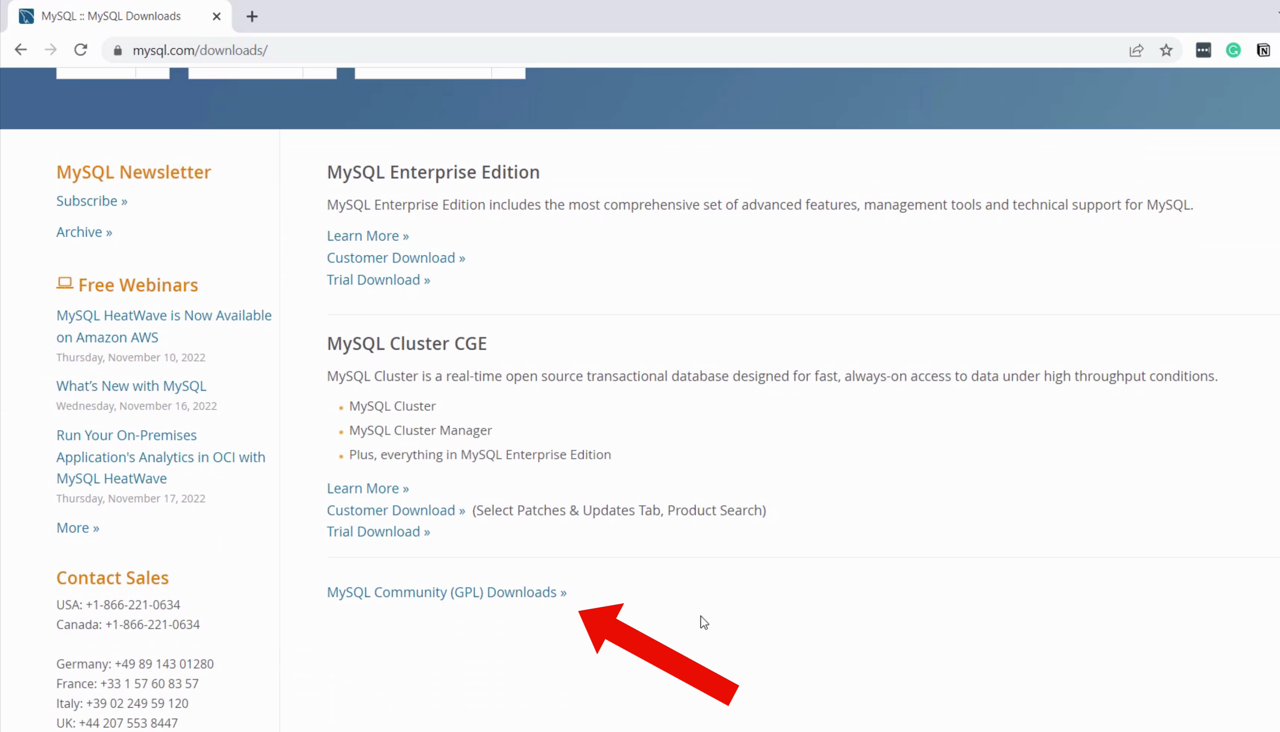
There are a few versions available on this page. Scroll down a little and click on MySQL Community GPL Downloads.
On this page, click on the MySQL Community Server. This is the free version that you can use.

On this Community Server page, it shows the latest version of MySQL, which as of today is 8.0.31.

The operating system is detected automatically as Microsoft Windows.
Click on the big MySQL Installer for Windows image here. This will download an installer file that lets you install a range of tools along with the database and is pretty easy to use.
Now, on the MySQL Installer page, click on the first Download button.

On the next page, you’ll be asked to create or log in to your Oracle account, because Oracle owns MySQL. This is optional, so you can just click on “No thanks, just start my download” at the bottom.

The installation file will begin downloading. It’s a small file because it’s only the installer, and the full database will be installed when you open this file and complete the wizard.
Once the file is downloaded, open it.
It will spend a few moments loading. If you see any Windows messages about allowing the installer to make changes, click Yes.
The MySQL Installer will then load. The first page will let you choose your setup type.

There are a few predefined setups here, and there’s a Custom option at the bottom if you want more control. For this example, we’ll leave it as Developer Default. The two things we need are MySQL Server and MySQL Workbench, both of which are included in this.
So, leave Developer Default selected and click Next.
On the next screen, you’ll see a list of products in the installer that have requirements before they can be used, and that my computer does not meet. In this example, we can see that MySQL for Visual Studio, and the Connector Python need to be addressed. Your list may be different, or you might not see this at all.
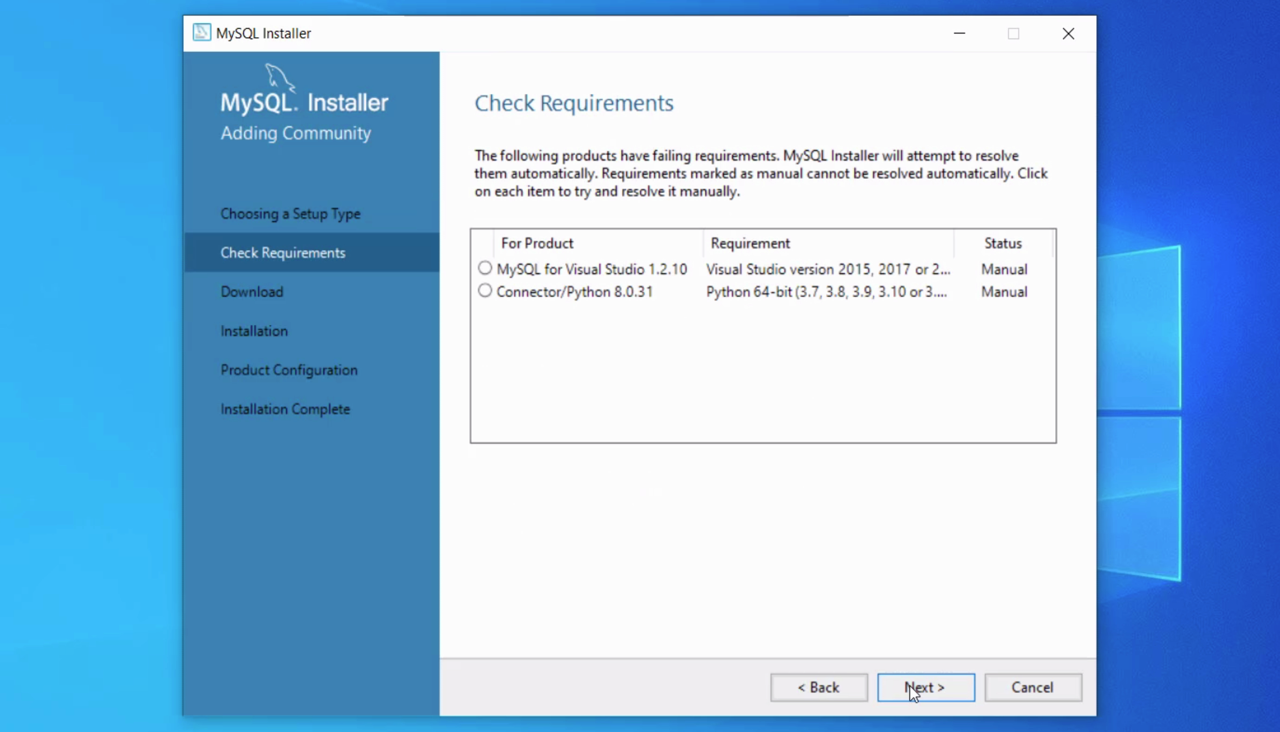
Click Next to attempt to resolve the issues.
In my installation, it tells me that one or more product requirements have not been satisfied. This is OK though, because we don’t need to use either of those products for our database.

Click Yes to continue.
On the Download screen that appears next, it lists all of the components and their status of “Ready to download”. Click the Execute button to start the download.

The components will begin downloading, which for me took a few minutes.
Once the downloads have finished, click Next.

The Installation screen is shown, with all components showing as Ready to Install. Click Execute.

The components will then be installed.
After a few moments, they will all be installed.
Click Next.
Configure MySQL
You’ll then see the Product Configuration screen.

As we chose the Developer Default setup, there are three things to configure. The first one is the MySQL Server which is the main thing we will use. The other two will be pretty quick to configure.
So, click Next.
On the Type and Networking screen, there is a range of settings you can set, with many of them prefilled. Leave them as the default, and click Next.

On the Authentication Method page, you can leave the default option of Use Strong Password Encryption. This is the recommended option. Click Next.

On the Accounts and Roles page, you can enter a password for the root account. This is the password you will use to connect to the database, so remember what you type here. I’ll enter a simple password, and the screen tells me it’s a weak password. You may want to consider entering a stronger password if you see this.

Further down on this screen, you can add new user accounts and roles. This is a handy feature of the installer and means you don’t need to use the root account for everything. For now, we will skip this, but you can set up an account here if you like.
On the Windows Service screen, you can leave all of the default values selected. One thing to notice here is the option for “Start the MySQL Server at system startup” is checked, so if you restart your computer, it will run automatically.

Click Next.
On the Server File Permissions screen, leave the default option and click Next.

On the Apply Configuration screen, click Execute. The settings you have selected will be applied.
After a moment it will be completed. Click Finish.
Configure Other Components
You’ll be taken back to the Product Configuration screen. The MySQL Server has been configured. Let’s proceed with the next two.
Click Next.

On the MySQL Router Configuration, you can leave the default values and click Finish.
Back on the Product Configuration screen, we can see the second item is complete. Click Next.
This last option will let us set up the sample databases. On the Connect to Server screen, enter the root password you used earlier in the setup, and click Check. If it’s correct, you’ll see a green tick and a green box on the top of the screen. Click Next.

On the Apply Configuration page, click Execute to set up the databases. After a few moments, this step will be complete.
Then, click Finish.
On the Product Configuration screen, all items are completed. Click Next.

On the Installation Complete screen, there are two checkboxes to notice. You can start MySQL Workbench after setup, and start the MySQL Shell after setup.
For this video, we’ll just use MySQL Workbench, but we’ll leave them both selected and then just close the shell so you can see what it looks like. If you want, you can unselect the checkboxes.

Click Finish. MySQL is now installed on your computer!
Connect Using MySQL Workbench
Now let’s connect to the database to test that it’s running correctly. We’ll do this in MySQL Workbench, which has been opened automatically. If it’s not open, you can run it from the Start menu.
We can see the main screen of MySQL Workbench here.

A connection has already been created, called Local Instance MySQL80. If you don’t have a connection here, you can click on the plus button next to MySQL Connections.
If you want to see the details of the connection, you can right-click on the connection and select Edit Connection.
The connections window appears. This shows the information for the connection: the host name, the port, username, and so on.

We can test the connection details by clicking Test Connection.
You’ll be asked to enter your password. This is the password you entered during the installation process. Enter it here.

Check the box labelled “Save password in vault”, if you want to save this password in the MySQL Workbench vault so you don’t need to enter it every time you connect. Click OK.
If the password is correct, it should say “Successfully made the MySQL Connection”.

Click OK, then Close on the connection window.
To connect to the database, click on the connection box on the main screen here. After a few seconds, you will be connected to the database. You can now start working with your MySQL database!
