
Download Article
Follow this step-by-step guide to install macOS on any Windows PC
Download Article
- What You Need To Make A Hackintosh
- Downloading Prerequisites on Windows
- Creating a Bootable Disk
- Getting the Right Serial for Your System
- Preparing the Boot Drive
- Installing macOS on Your PC
- Booting into macOS or Windows
- Video
- Q&A
- Tips
- Warnings
|
|
|
|
|
|
|
|
|
|
Do you have a Windows PC but prefer to use macOS? This is an incredibly time-consuming and complicated task that only people experienced with tech should attempt, but you can do it by following this step-by-step guide.
Gather the materials you need: a compatible PC, macOS download, and downloaded tools. Use the tools to create a bootable macOS installation disk, then use more resources to figure out what sort of SMBIOS works with your PC’s hardware. Once you’ve figured that out, you can get a serial code for your macOS, and then load it onto your system.
-

Check your computer’s specifications. Your Windows computer must have an Intel Core i3, i5, i7, or i9 processor in order to run macOS, as well as a minimum of four gigabytes of RAM.[1]
To check these specs:- Open Start

.
- Type in system information.
- Click System Information at the top of the menu.
- Look at the name of the processor to the right of the «Processor» heading.
- Scroll down and look at the number to the right of the «Installed Physical Memory» heading.
- You can also go to Dortania’s GPU’s Buyer Guide to see if your GPU is compatible with macOS. As of macOS Monterey, Kepler was dropped, so there’s no support for NVIDIA drivers. In short, you can’t make your PC a Mac if you have an NVIDIA driver.
- Open Start
-
Check your computer’s BIOS type. Next to the «BIOS Mode» heading in the System Information menu, check to see whether it says «UEFI» or «BIOS». Keep this information in mind for later.[2]
- You can exit System Information after this point.
Advertisement
-
Determine your computer’s bit type. There are two types of computers: 32-bit, and 64-bit. Your computer must be able to support 64-bit operation in order to install macOS.[3]
-
In order to install macOS on your Windows computer, you will need the following hardware:[4]
- USB drive — Find a flash drive that can hold at least 32GB.
- Blank hard drive — Find a USB external hard drive that holds at least 100 gigabytes if you don’t want to partition your Windows hard drive. You’ll need lots of free space for either OS to run smoothly, so consider getting an external if the built-in one is over half-full.


Advertisement
-
Press Ctrl + Shift + Esc to open Task Manager and click the Performance tab (on the left).
-
Open a web browser and navigate to Etech Labs. Type in the information for your CPU, then click Go to Specs.
- Near the top of the chart is your CPU’s codename and architecture.
- You will need this information to download the correct EFI file.
-
Go to this site to download this tool that flashes OS images to USB drives.
- Download the appropriate file for Windows.
-
You’ll see two main sections on this site: desktop and laptop. Look in the appropriate section for the codename of your CPU and click Download next to it.
- Be careful to click the right button since the site contains ads with similar Download buttons. You should see text appear in the bottom left corner of your browser window when you hover over the correct Download button.
- Your best option is to use ad blockers to prevent seeing these ads.
-
You can find the Explorer++ site here. It’s a lightweight and fast file manager for Windows.
- Click the Download 64-bit option.
-
This is used to generate a unique serial for your Mac so you can use Apple services. You can find it here.
- Click Code and Download Zip.
-
You’ll find this tool here. You want to download the free version, so click Download Now.
-
Go to this site and click Download.
- This is also referred to as «OCC.»
-
You can find a working version here.
- You should have 8 items in your downloads folder for this project:
- Sequoia
- OCC
- Pw-free-online
- genSMBIOS-master
- Explorerpp_x64
- Balenaetcher
- EFI
- You should have 8 items in your downloads folder for this project:


Advertisement
-
You should find it in your Downloads folder.
-
It’s the first option on the menu.
-
It’s in your Downloads folder.
- Alternatively, single-click it and click Open.
-
If your USB flash drive is plugged in, you’ll see it appear. If not, plug it in to continue.
- Click Select to continue.
-
This might take 30+ minutes, so don’t rush it!
- When it’s done, you’ll see the window change to «Flash Completed!».


Advertisement
-
This is based on your graphics card and is desktop-laptop different, so read carefully to make sure you have the right one. You can find the right one here.
-
To do this, go to Downloads and select the GenSMBIOS-master folder. Click Extract all and save it to the same Downloads folder.
-
With modern systems, built-in programs can extract zipped folders without you having to download additional software. To do this, click the zipped folder and click Extract all. Save the extracted folder in the Downloads folder so you can easily find it later.
-
You’ll find the extracted file in Downloads > GenSMBIOS-master > GenSMBIOS-master.
-
This will allow you to install/update MacSerial.
- Press Enter after the number to enter the code.
- Press Enter to go back.
-
This will let you enter the configuration plist.
-
Find the configuration plist in Downloads > EFI > EFI > OC.
- Press Enter to continue.
- You’ll see the plist listed at the top of the window under the MacSerial info.
-
You need to create a serial number so you can use Apple services on your Mac.
-
Check the chart here to see which platform you can use.
- For example, a CPU with a «Penryn(M)» codename is compatible with a MacBook 7,1.
- Press Enter to continue.
- The serial number has been inserted automatically in the «config.plist» file and is listed above.
- Press Enter again to go back and then you can close the window.


Advertisement
-
This is the Mini Partition Wizard that you downloaded earlier, so you’ll find it in your Downloads folder.
-
Select your language, then press OK. Continue with the free version by making sure «Continue installing free edition» is checked, then clicking Next.
- In the next window, deselect «Participate in the Customer Experience Improvement Program».
- Make sure «Mini Tool Partition Wizard Free» is selected.
- Press Next to continue.
- Launch the wizard after it installs.
-
Use the drop-down menu to assign it a new letter, like «X:» or «D:».
- Press OK to continue.
-
Click Yes to continue.
-
For example, name it «OCC» so you can remember it contains the OpenCore Configuration.
- Press Ok to continue.
-
It’s in the lower left corner of the partition wizard.
- Click Yes and close any open windows.
- You should see a «Success» message and can close the wizard.
-
Click the zipped folder in Downloads and click Extract all. Save the unzipped folder in the same location so you can find it easily.
-
To do this, double-click the Explorer++ folder in Downloads, right-click the Explorer++ Application, and select Run as administrator.
-
This should be the default location and you can skip this step. However, you can also navigate here using the menu on the left.
-
You should see a list of drives on your computer including the new ones that you created with the Mini Partitioner tool.
-
Inside the EFI drive, you’ll find default EFI files and folders that you need to delete.
- Press Ctrl + A to select everything, then press Delete.
-
Using Explorer++, navigate to your Downloads folder and find the unzipped EFI folder. Remember, since it’s unzipped, there’s an extra EFI folder level that we don’t want to copy.
- To make sure to get the right folder, click through the EFI folders until you see «OC» and «Boot«. Go up one level and copy that folder (right-click it and select Copy).
- Return to your EFI partition and paste the copied folder (right-click an empty space in the drive and select Paste).
- Close Explorer++.
-
To open this quickly, press the Windows key and enter create partitions. Then click the Control Panel app.
- This also says «Create and format hard disk partitions.»
-
drive and select Shrink Volume. You’re doing this to make room for the macOS.
- This number depends on your hard drive; but you want to reserve a good amount of space for macOS to use (like 50GB+).
-
Click Next to continue past the first and second pages.
- The default values on the second page will be fine.
- Assign a letter to your drive and click Next.
- Label the volume. For example, name it macOS 15 so it’s easily identifiable.
- Click Next and Finish.
- Close Disk Manager and return to your Downloads folder.
-
Click the folder to select it, then click Copy.
- Go to This PC > OCC. It’s the OCC drive on your flash drive that you created with Mini Partition Wizard.
- Paste the folder by right-clicking empty space and selecting Paste.
-
In the Start menu, click the «Power» icon, then select Restart.


Advertisement
-
As your PC restarts, press the button needed to launch BIOS. Common manufacturers are listed in this wikiHow article, but you can also find the buttons you need to press online by searching your motherboard’s manufacturer and model number.
-
Navigate to the Boot tab and choose «Disabled» in the drop-down next to «Fast Boot.»
-
The location of this menu is different between manufacturers, so refer to your manual if these steps don’t match. You can find Secure Boot Keys in:
- Boot > Secure Boot > Key Management > Clear Secure Boot Keys.
-
You might find this under Advanced > PCH Storage Configuration > SATA Mode Selection.
-
Go to the Exit tab and select Save Changes & Reset.
-
As your computer loads, press and hold F8. This keyboard shortcut is different depending on your PC’s manufacturer.
-
FAT (Your USB Name)». Select it using the arrow keys on your keyboard and press Enter.
-
Your PC will reboot again.
-
Boot options should load automatically for you. If not, try again and press the button to see Boot Options.
-
You’ll see lots of code flicker across the screen, then you’ll be asked to choose a language for installation.
-
Disk Utility will open so you can install macOS Sequoia.
-
«macOS 15» is the partition you created in Windows, so you’ll need to format it for Mac before you can use it.
- Set the format to «APFS» and click Erase.
- When it’s finished, click Done and close the Disk Utility window.
-
Click Continue again to proceed.
- Select the Mac hard drive. In this case, it’s macOS 15. Click Continue again to proceed.
- This can take a while (around an hour!) and your computer may restart a few times.


Advertisement
-
If you’re using macOS and want to switch to Windows, shut down your computer by clicking Shut Down from the Apple menu.
- Turn your computer back on and select Windows when prompted.

Add New Question
-
Question
Will this work on AMD systems?
No, it won’t, unfortunately.
-
Question
Why do high system requirement applications like Android Studio, After Effects, Photoshop, etc., run so smoothly on a Mac but are quite slow in Windows?
This is very much dependent on the hardware you are using. It may be that the Windows PC you are using has lower specs or has other software which is slowing it down.
-
Question
Can I use other virtual programs like VirtualBox or VMWare to use Mac OS?
You can; VMware will be the best for using it because it provides for functions and runs smoothly on Windows. You should allocate 4 GB RAM for Mac OS.
See more answers
Ask a Question
200 characters left
Include your email address to get a message when this question is answered.
Submit
Advertisement
Video
-
If you enjoy macOS on your Windows computer, consider purchasing a Mac to stay Apple-compliant.
-
Windows computers with macOS installed on them are called «Hackintoshes».
-
Macs are mostly used for professional things, i.e. video editing. Graphics-intensive games such as COD (Call of Duty) won’t work as smoothly as expected.
Show More Tips
Thanks for submitting a tip for review!
Advertisement
-
Installing macOS on a Windows computer violates the Apple End User License Agreement.
-
Only do this if your computer has a sufficient amount of RAM installed.
Advertisement
References
About This Article
Article SummaryX
Installing macOS on a Windows computer is tricky, but not impossible. You’ll need to download the macOS High Sierra installation file on a Mac and then transfer the installer over to Windows by using a macOS-formatted USB drive running a program called Unibeast; after this point, you can use the USB drive to install macOS over onto a blank hard drive that you’ve also formatted for macOS. Once you’ve installed macOS, it’s a good idea to run Multibeast from the flash drive in order to install drivers needed for things like sound, Internet, and graphics cards.
Did this summary help you?
Thanks to all authors for creating a page that has been read 2,154,769 times.
Is this article up to date?
Quick Answer
- All you have to do is create a virtual disk using VMware on your system and install macOS on it to experience the same.
- To install macOS as a virtual machine on your Windows PC, you must ensure that the Virtualization Technology is enabled in your device’s BIOS.
- Since we are using third-party virtualization software (VMware) to run our ‘Virtual macOS’, which offers far more customization features, you need to disable Hyper-V on your machine to avoid conflicts between the two.
Getting macOS to run on a Windows machine has always been a tiresome job. Unlike Windows, macOS relies heavily on hardware compatibility to function properly on any machine. But what if we tell you there’s an easy way to install and experience the same alongside your Windows operating system? In this explainer, we have demonstrated easy steps to install macOS on Windows 11 or 10. Additionally, you can try macOS’s Quick Look feature on your Windows machine.
How to Install macOS on a Windows Computer
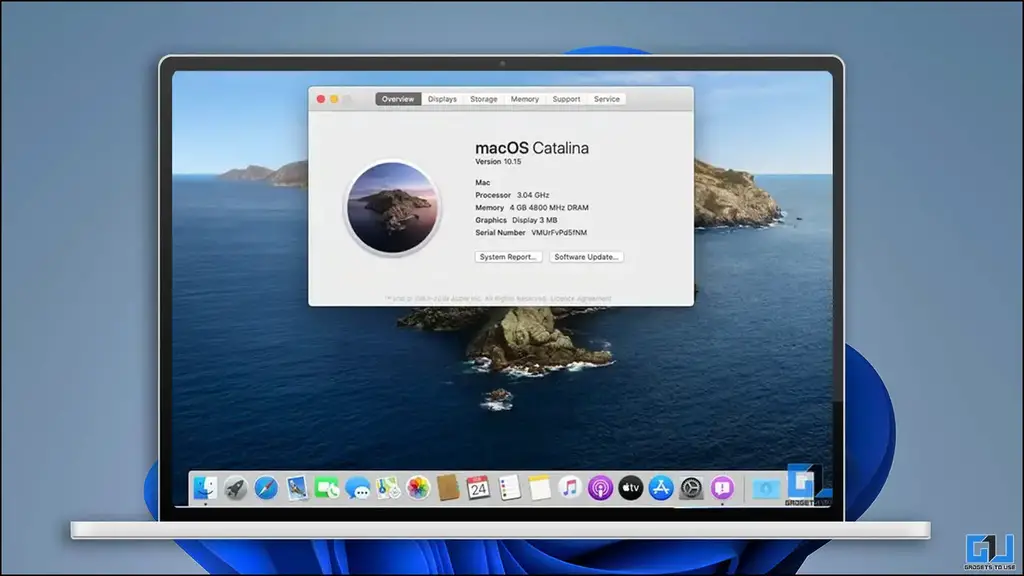
For this demonstration, we will install macOS Catalina on Windows 11 using a third-party virtualization software called VMware Player. The advantage of using this software is that you don’t have to format or relocate your system data to install it. All you have to do is create a virtual disk using VMware on your system and install macOS on it to experience the same.
Installation Pre-Requisites
Let’s have a look at the prerequisites to install it.
- Enable Virtualization
- Disable Hyper V
- Download macOS Image
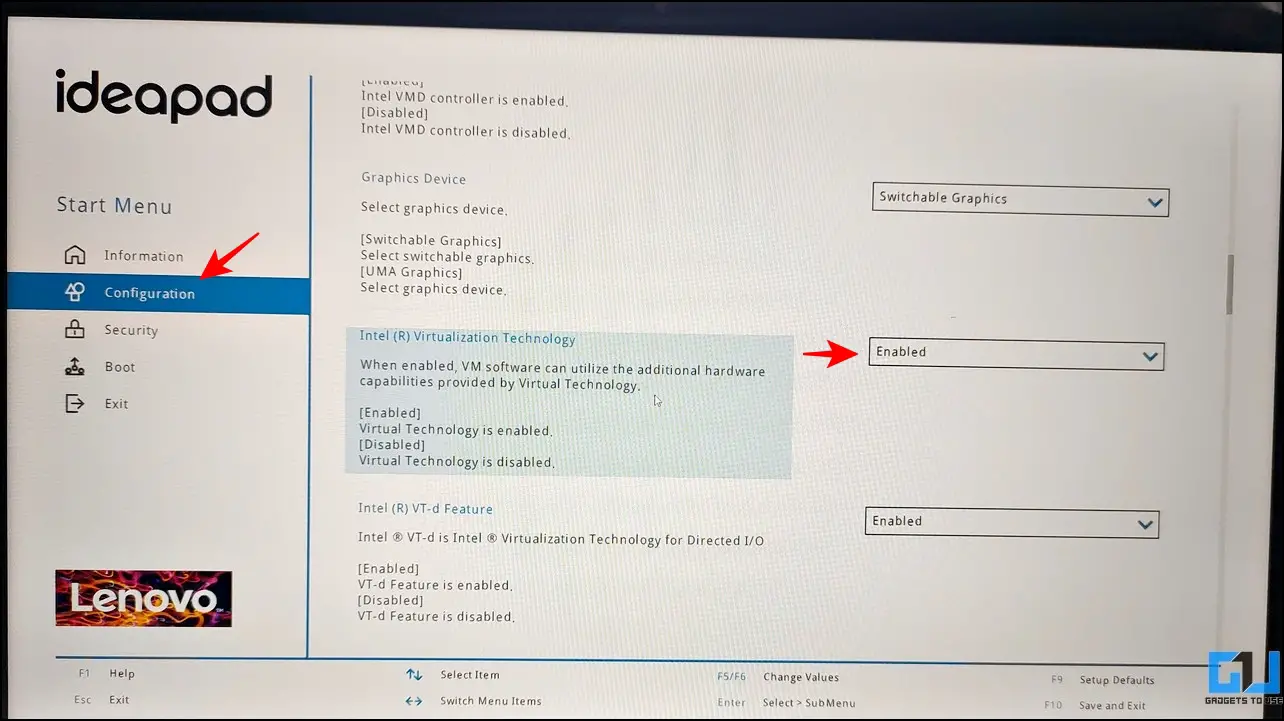
Step 1- Enable Virtualization Technology on Windows
Virtualization Technology helps users emulate and run different operating systems on a single machine. To install macOS as a virtual machine on your Windows PC, you must ensure that the Virtualization Technology is enabled in your device’s BIOS. Here’s how you can check the same:
1. Restart your Windows PC and press the dedicated Function key at boot to enter your system’s BIOS. If you’re unsure about the key, you can search for the same by searching your system’s model number on Google.
2. Switch to the configuration tab and locate Virtualization Technology to enable it. Once done, save the changes and reboot your system.
Step 2- Disable Windows Hyper-V to install Virtual Machines
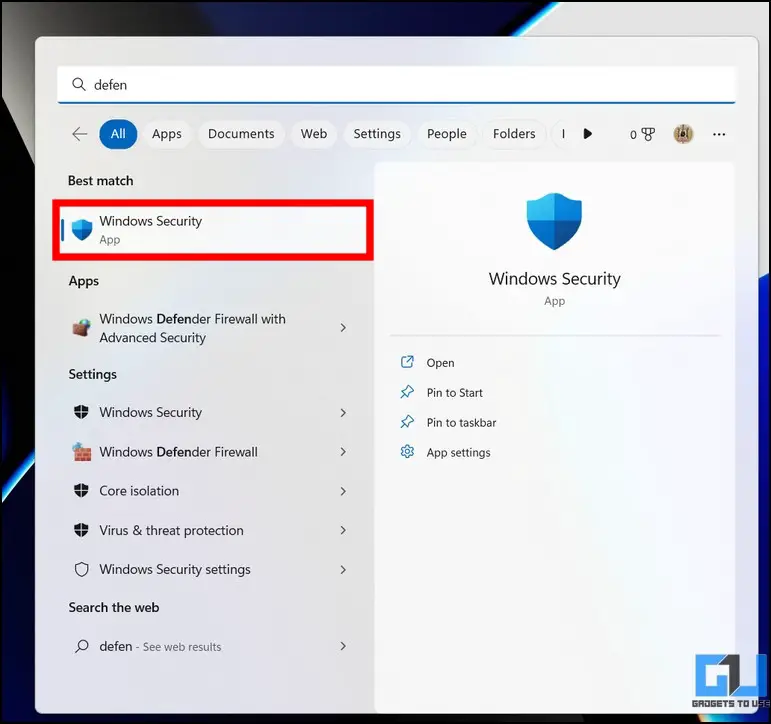
By default, Microsoft Windows comes with its native virtualization product called the ‘Hyper-V’ that lets you create and run virtual machines. Since we are using third-party virtualization software (VMware) to run our ‘Virtual macOS’, which offers far more customization features, you need to disable Hyper-V on your machine to avoid conflicts between the two. Here’s what you need to follow.
1. Press the Windows key and access Windows Security settings.
2. Next, click on the Device Security option to configure it.
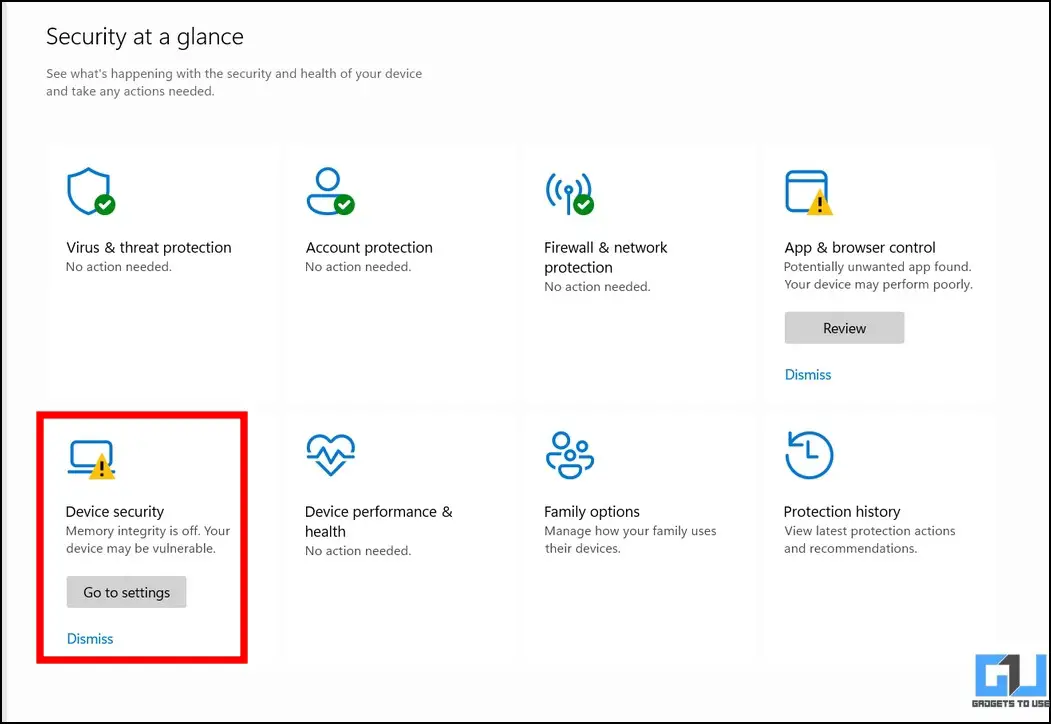
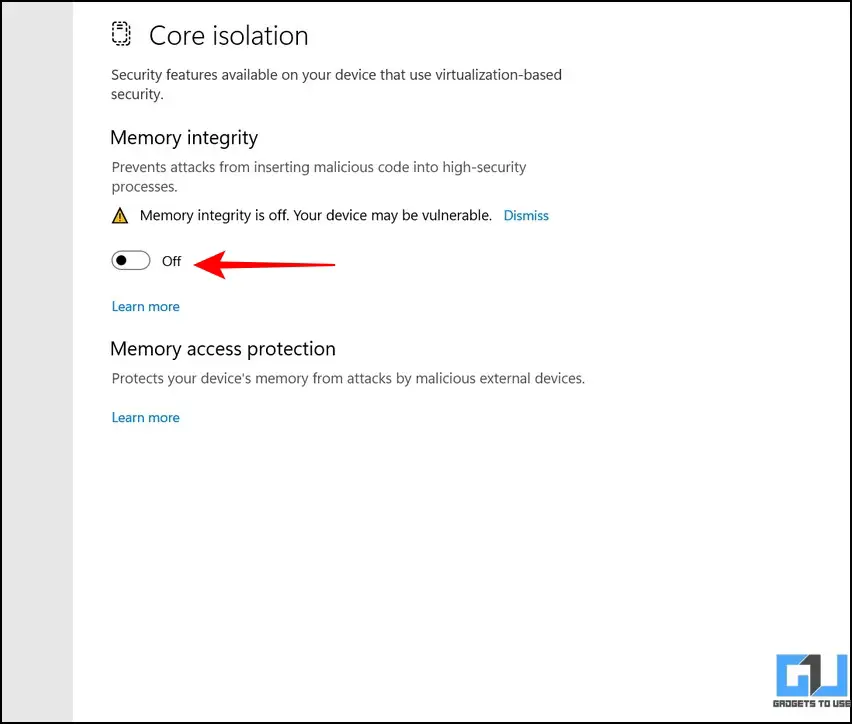
3. Further, tap on the Core Isolation feature to access its settings.
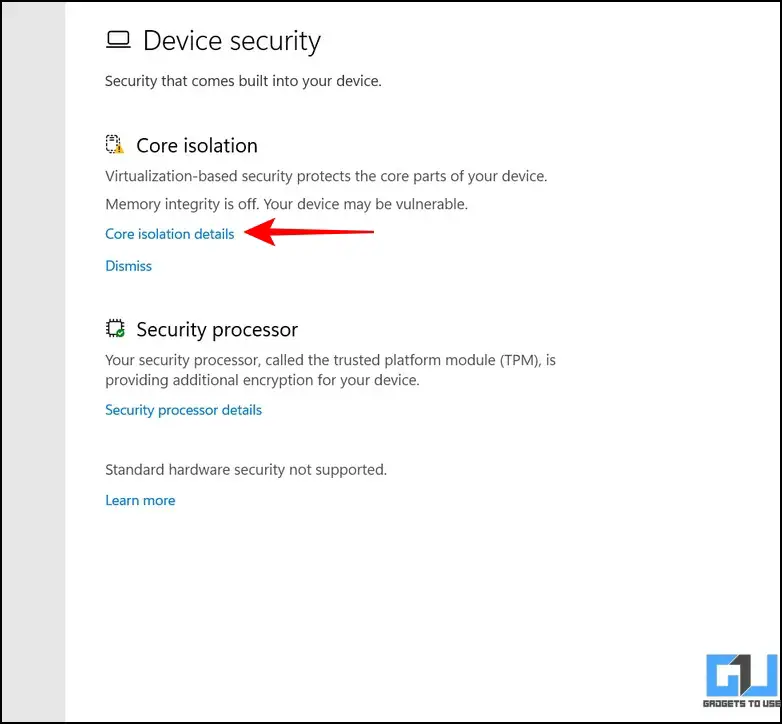
4. Finally, turn off the toggle for Memory Isolation to disable it. This will prevent Windows Security from interrupting while making changes to the system product (Hyper-V in this case).
5. Now, launch Command Prompt with Administrator privileges.

6. Execute the following command on the terminal to turn off the Windows Hypervisor (Hyper-V):
Set hypervisorlaunchtype off
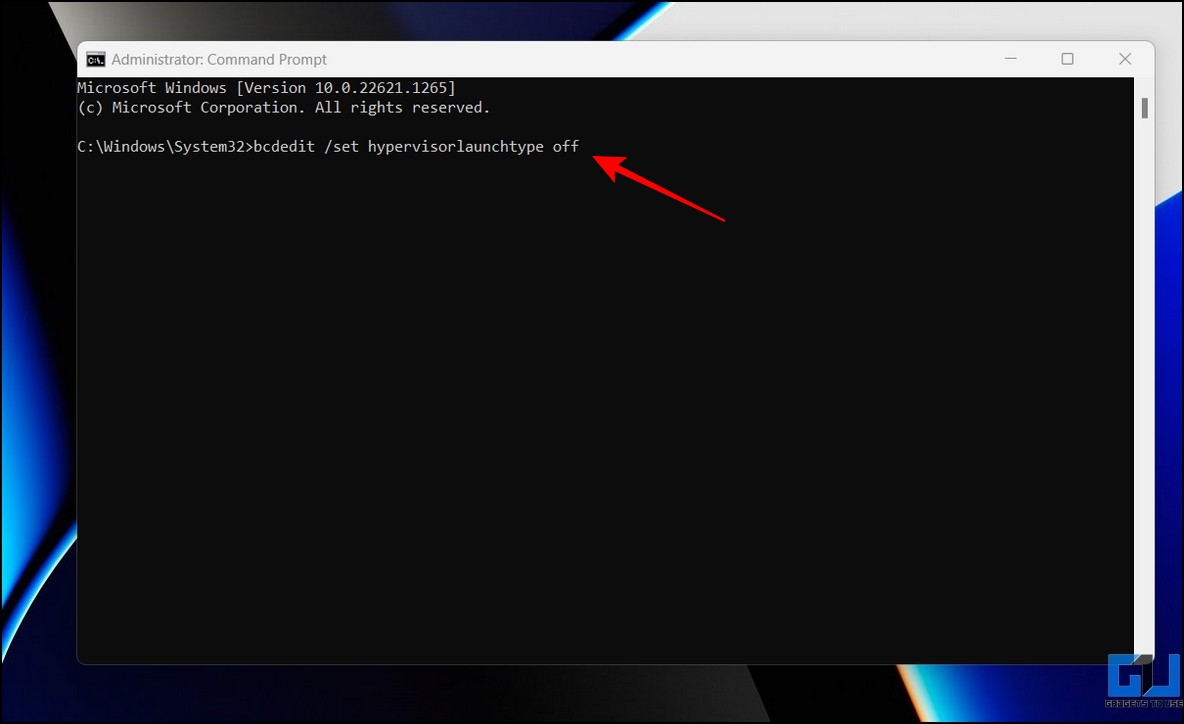
7. Reboot your system to apply changes.
Step 3- Download the macOS Catalina VMware Image
The final pre-requisite to install macOS Catalina is its VMware image. Follow these steps to download the same.
1. Download the macOS Catalina VMware image from the Google Drive Link.
2. Extract the downloaded compressed file to your system via native or third-party decompression tools such as WinRAR.
Tip: The password for extracting the compressed file is Geekrar.com
3. Once extracted, you will see the .vmdk file that will be used for installation.
Steps to Install macOS on Windows 11/10
Now that you’ve fulfilled the prerequisites, let’s look at the steps to install macOS on Windows 11/10.
1. Download and install the VMware Workstation Player from its official website.
2. Next, download the VMware Unlocker tool and extract the downloaded file to a new folder.

3. Locate the win-install.cmd in the list of extracted files and right-click on it to run it as administrator.
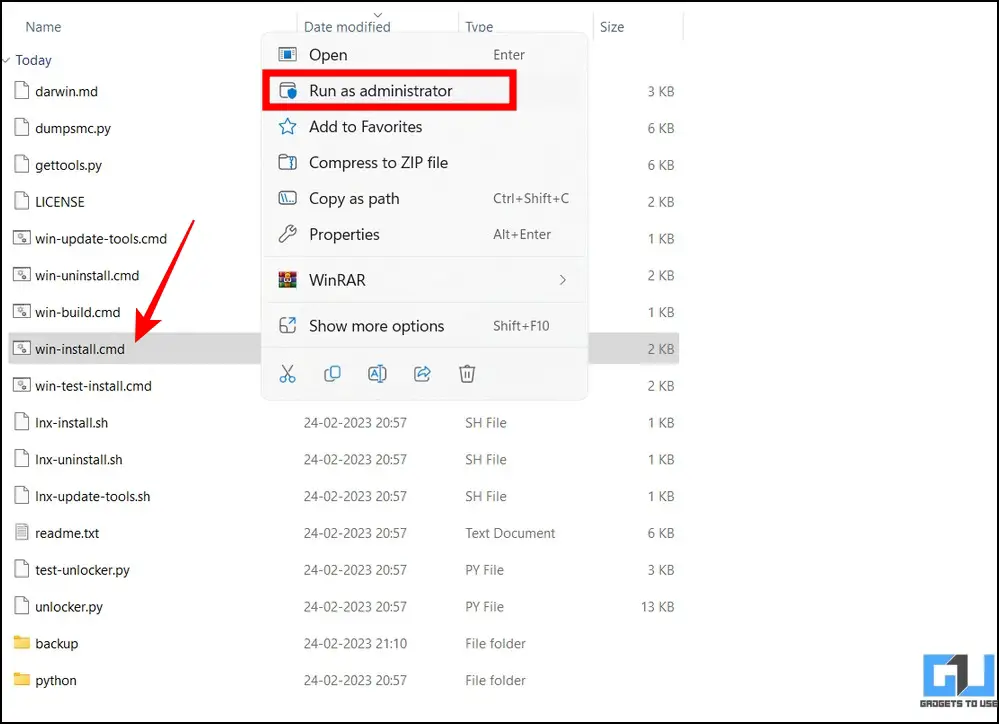
4. The commands in the win-install.cmd file will patch the installed VMware Workstation Player to add an entry for Apple macOS during installation.
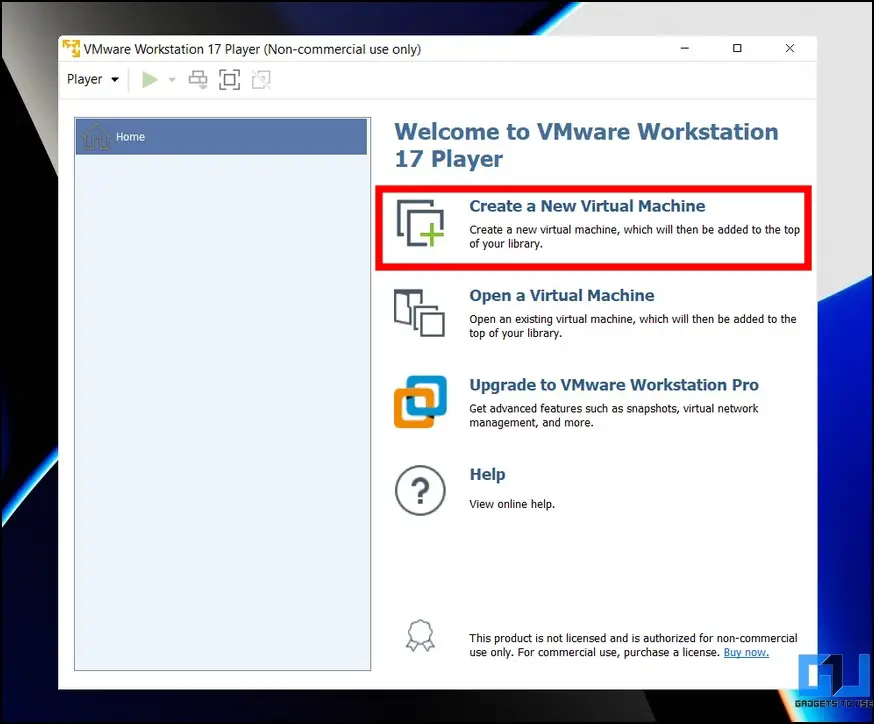
5. Open the VMware Workstation Player and create a New Virtual Machine.
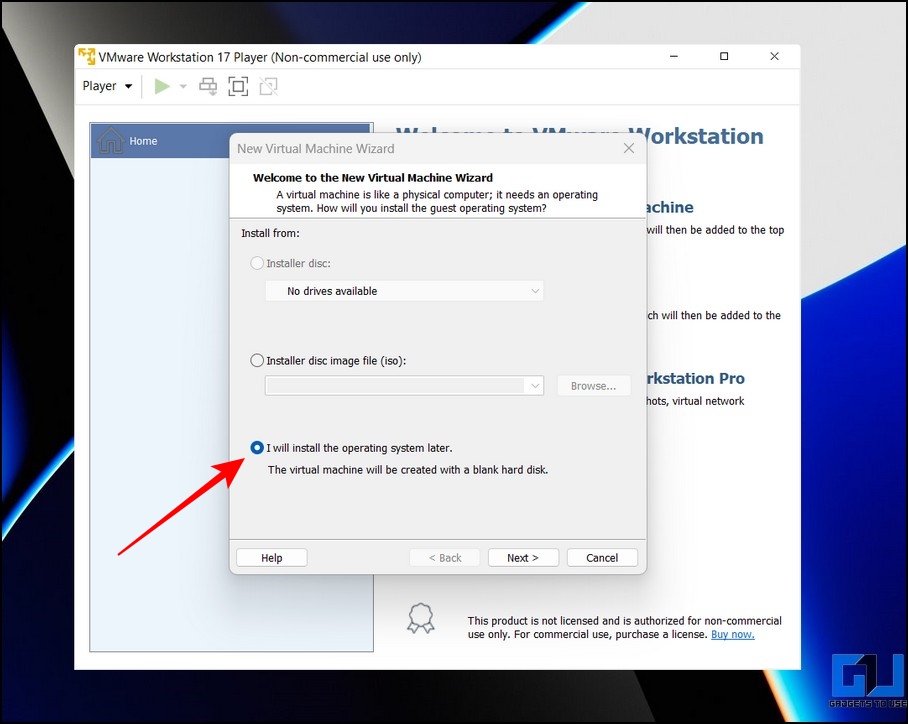
6. Next, pick ‘I will install the operating system later‘ and click the Next button.
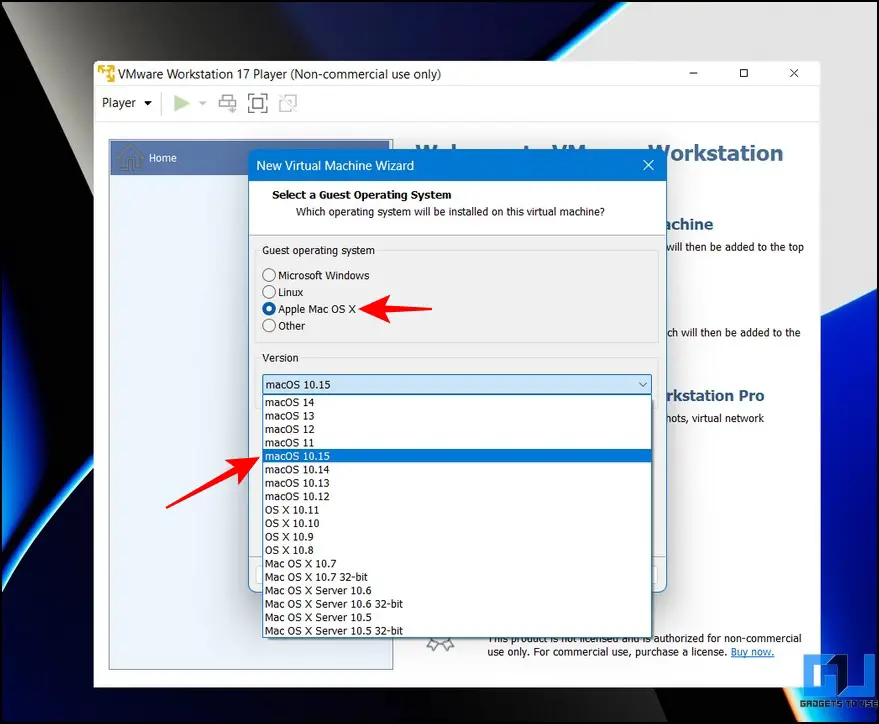
7. Select Apple Mac OS X from the list and pick macOS 10.15 to install macOS Catalina.
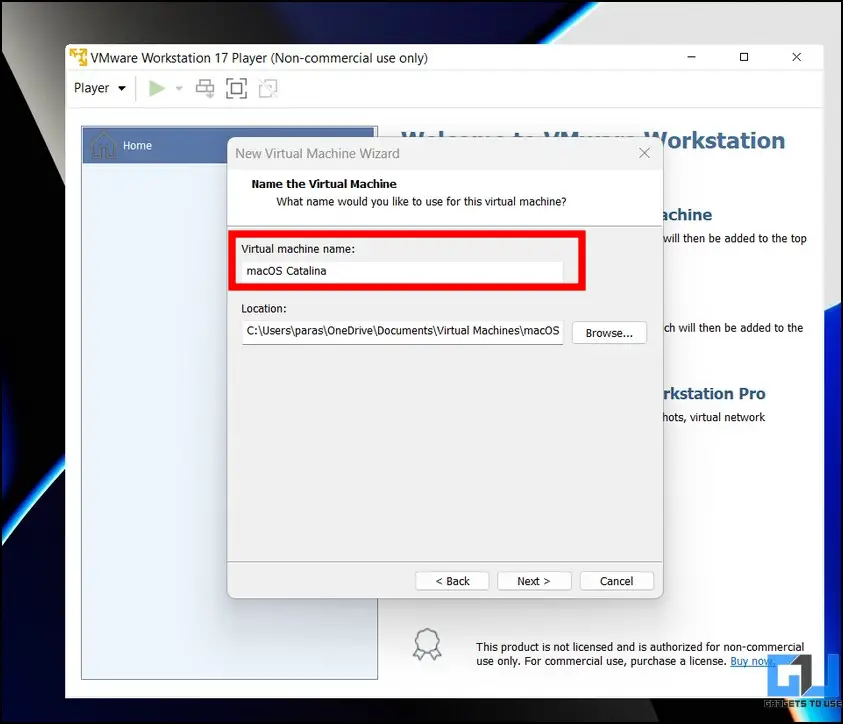
8. Provide a new name to your virtual machine and click the Next button to proceed.
9. Allocate at least 80GB of disk space and click the Next button to finish setting up the configuration.

10. Click the Finish button to complete the creation of a new virtual machine.

11. Now, click Edit Virtual Machine Settings to edit the configuration of the created VM.
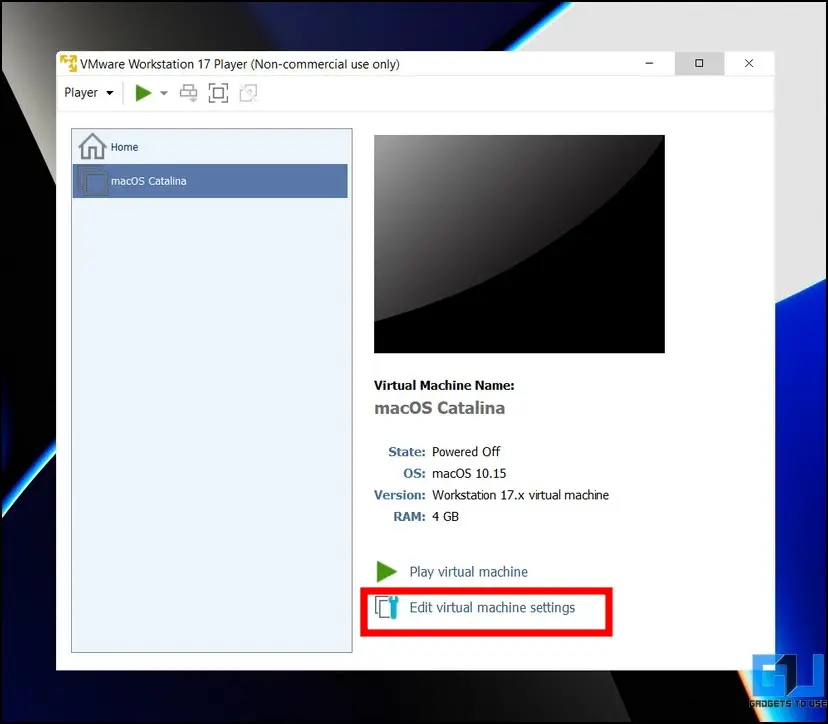
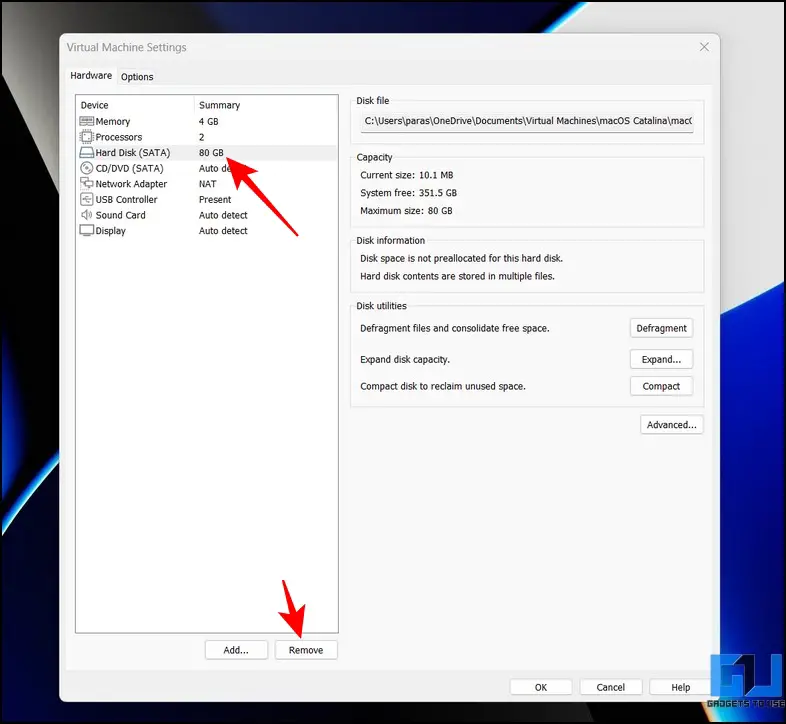
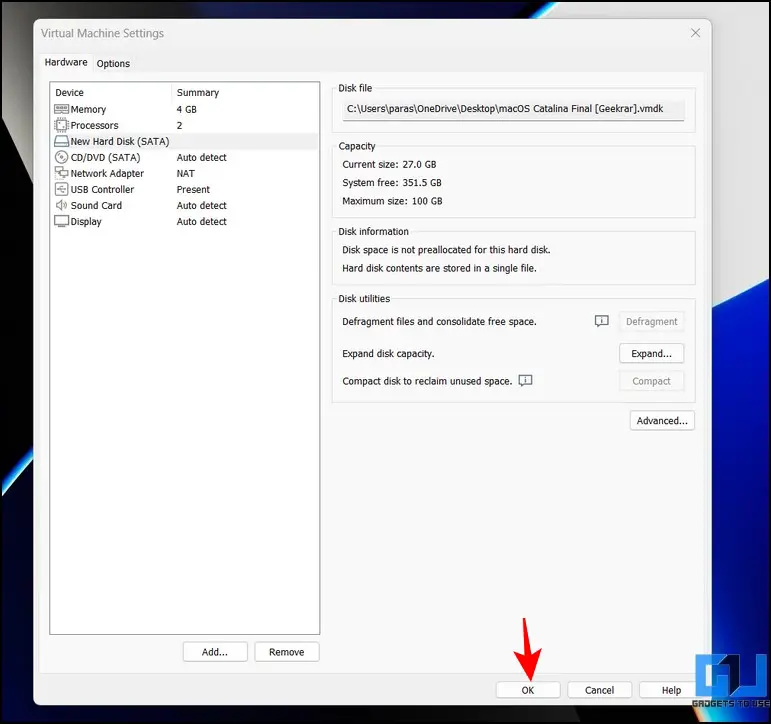
12. Here, select the Hard Disk in the left sidebar and click the Remove button to delete it.
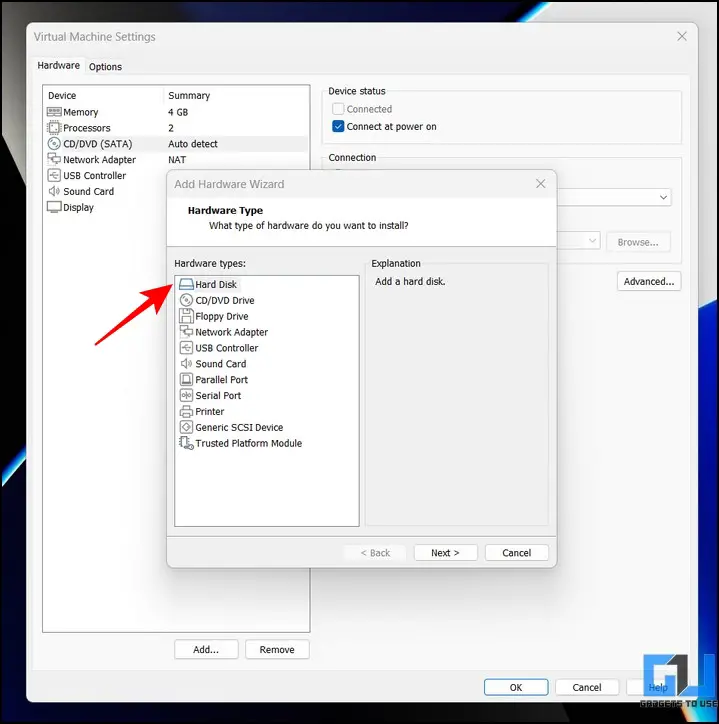
13. Once removed, click the Add button to add new virtual hardware to your machine.

14. Select Hard Disk under the Hardware types list.
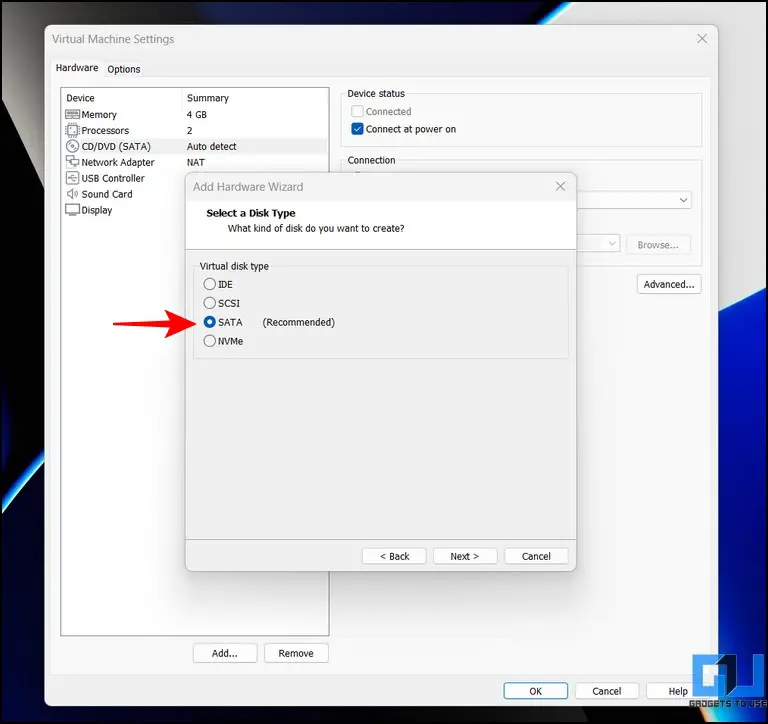
15. Pick the SATA disk drive under the virtual disk type.
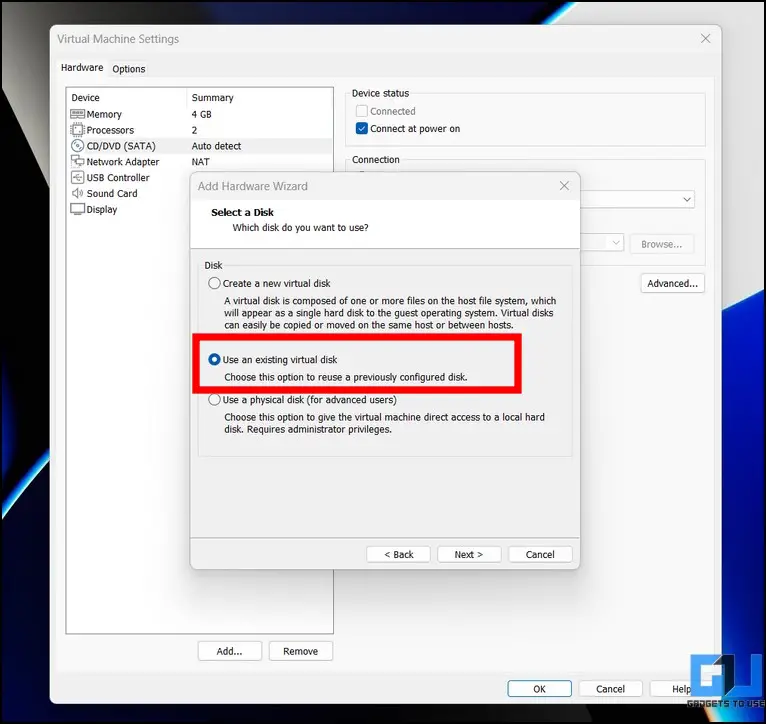
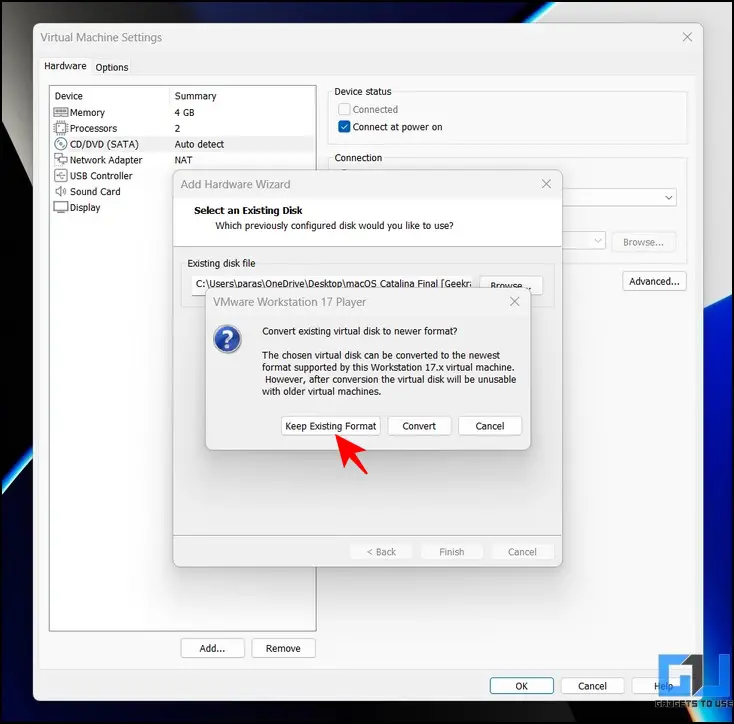
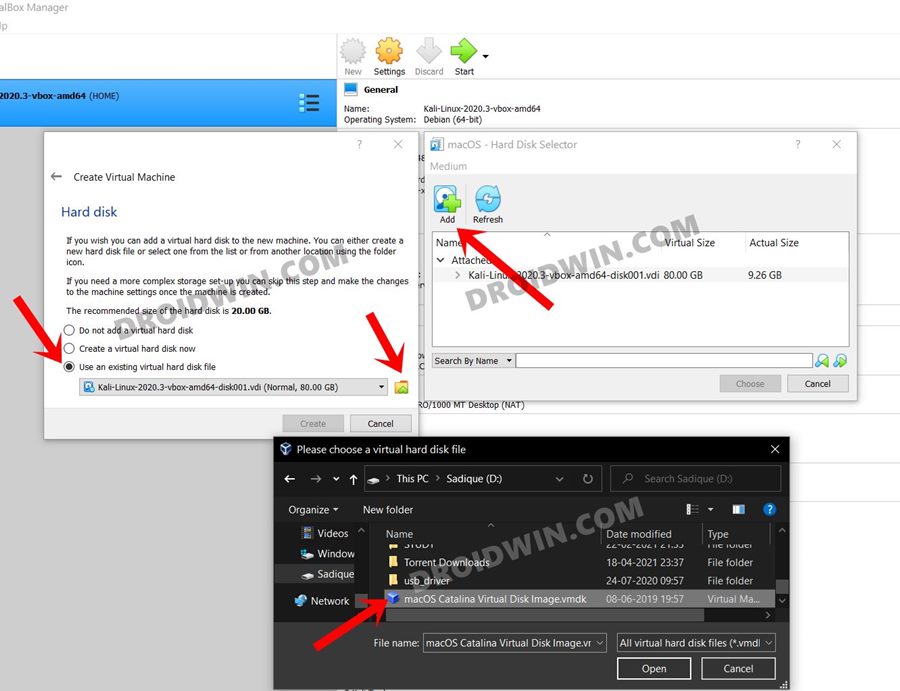
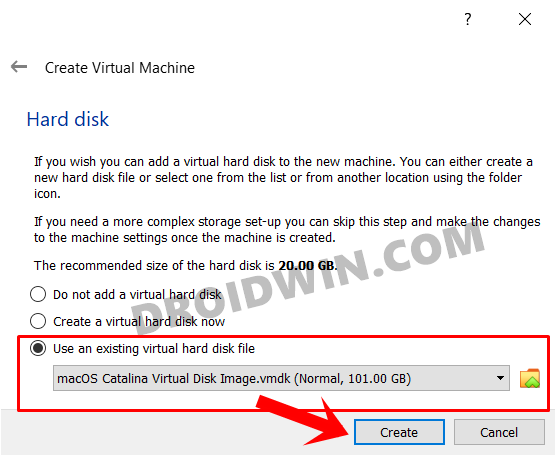
16. Next, select the ‘Use an Existing Virtual Disk‘ option.
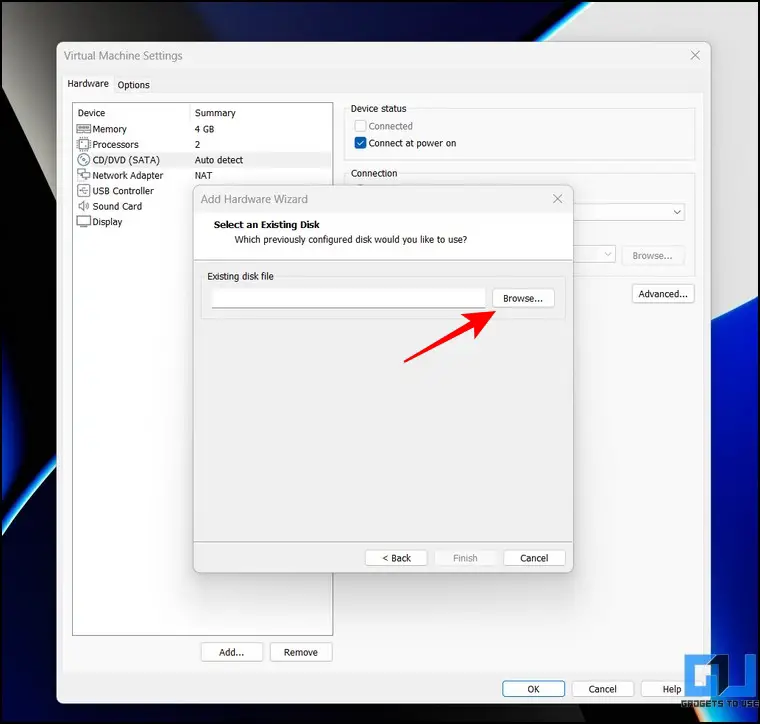
17. On the next page, click the Browse button to locate the .vmdk file extracted earlier from the downloaded file.
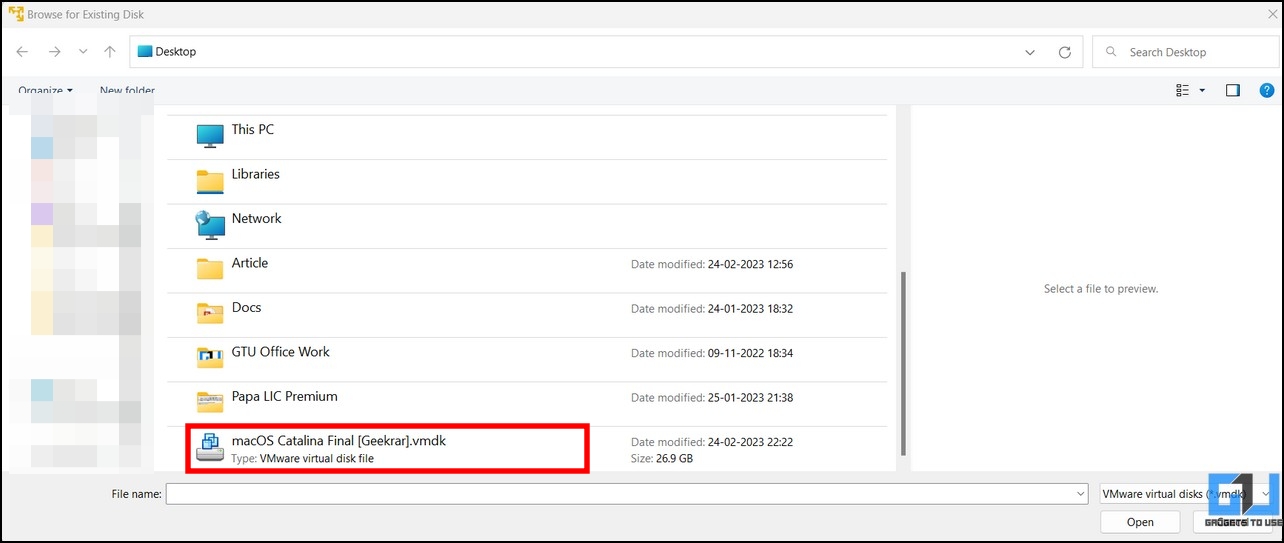
18. Select the macOS Catalina Final .vmdk file and click the open button to allocate it to your virtual machine.
19. Press the Finish button to save your changes.
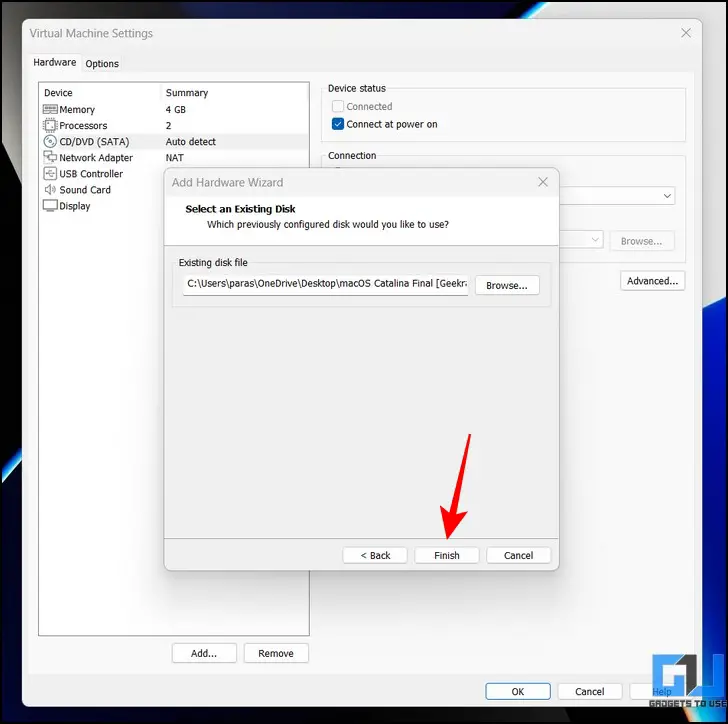
Pro-Tip: If you get a prompt asking to convert the existing virtual disk to a newer format, click the Keep Existing Format button to retain the original disk format.

20. Click the OK button to save changes.
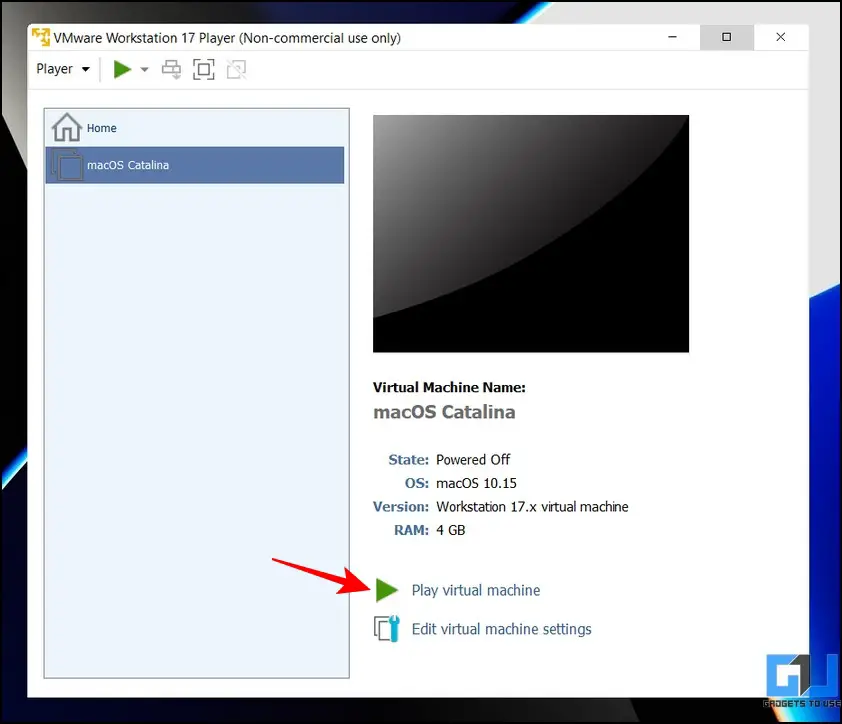
21. Finally, press the Play Virtual Machine option to boot into the macOS virtual machine.
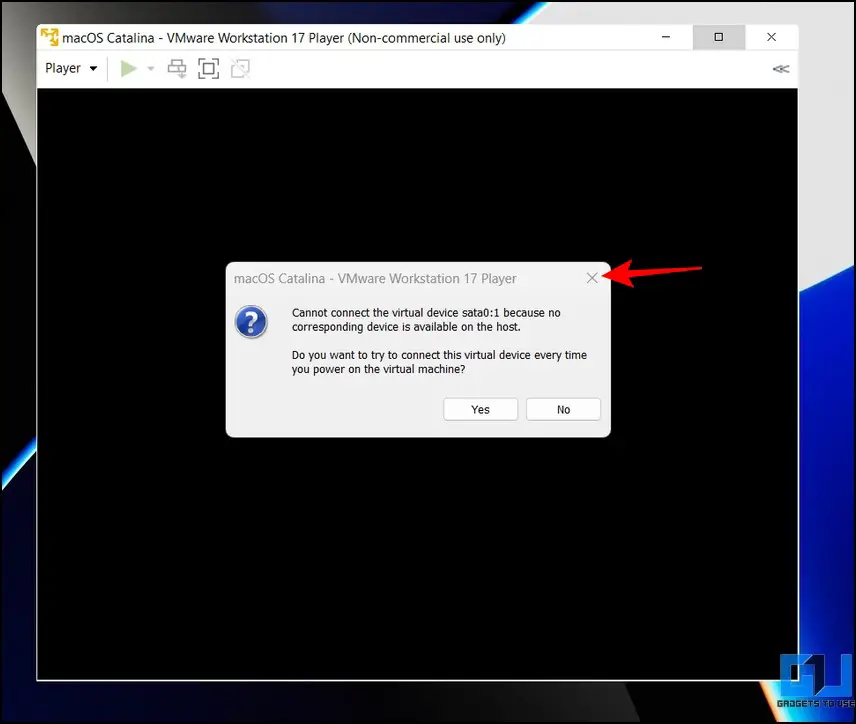
Pro-Tip 2: If you get the ‘cannot connect the virtual device sata0:1 warning, simply close the popup to ignore it.
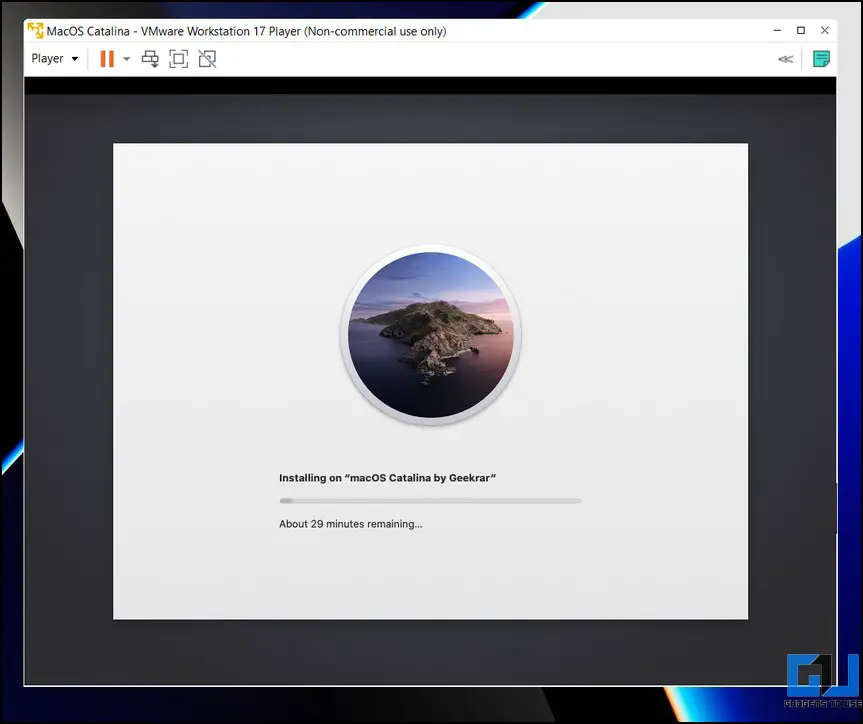
22. You will now boot into macOS Catalina, where you will see the Apple logo.
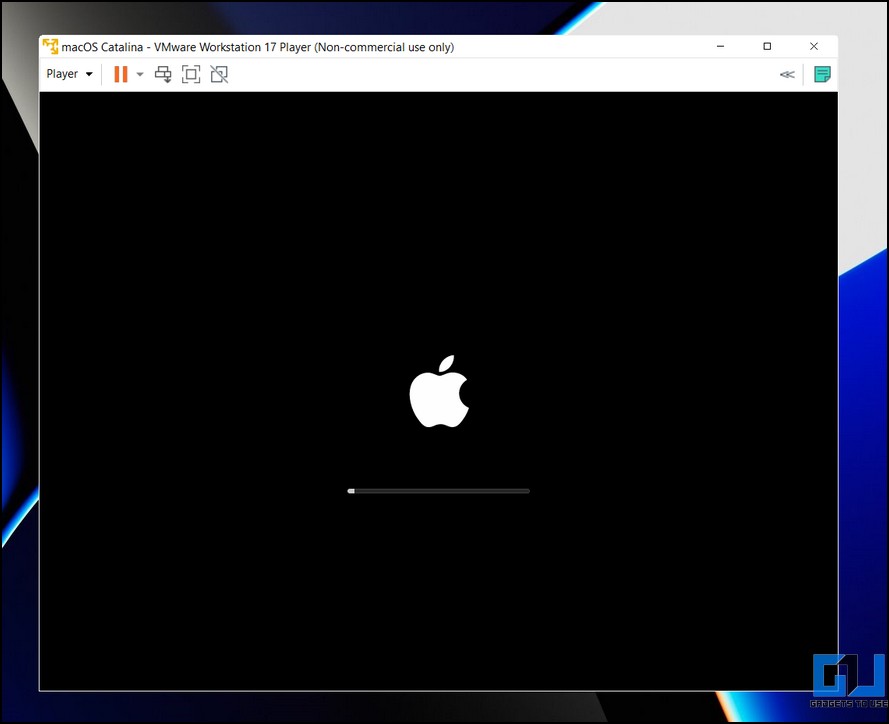
23. Wait a few minutes to let macOS install on the allocated virtual disk. The virtual machine will restart automatically once the installation completes.
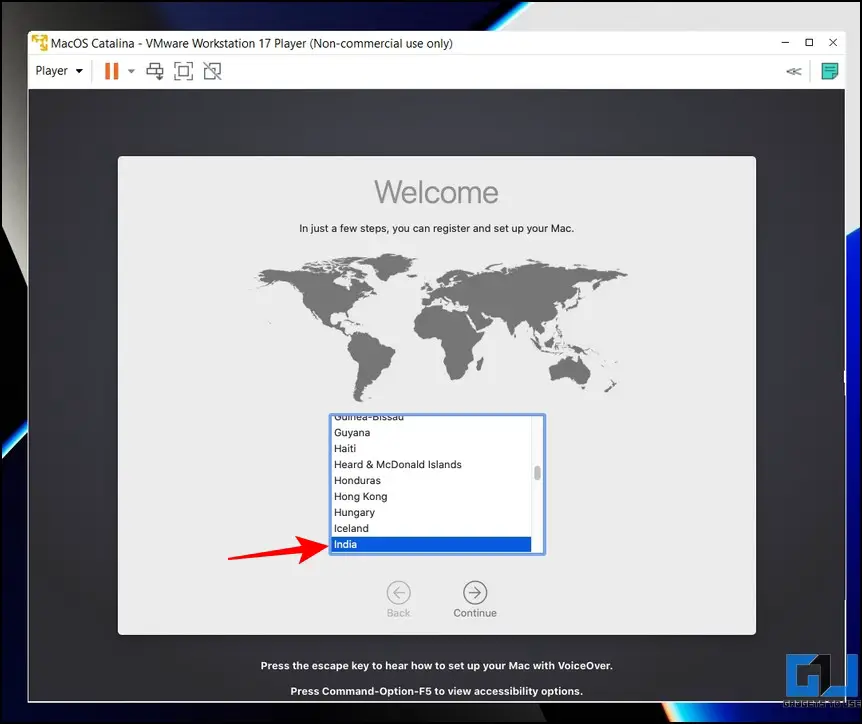
24. After reboot, pick your desired region to set up the macOS. You can also press the Escape key to set up your Mac with Voiceover.
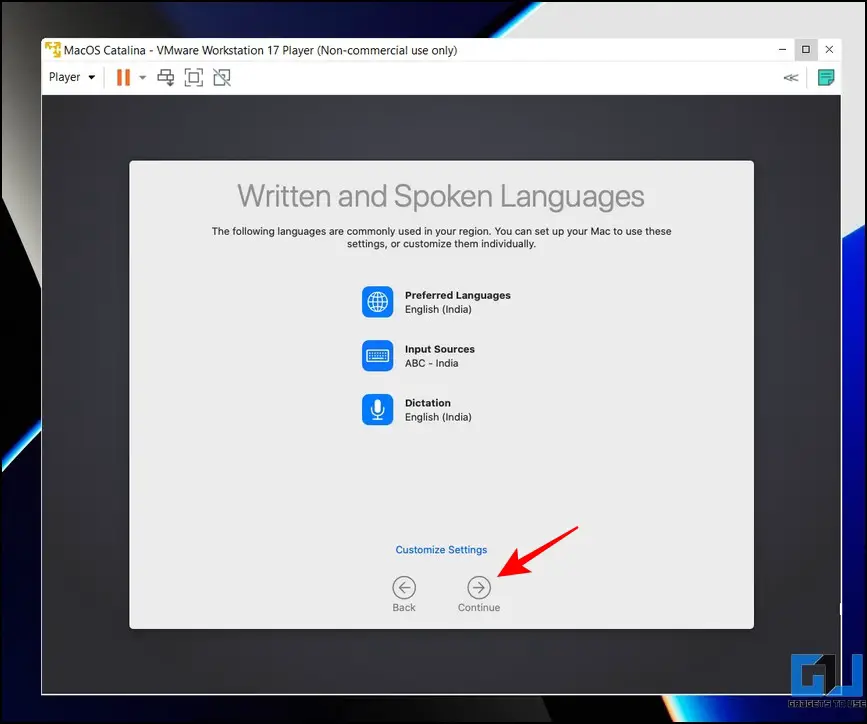
25. Next, pick your written and spoken language and press the Continue button.
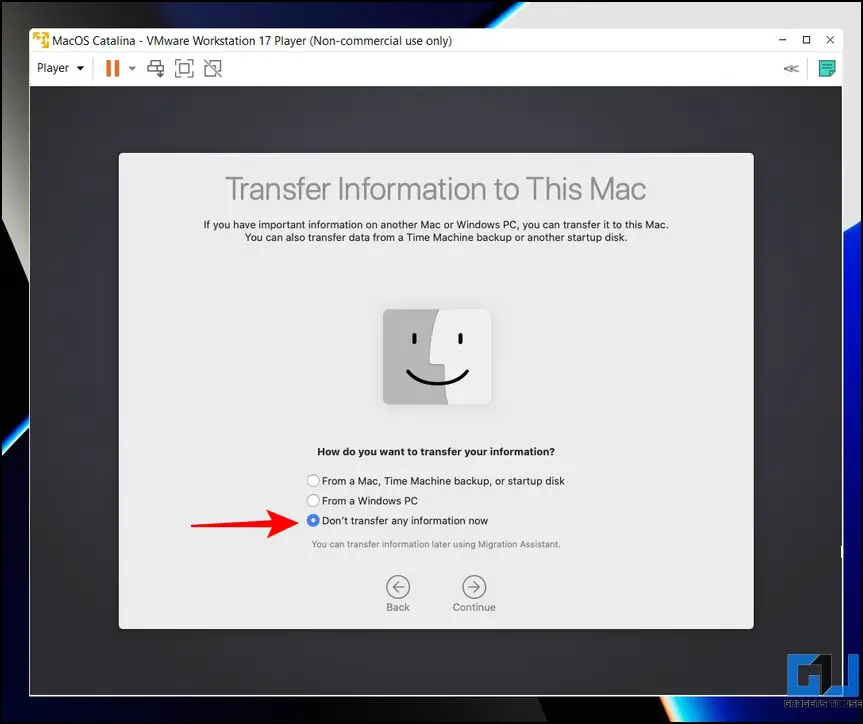
26. You will now see the page to transfer information from your old Macbook or Windows PC. Alternatively, if you desire to set macOS afresh, pick the ‘Don’t Transfer any Information now‘ option.
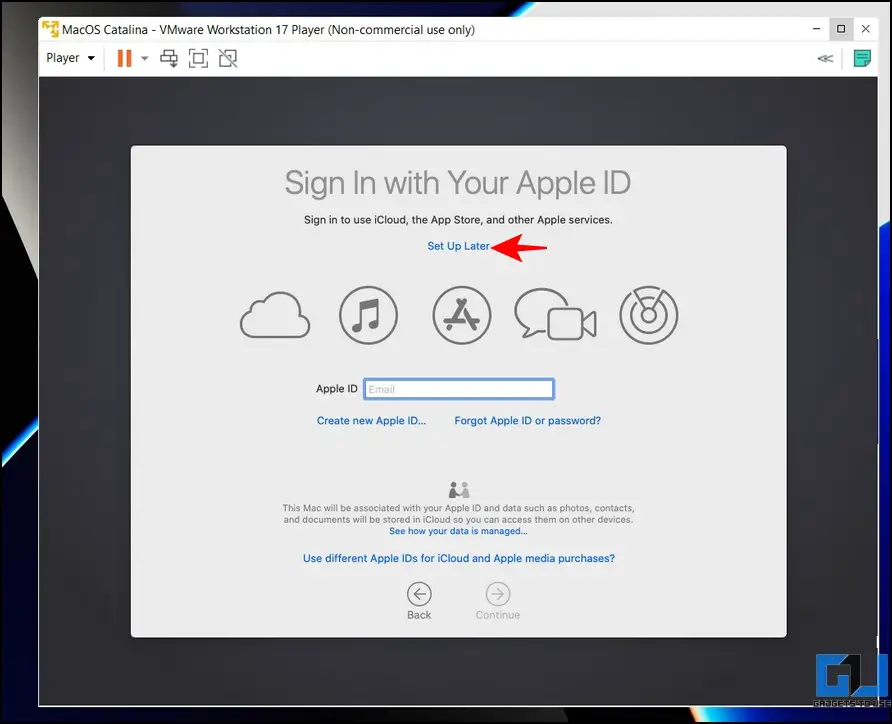
27. Next, skip the option to set up iCloud by clicking the Set Up Later button. (This is because users have often reported issues completing the setup after signing into iCloud during the initial setup. You can sign in to iCloud later after booting the macOS)
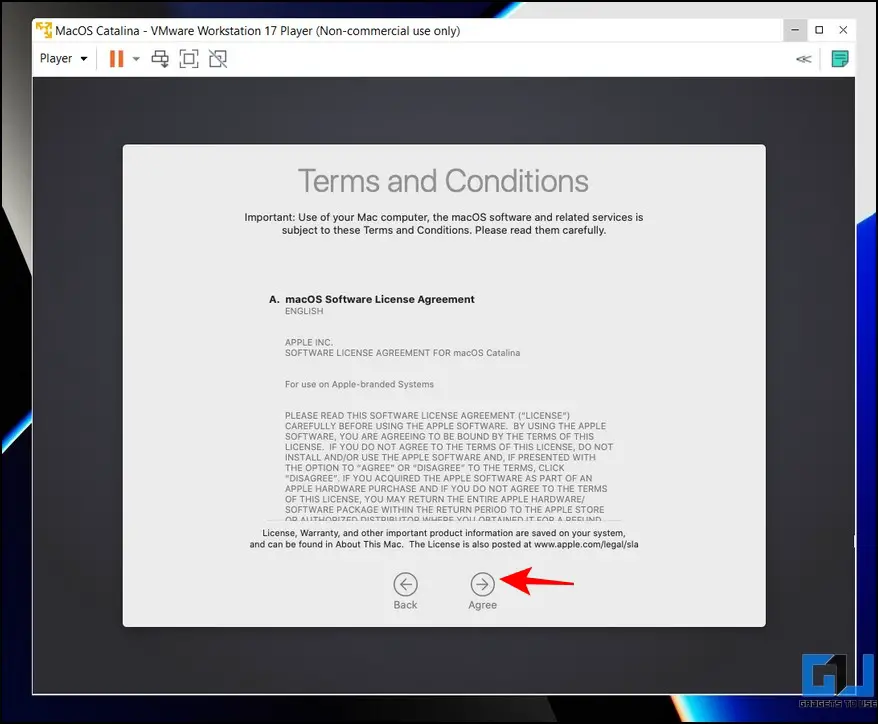
28. On the next page, press the Agree button to accept the Terms and Conditions.
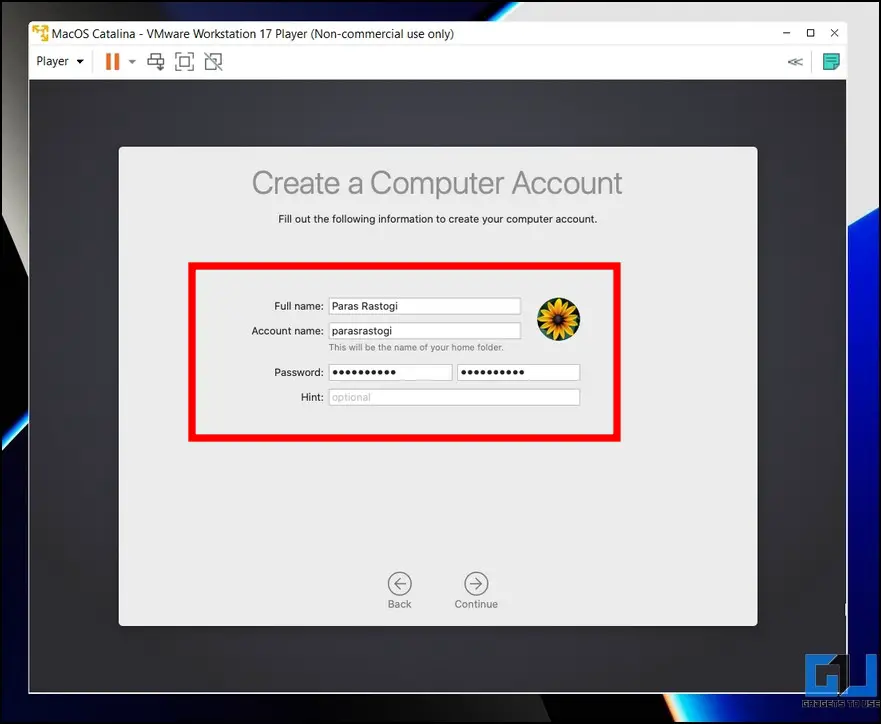
29. Enter your desired Account Name and Password for the virtual machine and hit the Continue button.
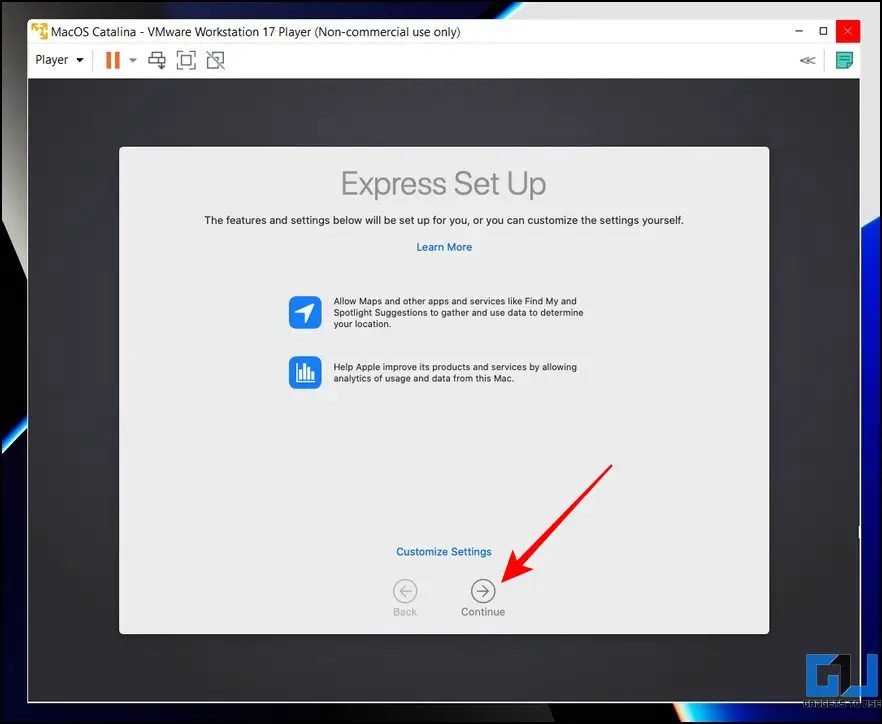
30. Pick Express Setup and press the Continue button. If you wish to customize some features during installation, you can click the Customize Settings button.
31. Select your theme appearance for the macOS and press Continue.

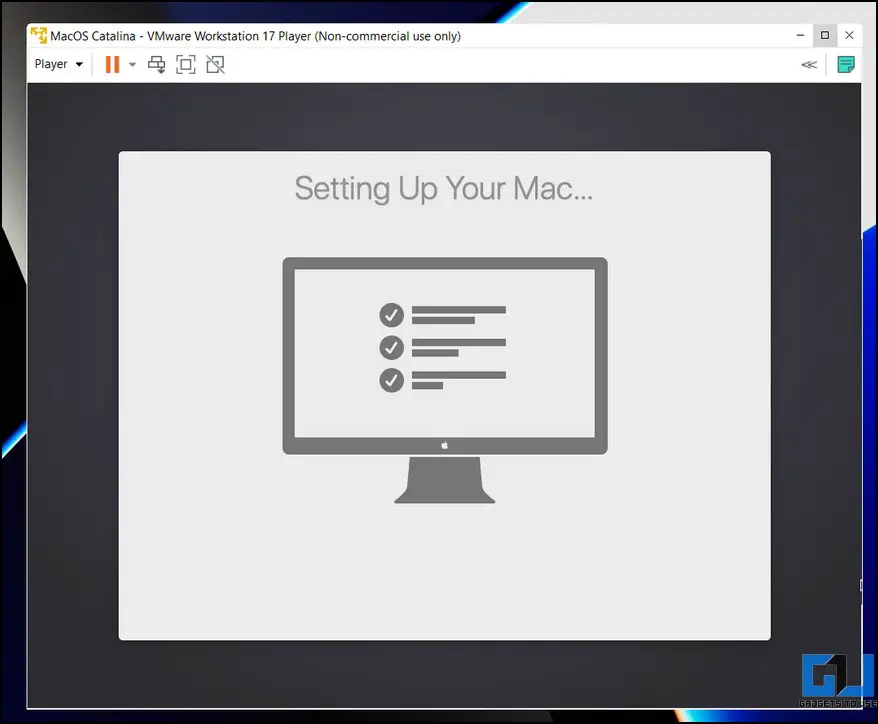
32. That’s it! Wait a few seconds to finalize setting up your Mac.
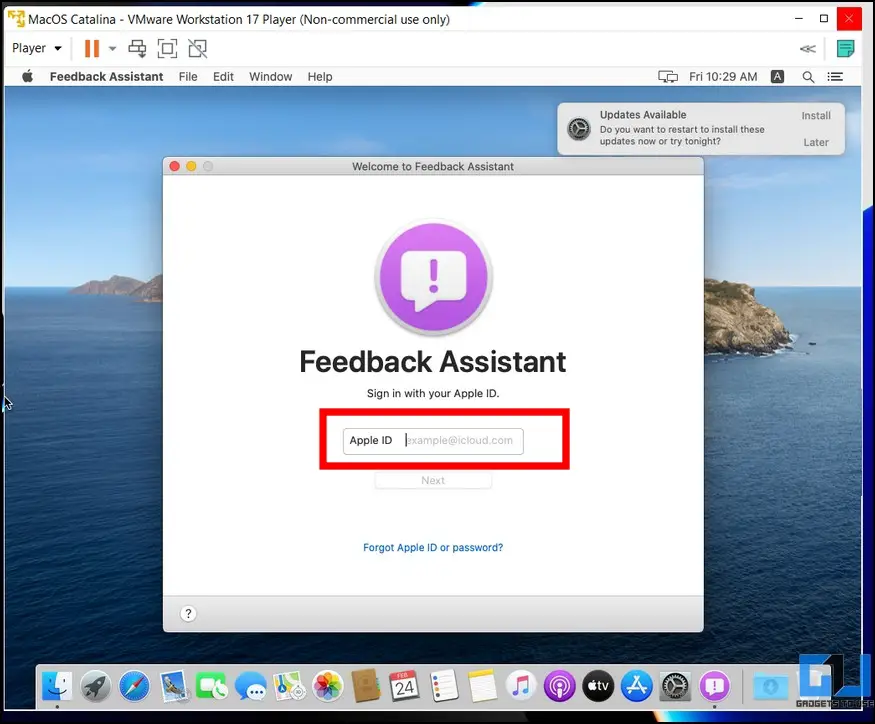
33. Once booted, accept the Feedback Assistant terms and conditions and sign in with your Apple ID to access all iCloud features on your virtual machine.
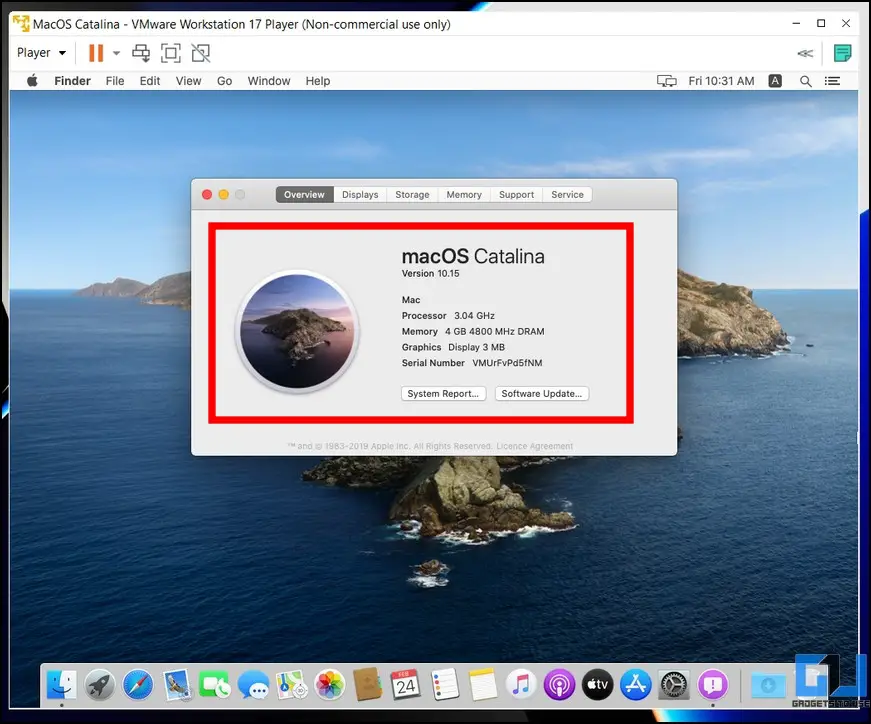
34. Congrats! You’ve successfully installed macOS Catalina on Windows 11/10 using VMware. You can head over to the ‘About this Mac‘ option to see details of your ‘Virtual Mac’.
35. We’ve tested most features of the virtual Mac, and they seem to work fine without any major bugs or crashes. You can also update the system to the latest version by installing the available updates.
Troubleshooting Issues When Installing macOS on Windows
If you’re facing issues while installing macOS Catalina on your Windows PC, we have compiled common error fixes in this section to help you troubleshoot them easily.
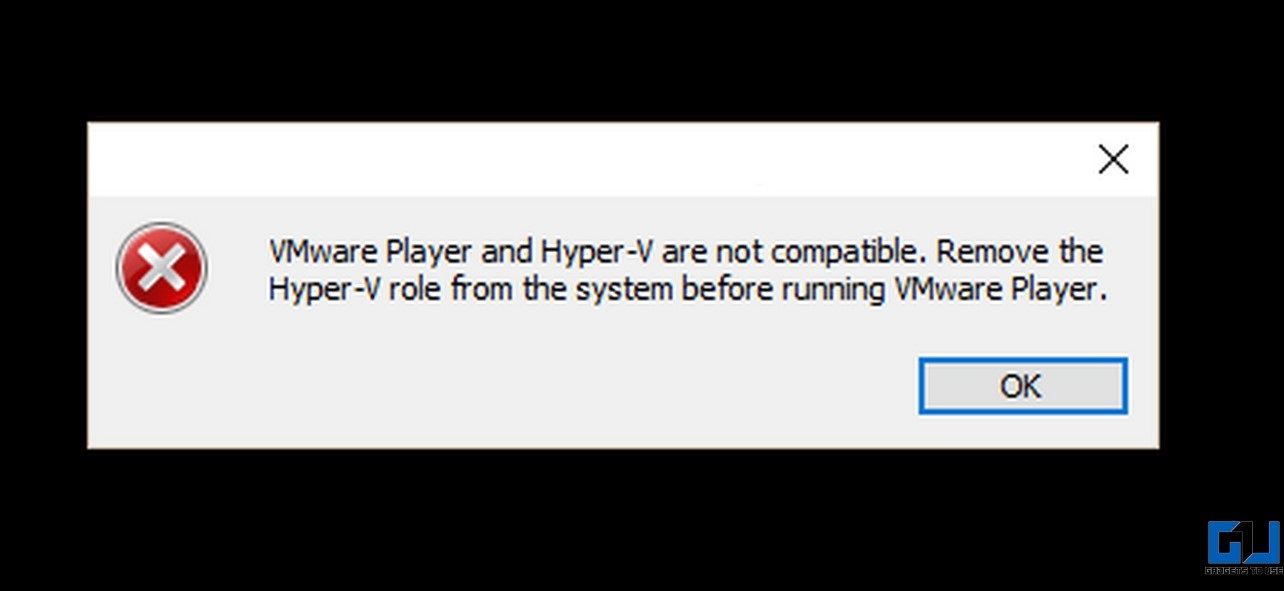
Error 1: VMware Player and Hyper-V are Not Compatible
You need to disable Hyper-V on your system to run the virtual machine on the VMware Workstation Player. Follow the steps in the pre-requisite section above to troubleshoot the same.
Error 2: No Apple MacOS X Option in Virtual Machine Installation Wizard
Download and run the ‘unlocker CMD installation‘ file to patch VMware for adding an entry for Apple Mac OS X while installing the virtual machine. For more details, refer to the pre-requisites section.
Warning 1: Convert Existing Virtual Disk to New Format
Retain the original image format by clicking the ‘Keep Existing Format‘ button. Converting the image to a new format might corrupt it.
Error 3: Vmware Workstation Unrecoverable Error
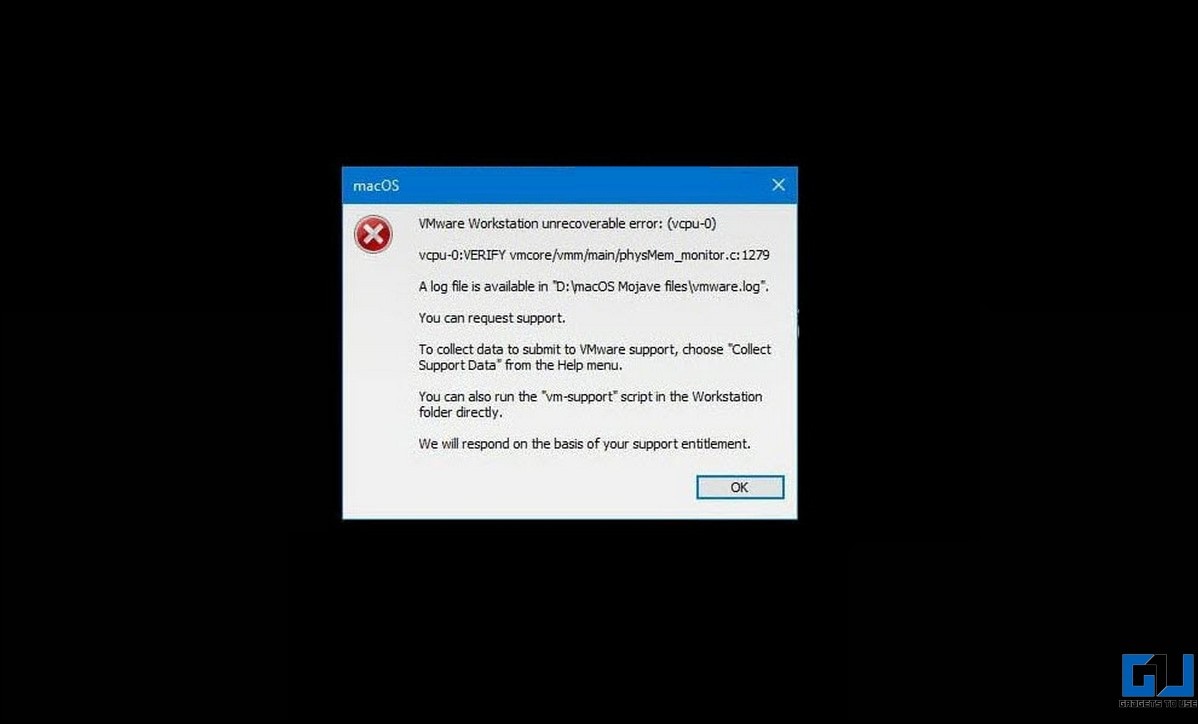
Follow these easy steps to fix the VMware Workstation Unrecoverable error:
1. Head over to your system’s Document> Virtual Machines> MacOS Catalina folder and locate the .vmx file to edit it with Notepad.

2. Next, add the following line at the end and save the changes:
smc.version = “0”

3. Play the Virtual Machine to verify if the issue is fixed.
Warning 2: Can’t connect the Virtual device Sata0:1
The easiest method to eliminate this warning and run the macOS without errors is to ignore it. Simply close the warning popup by clicking the X button.

FAQs
Q: How to install macOS on Windows PC without Mac?
A: You need to create a virtual machine on your Windows PC to install macOS on Windows. Follow the easy steps in this guide to install macOS on your Windows PC.
Q: Can you install macOS on Windows 11?
A: Yes, you need third-party virtualization software such as VMware to create a virtual macOS on Windows 11. For more details, refer to the steps above.
Q: How to install macOS on VMware Workstation Player?
A: Check out VMware installation steps in this explainer to install macOS without errors.
Wrapping Up: Experience macOS without paying a Fortune!
We hope this explainer has assisted you in installing macOS on your Windows 11/10 system. If you find it useful, spread the word with your friends, and check the below links for more helpful articles on macOS. Stay tuned to GadgetsToUse for more such reads.
Also, Read:
- MacOS Ventura Stage Manager Tricks: Hide Recent Apps, Show Desktop Files, and More.
- How to Unblock AirDroid to run on macOS.
- Guide to Install ADB on Your Mac and Connect Android
- How to Install macOS Dynamic Wallpapers on Windows 11/10.
You can also follow us for instant tech news at Google News or for tips and tricks, smartphones & gadgets reviews, join GadgetsToUse Telegram Group, or for the latest review videos subscribe GadgetsToUse Youtube Channel.
Was this article helpful?
YesNo
In this guide, we will show you the steps to install macOS on Windows 10 and hence directly run Mac apps on your PC. It has always been a never-ending debate as to which of the two OS occupies the top spot in the pecking order. In most cases, it ultimately boils down to two factors- the budget and the underlying need. In this regard, as of now the ratio of the Windows users have gained an upper hand over their Mac counterpart.
But even then, there could always arise a need where the former user might have to take a helping hand from the latter one. This situation arises more so in my area of expertise since I have to regularly cover write-ups for both the OS. And this is what gave rise to this article. Today, we will show you the steps to install macOS on your Windows 10 PC that will allow you to run Mac apps as well. So without further ado, let’s get started.
- How to Uninstall Apps on Windows 10 using Command Prompt
- How to Run Linux Commands in Windows 10 [without Virtual Machine]
- Unlock Hardware and Devices Troubleshooter in Windows 10
- How to Enable gpedit.msc Local Group Policy Editor in Windows 10 Home
Table of Contents
Before we list out the instructions, let’s make you aware of the basic requirements that your PC needs to qualify. Do keep in mind that you would still be able to install macOS even if your PC doesn’t qualify these requirements, but it would be quite slow to be used as your daily driver.
Minimum Prerequisites
- A PC or laptop running Windows 10 (might work on Windows 8/7, but I haven’t tested it on those versions).
- Minimum 8GB RAM (For RAM allocation to macOS, make sure not to exceed 50% of your total RAM. For example if you have 8GB RAM, then you could allocate anywhere between 2-4GB).
- 100GB or more free Disk Space (some space will be used by the macOS, others by the apps that you install). You could delete the macOS and regain all your space any time you want.
- A good WiFi connection that could download around 6.5GB of file with ease (6GB is for the macOS ROM, the rest will be used by a couple of other software.
So if that is all well and good, then you may proceed with the below steps to install macOS on your Windows 10 PC.
Downloads
- First off, download Oracle’s Virtual Box for your Windows PC. This is an emulator software that will be used to run macOS onto your Windows setup.
- Next up, download the Virtual Box Extension Pack. This is an add-on that will make it possible for the keyboard and mouse to function on your macOS properly. Likewise, it will also enable support for USB 3.0.
- Finally, download the macOS Catalina Virtual Machine IMG file [Credits: MakeUseOf]. This is the ROM file that will be loaded onto the Virtual Box in order to run the macOS and Mac apps onto your Windows 10 PC.
STEP 1: Install the Required Files
- To being with, launch the Virtual Box setup and proceed with the on-screen instructions to install it onto your PC. Make sure you remember the location as it will be used later on.
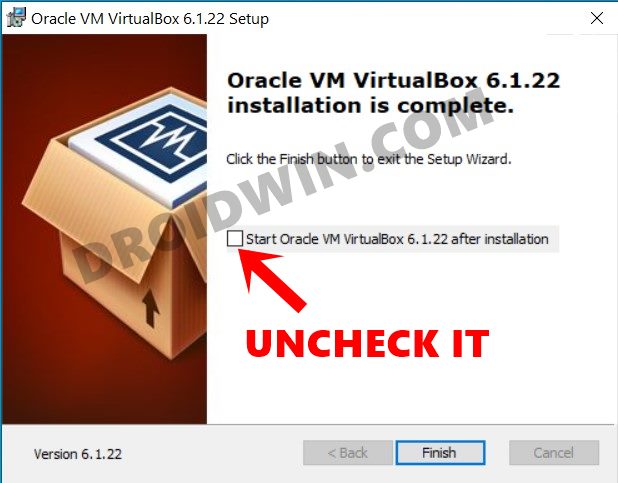
- Once the installation is complete, uncheck the Start Oracle VM VirtualBox option and hit Finish.

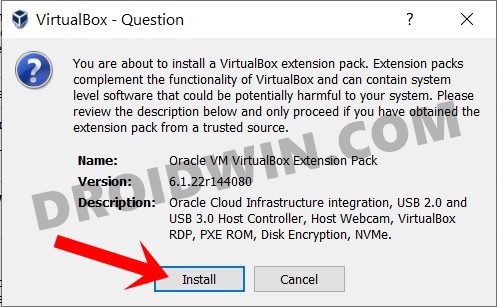
- Now launch the Virtual Box Extension setup and install it onto your PC as well.

- Once that is done, extract the downloaded macOS Catalina Virtual Machine IMG file to your PC.
That’s it, these were the required files that were needed to be downloaded/extracted. You may now proceed with the instructions to run the macOS and Mac apps onto your Windows 10 PC.
STEP 2: Setup Virtual Box for macOS on Windows 10
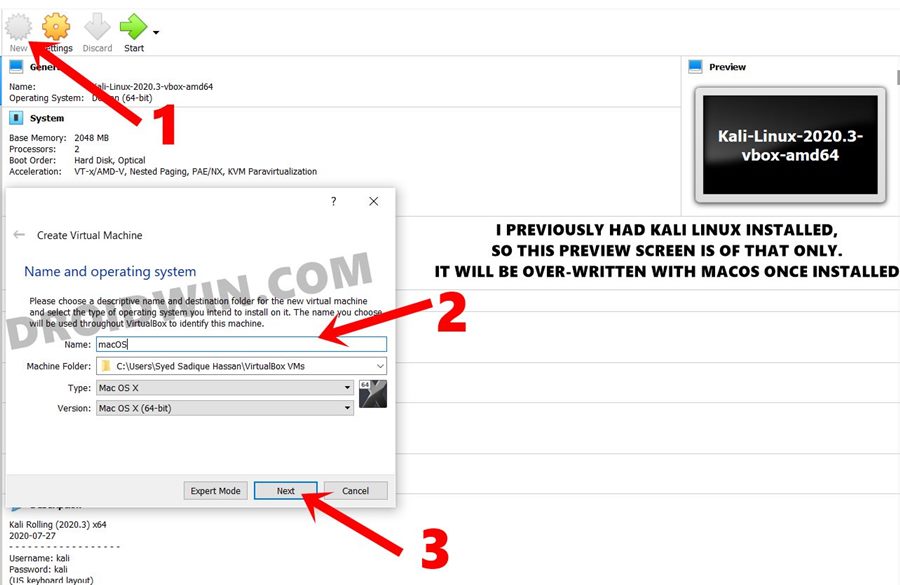
- Launch OracleVM Virtual Box and click on the New button situated at the top menu bar.
- Under Name, type in macOS. Virtual Box will then automatically assign Type and Version.

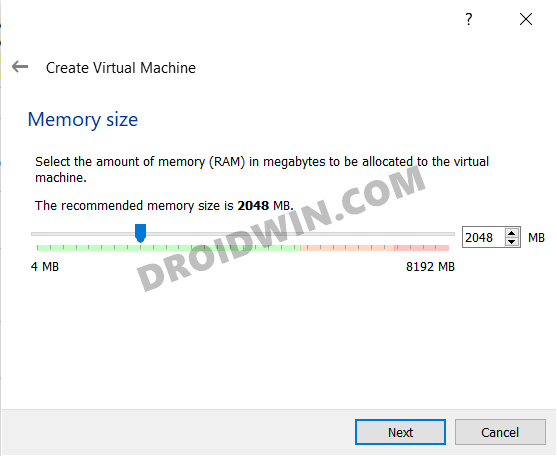
- You will now have to allocate RAM. You may leave it at the recommended level and click Next.

- Under the Hard Disk dialog box, select Use an existing virtual hard disk file. Then click on the Browse icon.
- Click on the Add button in the menu that appears. Then navigate to the downloaded macOS ROM file and select it.

- macOS will now be loaded onto the Virtual Box. Click on Create and wait for the process to complete.

STEP 3: Optimize macOS Catalina Virtual Machine for Windows 10
We will now be tweaking the VM settings so that macOS is able to install and run in the most efficient manner. Follow along.
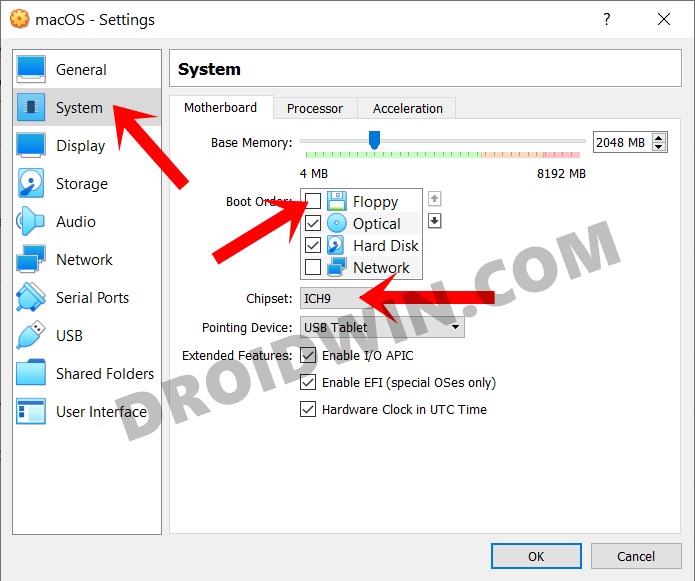
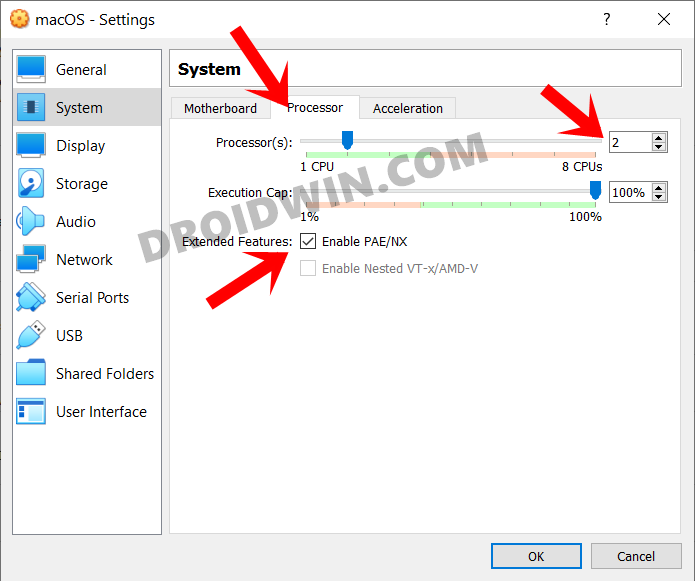
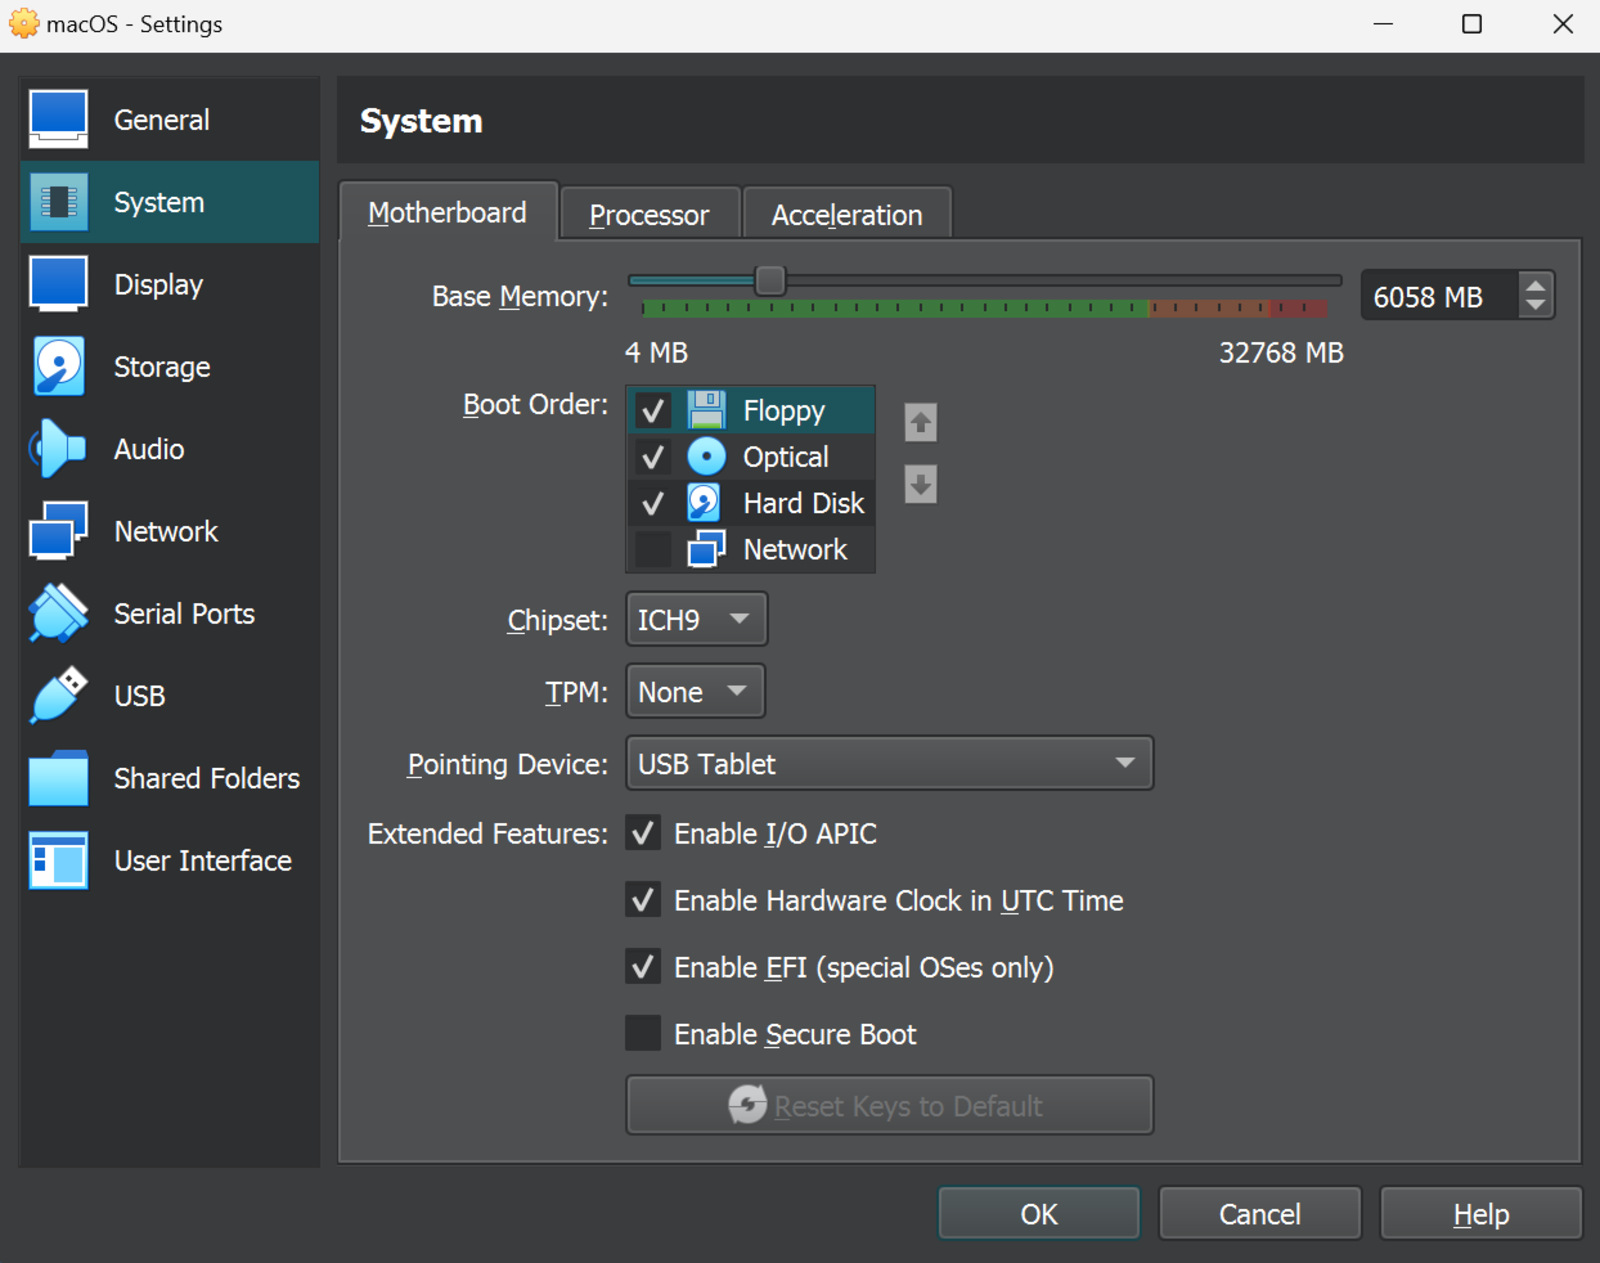
- Go to the System settings and then to the Motherboard tab. From there, uncheck Floppy from the boot order. Likewise, also ensure that the Chipset is set to ICH9.

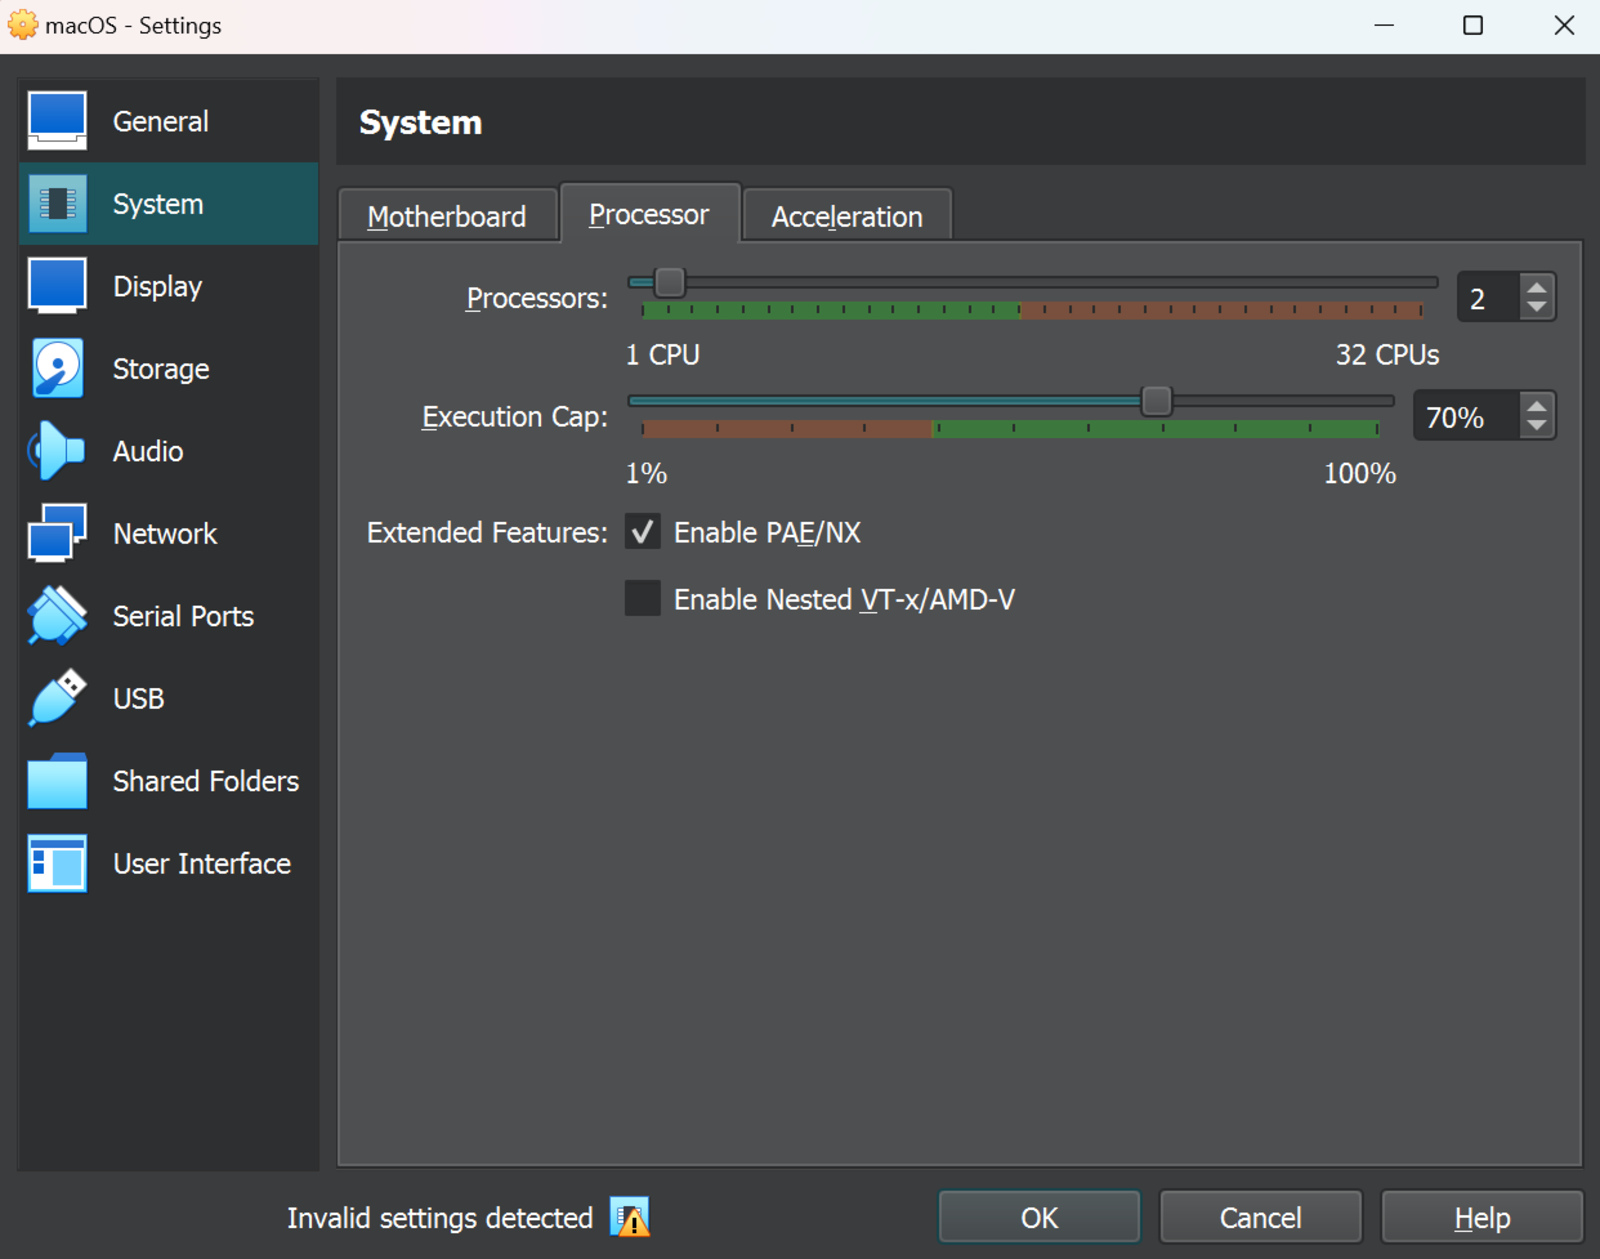
- After that, head over to the Processor tab, drag the arrow marker and assign it two processors. Also, make sure that Enable PAE/NX box is enabled.
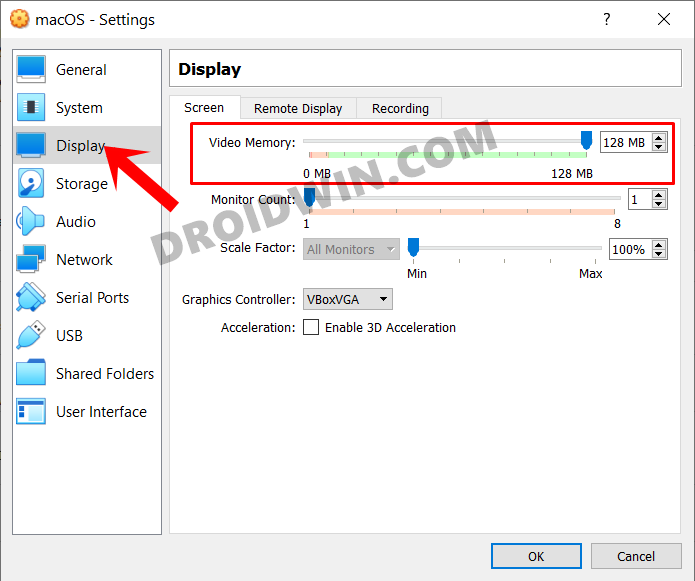
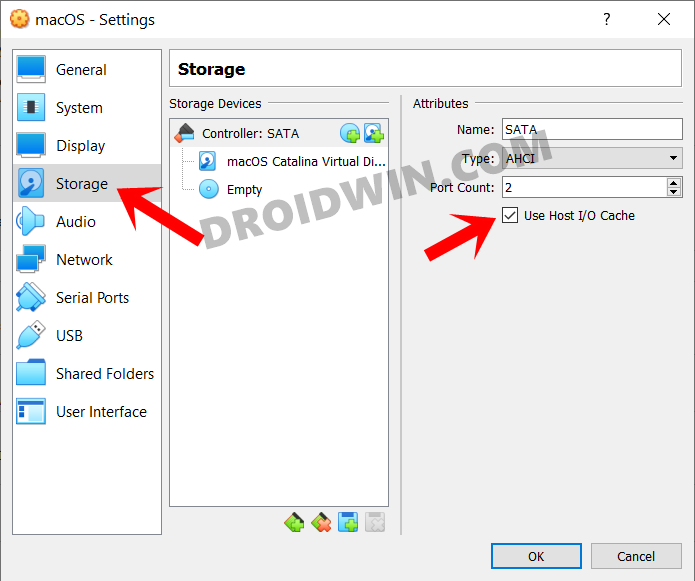
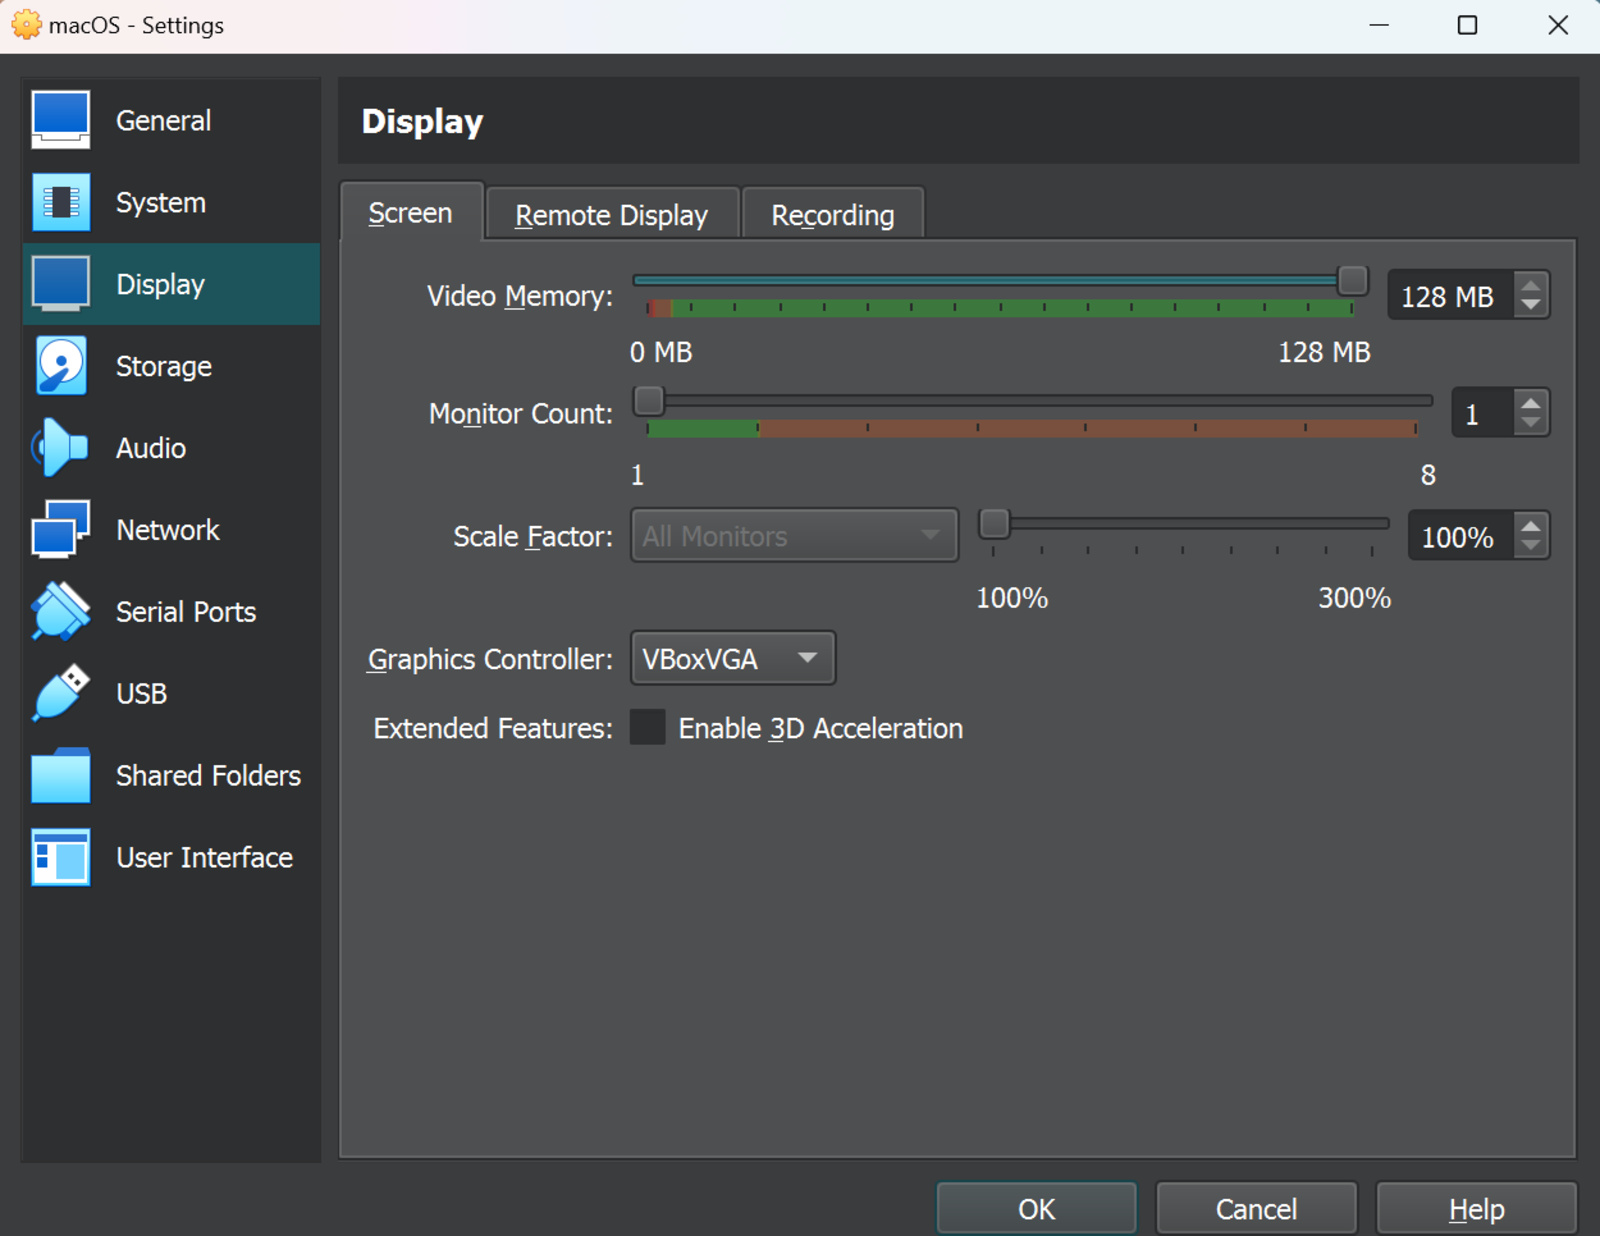
- Now go to the Display section and set Video Memory to 128MB.
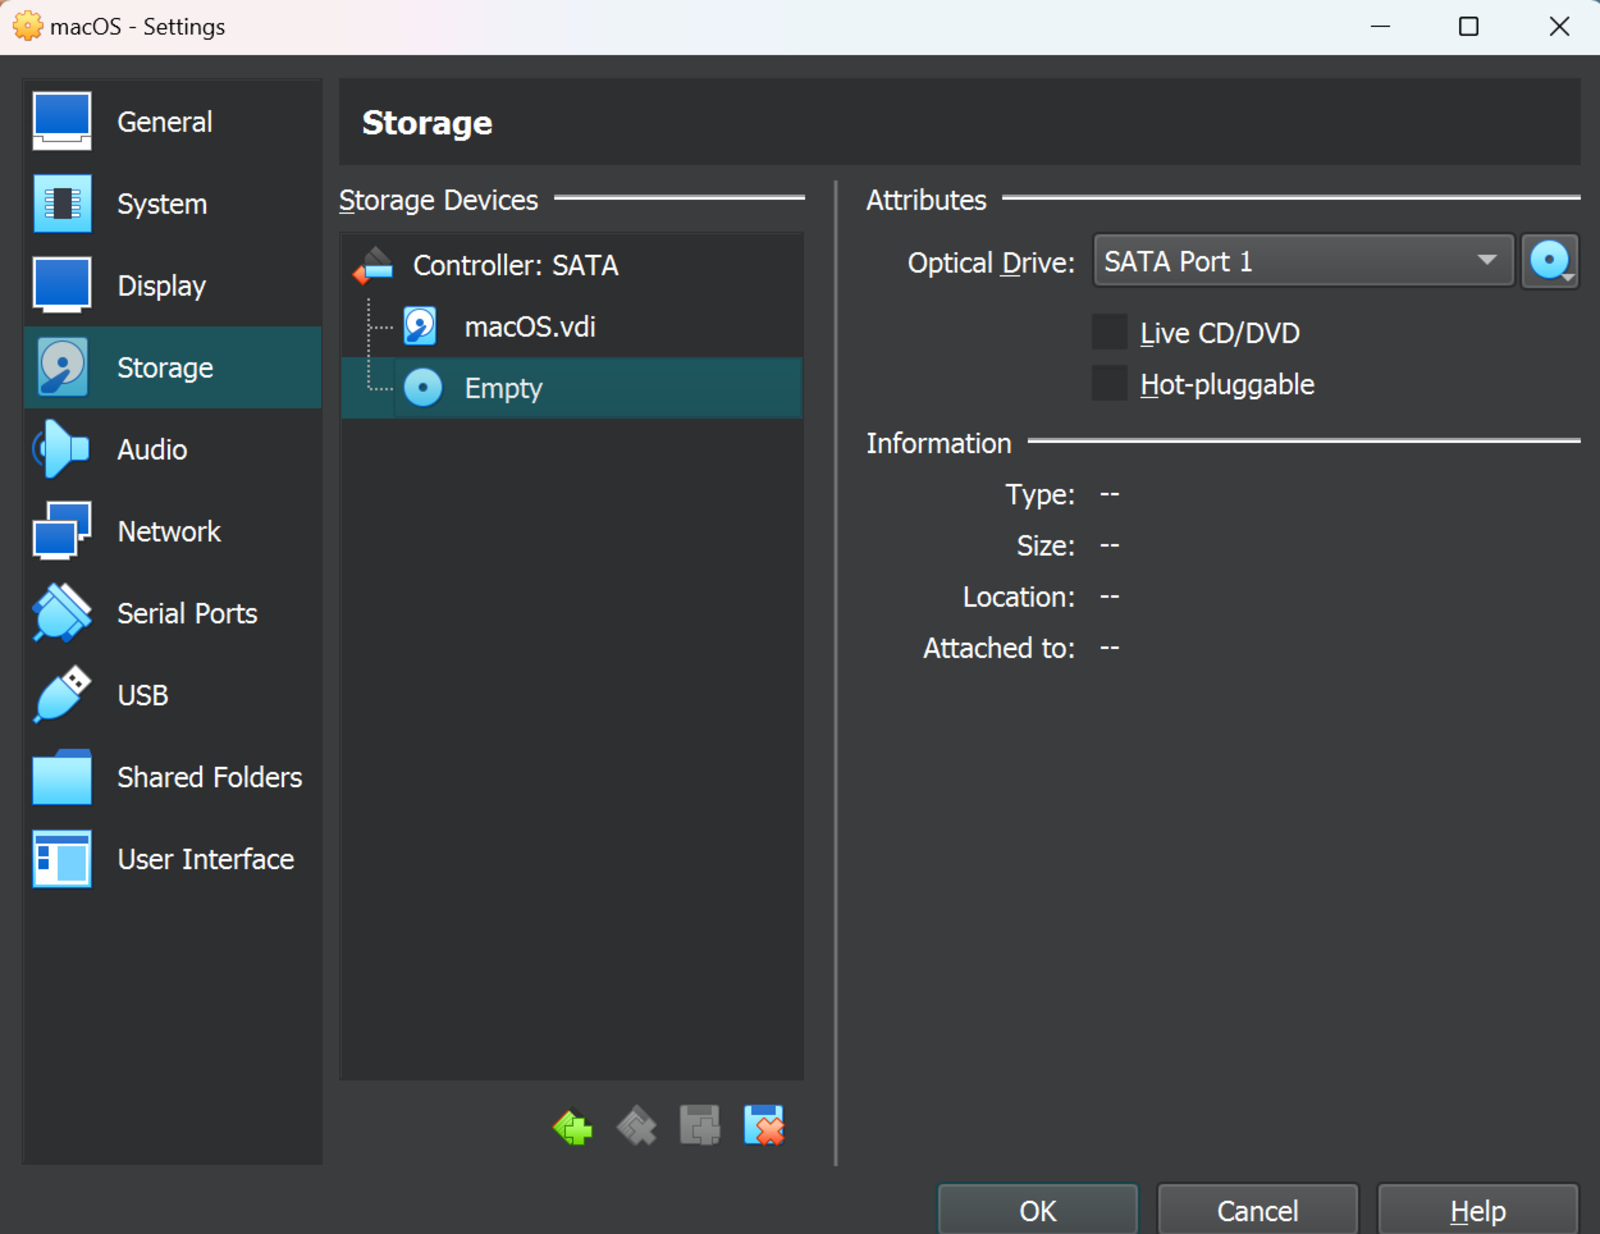
- After that, go to Storage, and enable the Use Host I/O Cache option.
- Finally, head to the USB tab, select USB 3.0, and hit OK.

The setup is now complete as well. Let’s now add a few lines of commands to add the finishing touch that will easily allow you to run macOS and Mac apps onto your Windows 10 PC.
STEP 4: Add Virtual Machine Codes for macOS
- To begin with, close the Virtual Box that it doesn’t conflict with the execution of codes.
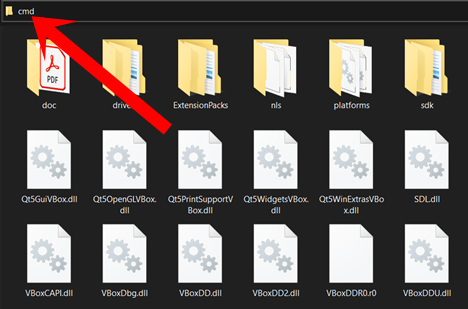
- Then head over to the folder where you have installed Virtual Box.
- Go to that folder’s address bar, type in CMD, and hit Enter. This shall launch the Command Prompt window:

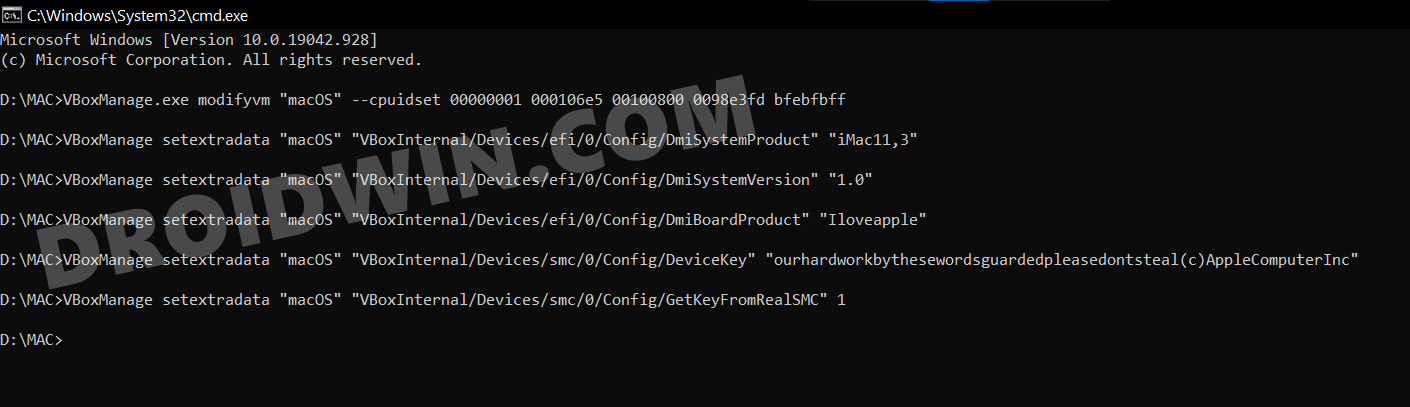
- Now execute the following six commands inside this CMD window one at a time. Make sure to write the correct name under double inverted commas (in our case, it is macOS):
VBoxManage.exe modifyvm "macOS" --cpuidset 00000001 000106e5 00100800 0098e3fd bfebfbff
VBoxManage setextradata "macOS" "VBoxInternal/Devices/efi/0/Config/DmiSystemProduct" "iMac11,3"
VBoxManage setextradata "macOS" "VBoxInternal/Devices/efi/0/Config/DmiSystemVersion" "1.0"
VBoxManage setextradata "macOS" "VBoxInternal/Devices/efi/0/Config/DmiBoardProduct" "Iloveapple"
VBoxManage setextradata "macOS" "VBoxInternal/Devices/smc/0/Config/DeviceKey" "ourhardworkbythesewordsguardedpleasedontsteal(c)AppleComputerInc"
VBoxManage setextradata "macOS" "VBoxInternal/Devices/smc/0/Config/GetKeyFromRealSMC" 1

- Once all six commands have been executed, you may close the CMD window.
STEP 5: Boot your Windows 10 PC to macOS
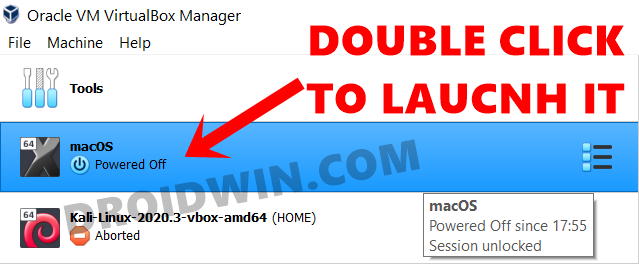
- It’s now time to put all our efforts to test! So launch the Virtual Box software and double click on the macOS virtual machine from the left menu bar to start it.

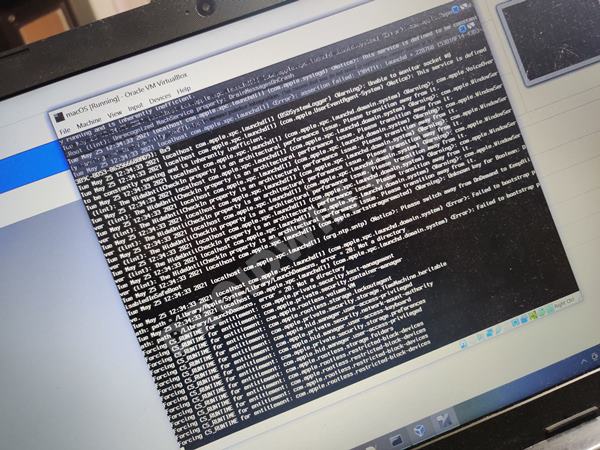
- It will now run a few lines of codes and then the installation process will start. It could take around 15-20 minutes for the installation to complete.

- That’s it, the process stands complete. You may now download and install the desired app onto your macOS that is running on your Windows 10 PC.
STEP 6: Shutdown macOS Virtual Machine on Windows 10
- If you are done using macOS and want to close it, then don’t directly shut down your Windows PC.
- Rather you will first have to shutdown macOS. For that, click on the Apple logo situated at the top right and select ShutDown.
- Mac will now close down, followed by the Virtual Machine. You may then shut down your Windows PC if required.
So on that note, we conclude this guide on how you could install macOS and run Mac apps onto your Windows 10 PC. If you have any queries concerning the aforementioned steps, do let us know in the comments. We will get back to you with a solution at the earliest.

It’s no secret that macOS and Windows are two very different operating systems. While most apps are available on both systems, certain apps, such as Xcode and Final Cut Pro, remain exclusive to Apple. This puts Windows users at a disadvantage, as they are barred from using these services. However, instead of spending thousands of dollars on a new MacBook, you can actually run macOS on your Windows PC using virtualization. This article will guide you through the necessary steps to set up macOS in no time.
What is Virtualization?
To put things into perspective, virtualization refers to running a new operating system in a virtual box within another OS. This allows users to use both operating systems simultaneously without manually switching between the two. However, it is important to note that since both operating systems share the same resources, your PC needs to have at least 8GB of RAM and a 4-core processor.
Now that we have the requirements out of the way, we need to choose virtual machine software to install macOS on. While there are several options available, we have chosen VirtualBox for this tutorial since it is the easiest to set up and manage.
Step 1: Download VirtualBox and its extension
Fortunately, the installation process is simple. Users need to:
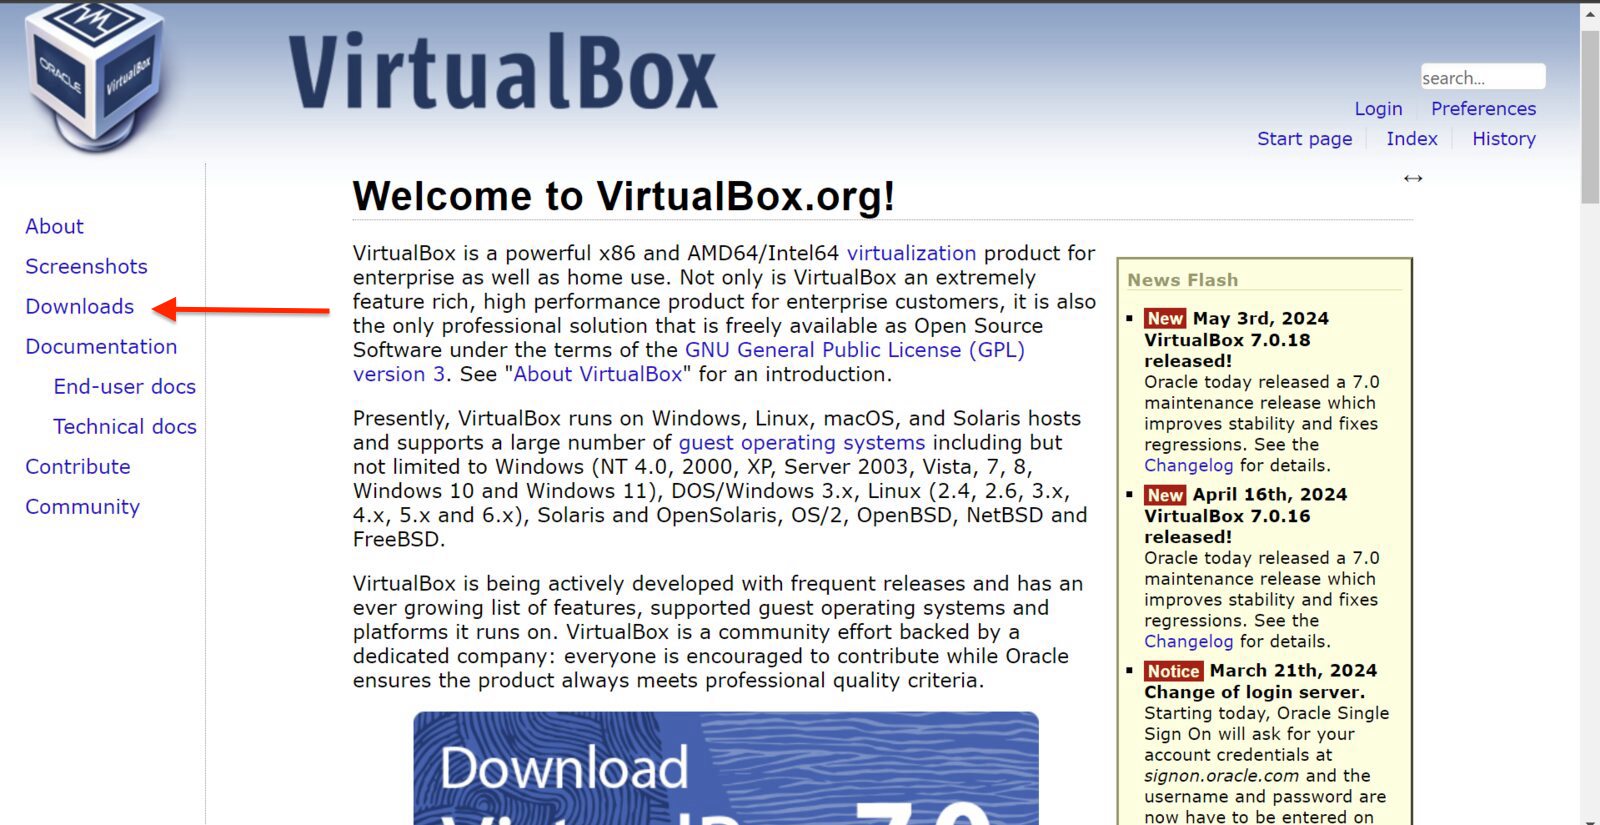
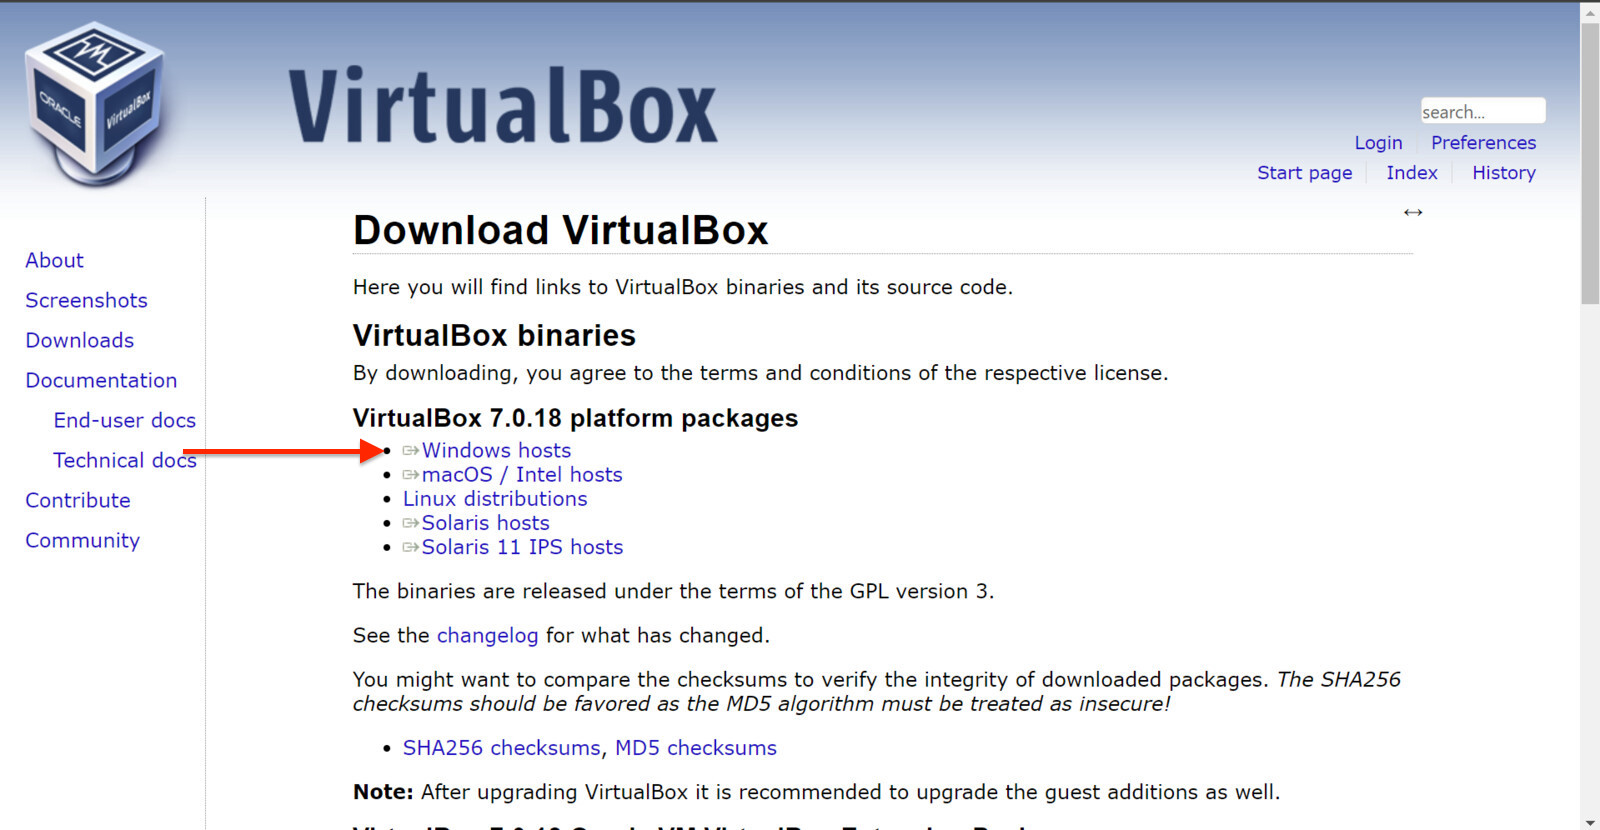
- Go to the VirtualBox website.
- Click on the “Downloads” section.

- Tap the “Windows Host” link and download the software.

- Open the downloaded file and set up VirtualBox.
Since we will install the latest macOS version, we must also download the VirtualBox extension pack. To do this:
- Head back to the VirtualBox website.
- Navigate to the “Downloads” section.
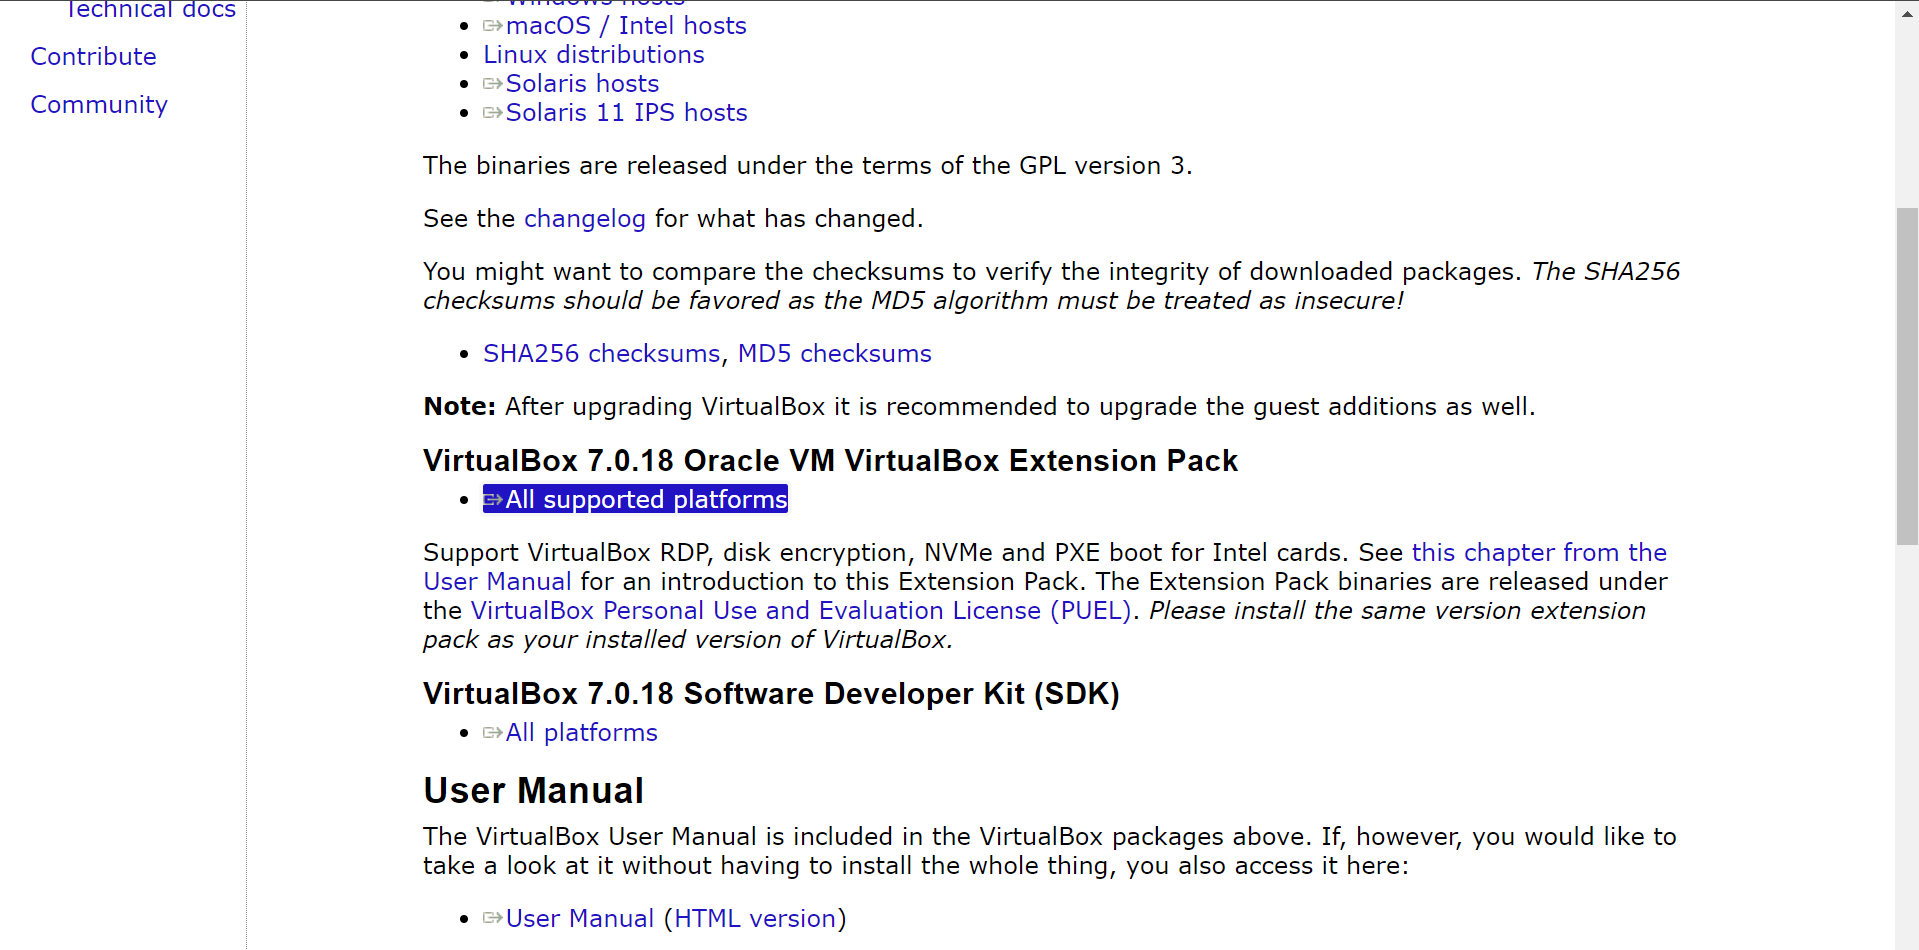
- Download the extension pack under the “VirtualBox 7.0.18 Oracle VM VirtualBox Extension Pack” heading.

- Open the VirtualBox app.
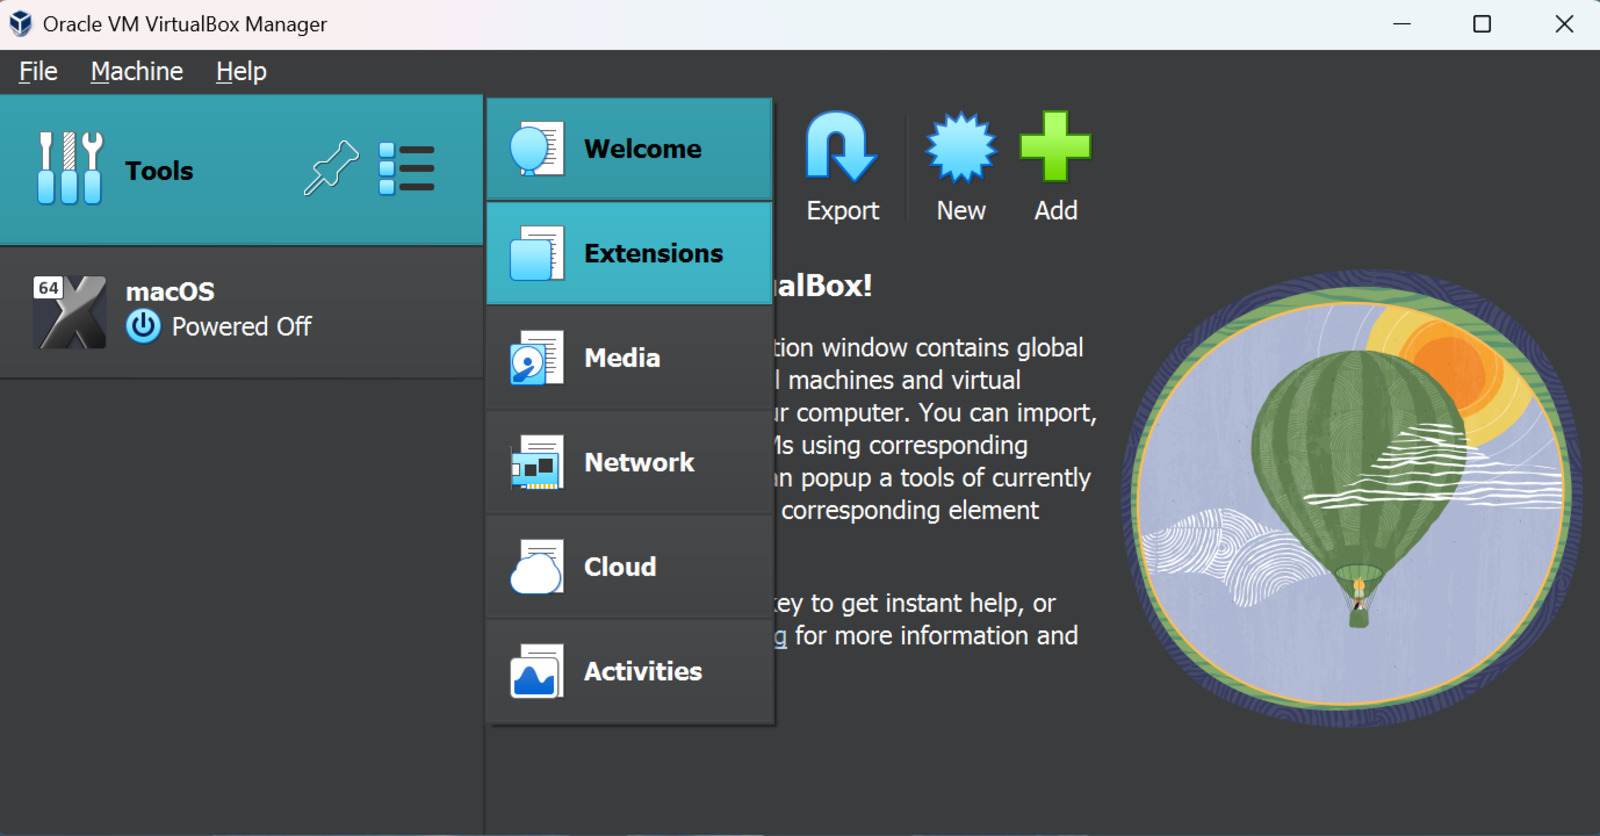
- Click on the menu icon beside the “Tools” button.
- Select “Extensions” from the drop-down menu.

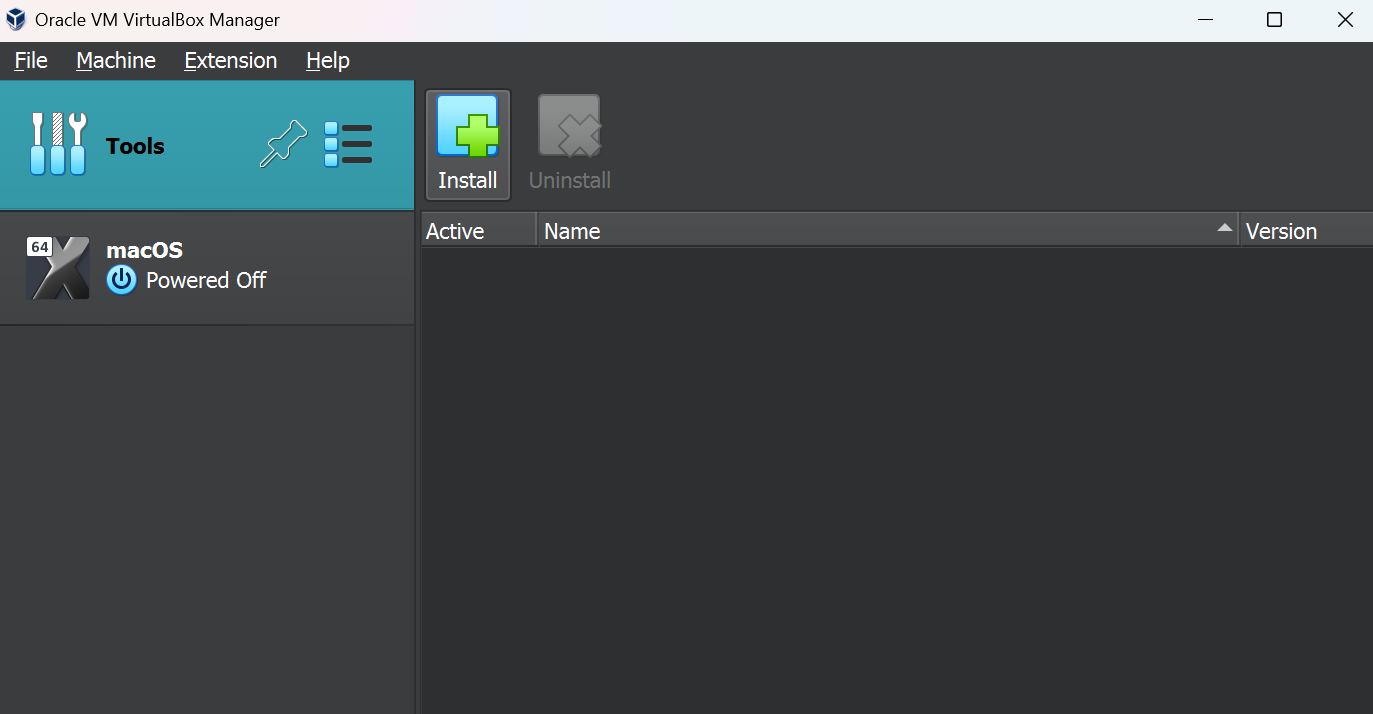
- Click on “Install.”

- Locate your installed file.
- Go through the setup process.
Step 2: Download macOS Sonoma
People familiar with emulation know there are a couple of ways to get an ISO file. To begin with, one can use a MacBook to get the latest ROM, but this requires access to a macOS machine, which defeats the purpose of installing macOS on Windows. Therefore, websites like the Internet Archive are a logical way to get a macOS ISO file. Here is how:
- Head over to this website.

- Download the Zip file. It may take a while, depending on your internet connection.
- Unzip the ISO file and save it to a convenient location.

Step 3: Set up VirtualBox
After downloading the macOS file, the next step is to import macOS to the VirtualBox application. Here is how:
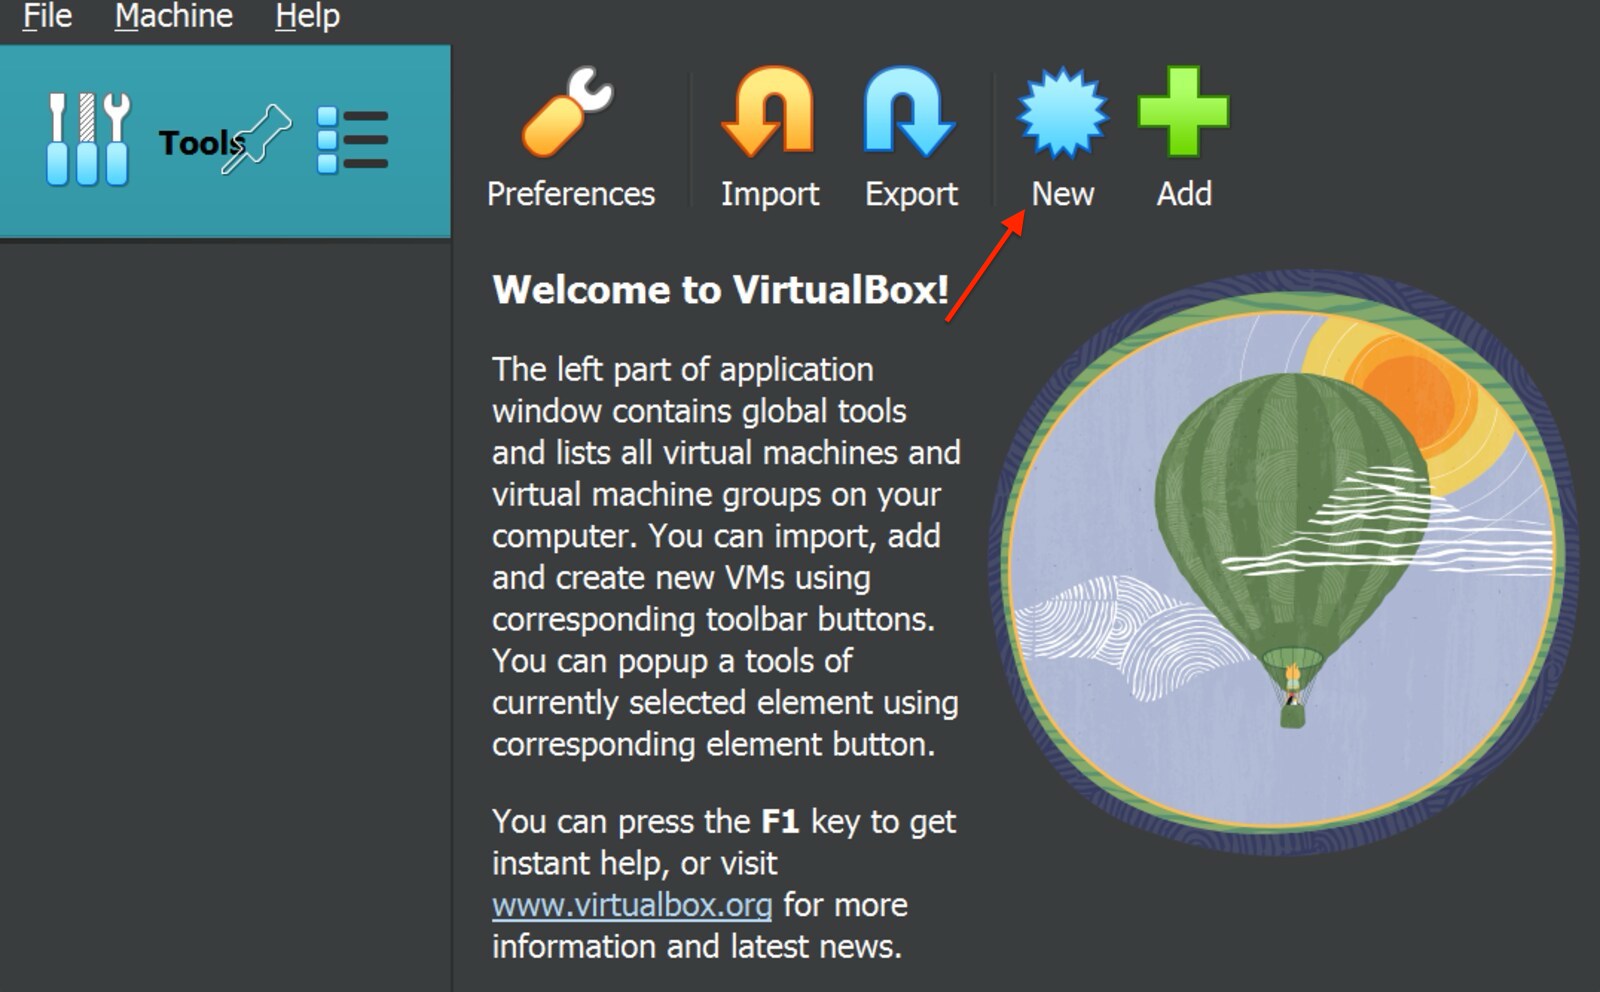
- Open the VirtualBox app.
- Click the “New” button at the top.

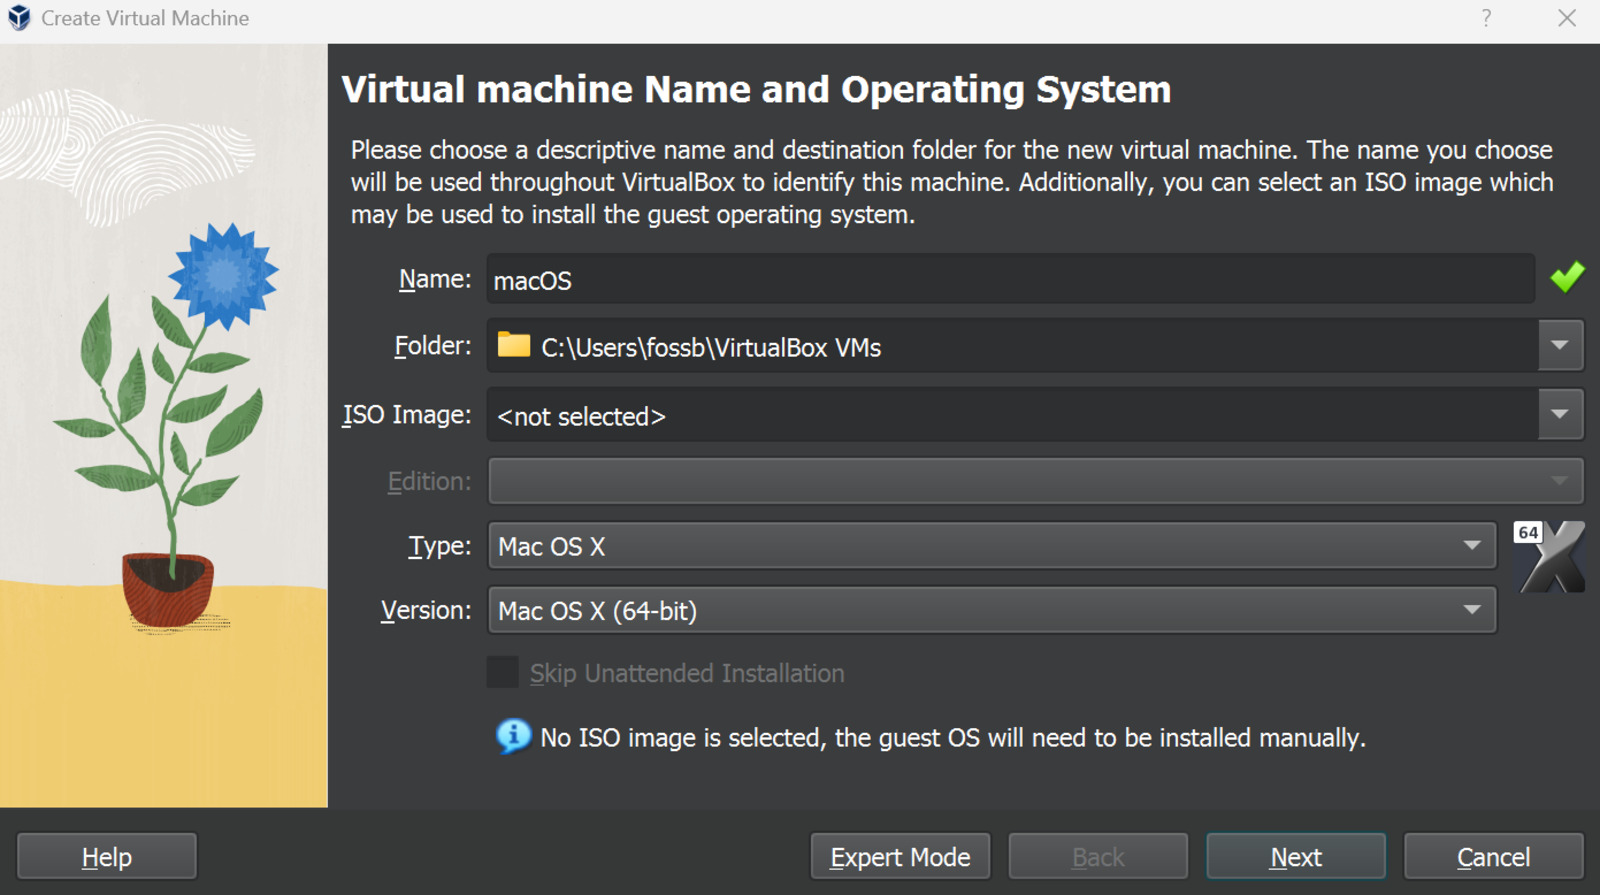
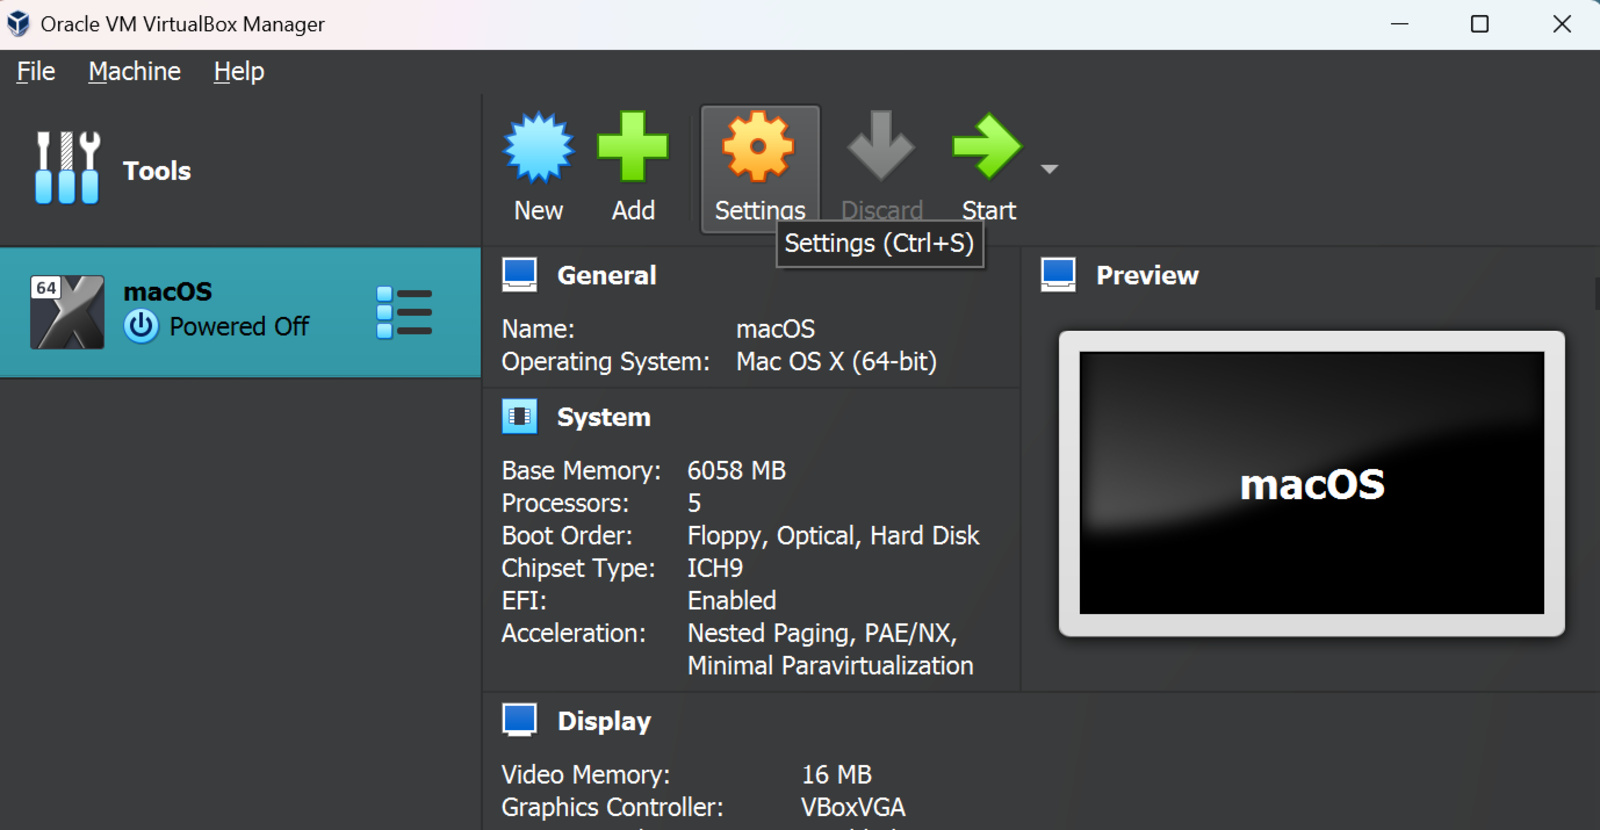
- In the dialog box, give a suitable name for your OS. We have chosen “macOS” for this example.
- After typing the name, the Type and Version options should be filled out automatically. If not, select “Mac OS X” for the Type and “Mac OS X (64-bit)” for the Version.

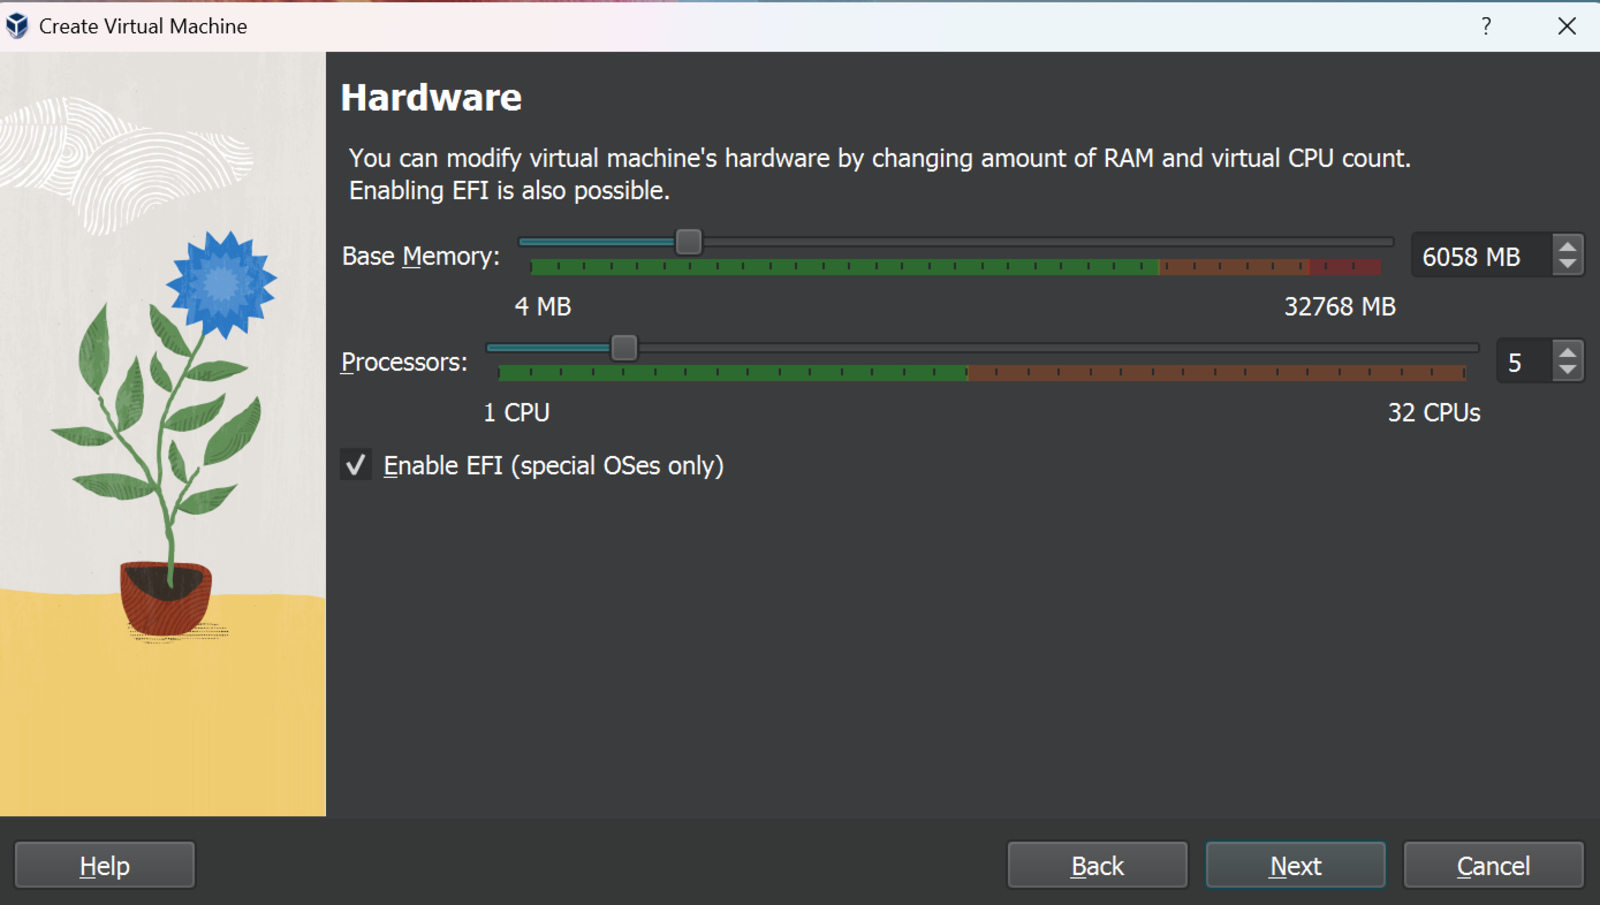
- Allocate the desired memory and CPU cores to the macOS file. If unsure, we recommend at least 4GB of RAM and two cores.

- Click “Next.”
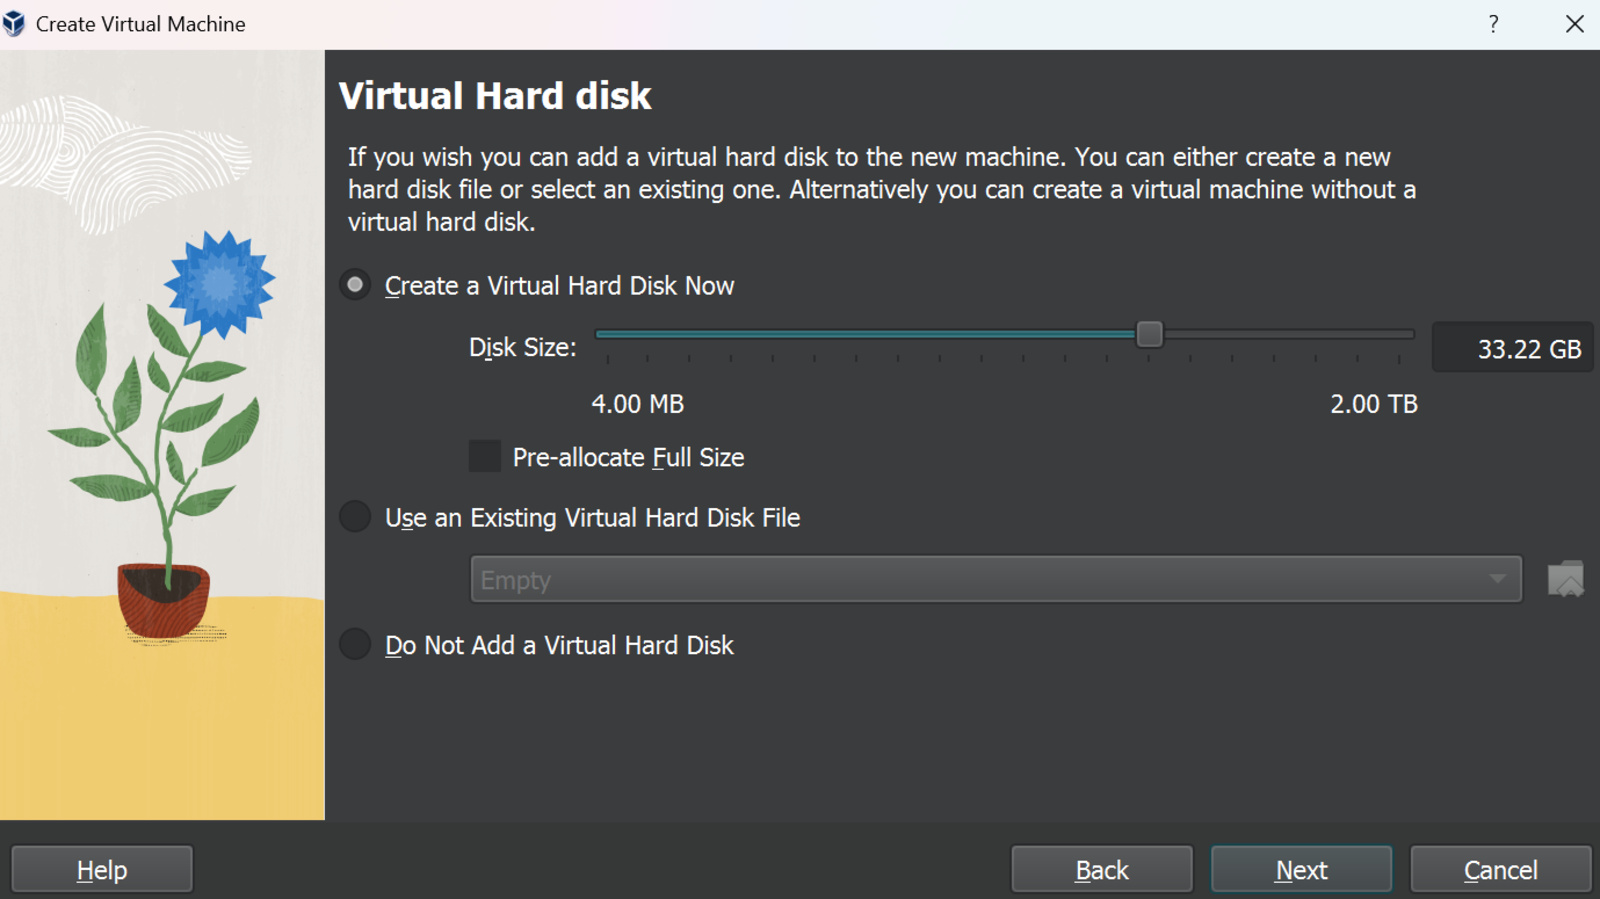
- Configure the hard drive space for macOS on the following page. We recommend at least 35GB.

- Click “Finish.”
Step 4: Configure VirtualBox Settings
Before starting our macOS virtual machine, there are some settings we need to change to ensure a smooth experience:
- In the VirtualBox app, open the “Settings” section.
- Change the motherboard chipset to “ICH9” in the System pane and check the “Enable EFI” box.

- Change the processor count to two and set the “Execution Cap” to 70%.

- In the “Display” section, set the video memory to “128 MB.”

- Navigate to the “Storage” section and select the “Empty” option.

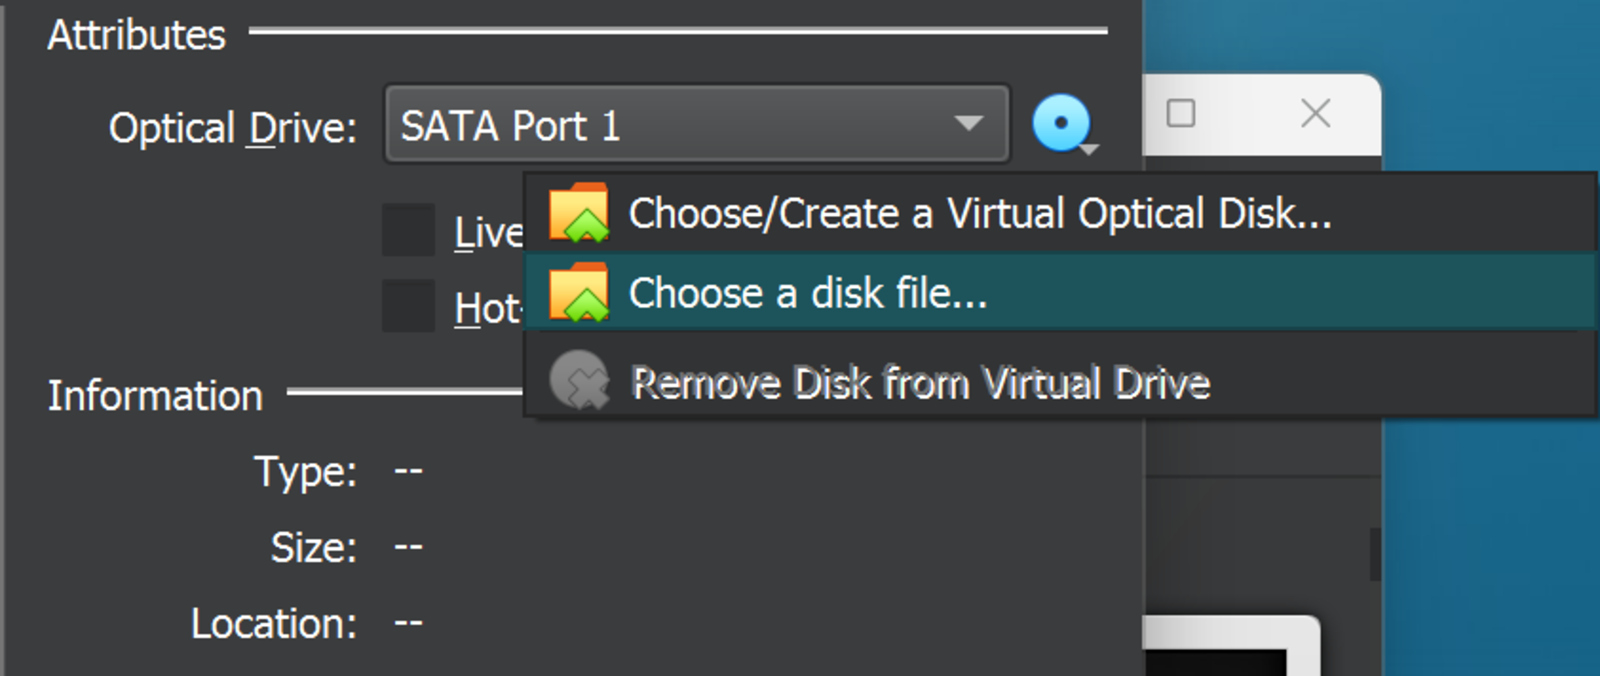
- Tap the blue dot next to “Optical Drive” and select the “Choose a file” option.

- Locate and select your downloaded macOS file.
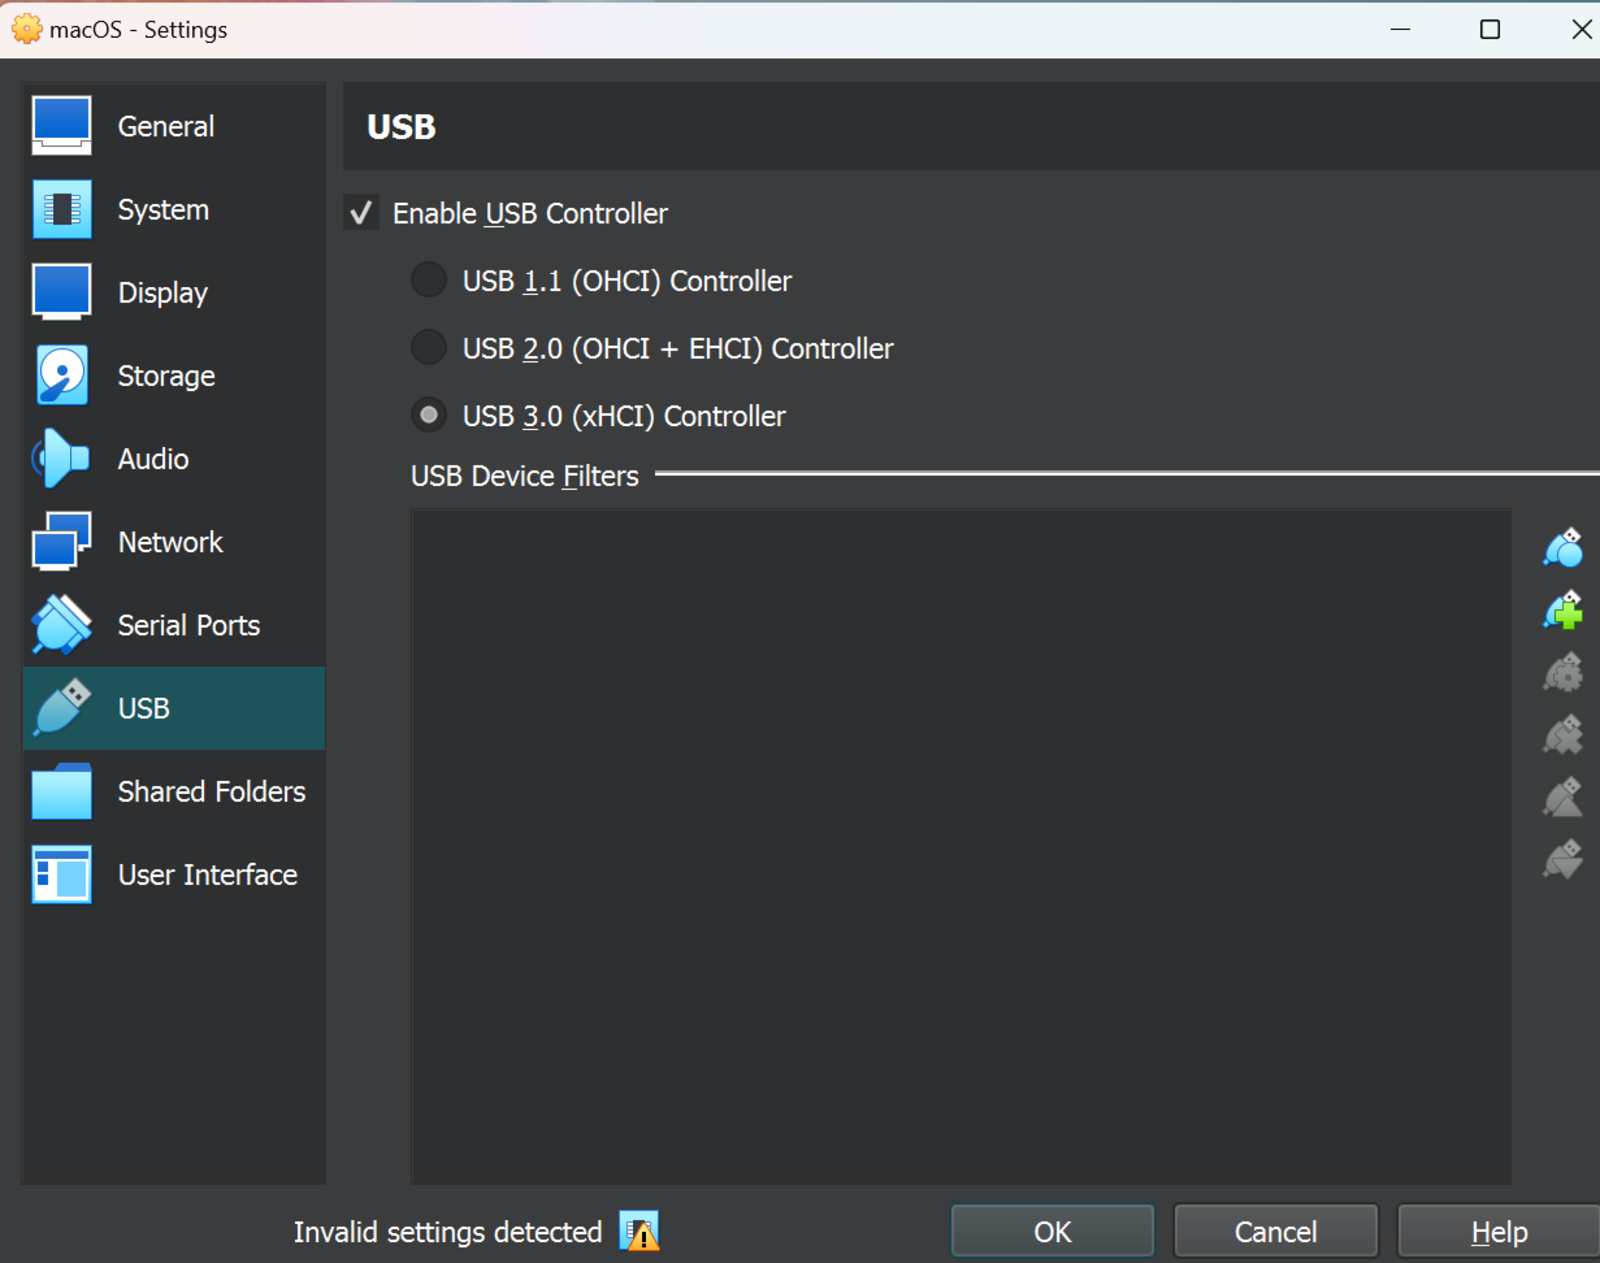
- Enable the USB 3.0 setting in the “USB” section.
We also need to make some changes through the Command Prompt to ensure that macOS recognizes the hardware as Apple Silicon. To make them, run the following commands given below. However, remember to replace “VM Name” with the name of your macOS virtual machine. Additionally, note that these commands are for an Intel-based Windows laptop.
cd "C:\Program Files\Oracle\VirtualBox\"

VBoxManage.exe modifyvm "VM NAME" --cpuidset 00000001 000106e5 00100800 0098e3fd bfebfbff

VBoxManage setextradata "VM NAME" "VBoxInternal/Devices/efi/0/Config/DmiSystemProduct" "iMac19,3"

VBoxManage setextradata "VM NAME" "VBoxInternal/Devices/efi/0/Config/DmiSystemVersion" "1.0"

VBoxManage setextradata "VM NAME" "VBoxInternal/Devices/efi/0/Config/DmiBoardProduct" "Iloveapple"

VBoxManage setextradata "VM NAME" "VBoxInternal/Devices/smc/0/Config/DeviceKey" "ourhardworkbythesewordsguardedpleasedontsteal(c)AppleComputerInc"

VBoxManage setextradata "VM NAME" "VBoxInternal/Devices/smc/0/Config/GetKeyFromRealSMC" 1
Step 5: Launch macOS
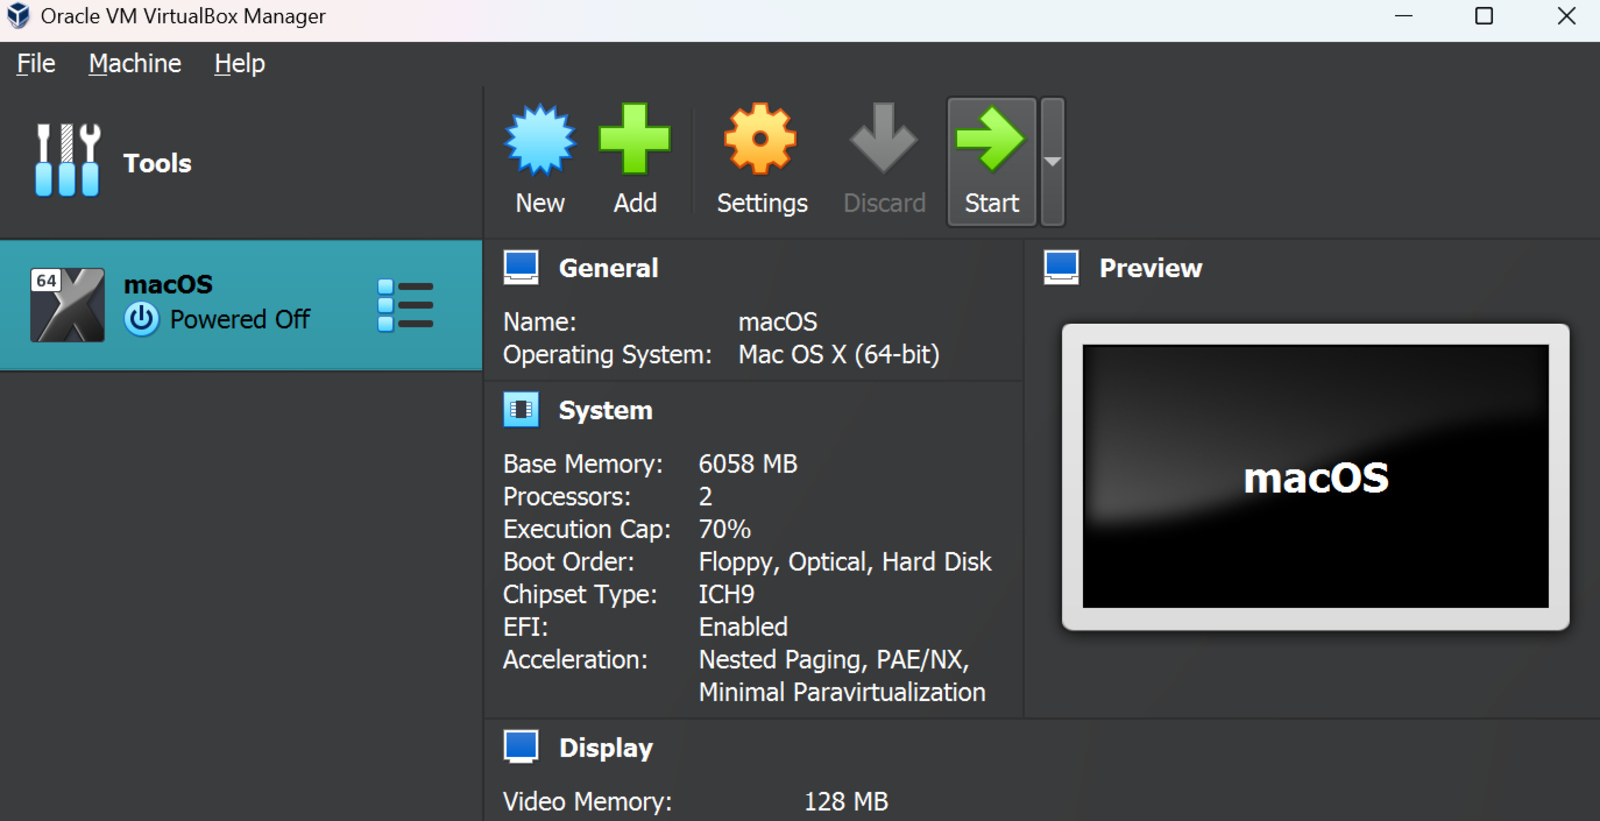
After successfully running the commands, the final step is to launch macOS. Here’s how:
- Open the VirtualBox application.
- Click on the “Start” button.

- Go through the macOS setup process.
Read More
Typical tech nerd, who loves playing with all the latest tech. Besides, I’m a big F1, Cricket, and Star Wars fan.
Are you interested in running macOS on your Windows PC? Whether for development, testing, or just exploring a different operating system, running macOS on Windows can be highly beneficial. In this guide, we will provide a step-by-step tutorial on how to install and run macOS on Windows. Using virtualization software, you can experience macOS on your Windows system without the need for dual-booting or hardware changes.
Create a Bootable macOS Installation USB Drive
The first step of installing macOS on your Windows PC is making your bootable USB drive with macOS. Once you have your Mac and USB ready, ensure the steps given below to create a bootable macOS USB.
Step 1: Open the Mac App Store on your Mac. Sign in to your Apple account there. Find and download the latest version of macOS.
Step 2: Restart your Mac and press Command + R to enter recovery mode.
Step 3: Release Command + R when the Apple icon and progress bar appear on the screen. Wait for macOS Recovery to load.
Step 4: Then click Utilities → Terminal. When the Terminal opens, type “csrutil disable” in it and press Enter.
Step 5: Wait until the terminal displays a message that the SIP is disabled.
Step 6: Click on the Apple menu and restart your Mac. Once your Mac boots up, plug in your USB. Then open Disk Utility, select the USB drive in the left column, and click Erase. In the pop-up menu that appears, select the name of your USB drive, select macOS Extended (Written material) format, and click Erase. Lastly, click Done.
Step 7: Run the Unibeast app. If you don’t have it, download the latest version first. Click Next and then agree until you are ready to use the app. Finally, you will see a window containing the USB drive you set up earlier. Then click Next. Then select Catalina and click Next. Then select UEFI Boot Mode or Legacy Boot Mode and click Continue. If you have older hardware, you should select legacy boot mode.
Step 8: Then select whether you have an NVIDIA or ATI graphics card and click Next.
Step 9: Lastly, review your choices and click Next. Then enter your password when prompted and click OK.
Install macOS on Windows using Installation USB
As per the previous steps, we have created a bootable drive to install macOS on the system. Now, to install macOS on your system, refer to the steps given below:
Step 1: Go to Clover boot screen and select “Boot macOS Installation” from “Install macOS Catalina”.
Step 2: Select your preferred language and click Next. Then select Disk Utility from the macOS Utilities menu.
Step 3: Click on your PC’s hard drive in the left column. Then click Delete.
Step 4: From there, select a new name for the drive, select APFS as the format, and click Erase. Then click Done.
Step 5: Return to the macOS Utilities main menu, select Install macOS, and click Next.
Step 6: Click Next again to continue installing macOS on your PC.
Step 7: Once the installation process is complete, your PC will restart. If macOS doesn’t load automatically, select macOS Catalina from the bootloader.
Install macOS on VirtualBox
This is the most important prerequisite for installing the Mac operating system on the device. The device should have the Windows operating system as its primary operating system. These users should install this proper software. This is open-source software. This software is available free of cost on the internet. Users need to install & ready with them before going for the installation of the Mac operating system.
Step 1: First, users need to open the Virtual Box software on their devices. There will be an option inside the software. There will be a new button. Users need to click on the New button.

Step 2: After that, a small new window will open. From there, users will need to provide a name. The name should be the operating system name. In this case, users need to write macOS in that field. Now, users need to click on Next.

Step 3: Now, in the next window, there, users need to adjust the memory size of the operating system disk. To install the macOS, users need to adjust the size of the disk to 4000 MB or 4 GB minimum size. After that, click on Next.

Step 4: In the next window, there is no need to make any changes. Users just need to click on the Create button.

Step 5: Now, in the next window, users need to click on the VHD (Virtual Hard Disk) option. Then users need to click on the Next button.

Step 6: Now, there is no need to make any changes in the next window. Users need to click on the Dynamically allocated option. Users just need to click on the Next button to proceed.

Step 7: In this case also, there is no need to make any changes. In this window, the software will ask for the location of the installation. It is recommended not to make any changes there. Users just need to click on the Create button.

Step 8: Hence, users have successfully installed & added the macOS to the Virtual Box on Windows operating system.

Configuration of macOS on Windows
Step 1: After successfully installing the macOS in the Virtual Box, it is time to complete the configuration. After making the configuration, the macOS will start running. For that purpose, users need to click on the Start option.

Step 2: Now, the macOS will start running. Users need to wait till the next window comes.

Step 3: Now, choose the appropriate language from the provided list & click on the Next arrow there.

Step 4: Now, there will be some more options present. However, users need to click on the Installation macOS option. Then they need to click on the Continue button.
Note: This is not an installation of macOS. Instead, this is the configuration step. macOS will automatically configure itself for the device. The configuration will take a long time to complete. This will try to adjust the operating system with the device configuration.
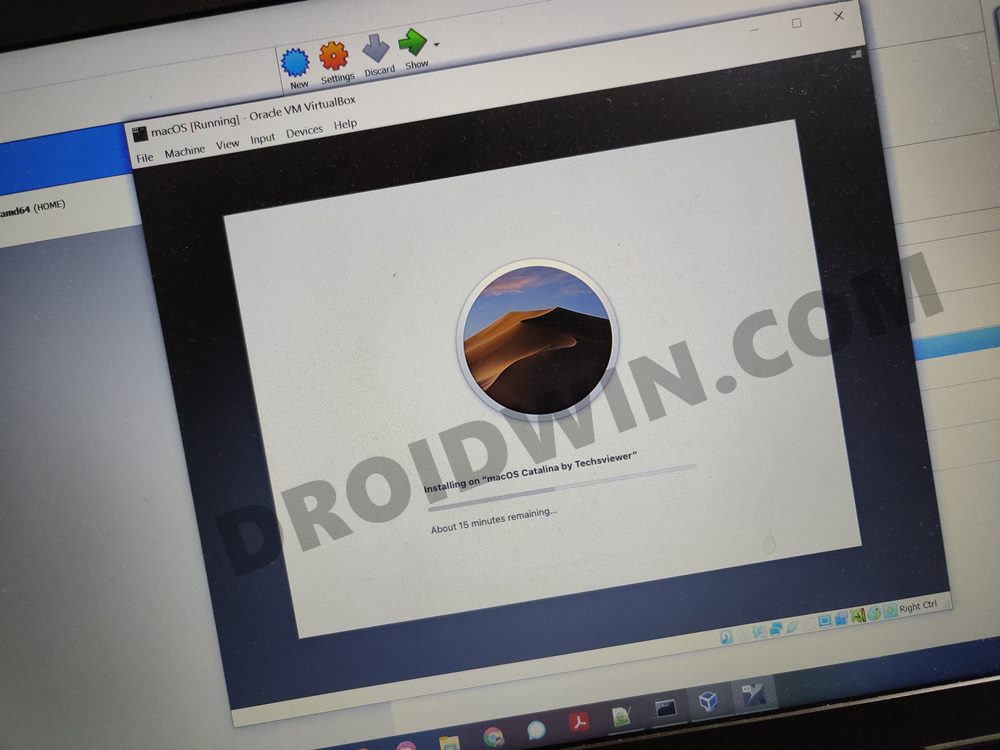
Step 5: Now, the configuration will start. It will take nearly 30 minutes of time to complete. Users are advised to have patience for that.

Step 6: The window will now get changed. Users can now see the Apple logo there. But still, the configuration is going on there. It will take another 15 minutes of time to complete. Users should wait until the process is completed.

Step 7: Now, in the next step, it will ask for the permission of Data & Privacy. Users will need to click on the Continue button to move forward.
Note: It is always advisable to read all the documents before giving consent to them. Whatever the scenario is, users should always be cautious. In this case, it is advisable to read the whole document for Data & Privacy.

Step 8: Now in this step, it will ask you to choose any theme. Users can decide their favorite theme from that. Then they should click on the Continue button.

Step 9: Now, users will get the macOS window in front of them. So, users have completed all the processes & they can now operate the macOS there.

Hence, we have successfully run macOS on Windows operating system.
Running macOS on Windows opens up a world of possibilities for developers and tech enthusiasts. By following the steps outlined in this guide, you can easily set up macOS on your Windows PC using virtualization software. Enjoy the benefits of both operating systems on a single machine, and enhance your productivity and versatility.