
Installing Mac Apps on Windows: A Step-by-Step Guide
Introduction
Installing Mac apps on Windows can be a bit tricky, but with the right steps, you can easily access a wide range of Mac-exclusive applications on your Windows machine. In this article, we will guide you through the process of installing Mac apps on Windows, covering the necessary steps, tools, and tips to ensure a smooth experience.
Prerequisites
Before we dive into the installation process, make sure you have the following:
- A Mac with macOS 10.12 or later
- A Windows 10 or later operating system
- A compatible app (e.g., Adobe Photoshop, Final Cut Pro, or Logic Pro)
- A valid Mac App Store subscription or purchase
Step 1: Download and Install the App
To install a Mac app on Windows, you’ll need to download the app from the Mac App Store. Here’s how:
- Go to the Mac App Store on your Mac and search for the app you want to install.
- Click the «Get» button to download the app.
- Once the download is complete, click the «Install» button to begin the installation process.
Step 2: Launch the App
After installation, you’ll need to launch the app. Here’s how:
- On Windows 10, you can launch the app by searching for it in the Start menu or by clicking on the «Apps» folder in the File Explorer.
- On macOS, you can launch the app by clicking on the «Applications» folder in the Finder or by using Spotlight to search for the app.
Step 3: Authenticate with the Mac App Store
To access the Mac App Store, you’ll need to authenticate with the store using your Apple ID. Here’s how:
- On Windows 10, you can authenticate with the Mac App Store by clicking on the «Sign In» button in the top-right corner of the app window.
- On macOS, you can authenticate with the Mac App Store by clicking on the «Sign In» button in the top-right corner of the app window.
Step 4: Install the App
Once you’ve authenticated with the Mac App Store, you can install the app. Here’s how:
- On Windows 10, you can install the app by clicking on the «Install» button in the top-right corner of the app window.
- On macOS, you can install the app by clicking on the «Install» button in the top-right corner of the app window.
Step 5: Configure the App
After installation, you may need to configure the app to work with your Windows machine. Here’s how:
- On Windows 10, you can configure the app by clicking on the «Settings» button in the top-right corner of the app window.
- On macOS, you can configure the app by clicking on the «Preferences» button in the top-right corner of the app window.
Tips and Tricks
- Use a VPN: If you’re using a public Wi-Fi network, consider using a VPN to protect your Mac App Store authentication.
- Use a secure connection: Make sure your Windows machine is connected to a secure network to prevent unauthorized access to your Mac App Store account.
- Use a password manager: Consider using a password manager to securely store your Apple ID and password.
Troubleshooting
- App not installing: Check that the app is compatible with your Windows machine and that you have the necessary permissions.
- App not launching: Check that the app is installed correctly and that you have authenticated with the Mac App Store.
- App not working: Check that the app is configured correctly and that you have the necessary permissions.
Conclusion
Installing Mac apps on Windows can be a bit tricky, but with the right steps and tools, you can easily access a wide range of Mac-exclusive applications on your Windows machine. By following the steps outlined in this article, you can ensure a smooth experience and take advantage of the many benefits of using Mac apps on Windows.
Additional Resources
- Mac App Store: www.macappstore.com
- Apple Support: support.apple.com
- Windows Subsystem for Mac: docs.microsoft.com/en-us/windows/wsl/windows-subsystem-for-mac
Table: Common Mac App Store Apps
| App | Description |
|---|---|
| Adobe Photoshop | A popular photo editing and design app |
| Final Cut Pro | A professional video editing and post-production app |
| Logic Pro | A professional music production and recording app |
| Microsoft Office | A suite of productivity apps, including Word, Excel, and PowerPoint |
| Safari | A web browser for macOS |
Conclusion
Installing Mac apps on Windows can be a bit tricky, but with the right steps and tools, you can easily access a wide range of Mac-exclusive applications on your Windows machine. By following the steps outlined in this article, you can ensure a smooth experience and take advantage of the many benefits of using Mac apps on Windows.
Unlock the Future: Watch Our Essential Tech Videos!
-
Home
-
News
- Want to Run Mac Apps on Windows? Try These Ways!
Want to Run Mac Apps on Windows? Try These Ways!
By Linda | Follow |
Last Updated
Do you need to run Mac apps on Windows? If so, this post is worth reading, in which Partition Magic offers you 3 ways to do that. You can choose one way from them according to your condition.
If you find a piece of amazing software on a Mac, you may want to know whether you can use it on Windows after you switch to a Windows PC. However, Apple’s software is explicitly designed just to run on hardware that’s made by Apple itself. Can you run Mac apps on Windows?
The short answer is YES. In addition, there are several ways for you. You can choose one according to your condition.
How to Run Mac Apps on Windows
A lot of users have macOS apps installed on their Windows PCs because of several reasons and there is no punishment or consequence to the action. If you also have this need, you can try the following ways.
Way 1. Run the Windows Version of the App
Some apps have both the macOS version and the Windows version. You can check if the app has a Windows version. If it has, you can download the Windows version directly. If not, you can try other ways.
Way 2. Run Mac Apps on a Virtual Machine
You can install a macOS virtual machine on your Windows PC and then run Mac apps on this virtual machine.
The defect of this method is that it requires you to be quite technical as you may need to change the OS image format and change some settings when installing the macOS virtual machine.
If you use this method, you may need a disk management tool like MiniTool Partition Wizard to help you create a partition for the virtual machine. In addition, if the partition becomes full as time goes on, this software can help you extend the partition. You can have a try.
MiniTool Partition Wizard FreeClick to Download100%Clean & Safe
Way 3. Run Mac Apps in Cloud-Based macOS Environment
Some cloud-based macOS services like MacinCloud will give you remote access to virtual macOS environments that they are hosting on their servers. This method is predominantly for Apple app and macOS development, but you can still run an app if you wish.
Which Method to Choose?
Should you run Mac apps on a virtual machine or in cloud-based macOS services? Some people may be bothered by this issue. Here, I will list some pros and cons of the two methods and then you can make a decision.
macOS Virtual Machine
- Pros: Free.
- Cons: Making a macOS virtual machine may be a little difficult. In addition, there are computer hardware requirements for running a virtual machine. If the hardware is not good enough, the performance may be affected.
Cloud-Based macOS Services
- Pros: This removes the processing load from your local machine.
- Cons: The service is not free and you’ll need a fast internet connection to avoid performance issues and latency when connecting to the remote servers.
After knowing their pros and cons, you can know which one to choose.
Bottom Line
This introduces how to run Mac apps on Windows. Do you know other ways? If so, contact me and I will add them to my post in the next update.
About The Author
Position: Columnist
Linda has been working as an editor at MiniTool for 5 years. She is always curious about computer knowledge and learns it crazily. Her articles are simple and easy to understand. Even people who do not understand computer can gain something. By the way, her special focuses are disk management, data recovery and PDF editing.
There are some apps that only work on macOS. Some Windows users may want to use the Mac apps for work or personal purposes. But the question is, how to run Mac apps on Windows? You may ask, what should you do to access Mac operating system inside your Windows PC? The answer is virtualization.
Virtualization is a method that enables you to install macOS on a Windows computer. After installing, you can use the OS seamlessly, as you would normally do on a physical Mac device. Furthermore, another advantage of this approach is that you can run both Windows and Mac operating systems simultaneously.
Here you will learn how to run Mac apps on Windows using a virtualization program developed by VMware.
VMware is a company that is dedicated to producing virtualization solutions and the Workstation is one of them. VMware Workstation comes in two variants, namely:
· Workstation Pro
Workstation Pro has some advanced features but it is a paid program.
· Workstation Player
Workstation Player lacks a few options such as capturing snapshots (virtual machine states), virtual machine encryption, etc. Nevertheless, Player is free software and it is mostly used by students and organizations for educational and testing purposes respectively. Also, the process of installing macOS on Workstation Pro and Workstation Player is identical.
Notes:
1. VMware Workstation Player is used here for demonstration.
2. Before installing macOS you must first obtain an installation media in ISO format. You can conduct an online search to find and download the file.
Preparation to Run Mac Apps on Windows
VMware Workstation apps are all good, alright! However, there’s a catch. Neither Workstation Pro nor Workstation Player natively support macOS. To install Mac OS on virtual machines created in either of these variants, you must use a third-party tool called ‘Unlocker’. When executed, ‘Unlocker’ adds the option for Mac to the list of supported operating systems. In short, you need three things, namely:
1. VMware Workstation (Pro or Player)
Link: https://www.vmware.com/products/workstation-player.html
2. Installation Media for macOS (.ISO Format)
Please conduct an online search to obtain the file from a reliable source.
3. Unlocker for macOS
Link: https://github.com/DrDonk/unlocker/releases/tag/v4.2.3
Once you have all the ingredients in place, you can follow the steps given below to learn how to run Mac apps on Windows after installing macOS on VMware Workstation.
Steps on How to Run Mac Apps on Windows
This is not a very simple process. We do our best to offer a detailed guide, so it will be easy to follow.
Step 1: Install VMware Workstation and Run Unlocker
Use your favorite web browser to download VMware Workstation Player. Once obtained, use the regular method to install the software on your PC.

Next, use your preferred ZIP extractor tool to unzip the unlocker423.zip file (this is the latest version at the time of this writing) and go to the unlocer423 > windows folder. Right-click the unlock.exe file and click Run as administrator from the context menu.
Click More info on the Windows protected your PC screen if it appears, and click Run anyway. Click Yes on the User Account Control confirmation box and wait while Unlocker runs and does its work.

Once the process is complete, press Enter on your keyboard to exit the command prompt.

Step 2: Create a New Virtual Machine
Launch VMware Workstation Player, ensure that the Use VMware Workstation 16 Player for free for non-commercial use radio button is selected, and click Continue. On the next screen, click Finish.

On the next window, click Create a New Virtual Machine.

On the New Virtual Machine Wizard box, click to select the I will install the operating system later radio button, and click Next.

On the next screen, click to select the Apple Mac OS X radio button, and choose your preferred macOS version from the Version drop-down list (macOS 13 is selected here for demonstration). Click Next to continue.

On the Name the Virtual Machine screen, give a name to your virtual machine or leave the default one intact. Optionally, click Browse to define your preferred location to save the virtual machine. Click Next to proceed to the next step.

On the Specify the Disk Capacity screen, define your preferred size for the virtual hard drive in the Maximum disk size (GB) field or leave the default size unchanged. Click to select the Store virtual disk as a single file radio button, and click Next.

Note: You can also choose to split the virtual disk into multiple files but in that case, it would be tedious to move the VM to a different location when/if needed.
On the next screen, review the specifications of the virtual machine you are about to create, and if everything looks fine, click Finish. Optionally, you can click Customize Hardware if you want to make any changes to the virtual hardware assigned to the virtual machine.

Step 3: Prepare Virtual Machine for macOS Installation
On the next screen, click Edit virtual machine settings from the bottom of the right pane.

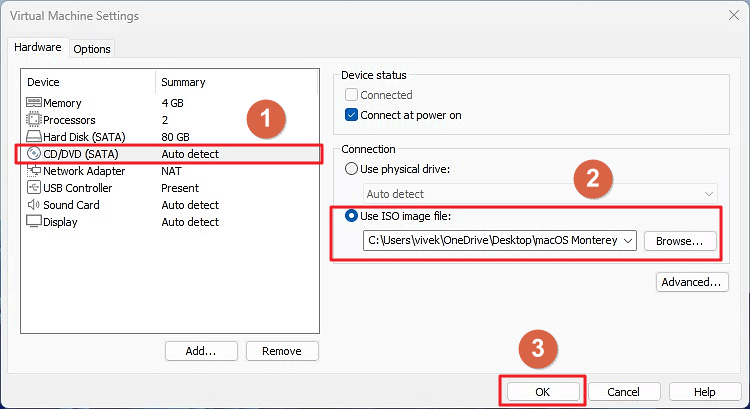
On the Virtual Machine Settings box, click to select CD/DVD (SATA) from the left pane. From the right, click choose the Use ISO image file radio button from the Connection section. Next, click Browse and select the macOS installation ISO file that you obtained earlier. Click OK when done.
Now, close VMware Workstation Player and exit it from the System Tray as well. Go to the folder where you saved the virtual machine, right-click the file with the *.vmx extension (it usually has the name of the virtual machine that you specified earlier), and open it with Notepad.

Scroll down to the bottom of the written lines and add the following code at the end:
smbios.reflectHost = “TRUE”
hw.model = “MacBookPro14,3”
board-id = “Mac-551B86E5744E2388”
smc.version = “0”
After this, go to File, click Save, and close the Notepad file. Now, launch VMware Workstation Player again, and move to the next step.

Step 4: Begin macOS Installation
Back on the main screen, from the left pane, click to select the virtual machine you created, click Play virtual machine from the right, and follow the on-screen instructions to use Disk Utility to create a partition and install macOS on VMware Workstation Player.

Once installed, you can boot the virtual machine and safely run Mac apps on Windows.
Conclusion
You can use any virtualization program that is available online. While VMware is quite popular as it develops solutions for home users and corporates, many other vendors produce dedicated applications specific to certain usage types, i.e., businesses or homes. Nevertheless, the method explained above on how to run Mac apps on Windows works on a common principle, regardless of the virtualization software you pick.
As technology advances, the world becomes increasingly interconnected, offering users the versatility to choose from different operating systems based on their preferences and requirements. One of the most common situations is for Windows users who want to run macOS applications on their computers. This is especially prevalent among those who may have transitioned from macOS to Windows or users who rely on specific macOS applications for their work or hobbies. However, running macOS applications on a Windows machine can seem challenging. In this comprehensive guide, we will explore various methods to run macOS apps on Windows, examining their effectiveness, ease of use, and potential pitfalls.
Understanding the Basics
Before delving into the methods to run macOS applications on Windows, it’s essential to understand the underlying principles. macOS applications are primarily designed to be executed within the macOS environment, which means that they often rely on specific functions, libraries, and frameworks unique to macOS. However, that doesn’t mean Windows users are entirely out of luck. Here are a few avenues to explore:
-
Emulation: Emulation involves mimicking the functions of one operating system on another. While this is a complex subject, several tools can help emulate macOS on a Windows system.
-
Virtualization: Virtualization allows users to run a different operating system within their existing environment. By using applications like VirtualBox or VMware, you can create a virtual machine that runs macOS, giving you access to macOS applications.
-
Cross-Platform Availability: Some macOS applications have Windows alternatives or versions. In some cases, it’s best to seek out a cross-platform alternative instead of trying to make a macOS app work on Windows.
-
Binary Compatibility: Some macOS apps can be run on Windows through compatibility layers, which allow Windows to understand and process macOS binary files.
Method 1: Using a Virtual Machine
One of the most straightforward ways to run macOS apps on a Windows machine is through a virtual machine (VM). A virtual machine allows you to create a simulated computer environment within your physical machine, effectively running another operating system within Windows.
Step-by-Step Guide to Setting Up macOS in a Virtual Machine
-
Download Virtualization Software: You’ll need virtualization software to create a VM. Popular choices include VMware Workstation Pro, Oracle’s VirtualBox, or Parallels Desktop. For this guide, we’ll use VirtualBox due to its free nature.
-
Get a macOS Image: You’ll need a macOS installer. You can create a macOS image using a Mac computer or find pre-existing images online (though this may have legal implications).
-
Install VirtualBox: Download and install VirtualBox from its official website. Ensure your system meets the required specifications.
-
Create a New Virtual Machine:
- Open VirtualBox and click on «New.»
- Name the virtual machine, select “macOS” as the type, and choose the appropriate version (e.g., macOS 10.14).
- Allocate memory (RAM) to the VM. At least 4GB is recommended for smooth operation.
- Create a virtual hard disk and adjust the allocated space (minimum of 40GB is advisable).
-
Configure the VM:
- Before starting the VM, click on “Settings.”
- Under “System,” uncheck the “Floppy Disk” option in the boot order.
- Under “Processor,” allocate more CPU resources for better performance.
- Under “Display,” allocate enough video memory (128MB is a common recommendation).
- Under “Storage,” select your macOS .iso file in the optical drives section.
-
Boot the Virtual Machine: Start the VM. If everything is set up correctly, you should see the macOS installation screen. Follow the prompts to install macOS.
-
Install macOS Applications: Once macOS is operational within the VM, you can install your desired macOS applications just as you would on a standard Mac.
Pros and Cons of Using a Virtual Machine
-
Pros:
- Full compatibility with macOS applications.
- No need for dual-booting; you can run macOS alongside Windows.
- Virtual machines can be easily reset or deleted.
-
Cons:
- Performance may not match that of a native macOS installation.
- Requires a powerful machine to run smoothly alongside Windows.
- Legal complexities regarding Apple’s software licensing terms.
Method 2: Emulation with Hackintosh
Another method to run macOS applications on Windows is by creating a Hackintosh—a non-Apple computer that runs macOS. This method involves technical know-how and a bit of risk, as it may involve violating Apple’s EULA (End User License Agreement).
Step-by-Step Guide to Creating a Hackintosh
-
Research Compatible Hardware: Not all hardware is compatible with macOS. Use online resources to seek recommendations for motherboards, CPUs, and other components known to work well with macOS.
-
Get the macOS Installer: You’ll need a macOS installer that you can create using a Mac or download from Apple’s official website.
-
Prepare a Bootable USB Drive: Use tools like UniBeast to create a bootable USB drive for macOS installation.
-
BIOS Settings: Configure the BIOS settings to facilitate macOS installation. This usually involves settings like disabling secure boot and enabling AHCI.
-
Install macOS: Boot from the USB drive and install macOS as you would on a regular Mac, following instructions specific to Hackintosh installations.
-
Post-Installation: Use MultiBeast or other Hackintosh tools to adjust driver settings and configurations. This is necessary for optimal performance and compatibility.
Pros and Cons of Creating a Hackintosh
-
Pros:
- Full native experience of macOS on non-Apple hardware.
- Better performance than a virtual machine in many cases.
-
Cons:
- High complexity and potential legal issues.
- Requires specific compatible hardware.
- May be unstable; updates can break the system.
Method 3: Explore Cross-Platform Alternatives
Sometimes, rather than running macOS applications themselves, it’s more feasible to explore cross-platform alternatives. Many applications have versions available for both macOS and Windows or have excellent substitutes. This method might save you time and potential issues with stability.
Common Alternatives for Popular macOS Applications
- Final Cut Pro: Adobe Premiere Pro and DaVinci Resolve are great alternatives for video editing.
- Logic Pro: Consider using Ableton Live or FL Studio for music production.
- Pages: Microsoft Word or Google Docs can serve as robust alternatives for word processing.
- Keynote: Microsoft PowerPoint or Google Slides are excellent for presentations.
Benefits of Exploring Alternatives
- Better Compatibility: Cross-platform applications are designed to operate seamlessly across different operating systems.
- Reduced Complexity: Avoid the technical challenges of virtual machines or emulators.
- Regular Updates: Established applications often receive continual support and improvements.
Method 4: Using Wine or PlayOnMac
Wine is a compatibility layer that allows you to run Windows applications on Unix-like operating systems. There’s a version for macOS, but users can utilize Wine to run macOS applications indirectly on Linux systems. However, PlayOnMac offers a GUI to use Wine more effectively and is specifically designed for that purpose.
Step-by-Step Guide to Using Wine/PlayOnMac
-
Download Wine: Get the latest version of Wine or PlayOnMac compatible with your Windows OS.
-
Install Wine: Follow the installation instructions provided on the Wine website.
-
Configure Wine: Once installed, open the Wine configuration tool to set up Wine for your environment.
-
Install macOS Applications: After configuring Wine, attempt to run your desired macOS applications by right-clicking and selecting “Open with Wine.”
Pros and Cons of Using Wine/PlayOnMac
-
Pros:
- Lightweight and doesn’t require a full installation of macOS.
- Easy to use for running smaller macOS programs.
-
Cons:
- Compatibility isn’t guaranteed; many applications may not work.
- Performance can vary based on the application and settings.
Conclusion
Running macOS applications on Windows is certainly feasible, albeit it comes with technical challenges and considerations. The choice of method largely depends on your needs, technical know-how, and willingness to work through potential complications. Whether you opt for a virtual machine, explore alternatives, delve into the Hackintosh community, or experiment with compatibility layers like Wine, you can successfully access the software you need. Each method has its trade-offs, and weighing those against your situation is key to achieving the best outcome.
As with any significant undertaking in the realm of software and operating systems, patience, research, and a willingness to troubleshoot will serve you well. Remember to stay informed about the licensing implications of each approach, particularly with methods that require macOS. Enjoy your journey in exploring and working with macOS applications on your Windows machine!
How to Run Mac Apps on Windows 10 Step 1: Create a macOS Virtual Machine. The easiest way to run Mac or other Apple apps on your Windows 10 machine is with a virtual machine. Step 2: Log Into Your Apple Account. Step 3: Download Your First macOS App. Step 4: Save Your macOS Virtual Machine Session.
People also ask,can i open mac files on windows?
Yes, in most cases you should be able to open a file created on a Mac on your Windows computer. You can transfer files between the two platforms using a CD, a USB drive, or a network connection. Another option is to upload the files to a web server from the Mac and then download them on your Windows computer.
Likewise,can you run mac software on a pc? If you want to install Mac on PC, you have two basic options how to do it: you can either install the Mac OS X operating system directly on a drive or use a Mac emulator for Windows. The former option gives you the best performance you can get, while the latter option is a lot simpler.
Also Know,can you download apple apps on windows?
The App Store is Apple’s application store, built in to iTunes, that allows you to download and install new apps for your iPhone or iPod. While there is a general App Store for Macs distributing Mac apps, it’s not available for Windows users.
Is there a Mac emulator for Windows?
An easy way to run “classic” Mac OS applications under Windows. Under Windows, software written for the “classic” Mac OS (i.e. versions 6 through 9) can only be run through software that emulates Macintosh hardware from 1980s and 1990s. The most advanced of these emulator programs is SheepShaver.
Things to consider
Below are some things to consider when trying to figure out how to open mac apps on windows.
How do I open Apple files in Windows 10?
Use Adobe Reader Take your Apple file and convert it into a PDF format. Then use the best pdf viewer, Adobe Reader, to open the newly converted file and read the contents. On the top bar, select the Upload icon and choose the file from your computer. Repeat this process for all the documents you want to view.
How can I run iOS apps on Windows 10? How can I run iOS apps and games on Windows 10?
- iPadian Emulator. Perhaps the best iOS emulator for Windows 10 currently available on the market is iPadian.
- Air iPhone Emulator. Another way to run iOS apps and games on Windows 10 is Air Iphone Emulator.
How can I run iOS apps on Windows?
How To Run iOS Apps on a PC
- iPadian. iPadian is a free iOS simulator that offers high processing speed and smooth operation.
- AIR iPhone. AIR iPhone emulator is famous for its simplicity and ease of use.
- Smartface.
- Appetize.io.
- Xcode.
- Xamarin.
- 5 thoughts on “How To Run iOS Apps on a PC”
How do I browse Apple App Store on PC? Browse the App Store from Your Computer
- Launch iTunes.
- Click the iTunes Store button near the upper-right corner of the iTunes window, or click iTunes Store in the sidebar.
- Click the App Store link.
Can you download Apple app store on Windows 10?
How to Run Mac OS X on Any Windows PC Using VirtualBox
Apple’s iTunes App Now Available Through Microsoft’s Windows 10 Store. iTunes, Apple’s software for downloading, purchasing, and managing content on iOS devices and playing Apple content on Macs and PCs, is now available for download through Microsoft’s Windows 10 Store.
Is it legal to run macOS on VirtualBox? Answer: A: It is only legal to run OS X in a virtual machine if the host computer is a Mac. Therefore yes it would be legal to run OS X in VirtualBox if VirtualBox is running on a Mac. The same would apply to VMware Fusion and Parallels.
How do I convert Apple files to Windows?
How to Move Your Mac files to a Windows PC
- Connect your external drive to your Mac, open the drive and select File.
- Select New Folder.
- Type Exported Files” and hit Return.
- Open the Photos app and click Edit in the Menu bar.
- Click Select All.
- Click File.
- Move your cursor to Export.
How do I convert Mac pages to PDF? How to convert Pages to PDF on a Mac
- Open the Pages document you want to convert.
- Click on File from the menu bar.
- Scroll down and click on “Export to.” This will bring up the export dropdown menu.
- In the “Export to” dropdown menu, scroll to and click on PDF.
- Next you will get the PDF menu, asking about image quality.
How do I convert Mac Pages to Word?
How to Convert Apple Pages to Word Documents on a Mac
- Open the Pages app on Mac.
- Open the Pages document you want to convert.
- Click File on the menu at the top.
- Click Export to.
- Select Word.
- If you want to, you can add a password.
Windows Weekly
How do I open ISO files on Windows? Windows 8, 8.1 or 10 Right click on the ISO image file and choose mount from the menu. This will open the file much like a DVD. You will see it listed among your drive letters in Windows explorer. Browse to the location of the setup file and double click it to start your installation.
Does BlueStacks work for iOS?
BlueStacks is not available for iPhone but there is one alternative with similar functionality. The best iPhone alternative is Appetize.io, which is free. If that doesn’t work for you, our users have ranked more than 10 alternatives to BlueStacks, but unfortunately only one of them is available for iPhone.
How can I run iPhone apps on my Mac? How to Run iOS Apps on Mac
- Open the App Store on your Mac.
- Click on the search field in the App Store, and type in the app you want to download.
- In the search results, select the iPhone & iPad Apps tab.
- Click the Get button next to the app search result.
- Download it, and you’ll be able to run iOS apps on a Mac!
How To Run Windows Apps on Mac
How do I download Apple apps?
How to download apps for Mac
- Open the App Store app.
- Browse or search for the app that you want to download.
- Click the price or Get button. If you see the “Open” button instead of a price or Get button, you already bought or downloaded that app.
Is macOS ISO legal? It’s totally legal to get the macOS ISO from App Store and install it as long as you use it not for commercial purposes and on your own mac machine. Sep 2, 2021
Is VMware illegal?
The contents of the VMWare Websites are protected by copyright and intellectual property laws in the United States and other countries as well as by international treaties. You may not copy or distribute any portion of the VMware Websites, except as necessary to view the VMware Websites.
Can you run macOS on VM? You can install Mac OS X, OS X, or macOS in a virtual machine. Fusion creates the virtual machine, opens the operating system installation assistant, and installs VMware Tools. VMware Tools loads the drivers required to optimize a virtual machine’s performance.