
Maybe you have already read a lot of articles on the Internet and are interested in the open-source operating system that is called Linux. Maybe you even have installed it on VirtualBox or run in Live mode and learned how it looks and works. But now, you can have a question «How to install it on my computer and start using it every day?». If you are a beginner, you probably don’t want to lose Windows, because when something goes wrong you always can switch to Windows and continue work. And, of course, all your applications and games are installed on Windows. You can install Linux with Windows for Dualboot. It was an ideal option for me a few years ago.
In this guide, I will explain how to install Linux on Windows 10 or 11. Everything will be performed in Windows 11, but it should work in Windows 10, 8 and 7 too.
I assume that you already have installed Windows and you already have decided where to get disk space for the Linux installation but don’t know how to do it. Here you will get a detailed explanation of this. Most of PC and notebooks with Windows 10 or 11 have UEFI instead of regular BIOS nowadays, so I will use it in this article. But if you have an old BIOS, there will not be many differences during the installation process.
Table of Contents
- Basics
- Prepare the Partition for Installing in Windows
- Boot from USB in Windows
- Prepare the Partition for Installing in Windows
- How to Install Linux on Windows 10
- Wrapping Up
Basics
If you want to install Linux on the same drive as Windows, you have to create a few additional partitions. At least one, preferably two. Linux users do not install Linux on one partition like Windows, although this option is possible. Linux is very flexible, so it allows to place system and user files on different partitions. It gives a big benefit for system reinstallation. You can reinstall the system on the system partition independently from your home partition and your files will not be deleted.
Here are these partitions:
- Root — for system files;
- Home — for your own files;
Minimum system requirements for storage size are different for various distributions. Usually, it is between 10 and 30 GB. But it is only enough for installing the operating system and multiple additional applications. If you want to install a lot of applications and games you should add extra 30-60 GB. I recommend using for Linux root partition 50-100 GB, as same as for drive C for Windows. A home partition must be as large as possible.
Previously, I recommended making a swap partition as well. But in modern distributions, a file is usually used for this purpose instead of a separate partition. So if you are a beginner, you can leave it as is by default.
Prepare the Partition for Installing in Windows
1. Backup Important Data
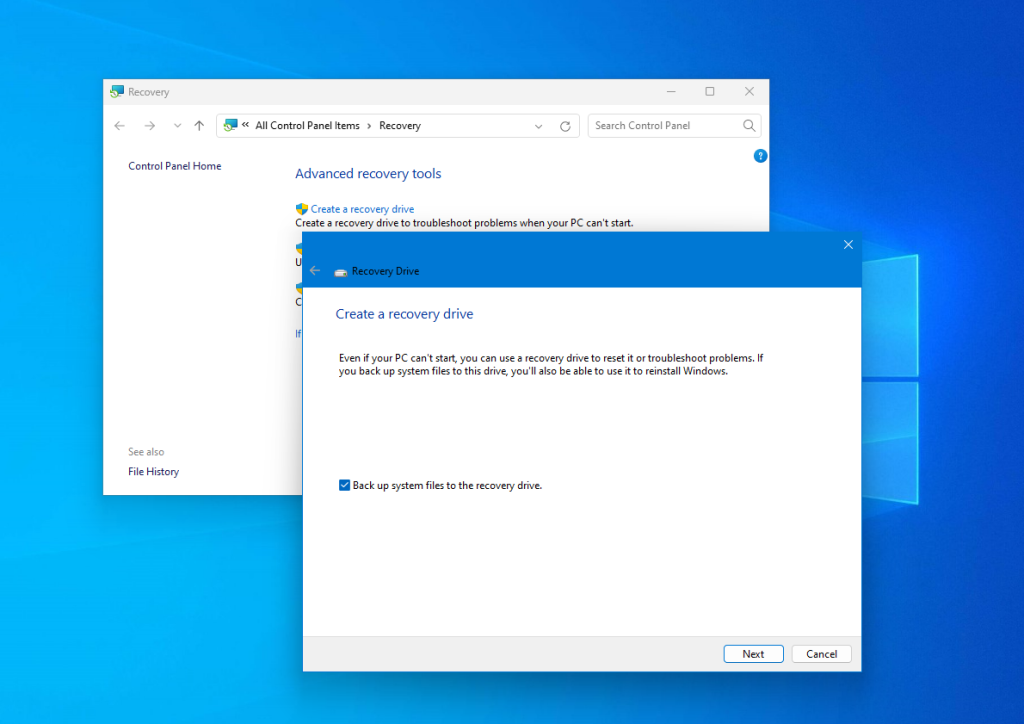
You must free up some space near existing Windows 10 or 11 before you be able to install Linux there. If you don’t want to lose your data, you should create a backup for important data before you start doing something. If everything goes well, your system and files will be fine. But the filesystem may be corrupted by any sudden failure, for example, a power cut or you can do something wrong. So, make sure that you have copied your important files to an external drive and created a system restore the image using Control Panel or Settings utility:
You also can use third-party tools, for example, Acronis or Clonezilla. If you want to shrink not a system partition, you can just copy important files from there.
2. Shrink a Windows Partition
Now, let’s prepare the partition for installing Windows and Linux. The simplest way to do this — use the default Disk Management tool in Windows.
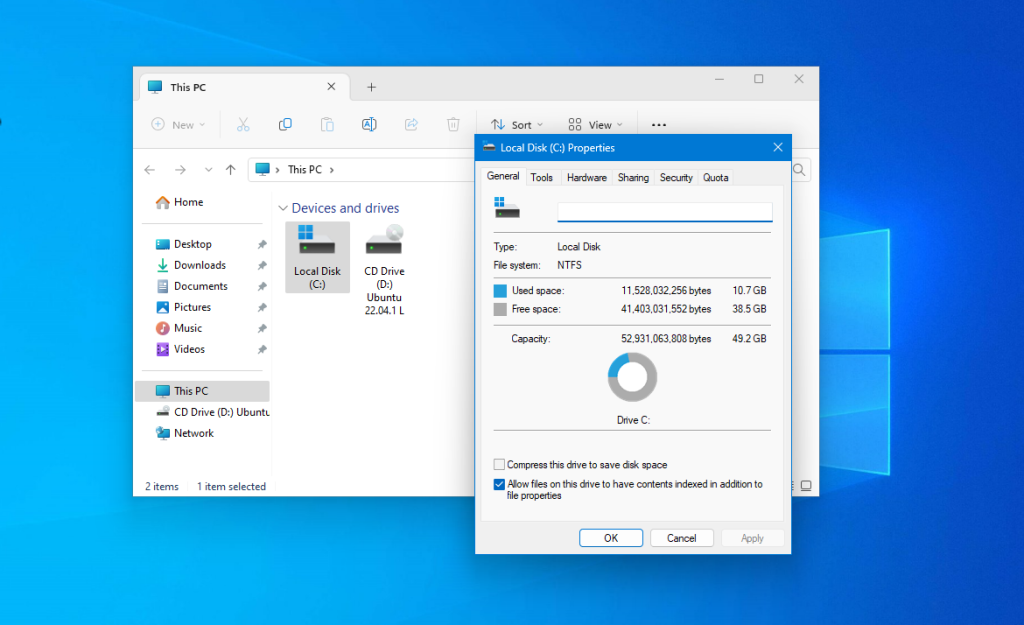
First of all, you can open This PC and view information about the drive, which you want to use for installing Linux:
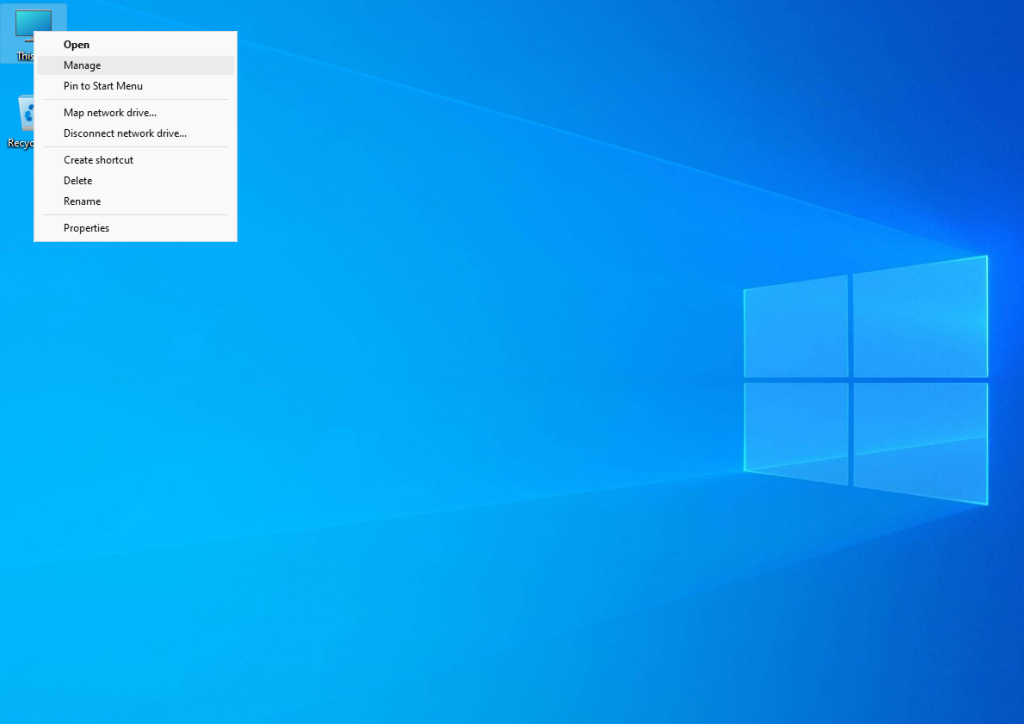
Then, open the contextual menu for the This PC shortcut and click on Manage:
Then, open the Disk Management tool:
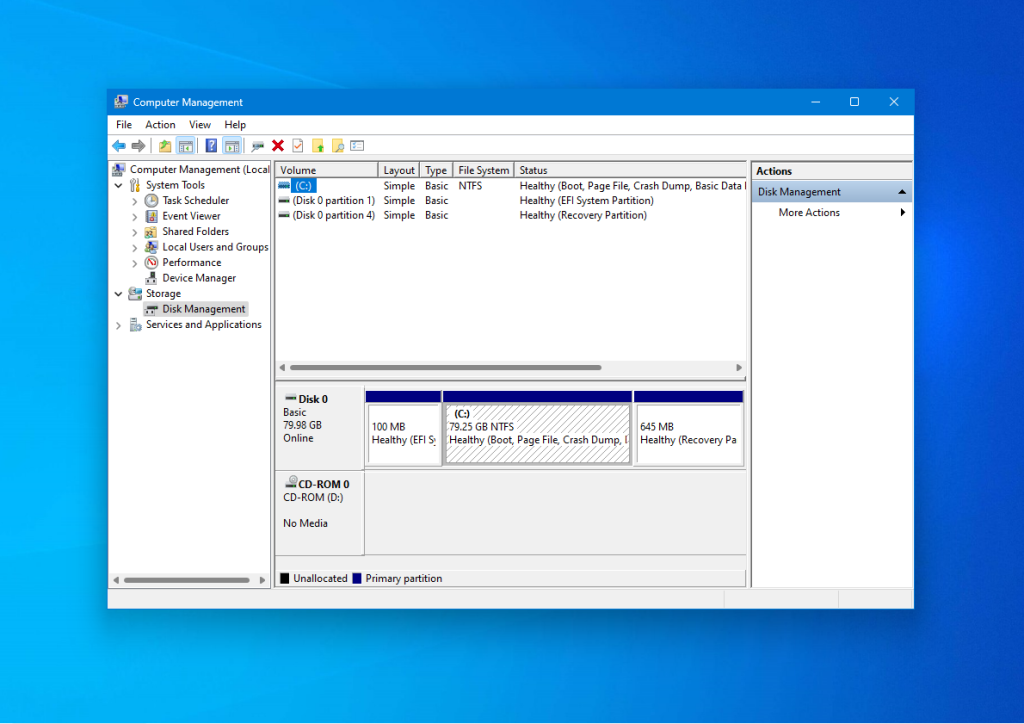
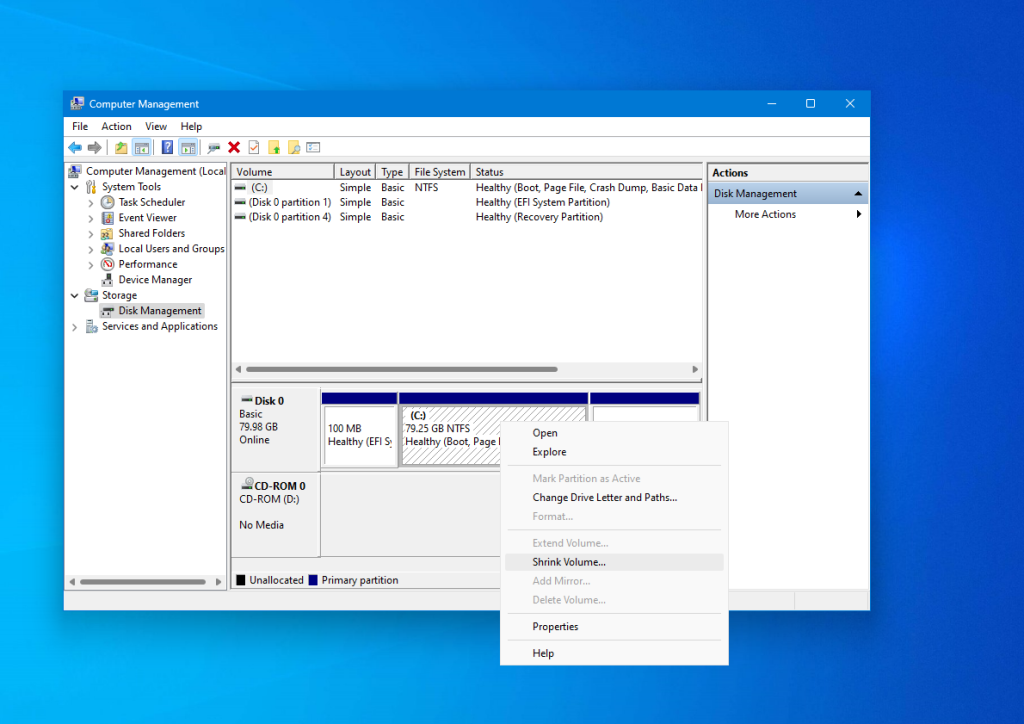
Here you can see the disks list, and system drive C: on Disk 0. If you have an additional drive for files it will be marked by D or E letter. I will explain how to shrink the system drive C: to get a free space. For other drives, everything is similar.
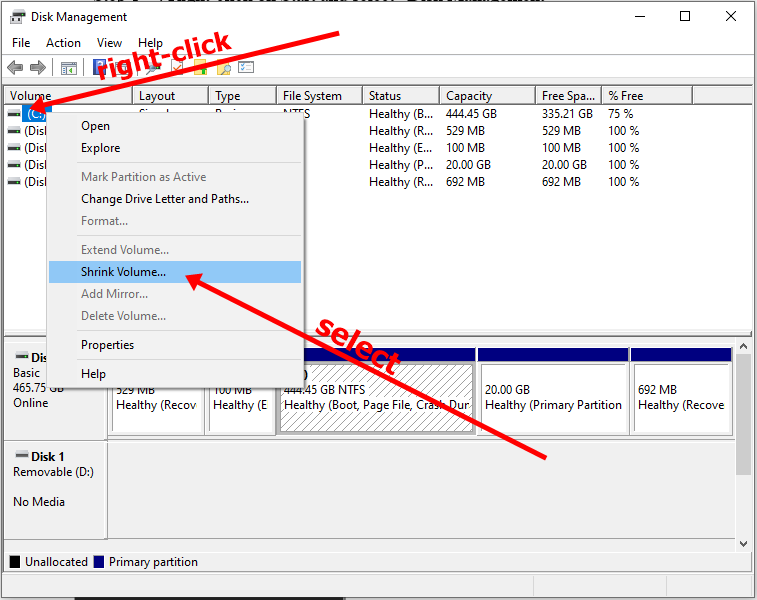
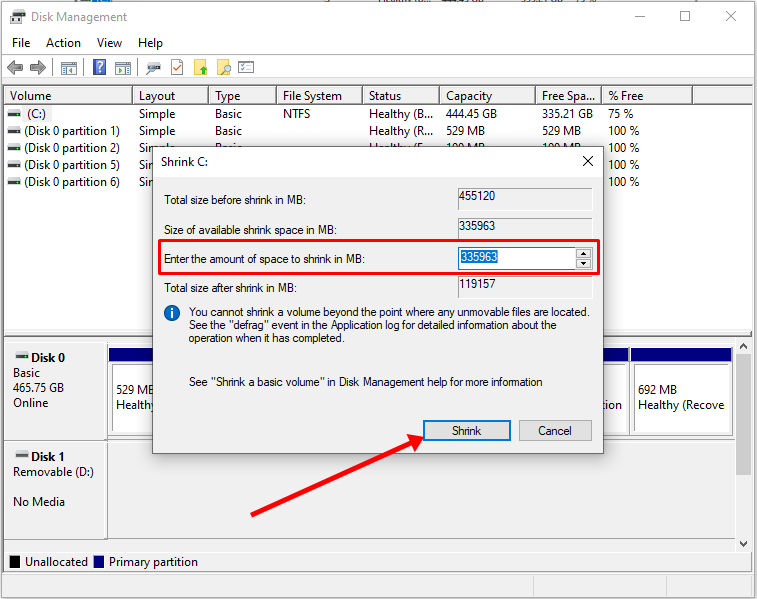
Open the contextual menu for the selected drive and choose the Shrink Volume option:
Enter how many megabytes to reduce the volume in the Enter the amount of space to shrink in MB field and press the Shrink button.
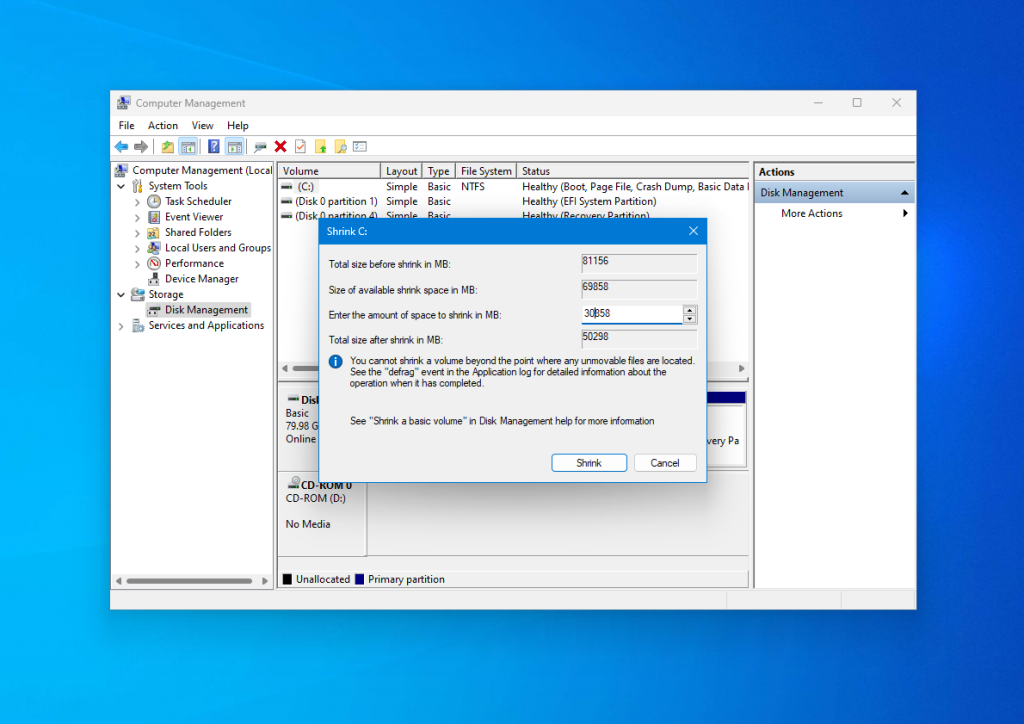
Pay attention, that you can’t enter a value that is larger than the amount of free space on the drive. So free up some space if you haven’t already. After this, you will see Unallocated Space which can be used for creating required partitions.
That’s it. Now you have space to install Linux with Windows. There is no sense to create Linux partitions in the Disk Management utility. We have done all operations which probably can corrupt Windows, and can continue creating Linux partitions using Linux tools.
Boot from USB in Windows
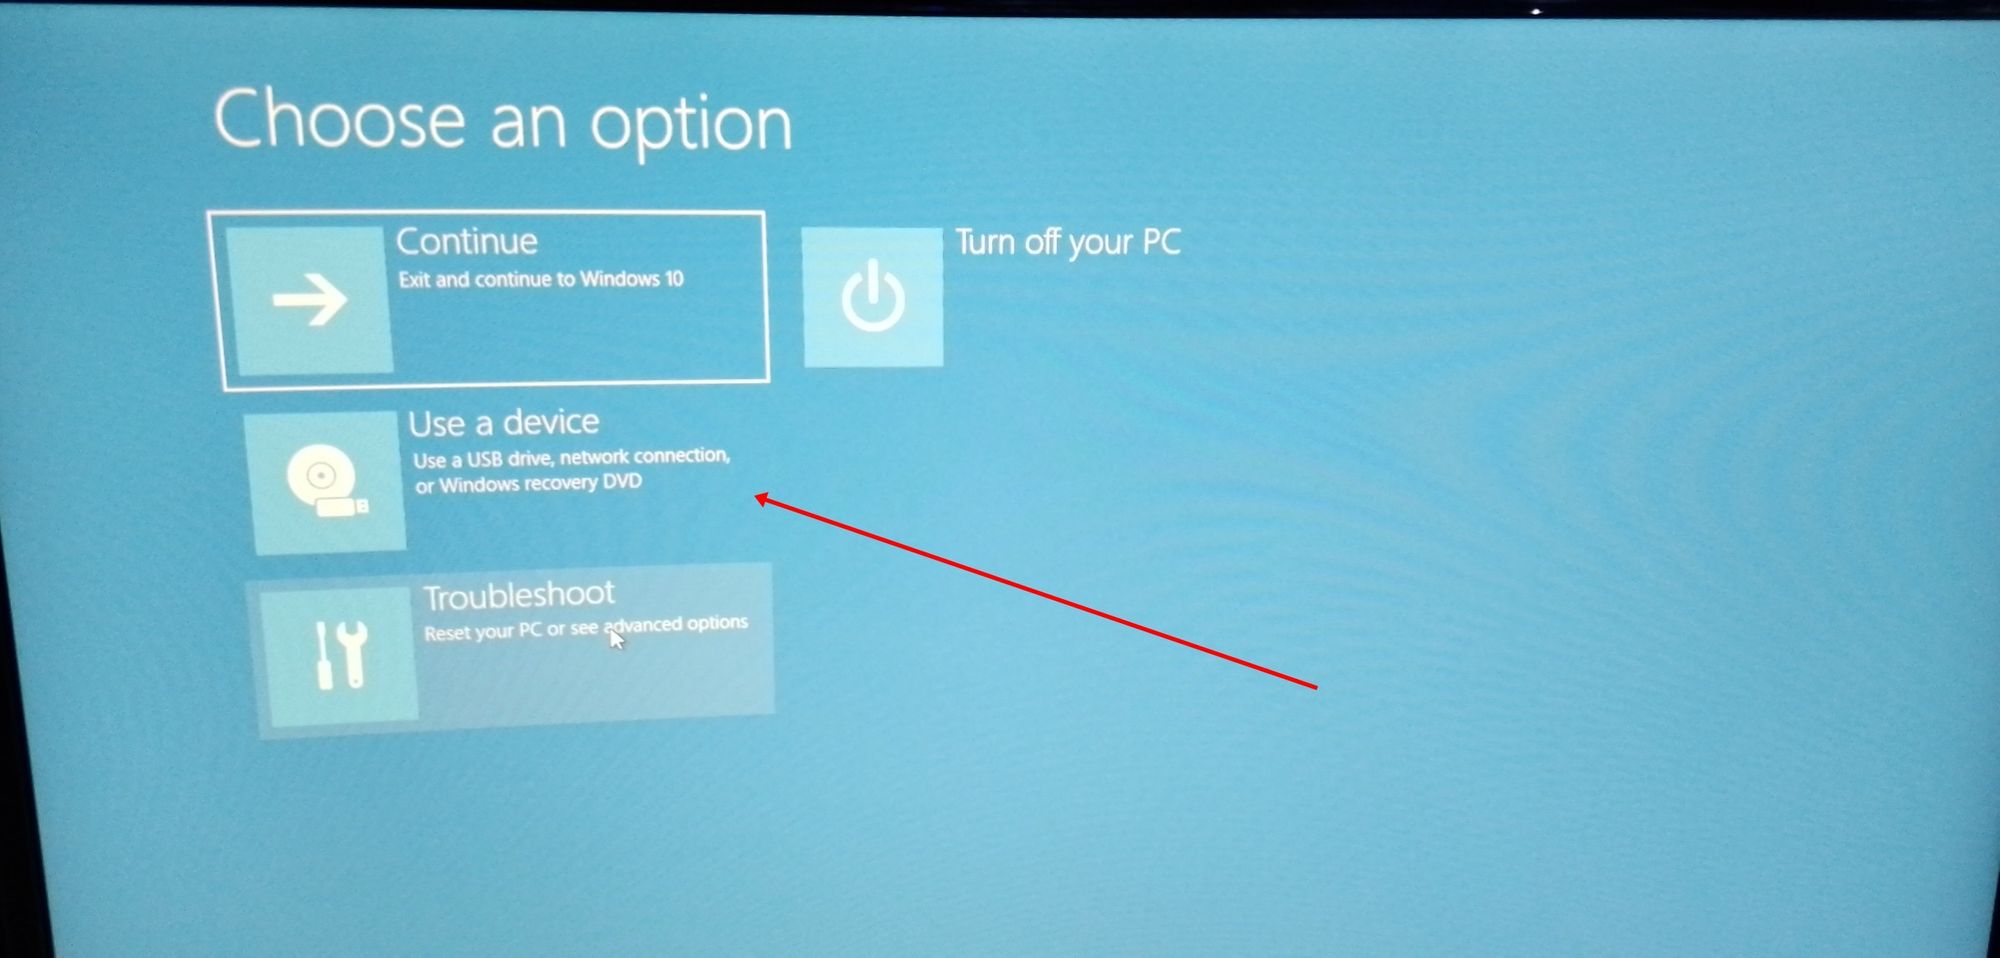
Most computers with Windows 10 and 11 have UEFI. This means that you can have trouble entering to BIOS setup interface and choosing the right device for booting. But you can reboot into the BIOS interface directly from Windows. Just open Settings, then System, and Recovery. Find there the Advanced Setup and press Restart Now:

Then, click on Troubleshoot -> Advanced Options -> EFI Firmware Settings after reboot:
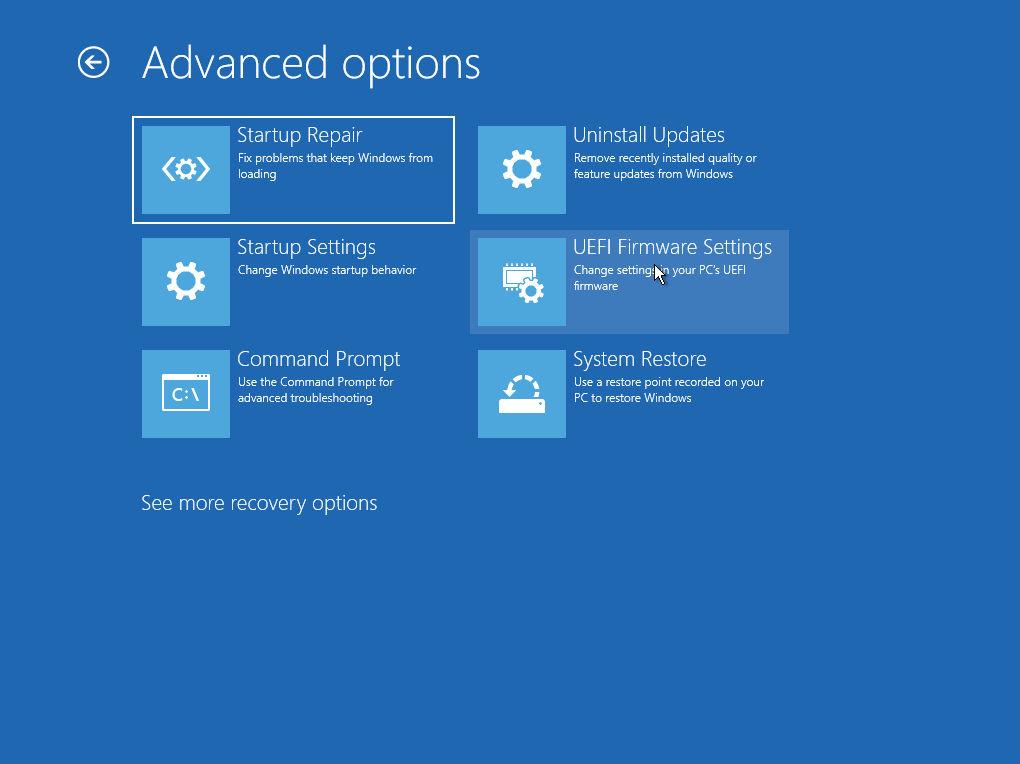
Here you can configure which device will be used for booting and boot your Linux USB drive.
Prepare the Partition for Installing in Windows
It is not the next step of this guide but an alternative option for how to shrink Windows partitions in Linux. If you don’t want to use the Disk Management tool in Windows, you can do the same thing using any LiveCD Linux distribution and the application for disk management that is called Gparted.
For example, you can do it in Ubuntu. Boot into LiveCD, open the Activities menu, and type Gparted there:
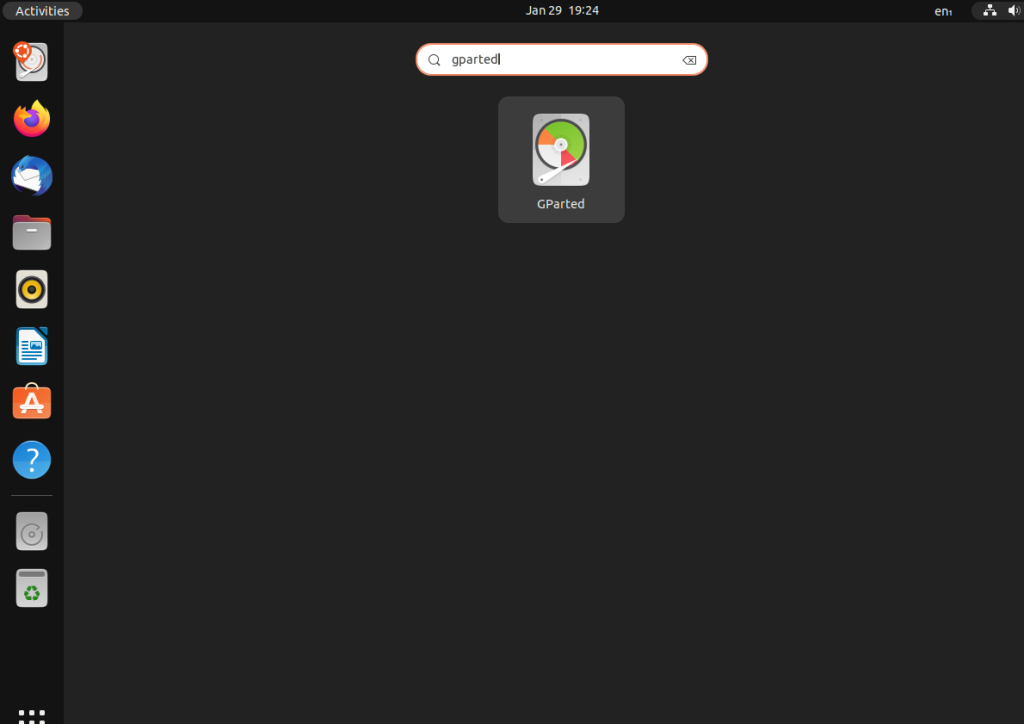
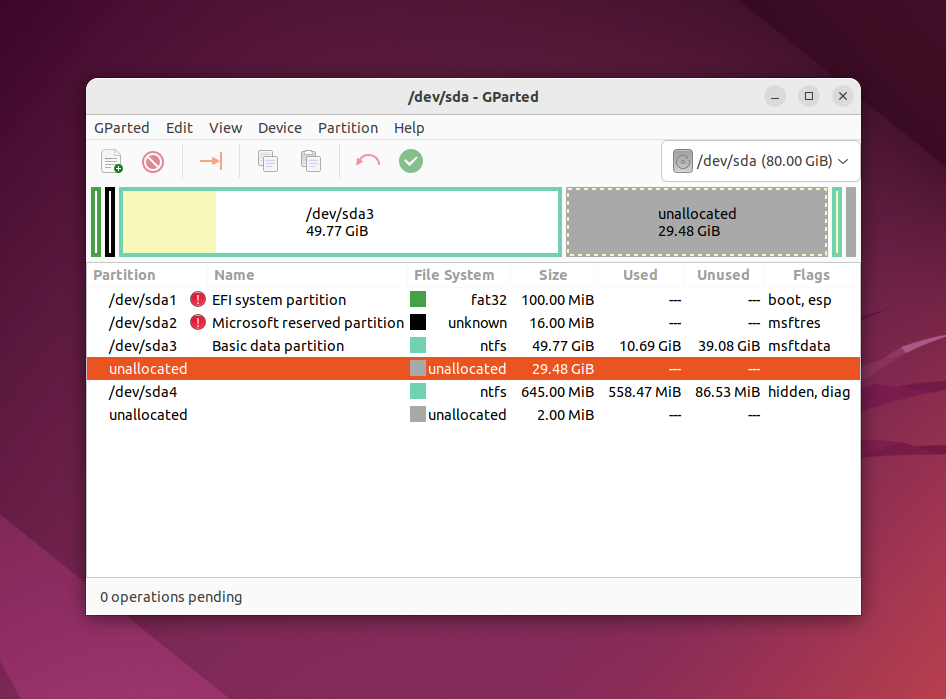
The main window of the application will look like this:
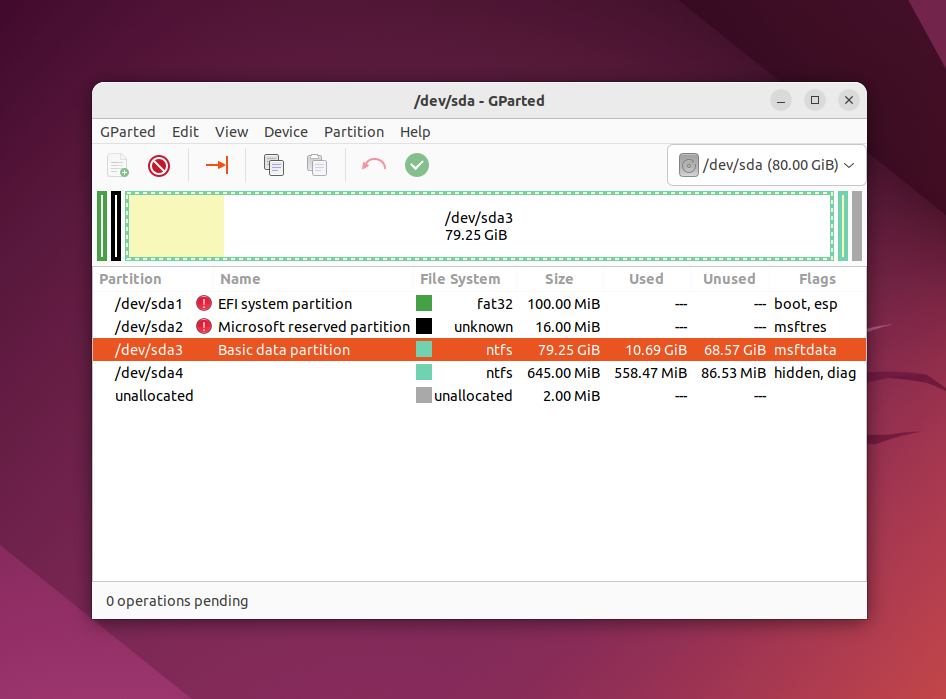
Note, that the Linux partition naming strategy differs from Windows. Partitions are just files in the special dev filesystem in Linux. You will understand later how it works, but at this moment you should know that each partition has a name that is started from /dev/sd. Then, you can see a letter which reflects a physical drive (sda, sdb, sdc, sdd, etc). At the end of the disk name, a decimal number is appended which reflects the partition number. For example, sda1, sda2.
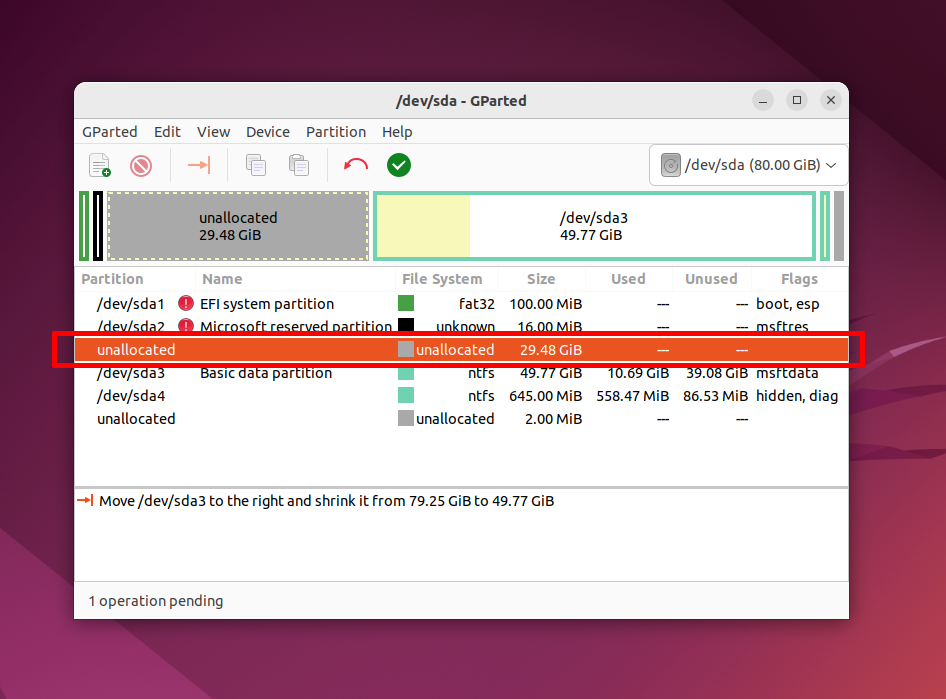
You can see not only the drive name but also the filesystem, size, and free space for each disk in Gparted. Use this information to find out which name has your Windows partition. In this example, you can see a lot of partitions but you shouldn’t delete them if you don’t want to break your system. Here is their description:
- /dev/sda1 — EFI partition with bootloader files;
- /dev/sda2 — a partition reserved by Windows;
- /dev/sda3 — a system partition with Windows installed, drive C;
- /dev/sda4 — a recovery partition for Windows.
Here the /dev/sda3 partition has NTFS filesystem and took 79 Gb as same as the system Windows partition, so that’s what we need.
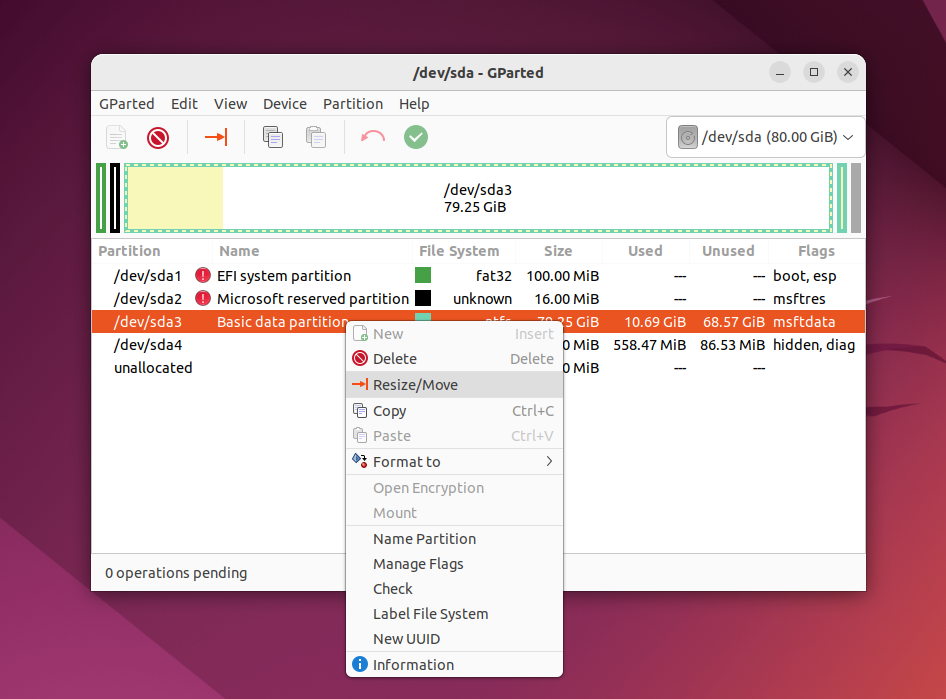
Let’s do the same thing as in the previous example — shrink the partition size for /dev/sda3 (C) to 50 Gb to install Linux on Windows. Make right-click on the /dev/sda3 partition and select the Resize/Move section:
In the next window, you can enter the wanted size manually in the New size field or use the slider:
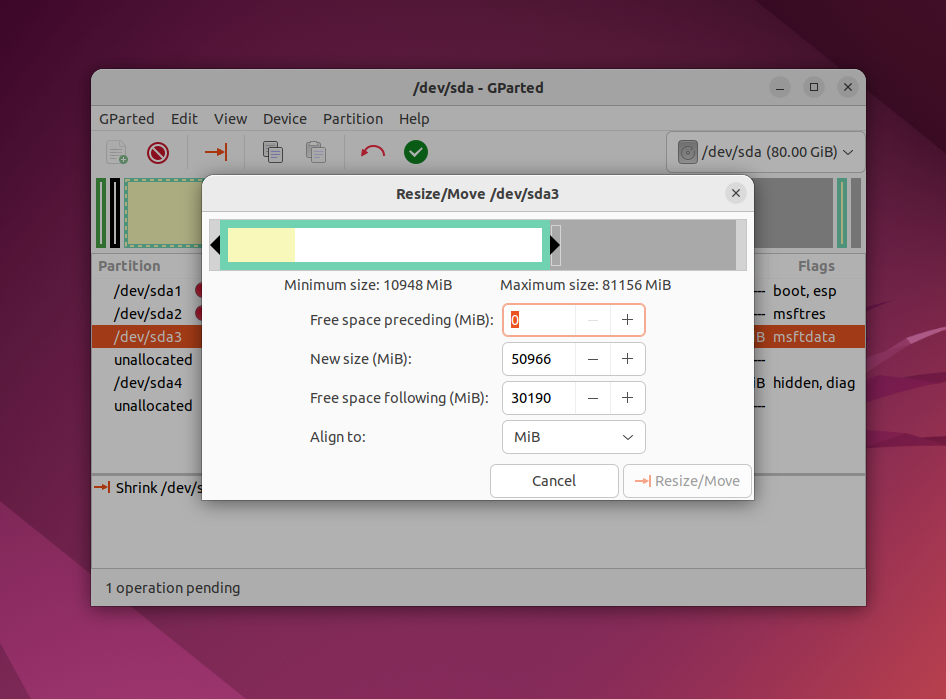
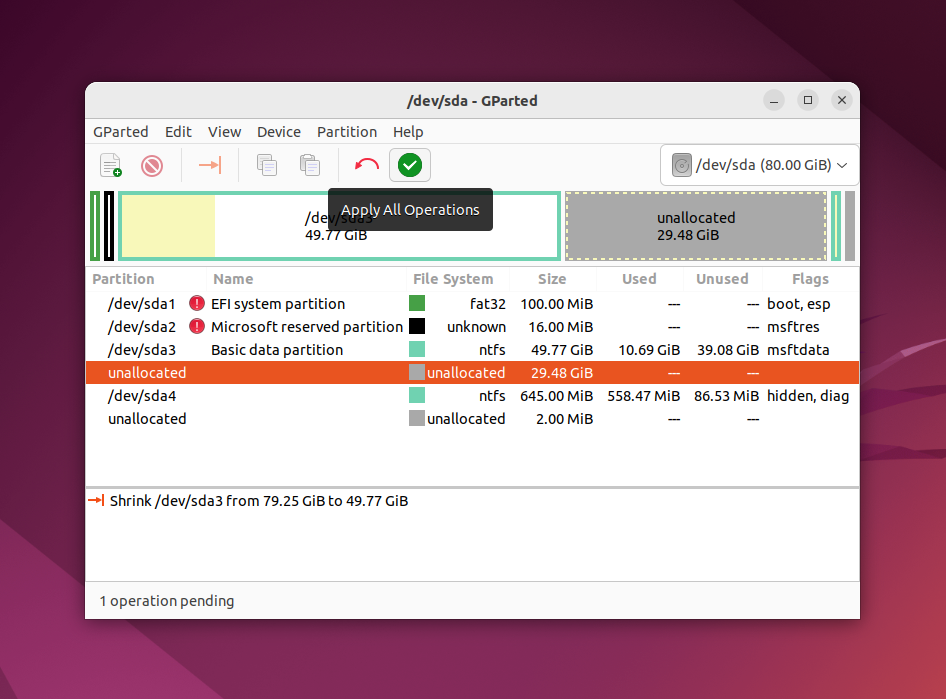
After this, press Resize/Move. You will see freed space but there are no real changes on the physical drive.
Pay attention, that you shouldn’t move the start of a system partition. You can carefully shrink a partition size by adding free space after it, but don’t try to get free space before it like this:
In this case, the Windows bootloader can be corrupted. It can be restored easily but I think you don’t want extra trouble.
When you are done with this, press the green button or select Apply All Operations in the Edit menu.
The application will ask for confirmation. Ensure that the confirmation alert looks the same as in the following screenshot:
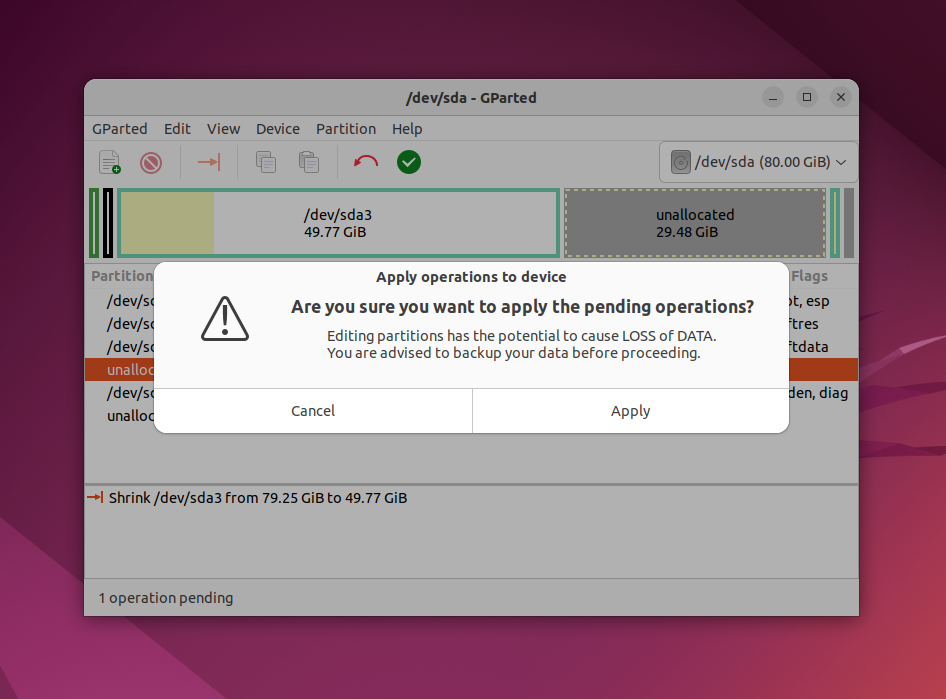
If the application warns that you are trying to move the start sector of the partition, you have done something wrong and you should cancel all and try again. Reducing the size of the filesystem can take a few minutes:
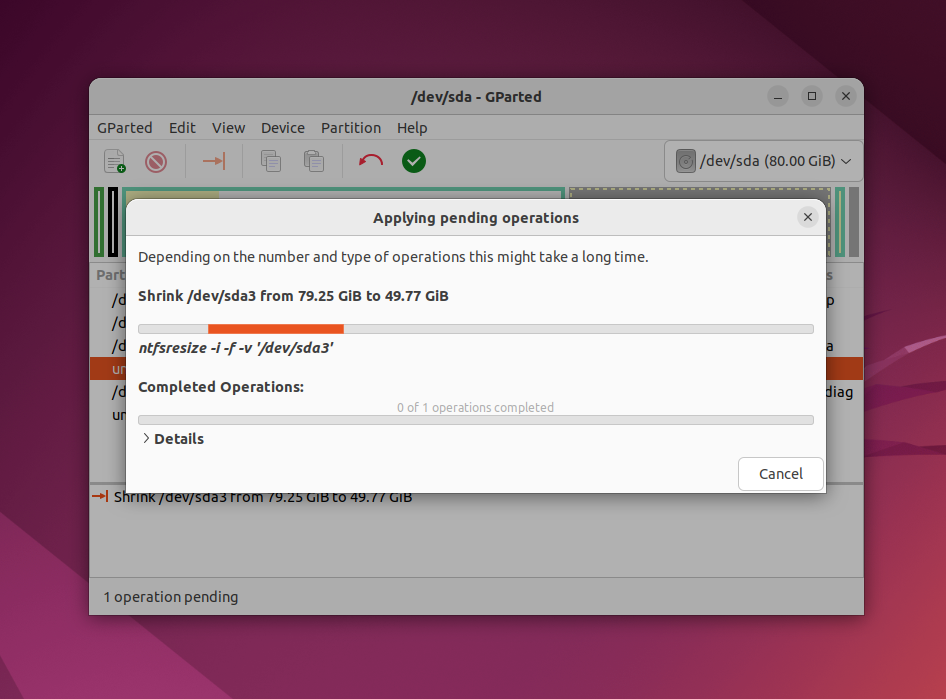
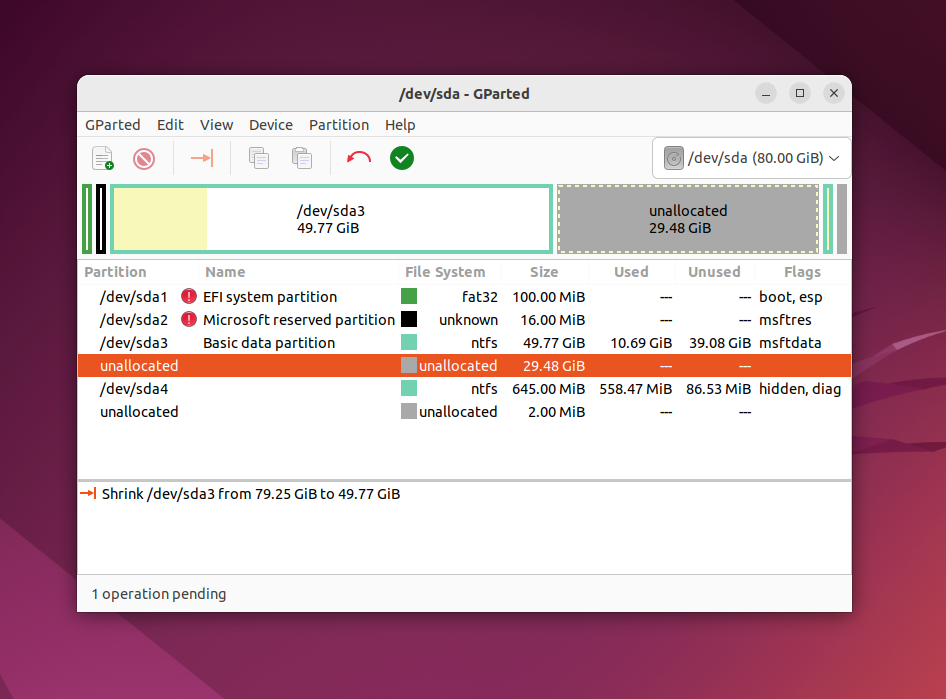
After this, you will see that the /dev/sda3 partition was reduced and free space appeared after it.
That’s it. I will not explain how to create Linux partitions here, let’s do it in the Linux installation tool.
I will not explain in detail how to install Ubuntu or any other distribution. It already has been explained in a lot of articles on the Internet or this site. Let’s have a look at how to do disk partitioning. You can use any distribution, actions will be pretty same. But I will use Ubuntu as an example in this article because it is the most popular Linux distribution for beginners.
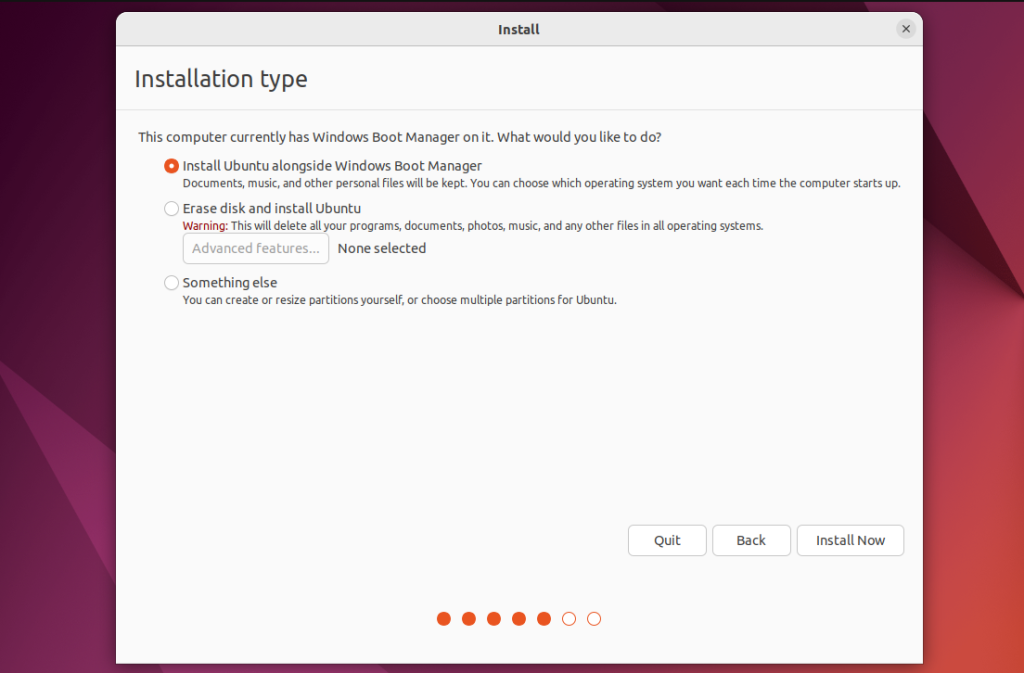
1. Choose a partitioning method
You can choose the partitioning method in the Installation type step. By default Install Ubuntu alongside Windows Boot Manager option will be selected. In this case, Ubuntu will be installed in the free space automatically:
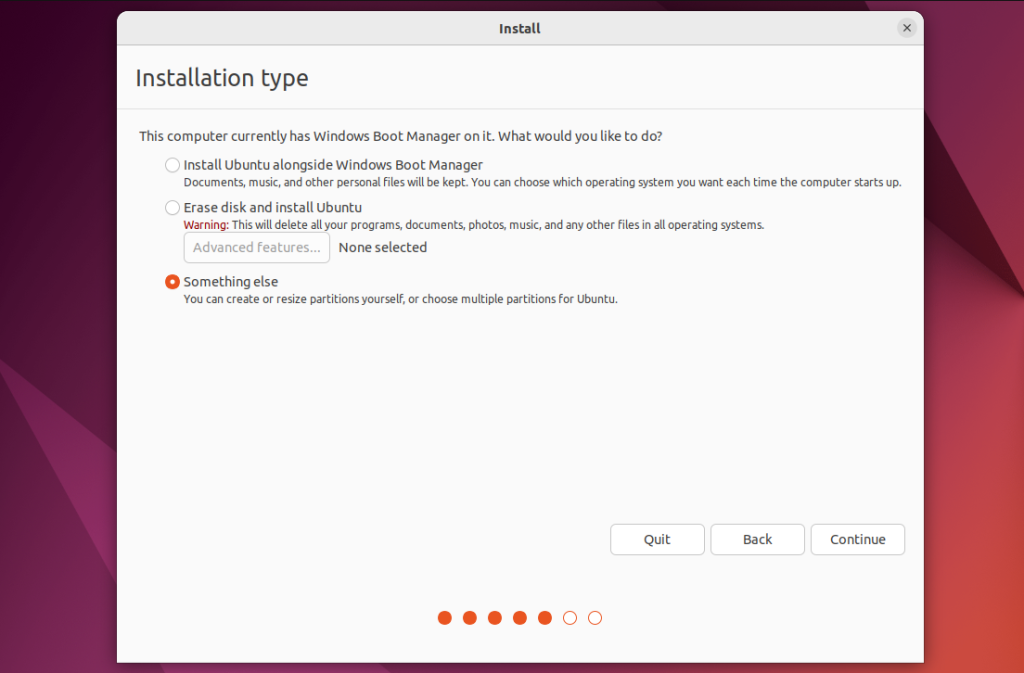
But I recommend choosing the manual method. Select Something else option for this. In this case, you will have more control over the installation process:
2. Create Partitions
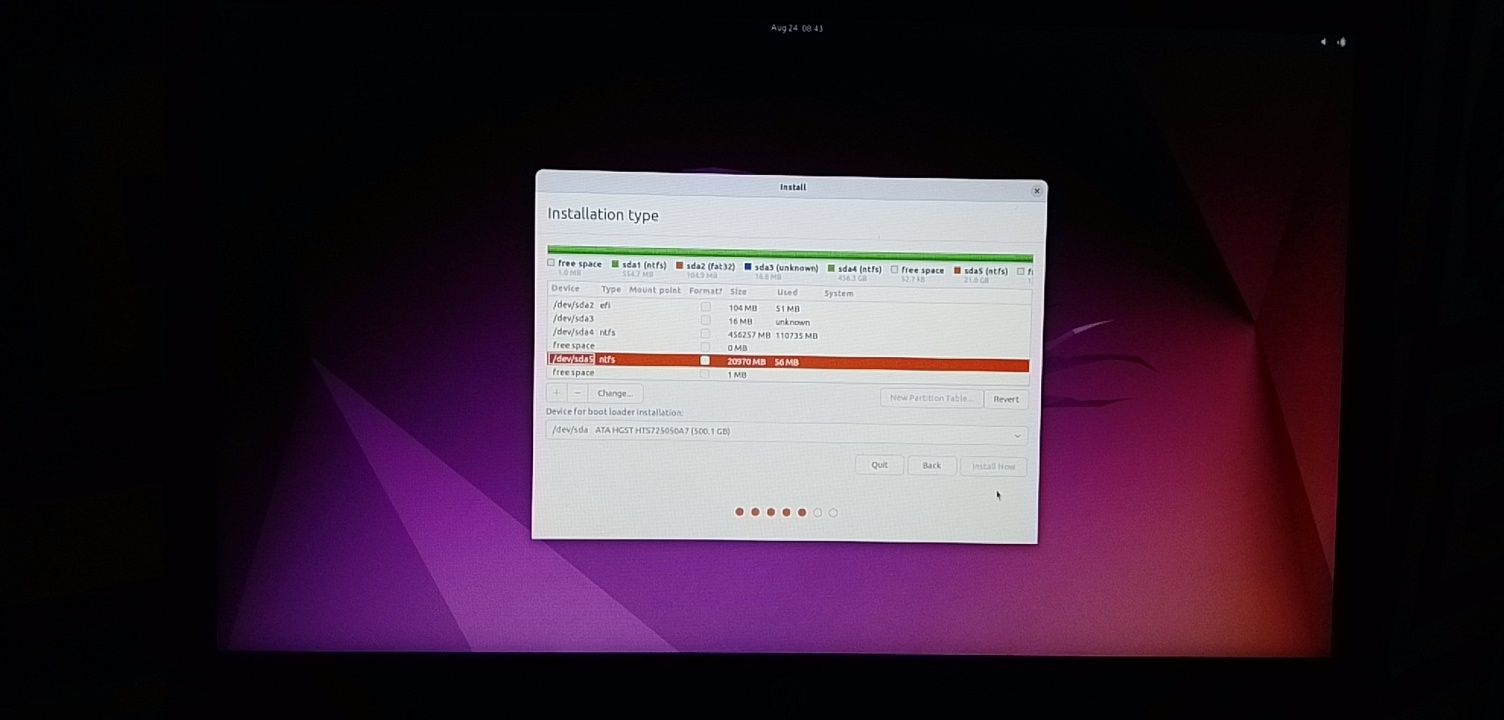
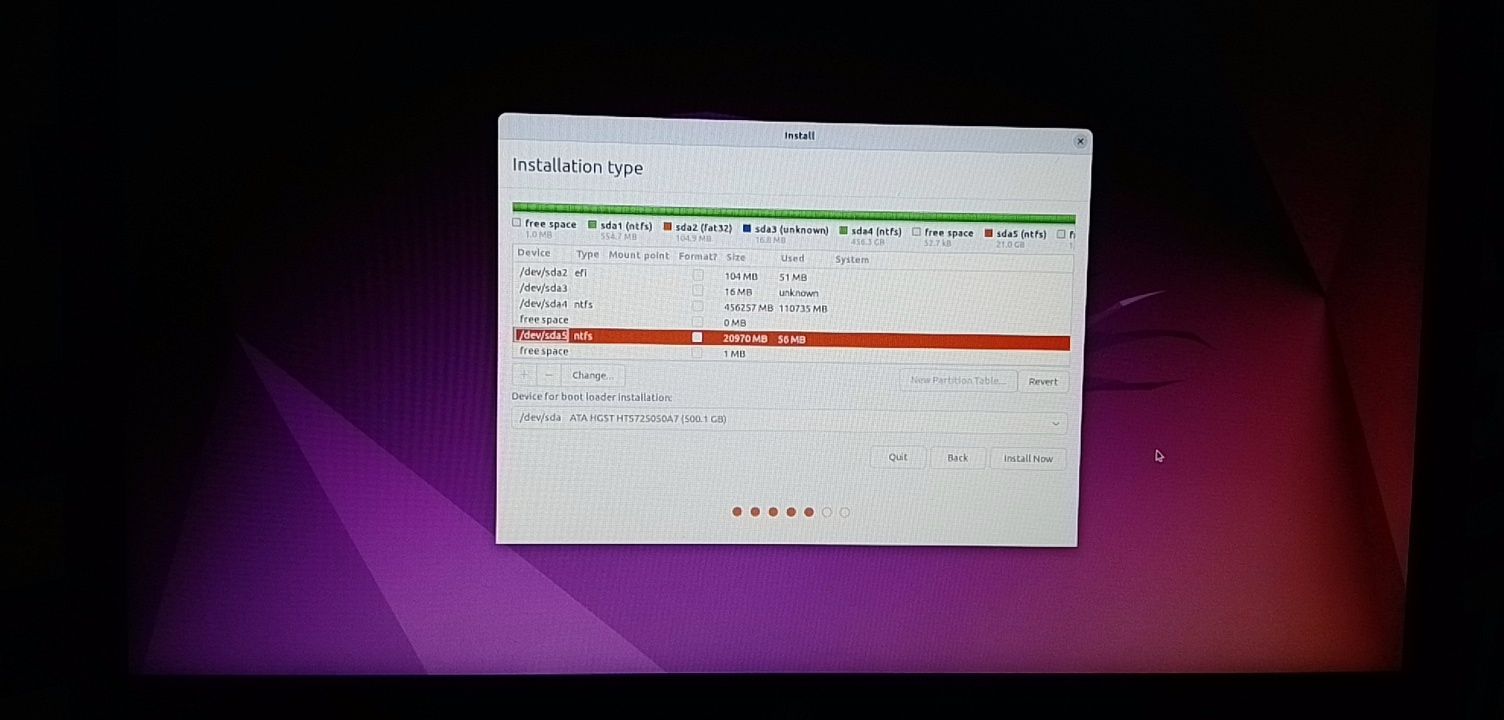
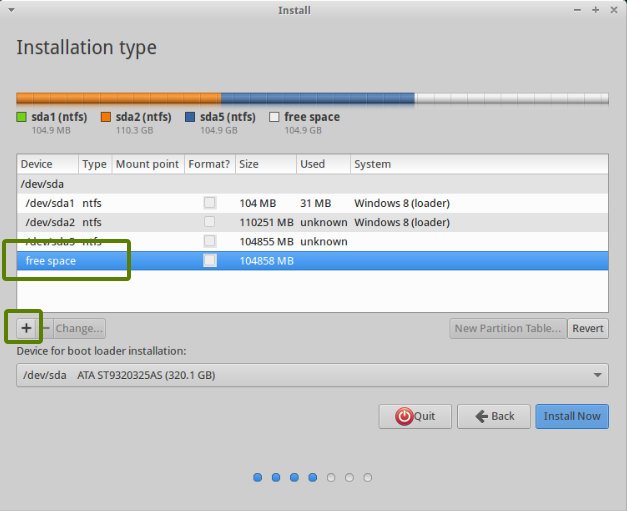
If you choose the manual partitioning method, you will see this window on the next step:
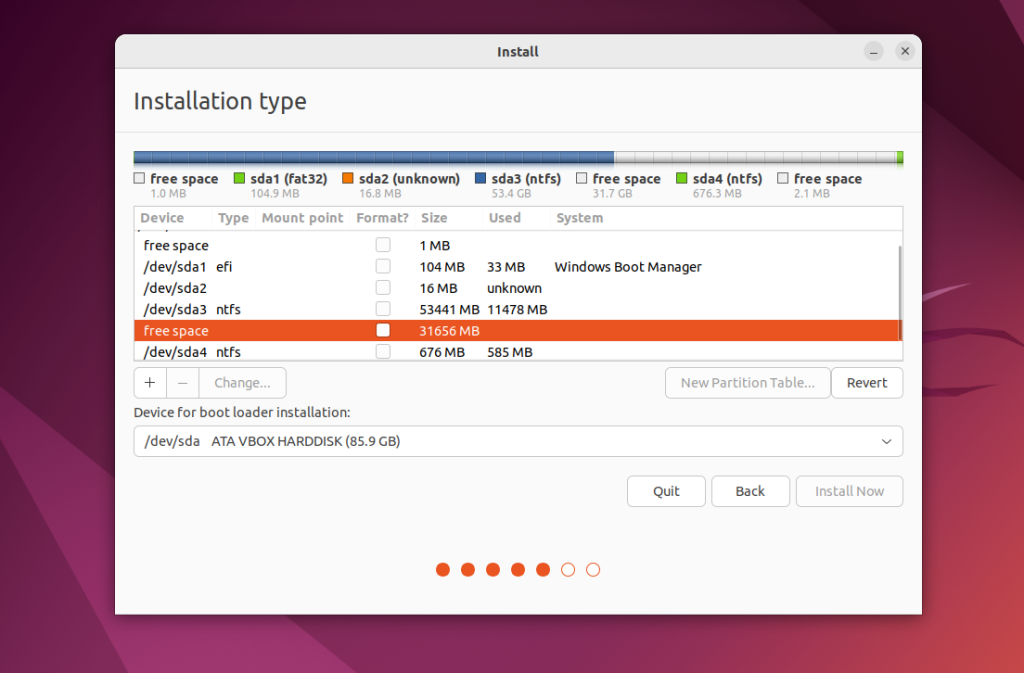
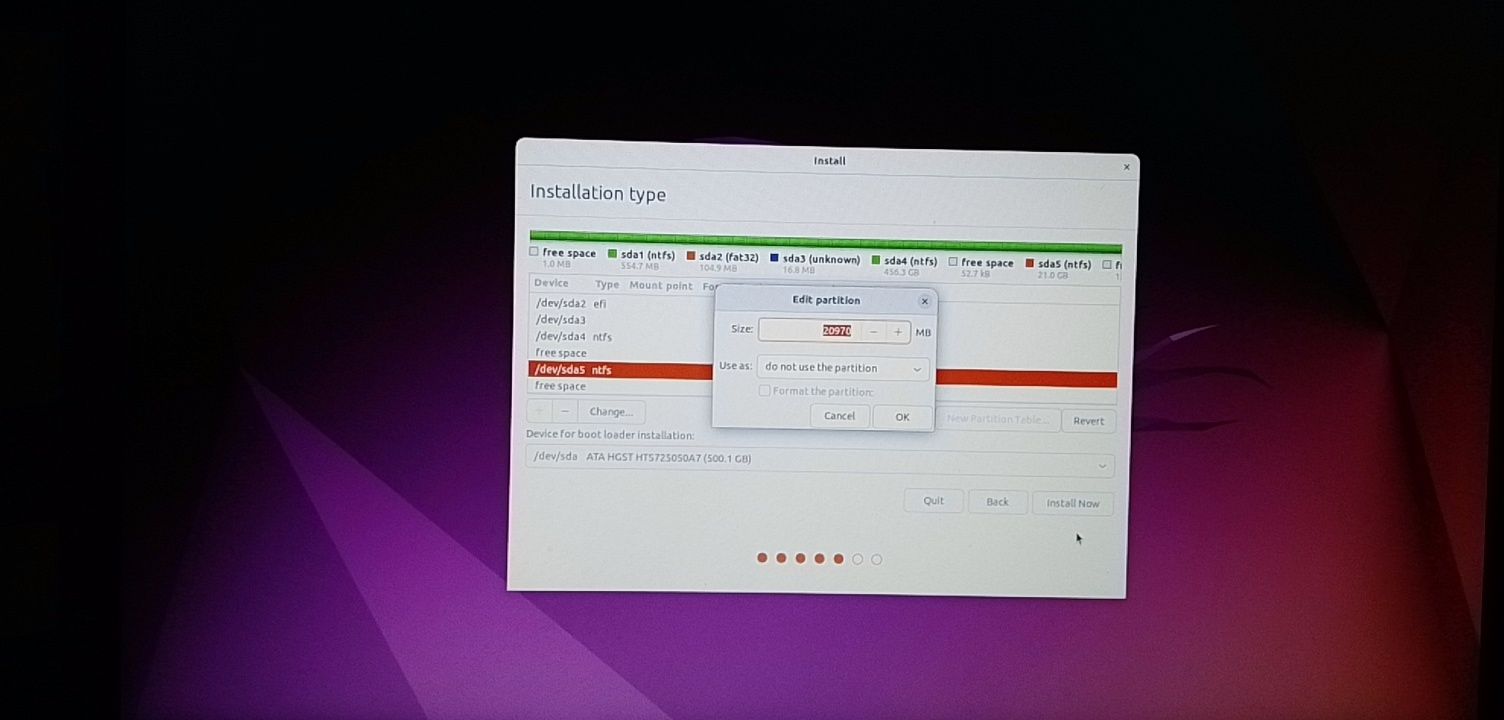
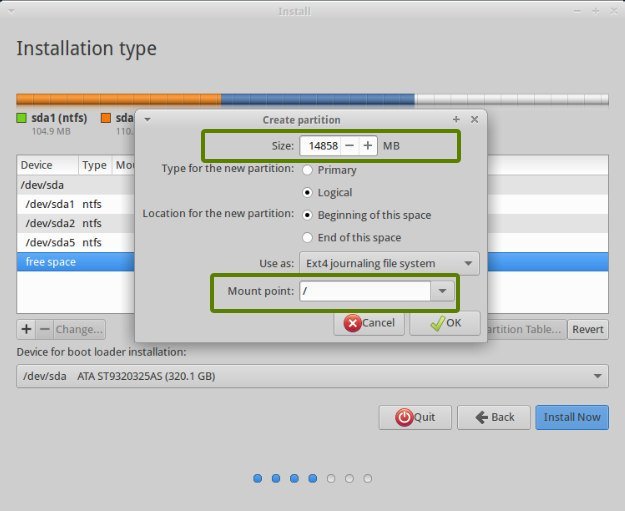
Click on Free space and then click on the plus button to create a new partition. Then enter a size for a new partition and mountpoint. You must create at least a root partition. It must be not less than 25 GB. But I recommend allocating for this partition 50 — 100 GB. Then, specify / as the mountpoint.
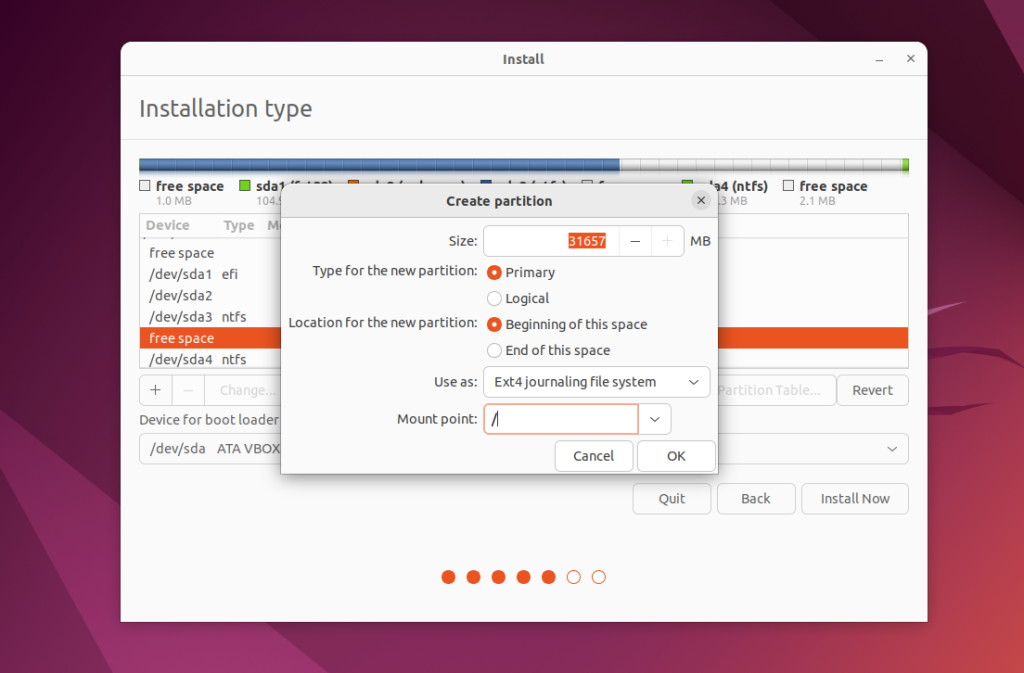
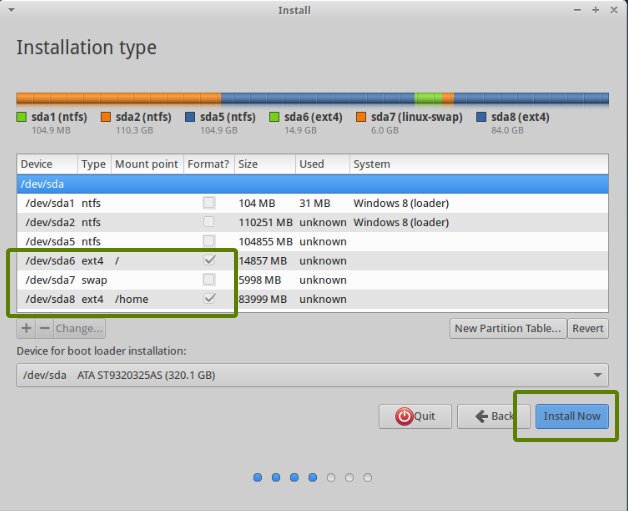
After this, the partition will appear in the list:
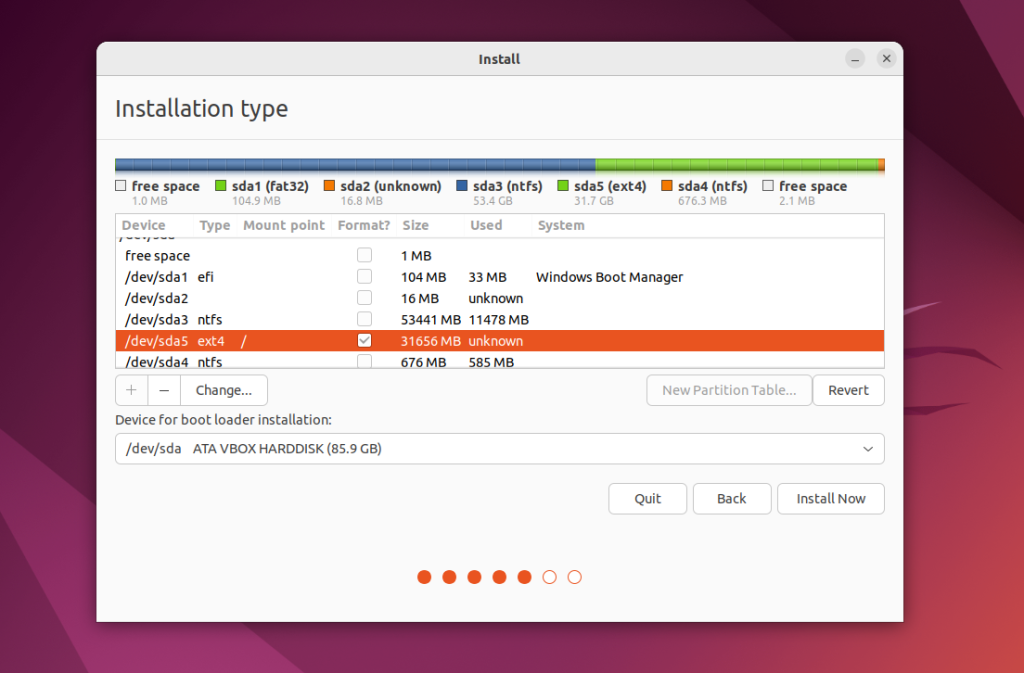
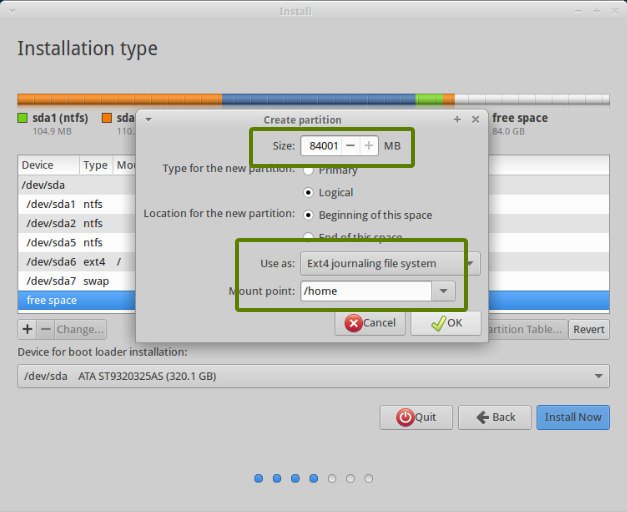
You can create a home partition in the same way if you have space for it. But use /home as the mountpoint.
2. Install Bootloader
In UEFI systems bootloader should be installed on the EFI partition. So it is important to choose this partition or even a drive which has this partition for installing a bootloader. In this case, this is /dev/sda1. You can configure it using the Device for bootloader installation section at the bottom of the window:
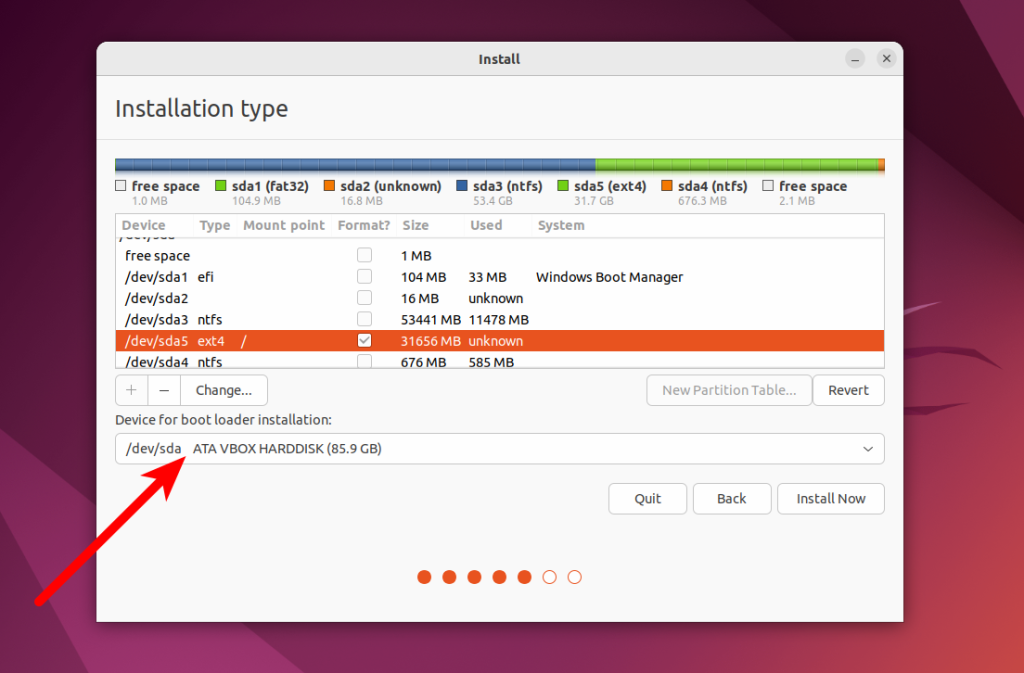
Systemd mounts this partition automatically, so you don’t have to specify mountpoint for it. If everything is done correctly, you will see the Grub bootloader after installing, and there you will be able to select a operating system for booting.
If you are installing Linux on a non-UEFI system, you can leave the default value for bootloader configuration. There are multiple ways to install a bootloader and they depend on the partition table. It will be described in another article.
Then, you can continue the installation process as usual, and installing Linux with Windows 10 or 11 will be completed successfully.
3. Complete Installation
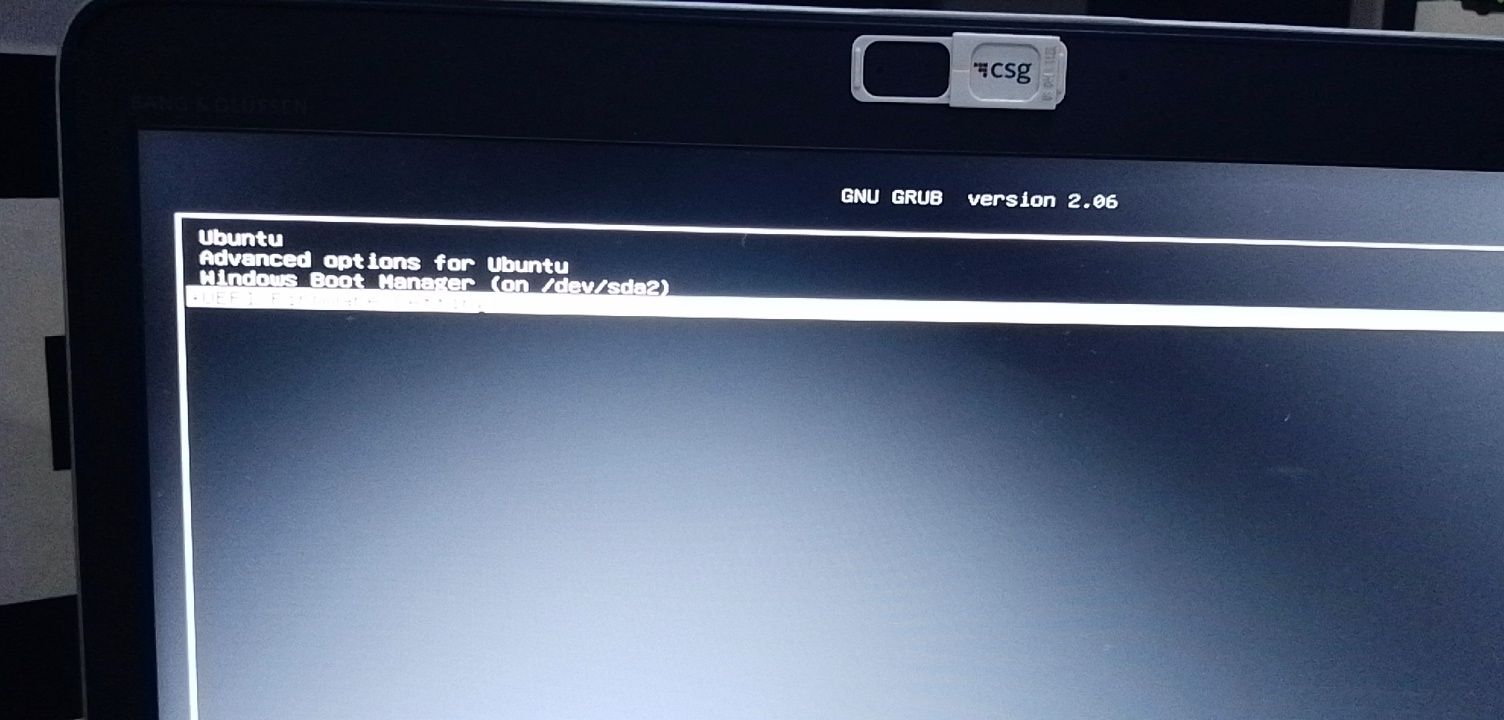
Many users want to know: «How to boot into my Windows after all of this?» Don’t worry, the Grub bootloader will find the Windows bootloader and will output the menu where you can select a operating system for booting:
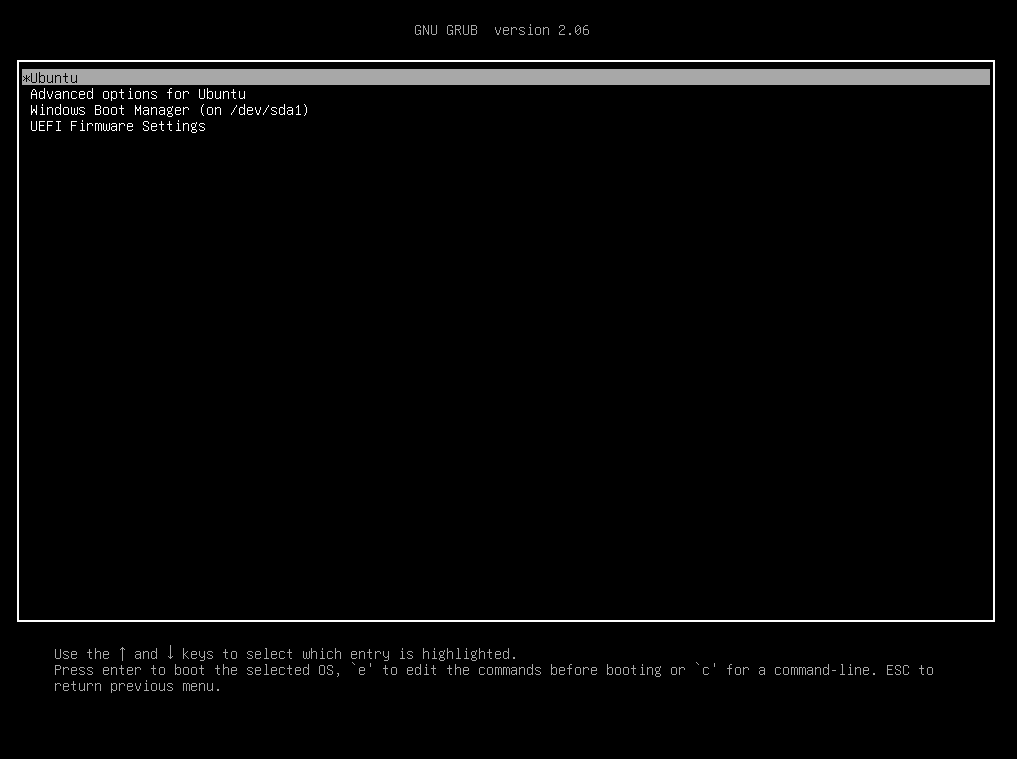
So dual-booting for Windows and Linux will be configured automatically. If everything goes wrong and you don’t see the Grub bootloader, you always can repair the Windows bootloader or reinstall Grub using LiveCD. If everything is done correctly, you will be able to access your Windows.
Wrapping Up
In this article, we have explained how to install Linux on Windows 10 or 11, how to resize and create partitions on the Windows drive and specify those partitions for Linux installation. There is no sense to explain how to install each Linux distribution. There are dozens of different distributions and all actions will be pretty same. If you have any questions or suggestions on how to improve the article, use the comments form below!
The article is distributed under Creative Commons ShareAlike 4.0 license. Link to the source is required .

You don’t have to have two different computers to use Linux and Windows 10. It’s possible to have a Linux distro installed on a computer with Windows 10 preinstalled.
In this article, I will show you how to dual boot Windows 10 and the popular Ubuntu Linux distro. But before that, you have to install Ubuntu on your Windows 10 PC.
Before you go through this process, you must backup your files. That’s because installing an OS is a risky process. Sometimes it can overwrite the existing OS and delete all your files.
N.B.: Most of the processes in this article take time to get done, so you need to be patient.
What We’ll Cover – A step-by-step Guide to Dual-Booting Windows 10 and Linux
- Prerequisites
- How to Partition your Hard Drive for Ubuntu
- How to Optimize your Hard Drive for More Partition Space (Optional)
- How to Download Ubuntu in ISO Image Format
- How to Make an Ubuntu (Linux) Bootable USB Drive
- How to Install Ubuntu Linux Distro along with Windows 10
- Now You Can Dual Boot Ubuntu and Windows 10
- Conclusion
Prerequisites
Most importantly, there are some things you must have in place if you want to use (and dual boot) Ubuntu and Windows 10 on the same PC:
- A computer preinstalled with Windows 10
- A partitioned hard drive
- A BIOS in UEFI mode (Unified Extensible Firmware Interface)
- An empty USB drive of at least 4Gig for creating a bootable disk
- An internet connection to download Ubuntu ISO image (the Linux distro) and Rufus (a bootable drive creation tool)
How to Check If Your PC BIOS is in UEFI Mode
To check if your PC BIOS comes in UEFI mode, search for “system information” and hit ENTER.
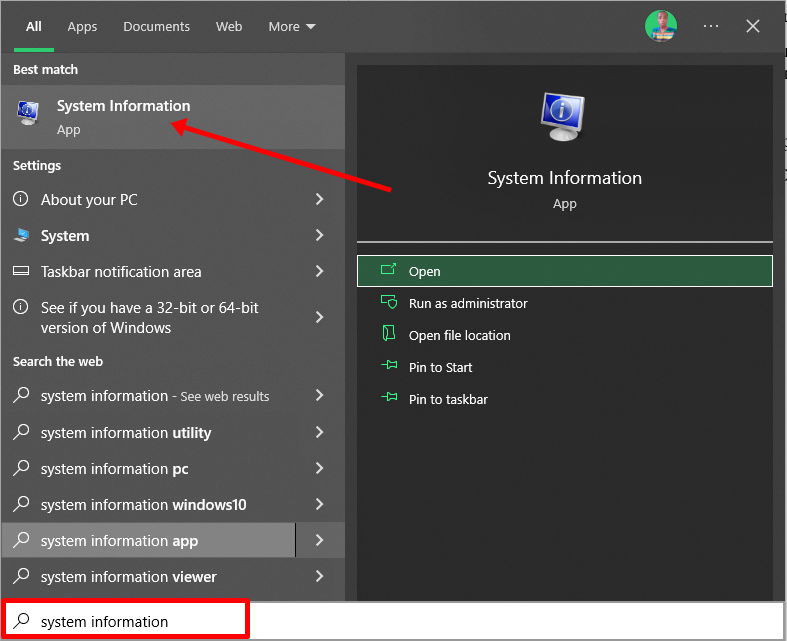
Look under BIOS mode to confirm that your PC BIOS mode comes as UEFI.
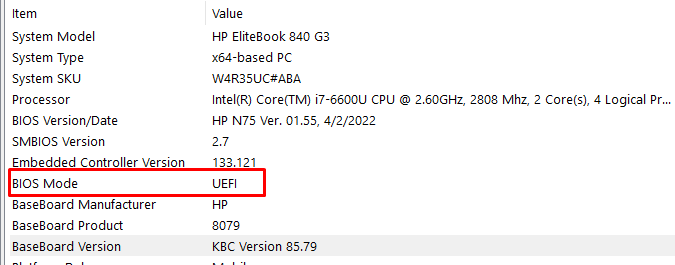
If your PC BIOS is not in UEFI mode, the two operating systems won’t see each other. You can learn more about the difference between these two modes here.
How to Partition your Hard Drive for Ubuntu
You have to partition your hard drive because you must set aside at least 20Gig for Ubuntu to live in and boot from.
To partition your hard drive, follow the steps below:
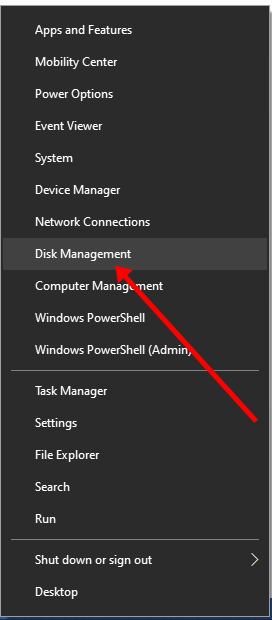
Step 1: Right-click on Start and select “Disk Management”.
Step 2: Right-click on your C drive and select shrink volume.
Step 3: Select at least (20000) 20Gig for Ubuntu and click “Shrink”. IT can take some time to complete, so be patient.
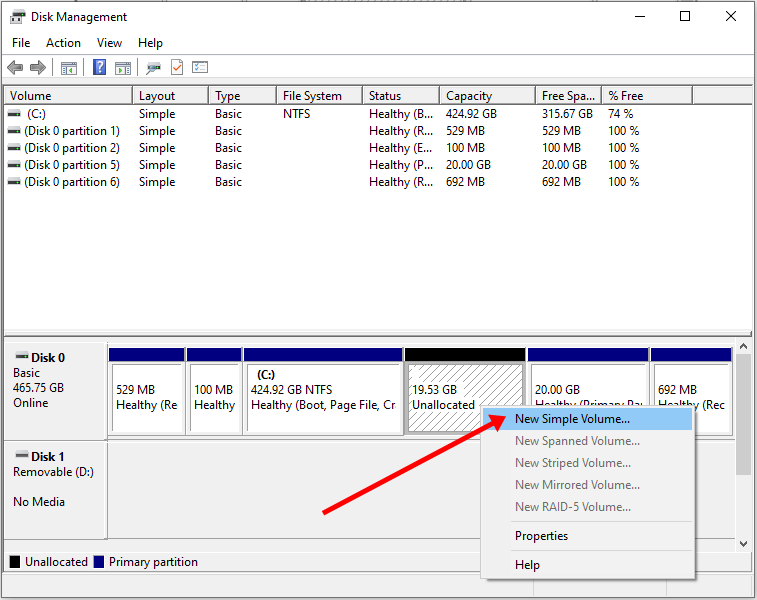
Step 4 (optional): You can go ahead and assign a letter to the new volume. Right-click on the unallocated space and select “New Simple Volume”.
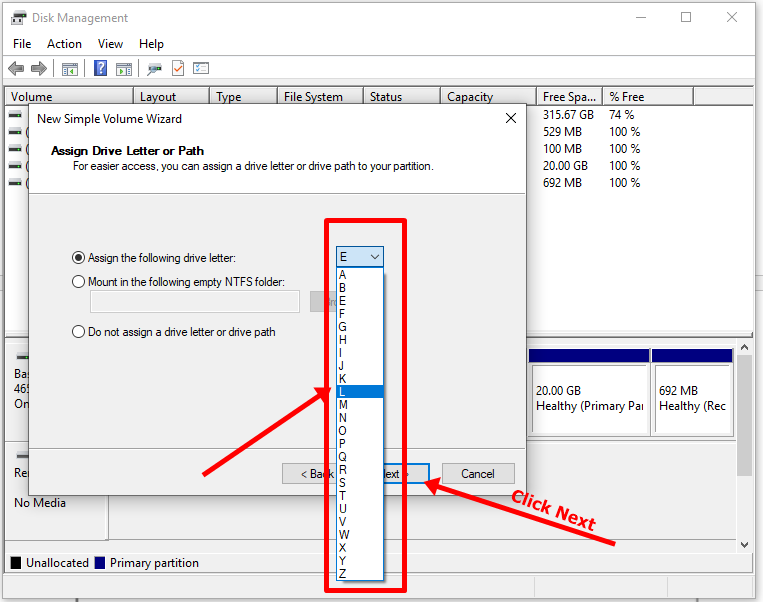
Step 5: Follow the wizard and assign a letter to the drive, then follow the rest of it.
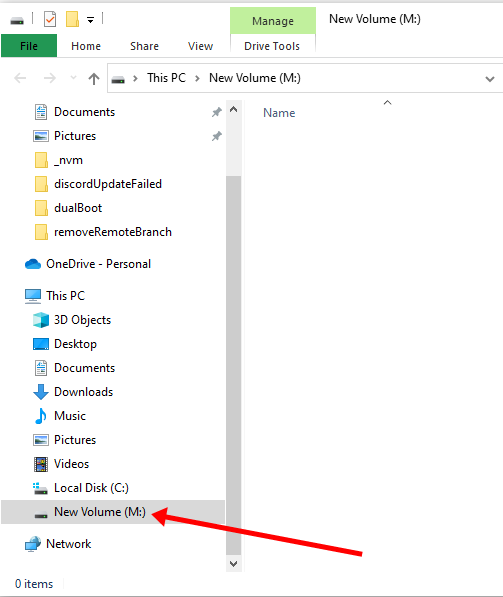
After completing the wizard, the drive should be listed on your computer.
Congrats! You’ve successfully partitioned your hard drive.
N.B.: If you have a lot of free space in your hard drive but your PC still didn’t give you up to 20Gig partition space, then you need to optimize your PC’s hard drive. Proceed to the next section of this article to do that.
How to Optimize your Hard Drive for More Partition Space (Optional)
The common purpose of hard disk optimization is to speed up your computer during boot time and make it run smoother.
At the same time, the process will defragment the hard disk and make free space more available for partitioning.
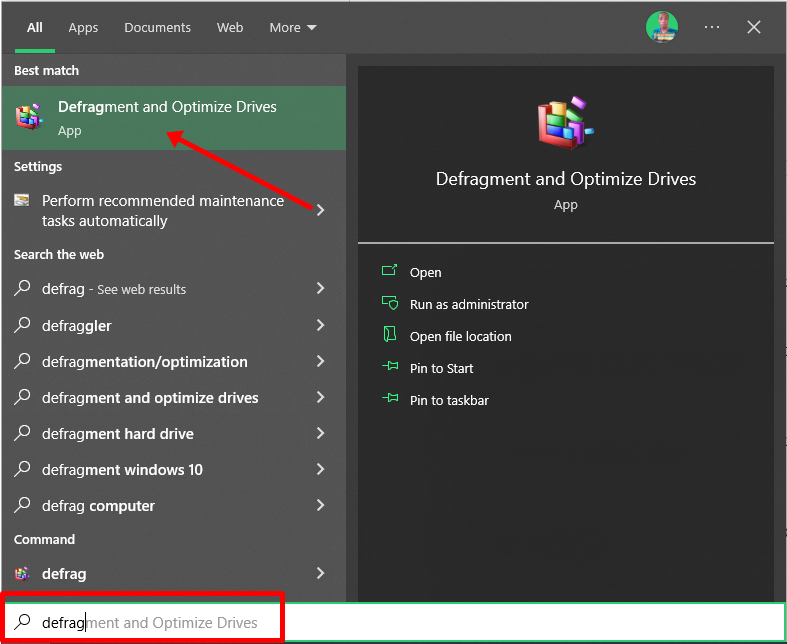
To optimize your hard drive, click Start (Windows logo key), search for “defrag” and select “Defragment and Optimize Drives”.
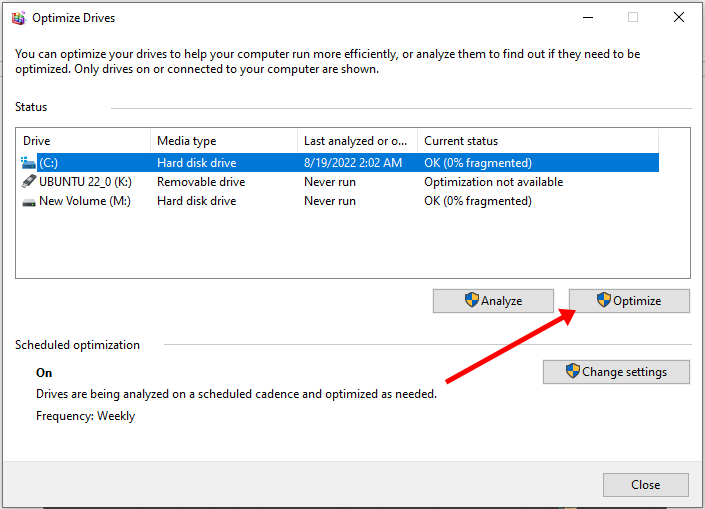
Make sure your C drive is highlighted, then click “Optimize”.
After you’ve been able to set aside at least 20Gig for Ubuntu by partitioning your hard drive, then it’s time to download Ubuntu and make a bootable USB.
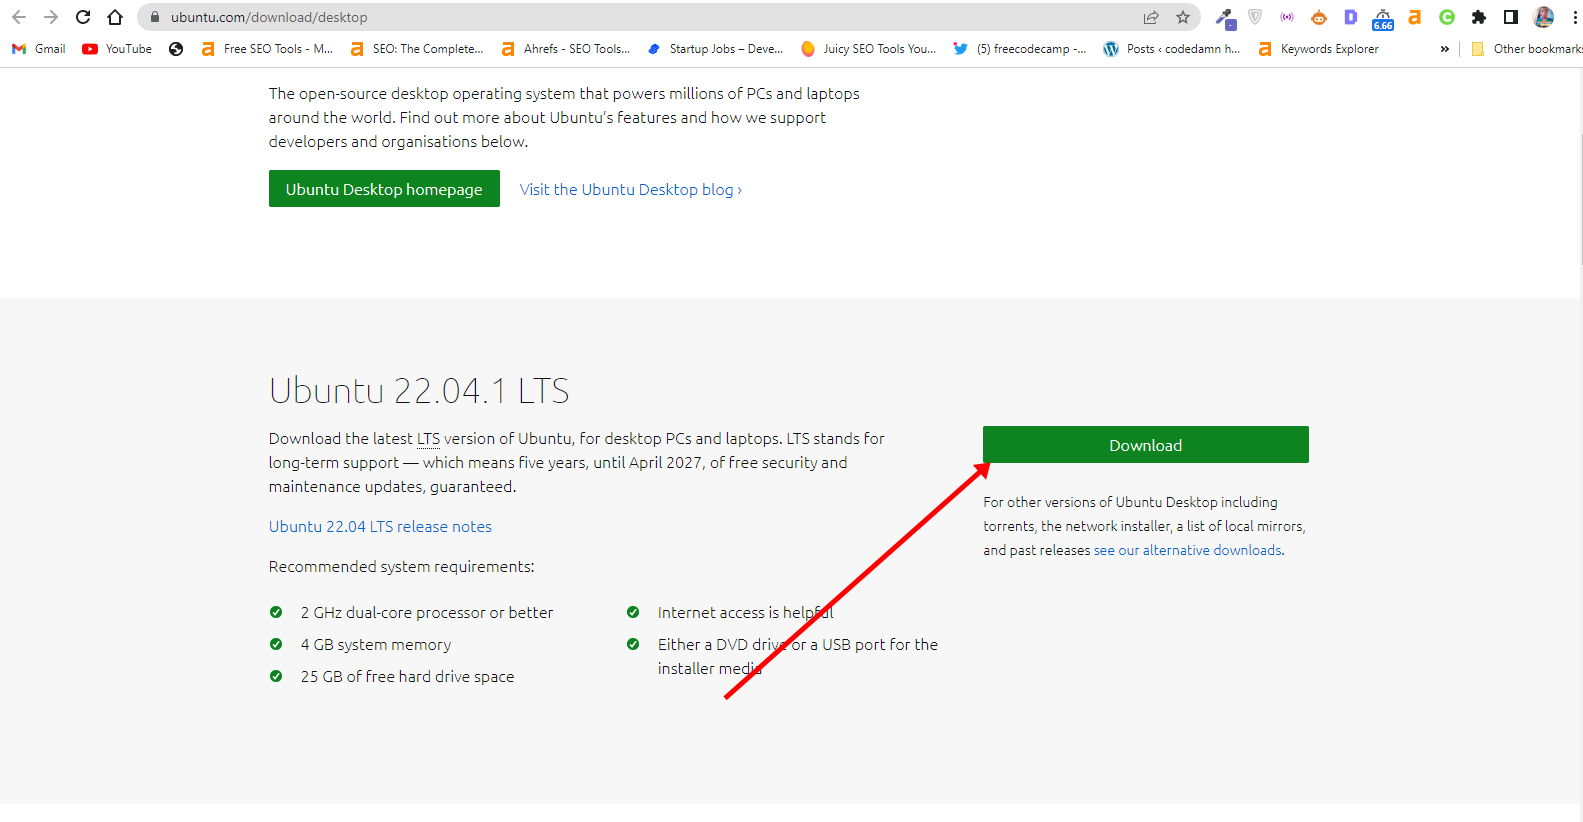
How to Download Ubuntu in ISO Image Format
The next thing is to download Ubuntu in ISO image format so you can install Ubuntu. You can download it from the Ubuntu distro website.
After downloading Ubuntu, don’t do anything with it yet. You need to make a bootable USB and put it in there. That’s how you’ll be able to use it.
The reason you can’t install Ubuntu just like that is that it doesn’t come as an executable. It comes in form of ISO (optical disk image). That means you have to find a disk to put it in before it can work.
The next part of this guide shows how you can put the downloaded Ubuntu ISO on a USB stick.
How to Make an Ubuntu (Linux) Bootable USB Drive
You won’t be able to make a bootable USB drive for Ubuntu by just placing the downloaded ISO image in it. Follow these steps to get it done:
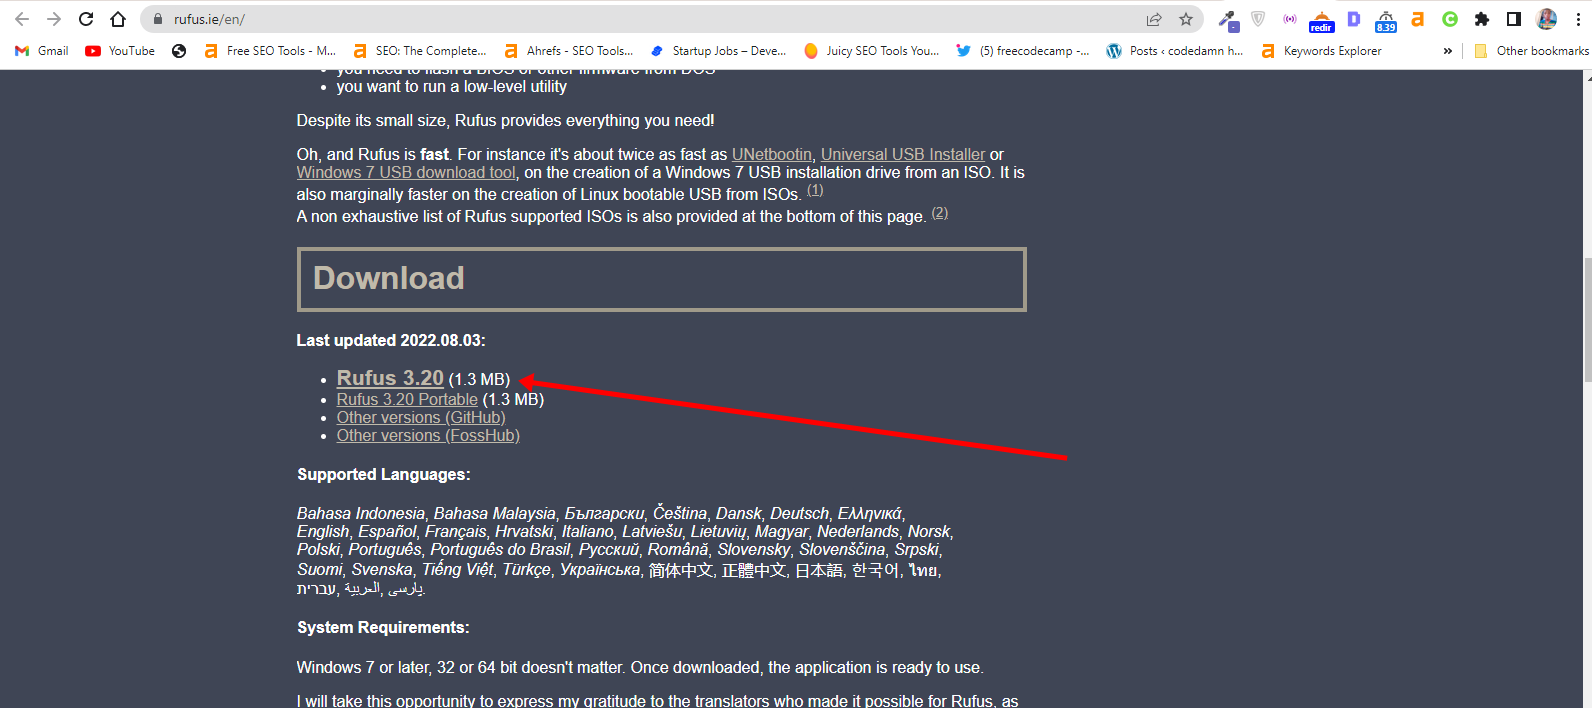
Step 1: You need to download a bootable USB drive creation tool like Rufus. You can download Rufus from their website.
Step 2: Insert the empty USB drive into your Windows 10 PC. Right-click on Rufus and select “Open”.
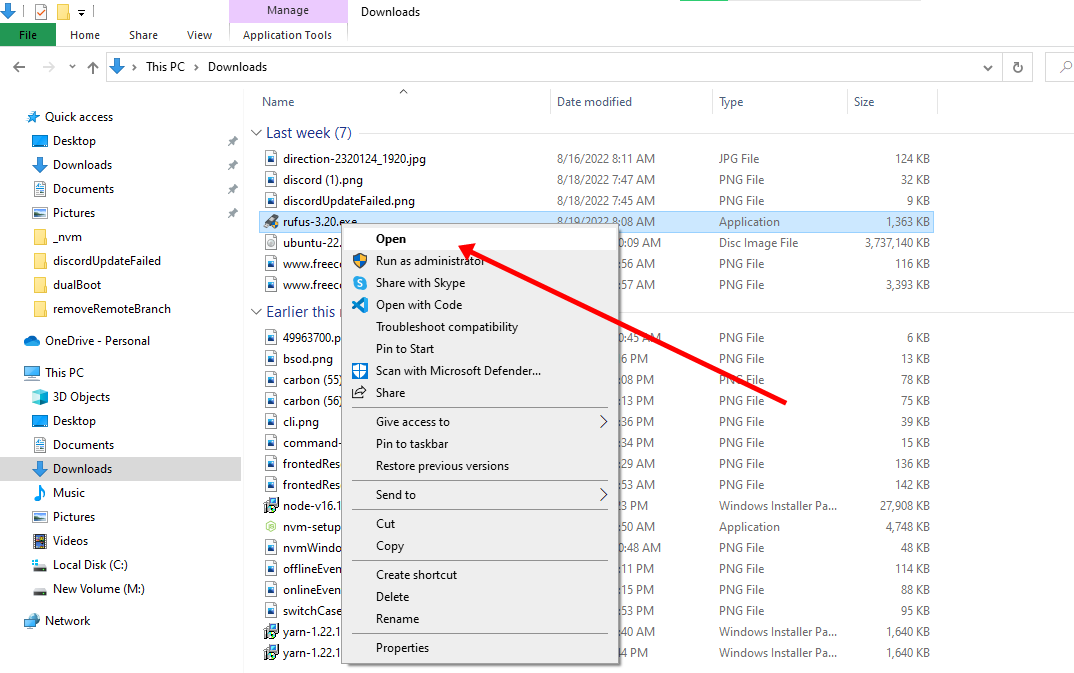
Step 3: Under “Device”, select your USB drive. And under “Boot selection”, click the “Select” button and select the Ubuntu ISO file you downloaded
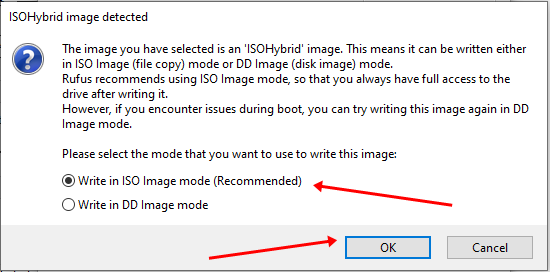
Step 4: Leave every other thing as default and click the “START” button to start burning the Ubuntu distro to the drive.

Step 5: Click OK to start the process.
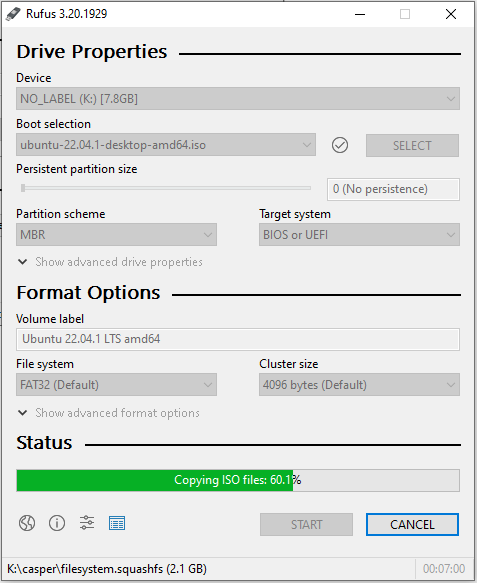
Once the process is done, you should see “READY” on a green background. Click the Close button. Its time to install Ubuntu.
Congrats! Now you have a bootable drive with which you can install Linux.
The next step is to install the Ubuntu distro on your Windows 10 PC. To do this, you have to boot your PC from the bootable USB drive you created.
How to Install Ubuntu Linux Distro along with Windows 10
Step 1: Ensure the bootable drive is inserted into your Windows 10 PC
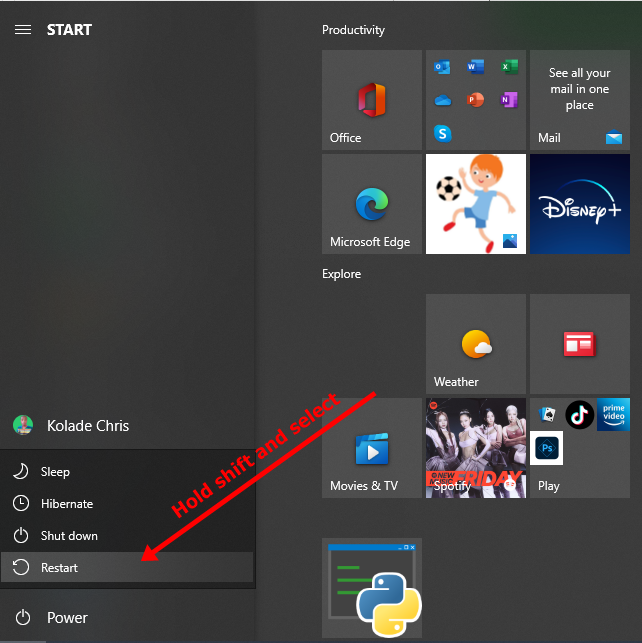
Step 2: Right-click on Start, hold SHIFT, and select Restart.
Step 2: Select “Use a Device”.
Step 3: On the next screen, you should see several devices you can boot from.
You may see the bootable drive as the name of the USB brand.
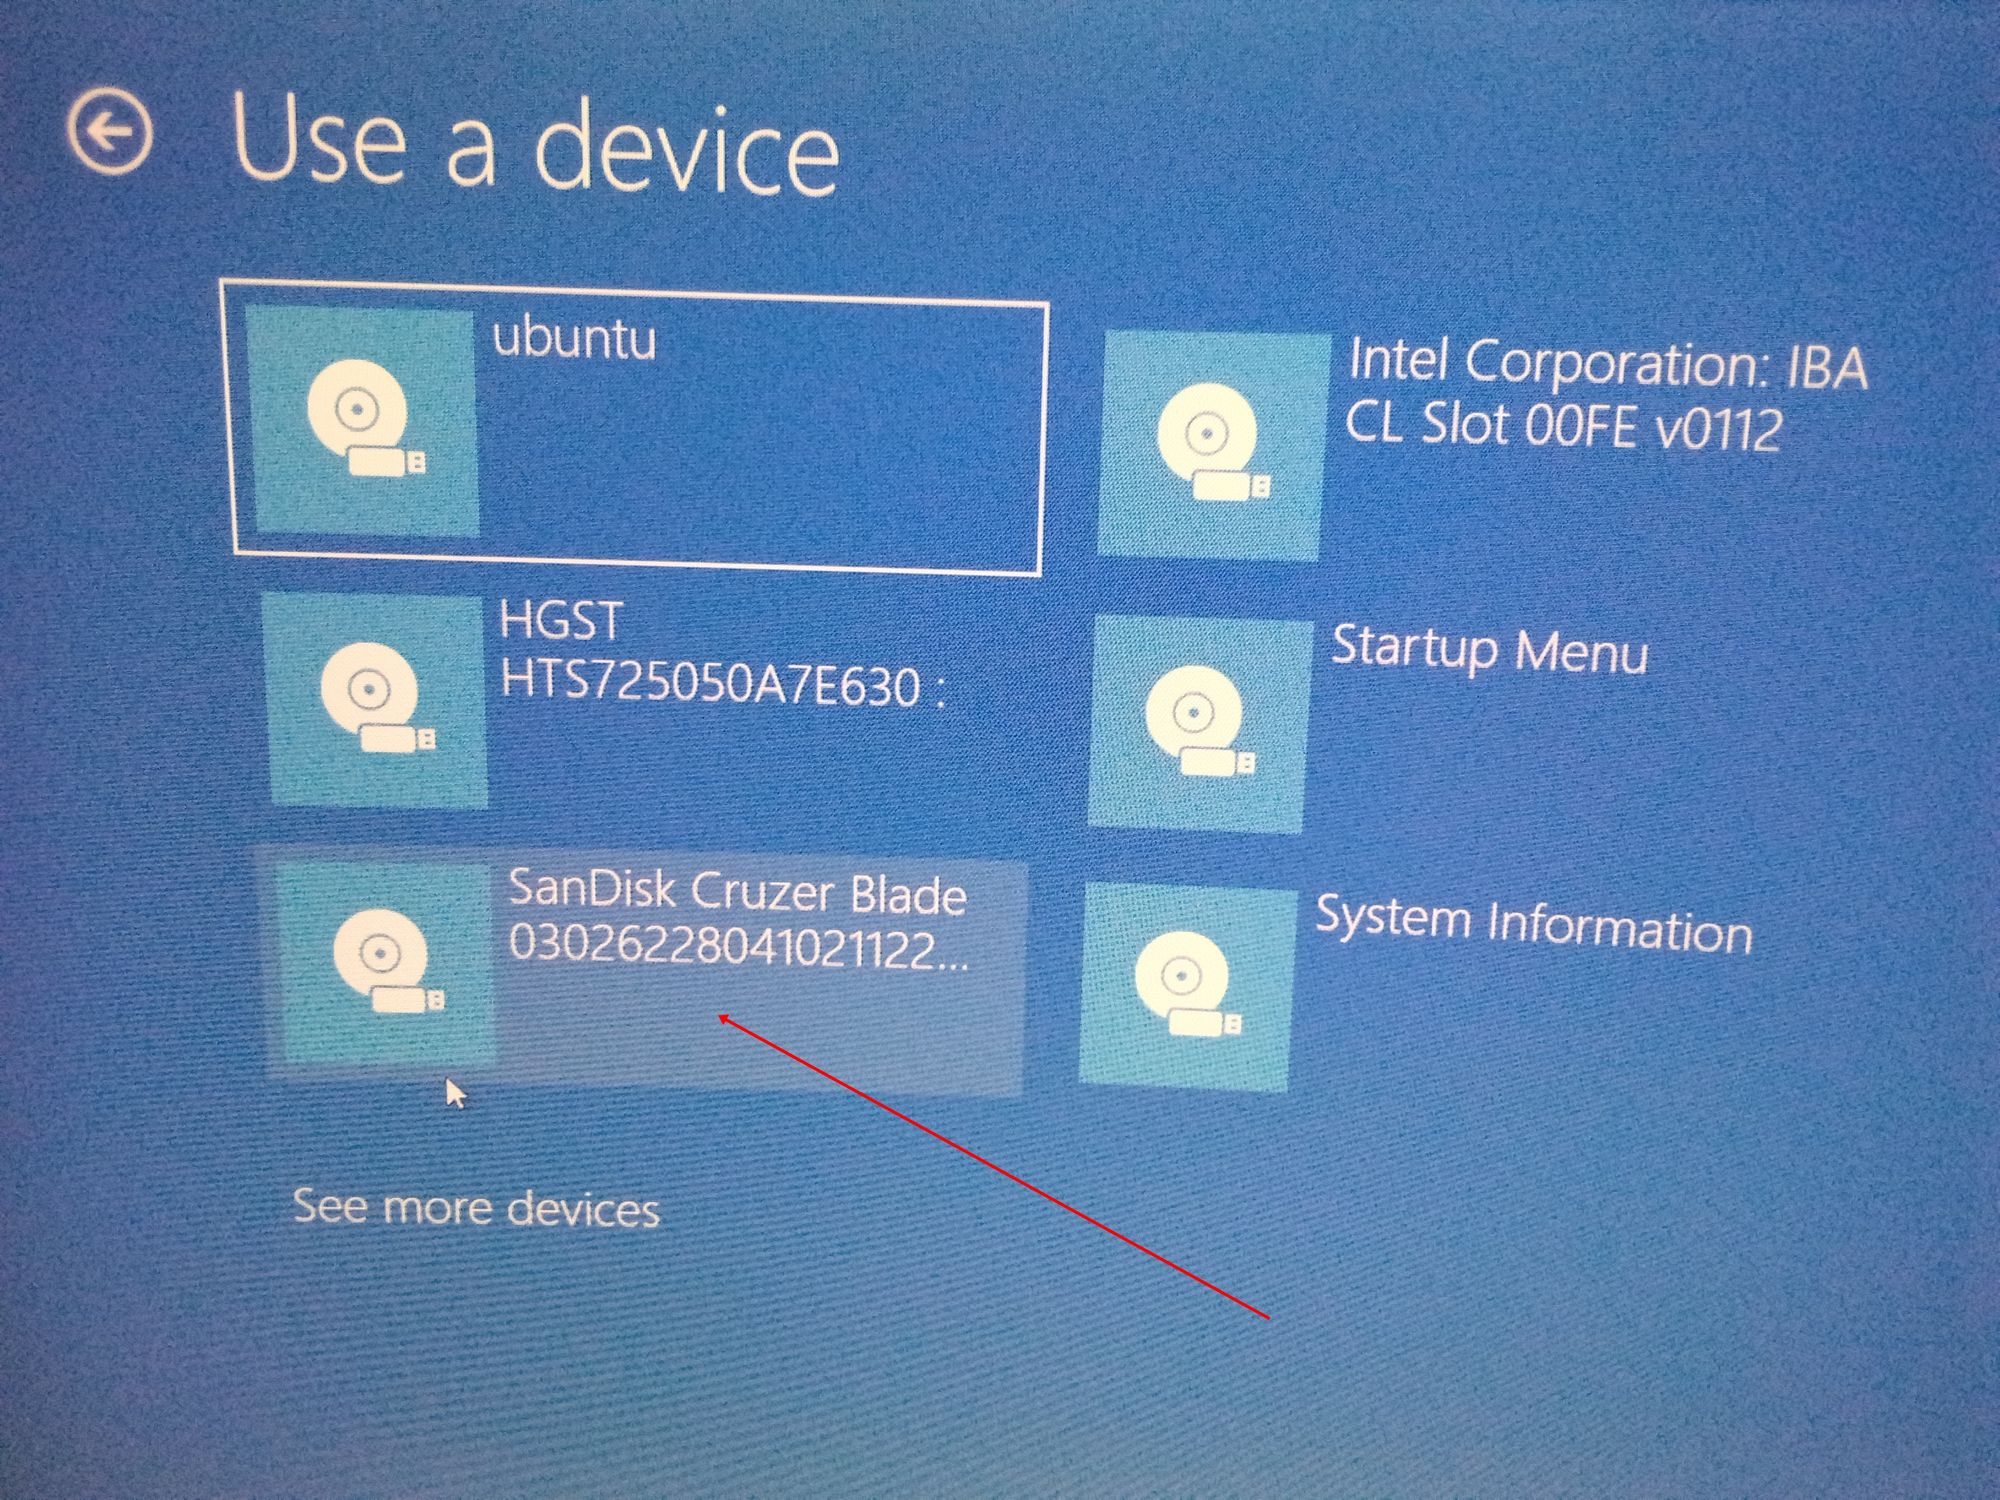
It’s possible to see it as “Ubuntu” too. Some other times, you might not see it, so you need to click on “See more devices».
If you still cannot see your bootable drive, head over to your boot menu by getting into BIOS. You will see it there.
N.B.: You should be very careful while making changes in BIOS. Whatever you do there has a lasting effect on your computer. If you are not sure of what you’re doing there, you should contact an IT professional.
Step 4: Choose «Install Ubuntu». You can also try it before installing it.
Follow other prompts of the installation wizard and make sure you don’t replace your Windows 10 OS installation with Ubuntu. This is why I suggested you back up all your files.
When you get to the point to select the partition you made, scroll to the partition you made earlier and press ENTER.
Click OK to select all the space in the partition.
This time around, the “Install now” button will not be greyed out anymore.
Follow other prompts until Ubuntu starts installing.
After the installation is done, Ubuntu will prompt you to remove the bootable drive and press ENTER to reboot your Computer.
Now You Can Dual Boot Ubuntu and Windows 10
Immediately after you reboot the computer, you should see a screen that looks as shown below:
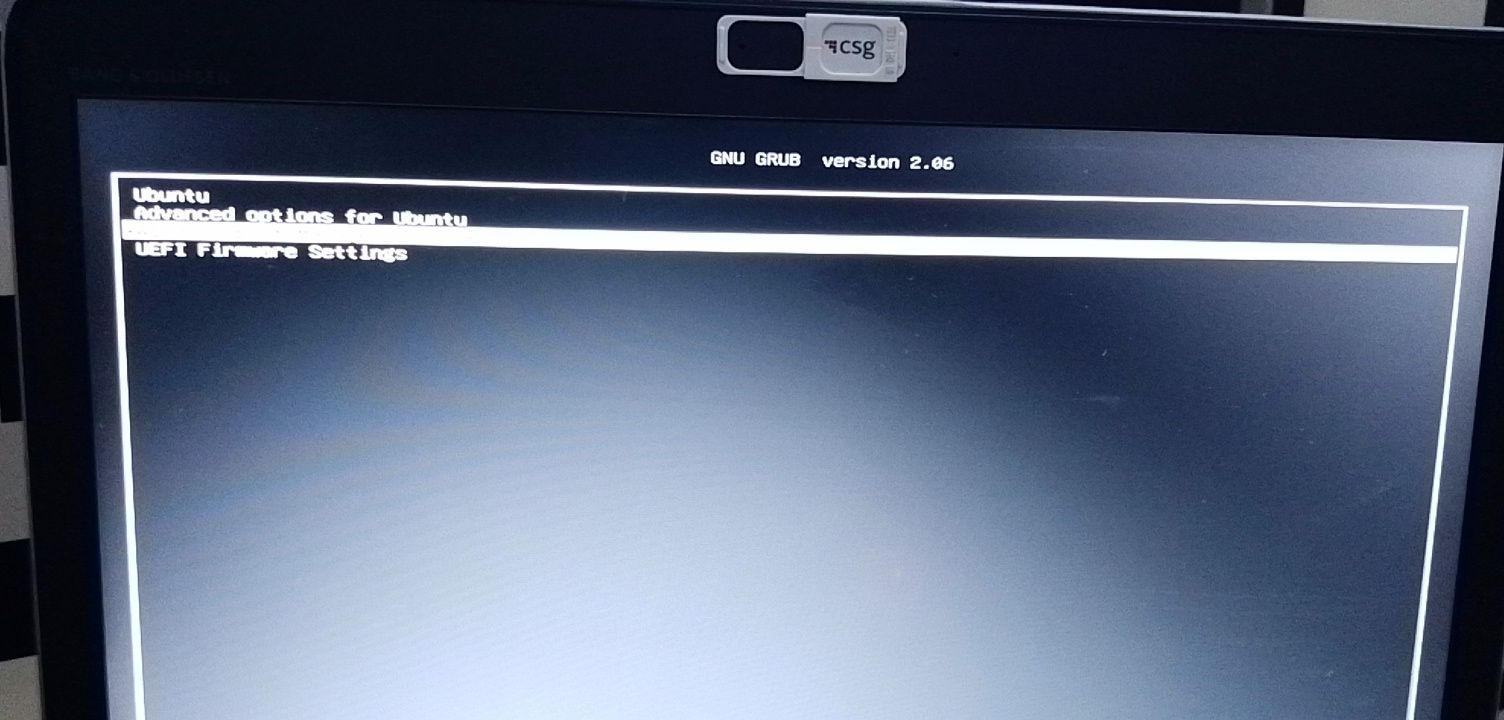
Now, you can select which one to boot into between Ubuntu and Windows 10.
To boot into Ubuntu, select Ubuntu. And to boot into Windows 10, select Windows boot manager.
You can also get into your BIOS from the same place by choosing UEFI Firmware Settings.
Conclusion
I hope this article helps you dual boot Ubuntu and Windows 10 on your computer.
The ultimate aim of this article was to show you how to dual boot Ubuntu and Windows 10.
But the article went beyond that to show you how to:
- check if your PC’s BIOS is in UEFI mode
- partition your hard drive
- optimize your hard drive
- make a bootable USB drive
- install Ubuntu Linux Distro along with Windows on your Windows 10 PC.
If you find this article helpful, kindly share it with your friends and family.
Learn to code for free. freeCodeCamp’s open source curriculum has helped more than 40,000 people get jobs as developers. Get started
Brief: This detailed guide shows you how to dual boot Ubuntu with Windows legacy BIOS systems. If you are not sure, read this to know if you have BIOS or UEFI system.
Continuing my experimentation with different Linux distribution, I installed Xubuntu last week. Xubuntu is a variant of Ubuntu with Xfce desktop environment instead of the default Unity. Light on resources, Xubuntu can be a good Linux alternative of Windows XP.
I prefer to install Linux in dual boot with Windows. I hardly use Windows but it gives me sort of back up if I mess up with things. Dual booting Linux with Windows is always suggestible for the beginners. In this tutorial, we shall see how to install Ubuntu in dual boot mode with Windows.
This guide covers system with BIOS. You can read this article for dual booting Windows 10 and Ubuntu with UEFI.
Ubuntu, Xubuntu, which one is it? Don’t be confused. The steps given here are equally applicable to Ubuntu, Xubuntu or even Linux Mint.
Before we see how to dual boot Ubuntu with Windows, let me give you some important details.
First, I had Windows 7 installed with 3 partitions on it. Later I installed Linux on it in dual boot mode. I changed the partition and kept around 100 GB of total 320 GB for Linux installation. In the course of time, I upgraded to Windows 8 and subsequently to Windows 8.1. I never had to face the problem of Windows 8′s secure boot thingy. It is just to clarify that this process does not show you how to deal with UEFI.
Install Ubuntu in dual boot with Windows 10 & Windows 8
Follow the steps below to install Ubuntu in dual boot with Windows:
Step 1: Create a live USB or disk
Download and create a live USB or DVD. In Windows, my favorite tool to create a live USB is Universal USB Installer.
Step 2: Boot in to live USB
Plug the live USB or disk in to the computer and restart the computer. While booting the computer press F10 or F12 function key (defers from computer to computer) to go to the boot menu. Now, choose the option to boot from USB or Removable Media.
Step 3: Start the installation
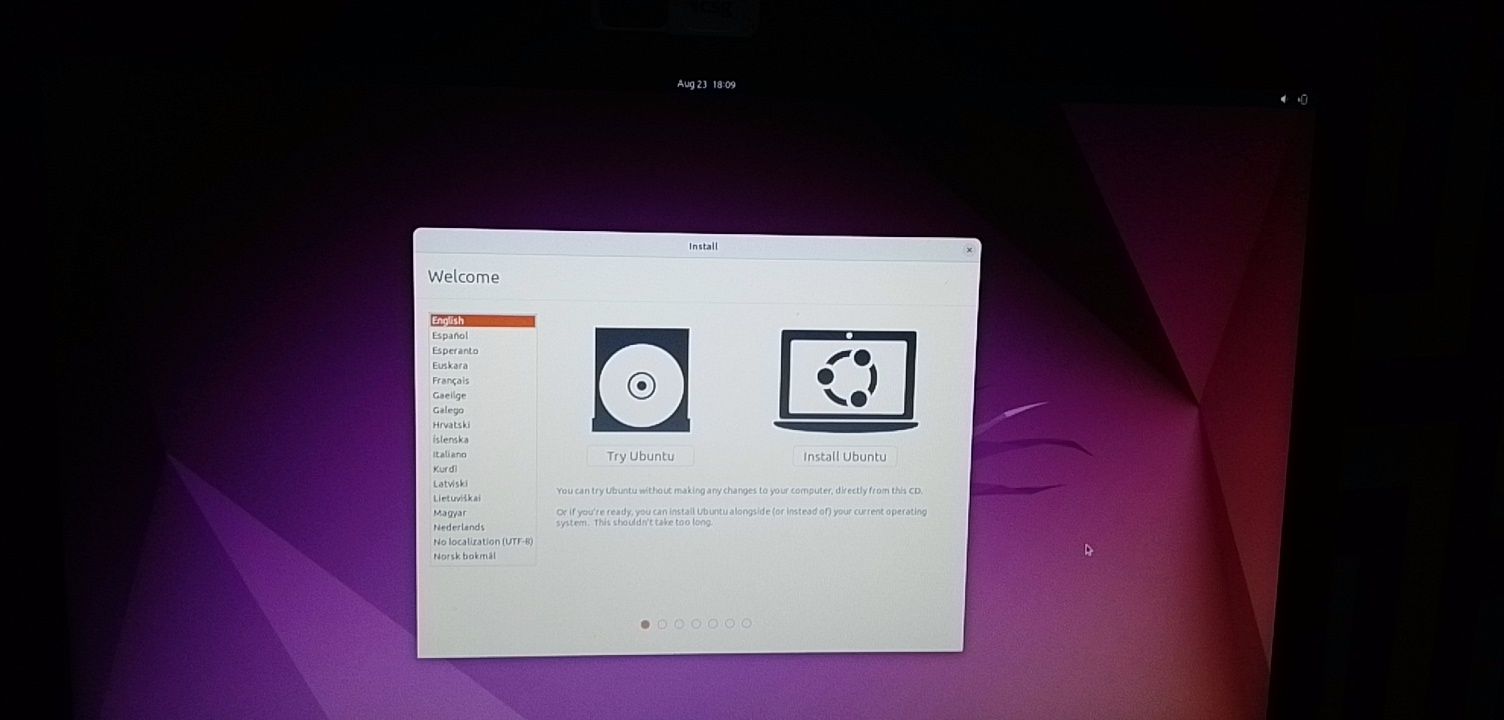
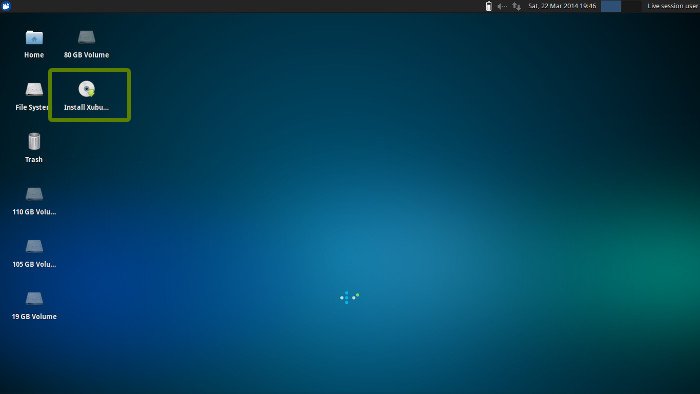
It will take some time to boot in to the live USB or disk. Once booted, you will be immediately provided with option to either try Ubuntu or install Ubuntu. Even if you choose to try, you can find the option to install on the desktop:
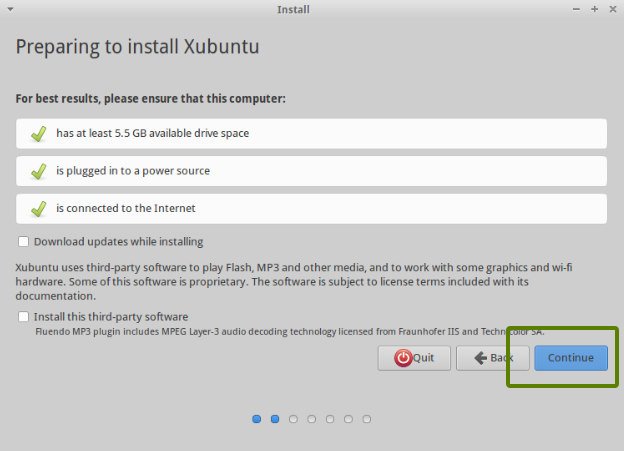
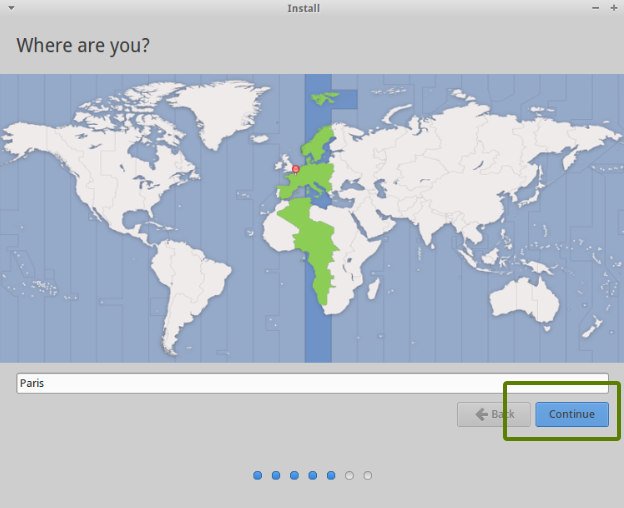
First few screens are pretty straight forward. Just choose press continue:
Step 4: Prepare the partition
This is the most important part of the whole dual boot installation. Where to install Ubuntu? Windows is already installed here, so, we’ll prepare a new partition for Ubuntu. In the Installation Type window, choose Something Else:
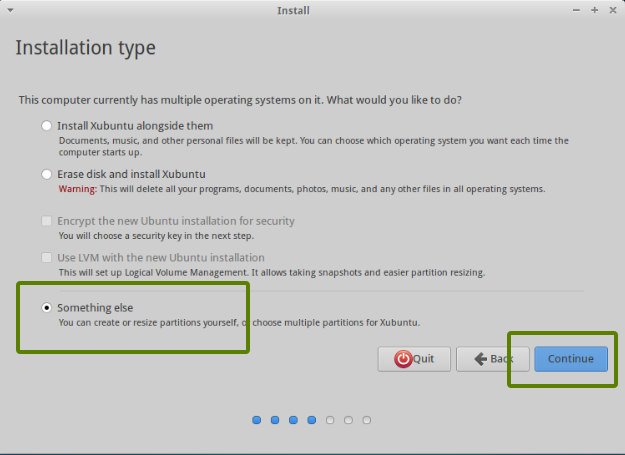
As you can see, I have 3 NTFS and some ext4 partitions. If you don’t have ext4 partition, don’t worry, we don’t need that. As you can see in the picture below, one of the NTFS partition consists of Windows installation. This should be untouched if you want to keep your Windows installation safe.
I presume that you have more than one NTFS (or FAT 32) partitions (i.e. Drives in Windows term) on your hard disk, with one of them consisting of Windows installation (usually C drive). What you need to do here is to delete a NTFS or existing ext4 partition and create some free space. This will delete all the data in that partition and this is why I asked you to verify if you have Windows installed in a different partition.
Click on the desired partition and press the – to delete the partition.

Step 5: Create root, swap and home
Once you have some free space on your hard drive, its time to install Ubuntu on it. Now, there are several ways to do it. But I prefer to have a Root, a Swap and a Home.
The root should be at least 15 GB for a comfortable use. If you have more disk space, increase the root size. Suppose you have 100 GB of disk space. You can easily devote 30 GB of space to root.
Create a root partition first. Choose the free space available and click on +.
Here, choose the size of root directory (keep it 20 GB or more), choose ext4file system, and mount point as / (i.e. root):
Next step is to create swap partition. It is advised by many that Swap should be double of your system’s RAM size. You can choose the swap size accordingly.

The next step is to create Home. Try to allocate the maximum size to Home because this is where you’ll be downloading and keeping the files.
Once you have created Root, Swap and Home partitions, click on Install Now button.
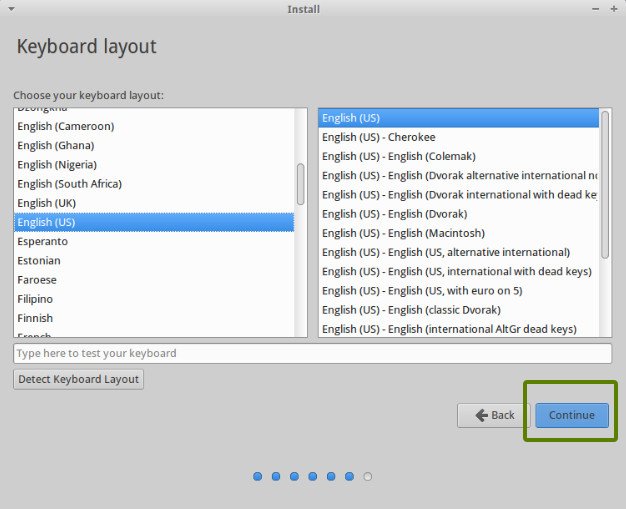
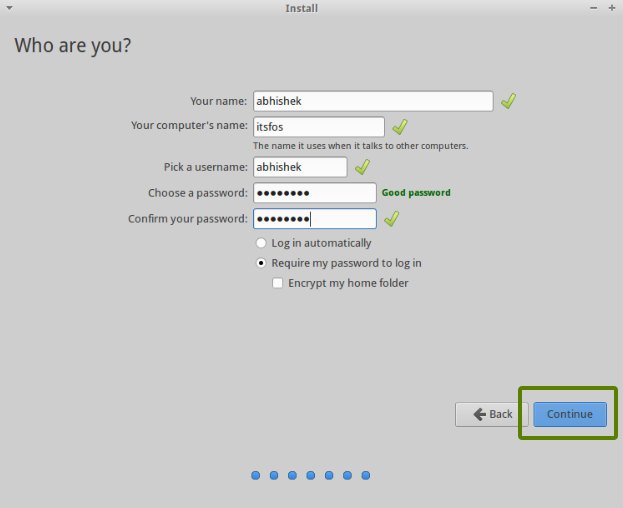
Step 6: Follow the trivial instructions
If you successfully created the partitions as mentioned above, you have almost won the battle. Rest is just some trivial steps to follow. You will be taken through a number of screens to select options like keyboard layout, login credentials etc. You don’t have to be a genius to figure out what to do here afterwards. I have attached screenshots for reference purpose here.

Once the installation is over, you will be presented with the option to keep trying live version or to restart the system.
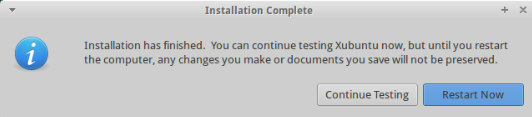
And that’s it. On next boot, you will see the option of Ubuntu in the grub screen. And thus you can enjoy the beautiful, beginner friendly and world’s most popular Linux distribution. I hope you found this guide to dual boot Ubuntu with Windows helpful. If you need, you can change the boot order easily to make Windows your default OS. Since you have just installed Ubuntu 14.04, you can check out things to do after installing Ubuntu.
If you have questions, suggestions or a word of thanks, feel free to drop a comment.
Уровень сложностиСредний
Время на прочтение3 мин
Количество просмотров64K
Всех приветствую. В свое время намучался с установкой Убунты в дуал буте с Виндой, переустановкой Винды в такой схемы, переустановкой Убунты и т.д. Недавно снова столкнулся с задачей установки Убунты в дуал буте с Виндой, решил написать краткий гайд, т.к. информация в интернете, кажется, в основном на английском языке и где-то устаревшая. Итак, что для этого потребуется:
-
Скачайте образ с оф. сайта и создайте загрузочную флешку.
Думаю здесь все понятно, подробно можно не описывать и есть информация в интернете, rufus в помощь.
-
Запуститесь с флешки и выберите try ubuntu.
Для чего? Здесь нам нужно найти в приложениях Gparted, найти диск с нашей Виндой, найти EFI раздел, нажать ПКМ -> «Manage flags» и отключить у него
bootиespфлаги. Для того, чтобы Убунта не установилась в EFI раздел Винды. Т.к.в будущем вам это доставило бы только проблем, да и в целом, лучше когда все раздельно.
Не серчайте за качество, все-таки особо не позаписываешь экран при установке -
После этого продолжите установку нажав «Install Ubuntu» или перезагрузившись и нажав то же самое.
Думаю подробно процесс можно не описывать, введите своё имя, имя юзера, и т.д.
-
Разбейте свой диск, куда хотите установить Убунту, на разделы.
Здесь каждый делает как хочет и по своему опыту, поэтому это не ультимативный гайд, но если вы не знаете, то выбираете нужный диск (поймете по размеру), удаляете у него все разделы (нажимаете на «-«), если они есть, создаете новые («+»), а именно:
4.1. Swap — раздел подкачки, если хотите режим гибернации, то таблица сколько нужно выделить здесь. Выбираем как на картинке (далее буду говорить лишь тип и поле «use as»/»mount point», т.к. «Location» всегда «Beginning»)
4.2. Boot — раздел загрузчика. Рекомендуемый размер 500мб-1гб. Ставим
Primary,use as Ext4иmount point /boot
4.3 Efi — тот самый раздел, из-за которого весь сыр-бор. У Винды по дефолту 100мб, где-то рекомендуют ставить 300 на Убунте. ТипPrimary,use as Efi system partition
4.4. Home — ваша личная папка, как users на Винде. Рекомендуют создавать отдельно, чтобы было больше вариации (можно зашифровать отдельно, можно забекапить отдельно, и т.д.). Размер по вашему усмотрению, типLogical,use as Ext4иmount point /home
4.5. Root — корень всего,/проще говоря. На него весь оставшийся размер./tmpи/varне рекомендую создавать отдельно, т.к. если не угадаете с размером, постоянно придется чистить вручную. Ставим также, как и/homeили тип можно поставитьprimary(но оба варианта рабочие). -
Дальше продолжаете установку как обычно, вытаскиваете флешку, перезагружаетесь.
Зайдя в Убунту качайте
gparted(почему-то у меня его не было по дефолту):sudo apt install gparted -y, находите снова диск с Виндой и включаете обратно флаги, закрываете (если галочка не нажимается, ничего страшного, так и должно быть, эти флаги сразу применяются) -
Дальше самое интересное.
6.1. Если вы ставите Ubuntu <22.04, то можете сразу написать
sudo update-grub, перезагрузиться и у вас благополучно появится меню с выбором ОС и Windows в качестве опции, наряду с Убунту. (Ах да, в любом случае на Windows желательно отключитьFast boot, т.к. говорят он мешает, так же легко найти, как это сделать в гугле).
6.2. Если же вы ставите 22.04 (и выше), то нужно потанцевать с бубном:
Откройте файл/etc/default/grubи добавьте туда строчкуGRUB_DISABLE_OS_PROBER=false. Это связано с тем, что по дефолту теперь GRUB не используетos_proberдля определения ОС, а значит нашу Винду без этого он не определит. -
Перезагружайтесь, смотрите меню, радуйтесь легкости бытия.


На этом у меня все. Надеюсь статья была полезной, наверное она подойдет и для других Linux систем. В любом случае, если вздумаете после этого переустанавливать Windows, то не торопитесь, возможно, вам стоит подождать нового гайда… (ну или можно просто отключить диск с Убунтой, так тоже сработает. Вообще-то говоря танцы с флагами можно было также избежать, отключив диск с Виндой, но кому не лень открывать корпус, отключать кабели, мыжпрограммисты).

Если вы только начали свой путь разработчика и до сих используете операционную систему семейства Microsoft Windows, то уже наверняка столкнулись с ситуацией, когда ваш инструментарий отличается от того, что установлено у большинства людей из этой профессии. Чаще всего проблемы начинаются при работе в командной строке. Дело в том, что Windows не является POSIX-совместимой операционной системой, поэтому в ней отсутствует базовый набор прикладных программ, который необходим для разработки.
- Ubuntu из Microsoft Store
- Другие способы
Несмотря на все написанное дальше, наша основная рекомендация — ставить полноценный Linux-дистрибутив, например, Ubuntu и полностью погружаться в него. Подавляющее большинство веб-проектов работает под управлением Linux-систем. А постоянное использование такой системы на домашнем и рабочем компьютере равносильно погружению в языковую среду при изучении иностранных языков.
Для новичков есть способ проще и быстрее — технологии виртуализации. Об этом и поговорим.
Ubuntu из Microsoft Store
Если вы работаете на Windows версии не ниже 10 с архитектурой x64, то можно воспользоваться встроенным решением и установить слой совместимости (Windows Subsystem for Linux), а затем дистрибутив на основе Ubuntu Linux через магазин приложений Microsoft Store.
Подсистема WSL поставляется вместе с Windows, но не включена по-умолчанию. Чтобы её активировать, необходимо открыть PowerShell и ввести команду:
wsl --install
Также эта команда скачивает и устанавливает дистрибутив Ubuntu Linux. Скорее всего после завершения установки потребуется перезагрузить компьютер.
После перезагрузки найдите в меню Пуск приложение Ubuntu и запустите его.
Первый запуск может вызвать ошибку Error: 0x8007007e и предложение прочитать инструкцию по её решению https://aka.ms/wslinstall. Если хотите сэкономить время, то просто запустите PowerShell (не путать с cmd) от имени администратора и выполните следующую команду:
Enable-WindowsOptionalFeature -Online -FeatureName Microsoft-Windows-Subsystem-Linux
После этого компьютер попросит перегрузиться, а потом нужно снова запустить приложение Ubuntu. В случае удачной установки откроется интерпретатор командной строки с предложением ввести имя пользователя и пароль. Выглядеть это будет вот так:
Installing, this may take a few minutes...
Installation successful!
Please create a default UNIX user account. The username does not need to match your Windows username.
For more information visit: https://aka.ms/wslusers
Enter new UNIX username:
Данные логин и пароль никак не связаны с вашим пользователем в Windows, придумайте новые и не забывайте их. Чтобы изменить пароль Ubuntu в будущем, вам пригодится команда passwd
Обратите внимание на данные официальные инструкции от Microsoft, где рассмотрены не только установка и настройка WSL и Ubuntu, но так же рассказано о настройке окружения для разработки (VSCode, Git)
- Настройка среды разработки WSL
- WSL + VSCode
Другие способы
Если у вас нет возможности установить WSL, то можно использовать другие способы виртуализации для установки Linux. Смотрите другие наши гайды:
- VirtualBox
- Vagrant