
Contribute to this page
Toggle table of contents sidebar
What you will learn
-
How to enable and install WSL on Windows 10 and Windows 11
-
How to install
Ubuntu 24.04 LTSusing the Microsoft Store or WSL commands in the terminal
What you will need
-
Windows 10 or 11 running on either a physical device or virtual machine
-
All of the latest Windows updates installed
Install WSL
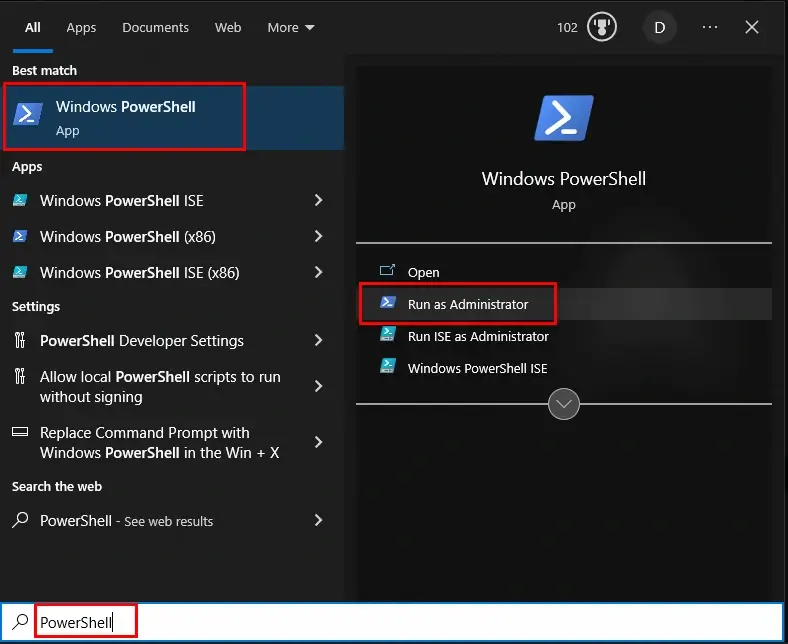
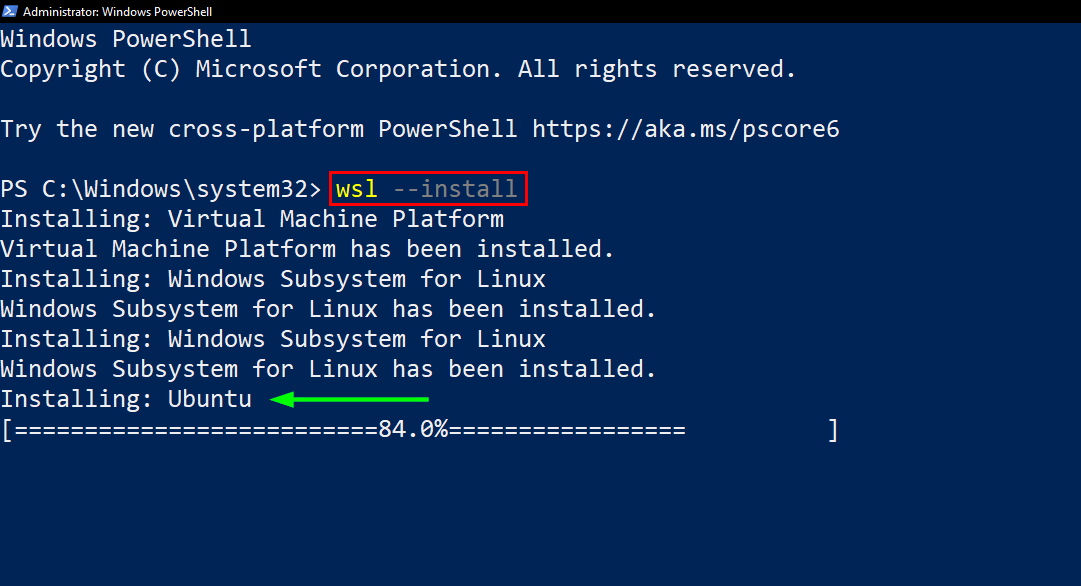
You can install WSL from the command line. Open a PowerShell prompt as an Administrator (we recommend using Windows Terminal) and run:
It is recommended to reboot your machine after this initial installation to complete the setup.
Install Ubuntu WSL
There are multiple ways of installing distros on WSL, here we focus on two: the Microsoft Store application and WSL commands run in the terminal. The result is the same regardless of the method.
Method 1: Microsoft Store application
Find the distribution you prefer on the Microsoft Store and then click Get.
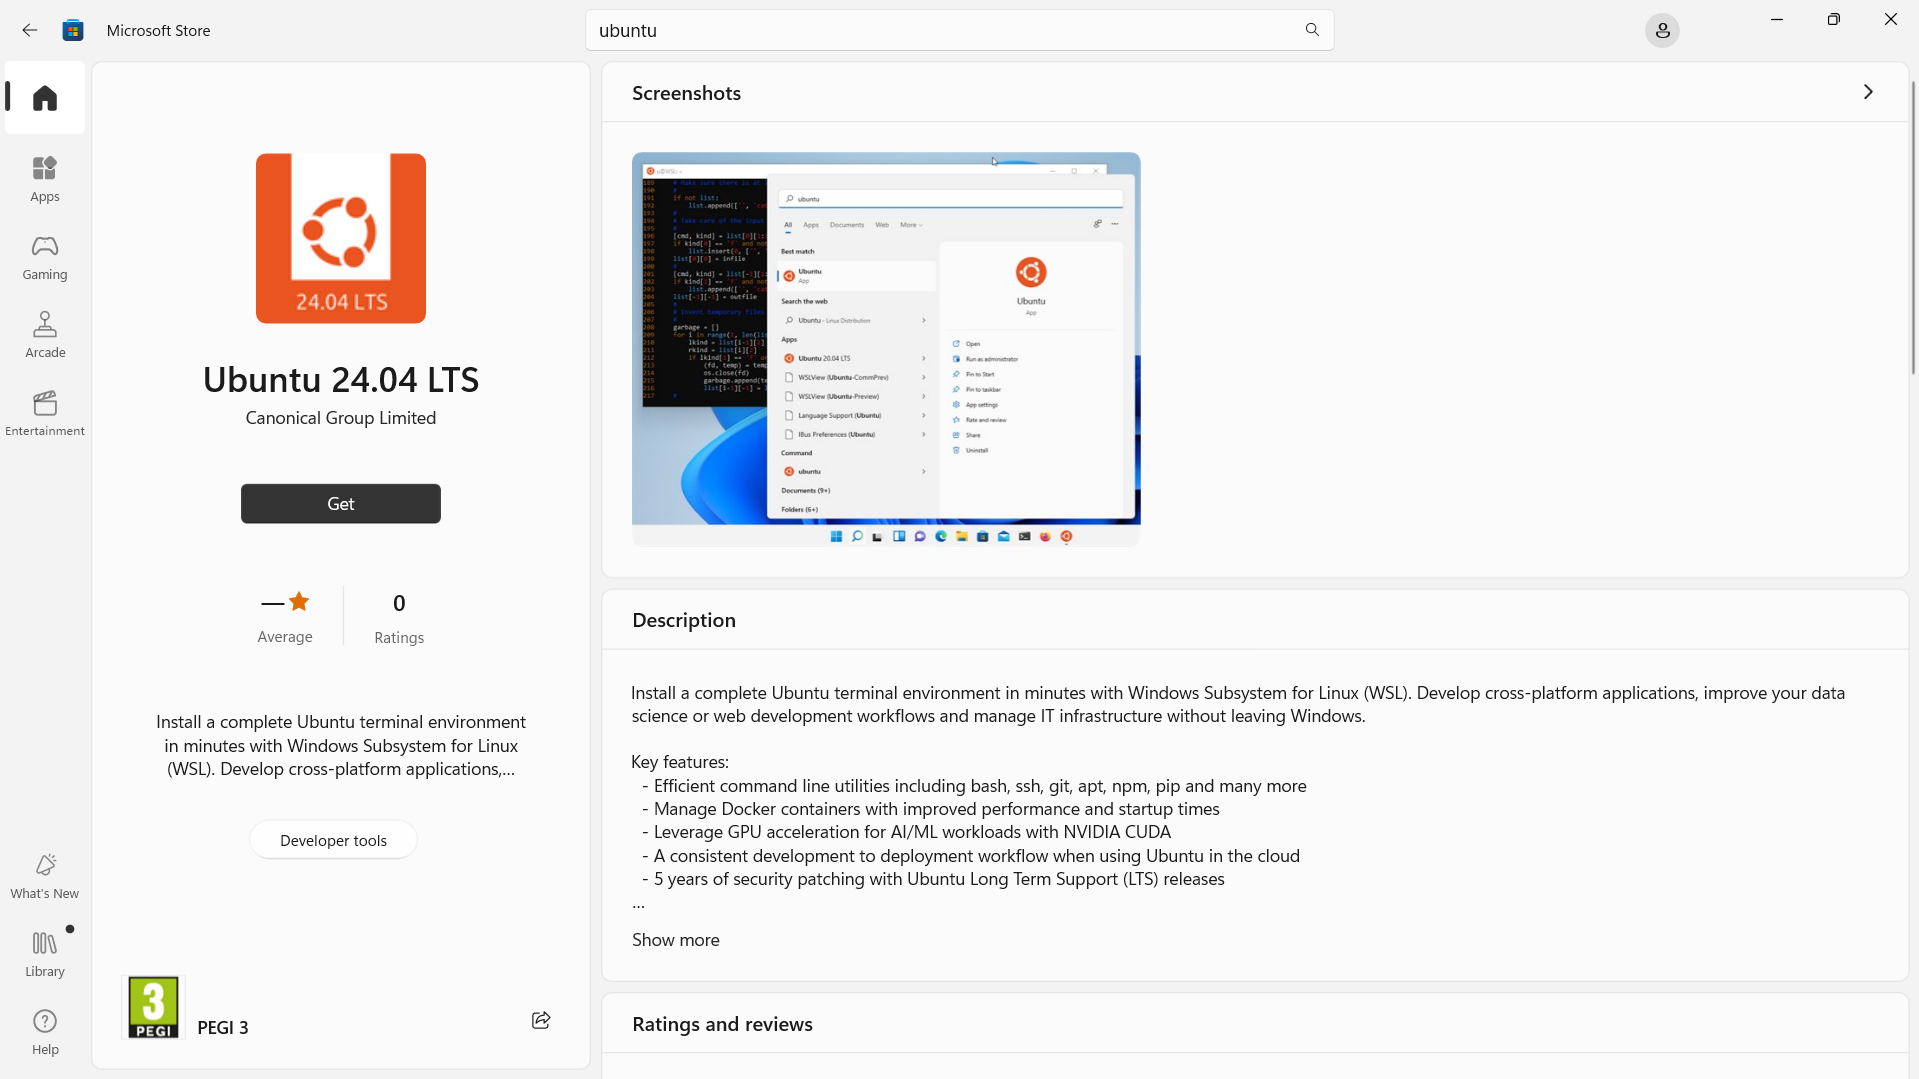
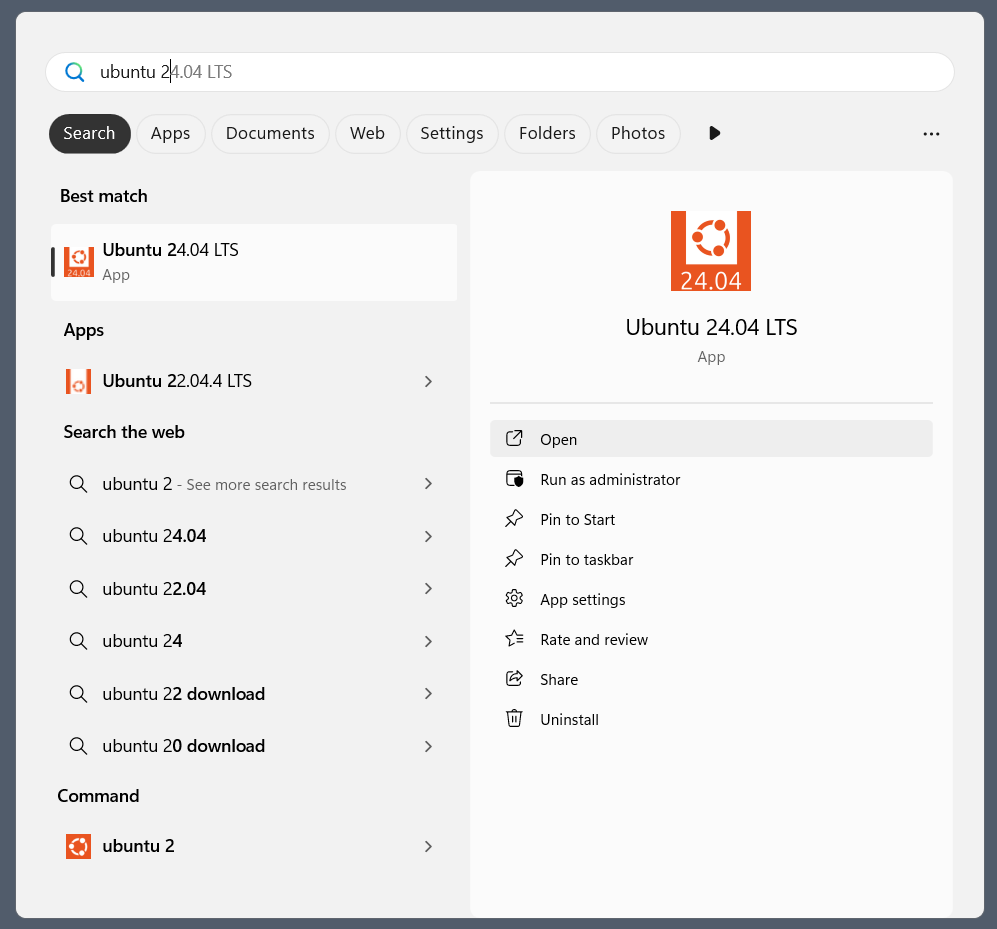
Ubuntu will then be installed on your machine. Once installed, you can either launch the application directly from the Microsoft Store or search for Ubuntu in your Windows search bar.
Method 2: WSL commands in the terminal
In a PowerShell terminal, you can run wsl --list --online to see an output with all available distros and versions:
The following is a list of valid distributions that can be installed.
The default distribution is denoted by '*'.
Install using 'wsl --install -d <Distro>'.

  NAME                                   FRIENDLY NAME
* Ubuntu                                 Ubuntu
  Debian                                 Debian GNU/Linux
  kali-linux                             Kali Linux Rolling
  Ubuntu-18.04                           Ubuntu 18.04 LTS
  Ubuntu-20.04                           Ubuntu 20.04 LTS
  Ubuntu-22.04                           Ubuntu 22.04 LTS
  Ubuntu-24.04                           Ubuntu 24.04 LTS
...
Your list may be different once new distributions become available.
You can install a version using a NAME from the output:
> wsl --install -d Ubuntu-24.04
You’ll see an indicator of the installation progress in the terminal:
Installing: Ubuntu 24.04 LTS
[==========================72,0%==========                 ]
Use wsl -l -v to see all your currently installed distros and the version of WSL that they are using:
  NAME            STATE           VERSION
  Ubuntu-20.04    Stopped         2
* Ubuntu-24.04    Stopped         2
Note on installing images without the Microsoft Store
If you do not have access to the Microsoft Store or need to install
a custom image it is possible to import a distribution as a tar file:
> wsl --import <DistroName> <InstallLocation> <InstallTarFile>
Appx and MSIX packages for a given distro can also be downloaded and installed.
Please refer to Microsoft’s documentation for more detailed information on these installation methods:
-
Importing Linux distributions
-
Installing distributions without the Microsoft Store
Warning
You should always try to use the latest LTS release of Ubuntu, as it offers the best security, reliability and support when using Ubuntu WSL.
Currently we do not have a recommended location from which to download tar and Appx/MSIX files for Ubuntu distros.
Run and configure Ubuntu
To open an Ubuntu 24.04 terminal run the following command in PowerShell:
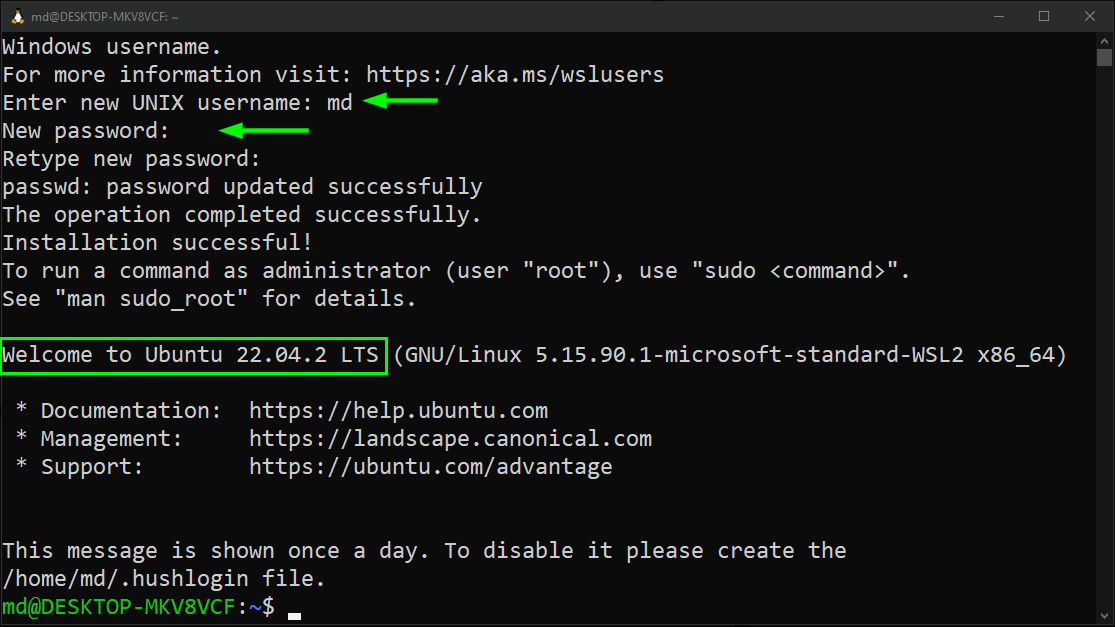
Once it has finished its initial setup, you will be prompted to create a username and password. They don’t need to match your Windows user credentials.
Finally, it’s always good practice to install the latest updates by running the following commands within the Ubuntu terminal, entering your password when prompted:
$ sudo apt update
$ sudo apt full-upgrade -y
Enjoy Ubuntu on WSL
In this guide, we’ve shown you how to install Ubuntu WSL on Windows 10 or 11.
We hope you enjoy working with Ubuntu in WSL. Don’t forget to check out our blog for the latest news on all things Ubuntu.
Further Reading
-
Setting up WSL for Data Science
-
Whitepaper: Ubuntu WSL for Data Scientists
-
Microsoft WSL Documentation
-
Ask Ubuntu
Are you eager to run Ubuntu alongside your Windows 10 system? With the Windows Subsystem for Linux (WSL) 2, you can easily achieve that, for more details WSL 2 was introduced in Windows 10 version 2004. This guide will walk you through the steps to install either Ubuntu 20.04 or 22.04 in WSL 2 on your Windows 10 machine.
Before you start, ensure you have the following:
- A Windows 10 machine with version 2004 or later.
- A Microsoft account with admin privileges.
- Windows Subsystem for Linux (WSL) feature enabled on your Windows 10 machine.
- Open PowerShell with administrative privileges.
These are the step-by-step process what you need to do:
- Check your Windows version and build number.
- Verify administrator privileges.
- Enable the Windows Machine Platform feature.
- Enable the Windows Subsystem for Linux (WSL) feature.
- Install Ubuntu 20.04 or 22.04 in WSL 2.
- Optional: Install Ubuntu in WSL 2 via PowerShell.
- Configure Ubuntu user account and password.
Step 1: Check your Windows version and build number
Firstly, you need to check your Windows version and build number to ensure compatibility with the Windows Subsystem for Linux (WSL) feature. Follow these steps:
- Open PowerShell with administrative privileges.
- Type the following command and press Enter:
systeminfo | findstr /B /C:"OS Name" /C:"OS Version"

- Look for the output that includes your “OS Name” and “OS Version.”
- For compatibility with WSL 2, your Windows version should be 2004 or later, and the build number should be 19041 or later.
- Ensure that the output includes the Windows version and build number that meets or exceeds these requirements.
If your Windows version and build number meet these criteria, then your system is compatible with Windows Subsystem for Linux (WSL) 2. If not, you may need to update your Windows operating system to a compatible version.
Step 2: Verify administrator privileges
To determine if your user account has administrative privileges using the whoami /groups command in Windows, look for the presence of the “Administrators” group in the output. Here’s how to do it:
- Open PowerShell with administrative privileges.
- Type the following command and press Enter:
- Look for the “S-1-5-32-544” entry in the output.
- If you see “S-1-5-32-544” listed, it means your user account belongs to the “Administrators” group, indicating administrative privileges.
- If you don’t see “S-1-5-32-544” listed, it means your user account does not have administrative privileges.
If your user does not have administrator privileges, log in as an administrator or ask an administrator to elevate your privileges.
Step 3: Enable Windows features
Enable the required Windows features for WSL 2:
- Open PowerShell with administrative privileges.
- Run the following command:
dism.exe /online /enable-feature /featurename:Microsoft-Windows-Subsystem-Linux /all /norestart
The command above typically enables the Windows Subsystem for Linux (WSL) feature without requiring a restart. However, there can be cases where a restart is necessary for the changes to fully take effect, depending on your system configuration or settings. So, much better to restart your machine ?.
Step 4: Enable WSL feature
To determine if WSL 2 is enabled on your machine using both PowerShell and the DISM command, follow these steps:
- Open PowerShell with administrative privileges.
- Enter the following command and press Enter:
Get-WindowsOptionalFeature -Online | Where-Object {$_.FeatureName -eq "VirtualMachinePlatform"}
- If WSL 2 is enabled, you’ll see output similar to:
FeatureName : VirtualMachinePlatform
State       : Enabled
- Additionally, you can use the DISM command to check:
dism.exe /online /get-features | Where-Object { $_ -match "Microsoft-Windows-Subsystem-Linux" }
Output:
Feature Name : Microsoft-Windows-Subsystem-Linux
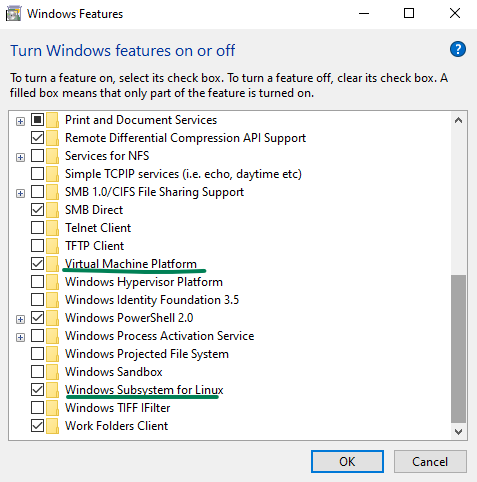
Otherwise, you can go to ‘Turn Windows features on or off‘ in your Windows settings to verify if the Windows Subsystem for Linux is enabled.
Once the WSL feature is enabled, you can install Ubuntu from the Microsoft Store or using the wsl command. Here’s how:
- Open the Microsoft Store and search for “Ubuntu 20.04” or “Ubuntu 22.04”.
- Click on the desired app and click the “Get” button to download and install it.
- After installation, launch Ubuntu from the Start menu.

Step 6: Optional – Installing Ubuntu in WSL 2 via PowerShell
Alternatively, you can install Ubuntu in WSL 2 using PowerShell commands:
- List the available WSL distributions:
- Install Ubuntu:
wsl --install -d Ubuntu-20.04
- Set WSL 2 as the default version:
wsl --set-default-version 2
- Check the installed distributions:
- Verify the Ubuntu version:
Final Step: Configure Ubuntu user account and password
Upon installation, follow the prompts to create a user account and password for Ubuntu.
Creating new user account...
username:
After following these steps, you’ll have Ubuntu 20.04 or 22.04 installed in WSL 2 on your Windows 10 machine. Enjoy the seamless integration of Linux with your Windows environment!
Welcome to Ubuntu 20.04 LTS (GNU/Linux 4.19.104-microsoft-standard x86_64)

 * Documentation:  https://help.ubuntu.com
 * Management:     https://landscape.canonical.com
 * Support:        https://ubuntu.com/advantage

0 packages can be updated.
0 updates are security updates.


The programs included with the Ubuntu system are free software;
the exact distribution terms for each program are described in the
individual files in /usr/share/doc/*/copyright.

Ubuntu comes with ABSOLUTELY NO WARRANTY, to the extent permitted by
applicable law.

username@Ubuntu:~$
For troubleshooting Windows Subsystem for Linux, refer to Microsoft’s official documentation.
Что такое Ubuntu?
Ubuntu — это операционная система Linux с открытым исходным кодом, основанная на Debian. Это один из самых популярных дистрибутивов Linux, но между ними есть некоторые различия: Ubuntu — это операционная система, основанная на ядре Linux, поэтому Ubuntu на самом деле является дистрибутивом системы Linux. Linux — это ядро, а Ubuntu — это полноценная операционная система, построенная на ядре Linux, включая пользовательский интерфейс, приложения, инструменты управления пакетами и т. д. Как загрузить систему Ubuntu — это проблема, которая беспокоит большинство пользователей, поэтому мы подготовили конкретный метод установки Ubuntu, конкретный метод выглядит следующим образом:
1.Как найти версию Ubuntu?
Откройте эту ссылку в вашем браузере и вы сможете найти нужную вам версию. После того, как вы ее найдете, подготовьте USB-накопитель и загрузите образ системы Ubuntu.
Загрузите Ubuntu на русском языке следующим образом: https://ubuntu.ru/get
Ссылки следующие:https://ubuntu.com/download/desktop?utm_expid=.t_P3dGHLTjiXbkBPgMHsUw.0&utm_referrer=
2.Установите необходимые инструменты Ubuntu.
После загрузки необходимой вам системы на USB-накопитель нам также понадобится инструмент:
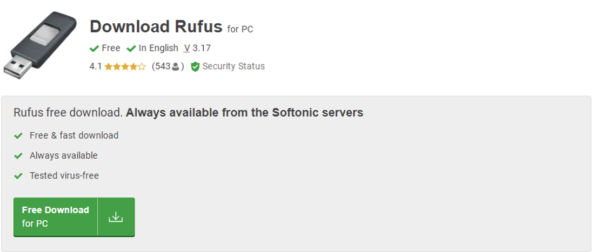
Адрес для скачивания:https://rufus.ie/ru/
3.Вставьте USB-накопитель в компьютер и откройте инструмент.
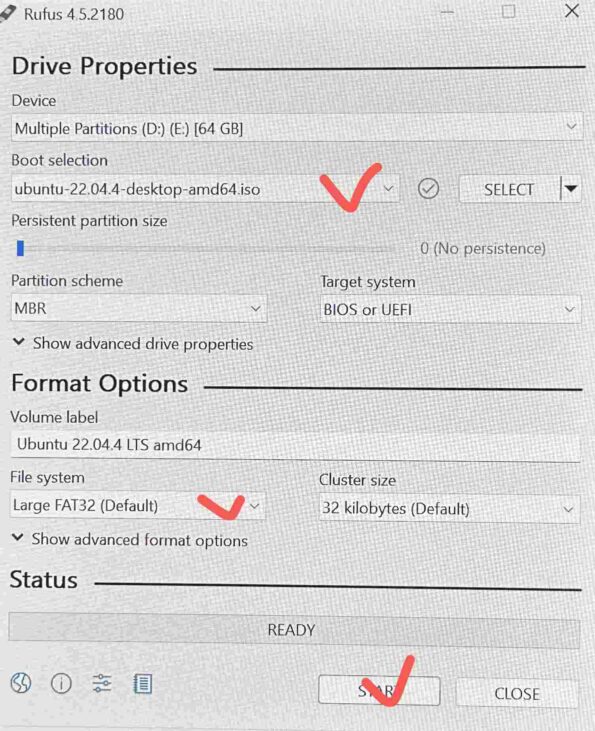
Выберите образ для развертывания на требуемом USB-накопителе
Выберите загруженный файл образа ubuntu-24.04-desktop-amd64 (1).iso
Выберите файловую систему FAT32 по умолчанию
Затем нажмите «Начать» для развертывания
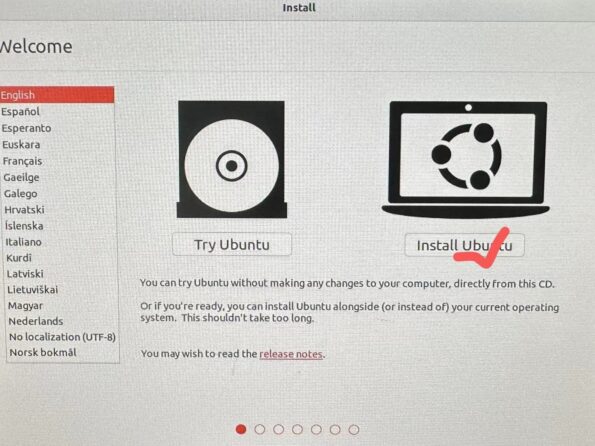
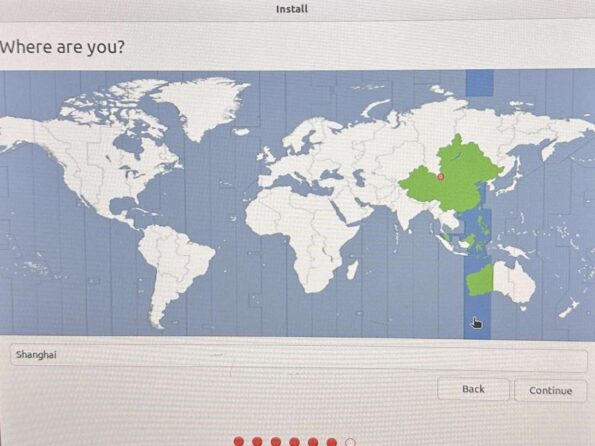
4.Как установить Ubuntu?
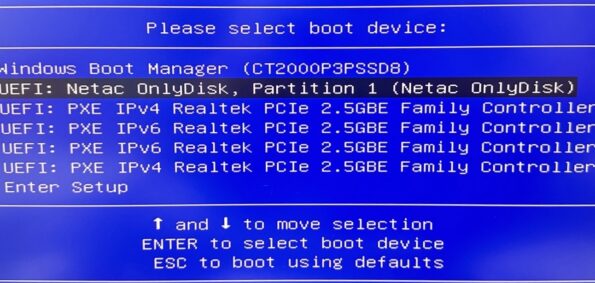
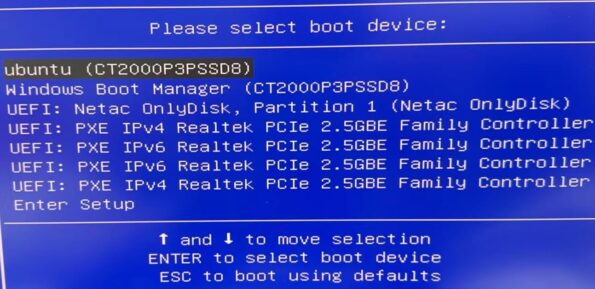
После завершения вышеуказанного процесса мы перейдем к формальной фазе установки: вставьте USB-накопитель в машину, на которой будет установлена система, нажмите кнопку питания, чтобы включить машину, а затем нажмите F7. Когда появится следующая страница, выберите USB-накопитель, чтобы начать установку
Ubuntu выбран по умолчанию
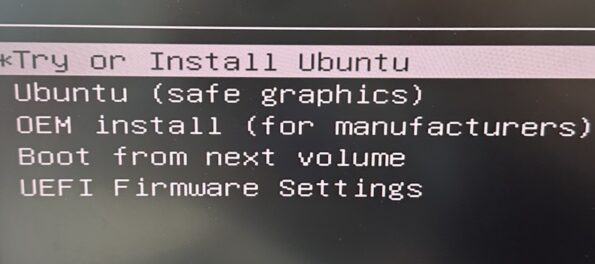
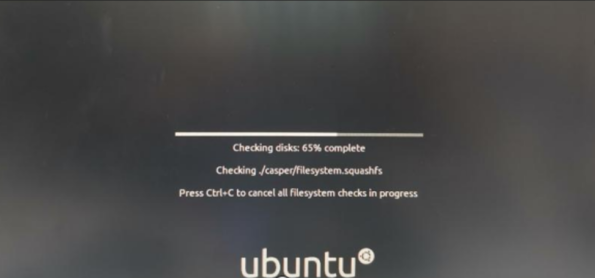
Дождитесь завершения загрузки, прежде чем переходить к следующему шагу.
Выберите нужный язык, затем нажмите «Установить Ubuntu», чтобы перейти к следующему шагу.
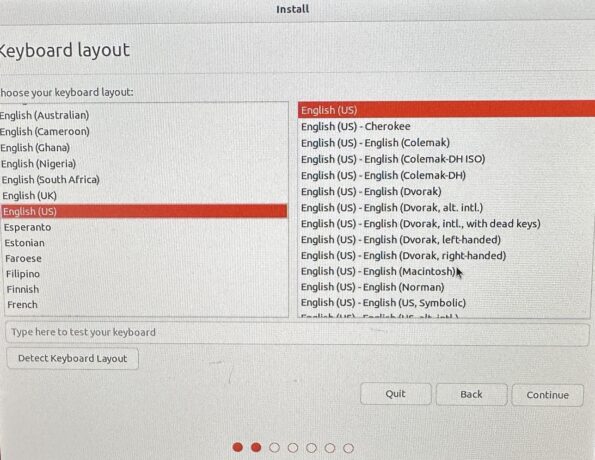
Выберите необходимую региональную языковую клавиатуру и перейдите к следующему шагу.
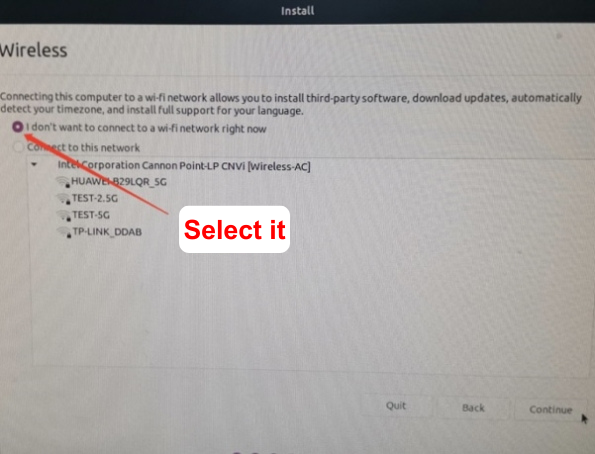
Выберите «Офлайн» и перейдите к следующему шагу.
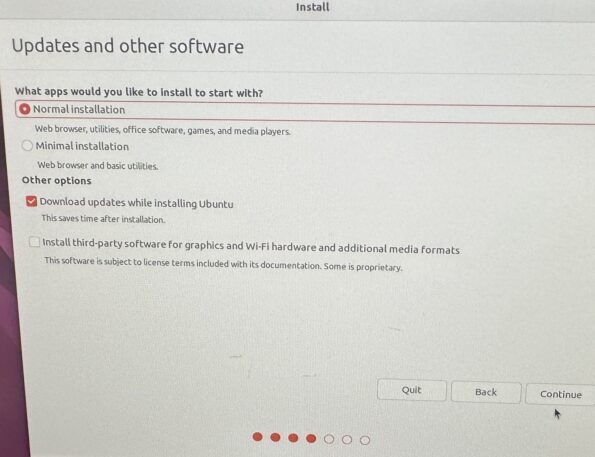
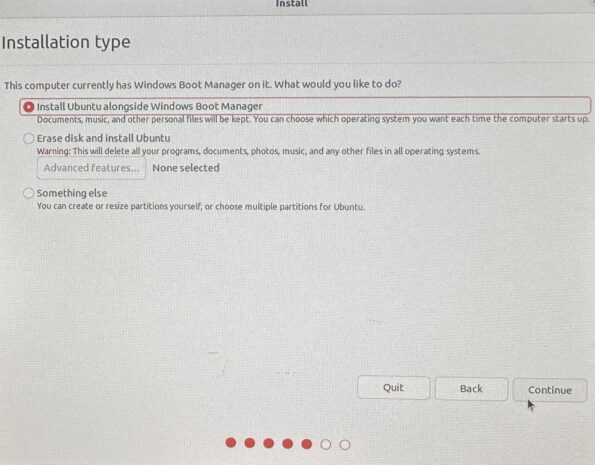
Выберите обычную установку и перейдите к следующему шагу.
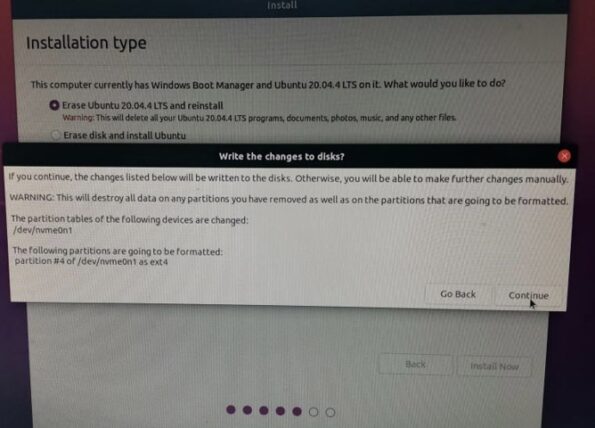
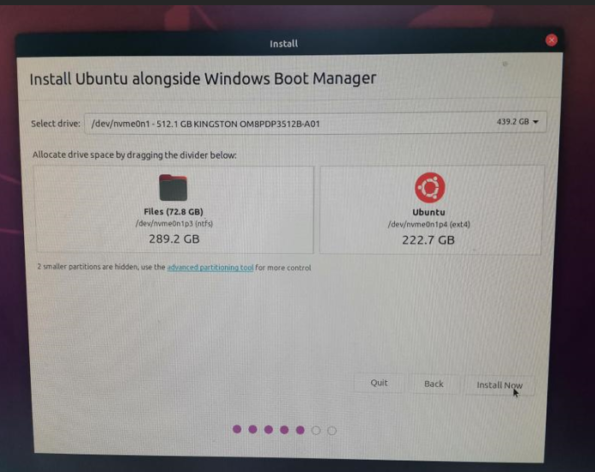
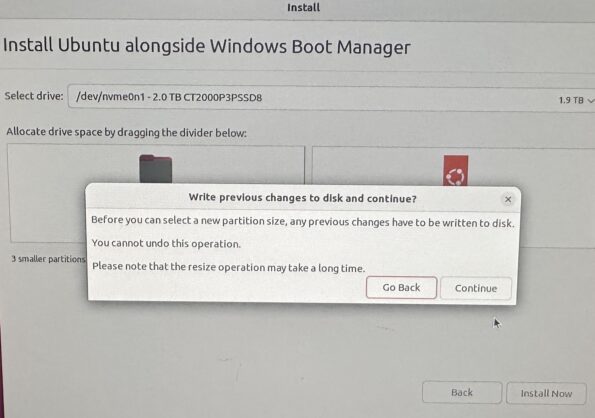
Выберите диспетчер загрузки Windows для совместной работы с Ubuntu, затем нажмите «Продолжить».
Установка по умолчанию
Перейти к следующему шагу
Подтвердите регион
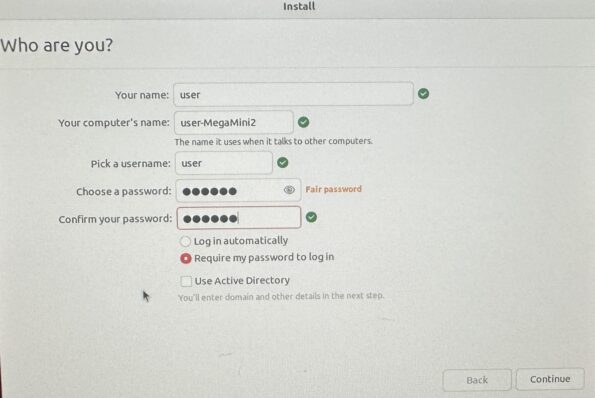
Создайте имя пользователя и пароль (при установке пароля вам потребуется его подтверждение)
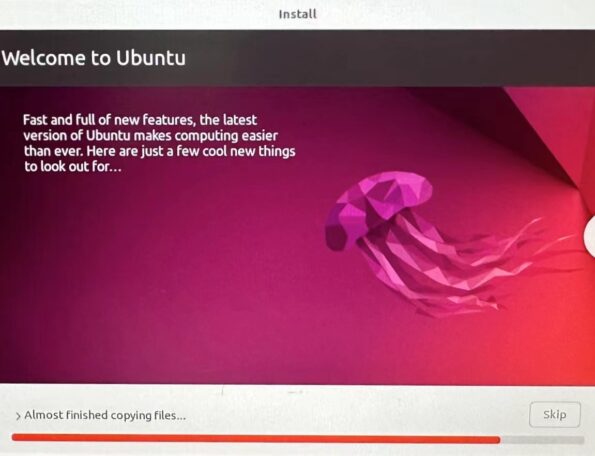
Ожидание загрузки в систему
Затем перезагрузите компьютер, чтобы завершить установку.

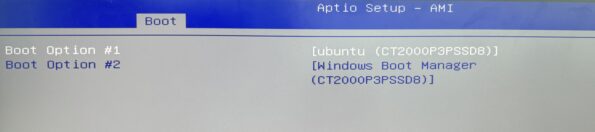
Нажмите «del» на клавиатуре, чтобы войти в интерфейс настройки BIOS.

Выберите опцию «Загрузка»
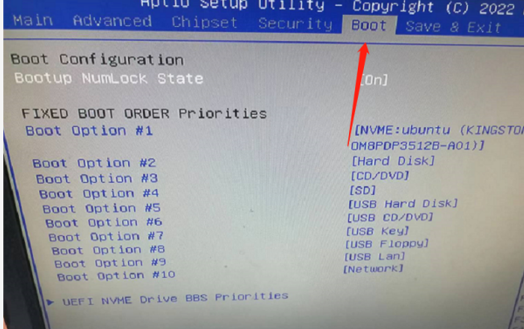
Выберите опцию «Приоритеты BBS диска UEFI NVME»

Установите параметр загрузки № 1 на «Ubuntu ..»
Установите параметр загрузки № 2 на «Windows boot manager..»
Нажмите «F4» на клавиатуре, чтобы сохранить и выйти для завершения настройки двойной системы.
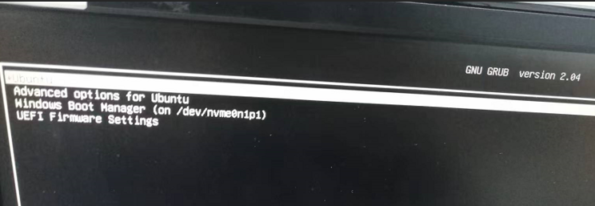
После сохранения и выхода появится следующий интерфейс. Выберите Ubuntu и нажмите Enter, чтобы войти в систему Ubuntu.
Домашняя страница после входа в систему:

Если вы хотите вернуться к системе Windows, перезагрузите компьютер и продолжайте нажимать «F7», пока не появится следующая страница. Выберите «Управление загрузкой Windows» на странице и нажмите Enter, чтобы вернуться к системе Windows.
5.Заключение
Надеюсь, что приведенные выше методы будут вам полезны при установке системы Ubuntu, а также надеюсь, что они помогут вам установить систему Ubuntu лучше и быстрее. Если вы хотите оснастить мини-ПК, совместимый с системами Windows и Ubuntu, Geekom — ваш лучший выбор!
Geekom
Штаб-квартира GEEKOM находится в Тайване, а филиалы — во многих странах мира. Наши основные члены команды — это технический костяк, который когда-либо служил Inventec, Quanta и другим известным компаниям. Мы обладаем мощным потенциалом в области исследований и разработок и инноваций. Мы постоянно стремимся к совершенству в области технологических продуктов.
This blog will offer an optimal solution for installing the latest as well as a specific version of Ubuntu in your Windows by using WSL.
What is WSL?
WSL (stands for “Windows Subsystem for Linux“) is a feature of Microsoft Windows that allows the user to run Linux distribution alongside Windows by utilizing a compatibility layer. It was released in 2016, however, the current version is WSL 2, which supports numerous Linux distributions including Ubuntu, Debian, and Fedora.
WSL is a beneficial feature for developers as it eliminates the need for extra hardware, virtualization, or dual-boot setups to manage Linux file systems or to access Linux command-line and tools.
With WSL, one can seamlessly switch between Windows and Linux workflows, enabling them to take advantage of Linux-specific tools while still enjoying the features of Windows as their primary operating system.
Let’s start the installation process of Ubuntu on Windows by using WSL 2.
Enable Windows Subsystem for Linux on Windows
To enable WSL, press the “Windows Logo + S” keys and search “Turn Windows features on or off”, then, click on the “Open” option.
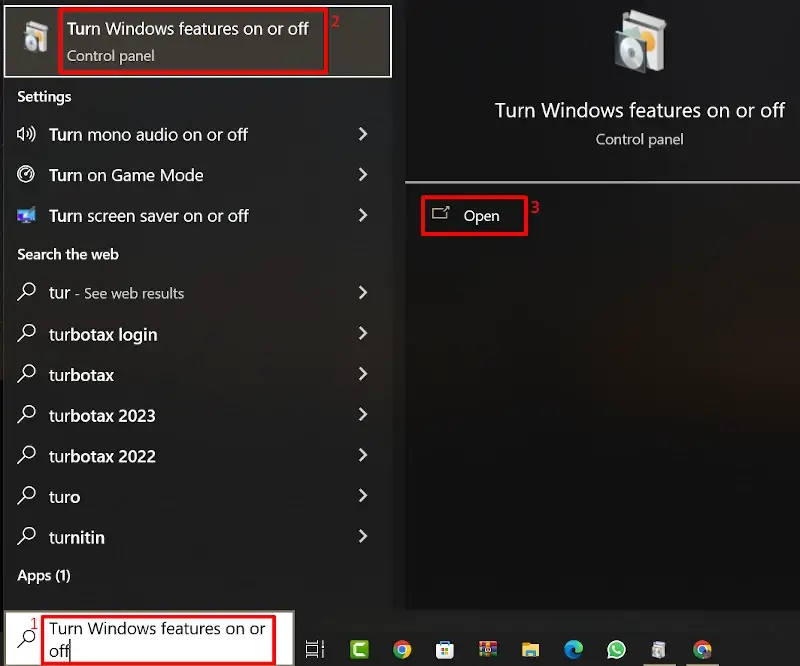
The Windows feature dialogue box will open. Here, locate the option “Windows Subsystem for Linux” and select the checkbox associated with it. Finally, click on the “OK” button:
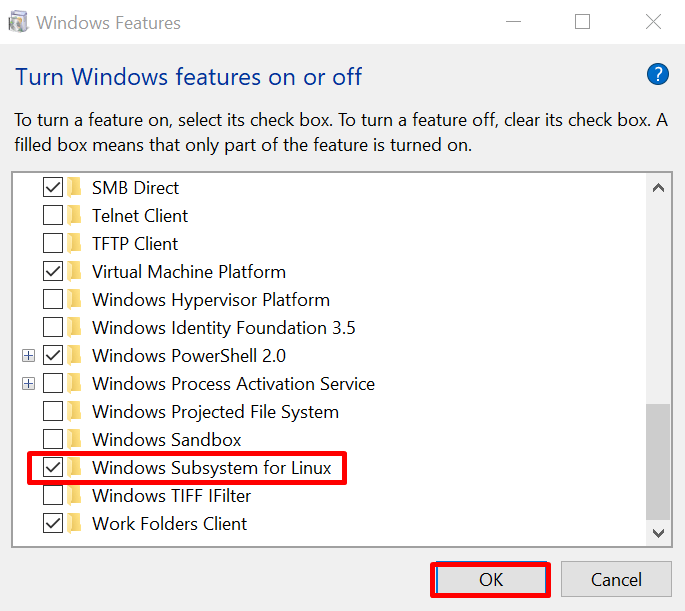
Now restart your Windows to enable WSL.
The process of installing Ubuntu on Windows by using WSL is quite straightforward.
To install the latest version of Ubuntu by utilizing WSL, simply run “Windows PowerShell” as administrator:
Then, type the command listed below to automatically install and set up WSL along with the default version of Ubuntu:
$ wsl --install
This command takes care of everything including turning on the required features of Windows, installing the WSL Linux kernel update package, and setting up Ubuntu.
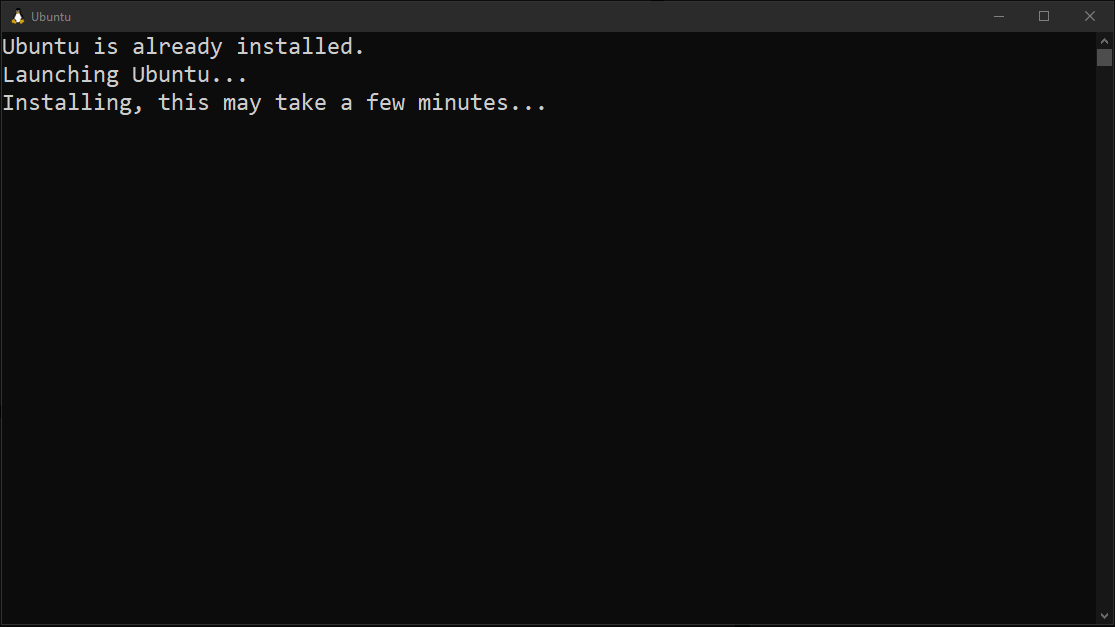
Once the installation process completes, reboot your Windows system to access Ubuntu. After the reboot, the further installation and launching process of Ubuntu will automatically start and will consume some time, so wait for its completion:
The next step is to provide the username for Ubuntu (22.04) and also set its password. After it, you will be able to execute Ubuntu commands:
Let’s try this by executing, the apt update command:
$ sudo apt update
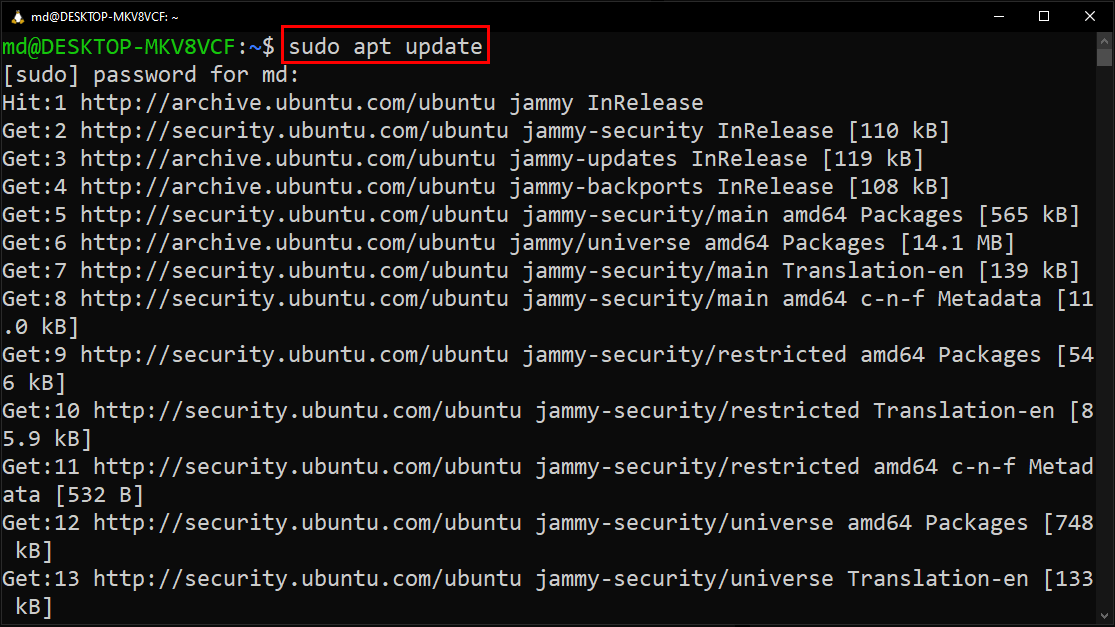
It is visible that your Ubuntu has started the process of updating the local repository cache.
Install Specific Ubuntu Version on Windows via WSL
However, if you want to install a specific previous version of Ubuntu on Windows. Then, head to Microsoft Store after following the previous steps or simply enables the Windows Subsystem for Linux as shown in the “Enable WSL” section of this blog:
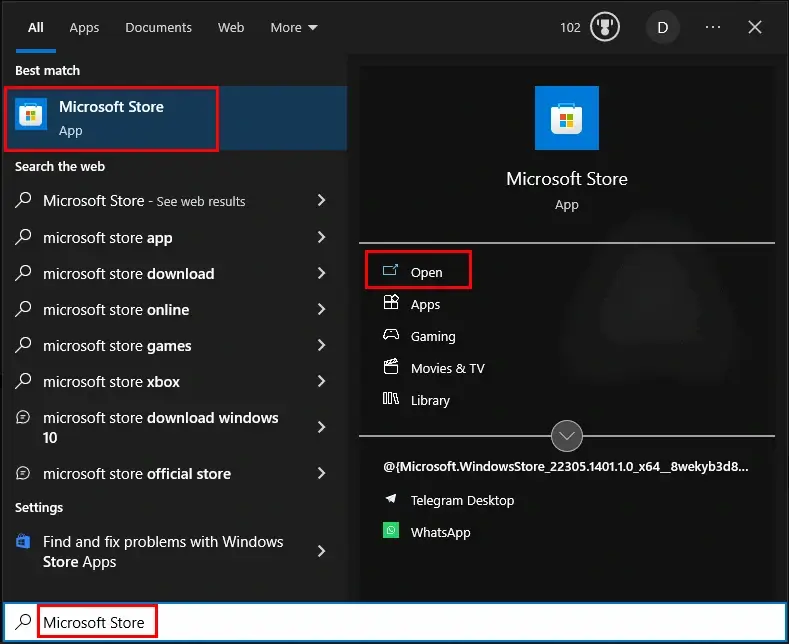
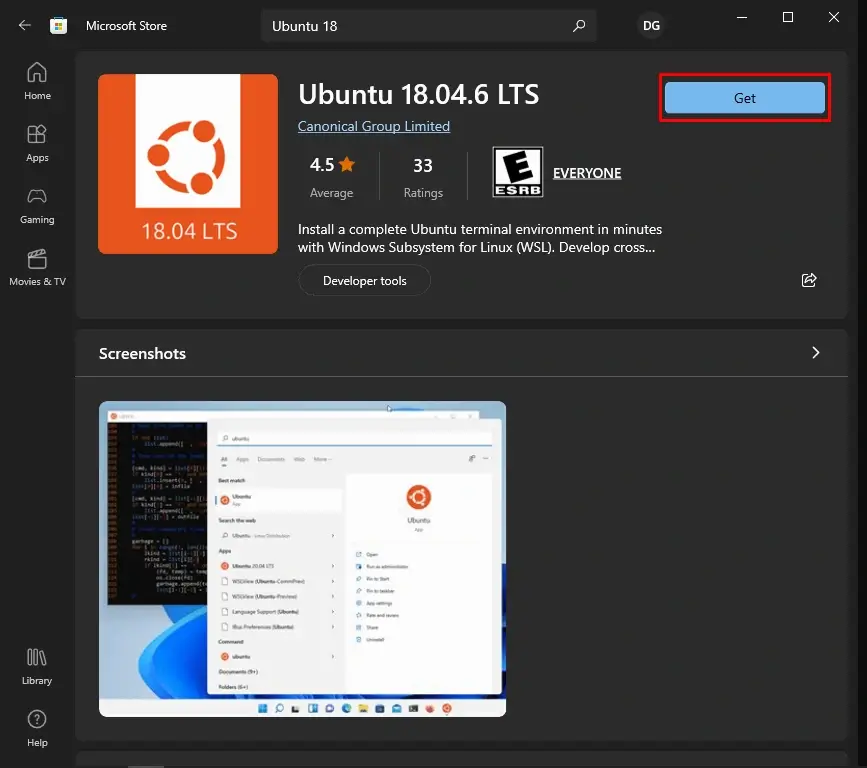
In the Microsoft store, search for the desired version of Ubuntu. For instance, let’s search “Ubuntu 18.04”:
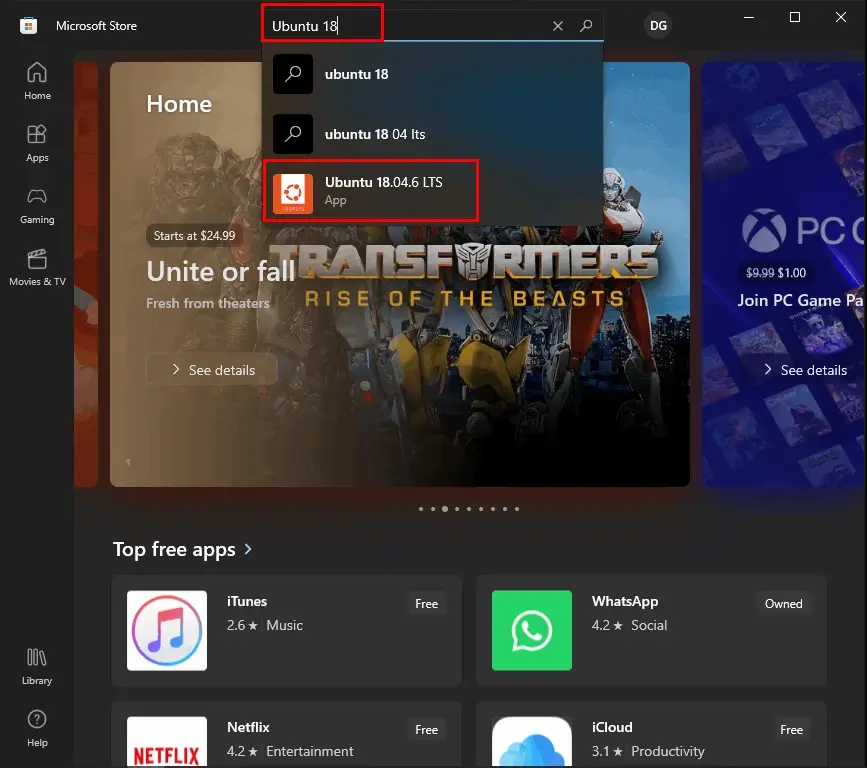
Then, click on the “Get” button and wait for the completion of the installation process:
Once the Ubuntu is installed, click on the “Open” button:

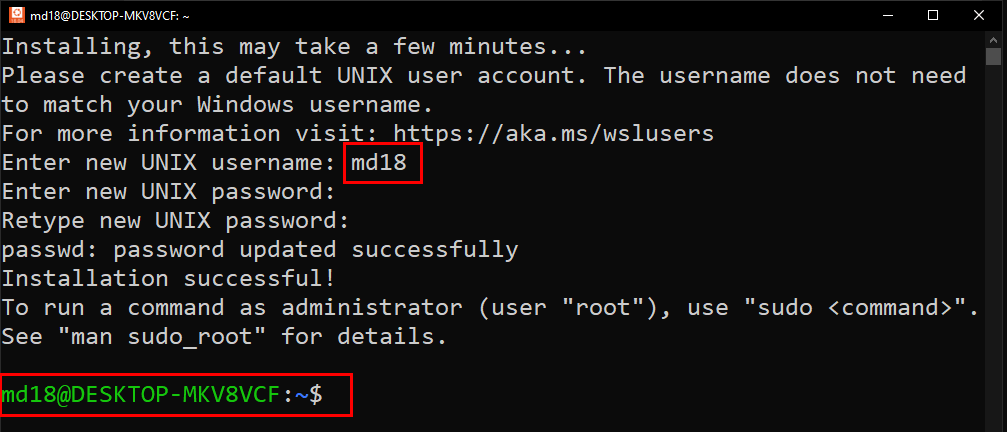
The Ubuntu 18.04 will launch successfully, now set its username and password:
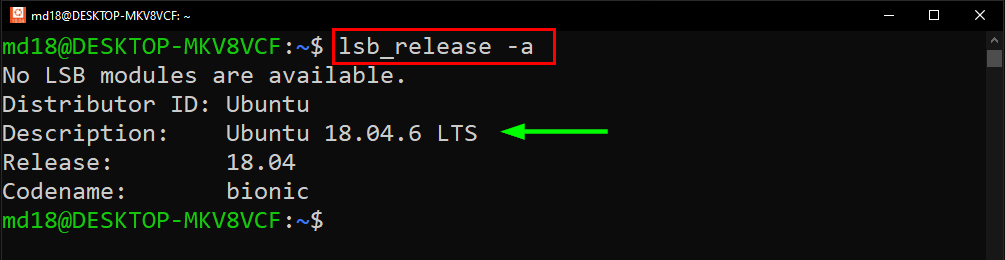
You can even check the version of installed Ubuntu by executing the command mentioned below:
$ lsb_release -a
Now close the terminal to shut down Ubuntu.
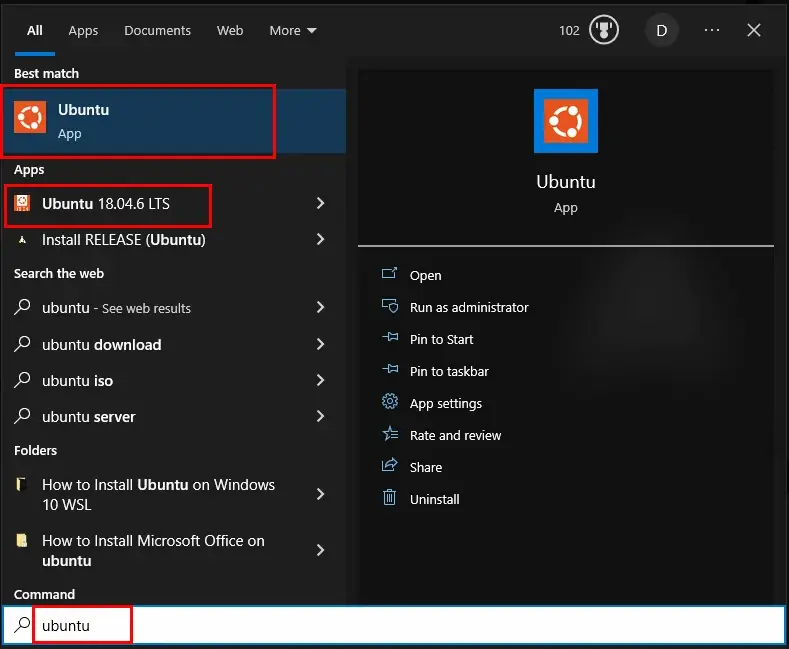
You can search Ubuntu to view and open your already installed Ubuntu from the Start Menu.
Conclusion
WSL (Windows Subsystem for Linux) is a feature offered by Microsoft that allows the user to run a Linux distribution alongside Windows 10. It supports many Linux distributions including Ubuntu, Fedora, and Debian.
This guide provided a solution for installing the latest/specific version of Ubuntu on Windows by using WSL.

Если вы только начали свой путь разработчика и до сих используете операционную систему семейства Microsoft Windows, то уже наверняка столкнулись с ситуацией, когда ваш инструментарий отличается от того, что установлено у большинства людей из этой профессии. Чаще всего проблемы начинаются при работе в командной строке. Дело в том, что Windows не является POSIX-совместимой операционной системой, поэтому в ней отсутствует базовый набор прикладных программ, который необходим для разработки.
- Ubuntu из Microsoft Store
- Другие способы
Несмотря на все написанное дальше, наша основная рекомендация — ставить полноценный Linux-дистрибутив, например, Ubuntu и полностью погружаться в него. Подавляющее большинство веб-проектов работает под управлением Linux-систем. А постоянное использование такой системы на домашнем и рабочем компьютере равносильно погружению в языковую среду при изучении иностранных языков.
Для новичков есть способ проще и быстрее — технологии виртуализации. Об этом и поговорим.
Ubuntu из Microsoft Store
Если вы работаете на Windows версии не ниже 10 с архитектурой x64, то можно воспользоваться встроенным решением и установить слой совместимости (Windows Subsystem for Linux), а затем дистрибутив на основе Ubuntu Linux через магазин приложений Microsoft Store.
Подсистема WSL поставляется вместе с Windows, но не включена по-умолчанию. Чтобы её активировать, необходимо открыть PowerShell и ввести команду:
wsl --install
Также эта команда скачивает и устанавливает дистрибутив Ubuntu Linux. Скорее всего после завершения установки потребуется перезагрузить компьютер.
После перезагрузки найдите в меню Пуск приложение Ubuntu и запустите его.
Первый запуск может вызвать ошибку Error: 0x8007007e и предложение прочитать инструкцию по её решению https://aka.ms/wslinstall. Если хотите сэкономить время, то просто запустите PowerShell (не путать с cmd) от имени администратора и выполните следующую команду:
Enable-WindowsOptionalFeature -Online -FeatureName Microsoft-Windows-Subsystem-Linux
После этого компьютер попросит перегрузиться, а потом нужно снова запустить приложение Ubuntu. В случае удачной установки откроется интерпретатор командной строки с предложением ввести имя пользователя и пароль. Выглядеть это будет вот так:
Installing, this may take a few minutes...
Installation successful!
Please create a default UNIX user account. The username does not need to match your Windows username.
For more information visit: https://aka.ms/wslusers
Enter new UNIX username:
Данные логин и пароль никак не связаны с вашим пользователем в Windows, придумайте новые и не забывайте их. Чтобы изменить пароль Ubuntu в будущем, вам пригодится команда passwd
Обратите внимание на данные официальные инструкции от Microsoft, где рассмотрены не только установка и настройка WSL и Ubuntu, но так же рассказано о настройке окружения для разработки (VSCode, Git)
- Настройка среды разработки WSL
- WSL + VSCode
Другие способы
Если у вас нет возможности установить WSL, то можно использовать другие способы виртуализации для установки Linux. Смотрите другие наши гайды:
- VirtualBox
- Vagrant