
Все способы:
- Вариант 1: Установка в полуавтоматическом режиме
- Шаг 1: Выбор доступных дистрибутивов Linux
- Шаг 2: Запуск инсталляции
- Вариант 2: Установка в ручном режиме
- Шаг 1: Предварительная настройка системы
- Шаг 2: Загрузка и настройка ядра WSL2
- Шаг 3: Выбор и инсталляция дистрибутива Linux
- Вопросы и ответы: 1
Вариант 1: Установка в полуавтоматическом режиме
Установка WSL в операционной системе Windows осуществляется посредством выполнения специальных команд в консоли. Для этого потребуется предварительно определиться с дистрибутивом Linux, а затем запустить процесс его инсталляции.
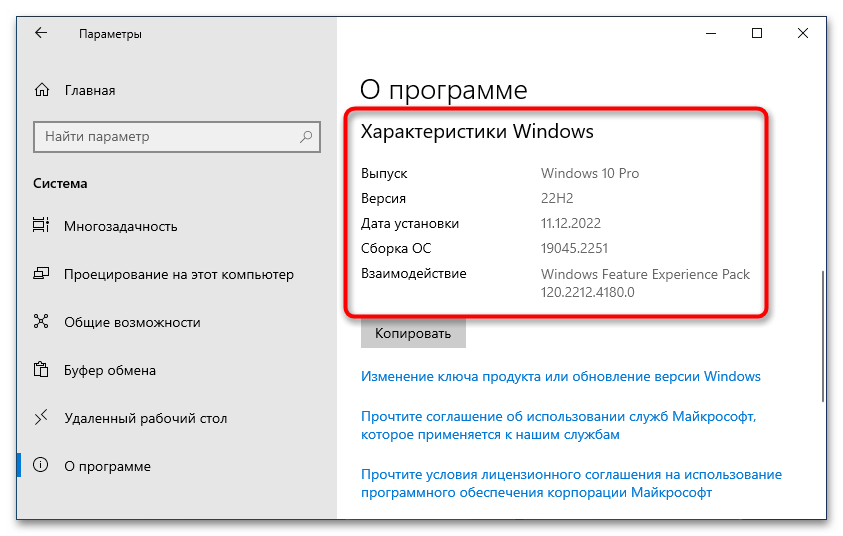
Важно! Приведенная ниже инструкция может быть выполнена только при условии использования Windows 10 версии 2004 (19041) и более новых. Узнать эту информацию можно в свойствах системы.
Шаг 1: Выбор доступных дистрибутивов Linux
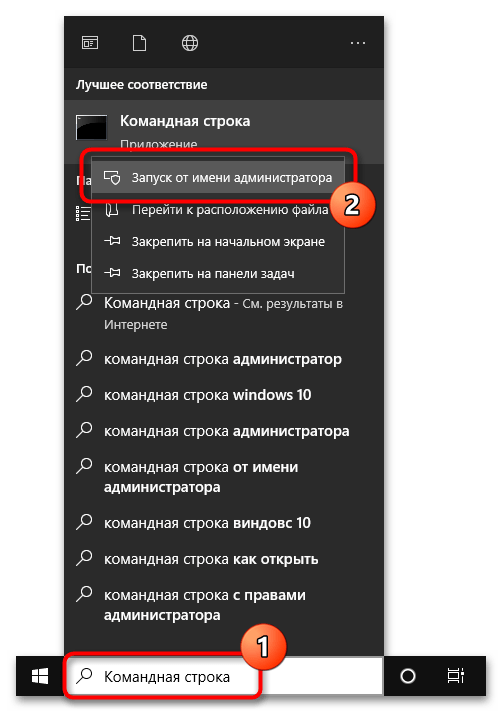
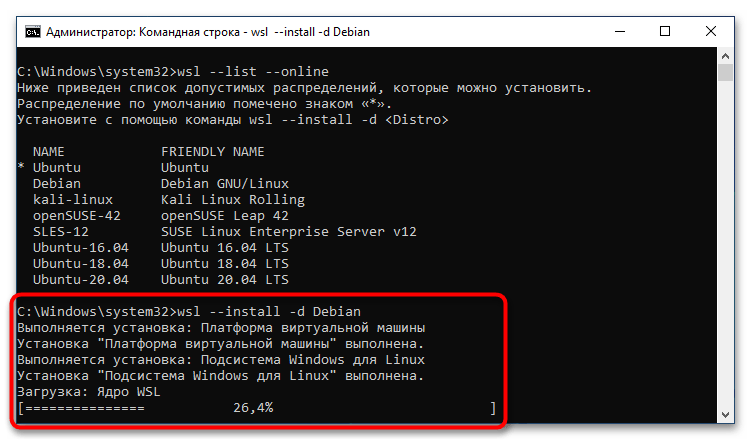
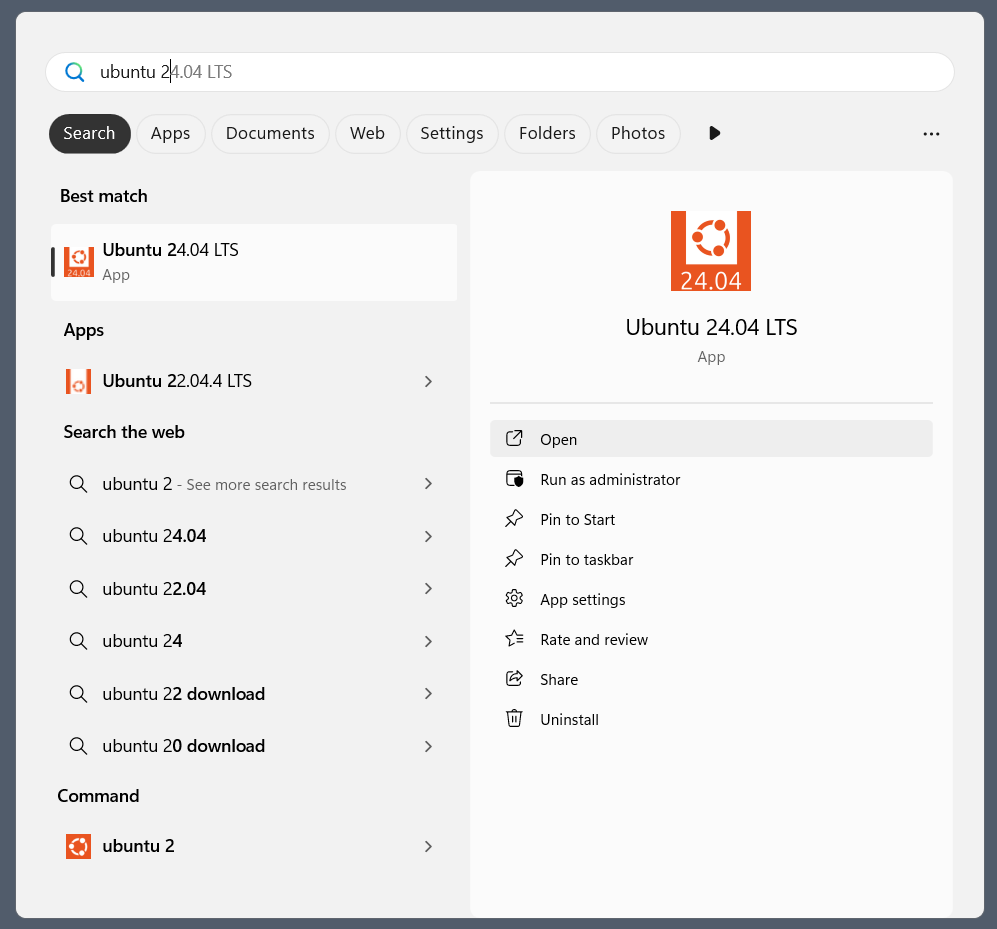
Каждому пользователю актуальной версии Windows 10 предоставляется возможность вручную выбрать дистрибутив Linux, который будет использоваться в WSL2. Для просмотра списка доступных систем необходимо ввести специальную команду в консоль, поэтому предварительно запустите «Командную строку» с правами администратора. Сделать это можно множеством способов, например посредством поискового запроса, как показано на изображении ниже.
Читайте также: Как открыть «Командную строку» от имени администратора в Windows 10
Примечание! По умолчанию всегда выбрана последняя версия дистрибутива Ubuntu. Если именно его вы и хотите установить, то пропустите этот шаг и переходите сразу ко второму.
После того как окно консоли будет открыто, впишите или вставьте в него одну из нижеприведенных команд, после чего нажмите клавишу Enter:
wsl --list --online или wsl -l -o
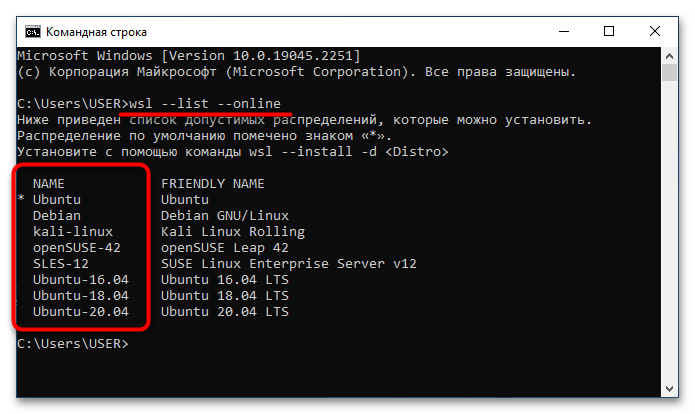
В результатах выдачи будет приведен список всех доступных дистрибутивов Linux. На этом этапе вам необходимо запомнить или скопировать в буфер обмена название, которое находится в столбце «NAME».
Обратите внимание! Если в списке доступных дистрибутивов нет желаемого, его можно импортировать в WSL2 посредством файла TAR или APPX. При необходимости есть возможность создать собственный дистрибутив на базе ядра Linux. Эти процессы описываются в официальной документации Microsoft, при необходимости ознакомиться с ними можно, воспользовавшись ссылками ниже.
Импорт любого дистрибутива Linux для использования с WSL
Создание пользовательского дистрибутива Linux для WSL
Шаг 2: Запуск инсталляции
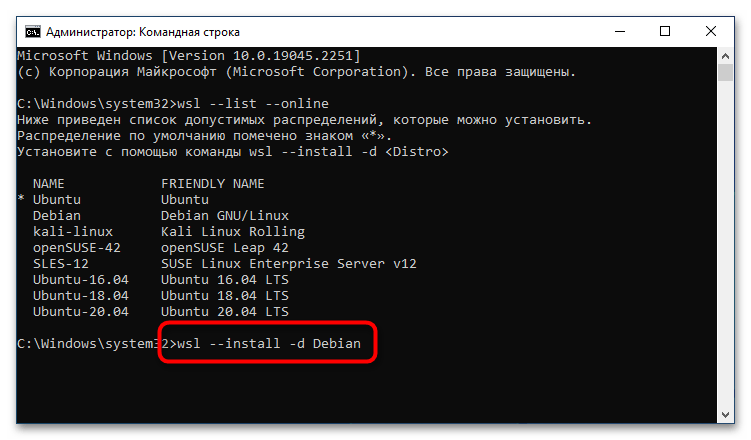
После того как версия дистрибутива Linux для WSL2 была выбрана, можно переходить непосредственно к ее инсталляции. Делается это тоже в «Командной строке», для чего нужно воспользоваться приведенной ниже командой. Не забудьте после ее ввода нажать клавишу Enter.
wsl --install -d <НазваниеДистрибутива>
Примечание! Если вы хотите установить версию по умолчанию, тогда нет необходимости прописывать название дистрибутива вручную, можно воспользоваться следующей командой:
wsl —install
Сразу после этого начнется процесс установки платформы виртуальной машины, затем инсталлируется «Подсистема Windows для Linux», а в завершение будет выполнена загрузка ядра WSL2.
После всех этих процедур можно будет воспользоваться WSL2 для вызова подсистемы Linux. Для этого достаточно будет запустить установленный дистрибутив через меню «Пуск».
Вариант 2: Установка в ручном режиме
Если версия вашей операционной системы Windows 10 ниже 2004 (19041), тогда воспользоваться вышеприведенной инструкцией не получится и большинство действий придется выполнять вручную.
Шаг 1: Предварительная настройка системы
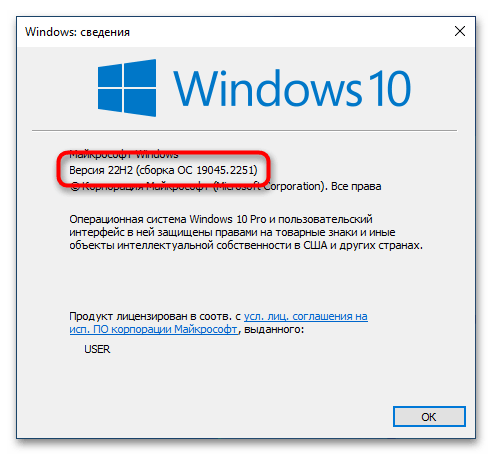
Первостепенно необходимо проверить, поддерживает ли установленная версия операционной системы обновление WSL до второй версии. Сделать это можно посредством вызова окна «Windows: сведения». Для этого нажмите сочетание горячих клавиш Win + R, впишите в поле запроса команду winver и нажмите клавишу Enter.

Появится соответствующее окно, в котором будет указана версия операционной системы и ее сборка. Убедитесь, что она выше 1903 (18362). Если это так, можете продолжить выполнение этой инструкции, в противном случае попробуйте прежде обновить Windows 10 до актуальной версии.
Читайте также: Как обновить Windows 10 до последней версии
Важно! Если ваш компьютер работает на процессоре с архитектурой ARM64, этот способ установки WSL2 не подойдет. Обновитесь до последней версии Windows 10 и воспользуйтесь ранее предоставляемой инструкцией.
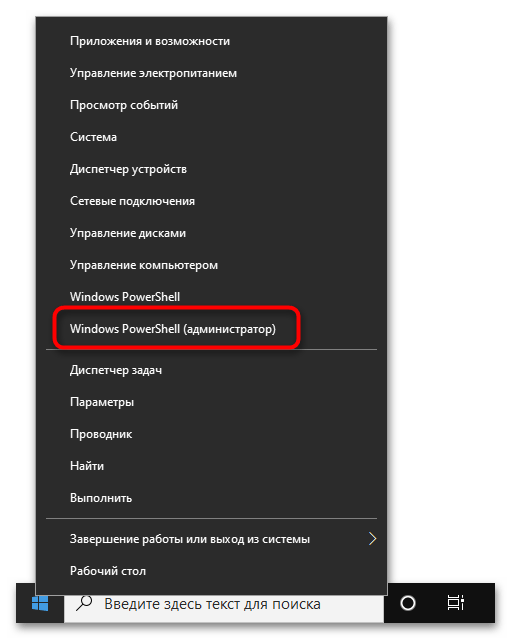
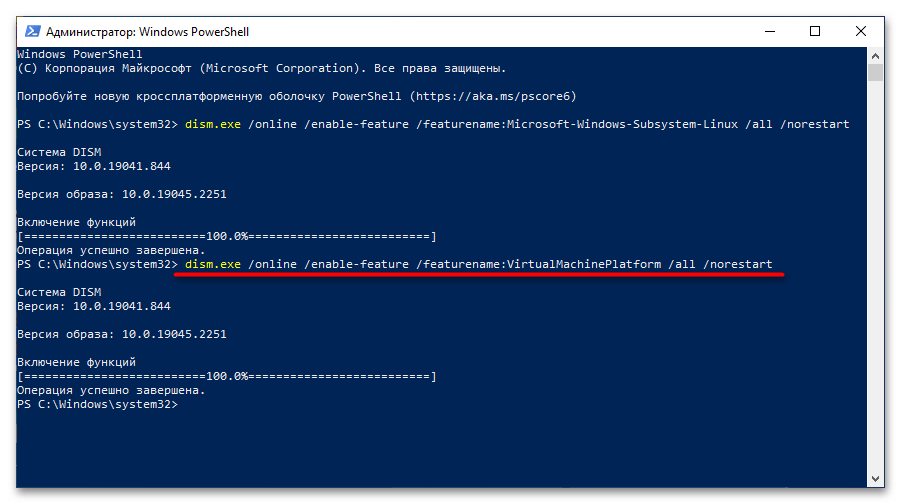
После того как вы удостоверились в актуальности версии операционной системы, необходимо произвести ее предварительную настройку, а именно — включить «Подсистему Windows для Linux» и компонент виртуальных машин. Делается это в оболочке PowerShell, поэтому предварительно запустите ее с правами администратора. Проще всего сделать это через контекстное меню кнопки «Пуск», как показано на изображении ниже. Но это не единственный способ.
Подробнее: Как открыть PowerShell в Windows 10
Теперь необходимо включить компонент «Подсистема Windows для Linux». Для этого скопируйте и вставьте в окно консоли PowerShell следующую команду, после чего нажмите Enter:
dism.exe /online /enable-feature /featurename:Microsoft-Windows-Subsystem-Linux /all /norestart
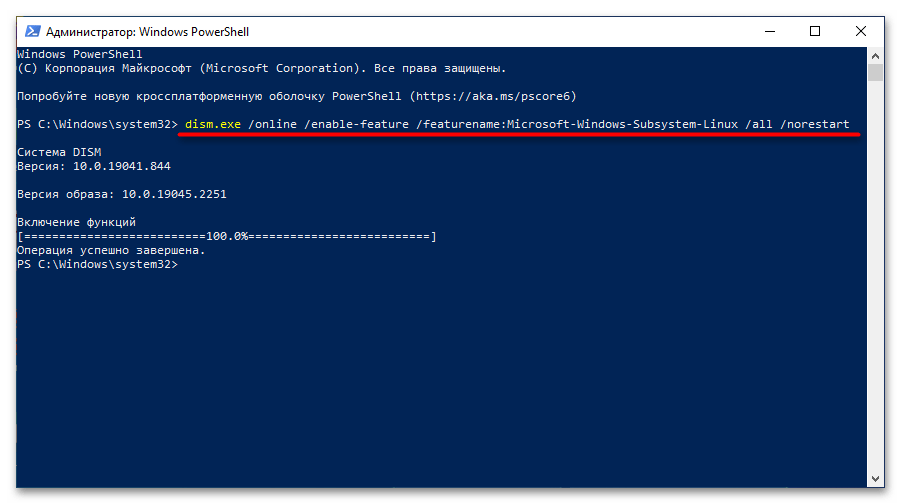
Ожидайте завершения процедуры, когда на экране появится приглашение к вводу новой команды. После этого включите компонент виртуальных машин. Это делается посредством нижепредставленной команды:
dism.exe /online /enable-feature /featurename:VirtualMachinePlatform /all /norestart
Важно! Если результатом ее выполнения является ошибка, потребуется предварительно включить виртуализацию. Делается это через BIOS, но сначала следует проверить статус этой функции в операционной системе. На нашем сайте есть отдельные статьи, посвященные этой теме.
Подробнее:
Как проверить, включена ли виртуализация в Windows 10
Как включить виртуализацию в BIOS

После того как компонент виртуальных машин будет установлен, потребуется перезагрузить компьютер.
Шаг 2: Загрузка и настройка ядра WSL2
Следующим шагом будет загрузка и установка ядра второй версии WSL, но изначально нужно определить архитектуру процессора, на которой работает операционная система. Для этого вызовите окно «Командной строки», в котором выполните следующую команду:
systeminfo | find "Тип системы"
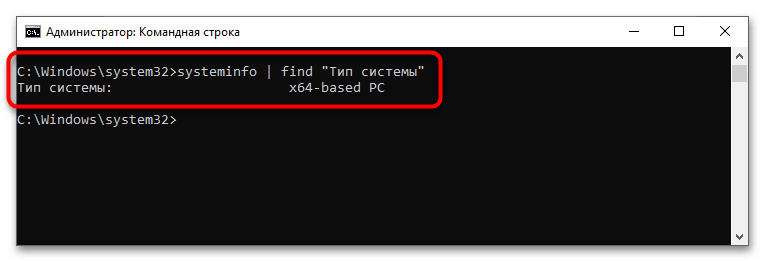
В результатах выдачи будет указана архитектура процессора. Если упоминается x64, скачайте пакет обновления ядра Linux в WSL2 для 64-разрядных компьютеров на базе процессора x86. Если в результатах выдачи есть упоминание ARM64, загрузите пакет обновлений по этой ссылке. Сохраните файл в любое удобное место, после чего запустите его, дважды кликнув по названию. Далее следуйте инструкции инсталлятора, пока не будет произведена установка.

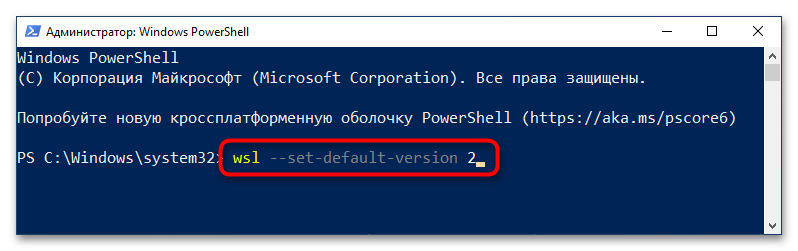
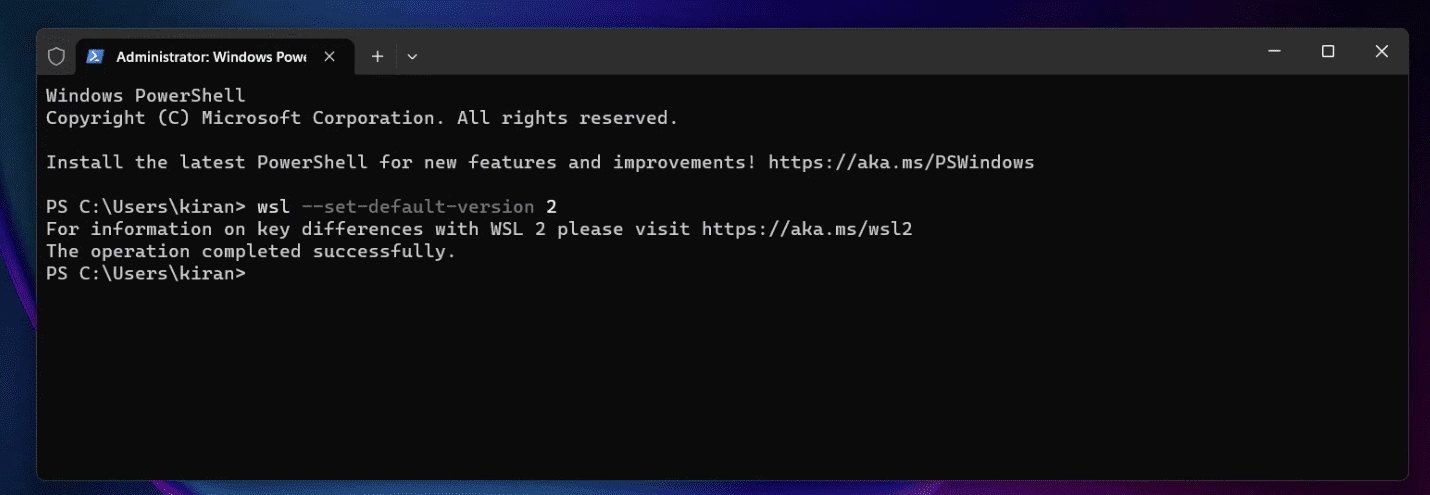
Теперь необходимо выбрать WSL2 версией по умолчанию, чтобы при установке дистрибутивов Linux они инсталлировались в этом окружении. Для этого достаточно в окне PowerShell выполнить представленную ниже команду:
wsl --set-default-version 2
Шаг 3: Выбор и инсталляция дистрибутива Linux
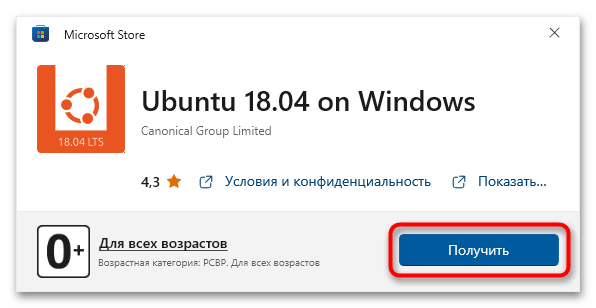
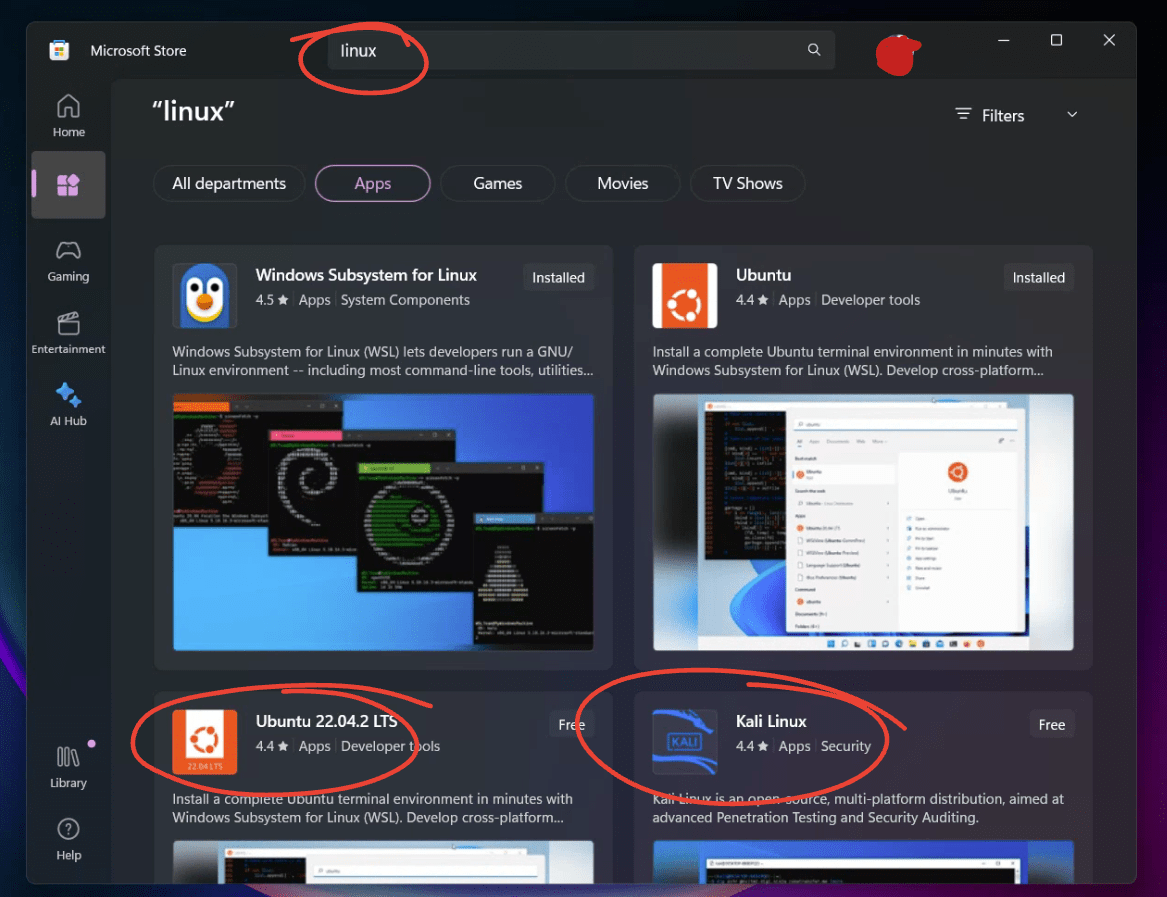
Как только все необходимые компоненты будут установлены, можно переходить к выбору дистрибутива Linux для инсталляции в окружении WSL2. В отличие от первого способа, представленного в этой статье, все действия будут выполняться не в «Командной строке», а в Microsoft Store. Для удобства ниже приведен список доступных систем со ссылками на них:
- Ubuntu 18.04 LTS
- Ubuntu 20.04 LTS
- Ubuntu 22.04 LTS
- openSUSE Leap 15.1
- SUSE Linux Enterprise Server 12 SP5
- SUSE Linux Enterprise Server 15 SP1
- Kali Linux
- Debian GNU/Linux
- Fedora Remix for WSL
- Pengwin
- Pengwin Enterprise
- Alpine WSL
- Raft (пробная версия)
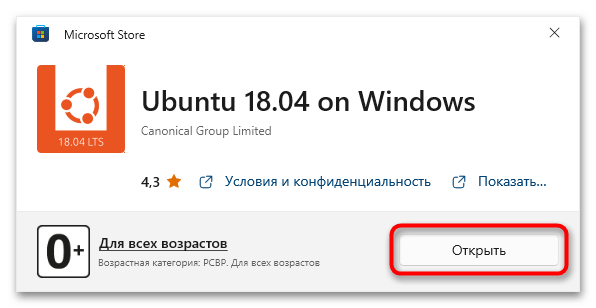
Воспользуйтесь нужной ссылкой, чтобы перейти в магазин приложений от Microsoft. Находясь на странице нужного дистрибутива, щелкните по кнопке «Получить», расположенной рядом с его названием.
Дождитесь завершения загрузки, после чего кликните по появившейся кнопке «Открыть». Запустится окно консоли, в котором будет предложено подождать несколько минут, пока идет распаковка дистрибутива. В дальнейшем процедура инициализации ядра Linux будет занимать считанные секунды.
Примечание! Представленный выше список дистрибутивов взят с официального сайта Microsoft и может со временем измениться. В случае необходимости рекомендуем обратиться за справкой непосредственно к статье-первоисточнику.
Наша группа в TelegramПолезные советы и помощь
When I first started my journey into the world of software development, one of the earliest hurdles I encountered was the operating system barrier. Like many others, I was raised in the comfort of Windows, with its user-friendly interface and wide array of applications. It was only when I plunged into the world of programming, I realized the endless possibilities that lay in the uncharted territory of Linux.
Why Linux?
It is crucial to understand why we are talking about Linux when the world is running on Windows and MacOS. Linux, contrary to popular belief, is not a geeky, complicated operating system. It is powerful, open-source, and highly customizable. It plays a massive role in the server environment and is the backbone of the majority of the world’s supercomputers.
However, switching entirely from Windows to Linux can be daunting, especially if you are used to Windows’ interface and have specific applications that are exclusive to Windows. Thankfully, Microsoft has taken a massive step in bridging this gap by introducing the Windows Subsystem for Linux (WSL). WSL allows you to run Linux on your Windows machine without the hassle of setting up a dual boot or running a virtual machine. Of course, I will cover both methods in this article i.e. Linux via WSL and Linux via Virtual Machine.
Here’s my step-by-step guide on installing Linux in Windows 10 & 11. While I’ve tried to make this as simple as possible, I recommend you take your time to understand each step, especially if you’re new to this.
Method 1: Setting Up WSL on Windows 10 & 11
Step 1.1: Enable the Windows Subsystem for Linux
To start, we first need to enable WSL on our Windows machine. We can do this using PowerShell, which comes pre-installed on Windows.
To open PowerShell:
- For Windows 10: Type
PowerShellin the search bar and right-click on the application and choose ‘Run as administrator’. - For Windows 11: Right-click on the Start button and choose ‘Windows Terminal (Admin)’.
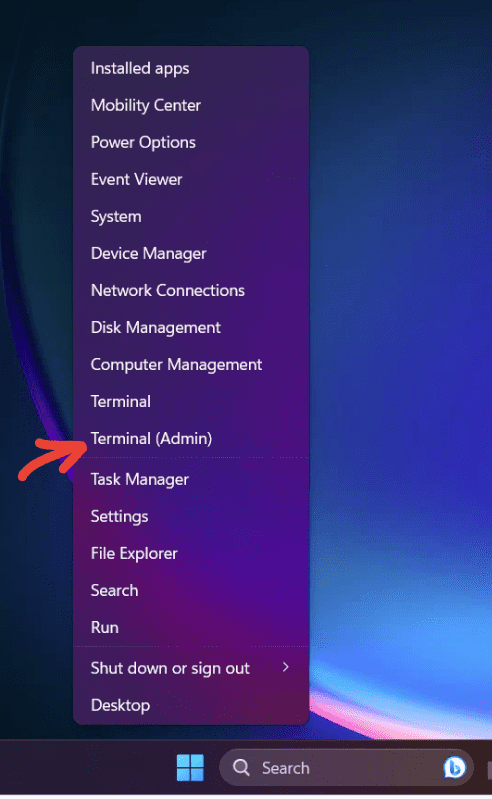
Launching Admin Terminal on Windows 11
Once you have the PowerShell open, type the following command:
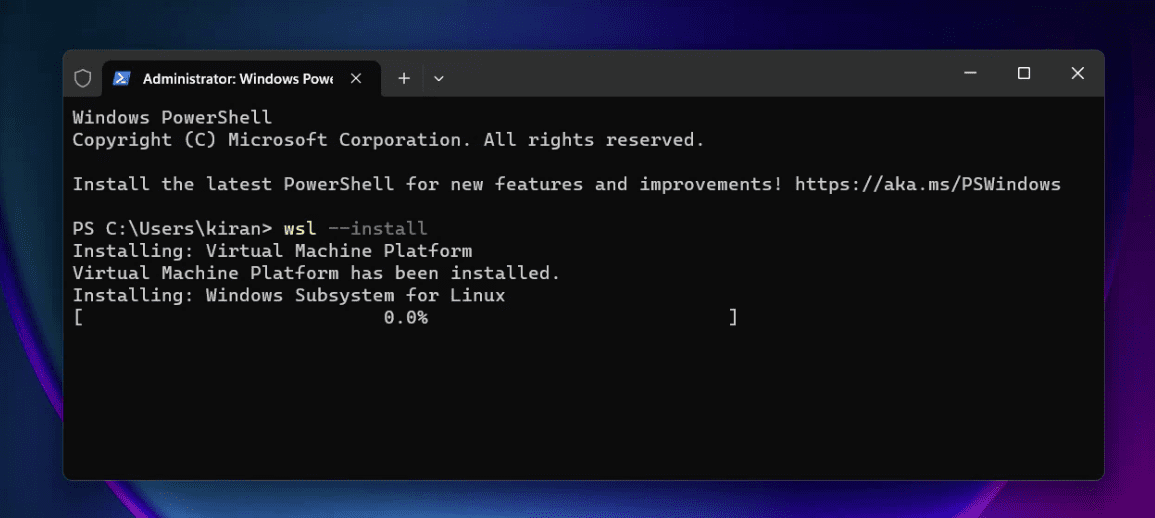
Installing WSL on Windows 11
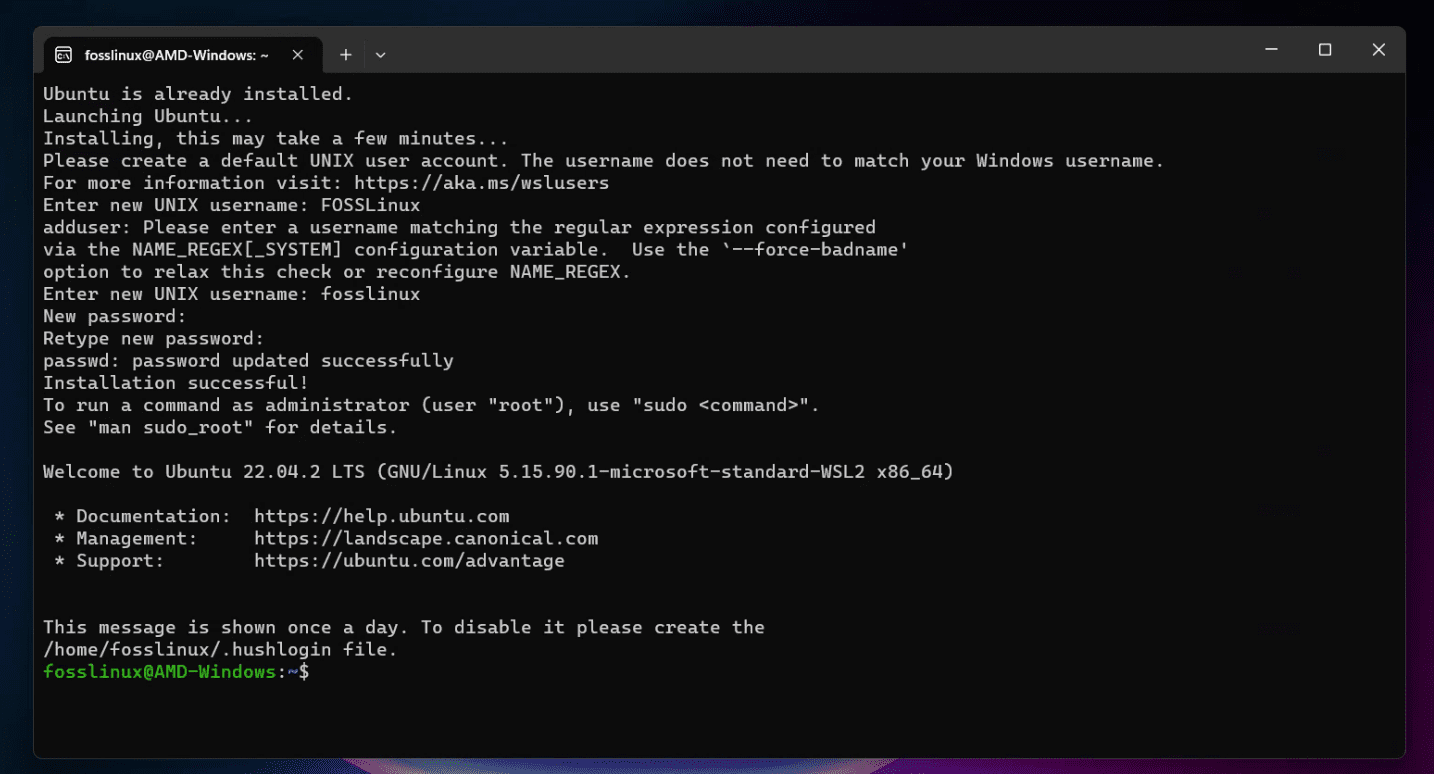
This command will enable WSL and install the Ubuntu distribution by default. The process will also ask you to restart your PC. After restarting your Windows PC, you should see the following Terminal open automatically saying “Ubuntu is already installed”. Go ahead and set up the UNIX username and password.
Installing Ubuntu on Linux
Pro tip: If you wish to select a different Linux distribution, you can list the available options using the command wsl --list --online and install your chosen distribution with wsl --install -d DistroName.
Step 1.2: Update to WSL 2
With the advent of WSL 2, there are significant improvements in file system performance and full system call compatibility, which is why it’s highly recommended to update to WSL 2.
Open PowerShell as an administrator again and run this command:
wsl --set-default-version 2
Confirming WSL 2 is installed on Windows 11
If the command executes successfully, congratulations, you have WSL 2 running on your machine.
Pro tip: If you see a message about Virtual Machine Platform not being enabled, it means your system does not support WSL 2. You can still use WSL 1 by running the command wsl --set-default-version 1.
Step 2: Installing a Linux Distribution
WSL allows you to run different Linux distributions. By default, it installs Ubuntu, but you can install any other distribution like Debian, Kali Linux, or SUSE.
To install a distribution:
- Open Microsoft Store.
- Search for your chosen Linux distribution (Ubuntu, for example).
- Click on ‘Get’ or ‘Install’.
Looking for other Linux distributions in Microsoft Store on Windows 11
Once the download is complete, you can launch the distribution, and it will prompt you to create a user account and password.
Pro tip: Remember this username and password. You will need it for administrative (sudo) tasks within the Linux environment.
Congratulations, you now have a fully working Linux distribution running on your Windows machine.
Step 3: Using the Linux Terminal
You can access your Linux distribution through the Start menu. It works just like a regular terminal. You can use it to run Linux commands, install packages, write scripts, and much more. This is where the power of Linux truly shines.
Personally, I found this feature incredibly handy, especially when I needed to use tools like grep, awk, and sed, which are far more robust in Linux than their Windows counterparts. It was also a breath of fresh air to use the package manager apt to install tools and software, something I had missed dearly on Windows.
Pro tip: The Linux files for each distribution installed through WSL are available in the Windows file system under this path: \\wsl$\<DistroName>\.
Step 4: Practical examples of using Linux inside Windows
Let’s look at couple of simple examples of using our brand new Ubuntu in Windows. Go ahead and launch “Ubuntu” from the start menu. You should see Ubuntu Terminal.
Example 1 : Updating Ubuntu and installing GIMP
Let’s run through the process of installing and using GIMP (GNU Image Manipulation Program) via the command line. GIMP is a powerful open-source tool for photo editing and manipulation, and it’s available for Linux distributions.
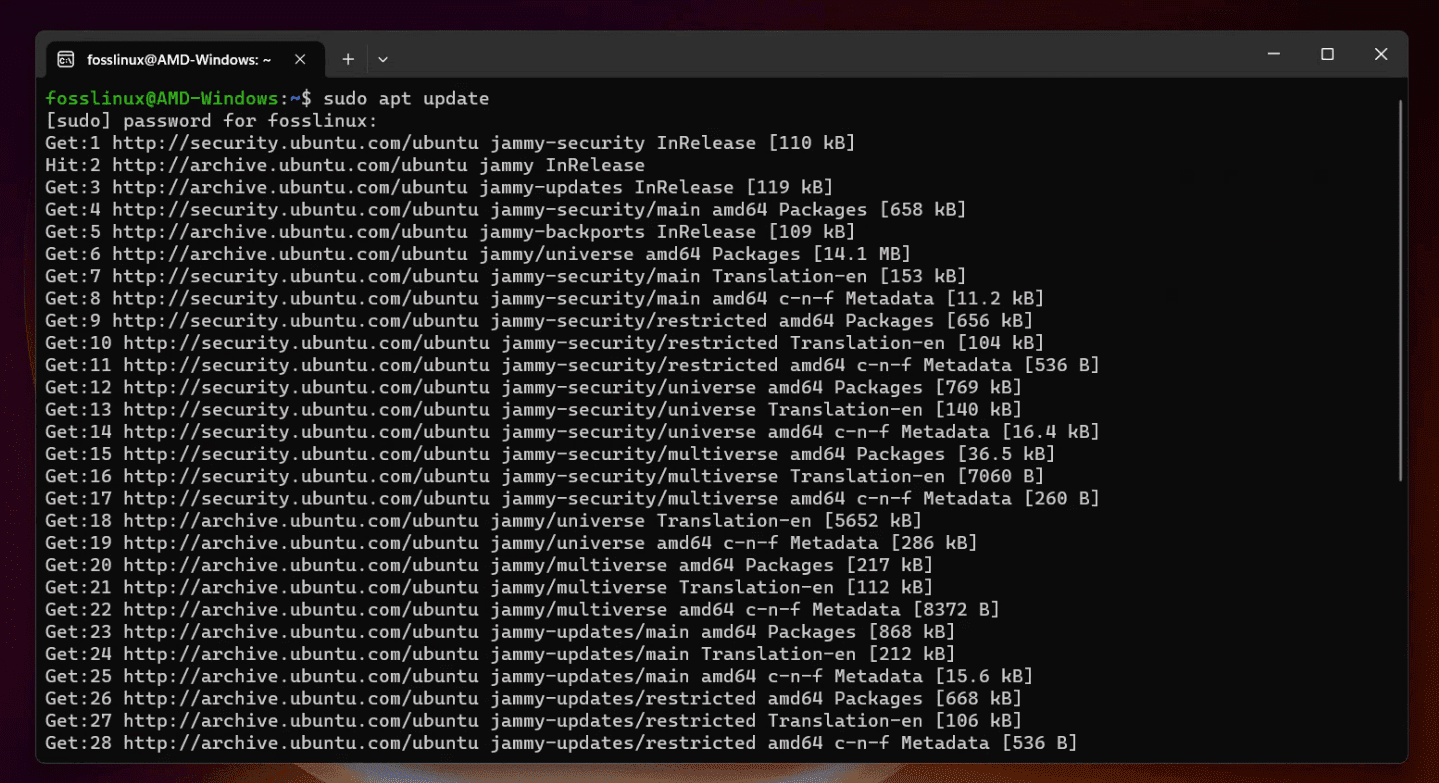
Update Your System
Before installing any new software, it’s a good practice to update your system. Open your Linux terminal within Windows and enter:
sudo apt update
sudo apt upgrade
Updating Ubuntu in Windows 11
Enter your password if prompted. These commands will update the package lists and upgrade installed packages to their latest versions.
Install GIMP
Now, you can install GIMP using the following command:
sudo apt install gimp
This command will download and install GIMP and its dependencies.
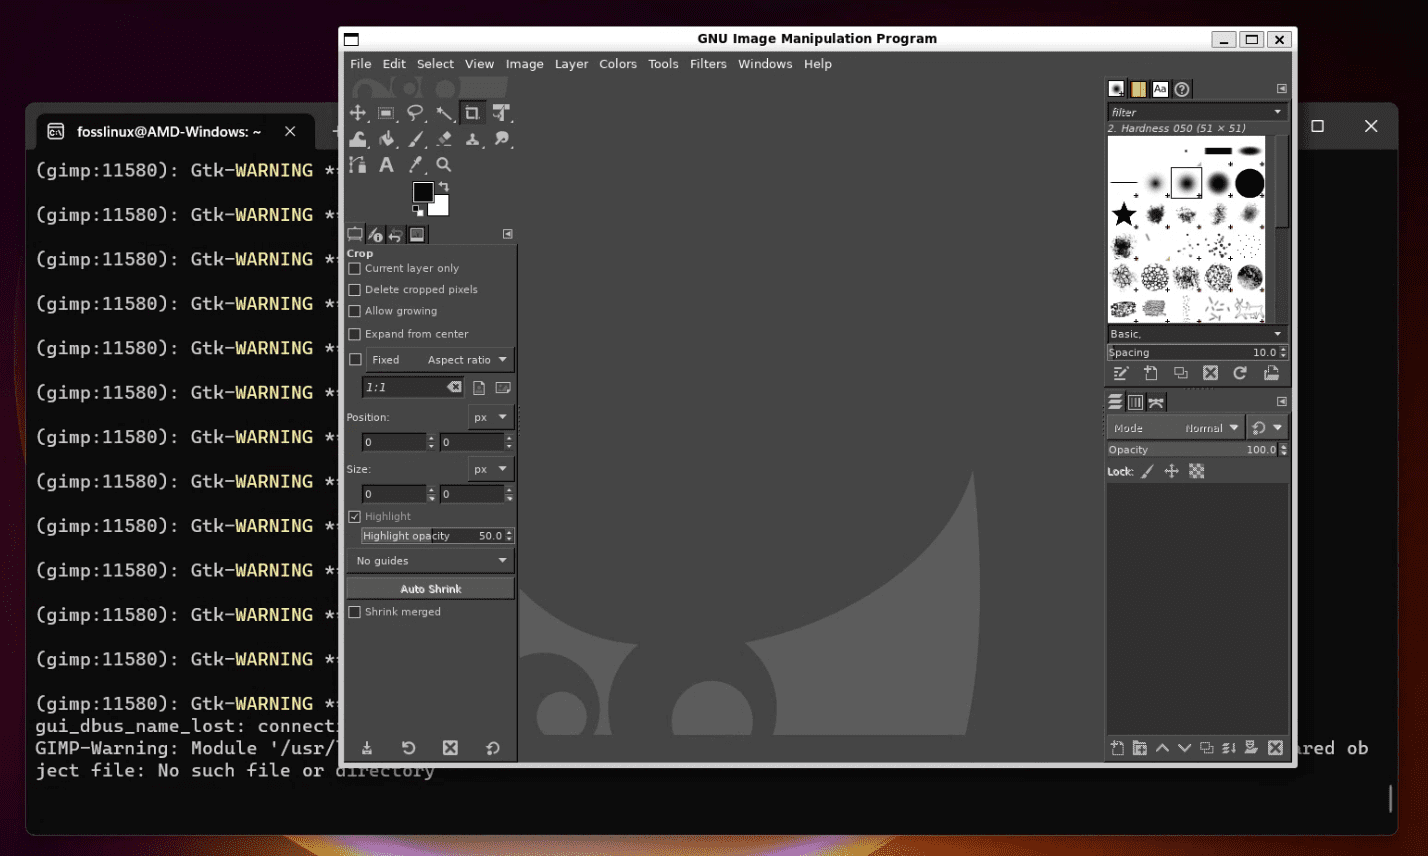
Launch GIMP
Once installed, you can launch GIMP directly from the command line:
gimp &
The ampersand (&) allows the program to run in the background, so you can continue to use the terminal.
Explore GIMP
GIMP will open, and you can start using it to edit images, create artwork, etc.
Running GIMP from Ubuntu on Windows 11
Just incase you wanted to remove GIMP, you can use the command:
sudo apt remove gimp
Example 2: Setting Up a Simple Web Server
After you’ve installed Linux on your Windows machine, you’ll have access to an extensive suite of Linux tools and commands. Let’s explore how you can use this environment to create a simple web server to host a basic HTML page. This will give you a taste of developing and hosting web applications on Linux.
Create a Project Directory
First, open your Linux terminal (Ubuntu, Debian, etc.) that you installed using WSL.
Use the following command to create a directory for your project:
mkdir my_web_server
Navigate to the directory using:
cd my_web_server
Write an HTML File
Next, create a basic HTML file using a text editor like nano. Type:
nano index.html
This will open the nano text editor. Add the following code:
<!DOCTYPE html>
<html>
<head>
<title>My Simple Web Server</title>
</head>
<body>
<h1>Welcome to My Web Server</h1>
<p>This is running on Linux within Windows!</p>
</body>
</html>
Press CTRL + O to write the file and then CTRL + X to exit nano.
Start the Web Server with Python
Many Linux distributions come with Python pre-installed. You can use Python to quickly start a web server.
Run the following command to start a basic HTTP server:
python3 -m http.server 8080
This command tells Python to run a simple HTTP server on port 8080.
View Your Web Page
Open a web browser on your Windows machine and navigate to:
http://localhost:8080
You should see your HTML page displaying the message “Welcome to My Web Server.”
Pro Tips:
This simple server is great for development and testing but isn’t suitable for production.
You can explore more complex web servers like Apache or Nginx if you want to delve deeper into web hosting on Linux.
Method 2: Installing Linux using Virtual Machine
Installing Linux on a virtual machine like VirtualBox is a popular method that many prefer due to its simplicity and the fact that it allows the user to run a full-fledged Linux distribution within Windows. Here’s a step-by-step guide:
Step 2.1: Download and Install VirtualBox
VirtualBox is a free and open-source virtualization software that lets you run different operating systems inside your current operating system. Here’s how you can install a Linux distribution (e.g., Ubuntu) inside VirtualBox on Windows 10 or 11.
- Visit the VirtualBox website.
- Click on “Download VirtualBox” and select the version for Windows hosts.
- Follow the installation instructions, accepting the default options.
We have earlier published a detailed article. Please refer to this article for a detailed step-by-step guide to installing Linux on VirtualBox.
Pro Tips:
- Ensure that virtualization is enabled in your BIOS/UEFI settings.
- You can create snapshots of your virtual machine, which allows you to revert to a previous state if something goes wrong.
Personal Reflections
My experience with VirtualBox has been largely positive. I’ve found it incredibly useful for testing different Linux distributions without having to make any permanent changes to my system. The ability to run Linux within a window on my Windows desktop has allowed me to experiment without fear.
However, I must note that running an OS inside a virtual machine does come with some performance overhead. It won’t be as fast as running Linux directly on the hardware or even through WSL. But for many tasks, the convenience outweighs the performance hit.
Conclusion
The integration of Linux within a Windows environment represents a remarkable evolution in computing that caters to a diverse range of users, from beginners to professionals. Whether through the Windows Subsystem for Linux (WSL) for a lightweight, flexible approach or using a virtual machine like VirtualBox for a full-fledged Linux experience, the doors are open to explore, experiment, and enhance your skills.
Contribute to this page
Toggle table of contents sidebar
What you will learn
-
How to enable and install WSL on Windows 10 and Windows 11
-
How to install
Ubuntu 24.04 LTSusing the Microsoft Store or WSL commands in the terminal
What you will need
-
Windows 10 or 11 running on either a physical device or virtual machine
-
All of the latest Windows updates installed
Install WSL
You can install WSL from the command line. Open a PowerShell prompt as an Administrator (we recommend using Windows Terminal) and run:
It is recommended to reboot your machine after this initial installation to complete the setup.
Install Ubuntu WSL
There are multiple ways of installing distros on WSL, here we focus on two: the Microsoft Store application and WSL commands run in the terminal. The result is the same regardless of the method.
Method 1: Microsoft Store application
Find the distribution you prefer on the Microsoft Store and then click Get.
Ubuntu will then be installed on your machine. Once installed, you can either launch the application directly from the Microsoft Store or search for Ubuntu in your Windows search bar.
Method 2: WSL commands in the terminal
In a PowerShell terminal, you can run wsl --list --online to see an output with all available distros and versions:
The following is a list of valid distributions that can be installed.
The default distribution is denoted by '*'.
Install using 'wsl --install -d <Distro>'.

  NAME                                   FRIENDLY NAME
* Ubuntu                                 Ubuntu
  Debian                                 Debian GNU/Linux
  kali-linux                             Kali Linux Rolling
  Ubuntu-18.04                           Ubuntu 18.04 LTS
  Ubuntu-20.04                           Ubuntu 20.04 LTS
  Ubuntu-22.04                           Ubuntu 22.04 LTS
  Ubuntu-24.04                           Ubuntu 24.04 LTS
...
Your list may be different once new distributions become available.
You can install a version using a NAME from the output:
> wsl --install -d Ubuntu-24.04
You’ll see an indicator of the installation progress in the terminal:
Installing: Ubuntu 24.04 LTS
[==========================72,0%==========                 ]
Use wsl -l -v to see all your currently installed distros and the version of WSL that they are using:
  NAME            STATE           VERSION
  Ubuntu-20.04    Stopped         2
* Ubuntu-24.04    Stopped         2
Note on installing images without the Microsoft Store
If you do not have access to the Microsoft Store or need to install
a custom image it is possible to import a distribution as a tar file:
> wsl --import <DistroName> <InstallLocation> <InstallTarFile>
Appx and MSIX packages for a given distro can also be downloaded and installed.
Please refer to Microsoft’s documentation for more detailed information on these installation methods:
-
Importing Linux distributions
-
Installing distributions without the Microsoft Store
Warning
You should always try to use the latest LTS release of Ubuntu, as it offers the best security, reliability and support when using Ubuntu WSL.
Currently we do not have a recommended location from which to download tar and Appx/MSIX files for Ubuntu distros.
Run and configure Ubuntu
To open an Ubuntu 24.04 terminal run the following command in PowerShell:
Once it has finished its initial setup, you will be prompted to create a username and password. They don’t need to match your Windows user credentials.
Finally, it’s always good practice to install the latest updates by running the following commands within the Ubuntu terminal, entering your password when prompted:
$ sudo apt update
$ sudo apt full-upgrade -y
Enjoy Ubuntu on WSL
In this guide, we’ve shown you how to install Ubuntu WSL on Windows 10 or 11.
We hope you enjoy working with Ubuntu in WSL. Don’t forget to check out our blog for the latest news on all things Ubuntu.
Further Reading
-
Setting up WSL for Data Science
-
Whitepaper: Ubuntu WSL for Data Scientists
-
Microsoft WSL Documentation
-
Ask Ubuntu
Linux is a family of open-source operating systems. They are based on the Linux kernel and are free to download. They can be installed on either a Mac or Windows computer. Here’s how to install Linux on a Windows 10 PC.
If you want to dual boot Linux and Windows, you will need to create a space for your Linux OS to live. In order to do this, you will have to partition your main hard drive. Here’s how to do that:
How to Partition a Hard Drive in Windows 10
- Open the Windows Search Bar. This is the magnifying glass-shaped icon in the bottom-left corner of your screen.
- Then type “DISKMGMT.MSC” in the search bar and hit enter.

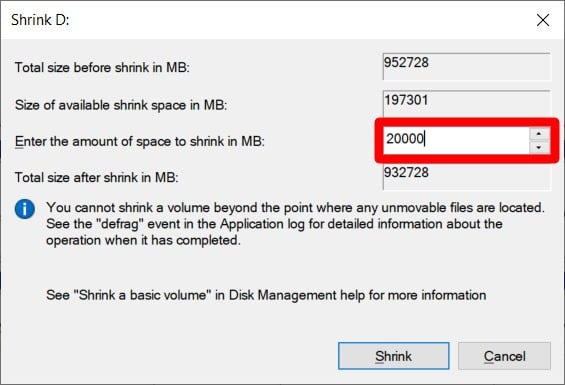
- Right-click on your main hard drive and select Shrink Volume. If you have more than one drive, make sure to choose the one that says Primary Partition. This will usually be labeled as the C: drive.
- Then choose how much you want to shrink your drive. It is recommended that you set aside at least 20GB (20,000MB) for Linux.
- Finally, click Shrink.

Once you have a designated space to install Linux, you’ll need to write a Linux Distro onto a USB thumb drive or external drive 4GB or larger. Here’s how to do that:
How to Make a Linux Bootable USB
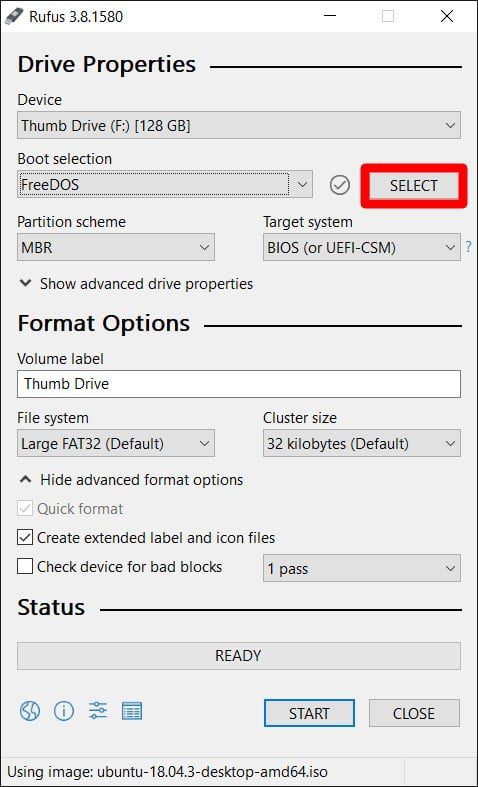
- Download a Linux distro in ISO format. An ISO file is a disk image. Some of the top options are Ubuntu, Mint, or Fedora. They are free to download from each distribution’s main website. For this article, we are using Ubuntu.
- Insert the USB drive into your computer. You might be asked to format your drive. This will erase all the data stored on your drive, so make sure to back up your files before you begin.
- Download Rufus. You can find the latest version of the application here.
- Open Rufus and select your USB drive from the Device list. If you don’t know which drive to use, eject all other drives until you only have one to choose from.
- Under Boot Selection, click the Select button and choose the ISO file you downloaded earlier. Don’t change the other default settings.
- Finally, click Start. If you get a pop-up message asking you to select a mode that you want to use to write the image, choose ISO.
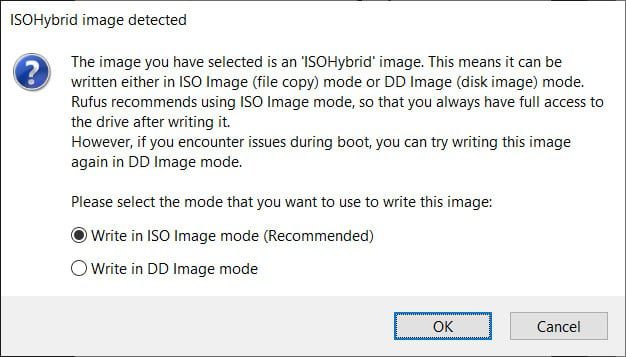
Then wait for Rufus to mount your ISO file onto your drive. This
might take some time, so be patient if the progress bar gets stuck.
Warning: This will erase all the data on your drive, so make sure to back up any important files.
How to Install Linux from USB
Now that you have your Linux distro on a USB, here’s how to
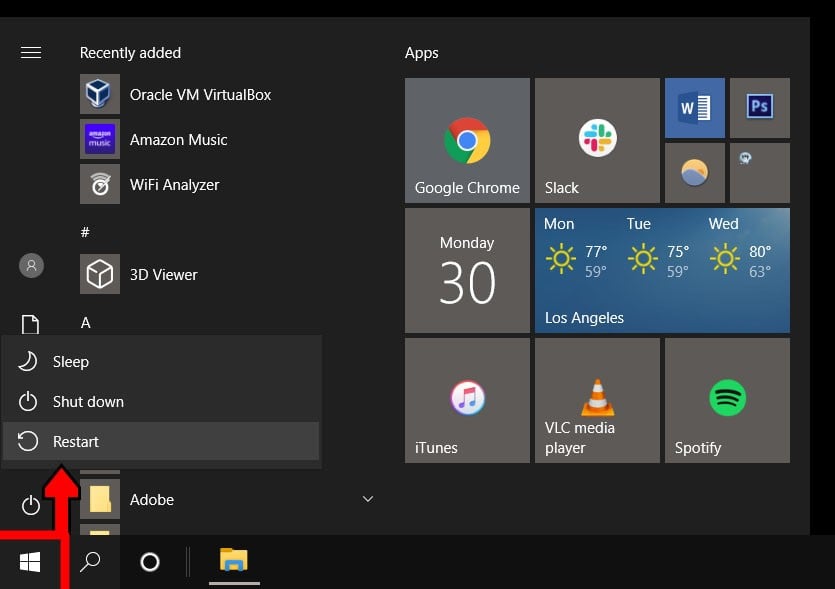
- Insert a bootable Linux USB drive.
- Click the start menu. This is the button in the lower-left corner of your screen that looks like the Windows logo.
- Then hold down the SHIFT key while clicking Restart. This will take you into the Windows Recovery Environment.
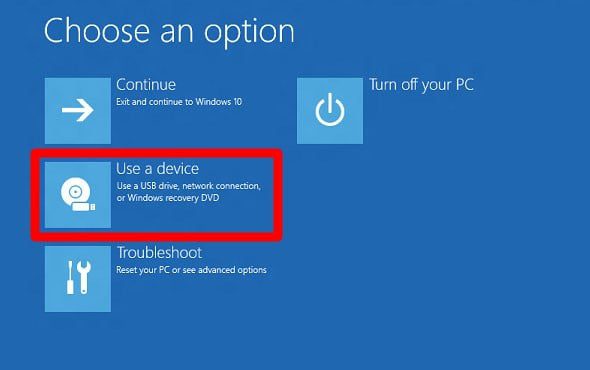
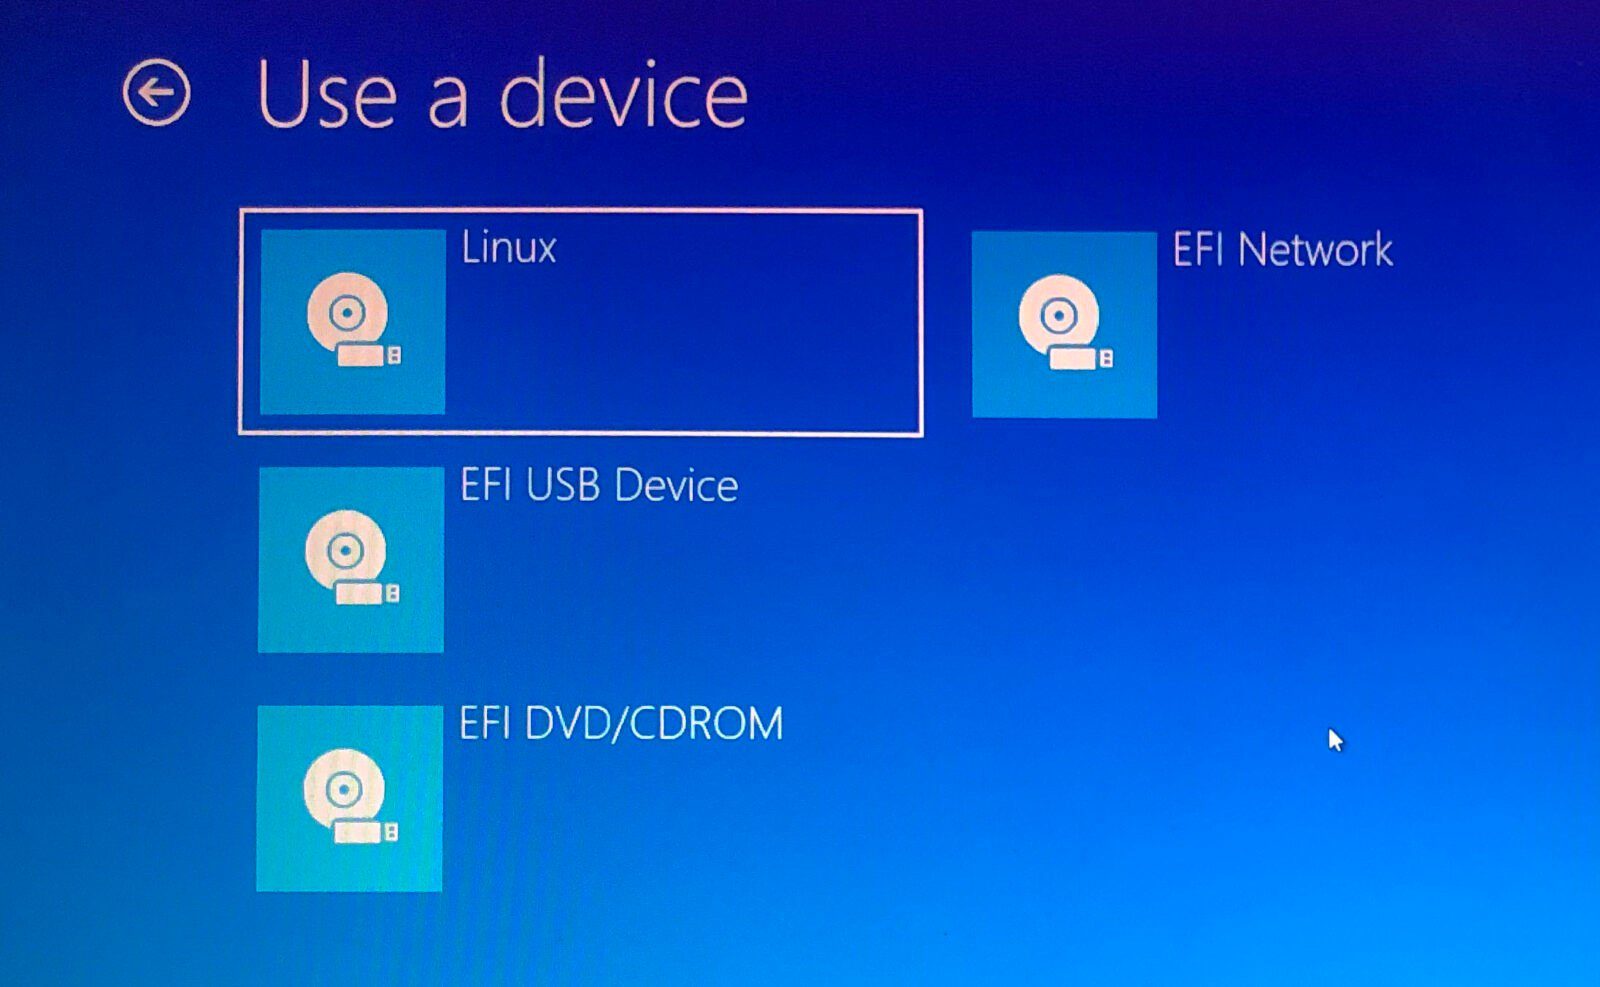
- Then select Use a Device.
- Find your device in the list. If you don’t see your drive, choose EFI USB Device, then pick your drive from the next screen.
- Your computer will now boot Linux. If your computer reboots Windows, there was either an issue with your drive, or you might have to change settings in your BIOS.
Warning: Changing BIOS settings can damage your computer if you don’t know what you’re doing.
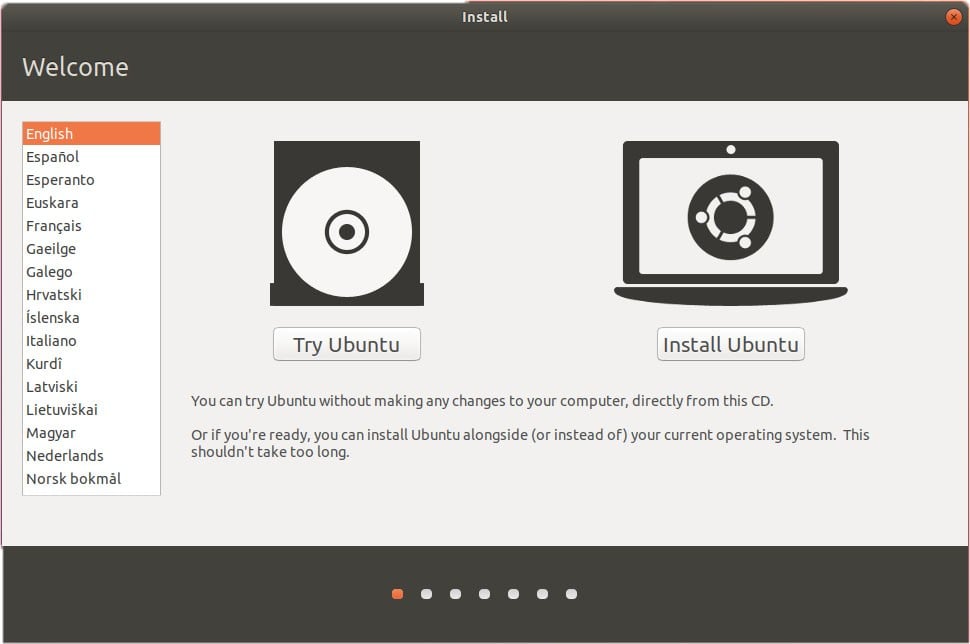
- Select Install Linux. Some distros also let you try out the OS before installing it here.
- Go through the installation process. This will differ depending on which distro you are trying to install. These details might include your WiFi network, language, time zone, keyboard layout, etc. You might also be required to create an account with a username and password. Make sure to write down any details, as you will likely need them in the future.
- Most distros will allow you to partition your drive or erase it and do a clean install during the installation.
Warning: Erasing your disk will mean you will lose your settings, files, and Windows operating system. Only select Erase if you have saved copies of all your files before starting the install process.
- Reboot your computer when prompted. If you have more than one OS in your system, you will be taken to a GNU GRUB screen after rebooting. This screen allows you to select which OS you want to boot.
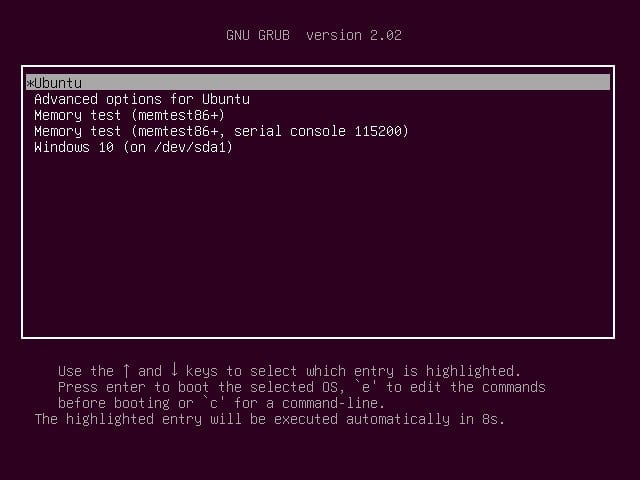
If you do not see a GRUB screen when you boot up your
computer, you can try moving your Linux distro higher on your boot list in
BIOS.
When you’re done, you can do a hardware check. In some cases, you may need to download additional drivers to make some hardware work. The option to download drivers can be found in the Systems Settings of your new Linux OS. After verifying that your hardware is working properly, you can start exploring and using your Linux distro.
If you’re a Mac user, check out our blog on how to install Linux on your Mac.
Are you eager to run Ubuntu alongside your Windows 10 system? With the Windows Subsystem for Linux (WSL) 2, you can easily achieve that, for more details WSL 2 was introduced in Windows 10 version 2004. This guide will walk you through the steps to install either Ubuntu 20.04 or 22.04 in WSL 2 on your Windows 10 machine.
Before you start, ensure you have the following:
- A Windows 10 machine with version 2004 or later.
- A Microsoft account with admin privileges.
- Windows Subsystem for Linux (WSL) feature enabled on your Windows 10 machine.
- Open PowerShell with administrative privileges.
These are the step-by-step process what you need to do:
- Check your Windows version and build number.
- Verify administrator privileges.
- Enable the Windows Machine Platform feature.
- Enable the Windows Subsystem for Linux (WSL) feature.
- Install Ubuntu 20.04 or 22.04 in WSL 2.
- Optional: Install Ubuntu in WSL 2 via PowerShell.
- Configure Ubuntu user account and password.
Step 1: Check your Windows version and build number
Firstly, you need to check your Windows version and build number to ensure compatibility with the Windows Subsystem for Linux (WSL) feature. Follow these steps:
- Open PowerShell with administrative privileges.
- Type the following command and press Enter:
systeminfo | findstr /B /C:"OS Name" /C:"OS Version"

- Look for the output that includes your “OS Name” and “OS Version.”
- For compatibility with WSL 2, your Windows version should be 2004 or later, and the build number should be 19041 or later.
- Ensure that the output includes the Windows version and build number that meets or exceeds these requirements.
If your Windows version and build number meet these criteria, then your system is compatible with Windows Subsystem for Linux (WSL) 2. If not, you may need to update your Windows operating system to a compatible version.
Step 2: Verify administrator privileges
To determine if your user account has administrative privileges using the whoami /groups command in Windows, look for the presence of the “Administrators” group in the output. Here’s how to do it:
- Open PowerShell with administrative privileges.
- Type the following command and press Enter:
- Look for the “S-1-5-32-544” entry in the output.
- If you see “S-1-5-32-544” listed, it means your user account belongs to the “Administrators” group, indicating administrative privileges.
- If you don’t see “S-1-5-32-544” listed, it means your user account does not have administrative privileges.
If your user does not have administrator privileges, log in as an administrator or ask an administrator to elevate your privileges.
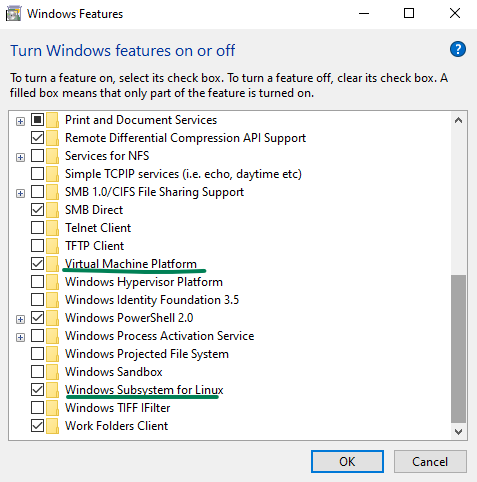
Step 3: Enable Windows features
Enable the required Windows features for WSL 2:
- Open PowerShell with administrative privileges.
- Run the following command:
dism.exe /online /enable-feature /featurename:Microsoft-Windows-Subsystem-Linux /all /norestart
The command above typically enables the Windows Subsystem for Linux (WSL) feature without requiring a restart. However, there can be cases where a restart is necessary for the changes to fully take effect, depending on your system configuration or settings. So, much better to restart your machine ?.
Step 4: Enable WSL feature
To determine if WSL 2 is enabled on your machine using both PowerShell and the DISM command, follow these steps:
- Open PowerShell with administrative privileges.
- Enter the following command and press Enter:
Get-WindowsOptionalFeature -Online | Where-Object {$_.FeatureName -eq "VirtualMachinePlatform"}
- If WSL 2 is enabled, you’ll see output similar to:
FeatureName : VirtualMachinePlatform
State       : Enabled
- Additionally, you can use the DISM command to check:
dism.exe /online /get-features | Where-Object { $_ -match "Microsoft-Windows-Subsystem-Linux" }
Output:
Feature Name : Microsoft-Windows-Subsystem-Linux
Otherwise, you can go to ‘Turn Windows features on or off‘ in your Windows settings to verify if the Windows Subsystem for Linux is enabled.
Once the WSL feature is enabled, you can install Ubuntu from the Microsoft Store or using the wsl command. Here’s how:
- Open the Microsoft Store and search for “Ubuntu 20.04” or “Ubuntu 22.04”.
- Click on the desired app and click the “Get” button to download and install it.
- After installation, launch Ubuntu from the Start menu.

Step 6: Optional – Installing Ubuntu in WSL 2 via PowerShell
Alternatively, you can install Ubuntu in WSL 2 using PowerShell commands:
- List the available WSL distributions:
- Install Ubuntu:
wsl --install -d Ubuntu-20.04
- Set WSL 2 as the default version:
wsl --set-default-version 2
- Check the installed distributions:
- Verify the Ubuntu version:
Final Step: Configure Ubuntu user account and password
Upon installation, follow the prompts to create a user account and password for Ubuntu.
Creating new user account...
username:
After following these steps, you’ll have Ubuntu 20.04 or 22.04 installed in WSL 2 on your Windows 10 machine. Enjoy the seamless integration of Linux with your Windows environment!
Welcome to Ubuntu 20.04 LTS (GNU/Linux 4.19.104-microsoft-standard x86_64)

 * Documentation:  https://help.ubuntu.com
 * Management:     https://landscape.canonical.com
 * Support:        https://ubuntu.com/advantage

0 packages can be updated.
0 updates are security updates.


The programs included with the Ubuntu system are free software;
the exact distribution terms for each program are described in the
individual files in /usr/share/doc/*/copyright.

Ubuntu comes with ABSOLUTELY NO WARRANTY, to the extent permitted by
applicable law.

username@Ubuntu:~$
For troubleshooting Windows Subsystem for Linux, refer to Microsoft’s official documentation.