
- Skip to content
- Accessibility Policy
Installing the JavaFX SDK
The JavaFX Software Development Kit (SDK) provides the command-line tools and technologies to develop expressive content for applications deployed to browsers, desktops, and mobile devices.
- JavaFX Desktop runtime
- JavaFX Mobile Emulator and runtime (Windows only)
- JavaFX API documentation
- Samples
The JavaFX SDK runs on Windows and Mac OS X. A beta release of the JavaFX SDK is provided for Ubuntu Linux and the OpenSolaris operating systems.
Contents
System Requirements
The system requirements for the JavaFX SDK, including the recommended version of the Java SE Development Kit (JDK), are listed in the JavaFX System Requirements document.
Installing the JavaFX SDK on Windows or Mac
- Download the latest JavaFX SDK installer file for Windows (an EXE extension) or Mac OS X (a DMG extension).
- Download older versions of the JavaFX SDK installer from the Previous Releases download page.
- After the download is complete, double-click the EXE or DMG file to run the installer. On the Mac OS X platform, double-click the open-box icon that appears after you start the installer.
- Complete the steps in the installation wizard.
- Note the default installation location:
- For Windows. The default installation location is
C:\Program Files\JavaFX\javafx-sdk-version. - For Mac OS X. The default installation directory is
/Library/Frameworks/JavaFX.framework/Versions/version-number.
On Mac OS X, the installation procedure also creates the following directories:
/Library/Frameworks/JavaFX.framework/Versions/Current
/Library/JavaFX/Home
/usr/bin/javafx
/usr/bin/javafxc
/usr/bin/javafxdoc
/usr/bin/javafxpackager
For information about samples and documentation in the SDK, see the README file in the top level of the SDK directory.
Installing the JavaFX SDK on Ubuntu Linux or OpenSolaris
- Download and save the JavaFX shell script for the Linux or OpenSolaris operating system.
- Download older versions of the JavaFX SDK installer from the Previous Releases download page.
- Run the
.shfile. For example: - Accept the license terms.
chmod a+x javafx_sdk-1_2-linux-i586.sh
./javafx_sdk-1_2-linux-i586.sh
The shell script installs the JavaFX SDK in the current directory.
For information about samples and documentation in the SDK, see the README file in the top level of the SDK directory.
More Information
- JavaFX Getting Started Guides and Tutorials
- JavaFX FAQs
Discussion
We welcome your participation in our community. Please keep your comments civil and on point. You can optionally provide your email address to be notified of replies your information is not used for any other purpose. By submitting a comment, you agree to these Terms of Use.
JavaFX is an open source, next generation client application platform for desktop, mobile and embedded systems built on Java. It provides an API for designing GUI applications that run on every device supported by Java.
This tutorial will guide you through the installation process of JavaFX on your operating system.
Download JavaFX
JavaFX is a standalone component and builds on top of a Java Development Kit. So you should consider installing a Java Development Kit (JDK) that works with the JavaFX version you plan to use, eg. JavaFX 21 requires prior installation of JDK 21. You can find out how to install a JDK by following the setting up a Java Development Kit section of the Getting Started with Java tutorial.
There is a one-stop page that always refers to the latest version of JavaFX and the JDK: https://jdk.java.net/.
Selecting the latest «Ready for use» JavaFX version takes you to a page where you can download the version of the JDK you need.
From this page you can choose the way to work with JavaFX:
- Use JavaFX as an SDK to compile and run JavaFX applications.
- Download the archive containing a series of jmod files and use those with jlink to create a JDK that includes the JavaFX modules, and optionally, your modular application.
You should download JavaFX based on your operating system:
- Linux/x64
- macOS/x64
- macOS/AArch64
- Windows/x64
This page provides production-ready open-source builds of JavaFX, under the GNU General Public License, version 2, with the Classpath Exception.
Setting up a JavaFX SDK for Windows/x64
If you choose to use the JavaFX SDK for Windows/x64, download and unzip it to a desired location. In this section you will use JavaFX 21.0.1.
Add an environment variable pointing to the lib directory of the runtime:
set PATH_TO_FX="path\to\javafx-sdk-21.0.1\lib"
Now you can compile and run JavaFX applications from the command line using the JavaFX runtime.
Let’s test this by writing a simple HelloWorldFX.java class:
import javafx.application.Application;
import javafx.scene.Scene;
import javafx.scene.control.Label;
import javafx.scene.layout.StackPane;
import javafx.stage.Stage;

public class HelloWorldFX extends Application {

    @Override
    public void start(Stage stage) {
        String javaVersion = System.getProperty("java.version");
        String javafxVersion = System.getProperty("javafx.version");
        Label l = new Label("Hello World running on JavaFX " + javafxVersion + " on top of Java " + javaVersion + ".");
        Scene scene = new Scene(new StackPane(l), 640, 480);
        stage.setScene(scene);
        stage.show();
    }

    public static void main(String[] args) {
        launch();
    }

}
First you will compile it with:
javac --module-path %PATH_TO_FX% --add-modules javafx.controls HelloWorldFX.java
When compiling the application you need to add the required modules (javafx.controls).
The required modules (javafx.controls) resolve the dependency of transitively required ones (javafx.graphics).
In case your application is declaring components via FXML, you should add the javafx.fxml module as well:
javac --module-path %PATH_TO_FX% --add-modules javafx.controls,javafx.fxml HelloWorldFX.java
Now run the application with the following command:
java --module-path %PATH_TO_FX% --add-modules javafx.controls HelloWorldFX
Setting up a JavaFX SDK for Linux/x64
In case you choose to use the JavaFX SDK for Linux/x64, download and extract/unpack it to a desired location. In this section you will use JavaFX 21.0.1.
Add an environment variable pointing to the lib directory of the runtime:
export PATH_TO_FX=path/to/javafx-sdk-21.0.1/lib
Now you can compile and run JavaFX applications from the command line using the JavaFX runtime.
Let’s test this by writing a simple HelloWorldFX.java class:
import javafx.application.Application;
import javafx.scene.Scene;
import javafx.scene.control.Label;
import javafx.scene.layout.StackPane;
import javafx.stage.Stage;

public class HelloWorldFX extends Application {

    @Override
    public void start(Stage stage) {
        String javaVersion = System.getProperty("java.version");
        String javafxVersion = System.getProperty("javafx.version");
        Label l = new Label("Hello World running on JavaFX " + javafxVersion + " on top of Java " + javaVersion + ".");
        Scene scene = new Scene(new StackPane(l), 640, 480);
        stage.setScene(scene);
        stage.show();
    }

    public static void main(String[] args) {
        launch();
    }

}
First you will compile it with:
javac --module-path $PATH_TO_FX --add-modules javafx.controls HelloWorldFX.java
When compiling the application you need to add the required modules (javafx.controls).
The required modules (javafx.controls) resolve the dependency of transitively required ones (javafx.graphics).
In case your application is declaring components via FXML, you should add the javafx.fxml module as well:
javac --module-path $PATH_TO_FX --add-modules javafx.controls,javafx.fxml HelloWorldFX.java
Now run the application with the following command:
java --module-path $PATH_TO_FX --add-modules javafx.controls HelloWorldFX
Setting up a JavaFX SDK for macOS
In case you choose to use the JavaFX SDK for macOS, download and extract/unpack it to a desired location. In this section you will use JavaFX 21.0.1.
Add an environment variable pointing to the lib directory of the runtime:
export PATH_TO_FX=path/to/javafx-sdk-21.0.1/lib
Now you can compile and run JavaFX applications from the command line using the JavaFX runtime.
Let’s test this by writing a simple HelloWorldFX.java class:
import javafx.application.Application;
import javafx.scene.Scene;
import javafx.scene.control.Label;
import javafx.scene.layout.StackPane;
import javafx.stage.Stage;

public class HelloWorldFX extends Application {

    @Override
    public void start(Stage stage) {
        String javaVersion = System.getProperty("java.version");
        String javafxVersion = System.getProperty("javafx.version");
        Label l = new Label("Hello World running on JavaFX " + javafxVersion + " on top of Java " + javaVersion + ".");
        Scene scene = new Scene(new StackPane(l), 640, 480);
        stage.setScene(scene);
        stage.show();
    }

    public static void main(String[] args) {
        launch();
    }

}
First you will compile it with:
javac --module-path $PATH_TO_FX --add-modules javafx.controls HelloWorldFX.java
When compiling the application you need to add the required modules (javafx.controls).
The required modules (javafx.controls) resolve the dependency of transitively required ones (javafx.graphics).
In case your application is declaring components via FXML, you should add the javafx.fxml module as well:
javac --module-path $PATH_TO_FX --add-modules javafx.controls,javafx.fxml HelloWorldFX.java
Now run the application with the following command:
java --module-path $PATH_TO_FX --add-modules javafx.controls HelloWorldFX
Working with JavaFX Runtime Images
You can also run your JavaFX application using the set of jmod files available in the JavaFX release page.
Start by downloading the archive appropriate for your operating system:
- Linux/x64
- macOS/x64
- macOS/AArch64
- Windows/x64
In case your operating system is Linux/x64 or macOS, unpack the downloaded archive and add the environment variable pointing to the resulting jmods directory:
export PATH_TO_FX_JMODS=path/to/javafx-jmods-21.0.1
If you are a Windows operating system user, unzip the downloaded archive and add the environment variable pointing to the resulting jmods directory:
set PATH_TO_FX_JMODS="path\to\javafx-jmods-21.0.1"
To use the set of jmod files we need to make HelloWorldFX.java application part of a module.
Firstly, you need to add a package declaration to the class:
package helloworld;

import javafx.application.Application;
import javafx.scene.Scene;
import javafx.scene.control.Label;
import javafx.scene.layout.StackPane;
import javafx.stage.Stage;

public class HelloWorldFX extends Application {

  @Override
  public void start(Stage stage) {
    String javaVersion = System.getProperty("java.version");
    String javafxVersion = System.getProperty("javafx.version");
    Label l = new Label("Hello World running on JavaFX " + javafxVersion + " on top of Java " + javaVersion + ".");
    Scene scene = new Scene(new StackPane(l), 640, 480);
    stage.setScene(scene);
    stage.show();
  }

  public static void main(String[] args) {
    launch();
  }

}
Secondly, you have to create a module-info.java where you declare the required modules to run the application:
module helloworldfx {
    requires javafx.controls;
    exports helloworld;
}
Next, you can compile the HelloWorldFX.java application with the JavaFX jmod files:
- for Linux/x64, macOS/x64, macOS/AArch64
javac --module-path $PATH_TO_FX_MODS -d mods/helloworldfx $(find . -name "*.java") - for Windows
dir /s /b *.java > sources.txt & javac --module-path %PATH_TO_FX_JMODS% -d mods/helloworldfx @sources.txt & del sources.txt
Because the helloworldfx is a modular project, you can use jlink to create a custom runtime image using the JavaFX jmods:
- on Linux/x64, macOS/x64, macOS/AArch64
$JAVA_HOME/bin/jlink --module-path $PATH_TO_FX_MODS:mods --add-modules helloworldfx --output helloworldfx - on Windows
jlink --module-path "%PATH_TO_FX_JMODS%;mods" --add-modules helloworldfx --output helloworldfx
After the image is built, you can run it using the following command:
- on Linux/x64, macOS/x64, macOS/AArch64
helloworldfx/bin/java -m helloworldfx/helloworld.HelloWorldFX - on Windows
helloworldfx\bin\java -m hellofx/helloworld.HelloWorldFX
Final words
Congratulations on successfully downloading, installing, and using JavaFX!
For further reading, please check out JavaFX Fundamentals.
Since Java 11, JavaFX is not included in the JDK anymore. Here’s how to download it and set it up on both Windows & MacOS!
🐍👑🌍
Note: JDK version earlier than 11 will throw error Unrecognized option: --module-path.
Make sure you have Java 11+ installed with java -version:
MacOS
Prerequisites
Make sure you have Java 11+ installed with java -version:
$ java -version
java version "11.0.7" 2020-04-14 LTS
Java(TM) SE Runtime Environment 18.9 (build 11.0.7+8-LTS)
Java HotSpot(TM) 64-Bit Server VM 18.9 (build 11.0.7+8-LTS, mixed mode)
If you have a lower version, you may download the JDK 11 from https://www.oracle.com/java/technologies/javase-jdk11-downloads.html
MacOS Java default installation path: /Library/Java/JavaVirtualMachines/jdk-11.0.7.jdk
JavaFX download
- Get JavaFX 11 from https://gluonhq.com/download/javafx-11-0-2-sdk-mac, and unzip it into
~/java/javafx-sdk-11.0.2. - Then, create an ENV var to store the JavaFX path
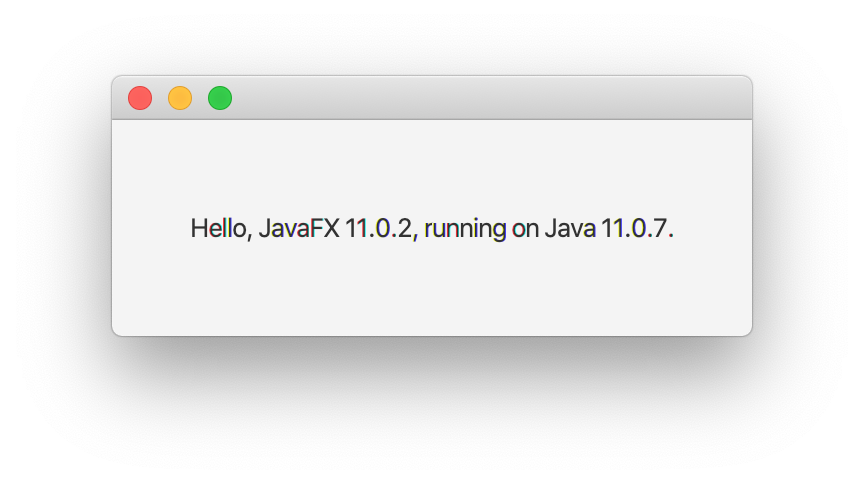
export PATH_TO_FX=/Users/me/java/javafx-sdk-11.0.2/lib - Finally, run the HelloWorld JavaFX app from OpenJFX:
$ curl https://raw.githubusercontent.com/openjfx/samples/master/HelloFX/CLI/hellofx/HelloFX.java -o HelloFX.java
$ javac --module-path $PATH_TO_FX --add-modules javafx.controls HelloFX.java
$ java --module-path $PATH_TO_FX --add-modules javafx.controls HelloFX
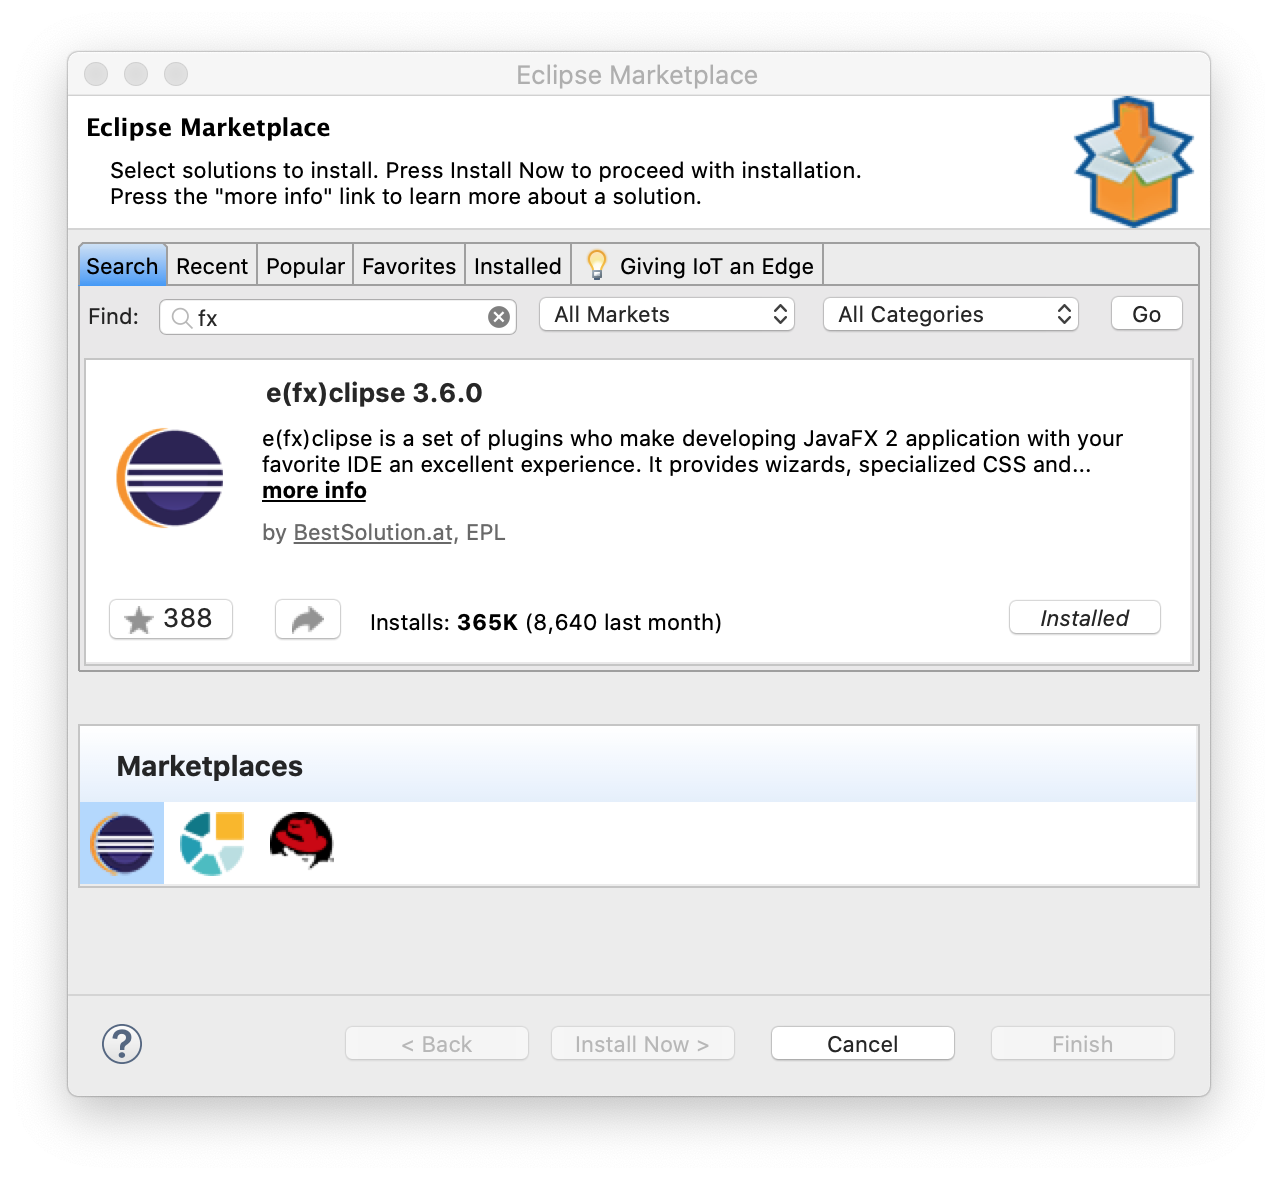
Eclipse setup
- Open Eclipse,
Help>Eclipse Marketplace>e(fx)clipse3.6.0
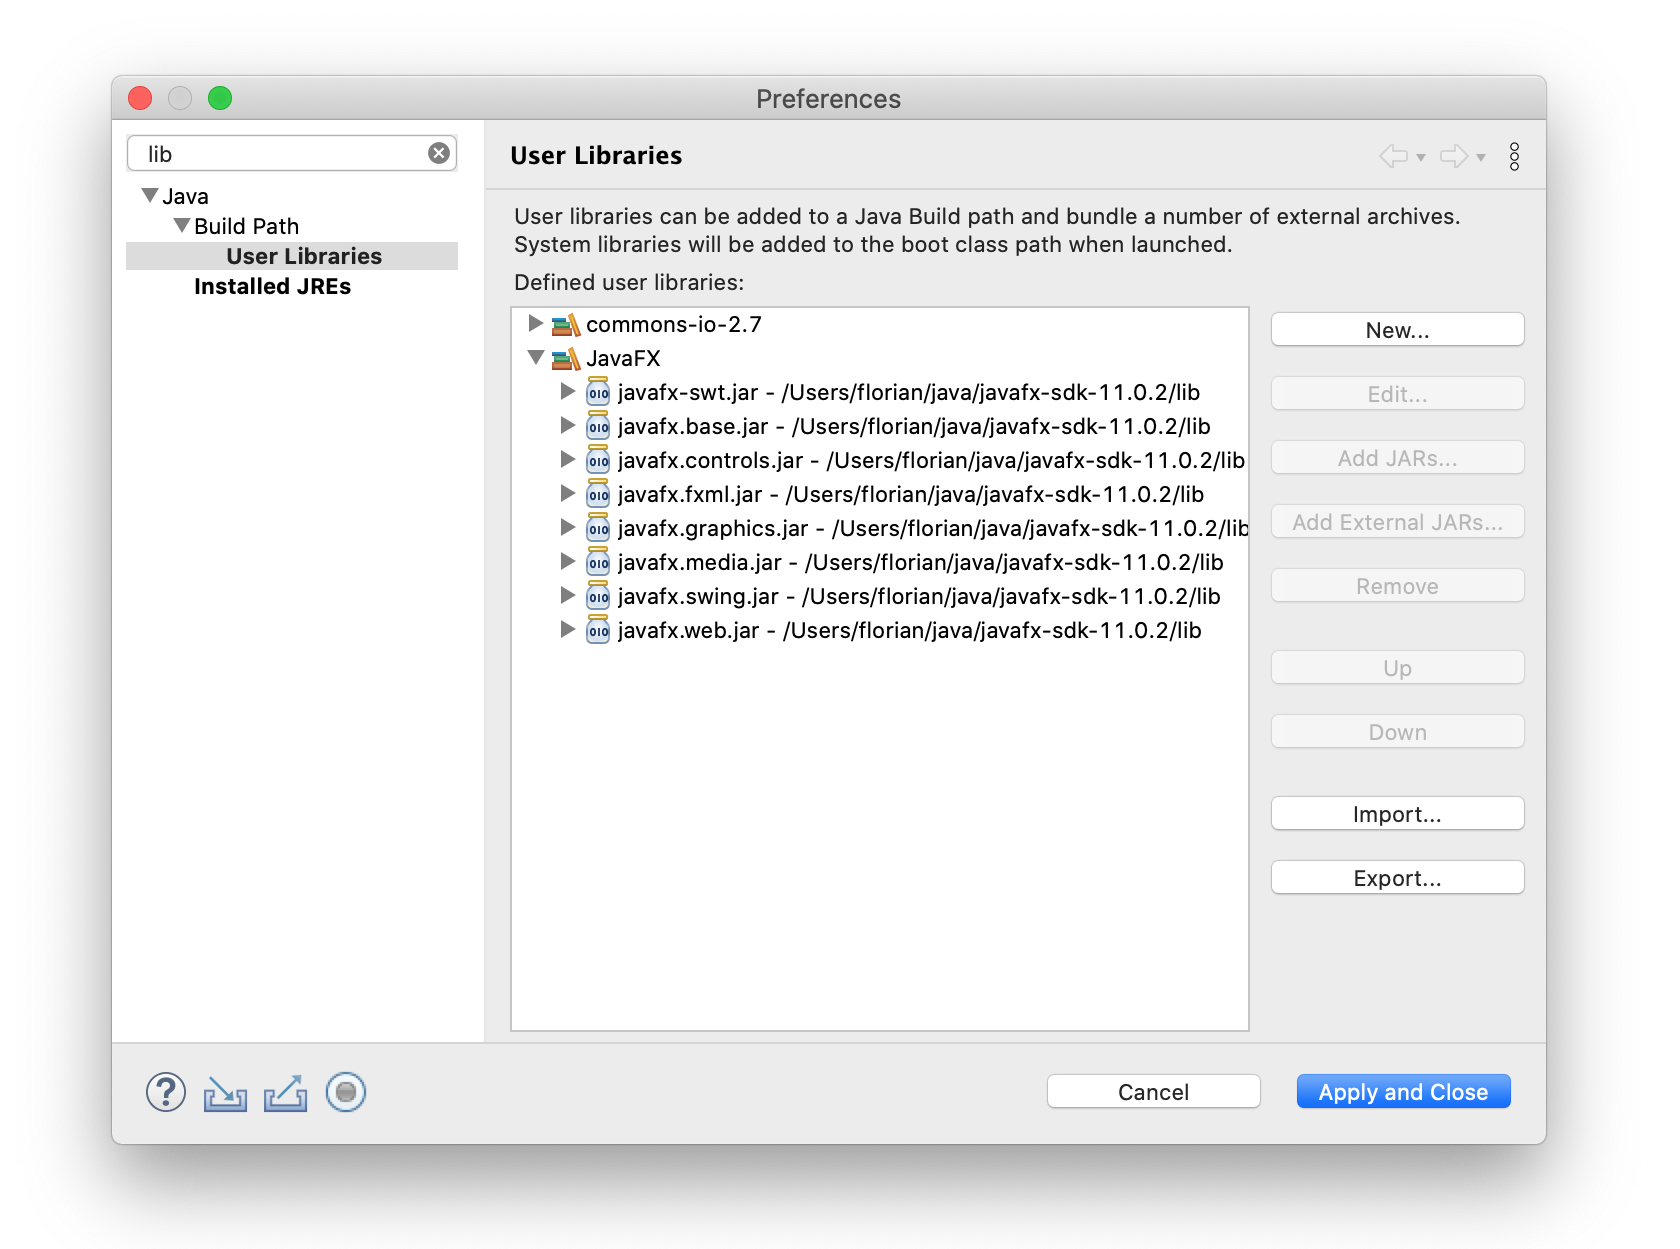
Eclipse>Preferences>User Libraries>New>"JavaFX">Add external JARs> Add all JARs fromjavafx-sdk-11.0.2/lib
- Right click your project>
Build Path>Add libraries>JavaFX Run>Run Configurations>Arguments>VM Arguments>--module-path /Users/me/java/javafx-sdk-11.0.2/lib --add-modules javafx.controls,javafx.fxml
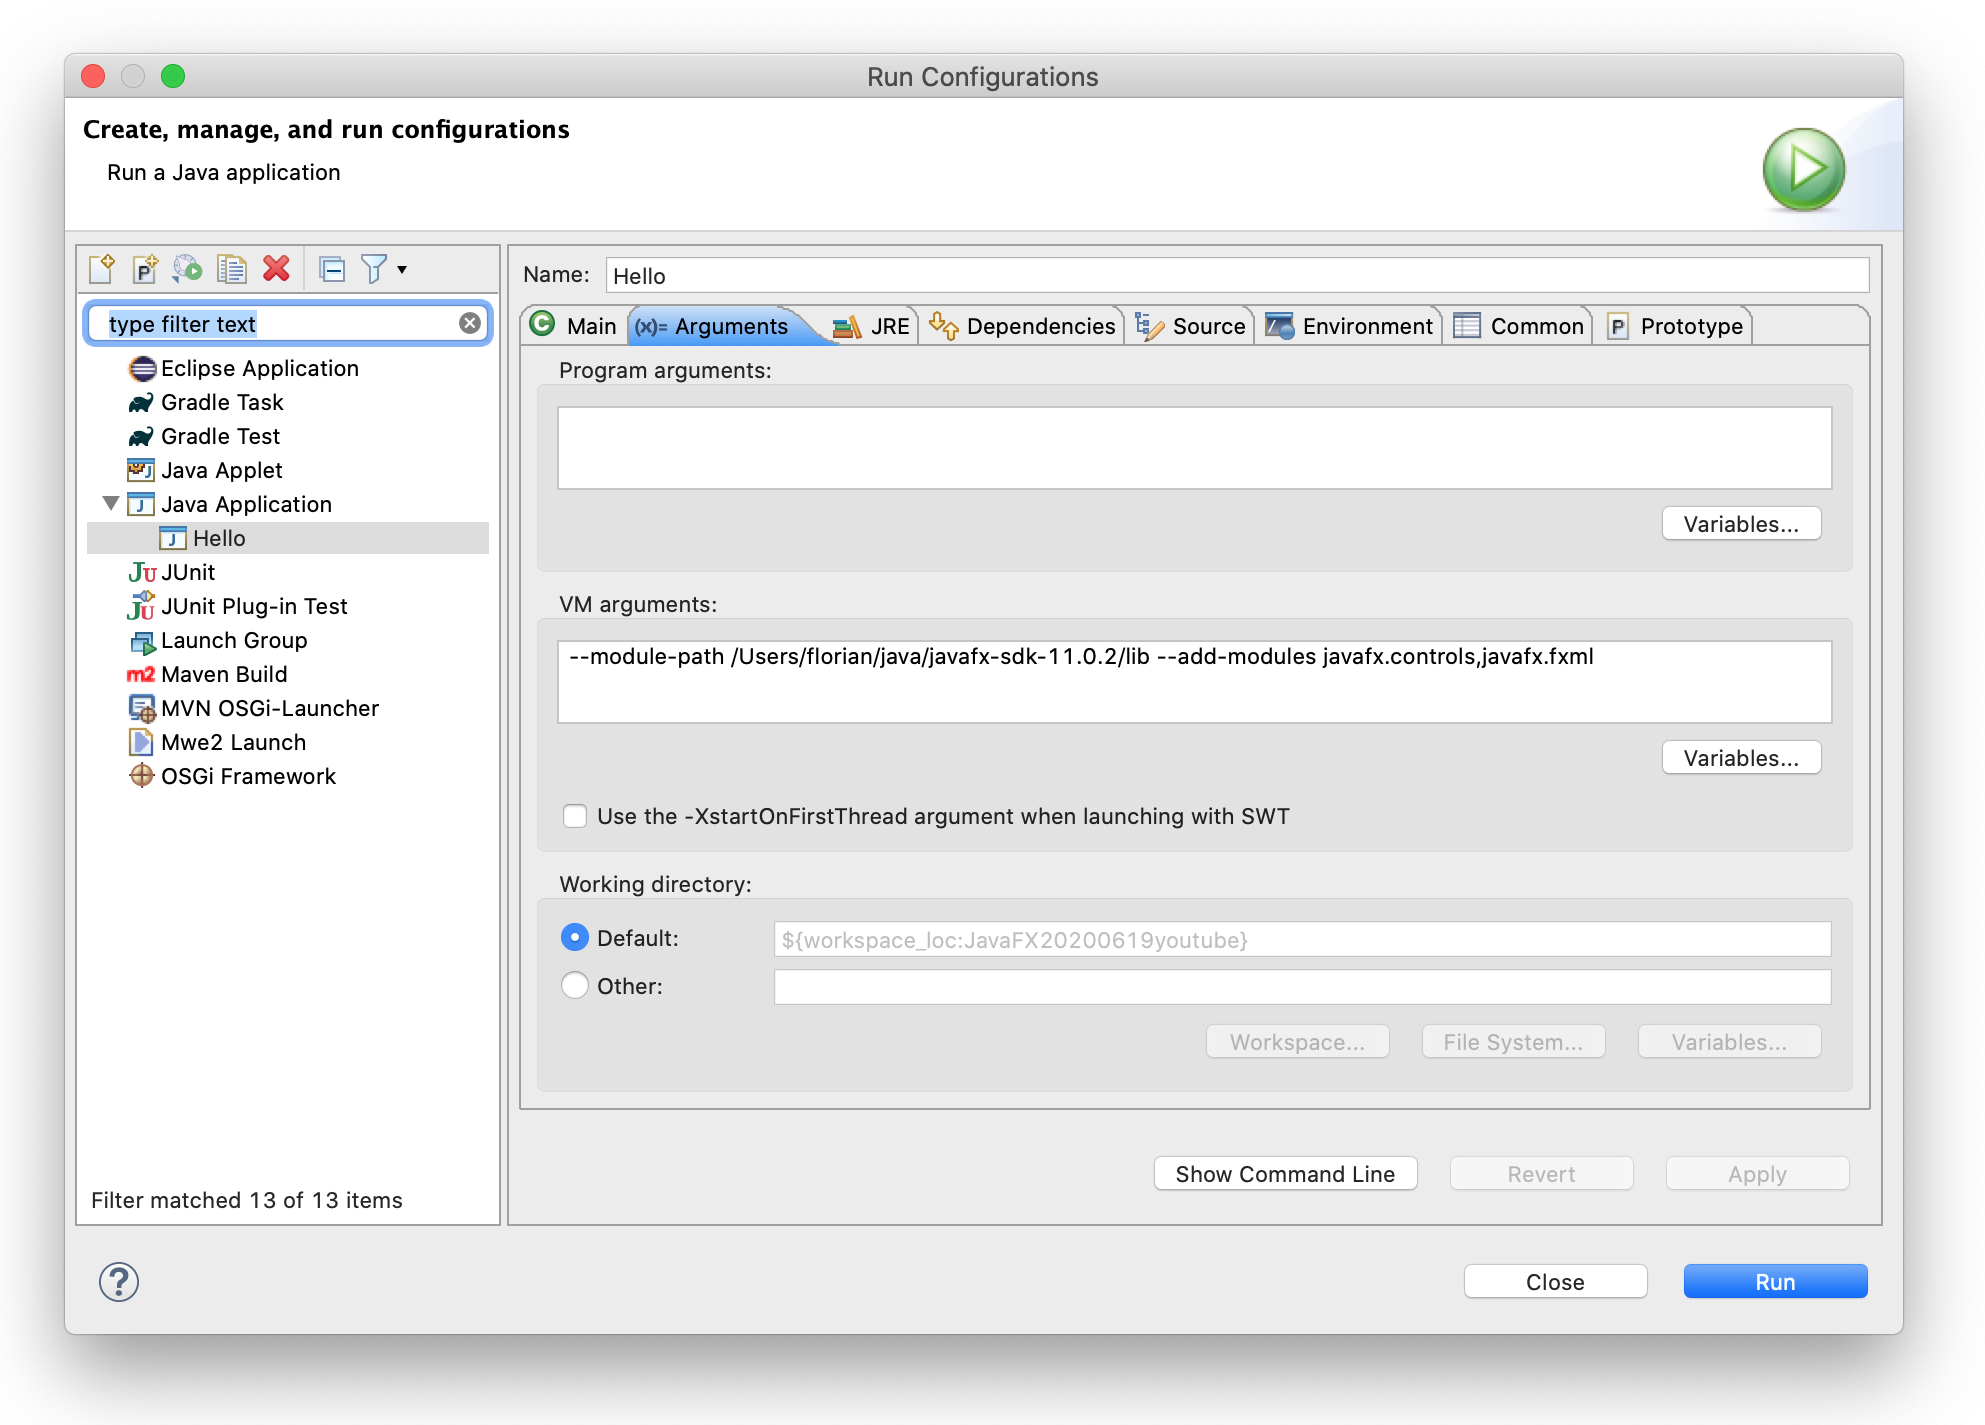
NB: do not use $PATH_TO_FX in Eclipse VM Arguments as it won’t work and will yield
Error occurred during initialization of boot layer
java.lang.module.FindException: Module javafx.controls not found
To display code in Disqus comment, use <pre><code> tags. For example:
<pre><code class="python">a = 'b';</code></pre>
See Disqus Syntax highlighting for details.
Installing JavaFX
In this article, I walk through installing JavaFX such that you’ll be able to run JavaFX applications on your local machine and running JavaFX programs in IntelliJ.
- Installing JavaFX
- JDK and JavaFX version numbers
- JDK 17.0.9
- JavaFX 17.0.9
- Setting JavaFX environment variables
- build.gradle
- VM Arguments
- Running without VM Arguments
You can find a guide for installing and using JavaFX in IntelliJ here. You can see how to add JavaFX to an existing Gradle project in IntelliJ here. Note that this requires the use of a module-info class, which we will talk about in this article.
JDK and JavaFX version numbers
For this class, I will be using JavaFX 17.0.9, along with JDK 17.0.9.
First, be aware that your JavaFX version and JDK version numbers should match. For instance, if you were using, say, JDK 21.0.1, you should also use JavaFX 21.0.1 in your development. JDK can run older versions of JavaFX, but a JDK cannot run a later version of JavaFX. For example, JDK 17.0.8 cannot run programs built with JavaFX 17.0.9
JDK 17.0.9
You can download the installer for Java 17.0.9 here — https://www.oracle.com/java/technologies/javase/jdk17-archive-downloads.html Be aware that the installer will typically update any older jdk 17 version (so if, for example, you are already running 17.0.8, this will update that to 17.0.9).
JavaFX 17.0.9
JavaFX can be downloaded here — https://gluonhq.com/products/javafx/
Be aware, you will need to select the version you want from the dropdown:
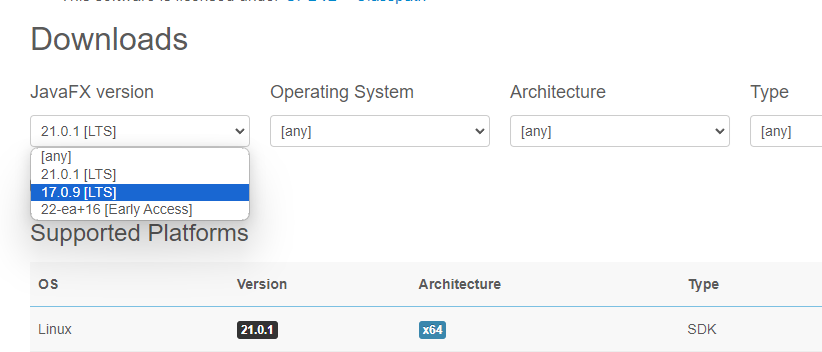
Make sure you select JavaFX 17.0.9 if following this guide, then download the appropriate SDK (not jmods) for your operating system/processor combination.
Setting JavaFX environment variables
It is recommended, though not required, to setup a system variable to help use JavaFX.
First, find where your JavaFX installed, and specifically find the lib folder inside of the folder javafx-sdk-17.0.9
On Linux/Mac, you can run the following command, replacing path/to with the path to your javafx-sdk-17.0.9 folder.
export PATH_TO_FX=path/to/javafx-sdk-17.0.9/lib
On Windows, you can use the following command, replacing path/to with the path to your javafx-sdk-17.0.9 folder
set PATH_TO_FX="path\to\javafx-sdk-21.0.1\lib"
build.gradle
JavaFX is not added like a dependency in Gradle. Rather, it is added as a plug-in. As such, here is an example build.gradle that sets up to use JavaFX 17.0.9.
plugins {
    id 'java'
    id 'application'
    id 'org.openjfx.javafxplugin' version '0.1.0'
}

javafx {
    version = '17.0.9'
    modules = ['javafx.controls', 'javafx.fxml']
}

repositories {
    mavenCentral()
}

dependencies {
    testImplementation platform('org.junit:junit-bom:5.9.1')
    testImplementation 'org.junit.jupiter:junit-jupiter'
}

test {
    useJUnitPlatform()
}
Be aware that you will still need to install JavaFX manually, as well as use VM Arguments to run JavaFX applications.
VM Arguments
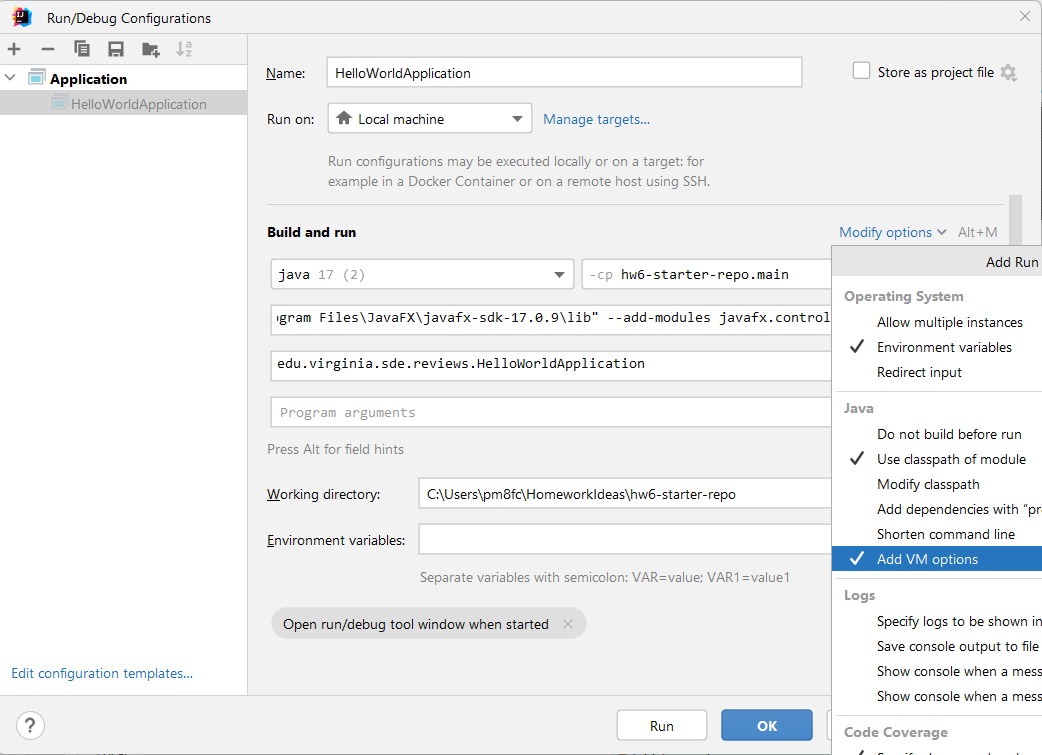
To run a JavaFX Application in IntelliJ, you’ll need to add VM Arguments to the run configuration. To do this, go to Run Configurations, select the application file you want to run, and then you need to select “modify options” and turn on VM Arguments:
Then, set the VM Arguments to:
On Mac/Linux:
--module-path $PATH_TO_FX --add-modules javafx.controls,javafx.fxml
On Windows:
--module-path %PATH_TO_FX% --add-modules javafx.controls,javafx.fxml
Do NOT add any extra spaces, such as adding a space after the comma after javafx.controls.
At this point, you should be able to run the file.
Running without VM Arguments
If you run a JavaFX Application without the VM Arguments, you’ll get the following error message:
JavaFX runtime components are missing, and are required to run this application
And the application will not run. So make sure you set the VM Arguments up correctly. If you are still getting this error after setting VM arguments, make sure you are using the path to the lib folder inside of your JavaFX folder, not the JavaFX folder itself, in the VM Arguments.
Please direct all complaints to Eric Liu. If you have any problems, please fill out this google form.
Downloading the SDK
You can get the SDK at this link.
Download the file corresponding to your operating system. The version should be the latest one available.
Please see the table below for the row with which you should download from:
| Your computer’s type | Column values on Gluon website |
|---|---|
| Windows (typical) | Windows, x64, SDK |
| Linux | Linux, x64, SDK |
Windows setup
After downloading the .zip archive, extract it to the folder where you want to install the JavaFX SDK.
Navigate to the location of the directory (named javafx-sdk-[version number]), and enter the /lib directory.
The objective here is to get the path of the /lib directory. You may do this manually.
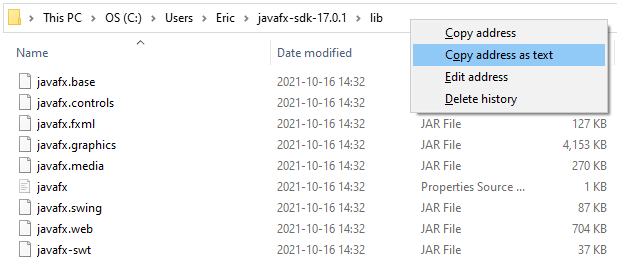
Alternatively, you can get the path following the above screenshot of Windows Explorer. This will move the path
into your clipboard.
One time run instructions
Now that the SDK is installed, you may run code at any time using the following commands, given you have the
path from the previous steps.
            > javac --module-path [INSERT_PATH_HERE] --add-modules javafx.controls [CLASS_NAME].java
            > java --module-path [INSERT_PATH_HERE] --add-modules javafx.controls [CLASS_NAME]
Insert the path to the /lib folder of the JavaFX SDK on your computer in place of [INSERT_PATH_HERE].
Making things permanent
In order to alleviate the need to type the path to the JavaFX SDK each time, you may add the path to the system
environment variables.
On Windows 10, you may do this by searching for «Environment Variables» in the Windows Start menu. Then, click
on the «Environment Variables» button in the bottom right corner.
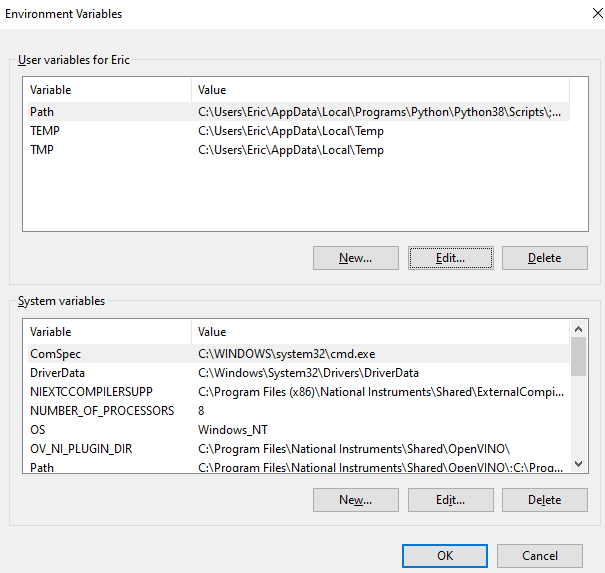
It should look like the above image. You may have different environment variables in your system.
In order to perform this process, select the «New» button below the «System Variables» section.
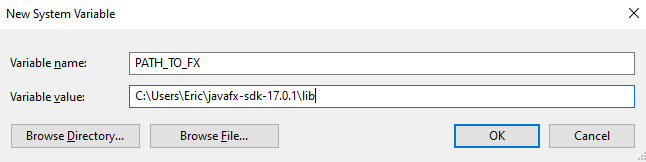
You may name the variable whatever you wish, but for the sake of this example, it will be named
PATH_TO_FX.
This is in accordance to the JavaFX website, and
will be used for the remainder of this page.
For the value of the environment variable, enter the path to the /lib folder of the JavaFX SDK on your computer.
Please ensure that you select «OK» on all menus so that the variable’s value is retained.
You may verify using the terminal whether the environment is present. All methods should return the correct path
set in the previous steps.
| Terminal | Command | Expected output |
|---|---|---|
| PowerShell | Get-Item Env:PATH_TO_FX | No error text |
| Command Prompt | echo %PATH_TO_FX% | Non-null output |
| Bash | echo $PATH_TO_FX | Non-null output |
The commands used to run a Java class using JavaFX are quite similar to before:
This section is not tested. Please fill out this google form if something goes wrong.
| Terminal | Commands |
|---|---|
| PowerShell | javac --module-path Get-Item Env:PATH_TO_FX --add-modules javafx.controls [CLASS_NAME].java |
java --module-path Get-Item Env:PATH_TO_FX --add-modules javafx.controls [CLASS_NAME] |
|
| Command Prompt | javac --module-path %PATH_TO_FX% --add-modules javafx.controls [CLASS_NAME].java |
java --module-path %PATH_TO_FX% --add-modules javafx.controls [CLASS_NAME] |
|
| Bash | javac --module-path $PATH_TO_FX --add-modules javafx.controls [CLASS_NAME].java |
java --module-path $PATH_TO_FX --add-modules javafx.controls [CLASS_NAME] |
*nix Setup
For macOS, please follow the instructions
at this link
Linux Setup
If your computer runs Linux, please prefer your package manager over this.
For Arch and Arch-based distributions, see
this AUR entry.
For Debian-based distributions, you may find the package openjfk in apt.
One-time install instructions
If you choose not to install via a package manager, these instructions will guide through the same process as
for Windows, with platform appropriate changes.
In theory, this should work for macOS as well, but it has not been tested.
After downloading the appropriate .zip file, extract this
archive into the folder of your choice.
Any responsible folder is okay for this task, however, please keep in mind the path as it will be used in the
next steps.
In this example, I will extract it to my Applications folder, at /home/[my user]/Applications. This can be done
using the following command:
> unzip openjfx-17.0.1_linux-x64_bin-sdk.zip -d [INSERT_PATH_HERE]
In place of [INSERT_PATH_HERE], insert the path to the /lib folder of the SDK.
The filename, in this case openjfx-17.0.1_linux-x64_bin-sdk.zip, may differ due to your platform.
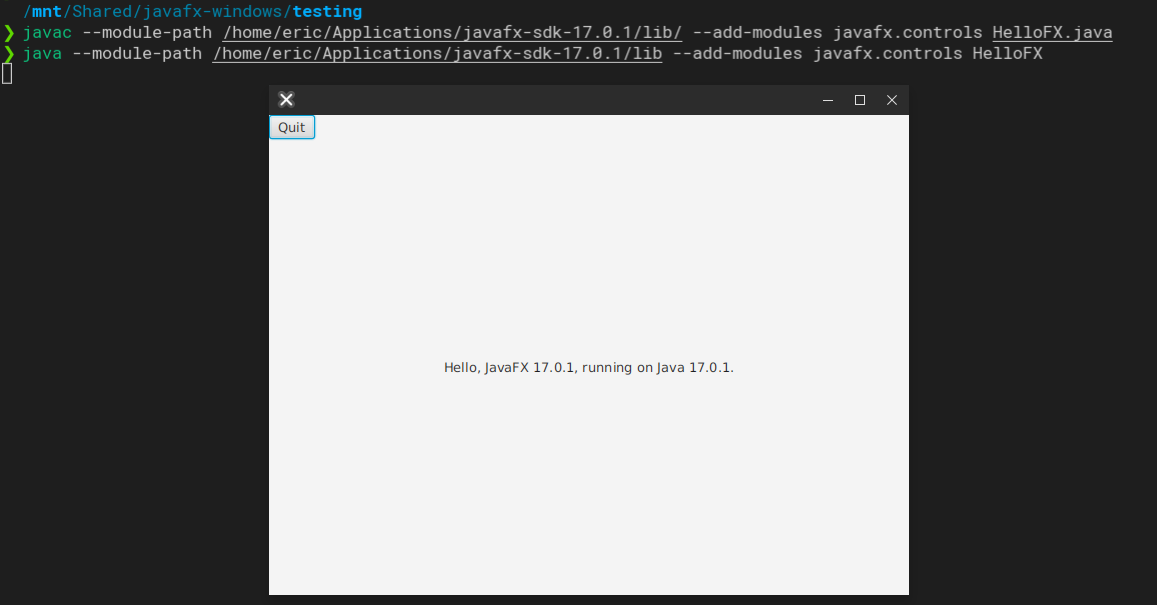
Now that you have the SDK installed, you may reference the path to the /lib folder of the SDK, and run the
JavaFX application.
The commands to do so are:
        > javac --module-path [INSERT_PATH_HERE] --add-modules javafx.controls [CLASS_NAME].java
        > java --module-path [INSERT_PATH_HERE] --add-modules javafx.controls [CLASS_NAME]
The end result should look similar to this:
Making things permanent
As a shortcut, you may alleviate needing to type the entire command by adding your SDK path to your system PATH,
or by setting an alias for it in your shell resource file.