
Для того, чтобы писать программы на C/C++ обычно достаточно установить какую-нибудь интерактивную среду разработки (IDE), например, Visual Studio или Eclipse, однако иногда (обычно в целях обучения студентов) требуется создавать программы в обыкновенном текстовом редакторе и компилировать приложение, используя консоль и компилятор gcc. В Unix системах он обычно установлен прямо «из коробки», а вот на Windows системах такой роскоши не наблюдается. Более того, у многих пользователей возникает множество проблем при установке компилятора. Поэтому нами было принято решение написать данную статью, чтобы помочь всем тем, кому пришлось или приходится мучаться с установкой этого компилятора на Windows.
Кстати, если вдруг на вашей Unix системе не установлен GCC, то поставить его можно командой sudo apt install gcc, введя свой пароль и согласившись на установку.
0. Прежде чем поставить компилятор GCC
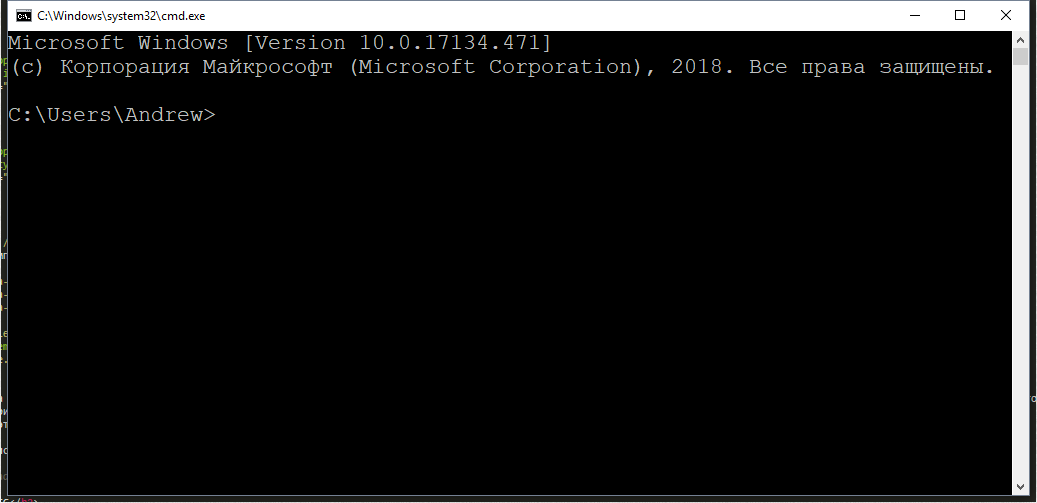
Перед тем как приступить к установке этого компилятора на ваш компьютер, убедитесь в том, что GCC ещё не установлен на нём. Для этого откройте консоль (нажмите Win + R, введите в появившемся окне cmd и нажмите клавишу Enter) и введите следующую команду: gcc --version и нажмите Enter. Если компилятор уже установлен, то выполненная команда выдаст примерно следующую информацию:
gcc (GCC) 8.1.0
Copyright (C) 2018 Free Software Foundation, Inc.
This is free software; see the source for copying conditions.  There is NO
warranty; not even for MERCHANTABILITY or FITNESS FOR A PARTICULAR PURPOSE.
Если в окне консоли появилось сообщение с версией компилятора и другая информация о GCC (второй скриншот), значит компилятор уже установлен и больше дополнительно ничего делать не нужно. А вот если вывод командной строки такой:
"gcc" не является внутренней или внешней
командой, исполняемой программой или пакетным файлом
— значит GCC ещё не установлен в системе, поэтому двигаемся дальше.
Появившееся окно консоли
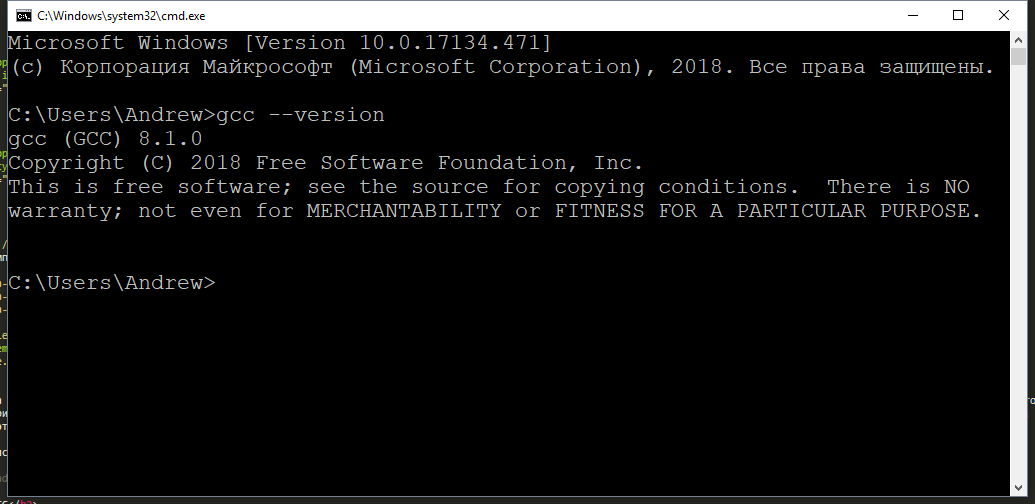
GCC уже установлен
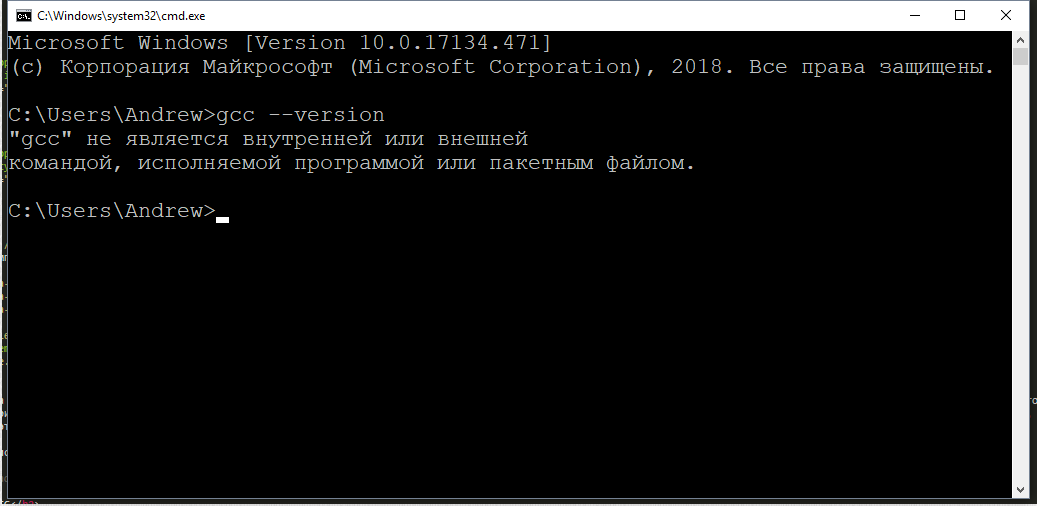
GCC не установлен
1. Скачиваем установщик компилятора
Чтобы поставить GCC на операционную систему Windows, необходимо скачать установочный файл для него. Сделать это можно здесь: equation.com/servlet/equation.cmd?fa=fortran. Найдите в таблице версию компилятора, которая вам больше нравится (мы рекомендуем скачивать самую последнюю, на текущий момент — это версия 8.2.0) и скачайте установщик для вашей системы (32 или 64 бит).

Выбор установочного файла
2. Установка GCC
После того, как файл был скачан, откройте в проводнике папку, в которую был скачан установщик и запустите его, кликнув по файлу дважды левой кнопкой мыши. Появится окно, требующее подтверждения действия. В нём нужно выбрать да (иначе ничего ставиться не будет).
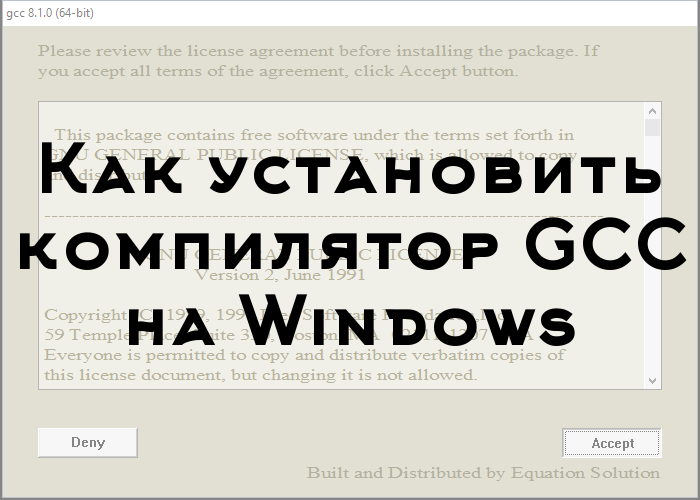
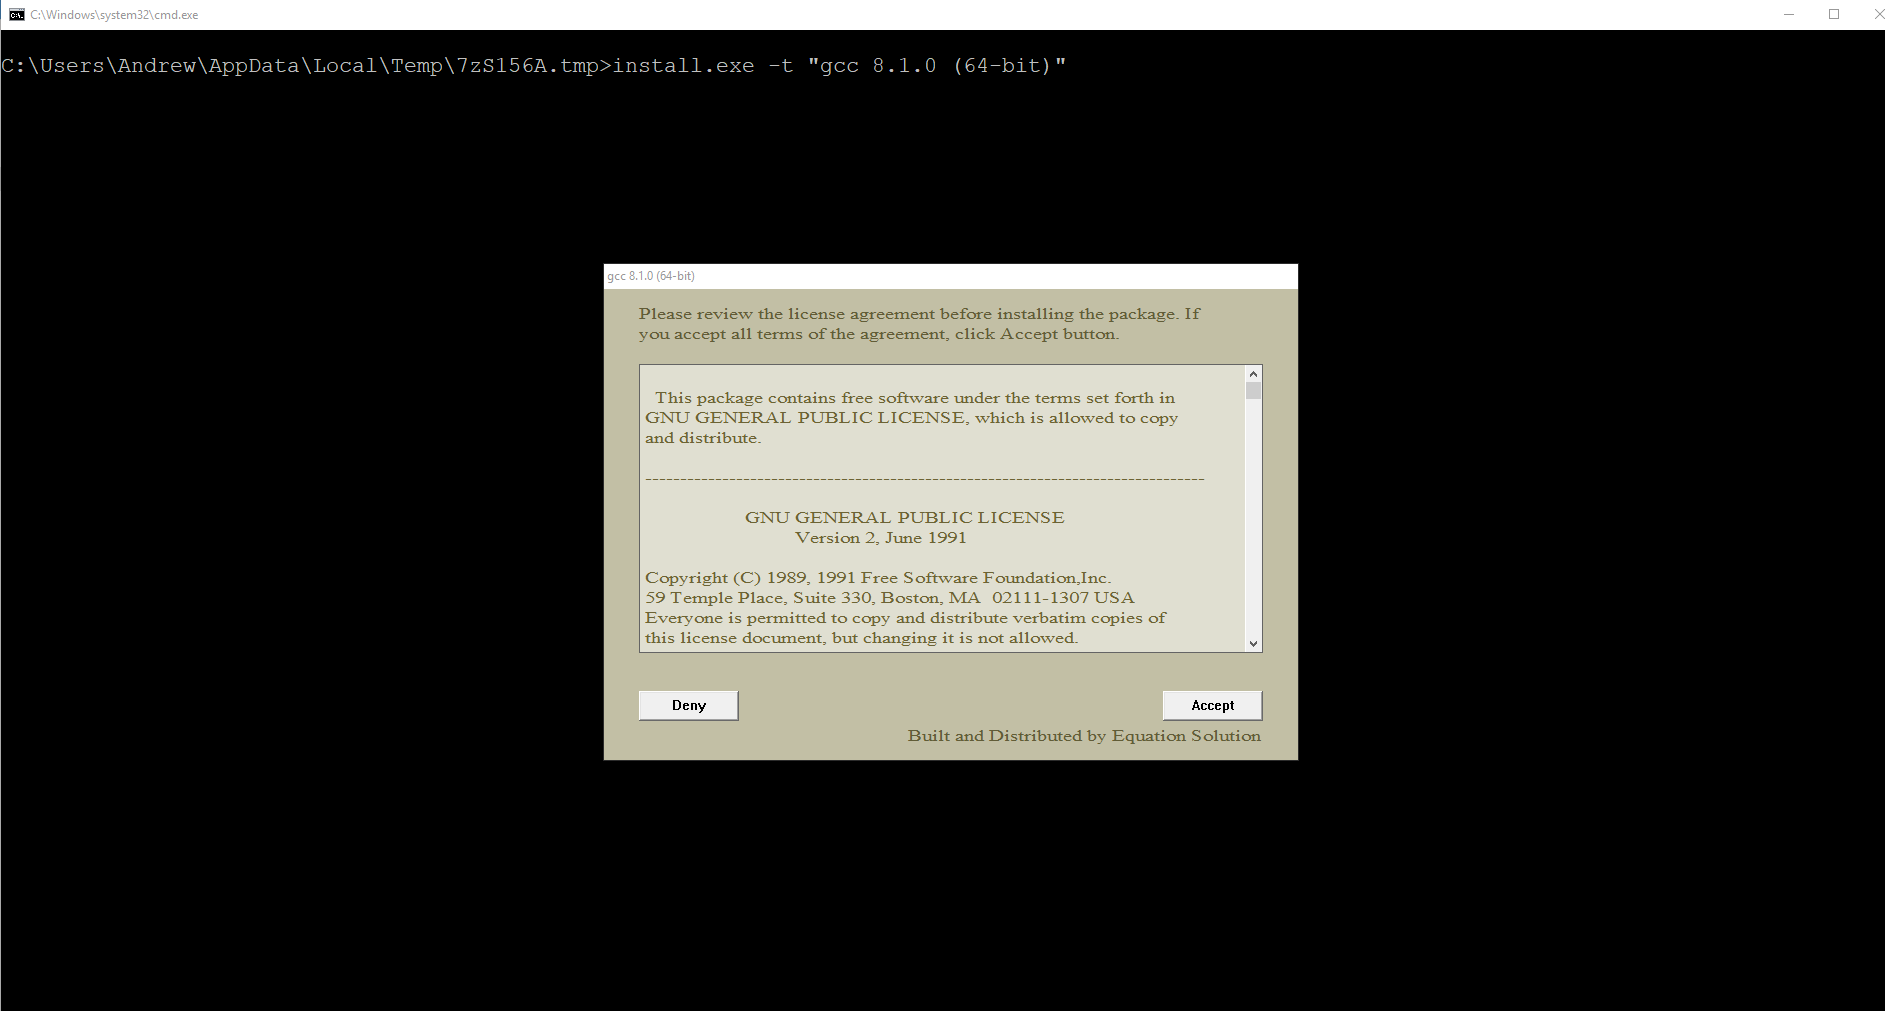
Установщик начнёт работу и отобразит окно с консолью, а также окно с бежевым фоном, в котором попросит прочесть и принять (или отклонить) лицензионное соглашение. Нажимаем Accept.
Открывшееся окно с установщиком
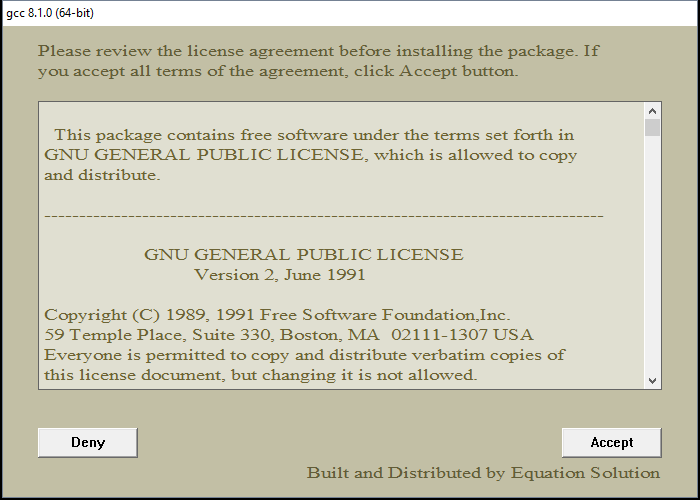
Принимаем лицензионное соглашение
После этого установщик попросит выбрать путь для установки, предложив по умолчанию путь C:\mingw. Если вам категорически не нравится этот путь — измените его на более подходящий на ваш взгляд, в противном же случае просто нажмите Install.

Выбор папки для установки
Теперь остаётся только дождаться окончания распаковки архивов и установки их на компьютер. Как только все файлы будут установлены, инсталятор сообщит об этом, после чего нужно будет нажать на кнопку Finish.
Распаковка файлов и установка
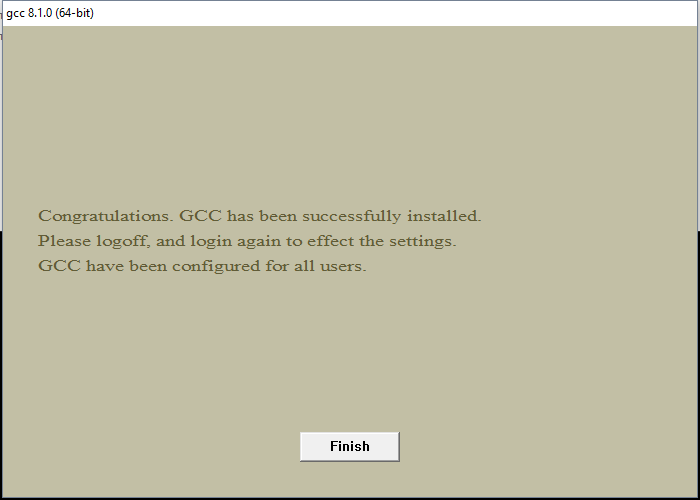
Окончание установки
3. Проверка установки
По завершении работы установщика перезагрузите компьютер и вновь откройте окно командной строки, введите команду gcc --version и нажмите Enter. На этот раз ответ от этой команды должен будет совпадать со вторым скриншотом из пункта 0. Если это не так, то скорее всего работа установщика была некорректно или преждевременно завершена, так что просто начните установку заново.
GCC установлен
Поздравляем! Теперь на вашем компьютере установлен компилятор GCC и вы можете писать программы на языках C и C++, а компилировать их через командную строку!
4. Бонус. Компиляция программ с помощью GCC
Теперь, когда у вас установлен компилятор GCC, вы можете создавать программы на C/C++, используя только текстовый редактор и консоль. Для этого создайте новый файл и назовите его как угодно (например, hello_world). Задайте ему расширение .c вместо .txt. Напишите (или скопируйте) текст программы на С в этот файл. Откройте командную строку (Win + R, cmd) и введите следующую команду gcc hello_world.c и нажмите Enter. Если код не содержит ошибок, то результатом команды будет пустота. В противном же случае вы увидите все ошибки, который нашёл компилятор в программе с указанием места этой ошибки. При этом в проводнике появится файл a.out.exe, который будет являться исполняемым файлом для написанной программы. Чтобы запустить его введите в консоли a.out (для Unix-систем нужно писать ./a.out) и нажмите Enter.
Что ещё за a.out? Непонятно!
По умолчанию при компиляции программ GCC в качестве результата создаём исполняемый файл с именем a.out (если такой уже есть, то b.out и т.д.). Это может быть не очень удобно, если у вас в папке лежит сразу много программ, которые нужно скомпилировать и затем запустить. Неудобно хотя бы тем, что разобраться, что такое a.out, а что такое b.out и c.out может быть непросто. Именно поэтому мы рекомендуем компилировать программы с явным указанием имени выходного файла. делается это так: gcc имя_файла.c -o имя_программы.
В результате выполнения такой программы вместо a.out будет создаваться файл с именем, заданным в имя_программы. Например, если для файла hello_world.c мы хотим получить программу hello, то компилировать нужно такой командой: gcc hello_world.c -o hello.
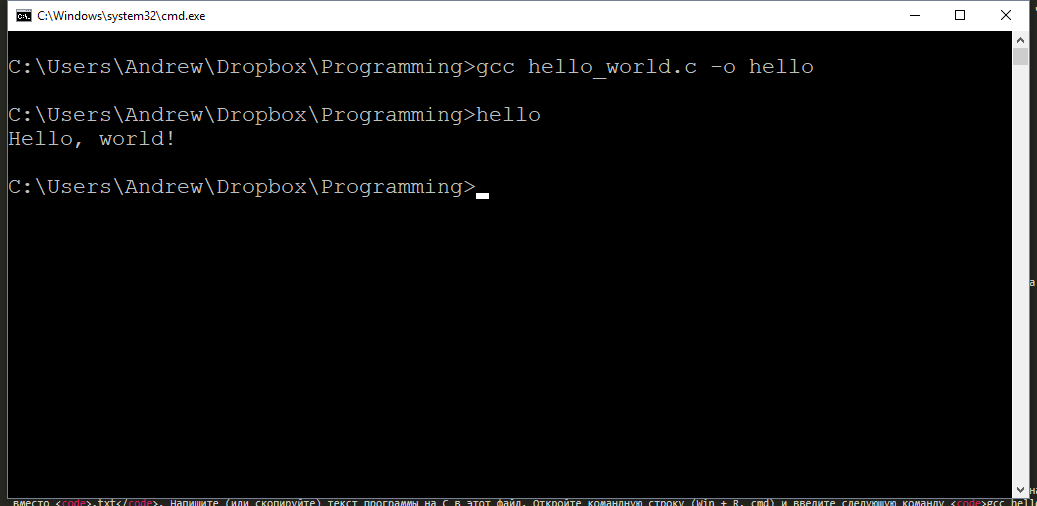
Результат компиляции и запуска программы
Используя понятные имена выходных программ (исполняемых файлов), вы гарантируете себе простоту работы и сокращение времени на разбирательство спустя долгое время.
Возможно, также будет интересно: как установить Sublime Text для работы с C/C++.
Программист, сооснователь programforyou.ru, в постоянном поиске новых задач и алгоритмов
Языки программирования: Python, C, C++, Pascal, C#, Javascript
Выпускник МГУ им. М.В. Ломоносова

GCC, abbreviation for ‘GNU Compiler Collection’ (thanks @saphirakai) (and not Gulf Cooperation Council, like I’d assumed) is a necessity if you (or your pesky college) is into C Programming.
Almost all Linux distros come pre-installed with it so they are out of the trouble. But for those of you who were constant users of Windows and Command Prompt, and never felt the necessity for a C compiler, GCC seems to come out of the blue and a tough nut to install. 1000 rage-quits later, I present you this article.
This article is written so that the installation process is made easier than most of the trashy articles I had to go through.
Installation
-
Go to MinGW official website and click on ‘Downloads’ on the left panel. You’ll be redirected to the site which hosts the files.
Important Edit: MinGW official website is now down (as of 24th March 2021). Hence, instead of their official website, download from MinGW SourceForge page - Look for mingw-get-setup.exe for downloading. Download it and launch the installer. Accept the terms and move on.
- You’ll now see that the installer is connecting to the Internet and downloading a lot of tiny and small files. Wait till it ends.
- Right when it ends (which won’t take long), you’ll be presented a window with title MinGW Installation Manager. You should be in the ‘Basic Setup’ tab by default when it launches. If not, click on Basic Setup.
- Out of the numerous check boxes presented to you on the right side, tick «mingw32-gcc-g++-bin«. If you are prompted with a menu, click on Mark for Install.
- Then on the top left corner click on Installation > Apply Changes. And wait while it downloads a billion files and installs them.

- Now you gotta edit your «Environment Variables» as well, so that gcc works in cmd no matter the file location.
- For that go to Windows Explorer > Right click on This PC > Properties > Advanced system settings > Environment Variables or you could just search for «Environment Variables» in Windows Search…
-
At the bottom «System Variables» panel, look for a Variable named «Path» and double click on it. Some systems show a good UI for adding a New Path easily (by clicking New), else you just need to add ; at the end and add the following path
C:\MinGW\bin
    ###### (This is assuming you didn't manually change any installation paths and went with just clicking 'Next' during installation)

10. Click on OK, and OK and close the other windows. Open a Command Prompt Terminal and try typing `gcc --version` and press Enter.

    If you get something like
    ```


    gcc (MinGW.org GCC Build-2) 9.2.0
    Copyright (C) 2019 Free Software Foundation, Inc.
    This is free software; see the source for copying conditions.
    There is NO warranty; not even for MERCHANTABILITY or FITNESS
    FOR A PARTICULAR PURPOSE.
Enter fullscreen mode
Exit fullscreen mode
gcc has been successfully installed in your PC. Enjoy!
Enter fullscreen mode
Exit fullscreen mode
Cheers and happy coding!
The GNU Compiler Collection (GCC) is a versatile set of compilers developed by the GNU Project. It supports a wide range of programming languages like C, C++, Fortran, and Go. Originally built for the GNU operating system, GCC has become an essential tool across multiple platforms, including Windows.
While GCC typically comes preinstalled on many Linux distributions, this is not the case with Windows. Additionally, due to differences in system architecture, installing GCC on Windows can be a bit more involved.
In this tutorial, you will learn to install GCC on Windows.
Prerequisites
- A machine running Windows.
- A user account with admin privileges.
- Access to the command line.
Install GCC on Windows via MinGW-w64
The minGW-w64 tool collection provides a straightforward way to install the GCC compiler and related Windows tools, supporting 32-bit and 64-bit architectures. This section outlines the steps for installing GCC using minGW-w64.
Step 1: Download MinGW-w64
Navigate to the GitHub minGW-w64 page and scroll down to the Assets section. From the list of files, select the one you want to use on your system:
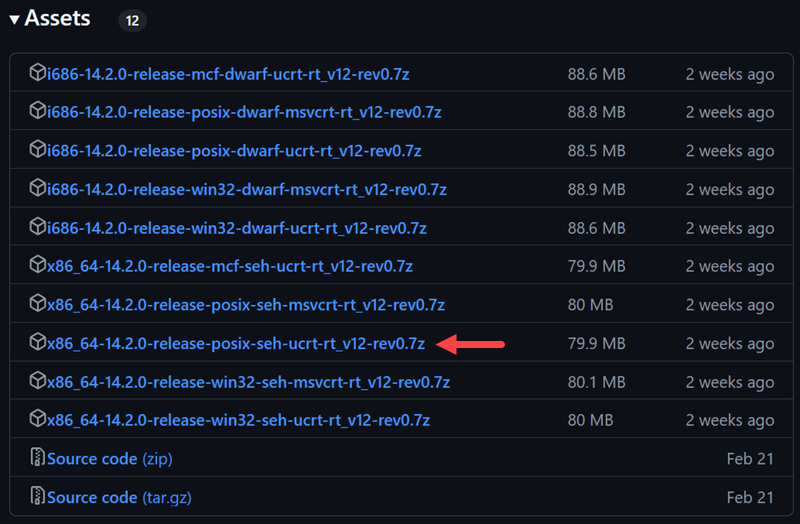
We use Windows 11 64-bit and will download the x86_64-14.2.0-release-posix-seh-ucrt-rt_v12-rev0.7z release. This version uses modern Windows runtime (ucrt), POSIX threading for cross-platform compatibility, and SEH for 64-bit Windows exception handling.
Step 2: Unpack Archive
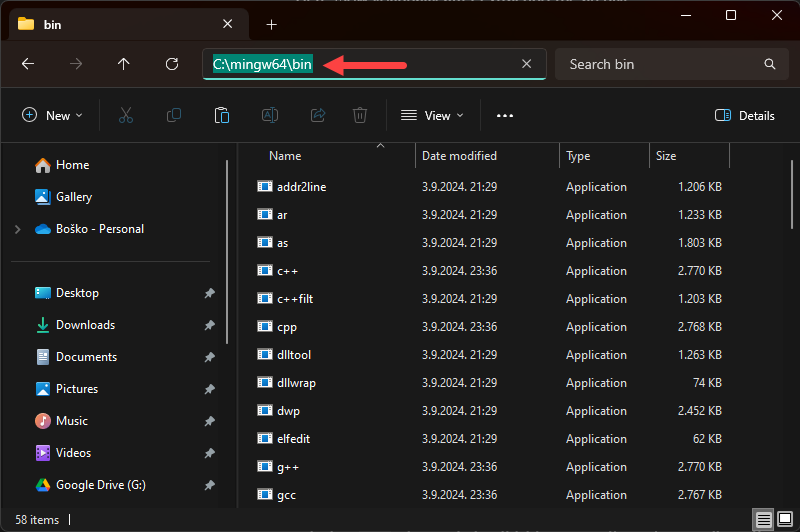
Extract the downloaded archive to a folder that is easy to access. For example, we will place it at the root of the C drive:
C:\mingw64After extracting the archive, navigate to the bin folder and copy the folder path. Add the path to the system’s PATH environment variable for it to function.
Step 3: Set Path Environment Variable
This section shows how to set the PATH environment variable on Windows to instruct the system where the executable files are.
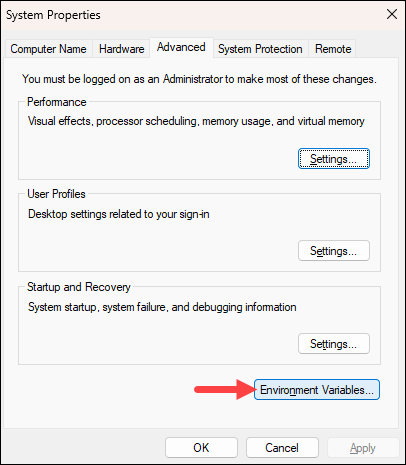
1. Press the Windows key and search for Environment variables. Press Enter to open the System Properties window and click the Environment Variables button.
2. Under the System variables section, find Path, select it, and click Edit…
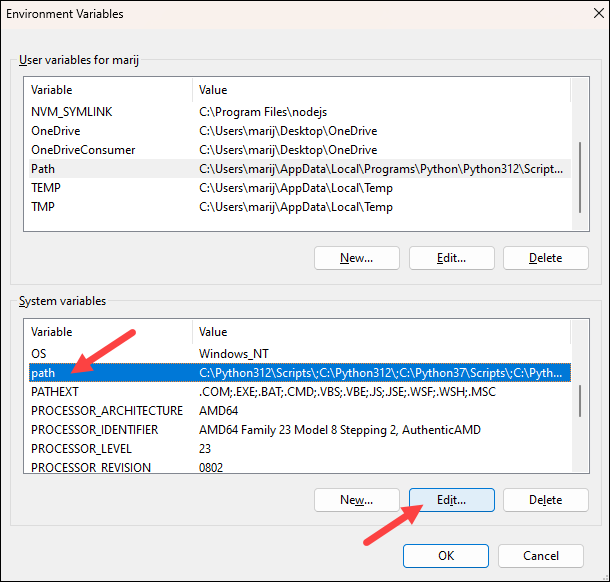
3. Click New and paste the path to the bin folder from the previous step.
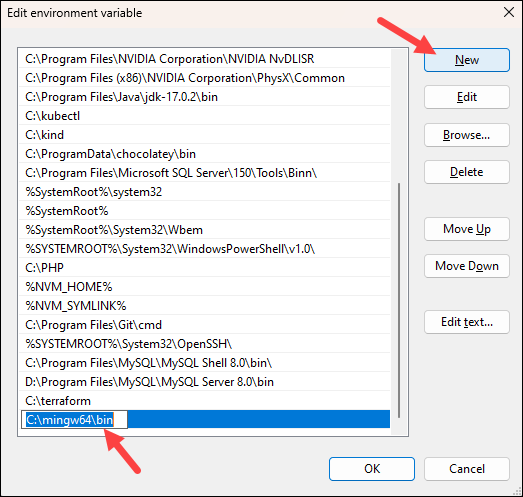
4. Click OK in each window to apply the changes.
5. Check if GCC was properly installed by opening the Command Prompt and running the following command:
gcc --version
The system should output the program version, which means that it has been properly installed.
Install GCC on Windows via Chocolatey
Another way to install GCC on Windows is to use Chocolatey, a package manager designed for the Windows OS. It simplifies the process of installing, updating, and managing software through the command line. It is especially useful for developers and system administrators because it reduces the time and effort required to download and configure tools like GCC manually.
The upside is that Chocolatey completely automates the installation, while the downside is that you will probably not get the bleeding edge version you would get from installing manually.
Follow the steps below to install GCC via Chocolatey:
Note: If you don’t have Chocolatey installed, check out our guide on how to install Chocolatey on Windows. The guide explains the process step-by-step and offers tips on getting started with the package manager.
Step 1: Install mingw
Open the Command Prompt as an administrator and run the following command to install the mingw installer:
choco install mingw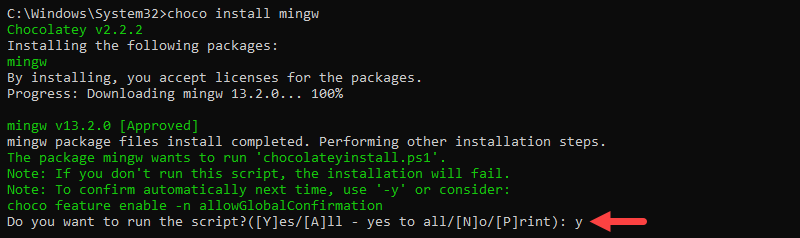
When prompted, type y and press Enter to confirm the installation.
Step 2: Confirm Installation
After the installation process completes, close and reopen the Command Prompt or run the following command to load the changes made to the PATH environment variable:
refreshenvConfirm the installation by checking the GCC program version:
gcc --version
Install GCC on Windows via Subsystem for Linux (WSL)
Windows Subsystem for Linux (WSL) allows you to run a Linux environment directly on Windows. Doing so enables you to install and use GCC as you would on a native Linux system.
Follow the steps listed in the sections below.
Step 1: Enable Windows Subsystem for Linux
WSL is a preinstalled feature on new Windows versions. However, you still need to enable it and install a Linux distribution to use it:
1. Press the Windows key and type powershell. Select the Run as administrator option from the right panel to open PowerShell as Administrator.
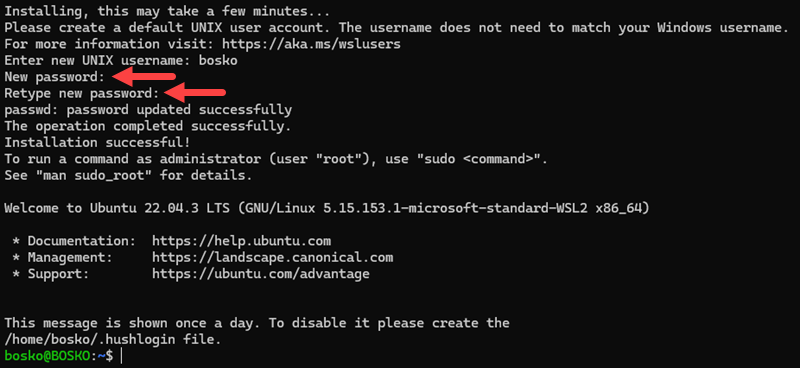
2. Run the following command to enable WSL and install Ubuntu:
wsl --install
Note: Ubuntu is installed by default when enabling WSL. Run wsl --list --online to see a list of other available distros, and install one using the syntax below:
wsl --install -d [distro_name]3. Restart the system when prompted and the installation continues automatically. Type in the username and password you want to use for your Linux distro:
Step 2: Install GCC on WSL
After the installation process completes, you can install GCC:
1. Refresh the package list:
sudo apt update2. Install GCC with:
sudo apt install build-essential -yStep 3: Verify GCC Installation
In the Linux terminal, run the following command to confirm the installation:
gcc --version
Conclusion
This tutorial showed how to install GCC on a Windows system using three different methods. GCC supports a wide range of programming languages and provides a robust, open-source platform for compiling code, making it essential for software development.
Next, learn how to install the GCC compiler on Ubuntu, or check out our list of 15 best DevOps tools on the market.
Was this article helpful?
YesNo
Цель статьи
Быстро, кратко, понятно описать свой личный опыт, что к чему (не супер программист, так что ввязывать в споры по типу, что один компилятор собирает программу на целых 20 килобайт меньше, итоговая программа быстрее на 200 миллисекунд или алгоритмы оптимизации лучше в Clang нежели в gcc, я не буду).
Просто кратко как, что сделать с чего начать и чем закончить.
Начало
Для начала стоит понимать, что gcc компилятор по сути сборник компиляторов для C/C++/D/Ada и др. (весь список или для любителей прямых источников) и в будущем, возможно других языков программирования. Хотя изначально разрабатывался только для C (первоначально аббревиатура расшифровывалась как GCC — GNU C Compiler (GNU компилятор для языки Си), а ныне GCC — GNU Compilers Collection (коллекция компиляторов) ).
Сама же приставка GNU отсылает нас к лицензии, используемой в данном проекте и к операционной системе GNU. Хотя скорее в целом к проекту GNU. Т.к. GNU является организацией по распространению и развитию open source решений.
Версии GCC
Так получилось, что изначально gcc идет исключительно под Linux/Unix подобные операционные системы, со всеми вытекающими несовместимостями с Windows окружением. Поэтому энтузиастами были собраны 2 различные версии GCC — Cygwin и MinGW.
Разница в том, что Cygwin эмулирует окружение Unix — подобных операционных систем прямо внутри Windows.
MinGW — по сути прямой (насколько возможно) порт GCC на Windows.
Я лично буду использовать MinGW т.к. привык к Windows, а на мой взгляд он чуть проще да и размеры бинарных файлов (исполняемых файлов) у него куда меньше т.к. отпадает нужна в эмуляции Unix-окружения.
Так что по сути и Cygwin и MinGW являются GCC компиляторами, но только это разные сборки сделанные по разным идеологиям и причинам.
Установка MinGW
Есть много вариантов (как и всегда для открытого ПО), но главных по сути 2:
-
Использовать MSYS пакетный менеджер (доступен для Windows)
-
Напрямую загрузить только MinGW.
Я буду действовать по наиболее простому и прямому пути без лишних «зависимостей» потому напрямую скачаю MinGW.
Страница для MinGW и репозиторий с готовыми билдами MinGW (ссылка взята со страницы для MinGW). Перейдя по ним, сразу видим много билдов, и с ходу не понятно какой выбрать. Но все просто. То что начинается с i686 (сильно упрощая — есть 32 bit версия компилятора), а то что начинается с x86_64 64 bit версия компилятора, действительная разница в том, что сборке в 32 bit версии не сможет генерировать 64 bit программы т.е. для ваших программ будет доступно максимум 4 Гб оперативной памяти (что для абсолютного большинства программ более чем достаточно).
Далее mcf/posix/win32. MCF — модель потоков GCC, Posix — порт предназначенный для опять же эмуляции Unix/Linux путей (но тут могу ошибаться т.к. сам не тестировал и не пробовал, что к чему). Win32 — название от winapi32, родной порт для Windows.
SEH/Dwarf — модель обработки исключений, но этот пункт имеет значение для более продвинутых останавливать не вижу смысла, проще — можно выбрать любой, когда поймете зачем он вам и в чем разница сами выберите нужный.
UCRT/MSVCRT — стандартная библиотека для языков и ее реализация. Для более менее правильно работы рекомендую MSVCRT т.к. используется стандартная библиотека времени выполнения от Windows. UCRT стандартная библиотека больше ориентированная для Linux/Unix систем т.к. для них изначально и разрабатывалась, хотя вполне работает и на Windows. Но со сборкой некоторых библиотек на C/C++ могут возникнуть проблемы.
Промежуточный итог
Это был крайне короткий и простой для понимания новичков, обзор, что к чему. Много мест где мог допустить неточность или ошибиться, но опять же вся информация из моего опыта работы с GCC.
Установка
Как такового процесса установки нет, т.к. это не в полном смысле программа или приложения, а просто собранные в архив бинарные файлы.
Но «установка» не сложна. Требуется лишь выбрать нужный каталог на вашем ПК, туда распаковать ранее скаченный архив и ВАЖНО! прописать к нему путь в системной переменной Path. Для чего это нужно, чтобы при вызове из командой строки фразы «gcc» операционная система понимала к какому именно файлу из тысяч других нужно обратиться.
Проще всего будет сделать через графический интерфейс самой Windows хотя можно и через командную строку.
-
Открыть мой компьютер (проводник) — корневой каталог где находятся диски или диск (Локальный диск (C:), Локальный диск (D:) — (если имеется) и др.).
-
Кликнуть ПКМ на любое свободное место и в выпадающем меню перейти в свойства.
-
Далее в перейти в дополнительные параметры.
-
Далее в переменные среды.
-
В разделе системные переменные найти в колонке «переменная» название Path, нажать на нее и далее нажать изменить.
-
И можете в начало а можете и в конец вставить полный путь к тому месту где у вас находится компилятор MinGW, например у меня это D:\mingw64. Главное вы НЕ ДОЛЖНЫ удалять или изменять содержимое данной переменной, а просто дополнить ее новым путем отделенным от других точкой с запятой (;), например D:\mingw64;C:\Program Files\Python312\Scripts. Но и в интернете есть куча более подробных статей на эту тему том числе со скриншотами и посвященными именно MinGW.
Итог
Установленный и настроенный MinGW. Чтобы убедиться, что вы все сделали правильно откройте командную строку и введите gcc —version если windows пишет что такой команды не существует значит, вы что-то сделали неправильно пересмотрите шаги. Если выведет информацию о текущей версии gcc компилятора и некоторые другие данные, значит gcc в вашей системе успешно установлен и готов к работе.
Installing GCC on Windows 10 might sound like a daunting task, but it’s simpler than it seems. You’ll need to download and install a software collection called MinGW, which stands for Minimalist GNU for Windows. MinGW includes the GCC compiler, which will allow you to compile C and C++ programs on your Windows 10 machine. Follow these steps, and you’ll have GCC up and running in no time.
By following the steps below, you will successfully install the GCC compiler on your Windows 10 computer. This will enable you to compile and run C and C++ programs.
Step 1: Download MinGW
First, you need to download MinGW from the official website.
Go to the MinGW website (https://sourceforge.net/projects/mingw/) and click on the “Download” button. This will download the MinGW setup executable to your computer.
Step 2: Install MinGW
Next, run the MinGW setup executable to start the installation process.
When the setup starts, you will see the MinGW Installation Manager. Click on “Install” to proceed. Follow the on-screen instructions to complete the installation. Usually, you’ll use the default installation path.
Step 3: Select Packages to Install
After installing MinGW, you need to select the packages you want to install.
Open the MinGW Installation Manager. In the “Basic Setup” tab, right-click on “mingw32-gcc-g++” and select “Mark for Installation.” Repeat this for “mingw32-gcc-objc.”
Step 4: Apply Changes
Now, you need to apply the changes to download and install the selected packages.
Click on “Installation” in the top menu and select “Apply Changes.” Click on “Apply” in the pop-up window. MinGW will download and install the packages, which might take a few minutes.
Step 5: Set Environment Variables
After installation, you need to set the environment variables to use GCC from the command line.
Right-click on “This PC” and select “Properties.” Click on “Advanced system settings,” then “Environment Variables.” In the “System variables” section, find the “Path” variable, click “Edit,” and add the path to the MinGW bin folder (usually C:MinGWbin).
Step 6: Verify GCC Installation
Finally, verify the installation to ensure everything is set up correctly.
Open Command Prompt and type gcc --version. If everything was done correctly, you’ll see the GCC version information displayed.
What Happens Next?
After completing these steps, you will have a fully functional GCC compiler on your Windows 10 computer. You can now compile and run C and C++ programs directly from the command line.
Tips for Installing GCC in Windows 10
- Ensure your internet connection is stable during the download and installation process.
- Use the default installation path for MinGW unless you have a specific reason to change it.
- Double-check the path to the MinGW bin folder when setting environment variables to avoid mistakes.
- You can update MinGW packages later by reopening the Installation Manager and selecting new packages.
- Familiarize yourself with basic command-line operations to efficiently use GCC.
Frequently Asked Questions
What is GCC?
GCC stands for GNU Compiler Collection. It includes compilers for C, C++, and other programming languages.
Why do I need MinGW to install GCC on Windows?
MinGW provides the necessary tools and libraries to run GCC on a Windows environment, which is normally Unix-based.
How can I uninstall MinGW?
To uninstall MinGW, go to the Control Panel, find MinGW in the list of installed programs, and select “Uninstall.”
Can I use an IDE with GCC?
Yes, many IDEs like Code::Blocks, Eclipse, and Visual Studio Code can be configured to use GCC as the compiler.
What should I do if I encounter installation errors?
Check the MinGW documentation and user forums for troubleshooting tips. Ensure you follow each step carefully, and verify your internet connection.
Summary
- Download MinGW from the official website.
- Install MinGW.
- Select packages to install.
- Apply changes.
- Set environment variables.
- Verify GCC installation.
Conclusion
Installing GCC in Windows 10 is a straightforward process once you know the steps. By downloading and installing MinGW, selecting the necessary packages, and configuring your environment variables, you can set up a powerful development environment on your Windows machine.
If you encounter any issues, there are plenty of resources and community forums ready to help. So, roll up your sleeves and get ready to dive into the world of C and C++ programming with your newly installed GCC compiler. For further reading, consider checking out tutorials on specific GCC commands and advanced configurations. Happy coding!
Matt Jacobs has been working as an IT consultant for small businesses since receiving his Master’s degree in 2003. While he still does some consulting work, his primary focus now is on creating technology support content for SupportYourTech.com.
His work can be found on many websites and focuses on topics such as Microsoft Office, Apple devices, Android devices, Photoshop, and more.