
- Dependency management
- System Requirements
-
Installation — Linux / Unix / macOS
-
Downloading the Composer Executable
- Locally
- Globally
-
Downloading the Composer Executable
-
Installation — Windows
- Using the Installer
- Manual Installation
- Docker Image
- Using Composer
Composer is a tool for dependency management in PHP. It allows you to declare
the libraries your project depends on and it will manage (install/update) them
for you.
Dependency management#
Composer is not a package manager in the same sense as Yum or Apt are. Yes,
it deals with «packages» or libraries, but it manages them on a per-project
basis, installing them in a directory (e.g. vendor) inside your project. By
default, it does not install anything globally. Thus, it is a dependency
manager. It does however support a «global» project for convenience via the
global command.
This idea is not new and Composer is strongly inspired by node’s
npm and ruby’s bundler.
Suppose:
- You have a project that depends on a number of libraries.
- Some of those libraries depend on other libraries.
Composer:
- Enables you to declare the libraries you depend on.
- Finds out which versions of which packages can and need to be installed, and
installs them (meaning it downloads them into your project). - You can update all your dependencies in one command.
See the Basic usage chapter for more details on declaring
dependencies.
System Requirements#
Composer in its latest version requires PHP 7.2.5 to run. A long-term-support
version (2.2.x) still offers support for PHP 5.3.2+ in case you are stuck with
a legacy PHP version. A few sensitive php settings and compile flags are also
required, but when using the installer you will be warned about any
incompatibilities.
Composer needs several supporting applications to work effectively, making the
process of handling package dependencies more efficient. For decompressing
files, Composer relies on tools like 7z (or 7zz), gzip, tar, unrar,
unzip and xz. As for version control systems, Composer integrates seamlessly
with Fossil, Git, Mercurial, Perforce and Subversion, thereby ensuring the
application’s smooth operation and management of library repositories. Before
using Composer, ensure that these dependencies are correctly installed on your
system.
Composer is multi-platform and we strive to make it run equally well on Windows,
Linux and macOS.
Installation — Linux / Unix / macOS#
Downloading the Composer Executable#
Composer offers a convenient installer that you can execute directly from the
command line. Feel free to download this file
or review it on GitHub
if you wish to know more about the inner workings of the installer. The source
is plain PHP.
There are, in short, two ways to install Composer. Locally as part of your
project, or globally as a system wide executable.
Locally#
To install Composer locally, run the installer in your project directory. See
the Download page for instructions.
The installer will check a few PHP settings and then download composer.phar
to your working directory. This file is the Composer binary. It is a PHAR
(PHP archive), which is an archive format for PHP which can be run on
the command line, amongst other things.
Now run php composer.phar in order to run Composer.
You can install Composer to a specific directory by using the --install-dir
option and additionally (re)name it as well using the --filename option. When
running the installer when following
the Download page instructions add the
following parameters:
php composer-setup.php --install-dir=bin --filename=composerNow run php bin/composer in order to run Composer.
Globally#
You can place the Composer PHAR anywhere you wish. If you put it in a directory
that is part of your PATH, you can access it globally. On Unix systems you
can even make it executable and invoke it without directly using the php
interpreter.
After running the installer following the Download page instructions
you can run this to move composer.phar to a directory that is in your path:
mv composer.phar /usr/local/bin/composerIf you like to install it only for your user and avoid requiring root permissions,
you can use ~/.local/bin instead which is available by default on some
Linux distributions.
Note: If the above fails due to permissions, you may need to run it again
withsudo.Note: On some versions of macOS the
/usrdirectory does not exist by
default. If you receive the error «/usr/local/bin/composer: No such file or
directory» then you must create the directory manually before proceeding:
mkdir -p /usr/local/bin.Note: For information on changing your PATH, please read the
Wikipedia article and/or use
your search engine of choice.
Now run composer in order to run Composer instead of php composer.phar.
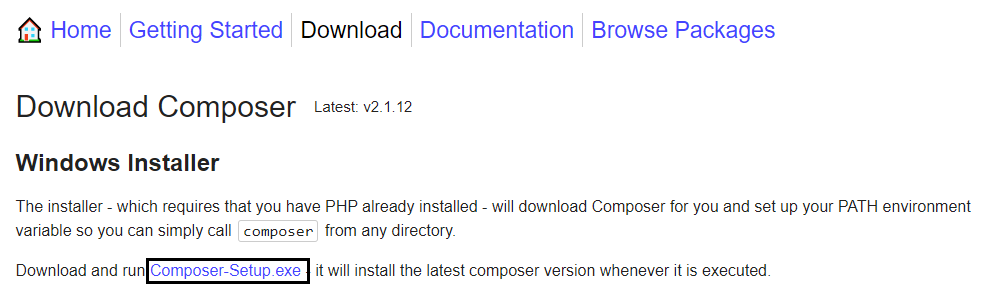
Installation — Windows#
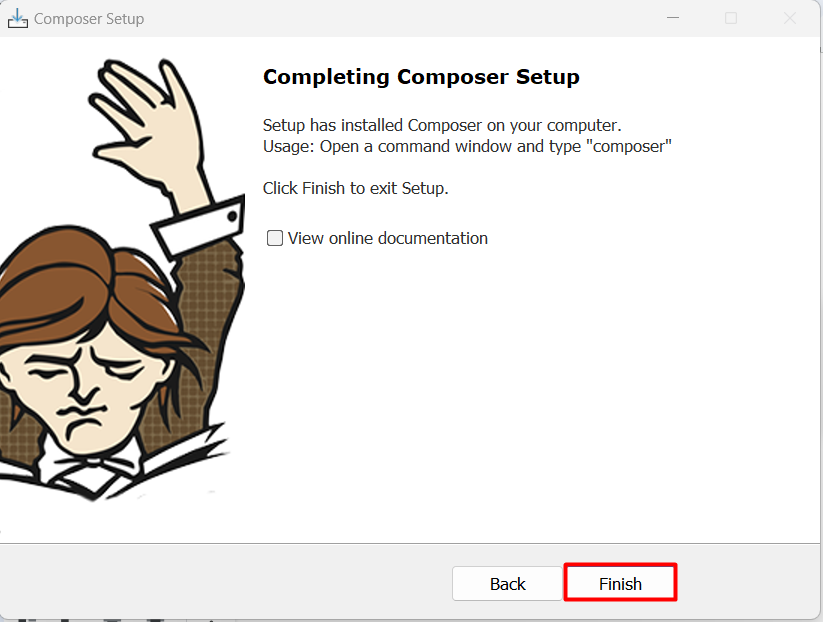
Using the Installer#
This is the easiest way to get Composer set up on your machine.
Download and run
Composer-Setup.exe. It will
install the latest Composer version and set up your PATH so that you can
call composer from any directory in your command line.
Note: Close your current terminal. Test usage with a new terminal: This is
important since the PATH only gets loaded when the terminal starts.
Manual Installation#
Change to a directory on your PATH and run the installer following
the Download page instructions
to download composer.phar.
Create a new composer.bat file alongside composer.phar:
Using cmd.exe:
C:\bin> echo @php "%~dp0composer.phar" %*>composer.batUsing PowerShell:
PS C:\bin> Set-Content composer.bat '@php "%~dp0composer.phar" %*'Add the directory to your PATH environment variable if it isn’t already.
For information on changing your PATH variable, please see
this article and/or
use your search engine of choice.
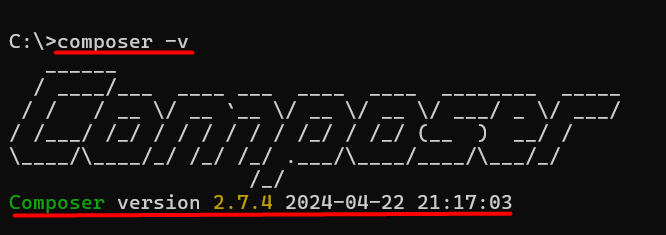
Close your current terminal. Test usage with a new terminal:
C:\Users\username>composer -VComposer version 2.4.0 2022-08-16 16:10:48Docker Image#
Composer is published as Docker container in a few places, see the list in the composer/docker README.
Example usage:
docker pull composer/composer
docker run --rm -it -v "$(pwd):/app" composer/composer install
To add Composer to an existing Dockerfile you can simply copy binary file from pre-built, low-size images:
# Latest release
COPY --from=composer/composer:latest-bin /composer /usr/bin/composer

# Specific release
COPY --from=composer/composer:2-bin /composer /usr/bin/composer
Read the image description for further usage information.
Note: Docker specific issues should be filed on the composer/docker repository.
Note: You may also use composer instead of composer/composer as image name above. It is shorter and is a Docker official image but is not published directly by us and thus usually receives new releases with a delay of a few days. Important: short-aliased images don’t have binary-only equivalents, so for COPY --from approach it’s better to use composer/composer ones.
Using Composer#
Now that you’ve installed Composer, you are ready to use it! Head on over to the
next chapter for a short demonstration.
Basic usage →
Found a typo? Something is wrong in this documentation?
Fork and edit it!
Last Updated :
11 Sep, 2024
Composer is essentially a package manager for PHP. You can effectively manage libraries and packages in your PHP projects by using Composer, a dependency management for PHP. Composer makes package management easier for both small and large-scale applications by automating the installation and update of dependencies. A package manager is, it allows anyone to import codebases into the project & keep them up to date. It just helps you to manage those dependencies.
In this article, we will look into the process of installing a composer on a Windows system.
Prerequisites
Make sure your machine satisfies the following prerequisites before you start:
- Windows 10 or later: Although the instructions are specific to Windows 10, they should also apply to earlier versions of the OS.
- PHP: Installing PHP on your computer is necessary for Composer to work. Installing PHP is required if it isn’t already installed before continuing.
Installation of PHP composer on Windows:
Follow the below steps to install PHP composer on a Windows system:
Step 1: Navigate to the official composer website.

Step 2: Then click on the Download button.

Step 3: Then click on the Composer-Setup.exe & download the file.
Step 4: Then click on “Install for all users”.

Step 5: Do not make any changes & click Next

Step 6: First, you have to install PHP on your computer. You can see the installation location here. Click Next.

Step 7: Do not make any changes & click Next.

Step 8: Do not make any changes & click Install.

Step 9: Wait for the installation.

Step 10: Do not make any changes, just leave it & click Next.

Step 11: Click Finish, Composer is installed successfully.

Step 12: Open the command prompt & execute the below command :
composer
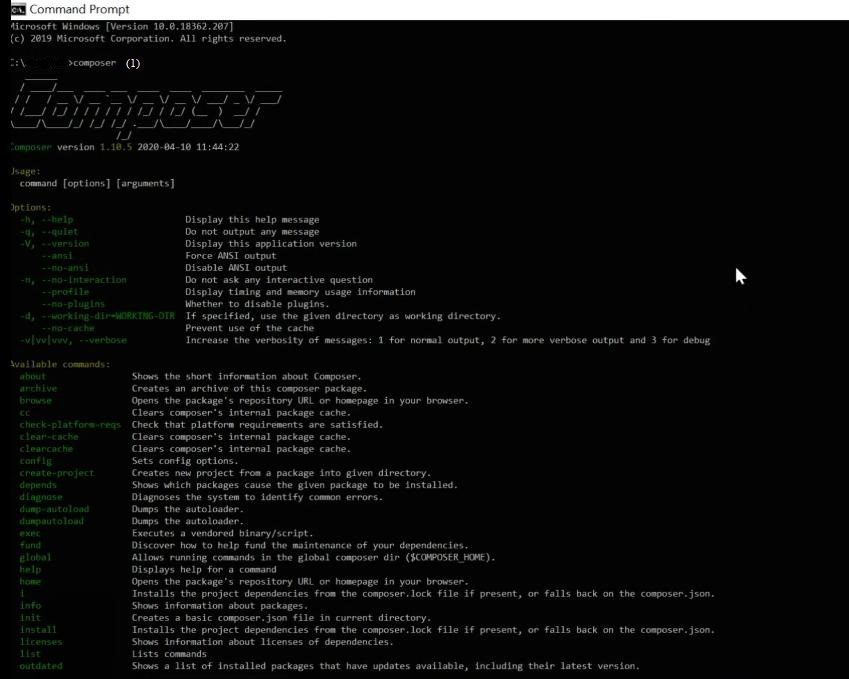
Hence you can see all the details & your installation is successful.
Conclusion
PHP Composer is a very simple tool for managing dependencies in PHP projects; it’s easy to install, update, and manage packages with Composer, which makes your development process more organized and productive. Installing PHP Composer on Windows is a simple process.
Also Read
- How to install PHP in windows 10
- How to Install PHP Composer on cPanel?
- How to Install and use PHP Composer on Linux?
In modern PHP development, managing external libraries and dependencies efficiently is crucial for building robust and scalable applications. Manually downloading, updating, and configuring these dependencies can be time-consuming and error-prone, especially within a Windows environment. Composer, an open-source dependency manager for PHP, addresses this challenge by automating the process of finding, installing, and updating project dependencies specifically for Windows systems.
Composer simplifies dependency management by allowing developers to declare the libraries their project needs, while it handles the rest. It ensures that the correct versions of dependencies and their sub-dependencies are installed, preventing compatibility issues. Additionally, Composer promotes project organization by maintaining a clear structure for dependencies and autoloading, streamlining development workflows, and enhancing code maintainability across different platforms, including Windows.
In this article, you will get detailed information on install Composer Windows system.
Prerequisites for Installing Composer on Windows
Before diving into the Composer install Windows, it’s essential to ensure your system meets the necessary requirements and has PHP properly set up.
System Requirements
Composer runs on Windows 7, 8, 10, and 11. While there are no strict hardware limitations, ensure your system has sufficient resources for development tasks. Generally, having at least 4GB of RAM and adequate free disk space is recommended for a smooth experience.
Installing PHP on Windows
Composer is a dependency manager for PHP, so having PHP installed on your system is a fundamental requirement.
To verify if PHP is already installed on your Windows or not, you can execute the below command:
php -v

If PHP is installed, it will display the installed version information. It is also possible that PHP is installed but you didn’t enter its path inside the environment variable. Read this guide, To learn more about installing PHP on Windows or how you can place its path inside the environment variable.
So when you properly follow the steps then this should be the output you should expect:

Installing Composer on Windows 10
Download Composer
After successfully installing and enabling PHP, you should now proceed to install Composer on Windows. For this, you need to first go to its official website and download Composer Windows executable file:
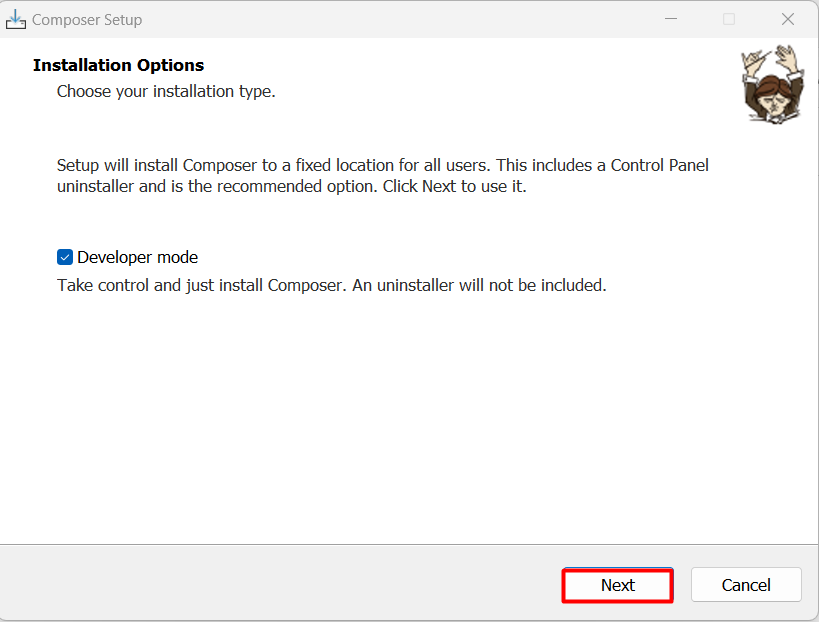
Choose Standard or Developer Mode
When installing Composer for Windows using the installer, you’ll encounter a choice between two installation types:
- Standard
- Developer
Standard Installation: This is the recommended installation type for most users. It installs Composer with the default settings, which are suitable for most use cases. With a standard installation, Composer will be installed in a way that allows you to use it for managing dependencies for your PHP projects.
Developer Installation: This installation type is intended for developers who need more control over the Composer installation. It allows you to customize the installation settings, such as the installation path, the PHP executable to use, and other advanced options.
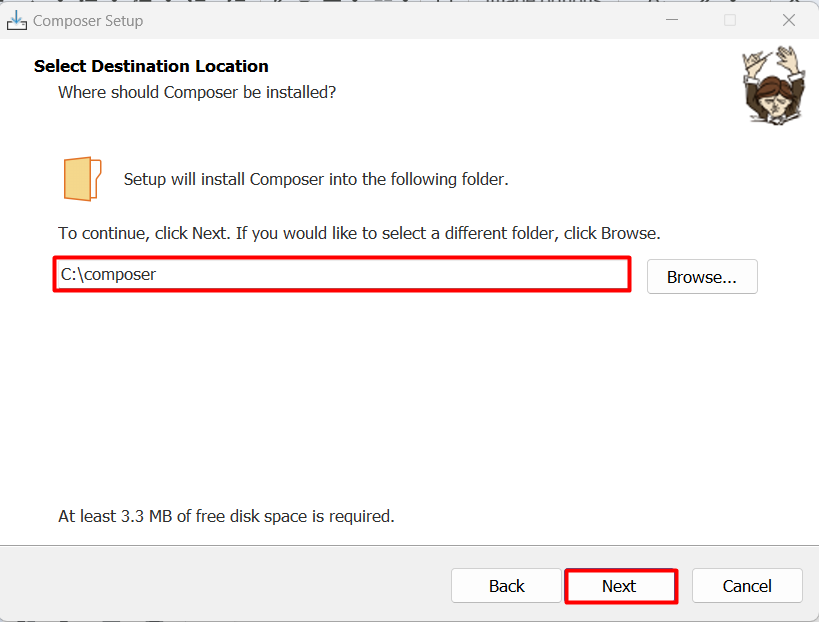
Provide Composer Installation Path
Now you need to provide the path where you want to install composer:
Choose PHP Executable
Next, you need to select the command line PHP executable that Composer will use. This is important because the Composer needs to interact with PHP to perform tasks like installing dependencies and running scripts.
Composer needs to know which PHP executable to use to execute its commands. This ensures that Composer can correctly interpret and execute PHP code and that the correct version of PHP is used for your projects.
The path will be displayed automatically as the installer attempts to locate your PHP installation by checking common installation directories and the system’s PATH environment variable.
In case you are using multiple PHP versions, then you need to provide the desired path in this case:

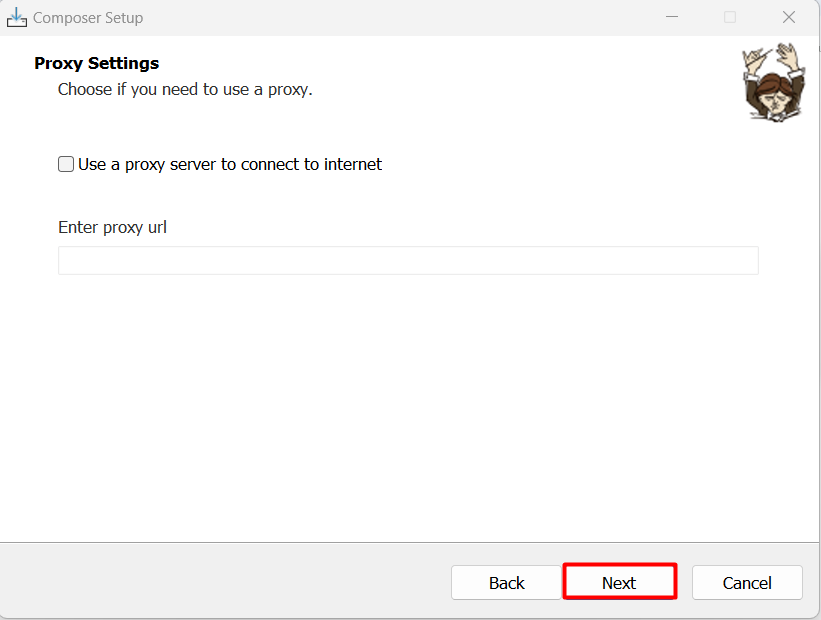
Provide Proxy Settings or Skip it
The Composer installer provides an option to configure proxy settings, which is essential for users whose internet connections route through a proxy server. A proxy server acts as an intermediary between your computer and the internet, controlling and often filtering network traffic.
If your network or organization uses a proxy server to access the internet, you’ll need to enter the proxy settings to allow Composer to download dependencies and packages. This is especially important if you’re behind a corporate firewall or have restricted internet access.
Verify the Installation
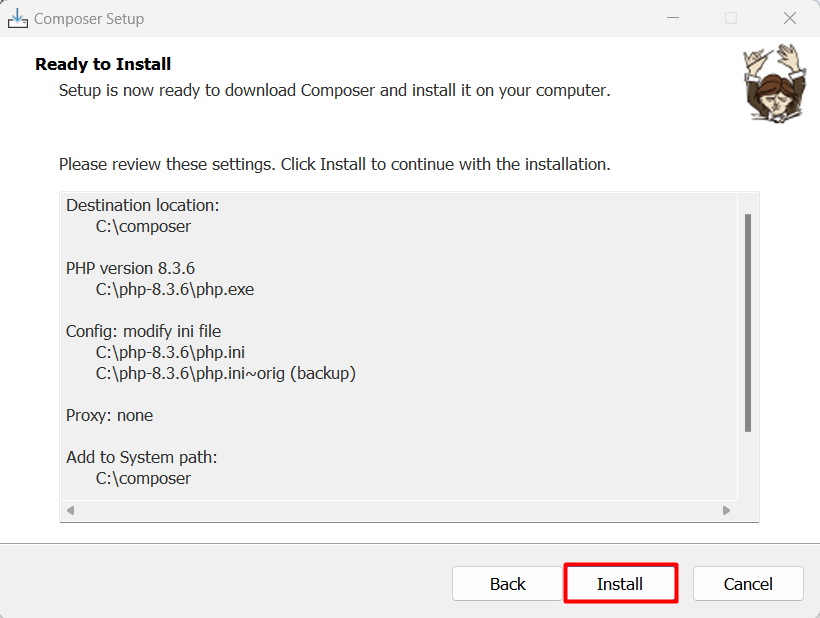
In this step, the installer is displaying a summary of the settings you’ve chosen so far. Carefully examine each setting to confirm it aligns with your choices and environment. If you spot any discrepancies, use the “Back” button to navigate to the relevant step and make corrections. Once you’re satisfied with the configuration, proceed with the installation.
Install Composer on Our Windows 10 VPS!
With Ultahost, Hosting Windows VPS has never been easier or faster. Enjoy ultra-fast SSD NVME speeds with no dropouts and slowdowns.
Understanding Environment Changes
Congratulations! You’ve successfully installed Composer on your Windows system. The installer is providing you with a crucial piece of information. When you installed Composer, it updated your system’s environment variables to include the Composer executable. However, this change only takes effect in new command windows or terminal sessions. Any existing command windows or running programs may not be aware of this change.
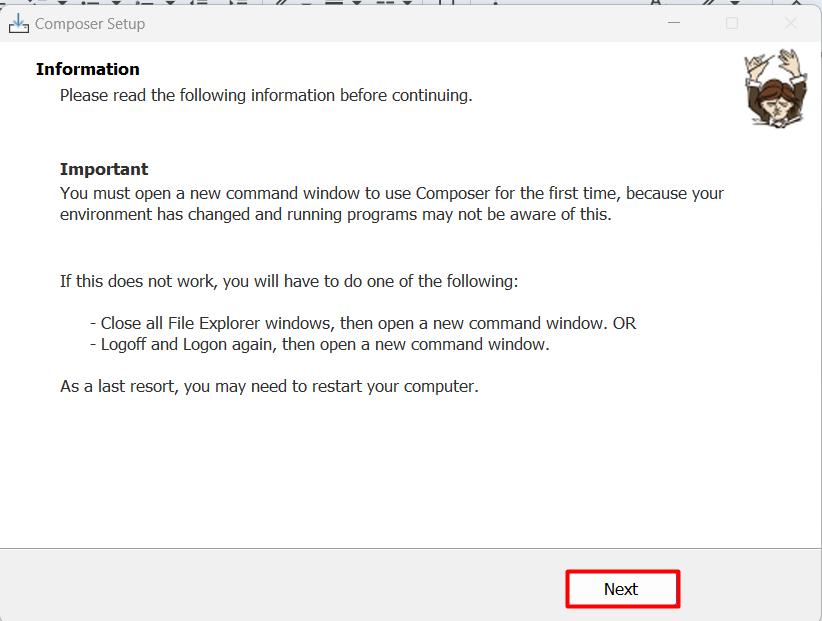
After acknowledging it, you can now close the installation process by clicking on the Finish button:
Now to verify this, you need to close any opened terminal and then reopen it to execute the below command:
composer -v
The output displays the composer version which shows it has been installed successfully.
Conclusion
Installing Composer on Windows is a straightforward process that requires minimal effort. By following the steps outlined in this article, you can easily set up Composer on your Windows system and start managing your PHP project dependencies with ease. From ensuring PHP is installed and configured correctly to choosing the right installation type and providing proxy settings, we’ve covered all the essential steps to get you started with Composer.
With Composer installed you can now take advantage of its powerful dependency management features to streamline your development workflow and build robust, scalable applications. Remember to update your environment variables by opening a new command window or terminal session to ensure Composer is ready to use.
While installing Composer on Windows is possible it can be introduce compatibility challenges down the line. Upgrading to an Ultahost cheap Windows VPS server provides a more robust and cost-effective solution that offers a full Windows desktop environment allowing you to install Composer with ease and ensuring it integrates seamlessly with your development workflow.
FAQ
What is Composer?
Composer is a dependency manager for PHP. It simplifies the process of managing PHP libraries required for your projects.
How do I install Composer on Windows?
You can install Composer on Windows by following these steps:
- Download Composer: Visit the Composer website and download the Composer-Setup.exe file.
- Run the Installer: Once the download is complete, double-click the Composer-Setup.exe file to run the installer.
- Follow the Installation Wizard: The installation wizard will guide you through the installation process. You can choose the installation location and other preferences during this step.
- Verify Installation: After the installation is complete, open Command Prompt or PowerShell and type composer -version to verify that Composer has been installed correctly. You should see the Composer version number printed on the console.
Do I need to have PHP installed before installing Composer?
No, Composer includes its own PHP runtime, so you don’t need to have PHP installed separately on your system.
Can I install Composer globally on Windows?
Yes, Composer installs globally by default on Windows. You can use it from any directory in your Command Prompt or PowerShell.
Is there a graphical installer for Composer on Windows?
No, Composer does not have a graphical installer for Windows. However, the command-line installer is straightforward and easy to use.
The package manager Composer greatly simplifies working with the PHP scripting language. Once installed, you can easily access a variety of ready-to-use PHP packages such as libraries and integrate your own packages. So how does the Composer Windows installation work on Windows 11?
Composer on Windows 11: How to install step by step
The easiest way to install Composer on Windows 11 is via the Composer Windows installer file. It’s available to download for free and executed in the usual manner. We’ve summarized the individual steps below.
Before installing and using Composer, you need to have a version of PHP set up on your system. Find out how to install PHP in our article on the topic.
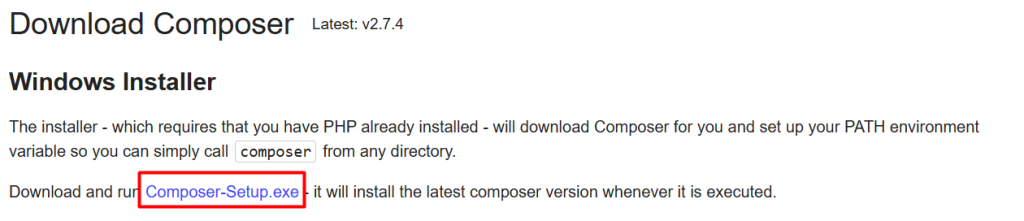
Step 1: Download Composer installation file
Head to the official Composer download page. Click the Composer-Setup.exe link to download the installer file for Windows.
Step 2: Begin installation of Composer
Navigate to your download directory and double-click the downloaded file. Then select the recommended option Install for all users so all users of the device are able to access the package manager later.

From the option that follows, you can activate the developer mode by setting a check mark. In this case, the wizard will automatically determine the path of your PHP installation. However, you cannot choose between the PHP version if you have multiple PHP editions installed.


Skip the following proxy settings and finally press Install to start the installation.
Step 3: Finish setup
Following successful installation, you’ll receive a notification that you need to use a new command line instance to use Composer. That’s because the system environment has changed. Click Next and then Finish to complete the installation.
In some cases, you may need to restart Windows 11 for the Composer installation to be detected correctly.
Step 4: Test Composer installation via Windows 11 command prompt
Finally, check if the package manager setup worked. For this purpose, open the command prompt by pressing the key combination [Windows] + [R] and executing the “cmd” command.
In the command prompt window, type “composer” and confirm by pressing Enter. You should see the installed Composer version and an overview of available commands.

How to use Composer on Windows 11 (An example with cocur/slugify)
Once you’ve installed Composer on Windows, you can use the package manager to obtain existing public PHP packages. We’ll show you how below using the cocur/slugify package as an example. This package is used to convert strings to slugs.
Step 1: Install Git and add to PATH
To download the cocur/slugify package, the Git version control system must be installed on your system and added to the PATH system variable. Windows 11 uses this variable to determine the required files for running a command-line program.
If you haven’t already installed Git, you can do so now. Detailed information on installing and using the tool can be found in our Git tutorial.
To add the version management tool to the PATH variable, do the following:
- Start Windows search and search for “Edit environment variable”.
- Click on the corresponding search result.
- In the Advanced tab, open the Environment variables menu.
- In User variables select Path and press Edit.
- Click New and paste the value “C:\Program Files\Git\bin\”.
- Repeat for “C:\Program Files\Git\cmd\”.
- Save your adjustments by clicking on OK.

Step 2: Create directory for the Composer package
Next, create a directory for the PHP package that you want to obtain using Composer. Launch the command prompt using the key combination [Windows] + [R] and the “cmd” command. We want to create the Slugify directory directly in C:, so we are going to change to the root directory:
Then we create the directory with the name “slugify” by entering the following command:
Step 3: Install package using Composer
Swap to the created directory by executing the following command:
Once in the directory, install Slugify using Composer as follows:
composer require cocur/slugifybash

Step 4: Create test PHP script
You’ll find the composer.lock and composer.json files and a folder named “vendor” in the newly created slugify directory. The autoload.php file, which you need to include in your PHP script to access the services of the cocur/slugify package, is located in the vendor folder.
To create a simple test script, create a file named test.php in the main slugify directory by typing the following command:
Insert the following PHP code which, among other things, integrates autoload.php:
<?php
require __DIR__ . '/vendor/autoload.php';
use Cocur\Slugify\Slugify;
$slugify = new Slugify();
echo $slugify->slugify('This is a long sentence and I need to make a slug from it!');
bash
Save the file with the key combination [Ctrl] + [C] and execute the script using the following command:
The output is the slug of the string specified in the brackets:
this-is-a-long-sentence-and-i-need-to-make-a-slug-from-itbash

17 Mar 2025 | 5 min read
Composer is an application that is used for dependency management in standard format in PHP. Composer lets you declare the libraries on which your PHP project depends and manage it for you. It installs and updates the libraries that you need for your project.
By default, Composer doesn’t install anything globally; it manages dependencies based on per-project and installs them in the directory (vendor) inside your project.
Composer offers two things for our projects:
- Helps in dependency management for PHP.
- Helps in file auto-loading in the project.
The Composer is highly energized by Node’s NPM and Ruby’s bundle.
Suppose a scenario:
- You have a PHP project which depends on several libraries.
- And some of these libraries also depend on other libraries.
Composer fulfills the requirement of the above scenario as:
- It lets you declare the libraries your project depends on.
- It finds out which versions of the package you require to install in your project, and it downloads and installs for you.
- It also allows updating all your dependencies in a single command.
System requirements to install Composer:
Composer requires installed and successfully running PHP 5.3.2+ on the machine. It also requires some sensitive PHP settings and compiles flags. Installing the Composer packages from source rather than zip archive, you will require git, svn, fossil or hg based on the package version-controlled. A Composer is a multi-platform tool that runs equally on Windows OS, Linux and macOS.
Install Composer on Windows
There are two ways to install Composer on the Windows operating system: the first one is using Composer installer setup, and the other is by manual installation using script.
1. Using Installer
a) Installing Composer using Composer installer setup is the easiest way to install it on Windows operating system. Launch your default browser and visit https://getcomposer.org and click on the «Getting Started» button. Under the «Installation — Windows» section, click on the «Using the Installer» option; it will take you to the «Using the Installer» section.

b) Click on the Composer-Setup.exe link to download Composer setup on your device. After downloading the setup, run it to install and follow the instructions.
c) Open the downloaded Composer-Setup and click on the «Install for all users», which is recommended option to install Composer setup.

d) On the pop-up screen, click on YES to allow installation.
e) Now, choose your installation type and click on the Next

f) Now, choose the command-line PHP path you want to use, checkmark the box to add the PHP path, and click Next.

g) Composer setup pop-up a screen that provides an option to use a proxy server to connect to the internet. If you want to use a proxy server, checkmark the box and enter the proxy URL; if not, leave it and click on the Next We are skipping this as we are not using any proxy server to connect internet.

h) The Composer setup is ready to install on your computer; review your settings and click on the Install button.

i) After installation of Composer setup, it pop-up important information about how to open it. Read the information, click on Next and do accordingly after installation.

j) Click on the Finish button to complete the installation.

When the Composer gets installed on your machine, open command (cmd) windows, type composer and press Enter key. If it displays a list of commands, that means Composer is successfully installed on your computer.

2. Manual Installation
You can install Composer at any directory where you want. In our case, we are installing at C:\xampp\htdocs\composersetup directory. Open your command (cmd) terminal and go to the directory location you want to install (C:\xampp\htdocs\composersetup).
Copy and paste the following script in your cmd terminal and run it to install Composer. It will automatically install the latest Composer to your current directory.
This installer script just checks the php.ini settings. If settings are set incorrectly, it will warn you and start downloading the latest composer.phar in the current directory (C:\xampp\htdocs\composersetup). If the installation gets successful, you will see a message of successfully installed.

The above 4 scripting lines must be in order that performs the following activities:
- Download the composer installer to the current directory.
- Verify the composer installer SHA-384 certificate.
- Run the composer installer.
- Remove the composer installer.
Note: The script code may get change based on the new version released. To check the script for installing a new release of Composer, visit https://getcomposer.org/download/.
Note: If the script throws an error that «php is not recognized as an internal or external command«. Then check the PHP path is well set in computer Environment Variables settings or not. To set PHP path globally for your machine, copy the php path where it is located (C:\xampp\php), and past it, at Advanced system settings,> Environment Variables > select Path and click on New. Now, in the Variable Name type Path and in the Variable Value, paste the php location, i.e., C:\xampp\php.
You can check your installed composer version using a command composer -v at the current path. Such as:
For example:

Here, we get installed Composer’s current version 2.0.8 on our machine.
Create a new composer.bat file in the same directory where the composer.phar is present.
Using cmd

Using PowerShell

Some of the other notable installer options of Composer
—install-dir
You can install Composer in a particular directory where you want using the —install-dir option and providing the target directory name. For example:
—filename
You can even specify the filename other than its default name (composer.phar) using the —filename option. For example:
—version
Composer allows installing its particular release using the —version option along with providing a specific release version. For example:
—help
Using the —help option, you can view various composer options for a specific environment. For example:
Updating and Uninstalling Composer
If you want to updates your Composer or uninstall any of its dependency managers, make sure you have Git for Windows installed on your machine. From there, you can verify Composer’s installation by running —version command from the terminal. If the command returns the version code, it means the Composer is installed, and you are ready for the next steps.
Before updating your Composer, check its current version that is installed on your computer. You can do this by typing the following command in your terminal application:
or
Update Composer
To update Composer itself, run the below script, and it will update the Composer.
Update Dependency
As Composer manages the dependencies library of your project, you can update these dependencies if required for you using the below command:
If you don’t have an active project running with Composer’s dependencies on your current directory, Composer shows a message that it was unable to find a composer.json file.
Uninstall packages
To uninstall the packages from Composer, run the below command:
Make sure to replace «your_package_name» with the actual package name in the above command. It will uninstall the package from Composer.