

When Microsoft’s CEO announced that the Bash shell was coming to Windows, several people couldn’t believe it. #BashOnWindows trended on Twitter for days; such was the impact of this news.
Initially referred as Bash on Windows, it is actually called Windows Subsystem for Linux, popularly known as WSL.
With WSL, you can install one of the supported Linux distribution inside Windows and use the Windows terminal to access the Linux systems and run Linux commands.
In this tutorial, you’ll learn how to enable WSL on Windows and then install a Linux distribution of your choice.
📋
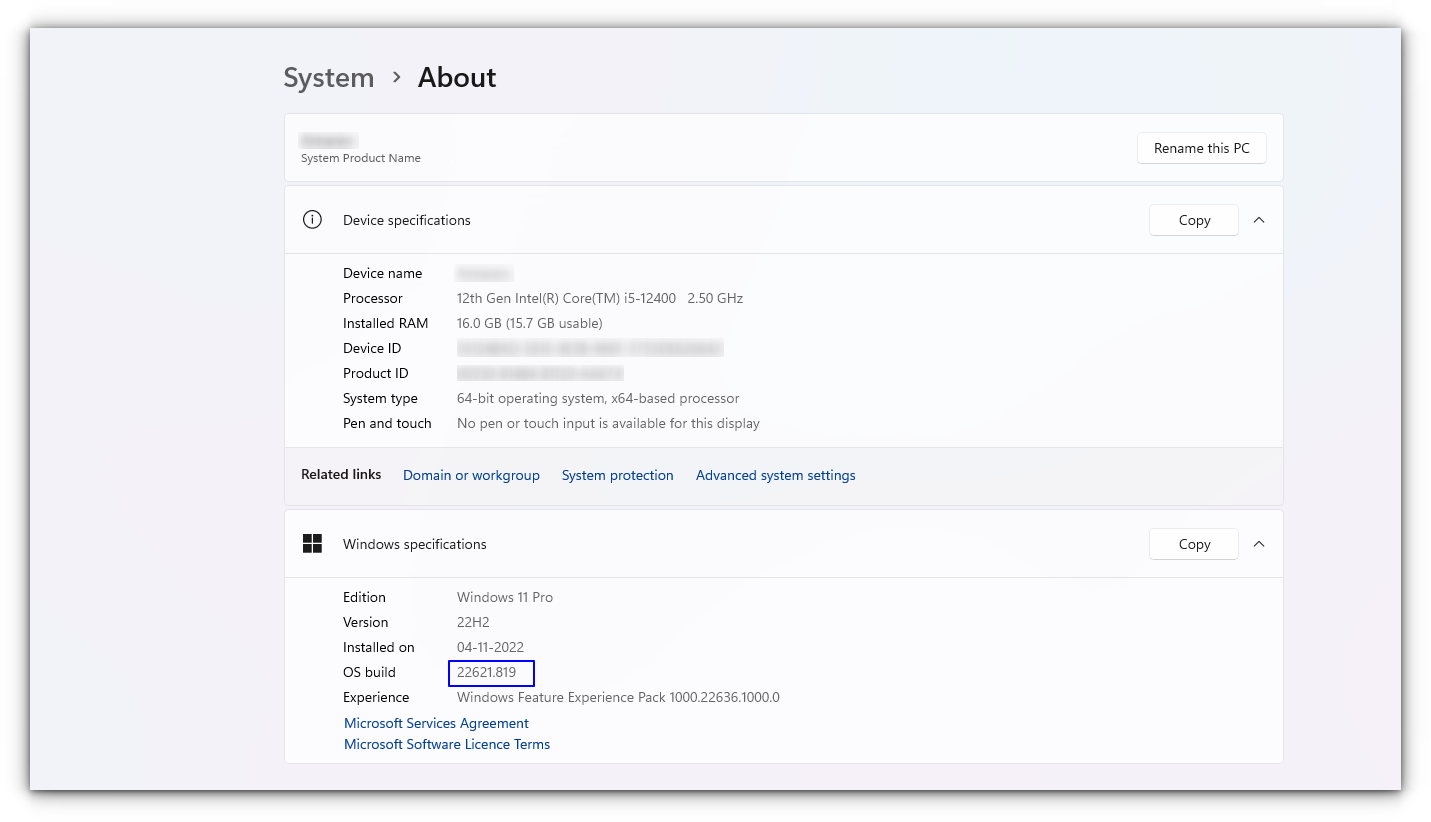
This tutorial was tested with the latest Windows 11 version 22H2, and build 22621.819. You might need to update your Windows installation if you have an older build to follow everything in this tutorial.
What is WSL?
WSL (formerly Bash on Windows) provides a Windows subsystem, and Linux runs atop it. It is not a virtual machine or an application like Cygwin. It is a complete Linux system inside Windows 10/11. It allows you to run the same Bash shell you find on Linux. You can run Linux commands inside Windows without installing a virtual machine or dual-boot Linux and Windows.
You install Linux inside Windows like a regular application. This is a good option if your main aim is to learn Linux/UNIX commands.
Check for System Compatibility
You must be running specific versions of Windows for the different features described in this article. Requirements necessary for a particular feature to work are described under its titles. To check your Windows version, search for about in the start menu.
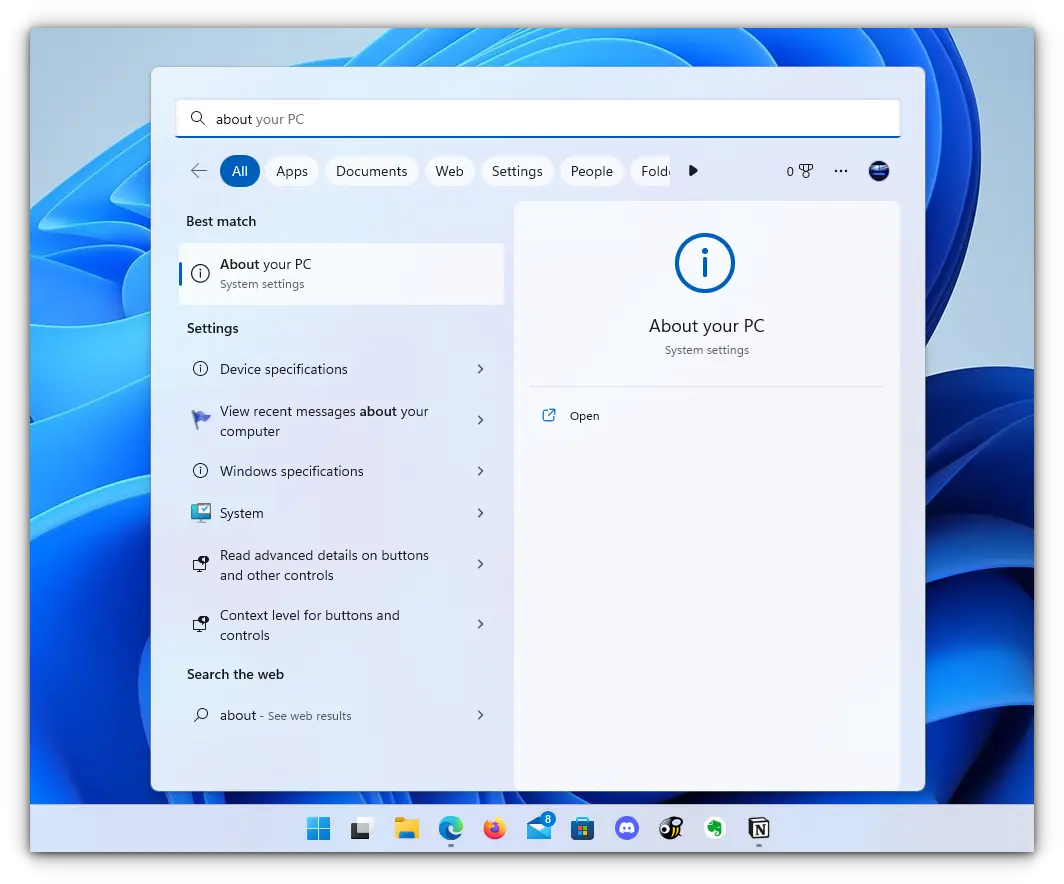
Here, you can see the build of your PC, as shown in the screenshot below. Make sure it is matching with the respective requirements described under various sub-headings here in this article.
- You must be running Windows 10 version 1607 (the Anniversary update) or above.
- WSL only runs on 64-bit versions 32-bit versions are not supported.
Install Bash in Newer Windows 10 and 11
The good thing is that the latest set of upgrades, including the stable release of WSL v1.0 released from Windows, makes it easier to install Bash on Windows.
There are two ways you can go about it:
- You can get it in one click from Windows Store.
- Choose to use the command-line.
1. Install WSL Using the Microsoft Store
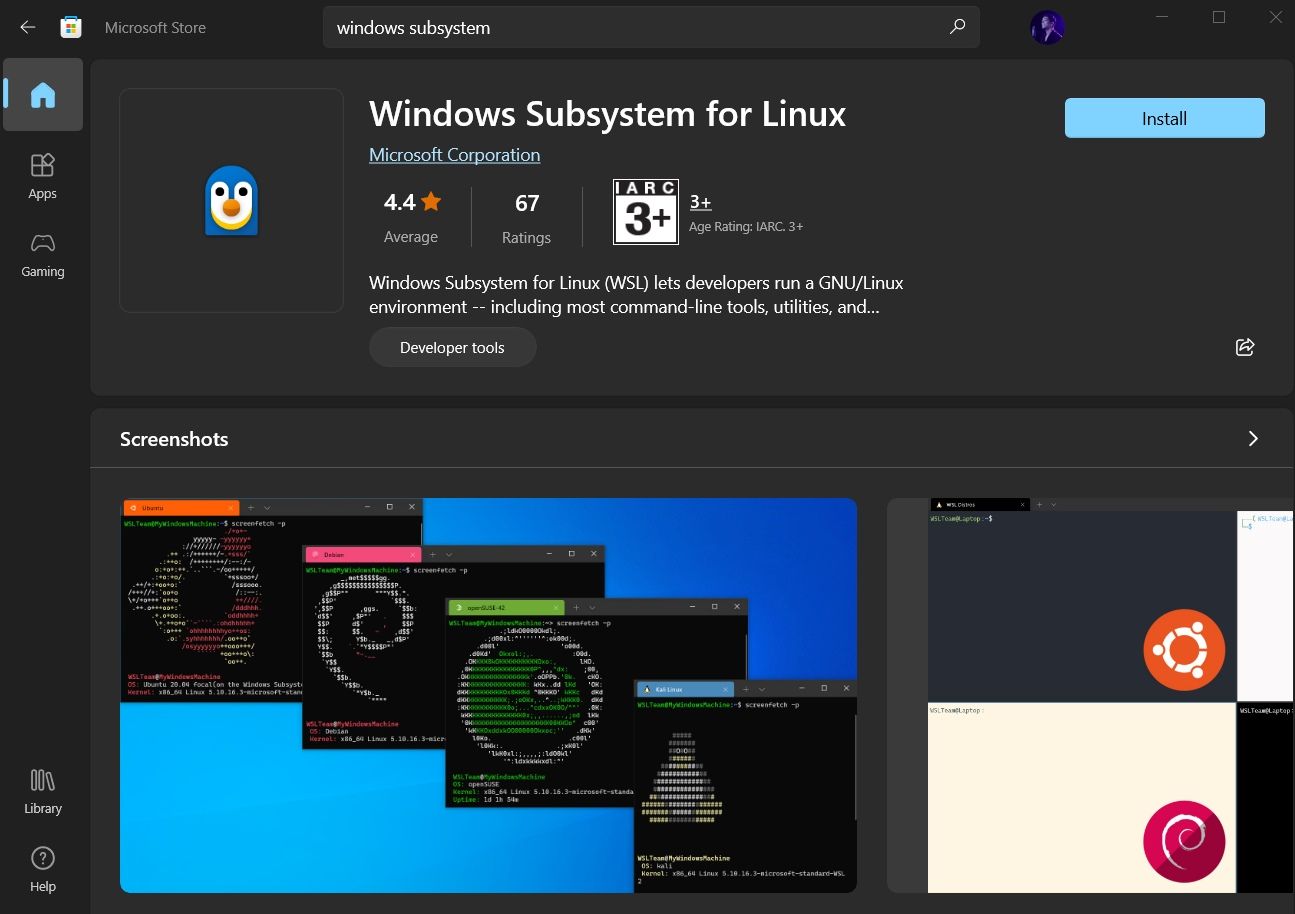
Launch the Microsoft Store and search for «Windows subsystem«.
Install it, and you’re done with the first step. Next, you have to install a Linux distribution.
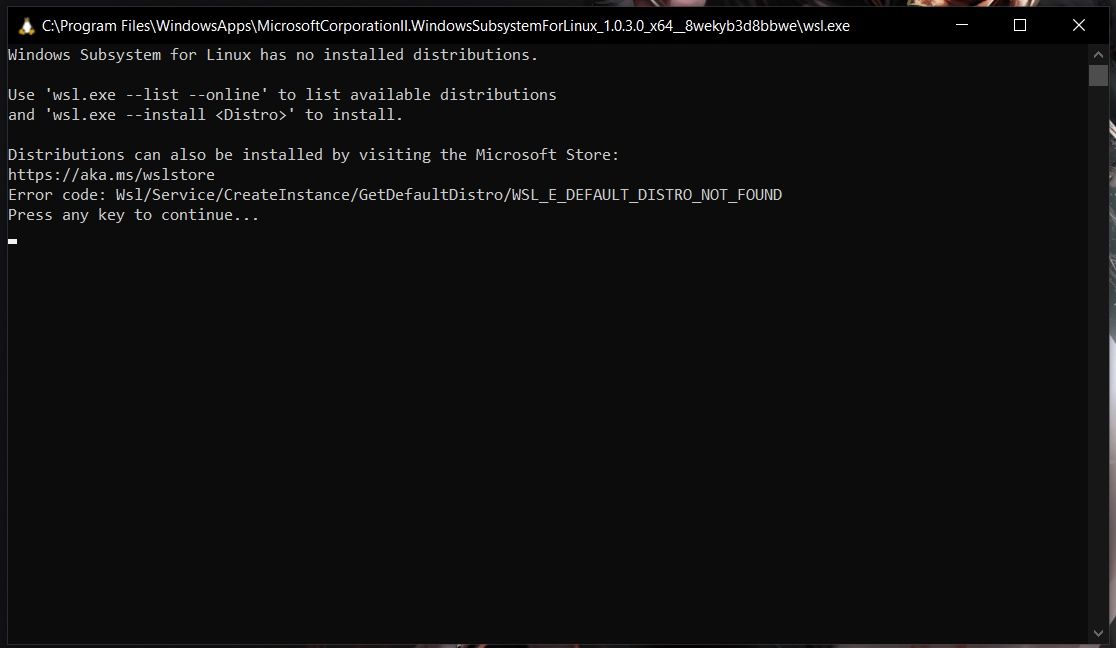
So, if you try to open WSL, you will get to see a window informing you that no distribution is installed.
Similar to WSL, search for the distribution on Microsoft Store, and then install it.
For instance, I installed Ubuntu from the store as shown in the image below:
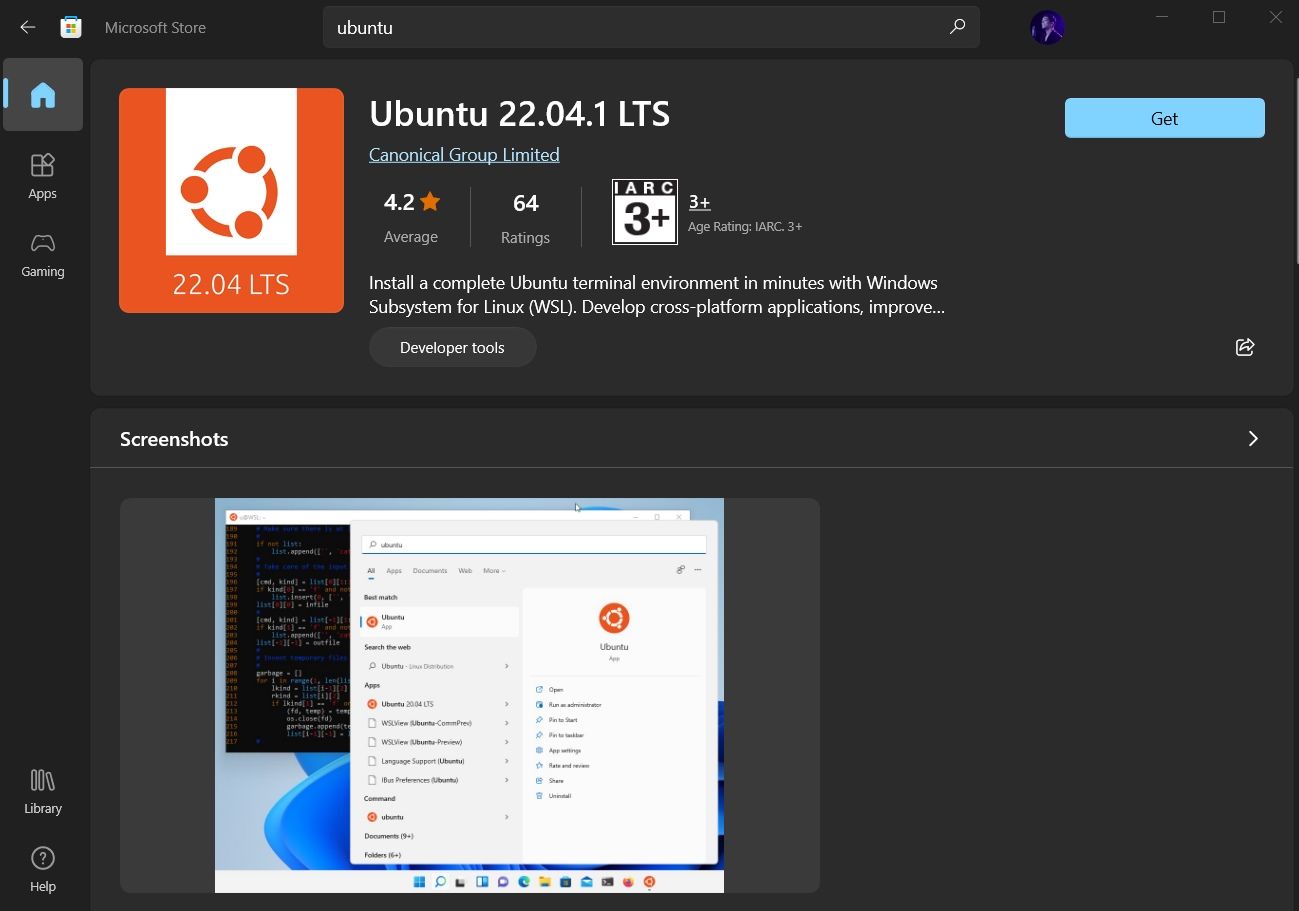
And, then proceed to «Open» it and it will automatically start installing. The procedure is same for any distribution you choose.
We then have to configure it, which is discussed right after installing it through the command line.
2. Install WSL and the default distribution using the command-line
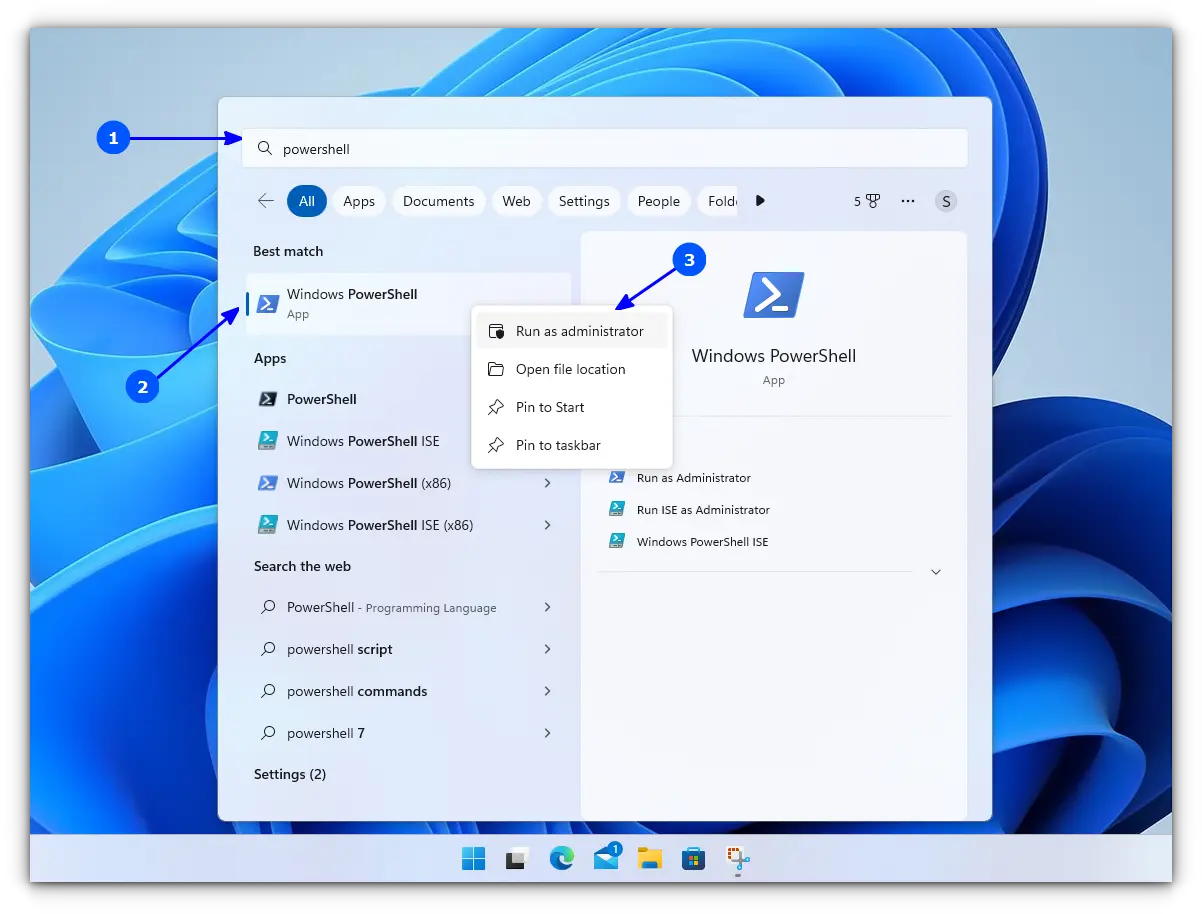
In WSL, the default distribution is Ubuntu (which can be changed). To install, open Powershell as an administrator.
For this, search for Powershell in the start menu, right-click on Powershell and select Run as Administrator.
Inside Powershell, enter the following command to install WSL, along with all necessary features and the default distribution, that is, Ubuntu.
wsl --installOnce finished downloading and installing, you need to reboot to apply the changes.
Whether you installed WSL and Ubuntu using the Microsoft Store or the command line, you need to configure it.
Here’s how it is done:
🛠️ Configure the newly installed Ubuntu
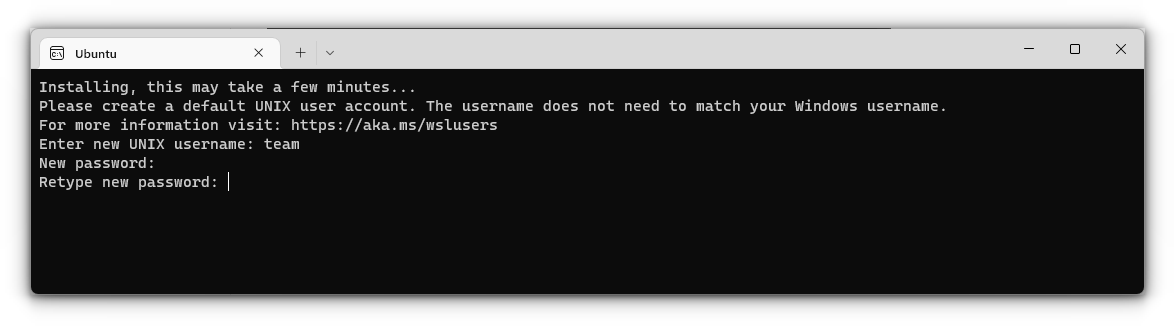
After rebooting, search for Ubuntu in Start Menu and open it.

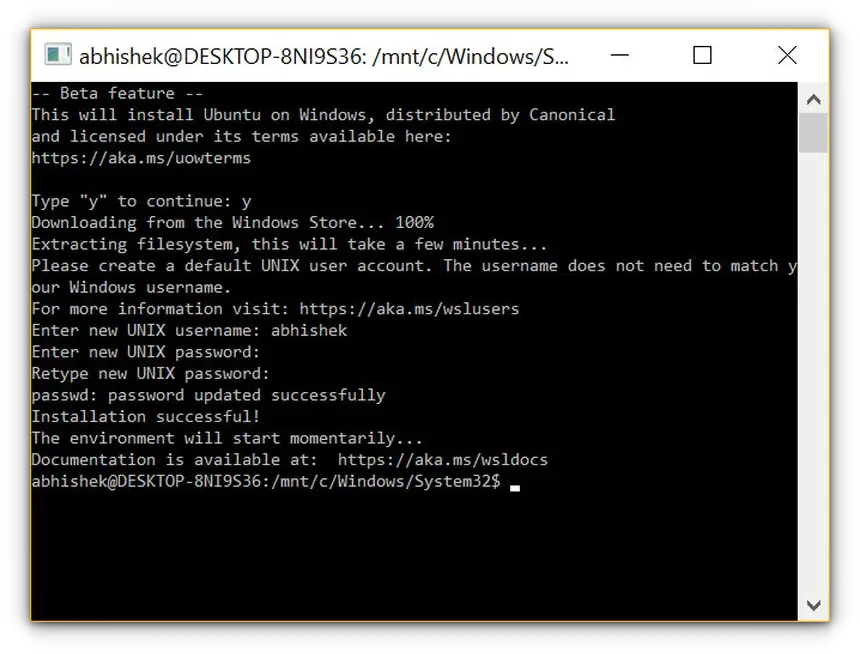
It will ask you to enter a UNIX Username and Password. Enter these details and press enter key.
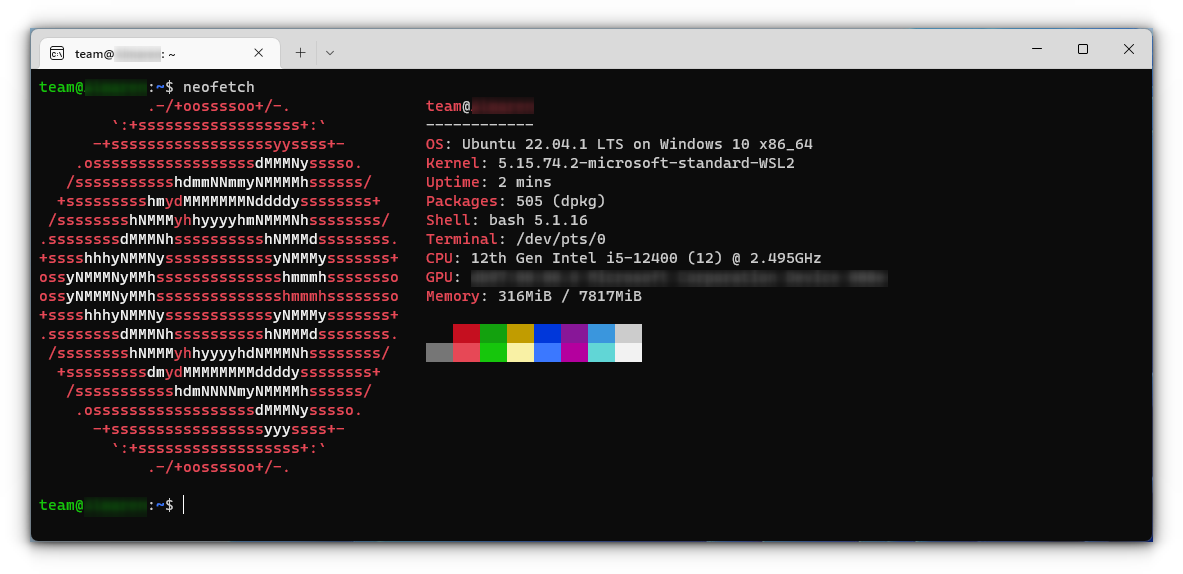
You will now be inside the terminal window of Ubuntu.
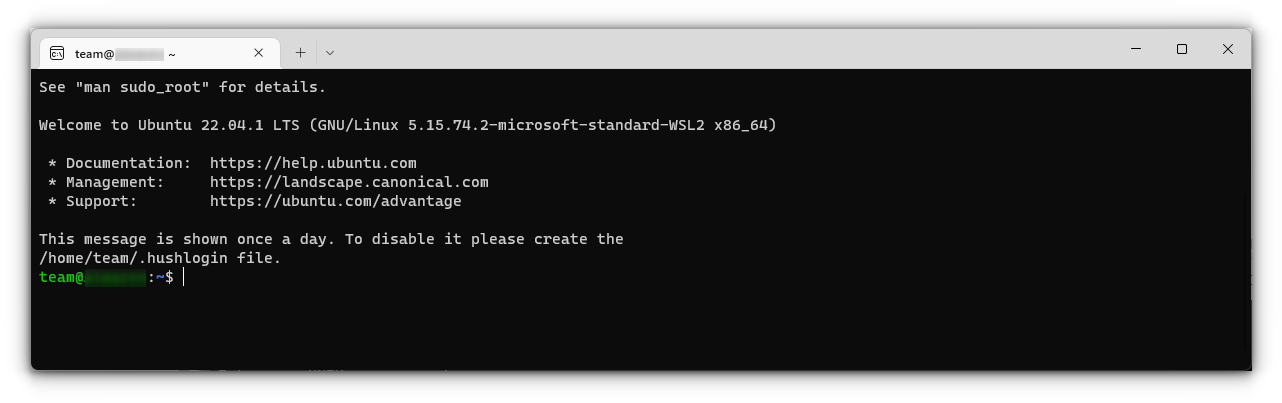
Once logged in, you need to update the installed Ubuntu. For this, enter the following commands one by one:
sudo apt update
sudo apt full-upgrade
After completing the update, you are good to go with Ubuntu in WSL.
Install Bash on Older Windows
If you have the minimum requirements mentioned in the beginning but are running an older Windows build, the previous method may not be supported. So there is a manual installation method.
Also, there are both WSL1 and WSL2 available. WSL2 offers some upgraded functionalities but has some minimum requirements to run:
- For x64 systems: Version 1903 or later, with Build 18362 or later.
- For ARM64 systems: Version 2004 or later, with Build 19041 or later.
So this brings us to two possibilities to install:
- Install Ubuntu with WSL1
- Install Ubuntu with WSL2
1. Install Ubuntu with WSL 1
This is a relatively simple procedure for those with a system incompatible with WSL2. First, you need to enable the Windows Subsystem for the Linux feature. This can be done through the command line. Open Powershell as an administrator and enter the following command:
dism.exe /online /enable-feature /featurename:Microsoft-Windows-Subsystem-Linux /all /norestartOr, to do this via GUI, follow the steps below:
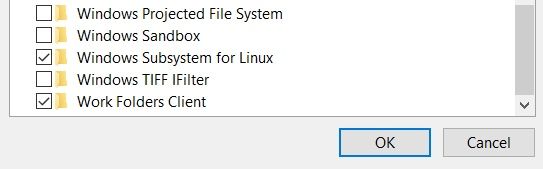
- Search for Windows Features in Start Menu.
- Turn on Windows Subsystem for the Linux feature.
- Reboot your system.
- Open the Windows store and search for the distribution of your choice to install.
Once installation is completed, open the Ubuntu app from the start menu. It will take a couple of seconds to install. You will be prompted to enter a username and password. Provide those credentials, and you are good to go with Ubuntu in WSL1.
2. Install Ubuntu with WSL 2
It is recommended to use WSL2 instead of WSL1 if you have support. To install Ubuntu with WSL2, you need to make sure that the Windows Subsystem for Linux feature is turned on. For this, as in the above case, execute the following command in an elevated Powershell:
dism.exe /online /enable-feature /featurename:Microsoft-Windows-Subsystem-Linux /all /norestartReboot the device once the command is completed.
After this, you need to enable the Virtual Machine Platform feature. Open the Powershell with admin privileges and enter the following command:
dism.exe /online /enable-feature /featurename:VirtualMachinePlatform /all /norestartOnce again, restart the device to complete the WSL install and update to WSL 2.
Now, download the Linux Kernel Update Package for x64 machines from the official website. If you are using ARM64 devices, use this link to download the latest kernel update package.
If you are not sure about the device architecture, enter the command below in Powershell to get the type:
systeminfo | find "System Type"When the file is downloaded, double-click on it and finish the installation of the Kernel update package.
Now, open PowerShell and run this command to set WSL 2 as the default version when installing a new Linux distribution:
wsl --set-default-version 2Once WSL2 is set as the default version, you can now install the Linux distribution of your choice.
Go to Windows Store and install Ubuntu, as described in the earlier steps. and the rest of the procedure is already described above.
Enjoy Linux inside Windows.
🔧 Troubleshooting Tip 1
«The WSL optional component is not enabled. Please enable it and try again.»
You may see an error like this when you try to run Linux inside Windows 10:
The WSL optional component is not enabled. Please enable it and try again.
See https://aka.ms/wslinstall for details.
Error: 0x8007007e
Press any key to continue...
And when you press any key, the application closes immediately.
The reason here is that the Windows Subsystem for Linux is not enabled in your case. You should enable it as explained in this guide. You can do that even after you have installed Linux.
🔧 Troubleshooting Tip 2
Installation failed with error 0x80070003
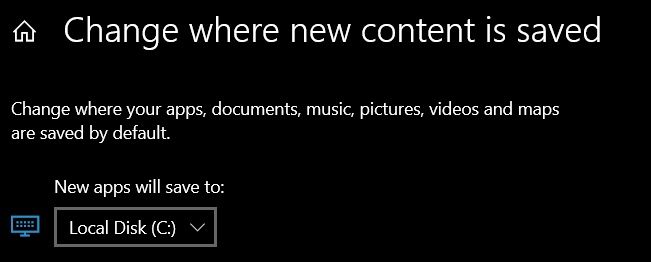
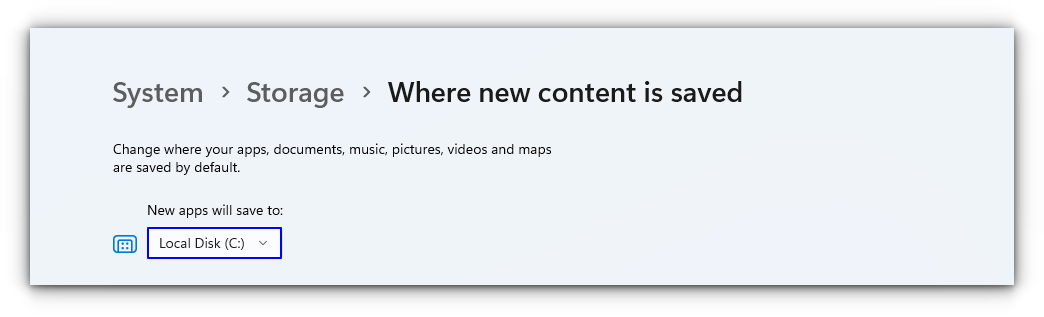
This is because Windows Subsystem for Linux only runs on the system drive i.e. the C drive. You should ensure that when you download Linux from the Windows Store, it is stored and installed in the C Drive.
On Windows 10, go to Settings -> Storage -> More Storage Settings -> Where new content is saved: Change where new content is saved and select C Drive here.
On Windows 11, go to Settings -> System -> Storage -> Advanced storage settings -> Where new content is saved and select C Drive here.
🔧 Troubleshooting Tip 3
«Failed to attach disk Error»
Sometimes, this error will appear when we reinstall the Ubuntu in WSL.
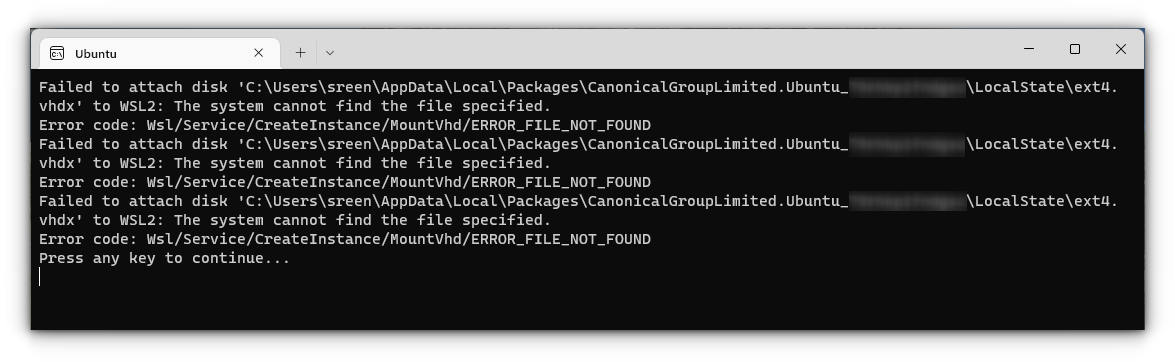
In this case, open Powershell and run the following command:
wsl -l -vThis will list the installed Linux systems. Find the name of the system, that is throwing the error, in my case Ubuntu. Now run the following command:
wsl --unregister UbuntuYou can restart the ubuntu app and it will run without any issues.
You can refer to more common troubleshooting methods from the official website.
Run GUI Apps On Windows Subsystem for Linux
The ability to run GUI apps on Windows Subsystem for Linux was introduced with the WSL 2 release in May 2020.
Windows Subsystem for Linux (WSL) with WSL2 now supports running Linux GUI applications (X11 and Wayland) on Windows in a fully integrated desktop experience. This allows you to install Linux applications and seamlessly integrate them into Windows desktop, including features like “pin to taskbar”.
📋
One crucial point is that you must be on Windows 10 Build 19044+ or Windows 11 to access this feature.
Step 1: Enable/Update WSL 2
This procedure has been explained in the above section and you can refer to it.
Step 2: Download and Install Graphics drivers
To run GUI apps, you need to install appropriate graphics drivers. You can use the following link to download the drivers according to your provider.
- Intel GPU Driver for WSL
- AMD GPU Driver for WSL
- NVIDIA GPU Driver for WSL
Once installed, you are all done.
Step 3: Install some GUI Apps
Now, go to your Ubuntu app and install any GUI app using the APT package manager. You should note that running apps from other sources like flatpak are problematic within WSL.
For this article, I installed the Gedit text editor using the following command:
sudo apt install gedit -yThis will install several MB of packages including required libraries. Once completed, you can run the following command to start the GUI Gedit app in Windows.:
gedit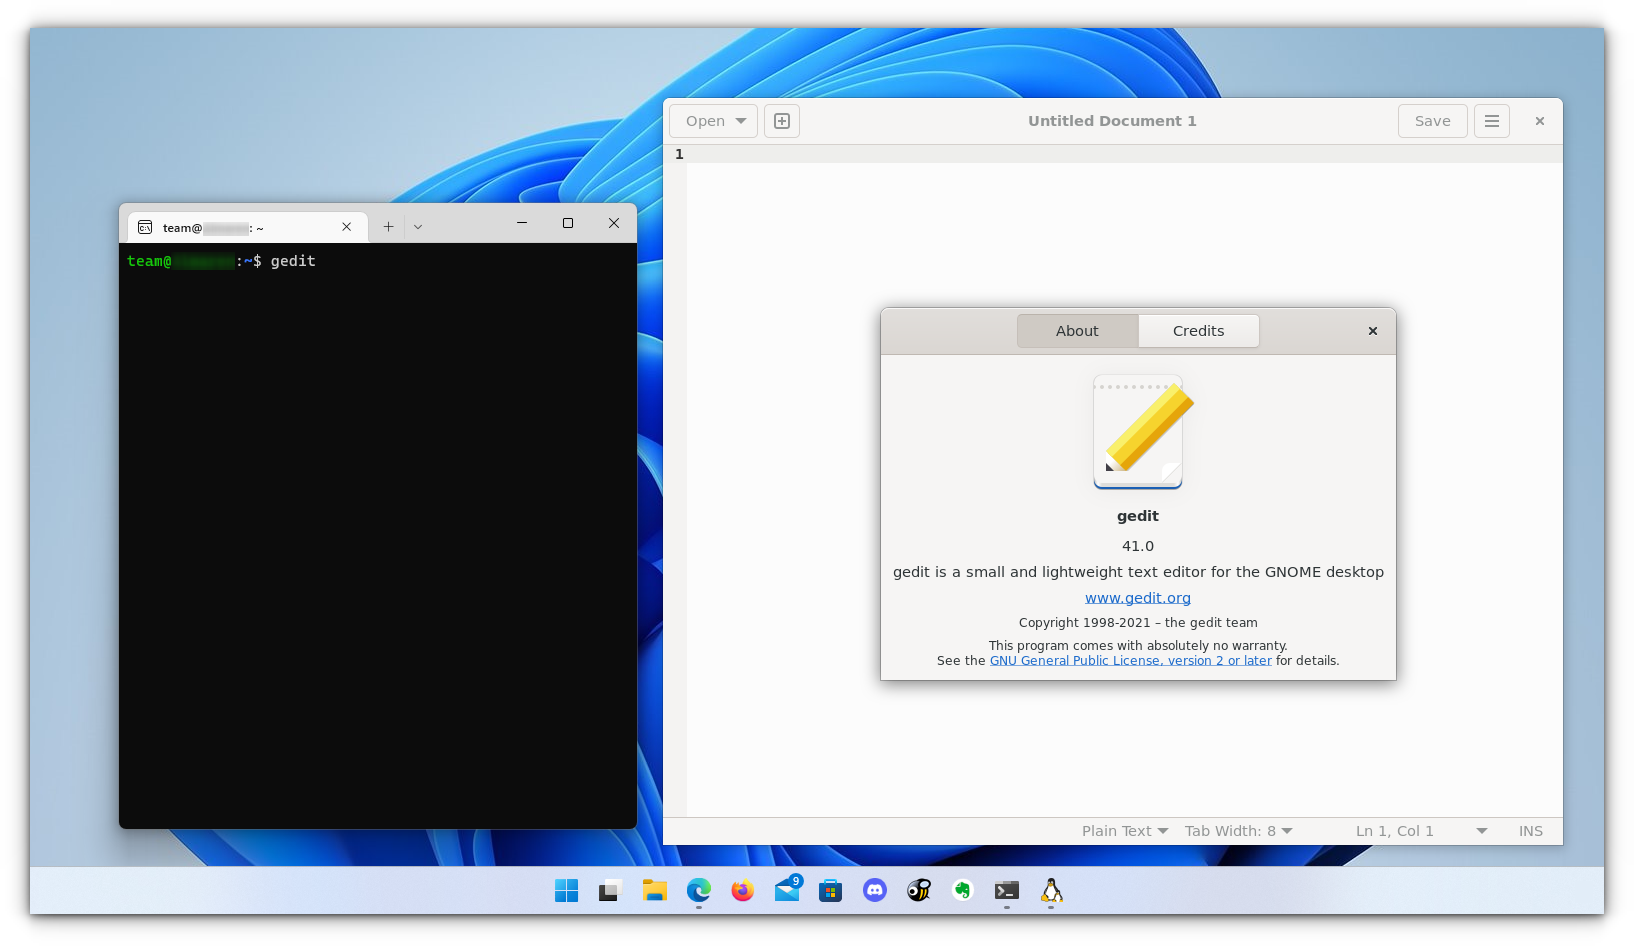
Similarly, you can install all the popular applications available to Linux, including Nautilus file manager, GIMP, etc. For more about running GUI applications in WSL, you can refer to the official documentation.
Install Linux Bash Shell on other older Windows 10
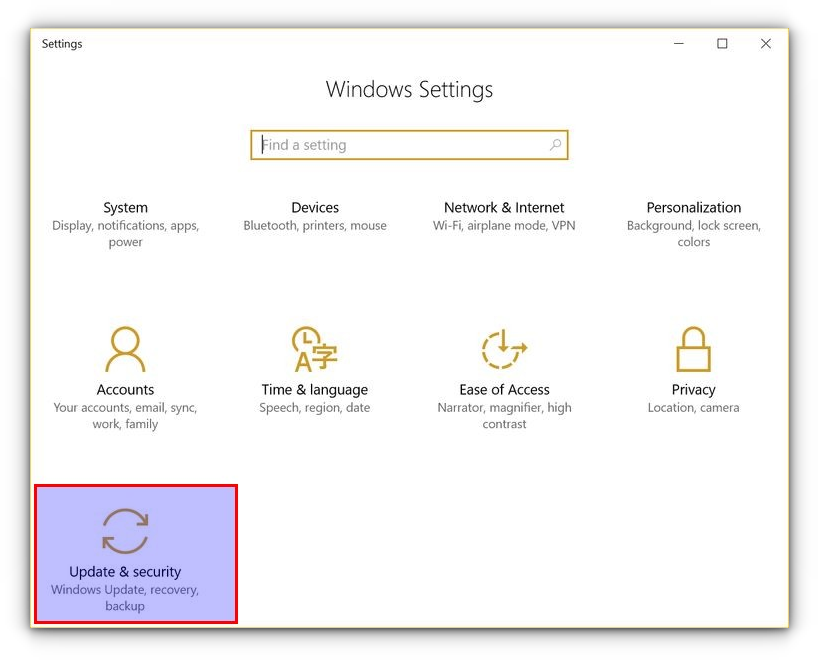
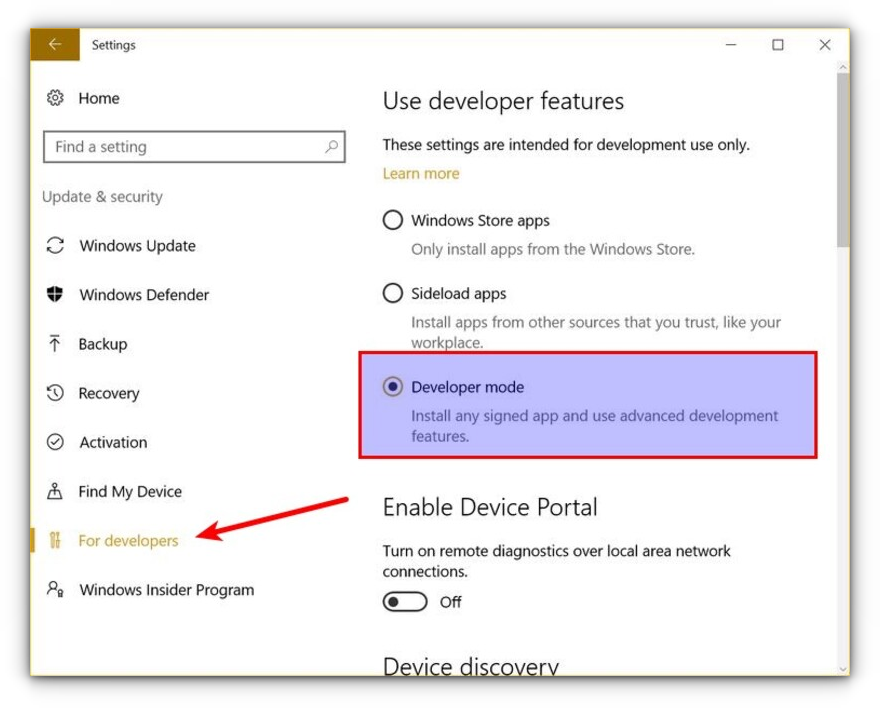
If you cannot get the Fall Creator’s update on Windows 10 for some reason, you can still install it if you have the Anniversary update of Windows 10. But here, you’ll have to enable developer mode. I still recommend upgrading to the Fall Creator’s update or the latest Windows 10 2004 version update though.
Press Windows Key + I to access Windows system settings. Here, go to Update & Security:
From the left side pane, choose “For developers.” You’ll see an option for “Developer mode.” Enable it.
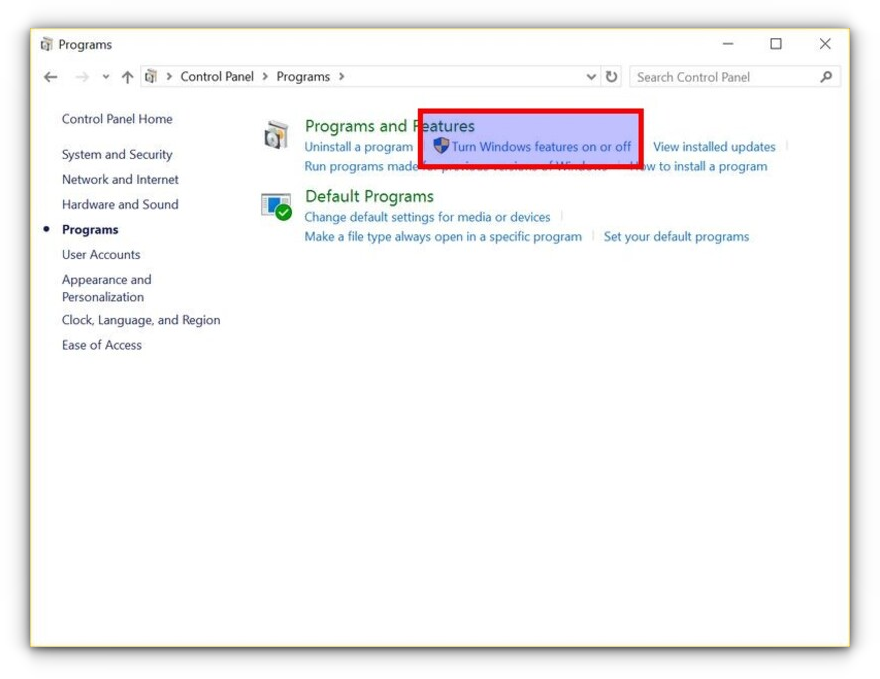
Now search for Control Panel and in Control Panel, click on “Programs”:
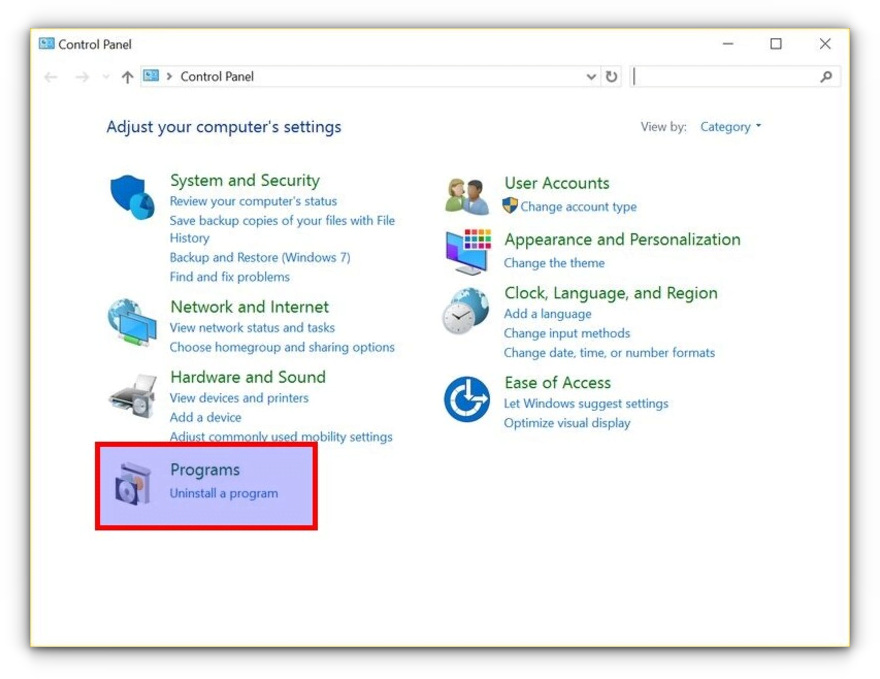
In Programs, click “Turn Windows features on or off”:
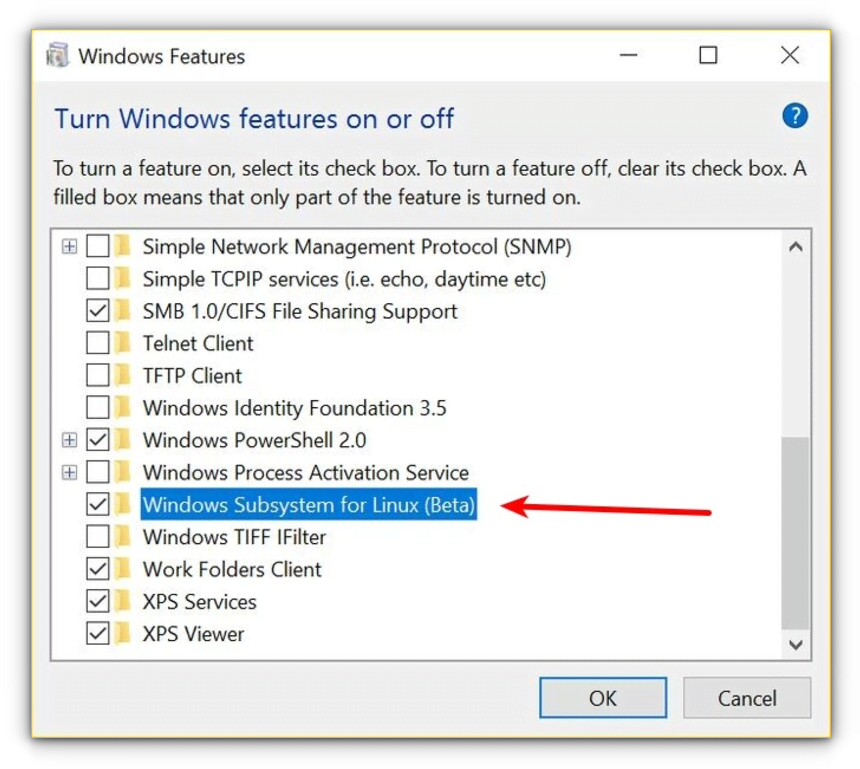
When you do this, you’ll see several Windows features. Look for “Windows Subsystem for Linux” and enable it.
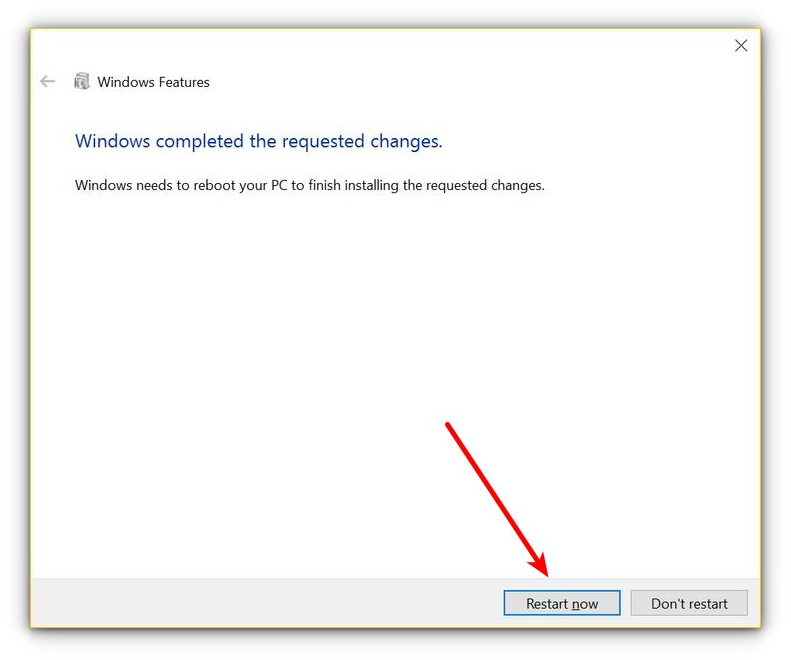
You’ll need to restart the system after doing this.
After restarting the computer, click the start button and search for “bash”.
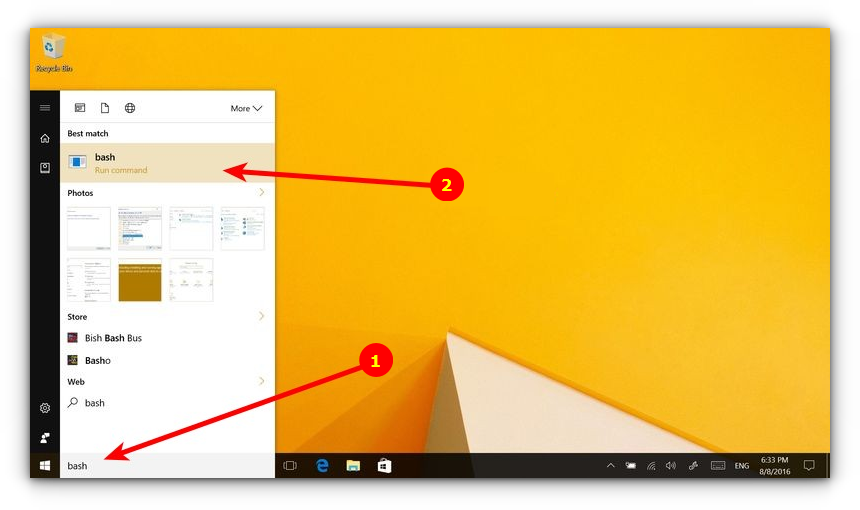
When you run it for the first time, you’ll be given the option to download and install Ubuntu. You’ll be asked to create a username and password during this process. It will install an entire Ubuntu Linux system, so have patience as it will take some time in downloading and installing Linux on Windows.
Once this is done, go back to the Start menu and search for Ubuntu or Bash.
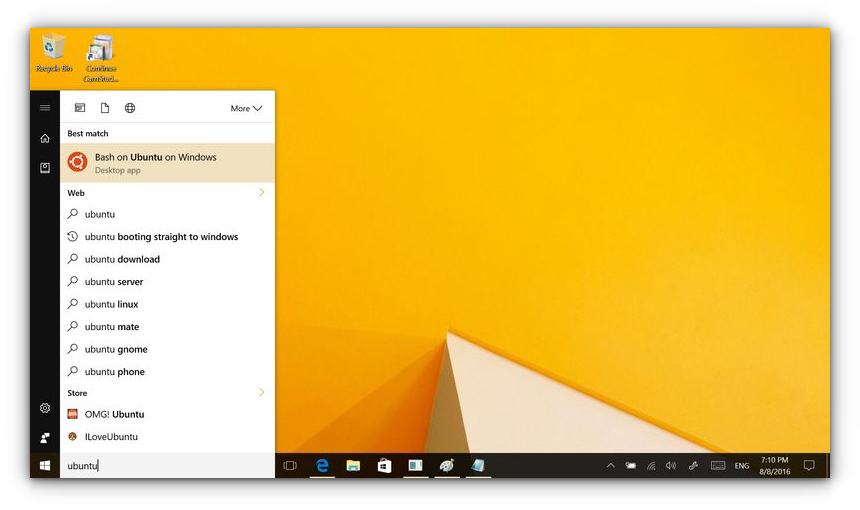
Now you have a command line version of Ubuntu Linux. You can use apt to install various command line tools in it.
💬 I hope you find this tutorial helpful for installing bash on Windows and experimenting with Linux GUI apps on Windows. No wonder WSL lets you play with Linux inside of Windows. If you have questions or suggestions, feel free to ask.
To install Bash on Windows 10, you can enable the Windows Subsystem for Linux (WSL) feature and install a Linux distribution from the Microsoft Store.
wsl --install
What is Bash?
Bash, short for «Bourne Again SHell,» is a popular command-line interface that allows users to interact with the operating system through text commands. It provides powerful scripting capabilities, making it essential for developers, system administrators, and anyone looking to efficiently manage their tasks.
Unlike the traditional Windows Command Prompt, Bash offers a more robust environment with access to numerous Unix/Linux utilities and scripts, thereby enhancing productivity and offering versatile usage in various environments, from servers to local machines.
Install Git Bash on Windows 11: A Quick Guide
Many Windows users seek to use Bash for several compelling reasons. Here are a few key points:
Advantages of Bash Over Windows Command Prompt:
- Scripting Flexibility: Bash supports advanced scripting techniques, which can automate repetitive tasks and improve workflows.
- Unix Utilities: Bash allows access to a wide range of utilities that can enhance your command-line productivity.
- Cross-Platform Compatibility: If you develop software for Linux-based systems, using Bash on Windows makes the transition smoother.
Use Cases:
- Developers can run scripts and develop software in a familiar environment.
- System Administrators can manage servers more effectively with command-line tools.
- Tech Enthusiasts gain access to a plethora of tools and utilities for experimentation and learning.
Mastering Bash on Windows 11: Your Quick Start Guide
How to Get Bash on Windows 10
Enabling Windows Subsystem for Linux (WSL)
What is WSL?
The Windows Subsystem for Linux is a feature in Windows that allows users to run a Linux environment directly on Windows, without the need for a virtual machine or dual-boot setup. This means you can run Linux commands and applications natively on Windows.
Steps to Enable WSL:
- Open PowerShell as Administrator. Right-click the Start button and select «Windows PowerShell (Admin).»
- Run the command:
wsl --install - What happens next?
This command automatically installs the WSL feature and the default Linux distribution, which is usually Ubuntu. You may be prompted to restart your computer to complete the installation.
Choosing a Linux Distribution
Why Choose a Linux Distribution?
WSL supports various Linux distributions. Choosing the right one depends on your specific needs, experience, and the tools you wish to use. Popular options include:
- Ubuntu: Great for beginners and widely supported.
- Debian: Offers stability and a robust environment for development.
- Kali Linux: Preferred for security professionals and ethical hackers.
How to Install a Linux Distribution:
- Access the Microsoft Store from your Windows 10.
- Search for your preferred distribution (e.g., Ubuntu).
- Click «Install» and follow the on-screen instructions.
Once installed, launch the distribution you chose. For example, after installing Ubuntu, you can start it from the Start Menu.
To finalize your installation, run the following commands to ensure everything is up to date:
sudo apt update
sudo apt upgrade
Add Git Bash to Windows Terminal: A Simple Guide
Accessing Bash on Windows 10
Launching Bash
How to Open Bash:
After installing your chosen distribution, you can easily access Bash:
- From the Start Menu, type the name of the distribution (e.g., Ubuntu) and click on it.
- Alternatively, if you installed Windows Terminal, you can open it and select your Linux distribution from the dropdown.
Basic Bash Commands
As a newcomer to Bash, it’s helpful to familiarize yourself with some basic commands. Try the following commands to navigate and manipulate files:
- `ls`: Lists files and directories in your current location. Use `ls -l` for more detailed information.
- `pwd`: Displays your current directory.
- `cd`: Changes directories. For instance, `cd Documents` will take you to the Documents folder.
Start experimenting with these commands in your Bash environment to get comfortable with the interface.
Install Bash Autocomplete: A Quick Guide
Customizing Bash on Windows 10
Enhancing User Experience
Changing the Appearance:
One of the advantages of using Bash is the ability to customize the environment to fit your preferences. You can modify how your prompt looks to add useful information, such as the current directory or time.
Edit the `.bashrc` file with a text editor like nano to make changes:
nano ~/.bashrc
Adding lines to customize your prompt or other configurations can enhance usability.
Installing Essential Tools:
To maximize your efficiency, installing additional tools can be beneficial. Some essential tools include:
- `git`: A version control system.
- `curl`: For transferring data with URLs.
- `wget`: For downloading files from the web.
You can install these tools by running:
sudo apt install git
By incorporating these utilities, your Bash environment can become a fully functional and powerful toolkit.
How to Start Bash Script: A Quick Beginner’s Guide
Troubleshooting Common Issues
Installation Problems:
If you encounter issues during installation, consider checking these common pitfalls:
- Ensure that your Windows version supports WSL (version 10, build 16215 or higher).
- Make sure virtualization is enabled in your BIOS settings.
Performance Issues:
If Bash runs slowly on your system, some optimizations may help:
- Allocate more resources to WSL in your settings.
- Keep your WSL version up to date by checking for Windows updates and ensuring your system is running smoothly.

Get Started with Bash on Ubuntu on Windows: A Quick Guide
Conclusion
In summary, learning how to install Bash on Windows 10 can significantly enhance your productivity and give you the power of a robust command-line interface. By enabling WSL, choosing your preferred Linux distribution, and customizing your Bash environment, you’ll be well-equipped to tackle any task efficiently. Embrace the power of Bash and explore the multitude of possibilities it offers as you continue your journey into the world of command-line computing!
How to Find Bash File in Mac: A Quick Guide
Additional Resources
For further exploration, consider checking the official WSL documentation for the latest updates. Additionally, numerous online courses and books are available to deepen your understanding of Bash and its applications. Engaging in community forums will also provide assistance and insights from other users.
Did you know that Windows 11, Microsoft’s latest operating system, comes with built-in support for running Linux commands? It’s a feature that’s more accessible than ever before.
You might be wondering why you’d want to use Linux commands on your Windows machine. Well, Linux is known for its powerful tools and flexibility. It’s particularly useful for developers, but it can be helpful for anyone who wants to do more with their computer.
In the past, using Linux on a Windows PC was complicated. You had to set up a separate system or use tricky workarounds. But now, Windows 11 has made it much simpler. You can add something called “Bash” to your computer, which lets you use Linux commands right alongside your regular Windows programs.
In this article, you’ll learn how to set up Bash on your Windows 11 PC. Don’t worry if you’re not very tech-savvy – we’ll guide you through each step in simple terms. By the end, you’ll be ready to explore the world of Linux commands right from your familiar Windows environment.
Whether you’re looking to enhance your computing skills or just curious about what Linux can do, this guide has got you covered.
How to set up Bash on Windows 11
Windows 11 makes it easier than ever to use Linux commands on your PC. Here’s how you can set it up:
Check your system requirements
Before you start, make sure your Windows 11 PC is up to date. You don’t need to worry about turning on Developer Mode or enabling Windows Subsystem for Linux manually – Windows 11 takes care of this for you.
Install a Linux distribution
- Open the Microsoft Store on your Windows 11 PC.

- Search for “Linux” in the store.

- Choose a Linux distribution you like, such as Ubuntu, Debian, or Fedora.
- Click “Install” and wait for it to download.

Set up your Linux distribution
- Once installed, click “Open” to launch your chosen Linux distribution.

- The first time you run it, you’ll need to set up a username and password. This doesn’t have to be the same as your Windows login.
- After setup, you’ll see a terminal window where you can start using Linux commands.

Access Bash anytime
To use Bash in the future, you have a few options:
- Click the Start menu and look for your installed Linux distribution.
- Open Windows Terminal and select your Linux distribution from the dropdown menu.
- In the Start menu search bar, type “wsl” and press Enter to open the default Linux distribution.
That’s it! You now have Bash set up on your Windows 11 PC. You can use Linux commands and tools right alongside your regular Windows programs. Whether you’re a developer or just curious about Linux, you’re now ready to explore this powerful tool.
The takeaway
Setting up Bash on Windows 11 is easier than you might think. You don’t need to be a tech expert to bring Linux commands to your PC. With just a few simple steps, you can add a powerful new tool to your computer.
The process is straightforward: update your Windows 11, install a Linux distribution from the Microsoft Store, and set up your new Linux environment. After that, you can access Bash whenever you need it through the Start menu or Windows Terminal. It’s like having two operating systems in one!
Some people think using Linux commands on Windows is only for programmers or advanced users. That’s not true. Anyone can benefit from learning a few Linux commands, whether you’re managing files, automating tasks, or just exploring new ways to use your computer.
The most important thing to remember is that you now have more options at your fingertips. Don’t be afraid to experiment with your new Bash setup. The more you use it, the more comfortable you’ll become. Who knows? You might discover new ways to make your computer work better for you.
We’d love to hear about your experience setting up Bash on Windows 11. Share your thoughts or questions in a comment below!
Frequently Asked Questions
What are the system requirements for installing Bash on Windows 10?
Your PC must be running a 64-bit version of Windows 10 with a version number no lower than 14393. Ensure your system is updated to the latest version to meet these requirements.
How do I enable Windows Developer Mode?
Right-click the Start menu, select Settings, go to Update & Security, click on For developers, and then select Developer mode. Confirm your selection to enable Developer Mode.
What is the Windows Subsystem for Linux and how do I enable it?
The Windows Subsystem for Linux (WSL) allows you to run a Linux environment directly on Windows. To enable it, search for Windows Features in the search bar, select Turn Windows Features On or Off, check the box next to Windows Subsystem for Linux, and click OK.
How do I install a Linux distribution on Windows 10?
Go to the Microsoft Store, choose your preferred Linux distribution (like Ubuntu), click install, and then launch it after the installation completes.
How do I access Bash after installing a Linux distribution?
After installation and setting up your Linux distribution, close the window, right-click the Start menu, choose Windows PowerShell (Admin), enter your administrator password if prompted, type bash in the PowerShell window, and press Enter.
Can I use Linux commands for Windows file management with Bash?
Yes, once you have Bash and your Linux distribution set up, you can use Linux commands to interact with the Windows file system. This allows for seamless operations across both platforms.
When it comes to installing Bash on Windows 10, you might be surprised to learn that it is actually possible to run a Unix-like command-line environment on a Microsoft operating system. This dynamic combination allows users to experience the best of both worlds, harnessing the power of Windows alongside the flexibility and familiarity of Bash. Rather than being limited to one or the other, you can have the convenience of Windows and the command-line capabilities of Bash, all in one environment.
To install Bash on Windows 10, you can take advantage of a feature called Windows Subsystem for Linux (WSL). WSL enables you to run native Linux command-line tools directly on Windows, including the Bash shell. With WSL, you can seamlessly integrate Bash into your Windows workflow without the need for virtual machines or dual-booting. This means you can easily execute Linux commands, run scripts, and access the rich Linux ecosystem, all from within your Windows environment. By unlocking this powerful functionality, you can expand your capabilities and productivity while enjoying the reliability and convenience of Windows.
Follow this step-by-step guide to install Bash on Windows 10. First, open the Microsoft Store app and search for «Bash.» Click on «Ubuntu» and select the version you want to install. Once downloaded, launch the «Ubuntu» app and create a username and password. You can now use Bash on Windows 10! This feature allows you to run Linux commands and scripts seamlessly on your Windows machine, enhancing your productivity and flexibility.

Introduction: What is Bash and Why Install it on Windows 10?
Windows 10 is a popular operating system used by millions of people around the world. While it offers a user-friendly interface and a wide range of software compatibility, some users prefer the versatility and power of the Unix shell, particularly Bash. Bash, short for «Bourne Again SHell,» is a command-line interface that enables users to interact with their computer through text-based commands.
Installing Bash on Windows 10 can greatly enhance the productivity and efficiency of developers, system administrators, and power users. With Bash, users can run scripts, automate tasks, and utilize a vast ecosystem of command-line tools and utilities. In this article, we will explore how to install Bash on Windows 10 and unlock the potential of this powerful tool.
Step 1: Check Windows 10 Version and Enable WSL
The first step to install Bash on Windows 10 is to check if your version of Windows 10 supports the Windows Subsystem for Linux (WSL). WSL is a compatibility layer that allows running Linux binaries on Windows without the need for a virtual machine.
To check if WSL is supported, open the PowerShell command prompt by right-clicking the Start menu, selecting «Windows PowerShell,» or «Windows PowerShell (Admin)» if you have administrative privileges. In the PowerShell window, enter the following command:
wsl --list --online
If you see a list of available WSL distributions, it means your system supports WSL, and you can proceed with the installation. If you don’t see any distributions listed or receive an error message, you may need to enable WSL.
Enabling WSL
To enable WSL, open PowerShell as an administrator and enter the following command:
wsl --install
This command will download and install the necessary components for WSL. The installation may take some time, and your computer may need to restart during the process. Once the installation is complete, you can proceed to the next step.
Step 2: Install a Linux Distribution
After enabling WSL, you can choose a Linux distribution to install from the Microsoft Store. The Microsoft Store offers various Linux distributions that are optimized for WSL, such as Ubuntu, Debian, Fedora, and more.
To install a Linux distribution, open the Microsoft Store by clicking the Start menu and searching for «Microsoft Store.» In the Microsoft Store app, search for your desired Linux distribution, such as «Ubuntu» or «Debian.» Click on the distribution to view more information, and then click the «Install» button.
The installation process may take some time, depending on your internet connection speed and the size of the distribution. Once the installation is complete, you can launch the Linux distribution from the Start menu or by searching for its name.
Step 3: Set Up and Configure the Linux Distribution
After installing the Linux distribution, you need to set up and configure some basic settings. The first time you launch the Linux distribution, it will prompt you to create a username and password. Enter your desired username and password, and remember them as they will be used to authenticate your access to the Linux environment.
Once you have set up your username and password, the Linux distribution will be ready to use. You can access the Linux environment by launching the distribution from the Start menu or by searching for its name.
It’s also recommended to update the Linux distribution’s package repositories and installed packages to ensure you have the latest software versions. To update the packages, open the Linux distribution and enter the following command:
sudo apt update && sudo apt upgrade
This command will update the package repositories and upgrade any installed packages to their latest versions. Depending on the number of packages, the update process may take some time.
Step 4: Customize the Linux Environment (Optional)
The Linux environment installed through WSL is highly customizable. You can install additional software, configure your shell environment, and personalize your setup to suit your needs.
To install additional software, you can use the package manager of your Linux distribution. For example, to install the Git version control system, you can enter the following command:
sudo apt install git
Similarly, you can install other development tools, programming languages, or utilities based on your requirements.
Exploring the Power of Bash on Windows 10
Now that you have successfully installed Bash on Windows 10, you can start harnessing its power and productivity features. With Bash, you can write shell scripts to automate repetitive tasks, utilize powerful command-line tools, and access a vast ecosystem of utilities built specifically for the Unix shell.
- Create and run shell scripts
- Utilize powerful command-line utilities such as grep, sed, and awk
- Access a vast array of development tools and programming languages
- Manage file systems, permissions, and processes
- Collaborate with other developers using version control systems like Git
The possibilities with Bash on Windows 10 are virtually endless, and by mastering the Unix shell, you can enhance your productivity and efficiency in various development and system administration tasks.
Additional Considerations for Bash on Windows 10
While Bash on Windows 10 offers a rich command-line environment, there are a few additional considerations to keep in mind:
File System Compatibility
Windows and Linux have different file systems, and while WSL attempts to bridge the gap between them, there may be some compatibility issues. It’s essential to be aware of these differences when working with files and directories in the Linux environment.
For example, Linux file systems are case-sensitive, while Windows file systems are case-insensitive. This means that «File.txt» and «file.txt» would be considered two different files in Linux, but the same file in Windows.
It’s also worth noting that the Linux file system is accessible through the Windows file system, usually located at:
\\wsl$
This allows you to access and work with Linux files and directories in Windows applications and vice versa.
Performance Considerations
While WSL provides excellent compatibility and functionality, it’s essential to be aware of potential performance differences. Since WSL works as a compatibility layer, there may be a slight overhead when executing certain commands or working with larger files.
In most cases, this overhead is negligible and doesn’t impact everyday usage. However, if you’re running resource-intensive tasks or working with large datasets, you might experience some performance differences compared to native Linux environments.
Understanding these considerations can help you optimize your workflow and make informed decisions when utilizing Bash on Windows 10.
Conclusion
By following the steps outlined in this article, you have learned how to install Bash on Windows 10 and leverage its power to enhance your productivity and efficiency. With Bash, you can automate tasks, work with command-line tools, and access a vast ecosystem of utilities, opening up new possibilities for development, system administration, and more. Whether you’re a developer, system administrator, or power user, Bash on Windows 10 can be a valuable addition to your toolset.

Installing Bash on Windows 10
If you are a professional looking to install Bash on Windows 10, follow these steps:
1. Open the Microsoft Store and search for «Windows Subsystem for Linux.»
2. Select the desired Linux distribution (e.g., Ubuntu, Debian, Fedora) and click «Install.»
3. Wait for the installation to complete, and then launch the Linux distribution from the Start menu.
4. Set up a username and password for the Linux distribution as prompted.
5. Update the Linux distribution’s package list and upgrade existing packages using the command «sudo apt-get update && sudo apt-get upgrade.»
6. You can now use Bash by opening the command prompt or PowerShell and typing «bash.»
By following these steps, you will have Bash installed and ready to use on your Windows 10 system.
Note: Before installation, make sure your Windows 10 version is compatible with Windows Subsystem for Linux. Check the Microsoft documentation for system requirements.
Key Takeaways: How to Install Bash on Windows 10
- You can install Bash on Windows 10 by enabling the Windows Subsystem for Linux (WSL).
- To enable WSL, go to the Windows Features and enable «Windows Subsystem for Linux.»
- After enabling WSL, go to the Microsoft Store and search for «Linux distribution» to choose and install a Linux distribution of your choice.
- Once the Linux distribution is installed, you can launch the Linux terminal by searching for it in the Start menu or using the command «bash» from the Windows command prompt.
- With Bash installed, you can now use Linux command-line tools and run Linux programs directly on your Windows 10 machine.
Frequently Asked Questions
Below are some common questions and answers regarding the installation of Bash on Windows 10.
1. Can I install Bash on Windows 10?
Yes, you can install Bash on Windows 10. Microsoft introduced the Windows Subsystem for Linux (WSL) feature, which allows you to run a full-fledged Linux environment directly on your Windows 10 computer.
First, you need to enable WSL by going to the Windows Features section in the Control Panel. Once enabled, you can download and install a Linux distribution of your choice from the Microsoft Store. This will include the Bash shell, providing you with a powerful command-line interface.
2. How do I enable Windows Subsystem for Linux (WSL)?
To enable WSL on Windows 10, follow these steps:
1. Open the Control Panel by searching for it in the Start menu.
2. Click on «Programs» and then select «Turn Windows features on or off.»
3. In the dialog box that appears, scroll down and find «Windows Subsystem for Linux.» Check the box next to it.
4. Click «OK» and wait for the feature to be installed. You may need to restart your computer.
3. How do I install a Linux distribution on Windows 10?
Once you have enabled WSL, follow these steps to install a Linux distribution:
1. Open the Microsoft Store on your Windows 10 computer.
2. Search for the Linux distribution you want to install, such as Ubuntu, Debian, or Fedora.
3. Select the desired distribution and click «Install.» The download and installation process will begin.
4. After the installation is complete, you can launch the Linux distribution from the Start menu or by typing its name in the search bar.
4. Can I use Bash commands after installing a Linux distribution?
Yes, once you have installed a Linux distribution, you can use Bash commands within that distribution. The Linux environment provided by WSL includes the Bash shell, which allows you to execute various commands and run scripts.
To access the Bash shell, simply launch the installed Linux distribution from the Start menu or by typing its name in the search bar. You can then use the terminal to interact with the Linux environment and run Bash commands.
5. Can I uninstall a Linux distribution from Windows 10?
Yes, you can uninstall a Linux distribution from Windows 10 if you no longer need it. Follow these steps to uninstall:
1. Open the Control Panel by searching for it in the Start menu.
2. Click on «Programs» and then select «Turn Windows features on or off.»
3. In the dialog box that appears, scroll down and find the Linux distribution you want to uninstall.
4. Uncheck the box next to the distribution and click «OK.» The distribution will be uninstalled, and its files will be removed from your system.
Now that you know how to install Bash on Windows 10, you can enjoy the benefits of using Linux commands and tools directly on your Windows system. By following the steps outlined in this article, you have learned how easy it is to enable the Windows Subsystem for Linux and install Bash on your computer.
With Bash installed, you now have access to a powerful command-line interface that allows you to navigate your system, automate tasks, and run Linux programs seamlessly. Whether you are a developer, a system administrator, or someone who wants to explore the world of Linux, having Bash on Windows 10 opens up a whole new realm of possibilities.
In an era where cross-platform compatibility and versatility are key to successful software development and system administration, the ability to run Bash on Windows 10 has become increasingly important. Bash (the Bourne Again SHell) is a command-line shell that is commonly used on Linux and macOS environments. It provides powerful command-line utilities, scripting capabilities, and a rich ecosystem of tools. This guide will take you through the detailed steps of installing Bash on Windows 10, enabling you to leverage its functionality within the familiar Windows environment.
Understanding Windows Subsystem for Linux (WSL)
Before we delve into the installation process, it’s essential to understand what the Windows Subsystem for Linux (WSL) is. WSL is a compatibility layer that allows you to run Linux binaries natively on Windows 10. This means that you can run a variety of Linux distributions and use Bash without the need for a virtual machine or dual-boot setup.
WSL has evolved significantly since its initial introduction, particularly with the release of WSL 2. The newer version provides a complete Linux kernel and offers improved performance, compatibility, and system calls, allowing for a more authentic Linux experience on Windows.
Prerequisites
Before proceeding with the installation, ensure that your system meets the following prerequisites:
-
Windows 10 Version: You need to be running Windows 10 version 1903 or higher. To check your Windows version, go to Settings > System > About. Look for the “Version” number.
-
Administrator Access: You will require administrative privileges to enable WSL and install a Linux distribution.
Step 1: Enabling Windows Subsystem for Linux
The first step in installing Bash on Windows 10 is to enable the Windows Subsystem for Linux feature. You can do this in two ways: through the GUI (Settings) or using PowerShell.
Method 1: Using Windows Settings
- Press
Windows + Ito open the Settings application. - Click on “Apps”.
- On the left sidebar, click on “Optional features”.
- Scroll down and click on “More Windows features” at the bottom.
- In the Windows Features dialog, scroll down to find “Windows Subsystem for Linux”. Check the box next to it.
- Click “OK” and wait for the feature to be enabled. You may be prompted to restart your computer.
Method 2: Using PowerShell
-
Right-click on the Start button and select “Windows PowerShell (Admin)” or “Windows Terminal (Admin)”.
-
Type the following command and press Enter:
wsl --installIf you’re not on a version that supports the
--installoption, use:dism.exe /Online /Enable-Feature /FeatureName:Microsoft-Windows-Subsystem-Linux /All /LimitAccess /All -
Restart your computer when prompted.
Step 2: Installing a Linux Distribution
Once you have WSL enabled, the next step is to install a Linux distribution. As of now, several Linux distributions are available for installation through the Microsoft Store, including Ubuntu, Debian, SUSE, and more.
Method 1: Installing via Microsoft Store
- Open the Microsoft Store from the Start menu.
- In the search bar, type the name of your preferred distribution (e.g., «Ubuntu»).
- Select the distribution from the search results and click on “Get” or “Install”.
- Wait for the installation to complete.
Method 2: Installing via Command Line
Alternatively, you can install a distribution directly from the command line:
-
Open Windows PowerShell or Windows Terminal.
-
To see available distributions, type:
wsl --list --online -
Choose your preferred distribution (e.g., Ubuntu) and install it by running:
wsl --install -d Ubuntu -
After the installation, you may have to restart the terminal or your computer.
Step 3: Initializing the Linux Distribution
After installing your chosen distribution, you need to complete the initial setup.
- Open the installed distribution from the Start menu (e.g., search for «Ubuntu»).
- The first run will prompt you to create a new user account. Enter a username and password.
- After completing the setup, you will be presented with a Bash shell prompt.
Step 4: Updating the Package List
Once you have Bash running, it’s a good practice to update the package list to ensure you have access to the latest tools and libraries.
-
In the Bash shell, type the following command:
sudo apt update -
If asked for your password, enter the password you set during the initialization.
Step 5: Installing Common Packages
Now that your Bash environment is set up, you can start installing common utilities and packages that you might need. Some commonly used packages are:
git– for version controlcurl– for transferring data with URLsbuild-essential– includes a list of packages required to compile software
To install these, run the following command in the Bash shell:
sudo apt install git curl build-essentialStep 6: Customizing Your Bash Environment
The default Bash environment on your Linux distribution can be customized to suit your preferences. Some common customizations include:
-
Changing the Shell Prompt: You can modify the
PS1environment variable in the.bashrcfile to change the appearance of your command prompt.Open the
.bashrcfile using a text editor:nano ~/.bashrcThen find and edit the
PS1variable to represent your desired prompt. -
Installing Additional Tools: You can install tools such as
vimorhtopusing the package manager:sudo apt install vim htop -
Aliases: You can define shortcuts for common commands by adding aliases in the
.bashrcfile. For instance:alias ll='ls -la'After editing
.bashrc, make sure to run:source ~/.bashrc
Step 7: Accessing Windows Files from Bash
One of the advantages of WSL is the ability to easily access your Windows files from Bash. You can find your Windows filesystem under the /mnt directory.
For example:
- Your C: drive is located at
/mnt/c - Your D: drive is located at
/mnt/d
You can navigate to your Windows files seamlessly using standard Linux commands.
cd /mnt/c/Users/YourUsername/DocumentsStep 8: Running Linux GUI Applications (Optional)
With the introduction of WSL 2, you can now run Linux GUI applications alongside your Bash shell. Ensure that you have the latest version installed, and then follow these steps:
- Open PowerShell and install an X server, such as Xming or VcXsrv.
- Start your X server.
- Launch your Linux application from the Bash shell.
For example, to install and run gedit:
sudo apt install gedit
gedit
Troubleshooting
While installing Bash on Windows 10 through WSL, you might encounter some common issues. Here are a few potential problems and their solutions:
-
WSL Not Working: If WSL does not start, ensure that the feature is enabled and try restarting your computer.
-
PowerShell Commands Not Recognized: Ensure that you are using an elevated PowerShell prompt (Run as Administrator).
-
Linux Distro Not Installing: Make sure that your Windows version is compatible with WSL. If there are update requirements, install them before proceeding with WSL installation.
-
File Access Issues: If you encounter permission denied errors when accessing files, check the file’s properties in Windows and ensure that you have the necessary permissions.
Conclusion
Installing and using Bash on Windows 10 is a simple yet powerful way to enhance your development and system administration capabilities. By leveraging the Windows Subsystem for Linux, you can run a full-fledged Linux environment within your Windows operating system, offering the best of both worlds. Whether you are a developer, system administrator, or an enthusiastic hobbyist, Bash can provide you with essential tools and scripts that can streamline your workflow.
With the steps outlined in this guide, you should be well-equipped to install Bash and begin your journey into the world of Linux-based command line utilities on Windows 10. Enjoy exploring, and happy scripting!