
This page provides instructions for installing Anaconda Distribution on Windows, macOS, and Linux.
Basic install instructions
Advanced install options
For more advanced installation instructions, such as installing with silent mode, installing on older operating systems, or multi-user installs, see Advanced installation.
Other ways to get Anaconda or Miniconda
For instructions on using Anaconda Docker images or the Anaconda Cloudera Distributed Hadoop cluster, see Applications/Integrations.
Problems?
- Troubleshooting guide for general troubleshooting
- Help and support for resources such as community support and bug reports
What’s next?
Get started programming with Anaconda in the Getting started with Anaconda guide.
Visit Anaconda.com to start programming for FREE in a notebook. Learn how from Anaconda Learning, too!
-
Download the installer:
-
Miniconda installer for
Windows -
Anaconda Distribution installer for
Windows -
Miniforge installer for Windows
-
-
Verify your installer hashes.
-
Double-click the
.exefile. -
Follow the instructions on the screen.
If you are unsure about any setting, accept the defaults. You
can change them later.When installation is finished, from the Start menu, open either the Anaconda Command Prompt (cmd.exe)
if using Miniconda or Anaconda Distribution, and the Miniforge Command Prompt if using Miniforge. Powershell
prompts are also available. -
Test your installation. In your terminal window, run the command
conda list. A list of
installed packages appears if it has been installed correctly.
Installing in silent mode#
Note
The following instructions are for Miniconda but should also work
for the Anaconda Distribution or Miniforge installers.
Note
As of Anaconda Distribution 2022.05 and Miniconda 4.12.0, the option to add Anaconda
to the PATH environment variable during an All Users installation has been disabled. This
was done to address a security exploit.
You can still add Anaconda to the PATH environment variable during a Just Me installation.
To run the the Windows installer for Miniconda in
silent mode, use the /S
argument. The following optional arguments are supported:
-
/InstallationType=[JustMe|AllUsers]—Default isJustMe. -
/AddToPath=[0|1]—Default is0 -
/RegisterPython=[0|1]—Make this the system’s default
Python.
0indicates Python won’t be registered as the system’s default.1
indicates Python will be registered as the system’s default. -
/S—Install in silent mode. -
/D=<installation path>—Destination installation path.
Must be the last argument. Do not wrap in quotation marks.
Required if you use/S.
All arguments are case-sensitive.
Example: The following command installs Miniconda for the
current user without registering Python as the system’s default:
start /wait "" Miniconda3-latest-Windows-x86_64.exe /InstallationType=JustMe /RegisterPython=0 /S /D=%UserProfile%\Miniconda3
Updating conda#
-
Open Command Prompt or PowerShell from the start menu.
-
Run
conda update conda.
Uninstalling conda#
-
In the Windows Control Panel, click Add or Remove Program.
-
Select Python X.X (Miniconda), where X.X is your version of Python.
-
Click Remove Program.
Note
Removing a program is different in Windows 10.
Last Updated :
04 Feb, 2025
Anaconda is a popular open-source distribution of Python and R and is widely used in the field of data science, machine learning and scientific computing. It contains Jupyter, Sypder, etc. that are well capable of handling a large number of data sets and processes as per user’s need. It helps in simplifying package management and deployment, which promotes a robust environment for various data-related tasks. In this guide, we’re going to walk you through the steps to install Anaconda on Windows OS.
Table of Content
- Download the Anaconda Installer – 3 Steps
- Run the Anaconda Installer – 8 Steps
- Verify the Installation
- Working with Anaconda
Download the Anaconda Installer – 3 Steps
We will start the process by downloading the Anaconda Installer by following these three simple steps as mentioned below:
Step 1: Visit the Official Website
Head over to anaconda.com and install the latest version of Anaconda. Make sure to download the “Python 3.13.1 Version” for the appropriate architecture.
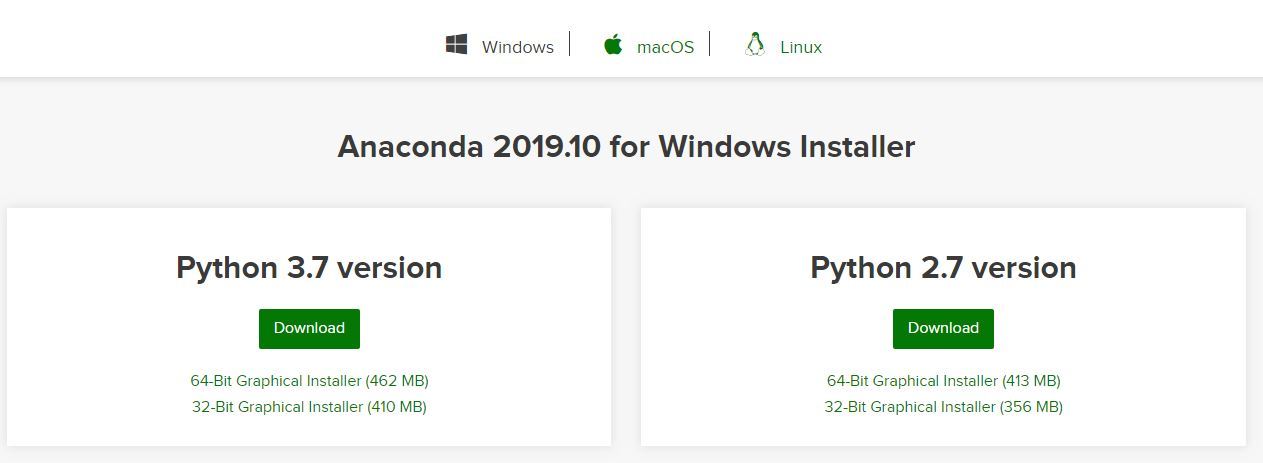
Step 2: Select the Windows Installer
Choose the appropriate installer (based on your system’s architecture) i.e. 64-bit (for modern systems) or 32-bit (for older systems).
Anaconda Installer
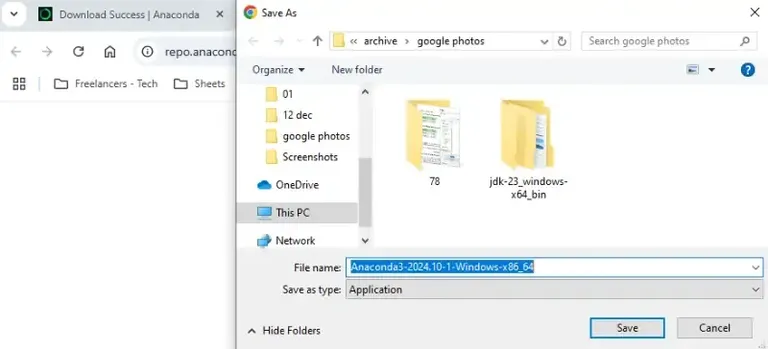
Step 3: Start the Downloading Process
Select the location where you want to save the file and click “Save” to start the downloading process.
Run the Anaconda Installer – 8 Steps
Once the installation is completed, now we will see how to setup Ananconda Installer in your Windows PC. Let’s check it out:
Step 1: Begin with the installation process
Navigate to the downloaded file, make a double-click on the .exe file and start the installation process.

Step 2: Getting through the License Agreement
Follow the on-screen instructions, read the license terms & agreement and proceed ahead.

Terms & License
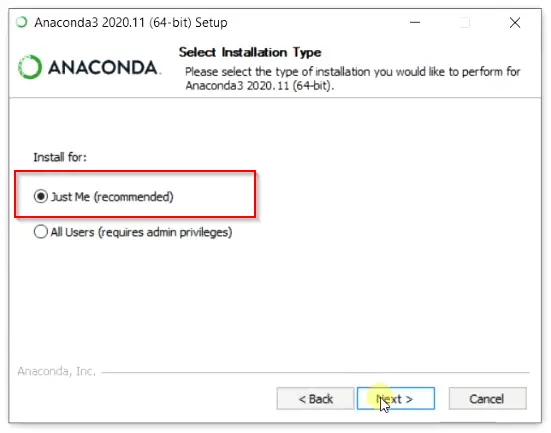
Step 3: Select Installation Type
Select Just Me if you want the software to be used by a single User else you can select All Users (for all users on the system)

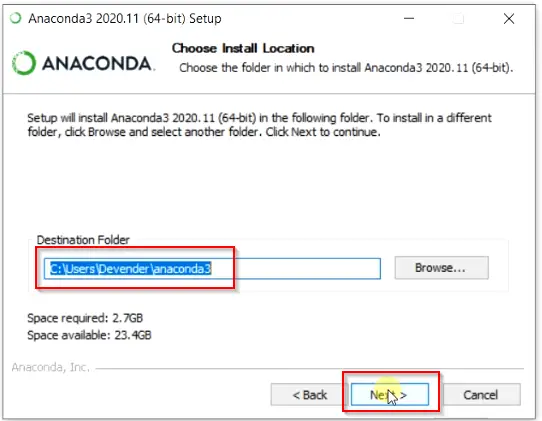
Step 4: Choose Installation Location
Select the path where you wish to install the file extractor and click “Next” to proceed ahead.

Anaconda Setup .exe
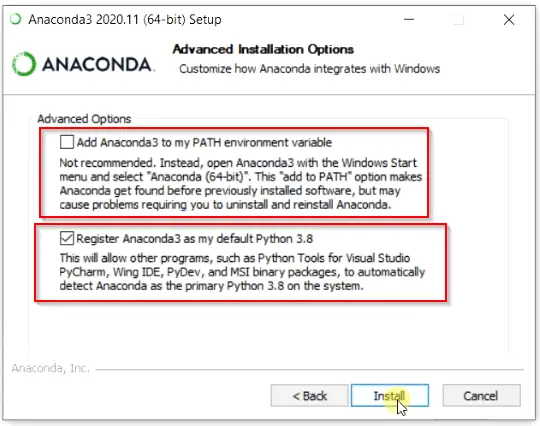
Step 5: Advanced Installation Option
Choose whether to add Anaconda to your system PATH environment variable. Also note that adding Anaconda to the PATH can interfere with other software and decide whether to register Anaconda as the default Python.

Advanced Installation Options – Anaconda
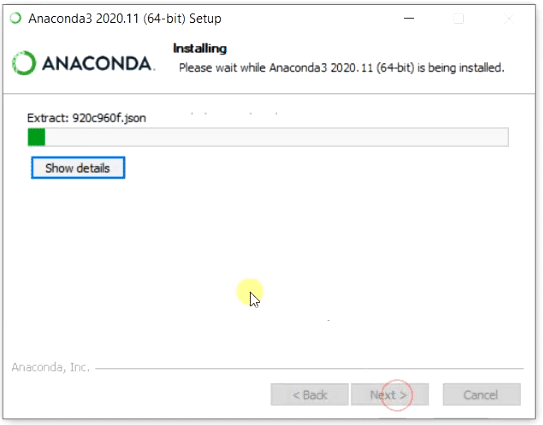
Step 6: Getting through the Installation Process
Click Install to start the Anaconda Installation process.

Step 7: Recommendation to Install Pycharm
During the installation, it will ask you to visit the official site to get PyCharm in your Windows PC. You can choose to visit or may skip as well.

PyCharm recommended
Step 8: Finishing up the Installation
Once the installation gets complete, click Finish to complete the process.

Verify the Installation
Once the installation gets completed, you may verify the installation by following these steps.
Step 1: Access to Anaconda Prompt
Click on the Start Menu and search for “Anaconda Prompt” and click to open it.
Anaconda Prompt
Step 2: Run the Program to check for the Anaconda Version
Type the following command to check for the installed version of conda:
conda --version
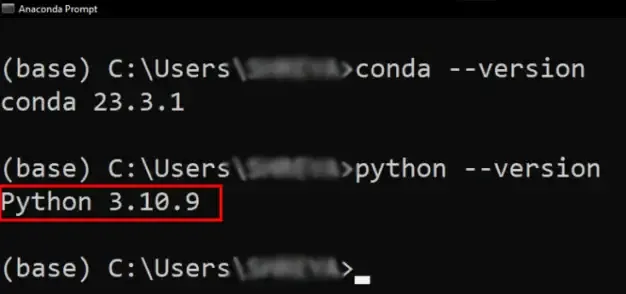
Verify the Installer
Working with Anaconda
Once the downloading, installing and verification of the Anaconda for Windows PC is competed, you can start exploring and get familiar with its features.
Step 1: Access Anaconda Navigator
Once the installation process is done, Anaconda can be used to perform multiple operations. To begin using Anaconda, search for Anaconda Navigator from the Start Menu in Windows PC.
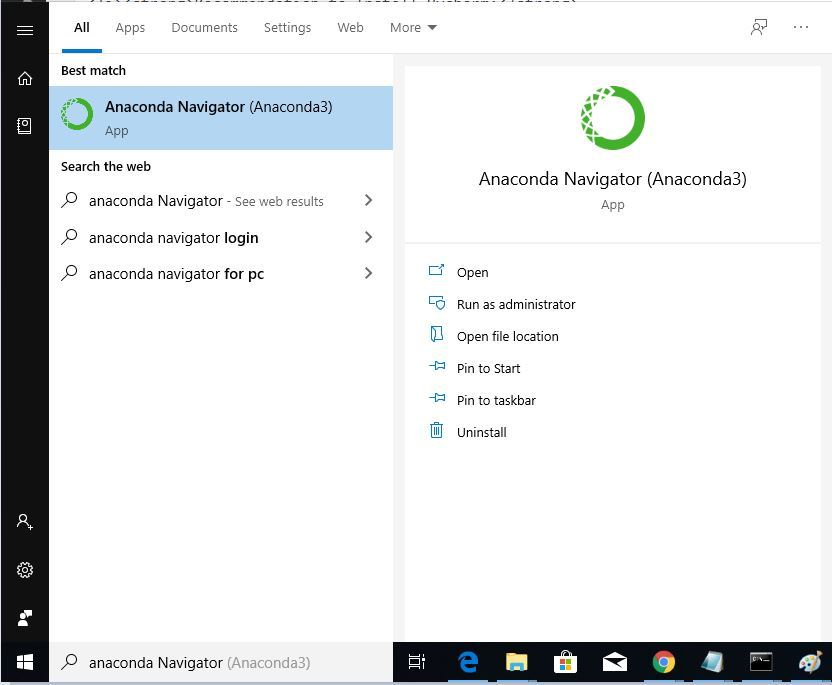
Step 2: Explore Navigator & Features
You can use navigator to create new environments, install packages, and launch applications without using the command line.

Conclusion
By following the above mentioned steps in this guide, you can now easily Download, Install, Verify and Start working on Anaconda on your Windows system. It is one of the most powerful tool for data scientists, analysts, and is also very helpful in machine learning projects with its wide range of tools and libraries. You can start working on this and create different projects seamlessly.
Пройдите тест, узнайте какой профессии подходите
Работать самостоятельно и не зависеть от других
Работать в команде и рассчитывать на помощь коллег
Организовывать и контролировать процесс работы
Введение в Anaconda
Anaconda — это популярная платформа для научных вычислений и анализа данных на языке Python. Она включает в себя множество полезных инструментов, таких как Jupyter Notebook, Spyder, и более 1500 пакетов для науки о данных и машинного обучения. Anaconda упрощает управление пакетами и окружениями, что делает её идеальным выбором для новичков и опытных пользователей. Платформа предоставляет удобные средства для работы с большими данными, машинным обучением и искусственным интеллектом, что делает её особенно полезной для исследователей и разработчиков.
Anaconda включает в себя пакетный менеджер Conda, который позволяет легко устанавливать, обновлять и удалять пакеты, а также управлять окружениями. Это особенно важно для проектов, которые требуют различных версий библиотек и инструментов. Например, один проект может использовать Python 3.8 и определённые версии библиотек, в то время как другой проект может требовать Python 3.9 и другие версии тех же библиотек. Conda позволяет изолировать эти проекты друг от друга, что предотвращает конфликты и облегчает управление зависимостями.

Установка Anaconda
Шаг 1: Скачивание установочного файла
Перейдите на официальный сайт Anaconda и скачайте установочный файл для вашей операционной системы (Windows, macOS, или Linux). Выберите версию Python, которую вы хотите использовать (рекомендуется последняя стабильная версия). На сайте вы найдете подробные инструкции и рекомендации по выбору версии, а также ссылки на документацию и поддерживаемые платформы.
Шаг 2: Запуск установщика
Запустите скачанный установочный файл и следуйте инструкциям на экране. На Windows и macOS установщик предложит вам несколько опций, таких как установка для всех пользователей или только для текущего, а также добавление Anaconda в PATH (рекомендуется оставить эту опцию включенной). Убедитесь, что вы внимательно прочитали все шаги установки и выбрали нужные опции. Например, добавление Anaconda в PATH позволяет вам использовать команды Conda из любой командной строки, что упрощает работу с инструментами Anaconda.
Шаг 3: Проверка установки
После завершения установки откройте командную строку (Terminal на macOS и Linux, Command Prompt или Anaconda Prompt на Windows) и введите команду:
Если установка прошла успешно, вы увидите версию Conda, установленную на вашем компьютере. Это подтверждает, что Anaconda была установлена корректно и готова к использованию. Если вы столкнулись с ошибками, обратитесь к документации на сайте Anaconda или воспользуйтесь форумами и сообществами для получения помощи.
Создание и управление окружениями
Создание нового окружения
Окружения позволяют изолировать проекты и их зависимости друг от друга. Это особенно полезно, когда вы работаете над несколькими проектами, которые требуют разных версий библиотек или интерпретаторов Python. Чтобы создать новое окружение, используйте команду:
Здесь myenv — это имя вашего окружения, а python=3.8 указывает версию Python, которую вы хотите использовать. Вы можете выбрать любую версию Python, которая поддерживается Conda. Например, если вам нужно создать окружение с Python 3.9, просто замените python=3.8 на python=3.9.
Активация окружения
Чтобы активировать созданное окружение, используйте команду:
После активации вы увидите имя окружения в начале строки командной строки. Это означает, что все последующие команды будут выполняться в контексте этого окружения. Активация окружения позволяет вам использовать установленные в нём пакеты и библиотеки, не влияя на другие окружения или системные установки.
Деактивация окружения
Чтобы деактивировать текущее окружение и вернуться к базовому, используйте команду:
Эта команда отключает активное окружение и возвращает вас к базовому окружению или системному интерпретатору Python. Деактивация окружения полезна, когда вы завершили работу над проектом и хотите переключиться на другой проект или окружение.
Удаление окружения
Если вам больше не нужно окружение, вы можете удалить его командой:
Эта команда удаляет окружение myenv и все установленные в нём пакеты. Удаление окружений помогает освободить место на диске и упрощает управление проектами. Перед удалением убедитесь, что у вас нет необходимости в этом окружении, так как восстановить его будет невозможно без повторной установки всех пакетов.
Установка и обновление пакетов
Установка пакетов
Для установки пакетов в активированное окружение используйте команду:
Здесь numpy — это имя пакета, который вы хотите установить. Conda автоматически установит все зависимости. Вы можете установить несколько пакетов одновременно, указав их через пробел, например:
Обновление пакетов
Чтобы обновить пакет до последней версии, используйте команду:
Эта команда обновит пакет numpy до последней доступной версии. Вы также можете обновить все установленные пакеты в окружении командой:
Удаление пакетов
Если вам нужно удалить пакет, используйте команду:
Эта команда удаляет пакет numpy из активированного окружения. Удаление пакетов помогает поддерживать окружение в чистоте и уменьшает размер проекта. Вы также можете удалить несколько пакетов одновременно, указав их через пробел, например:
Использование Jupyter Notebook с Anaconda
Установка Jupyter Notebook
Jupyter Notebook — это мощный инструмент для интерактивного программирования и анализа данных. Он позволяет вам создавать и редактировать блокноты, которые состоят из ячеек с кодом, текстом, изображениями и другими элементами. Чтобы установить его, используйте команду:
Запуск Jupyter Notebook
После установки запустите Jupyter Notebook командой:
Эта команда откроет веб-интерфейс Jupyter в вашем браузере. Вы можете создавать новые блокноты, писать и выполнять код, а также визуализировать данные. Jupyter Notebook поддерживает множество языков программирования, включая Python, R и Julia, что делает его универсальным инструментом для различных задач.
Работа с блокнотами
Jupyter Notebook позволяет вам создавать и редактировать блокноты, которые состоят из ячеек. Ячейки могут содержать код, текст, изображения и другие элементы. Вы можете выполнять ячейки по отдельности, что делает Jupyter отличным инструментом для экспериментов и анализа данных. Например, вы можете написать код для загрузки данных в одной ячейке, а затем выполнить анализ данных в другой ячейке, не перезапуская весь блокнот.
Сохранение и экспорт блокнотов
Вы можете сохранять свои блокноты в формате .ipynb, а также экспортировать их в различные форматы, такие как HTML, PDF и Markdown. Это позволяет легко делиться результатами своей работы с коллегами или публиковать их в интернете. Экспорт блокнотов в различные форматы полезен для создания отчетов, презентаций и документации.
Заключение
Anaconda — это мощный инструмент для управления Python-окружениями и пакетами, который упрощает работу с научными вычислениями и анализом данных. Следуя этой статье, вы сможете установить Anaconda, создать и управлять окружениями, устанавливать и обновлять пакеты, а также использовать Jupyter Notebook для интерактивного программирования. Anaconda предоставляет удобные средства для работы с большими данными, машинным обучением и искусственным интеллектом, что делает её особенно полезной для исследователей и разработчиков. Благодаря Anaconda вы сможете сосредоточиться на решении задач и разработке проектов, не беспокоясь о сложностях управления зависимостями и окружениями.
Читайте также
This tutorial will cover step by step instructions to install Anaconda on Windows. You will also learn how to update, write your first program and uninstall Anaconda. This is going to be awesome learning, in case you are a developer or exploring Anaconda and Python.
Let’s deep dive in with these topics –
What is Anaconda
Anaconda {a.ka. Anaconda Python} is a Python and R programming language distribution for scientific computing. All predictive analytics, data science, machine learning and big data falls under scientific computing.
It’s helps to simplify package management and deployment. Anaconda is available for all platforms like Windows, macOS and Linux.
There are two version available to install Anaconda in Windows –
- Anaconda distribution or Individual edition, which are open source and free
- Anaconda Team Edition and Anaconda Enterprise Edition are paid
In this tutorial, I will cover the Anaconda individual edition. It comes with more than 250 packages automatically installed and over 7500 packages available in the PyPI repository.
Conda is an open-source, language-agnostic and cross-platform package manager. It helps to manage and deploy packages using the command line while Anaconda navigator is a GUI alternative to Conda.
System requirement to Install Anaconda on Windows
- Internet connection
- Windows 10 machine
- Approx. 2.7GB free disks pace.
** You don’t need python to be pre-installed because Python 3.8 automatically get install with Anaconda3.
Download Anaconda Python 3
Follow these steps to download Anaconda3 for Windows 10.
Step1.1- Visit Anaconda installers section on Anaconda.com
- Visit https://www.anaconda.com/products/individual > Scroll down on the page to the Anaconda installers section
- Select your Operating system
Step1.2- Download Installer “Anaconda” for Windows 10 ( 64-bit)
- Click on 64-bit Graphical installer (457 MB) to download Anaconda. If your system supports 32 bit only, then go for a 32-bit Graphical installer (403 MB) Anaconda download.
- Default Python 3.8 comes with it as a bundle. Later in this post, I will let you know, how to get the latest Python version 3.9 using Anaconda.

Alternatively, Just Click on below mentioned “Download buttons” to avoid all hassles.
Depending upon your internet speed, within couple of minutes, you will get “Anaconda3-2020.11-Windows-x86_64.exe” in your Download folder.

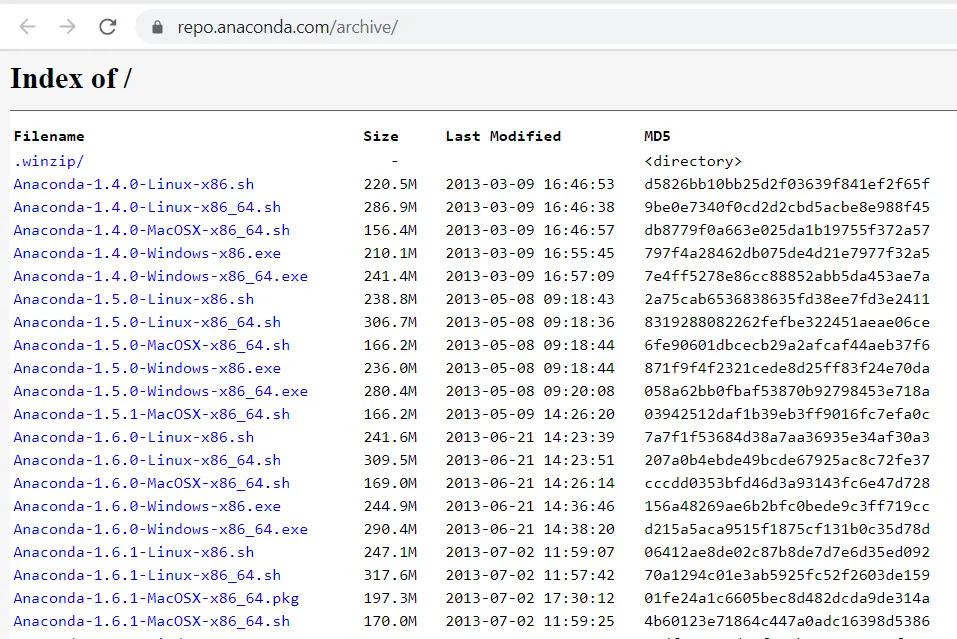
If you are in search of Old or Archive version of Anaconda installer for Windows 10, Then visit “https://repo.anaconda.com/archive/“.
Step1.3- Verify MD5 Checksum Keys for Anaconda installer
You need to perform this step to make sure you have a legitimate copy of Anaconda.
- Visit “https://repo.anaconda.com/archive/” and search for your Anaconda installer.exe, which you just downloaded.
- Look for the MD5 checksum Key written in the 4th column against your exe file.
For example, I will show MD5 Key for “Anaconda3-2020.11-Windows-x86_64.exe” in the image for reference.

- Now Type “Command prompt” in Windows search bar and open it as administrator.
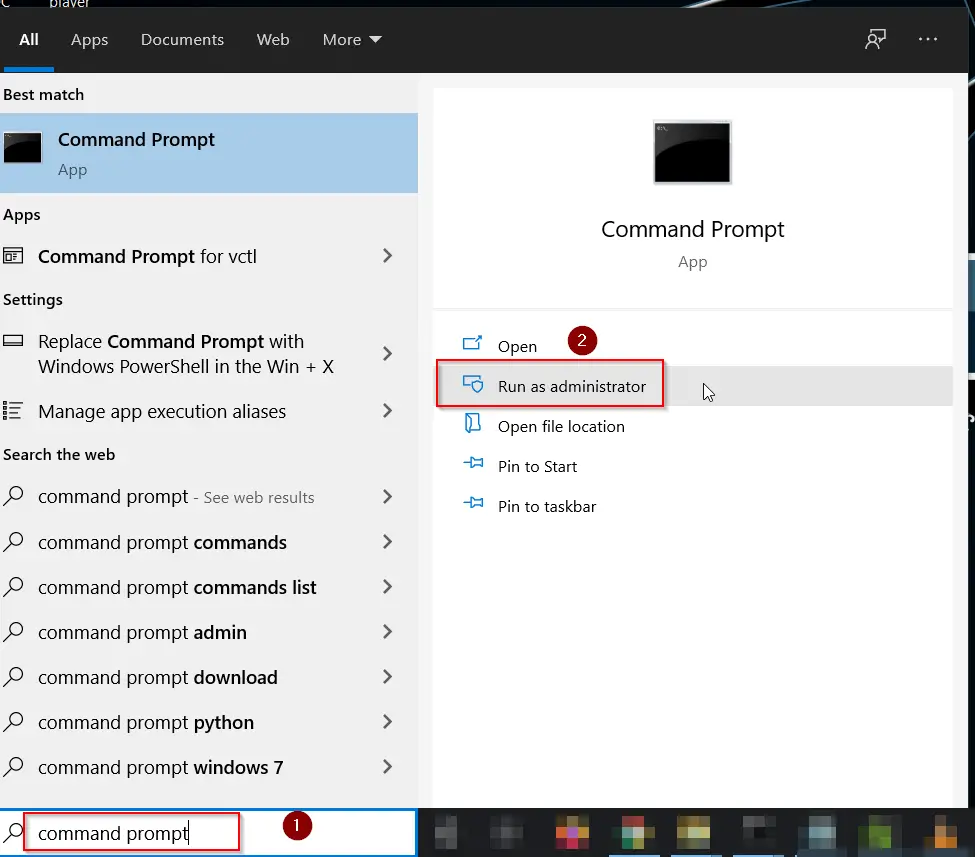
- Run the Certutil.exe command and provide the full path to your download file.
- Add MD5 in the last of your command. You will get a series of number.
- Match it with the key you got in Step1.3 from the Anaconda website. If all matches, you are good to proceed further.
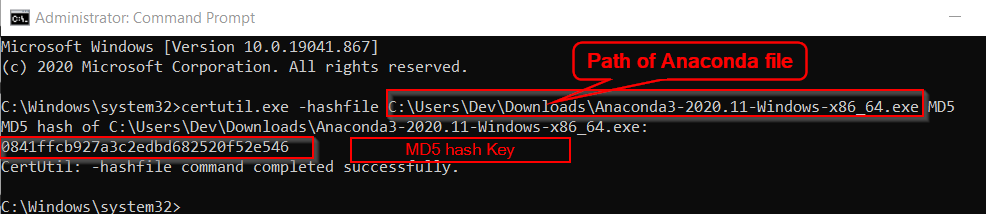
C:\Windows\system32>certutil.exe -hashfile "path to your anaconda file" MD5
For example, I have added “C:\Users\Dev\Downloads\Anaconda3-2020.11-Windows-x86_64.exe” as the file path in the command.
Then I got 0841ffcb927a3c2edbd682520f52e546 MD5 Key. And If you will look closely, it matches with the key we noted in Step1.3.
> certutil.exe -hashfile "C:\Users\Dev\Downloads\Anaconda3-2020.11-Windows-x86_64.exe" MD5

#Output#
MD5 hash of C:\Users\Dev\Downloads\Anaconda3-2020.11-Windows-x86_64.exe:
0841ffcb927a3c2edbd682520f52e546
CertUtil: -hashfile command completed successfully.
Now we know, that our Anaconda installer file is a genuine copy. Let’s go ahead with the installation steps.
Installing Anaconda on Windows 10 is pretty straightforward. You just need to decide on few options carefully.
Let’s deep dive into Anaconda installation steps –
Step2.1- Run Anaconda3 (Python) installer
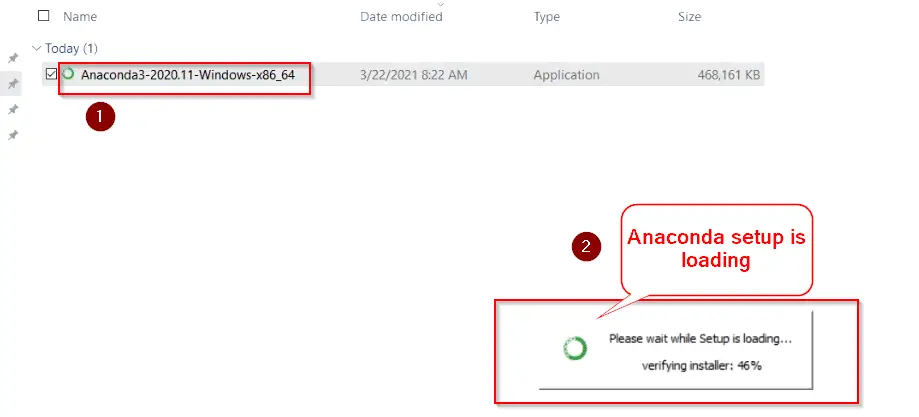
- Go to your “Download” directory, where the Anaconda installer exists.
- <Double click> on the Anaconda installer file to run the setup.
Step2.2- click Next on “Anaconda Welcome Screen”
Click Next on the “Welcome to Anaconda3 2020.11 (64-bit) setup” screen.
Make sure you have close all other applications before starting this setup. Because it may avoid updating important relevant system files. A system reboot will become mandatory in that case.

Step2.3- Accept End User License Agreement (EULA)
Select “I Agree” on End user license agreement page.

Step2.4- Select Anaconda installation type
On this screen you will get two options –
- Just me – It’s the recommended option. If you will select this option, you can install Anaconda on Windows without admin rights. But if your system is used by more than one user or developer. He or She will not be able to access it. I will go with the “Just me” option.
- All users – If you have a system, where more than one user will use Anaconda to develop scientific programs. You should select this option. Although you will require Admin rights on this system.
Also take a look on couple of extra steps, if you want to install Anaconda on Windows for multiple users.
Click Next –
Step2.5- Choose Anaconda install location
Select Destination folder, where you want to install Anaconda on Windows 10 system. By default, Anaconda3 will get install in the “Users home directory“. For example, it is in C:\users\Devender\anaconda3 in my case.
If you want to select different folder, then click Browse and choose your preferred folder.
I will go with default installation folder.
Hit Next, once you are ready.
Step2.6- Choose Advance installation options
You have flexibility to customize your Anaconda integration with Windows. There are two options available –
a. Add Anaconda3 to my PATH variable – I will not recommend you to select this option. Because setting up the Anaconda PATH variable can mess up with your previously installed software. Alternatively, you can open Anaconda Shell or Navigator using the Windows start menu. Let’s don’t tick this check box.
b. Register Anaconda3 as my default Python 3.8 – You can go with this option because it helps other software to detect Python 3.8 as primary. If you don’t want to set Python 3.8 as default, in case you are using some other python version. You can uncheck this option also.
I don’t have any other software or Python installed. So I will leave “Register Anaconda3 as my default Python 3.8” selected.
Click on “Install” button to move further.
Step2.7- Let Anaconda installation complete
Now you can relax and get a cup of coffee. This setup will take few mins to install Anaconda on Windows 10.
You can tap on “Show details” to check the details of actions happening during installation.
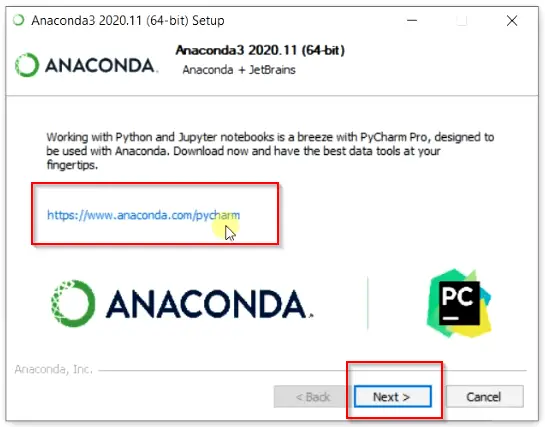
Step2.8- Install PyCharm Pro with Anaconda (Optional)
On this screen, Anaconda setup suggests you installing the PyCharm Pro editor. Actually, PyCharm is an IDE (integrated development environment) designed especially for Python programming by Jet Brains.
Let’s talk about PyCharm later in some other tutorial.
Click Next –
Step2.9- Finish Anaconda Installation Wizard
As soon as you will Finish completing the Anaconda3 setup. You will be redirected to the “Anaconda tutorial and the “Getting started” website of Anaconda.
Uncheck these two options on final screen to avoid redirection to Anaconda website for tutorial.
- Anaconda Individual Edition Tutorial
- Getting Started with Anaconda
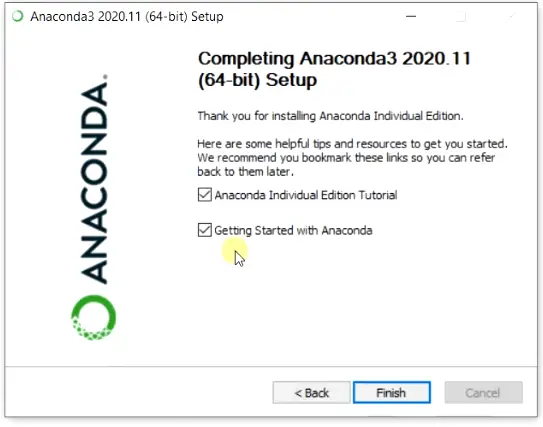
Congrats!! you are done with latest Anaconda installation in Windows.
How to run Anaconda in Windows using CLI and GUI
When you install Anaconda on Windows, you get a lot of bundled scientific packages with it like Spyder, Python and Jupyter notebook.
There are two methods to run Anaconda in Windows. If you are a CLI (Command Line Interface) fan, you can use Conda to run on the prompt.
In the case of GUI (Graphical User Interface), an Anaconda navigator can be used to manage packages, environment and launch applications.
I will show you both methods (Conda and Navigator) to create your first program. Just follow along :–
Step3.1 (CLI Method) – Create and Activate Anaconda environment
Let’s create our first test environment and run our first program in Python3.
Step3.1 (CLI Method) – Create and Activate Anaconda environment
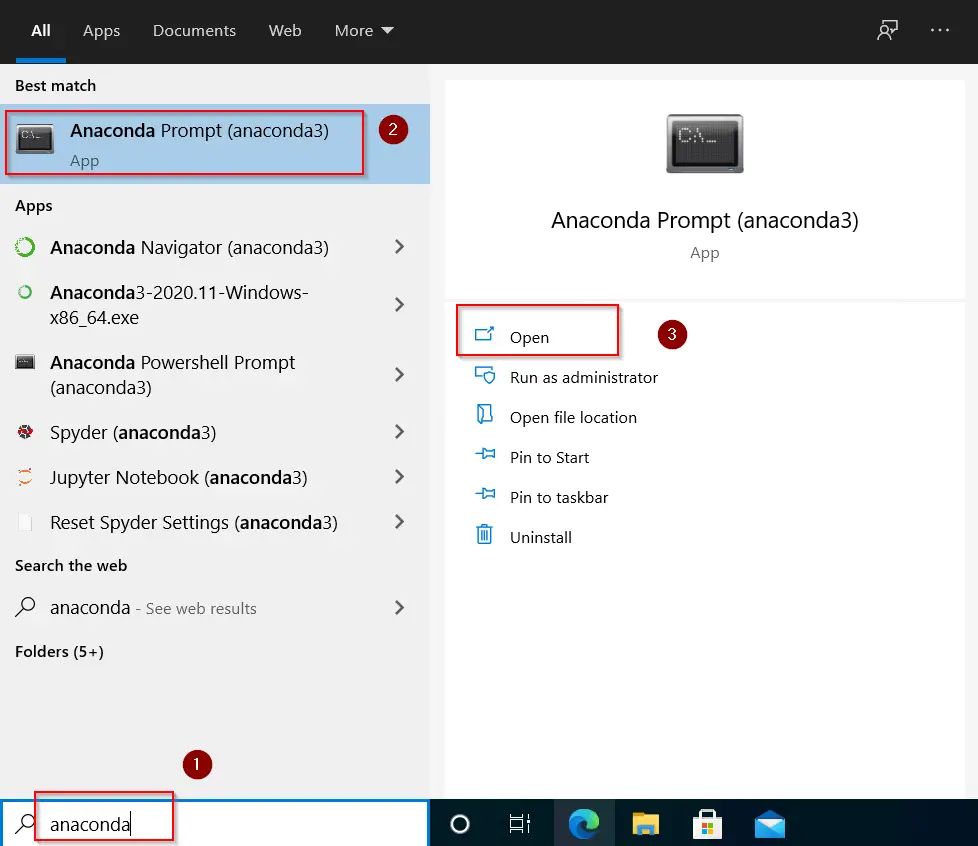
To create your first environment, you need to launch Anaconda3 prompt application.
- Type “Anaconda” in Windows search bar > Select Anaconda prompt application > Click Open
Step3.1.2 – Activate conda environment
By-default, you will get base(root) environment in Anaconda shell prompt.
Run the “conda create” command to set up our first test environment (test_env) with Python3. It will also install the latest Python 3.9 and Pip 21.0 packages.
(base) C:\Users\Devender>conda create --name test_env python=3
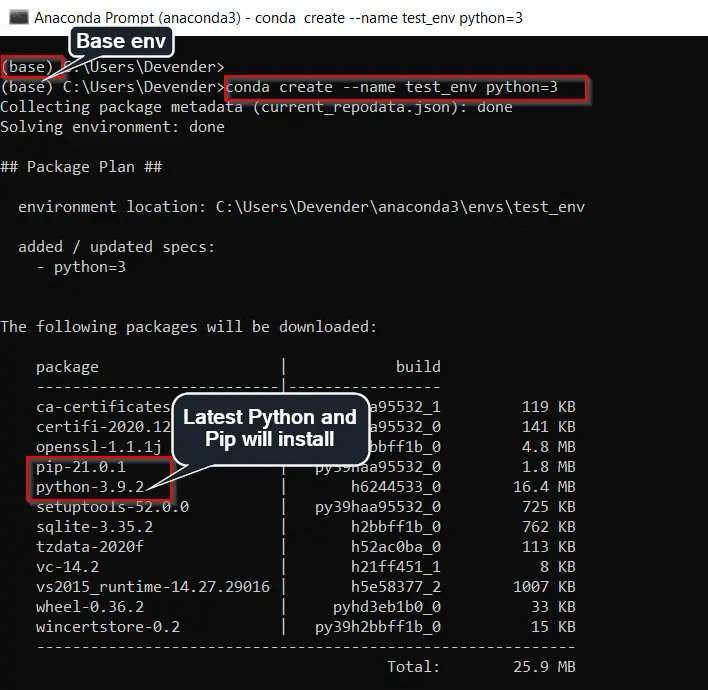
Please make a note, every environment is individual in Anaconda. You need to install required packages for each environment individually.
Press “y” to install packages.
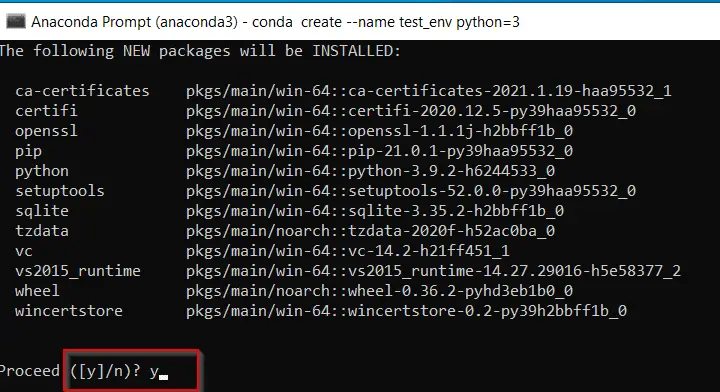
Anaconda will download, extract and install packages required. Once done, you can activate your environment with Conda activate command.
For example, test_env is the name of our newly create environment. So I will run this command –
(base) C:\Users\Devender>conda activate test_env
It will switch from base(root) environment to “test_env” environment as shown in image.

** Please make a note running conda activate command without an environment name argument, drops you in the base environment. So make sure you give your environment name.
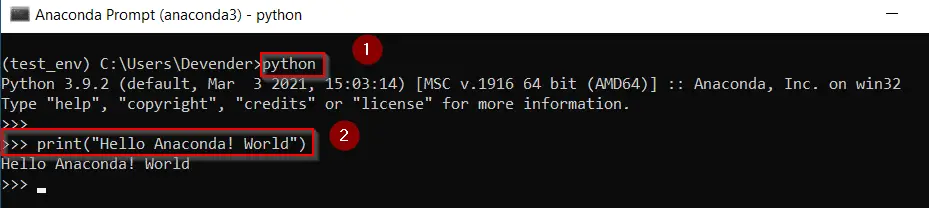
Step3.1.3 – Run your first python program
Now run Python and Type print(“your first program“) and check the output.
(test_env) C:\Users\Devender>python
You will get “>>>” prompt. Type print(“Hello Anaconda! World”) from your keyboard and press Enter.
# Type your first program code"
>>> print("Hello Anaconda! World")
Output should be “Hello Anaconda! World” as shown in image.
Type exit() to come out from Python prompt.
Hurray!! You have run your first python program in Anaconda successfully.
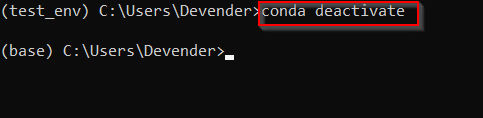
Step3.1.4 – Deactivate Conda environment
If you want to exit or want to deactivate any environment. You just need to run conda deactivate command.
For example, If I will run conda deactivate command inside my test_env environment. It will drop me to the default base environment as shown in the image.
(test_env) C:\Users\Devender>conda deactivate
Step3.2 (GUI Method)- How to start Anaconda navigator and Launch Jupyter
Just to make things interesting, I will show you how to Launch the Anaconda navigator. Also, how to install and launch Jupyter notebook using Anaconda in your newly created test environment.
So follow these easy steps –
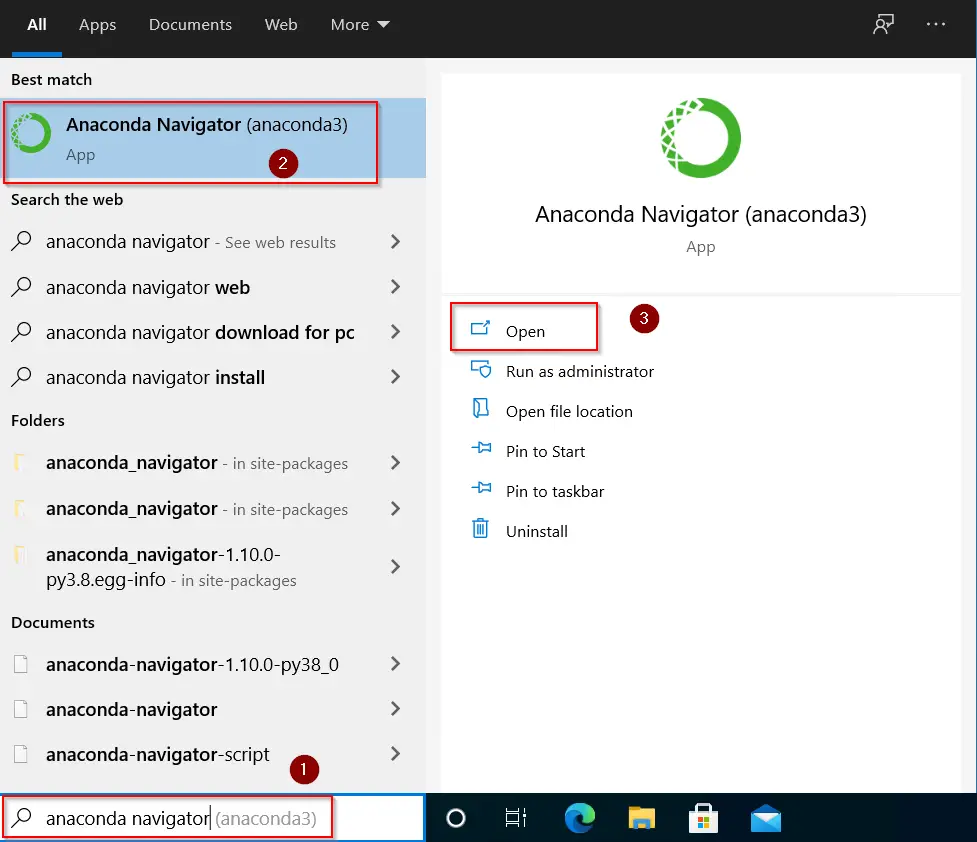
Step3.2.1 – Launch Anaconda Navigator in Windows 10
- Type “Anaconda Navigator” in Windows search bar > Select Anaconda Navigator > click Open.
Step3.2.2 – Select your test environment (test_env) and install Jupyter notebook
Jupyter notebook is a web based tool to interactively develop and present data science projects.
You can launch Jupyter notebook from <start menu> or search bar also. But It will get launch from base(root) environment by-default.
Here I will show, how you can install and launch Jupyter notebook in your custom environment. For example, test_env in my case.
- Select your environment from drop down > click on the “install” button in Jupyter Notebook application.
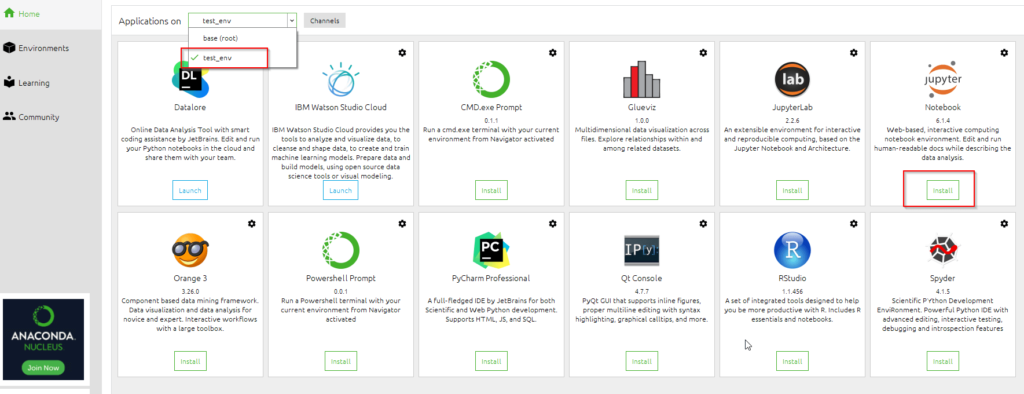
- Please wait and let Jupyter notebook installation complete. You can monitor the progress in Navigator task bar.

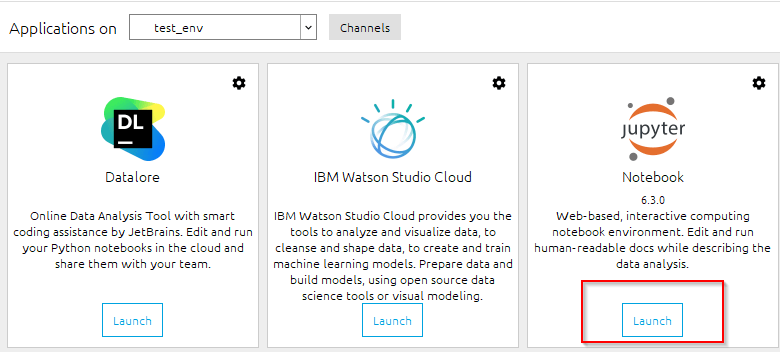
Step3.2.3 – Launch Jupyter Notebook in Anaconda navigator
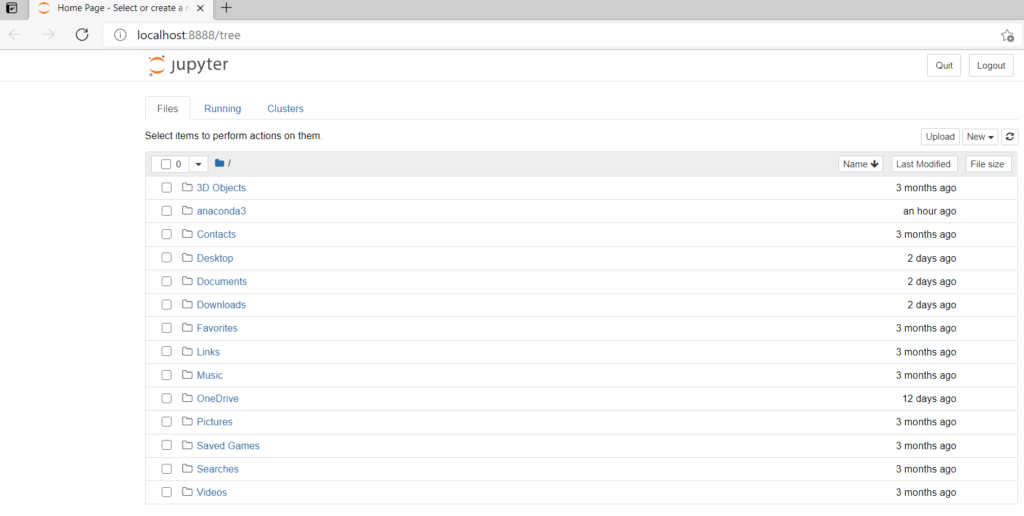
Click on Launch button of Jupyter notebook.
You will see a Jupyter home page in your default web browser. The default URL path of Jupyter notebook will be http://localhost:8888/tree.
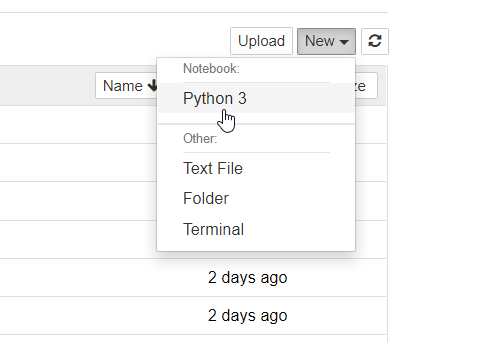
Step3.2.4 – Create your first Jupyter Notebook with Python3
Select New > Python3 notebook.
Step3.2.5 – Run first python program using Jupyter command cell
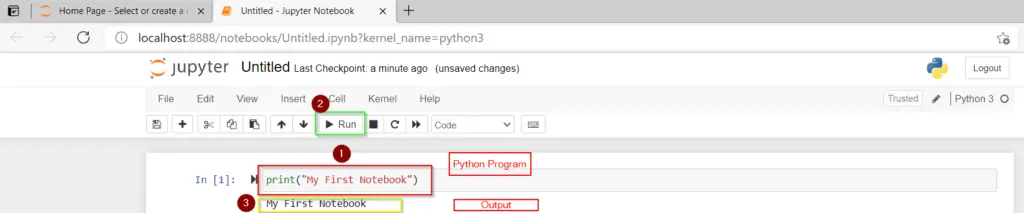
To run your first sample python program in Jupyter notebook. Follow these 3 steps –
- Type “print(“My First Notebook”) in Jupyter command cell
- Click on Run button as shown in image
- You will see output as “My First Notebook“.
You can also save this file. Go to File > save as > provide the file name (path) and you are done. This was just the basic, For more details, checkout Jupyter documentation.
Enjoy! Anaconda and Jupyter in your development journey.
How to update Anaconda in Windows 10
You can update Anaconda in Windows 10 by 3 simple steps –
Step4.1- Update conda utility
First you need to update conda utility before upgrading Anaconda package in windows 10. To achieve this-
- Type “Anaconda” in Windows search bar > Select Anaconda prompt application > Click Open
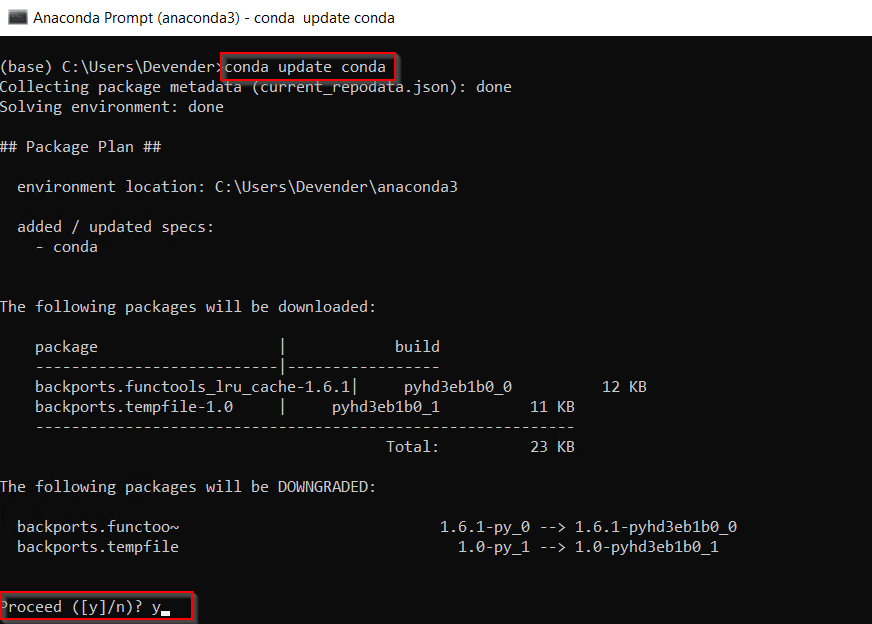
- Run conda update command.
(base) C:\Users\Devender>conda update conda
Press “y” to proceed
Step4.2- Update Anaconda package
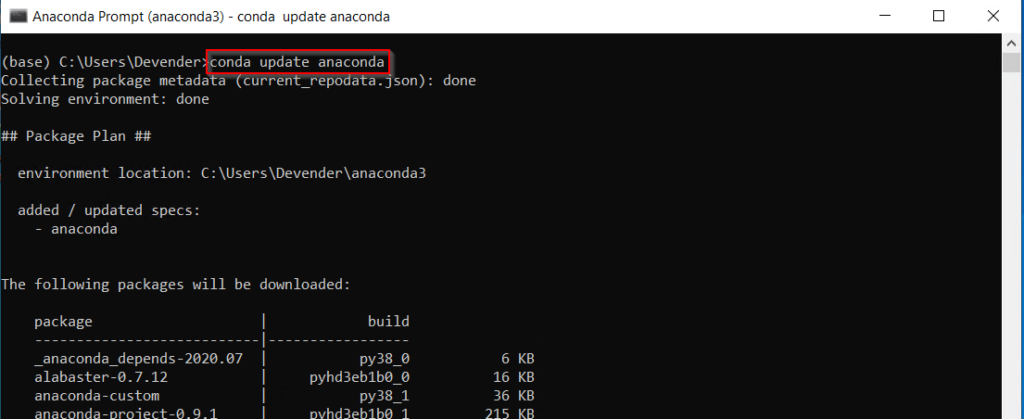
Run this command to update Anaconda packages to latest version –
(base) C:\Users\Devender>conda update anaconda
Press “y” to install packages.
To update Anaconda to specific version, Run below mentioned command –
> conda update anaconda=VersionNumber
For example, to upgrade it to Anaconda 2020.11 version, type
> conda update anaconda=2020.11
How to Uninstall Anaconda on Windows 10
Till this point, We know how to install Anaconda on Windows 10 and how to update it to latest version.
Now I will show you how to remove Anaconda from Windows10 completely. Follow along with these simple steps –
Step5.1- Go to Add remove programs
**** First of all take backup of all your projects, you created using Anaconda to be on safer side.
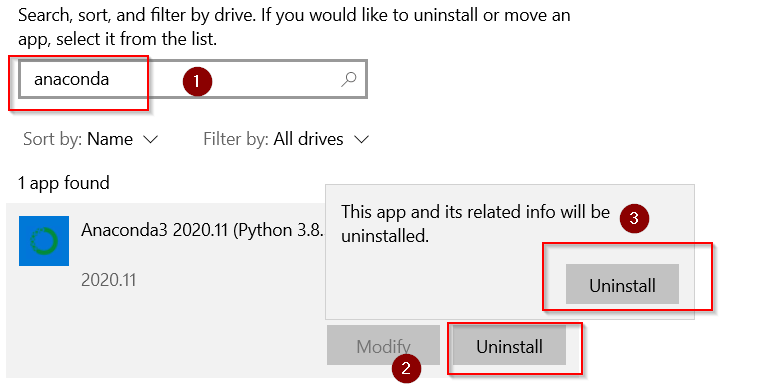
Then type “Add remove programs” in Windows search bar and click Open.

Step5.2- Uninstall Anaconda and Python completely
- In the “Apps and feature” window. Search for the “Anaconda” program > click Uninstall > then Uninstall again.
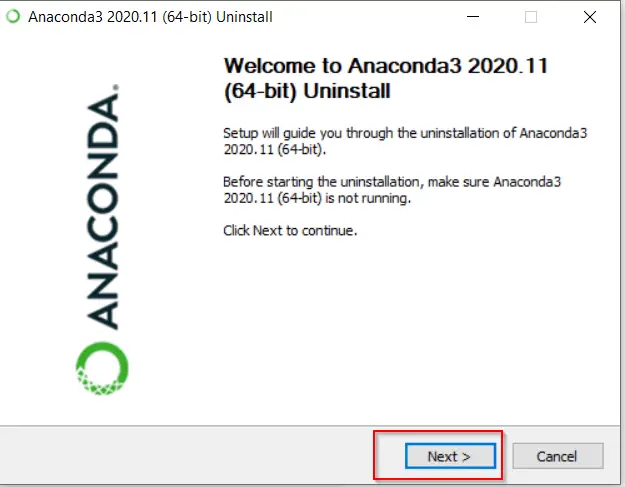
- Press Next on Anaconda welcome screen
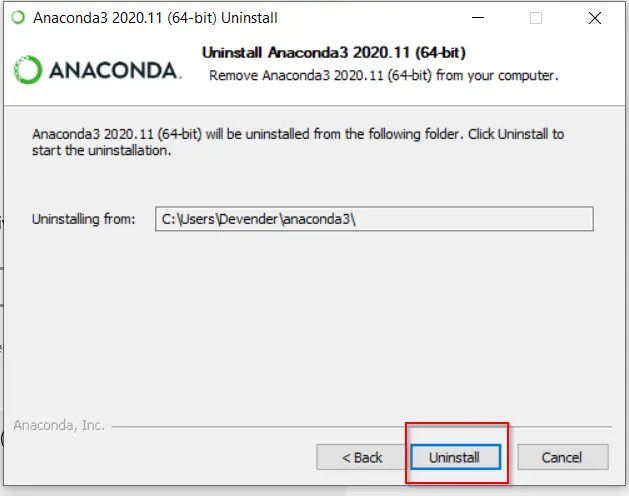
- Click “Uninstall“.
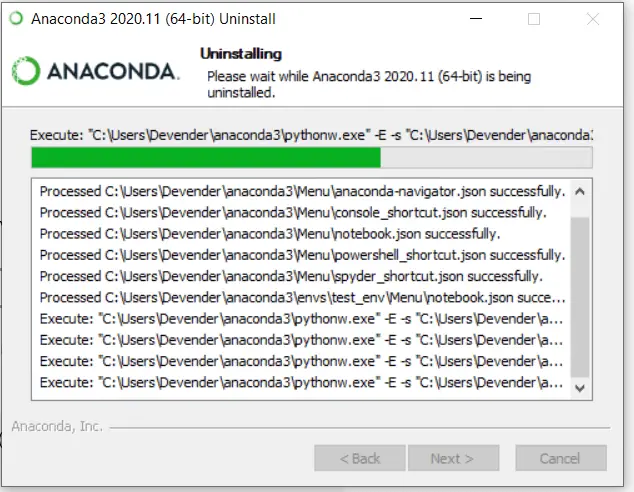
It will take a couple of minutes to uninstall anaconda and python 3.8.5 from your windows system.
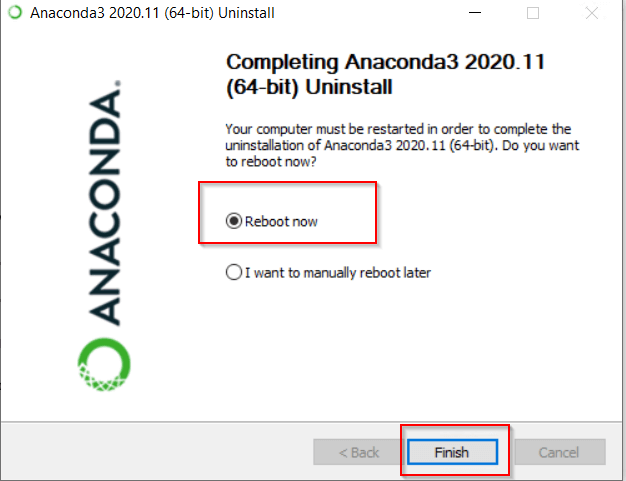
Click Next and then select Reboot Now or “I want to manually reboot later” as per your preference.
I will select reboot now and then Finish to complete uninstallation of Anaconda.
Important Tip
In a few rare cases, you may find the Anaconda3 folder, where you installed Anaconda. For example, in my case, it will reside in “C:\users\Devender\anaconda3“. You can manually delete it if you find it after uninstallation of Anaconda.
You must be a happy soul now!!
Video
Check out this informative video on “How to Install Anaconda on Windows 10“. In case, you don’t like reading text or something is not clear in text instructions.
Conclusion
If you follow each and every instruction of this tutorial, You can install Anaconda on Windows 10 very easily. Even if you are a novice in the development world.
I wish you all the good luck for your future learnings. You can also download Anaconda cheat sheet to keep it handy.
Let me know, in case you have any feedback or suggestions for me.