
Как скрыть раздел на жестком диске
Скрыть раздел жесткого диска или SSD обычно требуется, когда после переустановки Windows или других действий в системе вы вдруг видите в проводнике разделы восстановления или раздел «зарезервировано системой», которые требуется оттуда убрать (так как для использования они не подходят, а случайные изменения на них могут послужить причиной проблем с загрузкой или восстановлением ОС). Хотя, может вы просто хотите сделать раздел с важными данными невидимым для кого-то.
В этой инструкции — простой способ скрыть разделы на жестком диске, чтобы они не показывались в проводнике и других местах в Windows 10, 8.1 и Windows 7. Начинающим пользователям рекомендую быть внимательными при выполнении каждого шага, чтобы не убрать не то, что нужно. Также ниже есть видео инструкция с демонстрацией описанного.
В завершении руководства также описан способ скрытия разделов или жестких дисков в Windows не совсем для начинающих, и заключающийся не в простом удалении буквы диска, как в первых двух вариантах.
Скрытие раздела жесткого диска в командной строке
Более опытные пользователи, видя в проводнике раздел восстановления (который должен быть скрыт) или зарезервированный системой раздел с загрузчиком, обычно заходят в утилиту «Управление дисками» Windows, однако обычно с помощью неё нельзя выполнить указанную задачу — каких-либо доступных действий над системными разделами нет.
Однако, скрыть такой раздел очень просто, воспользовавшись командной строкой, которую требуется запустить от имени администратора. Для этого в Windows 10 и Windows 8.1 кликните правой кнопкой мыши по кнопке «Пуск» и выберите нужный пункт меню «Командная строка (администратор)», а в Windows 7 найдите командную строку в стандартных программах, кликните по ней правой кнопкой мыши и выберите пункт «Запуск от имени Администратора».
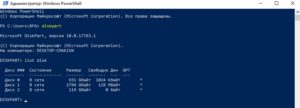
В командной строке по порядку выполните следующие команды (после каждой нажимаем Enter), будучи внимательными на этапах выбора раздела и указания буквы/
- diskpart
- list volume — эта команда покажет список разделов на компьютере. Вам следует отметить для себя номер (я буду использовать N) раздела, который нужно скрыть и его букву (пусть будет E).
- select volume N
- remove letter=E
- exit

После этого можно закрыть командную строку, а ненужный раздел пропадет из проводника.
Скрытие разделов диска с помощью управления дисками Windows 10, 8.1 и Windows 7
Для дисков, не являющихся системными, вы можете использовать более простой способ — утилиту управления дисками. Для ее запуска нажмите клавиши Windows+R на клавиатуре и введите diskmgmt.msc после чего нажмите Enter.
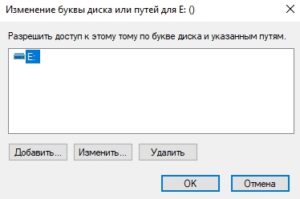
Следующим шагом, найдите нужный раздел, кликните по нему правой кнопкой мыши и выберите пункт меню «Изменить букву диска или путь к диску».
В следующем окне, выбрав букву диска (впрочем, она и так будет выбрана), нажмите «Удалить» и подтвердите удаление буквы диска.
Как скрыть раздел диска или диск — Видео
Видео инструкция, в которой показаны два вышеописанных способа скрыть раздел диска в Windows. Ниже также есть еще один способ, более «продвинутый».
Использование редактора локальной групповой политики или редактора реестра для скрытия разделов и дисков
Есть и еще один способ — использовать специальные настройки ОС, чтобы скрыть диски или разделы. Для версий Windows 10, 8.1 и 7 Pro (или выше) указанные действия проще всего выполнить с помощью редактора локальной групповой политики. Для домашних версий придется использовать редактор реестра.
При использовании редактора локальной групповой политики для скрытия дисков, выполните следующие шаги.
- Запустите редактор локальной групповой политики (клавиши Win+R, ввести gpedit.msc в окно «Выполнить»).
- Перейдите к разделу Конфигурация пользователя — Административные шаблоны — Компоненты Windows — Проводник.

- Дважды кликните по параметру «Скрыть выбранные диски из окна «Мой компьютер».
- В значении параметра укажите «Включено», а в поле «Выберите одну из указанных комбинаций» укажите, какие диски нужно скрыть. Примените параметры.


Выбранные диски и разделы должны исчезнуть из проводника Windows сразу после применения параметров. Если этого не произошло, попробуйте перезагрузить компьютер.
То же самое с помощью редактора реестра выполняется следующим образом:
- Запустите редактор реестра (Win+R, ввести regedit)
- Перейдите к разделу HKEY_CURRENT_USER\ Software\ Microsoft\ Windows\ CurrentVersion\ Policies\ Explorer
- Создайте в данном разделе параметр DWORD с именем NoDrives (с помощью правого клика в правой части редактора реестра по пустому месту)
- Установите для него значение, соответствующее дискам, которые нужно скрыть (далее поясню).
Для каждого диска имеется собственное числовое значение. Я приведу значения для разных букв разделов в десятичном счислении (потому как с ними проще оперировать в дальнейшем).
Например, нам требуется скрыть раздел E. Для этого мы дважды кликаем по параметру NoDrives и выбрав десятичную систему счисления вводим 16, после чего сохраняем значения. В случае, если нам нужно скрыть несколько дисков, то их значения нужно сложить и ввести получившийся результат.
После изменения параметров реестра, они обычно применяются сразу, т.е. диски и разделы скрываются из проводника, но, если этого не произошло, перезагрузите компьютер.
Вот и все, как видите, достаточно просто. Но если у вас, тем не менее, остались вопросы, касающиеся скрытия разделов — задавайте их в комментариях, буду отвечать.
В проводнике Windows вы можете скрыть от пользователей определенный диск (раздел диска) и запретить к нему доступ.
Содержание:
- Скрываем диски в проводнике Windows через GPO или реестр
- Удалить букву диска, назначенную разделу
Скрываем диски в проводнике Windows через GPO или реестр
В параметрах групповых политик Windows есть две опции, который позволяют скрыть локальные диски от пользователей.
- Откройте редактор локальной GPO (
gpedit.msc
) - Перейдите в раздел User Configuration -> Administrative Templates -> Windows Components -> File Explorer
- Откройте настройки параметра Hide these specified drives in My Computer
- Если включить этот параметр GPO, в его настройках можно скрыть определенные диски (A, B, C, D) или сразу все диски. Например, я выбрал скрыть только диск C: Выбрать другие буквы дисков для скрытия нельзя.

- Сохраните настройки. Настройки политики применятся немедленно, без необходимости перезагрузки. Диск C: будет скрыт из навигации в проводнике File Explorer.
- Однако пользователь все еще может открыть этот диск, набрав вручную его адрес (букву диска) в адресной строке проводника.


В этом же разделе GPO есть еще один параметр – Prevent Access to drives from My Computer. Если включить его и выбрать в настройках диск, это запретит пользователю доступ к диску (просмотр содержимого в проводнике).

При попытке открыть любой путь на скрытом диске появится ошибка:
This operation has been cancelled due to restrictions in effect on this computer. Please contact your system administrator.

Однако, скрытые таким образом диски будут видны в интерфейсе сторонних программ (файловые менеджеры, архиваторы и прочие). Диски скрываются только в оболочке проводника File Explorer.
Указанные выше политики позволяют скрывать только предопределенные диски в проводнике. Скрыть произвольную букву и запретить доступ к диску можно через реестр. Используются такие команды:
reg add "HKCU\Software\Microsoft\Windows\CurrentVersion\Policies\Explorer" /v "NoDrives" /t REG_DWORD /d XXXX /f
reg add "HKCU\Software\Microsoft\Windows\CurrentVersion\Policies\Explorer" /v "NoViewOnDrive" /t REG_DWORD /d XXXX /f
Вместо
XXXX
нужно указать десятичное значение диска (из таблицы ниже), который нужно скрыть. Если нужно скрыть несколько дисков, нужно сложить значения для них.
Например, я хочу скрыть диски F и L. Сумма значений для них, согласно таблице:
32 + 2048 = 2080
Указываем это значение в следующих командах:
reg add "HKCU\Software\Microsoft\Windows\CurrentVersion\Policies\Explorer" /v "NoDrives" /t REG_DWORD /d 2080 /f
reg add "HKCU\Software\Microsoft\Windows\CurrentVersion\Policies\Explorer" /v "NoViewOnDrive" /t REG_DWORD /d 2080 /f
Если вы правите значения этих параметров в реестре, убедитесь, что описанные выше параметры политик не заданы.

Проверьте, что выбранные вами диски скрыты в проводнике.
Таблица с десятичными кодами для букв дисков:
| A | 1 |
| B | 2 |
| C | 4 |
| D | 8 |
| E | 16 |
| F | 32 |
| G | 64 |
| H | 128 |
| I | 256 |
| J | 512 |
| K | 1024 |
| L | 2048 |
| M | 4096 |
| N | 8192 |
| O | 16384 |
| P | 32768 |
| Q | 65536 |
| R | 131072 |
| S | 262144 |
| T | 524288 |
| U | 1048576 |
| V | 2097152 |
| W | 4194304 |
| X | 8388608 |
| Y | 16777216 |
| Z | 33554432 |
| Все диски | 67108863 |
Скрытие локальных дисков сервера от пользователей часто используют на терминальных RDS серверах. Если вы хотите сильнее ограничить доступ пользователя к RDS серверу, запретив пользователю запускать проводник или любые другие программы, используйте опубликованные приложения RemoteApp.
Удалить букву диска, назначенную разделу
В некоторых случаях вместо скрытия буквы диска в проводнике имеет смысл просто удалить назначенную букву диска у неиспользуемых вами разделов. Например, в моем случае разделу восстановления WinRE назначена буква диска E:. Я хочу убрать этот диск из проводника.
Удалить букву диска можно из консоли управления дисками (Disk Management)
- Откройте консоль
diskmgmt.msc - Щелкните правой кнопкой по разделу, букву диска которого вы хотите удалить и выберите Change Drive Letter and Paths.

- Появится окно, в котором будет указана назначенная разделу буква диска.
- Нажмите Remove -> OK.

Для системных разделов (таких как recovery partition) назначенная буква не отображается в графической оснастке Disk Management. Букву у такого диска можно удалить из командной строки.
- Откройте cmd с правами администратора и выполните команду
diskpart - Выведите список томов в Windows:
list vol
- Я хочу удалить букву диска у скрытого системного раздела Volume 3. Выберите его:
sel vol 3 - Удалите назначенную букву диска:
remove letter=E - Завершите сессию diskpart:
exit

В результате этот раздел больше не будет показываться в проводнике под отдельной буквой диска.
Чаще всего потребность в создании скрытого раздела на жестком диске возникает после инсталляции свежей операционной системы. В результате некорректного процесса самой установки случается так, что разделы, которые зарезервированы системой под восстановление и другие нужды, оказываются видимыми в проводнике (хотя видимыми они быть не должны). Ну, или если вам просто нужно скрыть раздел с важными данными от сторонних глаз.
Данная процедура довольно простая и выполняется с помощью встроенных в Windows инструментов, но требует от начинающего пользователя внимательности, поскольку ошибившись в командах можно скрыть не то, что требуется. Существует несколько способов, рассмотрим каждый из них.
С помощью командной строки
Для того, чтобы запустить командную строку вам потребуется кликнуть правой кнопкой мыши по меню “Пуск”, находящемуся в левой нижней части экрана и выбрать соответствующий пункт “Windows PowerShell (администратор)». Некоторые операции требуют запуска именно в режиме администратора, поэтому не ошибитесь.
В открывшемся окне необходимо ввести следующие команды:
- Diskpart — запуск консольной утилиты для управления разделами жесткого диска
- List volume — отображает все разделы на компьютере
- Select volume N – выбор определенного раздела, где N — порядковый номер раздела
- Remove letter=E — удаление присвоенной разделу буквы.
- Exit — выход из консольной утилиты.
После проделанных операций, окно можно закрывать и в проводнике больше не будет отображаться нужный раздел.
С помощью управления дисками
Если диск, который вы хотите скрыть, не является системным, то можно воспользоваться более простым способом – с помощью системной утилиты “управление дисками”. Для этого нажмите на клавиатуре комбинацию клавиш Win + R и в открывшемся окне введите команду diskmgmt.msc.
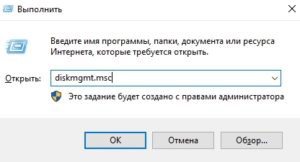
Далее кликаем правой кнопкой мыши по интересующему разделу и выбираем пункт “Изменить букву диска или путь к диску”. И просто удаляем букву.
С помощью редактора локальной групповой политики
Следующий способ несколько сложнее, чем предыдущие и подойдет тем, у кого возникли проблемы с первыми двумя. Для запуска редактора используем уже знакомую комбинацию клавиш Win + R и вводим команду gpedit.msc.
В левой колонке в открывшемся окне выбираем: Конфигурация пользователя – Административные шаблона – Компоненты Windows – Проводник.

Находим пункт «Скрыть выбранные диски из окна «Мой компьютер»» и кликаем по нему два раза левой клавишей мыши. Включаем параметр и выбираем нужную комбинацию дисков.

Применяем и закрываем все окна. Если диски так и не пропали из проводника, то перезагрузка компьютера должна это исправить.
С помощью редактора реестра
Всё та же комбинация клавиш Win + R, только команда теперь regedit.
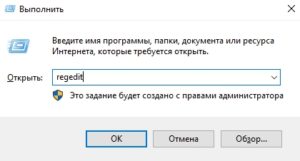
Находим раздел в левой части окна, находящийся по адресу: HKEY_CURRENT_USER\ Software\ Microsoft\ Windows\ CurrentVersion\ Policies\ Explorer
Кликаем правой кнопкой мыши в свободном пространстве в правой части открывшегося окна и выбираем пункт «Создать«. И выбираем «Параметр DWORD (32 бита)».

Присваиваем ему имя NoDrives, открываем его и задаём одно из следующих значений соответствующих каждой букве диска.
| A | 1 |
| B | 2 |
| C | 4 |
| D | 8 |
| E | 16 |
| F | 32 |
| G | 64 |
| H | 128 |
| I | 256 |
| J | 512 |
| K | 1024 |
| L | 2048 |
| M | 4096 |
| N | 8192 |
| O | 16384 |
| P | 32768 |
| Q | 65536 |
| R | 131072 |
| S | 262144 |
| T | 524288 |
| U | 1048576 |
| V | 2097152 |
| W | 4194304 |
| X | 8388608 |
| Y | 16777216 |
| Z | 33554432 |
Например, если вам необходимо скрыть диск D, то созданному параметру в реестре мы задаём значение 8. Для диска E — 16, для F — 32, ну и так далее.
Читайте также:
- Что такое RAID массив, и почему он вам нужен
- Рейтинг жестких дисков 3,5 дюйма
How to Hide Partition in Windows 11
Managing disk partitions efficiently is essential for users who want to organize their data, protect sensitive information, or optimize their system’s performance. Hiding a partition in Windows 11 can create a cleaner environment, especially if there are volumes meant for backup or recovery that don’t require regular access. This article will guide you through the process of hiding a partition in Windows 11, discussing various methods and important considerations while ensuring you understand both the reasons and the impact of this operation.
Understanding Partitions in Windows 11
Before diving into the specifics of hiding partitions, it’s important to understand what a partition is and its role in your operating system. A partition is a defined storage area on your hard drive or SSD that allows you to separate and organize your files. Each partition can be formatted with different file systems and can serve a variety of purposes, from system recovery to separate user data storage.
In Windows 11, just as in prior versions, partitions are used to install the operating system, but they can also host applications, files, or recovery environments. Users may find the need to hide certain partitions for reasons such as:
- Privacy: To prevent unauthorized users from accessing sensitive files.
- Clutter Reduction: To minimize the number of visible drives, making it easier to manage data.
- Protection of Recovery Tools: Most users don’t need to access recovery partitions regularly, and hiding them can decrease the chance of unintentional modification.
Methods to Hide a Partition in Windows 11
There are several methods to hide a partition in Windows 11, and each method caters to different user preferences and situations. Below, we shall outline several approaches, ranging from graphical user interface (GUI) options to command line solutions.
Method 1: Using Disk Management
One of the simplest ways to hide partitions in Windows 11 is through the Disk Management tool. This built-in utility allows users to configure hard drive partitions easily without the need for third-party software.
-
Open Disk Management:
- Right-click on the Start button and select «Disk Management.» You can also press
Win + Xand then choose Disk Management from the menu.
- Right-click on the Start button and select «Disk Management.» You can also press
-
Identify the Partition:
- In the Disk Management window, locate the partition you want to hide. Make a note of its letter (for instance E:, F:, etc.).
-
Remove the Drive Letter:
- Right-click on the partition and select «Change Drive Letter and Paths.»
- In the pop-up window, click on the drive letter and then click «Remove.»
- Confirm the action when prompted. Removing the drive letter will make the partition invisible in File Explorer.
-
Verification:
- Open File Explorer, and you will notice that the partition no longer appears in the list of drives.
To access the hidden partition again, you may need to assign a drive letter back to it using similar steps in Disk Management.
Method 2: Using Command Prompt
Advanced users or those comfortable with command line interfaces might prefer using the Command Prompt to hide a partition. This method is quick and efficient.
-
Open Command Prompt as Administrator:
- Press
Win + Sto open the search menu. Type “cmd,” right-click on Command Prompt, and choose “Run as Administrator.”
- Press
-
Launch Diskpart:
- In the Command Prompt, type
diskpartand press Enter. You will see a new prompt for Diskpart.
- In the Command Prompt, type
-
List the Partitions:
- Type
list volumeand press Enter. This will show all partitions along with their letters.
- Type
-
Select the Partition:
- Identify and select the volume that you want to hide by typing
select volume X, replacingXwith the volume number of the partition.
- Identify and select the volume that you want to hide by typing
-
Remove the Drive Letter:
- Type
remove letter=X, replacingXwith the drive letter you want to hide. This action will effectively hide the partition.
- Type
-
Exit Diskpart:
- Type
exitand press Enter to leave the Diskpart utility.
- Type
Method 3: Using Windows Registry
For users who want a more permanent solution, editing the Windows Registry will allow you to hide a partition effectively. However, this method requires caution, as improper changes may affect system stability.
-
Open the Registry Editor:
- Press
Win + R, typeregedit, and press Enter.
- Press
-
Navigate to the Correct Key:
- In the Registry Editor, navigate to:
HKEY_CURRENT_USERSoftwareMicrosoftWindowsCurrentVersionPoliciesExplorer.
- In the Registry Editor, navigate to:
-
Create a New DWORD Value:
- Right-click in the right pane of the window, and select
New > DWORD (32-bit) Value. - Name it
NoDrives.
- Right-click in the right pane of the window, and select
-
Set the Value:
- Double-click on the newly created entry and set its value to the combination that corresponds to the drive you want to hide. The value is calculated based on the drive letter:
- A=1, B=2, C=4, D=8, E=16, F=32, G=64, H=128, I=256, J=512, K=1024, L=2048, M=4096, N=8192, O=16384, P=32768, Q=65536, R=131072, S=262144, T=524288, U=1048576, V=2097152, W=4194304, X=8388608, Y=16777216, Z=33554432.
- For example, to hide drive E, set the value to
16.
- Double-click on the newly created entry and set its value to the combination that corresponds to the drive you want to hide. The value is calculated based on the drive letter:
-
Reboot Your Computer:
- Restart Windows 11 for the changes to take effect.
-
Restore Visibility:
- If you wish to reverse this change, simply delete the
NoDrivesentry or set its value back to0.
- If you wish to reverse this change, simply delete the
Method 4: Using Third-Party Software
There are numerous third-party applications designed specifically for partition management, many of which offer intuitive interfaces and additional features. Software such as EaseUS Partition Master, MiniTool Partition Wizard, or AOMEI Partition Assistant can be used to hide partitions easily. Here’s a brief example using EaseUS Partition Master:
- Download and Install EaseUS Partition Master.
- Open the Program and Locate the Partition:
- Look for the partition you want to hide in the list.
- Right-click on the Partition:
- Select “Hide Partition” from the context menu.
- Apply Changes:
- Click on “Apply” to make the changes effective.
Using graphical tools can be less intimidating for users and provide additional options for managing partitions.
Important Considerations
-
Backup Important Data: Before making any changes to your partitions, ensure that all essential data is backed up. Partition management can potentially lead to data loss if not handled carefully.
-
Impact on Software: Hiding a partition does not delete files or affect installed applications. However, programs that rely on accessing the targeted partition will encounter issues due to the drive not being visible.
-
Accessing Hidden Partitions: To access a hidden partition, you must reassign a drive letter using Disk Management or the appropriate method chosen to hide the partition.
-
Security Implications: Hiding a partition does not encrypt it. For sensitive data, consider using full disk encryption tools like BitLocker or third-party software.
-
Using Windows Tools: Remember, methods utilizing built-in Windows tools are generally safer and easier for less technical users compared to third-party software.
Conclusion
Hiding a partition in Windows 11 allows users to tidy up their file system, prevent unauthorized access to sensitive data, or reduce distractions in File Explorer. Whether you’re using the built-in Disk Management, Command Prompt, Registry Editor, or third-party software, it’s crucial to proceed with caution to ensure data integrity.
By following the steps outlined in this article, you can confidently manage your partitions, maintaining both organization and security within your Windows 11 environment. Always remember that regular backups and proper precautions are key to data safety during any partition management activities.
| Workable Solutions | Step-by-step Troubleshooting |
|---|---|
| Show Hidden Partition in Windows 10 |
#1. EaseUS Free Partition Manager Software…Full steps #2. Disk Management…Full steps |
| Hide Partition in Windows 10/8/7 |
#1. EaseUS Free Partition Manager Software…Full steps #2. Disk Management…Full steps |
Are you looking for a tutorial on how to show hidden partition in Windows 10? Have you forgotten how to unhide a hidden partition when you need to use the stored data on it?
When you can’t view a partition in File Explorer but can find it in Disk Management, the first thing you should check is that whether the disk partition is hidden or not. In Windows 10, 8, or 7. 3 causes can result in a hidden partition:
- Windows users set a partition as hidden which would be invisible to most ordinary users so to protect important data or files from being deleted, formatted, or lost due to unknown reasons.
- Partitions are hidden by a third-party program.
- Partitions are hidden by the manufacturer for system protection, such as Recovery Partition and OEM Partition.
If you want to unhide partitions on Windows 10/8/7, two simple and free methods are demonstrated here. Follow the guides to view hidden partition easily. Meanwhile, you can also learn how to hide partitions in vice versa.
Part 1. How to Show Hidden Partition in Windows 10 in 2 Ways
You can unhide and access hidden hard drive partitions by using a free partition manager or Disk Management.
1. How to Show Hidden Partitions in Windows 10 with Free Partition Manager Software
To find a hidden partition or partition your hard drive with a disk management program, EaseUS Partition Master Free will be a great choice. It helps you create, resize, clone, move, merge, and format partitions without any data loss.
To show hidden partition in Windows 10, download and run EaseUS Partition Master Free, then unhide partitions within seconds.
Option 1 — Hide Partition
- Right-click the partition, and choose «Advanced». Select «Hide» from the drop-down menu.
- Then you will see a window showing the notification. Read the instructions and click «Yes» to continue.
- Click the «Execute 1 Task(s)» button in the top-left corner. Then, click «Apply» to hide your partition.
Option 2 — Unhide Partition
- Right-click the partition you want to view and access. choose «Advanced» and select «Unhide» from the drop-down menu.
- Read the instructions and click «Yes» to continue.
- Click the «Execute 1 Task(s)» button in the top-left corner. Check the pending operations, then click «Apply» to unhide the partition on Windows 11/10/8/7.
;
In addition to unhiding partitions, EaseUS Partition Master provides other one-stop partition and disk management solutions for your Windows computer, for instances:
- Resize/move partitions (the Pro version allows to move space from D drive to C drive without deleting or formatting), create, format, delete, and merge partitions
- Copy and clone an entire disk to another even the target partition is smaller than the source
- Convert a logical partition to primary or primary partition to logical, FAT32 to NTFS partition, MBR disk to GPT, or GPT disk to MBR
- Completely wipe out all the data on the hard disk to prevent information from being leaked or recovered
This tool is multifunctional, isn’t it? Don’t hesitate to share this tool with your friends. To do so, click the buttons below to try.
2. How to Unhide Partitions with Disk Management
This method is quite simple, but you need to very careful while hiding the partition. Or false operation may get your partition deleted by mistake.
Step 1. Right-click on This PC/My Computer and click on «Manage».
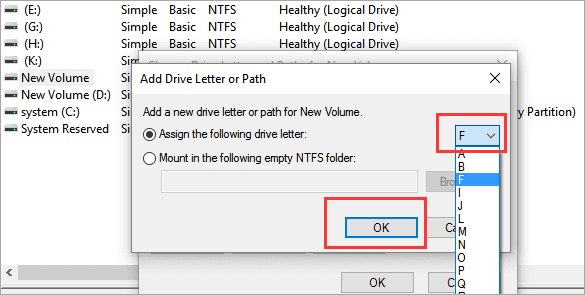
Step 2. Select the volume without a drive letter, the partition which you’ve hidden previously. Right-click it, select «Change Drive Letter and Paths…».
Step 3. Click «Add» to assign the drive letter for the partition to unhide it.
Step 4. Assign the drive letter for the hidden partition, such as F, and hit «OK». Then your hidden partition will show up in PC and work as a normal partition to store data for you again.
The opposite of unhiding partitions is hiding partitions. As mentioned before, sometimes you want to hide disk partitions for some purposes, but how? Here you’ll have two methods to hide partitions in Windows 10, 8, or 7 computers: hide partition with EaseUS free partition manager software or hide partition with Disk Management.
1. How to Hide Partition with EaseUS Free Partition Manager Software
You can also apply EaseUS Partition Master Free to hide partition with easy clicks by following the steps below.
Option 1 — Hide Partition
- Right-click the partition, and choose «Advanced». Select «Hide» from the drop-down menu.
- Then you will see a window showing the notification. Read the instructions and click «Yes» to continue.
- Click the «Execute 1 Task(s)» button in the top-left corner. Then, click «Apply» to hide your partition.
Option 2 — Unhide Partition
- Right-click the partition you want to view and access. choose «Advanced» and select «Unhide» from the drop-down menu.
- Read the instructions and click «Yes» to continue.
- Click the «Execute 1 Task(s)» button in the top-left corner. Check the pending operations, then click «Apply» to unhide the partition on Windows 11/10/8/7.
;
2
2. How to Create Hidden Partition with Disk Management
Step 1. Right-click This PC/My Computer, select «Manage», and click «Disk Management».
Step 2. Select and right-click the partition that you want to hide and choose «Change Drive Letter and Path…».
Step 3. Click «Remove» and click «OK».
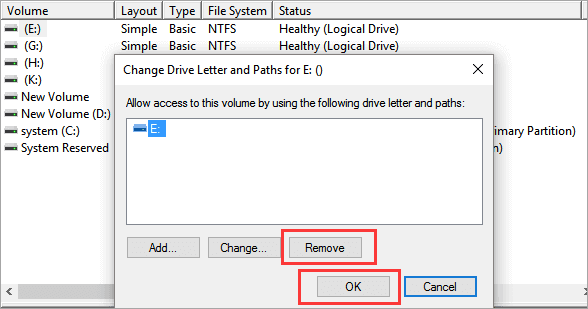
There, your partition will show as New Volume in Disk Management without a drive letter and will not show up in the File Explorer anymore.
Conclusion
Follow these simple guides; you can easily and effectively find hidden partition or hide disk partition on Windows 10. As a popular and user-friendly partition management tool, EaseUS Partition Master provides many useful functions to help you organize your disk, like resize/move/delete/format partition, disk copy, partition copy, repair MBR, create WinPE bootable disk (Pro version), and so on.
Download and try this disk management program to optimize your hard drive and improve computer performance.
FAQs About Hidden Partition Windows 10
The following are the top four highly relevant questions on how to show hidden partition in Windows 10. If you also have any of these problems, you can find the methods here.
How do I find a hidden partition on my hard drive?
You can find a hidden partition on your hard drive in two ways: using EaseUS Partition Master or applying Disk Management. Both solutions are quite simple.
How do I hide a partition in Windows 10?
Two methods are available for you to hide a partition in Windows 10, Windows 8, or Windows 7. Hide partition with Disk Management or EaseUS Partition Master. The operation is very simple and similar.
The difference is that this software gives you more comprehensive and more advanced disk management capabilities. For example, move free space from other partitions to target partition without deleting, clone bigger HDD to smaller SSD, convert logic partition to primary partition, or in the vice versa, etc.
How do I unhide a hidden drive?
You can access a hidden drive with the help of Disk Management:
Step 1. Right-click on This PC/My Computer and click on «Manage».
Step 2. Select the partition that you’ve hidden previously. Right-click it, select «Change Drive Letter and Paths…».
Step 3. Click «Add» to assign the drive letter for the partition to unhide it.
Step 4. Assign the drive letter for the hidden partition, and hit «OK».
How do I find hidden partitions in Windows 10?
To find hidden partitions on Windows 10, you can resort to EaseUS Partition Master is for help:
Step 1. Open EaseUS Partition Master, right-click the partition you want to unhide, and choose «Unhide» from the drop-down menu.
Step 2. Then you will see a window showing the notification. Check it and click «OK» to continue.
Step 3. Click the «Execute Operation» button in the top-right corner, check the changes, then click «Apply» to show your partition.