
Все способы:
- Способ 1: Апплет «Программы и компоненты»
- Способ 2: Утилита «DISM»
- Способ 3: Команда установки
- Дополнительные рекомендации
- Вопросы и ответы: 0
WSL, или «Подсистема Windows для Linux», представляет собой встроенную функцию Windows 10, позволяющую запускать в Windows-среде консольные и графические приложения Linux. Существуют два основных способа установки данного компонента.
Способ 1: Апплет «Программы и компоненты»
Данный способ является устаревшим, он использовался, когда Windows 10 (версия 20H2) еще не поддерживала установку WSL через консоль.
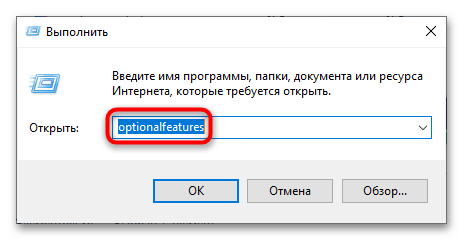
- Вызовите нажатием клавиш Win + R диалоговое окошко быстрого запуска приложений и выполните в нем команду
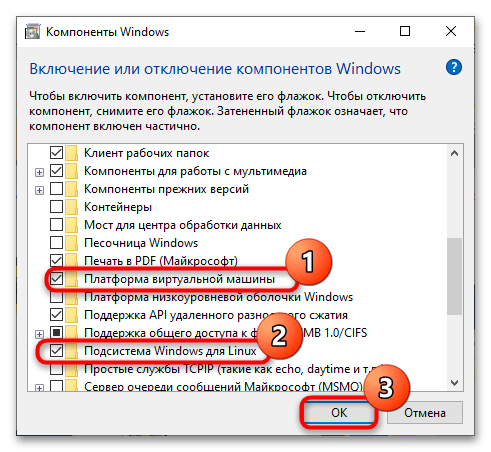
optionalfeatures, чтобы запустить апплет «Программы и компоненты». - Отыщите в списке компонентов «Платформа виртуальной машины» и «Подсистема Windows для Linux», включите их и нажмите кнопку «ОК».

Для применения конфигурации и установки компонентов потребуется перезагрузка компьютера.
- Запустите встроенное приложение «Microsoft Store», найдите через поиск нужный дистрибутив Linux и установите его. Процедура установки практически ничем не отличается от инсталляции других UWP-приложений, разве что занимает больше времени.
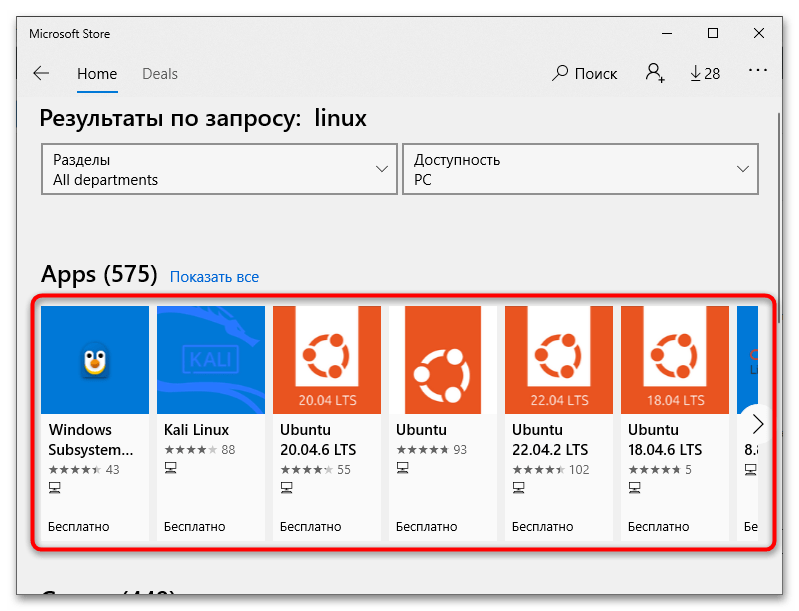
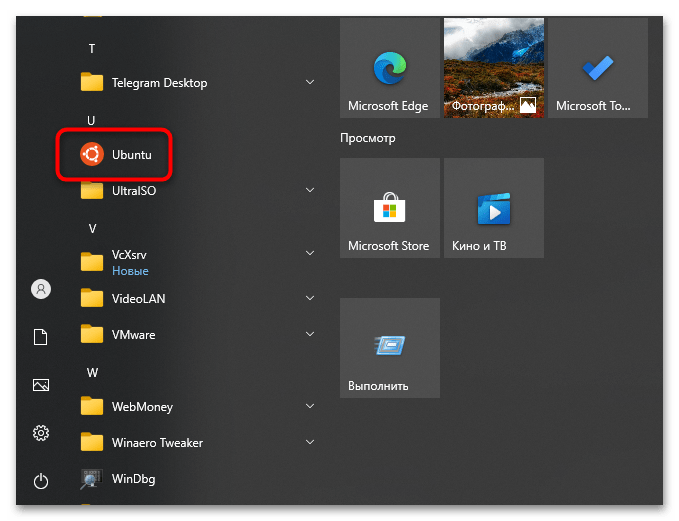
Запустить установленную Linux можно будет из меню «Пуск», как и всякое другое приложение. В настоящее время в магазине Windows доступны несколько популярных Linux-дистрибутивов, в частности Ubuntu, openSUSE Leap, SUSE Linux Enterprise, Kali Linux, Debian и некоторые другие.
Способ 2: Утилита «DISM»
Этот способ дублирует предыдущий, разница лишь в том, что необходимые компоненты устанавливаются через консоль.
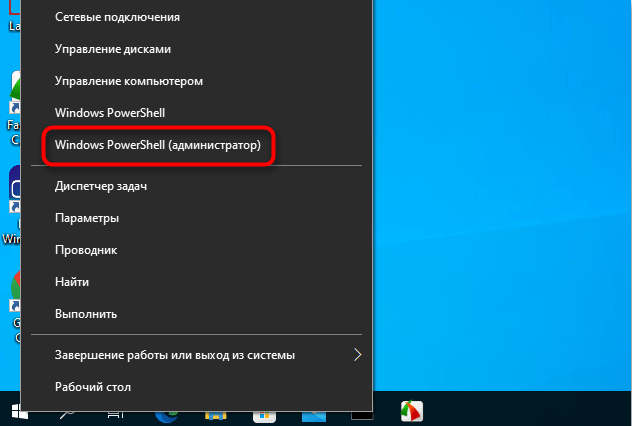
- Запустите от имени администратора «PowerShell» из контекстного меню кнопки «Пуск». Вместо «PowerShell» можно использовать классическую «Командную строку».
- Выполните одну за другой следующие две команды:
dism.exe /online /enable-feature /featurename:Microsoft-Windows-Subsystem-Linux /all /norestartdism.exe /online /enable-feature /featurename:VirtualMachinePlatform /all /norestart
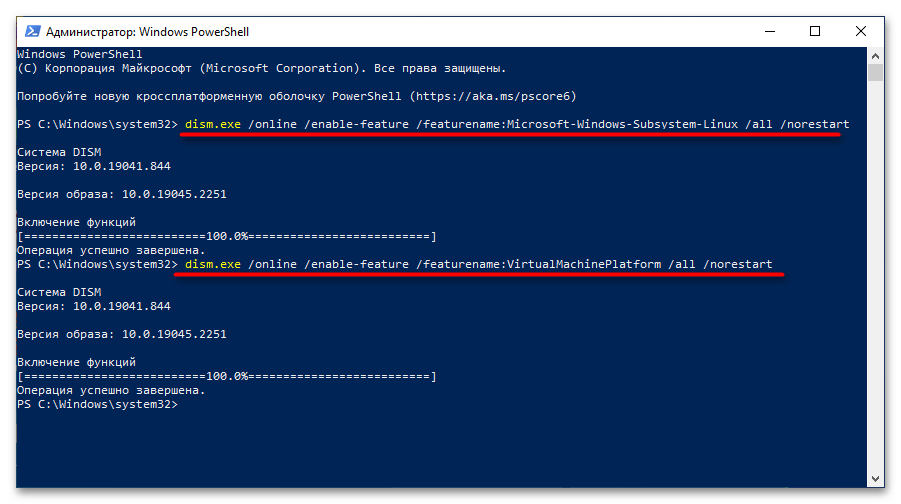
Вместо указанных выше, вы также можете использовать команды Enable-WindowsOptionalFeature -Online -FeatureName Microsoft-Windows-Subsystem-Linux и Enable-WindowsOptionalFeature -Online -FeatureName VirtualMachinePlatform (в «PowerShell») — результат будет тот же. Для применения настроек потребуется перезагрузка компьютера, после чего можно устанавливать дистрибутивы Linux из магазина Windows.
Способ 3: Команда установки
Все новые версии и сборки Windows 10 поддерживают установку WSL одной командой. Этот способ является наименее затратным по времени и наиболее простым.
- Запустите от имени администратора «PowerShell» или «Командную строку».
- Выполните команду
wsl --install.
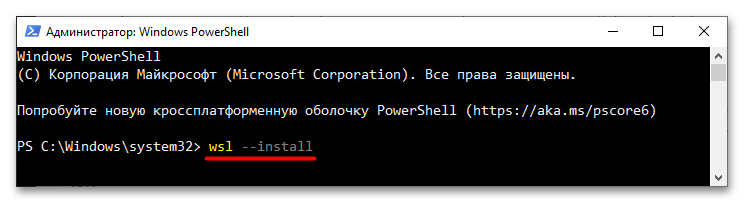
Windows 10 сама включит необходимые компоненты и установит актуальную на текущий момент версию подсистемы. Также автоматически будет загружен и установлен дистрибутив по умолчанию – Linux Ubuntu. Чтобы установить другой дистрибутив, сделайте следующее:
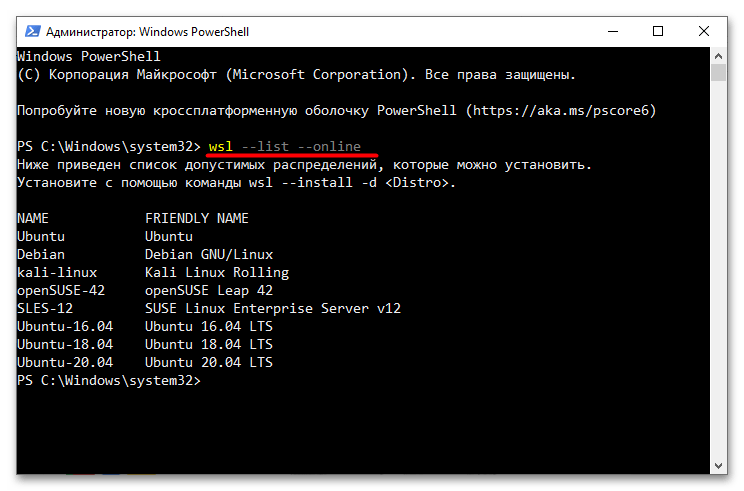
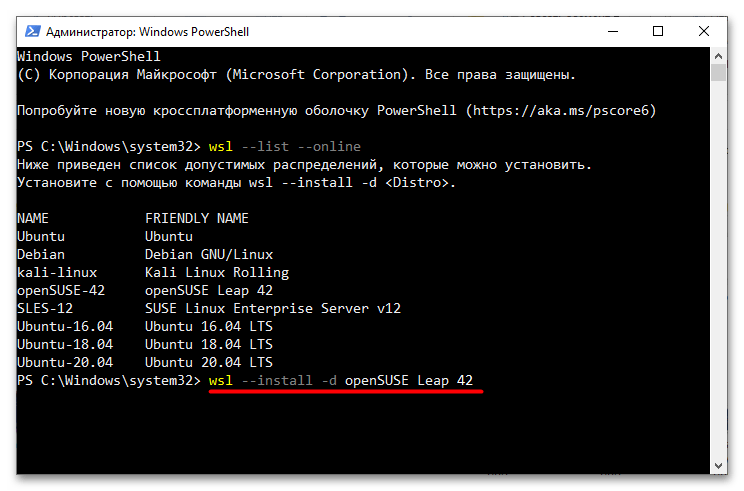
- Сначала выведите в запущенной консоли список доступных дистрибутивов командой
wsl --list --online. - Установите WSL c нужным дистрибутивом, выполнив команду
wsl --install -d name, где name – название дистрибутива.
Дополнительные рекомендации
После установки WSL рекомендуется выполнить некоторые настройки и проверить доступность обновлений подсистемы.
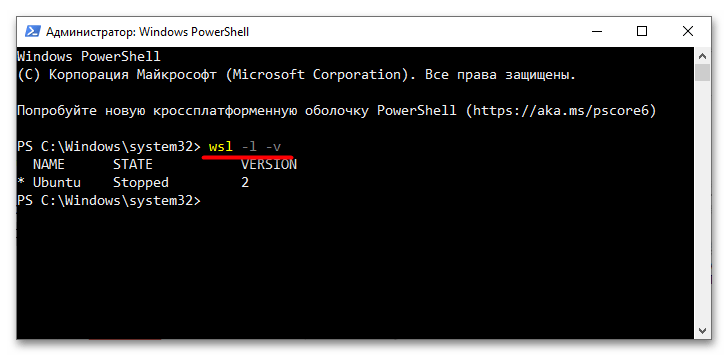
- На момент написания этой инструкции существуют две версии «Подсистемы Windows для Linux» – 1.0 и 2.0. Проверить версию установленной подсистемы можно командой
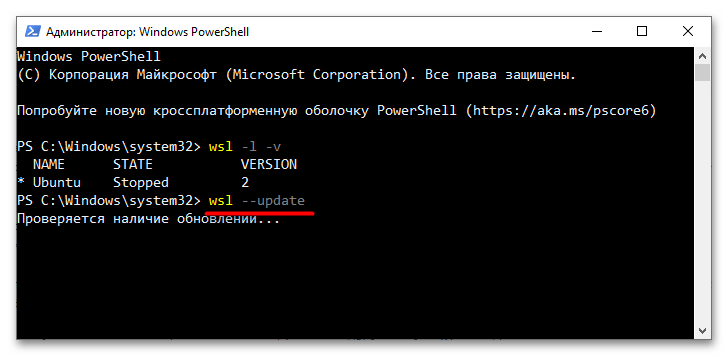
wsl -l -vв запущенной «PowerShell». - Установите последние обновления подсистемы, выполнив в запущенной с правами администратора консоли команду
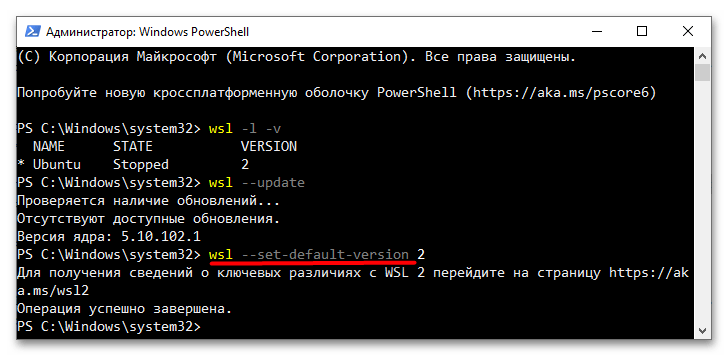
wsl --update. - Чтобы инсталлировать вторую версию используемой по умолчанию, выполните команду
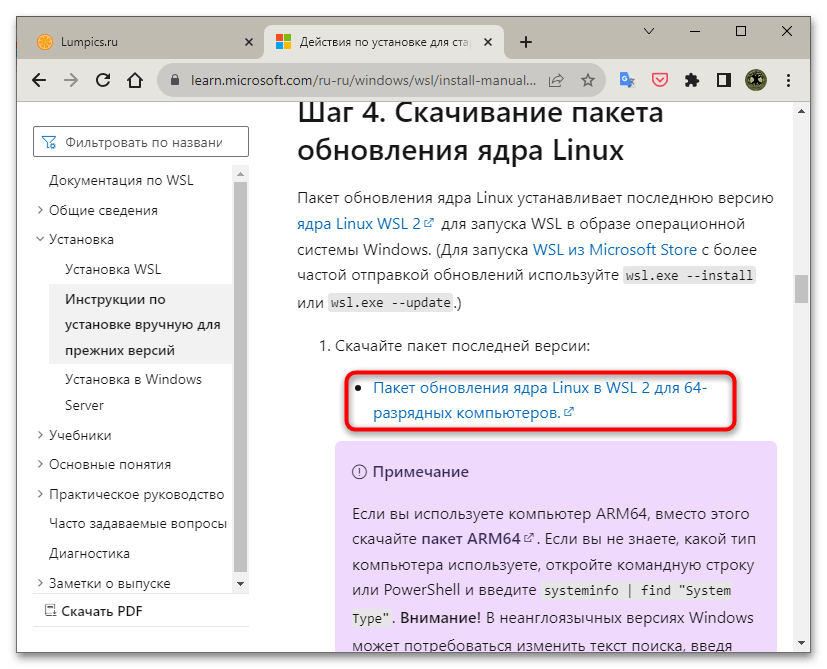
wsl --set-default-version 2. - Скачайте и установите обновление ядра Linux для WSL2 с сайта Microsoft.
Скачать обновление ядра WSL2 с официального сайта - Инсталлятор представлен исполняемым файлом MSI – запустите его двойным кликом и проследуйте указаниям мастера.
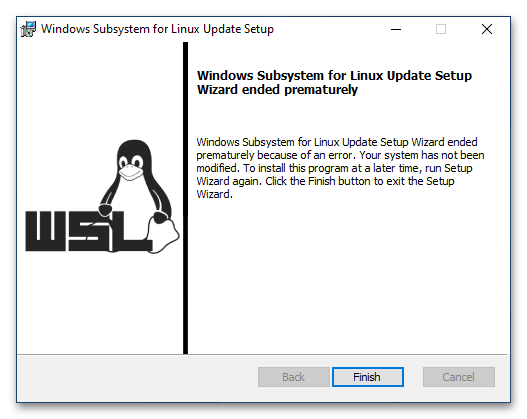
Если при инсталляции обновления ядра появится ошибка, вероятнее всего, версия Windows 10 не поддерживает данное обновление. В этом случае рекомендуется сначала установить последние обновления для самой операционной системы.
Читайте также: Обновление Windows 10 до последней версии
Наша группа в TelegramПолезные советы и помощь
If you are running the Home edition, you can now turn on or enable WSL in Windows 10 Home to run Linux programs. Here’re the exact steps to follow.
One of the best features on Windows 10 is the ability to run Linux specific applications and commands directly in Windows. This eliminates or at least greatly reduces the need to dual boot Windows 10. As you can guess, this is an awesome feature for a lot of developers. To run Linux apps, you first need to enable the Windows Subsystem for Linux (WSL) in Windows 10. Once you turn on WSL, you can then install the Linux flavor of your choice and start working on it like you would on a Linux machine.
The good thing is, Microsoft is constantly working on WSL and improving its performance and reliability. For instance, compared to WSL 1, WSL 2 is leagues ahead in terms of both performance and usability.
At first, the WSL feature is just limited to Windows 10 Pro users only. However, with recent updates, Microsoft made it possible for Windows 10 Home users to enable WSL in their machines. So, if you are running the Home edition, follow the steps listed below to enable WSL on Windows 10 Home.
Steps to Enable WSL on Windows 10 Home Edition
Below are the steps to follow to enable wsl in Windows 10 Home edition.
- First, press the Start key on the keyboard to open the Start menu.
- Type “Turn Windows Features on or off” and press Enter.

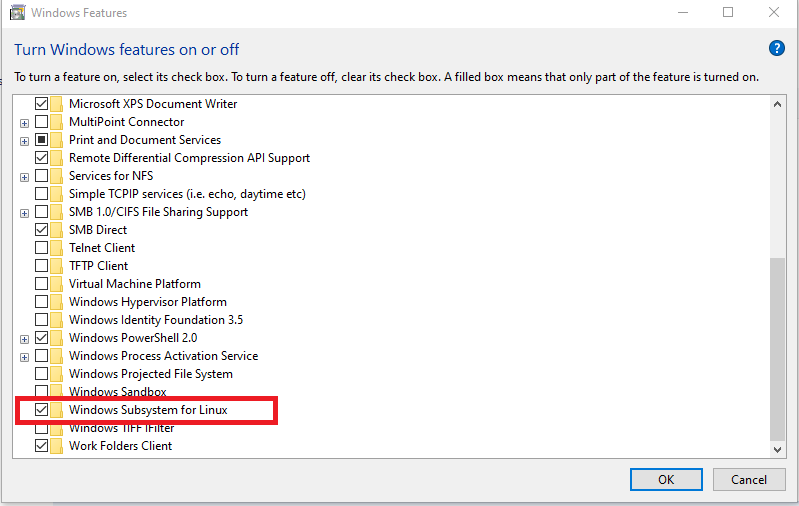
- Select the “Windows Subsystem for Linux” checkbox in the Windows Features box. You will find the option at the bottom.
- Click “Ok“.

- As soon as you click Ok, Windows will download and install any required files and enables the feature.

- Finally, click the “Restart now” button to apply the changes.


After restarting, you can install the Linux distribution of your choice directly from the Microsoft Store. Simply open the Store app, search for the Linux distribution of your choice and click the Install button. For example, I’m installing Ubuntu.

Once installed, you can launch it from the Start menu like any other Windows app and start using its command-line interface.
Uninstall WSL in Windows 10
If you no longer need WSL in Windows 10, you can uninstall it. To start off, uninstall any Linux distributions installed in your system. You can do that from the “Settings → Apps → Apps & features” page. After uninstalling the Linux distribution(s), open the Windows Features box, uncheck the “Windows Subsystem for Linux” checkbox, and click “Ok”. When prompted, press the “Restart now” button.
That is all. After restarting the system, the WSL is completely uninstalled. If you ever want to reinstall WSL, you can follow the above steps.
That is all. It is that simple to install WSL in Windows 10 Home edition. If you are stuck or need some help, comment below and I will try to help as much as possible.
- To install WSL on Windows 10, open Command Prompt (or PowerShell) as admin and run
wsl --installto install all the WSL2 components and the Ubuntu Linux distro. - If you want to install a specific distro, run the
wsl --install -d DISTRO-NAMEcommand, and to update the WSL kernel, run thewsl --updatecommand. - You can also install WSL and Linux distributions from the Microsoft Store.
UPDATED 11/5/2024: Windows Subsystem for Linux (WSL) is a feature that allows you to use Linux natively on top of Windows 10 (using a lightweight virtual machine) without having to set up another virtualization environment with Hyper-V, VMware Workstation, or Oracle VirtualBox or use a dual-boot setup. In other words, WSL gives you access to the powerful command-line tools and utilities of Linux while still using your familiar Windows desktop.
This Linux environment for Windows users has two versions, usually referred to us as WSL1 and WSL2. The original version (or WSL1) was designed as an actual integration with the operating system that relies on a translation layer to interact with Windows system calls. The problem was that it offered a slow performance, especially for file system operations and resource-intensive tasks.
On the other hand, WSL2 uses a lightweight virtual machine to run a full Linux kernel with the Microsoft Hyper-V hypervisor. It offers significantly faster performance and app compatibility, meaning that it can be used for more complex development workflows, running demanding applications, and using Docker containers.
This feature is primarily for command-line applications, but you can also install and run GUI (Graphical User Interface) apps leveraging tools like X11 or Wayland.
Finally, even though you may still be able to access WSL1, it’s recommended that you set up and use WSL2. Microsoft has simplified the installation process of the WSL on Windows 10 to only one command that downloads and installs all the required components, including the virtual machine platform and Ubuntu Linux by default.
In this guide, I will teach you the steps to install the Windows Subsystem for Linux (version 2) on Windows 10.
- Install WSL on Windows 10 from Command Prompt or PowerShell
- Install WSL on Windows 10 from the Microsoft Store
- Install WSL on Windows 10 (older versions)
Install WSL on Windows 10 from Command Prompt or PowerShell
To install Windows Subsystem for Linux on Windows 10, use these steps:
-
Open Start on Windows 10.
-
Search for Command Prompt (or PowerShell), right-click the top result, and select the Run as administrator option.
-
Type the following command to install the WSL on Windows 10 and press Enter:
wsl --install

-
Restart your computer to finish the WSL installation on Windows 11.
-
Continue with the Linux distro setup as necessary.
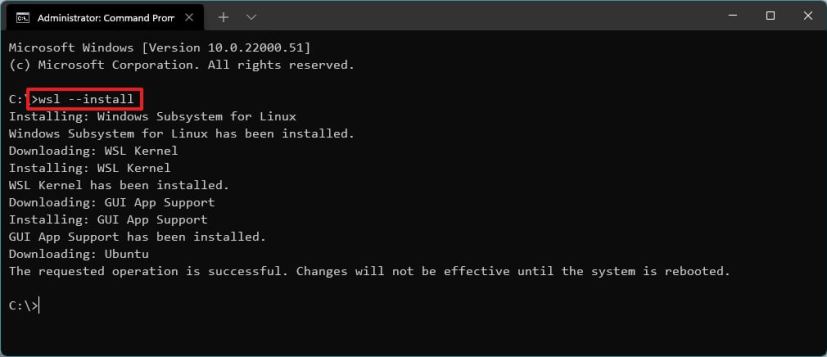
Once you complete the steps, Windows Subsystem for Linux will install on your computer with the latest version of the Ubuntu Linux distribution since it’s the default behavior.
You can also follow these instructions in my video tutorial on my YouTube channel. (Remember to like and subscribe.)
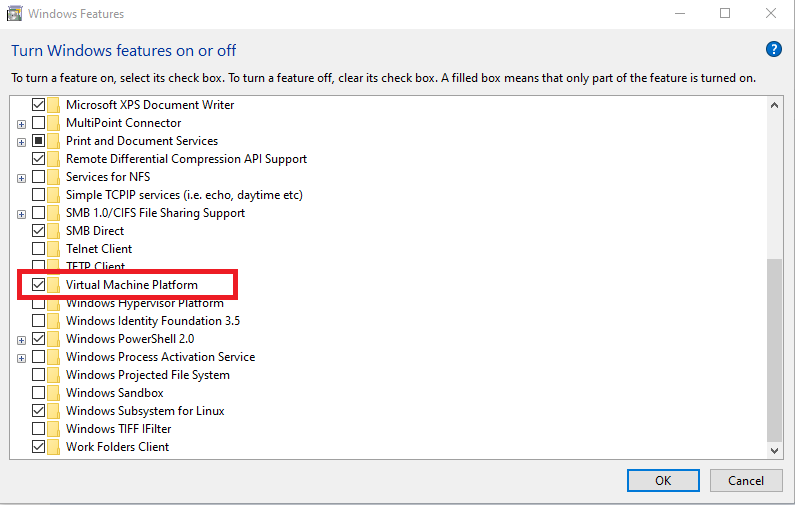
If you receive the error code 14107, it could indicate that the “Virtual Machine Platform” feature isn’t enabled on your computer. In this case, open Settings > Optional features > More Windows features, check the “Virtual Machine Platform,” and click the “OK” button to add the components. You can now run the WSL install command one more time.
Install WSL with specific distro
To install WSL with a specific distro on Windows 10, use these steps:
-
Open Start.
-
Search for Command Prompt, right-click the top result, and select the Run as administrator option.
-
Type the following command to view a list of available WSL distros to install on Windows 10 and press Enter:
wsl --list --online
Quick note: At the time of this writing, you can install Ubuntu, Debian, Kali Linux, openSUSE, and SUSE Linux Enterprise Server.
-
Type the following command to install the WSL with a specific distro on Windows 10 and press Enter:
wsl --install -d DISTRO-NAME

Remember to replace “DISTRO-NAME” in the command with the distro’s name to install, such as Debian.
-
Restart your computer.
-
Continue with the Linux distro setup as necessary.

After you complete the steps, the Windows Subsystem for Linux 2 components will be installed with the Linux distro you specified.
Update WSL kernel
To update the WSL kernel to the latest version, use these steps:
-
Open Start.
-
Search for Command Prompt, right-click the top result, and select the Run as administrator option.
-
Type the following command to update the WSL kernel and press Enter:
wsl --update


Once you complete the steps, if an update is available, it will download and install on the device.
If the update command doesn’t work, open Settings > Update & Security > Windows Update > Advanced options, and turn on the “Receive updates for other Microsoft products when you update Windows” toggle switch.
Install WSL on Windows 10 from the Microsoft Store
You can also install the Windows Subsystem for Linux and distros from the Microsoft Store. However, this process requires enabling the “Virtual Machine Platform” and “Windows Subsystem for Linux” features before installing the platform and the Linux distributions.
1. Enable WSL virtualization components
To install the required system components to run Linux on Windows 10, use these steps:
-
Open Start.
-
Search for Turn Windows Features on or off and click the top result to open the app.
-
Check the “Virtual Machine Platform” option.

-
Check the “Windows Subsystem for Linux” option.
-
Click the OK button.
-
Click the Restart button.

After completing the steps, you can proceed with the steps to download the WSL from the Microsoft Store.
2. Install Windows Subsystem for Linux app
To install WSL on Windows 11 from the Microsoft Store, use these steps:
-
Open the Windows Subsystem for Linux store page.
-
Click the Install button.
-
Click the “Open Microsoft Store” button (if applicable).
-
Click the Install button again.


3. Install Linux distro
To install a Linux distribution from the Microsoft Store, use these steps:
-
Open the Microsoft Store app.
-
Search for Linux distros, such as Debian.
-
Click the Get button.

-
Click the Open button.

Once you complete the steps, the Linux layer will install on Windows 10, including the support for Linux GUI apps and the Linux distribution.
Install WSL2 on Windows 10 (older versions)
Alternatively, you can still install WSL on Windows 10 version 1909 and older versions using the legacy processes. The process requires enabling WSL1, the Virtual Machine Platform, converting existing distros (if applicable), and configuring the Windows Subsystem for Linux 2 as the new default for future distro installations.
If you have an ARM64 system, the Linux integration is supported on version 2004 and higher.
Enable Windows Subsystem for Linux
If you are not already using Linux on Windows 10, you must enable the Windows Subsystem for Linux (version 1) with these steps:
-
Open Start on Windows 10.
-
Search for Turn Windows features on or off and click the top result to open the app.
-
Check the “Windows Subsystem for Linux” option.

-
Click the OK button.
-
Click the Restart button.

Once you complete the steps, you must enable the Virtual Machine Platform feature.
Enable Virtual Machine Platform
To enable the Virtual Machine Platform on Windows 10, use these steps:
Important: The motherboard and processor must support virtualization, and the option has to be enabled on the Basic Input/Output System (BIOS) or Unified Extensible Firmware Interface (UEFI).
-
Open Start.
-
Search for PowerShell, right-click the top result, and select the Run as administrator option.
-
Type the following command to enable the Virtual Machine Platform feature and press Enter:
Enable-WindowsOptionalFeature -Online -FeatureName VirtualMachinePlatform

-
Restart your computer.

After you complete the steps, you can set the Windows Subsystem for Linux version 2 as the new default architecture and convert existing distros.
Enable Windows Subsystem for Linux 2
To start using WSL2 or covert WSL distros to WSL2, use these steps:
-
Download this WSL 2 kernel update (required).
-
Double-click the wsl_update_x64.msi file and apply the update.
-
Open Start.
-
Search for PowerShell, right-click the top result, and select the Run as administrator option.
-
Type the following command to set Windows Subsystem for Linux 2 as your default architecture for new distros that you install, and press Enter:
wsl --set-default-version 2

-
(Optional) Type the following command to convert the distro from WSL to WSL 2 and press Enter:
wsl --set-version Ubuntu 2
In the command, change “Ubuntu” for the distro’s name you want to convert. If you do not know the distro’s name, use the
wsl -l -vcommand.


Once you complete the steps, your device will start using the new version of Windows Subsystem for Linux as the default architecture.
Confirm distro platform
To confirm distros are using the Windows Subsystem for Linux 2, use these steps:
-
Open Start.
-
Search for PowerShell, right-click the top result, and select the Run as administrator option.
-
Type the following command to verify the version of the distro and press Enter:
wsl --list --verbose
-
Confirm the distro version is 2.

After you complete the steps, you will know if the process was successful or if you need to troubleshoot any of the steps.
Update November 5, 2024: This guide has been updated to ensure accuracy and reflect changes to the process.
В последних сборках Windows Insider Preview вы можете установить все необходимое для запуска WSL, просто выполнив wsl.exe —install. Мы рады сообщить, что эта функция теперь официально перенесена в Windows 10 версии 2004 и выше, что значительно упростит установку WSL в этих сборках.
Использование wsl —install

Раньше процесс настройки WSL был слишком сложным и требовал включения нескольких параметров и установки нескольких пакетов. Мы упростили процесс до одной команды: просто откройте окно командной строки с правами администратора и запустите wsl.exe —install. После того, как вы нажмете Enter, процесс автоматически включит необходимые дополнительные функции WSL, установит дистрибутив Ubuntu по умолчанию и установит последнюю версию ядра WSL Linux на ваш компьютер. Когда он будет завершен и вы перезагрузите компьютер, ваш дистрибутив запустится после того, как вы снова загрузитесь, завершив установку.
Кроме того, вы можете найти список доступных для установки дистрибутивов Linux, введя команду wsl —list —online в PowerShell или командной строке Windows. Чтобы установить дистрибутив, отличный от стандартного для Ubuntu или в дополнение к нему, используйте эту команду: wsl —install -d <DistroName>
Замените <DistroName> именем дистрибутива Linux, найденным в предыдущей команде list. Эту команду установки можно использовать для первой установки или для добавления дополнительных дистрибутивов после того, как у вас уже установлен WSL с дистрибутивом Ubuntu по умолчанию.
Дополнительные команды
Мы также добавили несколько дополнительных команд, которые помогут вам управлять своими экземплярами WSL.
Вы можете использовать wsl —update, чтобы вручную обновить ядро WSL Linux, и вы можете использовать wsl —update rollback для отката к предыдущей версии ядра WSL Linux.
Наконец, вы можете использовать wsl —status для просмотра общей информации о вашей конфигурации WSL, такой как тип дистрибутива по умолчанию, дистрибутив по умолчанию и версия ядра.
Обновите версию Windows 10 для поддержки этих команд
Вы можете получить все это, просто обновив Windows, как обычно. Чтобы сделать это вручную, откройте настройки Windows, перейдите в «Обновления и безопасность» и нажмите «Проверить наличие обновлений».

Это обновление является частью KB5004296. На момент написания, когда вы нажмете «Проверить наличие обновлений», вы можете увидеть доступное дополнительное обновление, убедитесь, что оно имеет тот же номер, что и KB5004296, установите его, и вы получите доступ к wsl —update.
Recently Microsoft added a list of new features to the well-received WSL (Windows Subsystem for Linux) named “WSL 2”. This new version of WSL enables features such as increased file IO performance and full system call compatibility and is not enabled by default.
In this guide, we will install, configure WSL2 on our Windows 10 workstation, as well as install a Linux distribution on it.
Prerequisites
To install WSL 2, you must be running Windows 10. The following versions and builds are supported:
- For x64 systems: Version 1903 or higher, with Build 18362 or higher.
- For ARM64 systems: Version 2004 or higher, with Build 19041 or higher.
- Builds lower than 18362 do not support WSL 2. Use the Windows Update Assistant to update your version of Windows.
Step #1 — Enable the “Windows Subsystem for Linux” feature
To install WSL (any version) to Windows 10 we must first enable the “Windows Subsystem for Linux” feature in Windows 10. This can be done in two ways:
using Powershell
To enable the “Windows Subsystem for Linux” open Powershell and type the below command:
dism.exe /online /enable-feature /featurename:Microsoft-Windows-Subsystem-Linux /all /norestartusing GUI
Go to Control Panel -> Programs & Features -> Turn Windows features on or off, then find and enable “Windows Subsystem for Linux” like the below screenshot:
Step #2 — Enable the “Virtual Machine Platform” feature
Next, we need to enable the “Virtual Machine Platform” feature. This can be done in two ways:
Powershell
To enable the “Virtual Machine Platform” open Powershell and type the below command:
dism.exe /online /enable-feature /featurename:VirtualMachinePlatform /all /norestartGUI
Go to Control Panel -> Programs & Features -> Turn Windows features on or off, then find and enable “Virtual Machine Platform” like the below screenshot:
Step #3 — Download the “Linux kernel update” package
Microsoft provides the Linux kernel update package, which is needed to support the added feature set of WSL 2. You can find the package at the following links:
WSL2 Linux kernel update package for x64 machines
WSL2 Linux kernel update package for Arm64 machines
If you’re not sure what kind of machine you have, open Command Prompt or PowerShell and enter:
systeminfo | find "System Type".After downloading the package for your machine kind, run the update package downloaded in the previous step. (Double-click to run — you will be prompted for elevated permissions, select ‘yes’ to approve this installation.)
Once the installation is complete, restart your machine to complete the WSL install and update to WSL 2.
Step #4 — Set WSL 2 as your default version
As you can have both versions of WSL installed, it is always nice to set the default version of newly installed distributions to WSL2. To do so, open Powershell and type:
wsl --set-default-version 2This will ensure that the extra features are enabled on the Linux distributions you’re going to download and install in the future, but what about the already installed distros?
If you have recently updated WSL to WSL2, chances are your already installed distributions are using WSL 1 features. To check, open a Powershell window and type:
wsl --list --verboseThis will return with a list of installed distributions, along with the Version of WSL enabled on those. To update your installed distributions to the newer feature set, open a Powershell window and type:
wsl --set-version <distribution name> <versionNumber>Step #5 — Install your Linux distribution of choice
Now after we’ve set-up all the needed dependencies for WSL 2 and enabled its feature set by default it is time to download and use your distribution of choice.
The following lists all compatible and available distributions in the Microsoft store at the time of writing:
- Ubuntu 16.04 LTS
- Ubuntu 18.04 LTS
- Ubuntu 20.04 LTS
- openSUSE Leap 15.1
- SUSE Linux Enterprise Server 12 SP5
- SUSE Linux Enterprise Server 15 SP1
- Kali Linux
- Debian GNU/Linux
- Fedora Remix for WSL
- Pengwin
- Pengwin Enterprise
- Alpine WSL
To install any of those, go to the Win10 app store “Microsoft Store” and search for them. After you find your selected distribution, click on “Get” to start the download.
The first time you launch a newly installed Linux distribution, a console window will open and you’ll be asked to wait for a minute or two for files to de-compress and be stored on your PC. All future launches should take less than a second.
You will then need to create a user account and password for your new Linux distribution.
CONGRATULATIONS! You’ve successfully installed and set up a Linux distribution that is completely integrated with your Windows operating system!
Now if you like to test things out and restore the distribution to its original settings, you can uninstall it completely from the Settings -> Apps -> Apps & Features and re-install.
Thank you for reading! Be sure to share this post if you found it helpful and don’t hesitate to chat with me about it!
This post was first published on Stathis’ log book by Stathis Athanasiadis aka StatAth