
Вопрос о том, как включить Защитник Windows 10 задается, наверное, чаще чем вопрос о его отключении. Как правило, ситуация выглядит так: при попытке запуска Защитника Windows вы видите сообщение о том, что это приложение выключено групповой политикой, в свою очередь использование параметров Windows 10 для его включения также не помогает — в окне настроек переключатели неактивны и пояснение: «Некоторыми параметрами управляет ваша организация».
В этой инструкции — способы включить Защитник Windows 10 снова с помощью редактора локальной групповой политики или редактора реестра, а также дополнительная информация, которая может быть полезной.
Причина популярности вопроса обычно в том, что пользователь не сам отключал защитник (см. Как отключить Защитник Windows 10), а использовал, например, какую-либо программу для отключения «слежки» в ОС, которая, попутно, отключила и встроенный антивирус Windows Defender. Например, так по умолчанию делает программа Destroy Windows 10 Spying.

Включение Защитника Windows 10 с помощью редактора локальной групповой политики
Этот способ включить Защитник Windows подойдет только для владельцев Windows 10 Профессиональная и выше, поскольку только в них присутствует редактор локальной групповой политики (если у вас Домашняя или Для одного языка — перейдите к следующему способу).
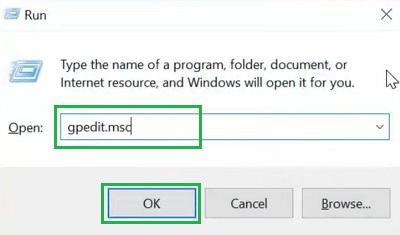
- Запустите редактор локальной групповой политики. Для этого нажмите клавиши Win+R на клавиатуре (Win — клавиша с эмблемой ОС) и введите gpedit.msc после чего нажмите Enter.
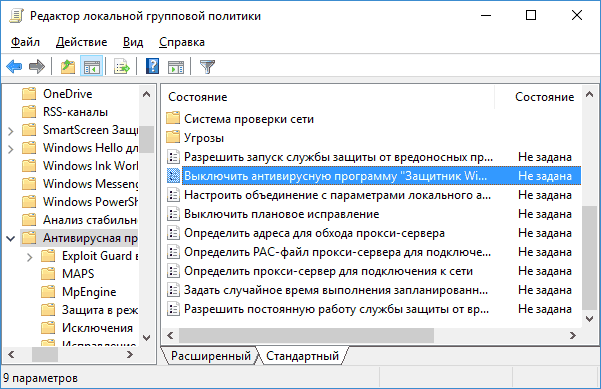
- В редакторе локальной групповой политики перейдите к разделу (папки слева) «Конфигурация компьютера» — «Административные шаблоны» — «Компоненты Windows» — «Антивирусная программа защитник Windows» (в версиях Windows 10 до 1703 раздел назывался Endpoint Protection).

- Обратите внимание на параметр «Выключить Антивирусную программу защитник Windows».
- Если там установлено «Включено», дважды кликните по параметру и установите «Не задано» или «Отключено» и примените настройки.

- Внутри раздела «Антивирусная программа Защитник Windows» (Endpoint Protection) загляните также в подраздел «Защита в режиме реального времени» и, если параметр «Выключить защиту в реальном времени» включен, переведите его в «Отключено» или «Не задано» и примените настройки.

После указанных процедур с редактором локальной групповой политики, запустите Защитник Windows 10 (быстрее всего — через поиск в панели задач).

Вы увидите, что он не запущен, но ошибки «Это приложение выключено групповой политикой» больше появиться не должно. Просто нажмите кнопку «Запустить». Сразу после запуска вам также могут предложить включить фильтр SmartScreen (в случае если он был отключен сторонней программой вместе с Windows Defender).
Как включить Защитник Windows 10 в редакторе реестра
Те же действия можно проделать и в редакторе реестра Windows 10 (по сути, редактор локальной групповой политики изменяет как раз значения в реестре).
Шаги для включения Защитника Windows данным способом будут выглядеть так:
- Нажмите клавиши Win+R на клавиатуре, введите regedit и нажмите Enter для запуска редактора реестра.
- В редакторе реестра перейдите к разделу (папки слева) HKEY_LOCAL_MACHINE\ SOFTWARE\ Policies\ Microsoft\ Windows Defender и посмотрите, есть ли в правой части параметр «DisableAntiSpyware». Если есть, кликните по нему дважды и присвойте значение 0 (ноль).

- В разделе Windows Defender есть также подраздел «Real-Time Protection», загляните в него и, если там имеется параметр DisableRealtimeMonitoring, то также установите значение 0 для него.
- Закройте редактор реестра.

После этого наберите в поиске Windows в панели задач «Защитник Windows», откройте его и нажмите кнопку «Запустить» для запуска встроенного антивируса.
Дополнительная информация
Если описанное выше не помогает или же возникают какие-то дополнительные ошибки при включении защитника Windows 10, попробуйте следующие вещи.
Ну а если и эти варианты не сработают — пишите комментарии, попробуем разобраться.
,
In Windows 10, 8, 8.1 operating systems, Microsoft updated its security protection with the Windows Defender Antivirus program. The Windows Defender (previously known as Microsoft Security Essentials) offers more protection to your Windows system from viruses, Trojans, worms and other malicious programs that can harm your computer.
When you buy a Windows 8 computer today, Microsoft Windows Defender is already bundled inside the new operating system, but for the reason that some OEM manufacturers prefer to install trial versions of antivirus protection programs from other manufacturers like Norton, McAffee, etc. the Windows Defender is disabled. If you don’t like the manufacturer’s antivirus, then you can uninstall it from your control panel and then you can enable and use Windows Defender to protect your computer.
(FIX: Windows Defender has been turned off and isn’t monitoring your computer).

In this article I will explain how to enable the default Windows Antivirus Protection (‘Windows Defender’ in Windows 10 or the ‘Microsoft Security Essentials’ if you own Windows 7 or Vista).
How to enable Windows Defender Antivirus (Microsoft Security Essentials) in Windows 10, 8, 7 & Vista OS.
1. You can easily enable Windows Defender from your control panel. To do this, go to: *
* Attention: Uninstall any other third party antivirus before you continue below.
1a. Windows 7: Start > Control Panel.
1b. Windows 8: Right click on the bottom left corner and select Control Panel }
2. From “Control Panel” menu items, double click to open “Action Center”. (In Windows 10 OS open the «Security and Maintenance» item)

3. In “Action Center” settings, press the “Turn on now” button to enable “Windows Defender”. *
* Notes:
1. In Windows 7, Vista OS you have to press the “Turn on now” button beside “Virus Protection” options.
2. In Windows 10 OS press the Turn on now button next to Spyware and unwanted software protection.
3. If after pressing the «Turn ON» button nothing happens, then follow the instructions on this guide: How to fix: Cannot Start Windows Defender on Windows 10 or Windows 8.

4. After Windows Defender Activation you should view the follow screen on your computer.

5. After you have enabled Windows Defender, press the “Update” tab and proceed to update its virus database.

6. In “Update” options, press the “Update” button to start updating Windows virus and spyware definitions.

That’s it! I hope that this article was useful for you.
Please leave a comment below if it helped you or not. It really helps us a lot. Thanks.
If this article was useful for you, please consider supporting us by making a donation. Even $1 can a make a huge difference for us in our effort to continue to help others while keeping this site free:
- Author
- Recent Posts
Konstantinos is the founder and administrator of Wintips.org. Since 1995 he works and provides IT support as a computer and network expert to individuals and large companies. He is specialized in solving problems related to Windows or other Microsoft products (Windows Server, Office, Microsoft 365, etc.).
Download Article
Easy step-by-step guide to disable Defender antivirus protection
Download Article
- Disabling Temporarily
- Disabling Permanently (Antivirus Software)
- Disabling Permanently (Group Policy Editor)
- Q&A
- Tips
- Warnings
|
|
|
|
|
This wikiHow guide will show you how to turn off Microsoft Defender (formerly Windows Defender) in Windows 10. Microsoft Defender can be disabled in Settings, but will turn back on automatically when you restart your computer. If you want to turn off Defender permanently, you’ll need to install a different antivirus program. You can also use the built-in Group Policy Editor to permanently turn off Defender.
Things You Should Know
- To disable Defender, open Windows Security, go to Virus & threat protection > Virus & threat protection settings, and turn off real-time protection.
- Defender will reenable automatically the next time you restart your computer.
- To turn off Defender permanently, install an alternative antivirus program, or use the Group Policy Editor.
-

A list of matching search results will appear.
- This method temporarily turns off Defender’s real-time antimalware protection, which can be helpful if you need to install trusted software that Defender improperly flags as harmful.
- Defender will turn back on automatically after you restart your PC.
-

This opens your security settings.
- If you don’t see this option, you’re likely not signed in as an administrator. If you’re not the administrator of the PC, you won’t be able to disable Windows Defender.
Advertisement
-

It’s the first option below the «Protection areas» heading near the top of the page.
-

You’ll find this option in the middle of the page.
-
Turning off real-time protection will mean your device is vulnerable until it turns back on.[1]
- Click the blue «On» switch below the «Real-time protection» heading.
- Click Yes when prompted. This will turn off the real-time scanning feature of Microsoft Defender.
- You can also disable Microsoft Defender’s cloud-based protection by clicking the blue «On» switch below «Cloud-delivered protection» and clicking Yes when prompted.
- Windows Defender will turn itself back on the next time you restart your computer.


Advertisement
-
To turn off Microsoft Defender permanently, you can install a 3rd party antivirus software like Bitdefender, McAfee, or Malwarebytes Premium. When setting up your new antivirus software, the new software will automatically disable Windows’ built-in antivirus protection.

-

If you’re using Windows 10 Pro or Enterprise, you can use the built-in Group Policy Editor to turn off Microsoft Defender permanently. Note that your computer will be vulnerable to malware after turning off Defender. You’ll need to turn off Tamper Protection to turn off Microsoft Defender:[2]
- Open the Windows Security app.
- Click Virus & threat protection.
- Click Manage settings.
- Switch Tamper Protection to “Off.”
-
The Run menu will open.
-
This will open the Group Policy Editor menu.[3]
-

Take these steps in the Group Policy Editor to find this option:
- Computer Configuration
- Administrative Templates
- Windows Components
- Microsoft Defender Antivirus
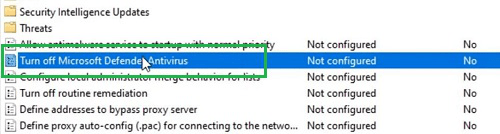
-

You’ll see it in the policy list. This opens an options menu for the policy.
-
-
This will confirm the choice to turn off Microsoft Defender and close the window.
- You must restart your computer to turn off Microsoft Defender fully.
- To reenable Defender in the future, return to the GPE and change “Turn off Microsoft Defender Antivirus” to Not Configured,


Advertisement
Add New Question
-
Question
I did not order Microsoft Defender, how do I delete it?
Microsoft Defender comes with Windows 10, and, unfortunately, it cannot be deleted.
-
Question
Is there a way to turn it off without admin privileges?
No, you need to be an administrator to disable Windows Defender. This is a security measure to prevent viruses from turning Windows Defender off. However, if you know what you are doing and are certain of the safety of a third party app, it is possible to turn it off by using third party operating systems or startup disks which can access system settings of this system or user account, and disabling services with help of third party apps.
-
Question
It keeps getting switched back to on. Why?
This is because Microsoft Defender automatically turns itself back on whenever Windows restarts.
See more answers
Ask a Question
200 characters left
Include your email address to get a message when this question is answered.
Submit
Advertisement
-
Installing a third-party antivirus will not delete Microsoft Defender but will deactivate it so they don’t conflict.
Thanks for submitting a tip for review!
Advertisement
-
Disabling Microsoft Defender may open your computer up to security threats. You should not do this unless you know what you are doing.
Advertisement
References
About This Article
Article SummaryX
1. Open the Start menu.
2. Click Settings.
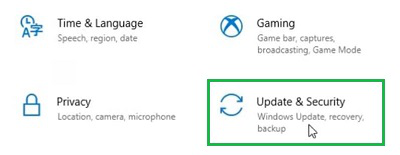
3. Click Update & Security.
4. Click Windows Security.
5. Click Virus & threat protection.
6. Click Virus & threat protection settings.
7. Toggle off «Real-time protection.»
For more information on how to disable Microsoft Defender, read on!
Did this summary help you?
Thanks to all authors for creating a page that has been read 2,452,405 times.
Is this article up to date?
There are times when we want to turn off Windows Defender on Windows 10 quickly. For example, if we are installing a software which requires that the antivirus should be disabled during installation (yes there are some software which requires this).
Windows Defender is an all in one security software from Microsoft consisting of antivirus and a firewall. Windows Defender comes pre-installed with Windows 10. It gets all its updates from Windows Update.
Although you can turn Windows Defender on or off from Windows Settings, there are other quick ways to turn it on or turn off Windows Defender Windows 10 or even Windows 8/8.1. You should choose the best method according to the version of Windows you are using.
Table of Contents
Why turn off Windows Defender?
A general recommendation in terms of security is that you should always have security enabled for your PC at all times. This could be using Windows Defender, Microsoft’s own security solution built into Windows 10, or using a third-party security tool.
Sometimes you will need to disable antivirus and firewall protection in Windows. For example, when you are playing a game but the antivirus keeps on scanning the files and slows down the system. Another example can be when the antivirus detects a program as a false positive although you know that the program is completely safe to use.
Some people believe that it is safe to turn off Windows Defender and use cracking software. This includes activating Windows using illegal tools like KMSPico or the Microsoft Toolkit. These cracking tools are not safe at all. They may inject malware into the system that may not be detectable by the antivirus after installation. The malware is used for cryptomining and other hacking purposes.
There are two ways to turn off Windows Defender, either temporarily or permanently. We will discuss both ways here.
How to Turn Off Windows Defender Using Windows Settings
If you want to turn Windows Defender on or off using Windows Settings, follow the steps below:
- Open Windows Settings (Windows key + i)
- Go to Update & Security –> Windows Security
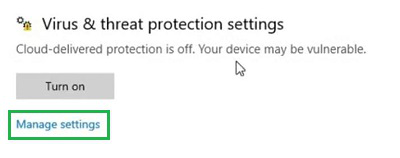
- From the right-hand pane, select Manage settings under Virus & threat protection settings.
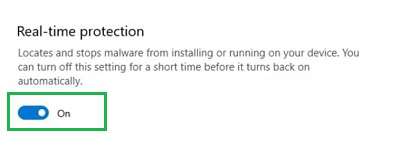
- Toggle the switch to Off under Real-time protection.

This will turn off real-time protection while a manual scan is available at your disposal.
How To Disable Windows Defender Using Command Prompt
To turn off Windows Defender using Command Prompt, follow these steps:
-
Open command prompt with administrative privileges
-
Run the following command to disable Windows Defender:
sc stop WinDefend -
To make sure that Windows Defender is stopped, run this command:
sc query WinDefend
To enable Windows defender again, run the following command:
sc start WinDefendPlease note that this is a temporary method to stop Windows Defender. The service will return to its original state once the system is restarted.
To disable Windows Defender permanently using the command prompt, run the following command:
sc config WinDefend start= disabled
sc stop WinDefend
To enable it again on startup, run the following commands:
sc config WinDefend start= auto
sc start WinDefend
If you want to check the current state of the Windows Defender service, run the following command:
sc query WinDefendCheck the STATE variable. It should be in RUNNING state if it is enabled.

How To Permanently Disable Windows Defender Using PowerShell
One advantage of PowerShell is that you can deploy changes to Windows Defender on multiple computers across the network.
If you prefer PowerShell way, follow the steps below:
- Run PowerShell with administrative privileges (Windows key + X + A)
- To disable real-time monitoring for Windows Defender, run the following command:
Set-MpPreference -DisableRealtimeMonitoring $true - To enable real-time monitoring, run the following command:
Set-MpPreference -DisableRealtimeMonitoring $false
The above method will only turn off real-time monitoring of Windows Defender. If you want to completely remove Windows Defender from Windows 10, use the following PowerShell command:
Uninstall-WindowsFeature -Name Windows-Defender
How To Permanently Turn Off Windows Defender Using Group Policy
If you are a network admin and want to disable Windows Defender from your network, it is wise to use Group Policy. Just follow the steps below to turn off Windows Defender using the Group Policy editor:
- Open Group Policy Editor (Run –> gpedit.msc)
- Go to Computer Configuration –> Administrative Templates –> Windows Components –> Windows Defender Antivirus

- From the right-hand pane, open Turn off Windows Defender Antivirus and select Enabled


This setting can be accessed through Local Group Policy as well as Domain Group Policy. The local policy will turn off Windows Defender for all local users while the domain policy will disable it for all systems on which the policy is applied.
How To Permanently Disable Windows Defender Using Windows Registry
You can also disable Windows Defender permanently from Windows Registry just by creating or altering a few registry keys.. Follow the steps below:
- Go to Run –> regedit. This will open the Windows Registry Editor.
- Navigate to the following key:
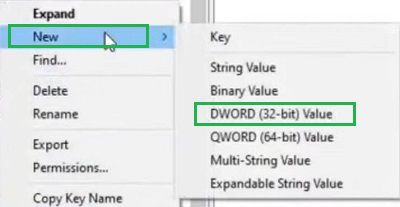
HKEY_LOCAL_MACHINE\SOFTWARE\Policies\Microsoft\Windows Defender - In the right pane, right-click the empty area and create a new DWORD (32-bit) value.
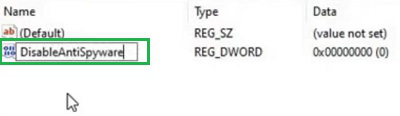
- Rename the new item to DisableAntiSpyware
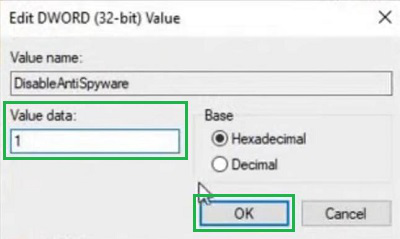
- Double-click DisableAntiSpyware and change its value to 1.
Windows Defender will not load after the next computer restart. To enable Windows Defender again, you can either delete the created registry key or simply change its value to 0.
Please note that you can’t completely uninstall the Windows Defender. Even if you manage to delete its service or files, it will most likely be restored on the next major Windows update.
There are a few scenarios where the user wants to disable a specific part of the Windows Defender system. We will discuss the scenarios below.
How to turn off Windows Firewall only
To turn off Windows Firewall only and keep using other Windows Defender functionality, follow the steps below:
- Open Windows Settings (Windows key + i)
- Click on Update & Security and then Windows Security
- In the right-hand pane, click on Open Windows Security
- From the left-hand pane, select Firewall & network protection
- In the right-hand pane, you will see three protection types. Domain network, Private network, Public network.
- Click on each network type and toggle it to disabled.
This will only turn off the firewall. The antivirus and other functionality of Windows Defender will keep on working.
How to turn off Windows Defender real-time antivirus only
If you want to turn off the antivirus real-time functionality only, you can follow the steps below:
- Open Windows Settings (Windows key + i)
- Click on Update & Security and then Windows Security
- From the left-hand pane, click on Virus & threat protection
- In the right-hand pane, toggle real-time protection to off.
Verdict
If you have not installed any third-party antivirus, then you should keep Windows Defender running as it will protect you from the most common virus/hacking threats while you are connected to the Internet. There should always be an anti-malware solution running on your computer at all times. These methods should be used to disable the security software temporarily.
I hope this has been informative for you. If there are any other easier ways to enable or disable Windows Defender, please let us know in the comments below!
Last Updated :
06 Feb, 2025
Windows Defender is a built-in security solution for Windows. It offers real-time protection from malware, threats or any other vulnerability. Since it’s an in-built feature of Windows & is recommended to keep it enabled throughout the time but, sometimes (like during any software installation) you may need to turn off the Windows Defender and as soon as the work is done, you will be required to turn it back on. Well, here are some of the best methods to turn Windows On or Off.

Method 1: Turnoff Windows Defender using Settings
You can use Windows Settings to turn off or on Windows Defender. Here’s are some quick actions to perform:
Step 1: Navigate to Windows Update & Security
Open Settings & go to the Update & Security.
Step 2: Click on Virus Protection
On the left-hand side, find out the Virus & Threat Protection. Click on that.
Step 3: Click to Open Manage Settings
Scroll down a bit to find Virus & Threat Protection Settings. Click on the Manage Settings option.
Step 4: Toggle OFF/ON Real-TIME Protection
Under the Real-Time protection, toggle on or off to turnoff Windows Defender
Hence, we have successfully turned Windows Defender On and Off using the Settings of the Device.
Method 2: Turnoff Windows Defender using Registry Editor
Alternatively you can also use Windows Registry Editor to turnoff Windows Defender. Below is te detailed steps to perform this action.
Step 1: Open Registry Editor
In the Search Bar, Search for the «regedit». And go with the best available option to open the Registry Editor.
Step 2: Navigate to DWORD (32-bit) Value
Follow the path HKEY_LOCAL_MACHINE > SOFTWARE > Policies > Microsoft > Windows Defender. Right-click on the option. Click the Next option, and later go for the DWORD (32-bit) Value.
Step 3: Enter DisableAntiSpyware to Turnoff Windows Defender
Provide the name DisableAntiSpyware for to turn off the Windows Defender. And to turn on the Windows Defender again, the name will be changed to EnableAntiSpyware.
Step 4: Set te Value Data as 1
Double-click over it to open a new small window. Provide the Value Data as 1 to make the key functional.
Hence, we have successfully turned Windows Defender On and Off using the Registry Editor.
Method 3: Use Group Policy to Turnoff Windows Defender Permanently
For advanced method, you can use Windows Group Policy to turnon or off Windows Defender.
Step 1: Open Run dialogue and type gpedit.msc
Open the Run Window by pressing the Windows + R keys. Now, write the command ‘gpedit.msc’ there and click OK.
Step 2: Navigate to Windows Components
Follow the path Computer Configuration > Administrative Templates > Windows Components > Microsoft Defender Antivirus. On the right-hand side, click on the Turn Off Microsoft Defender Antivirus option.
Step 3: Click the Radio Buttons to Turnoff or on Windows Defender
Now, you will get two options, Enabled or Disabled. Choose what you want. If you choose Enable, the Windows Defender for Windows 10 will be On. if you choose Disable, it will be Off.
Hence, we have successfully turned Windows Defender On and Off using the Group Policy.
While Windows Defender offers a tight and a real-time security, there are some of the handful reasons to make it disable (temporary and permanently). Keep this in mind that all te security measures are being taken before trying to get you hands on Windows Defender settings.
Also Read
- How to Disable Virus Protection on Your Computer?
- How to Fix «DNS Server Not Responding» Error?
- Optimize Windows OS for Better Performance
- How to Exclude Files or Folders from Windows Defender Scans?