How to enable hibernate in windows 10

Enabling Hibernate in Windows 10 is a simple process that allows your computer to save your current session so you can resume later without losing any work. This guide will walk you through the steps to turn on this power option, ensuring you can take advantage of it whenever needed.

Turning on hibernate in Windows 10 involves a few straightforward steps. This setting is useful as it saves your open applications, files, and documents, allowing you to pick up right where you left off. Here’s how to do it:

Step 1: Open Control Panel

First, Open the Control Panel from the Start menu.

You can do this by typing «Control Panel» into the search bar next to the Start button and clicking on the best match that appears.

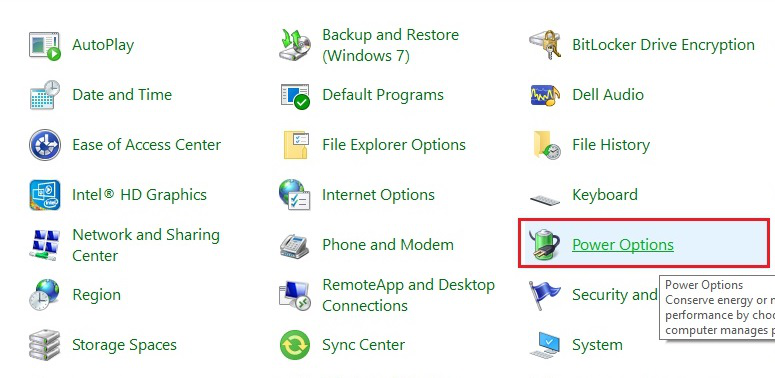
Step 2: Go to Power Options

Second, Navigate to the Power Options section.

In the Control Panel, click on «System and Security,» then «Power Options.» This will take you to the settings where you can manage your computer’s power.

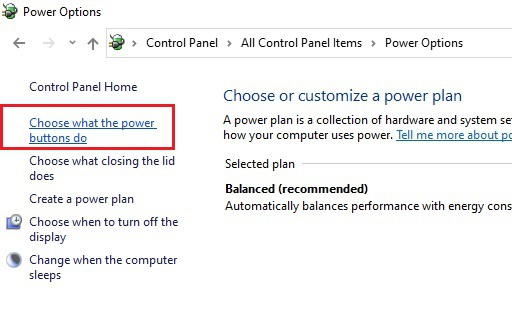
Step 3: Choose What the Power Buttons Do

Third, Select the option to choose what the power buttons do.

On the left side of the Power Options window, you will see an option that says «Choose what the power buttons do.» Click on this to proceed.

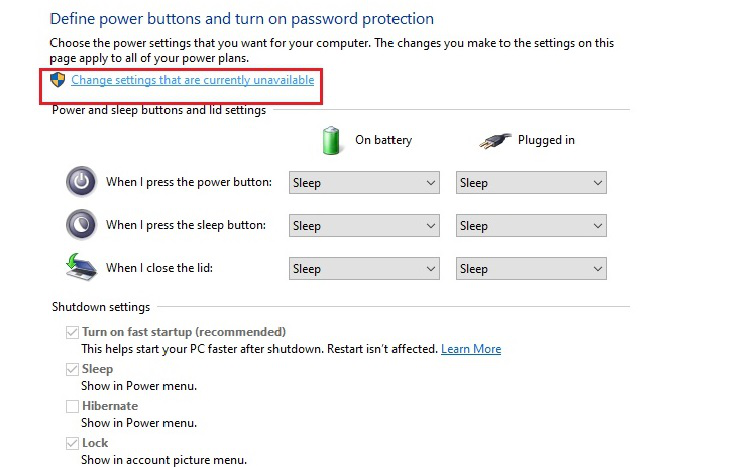
Step 4: Change Settings That Are Currently Unavailable

Fourth, Click on «Change settings that are currently unavailable.»

This action will unlock the hidden settings that include the Hibernate option.

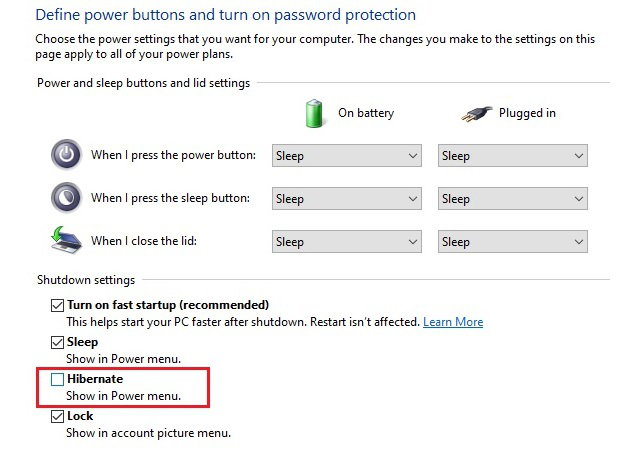
Step 5: Enable Hibernate

Finally, Check the box next to «Hibernate» and save changes.

Scroll down to the «Shutdown settings» section, check the box that says «Hibernate,» and click «Save changes» at the bottom of the window.

Once you complete these steps, the Hibernate option will be available on your power menu, allowing you to save power while keeping your session intact.

Tips for Enabling Hibernate in Windows 10

  • Make sure your system has enough free disk space, as hibernation saves the current state to a file on your hard drive.
  • If you don’t see the Hibernate option, your device’s hardware may not support it.
  • Regularly use the Disk Cleanup tool to ensure the hibernate file doesn’t take up too much space.
  • Hibernation is best used when you’ll be away from your computer for an extended period.
  • Restart your computer occasionally to keep it running smoothly, as hibernation doesn’t fully reset the system.

Frequently Asked Questions

What is the difference between Sleep and Hibernate?

Sleep mode saves your session to RAM and uses a small amount of power, while Hibernate saves it to the hard drive and uses no power.

Why isn’t the Hibernate option showing up?

If the Hibernate option isn’t showing up, your device’s hardware or BIOS settings might not support it.

Can hibernation harm my computer?

No, hibernation is a safe power-saving state and should not harm your computer.

How do I wake my computer from hibernate?

Press the power button to wake your computer from hibernate mode.

Does hibernation use more disk space?

Yes, the hibernation file can be large, as it saves the entire state of your computer.

Summary

  1. Open the Control Panel.
  2. Go to Power Options.
  3. Choose what the power buttons do.
  4. Change settings that are currently unavailable.
  5. Enable Hibernate.

Conclusion

Enabling hibernate in Windows 10 is a handy feature for users who want to save power without closing their current session. By following the simple steps outlined above, you can easily turn on this option and take advantage of its benefits. Hibernate mode is especially useful if you have multiple applications and documents open but need to step away from your computer for an extended period.

Remember, while hibernation is excellent for saving power and keeping your session intact, it’s essential to occasionally restart your computer to ensure everything runs smoothly. For further reading, you might want to explore additional power management settings in Windows 10 or learn more about optimizing your computer’s performance. Feel free to dive into these topics to get the most out of your Windows 10 experience.

Matt Jacobs has been working as an IT consultant for small businesses since receiving his Master’s degree in 2003. While he still does some consulting work, his primary focus now is on creating technology support content for SupportYourTech.com.

His work can be found on many websites and focuses on topics such as Microsoft Office, Apple devices, Android devices, Photoshop, and more.

Table of contents

  • What is Hibernation?
  • Why Should You Hibernate?
  • Is Hibernation Risky?
  • Difference Between Hibernation and Sleep Mode
  • How to Enable ‘Hibernate’ on Windows 10/11
    • Solution 1: Enabling the hibernate function via control panel
    • Solution 2: Enabling the hibernate function via the command prompt
    • Solution 3: Enabling the hibernate function via the registry editor
  • How to Hibernate Windows 10/11?
  • How to Turn Off Hibernation on Windows 10/11?
  • How to Disable Sleep Mode on Windows 10/11?
  • Conclusion
  • FAQ

One of the most persistent questions since PCs became a thing is how to increase laptop battery life. Using Windows hibernation function or Sleep Mode is a common suggestion to achieve this aim.

However, activating these functions is not always a straightforward process. Even after understanding how to enable and disable hibernation in Windows 10/11, it’s important to be aware of the implications of each choice.

This article is all about hibernation in Windows: how your computer hibernates, how to turn off hibernation in Windows 10/11, and even a bit about Sleep Mode. But first, let us look at what hibernation in Windows is.

What is Hibernation?

Hibernation is like shutting down your computer, except that it does not turn it off completely or shut it down. Instead, it places it in a sleep state that allows it to quickly wake up the next time you turn on your computer. In more technical terms, hibernation is an alternative to the Shut Down function or Sleep Mode. Just before you click the Hibernate option in the Power menu, Windows captures the system’s current state and stores that ‘snapshot’ to your hard drive. That way, it can immediately restore your system to that state when you turn it back on. 

Why Should You Hibernate?

Hibernation is known to achieve two different things for the average PC user. The first is helping your computer wake up faster than usual so you can resume work from where you stopped.

Keeping app windows open is one of the main reasons people keep their computers turned on for long periods.

The second is conserving battery life. When you hibernate your computer, power is cut off from different components, such as your RAM, to prevent your system from using power while in this state.

Thus, if you were using your PC and wanted to step out quickly, you could enable Hibernate on Windows 10/11 .

First, your PC will boot up faster when you do so. And second, only a trickle of battery life would have been used.

Is Hibernation Risky?

While there are minor concerns about hibernation, they are not significant enough to make you stop the practice entirely.

The only downside that you may notice is slow performance at startup when your computer loads the ‘snapshot’ onto the RAM.

That said, it’s always a good idea to shut down your computer occasionally to improve its lifespan.


Also Read: Laptop Lifespan: Why You Should Definitely Shut Down Your PC Every Night


Difference Between Hibernation and Sleep Mode

Hibernation and Sleep Mode are often considered to be similar in the sense that both of them are conditions of ‘half asleep, half awake’ computers.

Yes, both are functions for shutting down computers without shutting them down completely. But they are also different from each other.

The biggest difference between hibernation and Sleep Mode in Windows 10/11 is the state of inactivity.

Choosing the hibernate power option means your computer is almost completely turned off, which is why it uses up so little battery life.

But Sleep Mode essentially puts the computer on ‘standby,’ keeping your apps open.

A second notable difference between Hibernation Mode and Sleep Mode in Windows 10/11 is that hibernation saves the snapshot of your computer state to the hard disk.

On the other hand, Sleep Mode saves the snapshot to your RAM.


Also Read: How to Stop Apps from Running in the Background on Windows 10 PC?


How to Enable ‘Hibernate’ on Windows 10/11

Now that we have defined the hibernation function in Windows 10/11 and differentiated it from Sleep Mode, how do you enable it? Not all Windows computers have hibernation enabled as a default power option. In computers with this function enabled by default, you will find it alongside the Restart and Sleep Mode functions in the Power menu.  However, for the majority of PCs, you have to activate the hibernation function yourself, after which it will be included in the Windows Power menu. Once activated, you can click the power icon and select Hibernate or go to the Control Panel window and prompt your computer to hibernate whenever you press the power button or close the lid. Now, let’s show you the different ways to activate the Hibernate option.

Solution 1: Enabling the hibernate function via control panel

Control Panel is the most common route for enabling the hibernation function. This method leads you to the Power Options on your Windows PC, allowing you to determine how to use available options to turn on the hibernate function.


Also Read: [FIXED] “There Are Currently No Power Options Available” Windows Issue


Follow these steps:

  • Open the Run dialog window (press Windows + R), type control into the text field, and hit Enter.
  • Type power options in the search field and click Choose what the power buttons do under Power Options.

Choose what the power buttons do under Power Options.

  • Now, go to the Shutdown settings section on the subsequent screen and check the box beside Hibernate.
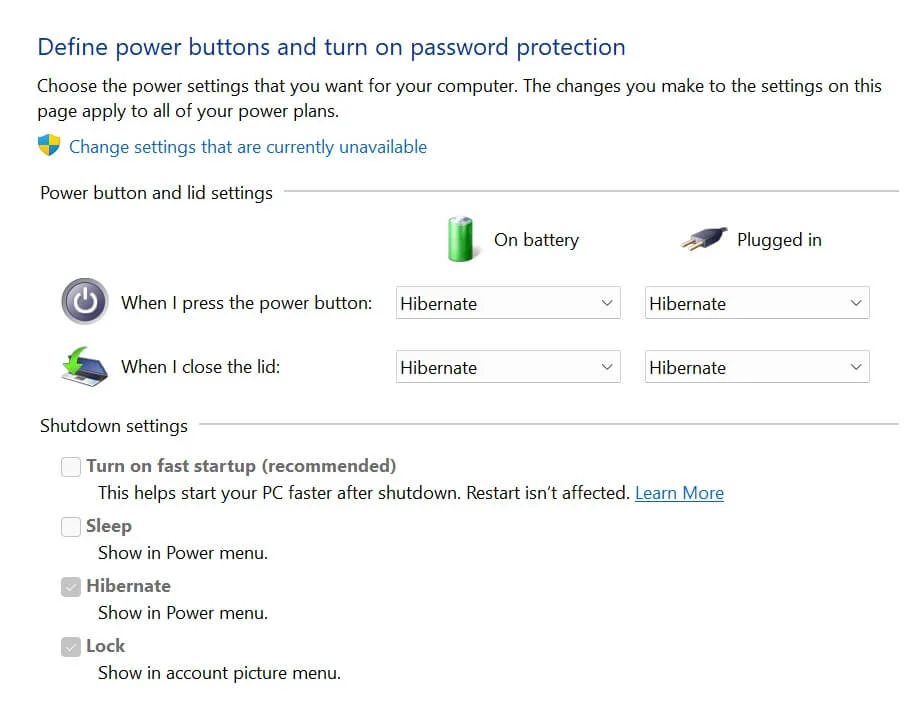
Shutdown settings section on the subsequent screen

As a bonus, you can also choose to enable the Hibernate option whenever you close your PC lid or press the power button. 

Solution 2: Enabling the hibernate function via the command prompt

The second method is the quickest, and it involves using the Command Prompt.  Follow these steps:

  • Go to the Start menu, type CMD or Command Prompt, and select the Run as administrator option in the search result.
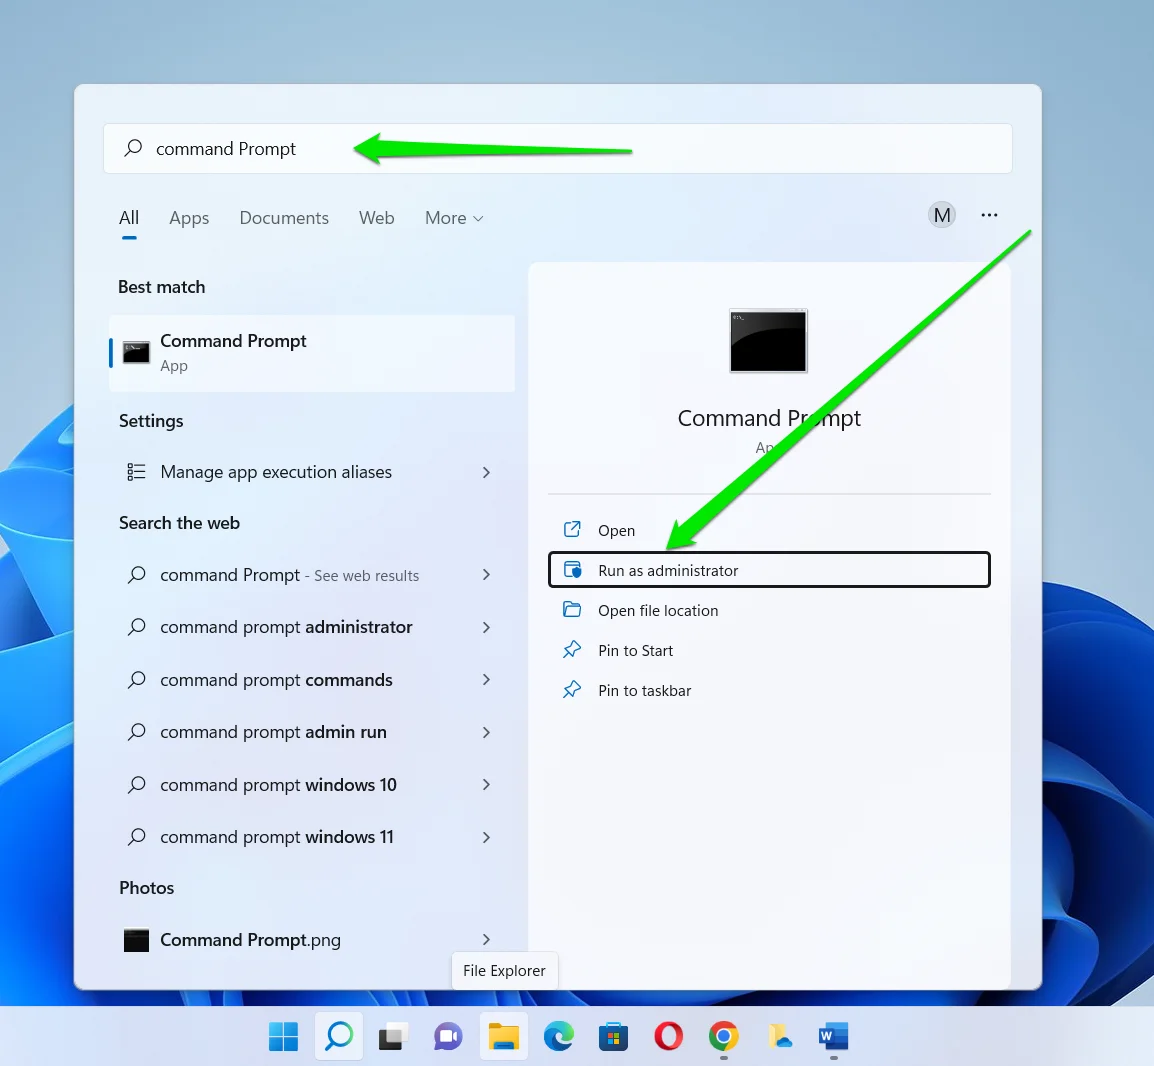
Run Command Prompt as Administrator

  • Click Yes if Windows asks for permission to allow the program to make changes to your PC.
  • Type the following code and press the Enter keyboard button once the Command Prompt window appears:

powercfg.exe /hibernate on  You should now be able to hibernate your computer through the Power menu.


Also Read: Windows Command Prompt: 28 Most Useful CMD Commands [with Examples]


Solution 3: Enabling the hibernate function via the registry editor

The Windows Registry is one of the ‘sacred’ and delicate places on your Windows PC. Windows users are usually advised to stay away unless they are power users and know what they are doing. But you can use the Registry Editor to enable Hibernate on your PC if you’re careful enough . That said, it’s important that you create a System Restore point or back up the registry before you proceed. That way, you can reverse any potential erroneous adjustment .


Also Read: Ultimate Guide: How to Fix Broken Registry Items in Windows 10/11


Follow these steps to enable the hibernate function on your Windows 10/11 via the Registry Editor:

  • Go to the Start menu, type regedit or registry editor, and click the first result.
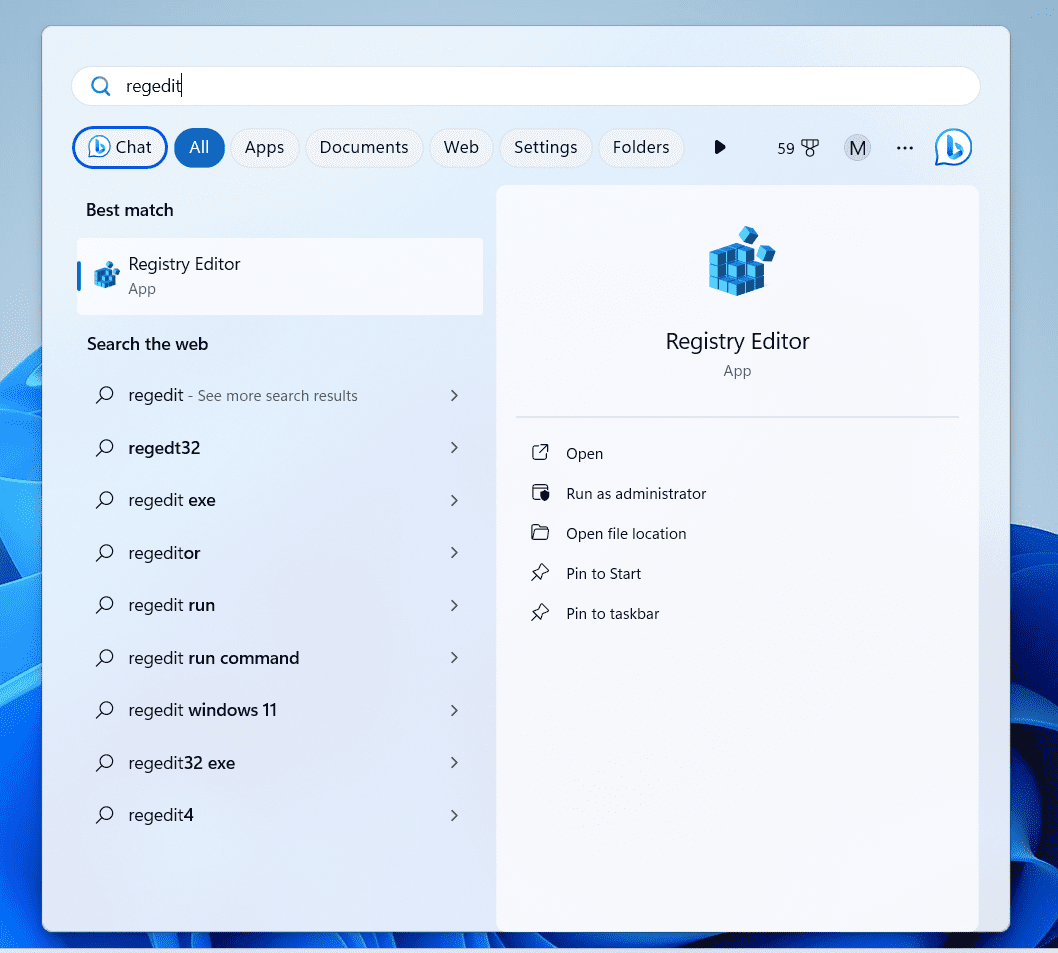
Enabling the Hibernate Function Via the Registry Editor

  • Click Yes to grant the program advanced permission.
  • After the Registry Editor window opens, go to the left sidebar and head to the following key:

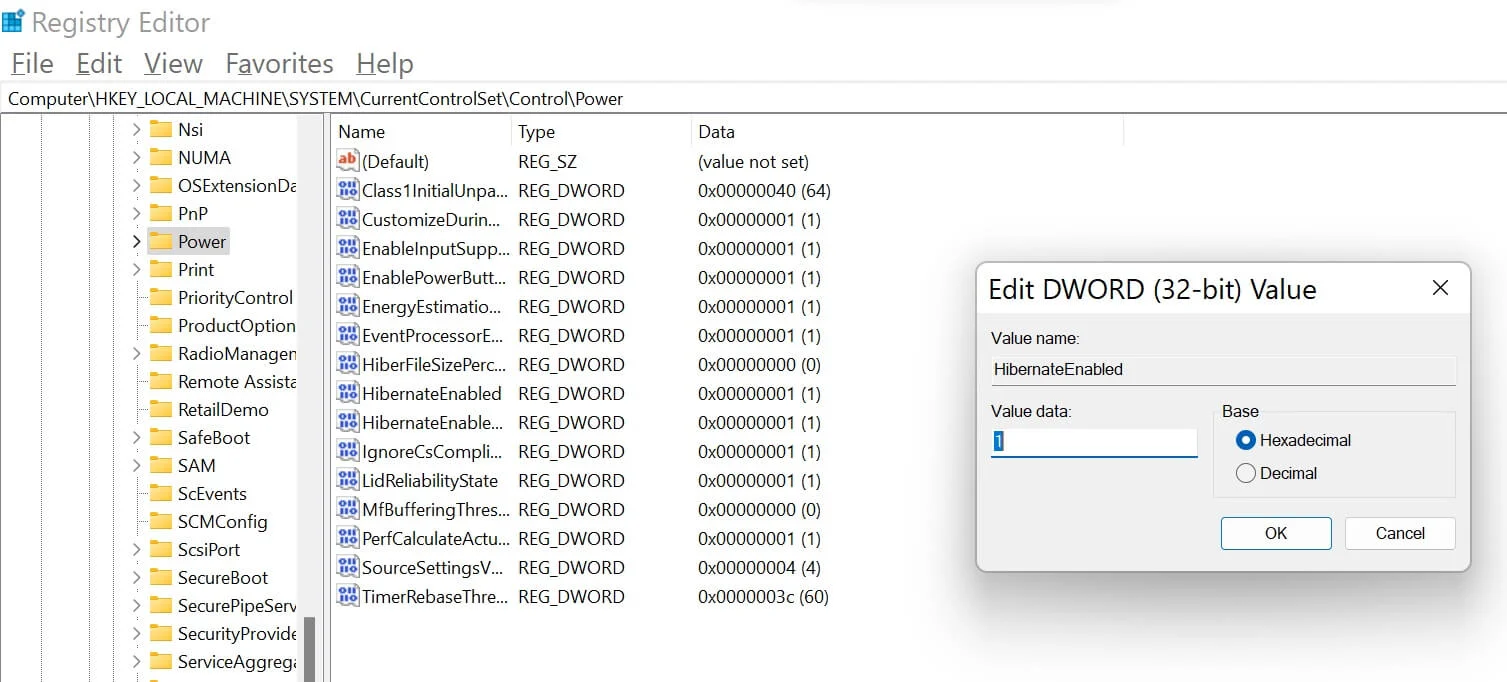
Computer\HKEY_LOCAL_MACHINE\SYSTEM\CurrentControlSet\Control\Power

  • Once you select the Power key, go to the right side of the screen and double-click the HibernateEnabled DWORD. If you don’t see that particular DWORD, right-click the space, select New > DWORD (32-bit) Value, and rename the new DWORD to HibernateEnabled.

Rename the new <em>DWORD</em> to <em>HibernateEnabled</em> » src=»https://www.auslogics.com/en/articles/wp-content/uploads/2023/11/Registry-Editor-Hibernate-Enabled-1.png»></p>
<div class= Картинка с сайта: www.auslogics.com

  • Next, type 1 in the Value data text field and hit Enter in the Edit DWORD (32-bit) Value dialog.
  • Restart your computer.

type 1 in the Value data text field


Important Read: Ultimate Guide: Why and How to Defrag Windows Registry?


How to Hibernate Windows 10/11?

There are three main ways you can hibernate your Windows PC: Power Button: From the section on how to enable hibernation on Windows 10/11, we explained how to enable hibernation via Control Panel (Power Options). There, you can select Hibernate for When I press the power button.
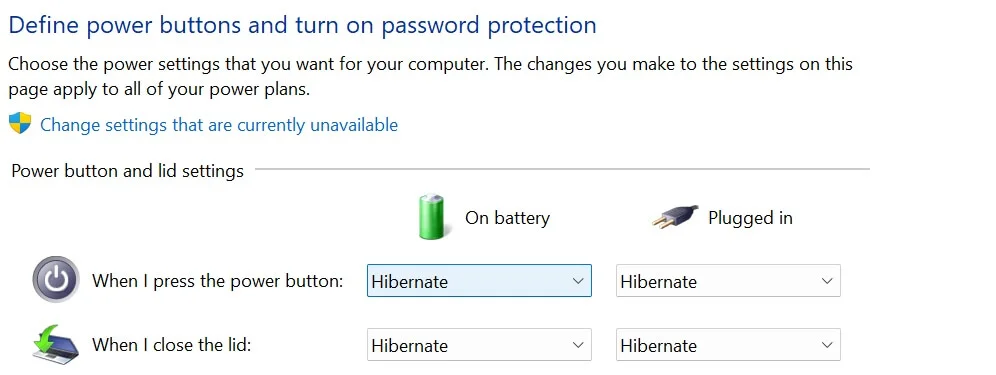
Power Button

Close PC Lid: In the same page as cited for the power button method, you can choose Hibernation for When I close the lid.

Using Keyboard Shortcut: Many PCs have the Sleep Mode attached to the F3 function key. To activate it, you need to use the fn + F3 key combination and your PC will hibernate. However, this option is only available on some computer models.

Using the Power Menu: The more traditional method would be to open the Start menu, click the power icon, and select Hibernate. You can also right-click the Start button or press Windows + X, choose Shut down, and click Hibernate.

How to Turn Off Hibernation on Windows 10/11?

To turn off hibernation on Windows 10/11, you only have to reverse each of the activation processes we have described in this article. For example, for Command Prompt hibernation activation, you can enter

powercfg.exe / hibernate off instead of  powercfg.exe / hibernate on

Similarly, for the Registry Editor option, when you modify the Value data for HibernateEnabled, enter 0 instead of 1 to turn off hibernation.

How to Disable Sleep Mode on Windows 10/11?

As earlier described, Sleep Mode is typically the default mode for your PC standby. However, if you want to turn it off so that your PC does not go into this standby mode, all you have to do is:

  • Search for edit power plan on the Windows Start Menu.
  • Under the Change settings for the plan submenu, move your cursor to the Put the computer to sleep option and choose Never from the options.
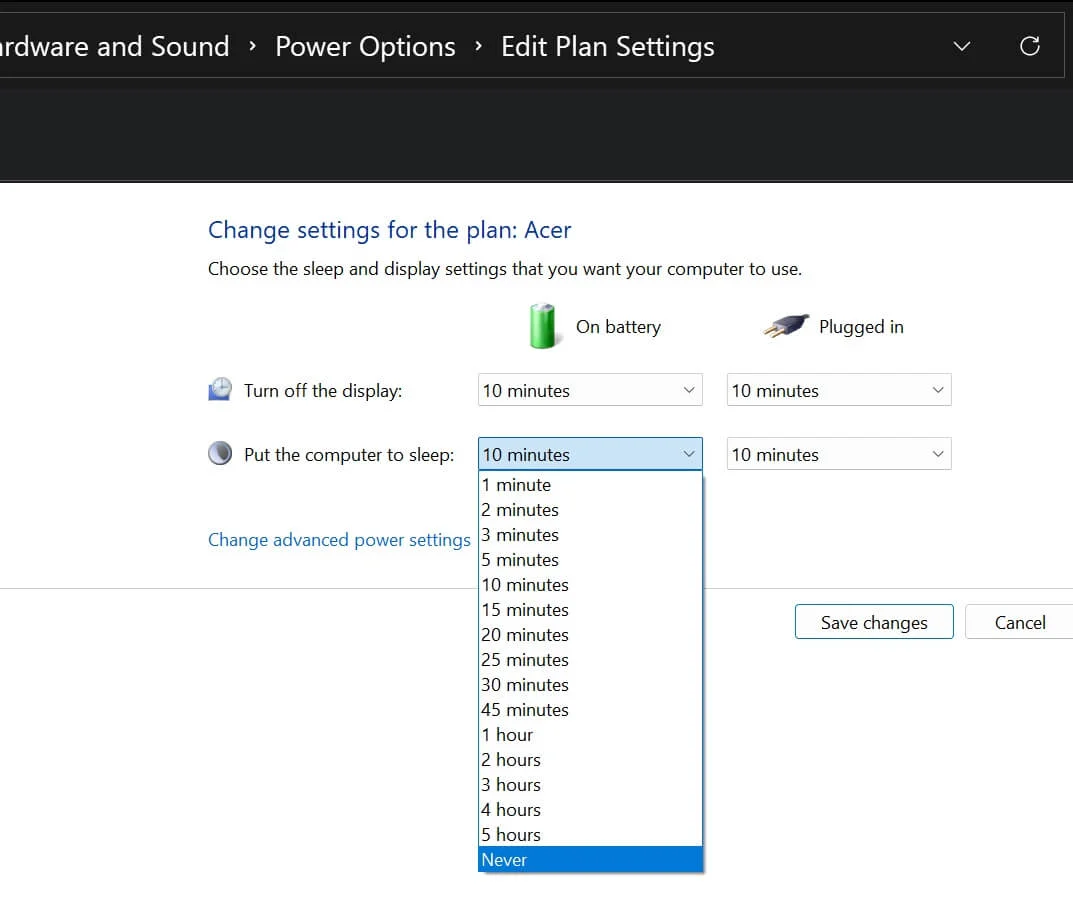
Change settings for the plan submenu

Conclusion

Enabling and using the hibernation function on Windows 10/11 can help you conserve your PC’s battery and let you continue work where you left off. You can always use the methods we showed you earlier to disable it whenever you change your mind.

FAQ

What is the main difference between sleep mode and hibernation?

The main difference is that Sleep Mode keeps your computer components, such as the RAM, running while Hibernation cuts power to those components.

Can I disable hibernation if I have limited storage space?

Yes, you can turn off hibernation whenever you want to.

Is hibernation safe for SSDs?

While hibernating your computer means there will be some write operation on the SSD, it doesn’t harm the device.

How do I know if Hibernation is enabled on my PC?

You will see the Hibernate option in the Power menu.

Hibernation in the context of Windows 10 is a state you can place your PC in as opposed to putting it to sleep or shutting it down. The feature of Hibernation is planned fundamentally for laptops, and probably won’t be accessible for all Windows computers and more especially PCs with InstantGo do not have the feature of Hibernation.

You won’t find the Hibernate mode option by default in Windows 10, but you can easily enable it using a manual method and command prompt.

Quick Overivew

Why do you need to enable the Hibernation feature?

Windows users enable Hibernation because just before the event when the PC goes into the state of hibernation and prior to shutting down, the PC takes a preview of its drivers and framework records, and then the PC saves it in the hard drive. As a result, your PC boots up quicker, on the grounds that it doesn’t have to restore those previous records and settings.

Moreover, the feature of Hibernation is enabled as a default but does not show in Start/Windows menu. However, it does not cause any trouble to your system and so there will be no issues even if you do not disable (in case if you are not using the Hibernation feature) it.

Why do you need to disable the Hibernation feature?

Well in case the Hibernation is enabled then it generally occupies a significant portion of your computers RAM. More specifically the hiberfil.sys file will occupy about 75 percent of your PC’s introduced RAM. For instance, in case you have 8GB of RAM, the hiberfil.sys document will take up 6GB of your RAM; if you have 16GB of RAM, your hiberfil.sys record will take up 12GB.

Note: The hiberfil.sys is located in the root folder where your Windows 10 operating system is loaded.

In this way, the Windows users who prefer to disable the Hibernation feature, do it because they truly need those additional gigs of hard drive space back. Hence you also might consider disabling it and as a result, you would not be able to utilize the feature of Hibernation.

1) Press the Windows button, type Power and Sleep, and click on it

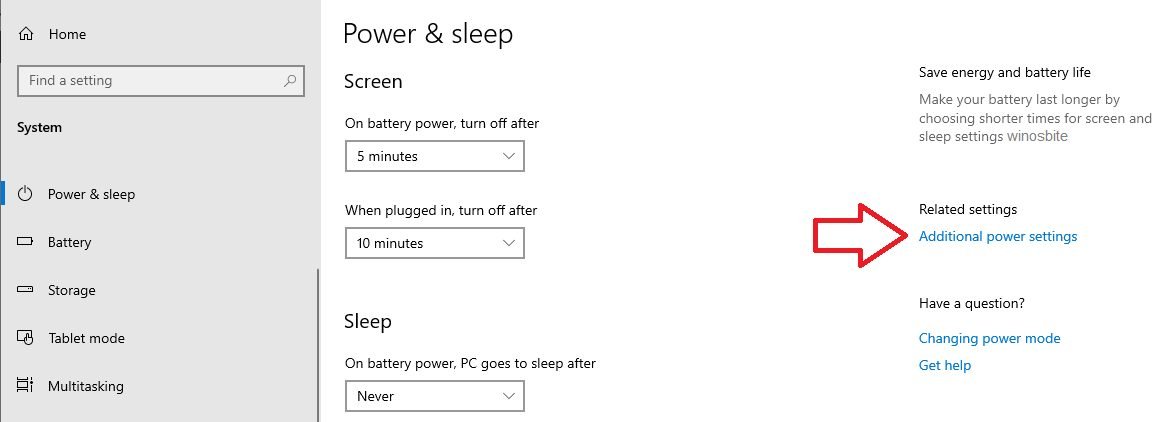
2) Click on Additional power settings located on the right-hand-side

Additional power settings on Windows 10

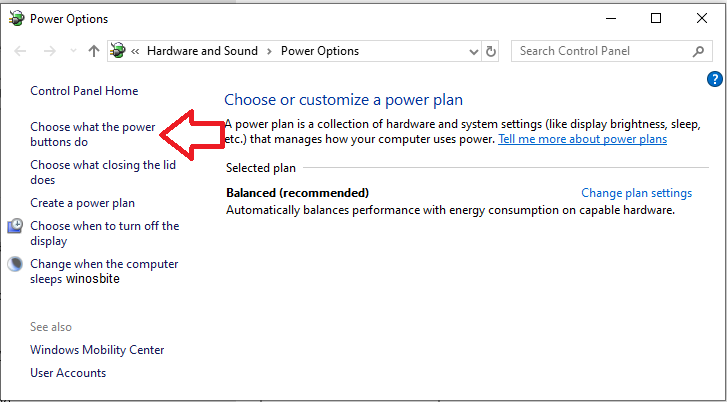
3) Now, click on Choose what the power buttons do from the left-hand sidebar

Choose what the power buttons do

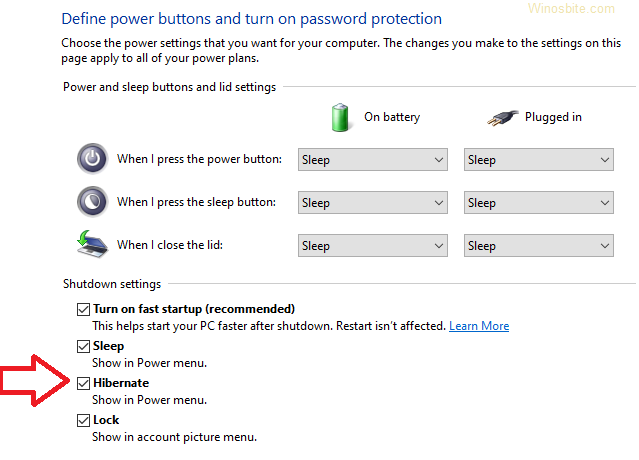
4) Click on Change settings that currently unavailable as shown below:

define power button and turn on password protection

5) Now check-box button will be enabled, click on Hibernate (Show in Power menu)

Hibernate option show in power menu

6) Click on Save Changes

This will allow you to enable the Hibernate option.

How to disable Hibernation using command prompt?

Follow the steps below so as to disable the Hibernation feature.

Step 1. Press the Windows button from your keyboard.

Step 2. Now type cmd and choose Run as administrator option as shown below

Command prompt run as administrator

Step 3. Now type or copy the command powercfg.exe /hibernate off‘ and hit the Enter key:

Step 4. Now exit the Command Prompt application by typing the command exit, and then hit the Enter key.

Well, that’s it, I hope after this the Hibernation feature will be disabled from your Windows system.

How to re-enable Hibernation by Command line?

Step 1) Press the Windows button from your keyboard.

Step 2) Now type ”cmd” and then right-click on the Command Prompt icon and select Run as administrator.

Step 3) Now type or copy the command ”powercfg.exe /hibernate on” and hit the Enter key.

Step 4) Now exit the Command Prompt application by typing the command ”exit”, and then hit the Enter key.

Well, that’s it, I hope after this the Hibernation feature will be enabled.

Conclusion: I hope you can get what is the Hibernation feature of your Windows 10 operating system and I hope you find my article interesting and valuable. Thank you for reading my article.

Please write me a comment if you face any issues regarding the Hibernation feature.

Have you ever needed to step away from your computer for an indefinite period but didn’t want to shut it down? This could be for various reasons; maybe you have some work that you wish to get right back into post your lunch break or your PC boots on like a snail. The sleep mode in Windows OS lets you do just that, but what if I told you there’s a better power-saving feature than the usual sleep mode?

Hibernation mode is a power option that lets Windows users exploit the features of both a complete system shut down and the sleep mode. Just like Sleep, users can configure when they want their systems to go under Hibernation, and if they wish, the feature can be entirely disabled, too (although keeping it active does make for a better overall experience).

In this article, we will be explaining the difference between sleep and hibernation modes, and also show you how to enable or disable hibernation on Windows 10.

Table of Contents

What is Hibernation?

Hibernation is a power-saving state primarily made for laptops, although it is available on certain computers as well. It differs from Sleep in terms of power usage and where your currently open (before you left your System); files are saved.

The sleep mode is activated by default when you leave your computer without shutting it down. In the sleep state, the screen is turned off, and all the foreground processes (files and applications) are saved in the memory (RAM). This allows the System to be in a low-power state but still be running. You can get back to work by a single click of the keyboard or by simply moving your mouse. The screen boots on within a few seconds, and all your files & applications will be in the same state as they were when you left.

Hibernation, pretty much like Sleep, also saves the state of your files & applications and is activated after your System has been under Sleep for a prolonged period. Unlike Sleep, which stores files in the RAM and therefore requires a constant power supply, Hibernation doesn’t require any power (like when your System is shut down). This is made possible by storing the current state of the files in the hard drive instead of the temporary memory.

When in an extended sleep, your computer automatically transfers the state of your files to the hard disk drive and switches to Hibernation. As the files have been moved to the hard drive, the System will take a little extra time to boot on than required by Sleep. Although, the boot on time is still faster than booting your computer after a complete shutdown.

Hibernation is particularly useful when the user doesn’t want to lose the state of his/her files but also won’t have the opportunity to charge the laptop for some time.

As obvious, saving the state of your files requires reserving some amount of memory and this amount is occupied by a system file (hiberfil.sys). The reserved amount is roughly equal to 75% of the System’s RAM. For example, if your System has 8 GB of RAM installed, the hibernation system file will take up almost 6 GB of your hard disk storage.

Before we move on to enabling Hibernation, we will need to check if the computer has the hiberfil.sys file. If absent, the computer can not go under Hibernation (PCs with InstantGo do not have the hibernation power option).

To check if your computer can hibernate, follow the below steps:

1. Launch File Explorer by double-clicking on its icon on the desktop or pressing the keyboard shortcut Windows Key + E. Click on Local Drive (C:) to open C Drive.

Click on Local Drive (C) to open C Drive

2. Switch to the View tab and click on Options at the end of the ribbon. Select ‘Change folder and search options’.

Switch to the View tab and click on Options at the end of the ribbon. Select ‘Change folder and search options’

3. Again, switch to the View tab of the Folder Options window.

4. Double click on Hidden files and folders to open a sub-menu and enable Show hidden files, folders, or drives.

Double click on Hidden files and folders to open a sub-menu and enable Show hidden files, folders, or drives

5. Uncheck/untick the box next to ‘Hide protected operating system files (Recommended).’ A warning message will appear when you try to untick the option. Click on Yes to confirm your action.

Uncheck/untick the box next to ‘Hide protected operating system files (Recommended)’

6. Click on Apply and then OK to save changes.

Click on Apply and then OK to save changes | Enable or Disable Hibernation on Windows 10

7. The Hibernation file (hiberfil.sys), if present, can be found at the root of the C drive. This means your computer is eligible for hibernation.

Hibernation file (hiberfil.sys), if present, can be found at the root of the C drive

Enabling or disabling Hibernation is quite easy, and either action can be achieved in a couple of minutes. There are also multiple methods via which one can enable or disable Hibernation. The easiest one is executing a single command in an elevated command prompt while other methods include editing Windows Registry Editor or accessing advanced power options. 

Method 1: Enable or Disable Hibernation using Command Prompt

As mentioned, this is the easiest way to enable or disable Hibernation on Windows 10 and, therefore, should be the first method you try.

1. Open Command Prompt as an administrator using any of the listed methods.

2. To enable Hibernation, type powercfg.exe /hibernate on, and press enter.

To disable Hibernation, type powercfg.exe /hibernate off and press enter.

Enable or Disable Hibernation on Windows 10

Both the commands do not return any output, so to check if the command you entered was executed properly, you will need to head back to the C drive and look for the hiberfil.sys file (Steps are mentioned earlier). If you find the hiberfil.sys, it implies you were successful in enabling Hibernation. On the other hand, if the file is absent, Hibernation has been disabled. 

Method 2: Enable or Disable Hibernation Via Registry Editor 

The second method has the user editing the HibernateEnabled entry in the Registry Editor. Be careful when following this method as Registry Editor is an extremely powerful tool, and any accidental mishap can lead to a whole other set of problems.

1. Open Windows Registry Editor using any of the following methods

a. Open Run Command by pressing Windows Key + R, type regedit and press enter.

b. Press Windows Key + S, type regedit or registry editor, and click on Open when the search returns.

Press Windows Key + R then type regedit and hit Enter to open Registry Editor

2. From the left panel of the registry editor window, expand HKEY_LOCAL_MACHINE by double-clicking on it or by clicking on the arrow to its left.

3. Under HKEY_LOCAL_MACHINE, double-click on SYSTEM to expand.

4. Now, expand CurrentControlSet

Follow the same pattern and navigate to Control/Power.

The final location indicated in the address bar should be: 

HKEY_LOCAL_MACHINE\SYSTEM\CurrentControlSet\Control\Power

Final location indicated in the address bar

5. In the right-hand panel, double click on HibernateEnabled or right-click on it and select Modify.

Double click on HibernateEnabled or right-click on it and select Modify

6. To enable Hibernation, type 1 in the text box under Value Data

To disable Hibernation, type 0 in the text box under Value Data.

7. Click on the OK button, exit registry editor, and restart your computer.

Again, head back to the C drive and look for the hiberfil.sys to ensure if you were successful in enabling or disabling Hibernation.

Also Read: Disable Windows Pagefile and Hibernation To Free Up Space

Method 3: Enable or Disable Hibernation Via Advanced Power Options

The final method will have the user enable or disable Hibernation through the Advanced Power Options window. Here, users can also set the time frame after which they want their system to go under Hibernation. Like the previous methods, this one is also quite simple. 

1. Open Advanced Power Options by any of the two methods

a. Open Run command, type powercfg.cpl, and press enter.

b. Open Windows Settings (Windows Key + I) and click on System. Under Power & Sleep settings, click on Additional power settings.

2. In the Power Options window, click on Change plan settings (highlighted in blue) under the Selected plan section.

Click on Change plan settings under the Selected plan section | Enable or Disable Hibernation on Windows 10

3. Click on Change advanced power settings in the following Edit Plan Settings window.

Click on Change advanced power settings in the following Edit Plan Settings window

4. Expand Sleep by clicking on the plus to its left or by double-clicking on the label.

5. Double-click on Hibernate after and set the Settings (Minutes) to how many minutes you would like your System to sit idle for before going into Hibernation.

To disable Hibernation, set the Settings (Minute) to Never and under Allow hybrid sleep, change the setting to Off.

6. Click on Apply, followed by OK to save the changes you made.

Recommended:

  • How to Enable Google Feed in Nova Launcher
  • 5 Ways to Remove Hyperlinks from Microsoft Word Documents
  • How to Identify different USB Ports on your Computer

We hope you were successful in enabling or disabling Hibernation on Windows 10. Also, let us know which one of the three above methods did the trick for you.

Last Updated :
05 Jul, 2022

Many times we need to power off our computer by not letting it consume the battery. Hibernation does the same, it allows us to shut down the computer by saving open apps status to the hard disk so that when next time start up the computer from Hibernate Mode it will take less time than starting up from the shutdown.

How to enable Hibernate Mode on your PC

Step 1: If you look at the power menu on your PC, then there probably are three options available: Sleep, Shut down, and Restart. 

Step 2: To add Hibernate button to your power menu go to your Control Panel and choose Power Options.

Choosing-power-options

Step 3: In the Power Options you click on what the power option does

Power-buttons

Step 4: You can see an option called Change settings that are currently unavailable, click on that.

Change-settings-option

Step 5: Here you will find the Hibernate checkbox as shown in the image below, check the check box and click on save changes.

Hibernate-checkbox

Step 6: Now the option for Hibernate will be available in the power menu.

Next time instead of Shutting Down your PC, or putting it in Sleep Mode you can do Hibernate.

How is Hibernate mode different from Sleep mode?

Answer:

Sleep Mode saves the open apps and or unsaved files to the RAM, which allows you to open them from where they were left. As RAM consumes the battery when in sleep mode your computer’s battery will be shrinking.

Hibernate Mode works similarly to the Sleep mode, the only difference is Hibernate Mode saves the open apps and unsaved files to the Hard disk. Now when next time you will open your computer those files are brought back to the RAM and you will see all the unsaved files and open apps again. As Hibernate Mode saves the data to the Hard disk, no battery is consumed for maintaining the status of unsaved files and open apps when the PC is in Hibernation mode.

Понравилась статья? Поделить с друзьями:
0 0 голоса
Рейтинг статьи
Подписаться
Уведомить о
guest

0 комментариев
Старые
Новые Популярные
Межтекстовые Отзывы
Посмотреть все комментарии
  • Нет доступа к windows defender
  • Как включить графический интерфейс в windows server 2012
  • Как удалить сценарий windows script host
  • Fifa 2002 windows 7
  • Программа для прозрачной панели задач windows 11