
-
Home
-
News
- How to Enable Cortana on Windows 10 Easily If It’s Disabled
By Vera | Follow |
Last Updated
Have you disabled Windows 10 Cortana due to some reason? But now you want to get Cortana back? What can you do to realize this aim? Easy! Read this post written by MiniTool and you will know how to enable Cortana on Windows 10 with 3 simple methods.
As is well known, Cortana is a voice assistant that is embedded in Windows 10 and Microsoft has spent much time building this virtual assistant. With it, you are able to do many tasks, for example, search for information on the web, organize your calendar, receive the weather forecast, find things on your PC, etc.
But, not all of you are satisfied with Cortana since some said that this feature could collect some private information and eat up a large percentage of system memory. Thus, you choose to disable Cortana.
What if you change your mind and want to bring Cortana back on Windows 10? You will be happy to read this article since we will show you how to enable Cortana easily.
How to Re-Enable Cortana in Windows 10
Method 1: Enable Cortana via Registry Editor
If the method chosen by you to turn off Cortana is to use Windows Registry Editor, you also need to use the same way to get Cortana back.
Note: Changing registry keys may bring damage to your operating system if you don’t operate properly. So, follow these steps. Also, you can choose to back up registry keys before starting.
- Open the Run window by simply pressing two keys on your keyboard – Win + R.
- Input regedit to the text box and press Enter or click OK.
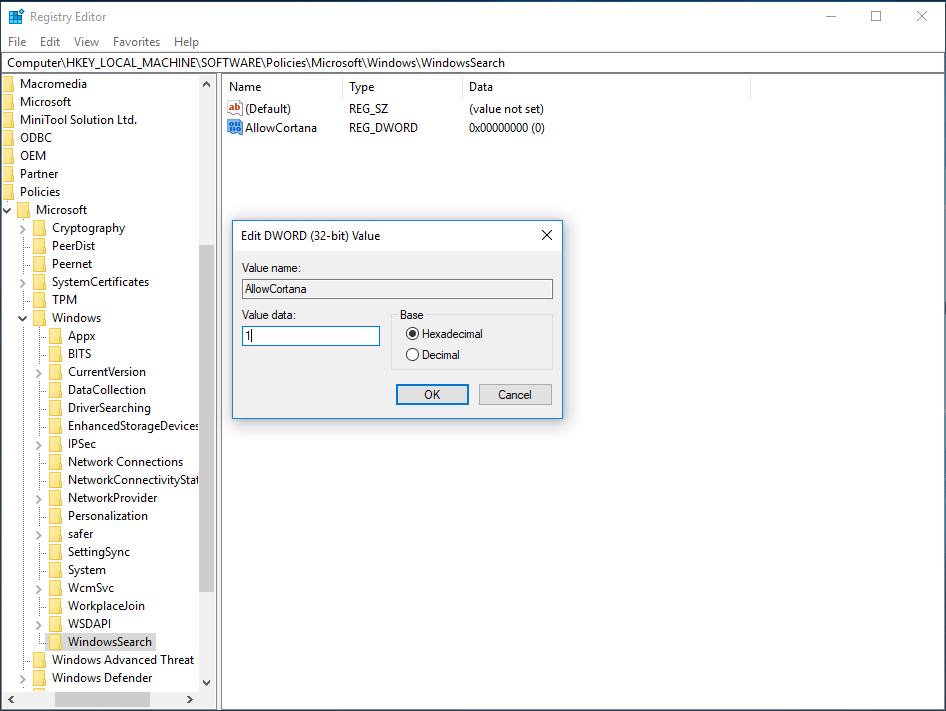
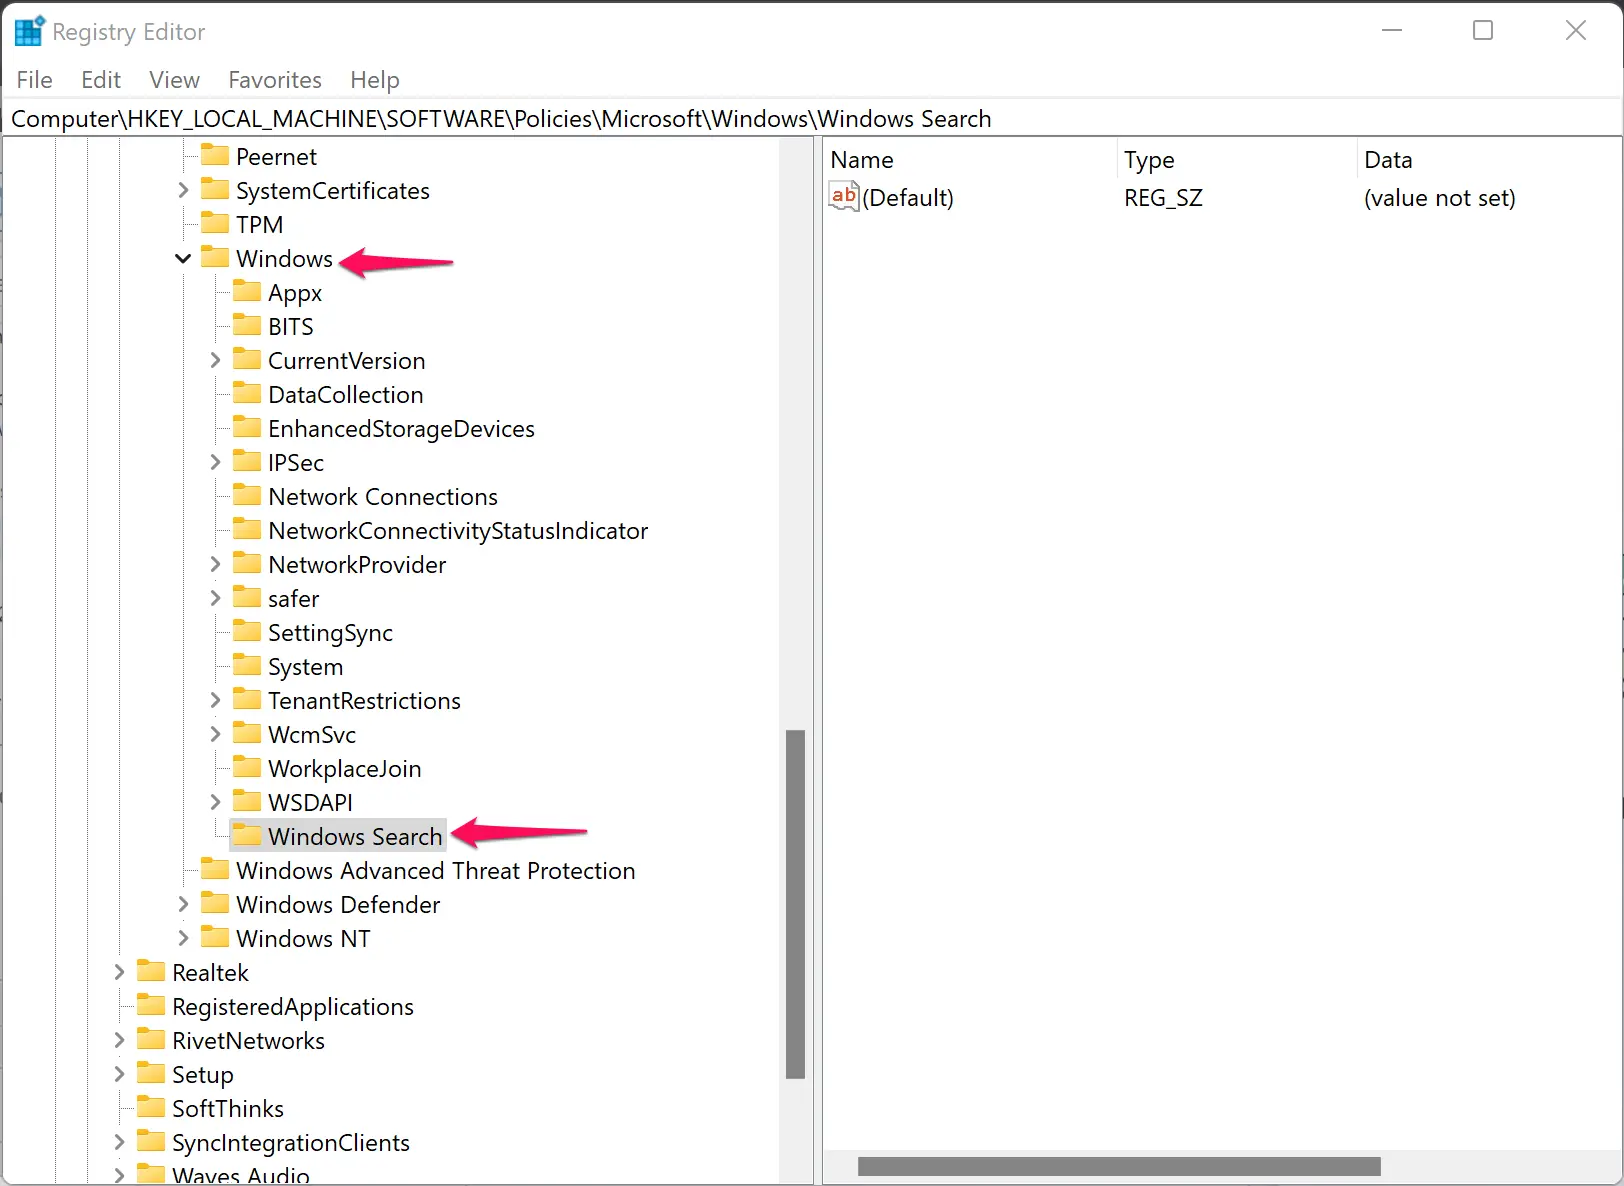
- In the Registry Editor window, navigate to the following path: HKEY_LOCAL_MACHINE\Software\Policies\Microsoft\Windows\WindowsSearch.
- Double-click the AllowCortana key and change its value data to 1. This can tell Windows to enable Cortana.
- Exit Registry Editor and restart your computer.
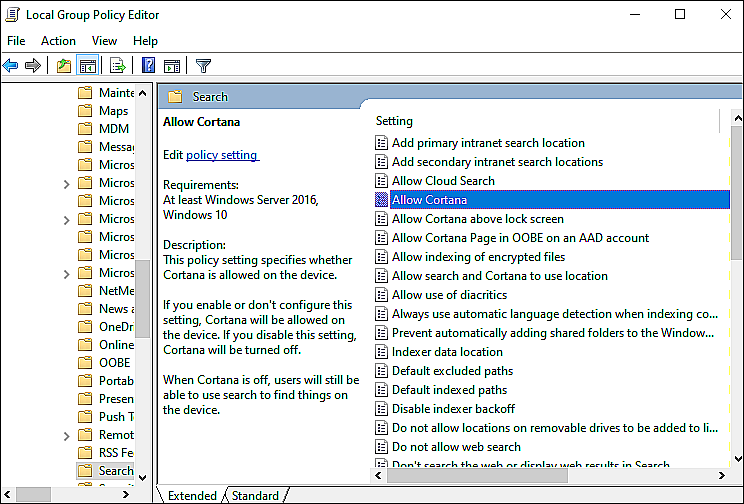
Method 2: Enable Cortana via Group Policy
If you are a Windows Pro user, you may disable Cortana in Windows 10 via the Group Policy Editor. To re-enable it, you should also use it.
- Input msc in the Run window and click OK.
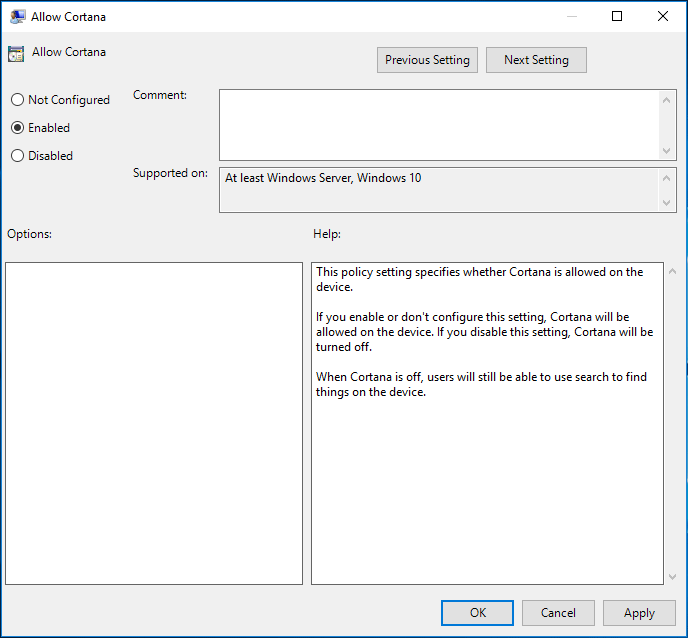
- After entering the Local Group Policy Editor interface, go to Local Computer Policy > Computer Configuration > Administrative Templates > Windows Components.
- Go to Search, find Allow Cortana and double-click it.
- Check the Enabled option, then click Apply and OK to save changes. Later, restart your PC.
Method 3: Get Cortana Back via Using the Correct Program Path Name
If you have initially renamed the path to disable Cortana in Windows 10, you should re-enable it in the same manner. Here is what you should do:
Tip: Sometimes you will find Task Manager is not responding when opening it. If yes, refer to this post – Top 8 Ways: Fix Task Manager Not Responding Windows 7/8/10.
- Open the Run window, input taskmgr and press Enter to open Task Manager.
- Find Cortana from the Processes tab, right-click on it and choose Open file location. This will take you to C:windowssystemapps.
- Locate to the Windows.Cortana folder with the .bak extension.
- Right-click this folder to choose Rename and then remove the .bak extension.
- Restart your computer.
Final Words
After reading this post, you have clearly known how to get Cortana back. Hope that all the mentioned methods can help you to enable Cortana easily. If you don’t remember which method you used to disable it, try them one by one.
About The Author
Position: Columnist
Vera is an editor of the MiniTool Team since 2016 who has more than 7 years’ writing experiences in the field of technical articles. Her articles mainly focus on disk & partition management, PC data recovery, video conversion, as well as PC backup & restore, helping users to solve some errors and issues when using their computers. In her spare times, she likes shopping, playing games and reading some articles.
Cortana was first introduced on Windows 8.1, and it is still an integral part of the Windows 11/10 operating system. Microsoft’s cloud-based digital assistant helps users with their voice commands to find files, folders, and apps on their computers. Using this Cortana app, you can do a lot, such as keep track of calendars, set reminders, search the web, etc.
A few users love to use the Cortana app and recognize it as a handy feature, but many people are annoyed and want to disable it. For your information, this application collects personal information such as your habits, location, calendar entries, search history, email, etc., and then stores them on its cloud server. It also slows down the system as it starts up with the machine and runs in the background on Windows 11/10.
Although Cortana is a pre-installed app, it’s not active by default on Windows 11/10. If you don’t use it and want to disable or remove it from your PC, this gearupwindows article will assist you. It is possible to temporarily/permanently disable it, or if you need, you can completely uninstall it from your computer.
How to Disable Cortana From Startup in Windows 11?
By default, the Cortana app starts up automatically when you boot your machine. If you want to disable the Cortana app from your PC temporarily, you can configure it to not start up with Windows.
Step 1. Open Windows Settings by pressing Windows + I keys from the keyboard.
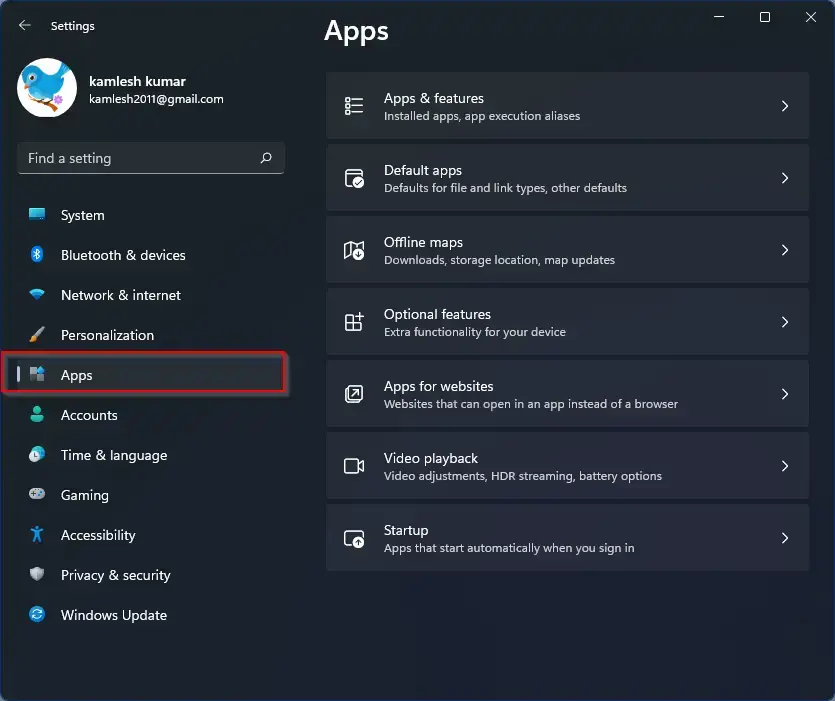
Step 2. When Windows Settings opens, select the Apps category from the left sidebar.
Step 3. Then, click the Apps & features tab on the right sidebar.
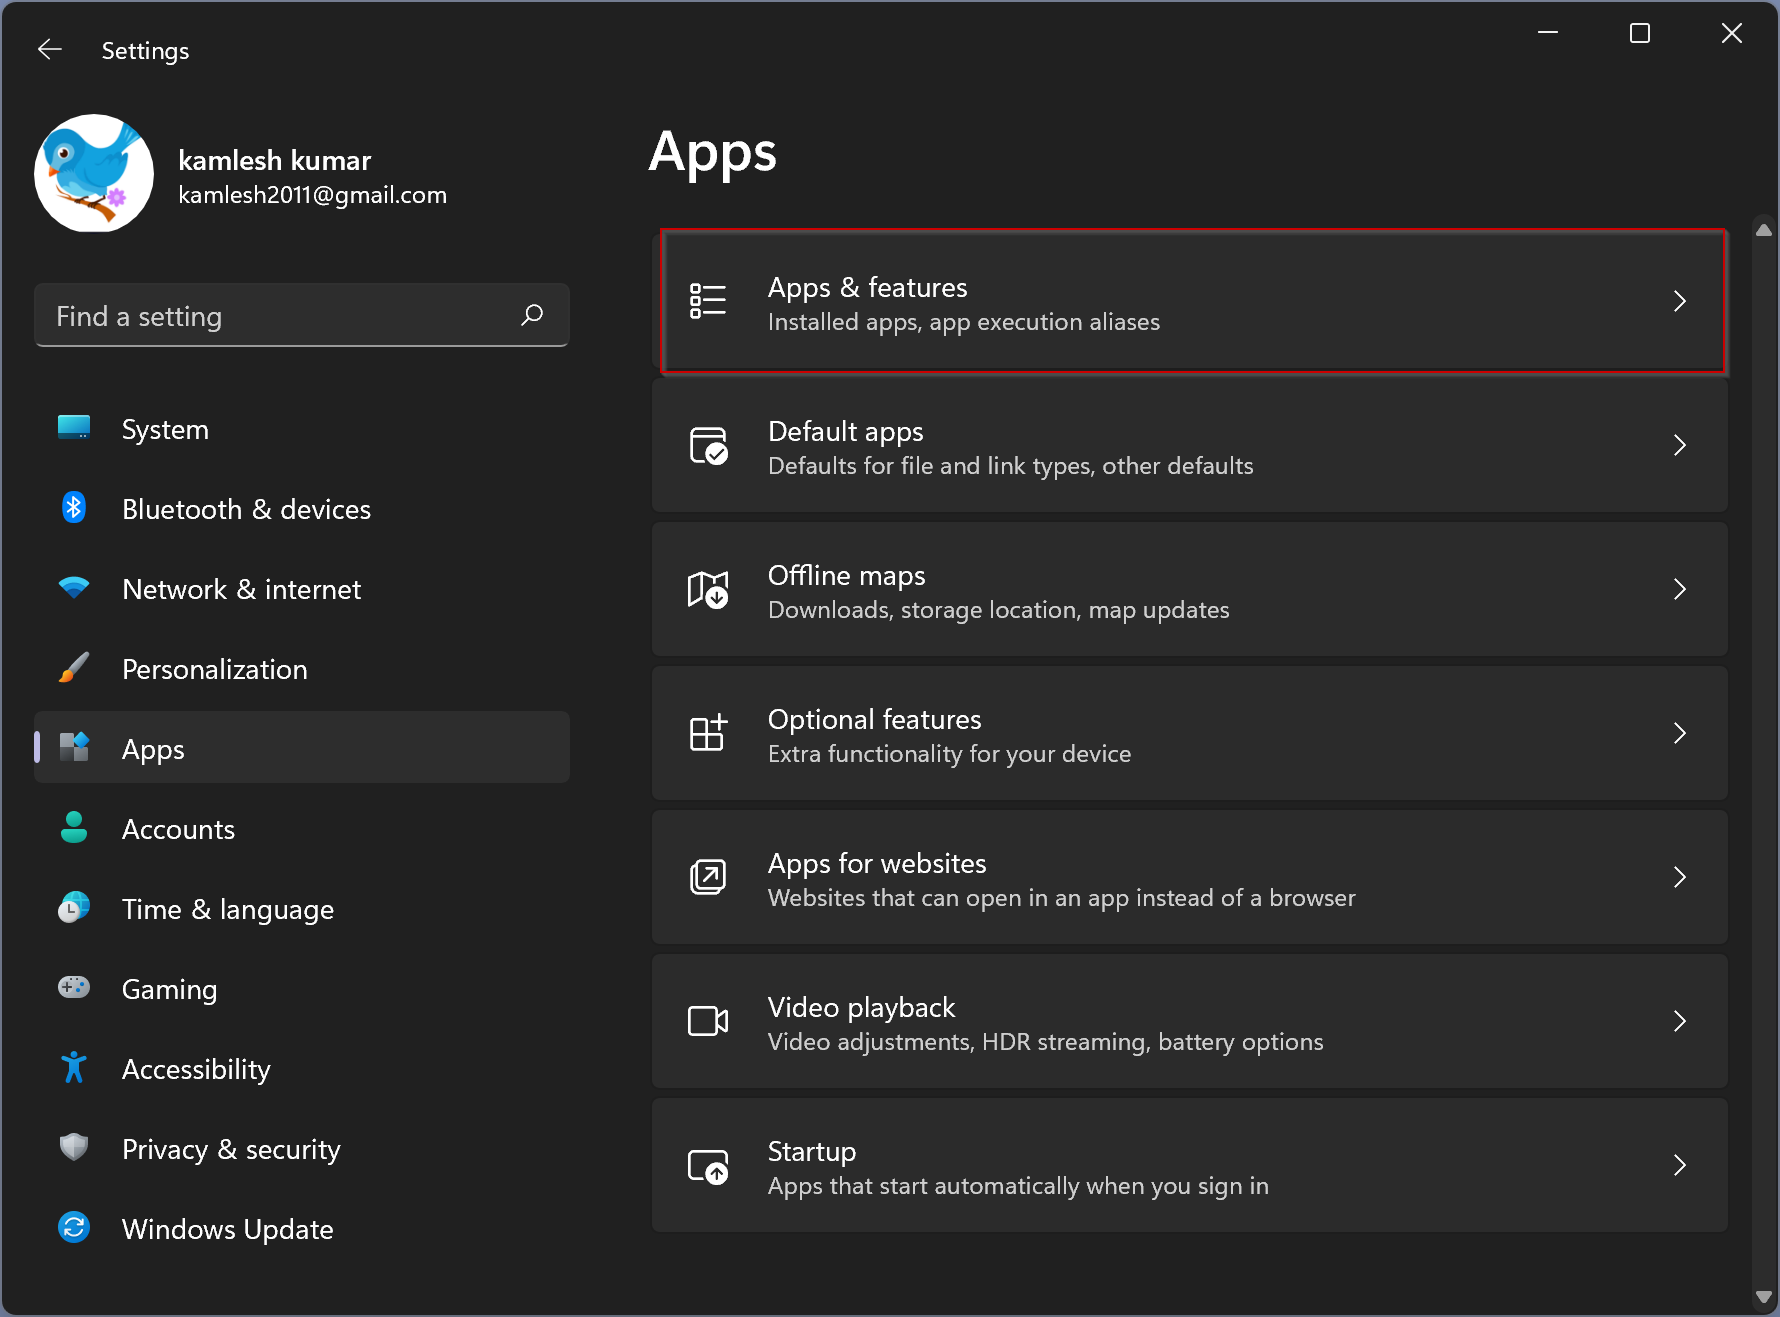
Step 4. On the Apps & features page, scroll down to view the list of apps. Click the three-dotted menu next to Cortana and select Advanced options.
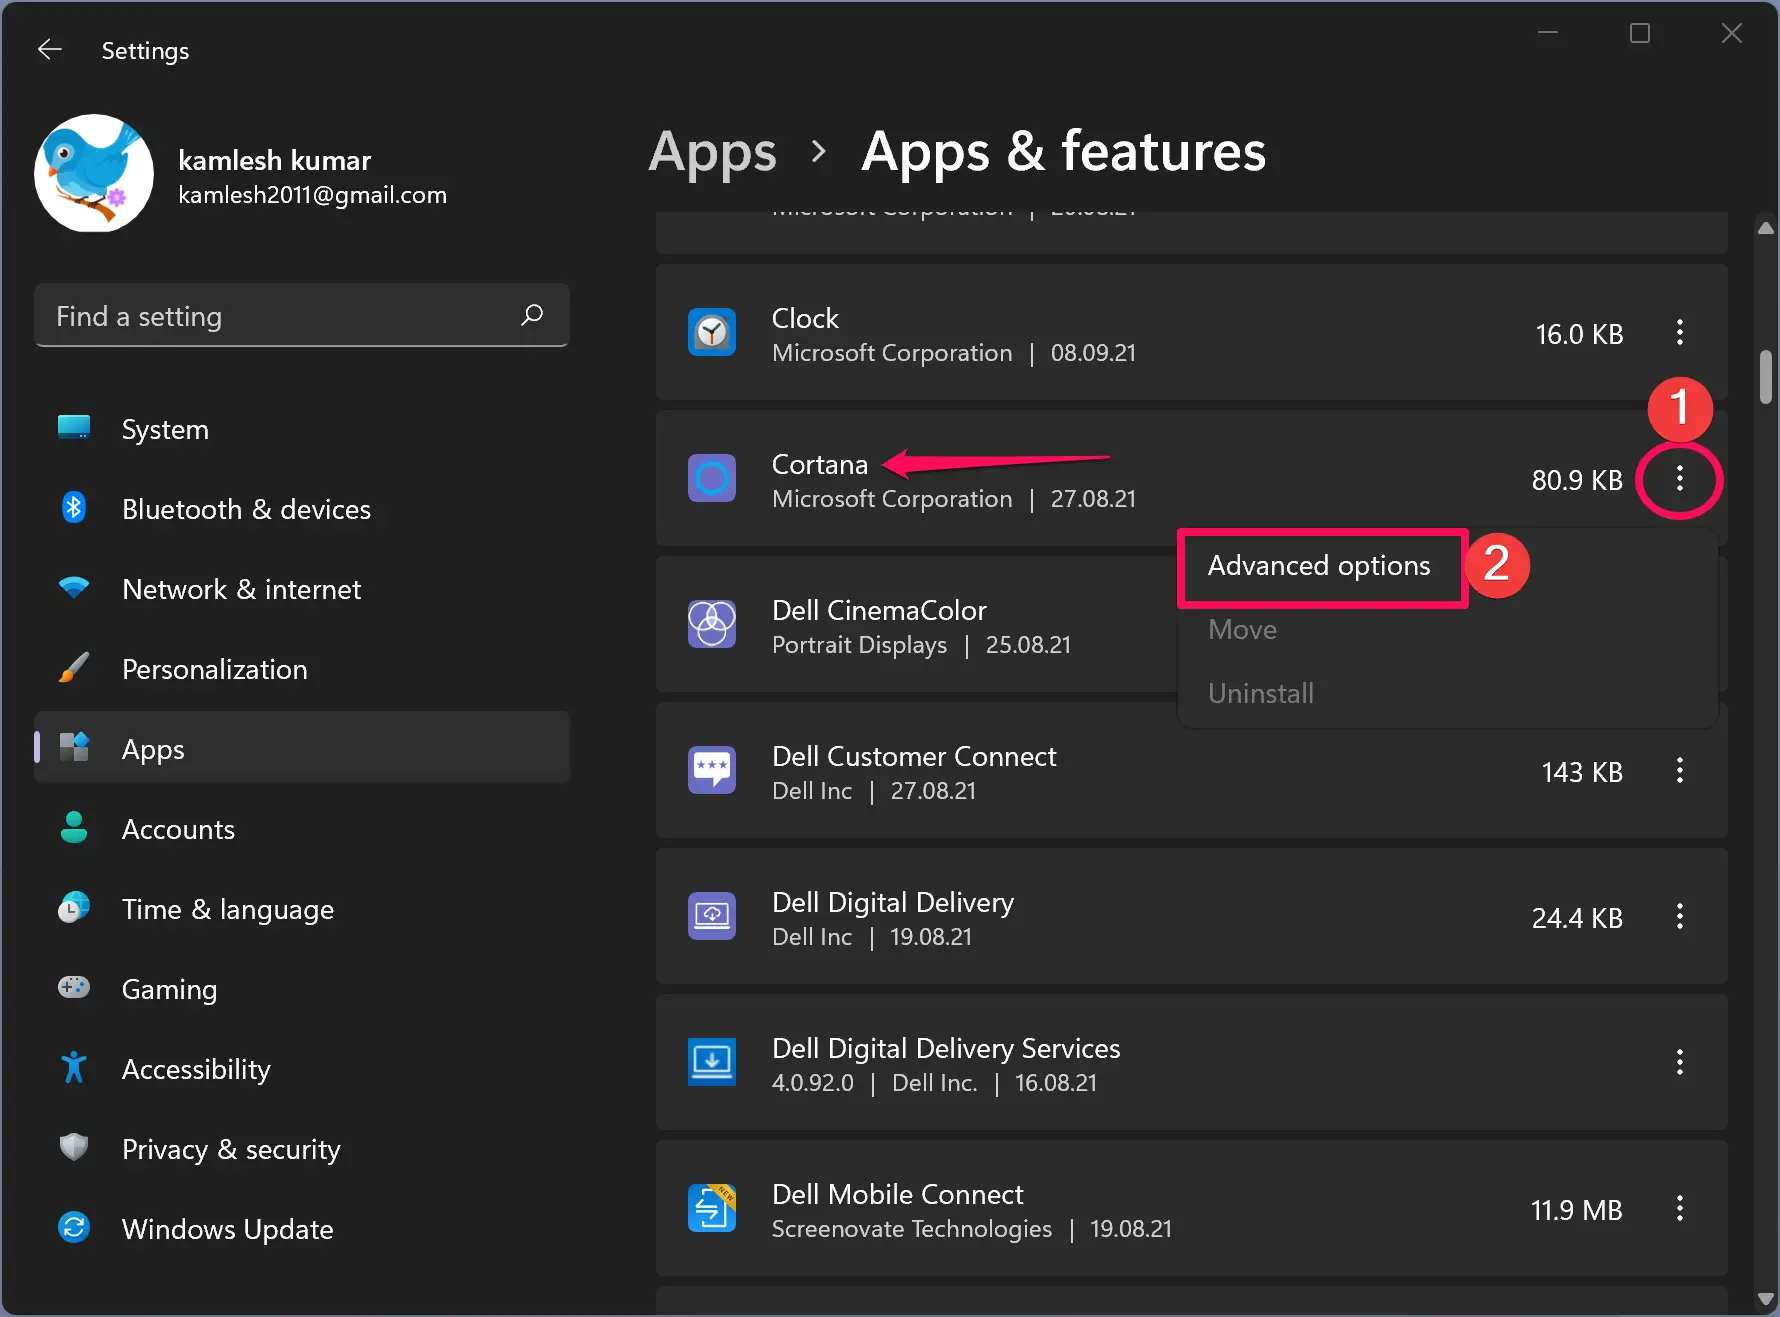
Step 5. On the Cortana page, scroll down to see the “Runs at log-in” section. Now, turn off the toggle switch of “Cortana.”
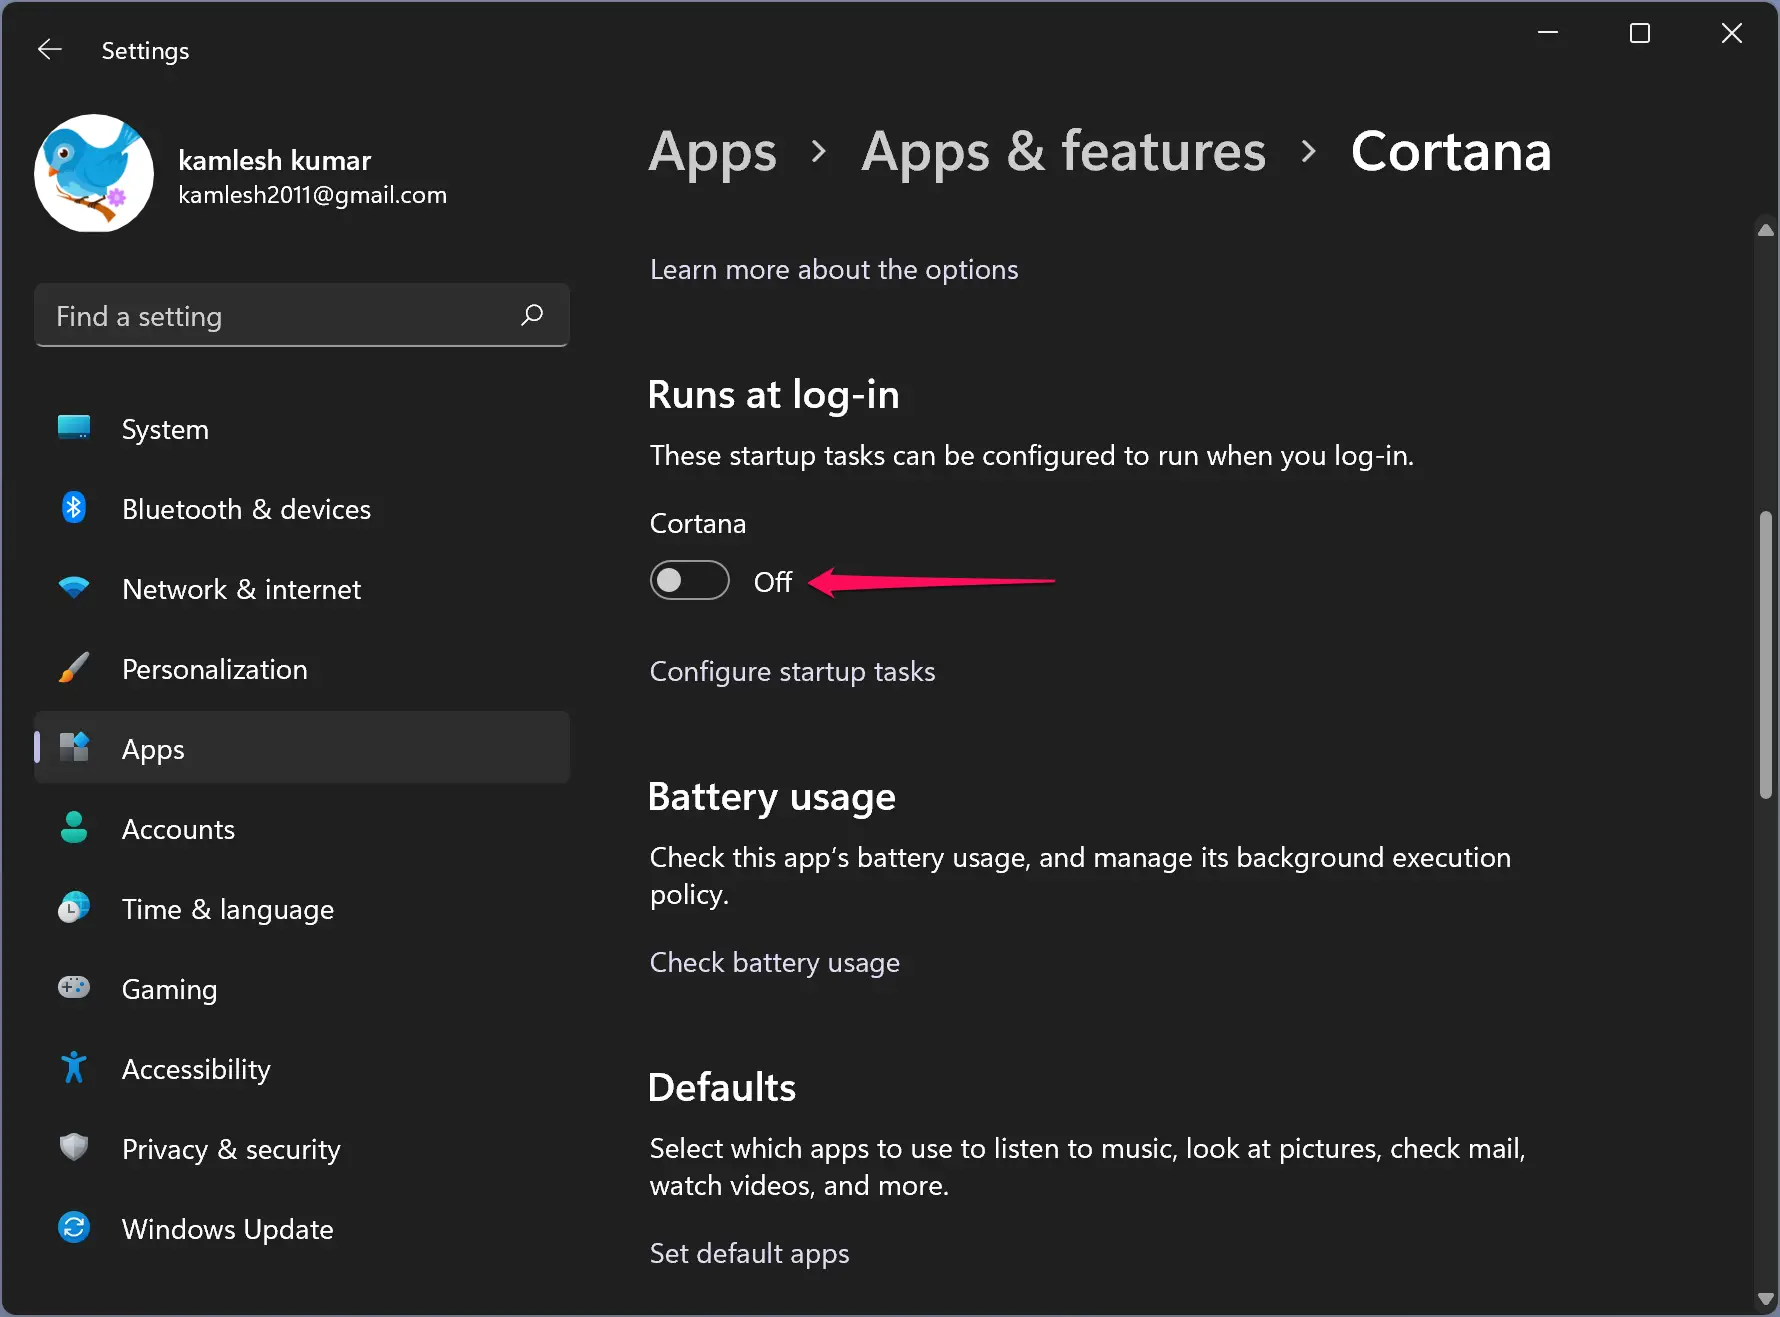
When you’re done, the Cortana service will not start up with your computer. If you wish to start it automatically with Windows, repeat the above steps, and in step 5, turn the toggle switch On next to Cortana.
How to Disable Cortana from Startup using Task Manager in Windows 11 or 10?
Follow these steps to turn off Cortana from Startup using Task Manager in Windows 11 or 10:-
Step 1. Open Task Manager.
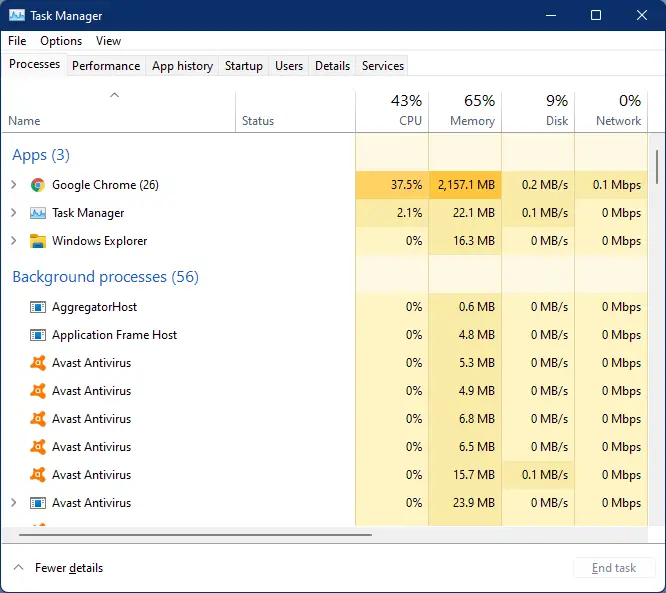
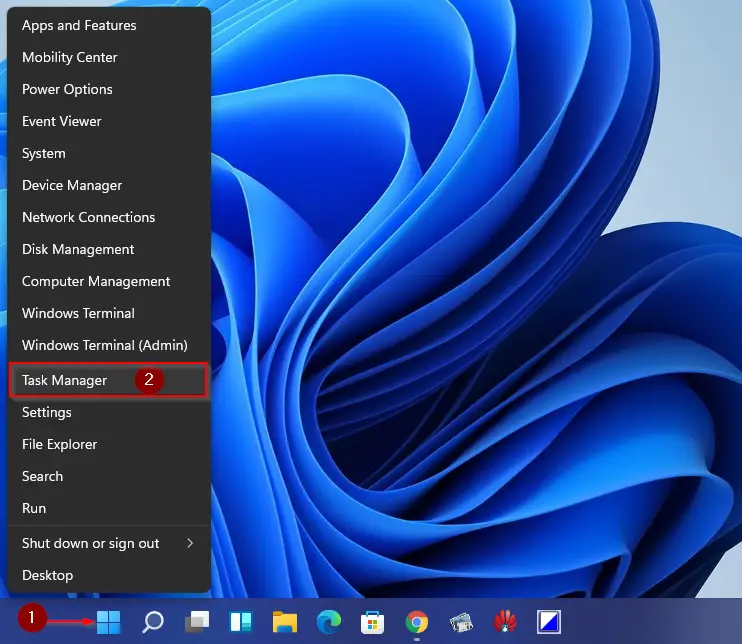
To do that, press Ctrl + Shift + Esc from the keyboard. Alternatively, right-click on the Start button on the taskbar and select “Task Manager” from the pop-up menu to open the same.
Step 2. When Task Manager opens, navigate to the Startup tab.
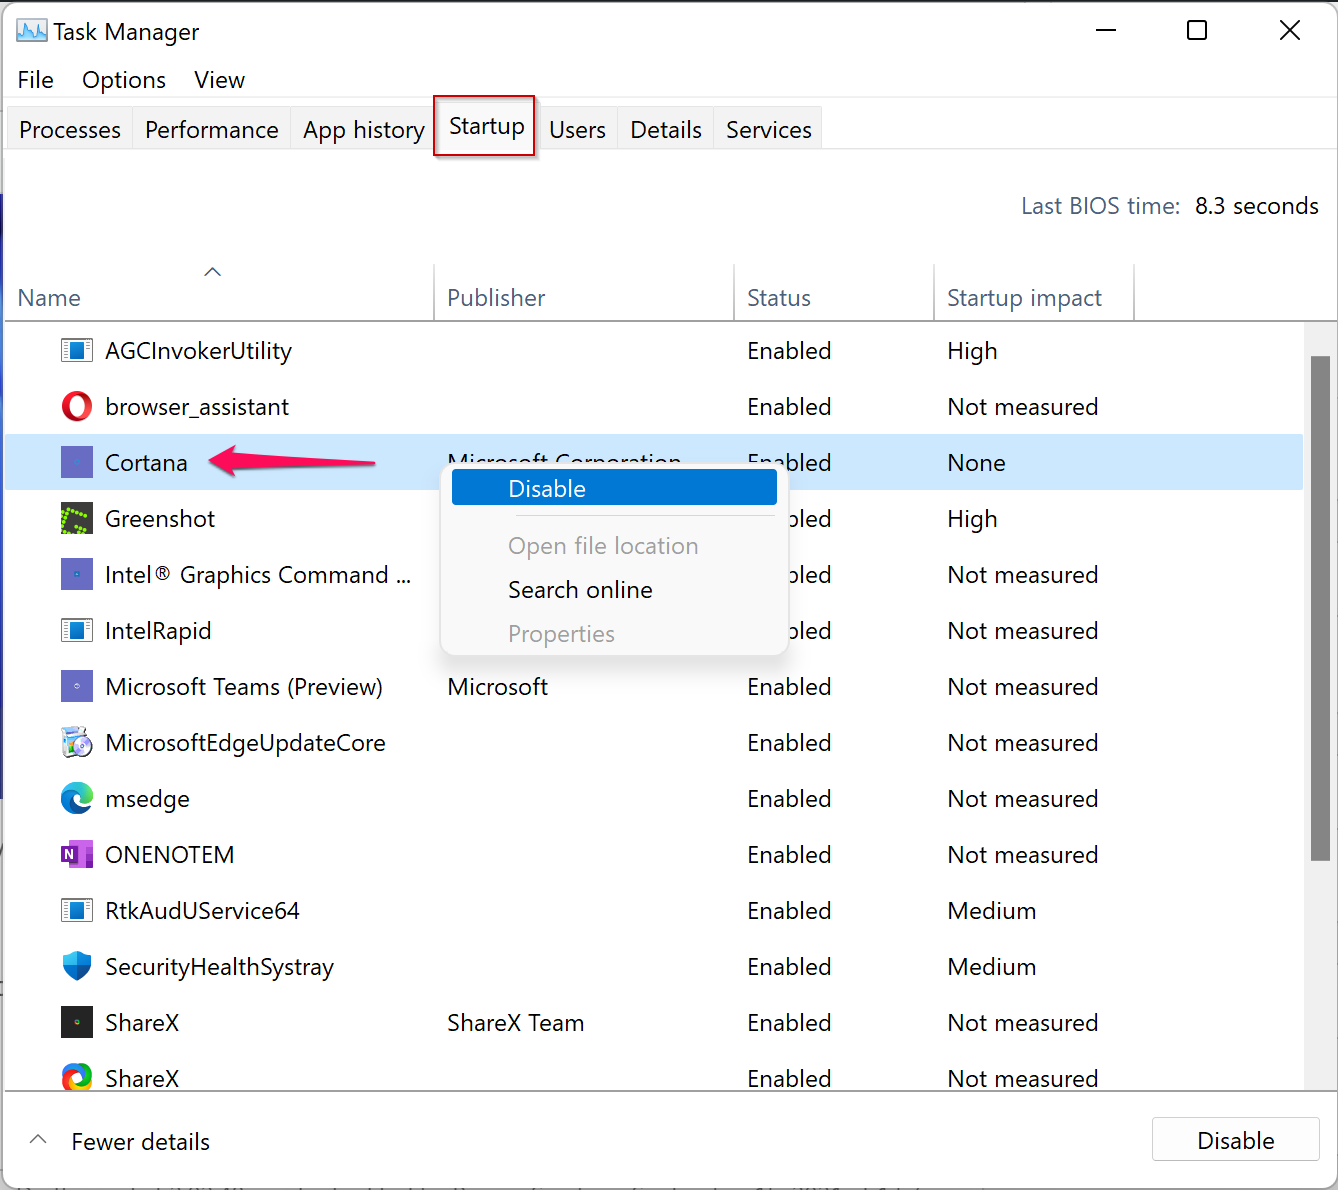
Step 3. Look for the Cortana application entry and then right-click on it.
Step 4. Select Disable option from the context menu.
Now Cortana is offline. To open the Cortana app manually, search this application in the Windows Search menu or just press the shortcut keys Windows + C.
To enable Cortana with the Startup of Windows, open the Task Manager again and navigate to the Startup tab. Right-click on the Cortana entry and select Enable option. That’s it!
How to Disable Cortana Permanently Using Windows 11 or 10 Registry Editor?
If you don’t find the Cortana app useful and want to disable it permanently, you can use Windows Registry Editor. When Cortana is permanently disabled, you won’t use the feature even when you try to run it manually.
Step 1. Open Registry Editor.
To do that, press the Windows + R keys from the keyboard to launch the Run dialog box. In the Run box, type regedit and then hit Enter from the keyboard.
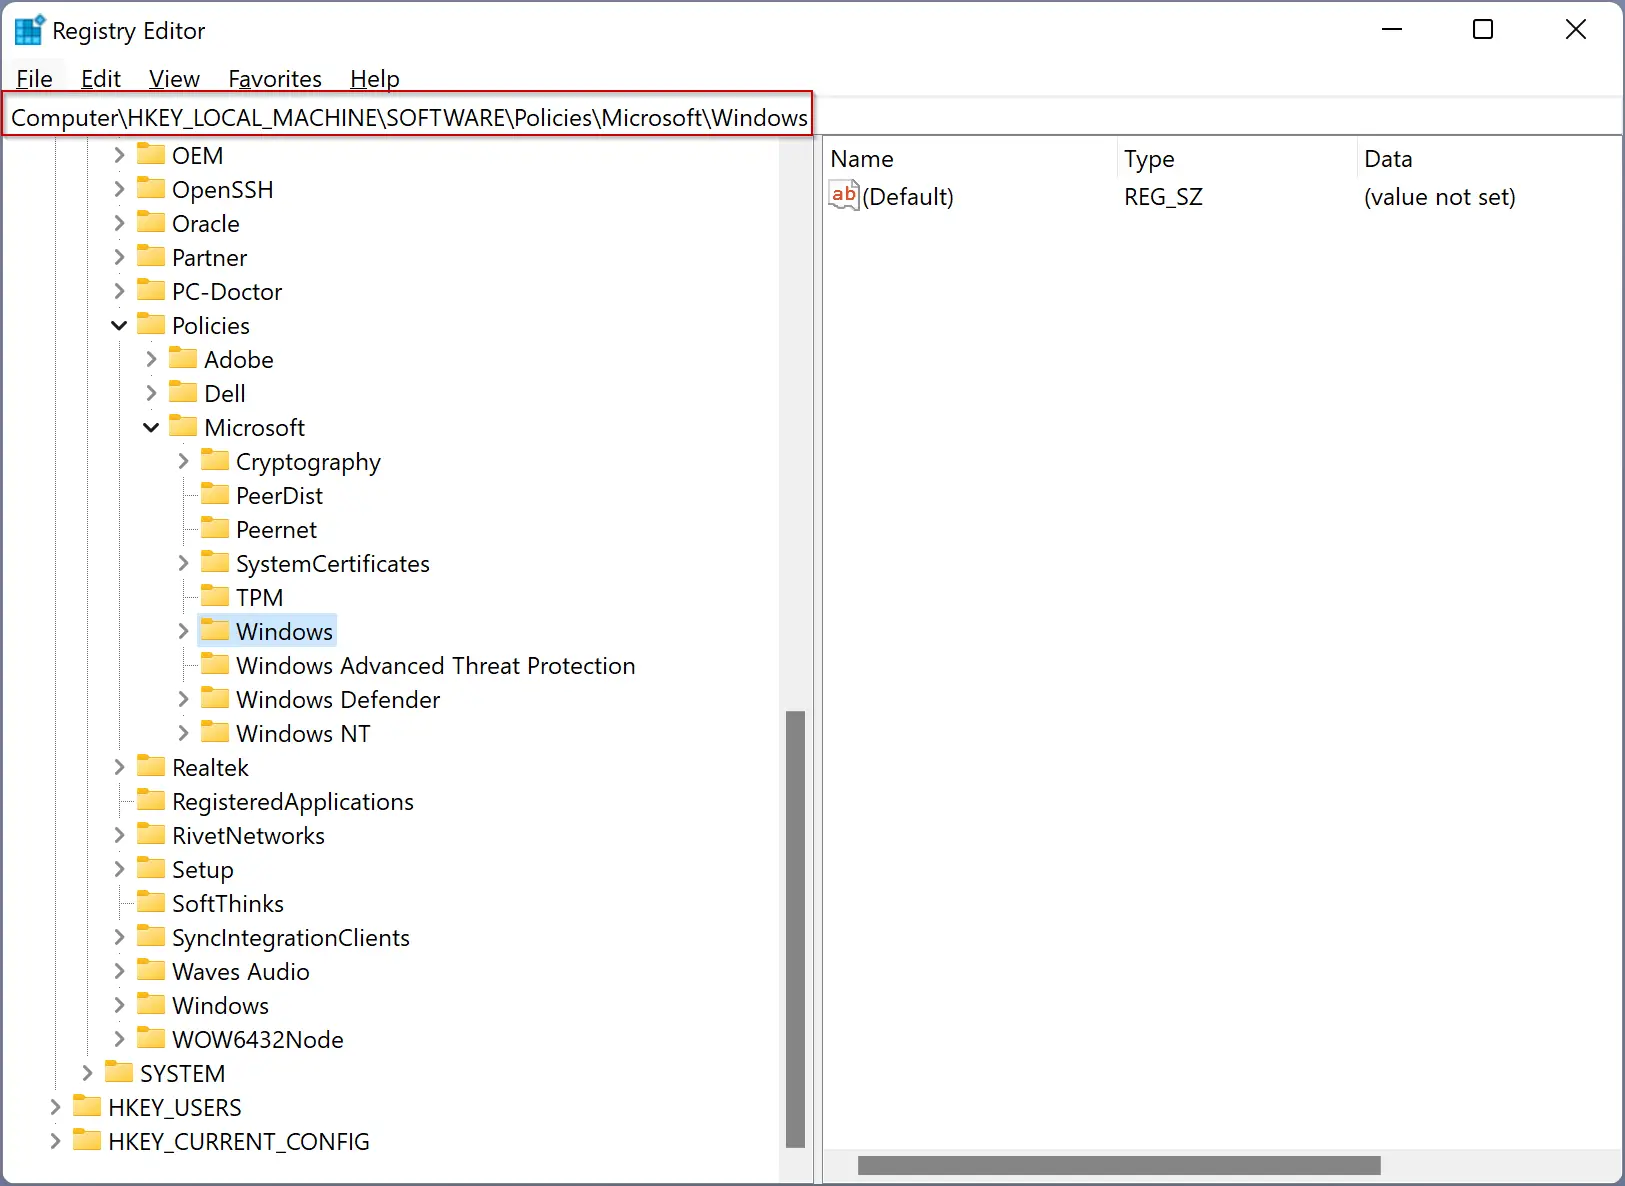
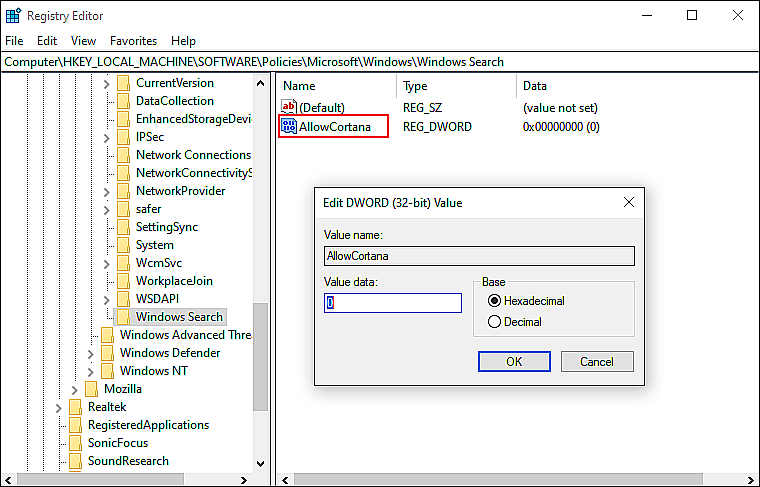
Step 2. When Registry Editor opens, navigate to the following key:-
Computer\HKEY_LOCAL_MACHINE\SOFTWARE\Policies\Microsoft\Windows
Step 3. Now, right-click the Windows folder and then select the New > Key option.
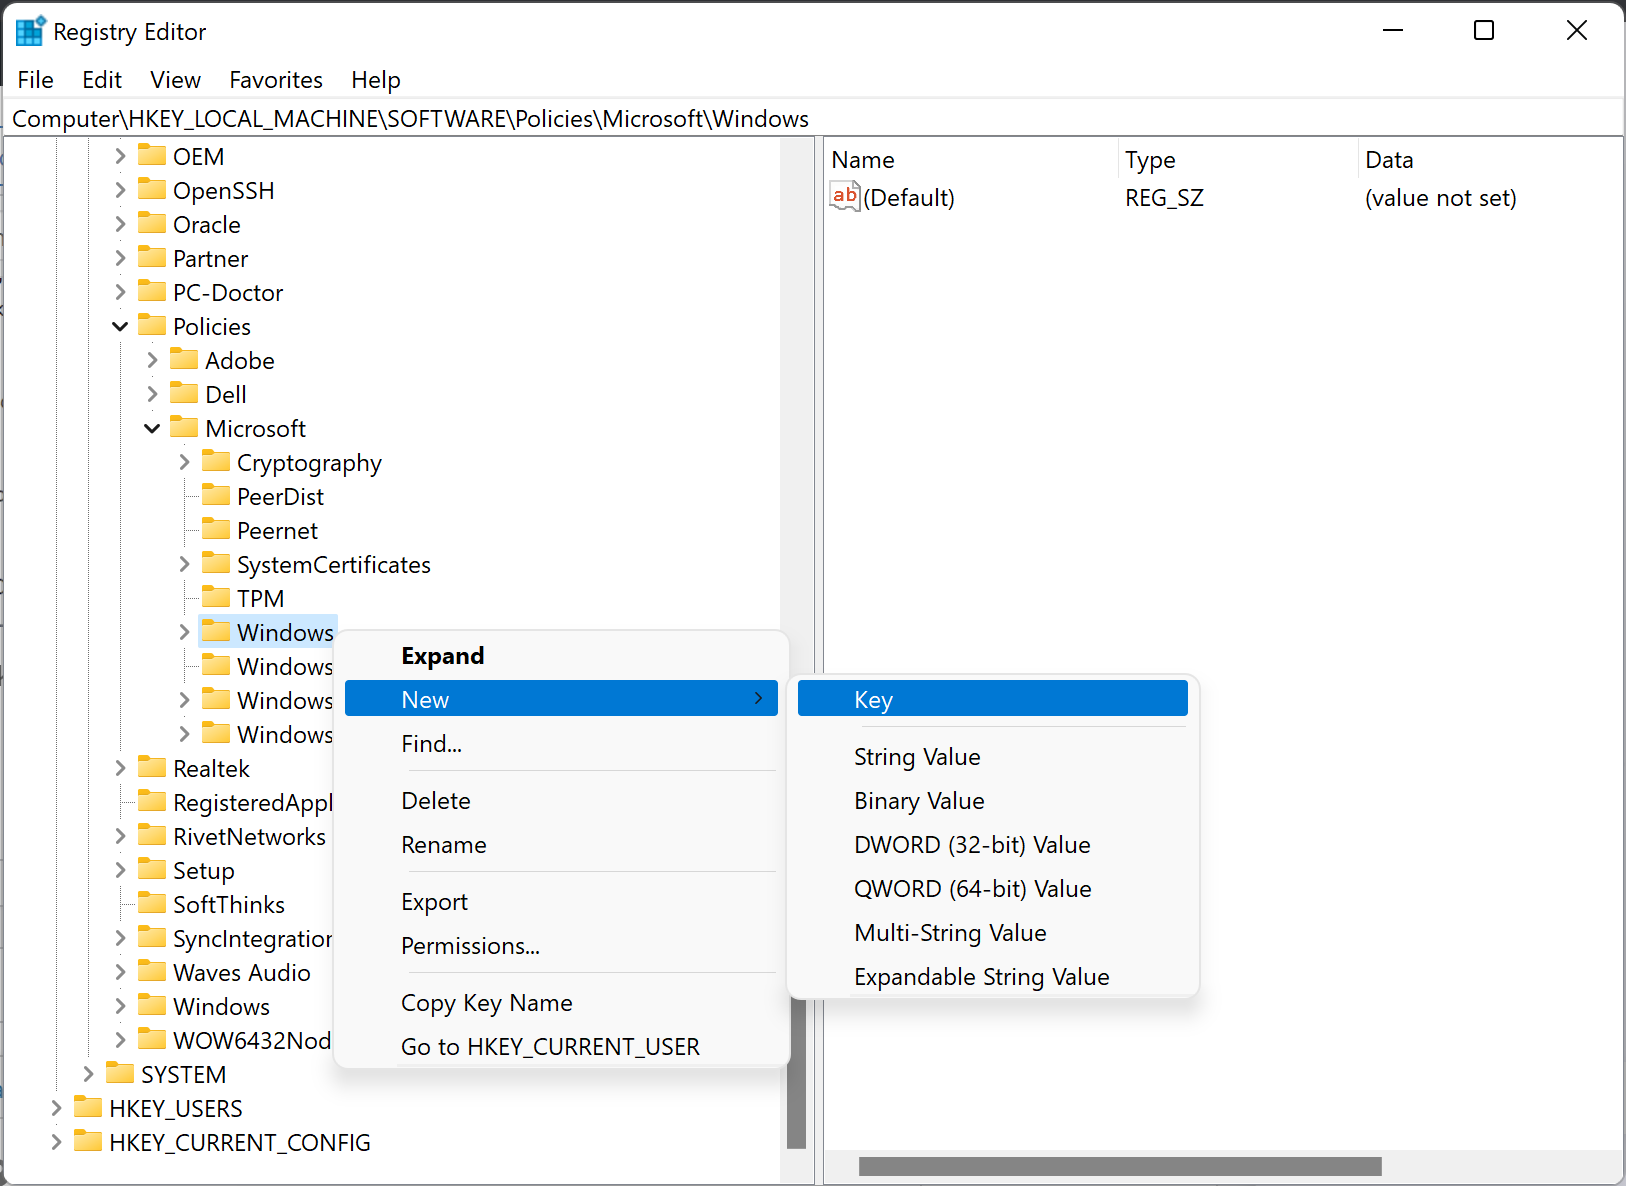
Step 4. Name the newly created key as Windows Search.
Step 5. Now, right-click the Windows Search folder, and select New > DWORD (32-bit) Value option.
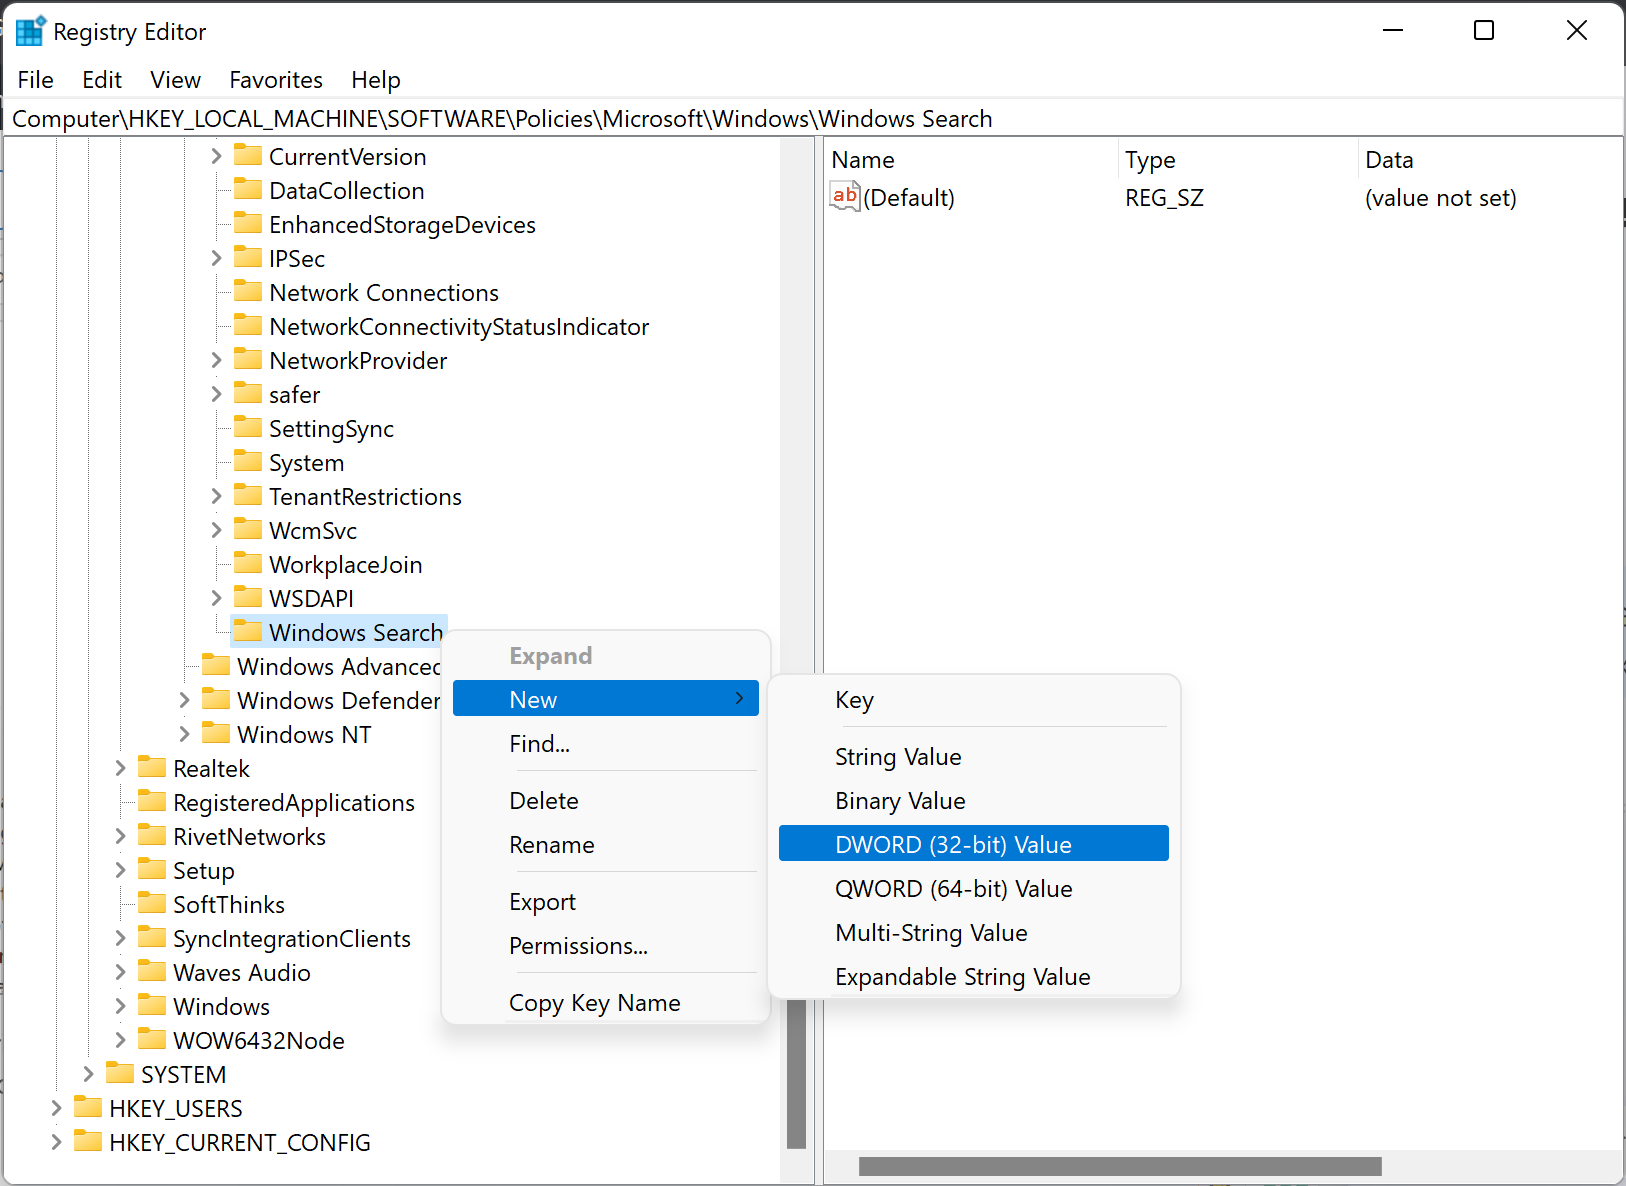
Step 6. Name the newly created DWORD as AllowCortana.
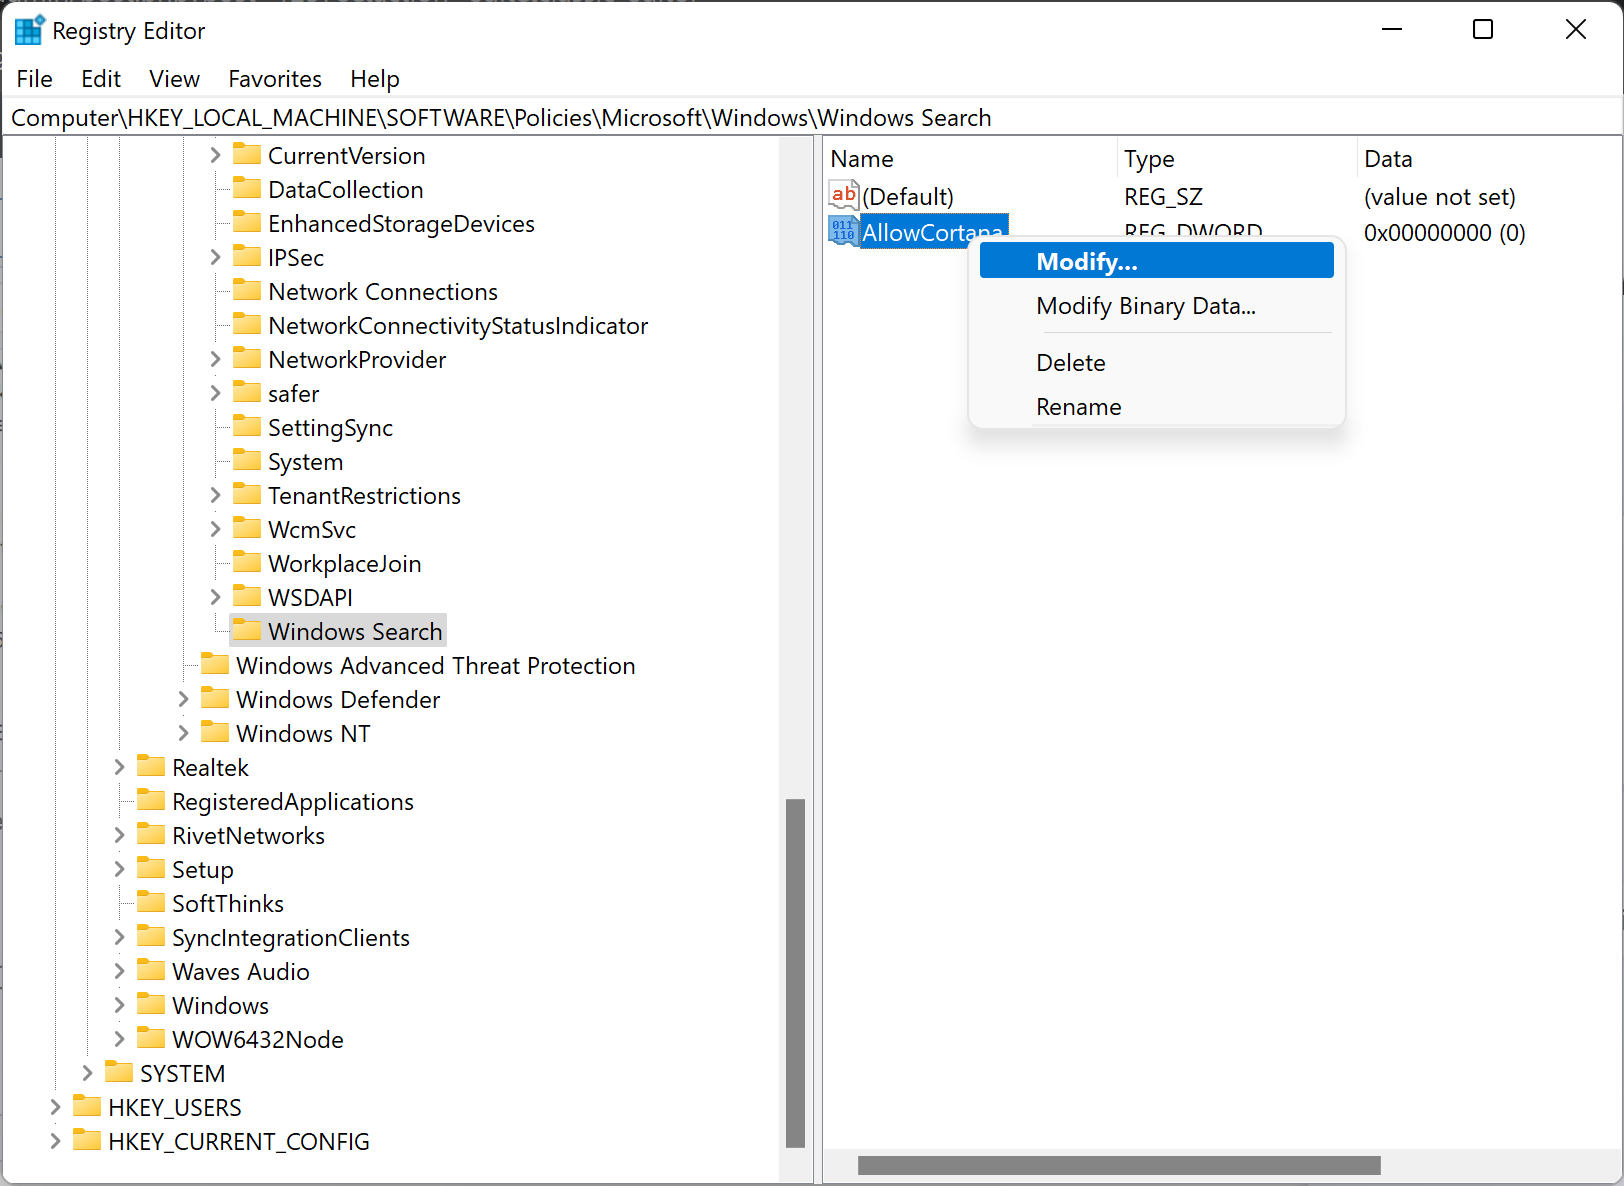
Step 7. Then, right-click AllowCortana on the right-sidebar and select Modify option.
Step 8. Set Value data to 0.
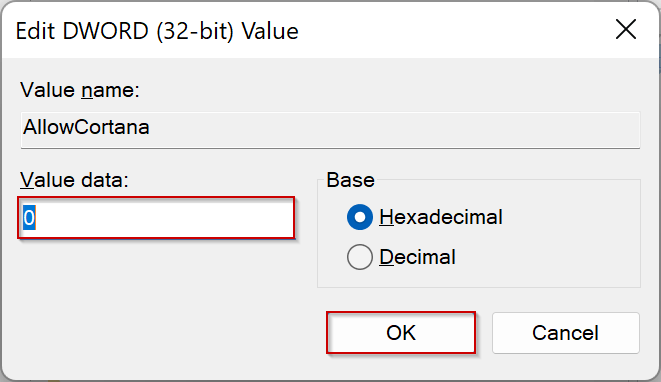
Step 9. Click OK.
Step 10. Restart your PC to apply changes.
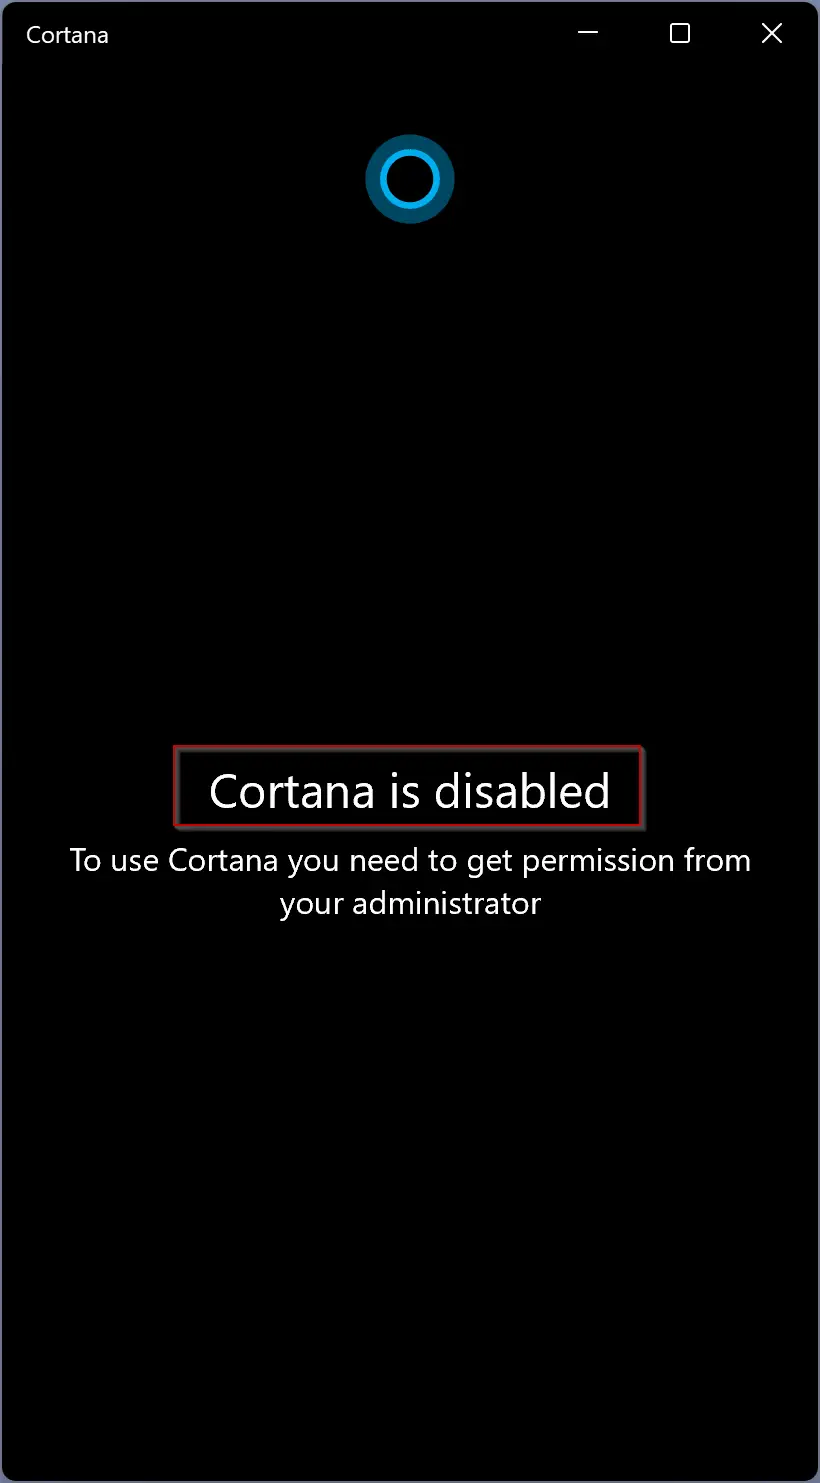
Now, the Cortana app is permanently disabled. When you try to open Cortana, you will see the message, “Cortana is disabled. To use Cortana, you need to get permission from your administrator.”
If you wish to re-enable this feature on your Windows 11/10 PC, browse to the following path in Registry Editor:-
Computer\HKEY_LOCAL_MACHINE\SOFTWARE\Policies\Microsoft\Windows\Windows Search
On the right side pane of the Windows Search folder, change AllowCortana Value data to 1.
How to Disable Cortana Permanently via Group Policy Editor in Windows 11 or 10?
If you prefer to use Local Group Policy Editor to disable Cortana app on Windows 11/10, do the following:-
Step 1. Open Local Group Policy Editor.
Step 2. When the Local Group Policy Editor window opens, navigate the following path from the left side pane:-
Computer Configuration > Administrative Templates > Windows Components > Search
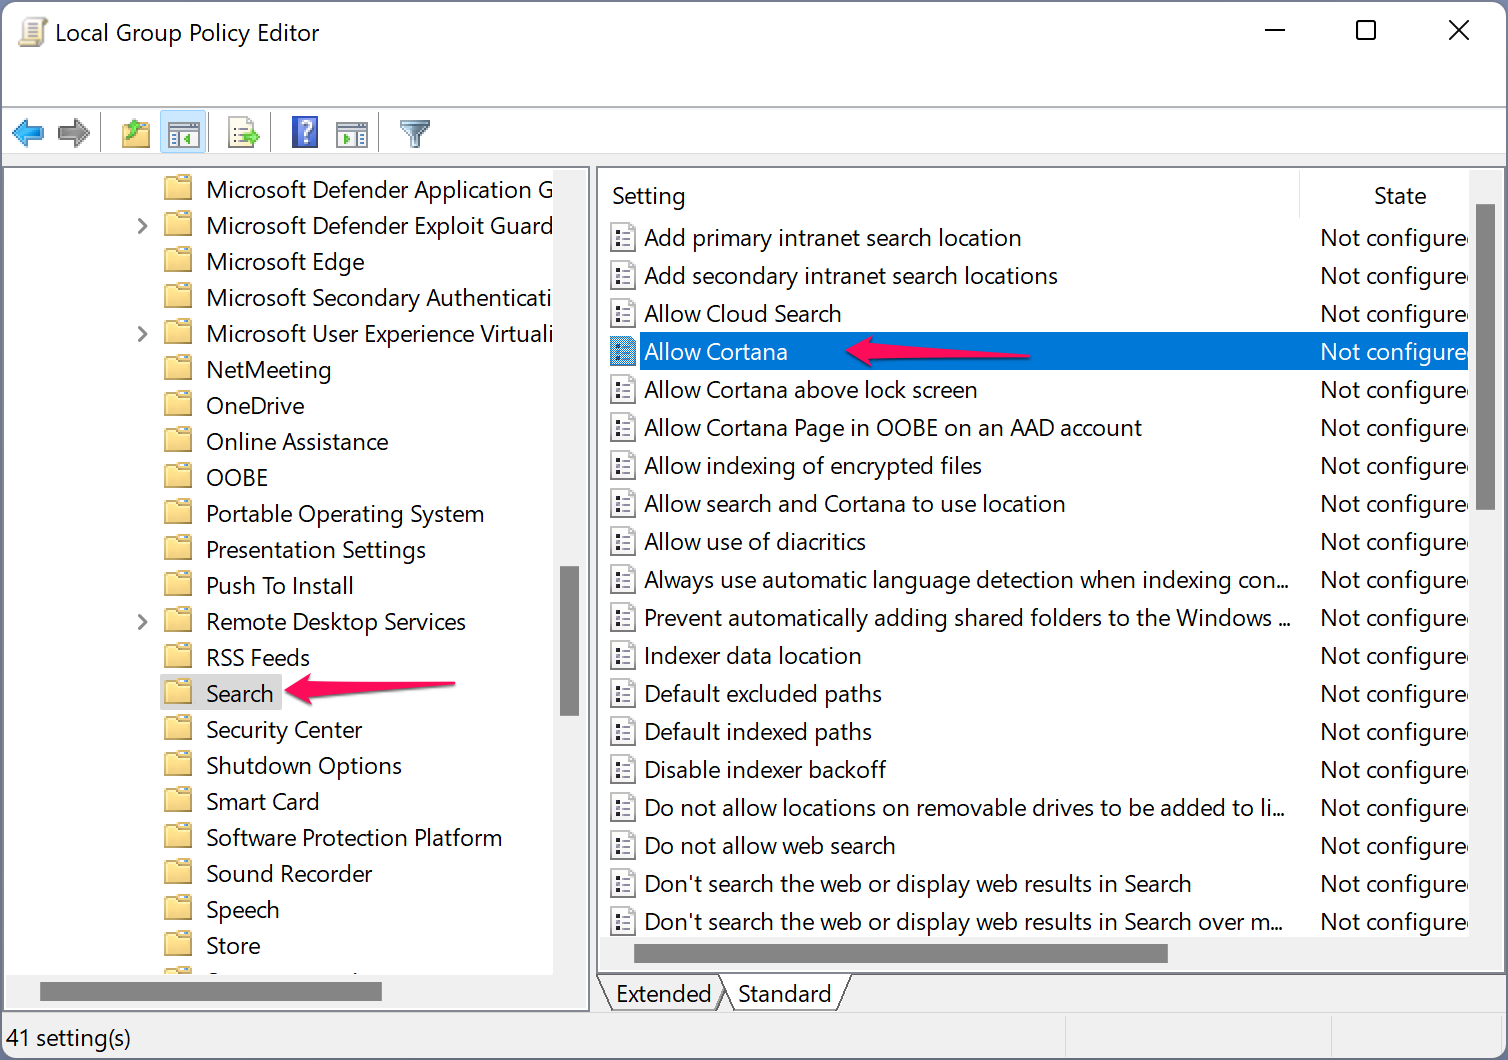
Step 3. On the right side pane of the Search folder, locate the “Allow Cortana” policy and double-click on it to change its settings.
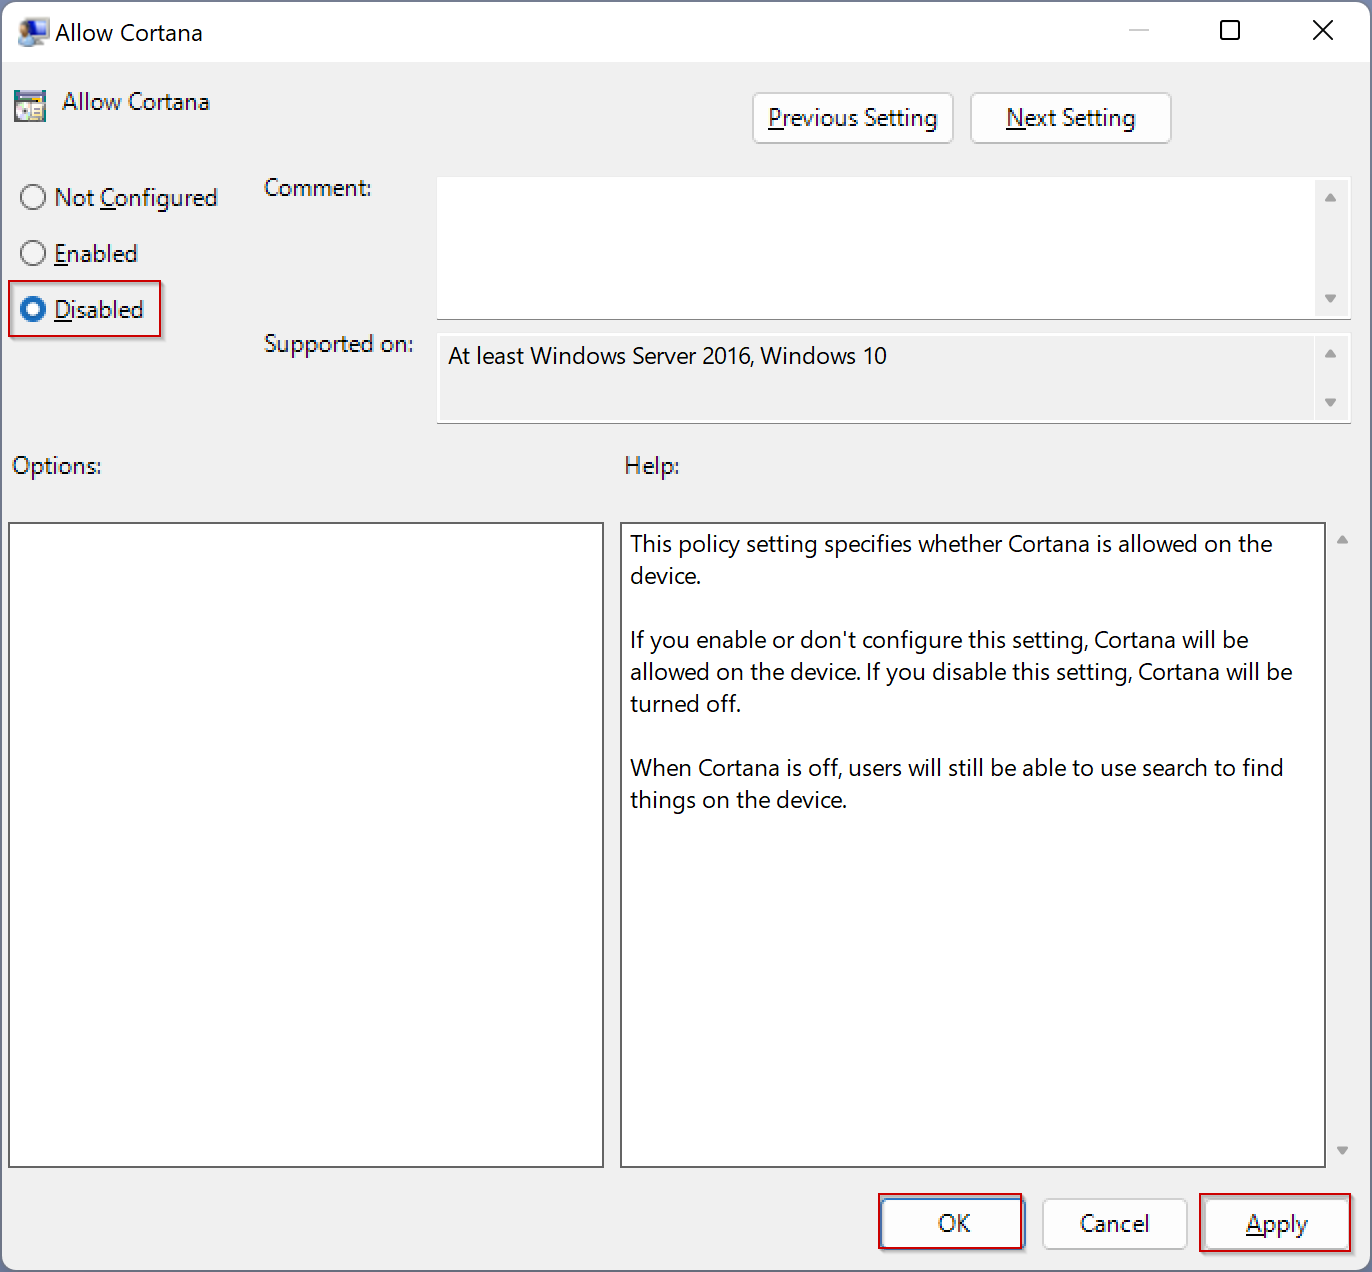
Step 4. Choose the Disabled option.
Step 5. Click Apply.
Step 6. Click OK.
Step 7. Reboot your computer.
Now, Cortana is permanently disabled on your PC.
To re-enable Cortana on your computer, repeat the above steps, and in step 4 above, select the Enabled or Not Configured option. That’s it!
How to Uninstall Cortana from Windows 11 or 10?
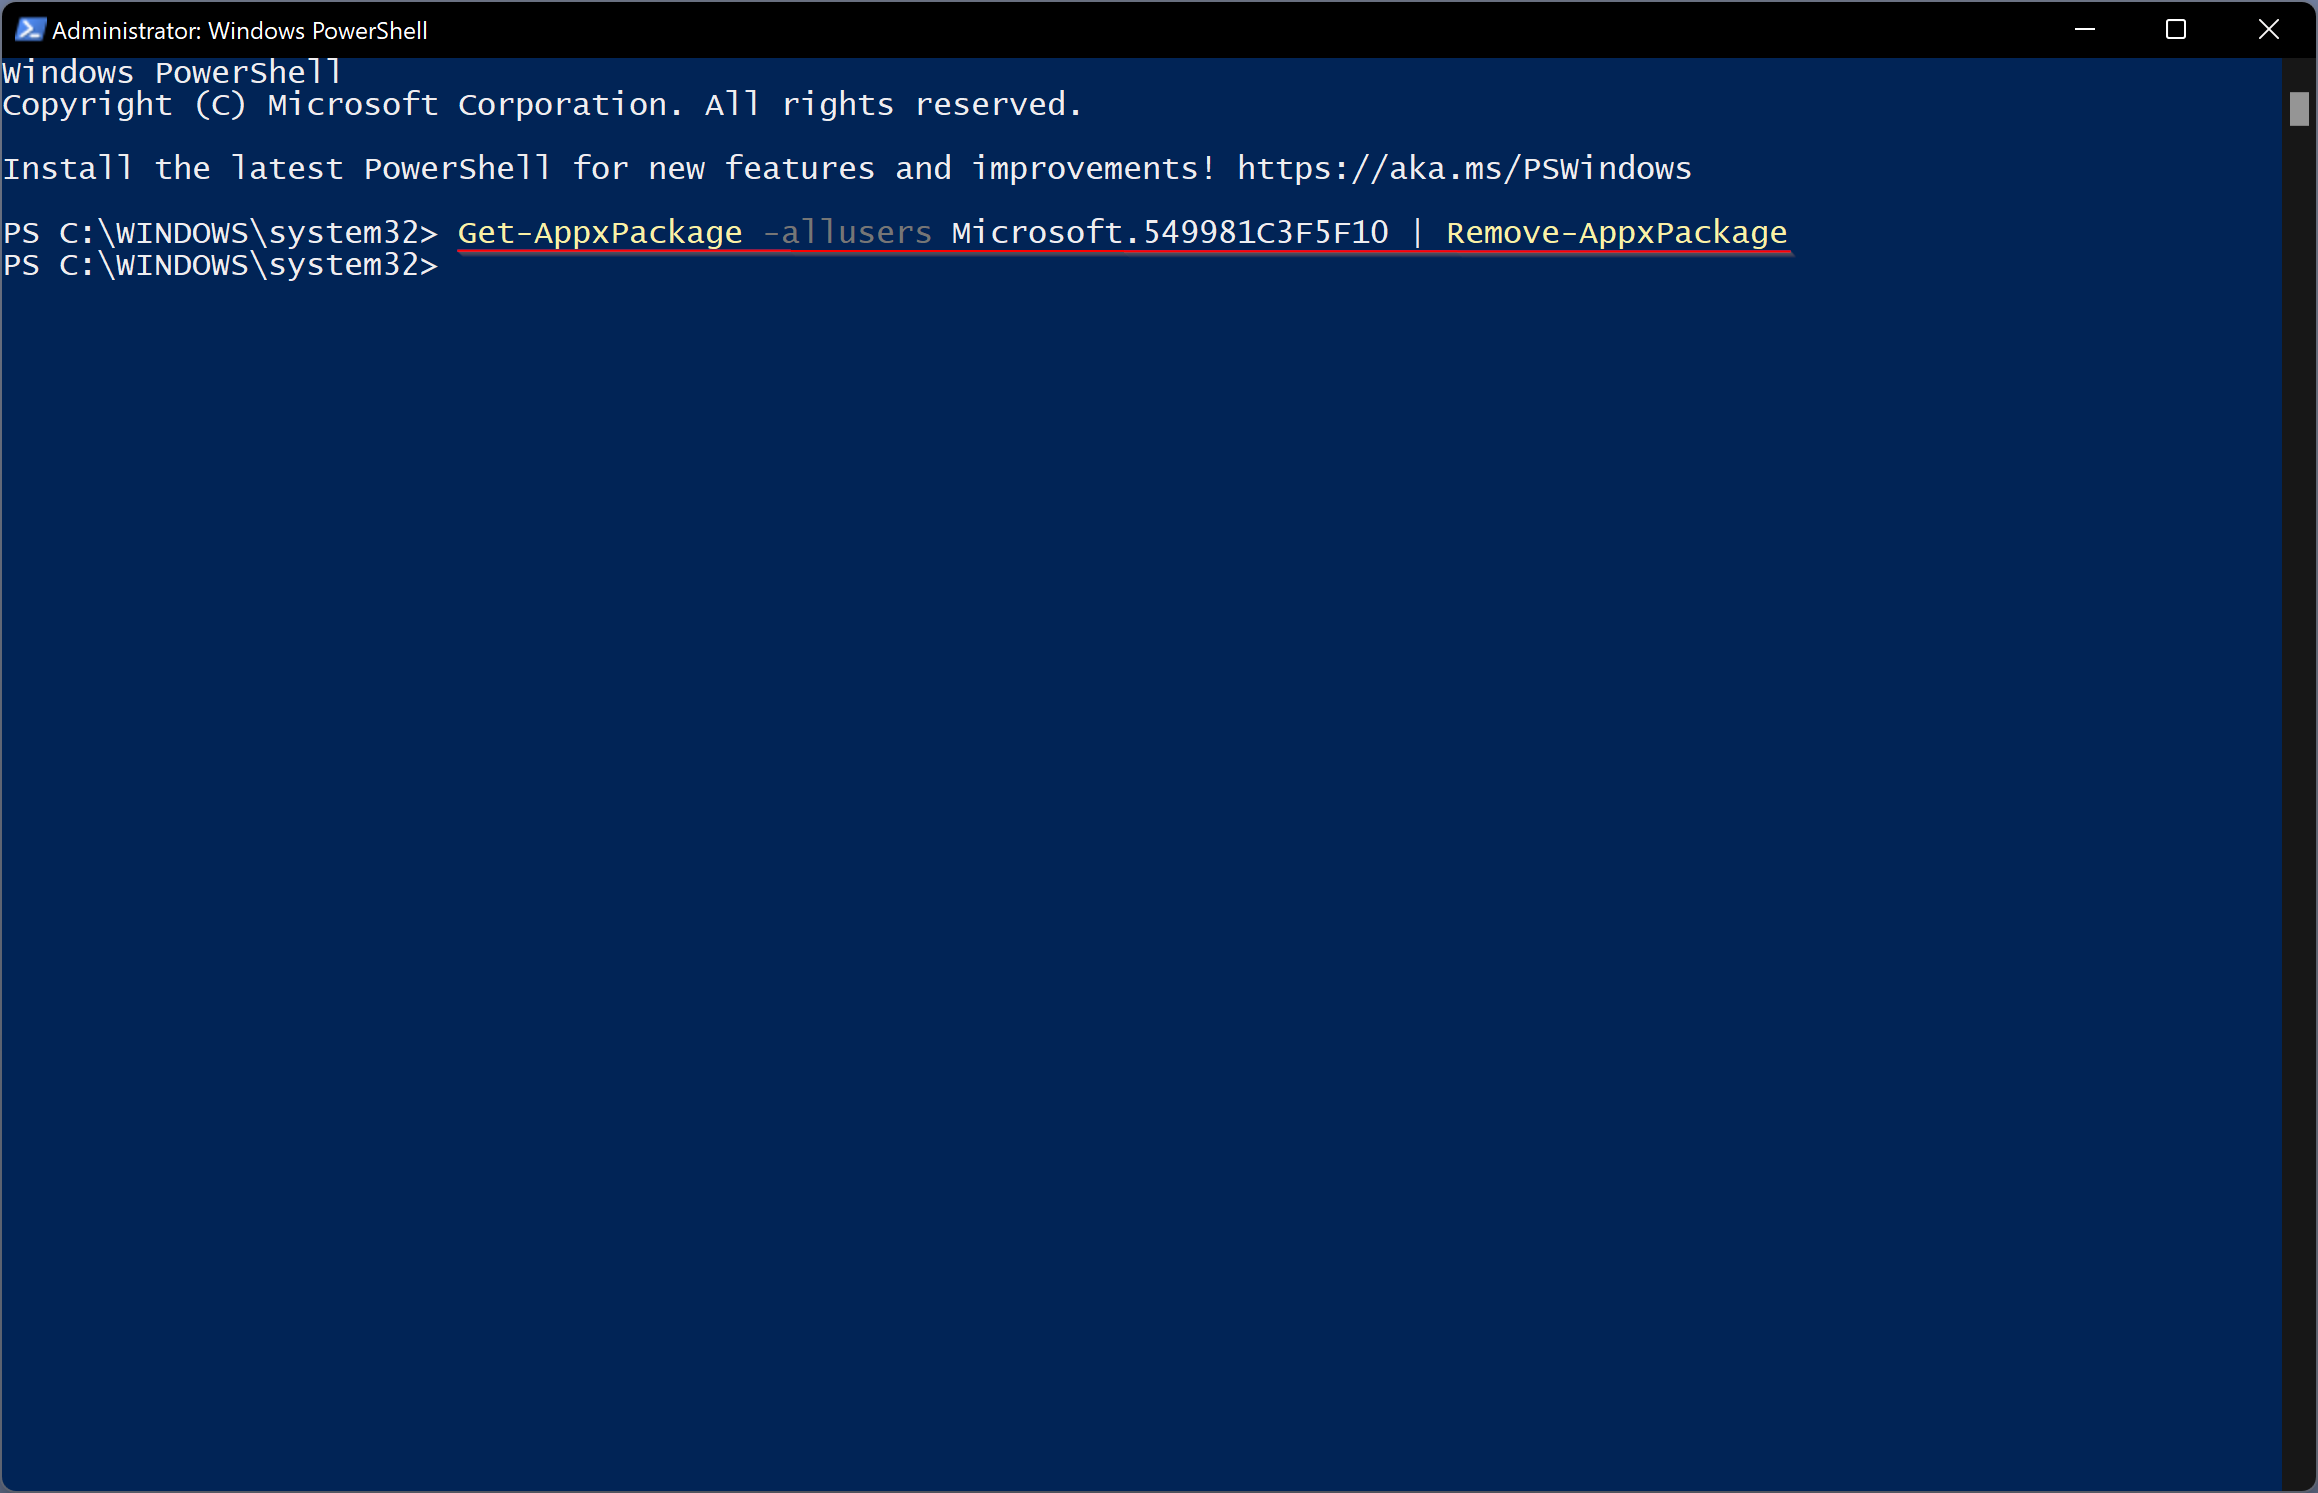
To uninstall Cortana from your PC, open Windows PowerShell with administrative rights. Use the following command to uninstall Cortana from your current user account:-
Get-AppxPackage *Microsoft.549981C3F5F10* | Remove-AppxPackage
To uninstall Cortana completely from your PC, issue the following command:-
Get-AppxPackage -allusers Microsoft.549981C3F5F10 | Remove-AppxPackage
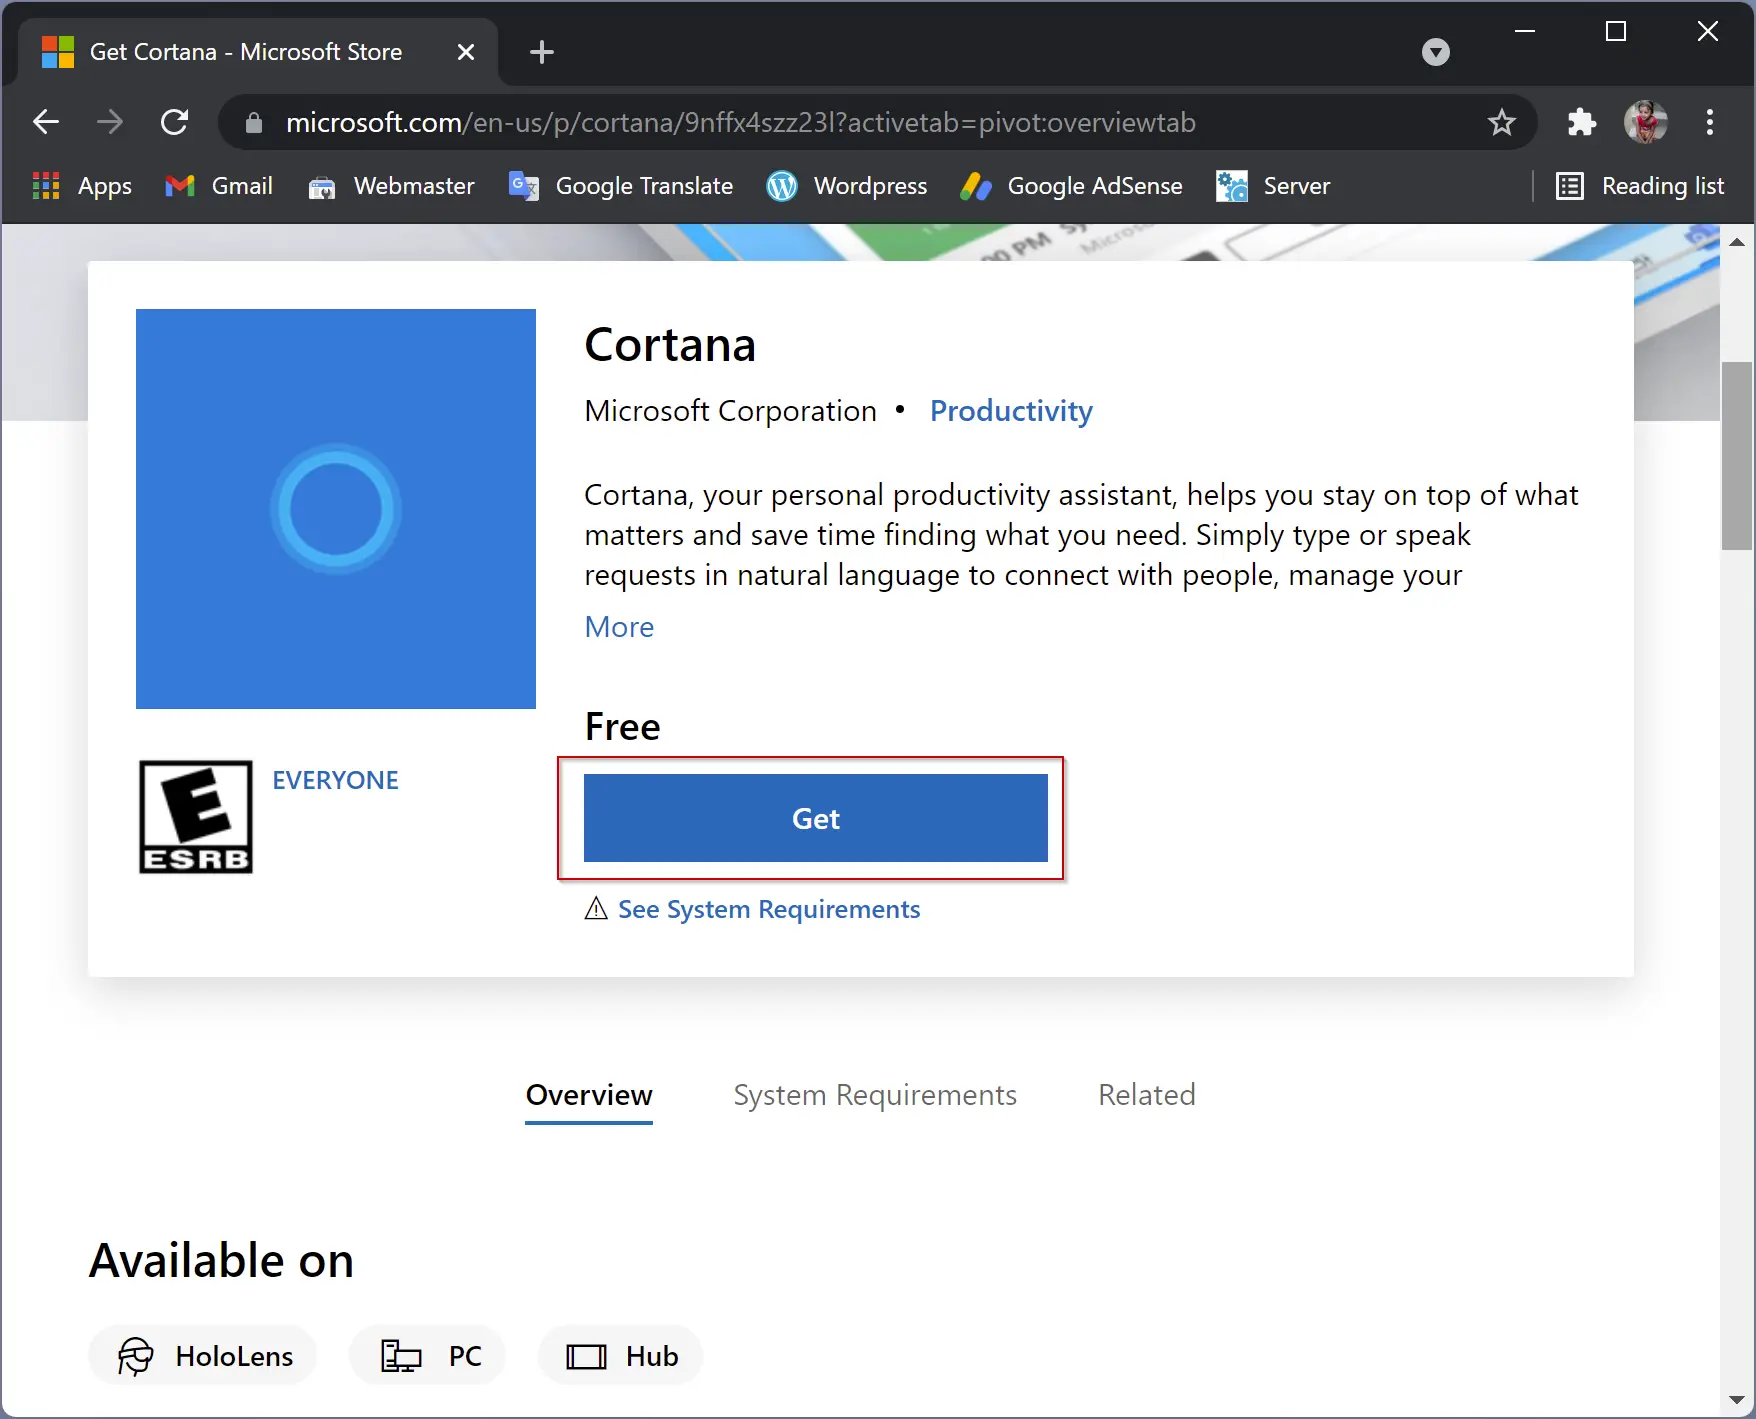
How to Install Cortana in Windows 11 or 10?
To install Cortana again on your Windows 11/10 PC, navigate to the Microsoft Store link and install it.
Conclusion
In conclusion, Cortana is a digital assistant that was first introduced on Windows 8.1 and remains an integral part of the Windows 11/10 operating system. It can be helpful for users who want to use voice commands to find files, folders, and apps on their computers, and it can also be used for tasks such as keeping track of calendars and setting reminders. However, some users find the app annoying and wish to disable it, as it can slow down the system and collect personal information.
There are several methods for disabling Cortana on a Windows 11/10 PC, including disabling it from the startup in Windows settings, using Task Manager to turn it off, or disabling it permanently using Registry Editor or Group Policy Editor. By following the appropriate steps, users can choose to temporarily or permanently disable Cortana on their Windows 11/10 computers based on their individual needs and preferences.
Cortana is enabled by default and you can’t manually turn off Cortana in Windows 10. It seems like Microsoft doesn’t want you to turn off Cortana as there is no direct option/setting in either the Control or Settings app. Earlier it was possible to switch off Cortana using a simple toggle but Microsoft removed it in the Anniversary Update. Now you need to either use Registry Editor or Group Policy to enable or disable Cortana in Windows 10.

It’s not necessary that everyone uses Cortana and a few users don’t want Cortana to listen to everything. Although, there are settings to disable almost all the features of Cortana but still many users want to completely disable Cortana from their System. Anyway, without wasting any time let’s see How to Enable or Disable Cortana in Windows 10 with the help of the below-listed tutorial.
Table of Contents
Make sure to create a restore point just in case something goes wrong.
Method 1: Enable or Disable Cortana in Windows 10 using Registry Editor
1. Press Windows Key + R then type regedit and hit Enter.
2. Navigate to the following registry key:
HKEY_LOCAL_MACHINE\SOFTWARE\Policies\Microsoft\Windows\Windows Search
3. If you can’t find Windows Search then navigate to Windows folder:
HKEY_LOCAL_MACHINE\SOFTWARE\Policies\Microsoft\Windows\
4. Then right-click on Windows select New then click on “Key“. Now name this key as Windows Search and hit Enter.

5. Similarly, right-click on Windows Search key (folder) and select New > DWORD (32-bit) Value.

6. Name this newly created DWORD as “AllowCortana” and hit Enter.
7. Double-click on AllowCortana DWORD and change it’s value according to:
To Enable Cortana in Windows 10: 1
To Disable Cortana in Windows 10: 0
8. Close everything and restart your PC to save changes.
Note: If this doesn’t work then make sure to follow the above steps for the Registry key:
HKEY_LOCAL_MACHINE\SOFTWARE\Microsoft\Windows Search
Also Read: How to Force Cortana to Use Chrome on Windows 10
Method 2: Enable or Disable Cortana in Windows 10 using Group Policy
1. Press Windows Key + R then type gpedit.msc and hit Enter.
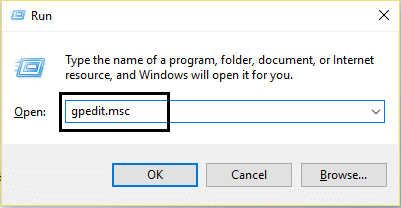
2. Navigate to the following policy location:
Computer Configuration > Administrative Templates > Windows Components > Search
3. Make sure to select Search then in right window pane double-click on “Allow Cortana“.

4. Now change its’ value according to:
To Enable Cortana in Windows 10: Select Not Configured or Enable
To Disable Cortana in Windows 10: Select Disabled

6. Once finished, click Apply followed by OK.
7. Close everything and reboot your PC to save changes.
Recommended:
- Add Copy To Folder and Move To Folder in the Context Menu in Windows 10
- Enable or Disable Cortana on Windows 10 Lock Screen
- Hide Items from Control Panel in Windows 10
- Show Control Panel in WinX Menu in Windows 10
That’s it you have successfully learned How to Enable or Disable Cortana in Windows 10 but if you still have any queries regarding this tutorial then feel free to ask them in the comment’s section.
Cortana, Microsoft’s virtual assistant, offers a range of helpful features and functionalities in Windows 10. However, some users may prefer to disable or enable Cortana based on their personal preferences or specific needs. Whether you want to enhance privacy, reduce system resource usage, or simply adjust your Windows experience, this guide will walk you through the step-by-step process of disabling or enabling Cortana in Windows 10, giving you full control of this virtual assistant.
Cortana, with its voice recognition capabilities and smart search functionality, can assist users in a variety of tasks such as setting reminders, searching the web, and managing their schedules. However, not everyone may find these features useful or may have concerns regarding privacy and data collection. Luckily, Windows 10 offers a built-in option to disable or enable Cortana easily, allowing users to tailor their Windows experience according to their preferences. By following the instructions provided in this guide, you will be able to adjust Cortana’s settings and choose whether to enable or disable this virtual assistant based on your individual needs and preferences.
Step 1: Open the Cortana settings
Click on the Start button, then type Cortana in the search bar. Click on the Cortana & Search settings option from the results.

Step 2: Disable Cortana
In the Cortana settings window, scroll down to find the Cortana section. To disable Cortana, toggle the switch under Cortana can give you suggestions, ideas, reminders, alerts, and more to Off.
Step 3: Confirm disabling Cortana
A warning message will appear, explaining the limitations of disabling Cortana. Read the message and click on Turn off if you still want to disable it.
Step 4: Enable Cortana (optional)
If you had previously disabled Cortana and want to enable it again, follow steps 1 and 2 to open the Cortana settings. Toggle the switch under Cortana can give you suggestions, ideas, reminders, alerts, and more to On.
Step 5: Customize Cortana settings
In the Cortana settings window, you can further customize your Cortana experience. You can adjust options such as voice activation, device history, and personalized advertising.
Step 6: Restart your computer
To apply the changes, it’s recommended to restart your computer. After restarting, Cortana will either be disabled or enabled, depending on the settings you have chosen.
By following these steps, you can easily disable or enable Cortana in Windows 10, allowing you to customize your virtual assistant settings based on your preferences and needs.
Unlock the full potential of your device with the cheapest Windows 10 Keys available for purchase on our website.
Wondering how to enable or disable Cortana in Windows 10?
Windows users have mixed feelings about Cortana.
Some say it is always looking out for them, remembering things so they don’t have to, and proactively suggesting relevant information. On the other hand, some disappointed users think it does not live up to its legendary name and is just another piece of bloat they do not want.
Whichever category you fall in, we have good news for you. Cortana is customizable, which means that you can enable or disable it according to your preferences.
If you are looking for easy ways of doing so, we got you covered. This guide will walk you through some easy methods of enabling/disabling Cortana in Windows 10 in detail.
Let’s get started!
1. Use the Registry Editor.
The Windows Registry is a database that stores low-level information about Windows applications and processes. When Windows performs relevant functions, it uses this information. This makes the Registry a crucial part of our operating system.
Information in Windows Registry is stored in the form of keys, and by modifying the relevant keys, we will enable/disable Cortana in Windows 10.
Make sure, however, that you are logged into Windows as an administrator before proceeding with this method.
Here is what you need to do:
- Press Windows + R keys simultaneously to open a Run dialogue box.
- In the text field of the dialogue box, type ‘regedit’ and hit Enter. This will open Windows Registry on your PC.

- Once you are inside the Registry Editor, navigate to the location mentioned below.
HKEY_LOCAL_MACHINE\SOFTWARE\Policies\Microsoft\Windows\Windows Search
- If you cannot locate the Windows Search key, then right-click on the Windows key and select the New > Key option.
- Rename this key as Windows Search and double-click on it.
- Now right-click in the right pane and select the New > DWORD (32-bit) Value option.
- Rename this newly created value as AllowCortana and double-click on it.
- If you want to enable Cortana, then type 1 under Value data, and if you want to disable it, type 0 under Value data.
- Finally, hit Enter and close the Registry Editor.
Doing so will enable/disable Cortana in Windows 10 without any issues.
2. Try Using CleanMyPC.
If your operating system is corrupted, the steps described here might not work for you.
Usually, corrupted files in your operating system are caused by junk files, so you should clean your system if you haven’t done so in a while.
The best way to do so is by using an efficient PC cleaner, and we recommend using CleanMyPC for this purpose.

This program offers a wide range of system maintenance tools, which are powerful enough to handle much more than simply removing the junk files. These tools include (but are not limited to) Multi-Uninstaller, Registry Cleaner, and a Speed Booster.
Install CleanMyPC now and get your PC up and running like new!
Try CleanMyPC Now!
3. Use the Group Policy Editor.
The working of the Group Policy Editor is quite similar to that of Windows Registry. It provides administrators control over their operating system by allowing them to customize the working of Windows.
Group Policy Editor stores information in the form of policies. In this method, we will modify policies related to Cortana to make the desired changes.
Here is what you need to do:
- Press Windows + R keys on your keyboard simultaneously to open a Run dialogue box.
- Inside the text field of the dialogue box, type ‘gpedit.msc’ and hit Enter. This will launch the Group Policy Editor on your PC.
- In the newly launched window, navigate to the location mentioned below.
Computer Configuration/Administrative Templates/Windows Components/Search
- In the right pane, search Allow Cortana and double-click on it.
- If you want to enable it, select Enabled or Not Configured.
- To disable it, select Disabled.
- Finally, click on OK/Apply and restart your PC to save the changes.
Hopefully, following the steps mentioned above will help you make the desired changes in no time.
This brings us to the end of our article on enabling/disabling Cortana in Windows 10. We hope that one of the methods mentioned in this guide did the trick for you. If you have questions regarding the methods discussed above, please let us know in the comment section below.
If this guide helped you, please share it. 🙂
-
Zainab Falak is a staff writer for Saint and an expert in Microsoft Windows, having authored more than 200 posts. She has a Bachelors in Actuarial Sciences and her passion for computers extends to exploring various aspects, from UI customization to the Windows registry and exploring error codes. Twitter
LinkedIn
View all posts