
Editing the hosts file in Windows 11 might sound technical, but it’s actually pretty straightforward. By following a few simple steps, you’ll be able to modify this file to block websites, redirect them, or even create shortcuts for internal network resources. Ready to dive in? Let’s get started!
In this section, we’ll cover the detailed steps needed to successfully edit your hosts file. You’ll need administrator rights on your computer, and be careful, as this file plays a crucial role in your system’s networking.
Step 1: Open Notepad as Administrator
First, search for Notepad in the Start menu, right-click it, and select “Run as administrator.”
Running Notepad as an administrator is crucial because the hosts file is protected by the system. Without these rights, you won’t be able to save any changes.
Step 2: Open the Hosts File
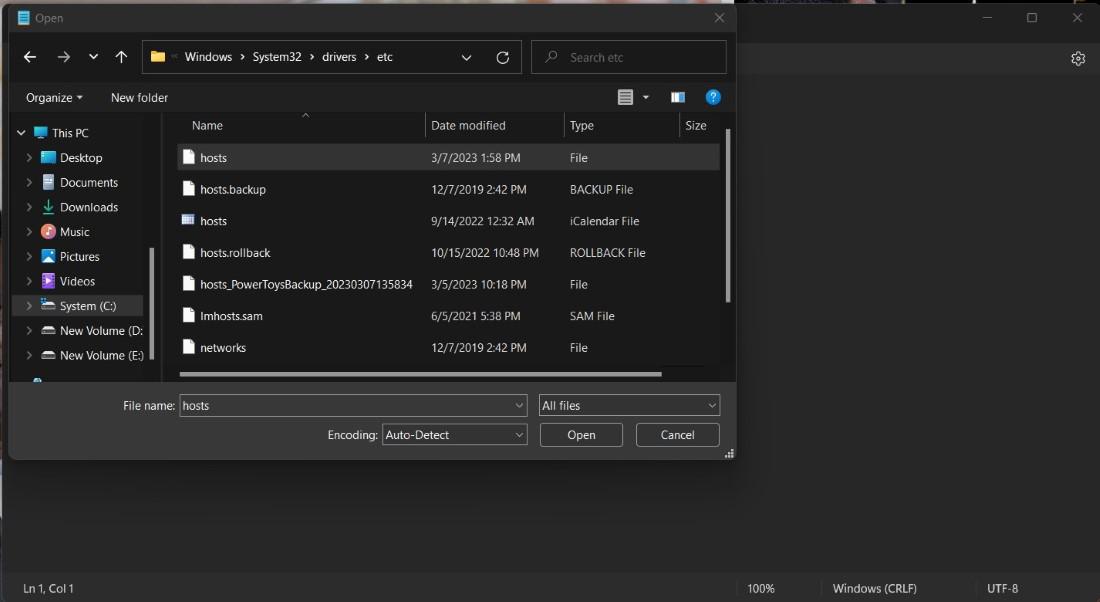
In Notepad, click on File > Open, then navigate to C:WindowsSystem32driversetc. Select “All Files” in the bottom right to see the hosts file and open it.
The hosts file is located in a protected system directory. By navigating to this folder, you ensure you’re accessing the correct file. Remember to change the file type filter to see all files, as the hosts file doesn’t have a .txt extension.
Step 3: Make Your Changes
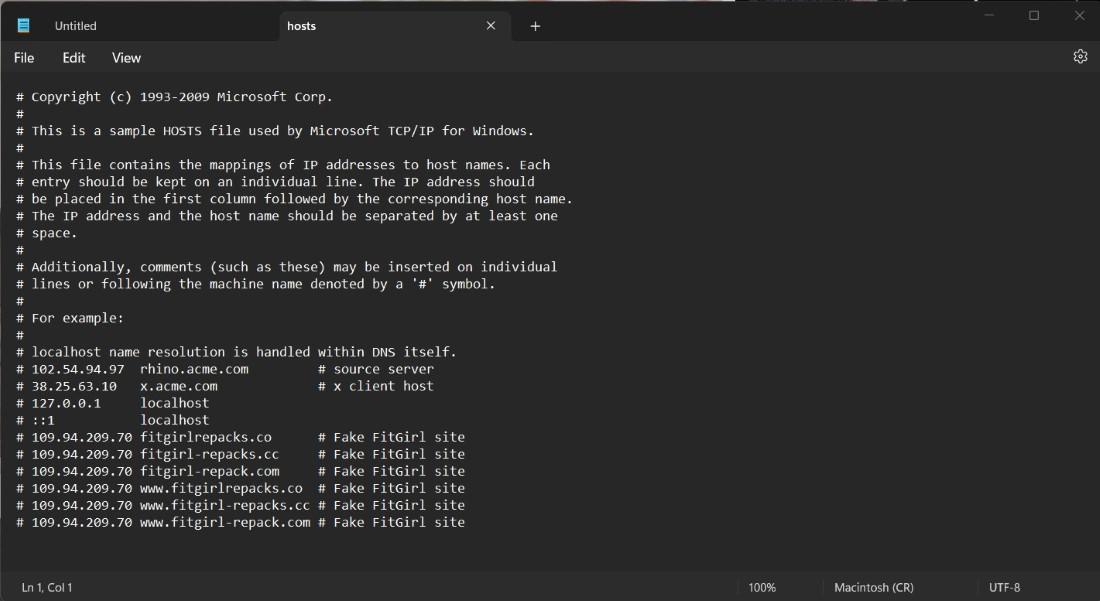
Add your desired entries at the bottom of the file. For example, typing “127.0.0.1 example.com” will block that website.
Entries in the hosts file map IP addresses to domain names. By adding a new line with an IP address followed by a domain name, you’re telling your computer to use that IP address instead of looking it up online. The IP address “127.0.0.1” is a loopback address, effectively blocking access to that domain.
Step 4: Save the File
Go to File > Save to save your changes. You may need to confirm with administrative privileges.
Simply saving the file will apply your changes. If you encounter any errors, double-check that you are running Notepad as an administrator; otherwise, the system will prevent you from saving your modifications.
Step 5: Flush DNS Cache
Open Command Prompt as an administrator and type “ipconfig /flushdns” to clear the DNS cache.
Flushing the DNS cache ensures that your changes take effect immediately. Without this step, your computer might still refer to the outdated DNS information stored in the cache.
Once you’ve completed these steps, the changes will take effect immediately. Any websites you redirected, blocked, or added will now follow the rules you set in the hosts file.
Tips for Editing Hosts File Windows 11
- Always create a backup of the hosts file before making any changes.
- Use Notepad or another basic text editor—do not use word processors like Microsoft Word.
- Remember to sync changes across multiple devices if needed.
- Keep entries organized and leave comments using the “#” symbol for future reference.
- Revert any unwanted changes by restoring the original hosts file from your backup.
FAQs for Editing Hosts File Windows 11
What is the hosts file?
The hosts file is a plain text file used by the operating system to map IP addresses to hostnames.
Can I block websites using the hosts file?
Yes, by redirecting a domain to the IP address “127.0.0.1,” you can effectively block access to that website.
Do I need to restart my computer for changes to take effect?
No, but you should flush the DNS cache using Command Prompt to ensure immediate effect.
Can editing the hosts file harm my computer?
Improper changes can disrupt your network connections, so always exercise caution and create backups.
How do I restore the original hosts file?
Replace the modified hosts file with a backup copy you created before making any changes.
Summary of Steps
- Open Notepad as Administrator.
- Open the Hosts File.
- Make Your Changes.
- Save the File.
- Flush DNS Cache.
Conclusion
Editing the hosts file in Windows 11 is a powerful way to control domain name resolution on your computer. By following the simple steps outlined above, you can easily block unwanted websites, create shortcuts for local networks, or make other useful changes. Always remember to exercise caution and create backups, as this file plays a significant role in your system’s networking functions.
If you’re interested in more advanced tasks, like scripting entries into the hosts file or understanding more about DNS resolution, there are plenty of resources available to deepen your knowledge. Feel free to explore and experiment, but always keep a backup handy!
So, next time you need to make network tweaks, you know where to start. Happy editing!
Matthew Burleigh has been writing tech tutorials since 2008. His writing has appeared on dozens of different websites and been read over 50 million times.
After receiving his Bachelor’s and Master’s degrees in Computer Science he spent several years working in IT management for small businesses. However, he now works full time writing content online and creating websites.
His main writing topics include iPhones, Microsoft Office, Google Apps, Android, and Photoshop, but he has also written about many other tech topics as well.
Read his full bio here.
The hosts file is a critical component of an operating system’s network configuration, serving as a simple text file that maps domain names to IP addresses. This file is an essential tool for system administrators, developers, and IT professionals to direct network traffic internally to specific IP addresses before reaching out to the global DNS (Domain Name System) on the internet.
Its functionality is key in environments where custom domain routes are necessary or where DNS resolution needs to be overridden for security and testing purposes.
This article will guide you through the detailed steps as to how to edit hosts file across different platforms, providing insights into its practical applications and helping you navigate its complexities for optimal network management.
An overview of the hosts file
Before the development of the Domain Name System (DNS) in the 1980s, the hosts file was the primary method for translating human-readable domain names into IP addresses.
Initially, the file was managed manually, with entries being added to a centralized file that had to be shared and regularly updated among all users on the ARPANET, the precursor to the modern internet.
As the network grew, this method became unsustainable, leading to the development of DNS to automate and decentralize hostname and IP address management on a global scale.
Comparing the manipulation of the hosts file across different platforms—Windows, MacOS, and Linux—reveals its universal role but varied handling in network settings. In Windows, the hosts file is often edited to block unwanted websites or create specific test environments. MacOS users may modify the hosts file for similar reasons but can also utilize it for app development.
In Linux, the hosts file is frequently adjusted for server aliasing and network testing. Each system’s unique approach to accessing and modifying the hosts file underscores its versatility and critical role in effective network management.
The hosts file acts as the first point of reference in mapping domain names to IP addresses, effectively bypassing the global DNS servers. Located in a specific path on the file system, which varies by operating system, the hosts file allows administrators to define specific IP addresses to hostnames, thereby controlling where traffic is directed locally on the computer.
The relationship between the hosts file and DNS
- Local DNS override: The hosts file can specify IP addresses for specific domain names, overriding DNS resolution for those domains on the local system.
- Testing and development: It is commonly used to test websites and other online services locally before going live, ensuring that they resolve correctly without altering the actual DNS records.
- First port of call: Due to the local-resolution nature of the hosts file IP resolution process, some VPN solutions partly operate by making edits to your hosts file to redirect the user’s DNS and other requests to e.g. their own secure points of presence/DNS servers/gateways, etc.
Editing the hosts file has some potential risks and/or other possible security outcomes, some more desirable than others:
- Security implications:
-
- Incorrect entries can misdirect traffic to malicious sites.
- Anti-malware sites can “inoculate” your system against malware by using the hosts file to redirect entire lists of known malware domains to your local system’s IP address 127.0.0.1 (i.e. “localhost”).
- Connectivity issues:
- Errors in the file can lead to problems accessing intended websites.
- Development/troubleshooting difficulties:
- Local testing discrepancies: Misconfigured entries can create inconsistencies between local testing environments and production settings, leading to unforeseen issues when deploying applications.
- Troubleshooting complexity: A modified hosts file can complicate diagnosing network problems, as it may not be immediately apparent that DNS resolutions are being overridden locally.
Precautions should include:
- Backing up the original hosts file before making changes.
- Using administrative privileges to edit the file to prevent unauthorized changes.
- Testing changes on a single machine before wider deployment.
How to edit the hosts file
In theory
The hosts file is a pivotal tool for network configuration, allowing direct control over how domain names are resolved locally without interacting with external DNS services. By manually editing this file, users can ensure specific domains point to chosen IP addresses for various purposes such as development, testing, or security measures.
Example: 192.168.1.5 example.com www.example.com dev.example.com # Wildcards not allowed
- IP Address: The line begins with the IP address that the domain names will resolve to.
- Whitespace: Spaces or tabs are used to separate the IP address from the domain names. Multiple successive tabs are allowed for aligning text.
- Domain Name: The primary hostname associated with the IP address. This should be the first text after the IP address and initial whitespace.
- Aliases: Additional hostnames can be subsequently listed on the same line as the primary domain name, separated by whitespace.
- Comments: Any text following a # symbol is considered a comment and is ignored by the system.
In Windows environments
- Locate the file: Navigate to C:\Windows\System32\drivers\etc\ where the hosts file resides.
- Open with administrative privileges: Right-click on Notepad and select “Run as administrator”. Open the hosts file through this Administrator instance of Notepad to ensure you can save changes.
Common modifications
- Blocking websites: Adding lines such as 127.0.0.1 example.com blocks all traffic to “example.com” by redirecting it to the local machine.
- Redirection: Directing domain names to specific IP addresses for testing or local development purposes.
In MacOS
Editing the hosts file on a MacOS requires a few specific steps:
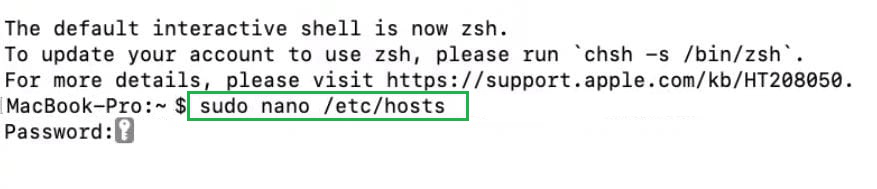
- Open Terminal: Use Spotlight to open Terminal.
- Use sudo to access the file: Type sudo nano /etc/hosts to edit the file in Nano with root permissions.
Typical MacOS use cases
- Development environments: Localhost mapping for web application development.
- Custom redirects: Redirecting traffic from production to staging servers for testing.
In Linux
In Linux, the process involves:
- Locate the file: Generally found at /etc/hosts, you can confirm with ls -l /etc/hosts or sudo stat /etc/hosts to confirm.
- Edit with a text editor:
- Command-line editor: Use commands like `sudo nano /etc/hosts` or `sudo vim /etc/hosts` to modify the file.
- Graphical editor: Depending on your desktop environment and favored text editor, use commands such as sudo gedit /etc/hosts or sudo kate /etc/hosts.
Linux-specific modifications
- Network testing: Assigning specific domains to test network configurations.
- Server aliasing: Mapping multiple names to different alias IP addresses on the same server for various service simulations.
Harnessing the hosts file for effective network management
The hosts file is a powerful tool for network configuration, crucial in managing how domain names are resolved on individual systems. Understanding its function across different operating systems enhances its utility for tasks from simple website blocking to complex network infrastructure testing.
We encourage IT professionals and system administrators to leverage the insights gained to optimize their network configurations and troubleshoot effectively, ensuring they maintain control over their domain resolutions and traffic management strategies.
By mastering the manipulation of the hosts file, IT professionals can not only refine their network’s operational efficiency but also fortify its defenses against common cyber threats, making it an indispensable skill in today’s digital landscape.
Download Article
Easily find and edit the Windows hosts file like a pro
Download Article
- Using Notepad
- Using PowerToys
- Troubleshooting
- Video
- Tips
|
|
|
|
The Windows hosts file is a system file you can edit to map hostnames or servers to IP addresses. Most people won’t ever need to edit this file, but sometimes, certain apps and services require making some changes, or you may need to add lines to the host file to block certain apps or domains. This wikiHow guide teaches you how to open, edit, and save the Windows Hosts file using Notepad and the PowerToys Hosts File Editor. We’ll also help you troubleshoot problems with your hosts file if you don’t get the expected results.
Edit the Hosts File on Windows: Quick Steps
- Open Notepad as an administrator.
- Go to File > Open.
- Navigate to c:\Windows\System32\Drivers\etc.
- Select All Files from the drop-down menu.
- Select the hosts file and click Open.
- Add any new lines below the current last line.
- Go to File > Save.
-

This opens the Windows menu and the search bar.
- To edit the hosts file in Windows, you need to open Notepad as an administrator. This means you must be an administrator of this PC to edit the hosts file.
-
Don’t click anything yet—just type the word and wait for the search results to appear.
Advertisement
-
A menu will expand.
-
This opens Notepad as an administrator.
- You may have to click Yes on the security warning to open Notepad as an administrator.
-
This opens your file browser.
-
The hosts file is usually located at c:\Windows\System32\Drivers\etc. You can paste that path into the bar at the top of the window and press Enter to go there. Don’t worry–you won’t see any files at first, but they are there.
- If Windows is installed on a different drive letter (e.g., on your D: drive instead of C:), replace the C: in the path with the correct drive letter.
-
It’s the menu toward the bottom-right corner of the window. You should now see a handful of files, including the hosts file.
-
The hosts file is now open for editing.
-

Now that the file is open, you can add lines to the file or remove lines you don’t need.
- When you add a line to the hosts file, you’ll want to enter the IP address first, followed by the domain name you’re mapping it to. Separate the two with a space or a tab, and keep each entry on its own line.[1]
- If you’re editing the host file to block a website, the IP address you’ll enter is 127.0.0.1. For example, to block Facebook, you’d enter 127.0.0.1 facebook.com.
- Don’t add «https://» or any other protocol before the domain name.
- Create a new line for each IP address and domain mapping you need to add to your hosts file.
- Lines that begin with a hash symbol # are considered comments, meaning they are inactive. If you want to remove a line in the hosts file, you can either delete it, or just type a # before it to comment it out. This way, you can easily reactivate the mapping if you change your mind later.
- When you add a line to the hosts file, you’ll want to enter the IP address first, followed by the domain name you’re mapping it to. Separate the two with a space or a tab, and keep each entry on its own line.[1]
-
This saves your changes to the hosts file.
- If you are unable to save the file this way, try this:
- Click the File menu and select Save as.
- Select All Files from the «Save as type» menu.
- Click Save.
- If you are unable to save the file this way, try this:


Advertisement
-
PowerToys now offers a utility that makes it easy to edit your hosts file in Windows.[2]
If you don’t want to mess around with your hosts file in a text editor, the Hosts File Editor is a great way to edit your Windows hosts file. To install PowerToys:- Go to the PowerToys release page on GitHub.
- The most current version of PowerToys is at the top of the page.
- Click the download link for the version you want to install and select Save.
- For example, if you want to install PowerToys only for yourself, not every user on your computer, and you have an Intel CPU, select the download link for «Per user—x64.»
- If you have an ARM processor and want to install PowerToys for every user on your computer, select the downloader for «Machine wide — Arm64».
- Once downloaded, double-click the installer in your default downloads folder.
- Check the box to agree to the terms and click Install.
- Click Close once the installation is complete.
- Go to the PowerToys release page on GitHub.
-
PowerToys comes with a ton of cool new tools, but unfortunately, it enables them by default, and they might interrupt you while you’re trying to edit your hosts file. For now, we’ll disable the other PowerToys so you can stay on task instead of wrestling with changes to how your mouse and desktop behave. Here’s what to do:
- If PowerToys doesn’t open on its own, open it from the Start menu.
- Click Open Settings on the Welcome screen.
- Turn off the toggle switches next to all options EXCEPT «Hosts File Editor.»
-
Now that everything else is turned off (and you should come back and check out the other PowerToys later), click Launch Hosts File Editor to open the editor.
- When prompted, click Yes and then Accept to confirm that you want to edit the hosts file.
-
It’s at the top-left corner. If you need to add an IP address and domain/hostname combo to your hosts file, you’ll do it here.
-
For example, if you’re using the Hosts File Editor to block a website, you’ll enter 127.0.01 here.
-
For example, if you want to be taken to the IP address you entered each time you access facebook.com, you’d enter facebook.com here. Don’t add «https://» or any other protocol before the domain name.
- If you’re blocking a website, it’s a good idea to block both the domain name and the domain name with «www» at the beginning, and any other subdomains you know. For example:
- 127.0.0.1 domain.com
- 127.0.0.1 www.domain.com
- 127.0.0.1 login.domain.com
- If you were instructed to enter more than one hostname or domain name, separate them with single spaces.
- If you’d like, you can add a comment to the «Comment» field that describes this entry. For example, if you’re adding a line to block ads from a specific application, you might type that application’s name here.
- If you’re blocking a website, it’s a good idea to block both the domain name and the domain name with «www» at the beginning, and any other subdomains you know. For example:
-
Once added, the line will be active in your Windows hosts file.
-
Each entry you see on the main screen is taken directly from your Windows hosts file, which is usually at c:\Windows\System32\Drivers\etc. You’ll see there’s a toggle switch next to each line.
- If the toggle switch next to a line in your hosts file is in the off position, that rule is inactive, so it won’t be used.
- You can easily disable a rule in your hosts file by toggling off its switch.
- If you’d rather delete something from your hosts file entirely, click the trash can icon.


Advertisement
-
If the change you made to your hosts file isn’t active yet, you may need a quick DNS flush. Here’s what to do:
- Open the Command Prompt as an administrator. To do this:
- Press the Windows key and type cmd.
- Right-click «Command prompt» and select Run as administrator.
- Type ipconfig /flushdns and press Enter.
- Open the Command Prompt as an administrator. To do this:
-
Clear your web browser cache. If you added something to your hosts file that’s supposed to block a website or direct you to a different IP address when you enter a hostname or domain name in your web browser, the old page may still be cached. Just clear your cache and try loading the site again.
-
If you’re using Chrome, this trick will clear Chrome’s DNS cache, which could make the changes you made in your hosts file take effect in Chrome.
- Type chrome://net-internals/#sockets into your address bar and press Enter.
- Click Flush socket pools.
- Click the DNS tab in the left panel.
- Click Clear host cache.[3]
-
The hosts file is mainly for mapping a domain name to an IP address, similar to how DNS works on a larger scale. If your goal is to block a website, block an ad domain, or similar, the hosts file won’t always be effective–not all applications prioritize the hosts file over DNS, and sometimes IP addresses and domain names change. It’s better to use a website-blocking or ad-blocking tool to get the job done.


Advertisement
Video
Ask a Question
200 characters left
Include your email address to get a message when this question is answered.
Submit
Advertisement
-
Always back up the file before editing.
-
While it used to be necessary to reboot your computer after modifying the hosts file, this is no longer required.
Thanks for submitting a tip for review!
Advertisement
References
About This Article
Article SummaryX
1. Open Notepad as an administrator.
2. Go to File > Open.
3. Go to c:\Windows\System32\Drivers\etc.
4. Select All Files from the drop-down menu.
5. Select the hosts file and click Open.
6. Make your changes.
7. Click File > Save.
Did this summary help you?
Thanks to all authors for creating a page that has been read 91,327 times.
Is this article up to date?
In this tutorial, we will be showing you how to edit the hosts file on the Windows operating system.
The hosts file is used on Windows when the system performs DNS lookups.
If your system finds a hostname within this file, it will use the defined IP address rather than an external server to perform the DNS lookup. Simply put, this allows you to override any hostname lookup without having to control the DNS server.
Editing this file is incredibly useful in a variety of cases. For example, you can use it to block a website or redirect it to a local equivalent.
Some game private servers require you to utilize the hosts file so you can be directed to their servers.
By the end of this tutorial, you should have a good idea of how to add any new hostname to the hosts file easily.
Exploring the Format of the hosts File on Windows
The format that the hosts file on Windows uses is straightforward to interpret and write. In fact, it is the same format used by other systems that implement the hosts file, such as Linux and macOS.
Each entry within the hosts file must be on a new line. Windows uses the new line to distinguish the separate entries.
You must start each line with an IP address. This IP address is where the defined hostnames will be directed.
After specifying an IP address, you must set at least one hostname. You can set as many hostnames as you like; just separate each hostname with a single space.
For example, if we wanted to use the hosts file on Windows to direct the hostname “cloudflaredns” to “1.1.1.1“, we would add the following line.
Taking this further, if we wanted to redirect two hostnames, for example “cloudflaredns” and “dnscloudflare“, we would add the following to the file instead.
This section teaches you how to find and edit the hosts file on Windows. We will even show you an example of adding a basic entry to this file.
Since the system owns the hosts file, your user must have administrator privileges. While you can view the file as a normal user, you won’t be able to edit it.
Opening the Hosts File for Editing
The hosts file is stored within the “C:\Windows\System32\drivers\etc\” directory on Windows. While you can manually navigate to this directory and edit the file, there is an easier solution that we will be covering in the next couple of steps.
1. On your Windows device, you should bring up the “Run” screen by pressing the WINDOWS + R keys on your keyboard.
Alternatively, you can open the terminal to run this command; however, this tool is good enough for running a single command.

2. With the Run menu now open on your device, you can use the following command to open the hosts file for editing.
This command uses PowerShell to launch Notepad as an administrator, with it directly opening the hosts file.
Copy
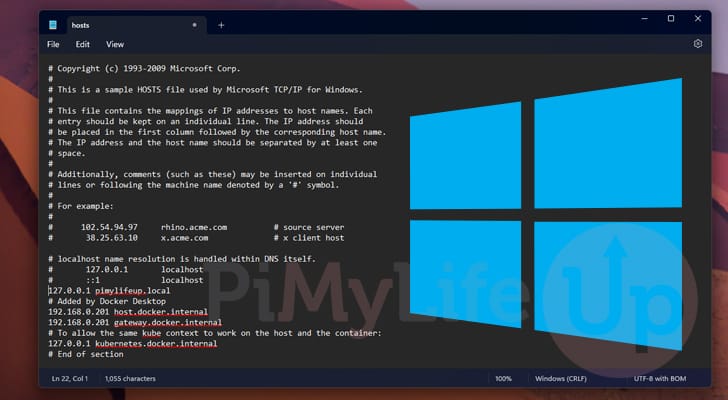
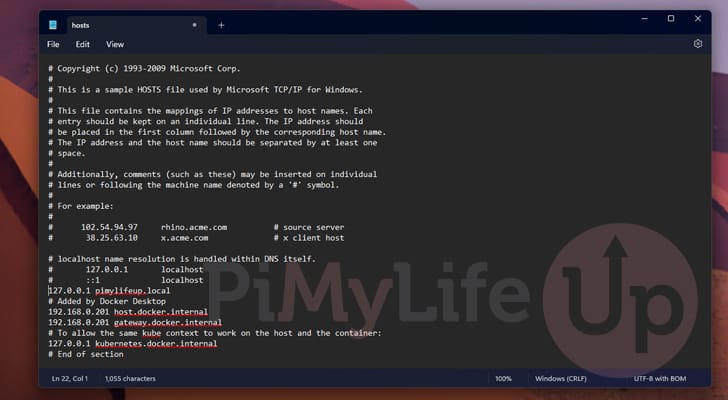
3. As shown below, you should now have the hosts file open within Notepad. You can begin to add your new entries to this file.
Example of Adding a Host to the Windows Hosts file
4. We often need to access a web interface on a Raspberry Pi. Instead of remembering the IP address and typing it in whenever we want to access it, we can specify it within the hosts file on Windows.
For this example, we are adding the IP address “192.168.0.34” with the hostname “pimonitor” being redirected to it.
5. Once you have finished making changes to this file, you can save by pressing CTRL + S or by quitting and clicking the “save” prompt.
Testing your hosts File Changes on Windows
6. Since changes to the hosts file on Windows take effect immediately, you don’t have to restart your device for it to take effect.
To test that the new hostname is directing to the correct IP address, we will use the built-in ping tool.
Before you can use this tool, you will need to open the command prompt. You can open this by typing in “cmd” into the RUN tool or by right clicking the Windows icon and clicking “Terminal”
7. With the command prompt open on your Windows device, you can test that everything is working correctly by attempting to ping the hostname
Copy
For example, testing the hostname “pimonitor” we would use the following command.
Copy
8. If everything has worked correctly, you should see your hostname, followed by the IP address you set in brackets.
Conclusion
Hopefully, by this point in the guide, you will have a good idea of how to edit the hosts file on Windows.
This file is a super useful thing to learn how to edit, as you can easily route any hostname to an IP address of your sorting. You could even theoretically use this to block ads or websites.
Please feel free to drop a comment below if you have had any issues with editing this file.
If you found this tutorial helpful, consider checking out our many other Windows tutorials.
Last Updated :
20 Nov, 2023
The operating system generally uses a host file to establish a connection between domain names and IP addresses before it goes to the domain name servers. However, sometimes it is required to host files on Windows, MacOS, and Linux to prevent any malicious attack.

In this article, hands-on practice is demonstrated for a better understanding of editing the host file on Windows, MacOS, Linux
What is a Host file?
A host file is a plain text file on a computer that maps hostnames to IP addresses. It establishes a connection between Domain Names and IP addresses. This file helps in local network configuration and can be used to block or redirect websites by associating them with different IP addresses.
Why you should edit the Host File?
You should edit the Host File for different reasons, It allows users to block specific websites, redirect sites to different addresses, or test website changes before they go live. It’s a simple way to control internet access and manage network configurations on a local level without relying on external DNS servers.
Prerequisite – How to Show Hidden Files and Folders in Windows 10
How To Edit Your Hosts File On Windows 10 and 11?
There are 2 different standard methods to edit Host file in Windows:
- Methode 1: Using Notepad to host files in Windows
- Methode 2: Using PowerToys to host files in Windows
Let’s go through both methods for Edit Hosts file on Windows
Methode 1: Edit Your Hosts File On Windows Using the Notepad
Step 1: Go to the start menu on the desktop and type the Notepad and press Enter button

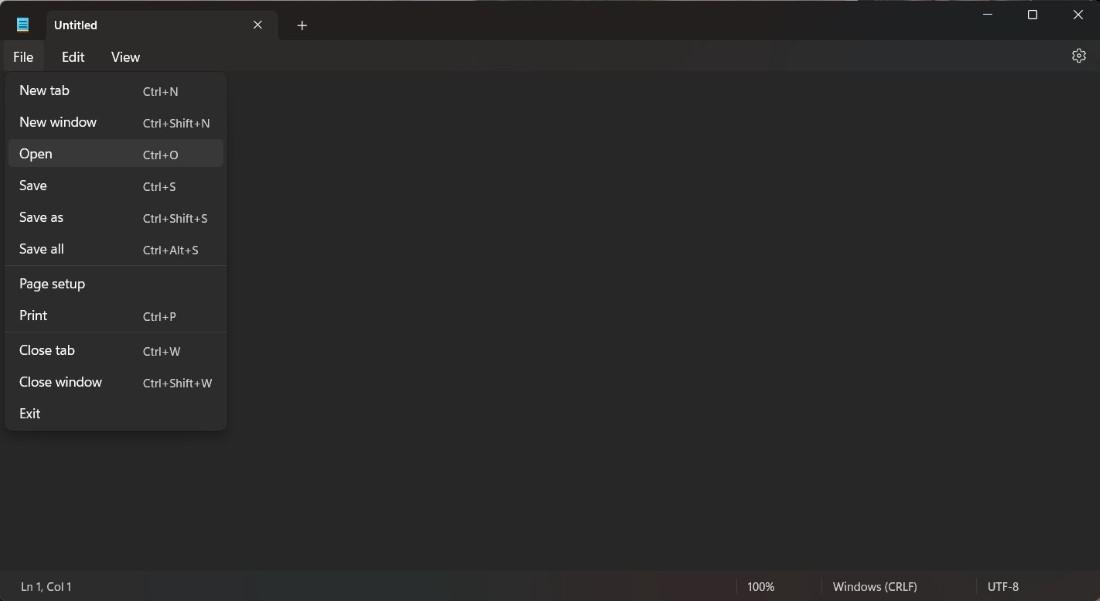
Step 2: Then open Notepad -> File -> Open to open the Hosts file
Step 3: Now you need to go to system c disk and go to Windows> System32 > drivers > etc and Select All Files on the right side
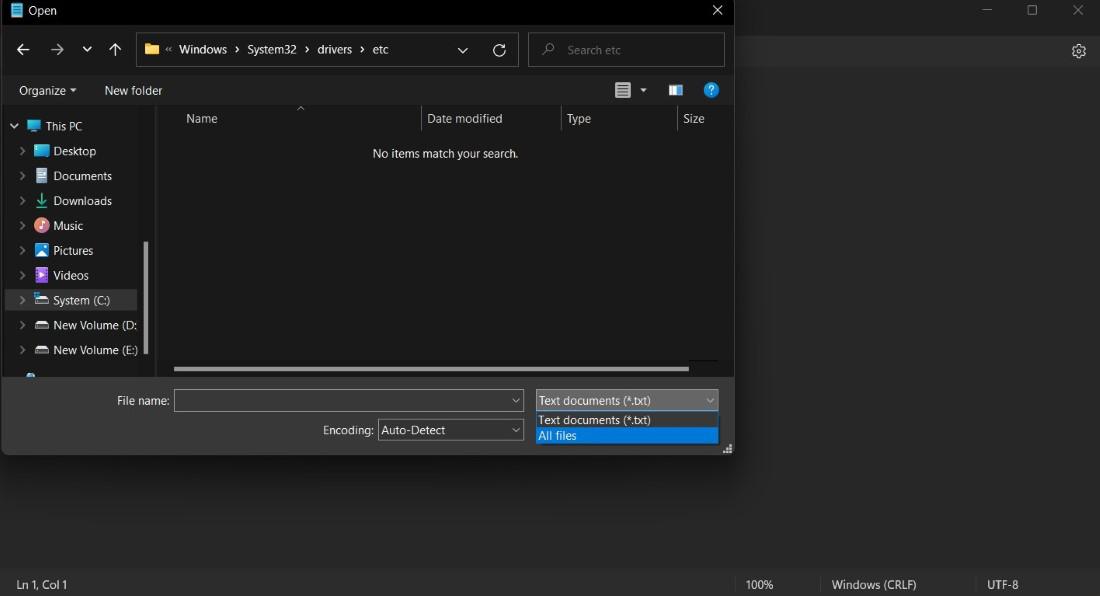
Step 4: Following this, you will now see the host file and click the entry for the open file in Notepad
Step 5: Now our file ready to EDIT
Now, your Hosts file is ready to edit in just 5 simple steps.
Methode 2: Edit Your Hosts File On Windows using PowerToys
Step 1: Hit the Start on the desktop and type the Microsoft Store and press Enter button

Step 2: You need to search the Microsoft PowerToys and click the install button from the Microsoft Store.

Step 3: Once the installation is complete, simply click on the PowerToys icon and click the Settings
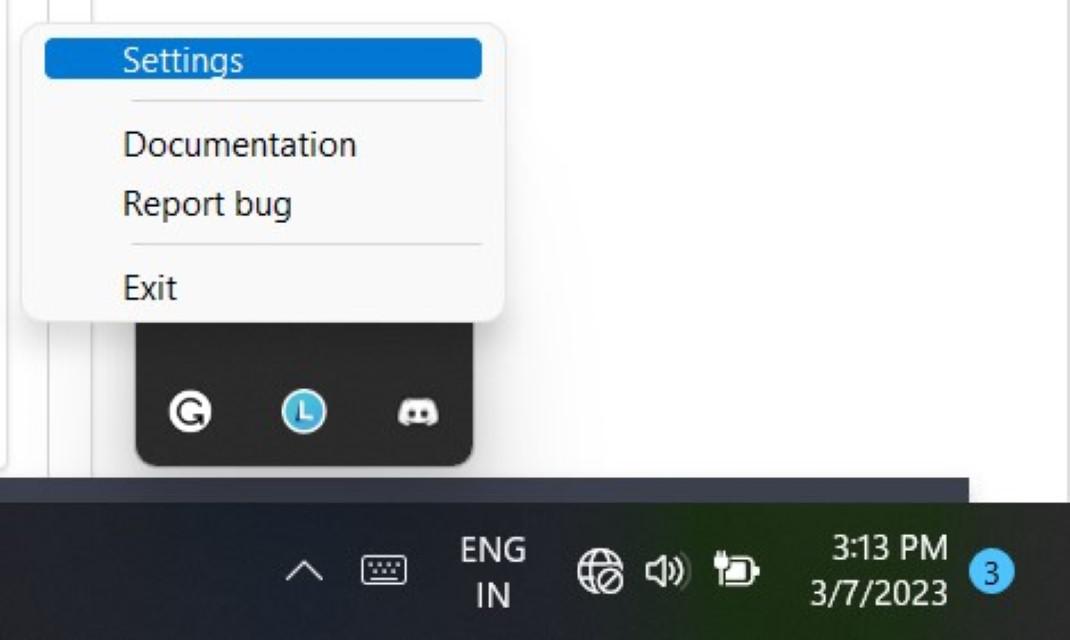
Step 4: Following this, now click on the Hosts File Editor and click on Launch Host File Editor

Step 5: Now simply click on the host file editor, and your Hosts file is ready to Edit

How to Edit Hosts File in Linux?
To edit the hosts file in Linux, follow these steps to edit the Linux host files:
Step 1: Open a terminal ( Ctrl+Alt+T )
Step 2: Run Text Editor with Administrative Rights by typing following command, you can replace «nano» with your preferred text editor
sudo nano /etc/hosts
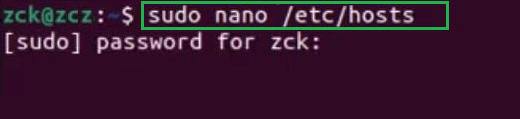
Step 3: Enter your Admin password.
Step 4: Edit the file entries in the format «IP_address domain_name».
Step 5: Save the file, Changes are now applied.
How to Edit Hosts File in MacOS?
To edit the hosts file on macOS, follow these steps to edit the MacOS host files:
Step 1: Open the Terminal application.
Step 2: Run Text Editor with Administrative Rights by typing following command, you can replace «nano» with your preferred text editor
sudo nano /etc/hosts
Step 3: Enter your Admin password.
Step 4: Edit the file entries in the format «IP_address domain_name«.

Step 5: Save the file( Ctrl+O ) and exit the text editor ( Ctrl+X ).
By following these simple steps, we successfully edited the host file available on Windows, MacOS, Linux to prevent any malicious attack.
Also Read
- What is Local Host?
- Changing Host IP Address in Flask
- Create a shared Folder between Host OS and Guest OS
- Difference Between Host and Guest Operating System