
Developers use the Node.js runtime environment to build server-side and networking applications using JavaScript. To guarantee optimal performance and security, you need to update Node.js to the latest version regularly.
However, developers sometimes need to downgrade Node to a previous version when they encounter compatibility issues with dependencies or when a project requires a specific release.
Learn how to downgrade the Node version in Windows and manage multiple Node.js versions on a machine.
Prerequisites
- Access to the Windows command prompt (CMD) or PowerShell.
- Administrator privileges.
Downgrade Node Version on Windows
Removing an existing Node distribution and reinstalling a previous version whenever you have a different project is impractical.
The nvm (Node Version Manager) tool enables developers to install different versions of Node side-by-side and switch between these versions via the Windows command line.
Note: Having two concurrent Node distributions, one installed using nvm and another using npm, may lead to compatibility issues. It is recommended to uninstall existing Node versions before installing nvm.
Step 1: Uninstall Existing Node Version
To remove a Node.js version from your Windows system:
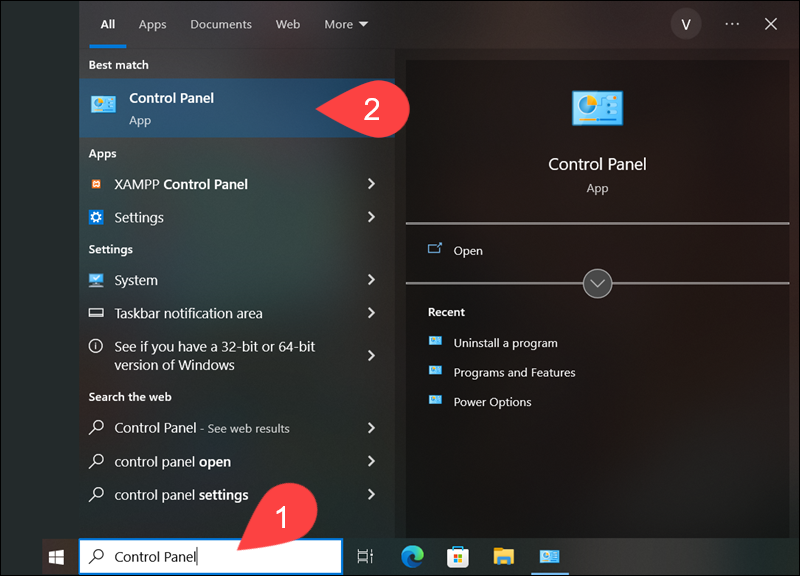
1. Type Control Panel in the search box on the taskbar.
2. Open the Control Panel app.
3. Click Uninstall a program in the Programs category.

4. Select the Node.js installation.
5. Click Uninstall.
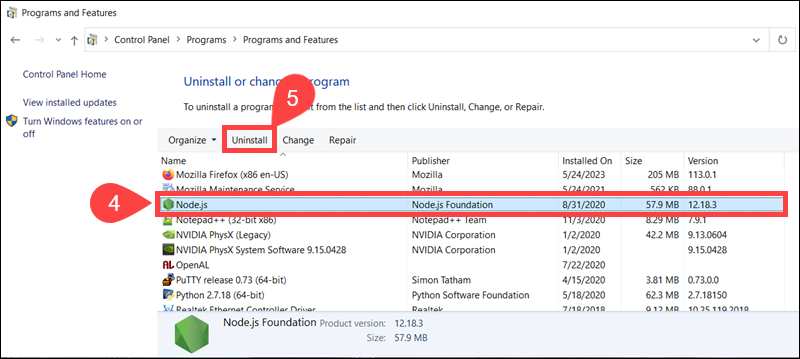
The Windows Installer proceeds to uninstall Node.js. Follow on-screen prompts to ensure the process runs its course and that the current Node.js version is completely removed from your Windows system.
Step 2: Install nvm on Windows
To install nvm on Windows:
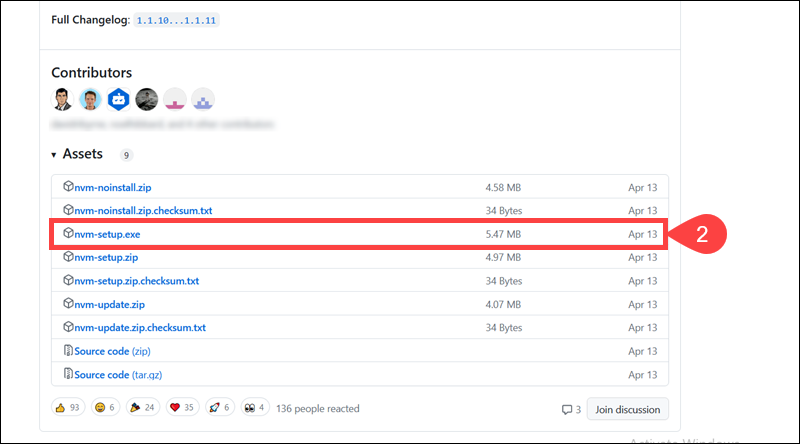
1. Use a browser to access the nvm GitHub repository.
2. Download the latest nvm installer by clicking nvm-setup.exe in the Assets section.
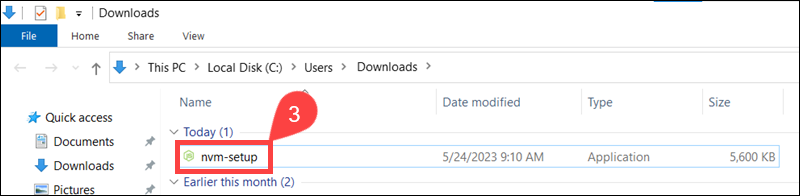
3. Locate the installer on your local machine and double-click to start the installation.
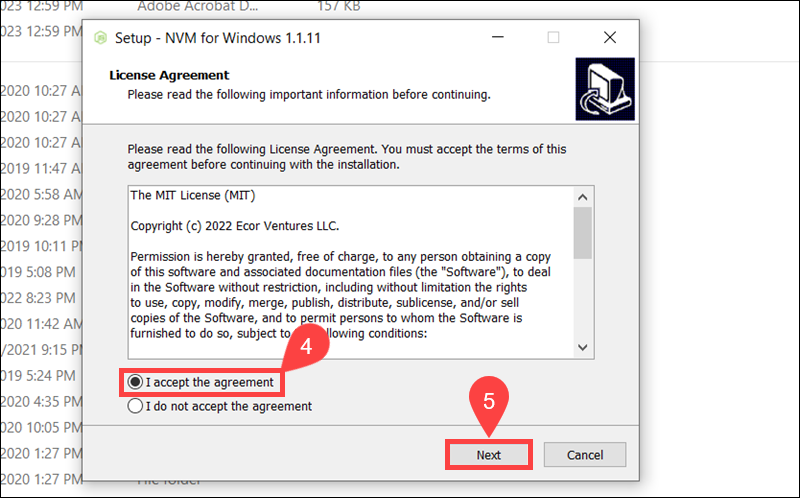
4. Select I accept the agreement.
5. Click Next.
6. Choose an nvm installation path and select Next.

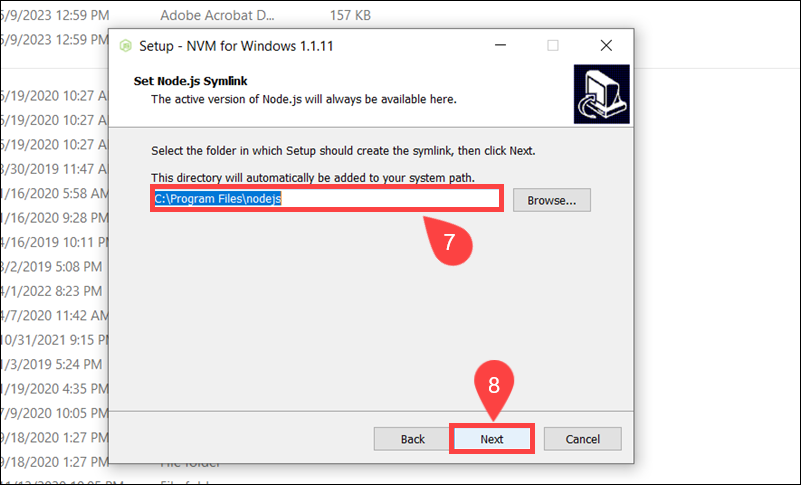
7. Keep the default path or define a custom symlink for the active Node.js version.
8. Click Next.
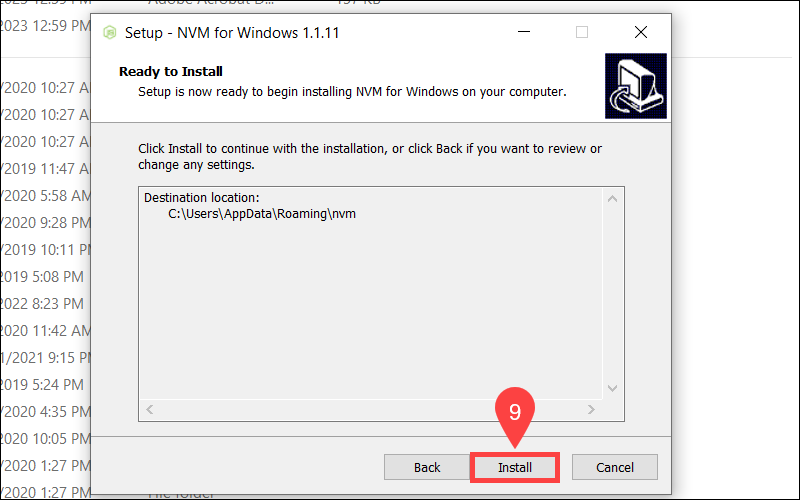
9. Select Install.
10. Click Finish.
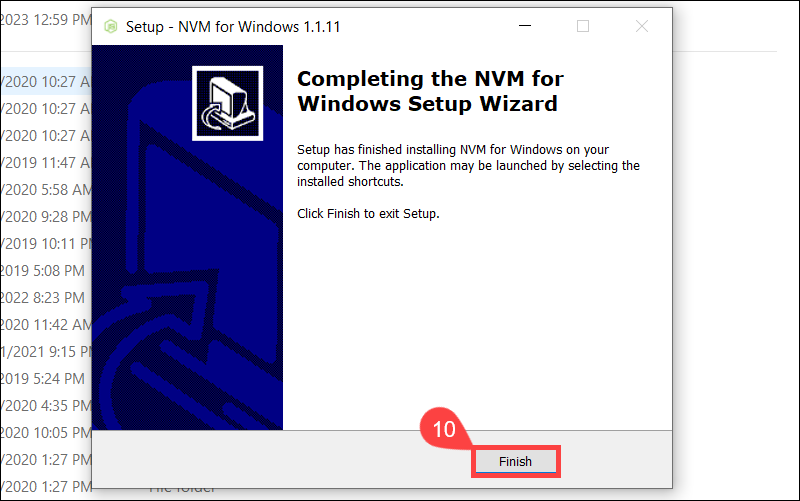
The nvm installation process is complete.
Step 3: Use nvm to Install Node
Managing Node.js versions via nvm requires administrator privileges for the Windows command prompt (CMD) or PowerShell.
To install a specific Node version using cmd:
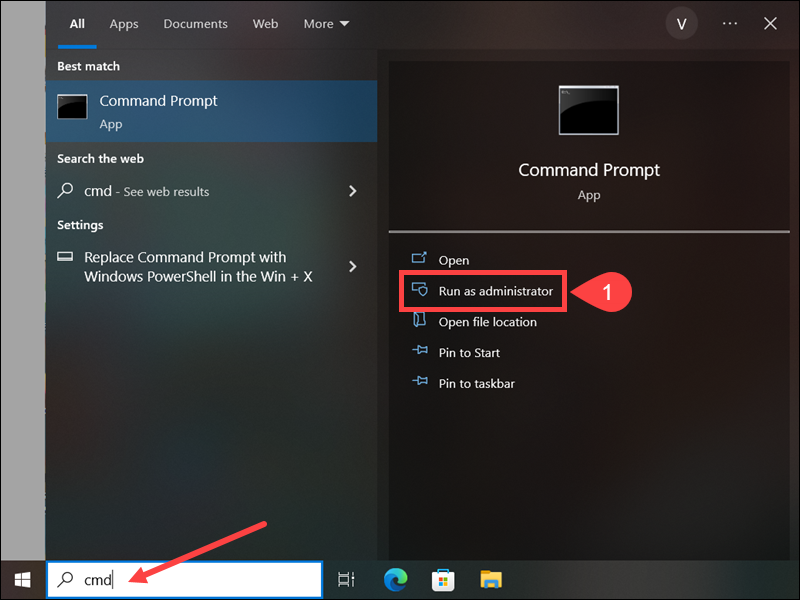
1. Type cmd in the search bar and select Run as administrator.
2. List the available Node versions using the following command:
nvm list available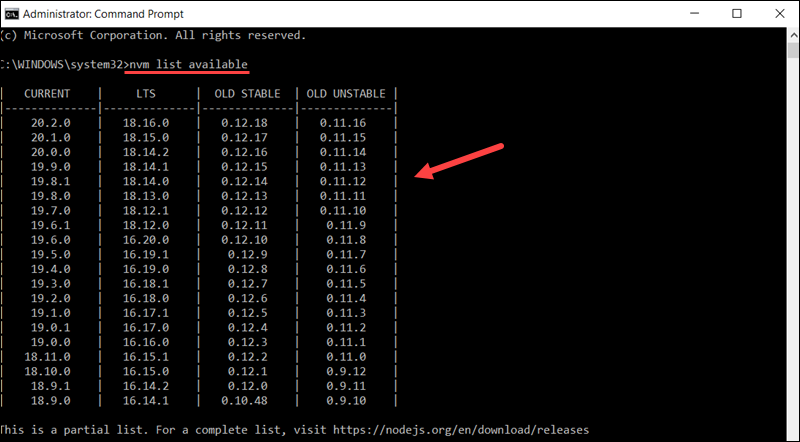
Identify the version you want to install and note the version number.
3. To install a specific version, use the following command (replace x.x.x with the version number):
nvm install x.x.xFor example, to install Node.js version 16.14.1, type:
nvm install 16.14.1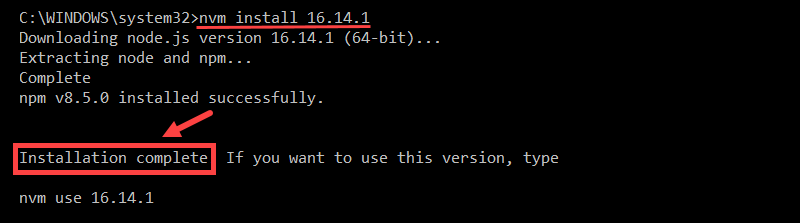
The system confirms that the installation is complete.
To install the latest available Node version, enter:
nvm install latest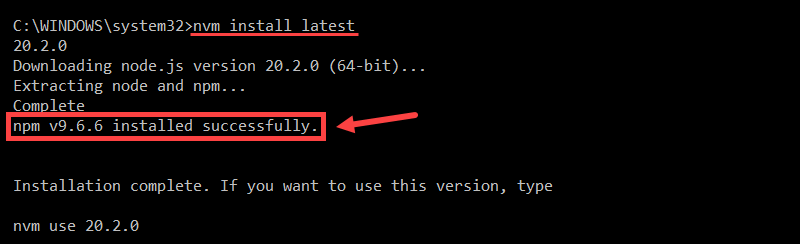
Note: Every time you use nvm to install a new Node.js version, the tool also installs the corresponding npm version by default.
To install the latest stable version, which is recommended for most users, type:
nvm install lts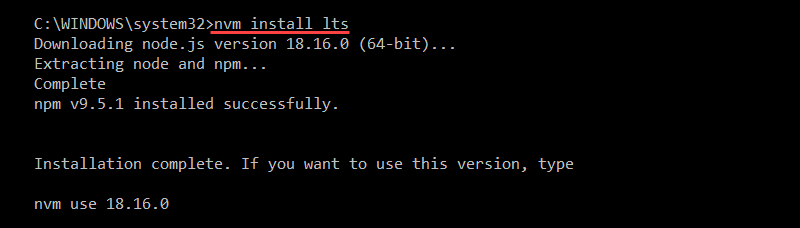
To start using the lts version, enter the following command:
nvm use lts
The system confirms the Node version currently being used.
Step 4: Downgrade Node Version
To downgrade a Node version, type the following command::
nvm use x.x.xReplace x.x.x with a version number.
Note: Ensure that the version you want to use is already installed.
For example, to start using a previously installed version, 16.14.1, enter:
nvm use 16.14.1
You have successfully downgraded the Node.js version on Windows using nvm.
Step 5: Check Current Node Version
To verify the system is using the correct Node version, run the following command:
node -v
The version number is shown in the terminal.
To confirm the npm version, type:
npm -v
The system displays the npm version.
How to Switch Between Node Versions
Before switching between Node versions, list the versions installed on your Windows machine.
1. Use the following command to list installed Node versions:
nvm list2. Switch to a different Node version from the list. For example:
nvm use 20.2.03. List installed Node versions again to confirm the correct version is actively used:
nvm list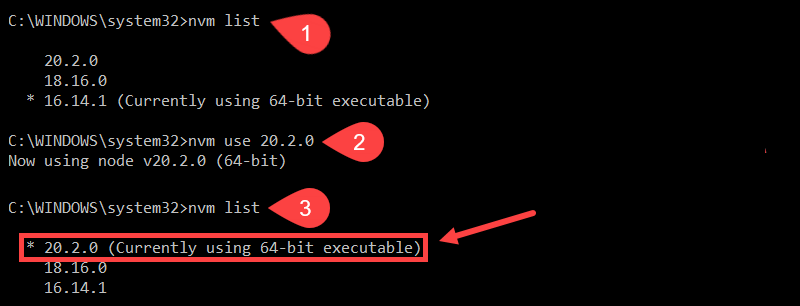
The asterisk (*) symbol shows which Node.js version the system currently uses.
Conclusion
Now you know how to downgrade and manage Node.js versions on Windows using the nvm tool.
Use this knowledge to quickly switch between Node versions based on project requirements and avoid potential compatibility issues.
Was this article helpful?
YesNo

In this article, we’ll walk through the simple steps to downgrade Nodejs version on Windows. So, let’s get started!
To begin, we need to install the Node Version Manager (NVM) which will handle the node version management. We can do this by going to the link provided and downloading the NVM setup execution file.
https://github.com/coreybutler/nvm-windows/releases

Next, we will need to run the NVM installer. Once we have downloaded the installer from the link provided, we can find it in «Downloads» folder (usually the default location). Simply navigate to the folder and double-click on the «nvm-setup.exe» file to initiate the installation process.
After double-clicking on the «nvm-setup.exe» file, a wizard called «Setup-NVM for Windows» will appear on screen. To proceed with the installation of NVM, we will need to accept the license agreement by selecting the corresponding radio button and clicking the «Next» button.

We can leave the default selected location as is and click the «Next» button. Finally, click the «Install» button to start the NVM installation process.
Great job! We have successfully installed NVM on our Windows machine. All that’s left to do now is to click the «Finish» button to wrap up the installation process and close the setup wizard.
And now, lets downgrade the Node version on Windows using NVM,
Open the Command Prompt on your Windows machine as an administrator. We can do this by searching for «Command Prompt» in the «Start» menu and then right-clicking on it and selecting «Run as administrator».

check the current Node version that is installed on Windows machine by using the «-v» option in the Command Prompt.
We are currently using node “v18.12.1” on Windows. Use the «nvm» command and specify the version we want to wish to install. For example, if we want to switch from Node version 18.12.1 to 18.5.0, simply execute the appropriate «nvm» command with the version number.
nvm install v18.5.0
Enter fullscreen mode
Exit fullscreen mode
Use the downgraded version, with the command:
nvm use 18.5.0
Enter fullscreen mode
Exit fullscreen mode
After downgrading the Node version using NVM, it is important to verify whether the downgrade was successful or not. To do this, check the Node version again using the same command as before.
node -v
Enter fullscreen mode
Exit fullscreen mode
That’s it! if the output displays the version number that you specified during the downgrade process, then it indicates that you have successfully downgraded the Node version using NVM. Great Job!
Now if we want to check all the Node versions that are currently installed on our Windows machine using NVM, simply execute the command
nvm list
Enter fullscreen mode
Exit fullscreen mode
This will give us a list of all the installed Node versions. To switch to a specific version that we want to use, use the «nvm use» command along with the version number just like we did above process.
We demonstrate the simplest and most commonly used method to downgrade Node version on a Windows machine. Follow the steps carefully and we’ll be able to successfully switch to the desired version. Thanks for reading this article. HAPPY CODING 🚀!!
Downgrading Node Version on Windows: A Step-by-Step Guide
Introduction
Node.js is a popular JavaScript runtime environment developed by Ryan Dahl. It’s widely used for building server-side applications, and its popularity has led to a surge in adoption. However, as time passes, updates can sometimes lead to compatibility issues or bugs in the latest versions of Node.js. In this article, we’ll explore the process of downgrading Node.js version on Windows.
Why Downgrade Node.js?
Before we dive into the process of downgrading Node.js, it’s essential to understand why this might be necessary. Some reasons to downgrade Node.js include:
- Compatibility issues: Node.js updates can sometimes break compatibility with older code or libraries.
- Bug fixes: Updates can sometimes introduce bugs that need to be fixed.
- Security patches: Updates can sometimes introduce security patches that need to be applied.
How to Downgrade Node.js on Windows
Here’s a step-by-step guide on how to downgrade Node.js on Windows:
Step 1: Open Command Prompt or PowerShell
- Command Prompt: Press Win + R, type
cmd, and press Enter. - PowerShell: Press Win + R, type
powershell, and press Enter.
Step 2: Run npm outdated
npmis the package manager for Node.js.npm outdatedwill display the versions of all installed packages.- If there are any versions that are outdated, you’ll see a list of the available options.
Step 3: Update Node.js
- Open a new Command Prompt or PowerShell window.
- Type
npm install --save-dev node@<version>and press Enter. - Replace
<version>with the desired version of Node.js.
Step 4: Check for Downgrades
- Open a new Command Prompt or PowerShell window.
- Type
npm lsand press Enter. - This will display the versions of all installed packages, including the downgraded Node.js.
Step 5: Restore Previous Packages
- Open a new Command Prompt or PowerShell window.
- Type
npm uninstall <package-name>and press Enter. - This will uninstall the downgraded package.
- Replace
<package-name>with the name of the package you want to restore.
Step 6: Reinstall Downgraded Package
- Open a new Command Prompt or PowerShell window.
- Type
npm install <package-name>and press Enter. - This will reinstall the downgraded package.
Important Points
- Be cautious when downgrading Node.js: Downgrading Node.js can sometimes introduce compatibility issues or bugs that need to be fixed.
- Use
npm outdatedto check for downgrades: Before downgrading Node.js, check the versions of all installed packages usingnpm outdated. - Backup your packages: Before downgrading Node.js, make sure to backup your packages to prevent losing your data.
Troubleshooting Common Issues
Here are some common issues that may arise when downgrading Node.js on Windows:
- Downgrade not working: If the downgrade process fails, try updating Node.js and reinstalling the package.
- Downgrade causing issues with code: If the downgrade process causes issues with your code, try reinstalling the downgraded package.
- Downgrade not working in certain environments: Downgrade may not work in certain environments, such as cloud-based services.
Conclusion
Downgrading Node.js version on Windows can be a useful troubleshooting tool to resolve compatibility issues or bugs in the latest versions of Node.js. By following these steps, you can successfully downgrade Node.js and resolve the issues. Remember to be cautious when downgrading Node.js, and make sure to backup your packages before attempting to downgrade.
Additional Resources
- Node.js documentation: The official Node.js documentation provides detailed instructions on how to downgrade Node.js.
- Node.js community forum: The Node.js community forum is a great resource for troubleshooting and asking questions.
- Node.js forums: The Node.js forums are another great resource for troubleshooting and asking questions.
Unlock the Future: Watch Our Essential Tech Videos!
Downgrading is not easy due to the fact that older installers are removed when a new alpha is up. In this guide, I am going to show how to downgrade nodejs on windows10.
Why?
Some packages require a specific versions range of nodejs and npm. for example, version 5 of React-native doesn’t work with npm5.
{“type”:”inserter”,”blocks”:[{“clientId”:”c31e28bc-fc93-41bd-bcfd-5a6098c99b62″,”name”:”jetpack/wordads”,”isValid”:true,”attributes”:{“align”:”center”,”format”:”mrec”,”hideMobile”:false},”innerBlocks”:[]}]}
Steps
- Delete the current nodejs version (Or delete the relevant nodejs parameters path from the Environment variables as shown in step 6 and 7).
- Visit all the nodejs available versions:
https://nodejs.org/dist/
- Select the version you need. for this guide, i am selecting
v7.9.0/{"type":"inserter","blocks":[{"clientId":"6f451400-92af-42bf-bd32-742b902f94b6","name":"jetpack/wordads","isValid":true,"attributes":{"align":"center","format":"mrec","hideMobile":false},"innerBlocks":[]}]} - Select the windows architecture you need. I selected
x86:node-v7.9.0-win-x86.zip
- Extract the zip file and place it on a permanent folder. for example:
c:\nodejs-v7.9.0
- Update windows variables: Press Start button >Write Environment and then select the next option:
- In the popped up window, Select Environment Variables
- In the popped up window, Edit the Path parameter under User variables for [username] and under System Variables add the path:
c:\nodejs-v7.9.0


- Restart the shell you are working on for the environment parameters to be reloaded


As an experienced full-stack developer, I often need to downgrade the Node.js runtime to older versions for projects I work on. Whether it‘s to resolve compatibility issues with outdated modules or replicate a legacy production environment, flexibility in Node.js version management is key.
In this comprehensive 3200+ word guide, I‘ll share my real-world expertise on the best practices for downgrading Node.js runtime versions on Windows, so you can effortlessly switch between Node releases.
Why Downgrade Node.js Versions?
Before jumping into the step-by-step instructions, it‘s important to understand what motivates the need to downgrade in the first place.
There are a few common reasons why as a full-stack developer you may need to downgrade the Node.js version on your Windows development machine or servers:
1. Incompatible Modules and Libraries
The Node.js ecosystem sees new module and library releases daily. In fast-moving landscapes, the latest Node.js runtime will often utilize cutting-edge JavaScript features that older modules are unable to leverage without updates.
Downgrading Node.js allows you to continue using incompatible modules by matching the version they were built for.
After new major Node.js releases, a spike of incompatible modules is common
2. Replicating Production/Legacy Environments Locally
If you are maintaining an application that runs on older versions of Node.js in production or legacy environments, you‘ll need to emulate the same runtime locally during development to accurately replicate behavior and bugs.
Pinning a local Node.js version to match production avoids unexpected issues down the road.
3. Testing Version Specific Functionality
The Node.js release cycle brings shiny new features with each version, but also shifts in how the runtime functions. When developing modules and applications that rely on specific Node.js functionality, testing across versions is crucial to ensure broad compatibility.
Having fine-grained control over the Node engine powering your experiments makes verifying version-specific behavior much easier.
4. Compatibility with Other Tools
Node.js often interacts with other programming tools like JavaScript transpilers, linters, bundlers, and runtimes. The versions need to align for a smooth developer experience.
For example, a project utilizing Babel v7 will require Node v10+ to operate properly. By downgrading Node appropriately you can eliminate unnecessary headaches.
Hopefully this gives some background on why you may find yourself needing to downgrade the Node.js version! Now let‘s look at effective approaches to accomplish this on Windows machines.
Prerequisite: Install a Node Version Manager
Before installing specific Node.js versions, a version manager tool should be set up to orchestrate switching between different runtime releases.
There are two excellent version managers I recommend for Windows:
nvm-windows – Activates Node versions dynamically at the command prompt
nodist – Installs Node versions into standalone directories
Both have their pros and cons. I‘ll provide instructions for nvm-windows and also touch on nodist as an alternative.
Option 1: Install nvm-windows
nvm-windows runs as a background service that intercepts Node commands allowing on-the-fly version switching. No need for separate Node installs or changing environment variables.
Benefits:
- Lightweight, runs fully in the background
- Easy commands to switch between versions dynamically
Drawbacks:
- Slower install/activation for some workflows
- Not all npm packages play nicely with environment hooking
To install nvm-windows:
- Download and run the nvm-windows installer
- Restart any open terminals to ensure PATH gets updated
- Verify it is working with
nvm --version
Once installed, nvm-windows enables you to switch between locally installed Node versions with two simple commands.
You can now install and manage any Node.js version needed!
Option 2: Install nodist
nodist takes a different approach, fully isolating Node versions into separate directories instead of dynamically redirecting commands.
Benefits:
- Node versions don‘t interfere with each other
- Productions apps can leverage standalone versions
Drawbacks:
- Requires changing PATH variable to switch versions
- More involved cleanup to remove unneeded versions
To quickly install nodist:
- Install Scoop to simplify Windows command line installs
- Run
scoop install nodistfrom an admin PowerShell prompt - Verify with
nodist --version
With nodist initialized you can now install into isolated Node directories.
Let‘s look at how to actually downgrade Node.js from here.
Step 1: Identify Target Node.js Version
The first step is identifying the specific Node.js version you intend to downgrade to. But how do you determine what version to use?
Taking a deliberate approach here pays dividends down the road to avoid compatibility issues. Here are smart ways to select a target version:
Match production environment – Replicate the Node runtime your applications run on in production environments. Check with your hosting provider, sysadmin teams, CI/CD pipelines to find out.
Consult documentation – Module README‘s will often list recommended, tested, or compatible Node versions to use with their code. Target those.
Review usage statistics – Understanding the adoption rates for various Node releases helps pick balanced versions.
v10, v12, v14 LTS prove most popular in downloads and usage
As you can see from the visual above, even-numbered LTS (Long-term Support) versions of Node have the highest usage which is important to consider.
Now that you know how to pick, choose the Node downgrade target. For the rest of this guide, I‘ll use v12.22.1 as an example.
Step 2: Install the Target Node Version
With nvm-windows or nodist installed, installing any Node.js version takes just a single command.
I‘ll include examples for both tools:
// nvm install command
nvm install 12.22.1

// nodist install command
nodist + 12.22.1
Wait for the installation process to complete.
The engines and binaries are now ready for the targeted v12.22.1 release!
Step 3: Activate the Downgraded Version
Once installed, the downgraded Node version must be activated to override your existing default.
nvm-windows command:
nvm use 12.22.1nodist instructions:
- Get path for the installed version:
nodist dist -l | find "12.22.1" - Set as node.exe alias:
set "path=C:\Users\name\nodist\dists\node-v12.22.1-win-x64;%path%"
Now confirm it worked:
node -v
# Should show v12.22.1
The Node runtime powering your terminal or actions like node . invocations should match the target version number.
Tip: To revert back, use nvm use default or reset PATH variables if on nodist.
You have successfully downgraded Node.js! But handling multiple coexisting versions takes a bit more consideration.
Maintaining Multiple Node.js Versions
In sophisticated development environments, you‘ll often need several Node.js versions simultaneously:
- Legacy apps on old stacks
- Modern tooling requiring newer releases
- Testing across targeted LTS versions
Managing the matrix of required Node engines can complicate things. Here are my recommended best practices as a senior full stack developer when dealing with Node.js downgrades across projects:
1. Categorize Projects by Required Node Versions
Audit projects and systems to create a checklist of required runtimes. Group together components relying on the same engines. This allows you to isolate conflicts.
Example:
- API Server – Node v12
- Admin Dashboard – Node v14
- CLI Tools – Node v16
Segment what parts apply to each downgrade path.
2. Standardize Environments with Version Managers
Centralize control of Node versions within version managers instead of local Node installations.
Benefits:
- Eliminates confusion tracking down binaries
- Standard tooling avoids surprises
- Single interface to manage
This concentrates the complexity into a consistent single tool.
3. Containerize Incompatible Components
If diverse Node requirements conflict, containerization isolates incompatible environments.
For example, building frontends relying on modern Node alongside legacy backend systems requiring older Node versions.
Spinning either up within Docker containers lets them coexist peacefully. Just be careful of networking contention.
4. Abstract Environment Differences in Code
Your source should adapt to the executed Node environment by feature detecting capabilities. Don‘t assume API support.
Encapsulate engine version checks into separate modules:
function supportsAsyncAwait() {

  // Node only supports native async/await after v7.6
  return parseFloat(process.version) >= 7.6;

}
This insulates your application code from underlying environment differences.
Following these leading practices pushes complexity out of your main code and maximizes flexibility in managing disparate Node.js versions across components.
The main takeaways around downgrading Node.js on Windows include:
- Use Node version managers like nvm-windows or nodist
- Identify target Node.js version wisely
- Install and activate older releases
- Additional care to handle multiple versions
Downgrading Node empowers you to eliminate version-specific bugs, achieve compatibility requirements, and match production environments accurately during development.
Mastering Node.js runtime version management ensures you can tackle projects relying on both modern and legacy stacks with confidence.
Whether working individually or leading a full-stack team spread across microservices, follow the approaches outlined here to gain absolute control over the engines powering your Node.js application components.
Now go forth and seamlessly downgrade across Node versions! The keys to downgrade without headaches are in your hands.