
Даже полезные программы иногда мешают работе. Например, встроенный в операционную систему защитник периодически блокирует установку стороннего софта или замедляет устройство. В этот момент приходится выяснять, как отключить антивирус Windows. Убрать его возможно как на время, так и насовсем.
Зачем отключать
В Windows 10 и 11
В Windows 7
После отключения
Чек-лист
Зачем отключать
В Windows 10 и 11
В Windows 7
После отключения
Чек-лист

Разберемся, как отключить антивирус в разных версиях Windows. Выясним, зачем иногда требуется временная деактивация встроенной защиты, какие при этом возникают риски, и что обязательно нужно сделать после отключения.
Стоит ли отключать Windows Defender и когда это может понадобиться
Windows Defender запускается в фоновом режиме и, подобно другим антивирусам, защищает компьютер от вредоносных программ. Отключая защиту, вы оставляете компьютер уязвимым, однако иногда приходится пойти на риск.
Отключение может понадобиться в нескольких случаях.
-
При установке определенных программ или игр, которые ошибочно распознаются как угрозы.
-
Для тестирования программного обеспечения или системных настроек.
-
При переходе на сторонний антивирус — например, Kaspersky, Avast и другие.
-
Когда Defender потребляет слишком много ресурсов и тормозит работу операционной системы.
Помните: не стоит надолго оставлять компьютер совсем без защиты. Если выключили «Защитника Windows», будьте особенно осторожны при загрузке файлов и серфинге в интернете, чтобы не заразить систему вредоносным ПО.
Как отключить защиту Windows 10 и 11
Современные версии операционной системы позволяют временно деактивировать защитник. Также существуют методы его полного отключения. Пошагово разберем все варианты.
Через «Параметры»
1. Откройте «Параметры» с помощью сочетания клавиш Win + I, выберите «Конфиденциальность и защита», далее «Безопасность Windows».

2. Откройте раздел «Защита от вирусов и угроз», после чего переходите в настройки.


3. Перетащите ползунок защиты в режиме реального времени в положение «Выключено».

Алгоритм временно отключает защиту. Она включится автоматически после перезагрузки. Можно сразу активировать Defender. Для этого достаточно вернуть ползунок в положение «Включено».
Учтите, что уже запланированную проверку антивирус выполнит, но новые файлы не тронет до следующей диагностики.
Через реестр
Деактивировать программу насовсем получится через реестр. Схема тоже несложная.
1. Чтобы попасть в реестр, нажмите Win + R, введите команду regedit, затем задайте путь или пройдите его вручную: HKEY_LOCAL_MACHINE\SOFTWARE\Policies\Microsoft\Windows Defender.

2. Щелкните мышкой справа, чтобы создать параметр DWORD.

3. Дайте ему имя DisableAntiSpyware.
4. В графе «Значение» поставьте единицу. Отправьте компьютер на перезагрузку.

5. Чтобы вновь активировать защиту, поставьте нулевое значение или лишите параметр имени.
Важно. Этот способ работает только в старых версиях платформы безопасности, выпущенных до августа 2021 года.
Если у вас установлена платформа антивируса версии 4.18.2108.4 или новее (а это практически все системы на Windows 10 версии 1903+ и Windows 11), то параметр DisableAntiSpyware больше не действует. Его просто игнорирует система.
Это связано с тем, что Microsoft включила функцию Tamper Protection (защита от несанкционированных изменений). Она блокирует любые попытки отключить встроенную защиту через реестр или сторонние программы, чтобы злоумышленники не могли сделать это без ведома пользователя.
Чтобы проверить свою версию платформы безопасности, откройте «Центр безопасности Windows» → «Параметры» → «О программе». Найдите строку «Платформа антивируса».
Если версия 4.18.2108.4 и выше — способ с реестром работать не будет. Отключить Defender можно в настройках, как мы описывали выше, или при установке другого антивируса. Чтобы избежать конфликта ПО, встроенный защитник Windows отключится автоматически.

Через редактор групповой политики
Профессиональные и корпоративные версии Windows 10 и 11 оснащены редактором групповой политики. Он тоже позволяет избавиться от срабатывания защиты навсегда.
1. Зажмите Win + R, используйте команду gpedit.msc.
2. По папкам проделайте такой путь: «Конфигурация компьютера» → «Административные шаблоны» → «Компоненты Windows» → «Антивирусная программа».

3. Откройте параметр «Выключить антивирусную программу» и выберите опцию «Отключено».

4. В папке «Антивирусная программа» также есть раздел «Защита в режиме реального времени». Деактивируйте все элементы.
5. Антивирус отключится после перезагрузки. Включить его получится, если возвратить параметры в прежнее положение.
Как отключить защиту Windows 7
В «семерке» процесс немного другой, но выключить встроенный антивирус тоже несложно.
1. Откройте «Панель управления» и перейдите в блок «Защитник Windows».
2. Нажмите «Программы» → «Параметры» → «Администратор».
3. Снимите галочку с опции «Использовать эту программу» и сохраните изменения.
Что делать после отключения встроенного антивируса «Защитник Windows»
После выполнения задач, которым мешал Defender, не забывайте включать его снова. В процессе работы с отключенным защитником придерживайтесь мер безопасности.
-
Установите альтернативный антивирус или хотя бы блокировщик рекламы, если у вас его еще нет.
-
Ограничьте время работы без защиты — оставлять так ПК насовсем не стоит.
-
Не посещайте сомнительные сайты, не загружайте и не открывайте подозрительные файлы.
-
Пользуйтесь только проверенными сетями Wi-Fi.
-
Проведите полное сканирование системы, когда закончите и включите встроенный антивирус снова.
Если антивирус каждый раз ложно блокирует определенные программы или файлы, а отключать его не хочется, некоторые папки можно внести в исключения Defender. Но не злоупотребляйте этой функцией, добавляйте только проверенные объекты.
Чек-лист: как отключить антивирус Windows Defender
Выключать антивирус не рекомендуется, но если защита блокирует программы или затрудняет работу, это допустимо.
-
Снимите защиту в реальном времени. Вам нужны параметры «Безопасность Windows» → «Защита от вирусов» → «Управление настройками».
-
Для Windows 7 — снимите галочку «Использовать эту программу» в параметрах защитника.
-
Соблюдайте осторожность и не блокируйте антивирус надолго.
-
Установите альтернативную антивирусную программу.
-
После повторной активации защиты просканируйте систему на вирусы.
Highlights
- Windows has an inbuilt antivirus called Windows Defender to protect your computer from external threats.
- Is Windows Defender any good? Is it enough to protect your data on your computer? In fact, many Windows users want to know how to permanently disable Windows Defender.
- Windows Defender is by no means your sole solution to protect your data. You’d better add a layer of protection to your computer via free backup software like EaseUS Todo Backup.
Microsoft does not provide an option to delete or uninstall the Defender. If you disable it normally, the system turns it back on as a fail-safe method. Anyhow, you must do more now to disable the Microsoft Defender. Let us see how to do it in 3 ways.
- Way 1. Using Group Policy Editor
- Way 2. Using Registry Editor
- Way 3. Using CMD
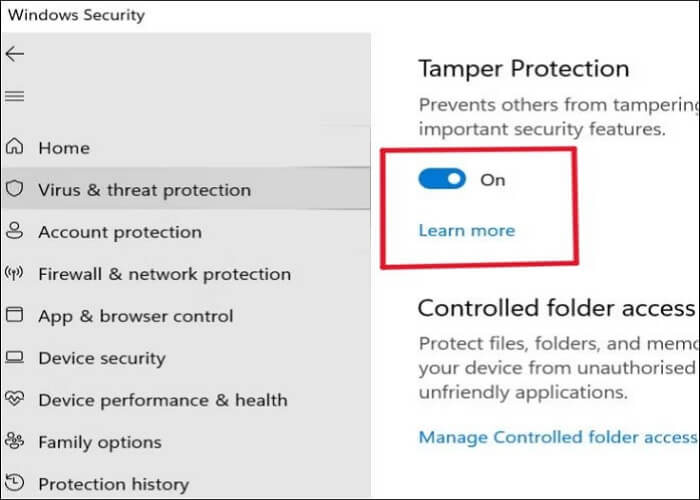
Before making any changes to the Windows Defender or its files, we must disable Tamper Protection first. Tamper Protection is a Windows setting to restrict other apps from making any changes to Microsoft Defender.
Navigate to Settings > Windows Security > Virus and Threat Protection > Virus and threat protection settings > Manage settings > Disable Tamper Protection.
Way 1. Using Group Policy Editor
Group Policy Editor is a tool to change and customize Windows OS settings. As we cannot uninstall Windows Defender, we can tweak some changes in Group Policy Editor to disable it. See the instructions below:
Step 1. Press Windows + R to open the Run dialog box. Type gpedit.msc and click Enter.
Step 2. Open the Local Group Policy Editor and click on the Computer Configuration option on the landing page.
Step 3. Navigate to the following path: Computer Configuration > Administrative Templates > Windows Components > Microsoft Defender Antivirus.
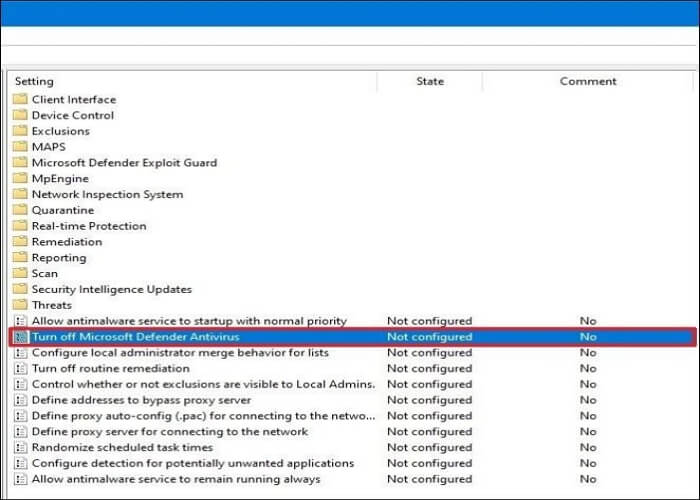
Step 4. Double-click on Turn off Microsoft Defender Antivirus to open it.
Step 5. Select the Enabled option from the options to disable Microsoft Defender permanently.
Step 6. Click Apply, and OK. Restart the computer to see the changes.
You can share this article on your social platforms.
Way 2. Using Registry Editor
If you have Windows 11 Home, you may be unable to access Group Policy Editor. But you can tweak some changes in the Registry to disable Microsoft Defender on Windows.
Note: Registry Editor contains important files to run your Windows OS and its functions smoothly. So, make a backup on Registry and create a system restore point in case of any emergencies.
Follow these steps to disable Microsoft Defender:
Step 1. Press Windows + S, and type Regedit. You will see the Registry Editor app and click on Run as administrator.
Step 2. In the Regedit window, paste the below path in the address bar:
Computer\HKEY_LOCAL_MACHINE\SOFTWARE\Policies\Microsoft\Microsoft Defender
Step 3. Right-click on empty space and select New > DWORD (32-bit) Value.
Step 4. Click on the new DWORD (32-bit) Value and name it as DisableAntivirus.
Step 5. Double-click on DisableAntivirus value, change the Value data to 1 and select the Base as Hexadecimal.

Step 6. Click OK, and close the Registry Editor. Restart the PC to apply changes.
After restarting, open the Windows Security and navigate to Virus and Threat Protection settings. You will see a «No active antivirus provider. Your device is vulnerable». Confirm the action.
Way 3. Using CMD
The Command Prompt can also be handy to disable the Defender Antivirus. You have to paste a registry modification command, and it will remove the antivirus from your device. Here are the steps:
Step 1. Search for Command Prompt and open it as an Administrator.
Step 2. Enter the command below and press Enter to execute it:
reg add «HKEY_LOCAL_MACHINE\SOFTWARE\Policies\Microsoft\Microsoft Defender» /v DisableAntiSpyware /t REG_DWORD /d 1 /f
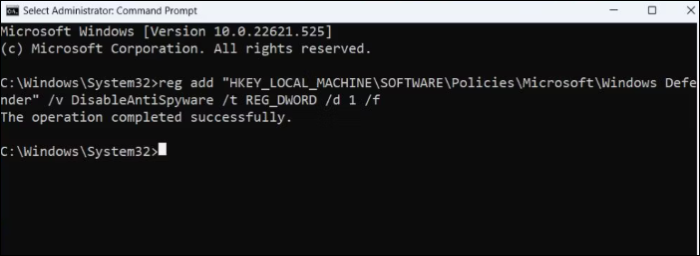
Step 3. If the operation is successful, you will see a «The operation completed successfully.» message.
Step 4. Close the CMD and restart your system.
Pro Tip: Always Backup Your PC for Data Security
Even with the advanced antivirus programs, your device is still vulnerable to external threats. And one should always keep a backup of your data in case of emergencies. Be it a security threat, a failing device or hard drive, or physical damage, there is always a risk of losing data. So, reliable backup software — EaseUS Todo Backup — ensures your data is safe and secure against all the odds.
EaseUS Todo Backup is the best backup tool to make a copy of your entire system against all emergencies. It can help you back up your files, disks, and computer apps and create a system image on a USB. With advanced backup, cloning, and restoration options, this software is a complete backup and restoration solution for personal and business use.
Other Features of EaseUS Todo Backup:
- Install Windows on a new PC without an operating system
- Create full, incremental, differential, scheduled, and auto backups
- Create a sector-by-sector backup and compress backups
- Offer 250G free Cloud and a Security Zone to keep data safe
- Image a hard drive and create an image of an SD card
To add an extra layer of protection, you can safeguard data in the security zone. Download the tool now, and make a backup of your computer.
Step 1. Launch EaseUS Todo Backup on your computer, and click Create Backup on the home screen and then hit the big question mark to select backup contents.

Step 2. To back up your Windows operating system, click «OS» to begin the backup task.

Step 3. Your Windows operating system information and all system related files and partitions will be automatically selected so you don’t need to do any manual selection at this step. Next, you’ll need to choose a location to save the system image backup by clicking the illustrated area.

Step 4. The backup location can be another local drive on your computer, an external hard drive, network, cloud or NAS. Generally, we recommend you use an external physical drive or cloud to preserve the system backup files.

Step 5. Customiztion settings like enabling an automatic backup schedule in daily, weekly, monthly, or upon an event, and making a differential and incremental backup are available in the Options button if you’re interested. Click «Backup Now«, and the Windows system backup process will begin. The completed backup task will display on the left side in a card style.

Why Do You Turn Off Windows Defender on Windows 10/11
The Defender is an excellent antivirus in the Windows ecosystem to tackle malware, viruses, and external threats while using your system online or offline. You can keep your system safe without spending a dime on other third-party apps. But why do you turn off/disable Windows Defender on Windows?
Here are some of the reasons why one wants to disable Windows Defender on Windows:
- When you want to install a third-party antivirus app, like TotalAV, it may be hard to coexist with the Defender.
- If the Defender blocks or flags a legitimate website or app as a threat.
- Windows Defender may conflict with some important system settings as it may be considered a threat.
- Finally, If you do not like Windows antivirus.
To Wrap Things Up
While Microsoft Defender is built into Windows and tough to disable, we can still find ways. Learn how to permanently disable Windows Defender using the 3 methods in this article. Along with antivirus, the best way to protect your data from various external emergencies is to create a backup with a reliable backup tool, like EaseUS Todo Backup. Download EaseUS Todo Backup and quickly make a backup of your system.
How to Permanently Disable Windows Defender FAQs
Here are some of the most frequent FAQs asked about how to permanently disable Windows Defender. I hope you find these queries helpful.
1. Why can’t I turn off Windows Defender?
Microsoft believes that the system can be exposed to threats if you turn off Windows Defender. So, it makes the Defender turn on after some time as a fail-safe method.
2. How can I disable Windows Defender Antivirus temporarily?
- Open Settings and go to Windows Security.
- Navigate to Virus & Threat Protection > Virus & threat protection settings > Manage Settings.
- Turn off Real-Time protection.
3. Is it OK if I turn off Windows Defender?
Yes, only if you have any other antivirus program installed on your device. If you disable Windows Defender without any antivirus programs, your device will be vulnerable to viruses, ransomware, and malware.
4. How do I turn my Windows Defender back on?
Open Settings and navigate to Windows Security > Virus & Threat Protection > Virus & Threat Protection Settings> Manage Settings. Turn on the Real Time protection toggle.
Latest update: May 26, 2023
ID: 13341
How to disable Windows Defender in Windows 10
- In the lower left corner, click Start → Settings.
- Select Update & security.

- Go to the Windows Security section and click Open Windows Security.

- Go to the Virus & threat protection section, expand the Windows Defender Antivirus options and disable Periodic scanning.

Windows Defender will be disabled on Windows 10.
How to disable Windows Defender scheduled scan in Windows 11
- Click the search icon in the Windows panel.
- Type «task scheduler» and click Task Scheduler in search results.

- Click Task Scheduler Library → Microsoft → Windows.

- Open the Windows Defender folder.
- Right-click Windows Defender Scheduled Scan and select Disable.

Windows Defender Scheduled Scan will be disabled.
How to remove Windows Defender
In Windows 10
You can delete the application using standard Windows tools. See the instructions on the Microsoft support website in the To uninstall Defender section.
If you cannot remove the application using the standard tools, use the Microsoft tool for solving installation and removal issues.
If the tool did not help, remove the application using the mseremoval.bat file:
- Download and unpack the mseremoval.zip archive.
- Right-click the mseremoval.bat file and select Run as administrator. Enter the login and password for the administrator account.
The command line window will appear. - When the necessary actions are completed, the command line window will close. After that, you can delete the mseremoval.bat file.
Windows Defender will be removed.
In Windows 11
You can disable Windows Defender in the real-time mode. For instructions, see Microsoft support site.
Learn how to permanently disable Windows Defender on Windows 10 & 11 using Registry, Group Policy, or PowerShell, with step-by-step instructions.
Disabling Windows Defender permanently can be necessary when you need to install certain software, run customized security setups, or rely on a third‑party antivirus. In this guide, we’ll walk through every step on how to turn off Windows Defender permanently on both Windows 10 and Windows 11.

We will also cover troubleshooting if Defender re‑enables after restart, and discuss risks of disabling Defender as well as alternatives & complementary security measures.
What is Windows Defender Role in Windows Security
Windows Defender is Microsoft’s built‑in antivirus and anti‑malware solution integrated into the Windows Security Center. It provides real‑time protection, automatic scans, and firewall capabilities. While its default configuration serves most users well, there are scenarios—such as testing software in a sandbox, gaming performance optimization, or deploying a corporate security suite—where you may wish to disable Windows Defender permanently. Before proceeding, it’s crucial to understand:
- Defender’s core functions: file scanning, cloud‑based threat detection, firewall management.
- How Defender integrates with Windows Security settings, including Windows Defender exclusions and real‑time protection toggle.
- The distinction between temporarily disabling Windows Defender (via the Windows Security app) and permanent disable (via policy, registry, or command‑line).
Knowing what you’re turning off—and why—will help you make informed choices and avoid unexpected gaps in your security posture.
Before making any system‑level changes, back up your system and registry to safeguard against misconfigurations:
Backup Your Registry and Create a System Restore Point
Editing the Windows Registry or Group Policy can have unintended effects. To disable Defender via Registry Editor, you will create and modify keys under HKLM\SOFTWARE\Policies\Microsoft\Windows Defender. Always export the current branch and set a restore point:
- Open System Properties ➔ System Protection ➔ Create.
- Name your restore point (e.g., “Pre‑Disable Defender”).
- In Registry Editor (
regedit.exe), right‑click theWindows Defenderkey, choose Export, and save the.regfile.
These precautions let you revert if the system behaves unexpectedly.
How to Disable Windows Defender Permanently
Method 1: Disable Windows Defender via Windows Security Settings
Windows Security provides a simple interface to toggle off real‑time protection, but this method is temporary and Defender re‑enables after restart.
Turn Off Real‑Time Protection in Windows Security
Navigate to Start ➔ Settings ➔ Privacy & Security ➔ Windows Security ➔ Virus & Threat Protection ➔ Manage Settings. Here, switch off Real‑time Protection and Cloud‑delivered Protection.
You may see a prompt confirming you want to turn off Windows Defender via Windows Security; accept to proceed.
Limitations of the Windows Security Method
Because Microsoft designed Defender to re‑activate at each boot for baseline protection, this approach only temporarily disables Windows Defender. If you need a permanent disable, proceed to the Group Policy or Registry methods below. Use this method only when you need a quick, one‑off suspension of antivirus scans (for instance, when installing certain development tools that Defender might flag).
Method 2: Permanently Disable Windows Defender Using Group Policy Editor
For Windows 10/11 Pro, Enterprise, and Education editions, Group Policy Editor (gpedit.msc) offers a reliable way to permanently disable Defender Windows 10/11.
Opening the Group Policy Editor
Press Win + R, type gpedit.msc, and press Enter. In the Local Group Policy Editor window, expand Computer Configuration ➔ Administrative Templates ➔ Windows Components ➔ Microsoft Defender Antivirus.
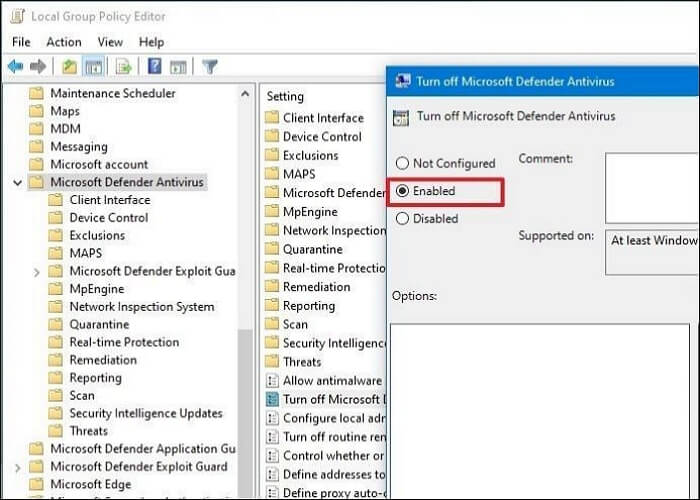
Configuring Defender Settings via gpedit.msc
Locate the policy named “Turn off Microsoft Defender Antivirus”. Double‑click it and select Enabled, then click Apply and OK. This configuration tells Windows to disable Microsoft Defender permanently and prevents Defender from initializing on startup.
Applying and Verifying the Group Policy
After enabling the policy, open an elevated Command Prompt and run gpupdate /force. Then, check Services (services.msc) for the WinDefend service; it should be set to Disabled and not running. You can also revisit Windows Security to see that Real‑time Protection options are grayed out, confirming a successful Windows Defender group policy permanent disable.
Method 3: Permanently Disable Windows Defender via Registry Editor
When Group Policy Editor isn’t available (e.g., Windows 10/11 Home), you can disable Defender via Registry Editor to achieve a permanent disable.
Editing the HKLM Registry to Turn Off Windows Defender
Open Registry Editor (regedit.exe) and navigate to:
HKEY_LOCAL_MACHINE\SOFTWARE\Policies\Microsoft\Windows Defender
If the Windows Defender key doesn’t exist, create it.
Creating and Editing the DisableAntiSpyware Key
Inside the Windows Defender key, right‑click on the right pane, choose New ➔ DWORD (32‑bit) Value, name it DisableAntiSpyware, and set its value to 1. This registry edit not only disables Windows Defender but also prevents future automatic re‑enabling, achieving a permanent disable.
Restarting and Verifying Registry Changes
Restart your PC. After reboot, open Windows Security or Services to confirm that Defender is inactive. If Defender still shows active components, double‑check the registry path and value, and ensure there are no conflicting policies under Windows Defender\Real-Time Protection keys.
Method 4: Disabling Windows Defender via Command‑Line & PowerShell
For script‑based automation or deployment scenarios, you can disable Windows Defender command line or use PowerShell to disable Windows Defender.
Using Command Prompt to Stop WinDefend Service
Launch an elevated Command Prompt and run:
sc config WinDefend start= disabled
sc stop WinDefend
This sequence stops the Defender service (WinDefend) and prevents it from starting at boot, effectively turning off Windows Defender via command line.
Using PowerShell to Disable Windows Defender
Open an elevated PowerShell window and execute:
Set-MpPreference -DisableRealtimeMonitoring $true
Set-MpPreference -DisableBehaviorMonitoring $true
Stop-Service -Name WinDefend -Force
The Set‑MpPreference cmdlets disable real‑time protection toggle and behavior monitoring, while Stop-Service halts the Defender service.
Automating the Disable Process with Scripts
Combine the above commands into a .ps1 script to distribute across multiple machines. Ensure the execution policy allows running your script (Set‑ExecutionPolicy RemoteSigned) and include error handling to detect if Defender won’t disable or re‑enables after restart.
Troubleshooting Common Issues When Disabling Defender
Even after following these methods, Windows Defender may resist being turned off or keep re‑enabling after restart. Here’s how to tackle these problems.
Windows Defender Won’t Disable or Re‑Enables After Restart
If Defender returns after reboot despite Group Policy or Registry tweaks, check for:
- Conflicting keys under
HKLM\SOFTWARE\Policies\Microsoft\Windows Defender\Real-Time Protection(e.g.,DisableBehaviorMonitoringset to0). - Third‑party AV installations that automatically re‑enable Defender to maintain a baseline shield.
Remove or correct conflicting registry entries, then re‑apply your disable method.
Fixing “Can’t Turn Off Windows Defender” Errors
Errors like “This setting is managed by your administrator” indicate an active Group Policy or MDM policy. Run rsop.msc (Resultant Set of Policy) to identify the controlling policy, then adjust accordingly. On domain‑joined machines, coordinate with IT to update domain‑level policies.
Dealing with Conflicts and Exclusions
Sometimes Windows re‑enables Defender to protect critical system files. Use Windows Defender exclusions (via Registry or PowerShell Add-MpPreference -ExclusionPath) to exempt specific folders, then disable real‑time scans. This hybrid approach lets you maintain Defender in a minimal state without fully turning it on.
Alternatives & Related Concerns After Disabling Defender
Disabling Defender exposes you to threats if no other protections are in place. Consider these Windows Defender alternatives and safety precautions.
Installing Third‑Party Antivirus Software to Disable Defender
Windows automatically disables Defender when a compliant third‑party AV is installed. Popular choices include Bitdefender, Kaspersky, and Norton. During installation, these tools set the appropriate registry and Group Policy flags to turn off Windows Defender permanently and manage AV responsibilities.
Risks and Precautions When You Permanently Disable Microsoft Defender
Completely turning off your built‑in antivirus invites malware, ransomware, and phishing attacks. To mitigate risks:
- Ensure regular backups and offline restore points.
- Use a firewall appliance or software firewall alternative.
- Schedule frequent manual scans with your chosen AV.
- Keep Windows and all applications patched.
Configuring Defender Exclusions and Complementary Security Measures
If full disablement feels too risky, you can apply a partial approach: disable real‑time protection but retain on‑demand scans, or set up Defender exclusions for development folders and high‑performance applications. Complement this with network monitoring, intrusion detection, and sandboxing tools to maintain a robust security stance.
Conclusion
Disabling Windows Defender permanently on Windows 10 and Windows 11 can be achieved through multiple avenues: the built‑in Windows Security app (temporary), Group Policy Editor (permanent on Pro/Enterprise/Education), Registry Editor (permanent on Home), and command‑line or PowerShell scripts for automation.
Each method has its place depending on your edition of Windows and security requirements.
Always back up your system before making changes, and consider installing a reputable third‑party antivirus or using a hybrid disable‑exclusion strategy to keep your PC protected. By following the detailed steps above, you’ll be able to turn off Windows Defender permanently while managing the associated risks effectively.
Visit Our Post Page: Blog Page
Download Article
Easy step-by-step guide to disable Defender antivirus protection
Download Article
- Disabling Temporarily
- Disabling Permanently (Antivirus Software)
- Disabling Permanently (Group Policy Editor)
- Q&A
- Tips
- Warnings
|
|
|
|
|
This wikiHow guide will show you how to turn off Microsoft Defender (formerly Windows Defender) in Windows 10. Microsoft Defender can be disabled in Settings, but will turn back on automatically when you restart your computer. If you want to turn off Defender permanently, you’ll need to install a different antivirus program. You can also use the built-in Group Policy Editor to permanently turn off Defender.
Things You Should Know
- To disable Defender, open Windows Security, go to Virus & threat protection > Virus & threat protection settings, and turn off real-time protection.
- Defender will reenable automatically the next time you restart your computer.
- To turn off Defender permanently, install an alternative antivirus program, or use the Group Policy Editor.
-

A list of matching search results will appear.
- This method temporarily turns off Defender’s real-time antimalware protection, which can be helpful if you need to install trusted software that Defender improperly flags as harmful.
- Defender will turn back on automatically after you restart your PC.
-

This opens your security settings.
- If you don’t see this option, you’re likely not signed in as an administrator. If you’re not the administrator of the PC, you won’t be able to disable Windows Defender.
Advertisement
-

It’s the first option below the «Protection areas» heading near the top of the page.
-

You’ll find this option in the middle of the page.
-
Turning off real-time protection will mean your device is vulnerable until it turns back on.[1]
- Click the blue «On» switch below the «Real-time protection» heading.
- Click Yes when prompted. This will turn off the real-time scanning feature of Microsoft Defender.
- You can also disable Microsoft Defender’s cloud-based protection by clicking the blue «On» switch below «Cloud-delivered protection» and clicking Yes when prompted.
- Windows Defender will turn itself back on the next time you restart your computer.


Advertisement
-
To turn off Microsoft Defender permanently, you can install a 3rd party antivirus software like Bitdefender, McAfee, or Malwarebytes Premium. When setting up your new antivirus software, the new software will automatically disable Windows’ built-in antivirus protection.

-

If you’re using Windows 10 Pro or Enterprise, you can use the built-in Group Policy Editor to turn off Microsoft Defender permanently. Note that your computer will be vulnerable to malware after turning off Defender. You’ll need to turn off Tamper Protection to turn off Microsoft Defender:[2]
- Open the Windows Security app.
- Click Virus & threat protection.
- Click Manage settings.
- Switch Tamper Protection to “Off.”
-
The Run menu will open.
-
This will open the Group Policy Editor menu.[3]
-

Take these steps in the Group Policy Editor to find this option:
- Computer Configuration
- Administrative Templates
- Windows Components
- Microsoft Defender Antivirus
-

You’ll see it in the policy list. This opens an options menu for the policy.
-
-
This will confirm the choice to turn off Microsoft Defender and close the window.
- You must restart your computer to turn off Microsoft Defender fully.
- To reenable Defender in the future, return to the GPE and change “Turn off Microsoft Defender Antivirus” to Not Configured,


Advertisement
Add New Question
-
Question
I did not order Microsoft Defender, how do I delete it?
Microsoft Defender comes with Windows 10, and, unfortunately, it cannot be deleted.
-
Question
Is there a way to turn it off without admin privileges?
No, you need to be an administrator to disable Windows Defender. This is a security measure to prevent viruses from turning Windows Defender off. However, if you know what you are doing and are certain of the safety of a third party app, it is possible to turn it off by using third party operating systems or startup disks which can access system settings of this system or user account, and disabling services with help of third party apps.
-
Question
It keeps getting switched back to on. Why?
This is because Microsoft Defender automatically turns itself back on whenever Windows restarts.
See more answers
Ask a Question
200 characters left
Include your email address to get a message when this question is answered.
Submit
Advertisement
-
Installing a third-party antivirus will not delete Microsoft Defender but will deactivate it so they don’t conflict.
Thanks for submitting a tip for review!
Advertisement
-
Disabling Microsoft Defender may open your computer up to security threats. You should not do this unless you know what you are doing.
Advertisement
References
About This Article
Article SummaryX
1. Open the Start menu.
2. Click Settings.
3. Click Update & Security.
4. Click Windows Security.
5. Click Virus & threat protection.
6. Click Virus & threat protection settings.
7. Toggle off «Real-time protection.»
For more information on how to disable Microsoft Defender, read on!
Did this summary help you?
Thanks to all authors for creating a page that has been read 2,452,966 times.