
Last Updated :
28 Oct, 2024
Turning off your Windows 10 device’s keyboard can be useful in a number of situations, like avoiding unnecessary input during presentations, keeping the interface tidy while using an external keyboard, and resolving keyboard-related problems. Thankfully, Windows 10 has a number of simple ways to disable the keyboard. We’ll go over these techniques in this post so you can fully control your keyboard settings.
Table of Content
- Methods To Disable The Keyboards In Windows 10
- Method 1: Disable the Keyboard in Windows 10 Using System Properties
- Method 2: Disable the Keyboard in Windows 10 Using Group Policy Editor
- Method 3: Disable the Keyboard in Windows 10 Using Device Manager
- How to Disable the Keyboard in Windows 10 — FAQ’s
Methods To Disable The Keyboards In Windows 10
Method 1: Disable the Keyboard in Windows 10 Using System Properties
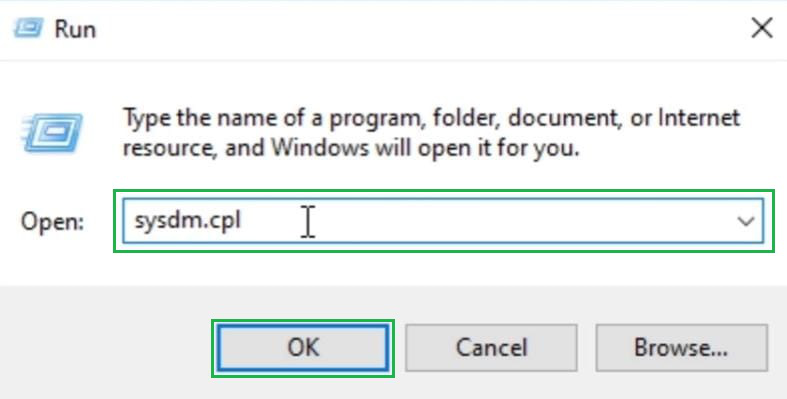
Step 1: Open the command prompt. Follow the below-mentioned command. After that click on OK to proceed.
sysdm.cpl
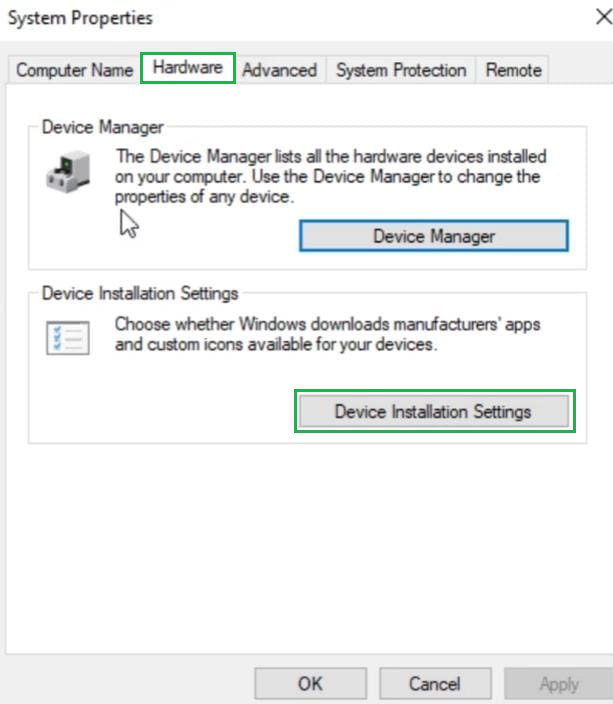
Step 2: Click on the Hardware Tab. After that, click on the Device Installation Settings option to open some more options to disable the keyboard.
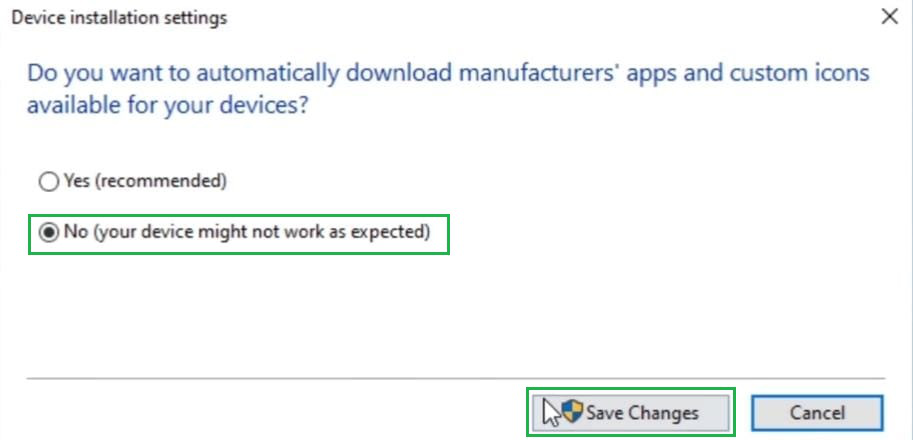
Step 3: Click on the No option. Post that, click on the Save Changes option to complete the process.
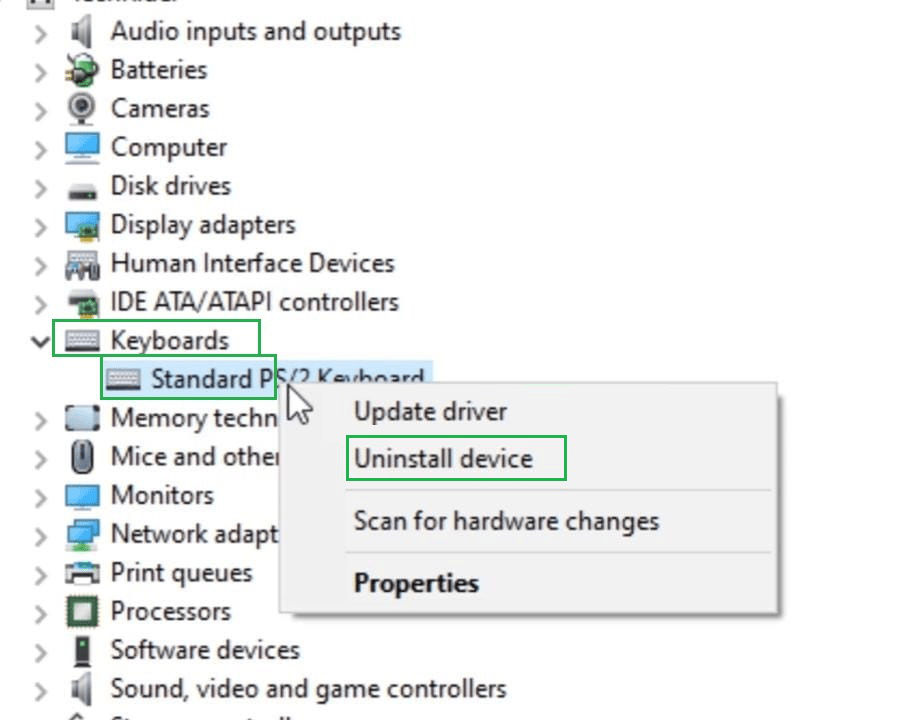
Step 4: Now open the Device Manager. An option for the Keyboard will be displayed there. Expand that particular section to get some more options. After getting the Standard option, Right-Click there to get some more options. Later, click on the Uninstall Driver option to disable the keyboard.
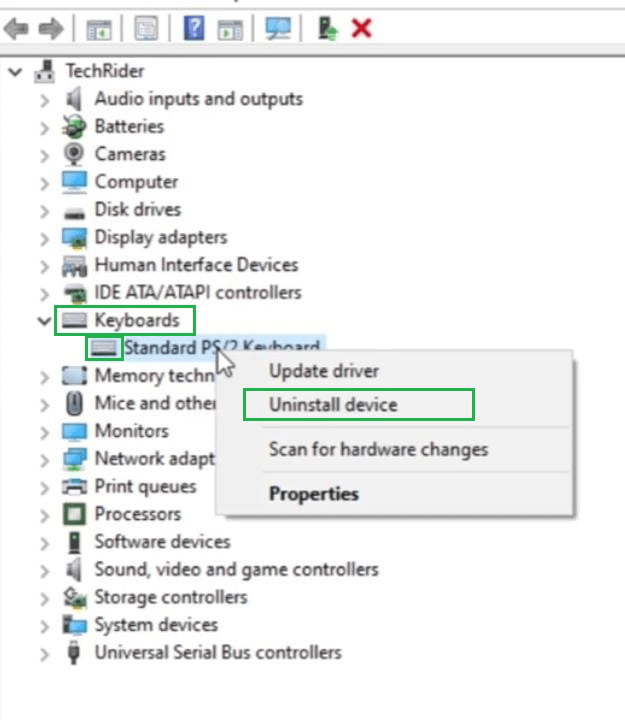
Hence, we have successfully disabled the keyboard using the System Properties.
Method 2: Disable the Keyboard in Windows 10 Using Group Policy Editor
Step 1: At first, open the Run command prompt in the machine. Execute the following command in that window. After writing the command, click on the Ok button.
gpedit.msc

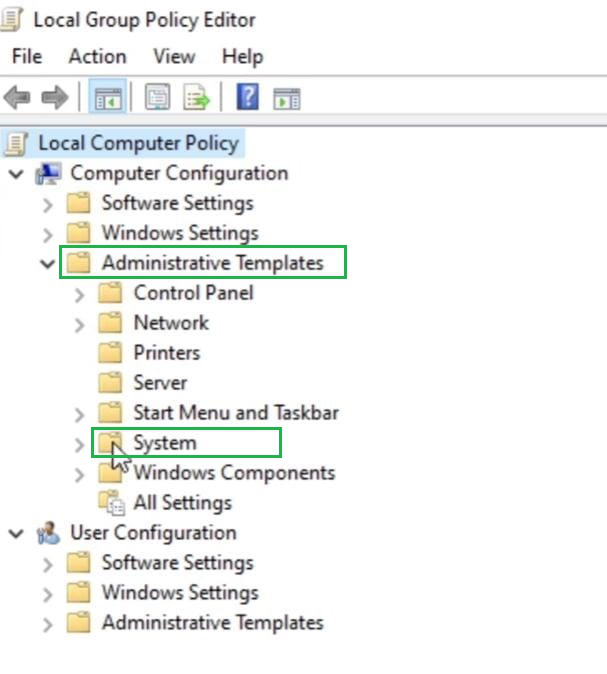
Step 2: Expand the Administrative Template option. Post that, expand the System option to get some more options to move ahead.
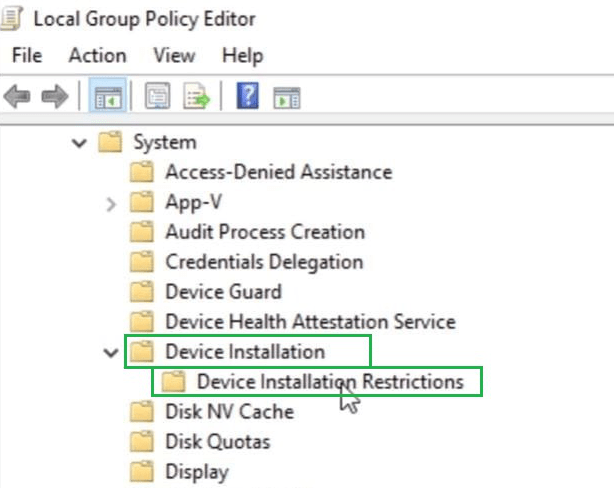
Step 3: Under the system option, expand the Device Installation. Under the Device Installation, click on the Device Installation Restriction option.
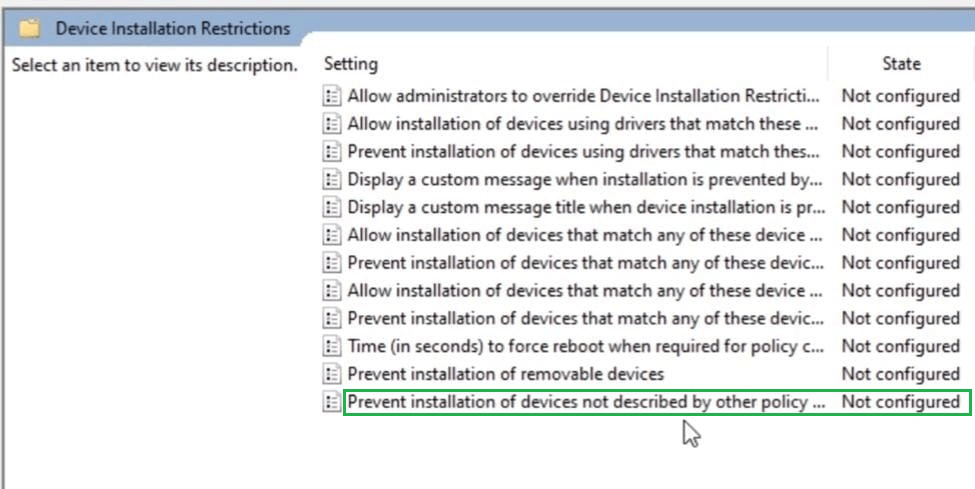
Step 4: On the right-hand side of the window, some restrictions will be visible, click on the last most restricted option to get some more options to work on there.
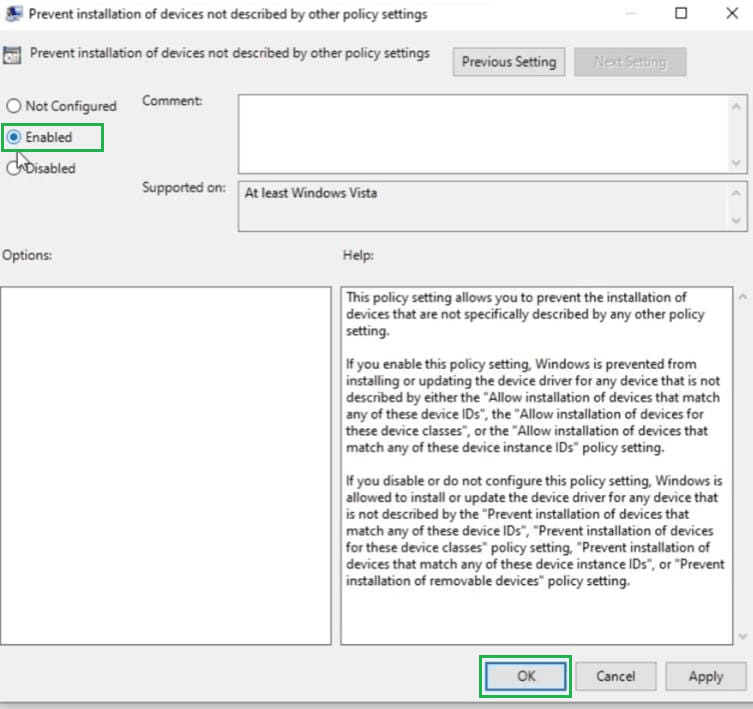
Step 5: A new window will open, click on the Enable option to change the settings. After that, click on the Ok option & close the opened window.
Step 6: After that, open the Device Manager. Option for a Keyboard will be displayed there. Simply expand the option to get some more options. After getting the Standard option, Right-Click there to get some more options. Then click on the Uninstall Driver option to disable the keyboard.
Hence, we have successfully disabled the keyboard using the Group Policy Editor.
Method 3: Disable the Keyboard in Windows 10 Using Device Manager
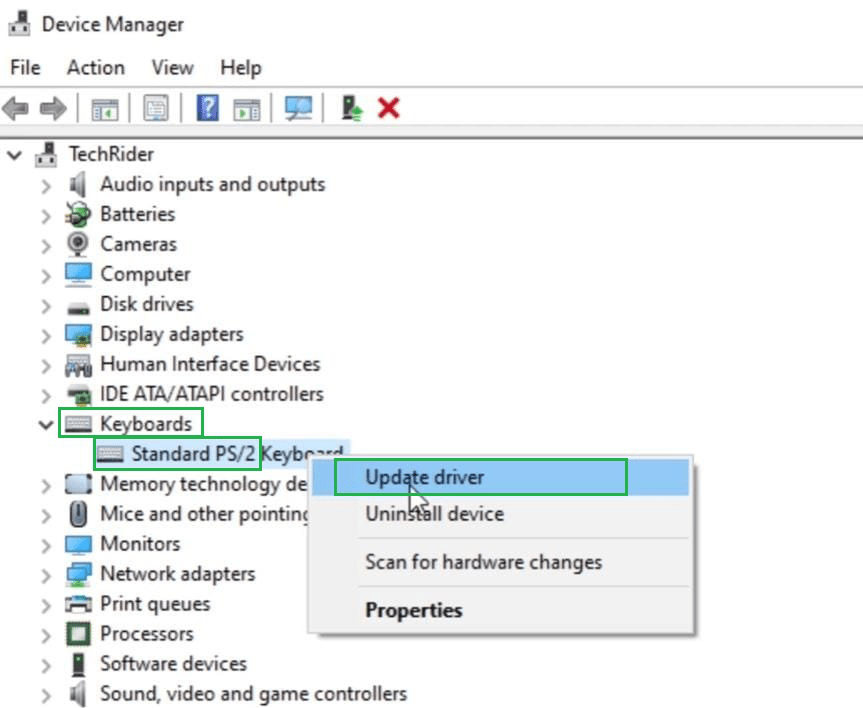
Step 1: Open the Device Manager on the machine. A Keyboard option will be displayed there. Expand the option to get some more options. After getting the Standard option, Right-Click there to get some more options. Then click on the Update Driver option to move ahead.
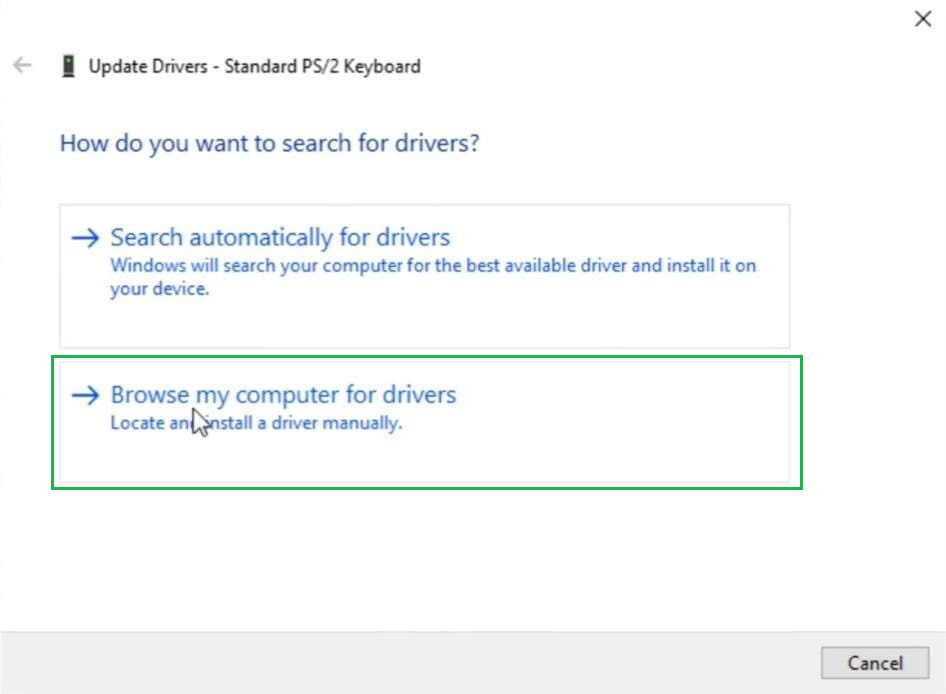
Step 2: Then a new window will open, click on the Second option to browse different other drivers present in that machine.
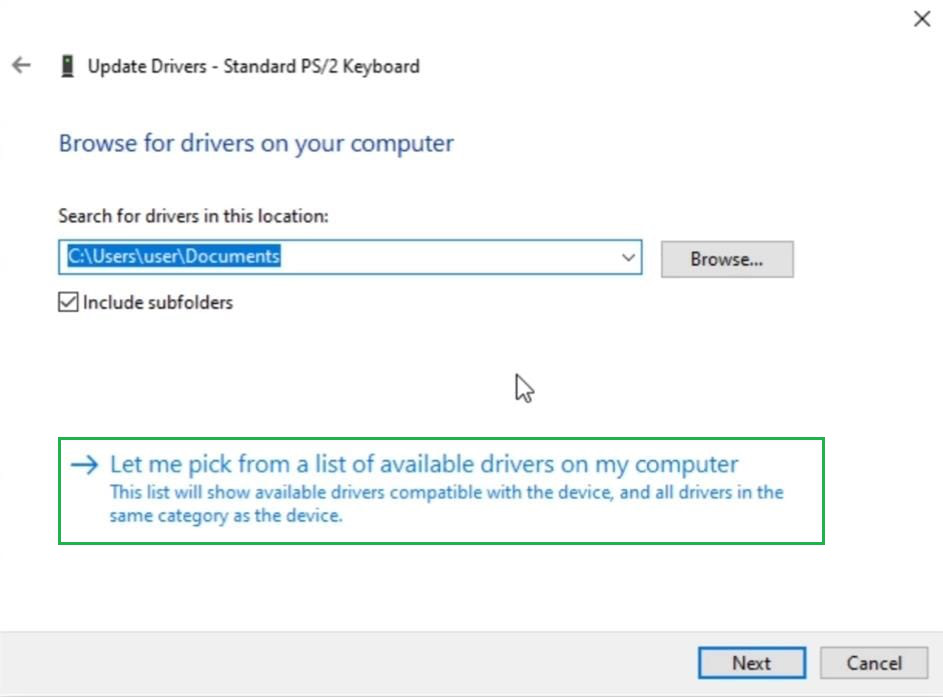
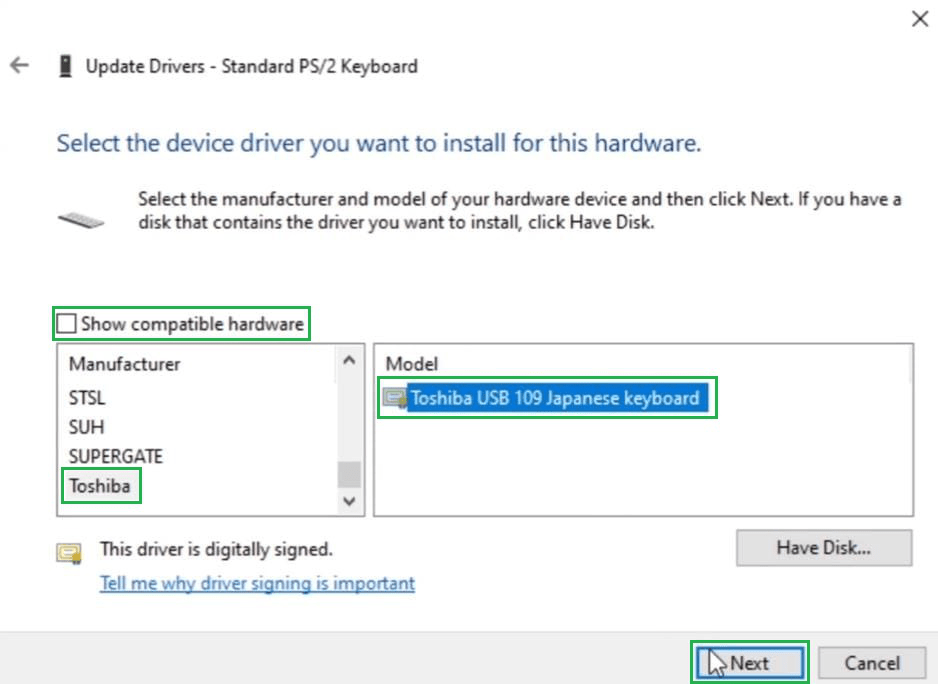
Step 3: Click on the option to pick up the drivers on their own. It will bring a new window where different drivers will be present. Click on that to initiate the process.
Step 4: Remove the Checkbox present there. Now, click on any Manufacturer name & then need to select the model name that appears there. After that, Click on Next.
Step 5: After that, a new window will open showing that the Driver is now Updated. Now, check the inbuilt keyboard of the laptop. It will be disabled now.
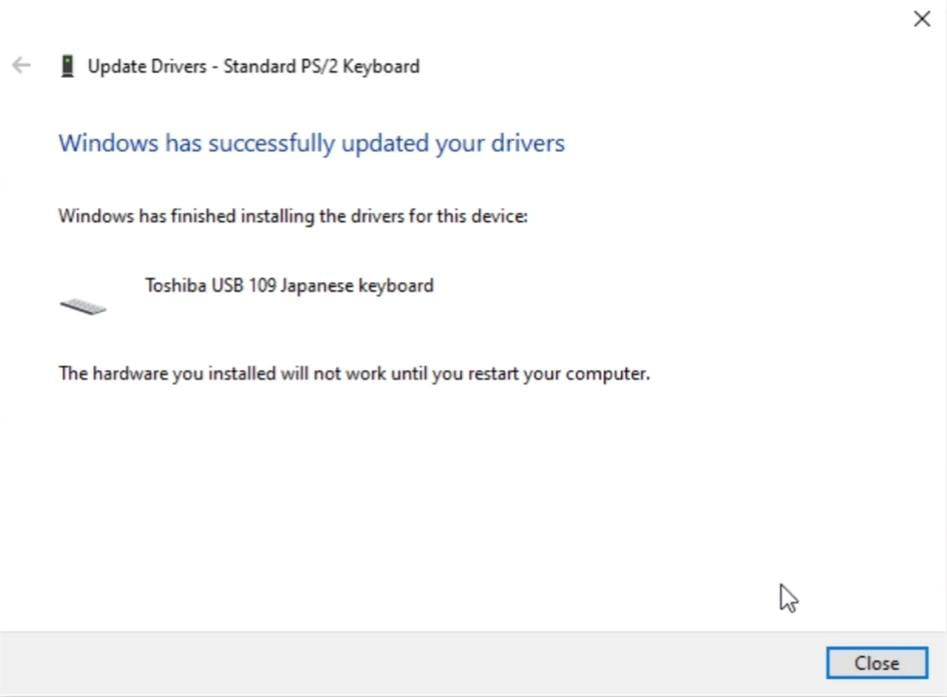
Hence, we have successfully disabled the keyboard using the Device Manager.
Conclusion
If you’re using a separate keyboard or frequently encounter unintended keystrokes, turning off the keyboard in Windows 10 offers a straightforward solution to enhance your interaction with the system. By following the steps outlined, you can easily deactivate the built-in keyboard or tweak your device’s options according to your liking. To maintain a smooth workflow, remember to activate the keyboard once more whenever necessary.
It’s easy to disable it through Device Manager, but you can also turn off the keyboard with Local Group Policy Editor
What to Know
- Open Device Manager, select Keyboards, then right-click Standard PS/2 Keyboard and click Uninstall device.
- Then, search Windows for Change device installation settings and select No on the prompt.
- Alternatively, use Local Group Policy Editor to enable an installation restriction policy to prevent keyboard installation.
This article explains how to disable the keyboard on a laptop in Windows 10.
How to Disable a Laptop Keyboard in Windows 11
Use Device Manager to Disable the Keyboard
This is the safest and easiest solution to permanently turning off a laptop keyboard. We’ll use Device Manager to uninstall the keyboard and then stop Windows 10 from installing it again.
-
Open Device Manager from the Run dialog box (Win+R): enter devmgmt.msc in the command line. Or, right-click Start and choose the Device Manager tool from there.
-
Expand the Keyboards section to see a list of devices.
-
Right-click Standard PS/2 Keyboard and choose Uninstall device > Uninstall.
-
At this point, the keyboard is disabled but it will work again the next time you restart the computer. To avoid that, search Windows for Change device installation settings, then open that option when you see it in the results.
-
Select No and then Save Changes.
Stop the Keyboard From Installing With Group Policy Editor
Another way to disable the laptop keyboard is to turn on a device installation restriction using the built-in Local Group Policy Editor. This will stop the keyboard from reinstalling every time your computer starts up.
The local group policy editor is only available with Windows Pro and Windows Enterprise.
-
Select Win+X and then select Device Manager.
-
Expand Keyboards.
-
Right-click Standard PS/2 Keyboard and choose Properties.
-
Go to the Details tab and change the Property drop-down option to Hardware Ids.
-
Open the Run dialog box (Win+R) and enter gpedit.msc in the command line.
-
Under Computer Configuration, navigate to Administrative Templates > System > Device Installation > Device Installation Restrictions.
-
Right-click Prevent installation of devices that match any of these device instance IDs, and select Edit.
-
Select Enabled and then choose Show from the area below it.
-
Return to where you were in Device Manager in Step 4. Right-click the first entry in the list, and choose Copy.
-
Go back to the policy you opened in Step 8, double-click the space under Value, and then paste (Ctrl+V) the copied ID into that box.
-
Choose OK on that screen, and then OK on the policy screen.
-
Find the device again in Device Manager, right-click it, and choose Uninstall device. Accept any prompts that show up.
-
Restart the computer to permanently disable the laptop keyboard.
If the keyboard still works, repeat Steps 9 and 10 with any other hardware IDs listed. There’s a possibility that the one you used didn’t take. In that case, add every ID from the list to be sure.
To undo this method, turn the keyboard on, return to the group policy editor, and set the policy to Not Configured. A reboot will then re-enable the laptop keyboard.
The Best Ergonomic Keyboards
FAQ
-
To clean a laptop keyboard, turn it off, disconnect it, and let it cool down. Wipe the keyboard with a slightly dampened microfiber cloth. Use a can of compressed air to remove debris between keys. To disinfect, wipe it with a non-bleach disinfectant wipe.
-
If your laptop keyboard is locked and unresponsive, restart the computer, turn off Filter Keys (Windows only), clean it, and check it for physical damage. You should also try updating or reinstalling keyboard drivers.
-
To reset a laptop keyboard to its default settings, open Device Manager, expand the Keyboard section, right-click your laptop, and select Uninstall Device. Next, restart your computer. Windows will reinstall the keyboard with the latest drivers.
Thanks for letting us know!
Get the Latest Tech News Delivered Every Day
Subscribe

StepanPopov/Shutterstock
- You can disable the keyboard on your Windows 10 computer via the Device Manager.
- Once you disable your keyboard, the keys will be unusable until you re-enable it or install another keyboard.
- Visit Business Insider’s homepage for more stories.
Whether you’re desperate to clean your computer keyboard of dust and debris, or the keyboard is malfunctioning and you want to use a new one, there may come a time when you need to disable the keyboard on your Windows 10 computer.
Thankfully, doing so is simple and can be completed in just a moment.
While the keyboard is disabled, you’ll be able to clean, touch, or even replace keys without affecting Windows.
However, this also means you’ll need an additional keyboard enabled if you do want to do any typing on your computer while the first keyboard is disabled.
Here’s how to disable your keyboard in Windows 10.
Check out the products mentioned in this article:
Windows 10 (From $139.99 at Best Buy)
Lenovo IdeaPad 130 (From $299.99 at Best Buy)
How to disable your keyboard in Windows 10
1. Open the Device Manager by tapping the Windows key, then type «Device Manager» into search and click on the first result.
Jennifer Still/Business Insider
2. Scroll down until you find the «Keyboards» section, and click to expand it.
3. Click on the keyboard you want to disable, then right-click it to reveal a list of options.
Jennifer Still/Business Insider
4. Click on «Disable» to disable the keyboard. If you don’t have this option, you should click «Uninstall» instead. Both will disable your keyboard.
5. If asked to confirm that you want to disable or uninstall the keyboard, click «Yes» in the pop-up that appears. You might also be asked to restart your computer — do so. Your keyboard will then be disabled.
To re-enable the keyboard, simply go back to the Device Manager, right-click your keyboard again, and click «Enable» or «Install.»
Related coverage from How To Do Everything: Tech:
-
How to empty the recycle bin on your Windows 10 computer in 3 ways
-
How to change the size of your desktop icons on a Windows 10 computer
-
How to add icons to your desktop on a Windows 10 PC to easily access the system folders or apps you use regularly
-
How to change the admin user on a Windows 10 computer, and add or remove admin accounts
-
How to copy your screen on a Windows computer in 2 ways, to take a full or partial screenshot
Jennifer is a writer and editor from Brooklyn, New York, who spends her time traveling, drinking iced coffee, and watching way too much TV. She has bylines in Vanity Fair, Glamour, Decider, Mic, and many more. You can find her on Twitter at @jenniferlstill.
Read more
Read less
Insider Inc. receives a commission when you buy through our links.
Back to Top
A white circle with a black border surrounding a chevron pointing up. It
indicates ‘click here to go back to the top of the page.’
Why would anyone want to disable the keyboard on a Windows PC? Well, if you watch videos on your PC with your toddler, the chances are that you want to temporarily block or disable the keyboard to stop the toddler from pausing or forwarding the video by hitting the keyboard.
Like its predecessors, Windows 10 also doesn’t offer an easy way to disable the keyboard, but disabling the keyboard in Windows 10 is not a tough job either. You can disable with or without the help of third-party utilities. And if you’re looking for a way to disable a specific key, refer to our how to disable any key on the keyboard in Windows 10.

The following are the five easy methods to turn off the keyboard on a Windows 10 PC.
Method 1 of 5
Use Device Manager to disable keyboard
This method is not for the built-in keyboard, meaning you might not be able to disable your PC’s built-in or laptop keyboard.
Step 1: Right-click on the Start button on the taskbar to see the power user menu. Click Device Manager to launch the same.

Note that you can also launch Device Manager by typing its name in Start/taskbar search and then press the Enter key.
Step 2: Once Device Manager is launched, expand Keyboards to see connected keyboards.
Step 3: Right-click on the keyboard entry and click the Uninstall device option. If you have connected multiple keyboards, you need to disable one by one.

Step 4: Click the Uninstall button when you see the confirmation dialog. If you are asked to reboot your PC, please click the Yes button to restart your PC and disable the keyboard.

Method 2 of 5
Use KeyFreeze to disable the keyboard in Windows 10
KeyFreeze is a free utility designed to help you quickly disable the keyboard on a Windows PC. KeyFreeze can disable your laptop’s built-in keyboard as well.
Using KeyFreeze is relatively easy. After running the software, click Lock Keyboard & Mouse button to disable keyboard and mouse. To enable keyboard and mouse again, simultaneously press Ctrl + Alt + Del keys on the disabled keyboard (to get Ctrl + Alt + Del screen) and then click Esc key.

The catch is that you cannot disable only the keyboard, like most other software.
KeyFreeze is not a standalone software, and it doesn’t offer a full offline setup as well. The official website provides only the web setup, which, when you run downloads and installs the actual KeyFreeze software.
Download KeyFreeze
Method 3 of 5
Use Kidkeylock to password protect keyboard and mouse
Unlike other tools mentioned in this article, this is an advanced program to disable keyboard and mouse/touchpad. The core feature of Kidkeylock is its ability to password protect your keyboard and mouse.

It also enables you to disable only the left, right, or middle mouse button. The tool also allows you to disable only certain key combinations.
To completely disable the keyboard, please move the slider to the extreme right. As you can see in the picture, you can change the default password as well.
Download Kidkeylock
Method 4 of 5
Keyboard and Mouse Cleaner to disable keyboard
Keyboard and Mouse Cleaner is a portable utility designed to disable keyboard and mouse on Windows PCs for user-defined time. This means you can disable keyboard and mouse up to a few seconds, minutes, or hours.

Download Keyboard and Mouse Cleaner
Method 5 of 5
Block keyboard using CrazyLittleFingers
CrazyLittleFingers is another excellent piece of software out there to help you block the keyboard on your PC. The best thing about this software is it’s portable, which means nothing, but you don’t need to install the software to run it.
Download and run the software to block the keyboard and mouse. Press Ctrl + Alt + Del simultaneously and then press Esc key to unblock keyboard and mouse.
The drawback is that it displays a black screen when you disable the keyboard and mouse. So, if you want to enjoy a movie after disabling the keyboard and mouse, this is not the perfect software.
Download CrazyLittleFingers
We also recommend you go through our 3 ways to disable touchpad in Windows 10 guide.
If you need to disable your laptop keyboard in Windows 10, it’s actually pretty straightforward. You’ll mainly use Device Manager to disable the hardware. This is handy if your keyboard is malfunctioning or if you want to use an external keyboard instead. Let’s get started!
This guide will show you how to disable your laptop keyboard using Windows 10’s Device Manager. Follow the steps closely to ensure the keyboard is disabled without affecting other functionalities.
Step 1: Open Device Manager
First, press the Windows key + X and select «Device Manager» from the menu.
Device Manager is where you manage all the hardware devices connected to your computer. By opening it, you’ll be able to see a list of all the devices, including your keyboard.
Step 2: Locate the Keyboard Section
In Device Manager, find and expand the «Keyboards» section.
This section will show you a list of all the keyboards connected to your laptop. It usually lists the internal keyboard and any external ones if connected.
Step 3: Select Your Keyboard
Right-click on the internal keyboard listed and select «Disable device.»
A warning message might pop up, asking for confirmation. Click «Yes» to proceed. This will disable the internal keyboard, making it non-functional.
Step 4: Confirm the Action
You may need to restart your computer to see the changes take effect.
Restarting ensures that the system registers the change. After the restart, your laptop’s internal keyboard should be disabled.
Step 5: Test the Keyboard
After your computer restarts, test the keyboard to make sure it’s disabled.
Try pressing some keys. If nothing happens, congrats! You’ve successfully disabled your laptop keyboard.
Once you complete these steps, your laptop keyboard will be disabled, and you won’t be able to use it until you re-enable it through Device Manager.
Tips for Disabling Laptop Keyboard in Windows 10
- External Keyboard: Make sure you have an external keyboard ready to use before disabling the laptop’s internal keyboard.
- Backup Drivers: Always back up your device drivers before making any changes in Device Manager.
- Administrative Rights: You need administrative rights to disable devices in Device Manager. Make sure you’re logged in as an admin.
- Temporary Solution: If you need to use the internal keyboard again, you can re-enable it anytime from Device Manager.
- Update Drivers: Sometimes, updating keyboard drivers can solve issues without needing to disable the keyboard.
Frequently Asked Questions
What happens if I disable the wrong keyboard?
If you disable the wrong keyboard, you can always re-enable it by following the same steps in Device Manager.
Will this affect my mouse or touchpad?
No, disabling the keyboard will not affect your mouse or touchpad. They will continue to function normally.
Can I disable the keyboard permanently?
Device Manager disables the keyboard temporarily. If you want a more permanent solution, you might need to uninstall the driver, but this method is usually sufficient.
Do I need to restart my laptop?
Yes, restarting your laptop ensures that the changes take effect properly.
Can I disable only specific keys?
Disabling specific keys is more complicated and usually requires third-party software. The steps provided disable the entire keyboard.
Summary
- Open Device Manager.
- Locate the Keyboard section.
- Select your keyboard.
- Confirm the action.
- Test the keyboard.
Conclusion
Disabling a laptop keyboard in Windows 10 can be a lifesaver, especially if you have malfunctioning keys or prefer using an external keyboard. By following the steps in this guide, you can quickly and easily disable the built-in keyboard without any hassle. Remember, you can always re-enable it through Device Manager if needed.
Keep in mind the tips provided to avoid any potential hiccups, and feel free to refer back to the frequently asked questions for more clarity. This small tweak can make a big difference in your daily computing experience. If you found this helpful, consider checking out more guides on optimizing your Windows 10 experience.
Matt Jacobs has been working as an IT consultant for small businesses since receiving his Master’s degree in 2003. While he still does some consulting work, his primary focus now is on creating technology support content for SupportYourTech.com.
His work can be found on many websites and focuses on topics such as Microsoft Office, Apple devices, Android devices, Photoshop, and more.