
Applies ToWindows 11 Windows 10
Брандмауэр Windows помогает защитить устройство, фильтруя сетевой трафик и блокируя несанкционированный доступ. Он снижает риск угроз сетевой безопасности, ограничивая или разрешая трафик на основе различных свойств, таких как IP-адреса, порты или пути к программе.
Вы можете использовать приложение Безопасность Windows для просмотра состояния брандмауэра Windows и управления им. Вы можете включить или отключить брандмауэр, а также получить доступ к дополнительным параметрам для различных типов сетей, включая доменные (рабочие), частные (доверенные) и общедоступные (ненадежные) сети.
Частные и общедоступные сети
Можно указать, что определенная сеть, к которую подключается устройство, является частной или общедоступной. Ключевое различие заключается в том, разрешено ли другим устройствам в той же сети видеть ваше устройство и, возможно, подключаться к нему.
Ваша домашняя сеть может быть примером частной сети. Теоретически единственными устройствами в ней являются ваши устройства и устройства, принадлежащие вашей семье. Вы в порядке с другими устройствами, которые могут видеть ваши, потому что вы доверяете этим устройствам.
Однако Wi-Fi в вашем местном кафе является общедоступной сетью. Большинство других подключенных к нему устройств принадлежат незнакомым людям, и вы, вероятно, предпочитаете, чтобы они не могли видеть или подключаться к вашему устройству.
Как правило, вы будете иметь более строгие средства контроля безопасности в общедоступной сети, чем в частной сети, просто из-за уровня доверия к другим пользователям и устройствам в этой сети.
Настройка брандмауэра Windows в Безопасность Windows
-
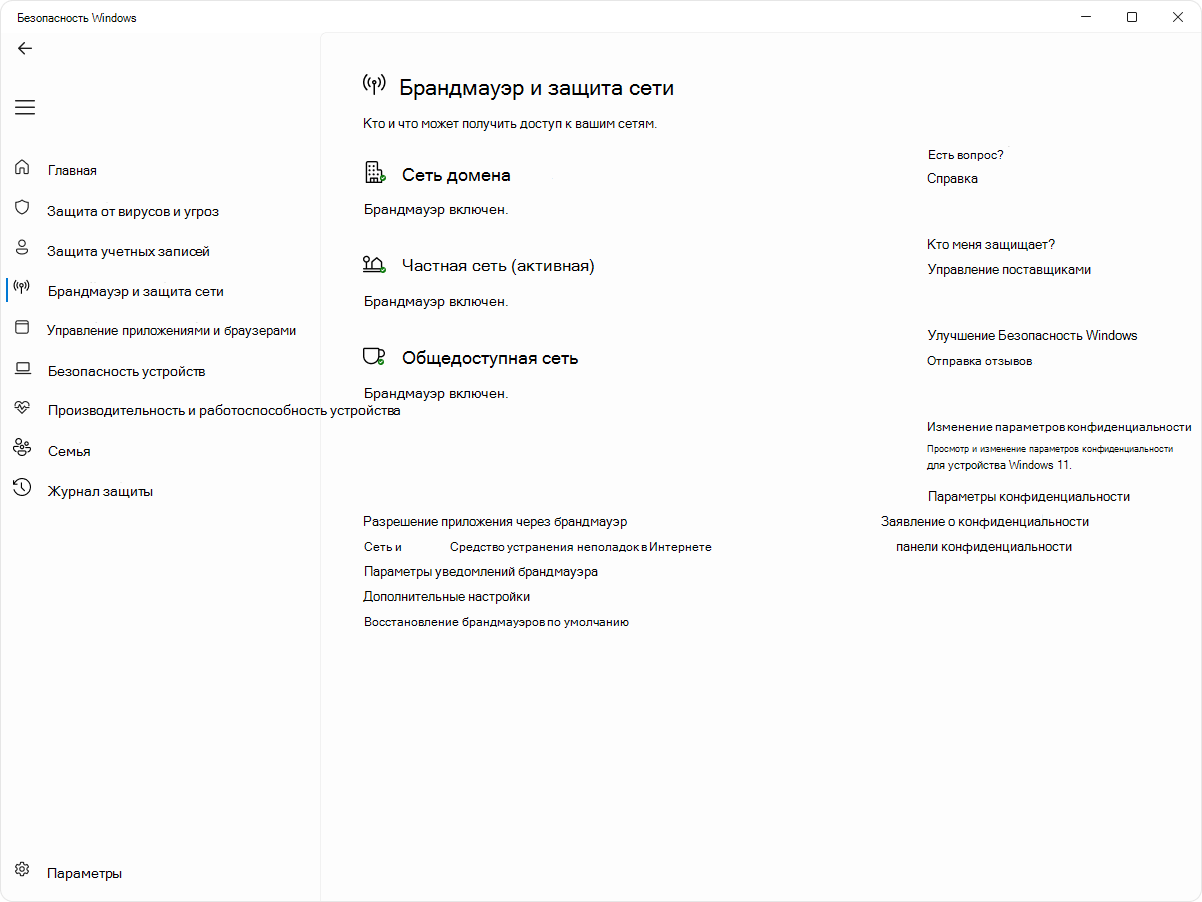
В приложении «Безопасность Windows» на компьютере, выберите Брандмауэр & защиты сети или используйте следующий ярлык:
Брандмауэр & защиты сети
-
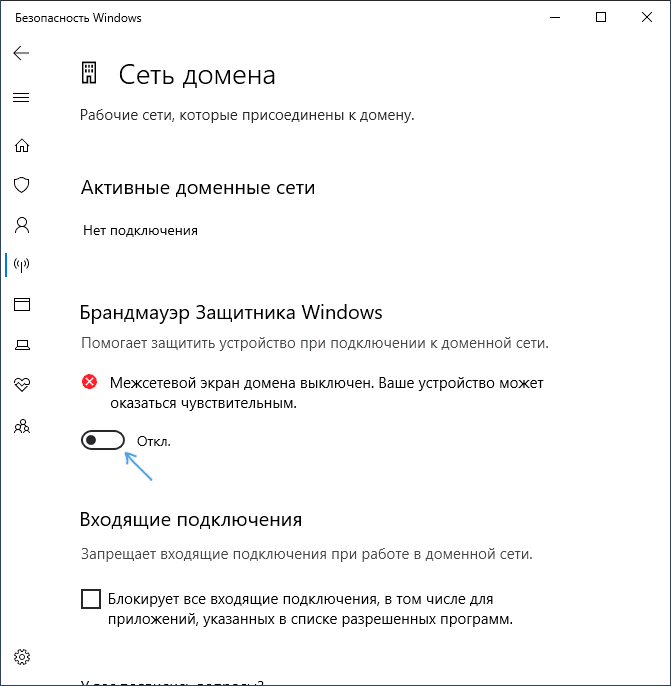
Безопасность Windows показывает, к какому типу сети вы подключены в данный момент. Как правило, устройство будет подключено только к одной сети за раз. Выберите профиль сети: Доменная сеть, Частная сеть или Общедоступная сеть
-
В разделеMicrosoft Defender Брандмауэр переключите параметр на Включено , чтобы включить брандмауэр Windows. Для выключения переключите этот параметр в положение Выкл. Отключение брандмауэра Windows может сделать ваше устройство более уязвимым для несанкционированного доступа. Если вам нужно использовать приложение, которое заблокировано, вы можете разрешить его через брандмауэр, а не выключать брандмауэр.
-
В разделе Входящие подключения установлен флажок Блокировать все входящие подключения, в том числе в списке разрешенных приложений. Установка этого флажка указывает брандмауэру Windows игнорировать список разрешенных приложений и блокировать все. Включение этого параметра повышает безопасность, но может привести к прекращению работы некоторых приложений.
Примечание: Если устройство управляется организацией, параметры политики могут препятствовать изменению конфигурации брандмауэра Windows. Для получения дополнительных сведений обратитесь к администратору.
Дополнительные параметры
Ниже приведен список дополнительных параметров, доступных на странице брандмауэра и защиты сети:
-
Разрешить приложению через брандмауэр
. Если брандмауэр блокирует нужное приложение, можно добавить исключение для этого приложения или открыть определенный порт. Дополнительные сведения об этом процессе (и о том, почему вы не захотите) см. в статье Риски, связанные с разрешением приложений через брандмауэр Windows. -
Средство устранения неполадок с сетью и Интернетом: Если у вас возникли общие проблемы с сетевым подключением, вы можете использовать это средство устранения неполадок, чтобы попытаться автоматически диагностировать и устранить их.
-
Параметры уведомлений брандмауэра: Хотите получать больше уведомлений, когда брандмауэр блокирует что-то? Меньше? Узнайте, как настроить уведомления
-
Дополнительные параметры: Откроется классический брандмауэр Защитника Windows, который позволяет создавать правила для входящего или исходящего трафика, правила безопасности подключения и просматривать журналы мониторинга брандмауэра. Большинство людей не хотят копаться в нем, что глубоко; неправильное добавление, изменение или удаление правил может привести к тому, что система станет более уязвимой или может привести к тому, что некоторые приложения не будут работать.
-
Восстановление брандмауэров по умолчанию . Если кто-то или что-то внес изменения в параметры брандмауэра Windows, что приводит к неправильной работе, вы просто в два щелчка от сброса параметров, как они были, когда вы впервые получили компьютер. Если ваша организация применила какие-либо политики для настройки брандмауэра, они будут применены повторно.
Нужна дополнительная помощь?
Нужны дополнительные параметры?
Изучите преимущества подписки, просмотрите учебные курсы, узнайте, как защитить свое устройство и т. д.
В этой инструкции о том, как отключить брандмауэр Windows 10 в параметрах безопасности системы, в панели управления или с помощью командной строки, отключить службу Брандмауэр Защитника Windows и уведомления «Брандмауэр и защита сети», а также информация, как не отключать его полностью, а лишь добавить в исключения брандмауэра программу, в работе которой он вызывает проблемы. Также в конце инструкции имеется видео, где показано все описанное.
Для справки: брандмауэр Windows — встроенный в ОС файрвол, проверяющий входящий и исходящий Интернет-трафик и блокирующий или разрешающий его, в зависимости от настроек. По умолчанию, он запрещает небезопасные входящие подключения и разрешает все исходящие подключения. См. также: Как отключить защитник Windows 10.
- Как отключить брандмауэр Windows 10 в параметрах безопасности
- Отключение с помощью командной строки
- Отключаем брандмауэр в панели управления
- Отключить брандмауэр в режиме повышенной безопасности
- Как отключить службу Брандмауэр Защитника Windows 10
- Как отключить уведомления «Брандмауэр и защита сети» об отключенном брандмауэре
- Видео инструкция
- Как добавить программы в исключения брандмауэра
Отключение брандмауэра Windows 10 в параметрах безопасности Windows 10
Вероятно, самый простой для начинающего пользователя способ отключить брандмауэр Windows 10 — использовать соответствующие параметры в Центре безопасности Windows 10:
- Откройте параметры «Безопасность Windows» двойным нажатием по значку со щитом в области уведомлений или через Пуск — Параметры — Безопасность Windows.
- Нажмите по пункту «Брандмауэр и безопасность сети», а затем выберите профиль сети, брандмауэр для которого требуется отключить: обычно достаточно отключить только для активного профиля, но при желании можете повторить это для всех пунктов.

- Поместите переключатель в положение Выключено для отключения брандмауэра для этого сетевого профиля.

На этом брандмауэр будет отключен, а также вы увидите уведомление с предложением снова его включить, о том, как убрать это уведомление — далее в инструкции.
Также, несмотря на отключение брандмауэра, соответствующая ему служба Windows 10 продолжит работать. О её отключении также можно прочитать в соответствующем разделе инструкции.
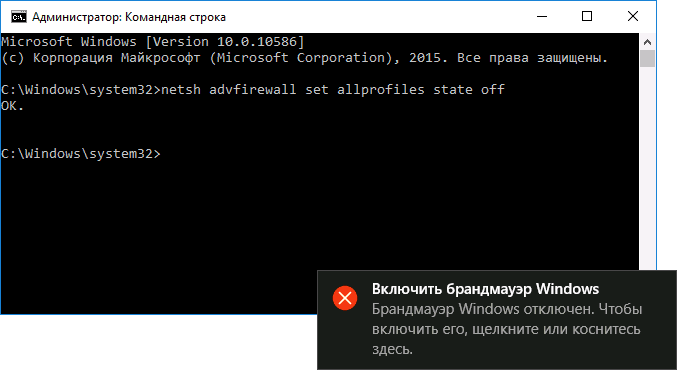
Как полностью отключить брандмауэр с помощью командной строки
Если вы знаете, как запустить командную строку от имени администратора, этот способ отключения брандмауэра Windows 10 будет даже проще и быстрее:
- Запустите командную строку от имени администратора — для этого вы можете использовать поиск в панели задач, а затем нажать правой кнопкой мыши по найденному результату и выбрать пункт запуска от администратора.
- Введите команду
netsh advfirewall set allprofiles state off
- Нажмите Enter.
В результате в командной строке вы увидите лаконичное «Ок», а в центре уведомлений — сообщение о том, что «Брандмауэр Windows отключен» с предложением снова включить его. Если вам потребуется вновь включить его, используйте тем же образом команду netsh advfirewall set allprofiles state on
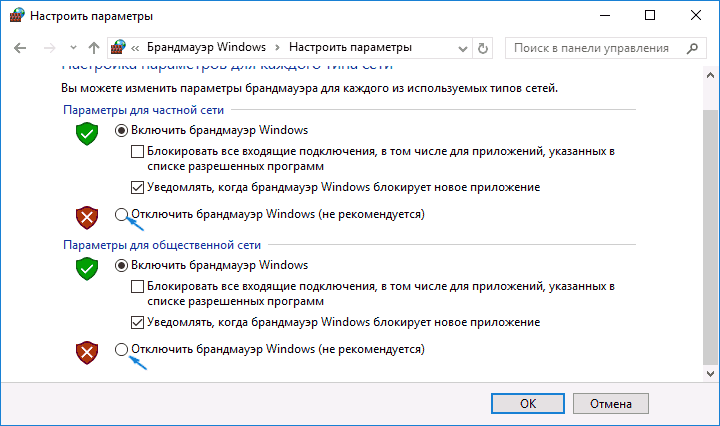
Отключение брандмауэра в панели управления Windows 10
Еще один метод — использовать панель управления: откройте её (для этого можно использовать поиск в панели задач), включите в пункте «Вид» (справа вверху) значки (если сейчас там у вас «Категории») и откройте пункт «Брандмауэр Защитника Windows».
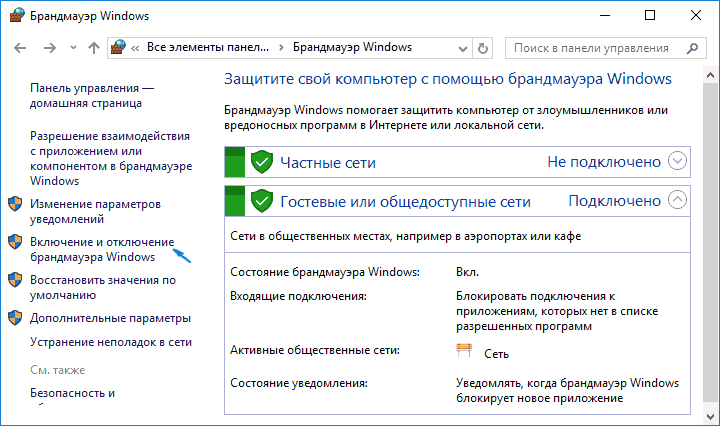
В списке слева выберите пункт «Включение и отключение брандмауэра», а в следующем окне вы сможете отключить брандмауэр Windows 10 отдельно для общественного и частного профиля сетей. Примените сделанные настройки.
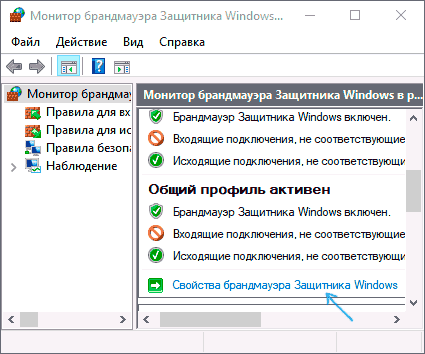
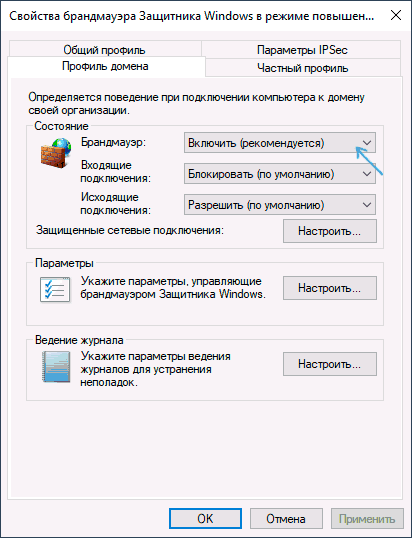
Отключение в мониторе брандмауэра Защитника Windows в режиме повышенной безопасности
Если в поиске на панели задач вы начнете вводить «монитор брандмауэра», вы сможете открыть отдельную панель управления его параметрами, предоставляющую, помимо прочего, и возможность отключения:
- Нажмите по пункту «Свойства брандмауэра Защитника Windows».

- На вкладках Общий профиль, Частный профиль и Профиль домена в верхнем поле установите «Отключить» и примените настройки.

Так же, как и в предыдущих случаях, встроенный файрвол Windows 10 будет отключен.
Как отключить службу Брандмауэр Защитника Windows 10
Даже после отключения брандмауэра Windows 10 описанными выше способами, соответствующая ему служба продолжит работать, причем отключить её в services.msc не получится. Тем не менее, отключение возможно:
- Нажмите клавиши Win+R на клавиатуре, введите regedit и нажмите Enter.
- В открывшемся редакторе реестра перейдите к разделу
HKEY_LOCAL_MACHINE\SYSTEM\CurrentControlSet\Services\mpssvc
- Дважды нажмите по параметру с именем Start в панели справа и задайте значение 4 для него.

- Примените настройки и перезагрузите компьютер.
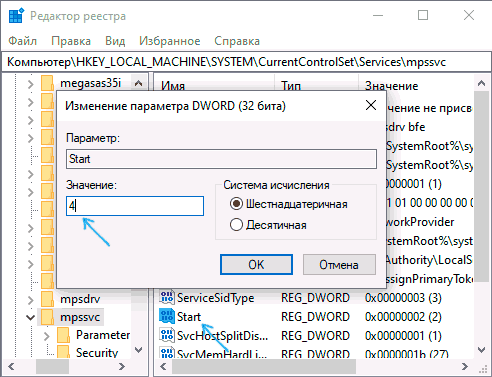
В результате служба будет отключена.
Как убрать уведомление о том, что брандмауэр отключен
После того, как вы отключите брандмауэр, Центр безопасности защитника Windows 10 начнет показывать уведомления о том, что он отключен с предложением снова его включить.
Чтобы убрать такое уведомление, в редакторе реестра в разделе
HKEY_LOCAL_MACHINE\SOFTWARE\Microsoft\Windows Defender Security Center\Notifications
создайте параметр DWORD с именем DisableNotifications и значением 1. Подробнее о том, как это сделать в инструкции Как отключить уведомления защиты Windows 10.
Видео — 4 способа отключить брандмауэр Windows 10
Как добавить программу в исключения брандмауэра Windows 10
Если вы не хотите полностью выключать встроенный файрвол, а требуется лишь предоставить полный доступ к подключениям какой-либо программе, то сделать это вы можете путем добавления ее в исключения брандмауэра. Сделать это можно двумя путями (второй способ позволяет также добавить отдельный порт в исключения брандмауэра).
Первый способ:
- В панели управления, в пункте «Брандмауэр Защитника Windows» слева выберите пункт «Разрешение взаимодействия с приложением или компонентом в брандмауэре Windows».
- Нажмите кнопку «Изменить параметры» (требуются права администратора), а затем внизу нажмите «Разрешить другое приложение».
- Укажите путь к программе для добавления в исключения. После этого также можно указать, каких типов сетей это касается с помощью соответствующей кнопки. Нажмите «Добавить», а затем — Ok.


Второй способ добавления исключения в брандмауэр чуть сложнее (но зато позволяет добавить в исключения не только программу, но и порт):
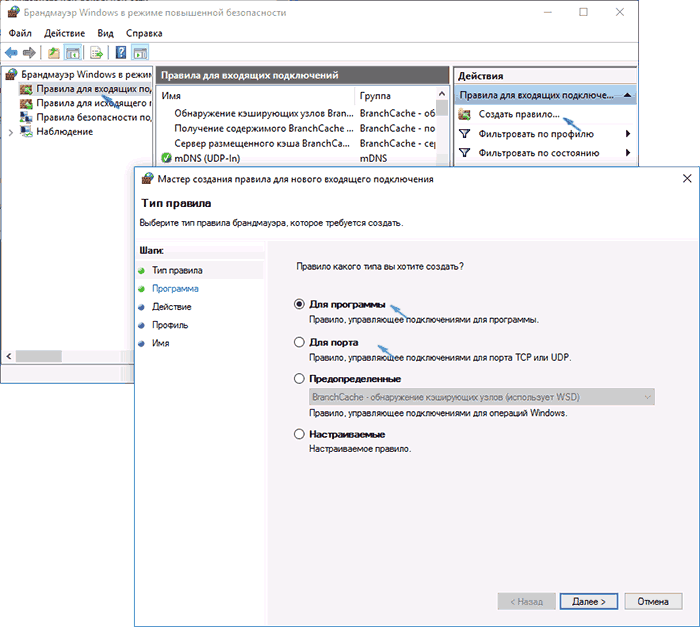
- В пункте «Брандмауэр Windows» панели управления выберите слева «Дополнительные параметры».
- В открывшемся окне расширенных настроек брандмауэра выберите «Исходящие подключения», а затем, в меню справа — создать правило.
- С помощью мастера создайте правило для вашей программы (или порта), разрешающее ей подключение.

- Аналогичным образом создайте правило для этой же программы для входящих подключений.
На этом все. Кстати, если что-то пойдет не так, вы всегда можете сбросить брандмауэр Windows 10 к настройкам по умолчанию с помощью пункта меню «Восстановить значения по умолчанию» в окне его параметров.
It is the Windows Firewall that protects your device from all kinds of trojans, malware, ransomware, and other online threats. By default, this tool restricts all third-party apps from accessing the system resources. As a result of this, you might face trouble opening certain apps or drivers.
You may disable Firewall on Windows 11/10 temporarily to troubleshoot certain things, and when the issue resolves, turn it back On. In this post, we will learn different ways to either enable or disable Firewall in Windows.

Is it safe to disable Windows Firewall?
If you use some third-party antivirus program, you may consider turning off the Windows Firewall. However, if you are not using any other antivirus, disabling it will make your Windows PC vulnerable to online threats, malware, and other issues.
In case you are troubleshooting something, you may turn off the Firewall and as soon as the issue resolves, turn it back ON. By default, this security feature turns itself On when you restart your computer.
6 Ways to Disable Windows Defender Firewall in Windows 11
As stated earlier, you should disable Windows Firewall only when you are either troubleshooting some internal issues or you have installed a third-party app. Uninstalling or disabling it for any other reason will simply make your device vulnerable to malicious software, which can cause several new issues or error codes on your computer.
Follow the below steps on how to disable Firewall in Windows –
- Open the Settings menu by pressing Windows + I.
- Go to Privacy & Security, and select Windows Security.

- On the next screen, scroll down and click on the “Firewall & network protection” option.

- Windows Security will pop up next. You will now see an active network either under Domain, Private, or Public. When you find such a network, click on it.

- Under Microsoft Defender Firewall, you will find a toggle switch.

- Turn off this toggle switch as shown in the below snapshot.
- When the UAC window prompts, hit Yes to authorize bypassing the Firewall.

- That’s it, you have successfully disabled Windows Defender Firewall on your system.
How do I disable Windows Firewall for Specific Apps?
Sometimes you might face trouble opening certain apps on Windows PC. This happens mostly when Windows Firewall is restricting their usage. If you do trust those apps, you may disable the Firewall settings for all those apps. Here’s how to perform this task –
- Press Windows + I to launch Settings.
- Inside the Settings window, navigate to the below path –
Privacy & Security > Windows Security > Firewall & network protection

- Scroll down and click on the link – “Allow an app through firewall.”
- Click on the “Change settings” button on the next screen.

Note: In order to change firewall settings, you must have administrator access. If you are not an admin, make sure to log into the administrator account using the correct user id and password.
- On the next screen, tick the checkbox next to an app name. The chosen app will now have access to the internet to use as your default profile.
- Moreover, if you would like it to allow your “Private’ profile”, make sure to tick the box next to an app’s name right under the Private column.
- In case you are not seeing a particular application, you may hit Allow another app. You can then browse to the System32 folder and search for the .exe file of that app and add it to “Allowed apps and features“.
- Click OK and all your current changes will be saved immediately afterward.
How to Restore Windows 11 Firewall Settings to Default
If you ever want to restore the default settings of Windows Firewall, do the following –
- Press Windows + X, and select Settings.
- Go to “Privacy & Security” and select Windows Security from the right pane.

- Moving forward, click on the button that says Open Windows Security.
- Go to the Firewall & network protection section, and click on Restore firewalls to default.

- When the Restore defaults window appears, click the “Restore defaults” button, and your Firewall is now reset to its default settings.

How to access the Windows 11 Firewall settings
Every now and then, users need to access Windows Firewall settings on their devices. If you are also a regular to this setting on your computer, you may use these steps –
- Right-click on Start and select Settings from the menu list.
- Select Privacy & Security, and click Windows Security available on the right pane.
- Click the Open Windows Security button and when it does open, click on the “Firewall & network protection” tile.
That’s it, you are now inside the Windows Defender Firewall. Choose whatever you want to do with the firewall default settings.
Different Ways to Enable or Disable Firewall on Windows PC
One may use either of the following methods to either enable or disable Firewall settings inside Windows 10 –
- Through Control Panel
- Using Windows Settings
- Via Command Prompt
- Through Windows PowerShell
1] Turn On or Off Windows Firewall settings using Control Panel
- Open Control Panel.
- Locate and click on Windows Defender Firewall.
- On the next screen, click “Turn Windows Defender Firewall on or off” available on the left pane.

- Locate Private network settings in the Customize settings window next.
Depending on whether you want to enable or disable the firewall settings on your computer, tick the respective radio buttons, and hit OK.
For disabling the Firewall: Check the radio button left of “Turn off Windows Defender Firewall (not recommended)” under both Public and Private networks, and hit OK.

To re-enabling the Firewall: Tick the radio buttons – “Turn on Windows Defender Firewall” under both Private and Public networks, and hit OK. See the Snapshot below –
2] Using Windows Settings
Disabling Firewall:
- Press the Windows key on your keyboard and type Windows Security in the text field.
- Press Enter, and this will start Windows Defender.
- Locate Firewall & network protection and click on the same.
- Here you will see the following network profiles – Domain network, Private network, and Public network.

- Click on each of the three network profiles one after the other and disable the Firewall for all.
- When you click on Public Network, the following panel will become visible. Under the Windows Defender Firewall, turn off the encircled toggle switch.

- When the UAC window prompts, hit Yes.
- Now, repeat the above steps for Domain and Private Networks as well.
Enabling Windows Defender Firewall:
- Click on the Start button.
- Type Windows Security in the text field, and hit Enter.
- Locate Firewall & network protection, and turn on its toggle switch.

- When the UAC window appears, hit Yes to authorize enabling Windows Defender Firewall.
3] Enable or Disable Firewall using Command Prompt
- First of all, click on the Start button and type CMD.
- Right-click on the Command Prompt and select Run as administrator.
- Click Yes when the UAC prompts and this will launch CMD as administrator.
To disable the firewall settings on your computer, copy/paste the below command on the elevated console, and press Enter.
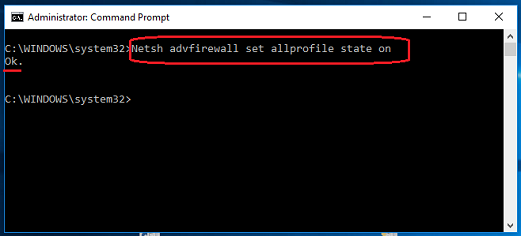
netsh advfirewall set allprofiles state off

To turn back on the firewall settings on your Windows PC, execute this command.
netsh advfirewall set allprofiles state on

I hope you know now how to disable or enable Windows Firewall using Command Prompt on your Windows PC.
4] Enable or Disable Firewall using PowerShell
- Press Windows + X, and choose Terminal (Admin). If you are on Windows 10, select Windows PowerShell (Admin) instead from the Power menu.
- On the elevated terminal or PowerShell, copy/paste the following and press Enter. This will disable Windows Defender Firewall on your Windows PC.
Set-NetFirewallProfile -Enabled False

To turn back on Windows Firewall settings on Windows, execute this command on the same prompt.
Set-NetFirewallProfile -Enabled True

That’s it, I hope you find this article useful, and now you know all possible methods to either enable or disable Windows Firewall on your Windows PC.
How to Disable Windows 10 Firewall: In today’s world, people are too much dependent on technology and they try to perform every task online. You need a device to access the internet such as PCs, phones, tablets, etc. But when you use PC to access the internet you connect to so many networks which might be harmful as some attackers make free WiFi connections and wait for people like you to connect to these networks in order to access the internet. Also, if you are working on some project with other people then you may be on a shared or common network which may be unsafe as anyone with access to this network can introduce malware or virus on your PC. But if that is the case then how should one protect their PC from these networks?

Don’t worry we will answer this question in this tutorial. Windows comes with built-in software or program which keeps the laptop or PC secure and safe from external traffic and also protect your PC from external attacks. This built-in program is called Windows Firewall which is a very important part of Windows since Windows XP.
What is the Windows Firewall?
Firewall: A Firewall is a Network Security system that monitors & controls the incoming and outgoing network traffic based on predetermined security rules. A firewall basically acts as a barrier between the incoming network and your computer network that allows only those networks to pass through which according to predetermined rules are considered to be trusted networks and block untrusted networks. The Windows Firewall also helps in keeping unauthorized users away from accessing resources or files of your computer by blocking them. So a Firewall is a very important feature for your computer and it is absolutely necessary if you want your PC to be safe & secure.
Windows Firewall is enabled by default, so you don’t need to do any changes on your PC. But sometimes Windows Firewall causes some issues with internet connectivity or blocks certain programs from running. And if you have any 3rd party Antivirus program installed then it will also enable the third party firewall, in which case you will need to disable your in-built Windows Firewall. So without wasting any time let’s see How to disable Windows 10 Firewall with the help of the below-listed guide.
Table of Contents
Make sure to create a restore point just in case something goes wrong.
Method 1 – Enable Firewall in Windows 10 Settings
To check if the firewall is enabled or disabled, follow the below steps:
1.Press Windows Key + I to open Settings then click on Update & Security.
2.Click on Windows Security from the left window panel.
3.Click on Open Windows Defender Security Center.

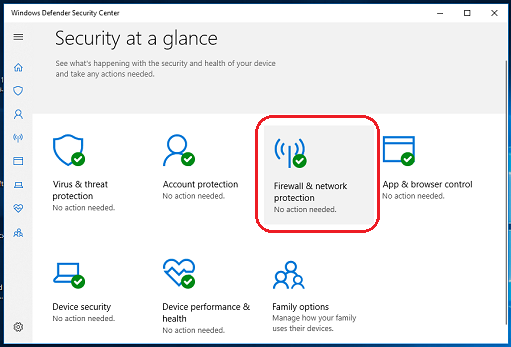
4.Below Windows Defender Security Center will open up.

5.Here you will see all the security settings which users have access to. Under Security at a glance, to check the status of the firewall, click on Firewall & network protection.

6.You will see three types of network there.
- Domain network
- Private network
- Public network
If your firewall is enabled, all the three network option would be enabled:

7.If the Firewall is disabled then click on the Private (discoverable) network or Public (non-discoverable) network to disable the firewall for the selected type of network.
8.On the next page, Enable the option Windows Firewall.
This is how you enable Windows 10 Firewall but if you need to disable it then you need to follow the below methods. Basically, there are two ways via which you can disable Firewall, one is using Control Panel and other is using Command Prompt.
Method 2 – Disable Windows Firewall using Control Panel
To disable the Windows Firewall using Control Panel follow the below steps:
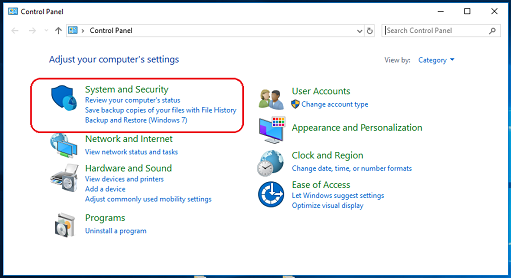
1.Open Control Panel by searching it under Windows search.
Note: Press Windows Key + R then type control and hit Enter to open Control Panel.
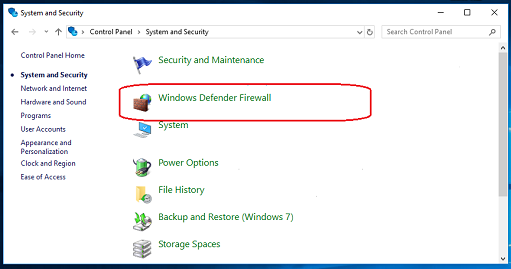
2. Click on System and Security tab under Control Panel.

3.Under System and Security, click on Windows Defender Firewall.

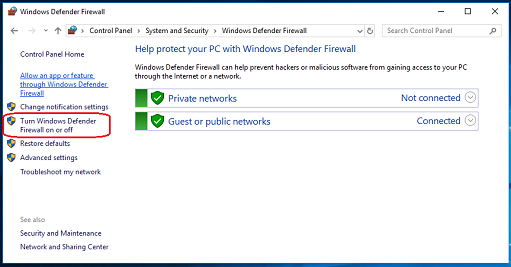
4.From the left-window pane click on Turn Windows Defender Firewall on or off.

5.Below screen will open up which shows different radio buttons to either enable or disable Windows Defender Firewall for Private and Public network settings.

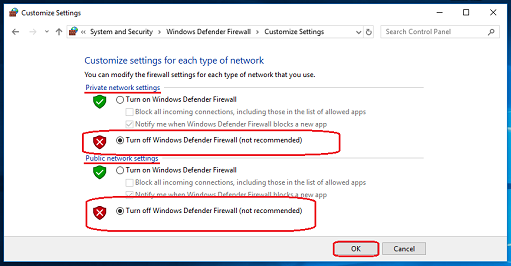
6.To turn off Windows Defender Firewall for Private network settings, click on the Radio button to checkmark it next to Turn off Windows Defender Firewall (not recommended) under Private network settings.

7.To turn off Windows Defender Firewall for Public network settings, checkmark “Turn off Windows Defender Firewall (not recommended)” under Public network settings.

Note: If you want to turn off Windows Defender Firewall for both Private and Public network settings, checkmark the radio button next to Turn off Windows Defender Firewall (not recommended) under both Private & Public network settings.
8.Once you have made your choices, click on the OK button to save the changes.
9.Finally, your Windows 10 Firewall will be disabled.
If in future, you need to enable it again then again follow the same step then checkmark “Turn on Windows Defender Firewall” under both Private & Public network settings.
Method 3 – Disable Windows 10 Firewall using Command Prompt
To disable the Windows Firewall using Command prompt follow the below steps:
1.Press Windows Key + X then select Command Prompt (Admin).
2.You can use the following commands to disable Windows 10 Firewall:
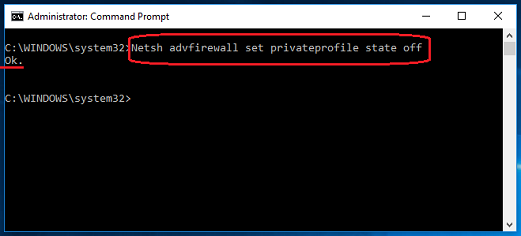
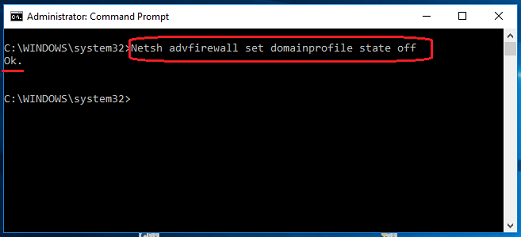
Disable Windows Firewall for all network types (profiles): netsh advfirewall set allprofiles state off
Disable Windows Firewall for the active profile only: netsh advfirewall set currentprofile state off
Disable Windows Firewall for the domain profile: netsh advfirewall set domainprofile state off
Disable Windows Firewall for the private profile: netsh advfirewall set privateprofile state off
Disable Windows Firewall for the public profile: netsh advfirewall set publicprofile state off
Note: To revert any of the above commands and re-enable Windows Firewall: netsh advfirewall set allprofiles state off
3.Alternatively, type the below command in the command prompt:
control firewall.cpl

4.Hit the enter button and below screen will open up.

5.Click on Turn Windows Defender Firewall on or off available under the left window pane.
6.To turn off Windows Defender Firewall for Private network settings, checkmark the Radio button next to Turn off Windows Defender Firewall (not recommended) under Private network settings.
7.To turn off Windows Defender Firewall for Public network settings, checkmark the Radio button next to Turn off Windows Defender Firewall (not recommended) under Public network settings.
Note: If you want to turn off Windows Defender Firewall for both Private and Public network settings, checkmark the radio button next to Turn off Windows Defender Firewall (not recommended) under both Private & Public network settings.
8.Once you have made your choices, click on the OK button to save the changes.
9.After completing the above steps, your Windows 10 Firewall is disabled.
You can enable Windows Firewall again anytime whenever you want, by simply clicking on the radio button next to “Turn on Windows Defender Firewall” for both Private and Public network settings and click on the Ok button to save the changes.
Recommended:
- Can’t Connect To WhatsApp Web? Fix WhatsApp Web Not Working!
- Windows 10 Tip: Save Space By Cleaning WinSxS Folder
- What Can I Do If I Forgot My Instagram Password?
- Fix Taskbar Search Not Working in Windows 10
I hope this article was helpful and you can now easily Disable Windows 10 Firewall, but if you still have any questions regarding this tutorial then feel free to ask them in the comment’s section.
Introduction
Windows Firewall is a shielding feature in the Windows Family. The Windows Firewall is designed to protect from unauthorized access to your system and this feature also permits authorized communications to and from your system.
As per Wikipedia, «Windows Defender Firewall was first included in Windows XP operating system and Windows Server 2003. Before September 2017, it was generally known as Internet Connection Firewall and later on, it was renamed Windows Defender Firewall».
Without turning off (disabling) the Windows Defender Firewall, the user can also allow apps or features through Windows Defender Firewall. In specific conditions, you have to turn off (disable) the Windows Defender Firewall, but remember you should turn it on again after completing the work.
This tutorial will show you various ways on, how to disable Windows Defender Firewall In Windows 10.
Method 1. Using Command Prompt (Admin)
By using the Command Prompt (Admin), the user can easily turn on or off the Windows Defender Firewall. Follow the below instructions to proceed.
Step 1
From the Search, type the Command Prompt and right-click on it and select «Run as Administrator».
Step 2
To turn off (disable) the Windows Defender Firewall for different profiles, type the command below in the Command Prompt (Admin).
1) For all Profile/Network Types
Netsh advfirewall set allprofile state off

2) For Private Network Only
Netsh advfirewall set privateprofile state off
3) For Public Network Only
Netsh advfirewall set publicprofile state off

4) For domain Network Only
Netsh advfirewall set domainprofile state off
Note:
1) To turn on (enable) the Windows Defender Firewall, type the below command in command prompt.
Netsh advfirewall set allprofile state on
2) The user can also check the status of the Windows Defender Firewall by using the below command.
Netsh advfirewall show allprofiles
Method 2. Through Windows PowerShell (Admin)
By using the Windows PowerShell, the user can easily (disable) turn off the Windows Firewall. Follow the below instructions to proceed.
Step 1
Open Windows PowerShell (Admin). (Alternatively, you can press the «Windows + X» key and click on «Windows PowerShell (Admin)» to open it.)
Step 2
To turn off (disable) the Windows Firewall for different profiles, type the command below in the Windows PowerShell (Admin).
1) For all Profile/Network Types
Set-NetFirewallProfile -Enabled False

2) For Private Network Only
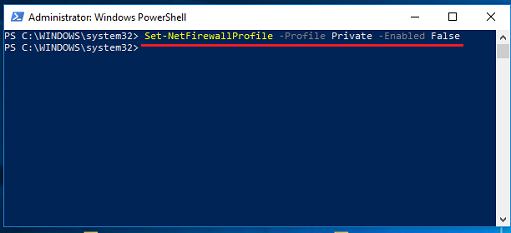
Set-NetFirewallProfile -Profile Private -Enabled False
3) For Public Network Only
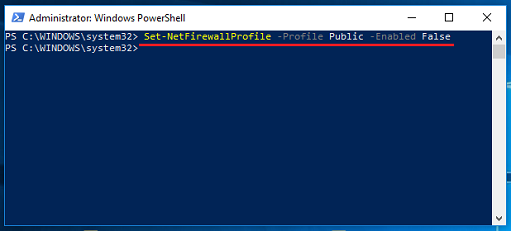
Set-NetFirewallProfile -Profile Public -Enabled False
4) For Domain Network Only
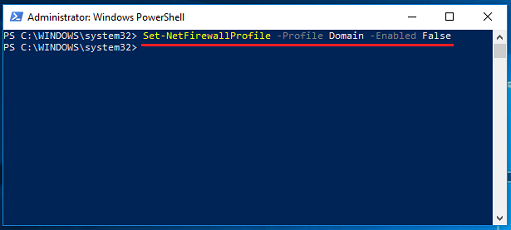
Set-NetFirewallProfile -Profile Domain -Enabled False
Note:
To turn on (enable) the Windows Defender Firewall, type the following command in Windows PowerShell (Admin), «Set-NetFirewallProfile -Enabled True».
Method 3. Using Control Panel
By using the Control Panel, the user can also disable the Windows Firewall for private as well as public networks. Follow the instructions to proceed.
Step 1
Open Control Panel.
Step 2
Click on «System and Security» option.
Step 3
Click on «Windows Defender Firewall» option.
Step 4
Click on «Turn Windows Defender Firewall on or off».
Step 5
Now, check (select) the «Turn off Windows Defender Firewall (not recommended)» option of both the public and private network settings.
Method 4. Through Windows Defender Security Center
The user can also disable the Windows Defender Firewall for all types of networks by using the Windows Defender Security Center. Follow the instructions to proceed.
Step 1
From the Search, type the «Windows Defender Security Center» and click on it.
Step 2
«Windows Defender Security Center» window will appear on the screen and click on the «Firewall & network protection».
Step 3
Now, choose the network on which firewall that you want to turn off. (like, click on the «Public Network (Active)»).

Step 4
Disable the «Windows Defender Firewall» option.
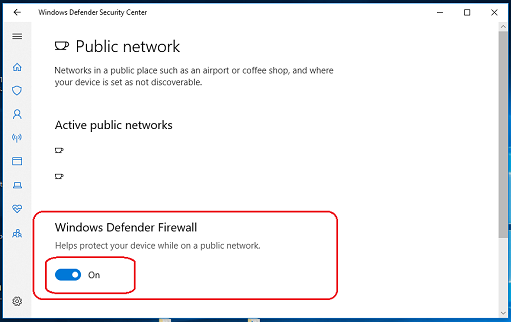
Step 5
«User Account Control» Confirmation will appear on the screen and click on the «Yes» button to proceed.
Conclusion
By following any of the above methods, you can disable (turn off) the Windows Defender Firewall in Windows 10.
I hope you enjoyed this article. Follow C# Corner to learn more new and amazing things about Windows 10.
Thanks for reading this article.