
Download Article
Download Article
- Using Windows Settings
- Using Group Policy Editor
- Using Registry Editor
|
|
Autorun is a feature of Windows in which a predetermined action is taken when certain types of media such as a CD, DVD, or USB flash drive is inserted in a computer. Most commonly, autorun will launch or install a new program on the media.[1]
Disabling Autorun in Windows will help prevent accidental installation of viruses and other malware. You can disable AutoPlay on Windows 10 Settings menu, the Group Policy editor, or using the Registry editor. This wikiHow teaches you how to disable autorun.
-

It’s the button with the Windows logo in the taskbar. By default, it’s in the lower-left corner.
-

This opens the AutoPlay Settings menu for Windows.
Advertisement
-
It’s at the top of the menu. This disables Autoplay and Autorun for your Windows computer. When you insert a drive, you will need to open it manually in File Explorer and run any programs automatically.
-
This ensures that Windows does not open a folder or automatically run any files when a removable drive, such as a CD-ROM or USB flash drive is inserted.
-
This ensures that Windows will not automatically open a memory card or automatically run any files when a memory card is inserted.


Advertisement
-
It’s the button with the Windows logo in the taskbar. By default, it’s in the lower-left corner.
- Group Policy Editor is not available for Windows 10: Home Edition.
-

This launches a program called «Run.» You can also click the Run icon in the Windows Start menu.
-
Use the field in the center of Run to enter «Gpedit.msc.» Then click Ok or press Enter. This launches the Group Policy Editor.
- If asked to enter an administrative password, enter the admin password and click Allow.
-
«Administrative Templates» can be found under both «User Configuration» and «Computer Configuration» Click the one under «User Configuration» to expand the Administrative Templates menu.
-
This displays the administrative template folders listed under «Windows Components.»
-
This opens the folder containing AutoPlay administrative templates.
-
This opens the administrative template that allows you to disable AutoPlay and Autorun.
-
It’s at the top of the template on the left-hand side of the Window. When this template is enabled, AutoPlay and Autorun will be disabled on all drives, including removable USB drives, disk drives.
-
It’s in the lower-right corner of the window. This applies to the new settings.
-
This closes the Group Policy Editor. [2]
-
Once you apply the new setting, restart your computer to ensure the new settings take effect.


Advertisement
-
It’s the button with the Windows logo in the taskbar. By default, it’s in the lower-left corner.
- Warning: Making changes to the Windows registry can cause permanent damage to your computer. Continue at your own risk to do not alter anything if you don’t know what it does.
-
This launches a program called «Run.» You can also click the Run icon in the Windows Start menu.
-
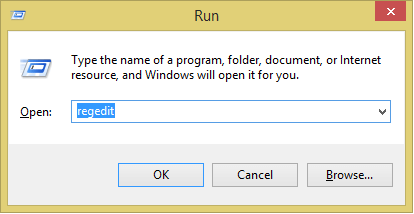
Use the field in the center of Run to enter «Regedit.exe.» Then click Ok or press Enter. This launches the Registry Editor.
- If asked if you want to allow the Registry Editor to make changes to your system, click Yes.
-
It’s in the menu to the left of Registry Editor. Double-click this option to expand it.
-
It’s below «HKEY_CURRENT_USER.» This expands the Software folder.
-
It’s in the Software folder. This expands the Microsoft folder.
-
It’s in the Microsoft folder. This expands the Windows folder.
-
It’s in the Microsoft folder. This expands the CurrentVersion folder.
-
It’s in the CurrentVersion folder. This expands the Policies folder.
-
It’s in the Policies folder. This expands the Explorer folder.
- The full path in the Registry Editor is «Computer\HKEY_CURRENT_USER\SOFTWARE\Microsoft\Windows\CurrentVersion\Policies\Explorer»
-
It’s the only option under «Explorer.» This allows you to change the policy with regards to Autorun in Registry Editor.
-
Each of the following values affects Autorun in a different way. Enter one of the following values of your choice in the «Value data» field. The values are as follows:
- «FF:» This disables Autorun on all drives.
- «20:» This disables Autorun on the CD-ROM only.
- «4:» This disables Autorun on all removable drives.
- «8:» This disables Autorun on all fixed drives.
- «10:» This disables Autorun on all network drives.
- «40:» This disables Autorun on the RAM disk only.
- «1:» This disables Autorun on all unknown drives.
- «91:» This sets Autorun to function as normal.
-
This saves the new value and setting for Autorun.[3]
[4]


Advertisement
Ask a Question
200 characters left
Include your email address to get a message when this question is answered.
Submit
Advertisement
Thanks for submitting a tip for review!
References
About This Article
Article SummaryX
1. Click the Windows Start menu.
2. Type «AutoPlay Settings» and press Enter.
3. Click the toggle switch to turn AutoPlay off.
5. Select «Take No Action» in the menu below «Removable Drive.»
6. Select «Take No Action» in the menu below «Memory Card.»
Did this summary help you?
Thanks to all authors for creating a page that has been read 21,700 times.
Is this article up to date?
Read time 6 minutes
Are you a Windows 10 user? If yes, you should consider yourself lucky, as Windows 10 gives you many amazing options that simply life. And one such feature is AutoRun. This feature is incorporated in Windows 10 to automatically start specific programs, open removable drives, or play media files automatically when CDs, DVDs, or media cards are inserted. AutoRun has a sub-feature., i.e., AutoPlay, which allows programs to play or run as soon as the media devices get attached to the computer (this feature is turned on by default in Windows 10).
AutoPlay could be annoying when media files like movies or music play automatically when inserting CDs, DVDs, USBs, etc. Therefore, if AutoRun or AutoPlay is annoying you while doing your crucial work, we have a solution to disable and control AutoPlay features.
If you want to disable AutoRun or AutoPlay in Windows 10, use the following methods.
Method 1: Disable AutoRun using Registry editor
You need to execute several Windows 10 Registry Editor actions to disable AutoRun. Perform the given steps to turn off AutoRun in Windows 10.
Step 1: Press Windows key + R from your keyboard, type regedit in the Run window, and click OK to open Registry Editor.
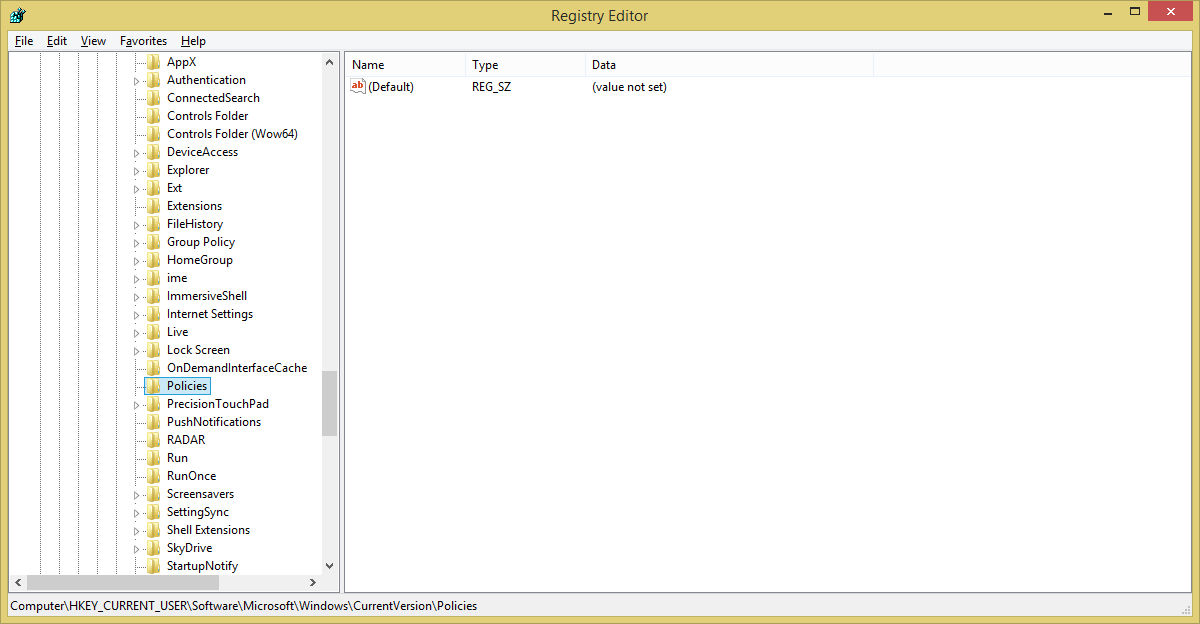
Step 2: Click HKEY_CURRENT_USER and follow the path to reach the Policies folder:
HKEY_CURRENT_USER\Software\Microsoft\Windows\CurrentVersion\Policies
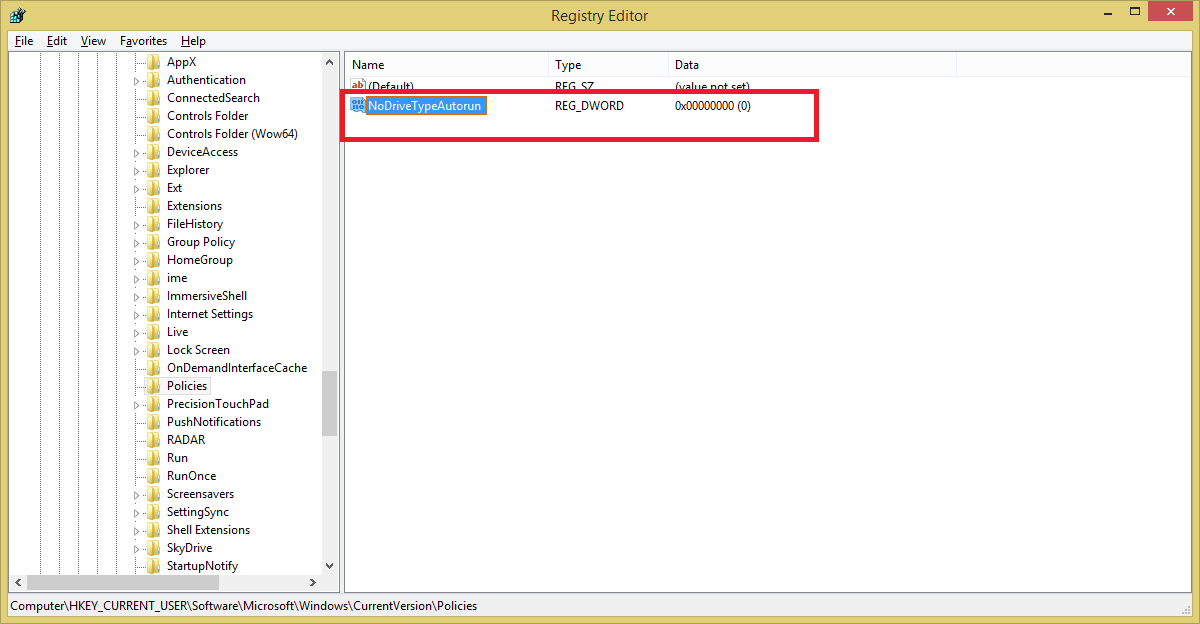
Step 3:Right-click in the right pane of the Registry Editor, create a new DWORD type value, and name it “NoDriveTypeAutorun.”
Set the DWORD value to one of the following to disable different programs:
- FF: To disable AutoRun on all drives
- 20: To disable AutoRun on CD-ROM drives
- 4: To disable AutoRun on removable drives
- 8: To disable AutoRun on fixed drives
- 10: To disable AutoRun on network drives
- 40: To disable AutoRun on RAM disks
- 1: To disable AutoRun on unknown drives
Method 2. Disable AutoPlay in Windows 10
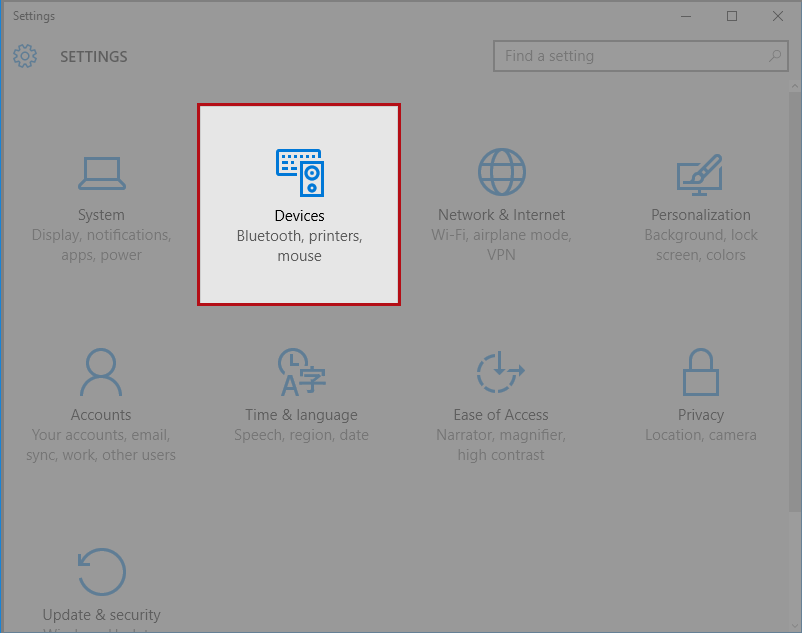
Another way to disable AutoPlay in Windows 10 operating systems is by doing it through Windows Settings. Follow the below-mentioned steps to turn off the AutoPlay in Windows 10:
Step 1: Click Windows icon, in your system.
Step 2: Now, from the menu that pops up, select Settings option
Step 3:Select Devices (Bluetooth, printers, mouse) options from the Settings menu.
Step 4: Select AutoPlay from the left side pane.
Step 5: Now, turn off the AutoPlay (Use AutoPlay for all media and devices) switch by clicking with your mouse.
Method 3: Disable AutoRun and AutoPlay at Group policy level
If you want to control AutoRun and AutoPlay settings, you can do it with Group Policy editor. Before executing the step-by-step guide, ensure you have logged in to the Windows 10 system as an Administrator for accessing Group Policy editor.
Step 1: Open Windows Start menu and type gpedit to open Local Group Policy Editor.
Step 2: Under Computer Configuration, click Administrative Templates >> Windows Components >> AutoPlay Policies.
Step 3: Double-click on Turn off AutoPlay under the Settings tab.
Step 4: Select the “Enabled” option under Turn Off AutoPlay.
Now, the annoying AutoPlay will no more disturb you when you attach an external device to your computer.
Recover damaged or corrupted Windows data using an automated solution
When AutoRun is enabled, malware or malicious programs can be installed automatically on your system, causing severe damage to your Windows system. In such cases, the above-mentioned methods will not resolve your problem. But, they can help prevent disasters from happening. Suppose you are already facing Windows data loss problems. In that case, we highly recommend using a third-party tool, and the best one suggested by IT professionals is Kernel for Windows Data Recovery.
Concluding Words
Windows 10 systems enabled with AutoPlay or AutoRun feature are vulnerable to malware attacks that cause data losses and corruption if a USB drive containing a malicious program is inserted into your computer (even if it is locked). So, always turn off the default Windows AutoPlay settings to keep your computer and crucial data safe and secure.
Autorun is a feature of Windows in which a predetermined action is taken when certain types of media such as a CD, DVD, or USB flash drive is inserted in a computer. Most commonly, autorun will launch or install a new program on the media. Disabling Autorun in Windows will help prevent accidental installation of viruses and other malware. You can disable AutoPlay on Windows 10 Settings menu, the Group Policy editor, or using the Registry editor. This wikiHow teaches you how to disable autorun.

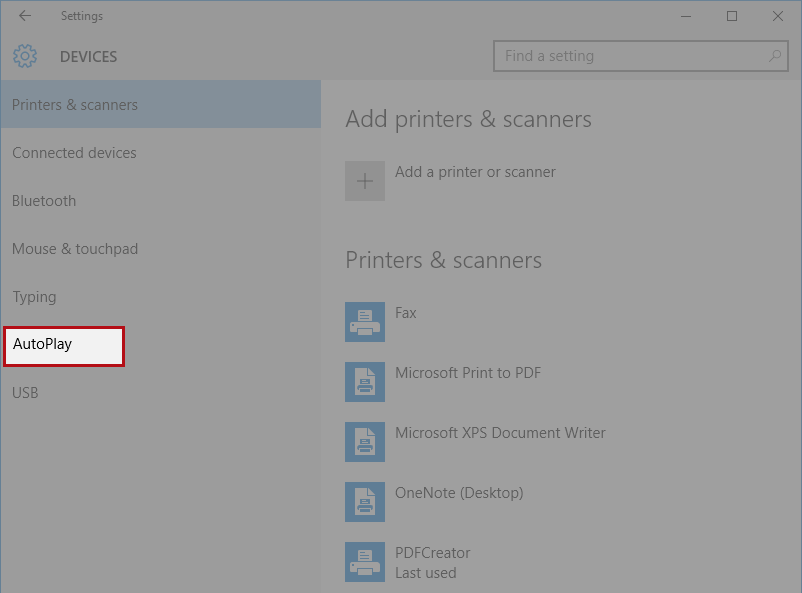
Using Windows Settings
Click the Windows Start menu.
It’s the button with the Windows logo in the taskbar. By default, it’s in the lower-left corner.
Type AutoPlay Settings and press ↵ Enter.
This opens the AutoPlay Settings menu for Windows.
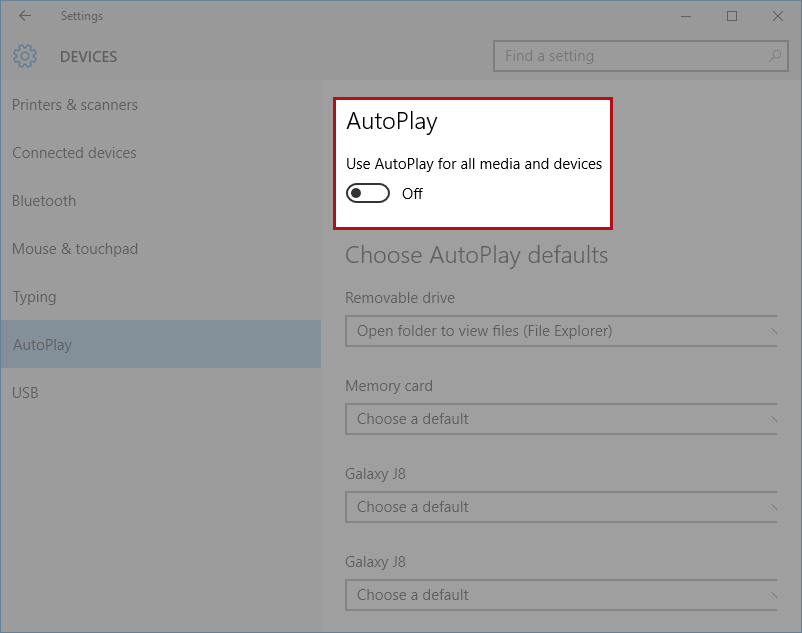
Click the toggle switch below Autoplay.
It’s at the top of the menu. This disables Autoplay and Autorun for your Windows computer. When you insert a drive, you will need to open it manually in File Explorer and run any programs automatically.
Select “Take No Action” in the menu below “Removable Drive.”
This ensures that Windows does not open a folder or automatically run any files when a removable drive, such as a CD-ROM or USB flash drive is inserted.
Select “Take No Action” in the menu below “Memory Card.”
This ensures that Windows will not automatically open a memory card or automatically run any files when a memory card is inserted.
Using Group Policy Editor
Click the Windows Start menu.
It’s the button with the Windows logo in the taskbar. By default, it’s in the lower-left corner.
- Group Policy Editor is not available for Windows 10: Home Edition.
Type Run and press ↵ Enter.
This launches a program called “Run.” You can also click the Run icon in the Windows Start menu.
Type Gpedit.msc into Run and click Ok.
Use the field in the center of Run to enter “Gpedit.msc.” Then click or press . This launches the Group Policy Editor.
- If asked to enter an administrative password, enter the admin password and click Allow.
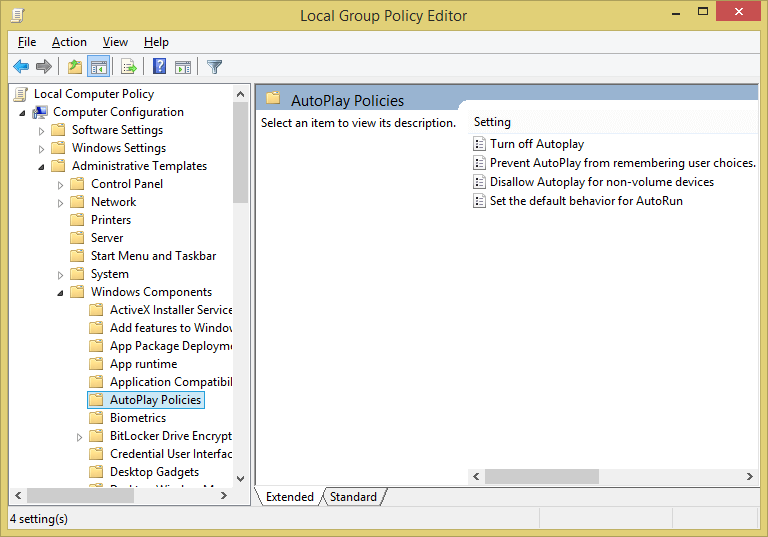
Double-click Administrative Templates under “User Configuration.”
“Administrative Templates” can be found under both “User Configuration” and “Computer Configuration” Click the one under “User Configuration” to expand the Administrative Templates menu.
Double-click Windows Components.
This displays the administrative template folders listed under “Windows Components.”
Double-click AutoPlay Policies.
This opens the folder containing AutoPlay administrative templates.
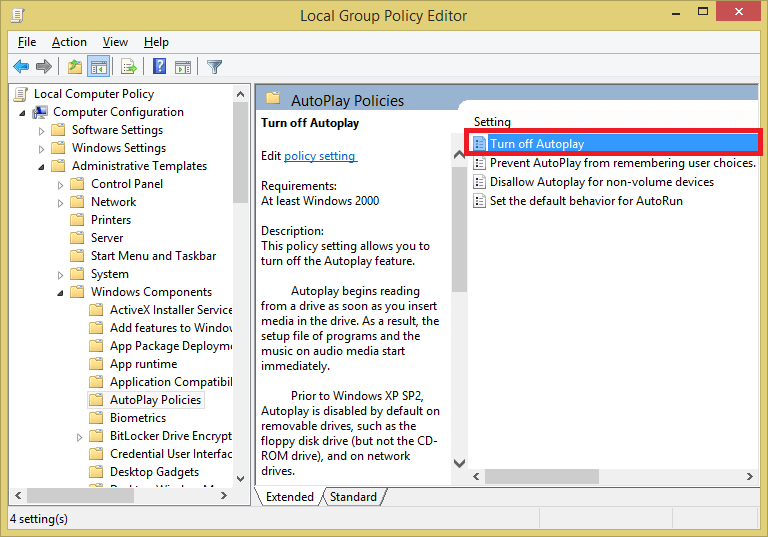
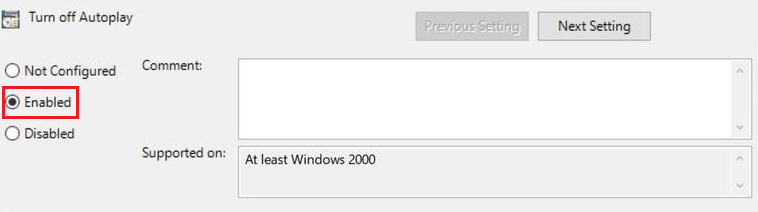
Double-click Turn off AutoPlay.
This opens the administrative template that allows you to disable AutoPlay and Autorun.
Click the radio option next to “Enabled.”
It’s at the top of the template on the left-hand side of the Window. When this template is enabled, AutoPlay and Autorun will be disabled on all drives, including removable USB drives, disk drives.
Click Apply.
It’s in the lower-right corner of the window. This applies to the new settings.
Click Ok.
This closes the Group Policy Editor.
Restart your computer.
Once you apply the new setting, restart your computer to ensure the new settings take effect.
Using Registry Editor
Click the Windows Start menu.
It’s the button with the Windows logo in the taskbar. By default, it’s in the lower-left corner.
- Warning: Making changes to the Windows registry can cause permanent damage to your computer. Continue at your own risk to do not alter anything if you don’t know what it does.
Type Run and press ↵ Enter.
This launches a program called “Run.” You can also click the Run icon in the Windows Start menu.
Type Regedit.exe into Run and click Ok.
Use the field in the center of Run to enter “Regedit.exe.” Then click or press . This launches the Registry Editor.
- If asked if you want to allow the Registry Editor to make changes to your system, click Yes.
Double-click HKEY_CURRENT_USER.
It’s in the menu to the left of Registry Editor. Double-click this option to expand it.
Double-click Software.
It’s below “HKEY_CURRENT_USER.” This expands the Software folder.
Double-click Microsoft.
It’s in the Software folder. This expands the Microsoft folder.
Double-click Windows.
It’s in the Microsoft folder. This expands the Windows folder.
Double-click CurrentVersion.
It’s in the Microsoft folder. This expands the CurrentVersion folder.
Double-click Poicies.
It’s in the CurrentVersion folder. This expands the Policies folder.
Double-click Explorer.
It’s in the Policies folder. This expands the Explorer folder.
- The full path in the Registry Editor is “ComputerHKEY_CURRENT_USERSOFTWAREMicrosoftWindowsCurrentVersionPoliciesExplorer”
Double-click NoDriveTypeAutoRun.
It’s the only option under “Explorer.” This allows you to change the policy with regards to Autorun in Registry Editor.
Enter one of the follow values.
Each of the following values affects Autorun in a different way. Enter one of the following values of your choice in the “Value data” field. The values are as follows:
- “FF:” This disables Autorun on all drives.
- “20:” This disables Autorun on the CD-ROM only.
- “4:” This disables Autorun on all removable drives.
- “8:” This disables Autorun on all fixed drives.
- “10:” This disables Autorun on all network drives.
- “40:” This disables Autorun on the RAM disk only.
- “1:” This disables Autorun on all unknown drives.
- “91:” This sets Autorun to function as normal.
Click Ok.
This saves the new value and setting for Autorun.
Wanna Disable AutoRun Feature in Windows 10?
If you are a Windows user then you should feel lucky as Windows 10 keeps on providing you the amazing options and make life easier. The one such benefit that it provides is Auto-Run.
Usually, this feature is incorporated in Windows 10 and it automatically starts certain programs, opens the removable drives, or sometimes plays the media files automatically when CDs and DVDs are inserted into it. Auto-run is a sub-feature and it allows the programs to play or un as the media devices get attached to the computer. Moreover, this feature is turned on by default in Windows 10.
Why do you need to Disable AutoRun Feature in Windows 10?
Auto-run on network drives is set to disable in the registry and whenever we install the update then a registry key was set to disable the Autorun on network drives which is enforced correctly. So, this would be the reason that this problem gets occur.
Some other reason for disabling the Auto-play is due to the removable drives like Floppy disk drive and the network drives.
AutoPlay could be annoying whenever the media files like music play run automatically on inserting the CD, DVD’s, or USB’s. Thus, Auto-run has become annoying whenever we do some crucial work. In this article, we have the best solutions to disable the Auto-play.
Method 1 – Disable AutoRun via Local Group Policy Editor:
So, if you want to control the Auto-run and its settings, then you simply need to do it with the Group policy editor. Thus, before you start executing this step you need to make sure that you have logged in to the Windows 10 system as an Administrator for accessing the Group policy editor.
Here is how you can disable it:
1: First, you need to open the Windows start button and then type gpedit to open the Local group policy editor.
2: Now, under the computer configuration, you need to click administrative templates>>Windows components>>Auto-play policies.
3: Next, you need to double-click on Turn off Auto-play under the setting tab.

4: Select the Enabled option under the Turn off Auto-Play.
Method 2 – Disable Auto-Run Windows 10 Default Settings
In order to disable Auto-run Windows 10 by default settings, then follow these steps:
1: First, press the Windows key.
2 Now, type in Auto-Play, and then you need to select the Auto-play settings.
3: Here under the Auto-play for all media and devices you need to move the slider to Off.

4: Now, under the Auto-play defaults for both removable drive and memory card, you need to select Do nothing.
Method 3– Disable AutoRun with Registry Editor:
To fix the Autoplay issue look for these given steps:
1: In the beginning, you need to press the Windows key +R from your keyboard.
2: Now, type Regedit in the Run window and then click Ok to open the Registry editor.
3: Next, you need to click HKEY_CURRENT_USER and follow the path to reach the Policies folder:
HKEY_CURRENT_USER\Software\Microsoft\Windows\CurrentVersion\Policies
4: Now, you need to right-click in the right pane of the Registry editor and then create a new DWORD type and then value and name it “No Drive Type Autorun”.

5: Here you need to set the DWORD value to one of the following and disable the following different programs.
FF: To disable AutoRun on all drives
20: To disable AutoRun on CD-ROM drives
4: To disable AutoRun on removable drives
8: To disable AutoRun on fixed drives
10: To disable AutoRun on network drives
40: To disable AutoRun on RAM disks
1: To disable AutoRun on unknown drives
Frequently Asked Questions (FAQ)
Q1: How you can manually start AutoRun?
Ans: Follow these steps to manually start the autorun:
1: First, you need to press Windows + E to summon a file explorer window.
2: Now, in Windows 10, you need to choose This PC from the list of locations on the left side of the window.
3: Next, right-click the drive icon i.e representing the media that you have inserted.
4: Choose to open Auto-play from the pop-up menu.
Q2: How you can run auto run.exe?
Ans: Here is how you can perform these steps:
1: First, you need to click start and then Run.
2: Now, you need to type regedt32.exe in the Run field.
3: Next, browse to HKEY_LOCAL_MACHINE/System/CurrentControlSet/Services/Cdrom
4: Change the Autorun value to 1 and then enable autorun and 0 to disable autorun.
5: Close RegEdit.
Q3: How you can fix Auto-play?
Ans: Here we have defined some of the reasons for fixing auto-play:
1: In the beginning, you need to press Windows key + S and then enter the Control panel.
2: Now, select the Control Panel from the list of results.
3: When the control panel gets open then you need to click on Auto-play.
4: In the Auto-play settings you need to make sure that you will use Auto-play for all media and devices.
5: Next, click and reset all defaults button.
Q4: How you can Auto-play USB?
Ans: Here is how to do it:
1: First, open settings.
2: Now, click on Devices.
3: Next, click on Auto-play.
4: Finally, you need to turn on or off using the Auto-play for all media and devices toggle switch.
Q5: How you can unblock an app that is running by an Administrator?
Ans: Perform the following steps to unblock an app that runs by an administrator:
1: Firstly, you need to disable the Windows smart screen.
2: Now, execute the file via the command prompt.
3: Next, you need to install the app by using the hidden administrator account.
4: Disable the antivirus program temporarily.
Conclusion
In the above article, we have defined all the steps that help to Disable AutoRun Feature in Windows 10. You can also try these steps and get rid of this issue.
Also, if you want to prevent your PC from malware attacks so it is important that you need to turn off the default windows Auto-play settings and keep your computer and its data safe and secure.
But if you are still facing trouble then you can contact our technical support team and get help from them in resolving this problem. So, in case of any queries, feel free to contact us!
In this article, we will share with you how to disable autorun in Windows 10 very easily.
Previously, what was AutoRun, anyway?
Broadly speaking, AutoRun (or other terms “Auto Play”) is used to run an application, on a device that is connected to a computer automatically.

For example:
- I put the DVD into the laptop.
- A notification appears (AutoRun).
- I run the AutoRun, then a program opens.
That’s more or less.
AutoRun itself is generally available on devices such as:
- Flashdisk.
- External hard drive.
- DVD.
While the features themselves are already active, be it on Windows 7, Windows 8, or Windows 10.
Table of Contents
How to Turn Off the AutoRun Function in Windows 10
In terms of benefits, you could say AutoRun is quite helpful. For example, when we insert the installer DVD, we don’t have to bother looking for the setup file anymore.
But for some conditions, AutoRun actually needs to be turned off. For example, if there is a virus on the flash so that the virus does not directly enter our computer system.
Well, for Windows 10, we can turn off AutoRun easily, you know. Here I will discuss it in full. It’s easy, guaranteed.
1. Via Windows 10 Settings

The first way is through Settings.
On this page, you can look for the AutoPlay setting to disable it. We can set it to the off position so that the AutoRun function does not turn on.
It’s like this:
- Open Settings via the Start menu.
- Then, please go to the Devices page.
- Check the left column, then click AutoPlay.
- Change the setting to the off position.
Finished.
This method is intended to turn off AutoPlay on all connected devices, yes. But if you want, you can also set it manually. There is a choice of options, really.
2. Via Control Panel

This method is more or less the same as before.
It’s just that, if you go through Settings, the AutoPlay setting may not be found on some versions of Windows 10.
Meanwhile, if you go through the Control Panel, it can be done in all versions.
Here’s how:
- In the Windows search field, type ” Control Panel “.
- Then, please open the Control Panel.
- Continue to open the Hardware and Sounds page, then enter AutoPlay.
- Uncheck Use AutoPlay for all media and devices.
Now, AutoRun has become disabled.
Just like through Settings, here we can also manually set the configuration. Try it.
3. Via Group Policy Editor

If this one might be somewhat complicated, yes. Via the Group Local Policy Editor in Windows 10.
But it’s guaranteed, really. If you want to try it, you can follow these steps:
- Click the Windows key + R.
- Type “ gpedit.msc ”, then click OK.
- Please go to Computer Configuration > Administrative Templates.
- Then go to the Windows Components > AutoPlay Policies page.
- Click on the Turn Off AutoPlay option, then set it to Enabled.
- Finally, just click Apply, then OK.
Try restarting the computer first. Now, AutoRun is disabled. It’s not as difficult as you think, is it?
4. Via Regedit

It’s more advanced than the previous one.
You can try it if it turns out that AutoPlay still appears, even though you have implemented the steps I described earlier.
The method is as follows:
- Type ” Regedit ” in the Windows search field, then open it.
- Go to HKEY_LOCAL_MACHINE > Software.
- Continue again go to Microsoft > Windows > CurrentVersion .
- Go back to Policies > Explorer.
- Next, right-click, select New, then create a DWORD (32-bit) Value.
- Name it ” NoDriveTypeAutoRun “.
- For Value , fill in 000000FF(255) .
- Finally, click OK to finish.
Then restart if you have.
The Final Word
That’s the discussion about how to turn off AutoRun in Windows 10.
For how to reactivate it, it’s more or less similar to the steps. Just repeat, anyway. As for regedit, just delete the value.
In closing, for those who want to ask questions, you can directly send your questions via the comments column below.
I hope it is useful.