
После обновления до Windows 11 или после чистой установки системы без форматирования системного раздела HDD или SSD вы можете обнаружить папку Windows.old на диске C, занимающую несколько гигабайт. При желании её можно удалить, но делать это лучше не в проводнике, как с обычной папкой, а используя специально предназначенные для очистки диска системные инструменты.
В этой пошаговой инструкции о двух способах удалить папку Windows.old в Windows 11 — в интерфейсе «Параметров» и с помощью встроенной утилиты очистки диска.
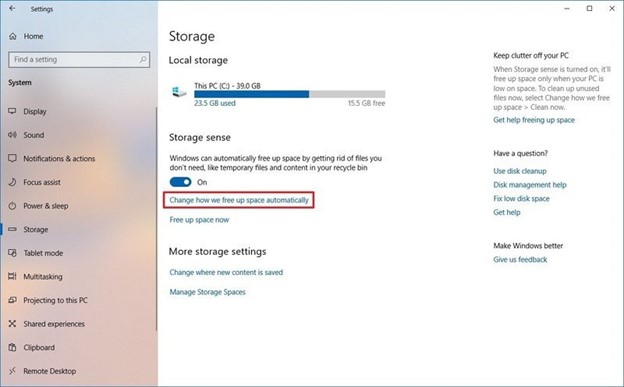
Удаление папки Windows.old в Параметрах Windows 11

Прежде чем перейти к описанию процесса удаления, несколько нюансов, касающихся папки Windows.old:
- Папка Windows.old содержит файлы предыдущей установки Windows.
- Если папка появилась после чистой установки системы без форматирования, в ней могут находиться ваши данных с рабочего стола и пользовательских папок, найти их можно во вложенной папке «Пользователи» (Users).
- При появлении папки после обновления до Windows 11 учитывайте, что после её удаления вы не сможете отменить обновление.
В Windows 11 предусмотрено два способа безопасно удалить папку Windows.old. Первый из них — использования интерфейса «Параметры». Шаги будут следующими:
- Зайдите в Параметры и в разделе «Система» откройте пункт «Память».
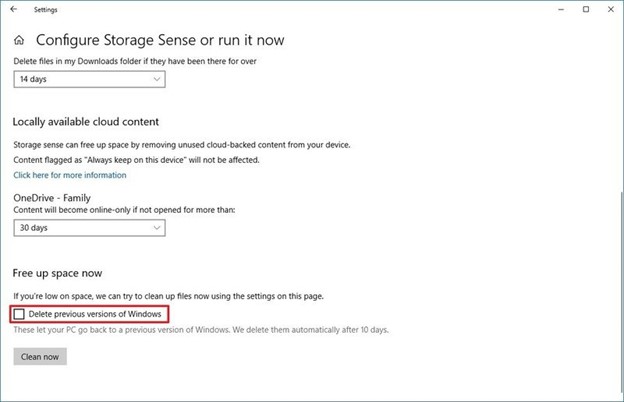
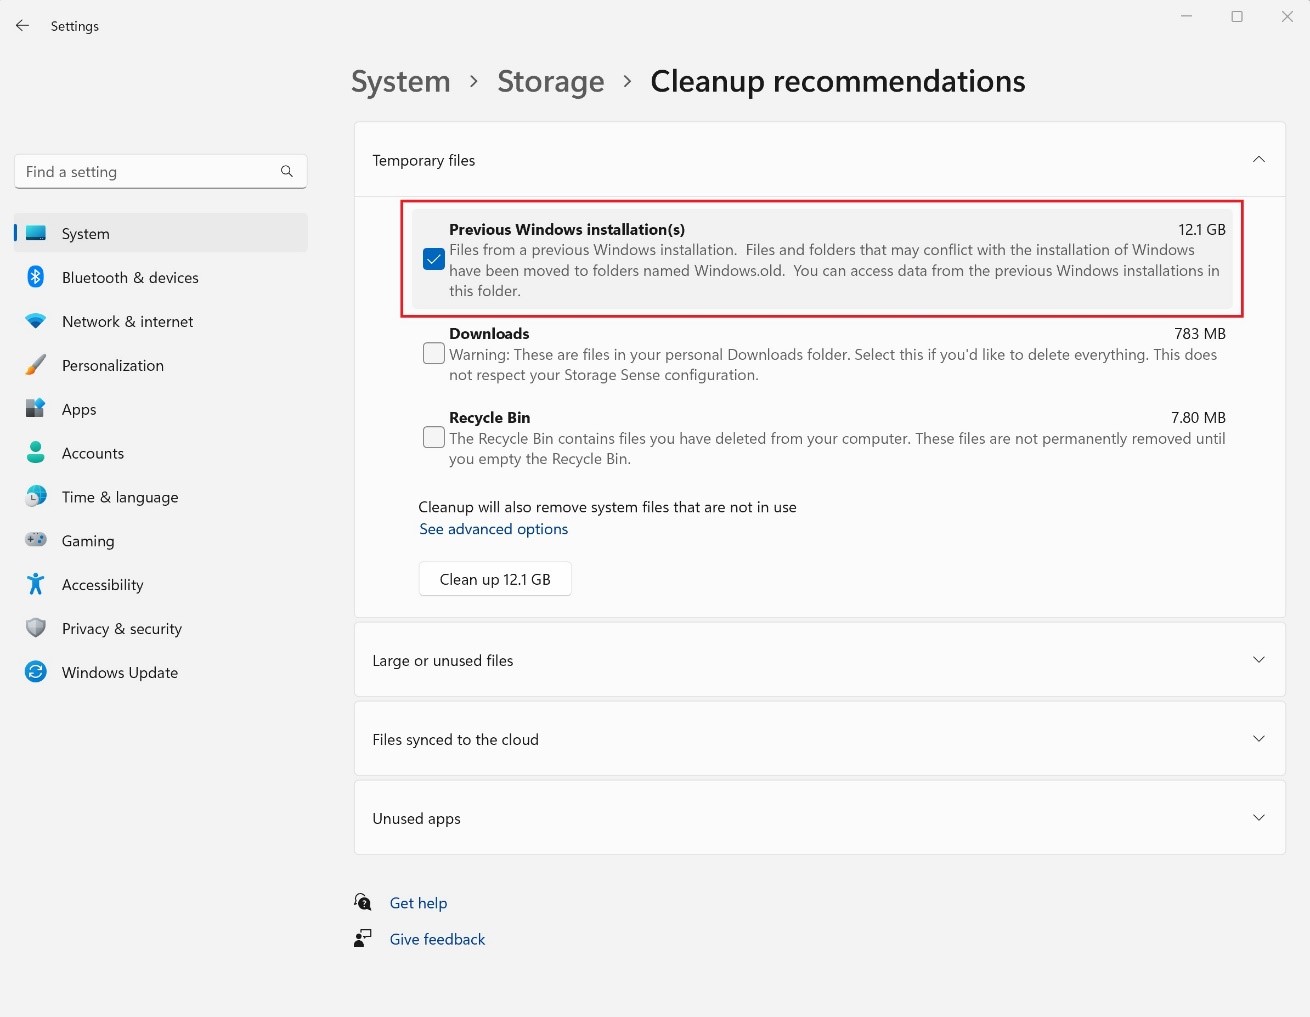
- После анализа занятого места на диске нажмите «Временные файлы».

- По завершении сканирования содержимого временных файлов в списке отобразится пункт «Предыдущие установки Windows». Отметьте его.

- Нажмите кнопку «Удалить файлы» и дождитесь завершения процесса удаления.


В результате папка будет удалена с диска C. Если вы обнаружите, что папка осталась, должно сработать простое удаление в Проводнике.
Как удалить папку Windows.old в утилите «Очистка диска»
Второй способ — использование классической утилиты «Очистка диска», потребуются права администратора на компьютере:
- Нажмите правой кнопкой мыши по кнопке «Пуск» и выберите пункт «Выполнить». Введите cleanmgr в окно «Выполнить» и нажмите Enter.
- В случае, если отобразится запрос о выборе диска для очистки, выберите диск C.
- В появившемся окне нажмите «Очистить системные файлы», может потребоваться повторить выбор диска.
- Отметьте пункт «Предыдущие установки Windows» и нажмите кнопку «Ок».


В результате будет произведено удаление папки Windows.old. В редких случаях она остается на диске (но меньшего размера) — остатки можно удалить средствами проводника.
Учитывайте, что из папки Windows.old при необходимости можно восстановить драйверы предыдущей системы и файлы пользователя, которые в ней присутствовали — это может быть полезным сделать перед удалением. Также она служит для отката системы к предыдущей версии, если после обновления что-то пошло не так. Если вас интересует очистка диска от ненужных файлов, вам может пригодиться статья со способами очистки диска средствами Windows 11.
Applies ToWindows 11 Windows 10, version 20H2, all editions Windows Server, version 20H2, all editions Windows 10, version 21H1, all editions Windows 10, version 21H2, all editions
Сводка
Папка Windows.old содержит предыдущую версию Windows на вашем устройстве. Если вы хотите удалить предыдущую версию после обновления, самый простой способ — использовать контроль памяти в приложении «Параметры». Выполните указанные ниже действия для своей версии операционной системы Windows.
Windows 10
-
Откройте Параметры.
-
Выберите Система.
-
Выберите Память.
-
В разделе Контроль памяти выберите Изменить способ автоматического освобождения места.

-
В разделе Освободить место установите флажок Удалить предыдущую версию Windows.
-
Затем нажмите кнопку Очистить сейчас.
Windows 11
-
Откройте Параметры.
-
Выберите Система.
-
Выберите Память.
-
Выберите Рекомендации по очистке.
-
Установите флажок Предыдущие установки Windows.

-
Затем нажмите кнопку Очистить, которая отображает размер файла.
Нужна дополнительная помощь?
Нужны дополнительные параметры?
Изучите преимущества подписки, просмотрите учебные курсы, узнайте, как защитить свое устройство и т. д.
Download Article
Delete your old Windows installation to quickly free up space on your hard drive
Download Article
- Using Storage Settings (Windows 10 & 11)
- Using Disk Cleanup
- Using the Command Prompt
- Video
- Q&A
|
|
|
|
If you recently upgraded to a new version of Windows, you may have noticed a huge folder called Windows.old on your hard drive. This folder contains a copy of the previous version of Windows in case you need to roll back your upgrade. Windows.old is automatically deleted 10 days after the upgrade (or 28 days for older versions), but you can delete it early if you’re running low on disk space and are 100% sure you won’t want to go back. This wikiHow article will show you 3 easy ways to remove Windows.old: Using the Storage area of your Settings, the Disk Cleanup tool, and the Command Prompt.
Things You Should Know
- On Windows 10 and 11, go to Settings > System > Storage > Temporary Files, select «Previous versions of Windows,» and click «Remove Files.»
- You can use Disk Cleanup on any version of Windows (from Windows 7 through 11) to delete your previous Windows installation.
- If you can’t delete Windows.old or have multiple Windows.old folders, you can forcefully delete them using the Command Prompt.
-

You can do this easily by clicking Settings or the gear icon in your Windows Start menu.
- On both Windows 10 and 11, Windows.old and other previous operating system files are deleted automatically 10 days after the upgrade.[1]
- You can delete Windows.old early to reclaim several gigabytes of disk space. Just keep in mind that you won’t be able to downgrade to your previous Windows version if you change your mind.
- On both Windows 10 and 11, Windows.old and other previous operating system files are deleted automatically 10 days after the upgrade.[1]
-
If you’re using Windows 11, it’ll be at the top of the left panel. On Windows 10, you’ll see the system icon in the main panel.
Advertisement
-

Once you click this option, Windows will take a few moments to analyze your hard drive(s) and display how you’re utilizing your disk space.
-

You’ll see this under your main hard drive.
-

If you’ve recently upgraded, you’ll see this option in the list.
- If you don’t see this option but still have a Windows.old folder, use this method to delete it.
- Remove the checkmarks from any other file types that you don’t want to delete. For example, if you don’t want to delete the files in your Downloads folder, remove the checkmark from the «Downloads» box.
-
You’ll see this button above the list. A confirmation pop-up will appear.
-
This removes all selected files, including the Windows.old folder that contains your previous version of Windows.


Advertisement
-
This utility will delete the Windows.old folder on any version of Windows, including Windows 7. There are a couple of different ways you can open it.
- On Windows 8, 10, and 11, you can press Windows key + S, type cleanup, and then click Disk Cleanup.
- You can also press Windows key + R, type cleanmgr, and press Enter.
- Another way is to open the Control Panel, select «System and Security», click «Administrative Tools, then select Disk Cleanup.
-
This is usually the C: drive.
-

You may be prompted for the administrator password.
-

Disk Cleanup will scan the drive again.
-
You can also check the boxes for any other types of files on the list you want to remove.
- If you don’t want to delete any other files, remove the checkmarks from other selected options now.
- If you don’t see this option but still have a Windows.old folder, see this method.
-
This deletes Windows.old and all previous operating system files from your PC. [2]


Advertisement
-

If you’ve already tried to delete Windows.old (or have multiple Windows.old files ending with different numbers) and were unsuccessful, you can use the Command Prompt to permanently delete the files.
-
To do this, type cmd into the Windows search bar, right-click Command prompt, then select Run as Administrator.
-

To do this, type takeown /F "C:\Windows.old" /A /R /D Y and press Enter.
- If your Windows.old folder is not on the C drive, replace C: with the correct drive letter.
-
To do this, type icacls "C:\Windows.old" /grant *S-1-5-32-544:F /T /C /Q and press Enter.
-
Type RD /S /Q "C:\Windows.old" and press Enter to permanently delete the folder.
-
If you have multiple Windows.old folders, run all of these commands for each of them. For example, takeown /F "C:\Windows.old.000" /A /R /D Y.


Advertisement
Add New Question
-
Question
How can I remove an old Windows?
ッRosie~Dosieッ
Community Answer
You can’t remove the old Windows system, but you can upgrade to a newer version if you wish.
Ask a Question
200 characters left
Include your email address to get a message when this question is answered.
Submit
Advertisement
Video
Thanks for submitting a tip for review!
About This Article
Thanks to all authors for creating a page that has been read 244,813 times.
Is this article up to date?
Windows.old folder gets created when you upgrade your Windows installation to a newer version of Windows operating system, when you install Windows on an existing version of Windows without formatting the drive, or when you perform a Refresh operation.
Why Windows.old folder is used?
If you have Windows.old folder under the root of your Windows 10 installed drive, it’s either because you have upgraded from Windows 7/8 to Windows 10 or performed a clean installation of Windows 10 without formatting the drive containing previous Windows installation files.
The Windows.old folder contains all files and apps from the previous Windows installation. The Windows installer uses this folder when you want to downgrade to the earlier version of Windows or when the installation of a newer version of Windows fails to complete.

Is it safe to delete the Windows.old folder?
Yes, it’s safe to delete the Windows.old folder unless you have plans to downgrade to the previous version.
Why remove the Windows.older folder?
Since the Windows.old folder contains all Windows operating system files and installed apps, it takes a significant amount of disk space. In some cases, Windows.old folder size might go up to 10 to 15 GB, depending on the total size of the previous Windows installation.
Users who have installed Windows on a smaller SSD drive or users who don’t have allocated a significant amount of disk space to the Windows installed drive might want to delete or remove Windows.old folder to gain some valuable disk space.
But Windows.old folder can’t be quickly deleted by right-clicking on it and then clicking the Delete button.
So how to delete Windows.old folder to free up disk space in Windows 10? There are a couple of ways out there to delete Windows.old folder. You can either use the native Disk Cleanup tool or use third-party free tools like CCleaner for the job.
Follow the instructions in one of the below-mentioned methods to get rid of Windows.old folder and free up GBs of disk space in Windows 10.
WARNING: Don’t delete Windows.old folder if you have plans to revert to the previous version of Windows. That is if you have upgraded your Windows 7/8 installation to Windows 10 and now planning to downgrade to Windows 7/8 again for some reason, don’t even think of deleting Windows.old folder as downgrade operation can’t be performed without the Windows.old folder.
Method 1 of 3
Delete Windows.old folder in Windows 10 using Disk Cleanup
Step 1: Open up This PC. Right-click on the drive where Windows is installed and click Properties.

Step 2: Under the General tab, click the small Disk Cleanup button to run the same. And if the Disk Cleanup button is not appearing as shown in the picture below, please refer to our Disk cleanup missing from drive properties in Windows 10 guide to restore the same.
Step 3: Once the Disk Cleanup utility shows the following dialog box, click the Clean up system files button to begin the scan.
Step 4: Finally, when you see the following dialog, look for the entry named Previous Windows installation(s) or Windows.old folder. Check Previous Windows installation files or Windows.old folder, and then click OK button to delete the Windows.old folder.
That’s all!
The Windows.old folder should no longer appear under the root of Windows installed drive.
Method 2 of 3
Removing Windows.old folder using CCleaner
If the Disk Cleanup tool isn’t listing Windows.old folder, you could take the help of popular CCleaner software to delete it.
Step 1: Download and install CCleaner software if it is not already installed on your PC. You can download the latest version of CCleaner for Windows 10 from here.
Step 2: Run CCleaner, click on the Cleaner tile in the sidebar, and uncheck all options except Old Windows Installation on the right side under Windows and Applications if you are interested in deleting only Windows.old folder.

Step 3: Click the Analyze button to begin the scan. Once done you’ll see Old Windows Installation and its size on the right-side. Click Run cleaner button to delete the Windows.old folder from your Windows 10 PC.

That’s it!
Method 3 of 3
Delete Windows.old folder in Windows 10 using Command Prompt
Step 1: Open elevated Command Prompt. To do so, type CMD in the taskbar search box or Start search box and then simultaneously press Ctrl+Shift+Enter keys to open Command Prompt as administrator. Click the Yes button when you see the UAC dialog.
Step 2: In the Command Prompt, paste the following command and then press Enter key to delete Windows.old folder.
RD /S /Q %SystemDrive%\windows.old

If you’re getting any error, make sure that you launched the Command Prompt as administrator. Good luck!
Очистите больше 20 ГБ, если вам не нужна предыдущая версия системы.
После установки или обновления в разделе жёсткого диска с Windows появится папка Windows.Old. В ней содержатся файлы предыдущей системы, а удалить её стандартными способами нельзя. Но если вам нужно срочно освободить место, то есть методы, которые помогут избавиться от этой папки.
Удаление на Windows 10
Большое апрельское обновление принесло Windows 10 много возможностей, среди которых есть и удобный способ удаления папки Windows.Old. Это стало возможным благодаря усовершенствованию функции очистки диска, которую теперь можно выполнять в ручном режиме.
После удаления папки Windows.Old автоматический откат к предыдущей версии системы станет невозможным.
Откройте меню «Пуск» и перейдите в «Параметры». Можно ускорить переход, нажав сочетание клавиш Win + I. Зайдите в раздел «Система» и выберите «Память устройства». В поле «Контроль память» нажмите «Освободить место сейчас».

Найдите и отметьте пункт «Предыдущие установки Windows». Пролистайте окно вверх и нажмите «Удалить файлы». Дождитесь завершения удаления временных файлов, в числе которых будет содержимое папки Windows.Old.

Если вы не ставили апрельское обновление «десятки», то этот способ не подойдёт. Чтобы удалить папку, используйте метод, который работал на Windows 7, 8 и 8.1. Он продолжает работать и после установки апрельского обновления, то есть является универсальным.
Удаление на Windows 7, 8 и 8.1
Нажмите на клавиатуре сочетание клавиш Win + R, чтобы вызвать окно «Выполнить». Введите cleanmgr и нажмите Enter. Выберите раздел, на который установлена Windows. Можно использовать и другой способ: открыть «Компьютер», щёлкнуть правой кнопкой по разделу с Windows, открыть «Свойства» и на вкладке «Общие» нажать «Очистить диск».

Дождитесь полной загрузки диалогового окна и нажмите «Очистить системные файлы».
Отметьте пункт «Предыдущие установки» и кликните «Ок». Если после такого удаления на диске останется пустая папка Windows.Old, избавьтесь от неё через командную строку. Запустите консоль от имени администратора.

Выполните команду:
rd /s /q c:windows.old
Буква С в синтаксисе команды означает диск, на котором хранится папка Windows.Old. У вас она может быть другой: например, D или G. После выполнения команды пустой каталог будет удалён.
Windows.Old — системная папка. Но на компьютере могут быть другие каталоги, которые не удаляются стандартными средствами. Их можно удалить и на Windows, и на macOS, так что если вам потребуется освободить место на диске, то это не станет непреодолимой сложностью.