
Latest update: May 26, 2023
ID: 13341
How to disable Windows Defender in Windows 10
- In the lower left corner, click Start → Settings.
- Select Update & security.

- Go to the Windows Security section and click Open Windows Security.

- Go to the Virus & threat protection section, expand the Windows Defender Antivirus options and disable Periodic scanning.

Windows Defender will be disabled on Windows 10.
How to disable Windows Defender scheduled scan in Windows 11
- Click the search icon in the Windows panel.
- Type «task scheduler» and click Task Scheduler in search results.

- Click Task Scheduler Library → Microsoft → Windows.

- Open the Windows Defender folder.
- Right-click Windows Defender Scheduled Scan and select Disable.

Windows Defender Scheduled Scan will be disabled.
How to remove Windows Defender
In Windows 10
You can delete the application using standard Windows tools. See the instructions on the Microsoft support website in the To uninstall Defender section.
If you cannot remove the application using the standard tools, use the Microsoft tool for solving installation and removal issues.
If the tool did not help, remove the application using the mseremoval.bat file:
- Download and unpack the mseremoval.zip archive.
- Right-click the mseremoval.bat file and select Run as administrator. Enter the login and password for the administrator account.
The command line window will appear. - When the necessary actions are completed, the command line window will close. After that, you can delete the mseremoval.bat file.
Windows Defender will be removed.
In Windows 11
You can disable Windows Defender in the real-time mode. For instructions, see Microsoft support site.
Даже полезные программы иногда мешают работе. Например, встроенный в операционную систему защитник периодически блокирует установку стороннего софта или замедляет устройство. В этот момент приходится выяснять, как отключить антивирус Windows. Убрать его возможно как на время, так и насовсем.
Зачем отключать
В Windows 10 и 11
В Windows 7
После отключения
Чек-лист
Зачем отключать
В Windows 10 и 11
В Windows 7
После отключения
Чек-лист

Разберемся, как отключить антивирус в разных версиях Windows. Выясним, зачем иногда требуется временная деактивация встроенной защиты, какие при этом возникают риски, и что обязательно нужно сделать после отключения.
Стоит ли отключать Windows Defender и когда это может понадобиться
Windows Defender запускается в фоновом режиме и, подобно другим антивирусам, защищает компьютер от вредоносных программ. Отключая защиту, вы оставляете компьютер уязвимым, однако иногда приходится пойти на риск.
Отключение может понадобиться в нескольких случаях.
-
При установке определенных программ или игр, которые ошибочно распознаются как угрозы.
-
Для тестирования программного обеспечения или системных настроек.
-
При переходе на сторонний антивирус — например, Kaspersky, Avast и другие.
-
Когда Defender потребляет слишком много ресурсов и тормозит работу операционной системы.
Помните: не стоит надолго оставлять компьютер совсем без защиты. Если выключили «Защитника Windows», будьте особенно осторожны при загрузке файлов и серфинге в интернете, чтобы не заразить систему вредоносным ПО.
Как отключить защиту Windows 10 и 11
Современные версии операционной системы позволяют временно деактивировать защитник. Также существуют методы его полного отключения. Пошагово разберем все варианты.
Через «Параметры»
1. Откройте «Параметры» с помощью сочетания клавиш Win + I, выберите «Конфиденциальность и защита», далее «Безопасность Windows».

2. Откройте раздел «Защита от вирусов и угроз», после чего переходите в настройки.


3. Перетащите ползунок защиты в режиме реального времени в положение «Выключено».

Алгоритм временно отключает защиту. Она включится автоматически после перезагрузки. Можно сразу активировать Defender. Для этого достаточно вернуть ползунок в положение «Включено».
Учтите, что уже запланированную проверку антивирус выполнит, но новые файлы не тронет до следующей диагностики.
Через реестр
Деактивировать программу насовсем получится через реестр. Схема тоже несложная.
1. Чтобы попасть в реестр, нажмите Win + R, введите команду regedit, затем задайте путь или пройдите его вручную: HKEY_LOCAL_MACHINE\SOFTWARE\Policies\Microsoft\Windows Defender.

2. Щелкните мышкой справа, чтобы создать параметр DWORD.

3. Дайте ему имя DisableAntiSpyware.
4. В графе «Значение» поставьте единицу. Отправьте компьютер на перезагрузку.

5. Чтобы вновь активировать защиту, поставьте нулевое значение или лишите параметр имени.
Важно. Этот способ работает только в старых версиях платформы безопасности, выпущенных до августа 2021 года.
Если у вас установлена платформа антивируса версии 4.18.2108.4 или новее (а это практически все системы на Windows 10 версии 1903+ и Windows 11), то параметр DisableAntiSpyware больше не действует. Его просто игнорирует система.
Это связано с тем, что Microsoft включила функцию Tamper Protection (защита от несанкционированных изменений). Она блокирует любые попытки отключить встроенную защиту через реестр или сторонние программы, чтобы злоумышленники не могли сделать это без ведома пользователя.
Чтобы проверить свою версию платформы безопасности, откройте «Центр безопасности Windows» → «Параметры» → «О программе». Найдите строку «Платформа антивируса».
Если версия 4.18.2108.4 и выше — способ с реестром работать не будет. Отключить Defender можно в настройках, как мы описывали выше, или при установке другого антивируса. Чтобы избежать конфликта ПО, встроенный защитник Windows отключится автоматически.

Через редактор групповой политики
Профессиональные и корпоративные версии Windows 10 и 11 оснащены редактором групповой политики. Он тоже позволяет избавиться от срабатывания защиты навсегда.
1. Зажмите Win + R, используйте команду gpedit.msc.
2. По папкам проделайте такой путь: «Конфигурация компьютера» → «Административные шаблоны» → «Компоненты Windows» → «Антивирусная программа».

3. Откройте параметр «Выключить антивирусную программу» и выберите опцию «Отключено».

4. В папке «Антивирусная программа» также есть раздел «Защита в режиме реального времени». Деактивируйте все элементы.
5. Антивирус отключится после перезагрузки. Включить его получится, если возвратить параметры в прежнее положение.
Как отключить защиту Windows 7
В «семерке» процесс немного другой, но выключить встроенный антивирус тоже несложно.
1. Откройте «Панель управления» и перейдите в блок «Защитник Windows».
2. Нажмите «Программы» → «Параметры» → «Администратор».
3. Снимите галочку с опции «Использовать эту программу» и сохраните изменения.
Что делать после отключения встроенного антивируса «Защитник Windows»
После выполнения задач, которым мешал Defender, не забывайте включать его снова. В процессе работы с отключенным защитником придерживайтесь мер безопасности.
-
Установите альтернативный антивирус или хотя бы блокировщик рекламы, если у вас его еще нет.
-
Ограничьте время работы без защиты — оставлять так ПК насовсем не стоит.
-
Не посещайте сомнительные сайты, не загружайте и не открывайте подозрительные файлы.
-
Пользуйтесь только проверенными сетями Wi-Fi.
-
Проведите полное сканирование системы, когда закончите и включите встроенный антивирус снова.
Если антивирус каждый раз ложно блокирует определенные программы или файлы, а отключать его не хочется, некоторые папки можно внести в исключения Defender. Но не злоупотребляйте этой функцией, добавляйте только проверенные объекты.
Чек-лист: как отключить антивирус Windows Defender
Выключать антивирус не рекомендуется, но если защита блокирует программы или затрудняет работу, это допустимо.
-
Снимите защиту в реальном времени. Вам нужны параметры «Безопасность Windows» → «Защита от вирусов» → «Управление настройками».
-
Для Windows 7 — снимите галочку «Использовать эту программу» в параметрах защитника.
-
Соблюдайте осторожность и не блокируйте антивирус надолго.
-
Установите альтернативную антивирусную программу.
-
После повторной активации защиты просканируйте систему на вирусы.
❌️ Defender Remover / Defender Disabler

❓️ What does the app do?
This application removes / disables Windows Defender, including the Windows Security App, Windows Virtualization-Based Security (VBS), Windows SmartScreen, Windows Security Services, Windows Web-Threat Service, Windows File Virtualization (UAC), Microsoft Defender App Guard, Microsoft Driver Block List, System Mitigations and the Windows Defender page in the Settings App on Windows 10 or later.
❓️ What components are removing?
Removing Security Components
This script removes/disables following security components:
    - support for Windows Security Center including Windows Security Center Service (wscsvc), Windows Security Service (SgrmBroker, Sgrm Drivers) which are needed to run Windows Security App.
    - virtualization support.
        - Hypervisor startup (this fixes disablation of Virtualization Based Security, this will auto enable if you use Hyper-V and/or WSL (Windows Subsystem for Linux), WSA (Windows Subsystem for Android))
        - LUA (disables File Virtualization and User Account Control, which will run all apps as administrator priviliges (also fixes old app errors))
        - Exploit Guard (something about Exploits)
        - Windows Smart Control
        - Tamper Protection (for Windows 11 21H2 or earlier)
    - SecHealthUI (Windows Security UWP App)
    - SmartScreen
    - Pluton Support and Pluton Services Support
    - System Mitigations
      - "Services Mitigations" (search on admx.help for more informations, its policy)
      - Spectre and Meltdown Mitigation (for get +30% performance on old Intel CPUs)
    - Windows Security Section from Settings App.
Removing Antivirus Components
This script forcily removes following antivirus components:
  - Windows Defender Definition Update List (this will disable updating definitions of Defender because its removed)
  - Windows Defender SpyNet Telemetry
  - Antivirus Service
  - Windows Defender Antivirus filter and windows defender rootkit scanner drivers
  - Antivirus Scanning Tasks
  - Shell Associations (Context Menu)
  - Hides Antivirus Protection section from Windows Security App.
📃 Instructions
Note
A system restore point is recommended before you run the script. (if you don’t know what are you doing)
- Download the packed script from Releases
- Run the «.exe» as administrator
- Follow the instructions displayed
OR
you can use git
git clone https://github.com/ionuttbara/windows-defender-remover.git
cd windows-defender-remover
Script_Run.bat
OR
you can use download entire source code
- Download the source code from Releases.
- Choose the file Source Code(.zip) from last version and download it.
- Unarchive the file into a folder and run the Script_Run.bat.
You can file an issue if you experience any problems.
📃 Automation of the script
You can remove Defender with arguments.
Removing
# Removal
Defender.Remover.exe /r <# or /R #>
Disable or Remove Windows Defender Application Guard Policies (advanced)
If you have any problems when opening an app (extremely rare) and get the message «The app can not run because Device Guard» or «Windows Defender Application Guard Blocked this app», you have to remove 4 files with the same name, from different locations.
- In EFI Partition
Remove-Item -LiteralPath "$((Get-Partition | ? IsSystem).AccessPaths[0])Microsoft\Boot\WiSiPolicy.p7b"
- In Code Integrity Folder
Remove-Item -LiteralPath "$env:windir\System32\CodeIntegrity\WiSiPolicy.p7b"
- In Windows Folder
Remove-Item -LiteralPath "$env:windir\Boot\EFI\wisipolicy.p7b"
- In WinSxS Folder
Remove-Item -Path "$env:windir\WinSxS" -Include *winsipolicy.p7b* -Recurse
Creating an ISO with Windows Defender and Services disabled
You can create an ISO with Windoows Defender and Security Services Disabled. It’s easy, so this is a fiie which it can helps you.
Here are the rules:
- Mount the ISO and extract it into location.
- Open the sources folder and create the $OEM$ folder. (this is needed to run the DefenderRemover part in OOBE).
- Open the $OEM$ folder and create the folder with $$ name.
- Open the $$ folder and create the folder with Panther name.
- Open the Panther folder.
The path it shown like to
*%location of extracted ISO%\sources$OEM$$$\Panther* - Download the unnatended.xml file from repo in ISO_Maker folder and put it in Panther folder.
- Save this as bootable ISO. (for now the script can’t do this automaticly, but it will do in next version).
❓ Frequently Asked Questions
⭕ How to remove Windows Security Center / Windows SecurityApp from PC without downloading Script?
Paste this code into a powershell file and after Run as Administrator.
$remove_appx = @("SecHealthUI"); $provisioned = get-appxprovisionedpackage -online; $appxpackage = get-appxpackage -allusers; $eol = @()
$store = 'HKLM:\SOFTWARE\Microsoft\Windows\CurrentVersion\Appx\AppxAllUserStore'
$users = @('S-1-5-18'); if (test-path $store) {$users += $((dir $store -ea 0 |where {$_ -like '*S-1-5-21*'}).PSChildName)}
foreach ($choice in $remove_appx) { if ('' -eq $choice.Trim()) {continue}
  foreach ($appx in $($provisioned |where {$_.PackageName -like "*$choice*"})) {
    $next = !1; foreach ($no in $skip) {if ($appx.PackageName -like "*$no*") {$next = !0}} ; if ($next) {continue}
    $PackageName = $appx.PackageName; $PackageFamilyName = ($appxpackage |where {$_.Name -eq $appx.DisplayName}).PackageFamilyName
    ni "$store\Deprovisioned\$PackageFamilyName" -force >''; $PackageFamilyName
    foreach ($sid in $users) {ni "$store\EndOfLife\$sid\$PackageName" -force >''} ; $eol += $PackageName
    dism /online /set-nonremovableapppolicy /packagefamily:$PackageFamilyName /nonremovable:0 >''
    remove-appxprovisionedpackage -packagename $PackageName -online -allusers >''
  }
  foreach ($appx in $($appxpackage |where {$_.PackageFullName -like "*$choice*"})) {
    $next = !1; foreach ($no in $skip) {if ($appx.PackageFullName -like "*$no*") {$next = !0}} ; if ($next) {continue}
    $PackageFullName = $appx.PackageFullName;
    ni "$store\Deprovisioned\$appx.PackageFamilyName" -force >''; $PackageFullName
    foreach ($sid in $users) {ni "$store\EndOfLife\$sid\$PackageFullName" -force >''} ; $eol += $PackageFullName
    dism /online /set-nonremovableapppolicy /packagefamily:$PackageFamilyName /nonremovable:0 >''
    remove-appxpackage -package $PackageFullName -allusers >''
  }
}
⭕ Why is the downloaded executable being flagged as a virus?
That is a false positive.
Some security apps flag this app as a virus because of the way the «.exe» files are created. Download with git or source code .zip will indicate virus-free.
Starting with Defender 12.6.x , some versions are considered as virus, some are not (its a bug from me, so do not file for this).
⭕ Why is the patch not working when Windows is updated?
Windows Update includes a Intelligence Update which blocks certain actions and modifies Windows Defender/Security policies.
If the script is not working for you, check if you have the Windows Security Intelligence Update installed. If you do, disable tamper protection, and re-run the script.
⭕ How to use the package remover without downloading the executable from the release?
Run the desired «.bat» file from cmd with PowerRun (by dragging to the executable). You must reboot for the changes to take effect.
⭕ How to disable VBS if the removal script does not work
Disable with this command and reboot.
bcdedit /set hypervisorlaunchtype off
Если понадобилось удалить встроенный защитник Windows, например он удаляет кряк и не дает активировать систему или просто хотим установить свой любимый антивирус которому мы доверяем больше и лишних процессов нагружающих систему нам не нужно.
Что нам даст удаление Защитника Windows? Удалив защитник мы освобождаем системные ресурсы, решим вопрос с удалением фалов без спроса, а также избавимся от “дырявого” антивируса, главное не забыть заменить его на надежный.
И так удалив Windows Defender Мы:
- – Ускорим работу компьютера так как освободим ресурсы процессора и оперативную память, это особенно актуально для старых ПК да и новым не помешает.
- – Решим вопрос с активаторами системы и удалением файлами, которые перестанут бесследно пропадать без вашего ведома.
- – Освободим примерно 600 Мб., дискового пространства, немного, но возможно для кого-то и это хорошо.
Назвать защитника надежным нельзя, особенно вспоминая случай заражения хостинга сайта вредоносом который был замечен защитой самого хостинга. А чем был занят антивирус Windows в это время, наверное, отсылал отчеты в Microsoft.
Удалить защитник windows средствами самой системы не получиться, так как его удаление не предполагается. Для удаления защитника воспользуемся программой от стороннего разработчика.
Ссылка на официальный сайт утилиты вот тут.
Перед началом удаления нам нужно отключить функцию “Защита от подделки”.
Кликнув по защитнику, попадаем в главное окно “Кабинет”, жмем по иконке со щитом “Защита от вирусов и угроз”.

Пункт “Параметры защиты от вирусов и угроз”, под ним – Управление настройками, кликаем по нему.

Четвертый пункта “Защита от подделки”, перетягиваем ползунок в положение откл.

Соглашаемся с предупреждением системы безопасности.

Все готово, теперь можно приступать к удалению защитника.

Распаковываем наш архив прямо на рабочий стол.

Нам нужно запустить файл DefenderKiller и нажать Да когда система безопасности попросит подтвердить действие.

Программа запустилась, интерфейс у нее довольно простой, нам нужно первое действие, поэтому жмем на клавиатуре 1 и Enter.

Программа проверила отключена ли защита от подделок, и предложила сделать резервную копию файлов антивируса на случай если мы передумаем. Нужна ли копия для восстановления решаем для себя сами.

Процесс запущен, программа удаляет службы, драйвера и папки, ждем завершения процесса удаления windows defender и перезагружаем систему.


Защитник может не удалиться с первого раза, утилита нам об этом сообщит и предложит сделать перезагрузку системы и повторить, поэтому жмем Нет на окне предупреждения и перезагружаемся.

После перезагрузки и повторного запуска утилиты мы видим что все прошло успешно, программа показывает список удаленных служб и папок защитника. Теперь можно установить свой любимый антивирус.

Как видите процесс удаления защитника windows довольно прост и не занимает много времени к тому же все изменения при наличии бэкапа можно откатить обратно. На этом все. Всем успехов!
When it comes to built-in antivirus, Microsoft’s Defender has received mixed reviews. Many users would rather turn to third-party solutions for protection. If you’re one of these people and would like to know how to delete Windows 10 Defender from your computer, you’ve come to the right place.
Unfortunately, Windows doesn’t provide the option to directly uninstall the program. On the plus side, it’s possible to deactivate it using a workaround. In this article, we’ll show you the easiest ways to disable Windows 10 Defender, both permanently and temporarily.
How to Completely Remove Windows 10 Defender?
Last year, Microsoft issued an upgraded version of their built-in, anti-malware protection – the Windows 10 Defender. They resolved some of the safety issues and improved its features.
However, compared to some third-party antivirus programs such as Bitdefender or McAfee, it does come up short. The lack of consistent updates and a subpar interface make it more vulnerable to malware files.
Another thing users find off-putting is the absence of tools such as private networks, identity theft protection, and password manager. That’s mainly why people choose to delete the antivirus from their PC.
Sadly, it’s not possible to completely remove Windows 10 Defender since it’s integrated into the operating system. If you try to uninstall it like any other program, it will just pop up again. The alternative is to permanently or temporarily disable it.
How to Permanently Disable Windows Defender?
If you own Windows 10 Pro or Enterprise, you can use Group Policy to permanently disable Microsoft Defender. There are two things you need to do:
- Go to Start.

- Look for “Windows Security.”
- Go to “Virus and threat protection.”
- Find the “Manage settings” option and click on it.
- Click on the slider to turn off “Tamper Protection.”
After you’ve finished, you can proceed to round two:
- Go to Start.
- Type “gpedit.msc” into Search.

- Click on the first result to access “Local Group Policy.”
- Open the following in this order: Configuration > Administrative Templates > Windows Components > Microsoft Defender Antivirus.
- Double-tap on the “Turn off Microsoft Defender Antivirus.”

- Click on the circle next to the word “Enable.”

- Select the “Apply” button, and then click on “OK.”
- Go back to Start to restart the computer.


After restarting your computer, Windows 10 Defender will be permanently disabled. The icon can sometimes linger on your Taskbar, but that doesn’t mean the process wasn’t successful. It actually refers to the Windows Security app, not the antivirus itself.
If you use Windows 10 Home, then you won’t have the Group Policy feature on your PC. However, you can permanently disable Windows 10 Defender through Windows Registry. Here’s how:
- Open Start.

- Write regedit.exe then, push “Enter.”
- Browse the key below:
HKEY_LOCAL_MACHINE\SOFTWARE\Policies\Microsoft\Windows Defender
- If the option to “Disable Anti-Spyware” appears, double-click on it. If not, continue.
- Right-click the Windows Defender.
- Go to New > DWORD (32-bit) Value and rename it as “Disable Anti-Spyware.”

- Program the value to 1.


None of this is irreversible, and you can always choose to restore Windows 10 Defender by deleting the key you created.
How to Disable Antivirus on Windows 10 Computer Easily?
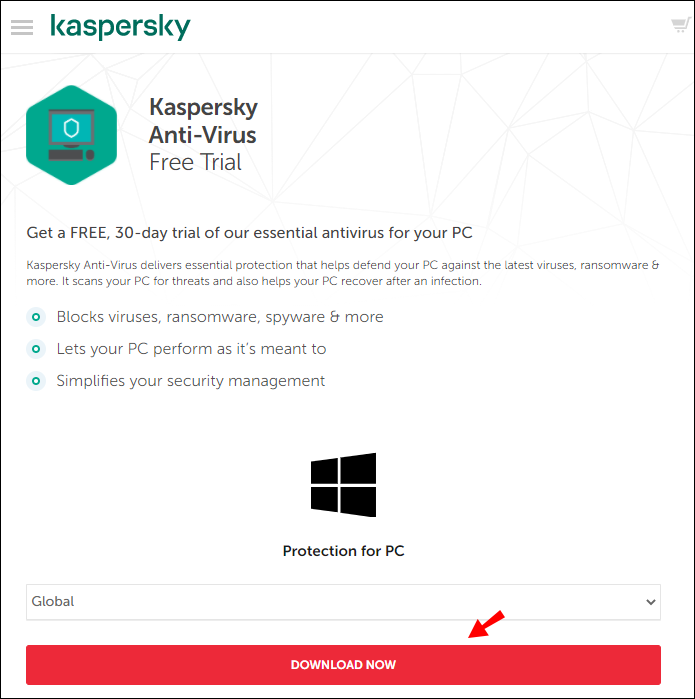
Probably the quickest and easiest way to disable the antivirus on Windows 10 is through a third-party solution. When you install a different anti-malware program, the built-in protection becomes redundant and is turned off automatically. Here’s how you can download antivirus protection to your computer:
- Find your chosen antivirus website. Kaspersky, Bitdefender, and Norton are the most common alternatives.
- Tap the “Download” button.

- A file will appear somewhere on the screen. Double-tap to proceed.

- Click “Agree” to begin the installation.

- Lastly, tap “Install.”
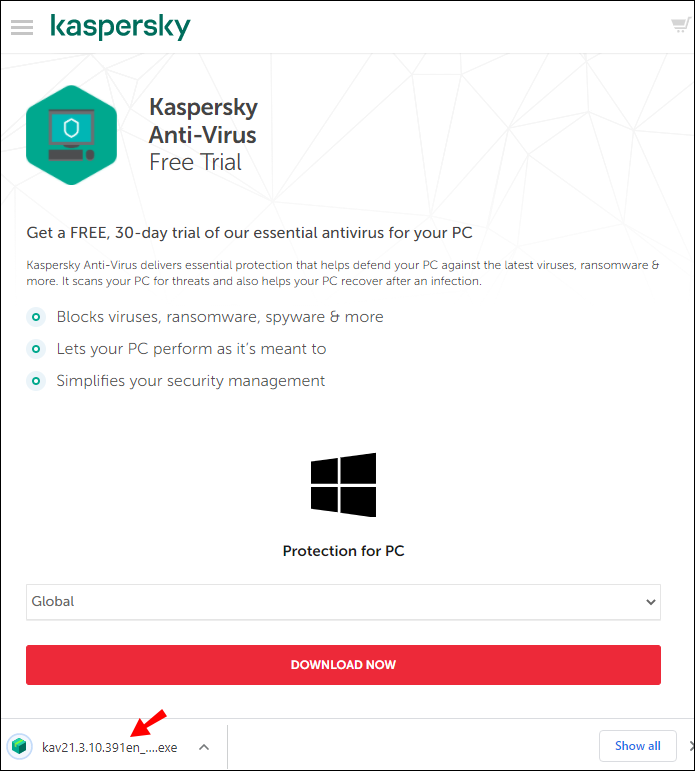


Once you’re done installing your new antivirus program, the Windows 10 Defender will be automatically disabled.
Every time the antivirus scans your computer for potential threats, it ends up saving that data on its Protection History page. That means it provides a detailed overview of every action taken to resolve security issues.
Generally, Windows Defender is programmed to automatically clear the scan log after a certain amount of time. It’s usually set to remove items from the folder in 30 days, but you can choose a different value.
You can also do it manually. Here’s how to delete Windows 10 Defender history from your local drive:
- Hold “Windows key + R” on your keyboard.
- Copy the link below and paste it in the Run dialog:
C:\ProgramData\Microsoft\Windows Defender\Scans\History - Click “Enter” and then “Continue.”
- A “Service” folder will appear. Right-click on it and choose to “Delete.”

- Leave File Explorer after you delete the folder.
- Go to Windows Security > Virus and Threat Protection > Manage Settings.

- Tap the button to turn it off, and then once again to turn on “Cloud-delivered Protection.”


The Protection History page is now cleared from your local drive. There’s another way to do it, using Windows Event Viewer:
- Initiate Run by holding “Windows Key + R.”
- Write “eventvwr” in the dialog to open Windows Event Viewer.
- Select “Applications and Services Logs” written on the left-hand side, just under “Event Viewer (Local).”

- Tap on “Windows.”
- Scroll to find Windows 10 Defender on the middle pane. Right-click to open it.
- Two options will appear. Right-click on “Operational” first, and then “Open.”
- Find Windows Defender on the list of logs.

- Click on “Menu” and find the option to “Clear Log.”

- You can now choose to “Clear” or “Save and Clear.”


How to Delete Quarantined Files in Windows Defender?
When a potential threat is detected, the antivirus program usually deletes the corrupted file irreversibly. However, sometimes the scan results are unclear, so it puts the file “in quarantine” Instead. Therefore, it can still be found on your drive, in case it turns out to be harmless.
Quarantined files are a solution to the problem of anti-malware protection accidentally removing important items from your computer. You can fix whatever’s wrong and then restore the data safely.
After you’ve deemed the files unnecessary, you can program Windows to permanently eliminate them. Here’s how to delete quarantined files in Windows Defender using Group Policy:
- Open Run by pressing “Windows Key + R.”
- Write “gpedit.msc” to locate the Local Group Policy Editor.

- Click on these in the following order: Computer Configuration > Administrative Template > Windows Components > Windows Defender Antivirus > Quarantine.

- In the big box on the right-hand side, you’ll find the option to “Configure Removal of Items from Quarantine Folder.” Double-click on that.

- Choose “Enable.”
- Choose the amount of time the files will be quarantined before being deleted (e.g. 14 days).
- Press “Apply,” then “OK.”


You have now programmed Windows 10 Defender to automatically delete quarantined files after a certain number of days. If you don’t have Group Policy, you can also use Register on older versions of Windows 10:
- Hold “Windows Key + R” to open Run.
- Write “regedit” to start Registry.
- Browse the link below:
HKEY_LOCAL_MACHINE\SOFTWARE\Policies\Microsoft\Windows Defender
- The Windows Defender folder will appear. Right-click on it.
- Choose “New” and press “Key.”

- Rename the key into “Quarantine.”
- Right-click on the renamed folder and press “New.”

- A list of values will appear. Choose the DWORD (32-bit) Value.

- Double-click that key. Under “Base” choose “Decimal.”
- Under “Value Data,” determine the amount of time files are kept in quarantine before removal.

- Press “OK” to finish.


As you can tell, it’s a little tricky to delete quarantined files using Registry. Make sure to follow all the steps accordingly so as not to cause damage to your PC. It might not be a bad idea to do a backup before trying this.
Additional FAQs
1. How Do You Turn Off Windows Defender Temporarily?
In case you’re still on the fence about Windows 10 Defender, you can choose to temporarily disable it. That way you can try out other forms of protection, and decide what works for you.
There are also cases where the antivirus is getting in the way of certain upgrades or software installation. If Windows 10 Defender is merely preventing you from downloading an app, it doesn’t make sense to permanently disable it. Especially if you don’t have a third-party antivirus program.
The alternative is to shut it down until you complete the installation. You can learn how to temporarily turn off Windows Defender by using Windows Security:
1. Go to Start.
2. Find Windows Security and open the app.

3. Go to ‘Virus and Threat Protection.”
4. Find the option to “Manage Settings.”
5. Turn off “Real-time Protection.”
Once you’re done, you can make any changes to your PC. You don’t have to turn it back on manually. Since Windows 10 Defender is temporarily disabled, it will automatically turn on the next time you start your computer.
2. How Do I Turn On Windows Defender in Windows 10?
If you would like to use the built-in protection, you can turn on Defender in a few steps. This is meant for users who have the Group Policy feature on their PC.
1. Open Start.
2. Write “group policy” in the Search bar. Find “Edit Group Policy” in the results to open The Local Group Policy Editor.
3. Go to Computer Configuration > Administrative Templates > Windows Components > Windows Defender Antivirus.
4. Find “Turn off Windows Defender Antivirus” on the list.

5. Choose the option to “Disable,” or “Not Configured.”

6. Click “Apply,” then “OK.”
You can also strengthen the anti-malware by enabling Real-time and Cloud-delivered protection. Here’s how you do it:
1. Open Start.

2. Type in “Windows Security” in Search.
3. Go to “Virus and Protection.”
4. Choose the option to “Manage Settings.”
5. Find the sliders for “Real-time protection” and “Cloud-delivered protection.” Click to turn them on.
There are cases when these options are hidden. You can still activate the features via Group Policy:
1. Go to Start.
2. Write “group policy” in the Search bar. Go to “Edit Group Policy” to open the Local Group Policy Editor.
3. Click the following Computer Configurations > Administrative Templates > Windows Components > Windows Security > Virus and Threat Protection.
4. Choose the option to “Hide the Virus and Threat Protection Area.”

5. Click “Disabled.”

6. Select “Apply”, then “OK.”
3. Is it OK to Delete Windows Defender?
Since it’s a built-in program, you might be thinking that disabling Windows 10 Defender will cause harm to your PC. This is not the case. As we’ve already established, you can’t actually delete it completely. You can merely turn it off, which is completely harmless.
That being said, there are a few things that can go wrong when trying to permanently disable Windows 10 Defender. Especially when you’re using Registry. However, you just need to be careful about following the required steps and back up important files.
It’s also not a good idea to disable Windows 10 Defender without downloading a different, third-party antivirus program. As lackluster as you may view it, Windows 10 Defender still acts as a decent anti-malware protection.
Keep Your Guard Up
When it comes to your PC, it’s always a good idea to keep your guard up. While Windows 10 Defender is a solid built-in antivirus, it has its shortcomings. There are other accessible, cost-free solutions with better features.
While you can’t completely remove it from your computer, you can manage to deactivate it temporarily or permanently. If you’re careful about the process, you won’t cause any damage to your system.
Do you have experience with Windows 10 Defender? How do you rank it as anti-malware protection? Comment below and tell us what antivirus software you prefer.