
Все способы:
- Вариант 1: Удаление Grub в MBR
- Вариант 2: Удаление Grub в UEFI
- Способ 1: Сторонние программы
- Способ 2: «Командная строка»
- Вопросы и ответы: 5
Вариант 1: Удаление Grub в MBR
К удалению линуксового загрузчика Grub обычно приходится прибегать после удаления раздела с операционной системой Linux, установленной рядом с Windows 10. Если на жестком диске используется таблица разделов MBR, для удаления загрузчика Grub можно воспользоваться «Командной строкой» в WinPE.
- Загрузите компьютер с установочной флешки Windows, а когда на экране появится окно мастера-установщика, нажмите комбинацию клавиш Shift + F10, чтобы вызвать «Командную строку».
- Выполните в открывшейся консоли одну за другой команды
bootrec /fixbootиbootec /fixmbr. - Закройте «Командную строку», выйдите из программы-установщика и загрузите компьютер в обычном режиме.

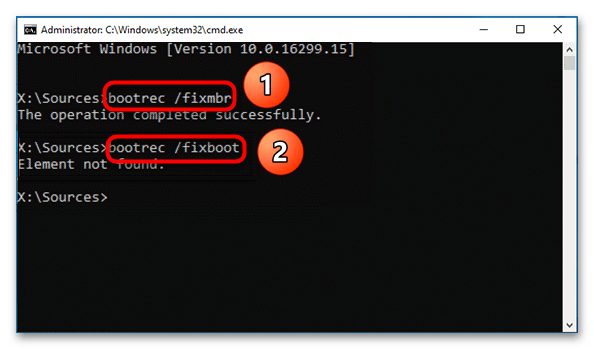
Чтобы проверить корректность удаления линуксового загрузчика, перезагрузите Windows 10.
Вариант 2: Удаление Grub в UEFI
Процедура удаление загрузчика Grub на компьютере с жестким диском GPT и на базе UEFI немного отличается и имеет свои особенности.
Способ 1: Сторонние программы
Проще всего избавиться от загрузочной записи второй операционной системы с помощью уже упомянутой бесплатной утилиты Bootice.
- Скачав и запустив утилиту, переключитесь на вкладку «UEFI» и нажмите кнопку «Edit Boot entries».
- В открывшемся окне выделите загрузчик Grub и нажмите кнопку «Del». Как правило, он имеет название второй операционной системы Linux и располагается в самом верху списка.
- Закройте окно утилиты и перезагрузите компьютер.
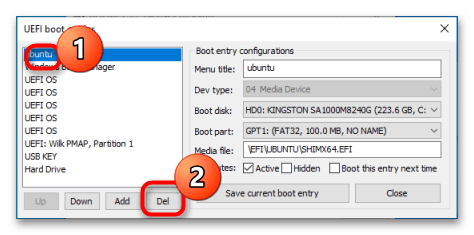
К сожалению, данный способ имеет один недостаток. Он удаляет лишь загрузочную запись, однако физически файлы загрузчика остаются на накопителе. Если их нужно удалить полностью, используйте следующий вариант.
Способ 2: «Командная строка»
Способ не слишком сложный, однако он требует внимания и последовательности. Используйте его, если хотите удалить загрузочные файлы UEFI физически.
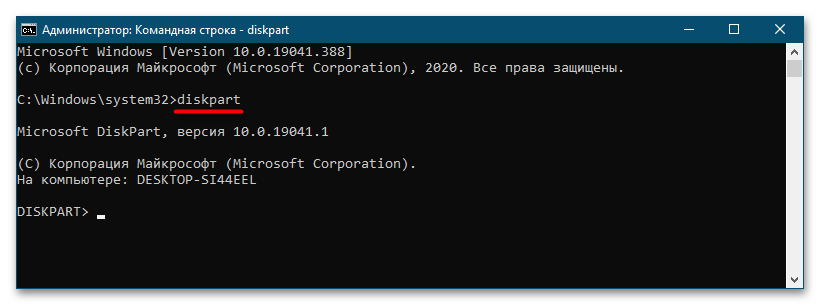
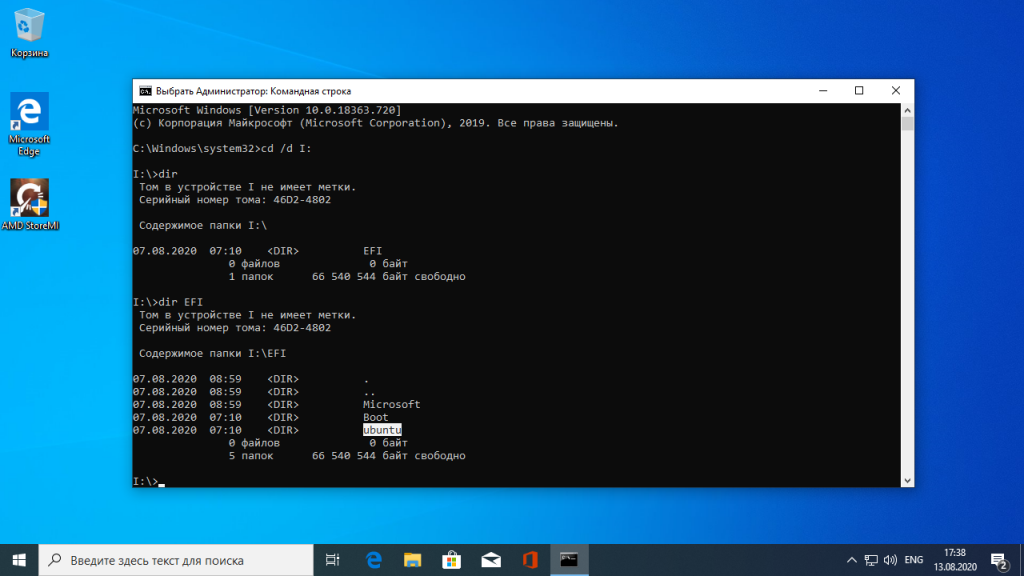
- Откройте «Командную строку» от имени администратора из поиска Windows или другим способом.
- Запустите встроенную утилиту управления дисками и разделами командой
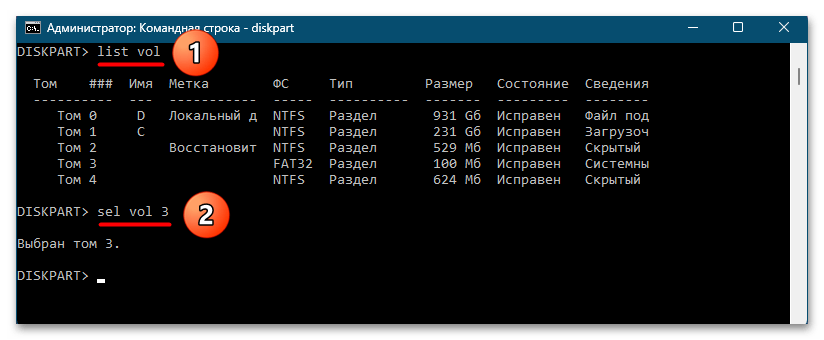
diskpart. - Командой
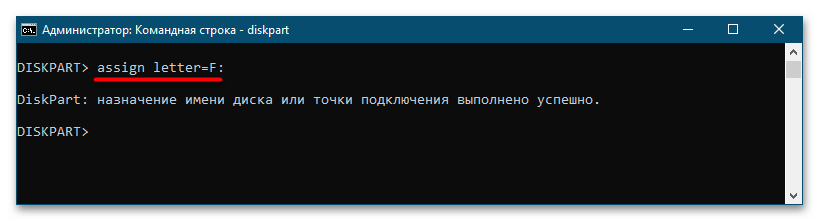
list volвыведите список разделов на дисках, после чего выберите раздел с файлами EFI, используя для этого командуsel vol №. Найти его нетрудно: он имеет файловую систему FAT32, тип «Системный» и небольшой размер в пределах 100 МБ. Исключение составляют жесткие диски расширенного формата 4K Native, на которых размер раздела EFI составляет 260 МБ. - Так как EFI-раздел не имеет буквы, чтобы работать с ним дальше, присвойте ему литеру командой
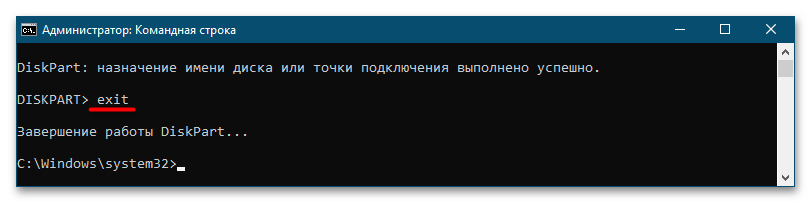
assign letter=F:. Буква может быть любой незанятой. - Выйдите из «Diskpart» командой
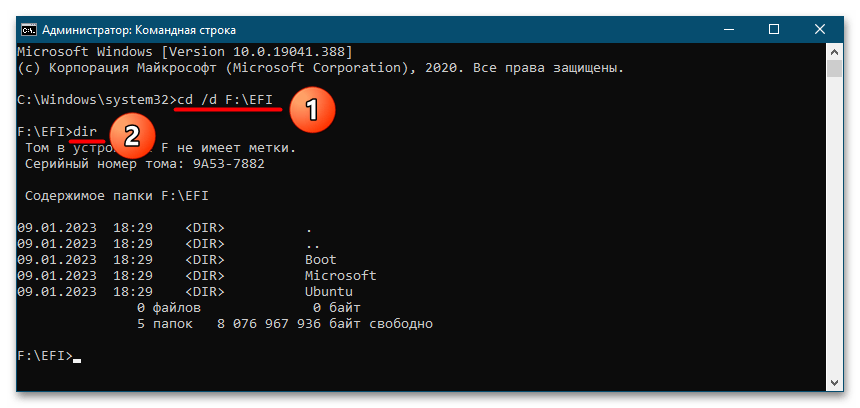
exit. - Перейдите в расположение каталога EFI на диске, для чего выполните команду
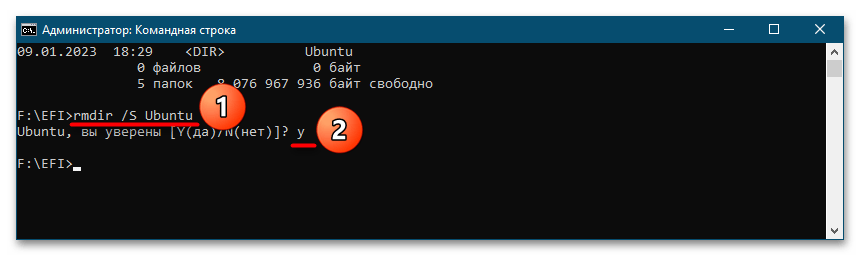
cd /d F:\EFI, а затем выведите ее содержимое командойdir. - Удалите каталог с названием операционной системы, использующей загрузчик Grub. В данном примере это папка Ubuntu. Удаление выполняется командой
rmdir /S Ubuntu. Чтобы подтвердить удаление, введите Y и нажмите клавишу ввода.

Готово. На этом удаление загрузчика Grub из Windows 10 можно считать завершенным.
Наша группа в TelegramПолезные советы и помощь
Загрузчик Grub — это загрузчик, который используется по умолчанию в большинстве дистрибутивов Linux. Grub расшифровывается как GRand Unified Bootloader, он поддерживает загрузку не только Linux, но и Widnows, и DOS.
Если вы устанавливали Linux, а потом по каким-либо причинам решили его удалить и вернуть Windows или создали загрузочную флешку Linux, но теперь она вам больше не нужна, нужно удалить загрузчик Grub. В этой инструкции мы рассмотрим, как удалить загрузчик Grub из MBR или из UEFI, также поговорим о том, как удалить Grub с флешки.
Содержание статьи
- Как удалить загрузчик Grub и восстановить Windows
- Как удалить загрузчик Grub в UEFI
- Как удалить Grub с флешки
- Выводы
Как удалить загрузчик Grub и восстановить Windows
Если на вашем компьютере установлено две операционные системы, Windows и Linux, и вы хотите стереть Linux и его загрузчик, восстановив загрузчик Widows, и у вас используется таблица MBR, то это сделать очень просто.
В сети часто советуют способ: взять установочный диск Windows, загрузиться с него в режиме восстановления и выполнить команды:
bootrec \fixboot
bootec \fixmbr
Это действительно ответ на вопрос «как удалить Grub и восстановить загрузчик Windows?», и он работает. Но есть способ намного проще. Вам даже не придётся перезагружать компьютер. Утилита Bootice позволяет восстановить загрузчик Windows и удалить Grub с жёсткого диска в несколько кликов.
Скачать утилиту можно с softpedia, потому что на официальном сайте всё по-китайски. Только выберите правильную разрядность для своей системы. Запустите утилиту, выделите диск, на котором у вас установлен загрузчик Grub, затем нажмите кнопку Proccess MBR:
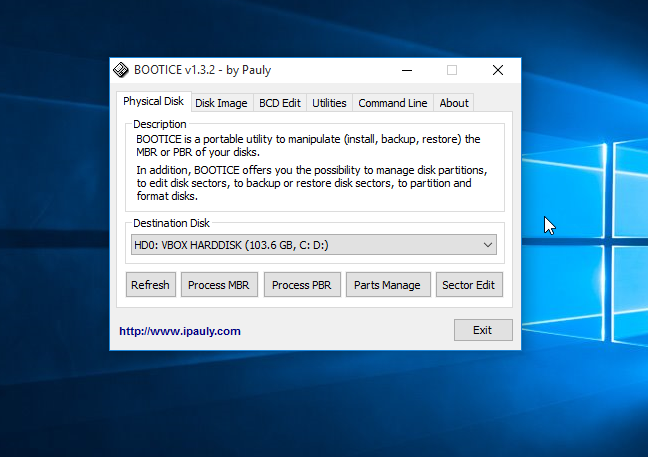
Затем Windows NT 5.x / 6.x MBR:
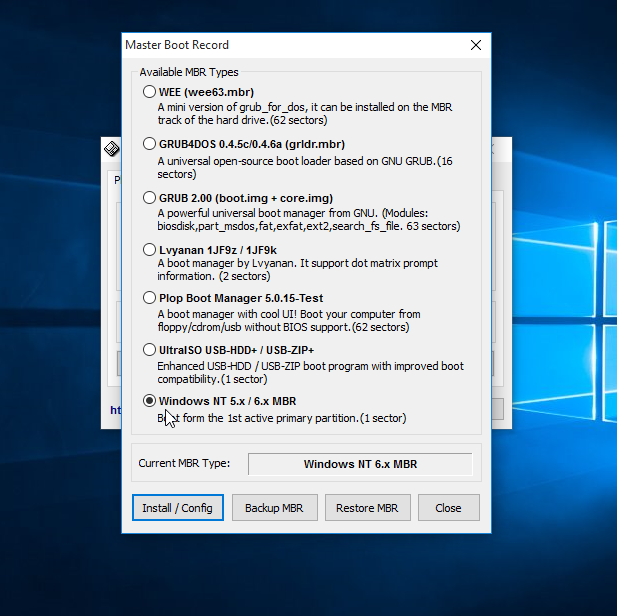
И нажмите кнопку Config / Install:
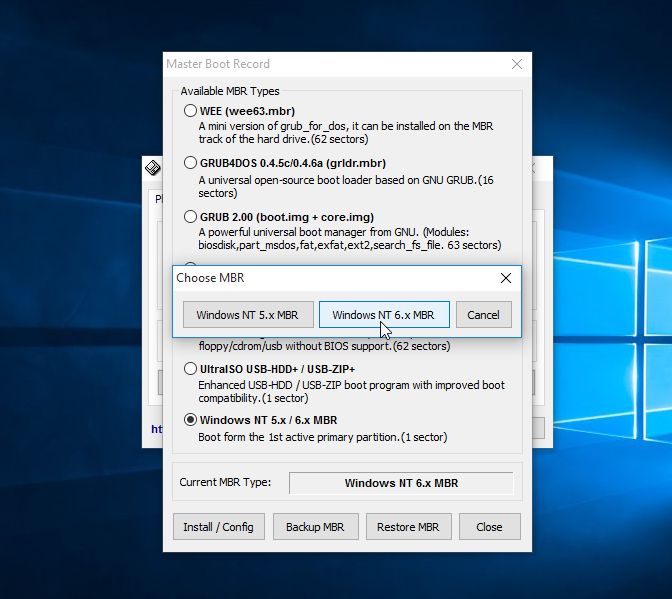
Дальше остаётся только выбрать нужную версию MBR, в нашем случае Windows 7,8,10 — Windows NT 6.x:
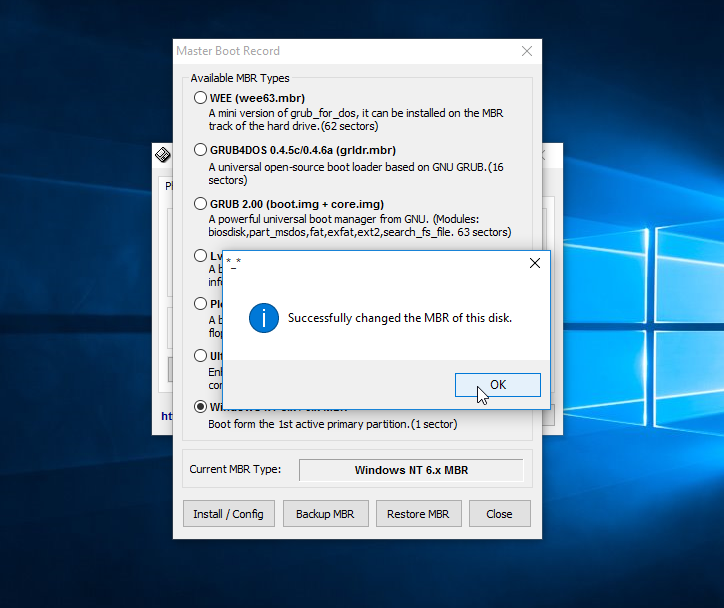
И готово: вы смогли успешно полностью удалить загрузчик Grub. Можете перезагружаться и проверять.
Как удалить загрузчик Grub в UEFI
Эта проблема тоже решается с помощью утилиты Bootice. Только на это раз вам нужна именно 64-битная версия программы.
Одно из преимуществ UEFI на MBR в том, что здесь можно устанавливать сразу несколько загрузчиков на специальный раздел. Для удаления загрузчика Grub и восстановления функциональности Windows достаточно переместить Grub чуть ниже в очереди загрузки UEFI.
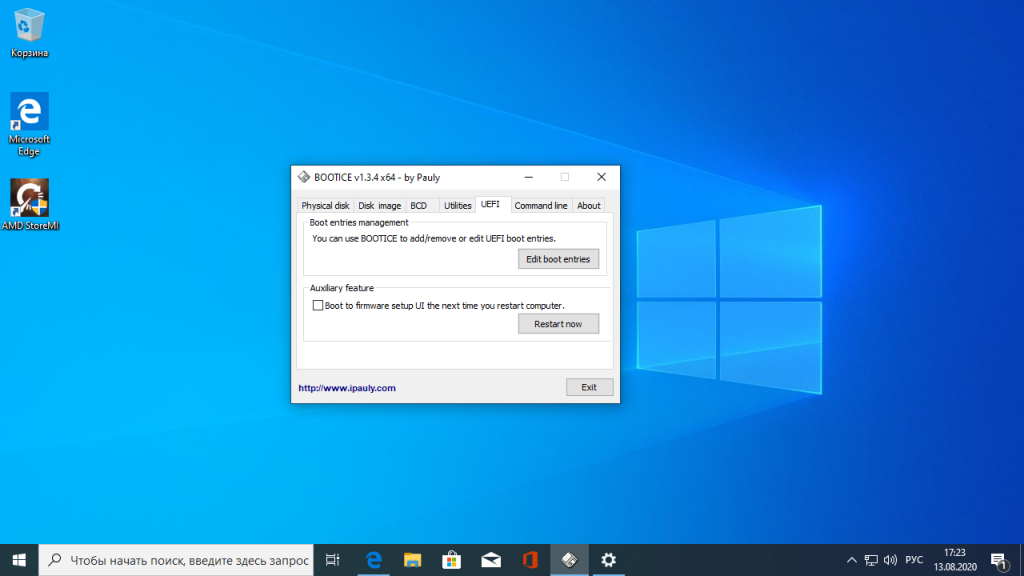
Откройте программу, перейдите на вкладку UEFI и нажмите Edit Boot Enteries. Откроется такое окно:
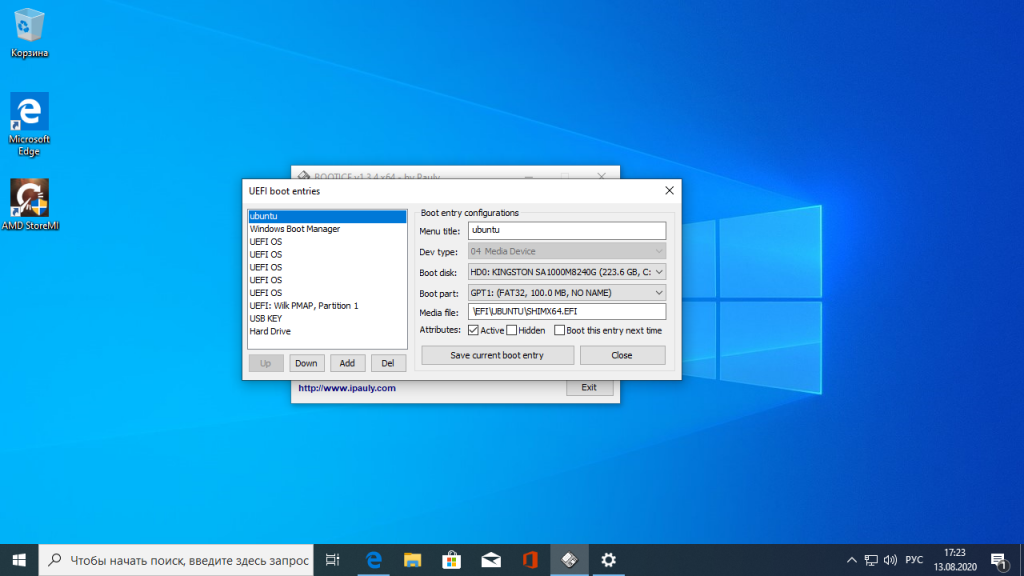
Здесь у вас есть два варианта действий. Либо опустить Grub ниже загрузчика Widnows кнопкой Down, либо полностью удалить запись о загрузчике кнопкой Del. Но в обоих случаях файлы загрузчика останутся на диске. Полностью удалить загрузчик Grub со всеми его файлами нужно из командной строки. Это немного сложный процесс, но всё же мы его разберём.
Кликните в левом нижнем углу экрана правой кнопкой мыши, в открывшемся контекстном меню выберите Командная строка от имени администратора.
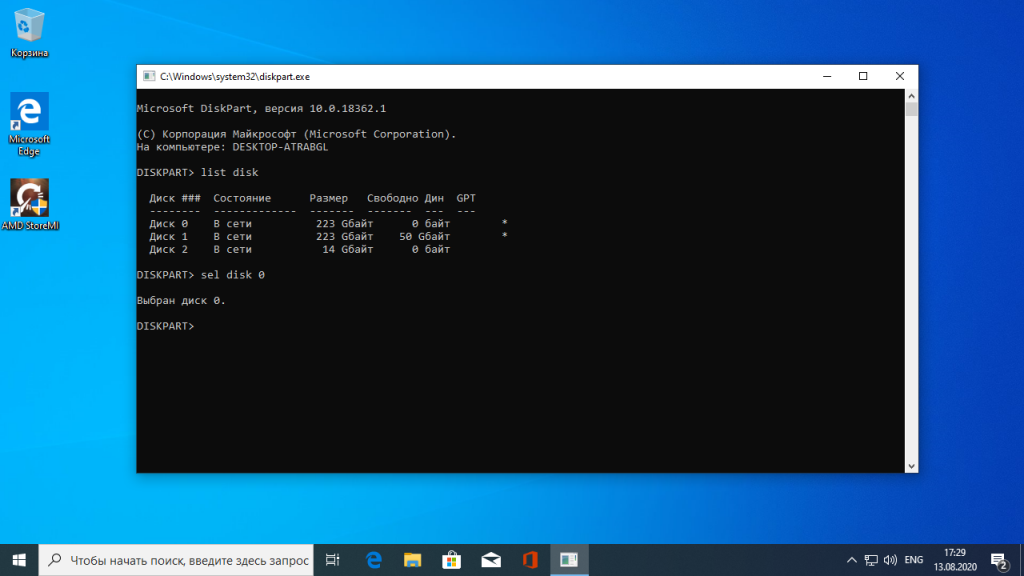
Далее нам понадобится утилита diskpart, все действия мы выполним с помощью неё. Запустите её командой:
diskpart
Затем смотрим доступные диски:
list disk
И выбираем наш единственный диск, на котором сейчас установлена Windows, а раньше была установлена Ubuntu:
sel disk 0
После того, как был выбран диск, мы можем посмотреть список разделов на нём:
list vol
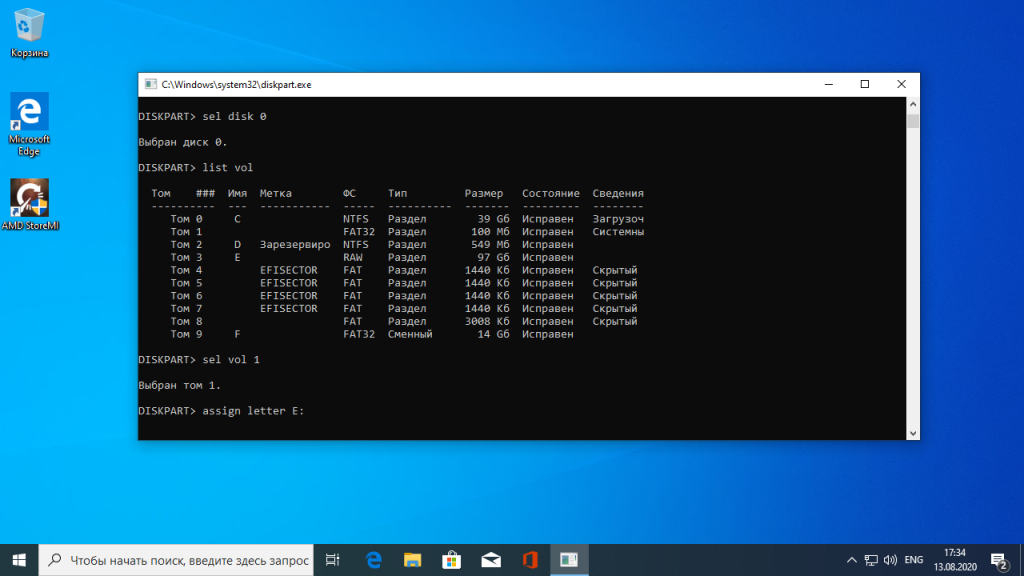
Среди этих разделов есть и раздел с файлами EFI, для обычной системы он скрыт, но не для этой утилиты. В нашем случае это Volume 2. Как правило, это небольшой раздел с файловой системой FAT32 и отмеченный как системный.
Мы выбрали этот раздел текущим с помощью команды:
sel vol 2
Затем назначим ему букву, чтобы можно было с ним работать:
assign letter=E:
Утилиту можно закрывать. Дальше продолжаем выполнять действия в консоли. Сделать всё с помощью проводника вы не сможете, потому что нужны права администратора. Переходим на диск E:
cd \d E:
Переходим в папку EFI:
cd EFI
Удаляем папку с файлами загрузчика Ubuntu:
rmdir \S ubuntu
Готово: удаление загрузчика Grub завершено, и теперь его файлов больше нет в системе.
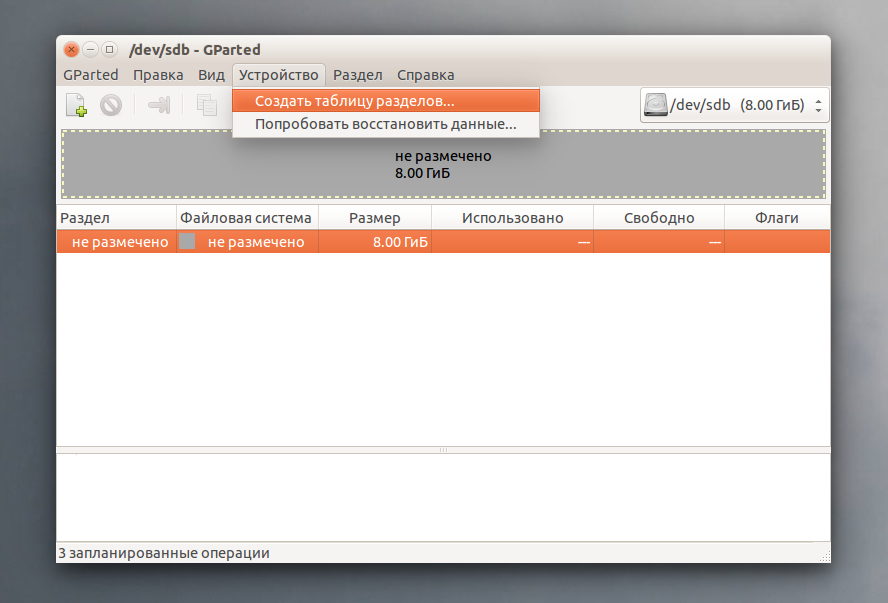
На флешках, как правило, используется таблица разделов MBR. Чтобы удалить загрузчик Grub с флешки недостаточно просто её отформатировать. Загрузчик записывается в таблицу MBR, а поэтому нам придётся её пересоздать. Очень не рекомендую использовать этот способ для удаления загрузчика Grub с жёсткого диска, потому что вы потеряете все данные.
Работать будем в системе Linux. Сначала посмотрите, какое имя устройства у вашей флешки, например, с помощью программы Gparted или в терминале командой:
fdisk -l
Затем удалим полностью существующую таблицу разделов:
dd if=/dev/zero of=/dev/sdc count=512
Теперь, с помощью той же Gparted создаём новую таблицу разделов:
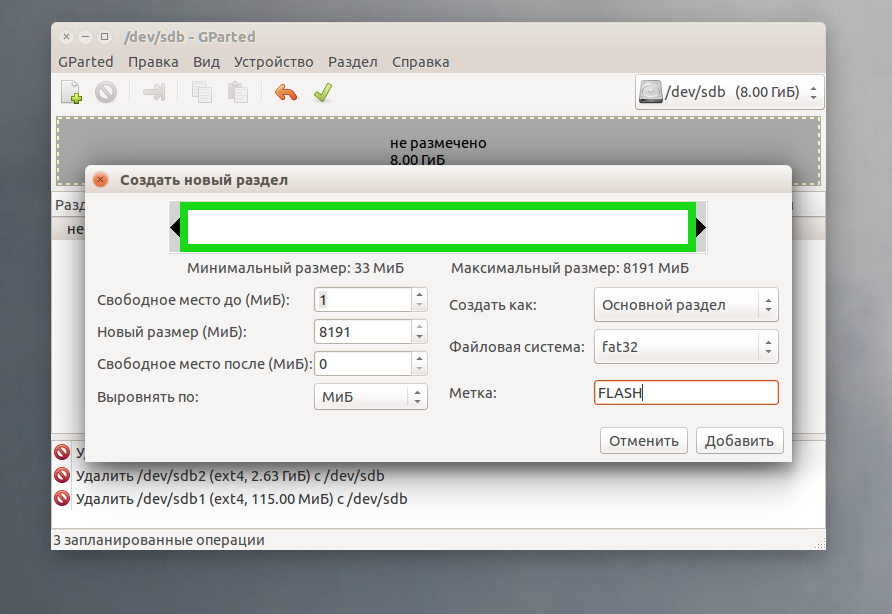
Создаём раздел на флешке и форматируем в файловую систему FAT32:
Теперь вы знаете, как удалить MBR с флешки, только не сотрите его с жёсткого диска, потому что потом будет сложно восстанавливать.
Выводы
Я не знаю, зачем вам понадобилось удалять Linux. Это отличная операционная система, правда ещё остаётся оборудование, которое она не поддерживает или поддерживает не полностью. Не сдавайтесь быстро: если Linux не работает на одном устройстве, то, возможно, в будущем у вас появится другой компьютер или ядро начнёт поддерживать ваш ноутбук. Пробуйте и экспериментируйте. Во всяком случае теперь вы знаете, как удалить Grub с жёсткого диска. Если остались вопросы — задавайте в комментариях.
How to remove GRUB from Windows laptop (MS Surface Pro 3) — the 4x BootRec commands did not work
From Windows 11
=====================
- Run a
cmd.exeprocess with administrator privileges
cmd.exe
- Run
diskpart
diskpart.exe
- Type: list disk then sel disk X where X is the drive your boot files reside on
    list disk
    select disk X
- Type list vol to see all partitions (volumes) on the disk (the EFI volume will be formatted in FAT, others will be NTFS)
list vol
- Select the EFI volume by typing: sel vol Y where Y is the SYSTEM volume (this is almost always the EFI partition)
select vol Y
- For convenience, assign a drive letter by typing: assign letter=Z: where Z is a free (unused) drive letter
assign letter=Z:
- Type exit to leave disk part
exit
- While still in the cmd prompt, type: Z: and hit enter, where Z was the drive letter you just created.
Z:
- Type dir to list directories on this mounted EFI partition
dir
- Type cd EFI and then dir to list the child directories inside EFI
cd EFI
- Type rmdir /S linux-entry to delete the linux boot directory
rmdir /S entry other than Boot and Microsoft
From Linux
=====================
- Run
efibootmgrto see current boot order and entries
- Change boot order to boot from from Windows
            $ # if windows bootnum is 000, and other entries are 003, 004 etc
            $ sudo efibootmgr -o 0,3, 4
- Delete Linux boot entries
            $ # if windows bootnum is 000, and other entries are 003, 004 etc
            $ sudo efibootmgr -b 3 -B
            $ sudo efibootmgr -b 4 -B
- Go to EFI directory most probably
/boot/efi
- Remove that foder having the name of your Linux distribution
- Reboot your system
When it comes to removing Grub from Windows 11, there are a few key considerations to keep in mind. Grub, or GRand Unified Bootloader, is a common bootloader used in many Linux distributions. However, it can sometimes cause issues when dual-booting with Windows. So, how can you efficiently remove Grub from your Windows 11 system?
The process of removing Grub from Windows 11 involves accessing the command prompt through the Windows recovery environment. This can be done by booting from a Windows installation media or by using the Advanced Startup options. Once you’re in the command prompt, you’ll need to use the «diskpart» command to select and delete the partition where Grub is installed. It’s essential to follow the steps carefully to avoid any data loss or system instability. By removing Grub from Windows 11, you can ensure a smoother and more seamless experience with your operating system.
If you need to remove GRUB from Windows 11, here’s a professional guide. The first step is to boot into Windows 11 and open the Command Prompt as an administrator. Then, type in the command «bootrec /fixmbr» and hit Enter. This will repair the Master Boot Record and remove GRUB. Finally, restart your computer and GRUB should no longer appear. Remember to proceed with caution and make sure you have a backup of your important files before making any changes.

What is GRUB in Windows 11?
Grub stands for GRand Unified Bootloader, and it is a commonly used boot loader for Linux-based operating systems. However, in some cases, users may have both Linux and Windows 11 installed on their computers, leading to the installation of Grub along with the Windows Boot Manager. While this can be convenient for dual-booting purposes, there may come a time when you want to remove Grub from Windows 11 to revert back to the default Windows Boot Manager. In this article, we will explore the steps involved in removing Grub from Windows 11, ensuring a seamless transition back to the Windows-only environment.
Before Removing Grub From Windows 11
Before you proceed with removing Grub from Windows 11, it is essential to understand the potential implications and take necessary precautions. Here are a few key points to consider:
- Make sure you have a backup of all your important data. Although the steps mentioned here should not cause any data loss, it is always recommended to have a backup for added safety.
- Ensure that you have a Windows 11 installation disk or a bootable USB drive ready. It is crucial to have a recovery option in case anything goes wrong during the process.
- If you are not confident about carrying out these steps on your own, it is advisable to seek assistance from a professional or someone experienced in handling Windows operating systems.
Removing Grub From Windows 11
Now that you are aware of the precautions and ready to proceed, here are the steps to remove Grub from Windows 11:
Step 1: Access Windows 11 Recovery Environment
To begin the process, you need to access the Windows 11 Recovery Environment. Here’s how:
| In Windows 11, go to the Start menu and click on the «Settings» icon. |
| In the Settings menu, select «Update & Security.» |
| Click on the «Recovery» tab in the left sidebar. |
| Under the «Advanced startup» section, click on the «Restart now» button. |
| Windows 11 will restart and present you with the «Choose an option» screen. |
| Choose «Troubleshoot» from the options. |
| Select «Advanced options.» |
| Now, choose «Command Prompt» to access the recovery environment. |
Step 2: Execute Bootrec Commands
Once you have access to the Command Prompt in the recovery environment, follow these steps:
Type the following command and press Enter: bootrec /fixmbr
|
| Wait for the command to complete its execution. |
Next, enter the command bootrec /fixboot and press Enter. |
| Again, wait for the command to finish its execution. |
Finally, type exit and press Enter to exit the Command Prompt. |
Step 3: Restart Windows 11
After executing the bootrec commands, you can restart your computer to complete the process:
- Type
shutdown /r /t 0in the Command Prompt and press Enter to restart your computer immediately. - Your computer will reboot, and Windows 11 should now load using the default Windows Boot Manager.
Final Thoughts
Removing Grub from Windows 11 can be a straightforward process if you follow the steps outlined in this article. However, it is crucial to ensure that you have a backup of your data and a recovery option in case of any complications. Remember to seek assistance if you are not confident in carrying out the process on your own. By successfully removing Grub, you can restore your Windows 11 system to its original configuration with the default Windows Boot Manager.

Step-by-Step Guide to Remove Grub From Windows 11
Grub, which stands for GRand Unified Bootloader, is a commonly used bootloader in Linux systems that allows users to choose between multiple operating systems during startup. However, if you have installed Windows 11 alongside a Linux distribution and want to remove Grub, here is a step-by-step guide:
Method 1: Using Command Prompt
1. Boot into Windows 11 and open Command Prompt as an administrator.
2. Type the following command and press Enter: bcdedit /set {bootmgr} path \EFI\Microsoft\Boot\bootmgfw.efi.
3. Restart your computer and Grub should be removed.
Method 2: Using Disk Management
1. Open Disk Management by right-clicking on the Start button and selecting «Disk Management».
2. Locate the partition where Grub is installed (usually labeled as «EFI System Partition») and delete it.
3. Restart your computer and Windows 11 should boot directly without Grub.
Note: Removing Grub may cause the Linux distribution to become unbootable. Make sure you have a backup of your important data before proceeding.
Key Takeaways — Remove Grub From Windows 11
- Grub can be removed from Windows 11 by using the Command Prompt.
- First, open the Command Prompt as an administrator.
- Type the command «bootrec /fixmbr» to fix the Master Boot Record (MBR) and remove Grub.
- Press Enter to execute the command and wait for the process to complete.
- Restart your computer to see the changes and verify that Grub has been removed.
Frequently Asked Questions
Here are some common questions and answers about removing Grub from Windows 11:
1. How can I remove Grub from Windows 11?
To remove Grub from Windows 11, you will need to access the Command Prompt or PowerShell with administrative privileges. Follow these steps:
- Type «cmd» or «PowerShell» in the Windows Search bar and right-click on «Command Prompt» or «PowerShell» to select «Run as administrator.»
- In the Command Prompt or PowerShell window, execute the following command: «
bcdedit /deletevalue {bootmgr} path \EFI\ubuntu\grubx64.efi«. This command will remove the Grub bootloader entry from the system. - Restart your computer, and you will no longer see the Grub bootloader.
2. Will removing Grub affect my Windows 11 installation?
No, removing Grub will not affect your Windows 11 installation. Grub is a bootloader used primarily for Linux-based operating systems. If you are using Windows 11 as your primary operating system and no longer require the Grub bootloader, removing it will not impact your Windows 11 installation in any way.
However, it is always recommended to create a backup of your important files and perform the removal process carefully to avoid any unforeseen issues.
3. Can I uninstall Linux to remove Grub from Windows 11?
Yes, if you have a dual-boot setup with Linux alongside Windows 11, uninstalling Linux will remove Grub from the Windows 11 bootloader. However, this method will remove Linux completely from your system.
Keep in mind that uninstalling Linux will also delete any files or data stored in the Linux partition, so make sure to backup any important files before proceeding with the uninstallation process.
4. Are there any third-party tools to remove Grub from Windows 11?
Yes, there are third-party tools available that can help you remove Grub from Windows 11. One popular tool is «EasyBCD.» EasyBCD provides a graphical interface to manage the Windows bootloader and can be used to remove the Grub bootloader entry. However, it is important to note that using third-party tools carries some risks, so proceed with caution and ensure you have a backup of your important files before making any changes.
Additionally, always download such tools from trusted sources to minimize the risk of malware or other security issues.
5. Is it possible to remove Grub without reinstalling Windows 11?
Yes, it is possible to remove Grub from Windows 11 without reinstalling the operating system. Following the steps mentioned earlier, using the Command Prompt or PowerShell with administrative privileges, you can delete the Grub bootloader entry from the system’s boot manager without affecting your Windows 11 installation.
Reinstalling Windows 11 should only be considered as a last resort if none of the other methods work or if there are other underlying issues with your operating system.
In conclusion, removing Grub from Windows 11 can be done by following a few simple steps. The first step is to access the Command Prompt as an administrator. This can be done by right-clicking on the Start menu and selecting «Command Prompt (Admin)». Once in the Command Prompt, you need to use the appropriate command to fix the Master Boot Record (MBR) and remove Grub. The command to use is «bootrec /fixmbr». After executing this command, you can restart your computer, and Grub should no longer be present on your Windows 11 system.
It’s important to note that removing Grub should be done with caution, as it is the bootloader for many Linux distributions and may affect your ability to boot into Linux if you have a dual-boot setup. If you no longer need Grub and want to switch to a different bootloader or remove it entirely, following these steps can help you achieve that. However, always remember to back up your important data before making any changes to your system to avoid any potential loss of data.
If you are a Windows 11 user who has found yourself facing the GRUB bootloader, you might be looking for ways to remove it. The GRUB (GNU GRand Unified Bootloader) is typically associated with Linux operating systems, and when it appears in a dual-boot configuration with Windows, it can sometimes create confusion. This article will guide you through the various methods available for removing GRUB and restoring the Windows bootloader, ultimately allowing for a more straightforward boot experience.
Understanding the significance of GRUB in dual-boot setups is key to addressing this issue. When you install a Linux distribution alongside Windows, GRUB often becomes the default bootloader, managing the boot process for both operating systems. While this is handy for users who require access to both environments, it can become problematic if you only want to run Windows or experience issues with the GRUB configuration.
The Need to Remove GRUB
Before diving into the methods of removing GRUB, it’s essential to understand why one might want to do this:
-
Returning to a Single Boot Environment: If you have decided to uninstall Linux or no longer wish to dual boot, removing GRUB makes sense.
-
GRUB Issues: Sometimes, GRUB may not function correctly, preventing access to Windows entirely. In such cases, it’s critical to restore the Windows bootloader.
-
Simpler Boot Process: A single operating system setup simplifies not just booting up but also system maintenance.
Preparing for Removal
Before you begin, there are a few preparatory steps you should follow:
-
Back-Up Important Data: Always ensure that you have a backup of your important files and data. In rare cases, data loss can occur during these procedures, so it’s better to be safe.
-
Create Windows Recovery Media: Having a recovery drive on hand can be a lifesaver. This will allow you to access recovery options and troubleshoot any problems that may arise after removing GRUB.
-
Ensure You Have Administrator Access: Many steps require administrative permissions, so ensure that you are logged in as an administrator.
Method 1: Using Windows Command Prompt
One of the easiest methods to restore the Windows bootloader and remove GRUB is through the Windows Command Prompt. Here’s how:
-
Access the Command Prompt:
- Right-click on the Start menu and select «Windows Terminal (Admin)» or «Command Prompt (Admin).»
- If prompted by User Account Control, click «Yes.»
-
Run Bootrec Commands:
- To remove GRUB, execute the following commands one by one:
bootrec /fixmbr bootrec /fixboot bootrec /scanos bootrec /rebuildbcd - Explanation of Commands:
bootrec /fixmbr: This command writes a new Master Boot Record (MBR) to the system partition, effectively eliminating GRUB.bootrec /fixboot: This attempts to write a new boot sector onto the system partition.bootrec /scanos: This scans for all installed operating systems.bootrec /rebuildbcd: This command rebuilds the Boot Configuration Data (BCD).
- To remove GRUB, execute the following commands one by one:
-
Restart Your Computer:
- After executing all commands, restart your PC. You should now boot directly into Windows.
Method 2: Utilizing Windows Recovery Environment
If issues arise during the Command Prompt method or if you cannot access the command line, you can utilize the Windows Recovery Environment (WinRE).
-
Accessing WinRE:
- You can access WinRE by booting from a Windows installation media or using the recovery drive you created earlier. If you don’t have one, you can create a Windows 11 installation media using Microsoft’s media creation tool.
- Boot from the USB drive and select «Repair your computer» instead of «Install now.»
-
Navigating to Command Prompt:
- Select «Troubleshoot,» then «Advanced options,» and finally «Command Prompt.»
-
Execute Bootrec Commands:
- Input the same bootrec commands as mentioned earlier:
bootrec /fixmbr
bootrec /fixboot
bootrec /scanos
bootrec /rebuildbcd
- Input the same bootrec commands as mentioned earlier:
-
Complete the Process:
- After executing the commands, exit the Command Prompt and return to the previous screen. Choose «Turn Off Your PC» and then turn it back on to check if Windows starts normally.
Method 3: Using Third-Party Tools
If you’re not comfortable using Command Prompt or WinRE, there are third-party tools available that can assist in managing bootloaders effectively. Tools like EasyBCD, and Acronis Bootable Recovery Media can offer straightforward interfaces for managing multiple operating systems and boot settings. Here is a general guide on using EasyBCD:
-
Download and Install EasyBCD:
- Install EasyBCD from its official website. This software is user-friendly and designed to help manage boot configurations.
-
Launch EasyBCD:
- Open the application and navigate to the “Add New Entry” section.
-
Remove GRUB:
- In the “Edit Boot Menu” section, you will see the existing entries for Windows and Linux. If GRUB is listed, you can select it and remove it.
-
Repair the Windows Bootloader:
- EasyBCD offers an option to repair the boot loader. Click on that option and follow the prompts to restore Windows boot.
-
Restart Your Computer:
- Once the changes have been made, reboot your system to see if the modifications have taken effect.
Method 4: Reinstalling Windows (Last Resort)
In cases where all the above methods fail or if the GRUB bootloader is causing serious issues, reinstalling Windows may be the last option.
-
Create Backup of Your Data:
- Ensure that all your important files are backed up to an external drive or cloud storage.
-
Download Windows 11:
- Create a Windows 11 installation media if you haven’t done so.
-
Start the Installation Process:
- Boot from the installation media. When prompted, choose “Install now.”
-
Choose Custom Installation:
- In the setup process, opt for “Custom: Install Windows only (advanced).”
-
Delete Windows Partitions:
- Be cautious: proceed to delete all Windows-related partitions. This will eliminate all data on those partitions.
-
Install Windows:
- After deletion, select the unallocated space and click on “Next” to install Windows 11 afresh. This process will automatically install the Windows bootloader, removing GRUB in the process.
Final Thoughts
Removing GRUB from Windows 11 can seem daunting initially, but with proper steps and precautions, it can be a straightforward process. Throughout this article, we discussed various methods, including using the Command Prompt, Windows Recovery Environment, and third-party tools.
Remember, always back up your important data before making significant changes to your boot configuration. If you’re ever uncertain, don’t hesitate to seek professional help to avoid potential issues. If you have performed these steps successfully, you should now enjoy a more direct boot process into Windows 11!