,
In this guide you will find step-by-step instructions on how to create a Windows recovery partition (aka «WinRE Partition») if it is missing in Windows 10/11.
The Recovery partition (aka «Windows Recovery Environment Partition») is a hidden partition on your hard drive that contains the necessary tools to repair your Windows 10/11 installation, without the need of a Windows Installation USB Media.
Usually, the Recovery partition is created by default during a clean installation of Windows 10/11, and you can see it in Disk Management (as in screenshot below).

However, in some cases the recovery partition may be missing (not shown in Disk Management) and as a result you cannot boot your system into the Windows recovery environment (aka «WinRE») to repair Windows.
In a such a case, you can follow the steps in this guide to manually create a Recovery Partition with the necessary repair tools to repair your system.

How to Create the Windows Recovery Partition on Legacy (MBR) or EFI (GPT) Windows 10/11 systems.
If the Recovery Partition is missing from your system (you don’t see the Recovery partition in Windows Disk Management utility), or if the Windows Recovery Environment is not working, or if you receive the message «Could not find the recovery environment» when you try to restore Windows using the «Reset this PC» option, follow one the methods below to fix the problem.
Method 1. Force Windows to Create the Windows RE Partition by performing a In-Place Upgrade.
The first and easiest method in my opinion to create a recovery partition in Windows 10/11, is to repair and upgrade Windows using a Windows ISO file. To do this, follow the instructions in one of the following articles according your Windows version:
- How to Repair Windows 10 with an In-Place Upgrade.
- How to Repair Windows 11 with an In-Place Upgrade.
Method 2. Create and Activate the Recovery Partition manually.
Step 1. Download Windows ISO file.
To manually create the Recovery Partition (aka «WinRE Partition», or «Windows Recovery Environment Partition») on Windows 10/11, you will need the following two (2) files, which can be obtained (extracted) from a Windows.ISO image file.
- Reagent.xml (Windows Recovery Environment (WinRE) configuration file).
- Winre.wim (Windows Recovery Environment Boot Image)
So, if you don’t own a Windows ISO file, then, according to your Windows version, proceed to download Windows 10 or Windows 11 in a ISO file using the instructions on this article.
Step 2. Extract Required files from a Windows 10/11 ISO file.
To extract the above mentioned files, from the Windows ISO file, do the following:
1. Download and install the 7-Zip file archiver.
2. Then, double-click on the Windows.iso file to mount it (open it), in File Explorer.
3. Explore the contents of the mounted ISO file and open the «sources» folder.

4. Right-click on the install.esd file (or on install.wim file) and select 7-Zip > Open archive

5a. Now double-click to open any of the numbered folders (e.g. the «1» in this example), and…

5b. …navigate to this folder:
- Windows\System32\Recovery\
6a. Then click the Extract button from the menu and…

6b. …select to copy the Reagent.xml & Winre.wim files to the «C:\sources\» folder and click OK.

7. When the extraction is completed, close 7-zip and continue to next step.
Step 3. Copy REAGENT.XML & WINRE.WIM to ‘C:\Windows\System32\Recovery’ folder.
1. Now, go ahead to copy the extracted files «Reagent.xml» & «Winre.wim» files from the «C:\sources» folder, and…

2. … paste them to the following location/folder: *
-
C:\Windows\System32\Recovery\
* Notes:
1. When asked, choose to Replace the file in the destination and then click Continue.
2. Important: In case of error in any of the remaining steps, copy again these files to «C:\Windows\System32\Recovery\» folder and then continue with the next step.

Step 4. Allocate Space for the Recovery Partition.
To create a recovery partition, you must first allocate space for it. To do this, you need to shrink the size of the C: drive by 1 GB (1000MB), as described below:
1. Press the Windows + R keys to open the ‘Run‘ command box.
2. In run command box, type diskmgmt.msc and press Enter to open Disk Management.

3. In Disk Management, right-click on drive C: and select Shrink Volume.

4. At Enter the amount of space to shrink in MB, type 1000 and then press Shrink.

5. Now right-click on the Unallocated space and select New Simple Volume.

6. On the Simple Volume creation wizard, continually click Next to create the new volume.
7. When asked to assign a drive letter, choose Do not assign a drive letter or path (Important) and click then click Next.

8. Then choose Next again to Quick Format the volume and then click Finish.*

9. When done, continue to next step.

Step 5. Find Out the Partition Style on Disk.
Before setting the created partition as a Recovery partition, you’ll need to know the type of the partition style on your system. To view the partition style on your system:
1. In Disk Management, right-click on Disk 0 and choose Properties.

3. Select the Volumes tab and notice if the Partition Style is «GUID Partition Table (GPT)» or «Master Boot Record (MBR)«. When done, close this window and the Disk Management and go to next step. *
* Note: The information you get from here will be needed in the next step.

Step 6. Change the Partition type of the New Volume to «Recovery».
After creating the new partition, proceed and change its type from «Primary» or «Basic Data Partition», to «Recovery», using the DISKPART utility:
1. Open Command Prompt as Administrator and then run the following commands in order:
- diskpart
- list disk
- select disk 0
- list partition
2. Now notice the partition number of the new partition you created with size 1000 MB (e.g. the partition «3» in this example).
* Note: On EFI systems with GUID Partition Table (GPT), usually the partition number is «4».

3. Then give the following command to select the new partition, using its partition number.*
- select partition number
* Note: Replace the partition number, according your case. In this example (MBR Partition style), the command is:
- select partition 3
4. Now, according to the partition style [GUID (EFI systems) or MBR (Legacy Systems)] you noticed in previous step, give the corresponding command (or commands) below to set the type of the selected partition to «Recovery»:
A. If you have GUID Partition Table (GPT), give these two (2) commands:
- set id=de94bba4-06d1-4d40-a16a-bfd50179d6ac
- gpt attributes=0x8000000000000001

B. If you own Master Boot Record (MBR) table, give this command:*
- set id=27 override
* Note: In our example we use the «set id=27 override» command, because the partition style is MBR.

5. When done, type exit to close the diskpart tool and without closing the command prompt window, continue to next step.
Step 7. Force Windows to Enable the Windows Recovery Environment.
After following the above steps, use the «REAgentC.exe» tool to force Windows to copy the WindowsRE boot image file ‘Winre.wim», to the created Recovery partition, and to create the Windows Recovery Environment (Windows RE) on it.
1. In Command Prompt (Admin), type this command and press Enter:
- reagentc /enable

2. After you get the «Operation Succeeded» message, the Windows Recovery Environment (Windows RE) should be created and enabled on the recovery partition you created before (e.g. the «partition 3» in this example). To verify this, give the following command:
- reagentc /info

3. That’s it! If you have followed the above steps exactly, you should have successfully created and configured the missing recovery partition.

4. To ensure that the Recovery Environment is working, boot to Windows RE and see if all the repair options are there. (Startup Repair, Command Prompt, Reset This PC, System Restore, etc..).
That’s it! Let me know if this guide has helped you by leaving your comment about your experience. Please like and share this guide to help others.
If this article was useful for you, please consider supporting us by making a donation. Even $1 can a make a huge difference for us in our effort to continue to help others while keeping this site free:
- Author
- Recent Posts
Konstantinos is the founder and administrator of Wintips.org. Since 1995 he works and provides IT support as a computer and network expert to individuals and large companies. He is specialized in solving problems related to Windows or other Microsoft products (Windows Server, Office, Microsoft 365, etc.).
В случае, если системный раздел восстановления с диска был удален вами, либо в результате каких-либо действий на компьютере, его при желании можно восстановить: это даст доступ ко всем инструментам среды восстановления, которые иногда могут оказаться полезными.
В этой инструкции пошагово о том, как создать раздел восстановления на диске в Windows 11 и Windows 10 средствами системы.
Процесс создания раздела восстановления на диске

Далее речь пойдет о повторном создании раздела восстановления Windows 11/10, который автоматически создается при чистой установке ОС на компьютер и содержит необходимые файлы для запуска среды восстановления, из которой можно использовать точки восстановления, выполнять сброс Windows к заводским настройкам и другие действия для восстановления работоспособности ОС.
В случае если вас интересует создание раздела восстановления, содержащего полный образ установленной системы со всеми программами для быстрого возврата к сохраненному состоянию, одним из лучших решений будет Aomei OneKey Recovery.
Перед началом действий по созданию раздела восстановления рекомендую проверить состояние среды восстановления: в командной строке, запущенной от имени администратора, введите команду
reagentc /info
и нажмите Enter.

- Если в поле «Состояние среды восстановления Windows» указано Disabled, можно продолжать.
- Если же указано «Enabled», похоже, среда восстановления все-таки присутствует, но находится не на отдельном разделе восстановления, а, вероятнее всего, в папке C:\Windows\System32\Recovery. Текущее расположение можно определить в пункте «Расположение образа для восстановления». Вы можете оставить всё как есть, либо использовать команду
reagentc /disable
а затем шаги, описанные далее для создания отдельного раздела восстановления на диске.
Порядок действий для возврата стандартного раздела восстановления в Windows:
- Включите показ скрытых и системных (это две разных опции) файлов в Проводнике.
- Проверьте, присутствует ли файл с именем Winre.wim в папке
C:\Windows\System32\Recovery
При его наличии перейдите к 4-му шагу.
- Если файла нет, подключите образ ISO Windows 11 или 10 (смонтируйте образ в системе), либо подключите флешку/диск c файлами установки Windows 11/10, после чего откройте файл install.esd или install.wim, находящийся в папке Sources (открывать его умеет архиватор 7-Zip) после чего извлеките из него файл winre.wim находящийся в папке Windows\System32\Recovery или 1\Windows\System32\Recovery\ и скопируйте его в папку
C:\Windows\System32\Recovery
на вашем компьютере.
- Запустите командную строку от имени администратора. Сделать это можно, используя поиск в панели задач: начните вводить «Командная строка», а затем нажмите правой кнопкой мыши по результату и выберите «Запуск от имени администратора».
- По порядку используйте следующие команды:
diskpart
list disk
вторая команда отобразит список дисков, в следующей команде потребуется ввести номер диска с системным разделом, я укажу его как N, вам потребуется заменить на свой номер диска:
select disk N
list partition
Это отобразит список разделов на диске, в следующей команде вам потребуется номер раздела, от которого вы готовы «отнять» часть пространства для раздела восстановления, в примере — M, вам потребуется заменить на свой номер раздела (внимание: в команде установки id диска используем set id=27 для MBR диска, для GPT — как в примере далее):
select partition M
shrink desired=650
create partition primary
format fs=ntfs quick
set id=de94bba4-06d1-4d40-a16a-bfd50179d6ac
exit
reagentc /enable

В результате выполнения трех последних команд, для раздела будет установлен идентификатор раздела восстановления, после чего на него будут распакованы необходимые файлы среды восстановления Windows из файла winre.wim и среда восстановления будет работать как обычно с наличием всех необходимых дополнительных параметров восстановления.

При этом в «Управлении дисками» он может не иметь пометки «Раздел восстановления», но в сведениях о разделе в diskpart эта информация будет отображаться:

Ещё один вариант действий для создания раздела восстановления:
- Как и в предыдущем случае убедиться в наличии файла Winre.wim в C:\Windows\System32\Recovery
- После создания пустого раздела для среды восстановления на диске (можно сделать и в управлении дисками, рекомендуемый размер — 650-700 Мб) назначить ему букву.
- Вручную создать папку с именем Recovery на этом разделе.
- Использовать команды (здесь следует поменять букву диска D на фактическую букву раздела восстановления)
reagentc /setreimage /path D:\Recovery
reagentc /enable
- Удалить букву раздела.
Это так же вернёт вам рабочую среду восстановления с необходимыми инструментами, при этом раздел не будет помечен как раздел восстановления.
A Recovery Partition is a crucial partition for Windows 11/10. Windows creates this partition automatically when you perform a Clean Installation of Windows OS or Upgrade Windows OS. It contains the system image and other crucial operating system files that are required to restore the Windows OS to a working state when a problem occurs. This article shows how to add a Recovery Partition in Windows 11/10.
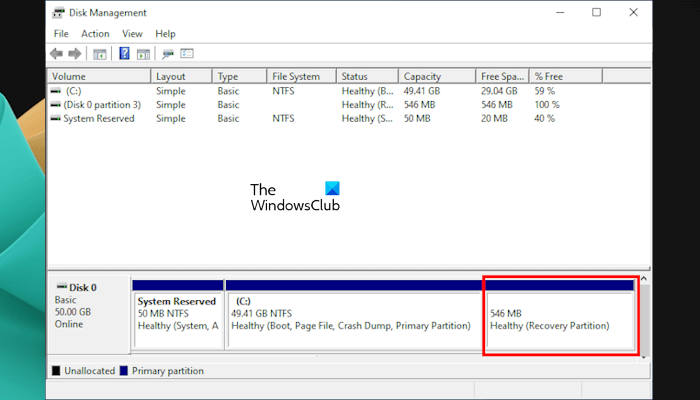
Recovery Partition in Windows 11
The Recovery Partition does not have a drive letter. Therefore, it is not visible in the File Explorer. You can view it in the Disk Management app. However, some users found the Recovery Partition missing from their computers. If this is the case with you, you can add a Recovery Partition in Windows 11/10 manually. This article shows how to do that.
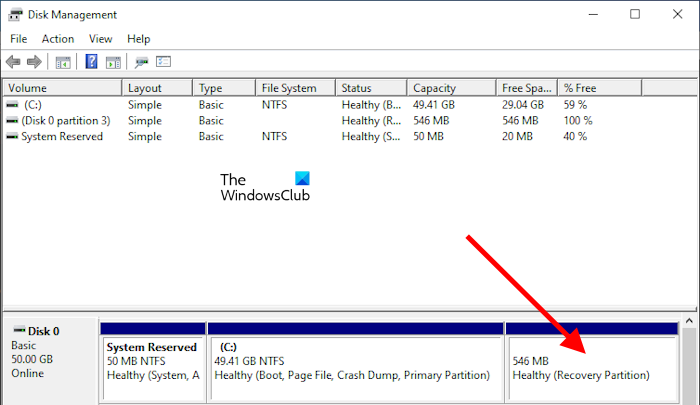
If you are a Windows user, you might have heard about Windows Recovery Environment, and some of you might have accessed it. WinRE is the short term used for Windows Recovery Environment. If the Recovery Partition is missing on your system or you have accidentally deleted it, you cannot boot into the Windows Recovery Environment.
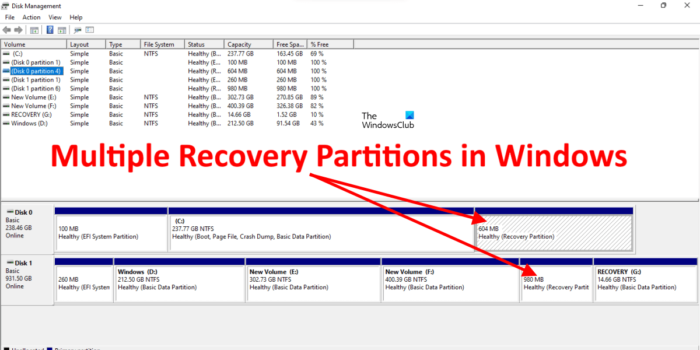
Some reports also show that users found more than one Recovery Partition on their computer systems. This happens when you upgrade the Windows operating system from a lower version to a higher version, say from Windows 10 to Windows 11, and there is not enough space on the existing Recovery Partition for the upgrade. In this case, Windows creates another Recovery Partition and leaves the previous Recovery Partition as it is. In such cases, you can delete the older Recovery Partition.
You will also find two Recovery Partitions on your computer if the OEM creates one and the other is created while installing the Windows OS.
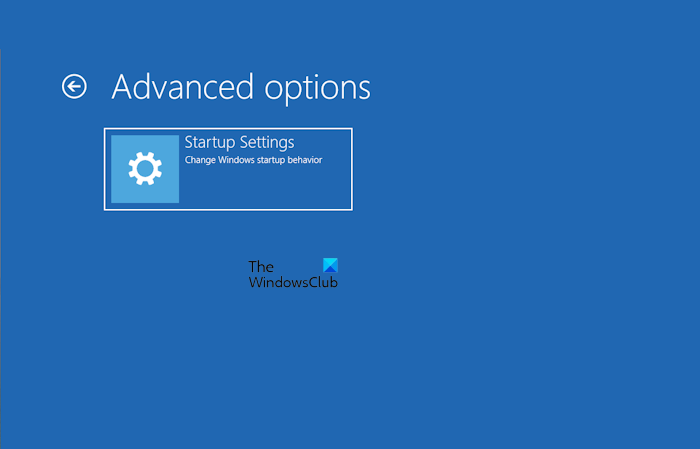
When the Recovery Partition is missing, you will not find the Advanced Recovery Options in the Windows Recovery Environment (refer to the above image).
How to view Windows Recovery (WinRE) file on Windows 11/10
The WinRE file is the Windows Recovery Environment file that contains the system image and other crucial operating system files needed to perform required actions in the Windows Recovery Environment. This file is located in the root directory but is hidden. To view this file, you have to force Windows 11/10 to show the hidden files and protected system files.
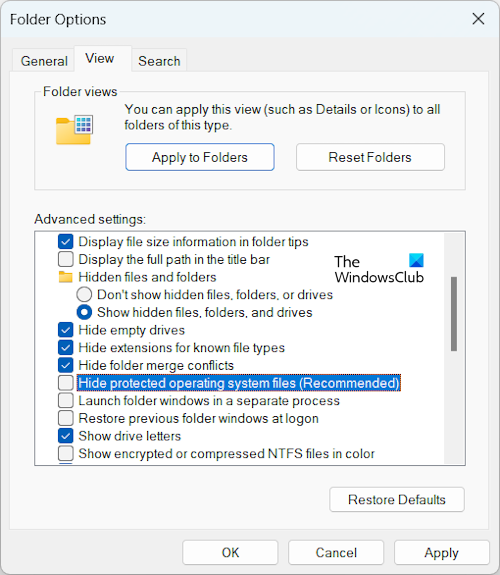
To force Windows to display the protected operating system files, follow the steps provided below:
- Open File Explorer.
- In Windows 11, click on the three dots and select Options. In Windows 10, go to View > Options.
- Select the View tab.
- Uncheck the Hide protected operating system files (recommended) checkbox.
- Click Apply and then click OK.
Now, go to the following location in File Explorer:
C:\Windows\System32\Recovery
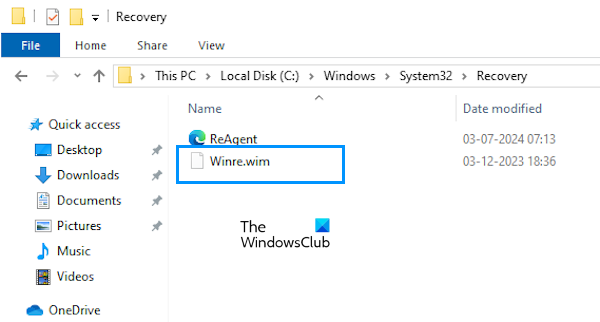
You will see the Winre.wim file there. It is the Windows Recovery Environment file.
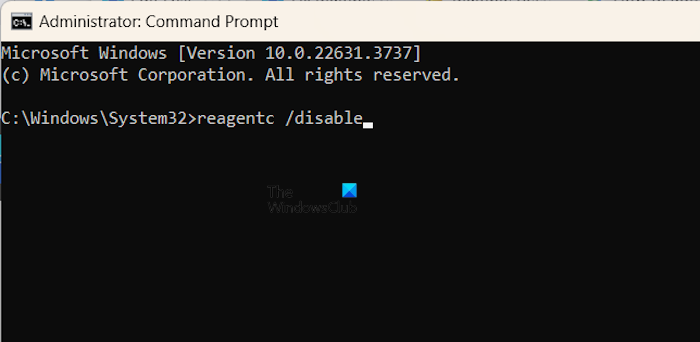
If you do not see this file, disable the Windows Recovery Environment by executing the following command in the elevated Command Prompt window.
reagentc /disable
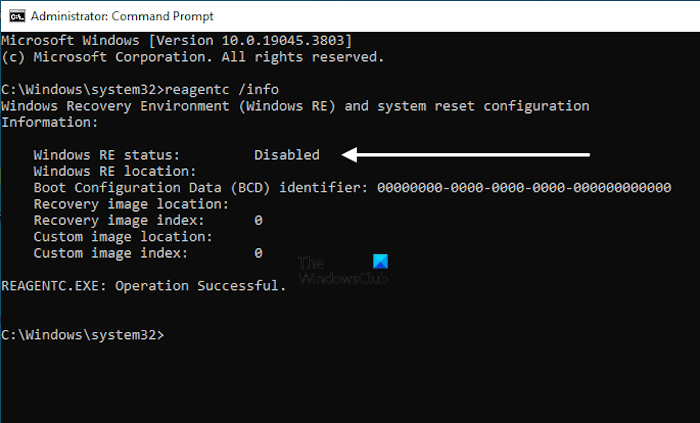
As you run the above command, the Winre.wim file will appear on the above-mentioned location on your C drive. The following command will show you the status of the Windows Recovery Environment.
reagentc /info
To create or add a Recovery Partition on Windows 11/10, you have to create a new partition on your C drive without assigning a drive letter, then assign it the ID of Recovery Partition based on the partition style of your hard disk.
To view your hard disk’s partition table, open the Disk Management app, right-click on your hard disk, and select Properties. Then, go to the Volumes tab to view its partition style.
Let’s see this process.
First, create a new Recovery Partition in Disk Management. Follow the steps provided below:
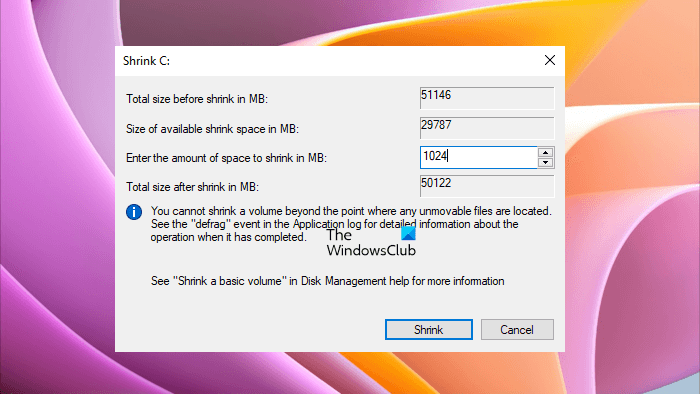
- Open Disk Management.
- Right-click on your C drive and select Shrink Volume.
- Enter 1024 and click Shrink. This will create a new Unallocated volume of 1 GB next to your C drive.
- Now, right-click on the Unallocated volume and select New Simple Volume.
- Click Next and select the Do not assign a drive letter or drive path option.
- Click Next and select the Format this volume option. Name this partition as Recovery Partition, and click next.
- Click Finish.
After performing the above steps, a new partition with the name Recovery Partition has been created. However, this partition does not contain the system image needed for the Windows Recovery Environment.
Now, open Command Prompt as an administrator and type the following command. Hit Enter after that.
diskpart
The above command will launch the Diskpart tool in the Command Prompt. Enter the following commands and hit Enter after entering each command:
list disk

select disk #

list partition

select partition #
In the above commands, replace # with the correct Disk number and Partition number. The Recovery Partition has an ID 27 (if the hard disk is MBR) and it is displayed as Type in the cmd. You have to assign this ID to the newly created Recovery Partition.
Now, type the following command and hit Enter:
detail partition
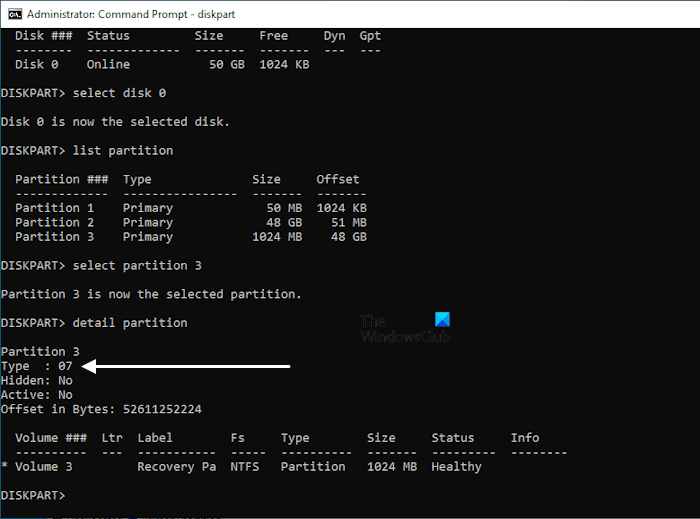
The above command will show you the details of the newly created Recovery Partition. That partition does not have ID 27 (refer to the above image). Set the ID=27 if the partition style of your hard disk is MBR.
Change the partition ID of the new Recovery Partition by executing the following command:
set id=27
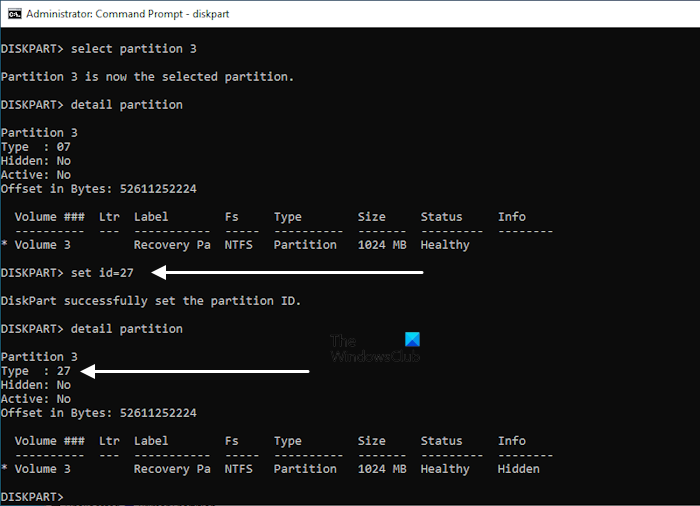
After the successful execution of the above command, the Winre.wim file will be copied to the new Recovery Partition. To confirm, you can view the details of the Recovery Partition. First, exit the Diskpart then type the following command:
reagentc /info
If your hard disk has a GPT partition style, you need to replace the ID 27 with the following ID:
de94bba4-06d1-4d40-a16a-bfd50179d6ac
Hence, in this case, the command will be:
set id=de94bba4-06d1-4d40-a16a-bfd50179d6ac
Those who have a GPT partition style have to execute one more command.
gpt attributes=0X8000000000000001
Now, the Recovery Partition has been created on your GPT hard disk.
That’s it. I hope this helps.
These posts will help you if you receive errors:
- REAGENTC.EXE The Windows RE image was not found
- REAGENTC.EXE Operation failed, An error has occurred
How to enable Recovery Partition in Windows?
The Recovery Partition is enabled or active by default on Windows 11/10. You need not enable it manually. You can check its status by executing the reagentc /info command in the elevated Command Prompt window. If it shows the status of the Recovery Partition disabled, you can enable it by running the reagentc /enable command in the Command Prompt as administrator.
Is recovery partition necessary?
A Recovery Partition contains a file called Winre.wim. This file contains the system image and other necessary files required to restore your system to a working state if any problem occurs. Recovery Partition also allows you to repair corrupted Windows OS. Therefore, a Recovery partition is necessary on Windows.
Read next: How to use Recovery Drive to restore Windows.
If you bought a pre-built system or a laptop, you might have seen a factory reset option which resets Windows 10 to its factory built state. Using the recovery partition, you can easily restore Windows when it is corrupted or cannot boot. Let me show you how to create a Windows 10 recovery partition of your own in simple steps.
A Few Things Before You Can Create Your Own Custom Recovery Partition in Windows 10
Before you can create a recovery partition in Windows 10, there are a few things you need to know and should have.
1. Keep your Windows 10 installation media ready. We are going to use the windows 10 installation drive to extract the OS image which can then be used to create a recovery image. If you don’t have the installation media, you can easily create a Windows 10 USB drive yourself. Make sure that the installed Windows 10 version and downloaded Windows 10 ISO version is the same. For instance, if I’m using Windows 10 v1809, the installation media should also be of v1809.
2. You should know how to create a partition. To create a partition, you can use the built-in disk management tool or third-party software like EaseUS Partition Manager.
3. Make sure that you’ve installed all the Windows updates and software that you use regularly. This makes it sure that when you restore your system using the recovery partition, you will have all your software ready to use.
4. This is not necessary but makes your life easier when using the command prompt. In the File Explorer, rename the C Drive to something you can easily recognize. For instance, I renamed my drive to OS Drive. To rename a drive, simply right-click on the drive and select “Rename”.

Creating a custom factory reset partition in Windows 10 is fairly simple. However, it is lengthy. So, to make matters simple, I’ve divided the steps into three sections. Just follow the below steps as is and you should be good.
1.1 Extract Windows Image to Create Windows 10 Recovery Partition
The first thing we need to do is extract the Windows 10 image. However, since you cannot extract the Windows 10 image while you are using it, we need to boot into the Windows 10 installation media.
1. Plug in the Windows 10 installation drive, reboot your system and boot into the installation media.

2. In the language selection screen, press Shift + F10 to open the command prompt window.

3. When you boot into Windows 10 installation media, there is a chance the drive letters will be changed temporarily. So, it is better to know the current drive letter of the OS installation drive and the drive where you’d like to store the extracted image file. To know the drive letter, we need to use the diskpart utility. So, execute the below command.
diskpart

4. Next, use the below command to list all the volumes in your system. In my case, the drive letter didn’t change. So, my OS installation drive letter is still C and the drive where I want to save the extracted image is D. Remember both drive letters, you need them in the next step.
listvol

5. Once you know the drive letters, exit the diskpart tool using the below command.
exit
6. Now, use the below command to extract the OS image and save it to the drive of your choice. Don’t forget to replace <DestinationDriveLetter> with the actual destination drive letter and <OSInstallationDriveLetter> with the actual OS installation drive letter.
dism /capture-image /imagefile:<DestinationDriveLetter>:\install.esd /capturedir:<OSInstallationDriveLetter>:\ /name:"Recovery" /compress:maximum
Once you add the drive letters, the command will look something like this. I’m extracting the Windows 10 image from C drive and storing it in the D drive.
dism /capture-image /imagefile:D:\install.esd /capturedir:C:\ /name:"Recovery" /compress:maximum

7. As soon as you execute the above command, Windows starts to extract the image. It can take some time to complete.

8. Once that is done, the extracted image will be saved to the drive you chose earlier. Close the command prompt window and reboot Windows 10.

9. After rebooting Windows, if you go the drive where you save the extracted image, you will see a file named “install.wim”. In my case, the install.wim file is around 5GB. This can vary depending on the applications and updates you’ve installed.
1.2 Copy Windows 10 Installation Files to Recovery Partition
10. Now, create a new partition that is a couple of gigabytes bigger than the size of the install.wim file. For instance, if your extracted install.wim file is around 10GB, create a new partition that is around 12GB. Remember the drive letter of the new partition, we are going to need it in the coming steps.

11. Now, plug in the Windows 10 USB drive, copy all the files in it and paste them in the new partition.

12. Next, copy the extracted “install.wim” file and paste it inside the “sources” folder in the new partition. You will see a duplicate file warning. Select “Replace” to replace the already existing “install.wim” file with the newly extracted “install.wim” file.

1.3 Add Recovery Partition to Advanced Boot Menu
Up until now, we’ve only created the recovery partition. We now need to add that recovery partition to the advanced boot menu. We are going to do that using a batch file. This allows you to boot into recovery from the advanced startup options.
13. Right-click on the desktop and select “New -> Text document”.

14. Rename the text file to “recovery.bat”. You can name the file anything you want, just make sure that the file extension ends with .bat.
15. Right click on the batch file and select “Edit”.

16. Paste the following code in the notepad and click on the “File -> Save” option. Close the file after saving.
@ECHO OFF
TITLE Add Recovery to Windows boot menu
:SETLETTER
CLS
ECHO.
ECHO ###################################################
ECHO # This batch file creates recovery environment    #
ECHO # adding it to Windows boot menu.                 #
ECHO ###################################################
ECHO.
SET /P DRIVELETTER= ^-- Please enter drive letter for your custom recovery partition (without colon):
IF NOT EXIST %DRIVELETTER%:\sources\boot.wim ECHO. & ECHO No valid Windows image found on given partition %DRIVELETTER% &ECHO. & PAUSE & GOTO :SETLETTER
ECHO.
bcdedit /create {ramdiskoptions} /d "Ramdisk"
bcdedit /set {ramdiskoptions} ramdisksdidevice partition=%DRIVELETTER%:
bcdedit /set {ramdiskoptions} ramdisksdipath \boot\boot.sdi
for /f "tokens=2 delims={}" %%i in ('bcdedit.exe /create /d "Recovery" /application OSLOADER') do (set guid={%%i})
bcdedit /set %guid% device ramdisk=[%DRIVELETTER%:]\sources\boot.wim,{ramdiskoptions}
bcdedit /set %guid% path \windows\system32\winload.efi
bcdedit /set %guid% osdevice ramdisk=[%DRIVELETTER%:]\sources\boot.wim,{ramdiskoptions}
bcdedit /set %guid% systemroot \windows
bcdedit /set %guid% winpe yes
bcdedit /set %guid% detecthal yes
bcdedit /displayorder %guid% /addlast
pause

18. Open the start menu, search for the command prompt, right-click on it and select the “Run as administrator” option.

19. Since the batch file is on the desktop, use the below command to go to the desktop. Replace <username> with your actual Windows 10 username.
cd c:\users\<username>\desktop

20. Once you are in the desktop, execute the batch file with its name.

21. As soon as you execute the file, the command prompt will ask you to enter the recovery partition drive letter. Type the drive letter and press Enter. In my case, the recovery partition drive letter is F.

22. The script will now add the recovery partition to the advanced startup boot options menu. Once the script has been executed successfully, you can close the command prompt window.

That is it. You’ve successfully created your own recovery partition in Windows 10 and added it to the boot options.
Windows 10 Create Recovery Partition Conclusion
As you can see, it is pretty easy to create a recovery partition in Windows 10. To see the recovery partition you need to boot into advanced startup options. To do that, open the Settings app, go to “Update and Security -> Recovery” and click on the “Restart Now” button under Advanced Startup. In the Advanced Startup options, click on the “Use another operating system” option.

You will see the recovery option.

If you ever cannot boot into Windows, simply boot into the Windows 10 installation media, press Shift + F10 to open the command prompt, and execute the below command. Replace <DriveLetter> with the actual drive letter of the recovery partition. This action will reinstall Windows with all your applications and updates intact.
<DriveLetter>:\setup.exe
Once you replace the actual drive letter, this is how the command should look like.
F:\setup.exe
Hope that helps. If you like this article, do check out how to lock folder in Windows 10 and how to change timezone in Windows 10.
Creating a recovery partition on Windows 10 is a great way to ensure you can quickly restore your computer to its original state in case something goes wrong. This guide will walk you through the process step by step, so you can easily set up a dedicated space on your hard drive to house a recovery partition. By the end, you’ll have a safety net for your system.
Setting up a recovery partition in Windows 10 involves several steps that will help you create a dedicated space on your hard drive for system recovery. This process ensures that, if your computer encounters serious issues, you can quickly restore it to a working state.
Step 1: Create a System Image
First, you’ll create a system image to store your system’s state.
A system image is like a snapshot of your entire system, including files, settings, and applications. It’s stored in a format that can be restored later.
Step 2: Open Disk Management
Next, open Disk Management by searching for it in the Start menu.
Disk Management is a built-in Windows tool that allows you to manage disk partitions, including creating, deleting, and resizing them.
Step 3: Shrink a Volume to Create Unallocated Space
Right-click a volume and select “Shrink Volume” to create unallocated space.
Shrinking a volume reduces its size, freeing up space on your hard drive. This unallocated space will be used to create the recovery partition.
Step 4: Create a New Simple Volume
Right-click the unallocated space and select “New Simple Volume.”
A new simple volume is essentially a new partition. You’ll follow the wizard to assign it a drive letter and format it.
Step 5: Copy System Image to New Partition
Copy the previously created system image to the new partition.
Placing the system image on the new partition ensures it’s available for recovery. Ensure the partition has enough space for the image.
After completing these steps, you now have a recovery partition on your Windows 10 system. This partition can be used to restore your PC in case of critical issues, ensuring you have a backup ready to go.
Tips for Creating a Recovery Partition on Windows 10
- Backup Regularly: Always keep a regular backup of your important files in addition to the recovery partition.
- Use a Large Enough Partition: Ensure your recovery partition is large enough to hold your system image and any additional files.
- Label the Partition: Name the partition clearly, so you know it’s for recovery purposes.
- Keep Recovery Tools Handy: Have a USB drive with recovery tools, just in case the partition gets corrupted.
- Update the Image Periodically: Refresh the system image every few months to ensure it includes the latest updates and settings.
Frequently Asked Questions
What is a recovery partition?
A recovery partition is a section of your hard drive dedicated to storing system recovery data. It helps in restoring your PC to its original state in case of system failures.
Can I delete the recovery partition?
Yes, but it’s not recommended unless you have another form of backup. Deleting it removes your quick recovery option.
How much space should I allocate for the recovery partition?
Allocate enough space to cover your system image and any additional recovery tools. Typically, 20-30 GB is sufficient, but it depends on your system size.
Can I create a recovery partition on an external drive?
Yes, you can create a recovery partition on an external drive, but it won’t be as readily accessible as one on your internal hard drive.
What happens if the recovery partition gets corrupted?
If the recovery partition gets corrupted, you may not be able to restore your system from it. This is why having a secondary backup like a USB recovery drive is essential.
Summary of Steps
- Create a system image.
- Open Disk Management.
- Shrink a volume.
- Create a new simple volume.
- Copy system image to new partition.
Conclusion
Creating a recovery partition on Windows 10 is a smart way to prepare for the unexpected. By following these steps, you set up a dedicated space on your hard drive that can help you restore your system quickly and efficiently. Having this safety net means you’re better prepared for any technical mishaps that might come your way.
Remember, this recovery partition is just one part of a robust backup strategy. Regularly updating your system image and keeping additional backups on external drives can further safeguard your data. If you run into any trouble or have questions, numerous online communities and resources can offer assistance. Now, go ahead and set up that recovery partition—you’ll thank yourself later!
Matt Jacobs has been working as an IT consultant for small businesses since receiving his Master’s degree in 2003. While he still does some consulting work, his primary focus now is on creating technology support content for SupportYourTech.com.
His work can be found on many websites and focuses on topics such as Microsoft Office, Apple devices, Android devices, Photoshop, and more.


