
1. Overview
With a bootable Ubuntu USB stick, you can:
- Install or upgrade Ubuntu
- Test out the Ubuntu desktop experience without touching your PC configuration
- Boot into Ubuntu on a borrowed machine or from an internet cafe
- Use tools installed by default on the USB stick to repair or fix a broken configuration
This tutorial will show you how to create a bootable USB stick on Microsoft Windows using Rufus.
For most users we recommend balenaEtcher instead of Rufus which is simpler to use and also available on MacOS and Ubuntu. Instructions are now included in the primary Install Ubuntu Desktop tutorial.
Creating a bootable Ubuntu USB stick from Microsoft Windows is very simple and we’re going to cover the process in the next few steps.
Alternatively, we also have tutorials to help you create a bootable USB stick from both Ubuntu and Apple macOS.

2. Requirements
You will need:
- A 4GB or larger USB stick/flash drive
- Microsoft Windows XP or later
- Rufus, a free and open source USB stick writing tool
- An Ubuntu ISO file. See Get Ubuntu for download links

Take note of where your browser saves downloads: this is normally a directory called ‘Downloads’ on your Windows PC. Don’t download the ISO image directly to the USB stick! If using Windows XP or Vista, download version 2.18 of Rufus.
3. USB selection
Perform the following to configure your USB device in Rufus:
- Launch Rufus
- Insert your USB stick
- Rufus will update to set the device within the Device field
- If the Device selected is incorrect (perhaps you have multiple USB storage devices), select the correct one from the device field’s drop-down menu

You can avoid the hassle of selecting from a list of USB devices by ensuring no other devices are connected.
4. Select the Ubuntu ISO file
To select the Ubuntu ISO file you downloaded previously, click the SELECT to the right of “Boot selection”. If this is the only ISO file present in the Downloads folder you will only see one file listed.
Select the appropriate ISO file and click on Open.

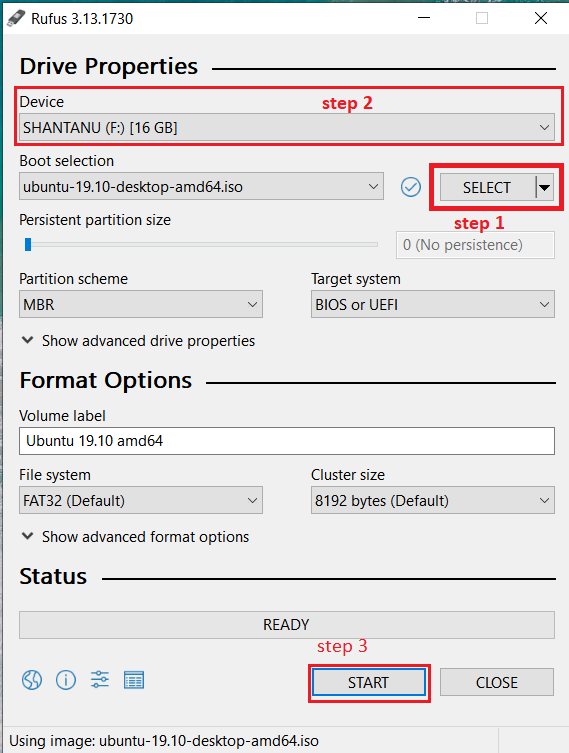
5. Write the ISO
The Volume label will be updated to reflect the ISO selected.
Leave all other parameters with their default values and click START to initiate the write process.

6. Additional downloads
You may be alerted that Rufus requires additional files to complete writing the ISO. If this dialog box appears, select Yes to continue.

7. Write warnings
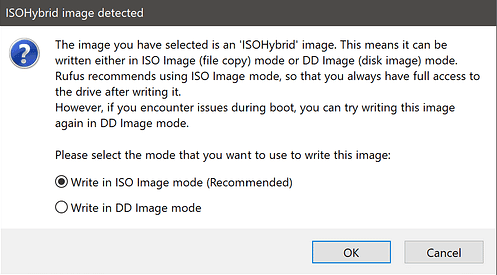
You will then be alerted that Rufus has detected that the Ubuntu ISO is an ISOHybrid image. This means the same image file can be used as the source for both a DVD and a USB stick without requiring conversion.
Keep Write in ISO Image mode selected and click on OK to continue.

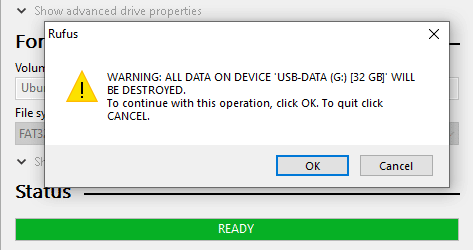
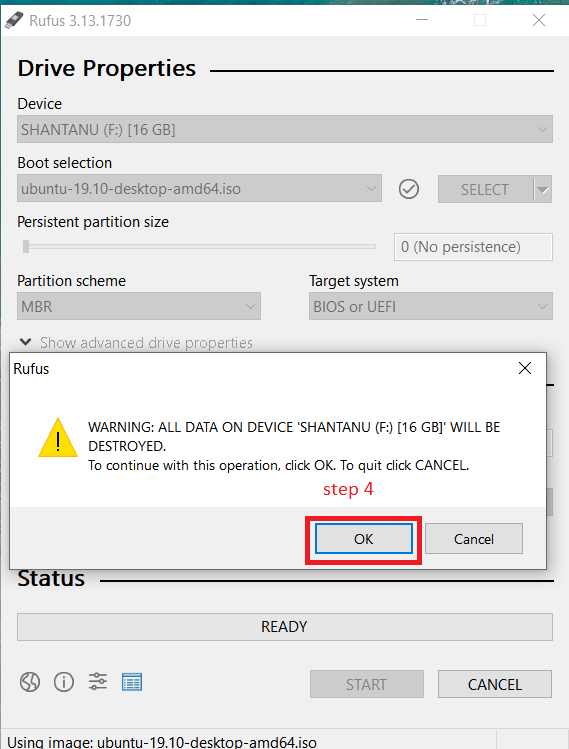
Rufus will also warn you that all data on your selected USB device is about to be destroyed. This is a good moment to double check you’ve selected the correct device before clicking OK when you’re confident you have.

If your USB stick contains multiple partitions Rufus will warn you in a separate pane that these will also be destroyed.
8. Writing the ISO
The ISO will now be written to your USB stick, and the progress bar in Rufus will give you some indication of where you are in the process. With a reasonably modern machine, this should take around 10 minutes. Total elapsed time is shown in the lower right corner of the Rufus window.

9. Installation complete
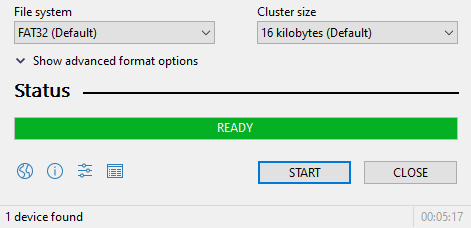
When Rufus has finished writing the USB device, the Status bar will be filled green and the word READY will appear in the center. Select CLOSE to complete the write process.

Congratulations! You now have Ubuntu on a USB stick, bootable and ready to go.
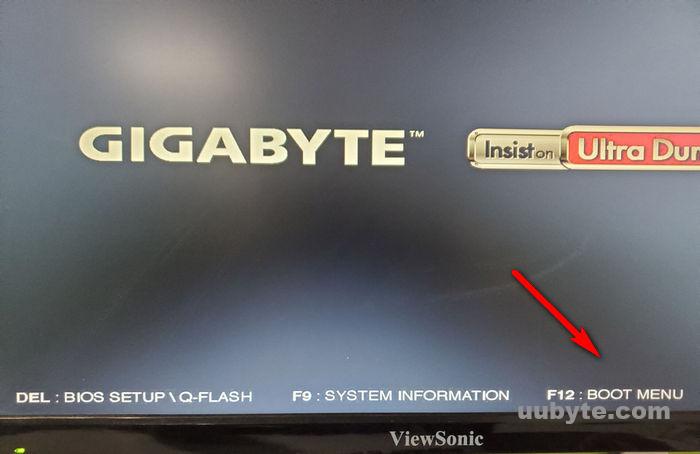
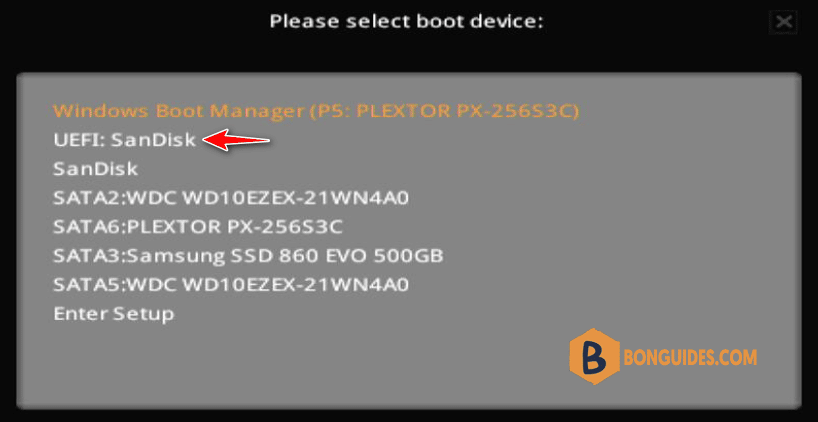
To use it you need to insert the stick into your target PC or laptop and reboot the device. It should recognise the installation media automatically during startup but you may need to hold down a specific key (usually F12) to bring up the boot menu and choose to boot from USB.
For a full walkthrough of installing Ubuntu, take a look at our install Ubuntu desktop tutorial.
Finding help
If you get stuck, help is always at hand:
- Ubuntu Discourse
- Ask Ubuntu
- IRC-based support
Was this tutorial useful?
Thank you for your feedback.
Creating a bootable Ubuntu USB drive is an essential skill for anyone looking to try out or install the popular Linux distribution on their computer. Whether you’re a seasoned developer or a casual user, having a bootable USB allows you to test Ubuntu without altering your current system setup.
In this guide, we’ll walk you through the process of creating an Ubuntu bootable USB on both Windows and Mac systems using the UUByte DMG Editor, a reliable and user-friendly tool.
Why Use UUByte DMG Editor?
Choosing the right tool to create a bootable USB can make the process seamless and hassle-free. UUByte DMG Editor stands out for several reasons:
1. Cross-Platform Compatibility: Whether you’re using a Windows PC or a Mac, UUByte DMG Editor supports both platforms. This brings a smooth experience regardless of the operating system.
2. User-Friendly Interface: The software is designed with simplicity in mind. Even if you’re not tech-savvy, the intuitive interface guides you through each step without confusion.
3. Fast and Reliable: UUByte DMG Editor efficiently handles large files and complex operations, reducing the time required to create a bootable USB and minimizing the risk of errors.
4. Support All Linux ISO: Including, Ubuntu, Kubuntu, Ubuntu Server, Debian, Fedora, Centos and other Linux distributions.
How to Create an Ubuntu Bootable USB Using UUByte DMG Editor
Follow these step-by-step instructions to create your Ubuntu bootable USB drive using UUByte DMG Editor on either Windows or Mac.
Step 1: Click the below link to download the Windows version of UUByte DMG Editor. Run the installer and follow the on-screen instructions to complete the installation.
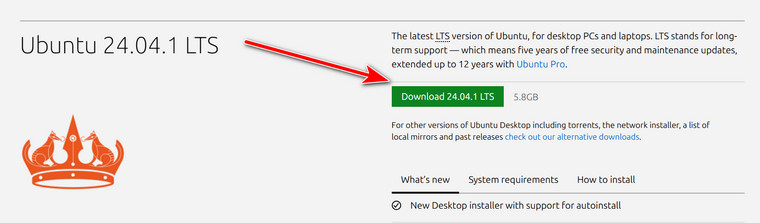
Step 2: Go to the Ubuntu official website and download the latest Ubuntu ISO file from the following link:
https://ubuntu.com/download/desktop
Step 3: Plug in a USB drive and open UUByte DMG Editor from your Start menu or desktop shortcut.
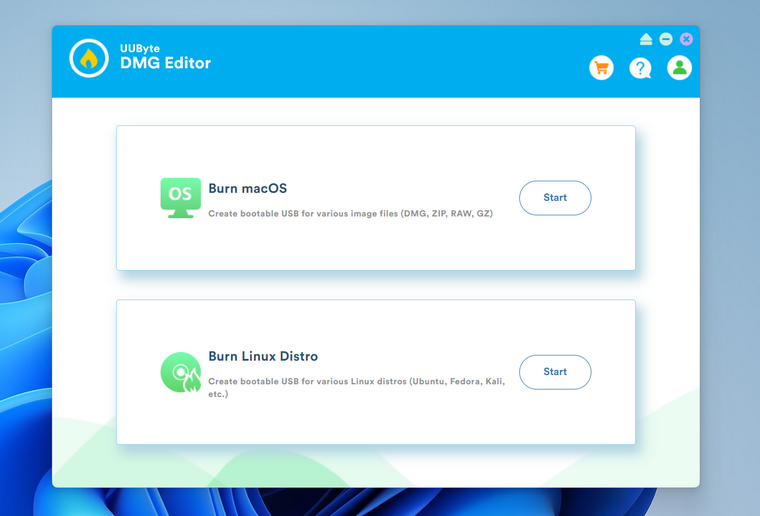
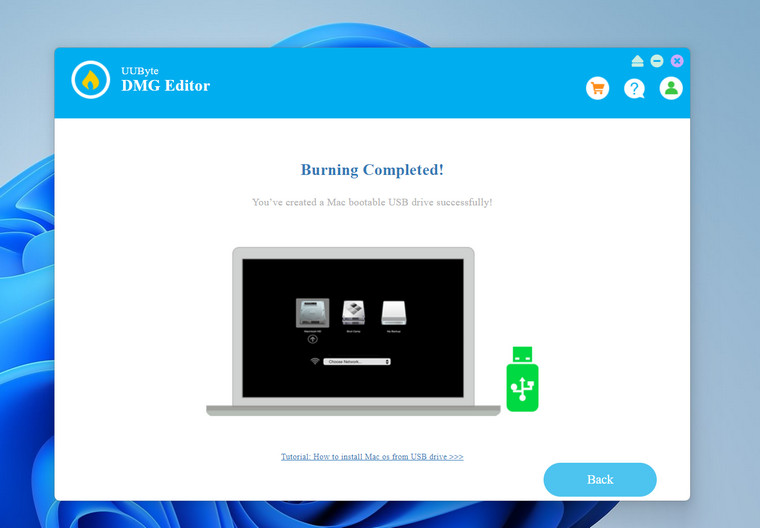
Step 4: In the UUByte DMG Editor interface, click on the «Burn Linux Distro» option. Browse and select the downloaded Ubuntu ISO file. After that, choose the correct USB drive from the list.
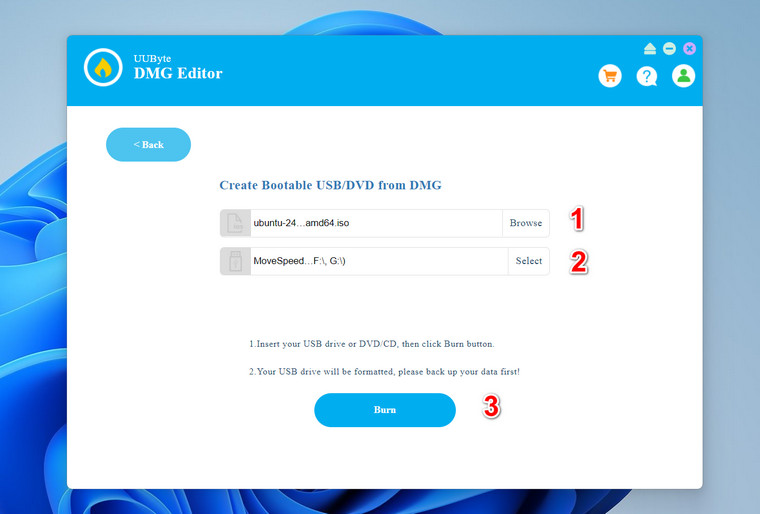
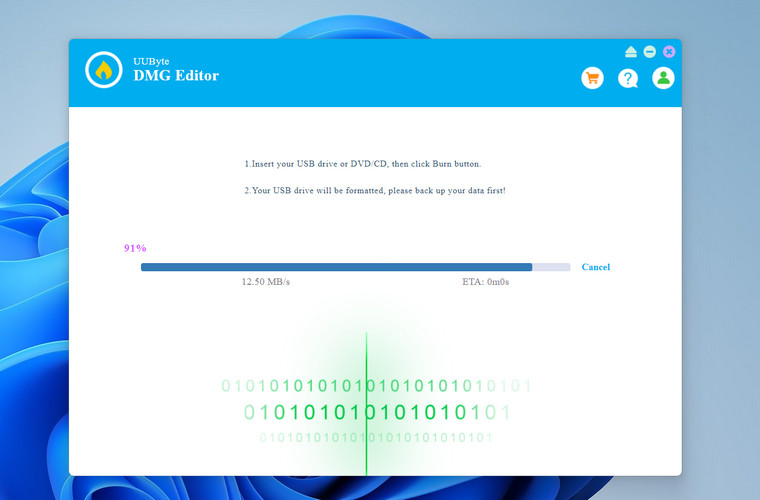
Step 5: Click the «Burn» button to begin the process. Wait for the software to complete writing the ISO to the USB drive. This may take several minutes.
Step 6: Once the process is finished, safely eject the USB drive from your computer. Your Ubuntu bootable USB is now ready to use.
Booting the Computer from the USB and Installing Ubuntu
With your bootable USB ready, the next step is to boot your computer from the USB drive and install Ubuntu. Plug the Ubuntu bootable USB drive into the computer where you want to install Ubuntu.
Restart the computer. As it starts up, you’ll need to access the boot menu. This usually involves pressing a specific key (such as F12, F10, Esc, or Del) immediately after powering on. Refer to your computer’s manual for the exact key.
In the boot menu, select the USB drive as the primary boot device. This will allow your computer to boot from the USB instead of the internal hard drive.
Once booted from the USB, you’ll see the Ubuntu welcome screen. You can choose to «Try Ubuntu» to test it without making changes to your system or proceed directly to «Install Ubuntu.«
Select your language and follow the on-screen instructions. Choose your installation preferences, such as keyboard layout, installation type (e.g., alongside existing OS, erase disk and install Ubuntu), and other settings.

Conclusion
Creating a bootable Ubuntu USB drive is a straightforward process, especially with the help of reliable tools like UUByte DMG Editor. Whether you’re using a Windows PC or a Mac, UUByte DMG Editor simplifies the creation of a bootable USB, allowing you to explore and install Ubuntu with ease. By following the steps outlined in this guide, you can set up Ubuntu on your computer, enabling you to enjoy the flexibility and power of Linux. Happy computing!
Table of Contents
With a bootable Ubuntu USB stick, you can:
- Install or upgrade Ubuntu.
- Test out the Ubuntu desktop experience without touching your PC configuration.
- Boot into Ubuntu on a borrowed machine or from an internet cafe.
- Use tools installed by default on the USB stick to repair or fix a broken configuration.
This tutorial will show you how to create a bootable USB stick on Microsoft Windows using Rufus and balenaEtcher.
Requirements
- A 4GB or larger USB stick/flash drive.
- Microsoft Windows XP or later.
- Rufus or baleanEtcher, they are free and open-source USB stick writing tool.
- An Ubuntu ISO file. See Get Ubuntu for download links.
Create a bootable Ubuntu USB stick using Rufus
You just need download the portable version of Rufus instead of installed Rufus on your computer.
1. Launch Rufus, insert your USB stick. Rufus will update to set the device within the Device field then select the correct one from the device field’s drop-down menu.
2. Select the Ubuntu ISO file you downloaded previously, click the to the right of Boot selection. then select the appropriate ISO file and click on Open.
3. The Volume label will be updated to reflect the ISO selected. Leave all other parameters with their default values and click to initiate the write process.
4. You will then be alerted that Rufus has detected that the Ubuntu ISO is an ISOHybrid image. This means the same image file can be used as the source for both a DVD and a USB stick without requiring conversion. Keep Write in ISO Image mode selected and click on OK to continue.
5. Rufus will also warn you that all data on your selected USB device is about to be destroyed. This is a good moment to double check you’ve selected the correct device before clicking OK when you’re confident you have.
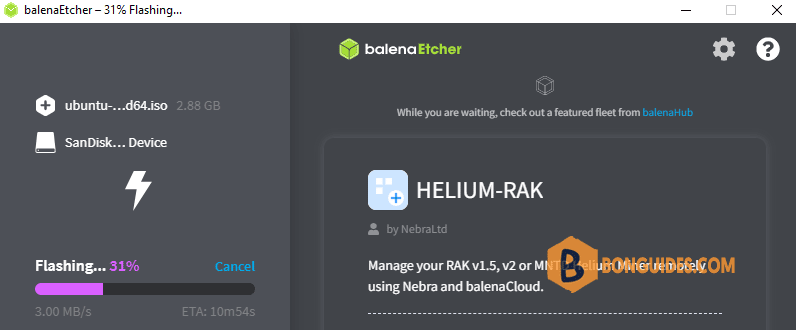
6. The ISO will now be written to your USB stick, and the progress bar in Rufus will give you some indication of where you are in the process. With a reasonably modern machine, this should take around 10 minutes. Total elapsed time is shown in the lower right corner of the Rufus window.
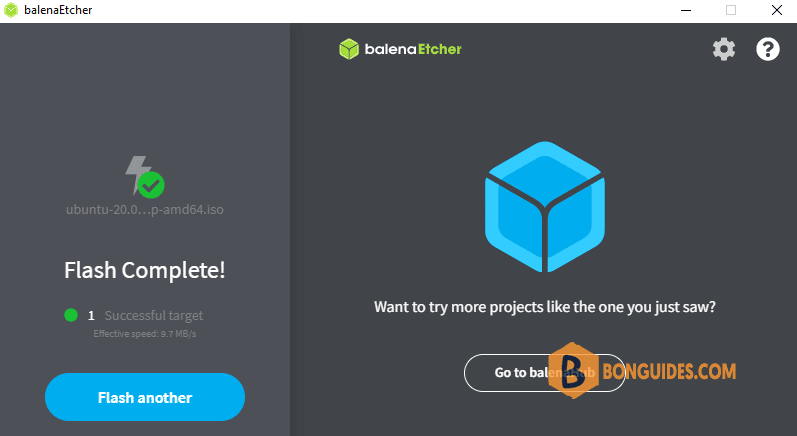
7. When Rufus has finished writing the USB device, the Status bar will be filled green and the word READY will appear in the center. Select CLOSE to complete the write process.
Congratulations! You now have Ubuntu on a USB stick, bootable and ready to go.
To use it you need to insert the stick into your target PC or laptop and reboot the device. It should recognize the installation media automatically during startup, but you may need to hold down a specific key (usually F12) to bring up the boot menu and choose to boot from USB.
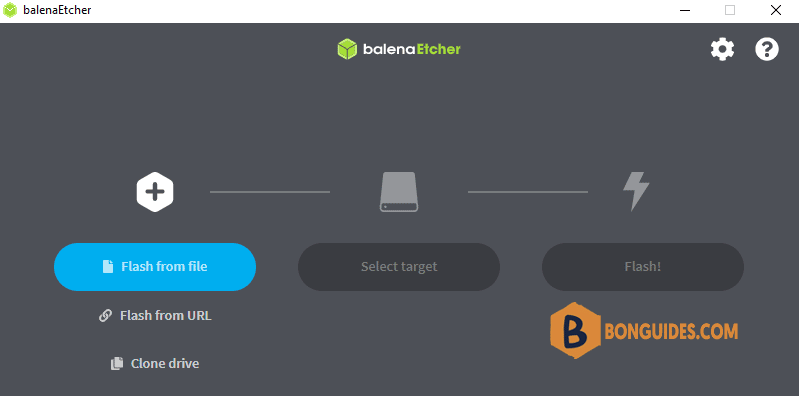
Create a bootable Ubuntu USB stick using balenaEtcher
1. Visit balenaEtcher site then download the portable version of the tool.
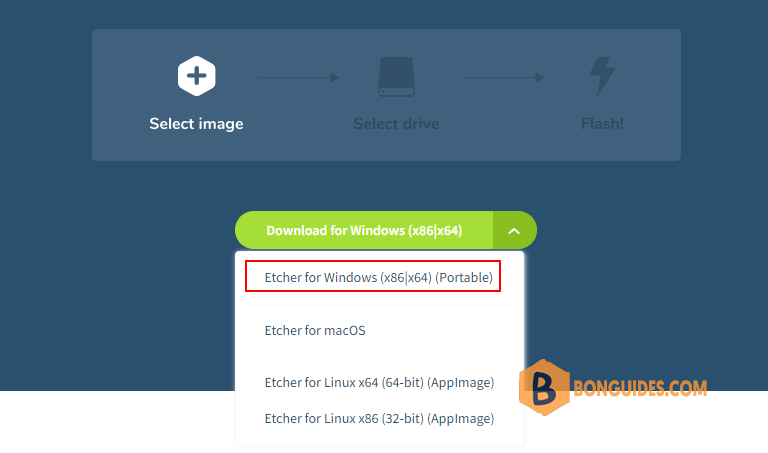
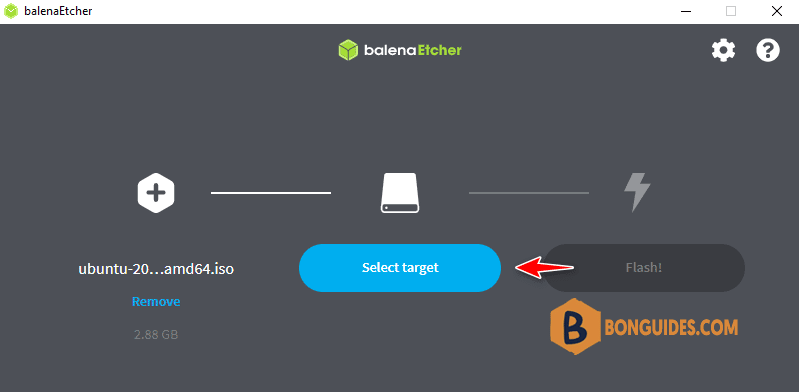
2. Open downloaded file to run balenaEtcher. First, click on the Flash from file button then select your iso of Ubuntu image.
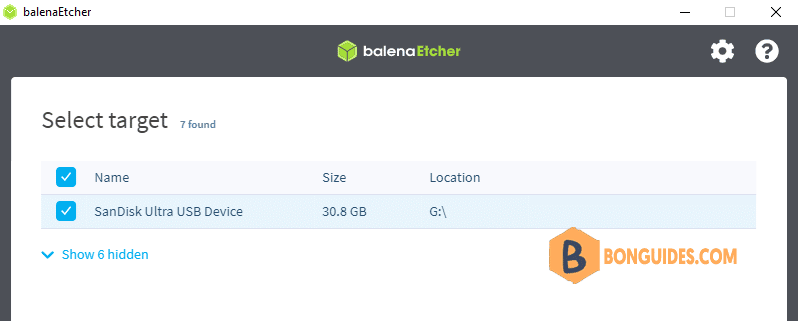
3. Next, select your USB stick to create a bootable drive.
4. Finally, click on the button.
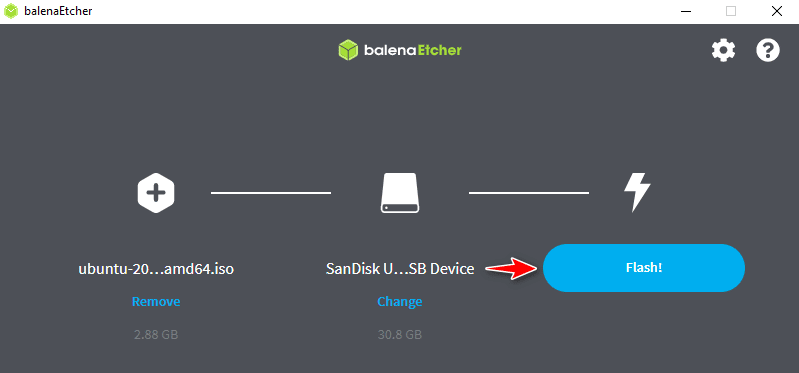
5. Creating an Ubuntu bootable USB stick, it could take several minutes to complete.
Congratulations! You now have Ubuntu on a USB stick, bootable and ready to go.
Last Updated :
07 May, 2025
A Ubuntu live USB is a bootable flash drive that contains a full Ubuntu operating system, allowing you to run Ubuntu without touching your Windows hard drive.
In this article, we will look into the process of creating an Ubuntu live USB on a Windows machine. This USB drive can be further used to either install Ubuntu on your Windows machine or use Ubuntu directly from the USB drive.
Requirements:
- A USB drive (8GB minimum, 16GB+ recommended)
- A Windows PC with internet access
Create Ubuntu Live USB
Here are the steps to create a live USB to install Ubuntu.
Step 1: Download the Ubuntu ISO Image
First, you need to download the Ubuntu ISO image file, before installing it on USB. You can download any version of Ubuntu at no cost.
Step 2: Download a USB Installer Tool (Rufus)
Once you have downloaded the ISO of Ubuntu, download the latest version of Universal USB Installer. For the sake of demonstration, we will be using the Rufus USB installer.
Note: Rufus is a utility that helps format and create bootable USB flash drives, such as USB keys/pendrives, memory sticks, etc.
The user can also use the
- Balena Etcher: User-friendly, cross-platform
- Universal USB Installer: Lightweight but slower
- Ventoy: Supports multiple ISOs on one USB
Step 3: Create a Bootable Ubuntu Live USB
Now we need to create a bootable USB. To do so, Plugin the USB drive in the computer and run Universal USB Installer. Follow the below steps to work with the installer:
- Step 1: Browse to the location of the downloaded Ubuntu ISO
- Step 2: Select the USB drive in which you want to flash Ubuntu.
- Step 3: Click on the start button to start the process.
- Step 4: Click OK
Now Wait for some time for the process to complete.
Once your Ubuntu live USB is prepared, it’s time to start it up and try Ubuntu in live mode or install it, according to Ubuntu Official Documentation. Booting from the USB means restarting your Windows computer, entering the boot menu, and choosing the USB drive. Live mode allows you to try Ubuntu without altering your Windows system, similar to taking a test drive in a car.
Conclusion
Building a Ubuntu live USB on your Windows system is essentially availing a free ticket to explore Ubuntu Linux without venturing out of your comfort zone. Using just a USB stick, a Ubuntu ISO, and an instrument such as Rufus, you can test Ubuntu 24.04 LTS, recover Windows files, or even install a dual-boot setup in less than an hour
Do you want to try the latest version of Ubuntu on your computer without installing it? Want to create an Ubuntu Live USB but not sure how to prepare the same on a PC running Windows 10? This guide will show you how to prepare a bootable Ubuntu Live USB in Windows 10.

What is a Live Ubuntu USB?
An Ubuntu Live USB lets you boot and run Ubuntu operating system from a USB drive. You do not need to install Ubuntu on your computer. With the help of Live USB, you can try Ubuntu on your computer without installing it or you can also use the Live USB to back up data from an unbootable Windows 10 PC.
There are multiple applications out there to create Ubuntu Live USB. In this guide, we are using the popular Rufus software. The software is free, fast, and easy-to-use as well.
Complete the steps given below to make your Ubuntu Live USB.
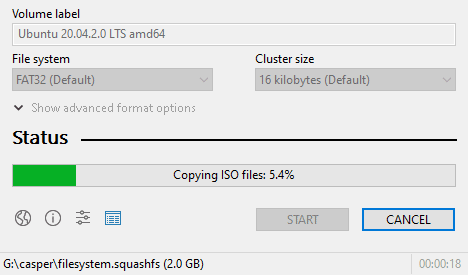
Step 1: The first step is to download the Ubuntu Desktop ISO, if not done already. Visit the official Ubuntu download page and get the latest version of Ubuntu Desktop. As of writing this article, 20.04.2.0 is the newest version, and its size is 2.7 GB.

Step 2: Once you have the Ubuntu ISO image, get the Rufus software from this page. As you might know by now, Rufus (free) is the best-in-class bootable USB-making utility out there for Windows. It can be used to prepare the bootable USB of Windows and Linux versions.
As we are using the Rufus just once, get the portable version (does not require an installation) from this official download page.
Step 3: Connect the USB drive that you intend to use as the Ubuntu Live USB. Back up or move all data from the connected USB drive as it will be erased before transferring files from the Ubuntu ISO.
Step 4: Run the Rufus software. Once running, it will automatically detect and select the connected USB drive. If you have multiple USB drives connected, select the USB drive that you want to make it as Ubuntu Live.
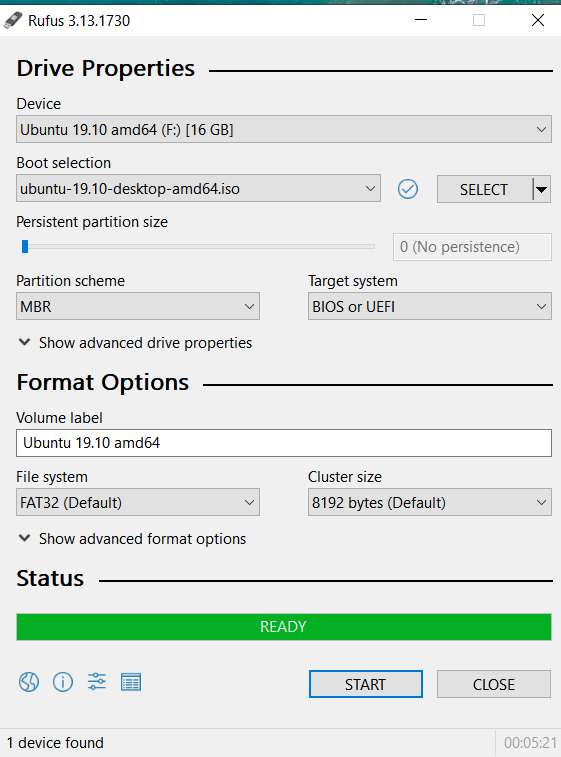
Next, in the Boot selection section, click on the Select button, browse to the Ubuntu ISO file, select the same and then click the Open button.

Now, if you are using Ubuntu 19 or later version, you will see a new section called Persistent partition size upon selecting the Ubuntu ISO image.
What is a persistent partition?
Generally, when you shut down Ubuntu or any other Linux distros running from a USB drive (Live USB), all changes or saved files will be deleted. However, while using an Ubuntu Live USB with a persistent partition, you can save files and even update many Ubuntu apps to the latest version. The persistent partition is used to save files and changes. Ubuntu Live USB with a persistent partition works more or less like a proper Ubuntu installation. It is just that you cannot update the operating system.
We recommend you create a persistent partition if you plan to use the Ubuntu Live USB for a long time without installing it on your PC. To create a persistent partition, move the slider in the Persistent partition size section. If your intention of making the Live USB is to try Ubuntu for a short time, you can ignore the persistent partition section.
Step 5: In the Partition scheme section, select MBR or GPT depending on your PC’s type, and then select UEFI (non CSM) or BIOS/UEFI from the Target system drop-down menu.
Step 6: Make sure that the File system is selected as FAT32. Finally, click on the Start button.

Step 7: When you get the following prompt, click on the OK button to give the Rufus tool permission to delete all data on the selected USB drive. If you have not backed up your data from the USB drive, please do so before clicking on the OK button.

Rufus might take approximately 20 minutes to prepare the Ubuntu Live USB. Once done, you will see the Ready message.

You may now connect the Ubuntu Live USB to any PC, make changes to BIOS startup settings to enable booting from USB, and then boot from the Ubuntu Live USB drive.
How to make the bootable USB of Ubuntu on Windows 10 guide might also interest you.