
Download Article
Make shortcuts quickly and easily on Windows 10 and 11
Download Article
- Using the Desktop Menu
- Using the Start Menu
- Using the File Location
- Making Website Shortcuts
- Video
- Expert Q&A
|
|
|
|
|
Desktop shortcuts allow files and applications to be opened easily with just 2 clicks, and can save you valuable time when you’re on the computer. With the help of computer specialist Yaffet Meshesha, we’ll guide you through the easiest ways to set up as many shortcuts as you need using the desktop menu, the file location itself, or the start menu. We’ll also cover how to make shortcuts of your favorite websites, no matter which browser you’re using.
Quick Steps
- Right-click (or press) the desktop to pull up a smaller menu.
- Click New > Shortcut.
- Click Browse.
- Find and click on the file you’d like a shortcut of.
- Hit OK.
- Find your new shortcut on the desktop.
-

If your computer has a touch screen, press and hold on the screen to access this menu.[1]
-
This will open up the Create Shortcut window.
Advertisement
-

It may help to review the exact file location of your desired app or file so it’s easy to access here. As soon as you choose the location, the box will be filled with the file path.[2]
- You can also type the address of the file if you know it offhand, but there are less likely to be any errors if you choose it manually.
-
At this point, double-check that you’ve selected the correct location for your shortcut.
-
If you’re happy with the default name, feel free to leave it as-is.
-
This confirms the name of your new shortcut and sends it to your desktop screen. Your shortcut is now ready to use!


Advertisement
-
A larger menu or window will pop up, depending on the version of Windows you’re running.
-
On Windows 10, the search bar will be at the bottom of the Start menu; on Windows 11, it’ll be at the top of the pop-up window.
-
Keep your cursor glued to the application.
-
The original application/file will still be in the window, but you’ll now have a shortcut on your desktop that’s ready to use.


Advertisement
-

Navigate through your computer’s folders and files until you find the file you’d like to make a shortcut out of.[3]
- If you’re struggling to find the proper file, use the Search bar in your taskbar to help.
-

According to Meshesha, all you have to do is «left-click on the item that you wish to create a shortcut for, then right-click on that item.”
-
In the menu that pops up, find Create Shortcut toward the bottom.[4]
- According to Meshesha, “a shortcut of that file or program will be made in that same file path that can then be moved to anywhere on your computer.”
-

You can now easily access your application with a double-click.


Advertisement
-
- Click ⁝ in the top right corner of the screen.
- Click Save & share.
- Click Create shortcut.
- Click Create.
-
- Click ⋯ in the top right corner.
- Click Apps.
- Click Install this site as an app.
- Check off Create Desktop shortcut on the menu that pops up in the new window.[5]
-
- Click on the address bar.
- Click and hold on the globe icon or the site’s icon left of the address bar.
- Drag this icon to your desktop.[6]
-
- Click and hold the lock icon next to the address bar.
- Drag this icon to your desktop to create a new shortcut.[7]
-
- Click and hold the icon left of the address bar.
- Drag this icon to your desktop.[8]


Advertisement
Add New Question
-
Question
How do I create a desktop shortcut in Windows 10? Is it any different?
Yaffet Meshesha is a Computer Specialist and the Founder of Techy, a full-service computer pickup, repair, and delivery service. With over eight years of experience, Yaffet specializes in computer repairs and technical support. Techy has been featured on TechCrunch and Time.
Computer Specialist
Expert Answer
Not really, it’s pretty straightforward. You just left click the item and the right click «create shortcut.» Then, you can cut and paste the shortcut to the desktop.
-
Question
I don’t know what it means to find the location.
Buckley cherry090
Community Answer
File Location is the place where the file is kept and stored on the disk. So you need to file which folder it is in, and then you can create its desktop shortcut.
Ask a Question
200 characters left
Include your email address to get a message when this question is answered.
Submit
Advertisement
Video
Thanks for submitting a tip for review!
About This Article
Thanks to all authors for creating a page that has been read 455,536 times.
Is this article up to date?
You are here:
Home » Windows 11 » How To Create App Shortcuts On Desktop In Windows 11 (2024)
Many Windows users prefer placing app shortcuts on the desktop so that they can launch their favorite apps quickly and easily by double-clicking on the app shortcuts on the desktop.
Windows 10 and earlier versions of Windows 11 allowed users to create desktop shortcuts for apps by just dragging and dropping them from the Start menu to the desktop. However, that is the case with the recent versions of Windows 11.

Although you cannot drag and drop apps from Start to desktop, there is a hidden way to create app shortcuts on Windows 11 desktop. Using this method, you can create desktop shortcuts for classic programs as well as modern apps.
Here is how to create app shortcut icons on your Windows 11 desktop.
Method 1 of 2
In this article, we are creating a shortcut for the built-in Photos app.
Step 1: Launch the app using search or any other method.
Step 2: Perform a right-click on the app’s icon on the taskbar to see the jump list.

Step 3: Now, hold down the Shift key and then right-click on the app’s name. For instance, if you are trying to create a desktop shortcut for the Photos app, you need to right-click the Photos entry in the jump list by holding the Shift key.

Step 4: Finally, click the Create shortcut option. If you cannot see the Create shortcut option, you might get the Send to option. Click the Send to option and then click the Desktop (create shortcut) option to make the shortcut icon.

Step 5: If you get the following error message, click the Yes button to create the app shortcut on your Windows 11 desktop.
You can use these directions to create desktop shortcuts for all modern apps. Classic desktop apps do not support this method.
Method 2 of 2
Another method to create desktop shortcuts for classic programs
Shortcuts of desktop programs like Google Chrome, Paint.net, or Windows Fax and Scan can be placed on the desktop using this method.
Step 1: Search for the program whose shortcut you would like to create on the desktop. In this guide, we are creating a shortcut to the Paint.net program.
Step 2: Right-click on the program’s entry and then click Open file location.

Step 3: In the resulting folder, hold down the Shift key, right-click on the program’s entry to open the old context menu, click Send to, and then click the Desktop (create shortcut) to create a desktop shortcut for the program.

After installing any application or software on the PC, everyone would prefer an easy approach to open it whenever required. This is where Desktop shortcuts are used, but in the case of Windows 11, certain apps and installations don’t get a shortcut in the Desktop automatically while wrapping up the installation especially in the case of apps downloaded from the Microsoft Store. So, we bring to you a perfect guide that will teach you how to create Desktop shortcuts on Windows 11.

Table of Contents
Many apps don’t function well with the Start menu and hence it becomes very necessary to create a Desktop shortcut in Windows 11. In this article, we’ll integrate some ways with which you can add file and app shortcuts on Desktop, and looking into the matter, let’s move forward with it.
Can We Create Desktop Shortcut Manually on Windows 11?
Adding a shortcut to the Desktop is a bit peculiar in Windows 11 as compared to Windows 10 but not impossible. There are various ways through which we can manually add a shortcut to the Desktop. These actions can be done through the Start Menu, File Explorer, and other ways. To establish the same, we have compiled a set of methods that will help you add file and app shortcuts on the Desktop.
Method 1: Drag Apps from Start Menu
If the app or software is visible in the start menu, you can simply use the drag method to bring it to the desktop which will create its shortcut.
1. Click on the Start and click on the All apps option.
Note: You can also locate the apps from the Pinned section.

2. Drag the app from the Start menu to the Desktop.

You will find the icon of the chosen file on the desktop, after this, you can further drag it to the required position on the Desktop. You can also right-click the empty space on the Desktop and use the Sort by option to arrange the Desktop shortcuts.
Method 2: Through File Explorer
Another way to create a desktop shortcut of your app or software is to locate the installation in the directory of file explorer. To do is, follow these steps:
1. Click on the Search icon, type PowerPoint, and click on the down arrow icon as highlighted in the pic below.
2. Here, select the Open File location option.

3. Right-click on the POWERPNT.exe file and select Show more options.

4. Then, click on Send to and select the Desktop (create shortcut) option.

A shortcut icon will appear on the desktop after completing these steps which can be arranged as per choice.
Also Read: How to Turn Off Windows 11 Camera and Microphone Using Keyboard Shortcut
Method 3: Through Applications Folder
Shortcuts can also be created by performing certain steps through a command prompt. To do this, follow these steps:
1. Hit the Windows key, type command prompt, and click on Run as administrator.

2. Type the explorer shell:AppsFolder command and press the Enter key.

3. Right-click on the app (e.g. Adobe Photoshop 2022) and select Create shortcut option.

Check your desktop and you’ll find the app/software shortcut with the list of other shortcuts.
Method 4: Through Create Shortcut Wizard
If you want to create Desktop shortcuts in Windows 11 for a specific app, there is another way through the context menu, by which we can manually create a Desktop shortcut for a file or an app. Following are the steps to do so:
1. Right-click on the app (e.g. Dreamweaver) and select Copy as path option.

2. Then, go to the Desktop and right-click on the empty space.
3. Here, hover to New and select the Shortcut option from the context menu.

4. Now, paste the copied app path under Type the location of the item section. Then, click on the Next button.

5. Finally, type a name for this shortcut and click on the Finish button.

The app shortcut will be created on the Desktop.
Also Read: How to Add Create Restore Point Context Menu in Windows 11
Method 5: Through Registry Editor
To create Desktop shortcuts in Windows 11, adding an app shortcut key in the Registry Editor can also be a useful method. To do so, follow these steps:
1. Press Windows + R keys together to open the Run dialog box.
2. Here, type regedit and click on OK, as depicted below.

3. In the Registry Editor, go to the following location path from the address bar
Computer\HKEY_CLASSES_ROOT\Directory\Background\shell

4. Right-click on the shell folder, hover on New, and then select Key.

5. Rename this Key folder on the name of the app (e.g. Photoshop) whose shortcut you want to create.

6. Now right-click on the Photoshop folder and hover on New, and then select Key.
7. Rename the newly formed Key folder as Command.

8. Then, open File Explorer and copy the app path as illustrated in Method 4.
9. Switch back to the Registry Editor window and click on Command key folder.
10. Here, double-click on the (Default) value as highlighted in the pic below.

11. Now, paste the copied app path in the Value data section. Refer to the pic below.

The shortcut will now appear in the right-click context menu of Desktop and can be accessed whenever needed.
Pro Tip: How to Set Desktop Icons
If you do not get an icon for a particular Desktop shortcut then, you can modify the Desktop icon settings. Read our guide on How to Change Desktop Icons on Windows 11
Recommended:
- Fix Steam Content File Locked Error
- Fix Windows PC Won’t Connect to TV
- Fix AdBlock Not Working on Twitch
- Fix Realtek Audio Console Not Working in Windows 11
Hope we were able to suggest to you some useful methods to create Desktop shortcuts on Windows 11 and you were able to find the best suitable method for your PC. Tell us in the comment section below which was your favorite method that worked for you and if you face any other problems regarding shortcuts on the desktop, mention them in the comment section below and feel free to reach us.
Last Updated :
10 May, 2020
Desktop shortcuts are a quick link to a particular file found inside the complex directories and drives on our Windows operating systems. Applications can be opened easily with only one click through desktop shortcuts. We can create desktop shortcuts for any type of file. Moreover, using desktop shortcuts reduces the valuable time of the user.
Ways of creating Desktop Shortcuts
Desktop Shortcuts can be created in multiple ways as per the user’s choice. Following are some of the methods of creating Shortcuts:
Method 1:
Follow the steps given below to create a Desktop Shortcut:
Step 1: Go to the folder which contains the file.
Step 2: Right click on the file and go to Send to.
Step 3: Click Desktop(create shortcut).
Method 2:
Follow the steps given below to create a Desktop Shortcut:
Step 1: Right click and go to New.
Step 2: Click Shortcut and a pop up window will open.
Step 3: Click Browse and set the path of the application, then click Ok.
Step 4: Click Next.
Step 5: Rename the desktop shortcut.
Step 6: Click Finish.
Method 3:
Follow the steps given below to create a Desktop Shortcut:
Step 1: Go to the folder which contains the application file.
Step 2: Right click on the file and click Create shortcut.
Step 3: Now drag the file to desktop.
Method 4:
Follow the steps given below to create a Desktop Shortcut:
Step 1: Go to the folder which contains the application file.
Step 2: Right-click on the file and click Copy.
Step 3: Now come to the desktop and right-click.
Step 4: Click Paste shortcut.
One of the most efficient ways to access your favorite apps, files, folders, and web pages is through shortcuts. That is why, in spite of the clutter, many of us choose to have lots of shortcuts on our desktops. This tutorial shows you how to create all kinds of shortcuts in Windows 11 and Windows 10. We cover shortcuts for files, apps, folders, and websites:
How to create shortcuts to desktop apps and files in Windows
This method works both for Windows 11 and Windows 10. To create a shortcut, right-click or press-and-hold on a free area on your desktop. This opens the right-click menu. Tap or click the New option to reveal another menu, and then click or tap on Shortcut.
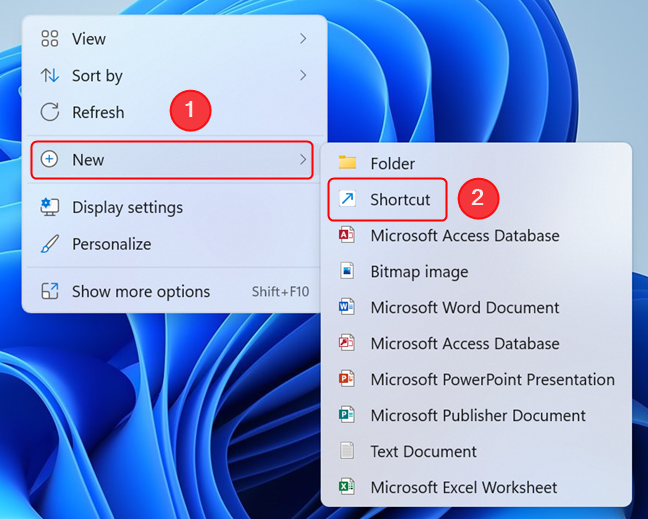
Open the right-click menu to create a shortcut
The Create Shortcut wizard opens. Type the location of the item you want to create a shortcut to, or, if you don’t know the exact path, click or tap on Browse.
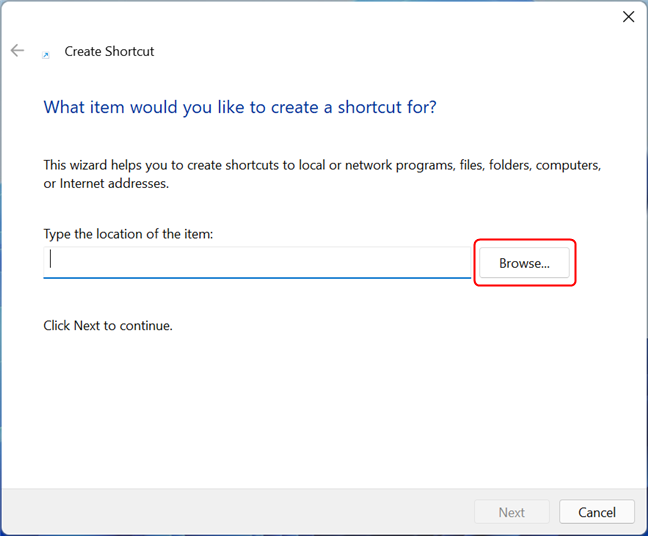
Click or tap on Browse or enter the path of the file
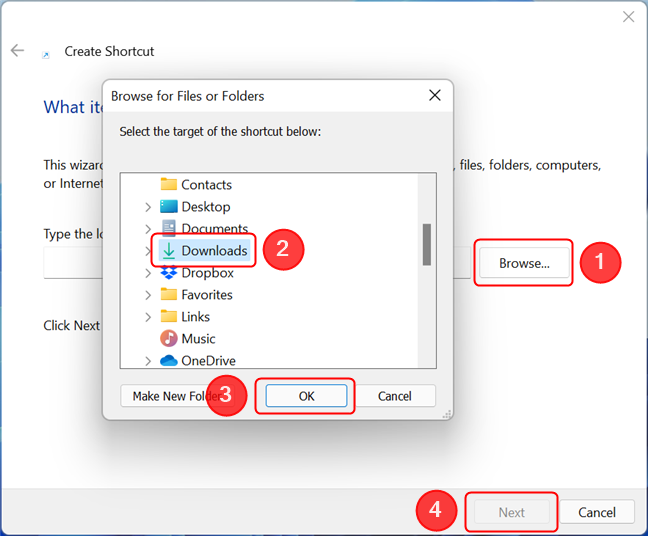
A pop-up window asks you to «Select the target of the shortcut below.» Navigate to the app or file you want to create a shortcut to, and then click or tap OK. We wanted to create a shortcut to Mozilla Firefox, so we had to navigate to «This PC > Windows (C:) > Program Files > Mozilla Firefox > firefox«. In the Create Shortcut wizard, you can see that the item’s location has been filled in automatically based on your selection. Click or tap Next to continue.

Navigate to the app or file you need a shortcut to
TIP: If you’re creating a shortcut to an app, make sure to choose the app’s executable file and not some ancillary file.
Now you can change the name of your shortcut or leave the default one. When you are done, click or tap on Finish.
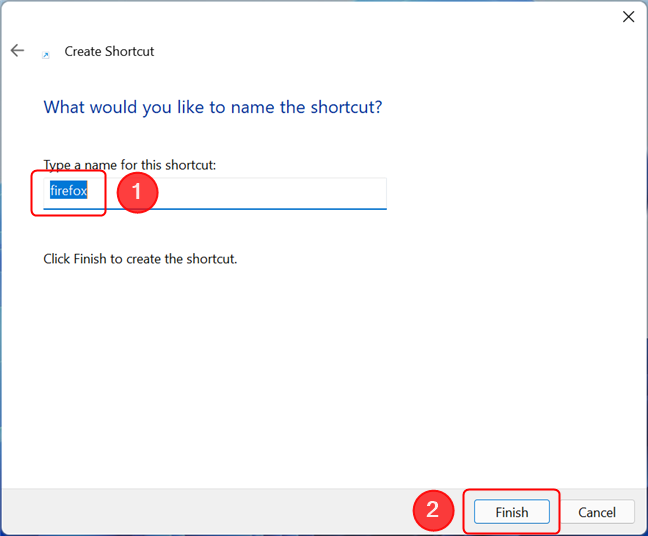
Press Finish to complete the process
The shortcut is now available on your desktop.
How to create shortcuts to folders in Windows
Shortcuts to folders are created the same way as the ones to apps and files. First, right-click or press-and-hold on a free area on your desktop to open a contextual menu. Go to New and click or tap on Shortcut to open the Create Shortcut wizard. Once here, either type the location of the folder in question, or click or tap on Browse to navigate to it. Select the folder you want to create a shortcut to, and then press OK. Click or tap on Next when you are returned to the Create Shortcut wizard.
Creating a folder shortcut is no different from creating one to an app or a file
All you need to do next is choose a name for your folder shortcut and then click or tap on Finish.
Pressing Finish completes the process and places the shortcut on your desktop
The shortcut should now be available on your desktop.
How to create shortcuts to web pages in Windows
Unsurprisingly, in Windows 11 and Windows 10, the process of creating a shortcut to a web page starts precisely the same way as the one for files and folders. Open the Create Shortcut wizard by first right-clicking or pressing-and-holding a free desktop area, and then clicking or tapping on the Shortcut option from the New menu.
In the wizard, type in or copy and paste the web address of the page you are trying to create a shortcut to. Then, click or tap on Next.
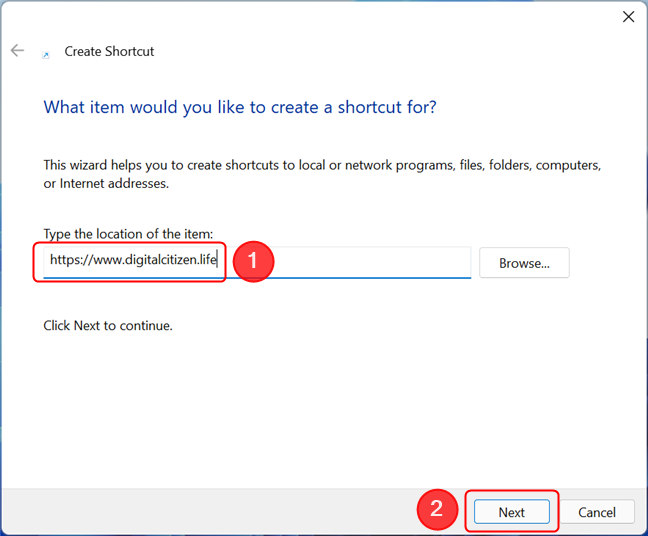
Type in the address of the site you need a shortcut to
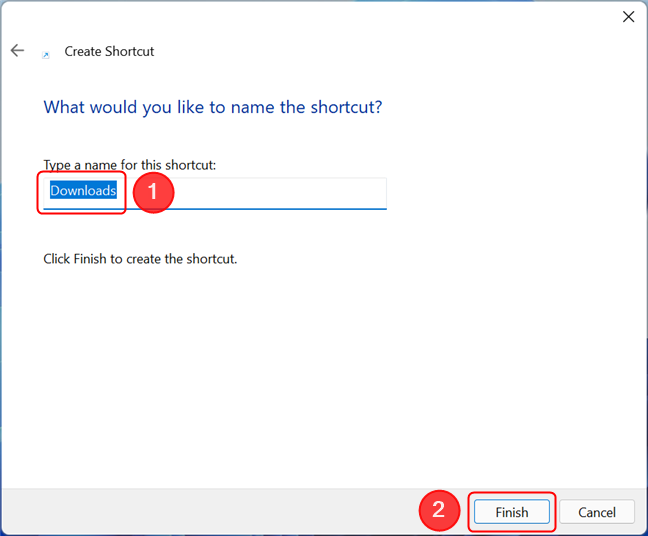
The default name for your shortcut is «New Internet Shortcut,» so you might want to change it to something else to avoid confusion. When you are done, click or tap on Finish.
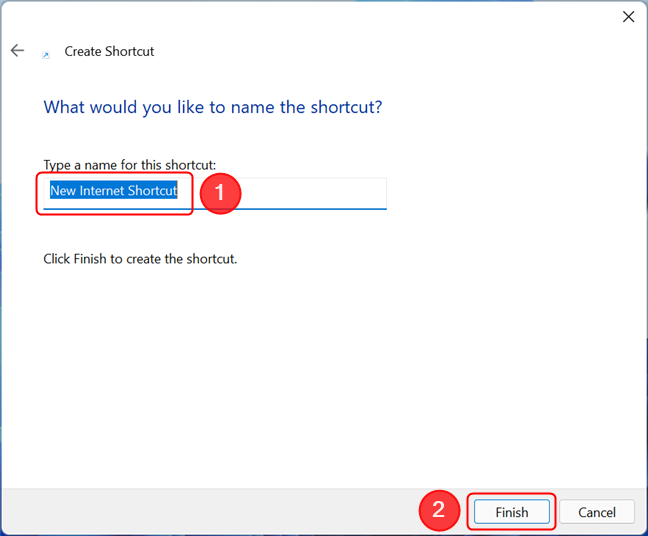
Choose a name and press Finish to save the shortcut to your desktop
The first time you use a web page shortcut, Windows asks in a pop-up window how you want to open the file. Click or tap on your preferred web browser, make sure to check the option to «Always use this app» and press OK.
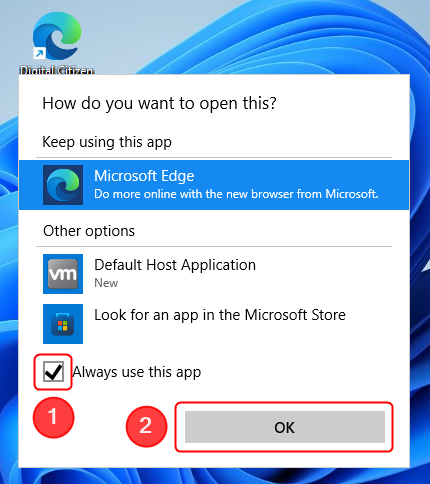
After selecting your preferred browser, check the box next to Always use this app, then press OK
This opens the target link of your shortcut in your default browser. At the same time, the icon for the shortcut is replaced by a variation of the icon used by your default web browser. The same icon (and the same browser) is used for all the shortcuts to web pages you create from now on.
TIP: To learn how to change a shortcut’s icon, read How to change the icon of any shortcut in Windows.
How to create shortcuts to Start Menu items in Windows
Windows allows users to create shortcuts for all the items listed in the Start Menu. The methods for Windows 11 and Windows 10 are slightly different, so let’s start with Windows 11.
Create shortcuts to Start Menu items in Windows 11
To begin, open the Start Menu by pressing the Windows key on your keyboard or the Start button on the taskbar. Next, press All apps.
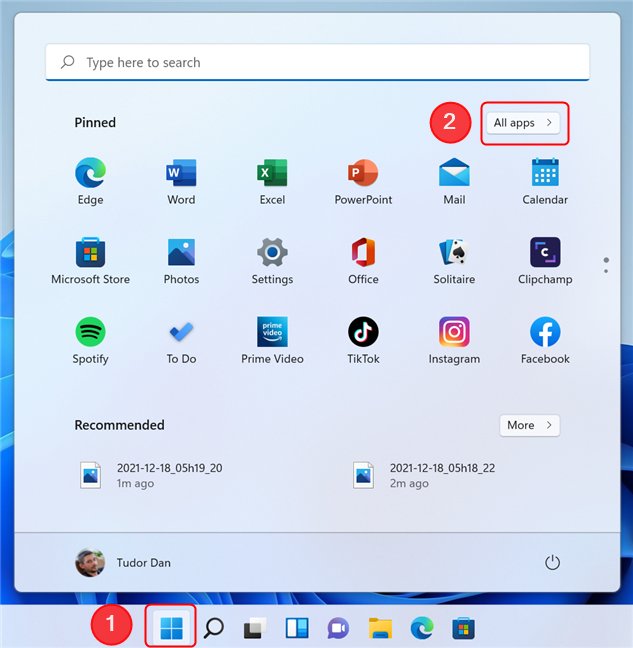
Go to All apps in the Start Menu
Find the item you are looking for in the All apps list. Then, click or tap on it, but do not release. Hold down the mouse button or keep your finger on the screen, and drag the item to the desktop. When the text Link appears next to your cursor, you can drop the item anywhere on your desktop to create a shortcut.
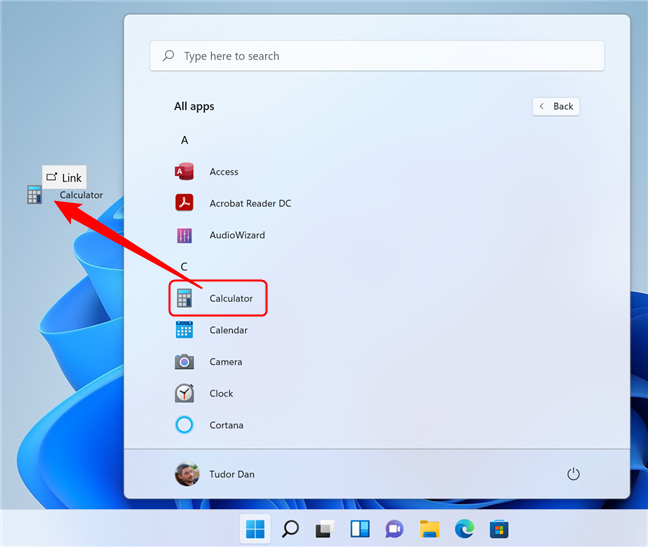
Drag and drop an item from the list to create a shortcut
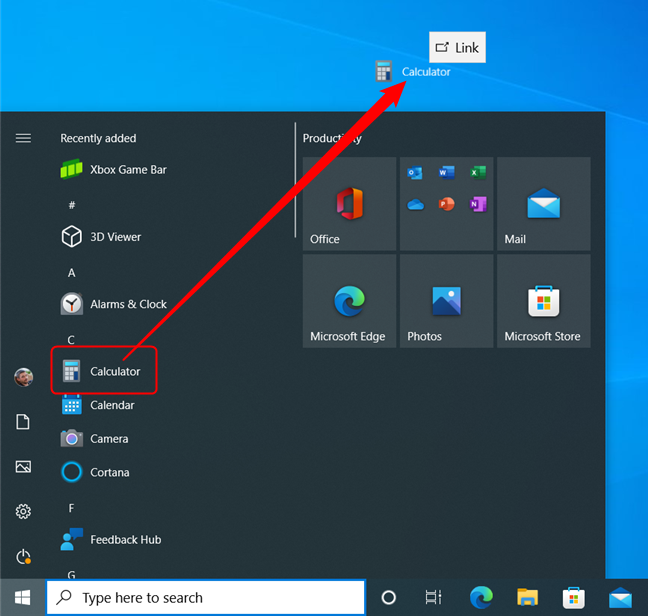
Create shortcuts to Start Menu items in Windows 10
Open the Start Menu by pressing the Windows key on your keyboard or the Start button on the taskbar. Find the item you are looking for in the apps list, then drag and drop it to the desktop.
Drag a Start Menu item to the desktop to create a shortcut in Windows 10
Alternatively, you can also grab any of the shortcuts and tiles from the right side of the Start Menu the same way, and you can drag and drop them on the desktop with the same results.
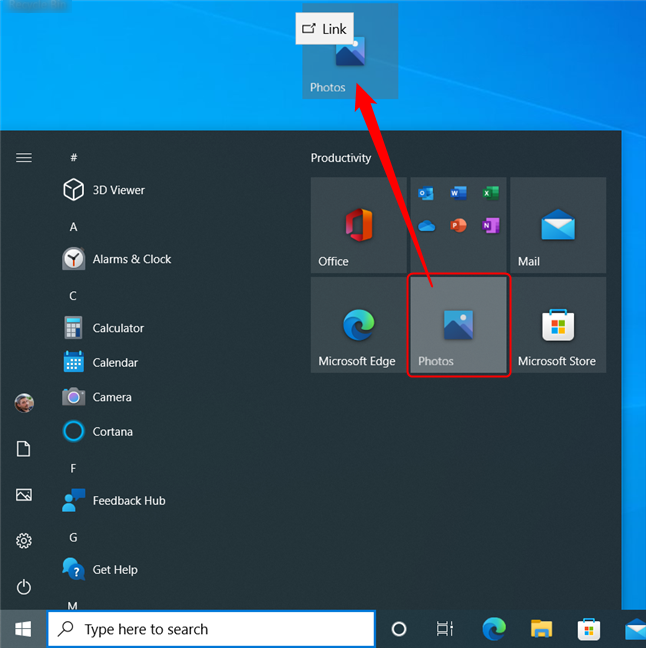
Drag and drop a tile or a shortcut to your desktop
In all these cases, dragging and dropping creates a new shortcut, leaving the original shortcut or tile in its place.
How to create shortcuts to files and folders using their right-click menu in Windows
You can also use the options in an item’s right-click menu to create a shortcut to it. Since the items in the Windows 11 right-click menu are arranged differently and involve an additional step, let’s first focus on it. Open File Explorer, navigate to the location of the file or folder you want to create a shortcut to, and then right-click or press-and-hold on it to open its contextual menu. Next, press Show more options.
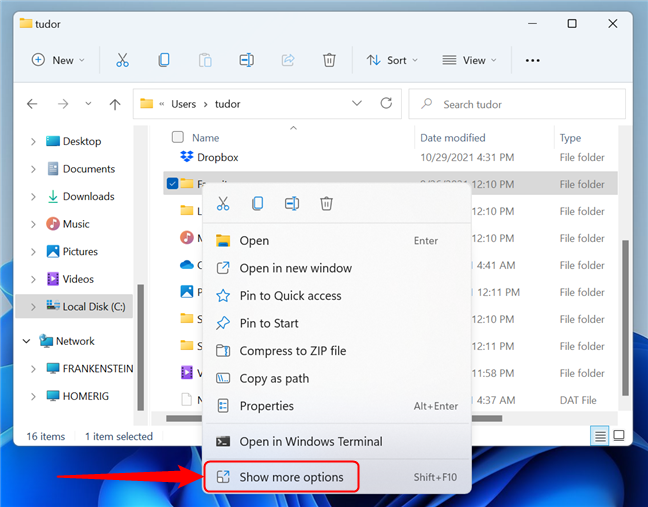
Right-click the item, then press Show more options
The classic right-click menu appears. Tap or hover over the Send to option, and then click or tap on «Desktop (create shortcut).»
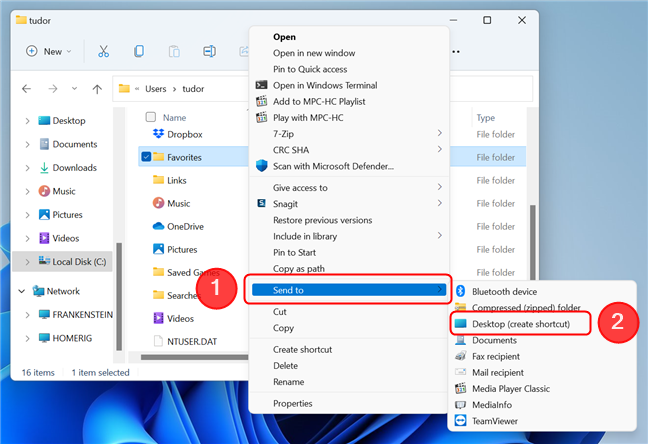
Choose Desktop from the Send to menu to create a shortcut
A shortcut is created on the desktop, pointing to the item you have selected. The classic right-click menu also has a Create shortcut option you can click or tap.
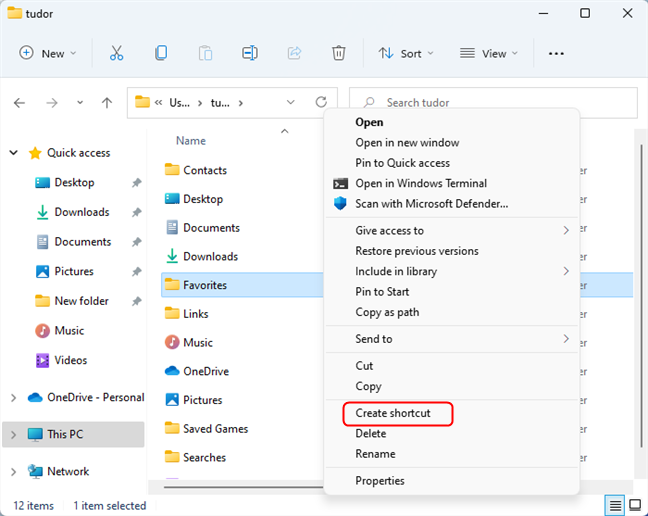
Press Create shortcut from the right-click menu
Unlike the other option, a shortcut to the selected item is created in the same folder as the original file, and you can move that shortcut to another location.
NOTE: In Windows 10, the method is almost identical to the one for Windows 11. The only difference is that when right-clicking an item, the classic right-click menu appears right away, so there’s no need to press Show more options.
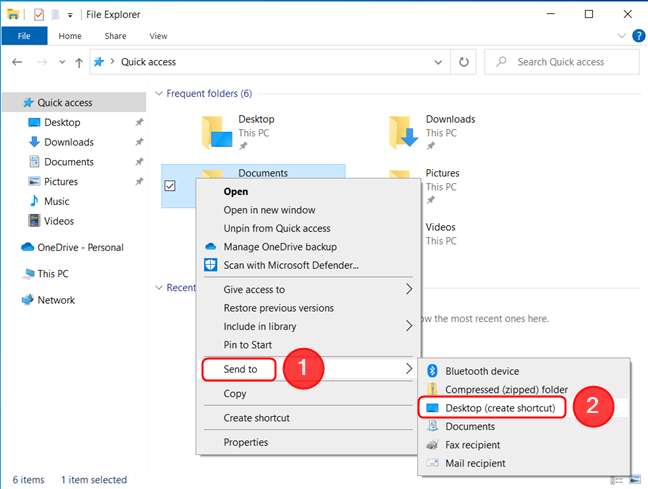
In the right-click menu, hover over Send to, then press on Desktop (create shortcut)
What type of shortcuts do you prefer?
Now you know how to create a shortcut in Windows 11 and in Windows 10, be it to an app, a file, a folder, or a web page. Before you close this article, let us know: what shortcut(s) do you want to create? Do you prefer desktop, taskbar, or Start Menu shortcuts? Comment below and let’s discuss.