
Are you looking for a Windows 10 apps development tutorial for beginners? There are numerous reasons why you might need to develop a desktop application. You might want to organize the data for your business so that everything is easily accessible. Perhaps you have an idea to create a computer program, game, utility, or application for commercial market release. Maybe you have thought up a great way to help out a charity or local neighborhood group.
In any case, if deployed in the right manner, apps be a way to generate an income or to be helpful to people by automating tasks or aiding in other ways. If you’re looking to create apps which have the easiest level or technical knowledge and make the most impact then it’s worth realizing that despite the popularity in mobile devices such as phones and tablets the number one target for a software developer is a desktop machine. For the majority of people, thanks to the success of Microsoft that desktop machine is probably running Windows 10 or to a lesser degree its younger sibling Windows 11.
Therefore, let us share some fundamentals of Windows 10 apps development with you.
Is a desktop app right for you?
When it comes to applications, you have three essential options to choose from: desktop apps, mobile apps, or web apps.
While desktop apps have the power and dependability to meet your requirements, web apps should not be overlooked but be mindful that delivering web apps requires some compromises and a suitable – and secure – place for them to be hosted. If you’re storing or handling personal data with your app you should research into the best ways to do that securely for a web app. Note also that different countries and jurisdictions can have their own rules about how to handle, store and transmit any personal data as well as a confusing array of non-obvious regulations about things like web browser cookies and accessibility considerations for users with physical impairments.

Should I create a mobile app?
At the same time mobile apps are also an option depending on the requirements of the project. Each has advantages and disadvantages that you must weigh in order for your application to be successful. But it’s worth mentioning that while mobile development is reasonably easy, especially with the right cross-platform development tool, there can be many hurdles to jump over. For example, deploying a mobile app on Android can be as simple as compiling the app and then copying it to the user’s device as an “ad hoc” app. But that’s not commonly how things are done, most developers have to contend with the device provider’s app store. For Apple this is the Apple App Store. For Android this is usually the Google Play Store or a more restricted supplier-specific market such as the Samsung Galaxy Store.
These stores can be a great way to get your app idea out into ‘the real world’ and it’s a definite thrill to see people actually downloading and using your mobile app. However, all these stores have got an extensive and sometimes confusing list of rules your app must stick to or it will either not be allowed on the app stores in the first place or will get withdrawn from sale at some future date. The rules vary from simple things like having the right kind of icons, text and images for the app’s page on the app store, and obvious things like correctly supporting the latest devices to slightly less obvious things like not having a separate sign-up page for any subscription services unless your also allow the users to sign up via an in-app link which goes through the app store owner’s payment methods (to ensure they get their slice of the profits).
If you know your app will be a part of the user’s daily routine, users will need to copy and paste to the clipboard, notifications will be sent, or the app will be used without internet access, then choose a desktop app. When something needs to be accessed quickly and frequently on a user’s machine, a desktop app should be preferred.
Do desktop apps have an app store?
In a word, yes, Windows has one and so do Apple and some types of Linux – although most software developers tend not to use an app store and simply allow the users to download the app directly to their desktops, usually from a web page link. The Windows app store has recently relaxed a number of their rules to make it easier for developers to sell or distribute their apps from it. Windows 11 also has a facility to support Android apps which can run on desktop computers running Windows 11. Microsoft have also introduced the Windows Subsystem for Linux or WSL. WSL allows Windows users to run, and you to develop Linux apps on a Windows 10 or 11 machine. This works in a similar fashion to running Android apps on Windows.
Are you considering cross-platform app development?
So, once you’ve established that a desktop app is the best fit for your requirements, you should then must decide which desktop platform to target. You can choose between platform-specific (native) and cross-platform programming. Platform-specific applications can only run on one platform, whether it is macOS, Windows or Linux. For the broadest reach though, Windows 10 and 11 is still by far the most widely-used desktop operating system in the World by a very significant margin.
Cross-platform development
Cross platform development which is the ability for you to create app code which is not tied to one specific target platform but can be made to work on, for example, Windows, macOS and Linux using the same code. If you require: rapid development, lower development and maintenance overheads, potentially fewer bugs due to a lower quantity of code, and the ability to launch for multiple platforms at once and attain a wider reach.
RAD Studio and Delphi support an extensive collection of development platforms. There are two key app development frameworks available for RAD Studio: the Visual Component Library (VCL) and FireMonkey FMX. Choosing to use the VCL means your app can only target Microsoft Windows (Win32/Win64) desktop or tablets running Windows such as the MS Surface.
Apps written using FMX are cross platform apps which can support Android, iOS, macOS, Windows, and Linux. Developers can build and deploy their apps from a single code base and UI using FireMonkey FMX to all of these platforms. Any differences in the ‘form factor’ of the devices – for example an iPad Pro has a might higher screen resolution and a different shape to an iPhone SE or older Android phone – can be taken care of using specialized screen layouts which are compiled into the app by RAD Studio.
If you design your screens carefully you may not need any specially customized screens – but often you will; luckily that’s very easy to do with RAD Studio.

Is UWP deprecated?
Obviously we’re focusing on the VCL and FMX frameworks for development – but what about other technologies such as Microsoft’s UWP? Universal Windows Platform (UWP) was one of the many computing platforms released by Microsoft for the developers and was first introduced in the Windows 10 operating system. Microsoft had intended UWP to be a universal platform that was supposed to help develop apps beyond the Windows operating system. Back in 2015 the intention was that UWP would allow developers to target not only Windows desktop but also other devices such as Microsoft’s XBOX console and the HoloLens mixed reality system with little or no changes. UWP came with a number of issues and technical restrictions that caused some disagreement with prominent organizations such as Epic Games. After some capitulation by Microsoft it seems that UWP has been deprecated by Microsoft. New directions are actively being pursued by Microsoft including the .NET Multi-platform App UI or .NET MAUI system.
UWP was one of the many development solutions released which could be used to create client applications for Windows. However, for the past few years, there have been various shifts in the Windows platform from Microsoft related to application development support and platforms. The innovations introduced to provide for Android apps to run on newer versions of Windows and the superb WSL show how far Microsoft have come into embracing other operating systems and non Windows devices, even if those apps are still running on a Windows machine.
What about Microsoft Windows 10 apps development and the WinRT?
By the time Microsoft released Windows 10, they had already added a new “application binary interface” based system (ABI), the Windows Runtime, known more commonly as WinRT, which launched with Windows 8. WinRT was aimed to cater for ‘managed’ programming languages and provided support for C++, Rust, Python, JavaScript/TypeScript and of course Microsoft’s own C# and Visual Basic.
The adoption of WinRT appears to be conservative and perhaps slower than Microsoft might have liked. Developers needed to re-engineer some of their code due to the fact WinRT was written using C++ and based on an object oriented paradigm and asynchronous programming model which for some existing code bases might have been a barrier to adoption.
Fortunately, RAD Studio offers WinRT API mappings and Object Pascal interfaces to support Windows services like Win 10 Notifications and Win 10 Contracts. Developers can utilize the components we provide for a Windows application for Notifications and Contracts in both VCL and FMX C++ and Object Pascal. The underlaying mechanism for enabling the Windows apps is not a concern for developers using RAD Studio since the VCL and FireMonkey FMX take care of the details for us. You write your code, either in Delphi or C++, and manipulate the properties of visual components like edit boxes, labels, lists, trees and so on; and the non visual components like open/save dialogs and notifications and let the compiler and runtime libraries do all the hard work for you. Why try harder?
Is Delphi and the VCL a better option for Windows 10 apps development?
You have the option to program using which tool you feel suits you, of course, but we think for the greatest productivity using C++ and Delphi is a better choice. Delphi and the Visual Component Library (VCL) offer superior abilities for the encapsulation of the capabilities of the Windows operating system. Perhaps the most important reason for considering RAD Studio and Delphi is the consummate ease of learning the Delphi language the fact developers can create fully ready to use programs extremely rapidly. The “RAD” in RAD Studio is an acronym for Rapid Application Development and the drag and drop screen and form design means you do not need any wireframe type tools or even sketches to work out what you want the screens of your program to look like – you build them in RAD Studio and know exactly what they will look like when they are running.
The VCL has established a reputation among its users as one of the best possible wrappers on top of the native Windows API and UI libraries. Only the VCL library offers forward thinking support for your source code with a well-deserved reputation for stability and longevity. You can take a ‘legacy’ application built many years ago and easily maintain and update it for Windows 10 and 11, as well as provide support for earlier versions of Windows. Apps written in Delphi are very resistant to changes in the operating system as different Windows updates and patches are released. This is noticeable compared to other types of technology such as Python which can flounder when a required Python runtime is either not present or is replaced with an incompatible version. This is also true for apps written with .NET languages which can suffer when too many moving parts of the supporting .NET runtime are replaced or upgraded. There are ways around this of course, nothing is ever too horrible, but apps produced with RAD Studio really are very robust due to their lack of dependencies on runtimes and their self-contained nature which promotes great stability.
Windows 10 apps development tutorial for beginners
Ok, we’ve talked enough about the merits of using RAD Studio and a primer on whether you should be developing a Windows 10 desktop program or a mobile cross-platform app. Let’s try creating a really quick and simple app to show you how easy it is! There are plenty more in-depth tutorials and articles here on the blog site where we cover all sorts of topics from beginner to advanced.
The following steps will give you an idea of how very easy it is to construct a simple “Hello world” VCL application for Windows in a couple of minutes. In the simplest manner, we attempt to demonstrate the essential steps for creating a VCL Forms app. The application that you will create using this tutorial will include the following:
- We will create a VCL form.
- We will add a control to that form.
- We will add some code which triggers when our user clicks on a button.
- Finally. our “Hello World” app will display a dialog box when the user interacts with it.
How to create a simple “Hello world” application
Open RAD Studio and click on the “Windows VCL Application – Delphi” (or C++) item on the Welcome Page.

How to create the first screen for your Windows app
You should now have a blank form on the screen. So let’s add a button control to that form.
- Select the “Palette” tab – if you can’t find it either select View > Tool Windows > Palette or simply press CTRL + ALT + P
- The palette shows all the types of controls you can simply drop onto your application. From the palette click on the TButton entry which is in the Standard group

- You should now have a button on your form. You can click it and drag it to where you would like it to be shown.
How to make your first app display a “Hello world” string
- Click once on Button1 on the form.
- In the Object Inspector, double-click the OnClick action field on the Events tab. The Code Editor displays, with the cursor in the Button1Click event handler block.
- For Delphi, move the cursor before the begin reserved word and then press ENTER. This creates a new line above the code block. For C++, place the cursor after the opening brace ({) and press ENTER.
- For Delphi, insert the cursor on the new line created, and type the following variable declaration:
For C++, enter the following code:
- For Delphi, insert the cursor within the code block and type the following code:
|
s:= ‘Hello world!’; ShowMessage(s); |
For C++, enter the following code:
|
s = «Hello world!»; ShowMessage(s); |

How to run your first “Hello world” application
- Choose Run > Run to build and run the application. The form displays with a button called Button1.
- Click Button1. A dialog box displays the message “Hello World!”
- Close the VCL form to return to the IDE.

Are you ready to get started with Windows 10 apps development?
If you don’t have a copy of RAD Studio yet why not check out RAD Studio with Delphi and download it today? Give yourself the edge that RAD Studio provides to develop powerful desktop and cross- platform apps in the most efficient possible way.
Windows 10 may well have the most comprehensive software library of any platform in the world, but a trip to the new Windows Store can leave you with a very different picture. Even with the recent addition of
Universal Apps that run on the desktop and mobile, developers still seem shy of writing dedicated apps for the Store. Well, now you can do it yourself, for free, and you don’t even need to know anything about coding. In this feature we’ll show you how, using the Windows App Studio.
Can I really create my own app without coding?
Yes, you most certainly can. Let’s be realistic though, this isn’t going to be a super complex, whizz-bang app that sets the world alight – those usually do require a bit more knowledge. However, that doesn’t mean it’s not worth doing. After all, if you can’t find something that pulls together information about your favourite band, sports team, or even your own content, then why not have a go at building it yourself?
How to use the Windows App Studio
The Windows App Studio is a web-based system that doesn’t require the installation of any software on your machine. The online nature also means that you can access your app from any PC with an internet connection. Head over to the
Windows App Studio site, and after you’ve logged in with your Microsoft account you’ll be able to make use of the free tools and get started straight away.

Getting started
The first page you’ll see after you’ve logged in is entitled Start New, and has options at the top for creating apps specifically for Windows 10 and Windows 8.1. Obviously you’ll want to make sure the Windows 10 one is selected.

The main pane has options for the different types of template that you can use to build the app. There are two types available : App or Content. The first is used to create web-apps, which are essentially a redirect to an existing webpage or site. Alternatively, Content apps are actual mobile apps, that draw data from various sources and display it in a manner that you specify.
Within Content there are two three options to choose between: Empty App, My Favourite Band, and My App. Empty is just as it says, a completely blank shell into which you add sections and sources, then determine the general look and feel of the app. If this sounds a little too much like hard work then the two others are Predefined templates that still give you control over the content, but use previously generated apps as a starting point. Select one of these to begin.
Using the Editing Menu
Once you begin you’ll be asked to name your app, and then you’ll be taken to the editing menu. This is the main engine house of the App Studio. On the right is a preview of the app as it will appear on a mobile device, to see a desktop version just click on the full screen option below the panel. Any change you make to the app won’t automatically appear in the preview, instead you’ll need to click the Refresh button for them to be presented.

The bulk of the screen is taken up by the blue boxes that represent the content that will appear in your app. Each one can be edited by clicking on the Pen icon in the bottom left corner of each box. To add a new section double-click on the relevant grey box below, then add the required information to connect it to the source of your data. For example you can add a Podcast or Blog feed by selecting the RSS box then entering the URL and clicking Confirm.

Some of the details can look a little scary at first, as adding a Facebook or Twitter feed both require Creating a new API. Thankfully this isn’t as complicated as it sounds, and clicking on the How to Create section that appears next to the request for an API brings up detailed and understandable instructions.
For the most part Microsoft has done a good job of making the process as easy as possible, but the very nature of creating an app means that you’ll need to read the instructions to really understand what’s going on. On the Editing Menu you’ll see a list of options across the top of the page – My Project, How To, Start New, etc. – and it’s definitely worth clicking on How To, as it takes you step by step through the whole process.
Finishing up
Once you’re happy with the app, and have checked to see that each section works in the way you intended, all that’s left to do is click the Finish button on the Editing Menu. This takes you to the Generation page where you can decide on how you want to download the app.

There are three choices; Installable Package, which allows you to directly install the app on any Windows device; Publish Package, that gives you everything you need to submit it to the Windows Store; and Source Code package, for the more code-savvy users that want to edit the app in Visual Studio.
That’s it. Your Windows app is now complete and you are an app developer. Well done!
- How do you create a computer app?
- How do I create a Microsoft app?
- How can I create my own app?
- How do beginners create apps?
- How can I make a free app for PC?
- How do I code an app?
- What is a desktop app?
- Can you create an app for free?
- How do free apps make money?
- How much does it cost to create an app?
- What are some good ideas for apps?
- How can I learn to code for free?
How do you create a computer app?
Moreover, its ambitious universal approach to development means apps you create potentially have reach across a wide range of platforms.
- Windows Dev Center. …
- Create your first Windows app. …
- Create a Windows desktop app with C#
- Make a Windows clock app. …
- Create a simple UWP game with DirectX.
How do I create a Microsoft app?
Create new desktop apps
Describes the project and item templates that Visual Studio provides to help you build apps for Windows 10 devices by using C# or C++. Describes the latest Windows 10 and UWP development features you can use in any desktop app, including WPF, Windows Forms, and C++ Win32 apps.
How can I create my own app?
Follow these steps to create your own app:
- Choose your app name.
- Select a color scheme.
- Customize your app design.
- Choose the right test device.
- Install the app on your device.
- Add the features you want (Key Section)
- Test, test, and test before the launch.
- Publish your app.
How do beginners create apps?
How to make an app for beginners in 10 steps
- Generate an app idea.
- Do competitive market research.
- Write out the features for your app.
- Make design mockups of your app.
- Create your app’s graphic design.
- Put together an app marketing plan.
- Build the app with one of these options.
- Submit your app to the App Store.
How can I make a free app for PC?
Build an app without coding in 3 easy steps using Appy Pie app maker?
- Enter your app name. Choose a category and color scheme.
- Add the features. Make an app for Android and iOS.
- Publish the app. Go live on Google Play and iTunes.
How do I code an app?
If you’re coding with Swift or Objective-C for iOS, you’ll want to look into Xcode. Android developers will need to learn about Android Studio. These are programs that give you the tools you need to actually design and publish apps, instead of just tinkering around with code. Third, you need to learn version control.
What is a desktop app?
A desktop application is a software program that can be run on a standalone computer to perform a specific task by an end-user. … You can also download and install different desktop applications directly from the Internet or purchased from software vendors.
Can you create an app for free?
Create Mobile Apps with the Best iOS & Android App Builder
App development is no longer just for professional developers. Now everyone can build mobile apps with a free version of an award-winning low-code app development platform.
How do free apps make money?
Free Android applications and IOS apps can earn if their content updates regularly. Users pay a monthly fee to get the freshest vids, music, news or articles. A common practice how free apps earn money is to provide some free and some paid content, to hook the reader (viewer, listener).
How much does it cost to create an app?
A complex app may cost from $91,550 to $211,000. So, giving a rough answer to how much it costs to create an app (we take the rate of $40 an hour as average): a basic application will cost around $90,000. Medium complexity apps will cost between ~$160,000. The cost of complex apps usually goes beyond $240,000.
What are some good ideas for apps?
Here are some original app ideas 2021 that you can steal.
- Augmented reality app that helps you design your room. …
- Scan and convert to pdf app. …
- Health check-up and food planner app. …
- Railway tracking app. …
- Language learning app. …
- Voice translation app. …
- Bike servicing app. …
- Call recording app.
How can I learn to code for free?
- Codecademy. Codecademy is the perfect place for aspiring coders to start learning. …
- Free Code Camp. At Free Code Camp, you’ll learn powerful skills while (eventually) building real-world projects for nonprofit organizations. …
- Codewars. …
- The Odin Project. …
- HackerRank. …
- CodeFights. …
- edX. …
- Upskill.
If you’re like me, you probably spend a lot of time on your computer and wished there was an easier way to do certain things. Well, I’m here to tell you that there is! With Windows applications, you can make your life much easier. In this blog post, I’m going to show you how to make Windows applications in just 40 or 60 characters. By following these simple steps, you’ll be able to create an app that is both functional and user-friendly. So let’s get started!
How to Make Windows Applications
There is no one-size-fits-all answer to this question, as the process of how to make Windows applications will vary depending on the specific software and tools being used.
This documentation provides the latest guidance on building desktop apps for Win 11 and 10. This includes new features, tips and tricks, and best practices to help you create amazing desktop apps.
Get started
To get started developing Windows apps, you’ll need to install tools for the Windows App SDK and enable your device for development. Developer Mode features and debugging will come in handy as you’re creating your app. Finally, create a developer account to submit your app to the Microsoft Store.
Overview
If you’re looking to get started with desktop applications, the Windows Application SDK is a great place to start. With WinUI 3, you can create amazing apps that look great on Win 11.
Build Your WinUI 3 App (Part 1)
The 3 part series will help developers who are new to the Microsoft platform to quickly get up to speed with development for the Windows Store.
This is the first post in a three-part series on using the Windows Application SDK.In this post, we’ll show you how to create a very simple, but functional, UI framework using WinUI 3. Part 2 will focus on windowing, and Part 3 will focus on single instancing.

(Source)
Windows App – Sample Overview
We’ll build a simple app that lets you create beats by tapping on virtual drums. This app will be very simple, but will show some of the cool things that can be done with the WinAppSDK:
- The interface of Windows UI 3 is simple to use and easy to learn.
- Allowing users to fully immerse themselves into the experience, or allowing them to multitask with the app, rather than limiting them to one activity at a time.
- By making it a single instance, it reduces any sync issues that might occur between multiple instances of the application.
Prerequisites for Developing Desktop Applications for Windows 10
- Install the developer tools you need for developing apps for Windows 11 and 10 here!
- Create a new blank Windows UI 3 application, package it, and call it “Drum Pad”.
WinUI 3 Template Structure
In the WinUI 3 project template, most of our code will be located in MainWindow.xaml.cs and MainWindow.xaml. This allows us to keep our code organized and easy to access.
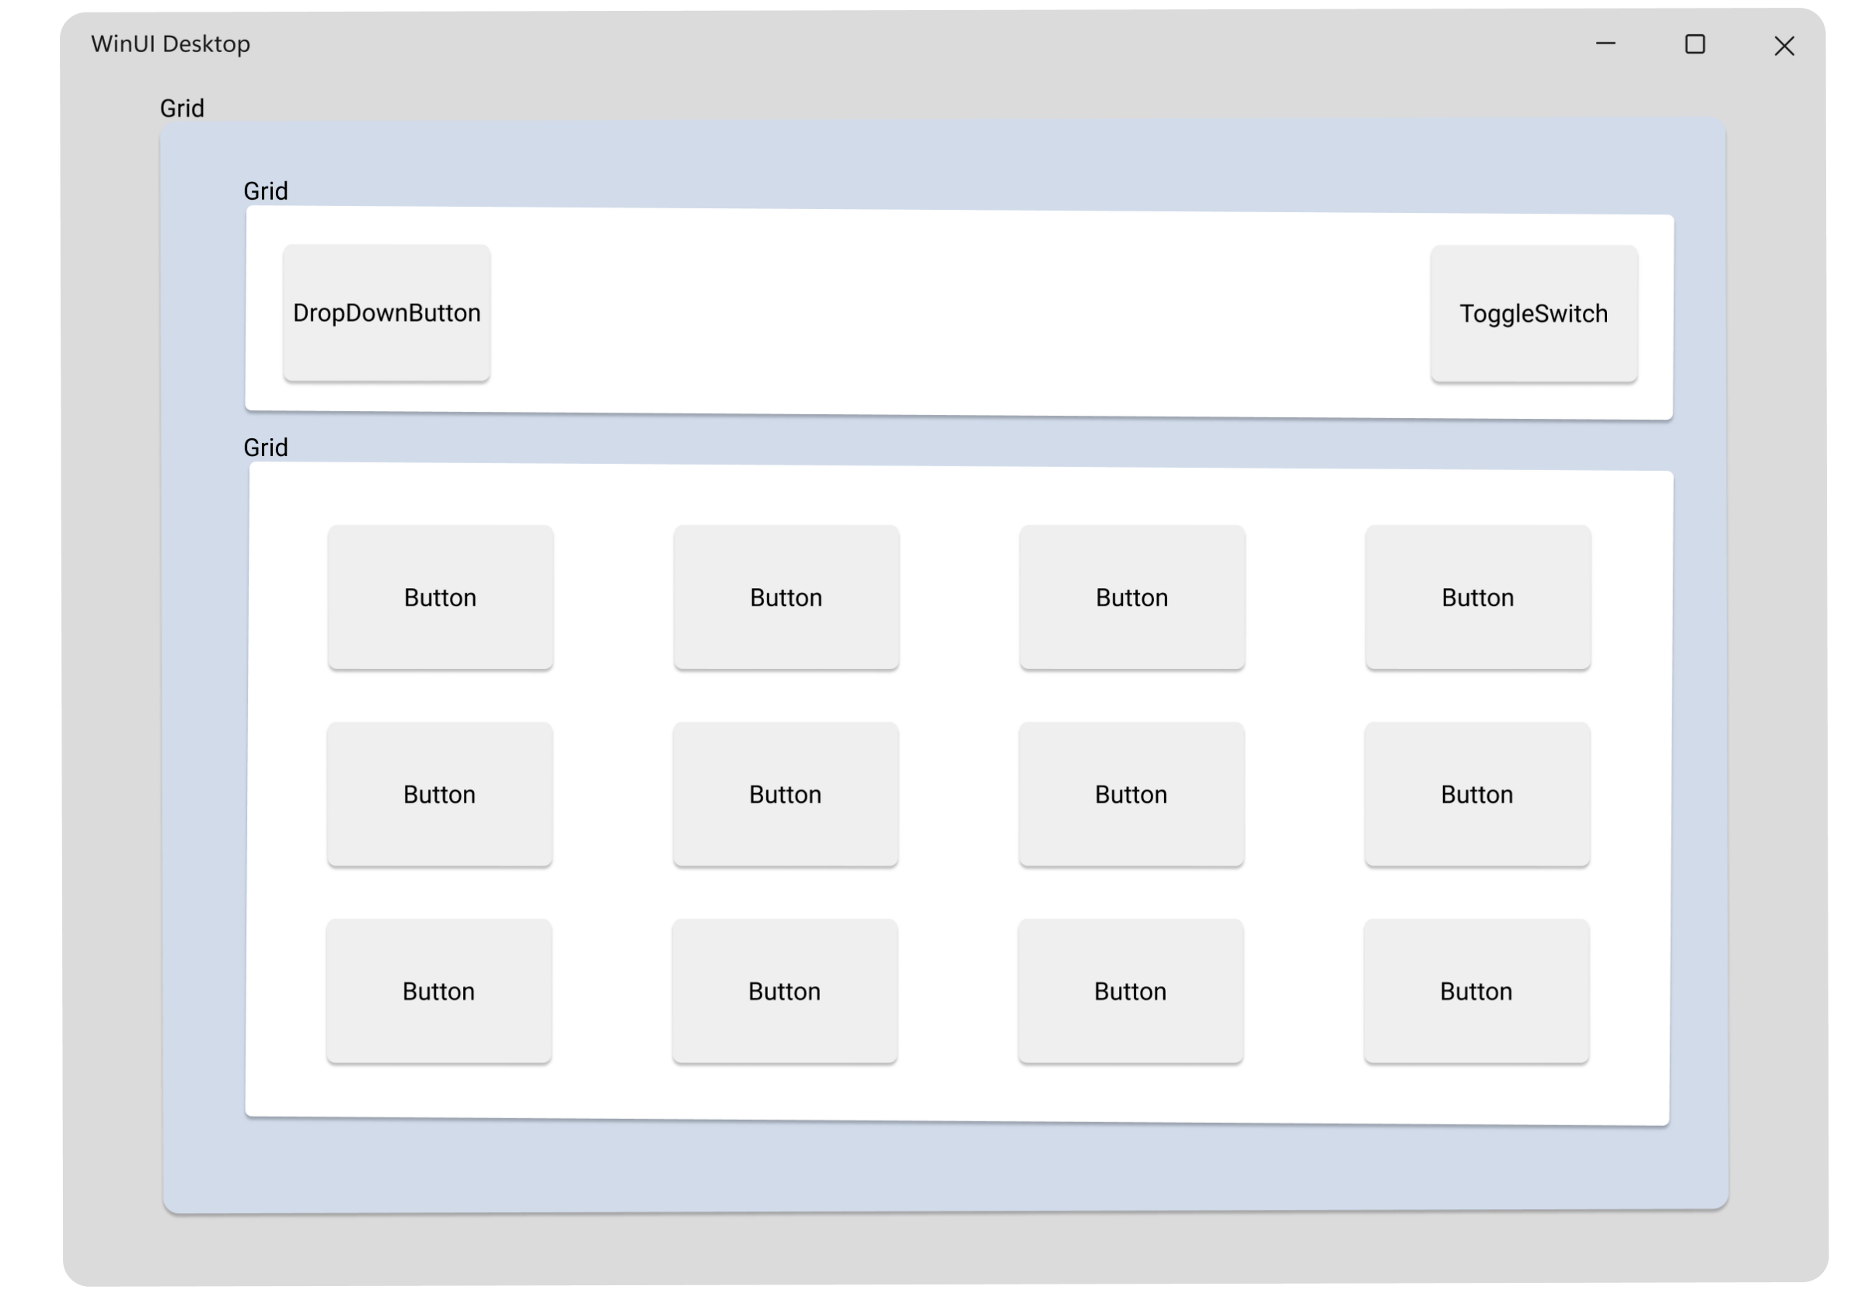
User Interface Layout Design for WinUI 3 Controls
The 3 controls below represent elements of a typical drum kit.

(Source)
Deleting Partially Templated Code
Delete the default block of code that the project templates come with.
Defining the Layout in MainWindow.xaml
In the MainWindow.xaml we will define the various grids and their corresponding controls that are to be used.
* and “Auto” are used to adjust the layout of the app window based on the size of the screen. This allows the user to use the application in a more natural way.
Setting Up Default Controls
First, add a dropdown button and toggle switch.
Now it’s time to add buttons.
Now, define how the buttons should be positioned in the grid.
STEP 4: Now it’s time to apply some style to the buttons.
WinUI 3 Controls – Visual Layer
Now you should see: We now have a visual control that was built out using the Windows UI 3.0 components. To test it, select x64 as the target platform and press F5 to run the project solution. You should see the following output:
You should now see:
(Source)
Moving forward
The buttons don’t do anything yet, but that will be changed in the next part. In part 2, we will focus on implementing the business logic.
Conclusion
By following the simple steps of how to make Windows application outlined in this blog post, you’ll be able to create a Windows application in just 40 or 60 characters. By doing so, you’ll make your life much easier and have a user-friendly app that is both functional and easy to use. So what are you waiting for? Give it a try today!
Related
As part of the Windows App SDK, WinUI 3 provides a modernized UI framework for building Windows 10 and Windows 11. This 3-part blog aims to help members new to Windows development quickly build familiarity using the Window App SDK through a fun sample app.
This post is only part 1 of the 3-part Windows App SDK blog and is scoped to showing you how to use WinUI 3 controls to create a simple working user interface. Part 2 and 3 are for windowing and single instancing.

Sample app overview
We are going to build an app with buttons that produce drum sounds (DrumPad). As simple as this demo app is, it shows some cool things you can do right away with the Windows App SDK (WinAppSDK):
- Working with simple and easy-to-use UI controls from Windows UI Library (WinUI) 3
- Customizing windowing options so that the user can multitask with the app always on top or have a full immersive experience
- Making the app single-instanced to reduce synchronization issues between instances
Prerequisites
- Install tools for developing apps for Windows 10 and Windows 11 here.
- Create a WinUI 3 app using the Blank App, Packaged (WinUI 3 in Desktop) template, and name it DrumPad.
Project template structure
In the WinUI 3 project template, most of our code will live in MainWindow.xaml and MainWindow.xaml.cs
- MainWindow.xaml is a XAML file where we will define all of our UI elements, called “controls”, that will make up the visual layer of our application.
- MainWindow.xaml.cs is the C# code-behind file where we will put all the logic that lets us interact with our application.
UI layout design
The following WinUI 3 controls are used to represent components of a drum pad:
- DropDownButton: includes a chevron to indicate a menu can be opened
- ToggleSwitch: a switch that can be toggled between dark/light mode
- Button: has a click user interaction and will trigger a unique drum sound
- Grid: made of rows and columns and is used to position the other controls
Deleting partial template code
The default project template comes with some blocks of code you’ll want to delete so we can replace them with our own markup and implementation:
MainWindow.xaml:
<!-- Delete the following template code -->

<StackPanel Orientation="Horizontal" HorizontalAlignment="Center" VerticalAlignment="Center">
    <Button x:Name="myButton" Click="myButton_Click">Click Me</Button>
</StackPanel>
MainWindow.xaml.cs:
// Delete the following template code

private void myButton_Click(object sender, RoutedEventArgs e)
{
    myButton.Content = "Clicked";
}
Defining the layout
In your MainWindow.xaml we will start by defining the set of nested grids and specify their controls and positioning. Open MainWindow.xaml in the XML editor view and inside the element add this content:
<!-- Add GRID CODE -->

<Grid>
    <Grid.RowDefinitions>
        <RowDefinition Height="Auto"/>
        <RowDefinition Height="*"/>
    </Grid.RowDefinitions>

    <Grid Margin="12">
        <Grid.ColumnDefinitions>
            <ColumnDefinition Width="*" />
            <ColumnDefinition Width="Auto" />
        </Grid.ColumnDefinitions>
        <!-- STEP 1: Add DropDownButton & ToggleSwitch CODE -->
    </Grid>

    <Grid x:Name="Control1" Grid.Row="1" ColumnSpacing="30" RowSpacing="12"
          VerticalAlignment="Center" HorizontalAlignment="Center">
        <!-- STEP 3: Define column & row positioning -->
        <!-- STEP 4: Add Styling for BUTTON -->
        <!-- STEP 2: Add BUTTON CODE -->
    </Grid>
</Grid>
NOTE: Auto and * are used to specify the height and width above to create a responsive layout. The controls held within the Grids are not fixed in size and can adjust to fill in spaces as the user resizes the app window.
Setting up remaining controls
STEP 1: Add DropDownButton & ToggleSwitch:
<DropDownButton Content="Display" Grid.Column="0" VerticalAlignment="Center" HorizontalAlignment="Left" Width="118" >
    <DropDownButton.Flyout>
        <MenuFlyout Placement="Bottom">
            <MenuFlyoutItem Text="Default"/>
            <MenuFlyoutItem Text="Compact Overlay"/>
            <MenuFlyoutItem Text="Fullscreen"/>
        </MenuFlyout>
    </DropDownButton.Flyout>
</DropDownButton>

<ToggleSwitch AutomationProperties.Name="simple ToggleSwitch" x:Name="dark_switch" Grid.Column="1" CornerRadius="3" VerticalAlignment="Center"  HorizontalAlignment="Right" MinWidth="0" HorizontalContentAlignment="Center" VerticalContentAlignment="Center" />
STEP 2: Add Buttons:
<Button Background="#FF0000" Grid.Row="0" Grid.Column="0" Content="Kick 1"/>
<Button Background="#C4425A" Grid.Row="0" Grid.Column="1" Content="Kick 2"/>
<Button Background="#D41DD8" Grid.Row="0" Grid.Column="2" Content="Kick 3"/>
<Button Background="#6A21A3" Grid.Row="0" Grid.Column="3" Content="Kick 4"/>

<Button Background="#C4425A" Grid.Row="1" Grid.Column="0" Content="Clap 1"/>
<Button Background="#D41DD8" Grid.Row="1" Grid.Column="1" Content="Clap 2"/>
<Button Background="#6A21A3" Grid.Row="1" Grid.Column="2" Content="Clap 3"/>
<Button Background="#473DB8" Grid.Row="1" Grid.Column="3" Content="Clap 4"/>

<Button Background="#D41DD8" Grid.Row="2" Grid.Column="0" Content="Open Hat 1"/>
<Button Background="#6A21A3" Grid.Row="2" Grid.Column="1" Content="Open Hat 2"/>
<Button Background="#473DB8" Grid.Row="2" Grid.Column="2" Content="Open Hat 3"/>
<Button Background="#26AAC7" Grid.Row="2" Grid.Column="3" Content="Open Hat 4"/>

<Button Background="#6A21A3" Grid.Row="3" Grid.Column="0" Content="Snare 1"/>
<Button Background="#473DB8" Grid.Row="3" Grid.Column="1" Content="Snare 2"/>
<Button Background="#26AAC7" Grid.Row="3" Grid.Column="2" Content="Snare 3"/>
<Button Background="#1A7BD6" Grid.Row="3" Grid.Column="3" Content="Snare 4"/>
STEP 3: Specify how the Grid should position these Buttons:
<Grid.ColumnDefinitions>
    <ColumnDefinition Width="*" />
    <ColumnDefinition Width="*" />
    <ColumnDefinition Width="*" />
    <ColumnDefinition Width="*" />
</Grid.ColumnDefinitions>

<Grid.RowDefinitions>
    <RowDefinition Height="*" />
    <RowDefinition Height="*" />
    <RowDefinition Height="*" />
    <RowDefinition Height="*" />
</Grid.RowDefinitions>
STEP 4: Apply standardized styling to all the Buttons:
Result
As simple as that, we should have a working visual layer built out using WinUI 3 controls. Choose x64 as your target platform, then press F5 to run the project solution. You should see:
Here is the completed code used in this post.
Moving forward
The buttons don’t do anything yet, but that’s next time! In part 2 we will dive into implementing the business logic.