
Connecting to a server on Windows 11 might sound like a geeky task, but it’s actually pretty straightforward. With a few clicks and some basic information, you’ll be able to access shared files, applications, and resources on a server. And guess what? It’s as easy as pie, even if you’re not a tech wizard!
Ready to get started? The following steps will guide you through connecting to a server on Windows 11. By the end of these steps, you’ll have access to the server’s shared resources right from your Windows 11 device.
Step 1: Open File Explorer
First things first, open File Explorer.
You can do this by clicking the folder icon on your taskbar or pressing the Windows key + E on your keyboard.
Step 2: Access the «This PC» Section
Next, in File Explorer, navigate to the «This PC» section.
You’ll find this in the left-hand sidebar. This is where all your connected drives and network locations are displayed.
Step 3: Click on «Add a network location»
In the «This PC» section, look for and click on «Add a network location» at the top.
This option will open a wizard that helps you connect to a server step-by-step.
Step 4: Follow the Wizard Prompts
The wizard will now guide you through the process. Click «Next» to start.
You’ll be asked for details like the server address. This is usually provided by your network administrator.
Step 5: Enter Server Address
When prompted, enter the server address in the format \serverfolder.
Make sure you type the address exactly as provided. A small typo can prevent the connection.
Step 6: Enter Credentials
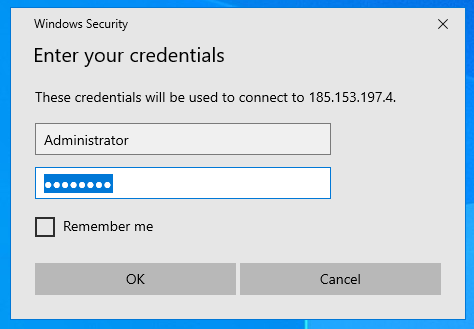
If required, enter your username and password.
These credentials are typically provided by the network administrator. Make sure they’re correct to gain access.
Step 7: Finish the Setup
Click «Finish» to complete the setup.
You’ll now see the server listed under «Network locations» in the «This PC» section.
Once you complete the above steps, you’ll have a direct link to the server in your File Explorer. You’ll be able to access shared folders, files, and applications as if they were on your local machine.
Tips for Connecting to a Server on Windows 11
- Check Network Permissions: Ensure that you have the necessary network permissions to access the server.
- Keep Credentials Handy: Make sure you have the correct username and password before starting.
- Verify Server Address: Double-check the server address for any typos or errors.
- Use a Stable Connection: Ensure you have a stable internet connection to avoid disruptions.
- Contact Admin for Issues: If you encounter problems, don’t hesitate to contact your network administrator.
Frequently Asked Questions
What if I can’t find the «Add a network location» option?
Make sure you’re in the «This PC» section and not in another part of File Explorer.
How do I know the server address?
Your network administrator should provide you with the server address.
Why am I getting a «network path not found» error?
Double-check the server address for typos or contact your network administrator to ensure the server is online.
Can I connect to multiple servers?
Yes, you can add multiple servers as network locations in the same way.
What should I do if my credentials are not accepted?
Verify your username and password with your network administrator.
Summary
- Open File Explorer
- Access the «This PC» section
- Click on «Add a network location»
- Follow the wizard prompts
- Enter server address
- Enter credentials
- Finish the setup
Conclusion
Connecting to a server on Windows 11 might initially seem like a daunting task, but it’s actually quite simple once you break it down into manageable steps. With this guide, you should find it easier to access the resources you need without any hassle. Remember, having the right credentials and server address is crucial. If something goes wrong, don’t panic; just reach out to your network administrator for help.
By mastering this skill, you’re not just connecting to a server, you’re opening up a world of shared resources and streamlined workflow. So go ahead, follow these steps, and make the most out of your Windows 11 experience. Connecting to a server on Windows 11 is a valuable skill that can make your tech life a whole lot easier!
Matt Jacobs has been working as an IT consultant for small businesses since receiving his Master’s degree in 2003. While he still does some consulting work, his primary focus now is on creating technology support content for SupportYourTech.com.
His work can be found on many websites and focuses on topics such as Microsoft Office, Apple devices, Android devices, Photoshop, and more.
In this article, we will describe about the basics of managing Dedicated, specifically how to connect to a remote server based on Windows Operating System. We will describe about connecting to Windows servers via RDP (Remote Desktop Protocol) from your local Windows computer. Connection to Linux servers is carried out via SSH and we have another article for this. Don’t switch.
How to connect to windows server?
As we mentioned, you can connect to a Windows server via RDP. By default, this remote access is enabled for all prebuilt Windows servers, including non-server versions. If you cannot connect to server after setup, please contact support. If you installed your Operating System over IPMI and configured the server OS yourself, our staff will not be able to help you on enabling and configuring RDP.
To connect via RDP you need:
- access to the server (IP address, administrator login and password);
- a built in application on a Windows computer (will demonstrate using the Windows OS as an example, but Microsoft also took care of Ubuntu users by releasing the Remmina client) or an application on Android Phones or iOS (iPhone).
Where can I get access to the server?
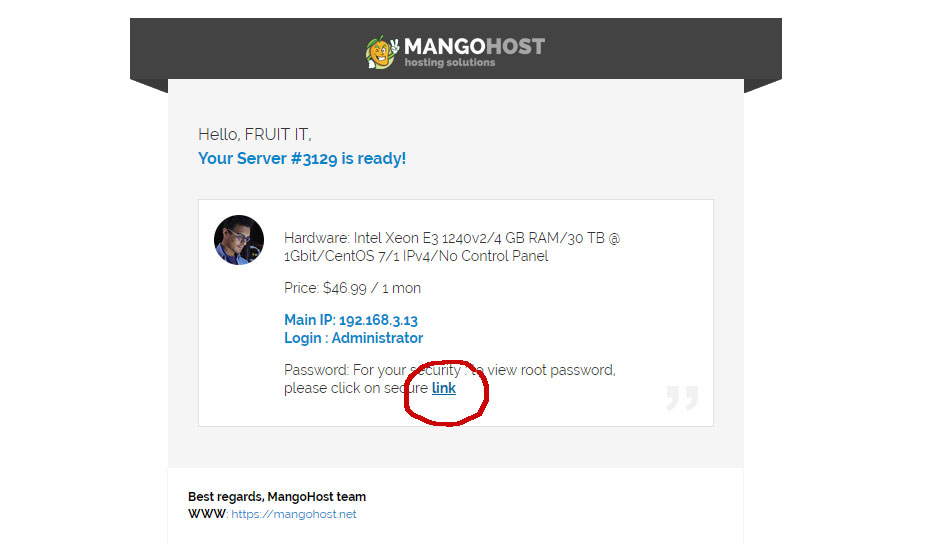
You will get notification on your email. If you ordered a dedicated Windows server you will get an email with access details. For your security we do not send you password in email directly – you need to click on a link and copy the Administrator/Admin password from your account in Control Panel.
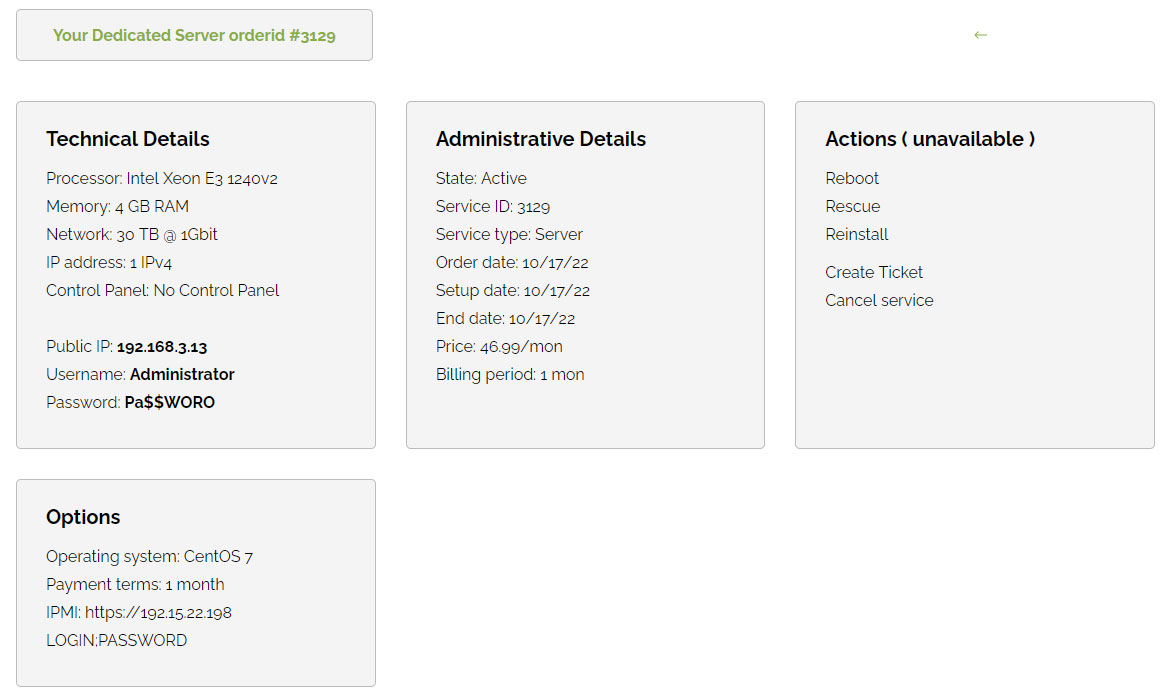
In case the email got lost in the spam folder, the accesses are always available in the Control Panel. Just log in, click on server’s ID you need details for.
Having Administrator access, now you can start connecting from your Computer / phone.
How to connect via RDP to the server (from any Windows version)
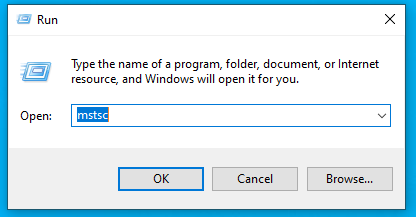
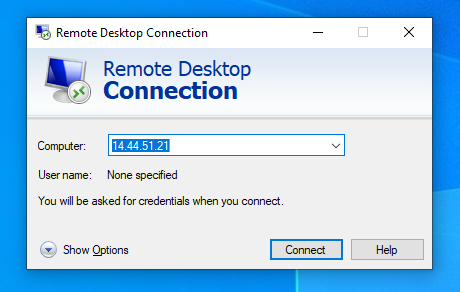
1. Press the key combination Win + R, type mstsc.exe and click OK:
2. Copy and paste your server’s IP address and click Connect:
3. Enter the username and password (from the email link) and click OK:
4. In the warning windows, check the box as shown in the screenshot and click Yes:

The desktop interface of the remote server must open. You can minimize the RDP window (for example, you want to open multiple Windows RDP)

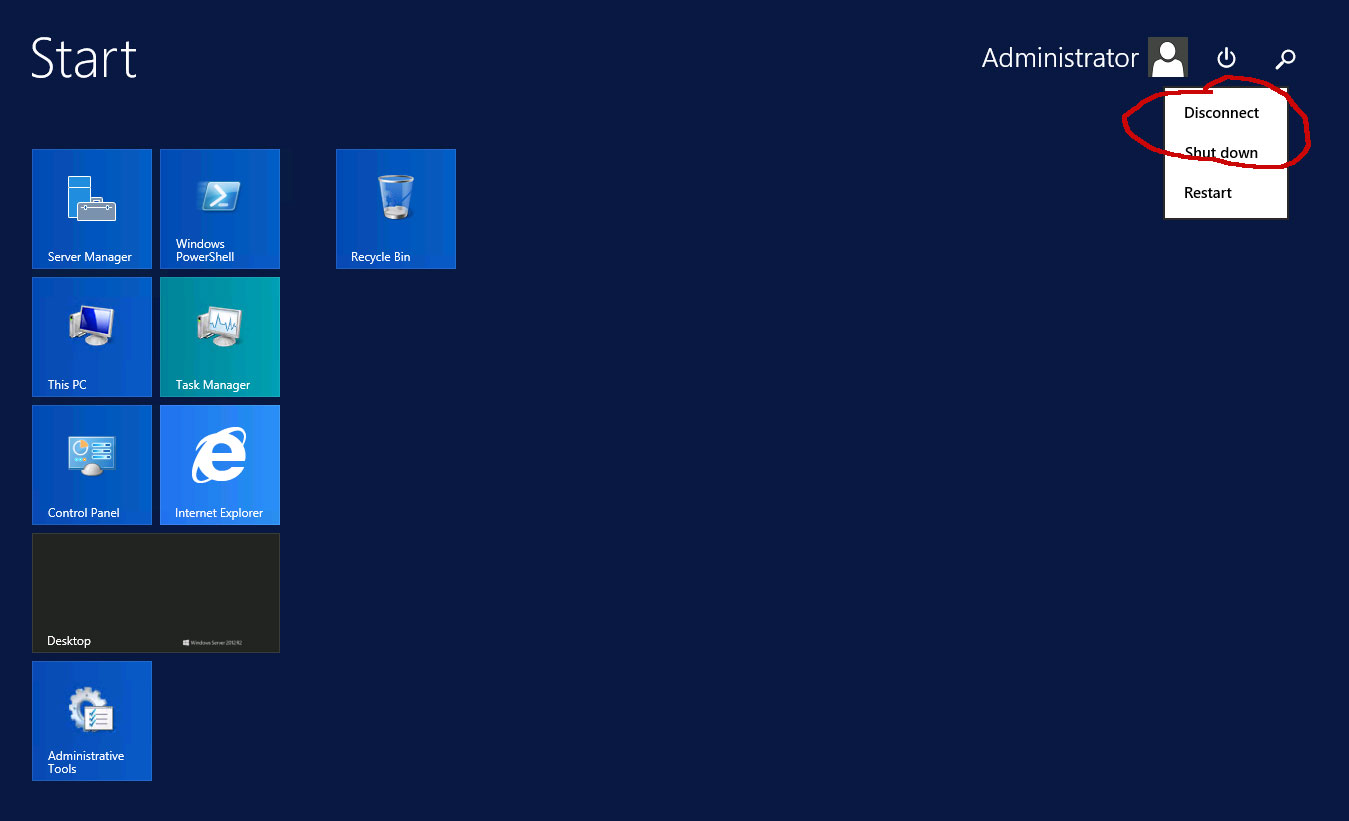
To log out of RDP after performing the operations you need, click Start – Logout. After that, you will return to the desktop of your computer.
How to connect to Windows RDP via Android
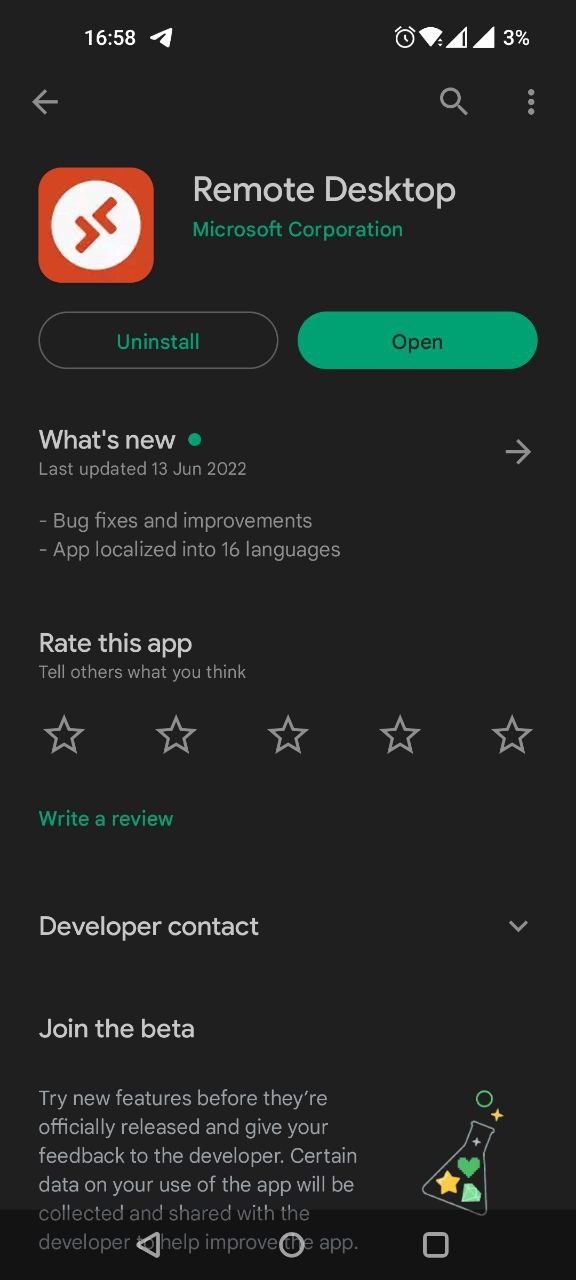
1 Download the Microsoft Remote Desktop app [link] on Google Play to your Android smartphone.
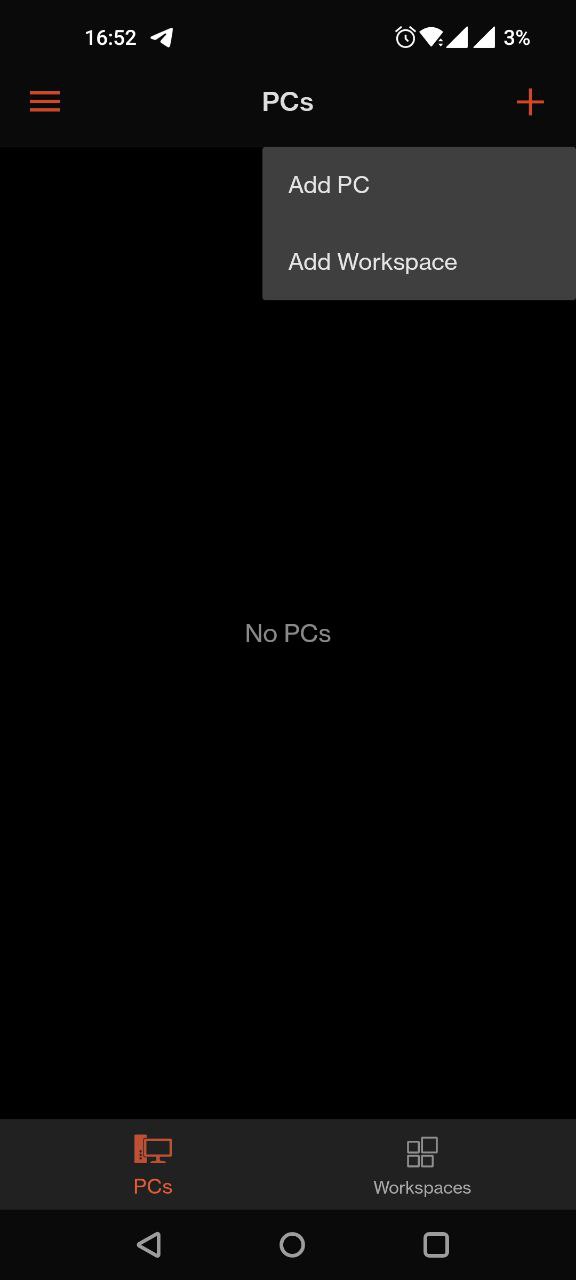
2 Click the + and select Add PC:
Enter the server’s IP address in the PC name field. In the “User Account” item, select Add user account:
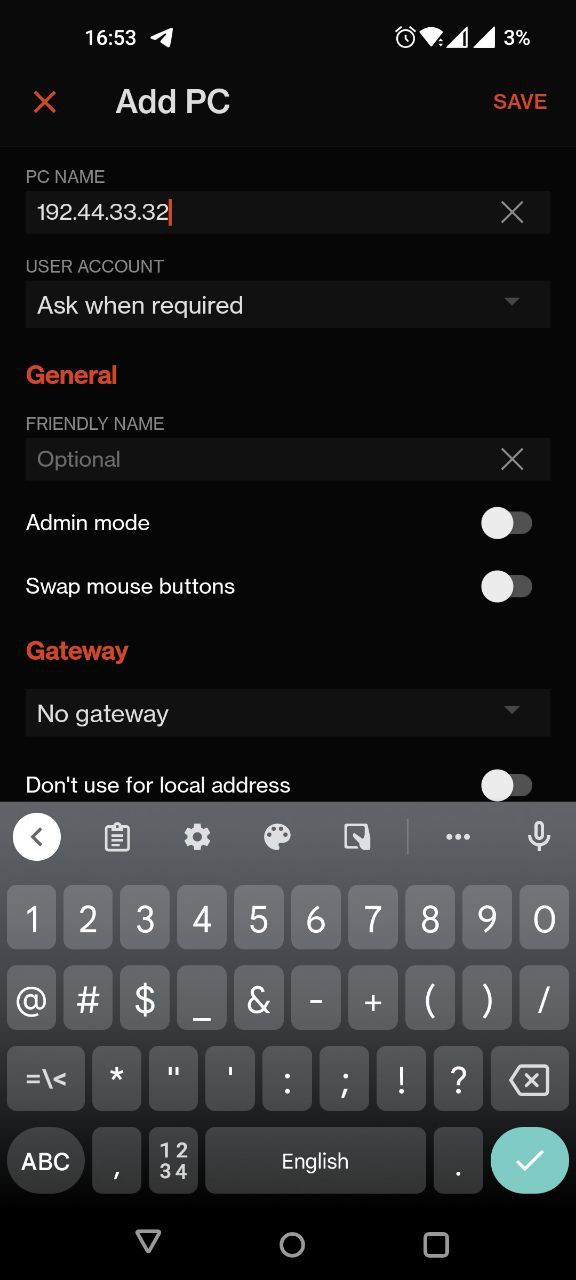
Enter username and password (from email). Click Save to continue. Then click Save in the top right corner. After that, the connection will be added as recently used in the application.
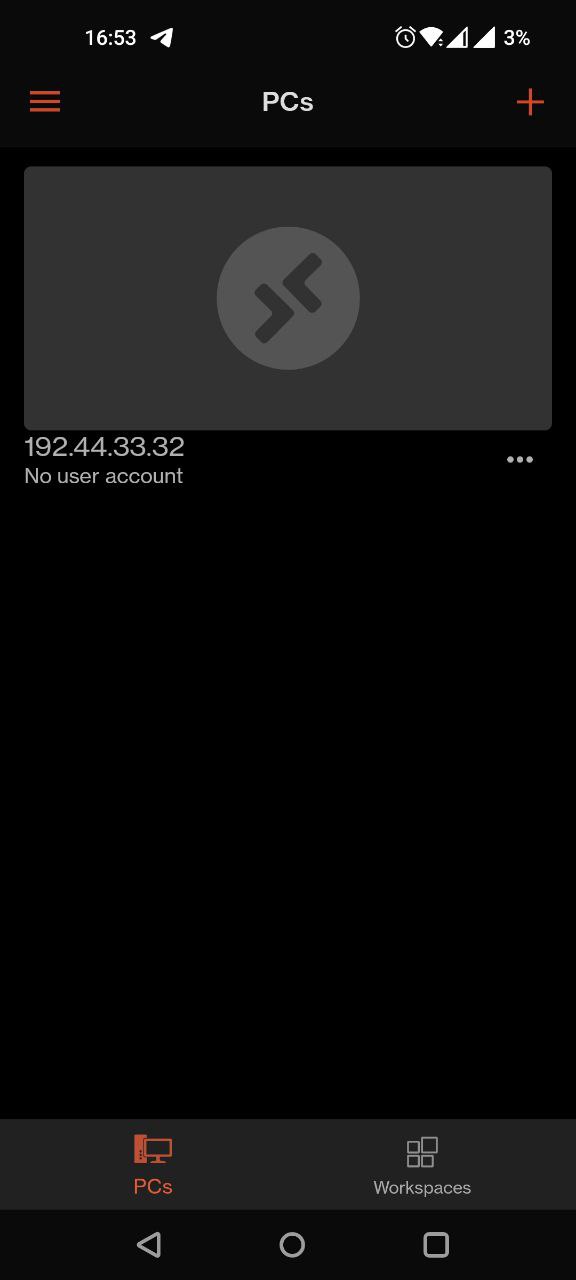
To go to the remote desktop, click on the screen:
On the page that opens, check the box and click Connect:
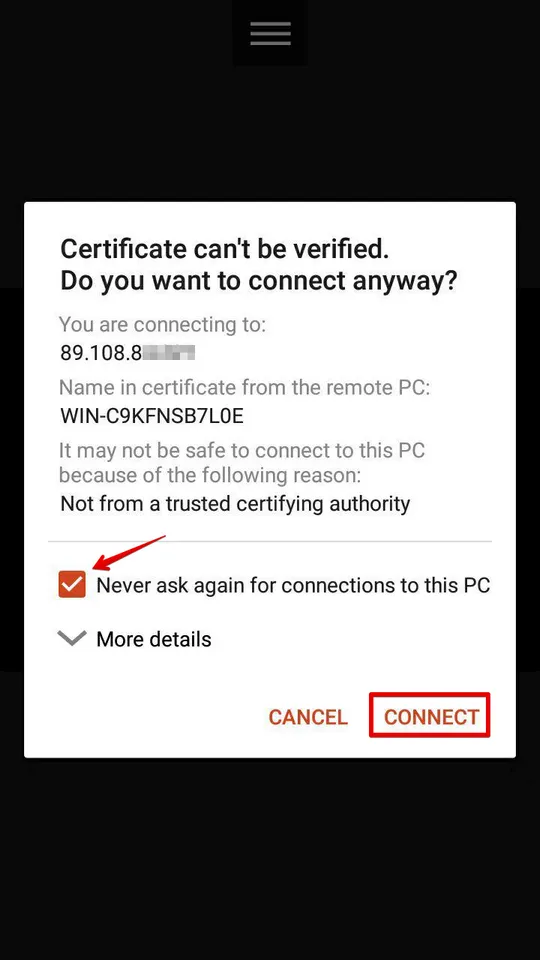
After that, you will be taken to the remote desktop and will be able to manage the server through the application:
Well, we looked at how to remotely connect to a Windows server via RDP, without installing any unofficial software via the Internet.

This article incorporates information and material from various online sources. We acknowledge and appreciate the work of all original authors, publishers, and websites. While every effort has been made to appropriately credit the source material, any unintentional oversight or omission does not constitute a copyright infringement. All trademarks, logos, and images mentioned are the property of their respective owners. If you believe that any content used in this article infringes upon your copyright, please contact us immediately for review and prompt action.
This article is intended for informational and educational purposes only and does not infringe on the rights of the copyright owners. If any copyrighted material has been used without proper credit or in violation of copyright laws, it is unintentional and we will rectify it promptly upon notification.
Please note that the republishing, redistribution, or reproduction of part or all of the contents in any form is prohibited without express written permission from the author and website owner. For permissions or further inquiries, please contact us.
There are many ways you can connect to a windows server using several freely available tools or use an inbuilt tool on a Windows or Linux platform. In the following article, we will discuss a few methods that can help you to connect a windows server using a remote Windows or Linux workstation.
- Connecting From A Windows Machine
- Connecting From A Linux Machine
- Connecting From A Tablet/Smartphone
- From Android Devices
- From iOS Devices
Connecting from a Windows machine
MSTSC (Remote Desktop Services)
Remote Desktop Services allows you to take control of a remote computer or virtual machine over a network connection. RDS is Microsoft’s implementation of a thin client, where Windows software, and the entire desktop of the computer running RDS, are made accessible to a remote client machine that supports Remote Desktop Protocol (RDP).
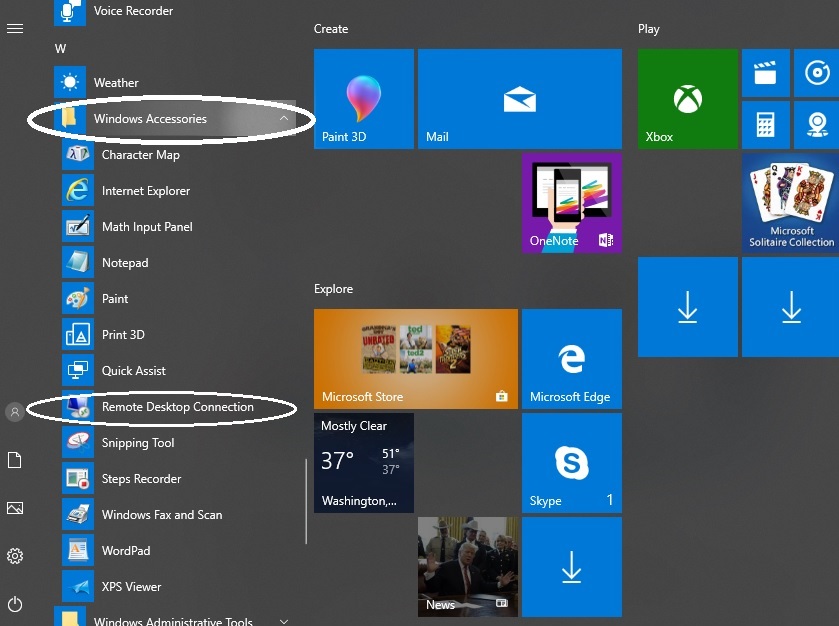
You can find the tool in the start menu -> Windows Accessories -> Remote Desktop Connection
There’s also a shortcut to open the Remote Desktop Connection window. This can be done with minimum steps given below
Step 1: Click the Start button.
Step 2: Click Run
Note: If you are using windows 10 you can simply use the search bar placed on the bottom left side.
Step 3: Type “mstsc” and press the Enter key.
Step 4: Next to Computer: type in the IP address of your server and Click Connect.
You will see the Windows login prompt. Refer to the image below:

Connecting from a Linux machine
Given the popularity among system admins of using a Linux machine, it is very common scenarios where they might need to connect to a windows server using their Linux consoles. This can be easily done using an available tool called «Freerdp».
‘Freerdp’ package is available in the default CentOS 7 and RHEL 7 repositories. In Case you have installed your CentOS 7 or RHEL 7 with Desktop Environments like GNOME or KDE then ‘Freerdp’ package will be installed automatically. If not, we have to manually install ‘Freerdp’ package.
Let us see how to Install and connect through Freerdp on CentOS 7 / RHEL 7
Step 1: First of all we need to install Desktop environment related packages
# yum install "@X Window System" xorg-x11-xauth xorg-x11-fonts-* xorg-x11-utils –y
Note: xfreerdp command will not work from the command line if these packages are not installed
Step 2: Install Freerdp
# yum install freerdp -y
Post successful installation we can now connect to a windows server through «xfreerdp» command.
# xfreerdp -g 800x600 -u user_name 168.XXX.XXX.XXX
Note: You can change the screen resolution parameters as per your requirement.
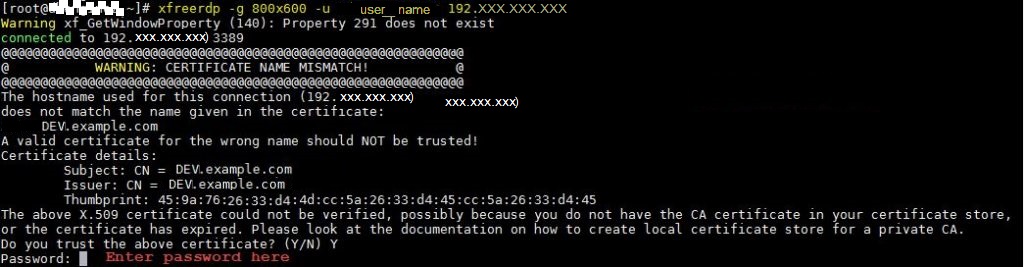
That’s all. You have successfully installed and remotely connected to a windows system using freerdp
Connecting from a tablet/smartphone using an iOS/Android
Microsoft Remote Desktop
Connecting to a Windows server is easy from a tablet or a smartphone running on the iOS/Android platform. You can use Microsoft Remote Desktop (A Microsoft proprietary software) for both iOS and Android OS. With the Microsoft Remote Desktop app, you can connect to a remote server/PC from almost anywhere.
This is a very easy to use and user-friendly tool and has a rich Windows experience with RemoteFX in a Remote Desktop client designed to help you get your work done
From Android-based devices (Tablet/Smartphone)
Supported Versions: Windows 8.1/10/Server 2019/Server 2016/Server 2012 R2
Download from: https://play.google.com/store/apps/details?id=com.microsoft.rdc.android
How to create a Remote Desktop connection:
Step 1. In the Connection Center tap +, and then tap Desktop.
Step 2. Enter the following information for the machine you want to connect to:
PC name – the name of the computer you wish to connect.
This can be a Windows computer name or an IP address. You can also append port information to the PC name
Example,
Dev_Server:1234 (Dev_Server is the machine name | 1234 is the port number)
192.00.00.00:1234 (912.00.00.00: is the IP address | 1234 is the port number)
User name – The user name to use to access the remote PC.
You can specify whether to prompt for a user name and password.
Step 3. Tap Save
From iOS based devices(iPad/iPhone)
Supported Versions: Windows 8.1/10/Server 2019/Server 2016/Server 2012 R2
Download from: https://itunes.apple.com/us/app/microsoft-remote-desktop/id714464092?mt=8
How to create a Remote Desktop connection:
Step 1. In the Connection Center tap +, and then tap Add PC or Server.
Step 2. Enter the following information for the computer you want to connect to:
PC name – the name of the computer you wish to connect.
This can be a Windows computer name or an IP address. You can also append port information to the PC name
Example,
Dev_Server:1234 (Dev_Server is the machine name | 1234 is the port number)
192.00.00.00:1234 (912.00.00.00: is the IP address | 1234 is the port number)
User name – The user name to use to access the remote PC.
You can specify whether to prompt for a user name and password.
Step 3. Tap Save
Hope you find these techniques useful. If you like the article above, please upvote it.
Хостинг
Если на вашем сервере установлена ОС Windows, вы можете подключиться к нему удалённо по протоколу RDP.
Предварительные условия
Перед подключением убедитесь, что вы знаете IP-адрес сервера, имя пользователя и пароль. Эта информация содержится в письме, которое вы получили после активации сервера. Если у вас нет этих данных, вы можете найти их в Панели управления. Для этого:
1. В разделе Товары/услуги → Виртуальные ресурсы или Товары/услуги → Физические ресурсы выделите нужный сервер и нажмите Инструкция.

2. На открывшейся странице найдите и сохраните необходимые данные.

Подключиться по RDP
Процесс подключения к серверу по RDP зависит от ОС компьютера, с которого вы будете подключаться. На компьютерах с ОС Windows по умолчанию установлено приложение «Удаленное подключение к рабочему столу». На компьютерах с ОС Linux для подключения по RDP нужно установить RDP-клиент.
С компьютера на ОС Windows
Откройте приложение «Подключение к удалённому рабочему столу» и нажмите Показать параметры. После этого введите IP-адрес и имя пользователя из инструкции в разделе Предварительные условия и нажмите Подключить. Далее введите пароль и нажмите OK.

С компьютера на ОС Linux
В качестве примера будет описано подключение с помощью RDP-клиента Remmina, при этом вы можете выбрать любой другой клиент.
1. Установите RDP-клиент Remmina по инструкции.
2. Откройте Remmina и нажмите на иконку в левом верхнем углу, чтобы добавить новое подключение.

3. Задайте имя для подключения, а также IP-адрес сервера, имя пользователя и пароль из инструкции в разделе Предварительные условия. После этого нажмите Save and Connect.

О дополнительных настройках Remmina можно прочитать в базе знаний.
EdgeЦентр
Управляйте нашими сервисами в единой платформе.
- CDN
- Облако
- Стриминговая платформа
- Веб‑защита
- Защита от кибератак для IT‑инфраструктуры
- DNS
- Хранилище
- Хостинг
Войти
Управляйте нашими сервисами в единой платформе.
- CDN
- Облако
- Стриминговая платформа
- Веб‑защита
- DNS
- Хранилище
- Хостинг
Создать аккаунт
Некоторые сервисы подключаются только с помощью менеджеров.
- Защита от кибератак для IT‑инфраструктуры
- EdgeConf
Написать менеджеру
Спасибо за ваш ответ!
Мы постоянно работаем над улучшением наших статей.
Данные не отправлены
Мы используем cookie, чтобы сайт стал лучше для вас.
Connecting to a server on Windows 10 can be a seamless process, allowing you access to a wide range of resources and data. Did you know that Windows 10 offers various methods to connect to a server, catering to different needs and preferences? Whether you’re a professional seeking remote access or an individual looking to share files, understanding how to connect to a server on Windows 10 is essential in today’s digital landscape.
When it comes to connecting to a server on Windows 10, there are a few key aspects to consider. With a rich history of networking capabilities, Windows 10 provides robust support for connecting to both local and remote servers. In fact, statistics show that over 70% of businesses rely on Windows 10 as their preferred operating system, highlighting its widespread usage in server connectivity. From utilizing the built-in File Explorer to accessing servers through Remote Desktop, mastering these methods empowers you with efficient ways to collaborate and access server resources.
If you need to connect to a server on your Windows 10 machine, follow these steps for a smooth connection. First, open the Start menu and search for «Remote Desktop Connection.» Click on the top result to open the application. Next, enter the IP address or hostname of the server you want to connect to. Click «Connect» and enter your login credentials when prompted. Finally, you’ll be connected to the server, allowing you to access files and resources remotely.

Understanding Server Connection on Windows 10
Connecting to a server on Windows 10 allows users to access resources, share files, and collaborate with others within a network environment. Whether it’s for work or personal use, knowing how to connect to a server on Windows 10 is an essential skill for anyone utilizing server-based services. This article will guide you through the process of connecting to a server on Windows 10, providing step-by-step instructions and useful tips to ensure a seamless connection experience.
Step 1: Determine the Server Address
The first step to connect to a server on Windows 10 is to determine the server address, which is typically provided by the server administrator or service provider. The server address can be an IP address or a domain name, depending on the type of server you are connecting to.
If you are connecting to an in-house server within your organization, the server address may be a local IP address such as «192.168.1.1» or a domain name like «server.domain.com.» On the other hand, if you are connecting to a cloud-based server or a remote server, the address may be an external IP address or a fully qualified domain name (FQDN).
It’s important to obtain the correct server address as any errors in inputting the address will result in a failed connection. If you are unsure about the server address, consult your system administrator or check the documentation provided by the server service.
Step 1.1: Finding the Server Address from Command Prompt
If you have access to the command prompt, you can find the server address by following these steps:
- Press the Windows key + R to open the Run dialog box.
- Type «cmd» and press Enter to open the Command Prompt.
- In the Command Prompt window, type «ipconfig» and press Enter.
- Look for the «IPv4 Address» or «Default Gateway» under the Ethernet or Wi-Fi section.
- The value listed is the server address you can use to connect to the server.
While this method primarily retrieves the local server address, it can provide valuable information for troubleshooting or identifying network-related issues.
Step 2: Choose the Appropriate Protocol
After obtaining the server address, the next step is to determine the appropriate protocol to use for connecting to the server. The most common protocols for server connection on Windows 10 are:
| Protocol | Description |
| FTP | A standard network protocol for file transfer between computers. |
| SMB | A file sharing protocol used by Windows for sharing files, printers, and other resources. |
| SSH/SFTP | A secure protocol for secure remote login and file transfer. |
| RDP | A proprietary protocol developed by Microsoft for remote desktop access. |
| HTTP/HTTPS | Protocols for accessing websites and web-based services. |
| SMTP/POP/IMAP | Email protocols for sending and receiving emails. |
Depending on the server setup and the purpose of your connection, you may need to use a specific protocol. For example, if you are accessing shared files on a Windows file server, SMB would be the appropriate protocol. If you are transferring files to a remote server, FTP or SSH/SFTP may be needed. Consult the server administrator or service provider to determine the correct protocol to use.
Step 2.1: Verifying Protocol Availability
To ensure you have the necessary protocol available on your Windows 10 system, follow these steps:
- Open the Control Panel on your Windows 10 system.
- Select «Programs» or «Programs and Features.»
- Click on «Turn Windows features on or off.»
- In the Windows Features window, check the box next to the appropriate protocol you need.
- Click «OK» and wait for the changes to be applied.
Enabling the necessary protocol ensures that Windows 10 has the required components to establish a connection to the server.
Step 3: Connect to the Server
Once you have the server address and the appropriate protocol, you can proceed to connect to the server on Windows 10. The steps to connect may vary slightly depending on the protocol, but the general procedure is as follows:
- Open the File Explorer on your Windows 10 system.
- In the address bar, type the server address using the appropriate protocol.
- Example FTP connection: ftp://serveraddress
- Example SMB connection: \\serveraddress
- Example SSH/SFTP connection: ssh://serveraddress
- Press Enter or click the «Go» button.
- If prompted, enter your credentials (username and password) to authenticate yourself with the server.
- Once connected, you should be able to access the server’s resources, view shared files, or perform other tasks depending on the server configuration.
It’s important to ensure that you have the correct permissions to access the server’s resources. If you encounter any issues during the connection process, double-check your server address, protocol, and credentials. Additionally, consider contacting the server administrator or service provider for assistance.
Step 4.1: Mapping a Network Drive
Instead of manually connecting to the server every time, you can map a network drive on Windows 10 for quick access. Here’s how you can do it:
- Open File Explorer on your Windows 10 system.
- Click on «This PC» or «My Computer» in the navigation pane.
- On the toolbar, click on «Map network drive.»
- In the «Map Network Drive» window, choose a drive letter to assign to the network drive.
- Enter the server address using the appropriate protocol in the «Folder» field.
- Check the box next to «Reconnect at sign-in» to automatically connect to the network drive whenever you sign in to Windows.
- Click «Finish» to complete the mapping process.
The mapped network drive will now appear in the File Explorer, allowing you to access the server’s resources with ease.
Exploring Advanced Server Connection Options
In addition to the basic steps outlined above, Windows 10 offers various advanced options for connecting to servers. These options provide additional security, configuration flexibility, and enhanced functionality. Let’s explore some of the advanced server connection options available on Windows 10.
Using Remote Desktop to Access a Server
The Remote Desktop feature in Windows 10 allows users to access and control a remote server or computer from their local system. This can be useful for scenarios where the user needs to manage or troubleshoot a server remotely, without physically being present at the server location.
To connect to a server using Remote Desktop on Windows 10, follow these steps:
- Ensure that the server you want to access has Remote Desktop enabled.
- On your Windows 10 system, open the Remote Desktop app.
- Enter the server address or IP address in the «PC name» field.
- Click «Connect» to initiate the remote desktop session.
- If prompted, enter your credentials to authenticate yourself with the server.
- Once connected, you will see the server’s desktop on your Windows 10 system, allowing you to interact with it as if you were physically present at the server location.
Remote Desktop provides a secure and efficient way to manage remote servers, making it an essential tool for server administrators and IT professionals.
Remote Desktop Protocol (RDP) Settings
Windows 10 offers various settings and configuration options for Remote Desktop Protocol (RDP), allowing users to customize their remote desktop experience. Here are some key RDP settings you can explore:
- Display settings: Adjust screen resolution, color depth, and other display-related configurations.
- Local resources: Choose which local resources (such as printers, drives, and clipboard) to make available during the remote desktop session.
- Experience settings: Optimize the performance of the remote desktop session by adjusting settings for audio, desktop background, and font smoothing.
- Security settings: Configure security protocols, encryption levels, and user authentication methods for the remote desktop connection.
- Advanced settings: Fine-tune advanced options like idle session timeout, device redirection, and multimonitor support.
By exploring and customizing these settings, you can tailor the remote desktop experience according to your needs and preferences.
Establishing a VPN Connection to the Server
Virtual Private Network (VPN) enables secure and private communication over a public network such as the internet. By establishing a VPN connection, users can access server resources and services as if they were directly connected to the server’s local network.
To connect to a server using a VPN on Windows 10, follow these steps:
- Ensure that the server has a VPN server configured and that you have the necessary VPN credentials.
- On your Windows 10 system, click on the «Network» icon in the taskbar notification area.
- Select the VPN connection you want to establish from the list of available networks.
- Click «Connect» and enter your VPN credentials when prompted.
- Once connected, your Windows 10 system will be securely connected to the server’s network, allowing you to access resources and services.
VPN connections are widely used for remote work, allowing employees to access company resources securely from anywhere in the world.
VPN Configuration Settings
Windows 10 offers various configuration options for VPN connections, allowing users to customize their VPN experience. Here are some common VPN configuration settings:
- VPN type: Choose the appropriate VPN protocol for your server, such as PPTP, L2TP/IPSec, or OpenVPN.
- Server address: Enter the server address or IP address provided by the VPN service or server administrator.
- Authentication method: Select the authentication method, such as username and password or certificate-based authentication.
- Encryption settings: Configure the encryption settings for the VPN connection, ensuring data confidentiality and integrity.
- Advanced settings: Fine-tune advanced options like DNS settings, split tunneling, and proxy server configuration.
Configuring the VPN settings properly ensures a secure and reliable connection to the server through the VPN network.
Using PowerShell for Server Connection
PowerShell is a powerful command-line shell and scripting language available on Windows systems, including Windows 10. It provides extensive automation capabilities, making it an excellent tool for managing and connecting to servers.
To connect to a server using PowerShell on Windows 10, follow these steps:
- Open the Start menu and search for «PowerShell.»
- Click on «Windows PowerShell» to open the PowerShell console.
- Use the appropriate cmdlets or scripts to establish the connection to the server, depending on the protocol or server type.
- For example, to establish an SSH connection, you can use the «ssh» cmdlet followed by the server address and your credentials.
PowerShell provides extensive functionality for connecting to various types of servers and automating administrative tasks, making it a valuable tool for system administrators and IT professionals.
PowerShell Remoting
PowerShell Remoting is a feature in PowerShell that allows users to run commands or scripts on remote servers

Connecting to a Server on Windows 10
If you are using Windows 10 and need to connect to a server, there are several ways to accomplish this. Here are two common methods:
1. Using Remote Desktop
Remote Desktop is built into Windows 10 and allows you to connect to a remote server using the server’s IP address or domain name. Follow these steps:
- Open the Remote Desktop app on your Windows 10 computer
- Enter the IP address or domain name of the server you want to connect to
- Click ‘Connect’ and enter your credentials if prompted
- You will now be connected to the server and can access its files and resources
2. Using File Explorer
If you prefer a more direct method, you can connect to a server using File Explorer. Here’s how:
- Open File Explorer on your Windows 10 computer
- In the address bar, enter the IP address or domain name of the server, prefixed with ‘\\’
- Press Enter and you will see a list of shared folders on the server
- Double-click on a folder to access its contents
Key Takeaways: How to Connect to a Server on Windows 10
- Ensure that you have the server’s IP address or hostname.
- Open the File Explorer and click on «This PC» on the left-hand side.
- Click on «Map network drive» from the «Computer» tab in the toolbar at the top.
- Choose a drive letter and click on «Browse» to find the server you want to connect to.
- Enter the server’s IP address or hostname in the «Folder» field and click on «Finish.»
Frequently Asked Questions
Connecting to a server on Windows 10 can be essential for accessing and managing resources within a network. Here are some commonly asked questions about connecting to a server on Windows 10:
1. How do I connect to a server on Windows 10?
To connect to a server on Windows 10, follow these steps:
1. Open the «File Explorer» by pressing the Windows key + E.
2. In the navigation pane, right-click on «This PC» and select «Map network drive» from the context menu.
3. In the «Map Network Drive» window, choose a drive letter and enter the server’s UNC path in the «Folder» field (e.g., «\\server\folder»).
4. Tick the «Reconnect at sign-in» if you want the connection to persist.
5. Click «Finish» to connect to the server on Windows 10.
2. What is the UNC path of a server?
The UNC (Universal Naming Convention) path of a server is a format used to access shared resources on a network. It consists of two parts:
1. The server name: This is the name or IP address of the server you want to connect to.
2. The share name: This is the name of the shared folder or resource on the server you want to access.
For example, if the server name is «server1» and the shared folder is «documents,» the UNC path would be «\\server1\documents».
3. Can I connect to a server using its IP address?
Yes, you can connect to a server using its IP address. Instead of entering the server name in the UNC path, you would enter the server’s IP address. The format would be «\\ip_address\share_name». Ensure that you have the necessary permissions and that the server is reachable on the network.
4. How do I disconnect from a server on Windows 10?
To disconnect from a server on Windows 10, follow these steps:
1. Open the «File Explorer» by pressing the Windows key + E.
2. In the navigation pane, right-click on the connected network drive and select «Disconnect» from the context menu.
3. Confirm the disconnection by clicking «Yes» in the dialogue box.
5. How can I troubleshoot connection issues with a server on Windows 10?
If you’re experiencing issues connecting to a server on Windows 10, you can try the following troubleshooting steps:
1. Check the server’s availability and ensure it is powered on and connected to the network.
2. Verify that the server’s IP address or hostname is correct in the UNC path.
3. Make sure you have the necessary permissions to access the server.
4. Disable any firewalls or antivirus software temporarily to see if they are blocking the connection.
5. Restart your computer and try connecting again.
6. Consult with your network administrator or IT support for further assistance if the issue persists.
To connect to a server on Windows 10, follow these simple steps. First, make sure you have the necessary credentials and network settings. Then, open the Remote Desktop Connection app and enter the server’s IP address or hostname. Next, click «Connect» and enter your username and password. If everything is set up correctly, you should be connected to the server in no time.
Remember to troubleshoot if you encounter any issues. Double-check the server’s IP address or hostname, ensure that your network connection is stable, and verify that your username and password are correct. Additionally, make sure that you have the necessary permissions to access the server. By following these steps and troubleshooting as needed, you’ll be able to connect to a server on Windows 10 hassle-free.