
Remote Desktop Protocol (RDP) enables users to establish a secure connection to remote computers over a network, allowing them to access files, applications, and system resources as if they were physically present.
Microsoft developed RDP primarily for Windows, but it also works for Linux, macOS, Android, and iOS devices, making it a versatile solution for remote access across different operating systems.
This article will show you how to connect to an Ubuntu system from Windows using RDP.
Prerequisites
- A client Windows machine.
- A host machine with Ubuntu installed.
- Sudo or root privileges on the host machine.
How to Connect to Ubuntu Remote Desktop From Windows
The RDP client is preinstalled on Windows. However, the Ubuntu system must be configured before it accepts incoming RDP connections.
Follow the steps in the sections below.
Install xrdp on Ubuntu
xrdp is an RDP server for Linux that listens for and accepts RDP connections from clients. Ubuntu systems usually do not have xrdp installed by default.
To install xrdp on Ubuntu, take the following steps:
1. Update the Ubuntu packages list:
sudo apt update2. Install xrdp with the following command:
sudo apt install xrdp -y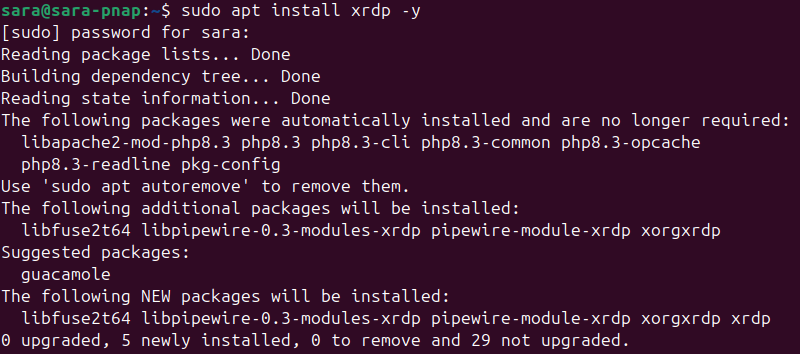
3. Check the xrdp server status:
sudo systemctl status xrdp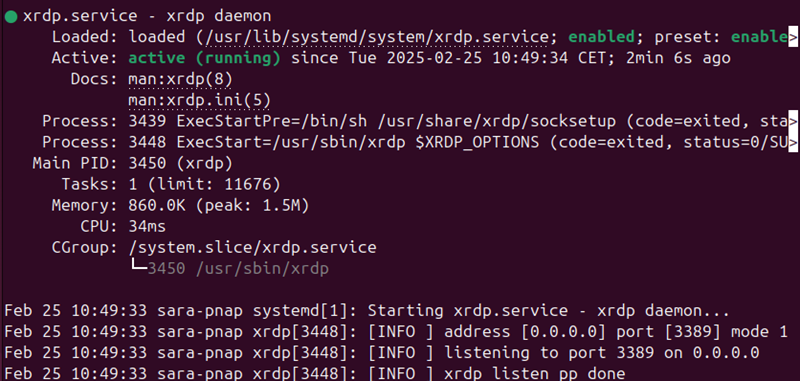
The output confirms the xrdp is active.
Configure xrdp Port (Optional)
The <strong>xrdp</strong> server listens for incoming RDP connections on port number 3389. Using a non-standard port for RDP connection is a form of protection through obscurity. It is not a robust security measure, but it protects a system from rudimentary brute-force attacks.
To instruct xrdp to listen on a different port, take the following steps:
1. Use a text editor, like Vim, to edit the xrdp configuration file, xrdp.ini:
sudo vim /etc/xrdp/xrdp.ini2. Locate the port directive in the [Globals] section and set the desired value. In this example, the RDP port is 49952:
port=49952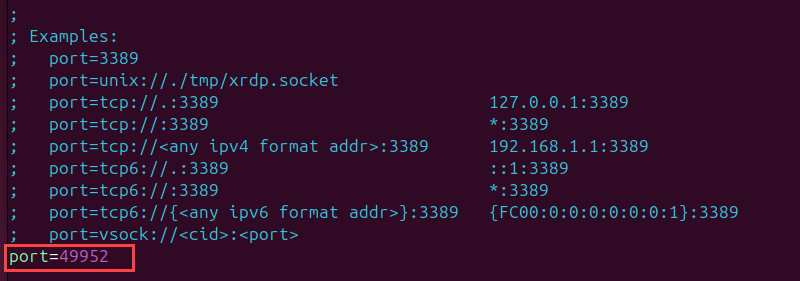
3. Save the changes and exit the file.
4. Restart the xrdp server to apply the changes:
sudo systemctl restart xrdpThere is no confirmation message after the server restarts.
Open a Port for Incoming Traffic in ufw
An active firewall on the Ubuntu system, such as ufw, can block traffic on specific ports. Configure the firewall and allow traffic on the desired port to ensure successful RDP connections.
Take the following steps:
1. Check the ufw firewall status:
sudo ufw status
If the firewall is inactive, use the following command to turn on ufw:
sudo ufw enable2. Allow traffic on port 3389 or choose a different port for your RDP connection. The following command allows RDP connections on port 49952:
sudo ufw allow 49952/tcp
Modify the command to open a different port number for RDP connections.
3. Reload the ufw firewall tool to apply the changes:
sudo ufw reload
Note: If you want to access the Ubuntu machine from outside its local network, configure port forwarding on the router or adjust external firewalls.
Configure Remote Desktop Connection on Windows
To initiate an RDP connection to a remote Ubuntu system from Windows, take the following steps:
1. Type rdp in the Windows search box.
2. Open the Remote Desktop Connection app.
3. Enter the IP address or name of the remote Ubuntu system in the Computer field.

If you change the default port number for RDP connections on Ubuntu, enter the port number after the IP address in the following format:
IP_address:port_number4. Type the username of the Ubuntu user for the RDP connection.
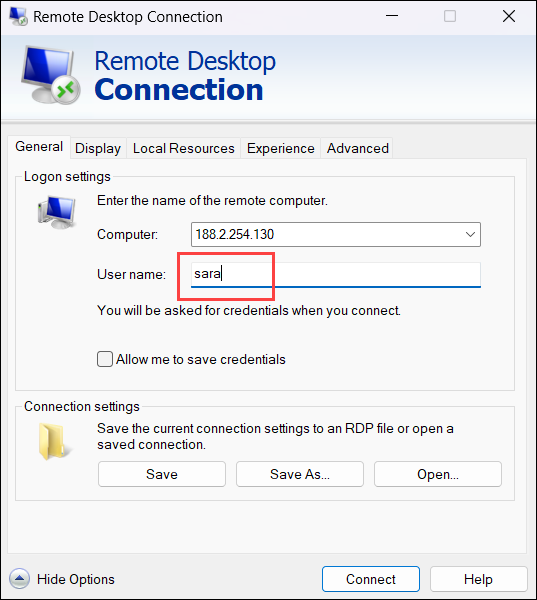
5. (Optional) Save the connection details for future use.
6. (Optional) The Remote Desktop Connection (RDP) app in Windows enables users to configure the RDP session. The main configuration options are split into several sections:
- Display. Adjust the size and color settings of the remote desktop window.
- Local Resources. Decide which local devices (keyboards, audio, and printers) to share with the remote system.
- Experience. Modify visual effects like desktop background and font smoothing based on network speeds.
- Advanced. Fine-tune server authentication settings, set up a Remote Desktop Gateway server, and more.
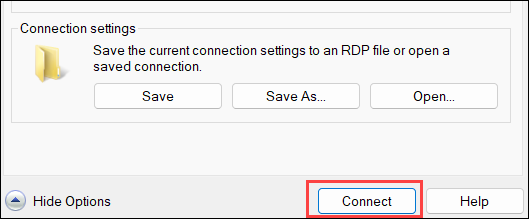
7. Click Connect.
Log in to Ubuntu System
Enter the password for the Ubuntu RDP user and click OK.
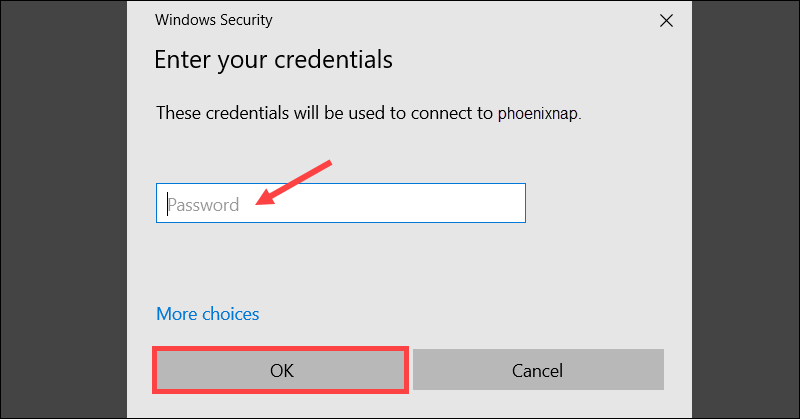
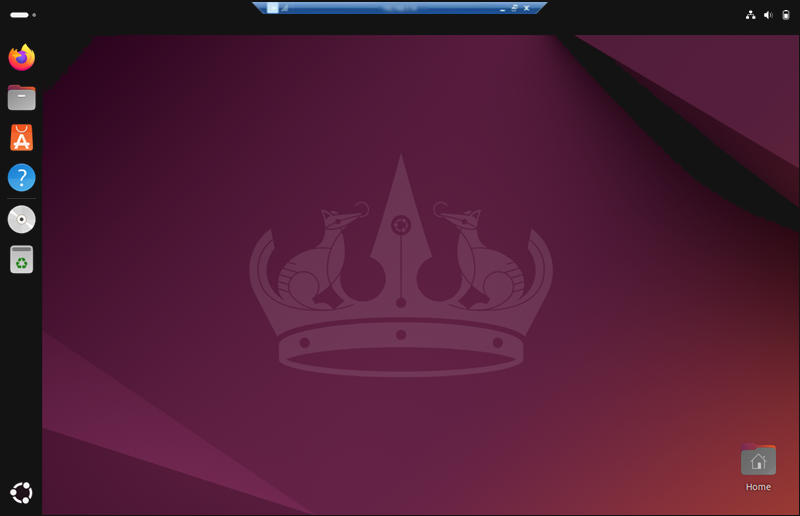
You are now able to interact with the Ubuntu machine via the established RDP session.
Ubuntu RDP From Windows: Extra Tips + Best Practices
To set up a smooth and secure RDP connection from Windows to Ubuntu, focus on more than basic configuration. Optimize hardware, internet speed, and security settings to improve performance and responsiveness.
The following text explains best practices and useful tips for RDP from Windows to Ubuntu.
Minimum vs. Optimal Hardware Requirements
The RDP connection quality from Windows to Ubuntu depends on the system’s hardware capabilities and the type of tasks and applications running on the Ubuntu system.
The Ubuntu system should meet the following requirements:
| REQUIREMENTS | MINIMAL | RECOMMENDED |
|---|---|---|
| CPU | Single-core 1 GHz+ | Dual-core 2 GHz+ |
| RAM | 2 GB+ | 8 GB+ |
| Storage | 25 GB+ | 50 GB+ (SSD) |
| Network | Basic NIC | Stable broadband (Ethernet NIC) |
| Graphics | Integrated graphics or entry-level GPU | Dedicated GPU |
Ideal Internet Speed for RDP Connections
Certain tasks require a minimal level of responsiveness and visual quality. The table offers an overview of minimal and recommended bandwidth per connection for general RDP tasks:
| Tasks | LOCAL NETWORK | INTERNET |
|---|---|---|
| Text editing | 1 Mbps | 1 Mbps |
| Web browsing | 5 Mbps | 2-5 Mbps |
| Video streaming | 10-15 Mbps | 5-10 Mbps |
Beyond bandwidth, factors such as server load, network latency, and packet loss impact RDP performance. For the best experience, prioritize low-latency connections and stable network conditions.
xrdp Black Screen Issue Troubleshooting
Users sometimes encounter a black screen when using xrdp with specific Ubuntu configurations. The screen appears after establishing an RDP session and prevents users from interacting with the Ubuntu system.
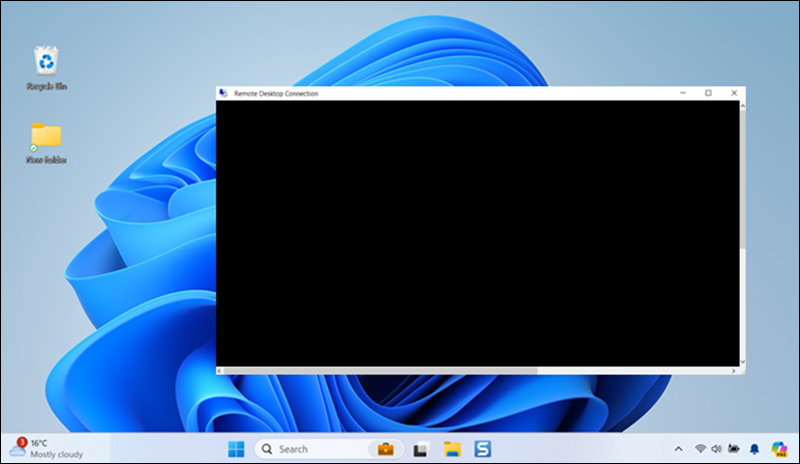
To try and resolve the black screen issue, use the tips from the sections below.
Check Log Files
Log files provide valuable information about potential errors. Access the /var/log/xrdp.log using the following command:
sudo vim /var/log/xrdp.log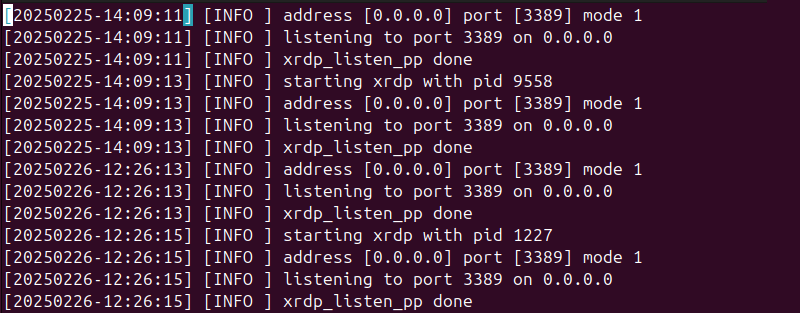
Look for warnings and error messages on the log timeline.
The /var/log/xrdp-sesman.log file contains entries about session startups and shutdowns, operational messages, and warnings. Use the following command to access the log:
sudo vim /var/log/xrdp-sesman.log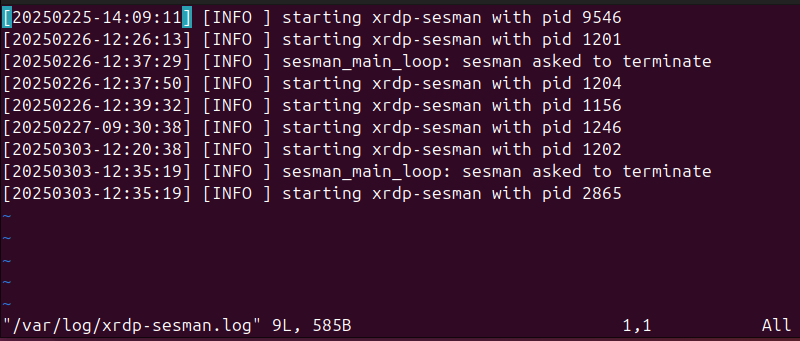
Check for errors occurring when a new session is initiated and for other backend-related issues.
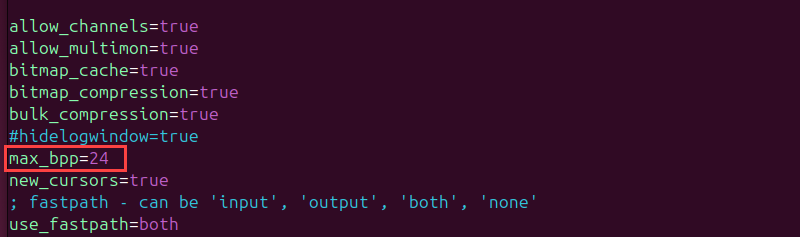
Set max_bpp in xrdp.ini File
The bits per pixel (bpp) value defines the number of bits used to represent the color of a single pixel. High bpp values increase the data that needs to be transferred, which affects performance and causes compatibility issues.
Use the following command to access the xrdp.ini configuration file and check the max_bpp value:
sudo vim /etc/xrdp/xrdp.iniSet the max_bpp value in the [Globals] section to 24, as the default value of 32 bpp sometimes causes issues. If there are other max_bpp values under individual sections, adjust them as well.
Save the changes and restart the xrdp service to ensure the changes take effect.
Reinstall xrdp
A straightforward way to resolve configuration or compatibility issues is to reinstall xrdp.
Run the following to remove the xrdp package and delete its configuration files:
sudo apt remove --purge xrdp -yInitiate a fresh xrdp installation from Ubuntu repositories with:
sudo apt install xrdp -yAfter the installation, modify the xrdp configuration files again.
Install a Different Desktop Environment
The default Ubuntu GNOME desktop occasionally has compatibility issues with xrdp. Install an alternative Ubuntu GUI, such as the XFCE desktop environment, and attempt to establish an RDP connection.
Security Measures
Secure an RDP session from Windows to Ubuntu to prevent unauthorized access and data breaches. Proper security measures include hardening the Windows client and Ubuntu host, restricting network access, and enforcing strong authentication policies.
The following sections present key steps to enhance security.
Windows
- Update Windows regularly to ensure the Remote Desktop Connection app is up-to-date with the latest security patches.
- Limit the number of simultaneous active RDP sessions.
- Disconnect from an RDP session when it is not being used and set timeouts for idle sessions.
Network
- Use a firewall to restrict RDP access to specific IP addresses.
- Change the default RDP port (3389) to a non-standard port number.
- Use a VPN to encrypt the data transfer between client and host machines.
- Alternatively, use SSH port forwarding to create an encrypted tunnel for the RDP session if a VPN is not an option.
Linux
- If you use xrdp, edit the /etc/xrdp/sesman.ini file to specify which users can establish an RDP connection.
- Create dedicated accounts for RDP to restrict access to critical systems or data.
- Implement two-factor authentication for RDP sessions. xrdp does not natively support 2FA but can be integrated with other authentication tools.
- Temporarily lock user accounts after multiple unsuccessful login attempts.
- Enforce strong password policies for RDP user accounts.
Reduce Resolution and Color Depth for Performance Boost
Enhance the RDP session performance by adjusting the color depth and screen size from the Windows RDP client.
To reduce the resolution and color depth, access the Remote Desktop Connection app and:
1. Open the Display tab.
2. Drag the Display configuration slider left to reduce the resolution. For optimal performance on slower connections, 1280×720 resolution is a good choice.
3. Expand the dropdown in the Colors section and choose High Color (16-bit) to reduce the color depth.
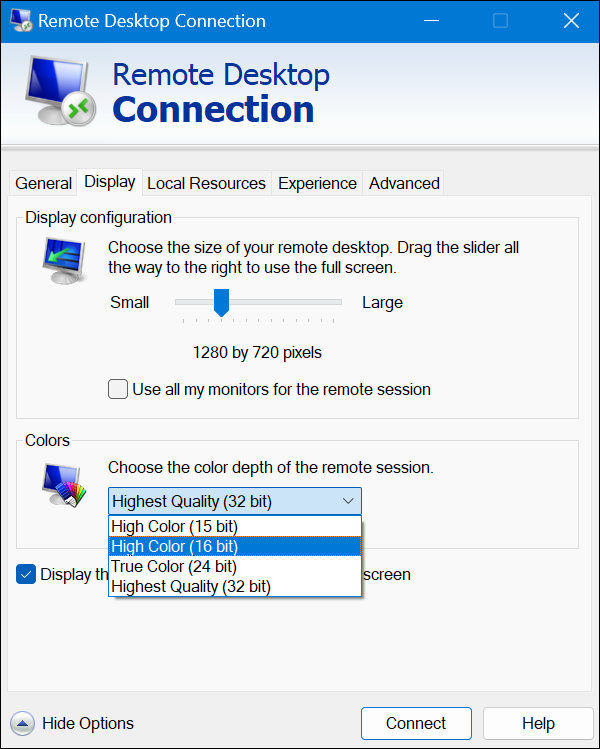
Reducing the screen size and color depth is especially beneficial for low-bandwidth or unreliable network connections.
Conclusion
This tutorial explained how to initiate an RDP session from your Windows system to a remote Ubuntu machine. It also elaborated on useful tips and best practices for a high-quality and secure connection.
Next, learn how to SSH to a remote server from Windows, Linux, or Mac.
Was this article helpful?
YesNo
Last Updated :
20 Feb, 2024
systemRemote Desktop from Windows helps to access a different operating system in Windows itself. Windows & Ubuntu operating systems can be used simultaneously with the help of Remote Desktop Access. Remote Desktop Access on Ubuntu from the Windows process will be discussed in this article by following simple steps on both Ubuntu & Windows.

Table of Content
- Method 1: Get Remote Access Using Remote Desktop Protocol (RDP)
- Method 2: Get Remote Access Using Virtual Network Computing (VNC)
- Method 3: Get Remote Access Using Third-party Software
Why Do We Use a Remote Desktop Connection?
There are many situations where we require remote desktop access of a computer system. Some of the cases are mentioned below.
- Remote Access: Enables accessing a computer from anywhere.
- File Retrieval: Access files and documents remotely.
- Tech Support: IT support resolves issues without physical presence.
- Collaboration: Multiple users work on the same project simultaneously.
- Resource Utilization: Use powerful software/resources remotely, saving local device resources.
Pre-Requisite to Establish Remote Desktop Access.
Before establishing the Remote desktop access on Ubuntu, you need to meet a few requirements :
- Enable Port Forwarding on the remote device’s router
- Find Ubuntu’s IP Address
- Install SSH on the Ubuntu box.
Let’s see how to do this quickly!
Enable Port Forwarding:
To access a remote Access on another network (e.g., your work network), you need to Enable Port Forwarding on the router where your Ubuntu PC is located.
- Log into your router’s web interface using a web browser.
- Look for the port forwarding section or NAT settings.
- Create a new port forwarding rule for port 3389 (Remote Desktop’s default port).
- Enter the local IP address of your Ubuntu machine.
- Save the changes and restart the router if necessary to apply the configuration.
Find Ubuntu’s IP Address:
- Launch the Terminal application on your Ubuntu machine.
- Type ‘ ifconfig ‘ and press Enter to display network interface details.
- Look for the IPv4 address associated with the network interface you are using (like eth0 or en0).
Install SSH:
- Launch Terminal on your Ubuntu machine.
- Type ‘sudo apt-get update‘ to update package lists.
- Type ‘sudo apt-get install openssh-server‘ and press Enter.
- Complete the installation process and set up SSH on your Ubuntu system.
How to Set Up Remote Desktop Access From Windows to Ubuntu?
Once you are equipped with all the prerequisites to establish Remote Desktop Access. You are ready to move on and start the actual process of Set Up Remote Desktop Access From Windows to Ubuntu.
Method 1: Get Remote Access Using Remote Desktop Protocol (RDP)
On the Ubuntu Operating System
Step 1: To develop Remote Desktop from Windows, first open the terminal open a terminal (Ctrl + Alt + T) of Ubuntu & execute the following command in the terminal. It will help to install the XRDP application in Ubuntu that helps to combine different operating systems. It will take some time to install the application.
Command: sudo apt install xrdp -y
.png)
Step 2: After installation of the application, run the following two commands. One of the commands will help to start the application that is installed on the device. The second command will help to enable the application on the machine.
Commands:
sudo systemctl start xrdp
sudo systemctl enable xrdp

Step 3: After running the above commands, again execute the following command to show the status of the XRDP application. The status of the application is now running.
Command: sudo systemctl status xrdp
.png)
Step 4: At last, execute the following command in the Ubuntu terminal. It will provide configurational details of the machine. Find out the IP Address of the Ubuntu operating system.
Command: ifconfig
.png)
Hence, we have completed the operations required in the Ubuntu operating system.
On Windows Operating System
Step 1: To complete Remote Access Ubuntu from Windows, first open the Remote Desktop Connection in the Windows OS & provide the IP Address of the Ubuntu operating system. It will be the same operating system that was noted down earlier. After that, click on the Connect button.

Step 2: In the next tab, click on the Yes button present there to connect Ubuntu from Windows.
.png)
Step 3: Now provide the username & password. It will be the same username & password used to enter into the Windows operating system. If there is no password present in the Windows operating system, keep it blank here. Then click on OK to finish the operation.

Hence, we have completed the operations required to establish remote desktop access to Ubuntu From Windows
Method 2: Get Remote Access Using Virtual Network Computing (VNC)
Virtual Network Computing allows desktop sharing on computer network. So to connect your Windows to Ubuntu PC, follow these steps.
Step 1: Install VNC Server on Ubuntu:
- 1. Open Terminal and type ‘sudo apt-get update‘.
sudo apt-get update
- 2. Install the VNC server with ‘sudo apt-get install tightvncserver’.
sudo apt-get install tightvncserver
Step 2: Install VNC Viewer on Windows:
- Download and install a VNC Viewer application on your Windows computer.
Step 3: Start VNC Server on Ubuntu:
- Type ‘vncserver‘ in the Terminal and set a password.
vncserver
Step 4: Connect from Windows:
- Open VNC Viewer on Windows.
- Enter Ubuntu’s IP address and the password you set.
- Click Connect to establish remote access to Ubuntu from Windows.

Method 3: Get Remote Access Using Third-party Software
Remote desktop Software allows you to connect and get remote access on computer in another location. You can easily control a connected PC via an internet connection with 2 simple steps.
Step 1: Install Software on Ubuntu and Windows:
- Choose a tool like TeamViewer, NoMachine, or Chrome Remote Desktop
- Go to their official websites and download the software for both Ubuntu and Windows.
Step 2: Launch the Software and Connect:
- Open the software on both devices.
- Enter the partner’s ID (displayed on Ubuntu) in the Windows software.
- Click Connect to establish remote access from Windows to Ubuntu.
Just like this you can use any of the above-mentioned methods and can Set Up Remote Desktop Access from Windows to Ubuntu.
Also Read
- How to control your PC by your Smartphone?
- How do I use SSH to connect to a remote server in Linux?
- How to Run Linux Software on Windows — GeeksforGeeks
In this article, we will guide you through how to use Windows Remote Desktop to connect to Ubuntu system. You’ll learn about the necessary tools, installation steps, and security measures to ensure a smooth connection.
Before we dive into the how-to, let’s briefly discuss why you might want to use RDP to connect from Windows to Ubuntu:
- Cross-platform compatibility: As Ubuntu is a Linux distribution and Windows is the most widely used desktop OS, many users need to switch between these two platforms seamlessly.
- Easy file sharing: With RDP, you can easily transfer files between your local Windows machine and the remote Ubuntu system.
- Graphical interface: Unlike command-line-based connections like SSH, RDP allows you to interact with the remote Ubuntu desktop just as if you were sitting in front of it.
- Centralized management: For administrators managing multiple systems, using a single Windows machine to manage both Windows and Ubuntu systems can be time-saving.
Step 1: Prepare Ubuntu for Remote Desktop Connection
To enable remote desktop access on Ubuntu, you’ll need to install and configure a remote desktop server. Ubuntu doesn’t have native support for RDP, so you’ll need to use a third-party solution. One of the most popular tools for this is xrdp, which enables RDP connections to Linux systems.
Install XRDP on Ubuntu
- Open the terminal on your Ubuntu machine. You can do this by pressing Ctrl + Alt + T or searching for “Terminal” in the applications menu.
- Update the package list to ensure you have the latest repository information:
bash Copy code sudo apt update - Install the xrdp package:
bash Copy code sudo apt install xrdp -y - After the installation is complete, start the xrdp service and enable it to run at boot:
bash   Copy code
sudo systemctl enable xrdp
sudo systemctl start xrdp
- Check the status of the xrdp service to ensure it is running properly:
bash   Copy code
sudo systemctl status xrdp
At this point, xrdp should be running, and your Ubuntu machine is ready to accept remote desktop connections.
Configure XRDP for Enhanced Performance
- Firewall: If you have a firewall running on Ubuntu, you need to allow the RDP port (3389 by default) through the firewall. Use the following order to open the port:
bash Copy code sudo ufw allow 3389/tcp - Desktop Environment: Ubuntu ships with the GNOME desktop environment by default, which may not work perfectly with xrdp. For better compatibility, you can switch to a lightweight desktop environment like Xfce.
To install Xfce:
bash   Copy code
sudo apt install xfce4 xfce4-goodies -y
Once installed, configure xrdp to use Xfce:
- Open the xrdp configuration file:
bash Copy code sudo nano /etc/xrdp/startwm.sh - Add the following line before the exit 0 line at the bottom of the file:
bash Copy code startxfce4 - Save the file and exit the editor (Ctrl + X, then Y to confirm changes).
- Restart the xrdp service:
bash   Copy code
sudo systemctl restart xrdp
Step 2: Configure Windows for Remote Desktop Access
Once the Ubuntu machine is configured to accept RDP connections, you’ll need to set up your Windows PC to connect to the Ubuntu system. Windows comes with a built-in Remote Desktop Client, so there’s no need to install additional software.
Open Remote Desktop Connection on Windows
- On your Windows PC, press Win + R to open the Run dialog box.
- Type mstsc and press Enter. This will open the Remote Desktop Protocol Connection window.
Alternatively, you can search for “Remote Desktop Connection” from the Start menu.
Enter the IP Address
To connect to your Ubuntu machine, you need its IP address:
- Find the IP address of your Ubuntu machine by typing the following in the terminal:
bash Copy code hostname -I - Enter this IP address in the “Computer” field of the Remote Desktop Connection window on your Windows PC.
Configure Connection Settings
- Username and Password: When prompted, enter the username and password of the Ubuntu account you want to access. Make sure the account has a desktop environment configured, as the RDP protocol will give you access to a graphical session.
- Display Settings: You can click on “Show Options” to configure advanced settings, such as display resolution and session recording options.
- Connection: Once everything is set, click “Connect.” You will see the login screen of your Ubuntu machine, and after entering your credentials, you will gain access to your Ubuntu desktop.
Step 3: Fine-tuning the Remote Desktop Experience
File Transfer
One of the advantages of using RDP is the ability to transfer files between the local Windows machine and the remote Ubuntu desktop. To enable this:
- Before connecting, click “Show Options” in the Remote Desktop protocol Connection window.
- Go to the Local Resources tab.
- Under Local devices and resources, click on More.
- Check the box for Drives to share your local drives with the remote Ubuntu machine. You can then copy files back and forth easily.
Printer and Clipboard Sharing
RDP also supports clipboard sharing (copy/paste) and printer redirection. These can be enabled in the Local Resources tab:
- Clipboard: Ensure that the Clipboard checkbox is checked to allow copy-pasting between the systems.
- Printers: If you want to use your local printer on the remote Ubuntu machine, check the Printers box.
Learn More: How to Enable Remote Desktop Protocol Using XRDP on Ubuntu
Step 4: Security Considerations
SSH Tunnel for RDP
While xrdp is secure, adding an extra layer of security by using an SSH tunnel can prevent unauthorized access. This is particularly useful if you are connecting over the internet, not just within a local network.
To create an SSH tunnel on your Windows PC:
- Install PuTTY or another SSH client.
- In PuTTY, go to the Tunnels section.
- Enter 3389 as the source port and localhost:3389 as the destination.
- Start the SSH session and connect to your Ubuntu machine over RDP using localhost as the IP address.
Use a Strong Password
Ensure that the user accounts on the Ubuntu machine have strong passwords to prevent brute-force attacks.
Conclusion
Using Windows Remote Desktop to connect to an Ubuntu system is a straightforward process that can improve productivity, especially if you work across multiple platforms. By installing and configuring xrdp on Ubuntu, you can remotely access a full graphical desktop environment from any Windows machine. Whether you’re an IT administrator, developer, or casual user, this setup will help you efficiently manage your Ubuntu system from a distance.
With additional security measures like SSH tunneling and file-sharing capabilities, RDP offers a versatile solution for remote Ubuntu access. Happy remote working!
Remote Desktop Protocol (RDP) allows users to access and control a remote computer over a network as if they were sitting directly in front of it. While RDP is natively supported by Windows, Ubuntu doesn’t come with built-in RDP support. However, you can easily set up an RDP server on your Ubuntu machine and connect to it from a Windows computer using the Remote Desktop client.
Step 1: Install an RDP Server on Ubuntu
Ubuntu doesn’t come with an RDP server by default, so you need to install one. One of the most commonly used RDP servers for Ubuntu is xrdp.
To install xrdp:
- Open the Terminal on your Ubuntu machine (press Ctrl + Alt + T).
- Update the package lists:
- Install xrdp:
- Once installed, start the xrdp service:
sudo systemctl enable xrdp sudo systemctl start xrdp - To check if xrdp is running, use this command:
sudo systemctl status xrdp
Now that xrdp is installed and running, Ubuntu is ready to accept remote desktop connections.
Step 2: Configure the Firewall on Ubuntu
To allow RDP connections through Ubuntu’s firewall, you need to open port 3389, which is the default port used by RDP.
To allow RDP through the firewall:
- If UFW (Uncomplicated Firewall) is enabled on your Ubuntu machine, allow the RDP port by running:
- If the firewall is disabled, you can enable it:
After completing these steps, the Ubuntu machine should be ready to accept incoming RDP connections.
Step 3: Connect to Ubuntu from Windows Using RDP
Once the RDP server is set up on Ubuntu, you can use Windows’ built-in Remote Desktop Connection tool to connect.
To connect to Ubuntu from Windows:
- On your Windows computer, press Windows + R to open the Run dialog box.
- Type mstsc and press Enter. This will open the Remote Desktop Connection tool.
- In the Remote Desktop Connection window, type the IP address of your Ubuntu machine. To find your Ubuntu machine’s IP address, you can run the following command in the terminal:
- Click Connect.
- A login screen will appear. Enter your Ubuntu username and password and click OK.
You should now be connected to your Ubuntu desktop from your Windows computer, and you can control it as if you were using it locally.
Step 4: Troubleshooting Common Issues
If you encounter issues while connecting to Ubuntu using RDP, here are some common problems and their solutions:
1. Black Screen After Login
If you successfully connect but see only a black screen, this is likely due to a display issue with the xrdp session. To fix it, you can set your Ubuntu desktop environment to Xfce, which is known to work well with xrdp.
Install Xfce:
Next, you’ll need to tell xrdp to use Xfce:
- Edit the xrdp configuration file:
echo xfce4-session >~/.xsession - Restart xrdp:
sudo systemctl restart xrdp
Now, try connecting again, and the black screen issue should be resolved.
2. Firewall Blocking Connection
If you can’t connect to the Ubuntu machine, make sure the firewall is correctly configured to allow connections on port 3389.
- Check the firewall status:
If you don’t see the rule for port 3389, you may need to add it again using:
3. Slow Connection
If you experience a slow connection, try reducing the display quality when connecting. In the Remote Desktop Connection window, go to Show Options > Display and lower the display quality.
Step 5: Enhance Security for RDP Connections
To improve security when using RDP, follow these best practices:
1. Change the RDP Port
By default, RDP uses port 3389, which is widely known. To reduce the risk of unauthorized access, you can change the RDP port to a custom port.
To change the xrdp port:
- Open the xrdp.ini file:
sudo nano /etc/xrdp/xrdp.ini - Find the line that says port=3389 and change it to another port number (e.g., 3390).
- Save and exit the file, then restart xrdp:
sudo systemctl restart xrdp - You will also need to update your firewall to allow the new port.
2. Use a VPN
Whenever possible, connect to the Ubuntu machine via a VPN (Virtual Private Network) before using RDP. This adds an additional layer of encryption and security.
3. Use Strong Passwords
Ensure that the Ubuntu user account has a strong password to prevent brute-force attacks. Consider implementing two-factor authentication (2FA) for added protection.
Conclusion
Setting up an RDP connection between Ubuntu and Windows is a straightforward process with the help of the xrdp server. By following the steps in this guide, you can enable remote access to your Ubuntu desktop and control it from a Windows machine. Just remember to configure the necessary firewall settings and troubleshoot any connection issues. Additionally, improving security with options like changing the default RDP port and using VPNs will help ensure that your remote connection remains safe and reliable.
Do you need to access a remote Ubuntu PC or Server from your Microsoft Windows PC? Unsure about how to do it? Follow along with this guide as we show you how to connect to Ubuntu from Windows!
Note: this guide covers Windows 10. If you are not using Windows 10, the instructions below may not work.
Connect to Ubuntu from Windows over the command-line
If you’re trying to connect to Ubuntu to access the command-line from Microsoft Windows, your best bet is to use SSH. Why? At this point, SSH is a universal protocol, and every operating system, from Linux to Windows, and even Mac OS have native support for it.
In the past, in Microsoft Windows, if you wanted to access your Ubuntu operating system, you needed to install a third-party SSH tool like Putty. Well, thanks to changes in Windows 10, you can now do it by launching Windows Powershell.
To connect to your Ubuntu computer from Windows over the command-line, follow the step-by-step instructions below.
Step 1: Head over to the Ubuntu PC or Ubuntu Server, and launch a terminal window. Then, with the terminal window open, update the system.
Step 2: After updating the system, use the apt install command below to install the OpenSSH server, which will automatically set up SSH on Ubuntu.
sudo apt install openssh-server
Having issues with OpenSSH Server? Follow our guide on how to set it up.
Step 3: After setting up OpenSSH server on your Ubuntu system, leave it be and go to the Windows PC.
Step 4: On the Windows PC, launch the PowerShell terminal. Unsure on how to start the Powershell terminal window? Do the following.
First, press the Win key on the keyboard to bring open the search box. Then, type in “PowerShell.” Look through the search results and launch PowerShell.
Step 5: Click on the PowerShell prompt with the mouse, and type in the Ubuntu PC’s username. Then, after the username, add an @ symbol, and the Ubuntu computer’s hostname. Or, if you don’t want to use the hostname, use the computer’s IP address. The command should look like the example below.
ssh ubuntu-user-name-here@ubuntu-computer-hostname-or-ip
Step 6: After writing in the SSH command in PowerShell, press the Enter key on the keyboard to initiate an outbound connection to the remote Ubuntu PC.
Step 7: Once you’ve successfully made a connection to the Ubuntu PC for the first time, you will see a message in the PowerShell terminal prompt. It states that you must accept the SSH connection, trust it, and add it to your known hosts. Do so.
Assuming the SSH connection to the Ubuntu PC is successful, you will now have full command-line access to your remote Ubuntu PC from Microsoft PowerShell. Feel free to use the terminal as if you were sitting right in front of it.
Need to exit the SSH session? Type in the exit command.
exit
You may need to access the file system of your remote Ubuntu PC via the Windows Explorer UI. FTP is the easiest way to remotely access the Ubuntu PC’s files from the Windows Explorer UI, as FTP is easily integrated within windows.
Note: you must set up an FTP server on your remote Ubuntu PC or Server. Please follow this guide here to learn how to get it set up.
To access your Ubuntu PC’s files on Windows through the Explorer UI, do the following.
Step 1: Open up Windows Explorer.
Step 2: Look to the sidebar in Windows Explorer for “This PC” and click on it with the mouse.
Step 3: Inside “This PC,” select “Add a network location” in the top bar.
Step 4: Go through the network wizard, till you get to, “Where do you want to create this network location?” Then, select “Choose a custom network location” and select “Next.”
Step 5: In the location box, type in ftp:// followed by the hostname (or IP address) of the remote Ubuntu PC.
ftp://ubuntu-pc-hostname-or-ip
Step 6: Click through to add the FTP server attached to the system.
Step 7: After adding the FTP server as a network location, you will see the remote FTP server location available in “This PC” under the “Network locations” section — double-click on the network location to access the Ubuntu PC’s files remotely.
Access FTP without adding a network location
You may want to access the Ubuntu PC’s files without adding a network location. Follow the step-by-step instructions below.
Step 1: Open up File Explorer, and click on the address bar with the mouse.
Step 2: Clear the location data from the address bar with the Backspace button.
Step 3: Write in the FTP server address in the address bar. It should look like the example below.
ftp://ubuntu-pc-hostname-or-ip
Step 4: Press the Enter key on the keyboard to access the FTP server.
