
Last modified: Jan 12, 2025 12:29 AM
14
4328
Last modified Jan 12, 2025 12:29 AM
If you’re experiencing difficulty connecting your iPhone to your PC, there are a few steps you can take to troubleshoot the issue:
- Assuming you have Windows 10. Download and use iTunes for Windows 10. With iTunes for Windows 10, you can manage your entire media collection in one place. Download and use iTunes for Windows 10
- Check the USB cable and ports: Ensure that you’re using a certified Lightning to USB cable and try connecting it to different USB ports on your PC. Also, check for any physical damage or debris in the ports that may be preventing a proper connection. Use genuine cable —> Identify counterfeit or uncertified Lightning connector accessories …
- Disconnect all other USB devices from your computer, except for your keyboard and mouse. —> Resolve USB-related alerts in iTunes/Finder — Apple Support
- Search for accessories that have completed MFi certification. Once an accessory has completed MFi certification requirements and is reported to Apple as sold/distributed, it will be searchable in our public database of authorized Lightning, headset, charging, iAP-enabled, and Find My network-enabled accessories.
- Learn how to identify counterfeit or uncertified Lightning-based accessories.
- Restart your iPhone and PC: Sometimes, restarting your devices can resolve temporary connection issues. Restart both your iPhone and your PC, and then try connecting them again.
- Restart the device. That’s it.
- Still not solved —> Force restart iPhone — Apple Support
- Make sure that your iPhone is running the latest software versions. On your iPhone, go to Settings > General > Software Update
- Update Over-the-Air (OTA) —> Update your iPhone or iPad — Apple Support (IN)
- Update using iTunes/Finder —> Update your iPhone, iPad, or iPod touch — Apple Support (IN)
- When connecting your iPhone to your PC for the first time, you may need to trust the computer on your iPhone. Unlock your iPhone and check for any prompts asking you to trust the connected computer. Confirm the trust request on your iPhone. About the “Trust This Computer” alert message on your …
- Try a different port, cable, or computer. The issue could be related to your computer, its USB port, or the USB cable connecting it to your device. If possible, try a different computer, USB port, or USB cable. Also, check for any debris in the charging port on the bottom of your iPhone or iPad. —> If your computer doesn’t recognize your iPhone, iPad, or iPod …
- Reset your iPhone’s settings: If the issue persists, you can try resetting your iPhone’s settings. Go to Settings > General > Transfer & Reset > Reset > Reset All Settings. This will not erase your data but will reset your settings to their default values. After the reset, attempt to connect your iPhone to your PC again. Return iPhone settings to their defaults — Apple Support (IN)
- If unable to connect —> If iTunes doesn’t recognize your iPhone, iPad, or iPod — Apple Support
- For your Windows PC —> Troubleshooting issues with iTunes for Windows — Apple Community
- Sometimes, third-party security software or firewalls can interfere with the connection between your iPhone and PC. Temporarily disable any security software or firewalls and see if that resolves the issue.
- Put your device in recovery mode and set it up again … Keep your device connected and wait until the Connect to computer screen appears: iPhone …If you can’t update or restore your iPhone or iPod touch
If you are experiencing an issue not listed here, contact support as they can provide specific troubleshooting steps based on your situation.
You can do the following using iTunes :
- Following this process is the only way out if your iPhone is disabled. The steps given in this link will help you reset the passcode -> If you forgot the passcode for your iPhone, iPad, or iPod touch, or your …
- Note: If you have forgotten the Screen Time Passcode then restoring your device from a backup after the passcode reset will return the Passcode back to your device. So, please do not restore from a backup.
- See how to —> Sync your iPhone, iPad, or iPod using iTunes on your computer …
- Learn how to—> Update your iPhone, iPad, or iPod touch — Apple Support
- Here is the process to —> Backup on iTunes.
- Microsoft support says (iTunes not required for Import) —> Import photos and videos from an iPhone to a PC
- In the iTunes app on your PC, choose Account > Sign In > Set up and view an iTunes Store account on PC — Apple Support
- Organize and play your music and video · Play or download unlimited songs with Apple Music (with a paid subscription) · Find music, movies, TV shows, and audiobooks—> What is iTunes on PC?
- In the iTunes app on your PC, choose Account > Sign In, then sign in with your Apple ID. If you don’t have an Apple ID, you can create one during setup. Choose Music from the pop-up menu at the top left, then click For You. Click Try it Now, then follow the onscreen instructions. Subscribe to Apple Music using iTunes on a PC
Download Article
A user-friendly guide to linking and pairing an iPhone with a computer or laptop
Download Article
- Using a Cable
- Using Phone Link (Windows 11)
- Using AirDrop (Mac)
- Video
- Expert Interview
- Q&A
|
|
|
|
|
Do you want to connect your iPhone to your Windows or Mac computer? You’ll just need the charging cable that came with your device and a USB port. If you want to link your iPhone to Windows, you can use Phone Link. For quick photo or video transfers on Mac, you can use AirDrop. This wikiHow will show you how to connect your iPhone to your computer using a wire or wirelessly.
Things You Should Know
- To connect your iPhone with a cable, plug the Lightning or USB-C end into your iPhone, then connect the USB end to your computer.
- On Windows 11, you can link your iPhone to your PC using Phone Link.
- On Mac, you can transfer files without connecting your iPhone using AirDrop.
-

To connect your iPhone to your computer or laptop with a cable, you must have an open USB-A port and a supported operating system.
- For Windows, you must have Windows 7 or newer.
- For Mac, you must have macOS X 10.9 (Mavericks) or later.
- If you have an iPhone 15 or newer, you can use a USB-C port instead.[1]
-
This is the cable that came with your device. One end will be Lightning or USB-C, and this is the part that plugs into your iPhone.
- If you have an iPhone 14 or older, you’ll use a Lightning to USB cable.
- If you have an iPhone 15 or newer, you’ll use a USB-C to USB-C.
- If you don’t have a USB-C port on your computer, you’ll need to buy a USB-C to USB-A adapter.[2]
- If you don’t have a USB-C port on your computer, you’ll need to buy a USB-C to USB-A adapter.[2]
Advertisement
-
This will likely be in the back of your computer case or on the side of your laptop. Some desktop computers have ports on the top of the case that can be used.[3]
-
If this is your first time connecting your iPhone to a computer, you’ll receive this alert. Otherwise, you can skip this step.[4]
-


Advertisement
-
Microsoft Phone Link comes preinstalled with Windows 11. To find it, open the Start menu and type «Phone Link.» This looks like a blue smartphone icon in front of a monitor.[6]
- You can use Phone Link to connect an iPhone to Windows for SMS texting, calling, and managing your notifications. This feature is only available on Windows 11 and iPhones with iOS 14 or higher.[7]
- You can use Phone Link to connect an iPhone to Windows for SMS texting, calling, and managing your notifications. This feature is only available on Windows 11 and iPhones with iOS 14 or higher.[7]
-
This is the option on the right.
- A QR code will appear on the screen.
-
Open the App Store and search for «Link to Windows». This is the app by Microsoft Corporation. Tap Get to install it.
- When it’s installed, tap the app to open it.
-
This will open your iPhone’s Camera. You may need to tap OK to allow permission.
- Alternatively, you can click Continue manually without a QR code instead. You’ll be required to open a hyperlink on your iPhone and pair your device through a webpage.
-
Scan the QR code on your computer. This will begin the Bluetooth pairing process. When it has paired, you’ll see a pop-up on your iPhone with a code. This code should be the same on your computer.[8]
- Make sure Bluetooth is enabled on both devices.
-
Do this on both your iPhone and computer.
-
You’ll receive pop-ups on your iPhone asking permission to receive notifications and access contacts. These must be allowed to sync SMS messages.[9]
-
Your iPhone will now be connected to your computer.[10]
-
If you want to send SMS texts from your computer to your iPhone contacts, you’ll need to enable it first. Do the following:
- On your iPhone, open Settings.
- Tap Bluetooth.
- Tap i next to your computer’s name.
- Toggle on Show Notifications and Sync Contacts.


Advertisement
-
If you don’t have a cable and want to connect your iPhone to transfer files, you can use AirDrop.
- Do the following to prepare:[11]
- Place the two devices within Bluetooth and Wi-Fi range of each other
- Enable Wi-Fi and Bluetooth on both devices
- Turn off Personal Hotspot on iPhone
- Do the following to prepare:[11]
-
You’ll find it on your Home screen or in your App Library.[12]
-
This displays all of your photos.
-
To select multiple photos, tap Select at the top, then choose the photos you want to send. Otherwise, just tap one photo to open it.
-
It’s at the bottom-left corner. Several sharing options will appear.[13]
-
It’s the white icon with several curved blue lines. Your iPhone will now scan for nearby AirDrop users and devices.
-
You’ll see your Mac under Devices. Once selected, you’ll see an AirDrop notification on your Mac.
-
Once you click Accept, you’ll be asked if you want to accept or save the files.[14]
When prompted, choose to save the files to your Photos so you can easily access them in your Mac’s Photos app.[15]


Advertisement
Add New Question
-
Question
What if iTunes isn’t recognizing my iPhone?
Try reinstalling iTunes. If that doesn’t work, then contact Apple support. Also, make sure that the iPhone is turned on and you are on the home screen when you are connecting your iPhone.
-
Question
How do I make my iPhone a hotspot and connect my computer to it?
Go into Settings > Personal Hotspot and enable. Then connect your computer to it like any Wi-Fi network.
Ask a Question
200 characters left
Include your email address to get a message when this question is answered.
Submit
Advertisement
Video
Thanks for submitting a tip for review!
Thanks for reading our article! If you’d like to learn more about iphones, check out our in-depth interview with Naseem Speach.
References
About This Article
Article SummaryX
1. Connect a USB cable to the iPhone.
2. Connect the other end to a computer.
3. Open iTunes on the computer.
4. Click the iPhone icon.
5. Click Back Up Now.
6. Choose content to sync.
7. Click Apply.
8. Click Sync.
Did this summary help you?
Thanks to all authors for creating a page that has been read 559,402 times.
Is this article up to date?
You are here: Home / iPhone / How to Connect iPhone to Windows PC Using Microsoft Phone Link
- With Microsoft Phone Link, iPhone devices are usable with Windows PCs.
- Using Microsoft Phone Link for iOS smart devices is simple with the right steps.
- Use Microsoft Phone Link for iPhone to make calls, play music, and more.
Contents
- How to Connect iPhone to Windows PC: Step-by-Step Guide
- Step 1. Head to the Microsoft Website
- Step 2. Launch Phone Link on Your PC
- Step 3. Ensure the App Launches on Your iPhone
- Step 4. Pair Both Devices
- Reasons to Use Microsoft Phone Link
- Bonus Tips: What to Do if Your iPhone Doesn’t Connect
How to Connect iPhone to Windows PC: Step-by-Step Guide
The Microsoft Phone Link for iPhone devices helps you stay connected to your phone while busy at work or on daily tasks. Make calls and keep up with messages right on your PC screen. If you’ve struggled connecting your iPhone to your Windows PC, this guide is for you.
Step 1. Head to the Microsoft Website
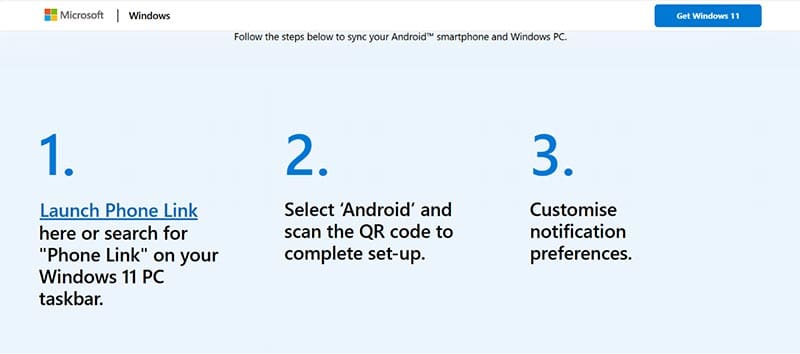
Go to this website:
https://www.microsoft.com/en-in/windows/sync-across-your-devices
And ensure you click the blue “Launch Phone Link” hyperlink under number “1.”
Step 2. Launch Phone Link on Your PC
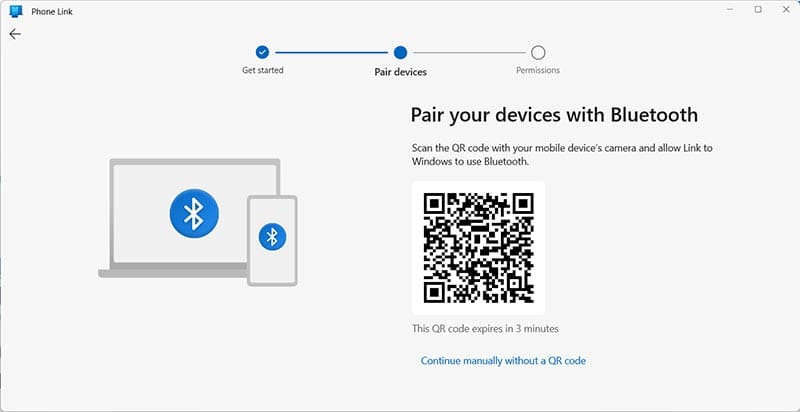
This should launch the app automatically and prompt you to scan a QR code with your iPhone. The QR code will tell your iPhone to launch its version of Phone Link. Note: This QR code expires after three minutes so don’t hang around.
Step 3. Ensure the App Launches on Your iPhone
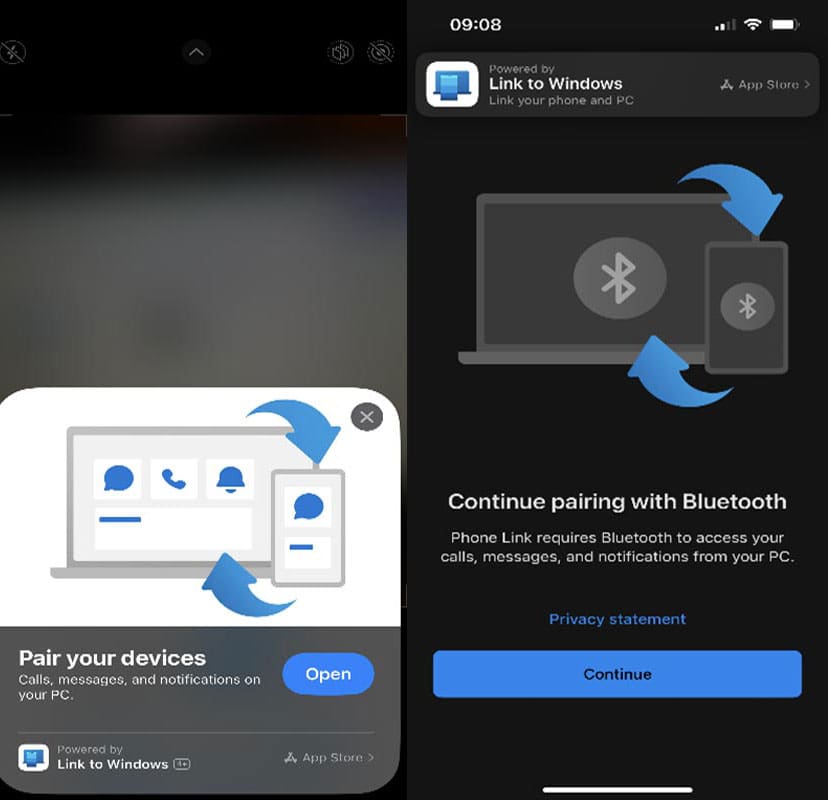
Once you’ve scanned the QR code with your iPhone, it should automatically launch the smartphone version of the app. You may need to press “Open” when your phone prompts you. Your iPhone will ask you to “Continue pairing with Bluetooth.” Press “Continue.”
Step 4. Pair Both Devices
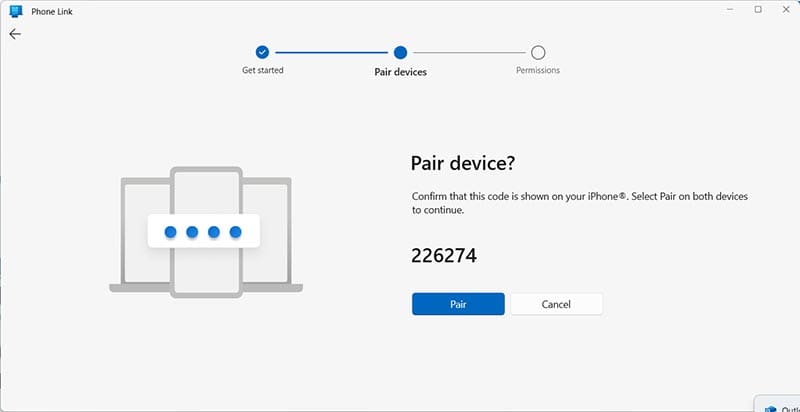
To ensure both devices are pairing, you now need to go back to the PC and click “Pair.” Just double-check that the number on the screen matches the number you see on your iPhone screen. Otherwise, you might inadvertently connect to a neighbor’s phone.
Wait a few seconds and you’ll receive confirmation that your phone is paired to the PC. It’s that simple.

Reasons to Use Microsoft Phone Link
Once you’re connected, you can complete many phone-based tasks using your PC. You can also use your Windows PC or laptop to control your iPhone. Here are just some of the things you can do with Microsoft Phone Link for iOS:
- Control the audio playback on your iPhone
- See messages from any app on your iPhone immediately on Phone Link
- View and clear all iPhone notifications
- Make and manage phone calls
If you’re busy working or studying, Phone Link allows you to keep up to date with messages without leaving your computer.
Bonus Tips: What to Do if Your iPhone Doesn’t Connect
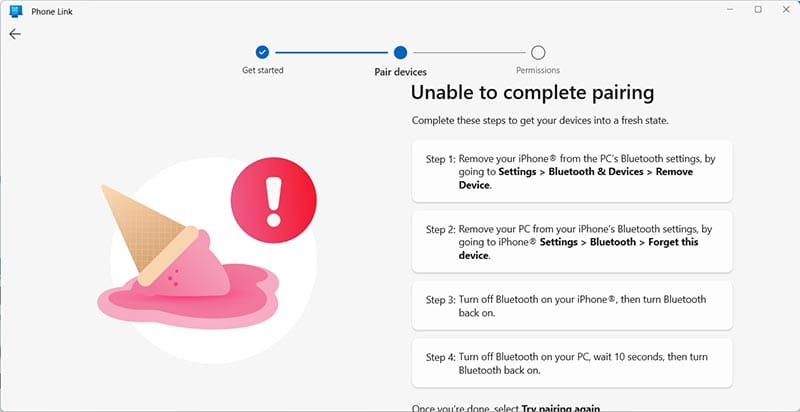
On rare occasions, you may see the message “Unable to complete pairing.” Helpfully, Microsoft has provided you with a list of steps to fix this problem.
In most cases, it will be one of the following issues that caused the problem:
- You waited longer than three minutes to scan the QR code
- Bluetooth needs to be switched off and on again — sometimes it just needs a quick reset
- The iPhone was previously connected to the PC with different settings — this is why removing your PC from your iPhone’s Bluetooth settings is recommended in Step 2
Always remember to try pairing again once you’ve made any changes. The PC and iPhone won’t know to automatically try pairing again so you have to prompt them. Make sure you use the new QR code that’s produced as the old one will have expired.
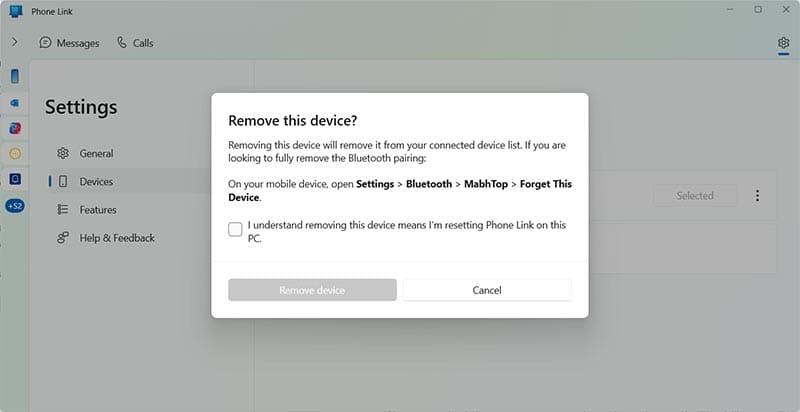
To disconnect your iPhone from Phone Link, go to Settings on the PC Phone Link app. Click the three dots next to your iPhone, then click “Remove.” You’ll see the below pop-up message reminding you that you’ll need to set up Phone Link again for this device the next time you connect. Tick the box and click “Remove device.”
Now you know how to connect iPhone to Windows PC, so you can always access your device on any computer. If you get disconnected, simply follow the steps above again.
As an avid gamer, I’ve run into my fair share of error codes and weird faults that have forced me to find fixes to problems I never anticipated. That gave me a passion for sharing those fixes with others so we can all game without feeling like our hardware is rebelling against us.
Reader Interactions
In an age where our devices are our lifelines, being able to connect your iPhone to a Windows PC has become essential. Whether it’s transferring important files, managing your photos, or syncing your music, knowing how to bridge the gap between these two operating systems can enhance your digital experience significantly. This comprehensive guide will walk you through the various methods to connect your iPhone to your Windows PC effectively.
Understanding the Need for Connectivity
Connecting your iPhone to a Windows PC opens up a world of possibilities. Here are some common scenarios where this connectivity proves beneficial:
- File Transfers: Easy movement of photos, videos, and documents between devices.
- Backup & Restore: Safeguarding your iPhone data by creating backups on your PC.
- Media Management: Managing music and playlists without the need for additional software.
Connecting your devices not only streamlines your workflow but also ensures that your important data is safe and easily accessible.
Methods for Connecting Your iPhone to Windows PC
There are several effective ways to connect your iPhone to a Windows PC. Depending on your preferences and the tools available, you can choose the method that suits you best. The primary methods include:
1. Using a USB Cable
Using a USB cable is one of the most straightforward methods for connecting your iPhone to a Windows PC. Here’s how to do it:
Step-by-Step Guide:
- Gather Your Equipment: You will need a lightning-to-USB cable, which usually comes with your iPhone.
- Connect to PC: Plug one end of the cable into your iPhone and the other end into a USB port on your Windows PC.
- Unlock Your iPhone: Make sure to unlock your iPhone and tap “Trust” on the prompt that appears, allowing your PC to access the device.
Once you’ve completed these steps, your iPhone will appear under “This PC” as a removable device.
2. Using iTunes
iTunes is Apple’s official software for integrating its devices with Windows. You can use it for a multitude of tasks, like backing up, restoring, and syncing content.
Step-by-Step Guide for iTunes:
- Download & Install iTunes: If you haven’t already, download iTunes from the official Apple website and install it on your Windows PC.
- Open iTunes: Once installed, launch the software.
- Connect Your iPhone: Use the USB cable to connect your iPhone to the PC.
- Trust the Computer: As earlier, make sure to unlock your iPhone and tap “Trust” when prompted.
Now you can transfer files, download music, or back up your device using iTunes.
3. Using iCloud
For those who prefer a wireless method instead of a USB connection, iCloud offers a flexible solution. This method allows you to sync photos, videos, documents, and more through the cloud.
Step-by-Step Guide for iCloud:
- Enable iCloud on Your iPhone: Go to Settings > [Your Name] > iCloud and toggle on the services you wish to sync (e.g., Photos, Documents). Ensure your iPhone is connected to Wi-Fi.
- Download & Install iCloud for Windows: Visit the Apple website to download iCloud for Windows and install it.
- Log In: Open iCloud for Windows and log in with your Apple ID.
- Select Features: Choose the features you want to sync between your iPhone and Windows PC, like Photos or iCloud Drive.
With this setup, your data will automatically sync across devices whenever you are connected to the internet, eliminating the need for manual transfers.
4. Using Third-Party Software
If you’re looking for enhanced functionality, various third-party applications offer a wide range of features for connecting your iPhone to your Windows PC.
Popular Third-Party Applications:
| Application Name | Key Features |
|——————|————–|
| 3uTools | Comprehensive file management, backup, and restore options. |
| CopyTrans | Great for managing iPhone music and videos without relying on iTunes. |
| Syncios | Versatile tool for transferring files, managing apps, and more. |
These applications usually provide a more intuitive interface and additional functionalities compared to native methods.
Troubleshooting Common Connection Issues
Connecting your iPhone to a Windows PC can sometimes present challenges. Here are a few common issues and their solutions.
1. iPhone Not Recognized by PC
If your iPhone is not recognized, follow these steps:
- Check USB cable and port: Inspect the cable for any damage and try using a different USB port on your PC.
- Update iTunes: Ensure you are using the latest version of iTunes. An outdated version may lead to compatibility issues.
- Restart devices: A simple reboot of both the iPhone and PC can resolve connection problems.
2. ‘Trust This Computer?’ Prompt Doesn’t Appear
If the prompt to trust the computer doesn’t show up:
- Unlock your device: Make sure your iPhone is unlocked.
- Disable Restrictions: Go to Settings > Screen Time > Content & Privacy Restrictions and ensure that USB Accessories are allowed.
If the prompt still does not appear after these steps, trying a different USB port or cable could be beneficial.
3. Syncing Problems with iTunes
If you are experiencing syncing issues with iTunes:
- Ensure proper settings: Go to Settings in iTunes and check that the correct options for syncing are selected.
- Delete and reinstall Tunes: Sometimes, reinstalling iTunes can resolve underlying issues.
Conclusion
Connecting your iPhone to a Windows PC is a simple yet crucial task that can enhance your productivity and data management capabilities. By following the steps outlined in this article, you can seamlessly transfer files, back up your device, and access your content with ease.
Whether you opt for a direct USB connection, use iTunes for comprehensive control, or resort to iCloud for a wireless approach, understanding these methods allows you to choose the best fit for your lifestyle. Embrace these techniques and revel in the improved synergy between your iPhone and Windows PC, ensuring that your essential data is just a click away.
What are the requirements for connecting my iPhone to a Windows PC?
To connect your iPhone to a Windows PC, you will need a few essential items. First, ensure you have a compatible USB cable to connect your iPhone to the PC. If you want to use wireless sync, ensure both devices are on the same Wi-Fi network. Additionally, you will need to install iTunes on your Windows PC, as it is the primary software that facilitates the connection between the two devices.
It’s also essential to ensure that both your Windows operating system and iPhone are updated to the latest versions available. This helps prevent compatibility issues during the synchronization process. Lastly, make sure to sign in to iTunes with your Apple ID, as this will enable additional features like syncing your music and photos seamlessly.
Can I transfer photos from my iPhone to my Windows PC?
Yes, transferring photos from your iPhone to a Windows PC is a straightforward process. If you’ve connected your iPhone via USB, open the Windows Photos app. You can then select your iPhone from the list of devices and choose the photos you wish to import. Once you confirm the selection, the app will begin transferring your chosen images to your PC.
Alternatively, if you prefer wireless transfer, you can use iCloud. By enabling iCloud Photo Library on your iPhone, your photos will automatically upload to iCloud. You can access them by logging into your iCloud account on your Windows PC through a web browser or the iCloud app. Ensure you have enough iCloud storage to accommodate your photo library for this option to work effectively.
Is it possible to sync music from my iPhone to my Windows PC?
Yes, you can sync music from your iPhone to a Windows PC, but the process differs slightly from transferring files the other way around. First, you will need to have iTunes installed on your Windows PC. Then, connect your iPhone using a USB cable and open iTunes. You can select your device when it appears, allowing you to manage music files and playlists.
If you wish to transfer purchased music, you can go to the “File” menu and select “Devices,” then choose “Transfer Purchases from [Your Device].” This action will transfer any music you’ve bought from the iTunes Store onto your PC. However, transferring non-purchased music requires using third-party applications or syncing options, as direct transfer is not supported by iTunes.
How can I ensure my data is safe when connecting my iPhone to a Windows PC?
Keeping your data safe during synchronization is essential. Firstly, make sure to keep both your iPhone and Windows PC protected with up-to-date security measures, including antivirus software and firewalls. Before connecting your devices, ensure they are free from malware or suspicious applications that might compromise your data.
Additionally, always use original cables and trusted software for the connection to minimize risks. Regularly back up your iPhone data to iCloud or iTunes before synchronization. This way, even in the rare event something goes wrong, you will have a secure backup of your data to restore from.
What should I do if my iPhone is not recognized by my Windows PC?
If your iPhone isn’t recognized by your Windows PC, start by checking the USB connection. Ensure the cable is properly connected and functional. Sometimes, using a different USB port on the computer might resolve the issue. If the problem persists, unplug the iPhone and restart both devices, as this can clear minor glitches that might be affecting the connection.
Another troubleshooting step is to check iTunes for updates or reinstall it if necessary. Ensure that your Windows operating system is also updated, as compatibility issues can sometimes arise with outdated software. If none of these solutions work, consider connecting your iPhone to a different computer to see if the issue lies with your PC or the iPhone itself.
Can I use third-party applications to connect my iPhone and Windows PC?
Yes, there are several third-party applications available that can help you connect your iPhone to a Windows PC seamlessly. Programs like SyncToy, 3uTools, or iMazing offer easy ways to manage files, including photos, music, and documents, between the two devices without relying solely on iTunes. These apps often provide additional functionalities that enhance user experience, such as easier file transfers and data backups.
Always ensure that any third-party software you choose is reputable and has positive reviews from other users. Misconfigured applications may lead to data loss or corruption, so it’s always wise to conduct thorough research and use only trusted programs. Additionally, keep in mind that using these tools might have varied compatibility with the latest versions of iOS and Windows, so stay updated on any changes from the developers.
How do I disconnect my iPhone safely from my Windows PC?
To safely disconnect your iPhone from your Windows PC, begin by properly ejecting your device through Windows. This can be done by clicking on the USB icon in the system tray, where you will see the option to eject your iPhone. Click on that option to ensure all transfers have completed and that you can safely unplug your device without risking data corruption.
After you receive a notification that it’s safe to remove the hardware, you may then unplug the USB cable from your iPhone and the PC. If you’ve been using iTunes, you may also want to close the program before disconnecting to avoid any potential issues. Always ensure that there are no ongoing transfers or operations in progress before disconnecting your iPhone.
In general, to transfer data or back up an iPhone, it’s necessary to connect the iPhone to a computer. However, many people don’t know how to connect iPhone to PC. In fact, it is pretty simple to establish a connection between them. Based on the files you want to transfer or manage, there are different methods to connect an iPhone to a computer. Don’t believe it? Continue reading more details and find your ideal way to get it done swiftly.
Directory
- Part 1. How to Connect iPhone to PC Wired
- Way 1. How to Connect iPhone to Computer with USB
- Way 2. How to Link iPhone to Computer via Coolmuster iOS Assistant
- Way 3. How to Connect iPhone to Computer Using iTunes
- Part 2. How to Connect iPhone to PC Wireless
Part 1. How to Connect iPhone to PC Wired
When it comes to connecting an iPhone to a PC, a wired connection is the most direct and common method, stable and fast. Here, we introduce three types of wired connections.
Way 1. How to Connect iPhone to Computer with USB
The directest way to connect an iPhone to a Windows PC is using only a USB cable. Although this way is convenient and simple, you can only get photos and videos onto your PC from an iPhone. If you only need to transfer the media files, you can repeat the following steps.
Here is how to display iPhone on PC via USB:
Step 1. Connect your iPhone to a PC with a USB cable and trust this PC on your iPhone.
Step 2. If a pop-up window shows and asks you, select «Open device to view files» and double-click the «Internal Storage» > «DCIM folder» > «100APPLE».

Step 3. Copy the photos or videos you want to export and paste them onto your computer.
Way 2. How to Link iPhone to Computer via Coolmuster iOS Assistant
If you want an easy way to connect your iPhone to Windows 11/10/8/7/Vista/XP seamlessly and manage or transfer the iPhone data on/to a PC directly, you cannot miss Coolmuster iOS Assistant. By connecting your iPhone to a Windows computer using a USB cable, you can easily export all content from your iPhone to the computer or iTunes backup location or import files from the computer to your iPhone. Besides, you can manage your iPhone data on this PC as well.
Highlights of Coolmuster iOS Assistant:
- Easily export contacts, messages, notes, calendars, bookmarks, voice memos, tones, movies, TV shows, music videos, photos, albums, and iBooks from your iPhone to the computer or the default iTunes backup location.
- Import notes, contacts, calendars, bookmarks, books, iTunes backups, etc., from the computer to your iPhone.
- One-click to back up and restore an iPhone on a computer.
- Manage your iPhone data on a PC: Add, delete & edit contacts, add, edit & delete bookmarks, uninstall apps, etc.
- Easy connection, one-click operation, absolutely secure, and user-friendly interface.
- Widely compatible with all iPhones, such as iPhone 15/14/13/12/11/11 Pro/11 Pro Max/XS Max/XS/XR/X/8/8 Plus/7 Plus/7/SE (1st generation)/6S Plus/6S/6/6 Plus/5S/5C/5/4S/4, etc.
Here is how to connect an iPhone to a Windows PC using iOS Assistant:
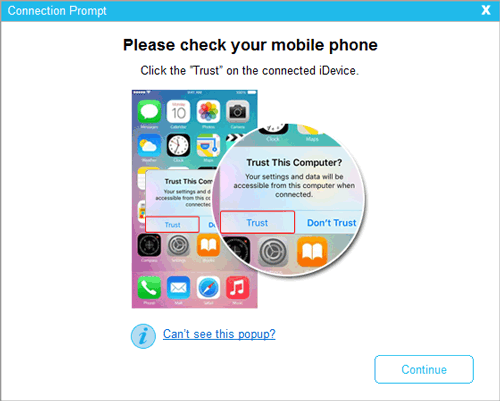
01Install and launch this tool on your computer. Connect your iPhone to the computer via a USB cable, and the program will detect your iPhone immediately. If a window pops up on your iPhone, tap «Trust» on your iPhone and click «Continue» on this program to move on.
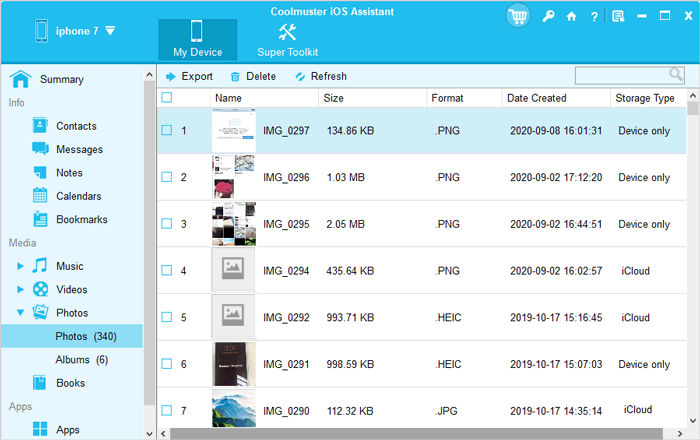
02Once connected, you will see the main interface as below. After that, you can start to transfer, back up, or manage your iPhone data on the PC.

03To transfer files from iPhone to PC, click one file type from the left panel, for example, «Photos». Next, preview and tick the photos you want to transfer, and hit the «Export» button on the top menu to transfer photos from your iPhone to your PC.
Video Tutorial:
Way 3. How to Connect iPhone to Computer Using iTunes
iTunes is another way to connect an iPhone to a computer. You can download iTunes onto your computer and sync ringtones, photos, music, etc., from a Windows PC to your iPhone or get everything from your iPhone to your computer successfully.
Here is how to connect your iPhone to the laptop using iTunes:
Step 1. Launch iTunes on your computer and plug your iPhone into the computer using a USB cable.
Step 2. When a window appears on your iPhone, hit the «Trust» option as prompted.
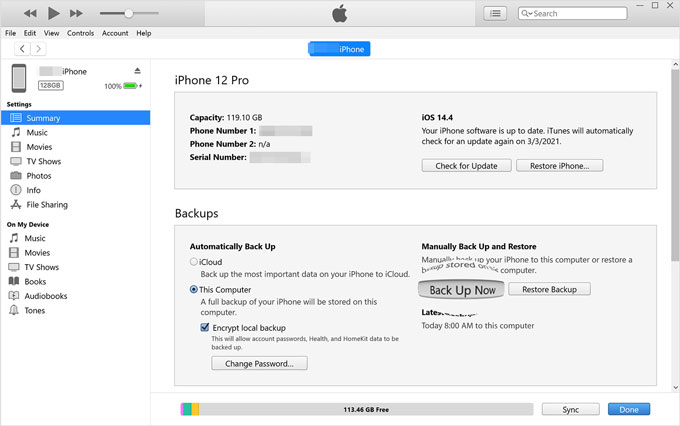
Step 3. Tap the iPhone icon at the upper-left window, and then sync files between your iPhone and PC.
Step 4. To download files from your iPhone to the Windows computer, you can click «Summary» from the left panel and tap «Back Up Now». Or, to transfer files from your computer to your iPhone, you can tap «Music», «TV shows», «Info», «Movie»s, or «Photos» from the left panel and hit the «Sync» button.
Of course, you can also wirelessly connect your iPhone to a laptop using iTunes. Here are the steps:
Step 1. Connect your iPhone to a computer using the original USB cable. Then, open iTunes on your computer.
Step 2. Select the iPhone icon in iTunes, then navigate to the «Options» section and check «Sync with this iPhone over Wi-Fi» in the right panel.
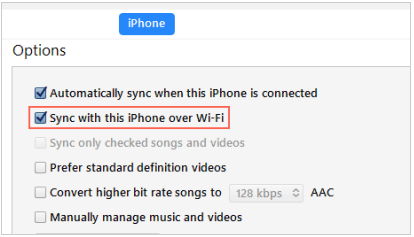
Step 3. Click «Apply» to begin the syncing process. Wait for the sync to complete before disconnecting your iPhone from the computer.
Step 4. On your iPhone, go to «Settings» > «Wi-Fi» and ensure both your iPhone and computer are connected to the same Wi-Fi network.
Step 5. After that, go to «Settings» > «General» > «iTunes Wi-Fi Sync». Make sure iTunes is running on your computer.
Step 6. Tap «Sync Now» on your iPhone to initiate wireless syncing with your PC via Wi-Fi.
Part 2. How to Connect iPhone to PC Wireless
Don’t have a USB cable by hand and wish to connect your iPhone to a PC wirelessly? iCloud is a good option. By syncing photos, videos, calendars, notes, and more files from your iPhone to iCloud, you can easily access them on your computer, phones, tablets, and any other devices.
Here is how to hook up an iPhone to a computer via iCloud:
Step 1. Open «Settings» on your iPhone, tap your name, and choose «iCloud».
Step 2. Sync the wanted files to iCloud. You can enable «Photos», «Calendars», and other data types from here. Please turn on the switch next to the desired data and wait until it finishes syncing the files.
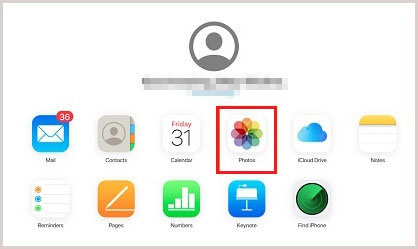
Step 3. Visit iCloud.com from your computer browser, sign in with the same Apple ID you use on your iPhone, and click the file you want to get, like Photos. You will see all photos from here. According to your need, you can download them to the PC. (Click here to learn more about how to download iCloud photos to your PC.)
Words in the End
After reading this post, owning an iPhone and a Windows computer at the same time will no longer worry you. As you can see, four easy ways in this article can help you connect an iPhone to a Windows computer and transfer files between them. As a matter of fact, Coolmuster iOS Assistant is the best choice for you. You can easily connect your iPhone to a PC or Mac to transfer, manage, back up, and restore your iPhone/iPad. So, hurry up! Select one way for you to get it done right now.
If you need any help during the connection, please let us know in the comments.
Related Articles:
How to Transfer Files from PC to iPhone Without iTunes — 6 Ways
How to Connect iPhone to iPad without Effort? (7 Practical Ways)
How to Connect iPhone to HP Laptop Successfully in 6 Ways
[3 Ways] How to Transfer Files from PC to iPhone Using USB Cable?