
Use Bluetooth to pair Apple’s wireless headphones
Updated on November 20, 2022
What to Know
- Go to Settings > Devices > Bluetooth & other devices > Add Bluetooth or other devices > Bluetooth.
- Select your AirPods. If your AirPods aren’t showing up, open the lid of the charging case.
- Once the pairing process begins, press the setup button on the charging case until the process completes.
This article explains how to connect AirPods to a Windows 10 PC using Bluetooth.
How to Pair Your AirPods to Windows 10 Computers
The method for connecting Apple AirPods is the same as adding any other Bluetooth speaker or headphones to a Windows computer:
-
Select the Action Center icon in the bottom-right corner of the Windows taskbar to open Windows Action Center.
-
Select All settings in the Windows Action Center.
While you have the Action Center open, check to make sure Bluetooth is enabled. The Bluetooth tile should be highlighted; if it’s not, select the tile to turn it on.
-
Select Devices in the Windows Settings.
-
Select the Bluetooth & other devices tab on the left side, then select Add Bluetooth or other devices.
-
Select Bluetooth in the Add a device window.
-
Your Apple AirPods should appear on the list as AirPods. Select AirPods to begin the pairing process.
If your AirPods aren’t showing up, open the lid of their charging case.
-
Press the setup button on the rear of the Apple AirPod charging case while having the lid open. The charging case’s light should change from green to white.
Continue firmly pressing the setup button until the pairing is complete. If you encounter an error message, press the setup button on the charging case before you select the AirPods on the Bluetooth device list.
Apple
-
If paired correctly, you should see a «Your device is ready to go!» message. Select Done to close the message.
How Can AirPods Connect to a Windows PC?
Apple AirPods use Bluetooth to connect to any computer. Once connected, you can use AirPods to listen to audio, input audio via their built-in mic, and control audio volume or pause sound via tap controls.
How to Fix Windows 10 Apple AirPod Sync Problems
If your Apple AirPods stop working on your Windows PC, try these fixes:
- Disable Bluetooth on other devices. If you’ve paired your AirPods with your iPhone, it could interfere with the connection to your PC, so try temporarily turning off Bluetooth on other devices.
- Open the charging case lid. Apple AirPods connect to devices when the charging case’s cover is open and its light turns green. Try opening it for a few seconds before removing the AirPods and putting them in your ears.
If you’re still having problems, follow these troubleshooting steps:
-
Open an app such as Spotify on your Windows 10 PC and begin playing some music.
-
Place your Apple AirPods back in their charging case and close the lid, then wait a few seconds.
Seremin / Getty Images
-
Open the Action Center and select All settings.
-
Select Devices in the Windows Settings.
-
Make sure your AirPods are on the list of paired devices.
-
Open the charging case’s lid, remove the AirPods, and place them in each ear.
John Edelson / Getty Images
-
Select AirPods in the device list, then select Connect. The AirPods should connect, and the audio should being playing through them.
If your Apple AirPods still won’t play sound, open All settings > Devices, then select Remove Device under AirPods and repeat the pairing process.
FAQ
-
To connect your AirPods to a Mac, go to the Apple menu > System Preferences > Bluetooth and turn on Bluetooth. Place your AirPods in the case, open the lid, and tap the button on the AirPods case until the status light blinks. Select Connect.
-
To connect AirPods to an Android device, go to Settings > Bluetooth and ensure Bluetooth is on. With the AirPods inside, open the charging case and press and hold the button on the case until it flashes. From the Android device, tap the AirPods from the available Bluetooth devices list.
Thanks for letting us know!
Get the Latest Tech News Delivered Every Day
Subscribe
In this article, I’m going to share how to connect AirPods, AirPods Pro, or AirPods Max to any Windows Laptop or PC with photos!
These instructions apply to any Windows 10 or 11 operating system laptops or desktop PCs.
If you just received your AirPods and are excited to listen to music and videos with them, follow the simple instructions below to get them connected as soon as possible.
I’ve also included instructional photos to help you understand the steps even easier with a visual aid.
How to Connect AirPods or AirPods Pro to Windows Laptop or PC

Here’s how to connect AirPods or AirPods Pro to any Windows 10 or 11 Laptop or PC:
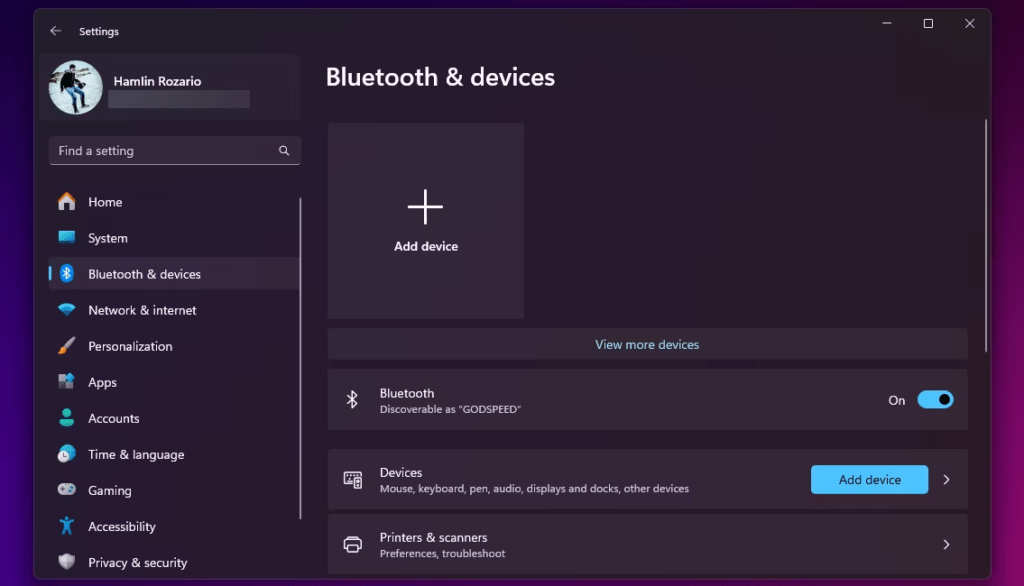
- Step 1: On your Windows Laptop or PC, click the magnifying glass on the bottom-left and search “bluetooth” > Click “Bluetooth and other devices settings“. This is also accessible from “System settings”.
- Step 2: Click “Add Bluetooth or other device“
- Step 3: Click “Bluetooth“
- Step 4: Open your AirPods or AirPods Pro case while leaving them inside, then press down and hold the button on the back of the case for at least 5 seconds (see photo above)
- Step 5: Now the LED light on the front or inside of the case should turn a blinking white, signaling that your AirPods are now in “Pairing Mode” (see photo below)
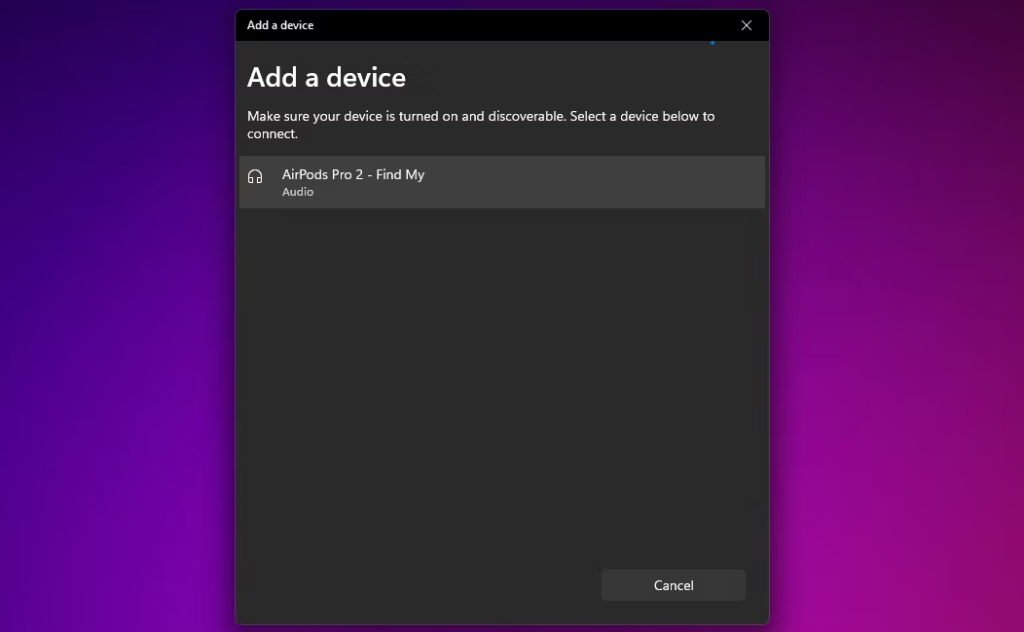
- Step 6: On your Windows laptop or PC, you should see the AirPods in the list of discoverable devices to pair with. Simply click your AirPods and it should begin pairing.
- Step 7: Once paired, click your AirPods from the “Audio” list on “Bluetooth & other devices”, then click “Connect”.
When AirPods or AirPods Pro 2 enters Bluetooth pairing mode, there will be a flashing white light on the charging case (or inside the case for some models)

How to Connect AirPods Max to iPhone, MacBook, or iPad (ALL Models)

Here’s how to connect AirPods Max to any Windows 10 or 11 Laptop or PC:
- Step 1: On your Windows Laptop or PC, click the magnifying glass on the bottom-left and search “bluetooth” > Click “Bluetooth and other devices settings“. This is also accessible from “System settings”.
- Step 2: Click “Add Bluetooth or other device“
- Step 3: Click “Bluetooth“
- Step 4: Take the AirPods Max out of the Smart Case. Sometimes your device may automatically prompt you to connect, but if not, continue to the next step.
- Step 5: Press and hold the noise control button (the oval button, not the circular digital crown) on the AirPods Max for at least 5 seconds until the LED light begins flashing white
- Step 6: On your Windows laptop or PC, you should see the AirPods in the list of discoverable devices to pair with. Simply click your AirPods and it should begin pairing.
- Step 7: Once paired, click your AirPods from the “Audio” list on “Bluetooth & other devices”, then click “Connect”.

Frequently Asked Questions
Why are my AirPods not connecting to my Windows laptop or PC?
First, make sure that Bluetooth is turned on for your laptop, and that the AirPods are charged and have battery life. Next, put the AirPods into pairing mode by pressing the circle button on the back of the charging case for at least 10 seconds. Now, go to your “Bluetooth & other devices” from system settings > Audio > Scroll through the list and click your AirPods to connect.
How to reset and restore AirPods, AirPods Pro, or AirPods Max back to factory settings?
Put AirPods back in its case and wait for 30 seconds. Open the lid, and hold the pairing button for at least 15 seconds until the status light flashes orange then white. Now the AirPods are restored to factory settings.
How to fix and troubleshoot AirPods pairing problems?
If your AirPods are having issues connecting, try placing them back in their case for a few seconds, then put them back on your ears. If it’s still not connecting, you can go to System settings > Bluetooth & other devices > Click on your AirPods > “Forget this device” or “Unpair” > then repeat the pairing process. Lastly, you can try resetting them to factory settings by following the instructions above.
Read Next
How to Clean AirPods, AirPods Pro Mesh + Case from Ear Wax

How long do AirPods last, and take to charge? (ALL Models)

How to Connect AirPods to iPhone, MacBook, iPad w/ Photos!

Why do my AirPods keep disconnecting or pausing?

Apple AirPods Pro 2 Review: WORTH IT in 2024? (USB C)

Apple AirPods Max Review: Still Worth it in 2024?

Apple AirPods Pro 2 vs AirPods Max: Owner Comparison (2024)

Apple AirPods 2 Review: WORTH IT in 2024? (2nd Generation)

Beats Studio 3 Wireless Review: WORTH IT in 2024?

Download Article
Download Article
Are you trying to connect your AirPods to your laptop? AirPods are an Apple device and work best with other Apple devices (like an iPhone or Mac), but you can still use them with your Windows laptop! This wikiHow article guides you through using your AirPods with your Windows laptop or a Macbook and gives you a few troubleshooting steps.
-

You can do this by clicking the Action Center button in your taskbar (it looks like a chat bubble icon) or you can press Win + A.
- This works with Windows 10 and Windows 11 laptops, although the process to locate the Bluetooth section of Settings is a little different.
-
You’ll find it with the Bluetooth icon, and selecting Go to Settings will open Settings in a new window.
Advertisement
-
If this switch is already on (to the right and colored in), you can skip this step.
- You should see something like «Now discoverable as (Laptop Name)» under «Bluetooth» when this feature is activated.
-
You’ll see this first option at the top of the window next to +. When prompted to select a device that you’re pairing, click to choose Bluetooth and all the Bluetooth devices within range will appear here.
-
You can do this by opening the AirPods case, then pressing and holding the button on the back of it.
- When the LED flashes white, release the button. This light is either on the front or inside your case.
-
You should see this device under your list of discovered devices.
- Pairing between your AirPods and Dell will begin as soon as you select them from the list.
-
After your AirPods and laptop pair, you can click Done to close this window.
- If they aren’t automatically switched to the active sound output, click the speaker icon in your taskbar, then select your AirPods from the list.[1]
- You will not have access to Siri on a Windows laptop.
- If they aren’t automatically switched to the active sound output, click the speaker icon in your taskbar, then select your AirPods from the list.[1]


Advertisement
-
You can do this by clicking the Apple icon in the top left corner of your screen and selecting System Preferences from the menu that drops down.
-
It’s near the center of the window next to a Bluetooth symbol.
-
You won’t see this button if Bluetooth is already on.
-
The AirPods must be in the case and the lid closed.
-
You can do this by opening the AirPods case, then pressing and holding the button on the back of it.
- When the LED flashes white, release the button. This light is either on the front or inside your case.
-
You’ll see your AirPods listed on the right side of the screen under «Devices.»
- To access your Bluetooth list faster than opening System Preferences, click to check the box «Show Bluetooth in menu bar.» Instead of going through System Preferences, you can click the Bluetooth logo in your Mac’s menu bar.


Advertisement
-
-
This is a problem even if you have a Macbook and an Android phone in your pocket. If your AirPods are connected to your Android phone, they won’t connect with your laptop, so make sure any other connections are disabled.
-
If it’s out of date, you might have issues connecting to your AirPods including an unreliable connection that randomly disconnects. Update your Bluetooth driver, and try again.
-
Doing this will test if the Bluetooth on your laptop is the issue or if the problem lies elsewhere. If different headphones connect reliably, the AirPods are most likely the problem.
-
Put them in Pairing Mode by pressing and holding the only button on the AirPods case with the lid open. Release the button when you see the LED flash white (the light is either on the front or inside your case).[2]
-
Once you place the case on a charging mat or use a charger, the LED should indicate the charge level of your AirPods (an amber light means they are charging and a green light indicates that they have a full charge).[3]


Advertisement
Ask a Question
200 characters left
Include your email address to get a message when this question is answered.
Submit
Advertisement
Thanks for submitting a tip for review!
References
About This Article
Article SummaryX
1. Open the Action Center.
2. Right-click the Bluetooth tile and click Go to Settings.
3. Click the toggle next to «Bluetooth» to turn it on (if it’s off).
4. Click Add Bluetooth or other device and select Bluetooth.
5. Put your AirPods into Pairing Mode.
6. Click your AirPods.
7. Click Done.
Did this summary help you?
Thanks to all authors for creating a page that has been read 28,570 times.
Is this article up to date?
If you own a pair of Apple’s AirPods, you probably love the effortless way they pair with your Apple devices. However, many users are unaware that these stylish and functional wireless earbuds can also be connected to Windows PCs. Whether you want to use your AirPods for gaming, listening to music, or participating in video calls, this guide will help you navigate the process of connecting them to your Windows machine. With detailed steps, tips, and troubleshooting methods, you’ll be enjoying your favorite audio in no time.
Understanding AirPods and Their Compatibility with Windows
Before diving into the connection process, it’s important to understand what AirPods are and how they interact with Windows systems. AirPods are sophisticated wireless earbuds designed primarily for use with Apple devices, leveraging the H1 or W1 chip for seamless integration. However, they can still be paired with non-Apple devices, including Windows computers.
Compatibility Overview
While AirPods are optimized for Apple products, the Bluetooth technology they utilize is standardized, enabling connection with most devices that support Bluetooth. Here are some key considerations:
- Bluetooth Capability: Ensure your Windows PC has Bluetooth capability. Most modern laptops come with built-in Bluetooth, but desktop computers may require a USB Bluetooth adapter.
- Drivers Updated: Maintain updated Bluetooth drivers to enhance compatibility and performance.
Steps to Connect AirPods to a Windows PC
Connecting your AirPods to a Windows computer is a straightforward process, albeit slightly different from connecting to an Apple device. Follow these steps to ensure a smooth pairing experience.
Step 1: Prepare Your AirPods
- Charge Your AirPods: Before attempting to connect, make sure your AirPods are charged. Place them in their charging case and ensure the case is also charged.
- Enter Pairing Mode: Open the lid of your AirPods case, and press and hold the button on the back of the case. Keep holding the button until the LED light on the front starts blinking white, indicating that your AirPods are now in pairing mode.
Step 2: Access Bluetooth Settings on Windows
- Click on the Start Menu, then select the Settings icon (gear symbol).
- In the Settings menu, click on Devices.
- Select the Bluetooth & other devices tab on the left-hand sidebar.
- Turn on Bluetooth if it is not already enabled. The toggle should be set to On.
Step 3: Add Bluetooth Device
- After enabling Bluetooth, click on the Add Bluetooth or other device button at the top of the Devices window.
- From the pop-up options, choose Bluetooth. Windows will start searching for available devices.
Step 4: Pair AirPods with Windows
- Your AirPods should appear in the list of available devices shortly. Click on the name of your AirPods when you see it (it may show as “AirPods” or any custom name you’ve set).
- A notification will pop up asking if you want to pair your AirPods with your PC. Click Connect.
- Once successfully connected, Windows will display a notification confirming that the AirPods are ready to use.
Step 5: Adjusting Sound Settings
- After pairing, you may want to adjust your audio settings to ensure the sound output and input are set to your AirPods. Right-click the sound icon in your taskbar, and choose Playback devices.
- In the Playback tab, find your AirPods, right-click on them, and set them as the default device.
- Similarly, switch to the Recording tab and set your AirPods as the default for microphone input if you plan to use them for calls or voice recording.
Troubleshooting Connection Issues
Occasionally, users may encounter issues while connecting their AirPods to a Windows PC. Here are some common troubleshooting tips:
Common Problems and Solutions
- AirPods Not Showing Up: If your AirPods don’t appear under available devices:
- Ensure your AirPods are in pairing mode (blinking white light).
- Move the AirPods closer to your PC.
-
Restart the Bluetooth service by toggling it off and on again.
-
Audio Lag or Poor Sound Quality: This can happen due to driver issues or interference:
- Update your Bluetooth drivers from the manufacturer’s website.
-
Disconnect other Bluetooth devices to minimize interference.
-
Connection Drops: If your AirPods frequently disconnect, consider:
- Checking battery levels; low battery can cause disconnect.
- Removing and re-pairing the device.
Enhancing Your Experience: Additional Tips
Once connected to your Windows PC, there are several ways to enhance your AirPods experience.
Managing Battery Life
Keep a check on your AirPods’ battery life, as Windows does not display battery percentage automatically. You can:
- Use a third-party app designed for Windows that monitors Bluetooth devices’ battery levels.
- Regularly charge your AirPods by placing them back in their case.
Leveraging AirPods Features
Depending on the AirPods model you own, you might have access to features such as:
- Automatic Ear Detection: This feature may not function with Windows, but you can easily navigate the audio based on AirPods detection.
- Siri Integration: While Siri integration is not available on Windows, you can still use voice commands on Windows through other software.
Comparing AirPods With Other Bluetooth Headphones
AirPods are not the only wireless earbuds in the market; understanding their pros and cons compared to others can help you make informed decisions when using them with non-Apple devices.
| Feature | AirPods | Competitor Model A | Competitor Model B |
|---|---|---|---|
| Sound Quality | Excellent | Good | Very Good |
| Battery Life | Up to 5 hours | Up to 6 hours | Up to 8 hours |
| Bluetooth Range | ~30 feet | ~35 feet | ~30 feet |
| Microphone Quality | Superior | Good | Average |
Conclusion
Connecting your AirPods to a Windows PC opens up a world of audio possibilities. Whether it’s for work, gaming, or leisure, these versatile earbuds can enhance your listening experience significantly, provided they are linked correctly. By following the steps outlined in this guide, troubleshooting any issues, and implementing enhancements, you can enjoy all your favorite tunes and sounds seamlessly.
Now that you know how to connect your AirPods to Windows, you can maximize your tech experience, no matter what device you are using. Happy listening!
What are AirPods and how do they work with Windows?
AirPods are wireless earbuds developed by Apple that utilize Bluetooth technology for connectivity. Designed to pair seamlessly with Apple devices, they can also connect to non-Apple devices, including Windows computers. When paired with a Windows device, AirPods function similarly to other Bluetooth headphones, allowing you to listen to audio and engage in calls wirelessly.
To connect your AirPods to Windows, enable Bluetooth on your computer and put your AirPods in pairing mode. This usually involves opening the AirPods case with the earbuds inside and pressing the button on the back until the light flashes white. Once in pairing mode, your AirPods should appear in the Bluetooth menu of your Windows device, allowing you to select them for connection.
How do I put my AirPods in pairing mode?
Putting AirPods in pairing mode is a straightforward process. First, make sure your AirPods are charged and inside their case. Open the lid of the charging case, and you will see a small button on the back of the case. Press and hold this button until the LED indicator on the front starts to flash white, signaling that the AirPods are in pairing mode.
Once your AirPods are in pairing mode, you can proceed to connect them to your Windows device by searching for available Bluetooth devices. It’s important to keep the AirPods close to your Windows computer during this process to ensure a successful connection.
Can I use AirPods with Windows for phone calls?
Yes, you can use AirPods with a Windows computer for phone calls, provided that your Windows device supports Bluetooth audio input and output. When connected, the AirPods act as a microphone and speaker, allowing you to communicate during calls through applications like Skype, Zoom, or Microsoft Teams. The audio quality may vary, but many users find the experience satisfactory for casual conversations.
However, some features that you may enjoy while using AirPods with Apple devices, such as automatic ear detection or seamless switching between devices, may not work the same way on Windows. Make sure to check your audio settings to ensure that the AirPods are selected as both the input and output device for your calls.
What should I do if my AirPods won’t connect to my Windows PC?
If your AirPods won’t connect to your Windows PC, the first step is to ensure that Bluetooth is enabled on your computer. Go to your device’s Bluetooth settings and verify that it is turned on. If Bluetooth is already enabled, try removing any previously paired devices that you are no longer using, as this can sometimes cause connection issues with new devices.
Additionally, you can reset your AirPods by placing them in the case, opening the lid, and holding the setup button until the LED indicator flashes amber and then white. This process may help clear any potential bugs preventing the connection. After resetting, attempt to put them back into pairing mode and connect them to your Windows device again.
Can I adjust the sound settings for AirPods on Windows?
Yes, you can adjust sound settings for your AirPods once they are connected to your Windows device. To do this, click on the volume icon in the taskbar and select ‘Playback devices’ from the menu. In the Playback tab, you will see your AirPods listed among other audio devices. Right-click on them for options to set them as the default playback device or to access additional properties.
Within the properties menu, you can manage enhancements and adjust levels such as bass, treble, and balance according to your preferences. However, remember that some advanced features available when using AirPods with Apple devices may not be accessible through Windows, but basic audio adjustments should provide a better listening experience.
Are there any limitations when using AirPods with Windows computers?
While AirPods can connect to Windows computers and function similarly to traditional Bluetooth headphones, there are some limitations to be aware of. One primary limitation is that you may not have access to all the features that are available when using AirPods with Apple devices, such as seamless switching between devices or automatic ear detection, which can impact convenience.
Additionally, some users may experience compatibility issues, particularly with specific audio applications or during gaming, where latency could be an issue. The sound quality and reliability can also vary based on the Bluetooth adapter in the Windows PC and its drivers, so ensuring your Bluetooth drivers are up-to-date can help improve performance when using AirPods.

For years, Apple AirPods have symbolized the freedom and simplicity of wireless. But what about when you want to use them with a Windows computer?
If you think it’s impossible, think again! Although AirPods are designed to work optimally with Apple devices, it is entirely possible to connect them to a Windowscomputer.
Follow this complete and simplified guide to enjoy your AirPods on Windows with ease.
Prerequisites
Before you begin, make sure you have the following:
- Windows 10 or 11 PC with the latest version of updates installed.
- Your AirPods are charged. Place them in their case for a few minutes to ensure a stable connection.
- Bluetooth is enabled on your Windows . You can do this via Settings > Devices > Bluetooth .
AirPods pairing: standard and simplified mode
Standard method :
- Open your AirPods case and hold the button until the LED light flashes white.
- On your Windows , go to Settings > Devices > Bluetooth > Add Bluetooth device.
- Select » Airpods » from the list of available devices.
- If a PIN code is requested, enter » 0000 » and confirm.
Simplified method : ( Windows 10 version 1803 and later)
- Open your AirPods case near your WindowsPC.
- A notification will appear on your PC. Click on » Connect «.
Advanced configuration: options and features
Choose the default audio output device
- Right-click the speaker icon in the taskbar.
- Select » Open the settings of your «.
- Under » output «, choose » Airpods «.
Change Bluetooth connection options
- Go to Settings > Devices > Bluetooth .
- Select » Airpods » and click on » Device options «.
- Here you can manage the connection, Bluetooth profile and audio services.
Troubleshooting: Solutions to Common Problems
Issue: AirPods are not showing in the Bluetooth device list.
Solution: Make sure Bluetooth is turned on on both devices, AirPods are in pairing mode, and have sufficient battery power. Then restart both devices and try again.
Problem: The sound is choppy or of poor quality.
Solution: Move your AirPods closer to your Windows . Also check for Bluetooth interference from other devices.
Tips and tricks

For a better audio experience, install the Microsoft Bluetooth driver
- Download the Microsoft Bluetooth driver from the official Microsoft website.
- Follow the driver installation instructions.
- Once the driver is installed, restart your WindowsPC.
To optimize the sound quality of your AirPods on Windows
- In the Bluetooth settings of your airpods, select » Properties «.
- Access the » Services » tab.
- Check the » hands -free » box.
- Click on » OK » to save your changes.
To use the voice control features of your AirPods on Windows
- Make sure the » Cortana » function is activated on your Windows .
- You can use the following voice commands to control audio playback:

«Hey Cortana, read music. »»
“Hey Cortana, pause music. »»
«Hey Cortana, goes to the next song. »»
“Hey Cortana, drops the volume. »»
Conclusion: take full advantage of your AirPods on Windows
By following this comprehensive guide, you now have all the keys to connecting your AirPods to your Windows and enjoying an optimal audio experience. Feel free to explore advanced configuration options to personalize your experience and unlock the full potential of your AirPods.