
Are you looking for a Windows 10 apps development tutorial for beginners? There are numerous reasons why you might need to develop a desktop application. You might want to organize the data for your business so that everything is easily accessible. Perhaps you have an idea to create a computer program, game, utility, or application for commercial market release. Maybe you have thought up a great way to help out a charity or local neighborhood group.
In any case, if deployed in the right manner, apps be a way to generate an income or to be helpful to people by automating tasks or aiding in other ways. If you’re looking to create apps which have the easiest level or technical knowledge and make the most impact then it’s worth realizing that despite the popularity in mobile devices such as phones and tablets the number one target for a software developer is a desktop machine. For the majority of people, thanks to the success of Microsoft that desktop machine is probably running Windows 10 or to a lesser degree its younger sibling Windows 11.
Therefore, let us share some fundamentals of Windows 10 apps development with you.
Is a desktop app right for you?
When it comes to applications, you have three essential options to choose from: desktop apps, mobile apps, or web apps.
While desktop apps have the power and dependability to meet your requirements, web apps should not be overlooked but be mindful that delivering web apps requires some compromises and a suitable – and secure – place for them to be hosted. If you’re storing or handling personal data with your app you should research into the best ways to do that securely for a web app. Note also that different countries and jurisdictions can have their own rules about how to handle, store and transmit any personal data as well as a confusing array of non-obvious regulations about things like web browser cookies and accessibility considerations for users with physical impairments.

Should I create a mobile app?
At the same time mobile apps are also an option depending on the requirements of the project. Each has advantages and disadvantages that you must weigh in order for your application to be successful. But it’s worth mentioning that while mobile development is reasonably easy, especially with the right cross-platform development tool, there can be many hurdles to jump over. For example, deploying a mobile app on Android can be as simple as compiling the app and then copying it to the user’s device as an “ad hoc” app. But that’s not commonly how things are done, most developers have to contend with the device provider’s app store. For Apple this is the Apple App Store. For Android this is usually the Google Play Store or a more restricted supplier-specific market such as the Samsung Galaxy Store.
These stores can be a great way to get your app idea out into ‘the real world’ and it’s a definite thrill to see people actually downloading and using your mobile app. However, all these stores have got an extensive and sometimes confusing list of rules your app must stick to or it will either not be allowed on the app stores in the first place or will get withdrawn from sale at some future date. The rules vary from simple things like having the right kind of icons, text and images for the app’s page on the app store, and obvious things like correctly supporting the latest devices to slightly less obvious things like not having a separate sign-up page for any subscription services unless your also allow the users to sign up via an in-app link which goes through the app store owner’s payment methods (to ensure they get their slice of the profits).
If you know your app will be a part of the user’s daily routine, users will need to copy and paste to the clipboard, notifications will be sent, or the app will be used without internet access, then choose a desktop app. When something needs to be accessed quickly and frequently on a user’s machine, a desktop app should be preferred.
Do desktop apps have an app store?
In a word, yes, Windows has one and so do Apple and some types of Linux – although most software developers tend not to use an app store and simply allow the users to download the app directly to their desktops, usually from a web page link. The Windows app store has recently relaxed a number of their rules to make it easier for developers to sell or distribute their apps from it. Windows 11 also has a facility to support Android apps which can run on desktop computers running Windows 11. Microsoft have also introduced the Windows Subsystem for Linux or WSL. WSL allows Windows users to run, and you to develop Linux apps on a Windows 10 or 11 machine. This works in a similar fashion to running Android apps on Windows.
Are you considering cross-platform app development?
So, once you’ve established that a desktop app is the best fit for your requirements, you should then must decide which desktop platform to target. You can choose between platform-specific (native) and cross-platform programming. Platform-specific applications can only run on one platform, whether it is macOS, Windows or Linux. For the broadest reach though, Windows 10 and 11 is still by far the most widely-used desktop operating system in the World by a very significant margin.
Cross-platform development
Cross platform development which is the ability for you to create app code which is not tied to one specific target platform but can be made to work on, for example, Windows, macOS and Linux using the same code. If you require: rapid development, lower development and maintenance overheads, potentially fewer bugs due to a lower quantity of code, and the ability to launch for multiple platforms at once and attain a wider reach.
RAD Studio and Delphi support an extensive collection of development platforms. There are two key app development frameworks available for RAD Studio: the Visual Component Library (VCL) and FireMonkey FMX. Choosing to use the VCL means your app can only target Microsoft Windows (Win32/Win64) desktop or tablets running Windows such as the MS Surface.
Apps written using FMX are cross platform apps which can support Android, iOS, macOS, Windows, and Linux. Developers can build and deploy their apps from a single code base and UI using FireMonkey FMX to all of these platforms. Any differences in the ‘form factor’ of the devices – for example an iPad Pro has a might higher screen resolution and a different shape to an iPhone SE or older Android phone – can be taken care of using specialized screen layouts which are compiled into the app by RAD Studio.
If you design your screens carefully you may not need any specially customized screens – but often you will; luckily that’s very easy to do with RAD Studio.

Is UWP deprecated?
Obviously we’re focusing on the VCL and FMX frameworks for development – but what about other technologies such as Microsoft’s UWP? Universal Windows Platform (UWP) was one of the many computing platforms released by Microsoft for the developers and was first introduced in the Windows 10 operating system. Microsoft had intended UWP to be a universal platform that was supposed to help develop apps beyond the Windows operating system. Back in 2015 the intention was that UWP would allow developers to target not only Windows desktop but also other devices such as Microsoft’s XBOX console and the HoloLens mixed reality system with little or no changes. UWP came with a number of issues and technical restrictions that caused some disagreement with prominent organizations such as Epic Games. After some capitulation by Microsoft it seems that UWP has been deprecated by Microsoft. New directions are actively being pursued by Microsoft including the .NET Multi-platform App UI or .NET MAUI system.
UWP was one of the many development solutions released which could be used to create client applications for Windows. However, for the past few years, there have been various shifts in the Windows platform from Microsoft related to application development support and platforms. The innovations introduced to provide for Android apps to run on newer versions of Windows and the superb WSL show how far Microsoft have come into embracing other operating systems and non Windows devices, even if those apps are still running on a Windows machine.
What about Microsoft Windows 10 apps development and the WinRT?
By the time Microsoft released Windows 10, they had already added a new “application binary interface” based system (ABI), the Windows Runtime, known more commonly as WinRT, which launched with Windows 8. WinRT was aimed to cater for ‘managed’ programming languages and provided support for C++, Rust, Python, JavaScript/TypeScript and of course Microsoft’s own C# and Visual Basic.
The adoption of WinRT appears to be conservative and perhaps slower than Microsoft might have liked. Developers needed to re-engineer some of their code due to the fact WinRT was written using C++ and based on an object oriented paradigm and asynchronous programming model which for some existing code bases might have been a barrier to adoption.
Fortunately, RAD Studio offers WinRT API mappings and Object Pascal interfaces to support Windows services like Win 10 Notifications and Win 10 Contracts. Developers can utilize the components we provide for a Windows application for Notifications and Contracts in both VCL and FMX C++ and Object Pascal. The underlaying mechanism for enabling the Windows apps is not a concern for developers using RAD Studio since the VCL and FireMonkey FMX take care of the details for us. You write your code, either in Delphi or C++, and manipulate the properties of visual components like edit boxes, labels, lists, trees and so on; and the non visual components like open/save dialogs and notifications and let the compiler and runtime libraries do all the hard work for you. Why try harder?
Is Delphi and the VCL a better option for Windows 10 apps development?
You have the option to program using which tool you feel suits you, of course, but we think for the greatest productivity using C++ and Delphi is a better choice. Delphi and the Visual Component Library (VCL) offer superior abilities for the encapsulation of the capabilities of the Windows operating system. Perhaps the most important reason for considering RAD Studio and Delphi is the consummate ease of learning the Delphi language the fact developers can create fully ready to use programs extremely rapidly. The “RAD” in RAD Studio is an acronym for Rapid Application Development and the drag and drop screen and form design means you do not need any wireframe type tools or even sketches to work out what you want the screens of your program to look like – you build them in RAD Studio and know exactly what they will look like when they are running.
The VCL has established a reputation among its users as one of the best possible wrappers on top of the native Windows API and UI libraries. Only the VCL library offers forward thinking support for your source code with a well-deserved reputation for stability and longevity. You can take a ‘legacy’ application built many years ago and easily maintain and update it for Windows 10 and 11, as well as provide support for earlier versions of Windows. Apps written in Delphi are very resistant to changes in the operating system as different Windows updates and patches are released. This is noticeable compared to other types of technology such as Python which can flounder when a required Python runtime is either not present or is replaced with an incompatible version. This is also true for apps written with .NET languages which can suffer when too many moving parts of the supporting .NET runtime are replaced or upgraded. There are ways around this of course, nothing is ever too horrible, but apps produced with RAD Studio really are very robust due to their lack of dependencies on runtimes and their self-contained nature which promotes great stability.
Windows 10 apps development tutorial for beginners
Ok, we’ve talked enough about the merits of using RAD Studio and a primer on whether you should be developing a Windows 10 desktop program or a mobile cross-platform app. Let’s try creating a really quick and simple app to show you how easy it is! There are plenty more in-depth tutorials and articles here on the blog site where we cover all sorts of topics from beginner to advanced.
The following steps will give you an idea of how very easy it is to construct a simple “Hello world” VCL application for Windows in a couple of minutes. In the simplest manner, we attempt to demonstrate the essential steps for creating a VCL Forms app. The application that you will create using this tutorial will include the following:
- We will create a VCL form.
- We will add a control to that form.
- We will add some code which triggers when our user clicks on a button.
- Finally. our “Hello World” app will display a dialog box when the user interacts with it.
How to create a simple “Hello world” application
Open RAD Studio and click on the “Windows VCL Application – Delphi” (or C++) item on the Welcome Page.

How to create the first screen for your Windows app
You should now have a blank form on the screen. So let’s add a button control to that form.
- Select the “Palette” tab – if you can’t find it either select View > Tool Windows > Palette or simply press CTRL + ALT + P
- The palette shows all the types of controls you can simply drop onto your application. From the palette click on the TButton entry which is in the Standard group

- You should now have a button on your form. You can click it and drag it to where you would like it to be shown.
How to make your first app display a “Hello world” string
- Click once on Button1 on the form.
- In the Object Inspector, double-click the OnClick action field on the Events tab. The Code Editor displays, with the cursor in the Button1Click event handler block.
- For Delphi, move the cursor before the begin reserved word and then press ENTER. This creates a new line above the code block. For C++, place the cursor after the opening brace ({) and press ENTER.
- For Delphi, insert the cursor on the new line created, and type the following variable declaration:
For C++, enter the following code:
- For Delphi, insert the cursor within the code block and type the following code:
|
s:= ‘Hello world!’; ShowMessage(s); |
For C++, enter the following code:
|
s = «Hello world!»; ShowMessage(s); |

How to run your first “Hello world” application
- Choose Run > Run to build and run the application. The form displays with a button called Button1.
- Click Button1. A dialog box displays the message “Hello World!”
- Close the VCL form to return to the IDE.

Are you ready to get started with Windows 10 apps development?
If you don’t have a copy of RAD Studio yet why not check out RAD Studio with Delphi and download it today? Give yourself the edge that RAD Studio provides to develop powerful desktop and cross- platform apps in the most efficient possible way.
As part of the Windows App SDK, WinUI 3 provides a modernized UI framework for building Windows 10 and Windows 11. This 3-part blog aims to help members new to Windows development quickly build familiarity using the Window App SDK through a fun sample app.
This post is only part 1 of the 3-part Windows App SDK blog and is scoped to showing you how to use WinUI 3 controls to create a simple working user interface. Part 2 and 3 are for windowing and single instancing.

Sample app overview
We are going to build an app with buttons that produce drum sounds (DrumPad). As simple as this demo app is, it shows some cool things you can do right away with the Windows App SDK (WinAppSDK):
- Working with simple and easy-to-use UI controls from Windows UI Library (WinUI) 3
- Customizing windowing options so that the user can multitask with the app always on top or have a full immersive experience
- Making the app single-instanced to reduce synchronization issues between instances
Prerequisites
- Install tools for developing apps for Windows 10 and Windows 11 here.
- Create a WinUI 3 app using the Blank App, Packaged (WinUI 3 in Desktop) template, and name it DrumPad.
Project template structure
In the WinUI 3 project template, most of our code will live in MainWindow.xaml and MainWindow.xaml.cs
- MainWindow.xaml is a XAML file where we will define all of our UI elements, called “controls”, that will make up the visual layer of our application.
- MainWindow.xaml.cs is the C# code-behind file where we will put all the logic that lets us interact with our application.
UI layout design
The following WinUI 3 controls are used to represent components of a drum pad:
- DropDownButton: includes a chevron to indicate a menu can be opened
- ToggleSwitch: a switch that can be toggled between dark/light mode
- Button: has a click user interaction and will trigger a unique drum sound
- Grid: made of rows and columns and is used to position the other controls
Deleting partial template code
The default project template comes with some blocks of code you’ll want to delete so we can replace them with our own markup and implementation:
MainWindow.xaml:
<!-- Delete the following template code -->

<StackPanel Orientation="Horizontal" HorizontalAlignment="Center" VerticalAlignment="Center">
    <Button x:Name="myButton" Click="myButton_Click">Click Me</Button>
</StackPanel>
MainWindow.xaml.cs:
// Delete the following template code

private void myButton_Click(object sender, RoutedEventArgs e)
{
    myButton.Content = "Clicked";
}
Defining the layout
In your MainWindow.xaml we will start by defining the set of nested grids and specify their controls and positioning. Open MainWindow.xaml in the XML editor view and inside the element add this content:
<!-- Add GRID CODE -->

<Grid>
    <Grid.RowDefinitions>
        <RowDefinition Height="Auto"/>
        <RowDefinition Height="*"/>
    </Grid.RowDefinitions>

    <Grid Margin="12">
        <Grid.ColumnDefinitions>
            <ColumnDefinition Width="*" />
            <ColumnDefinition Width="Auto" />
        </Grid.ColumnDefinitions>
        <!-- STEP 1: Add DropDownButton & ToggleSwitch CODE -->
    </Grid>

    <Grid x:Name="Control1" Grid.Row="1" ColumnSpacing="30" RowSpacing="12"
          VerticalAlignment="Center" HorizontalAlignment="Center">
        <!-- STEP 3: Define column & row positioning -->
        <!-- STEP 4: Add Styling for BUTTON -->
        <!-- STEP 2: Add BUTTON CODE -->
    </Grid>
</Grid>
NOTE: Auto and * are used to specify the height and width above to create a responsive layout. The controls held within the Grids are not fixed in size and can adjust to fill in spaces as the user resizes the app window.
Setting up remaining controls
STEP 1: Add DropDownButton & ToggleSwitch:
<DropDownButton Content="Display" Grid.Column="0" VerticalAlignment="Center" HorizontalAlignment="Left" Width="118" >
    <DropDownButton.Flyout>
        <MenuFlyout Placement="Bottom">
            <MenuFlyoutItem Text="Default"/>
            <MenuFlyoutItem Text="Compact Overlay"/>
            <MenuFlyoutItem Text="Fullscreen"/>
        </MenuFlyout>
    </DropDownButton.Flyout>
</DropDownButton>

<ToggleSwitch AutomationProperties.Name="simple ToggleSwitch" x:Name="dark_switch" Grid.Column="1" CornerRadius="3" VerticalAlignment="Center"  HorizontalAlignment="Right" MinWidth="0" HorizontalContentAlignment="Center" VerticalContentAlignment="Center" />
STEP 2: Add Buttons:
<Button Background="#FF0000" Grid.Row="0" Grid.Column="0" Content="Kick 1"/>
<Button Background="#C4425A" Grid.Row="0" Grid.Column="1" Content="Kick 2"/>
<Button Background="#D41DD8" Grid.Row="0" Grid.Column="2" Content="Kick 3"/>
<Button Background="#6A21A3" Grid.Row="0" Grid.Column="3" Content="Kick 4"/>

<Button Background="#C4425A" Grid.Row="1" Grid.Column="0" Content="Clap 1"/>
<Button Background="#D41DD8" Grid.Row="1" Grid.Column="1" Content="Clap 2"/>
<Button Background="#6A21A3" Grid.Row="1" Grid.Column="2" Content="Clap 3"/>
<Button Background="#473DB8" Grid.Row="1" Grid.Column="3" Content="Clap 4"/>

<Button Background="#D41DD8" Grid.Row="2" Grid.Column="0" Content="Open Hat 1"/>
<Button Background="#6A21A3" Grid.Row="2" Grid.Column="1" Content="Open Hat 2"/>
<Button Background="#473DB8" Grid.Row="2" Grid.Column="2" Content="Open Hat 3"/>
<Button Background="#26AAC7" Grid.Row="2" Grid.Column="3" Content="Open Hat 4"/>

<Button Background="#6A21A3" Grid.Row="3" Grid.Column="0" Content="Snare 1"/>
<Button Background="#473DB8" Grid.Row="3" Grid.Column="1" Content="Snare 2"/>
<Button Background="#26AAC7" Grid.Row="3" Grid.Column="2" Content="Snare 3"/>
<Button Background="#1A7BD6" Grid.Row="3" Grid.Column="3" Content="Snare 4"/>
STEP 3: Specify how the Grid should position these Buttons:
<Grid.ColumnDefinitions>
    <ColumnDefinition Width="*" />
    <ColumnDefinition Width="*" />
    <ColumnDefinition Width="*" />
    <ColumnDefinition Width="*" />
</Grid.ColumnDefinitions>

<Grid.RowDefinitions>
    <RowDefinition Height="*" />
    <RowDefinition Height="*" />
    <RowDefinition Height="*" />
    <RowDefinition Height="*" />
</Grid.RowDefinitions>
STEP 4: Apply standardized styling to all the Buttons:
Result
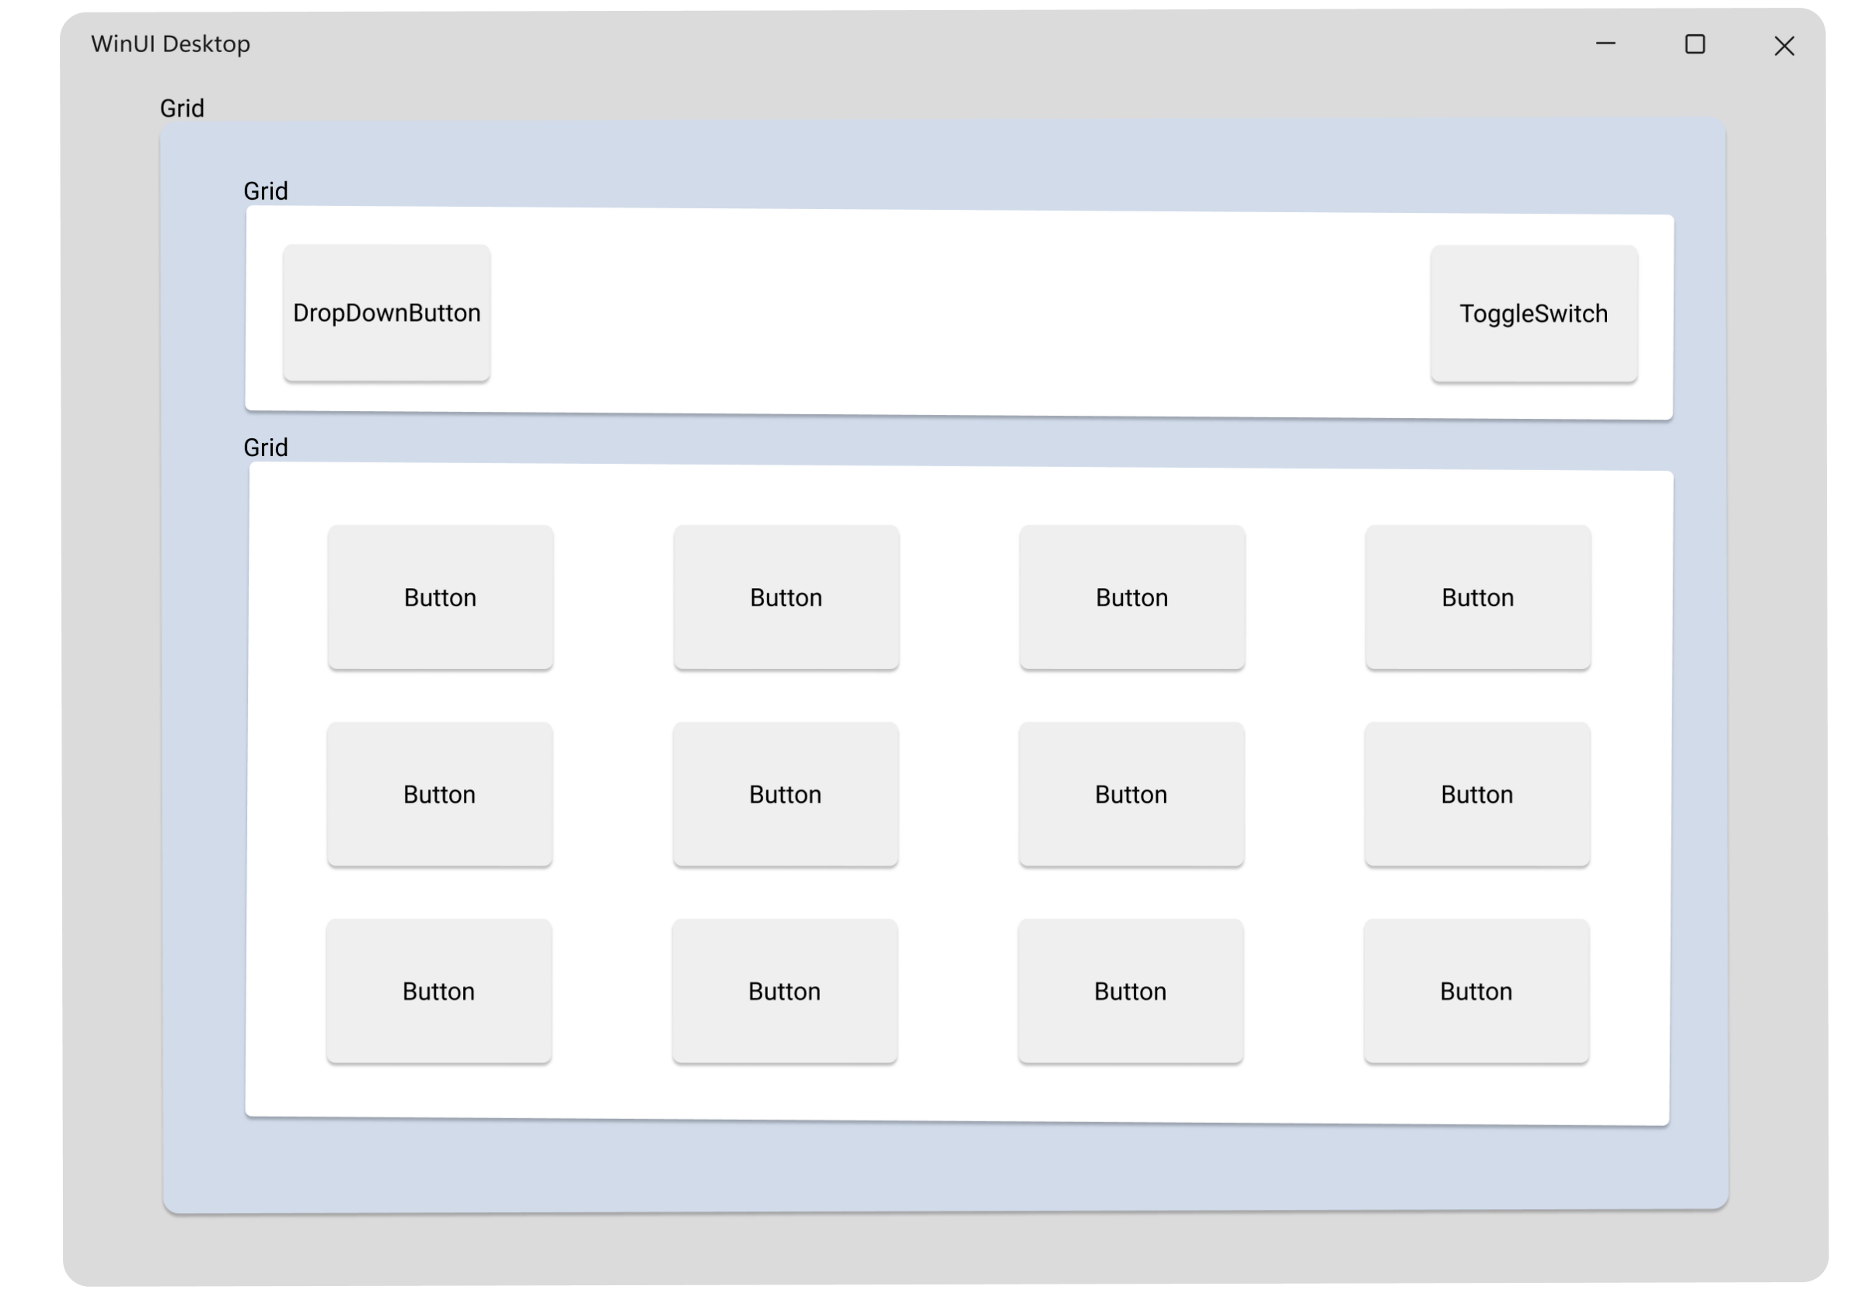
As simple as that, we should have a working visual layer built out using WinUI 3 controls. Choose x64 as your target platform, then press F5 to run the project solution. You should see:
Here is the completed code used in this post.
Moving forward
The buttons don’t do anything yet, but that’s next time! In part 2 we will dive into implementing the business logic.
In this tutorial, you will learn how to write your first WinUI 3 desktop app using the Windows App SDK. The Windows App SDK (previously known as Project Reunion) seeks to solve the problem of operating system level dependencies by providing consistent APIs for Windows 10 and Windows 11 app development. It supports .NET 5 and offers a UI framework with controls to help developers create modern Windows app.
Getting Started
Installing the Windows App SDK is as simple as installing the Project Reunion extension in Visual Studio. From the menu, navigate to Extensions > Manage Extensions. Search for Project Reunion and select Download. Restart Visual Studio to install the Windows App SDK.
Once you have installed the extension, you will be able to create a new project using the WinUI 3 template.
You will be asked to set your app’s target platform version and minimum platform version. When the new project has been generated, you will see two solutions in the Solution Explorer. You will write your app’s code in the Desktop project. The Project app is used to build an installer executable to make deploying your Windows app easier.
Your First WinUI 3 App — The Basics
The layout for your app is set in the Desktop project’s MainWindow.xaml. Open the file, and you will see a single button labeled Click Me within a stack layout container.
<StackPanel Orientation="Horizontal" HorizontalAlignment="Center" VerticalAlignment="Center">
    <Button x:Name="myButton" Click="myButton_Click">Click Me</Button>
</StackPanel>
The name of the button, myButton, is used to reference this button in the application’s code. The button’s click handler is assigned via the Click parameter. You can find the myButton_Click() method in the MainWindow.xaml.cs code-behind file.
private void myButton_Click(object sender, RoutedEventArgs e)
{
    myButton.Content = "Clicked";
}
If you run your app right now, you will see a basic Windows application with a single button. Clicking the button will change the label text for myButton to Clicked.
Navigate between Pages
Add New Pages
To make things a little more interesting, let’s add a new page to this WinUI 3 desktop app. In the Solution Explorer, right click the Desktop project and create a new folder called Pages. Right click the folder you just created and select Add > New Item…. In the left page, under the list of Installed Visual C# Items, select WinUI. You will see a list of available WinUI item templates. Select Blank Page (WinUI 3) and name it Page1.xaml.
You may notice, as of version 0.5 of Project Reunion, there is no toolbox or visual editor, so for now you will have to create your layout using XAML. On your new page, create a layout with a TextBlock element and a Button. My example uses a Grid to to position the two child elements. Inside the Page element, add the following layout.
<Grid
    Padding="8,8,8,8"
    HorizontalAlignment="Center">
        <Grid.RowDefinitions>
            <RowDefinition Height="auto"/>
            <RowDefinition Height="*"/>
            <RowDefinition Height="auto"/>
            <RowDefinition Height="*"/>
        </Grid.RowDefinitions>
        <TextBlock
			Grid.Row="0"
			FontSize="36"
			FontWeight="Bold"
			TextAlignment="Center"
			TextWrapping="WrapWholeWords"
			Text="Welcome to Page 1" />
        <Button
			Grid.Row="2"
			HorizontalAlignment="Center"
			x:Name="page1Button"
			Click="page1Button_Click">Go to Page 2</Button>
</Grid>
The button’s click handler is defined as page1Button_Click() method. Create the method in the Page1 code-behind file Page1.xaml.cs.
private void page1Button_Click(object sender, RoutedEventArgs e)
{
    this.Frame.Navigate(typeof(Page2));
}
The above method will navigate the current frame to Page2 when the Page1 button is clicked. Now create a second page called Page2 and create the same layout and button click handler, but this time navigate back to Page 1.
<Grid
    Padding="8,8,8,8"
    HorizontalAlignment="Center">
        <Grid.RowDefinitions>
            <RowDefinition Height="auto"/>
            <RowDefinition Height="*"/>
            <RowDefinition Height="auto"/>
            <RowDefinition Height="*"/>
        </Grid.RowDefinitions>
        <TextBlock
			Grid.Row="0"
			FontSize="36"
			FontWeight="Bold"
			TextAlignment="Center"
			TextWrapping="WrapWholeWords"
			Text="Welcome to Page 2" />
        <Button
			Grid.Row="2"
			HorizontalAlignment="Center"
			x:Name="page2Button"
			Click="page2Button_Click">Go to Page 1</Button>
</Grid>
private void page2Button_Click(object sender, RoutedEventArgs e)
{
    this.Frame.Navigate(typeof(Page1));
}
Update MainWindow
Next, modify the MainWindow layout to add the frame element referenced by our pages. Open MainWindow.xaml and replace the existing StackPanel layout with a simple Frame element called mainFrame.
<Grid>
    <Frame x:Name="mainFrame" />
</Grid>
Finally, we need to load Page1 into the mainFrame when the MainWindow is initialized by adding the following line in MainWindow.xaml.cs.
public MainWindow()
{
    this.InitializeComponent();
    mainFrame.Navigate(typeof(Pages.Page1));
}
Launch WinUI 3 App
When you launch your app, Page1 will be loaded by default. When you click the button, your app will navigate to Page2.
The Bottom Line
In this tutorial, you configured your development environment to create WinUI 3 apps for Windows 10 and Windows 11 using the Windows App SDK (Project Reunion). You then created your first app and created a functional layout using XAML. You configured your app with two pages, buttons, event handlers, and navigation. The Windows App SDK has native navigation controls, like NavigationView and TabView, but this tutorial should help you understand how to implement those control elements. What apps will you build using WinUI 3?
Writing a Windows GUI Application with Windows API was avoided by many programmers due to its complexity, but is it really something to be afraid of?
In the WinAPI you essentially need the WinMain(…), CALLBACK(…) and WndProc(…) functions to create and present a GUI. You will also need a Window Class (WNDCLASS) and the CreateWindow(…) function. Content is provided in the form of Text, Cotrol Elements, Menu and MessageBoxes.
All in all it’s not that bad, mostly some typing if you know what you need. In order for you to gain this knowledge, I have summarized the essential elements along with examples in this article.
Creating a WinAPI Window in Modern C
The following article shows the creation of a basic WinAPI application with a GUI that resembles the most common applications used in the MS Windows environment.
Basics
In another article I showed how to create a very basic WinAPI GUI Application and we will reuse most of this code here. It is a lot of code to make very little happen, but it is the basis of our application and shows a MS Windows window with a text.
We will need two functions, WinMain(…) as a replacement for main() and WndProc(…) as a function that processes the MS Windows event loop. In order to use the types and functions of the WinAPI we include windows.h.
#include <windows.h>

LRESULT CALLBACK WndProc(HWND, UINT, WPARAM, LPARAM);

int WINAPI WinMain(HINSTANCE hInstance, HINSTANCE prevInstance, PSTR cmdLine, int cmdShow)
{
   ... /* code here */
}
Creating and Initializing the Window with the WinAPI
Again, the details are shown in another Article about GUI in C, so we will cover it briefly here. Instead of our beloved main(…) function we now have to use WinMain(…) together with some parameters that are necessary for Windows.
Next we create a windowclass and register it. Then we create the window itself (with a title) and show it to the screen. An EventLoop that collects operating system messages is also started.
...
int WINAPI WinMain(HINSTANCE hInstance, HINSTANCE prevInstance, PSTR cmdLine, int cmdShow)
{
    static TCHAR appName[] = TEXT("Hello WindowsAPI");
    HWND hwnd;
    MSG msg;
    WNDCLASS wndclass;

    wndclass.style = CS_HREDRAW | CS_VREDRAW;
    wndclass.lpfnWndProc = WndProc;
    wndclass.cbClsExtra = 0;
    wndclass.cbWndExtra = 0;
    wndclass.hInstance = hInstance;
    wndclass.hIcon = LoadIcon(NULL, IDI_APPLICATION);
    wndclass.hCursor = LoadCursor(NULL, IDC_ARROW);
    wndclass.hbrBackground = (HBRUSH)GetStockObject(WHITE_BRUSH);
    wndclass.lpszMenuName = NULL;
    wndclass.lpszClassName = appName;

    if(!RegisterClass(&wndclass)) {
        MessageBox(NULL, TEXT("Could not register Window Class!"), appName, MB_ICONERROR);
    }

    hwnd = CreateWindow(appName, TEXT("The Hello Windows Program"), WS_OVERLAPPEDWINDOW, CW_USEDEFAULT, CW_USEDEFAULT, CW_USEDEFAULT, CW_USEDEFAULT, NULL, NULL, hInstance, NULL);

    ShowWindow(hwnd, cmdShow);
    UpdateWindow(hwnd);

    while(GetMessage(&msg, NULL, 0, 0)) {
        TranslateMessage(&msg);
        DispatchMessage(&msg);
    }

    return msg.wParam;
}
...
Processing MS Windows Events with the WinAPI
The CALLBACK(…) function is called when the event loop fires events from the operating system. For each event you can react with whatever is necessary and/or appropriate.
The WM_DESTROY event announces the upcoming shutdown of the application, WM_PAINT is fired whenever a repaint of the window is necessary (e.g. because you moved it). WM_CREATE is fired on creation of the window and we will do something here later.
...
LRESULT CALLBACK WndProc(HWND hwnd, UINT message, WPARAM wParam, LPARAM lParam)
{
HDC hdc;
PAINTSTRUCT ps;
RECT rect;
switch (message)
{
case WM_CREATE:
/* Add Initialization Code */
return 0;
case WM_PAINT:
hdc = BeginPaint(hwnd, &ps);
GetClientRect(hwnd, &rect);
DrawText(hdc, TEXT("This is your first Windows Window!"),-1, &rect, DT_SINGLELINE | DT_CENTER | DT_VCENTER);
EndPaint(hwnd, &ps);
return 0;
case WM_DESTROY:
PostQuitMessage(0);
return 0;
default:
break;
}
return DefWindowProc(hwnd, message, wParam, lParam);
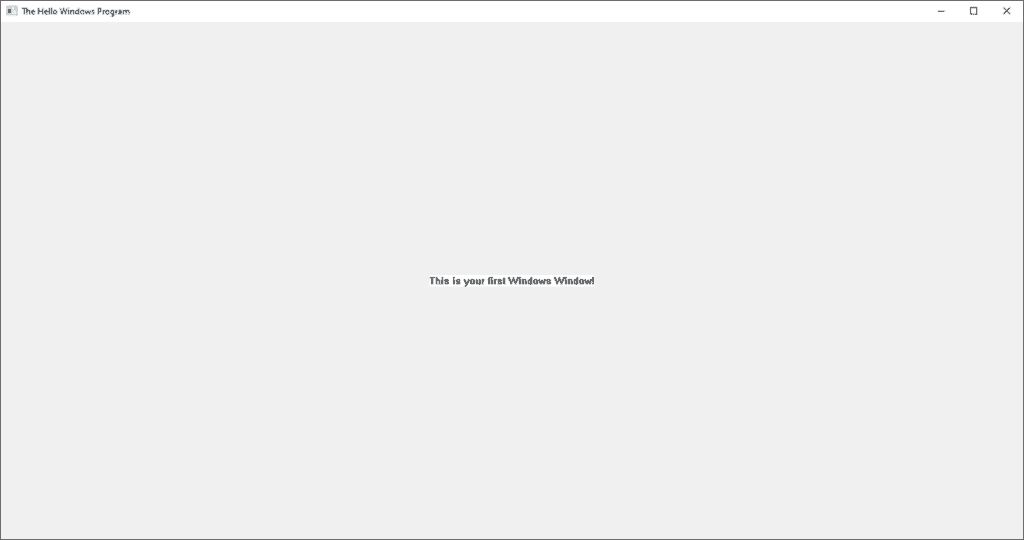
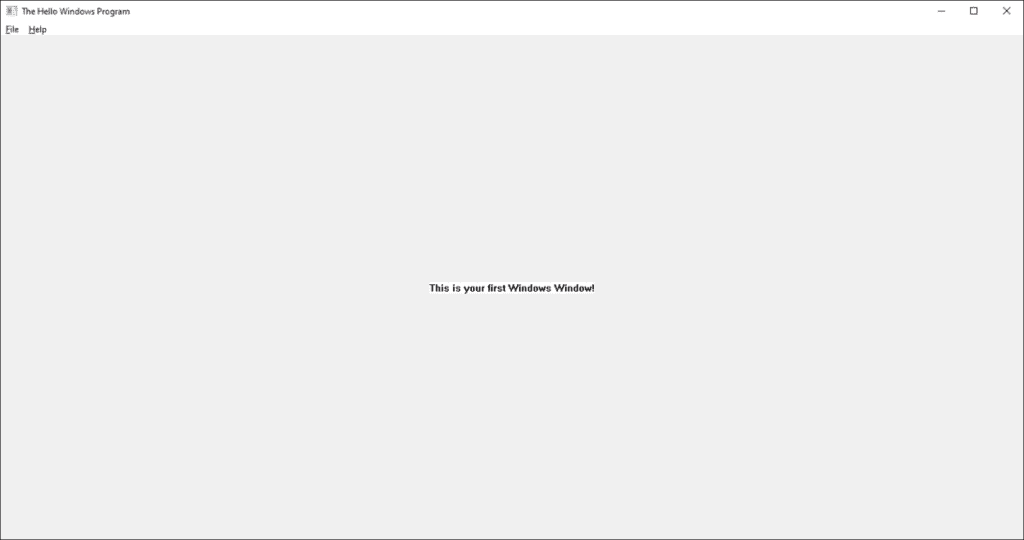
}Our Hello World Window
If you compile what we have coded so far, you should get a window with a title, a white background and a black text in the center of the screen.
Compiler Notice: You have to link gdi32 to link the Windows functionality into your code, otherwise you will get a linker error. In gcc you can do it with the -lgdi32 option (e.g. gcc main.c -o winapi -lgdi32)
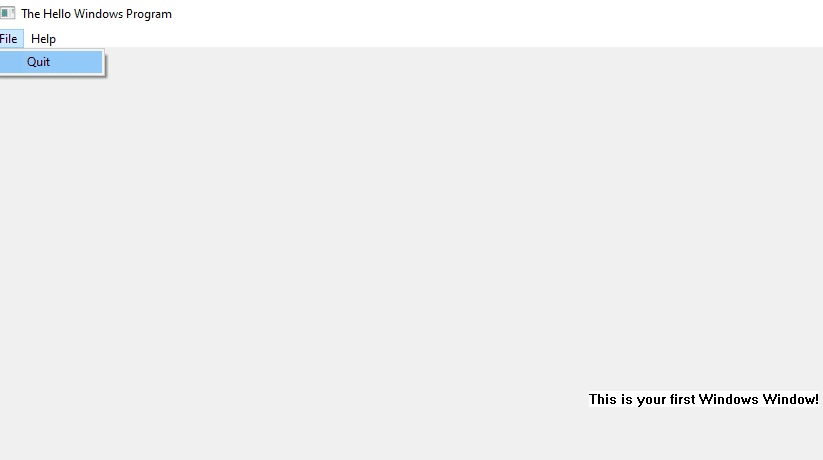
Most windows have a menu bar at the top where the user can find some actions that he is able to perform with the application. Let’s create a menu bar for our example application.
On the top we add the declaration for an add_menu(…) function which takes the window reference as a parameter.
In the function itself we create four menu items, two of them are main menu items and two are sub menu items. Last we add the created menu to the main window with help of the hWnd Reference.
The & character underlines the following letter and enables access via the ALT Key+Letter (e.g. ALT+F for &File). Make sure that there are no duplicates (like &File and &Format) in the same menu level.
#include <windows.h>
...
void add_menu_bar(HWND);

int WINAPI WinMain(HINSTANCE hInstance...
...
void add_menu_bar(HWND hwnd)
{
    HMENU hFileMenu = CreateMenu();
    HMENU hHelpMenu = CreateMenu();
    HMENU hQuitItem = CreateMenu();
    HMENU hAboutItem = CreateMenu();

    AppendMenu(hQuitItem, MF_STRING, ITEM_QUIT, "&Quit");
    AppendMenuW(hFileMenu, MF_POPUP, (UINT_PTR)hQuitItem, L"&File");

    AppendMenu(hAboutItem, MF_STRING, ITEM_ABOUT, "&About");
    AppendMenuW(hFileMenu, MF_POPUP, (UINT_PTR)hAboutItem, L"&Help");

    SetMenu(hwnd, hFileMenu);
}
Now we have to call the add_menu() function in WndProc(…), namely in the WM_CREATE case so the menu is created when the GUI is created.
...
LRESULT CALLBACK WndProc(HWND hwnd, UINT message, WPARAM wParam, LPARAM lParam)
{
    HDC hdc;
    PAINTSTRUCT ps;
    RECT rect;

    switch (message)
    {
    case WM_CREATE:
        add_menu_bar(hwnd);
        return 0;
    case WM_PAINT:
      ...

    ...
}
...
After compiling and running the application we now have a menu bar with two items which itself contain one item each.
Closing the Application on Menu Item Click
Right now our Menu doesn’t do anything. We want to make the Quit item close the application. When such an item is clicked, WndProc will receive a WM_COMMAND event which we can handle appropriatly.
We extend he switch(message) block and check if ITEM_QUIT was clicked. If yes we will send the PostQuitMessage() in order to close the application.
Now the application should close if you click on File->Quit.
...
LRESULT CALLBACK WndProc(HWND hwnd, UINT message, WPARAM wParam, LPARAM lParam)
{
    ...

    switch (message)
    {
    case WM_CREATE:
    ...
    case WM_PAINT:
    ...
    case WM_COMMAND:
        switch (LOWORD(wParam))
        {
        case ITEM_QUIT:
            PostQuitMessage(0);
            break;
        default:
            /* not handled*/
            return 0;
        }
        break;
    case WM_DESTROY:
    ...
    default:
    ...
    }

    return DefWindowProc(hwnd, message, wParam, lParam);
}
...
Control Elements
A blank window with some text is mostly not what we want so lets add some control elements. First we will add an EditBox where the user can type some text. We will also add a Buttons that the user can click but will do nothing for now.
The call to the creation again happens in the WndProc(..) function where we already created the menu. We declare add_controls(…) and call it in the WM_CREATE case. We also need two new IDs for our control elements.
We also declare the EditBox Element globally so that we can use it later when we implement Message Boxes.
#include <windows.h>

#define ITEM_QUIT 1
#define ITEM_ABOUT 2
#define EDIT_BOX_ID 3
#define SEND_BUTTON_ID 4

LRESULT CALLBACK WndProc(HWND, UINT, WPARAM, LPARAM);
void add_menu_bar(HWND);
void add_controls(HWND);

HWND hEditBox;

...
LRESULT CALLBACK WndProc(HWND hwnd, UINT message, WPARAM wParam, LPARAM lParam)
{
  ....
    switch (message)
    {
    case WM_CREATE:
        add_menu_bar(hwnd);
        add_controls(hwnd);
        return 0;
    case WM_PAINT:
...
The function itself is rather simple; we create an EditBox and a Button with the help of the CreateWindowL(…) function where the first parameter indicates the type of control that we want. The Button also gets a Text which serves as caption. The four numbers are x and y position as well as width and height of the control.
WS_CHILD makes the Element a child of the main window and WS_VISIBLE makes it visible. We also need an ID for each control in order to identify it later (e.g. for button click events, etc.).
void add_controls(HWND hwnd)
{
hEditBox = CreateWindowW(L"Edit", NULL, WS_CHILD | WS_VISIBLE | WS_BORDER, 30, 50, 150, 25, hwnd, (HMENU)EDIT_BOX_ID, NULL, NULL);
HWND hButtonSend = CreateWindowW(L"Button", L"Send Text", WS_CHILD | WS_VISIBLE, 30, 80, 80, 30, hwnd, (HMENU)SEND_BUTTON_ID, NULL, NULL);
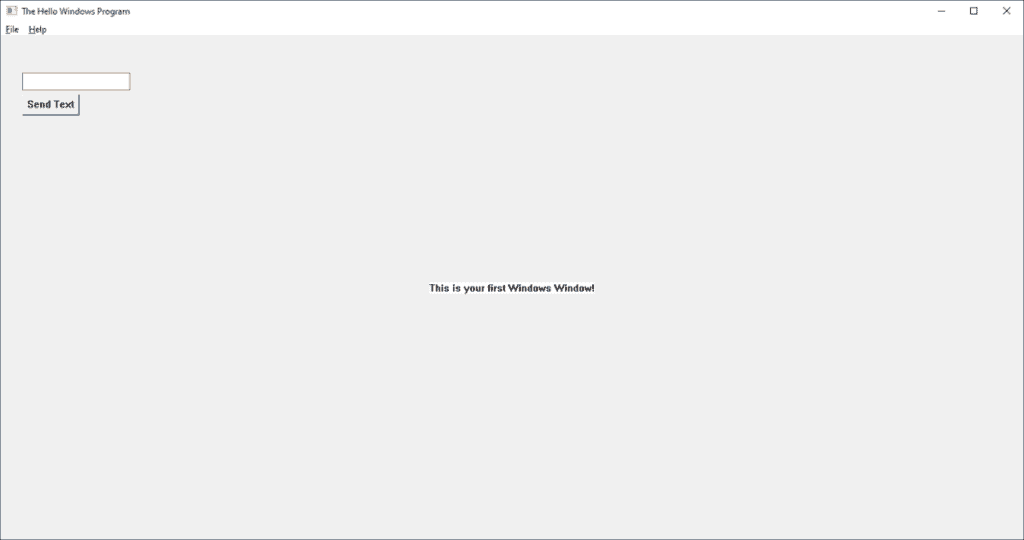
}When we compile and run the application now we get the following result:
Message Boxes
A MessageBox is also a common control element in a GUI. It is an easy way to show important information to the user or to get an answer for a request.
We will implement a simple MessageBox that will show up when we click on our About menu item in the Help section of the Menu Bar. We created this a few paragraphs ago.
In the WM_COMMAND section of the WndProc(…) function we will add another case for the About item. Instead of closing the application we now call a Windows function called MessageBox(…) which will show us a MessageBox with a Title, Text and Button.
I will only show you the part of WndProc(..) that has changed
...
LRESULT CALLBACK WndProc(HWND hwnd, UINT message, WPARAM wParam, LPARAM lParam)
{
...
  case WM_COMMAND:
        switch (LOWORD(wParam))
        {
        case ITEM_QUIT:
            PostQuitMessage(0);
            break;
        case ITEM_ABOUT:
            MessageBox(NULL, TEXT("Thank you for reading this far."), TEXT("A Message Box!"), 0);
            break;
        default:
            /* not handled*/
            return 0;
        }
        break;
...
}
If we now navigate to the menu item Help->About and click the MessageBox will appear.
Remember the Button we added in the Control Elements paragraph? We now give it something to do. When the user clicks the button we will show the text that he entered in the EditBox inside a MessageBox.
We have to visit the WndProc(…) function one last time. In the WM_COMMAND section we check if the event comes from our button (SEND_BUTTON_ID) and then check if the event was a button click (BN_CLICKED). Then we create a buffer that will hold our text and copy the contents of the EditBox into this buffer. Finally we show a MessageBox with a title and our buffer as text.
Now you see why the EditBox was declared globally – we need to access it in two different functions.
...
LRESULT CALLBACK WndProc(HWND hwnd, UINT message, WPARAM wParam, LPARAM lParam)
{
    ...

    switch (message)
    {
    case WM_CREATE:
        ....
    case WM_PAINT:
        ...
    case WM_COMMAND:
        switch (LOWORD(wParam))
        {
        case ITEM_QUIT:
            PostQuitMessage(0);
            break;
        case ITEM_ABOUT:
            MessageBox(NULL, TEXT("Thank you for reading this far."), TEXT("A Message Box!"), 0);
            break;
        case SEND_BUTTON_ID:
            if(HIWORD(wParam) == BN_CLICKED)
            {
                TCHAR buffer[1024];
                GetWindowText(hEditBox, buffer, 1024);
                MessageBox(NULL, buffer, TEXT("Sending Text:"), 0);
            }
            break;
        default:
            /* not handled*/
            return 0;
        }
        break;
    case WM_DESTROY:
        PostQuitMessage(0);
        return 0;
    default:
        break;
    }

    ...
}
Finally when we click on the button the entered text will appear inside a MessageBox.

Summary
This was a brief introduction to GUI Programming with the WinAPI in C. From here you can write your own programs and begin to add more control elements and functionality.
If you want to try out an alternative GUI that you can program in C you can e.g. read about SDL (Simple DirectMedia Layer) in this article. In contrast to WinAPI, SDL is portable.
Как создать программу на ПК: пошаговое руководство
Пройдите тест, узнайте какой профессии подходите
Работать самостоятельно и не зависеть от других
Работать в команде и рассчитывать на помощь коллег
Организовывать и контролировать процесс работы
Введение в программирование
Программирование — это процесс создания программ, которые выполняют определенные задачи на компьютере. Программы могут быть самыми разными: от простых калькуляторов до сложных систем управления базами данных. Если вы новичок и хотите научиться создавать программы на ПК, то вы попали по адресу. В этой статье мы рассмотрим основные шаги, которые помогут вам начать путь в программировании.
Программирование открывает перед вами множество возможностей. Вы сможете автоматизировать рутинные задачи, создавать собственные приложения и даже разрабатывать игры. Важно понимать, что программирование — это не только написание кода, но и решение задач, логическое мышление и постоянное обучение. Начать может быть сложно, но с правильным подходом и упорством вы сможете достичь успеха.

Выбор языка программирования
Первый шаг в создании программы — это выбор языка программирования. Существует множество языков, каждый из которых имеет свои особенности и области применения. Вот несколько популярных языков для начинающих:
- Python: Отличный выбор для новичков благодаря простому синтаксису и широкому сообществу. Подходит для веб-разработки, анализа данных и автоматизации задач.
- JavaScript: Основной язык для веб-разработки. Позволяет создавать интерактивные веб-страницы и приложения.
- Java: Популярен в корпоративной среде и для разработки мобильных приложений на Android.
- C#: Используется для разработки приложений на платформе .NET, включая игры на Unity.
Как выбрать язык программирования?
Выбор языка зависит от ваших целей и интересов. Если вы хотите быстро увидеть результаты своей работы, начните с Python или JavaScript. Если вас интересует разработка мобильных приложений, обратите внимание на Java или Kotlin. Для создания игр подойдет C#.
Важно также учитывать, что каждый язык программирования имеет свое сообщество и ресурсы для обучения. Например, для Python существует множество бесплатных курсов, книг и форумов, где вы можете получить помощь. JavaScript активно используется в веб-разработке, и вы найдете множество онлайн-ресурсов и уроков по созданию веб-приложений. Java и C# также имеют обширные сообщества и множество учебных материалов.
Установка и настройка среды разработки
После выбора языка программирования необходимо установить среду разработки (IDE). IDE — это программное обеспечение, которое облегчает написание, отладку и тестирование кода. Вот несколько популярных IDE для разных языков:
- Python: PyCharm, Visual Studio Code
- JavaScript: Visual Studio Code, WebStorm
- Java: IntelliJ IDEA, Eclipse
- C#: Visual Studio
Установка Visual Studio Code
Visual Studio Code (VS Code) — это бесплатная и мощная IDE, которая поддерживает множество языков программирования. Вот как установить VS Code:
- Перейдите на официальный сайт Visual Studio Code.
- Скачайте установочный файл для вашей операционной системы (Windows, macOS, Linux).
- Запустите установочный файл и следуйте инструкциям на экране.
После установки VS Code, вы можете установить расширения для поддержки выбранного языка программирования. Например, для Python установите расширение «Python», для JavaScript — «JavaScript (ES6) code snippets».
Кроме того, VS Code предлагает множество других полезных расширений, таких как линтеры для проверки синтаксиса, автодополнение кода и интеграция с системами контроля версий, такими как Git. Все это делает работу с кодом более удобной и продуктивной.
Создание первой программы
Теперь, когда у вас установлена среда разработки, можно приступить к созданию первой программы. Давайте начнем с простого примера на Python — программы, которая выводит «Hello, World!».
Пример программы на Python
- Откройте Visual Studio Code.
- Создайте новый файл и сохраните его с расширением
.py(например,hello.py). -
Введите следующий код:
-
Сохраните файл и запустите его, нажав правой кнопкой мыши на файле и выбрав «Run Python File in Terminal».
Вы должны увидеть вывод «Hello, World!» в терминале. Поздравляем, вы только что создали свою первую программу! 🎉
Пример программы на JavaScript
Если вы выбрали JavaScript, вот аналогичный пример:
- Создайте новый файл и сохраните его с расширением
.js(например,hello.js). -
Введите следующий код:
-
Сохраните файл и запустите его в терминале, введя команду
node hello.js.
Вы увидите тот же результат — «Hello, World!» в терминале.
Создание первой программы — это важный шаг, который показывает, что вы можете написать код, который выполняет определенные действия. Это также дает вам уверенность и мотивацию продолжать изучение программирования.
Отладка и тестирование
Создание программы — это только начало. Важно также уметь отлаживать и тестировать свой код, чтобы убедиться, что он работает правильно.
Отладка кода
Отладка — это процесс поиска и исправления ошибок в коде. В большинстве IDE есть встроенные инструменты для отладки. Например, в Visual Studio Code вы можете установить точки останова (breakpoints) и пошагово выполнять код, чтобы понять, где возникают ошибки.
Отладка помогает вам понять, как работает ваш код и где могут возникать проблемы. Вы можете использовать точки останова, чтобы остановить выполнение программы в определенных местах и проверить значения переменных. Это особенно полезно, когда вы работаете с более сложными программами и алгоритмами.
Тестирование
Тестирование помогает убедиться, что ваша программа работает правильно в различных сценариях. Существует несколько видов тестирования:
- Модульное тестирование: Проверка отдельных частей кода (функций, методов).
- Интеграционное тестирование: Проверка взаимодействия между различными частями программы.
- Системное тестирование: Проверка всей программы в целом.
Для автоматизации тестирования можно использовать специальные библиотеки и фреймворки. Например, для Python это unittest или pytest, для JavaScript — Jest или Mocha.
Тестирование помогает выявить ошибки и проблемы на ранних стадиях разработки, что позволяет избежать серьезных проблем в будущем. Автоматизация тестирования делает этот процесс более эффективным и позволяет быстро проверять изменения в коде.
Заключение
Создание программы на ПК — это увлекательный и полезный навык, который открывает множество возможностей. В этой статье мы рассмотрели основные шаги, которые помогут вам начать путь в программировании: выбор языка, установка среды разработки, создание первой программы, отладка и тестирование.
Программирование — это не только технический навык, но и творческий процесс. Вы можете создавать что-то новое, решать интересные задачи и делиться своими проектами с миром. Начните с малого, постепенно усложняйте свои проекты и не бойтесь экспериментировать.
Надеемся, что эти советы помогут вам сделать первые шаги в мире программирования. Удачи! 🚀