
There are a few reasons why you might want to find your MAC address: perhaps you’re setting up a router and would like to filter certain devices out of your network for extra security. Maybe your router lists connected devices by their MAC address and you want to figure out which device is which. Or there’s a chance you’ll need to know your PC’s MAC address to diagnose or resolve some computer network errors.
Regardless, we can help you find your PC’s MAC address on Windows 10 by using a few different methods. And, if you’re wondering how to password protect a folder in Windows 10, or how to enter the BIOS on Windows 10, we’ve got you covered.
What is a MAC address?
A MAC address is a unique, alphanumeric hardware identifier for a device that connects to the internet. Every network device or interface, such as your laptop’s Wi-Fi adapter, has a MAC (or «media access control») address.
A MAC address is assigned by manufacturers and embedded into the device’s network interface card — it’s permanently tied to the device, which means that a MAC address cannot be changed.
The MAC address is listed as a series of 12 digits across six pairs (00:1A:C2:7B:00:47, for example).
A MAC address is essential in order for your device to interact with other local network devices. When your device detects a router, it sends out its MAC address to initiate a connection. This is where the IP address comes in — your router will assign you an IP address so that you can connect to the internet.
So what’s the difference between a MAC address and an IP address? In part, MAC addresses are permanently burned into your device while IP addresses can change depending on your location. MAC addresses are used in the local network while IP addresses can be used to identify network devices all around the world.
Sign up to receive The Snapshot, a free special dispatch from Laptop Mag, in your inbox.
Method 1: How to find your MAC address in Windows 10 with command prompt
The quickest way to find the MAC address is through the command prompt.
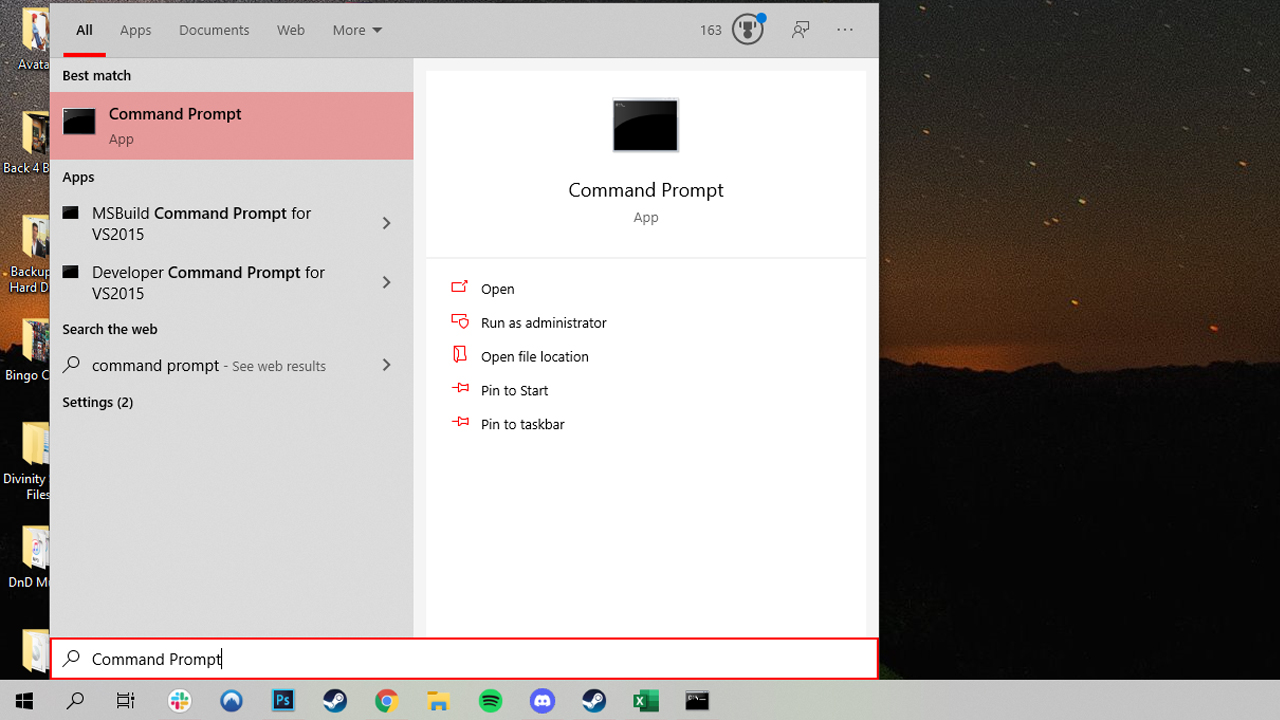
1. Open the command prompt. Search «Command Prompt» in the taskbar, or if you have an older version of Windows, you can right-click on the Start button and select Command Prompt from the menu.
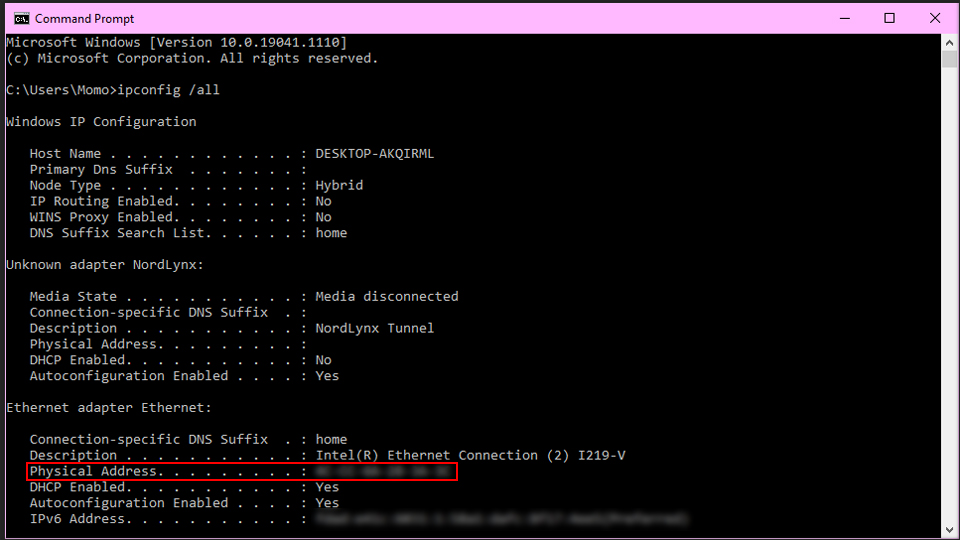
2. Type in ipconfig/all and press Enter. This will display your network configuration.

3. Find your adapter’s physical address. Scroll down to your network adapter and look for the values next to «Physical Address,» which is your MAC address.
How to find your MAC address in Windows 10 without using Command Prompt
Perhaps you don’t want to mess around with command prompt for some reason or another. Here are some ways you can snag a MAC address without accessing command prompt.
Method 2: How to find your MAC address in Windows 10 in the network connection settings
You can also find the MAC address by looking at the details of your network adapter in Windows.
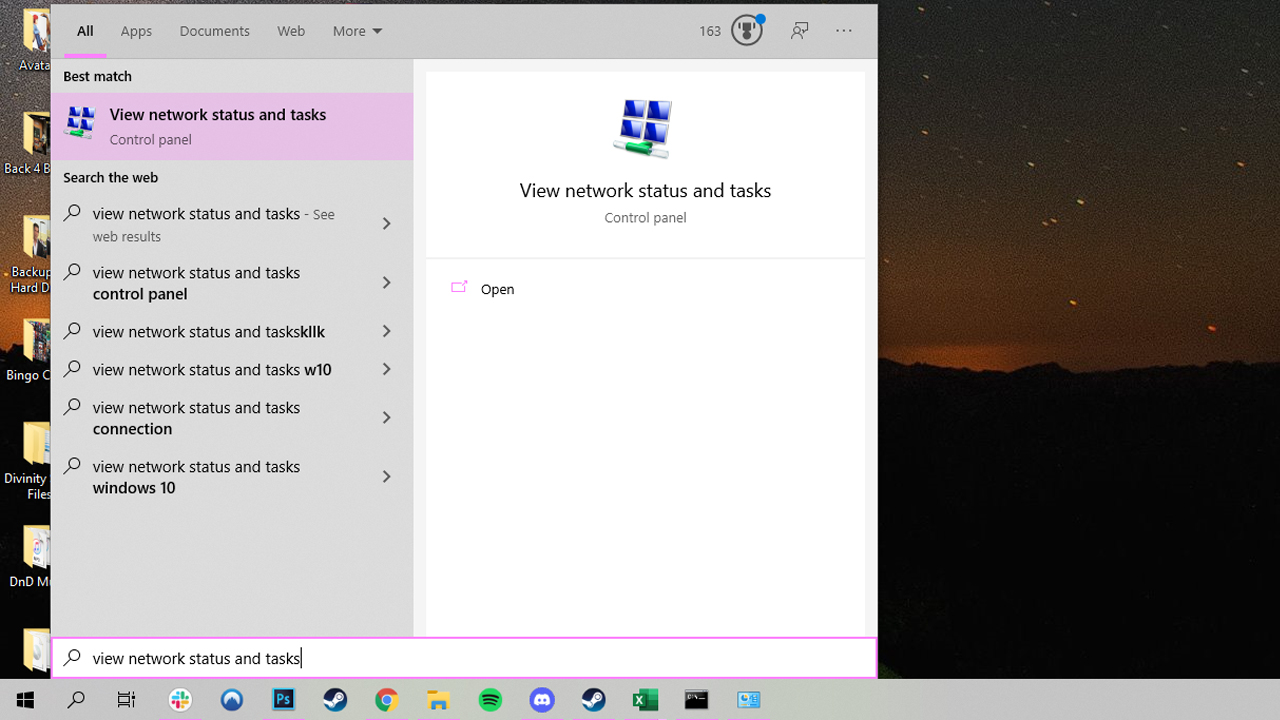
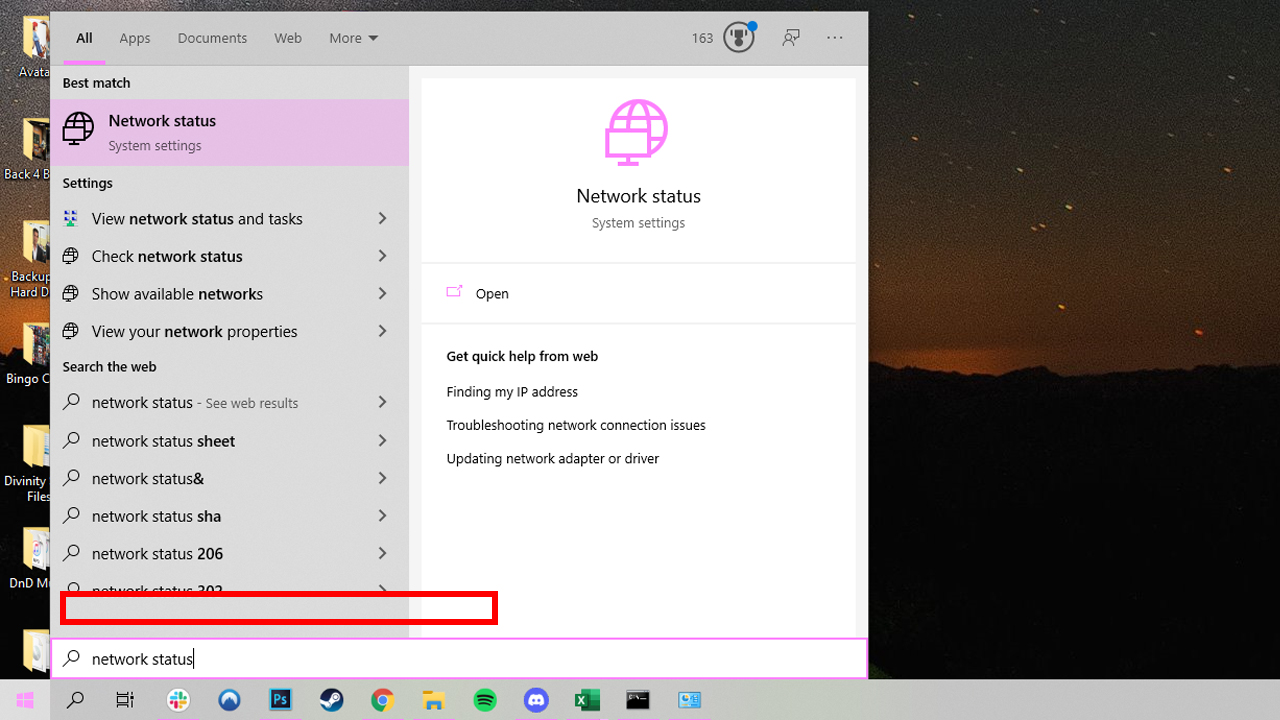
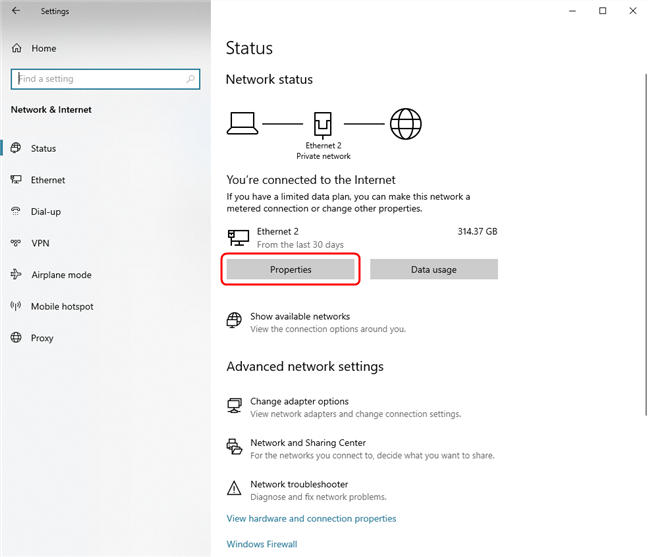
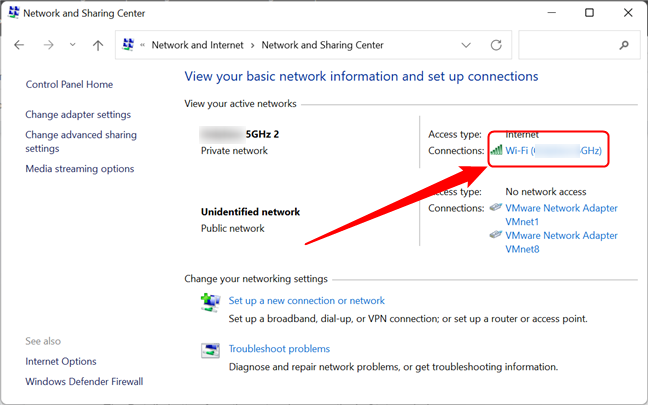
1. Search «View network status and tasks» in the taskbar and click on it. (Or navigate to Control Panel > Network and Internet > Network and Sharing Center)
2. Click on your network connection.
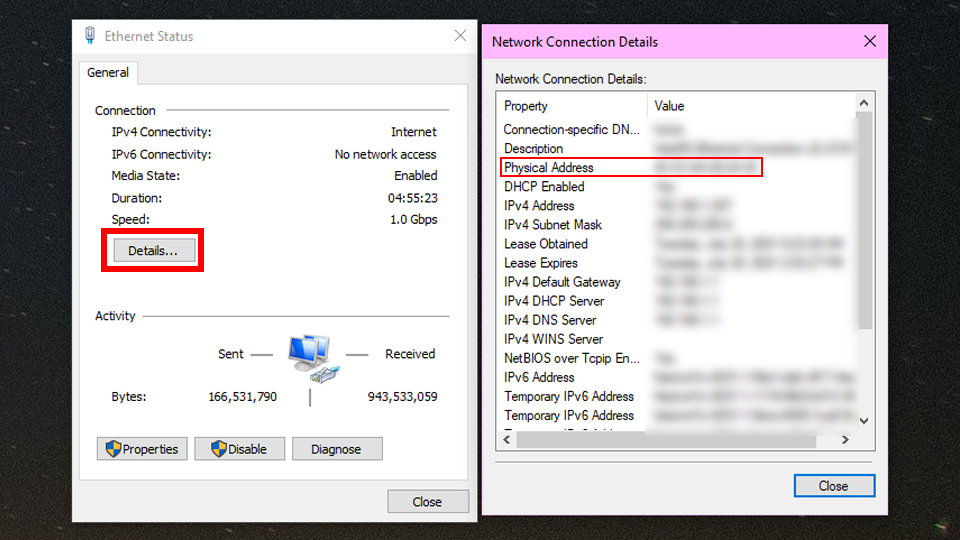
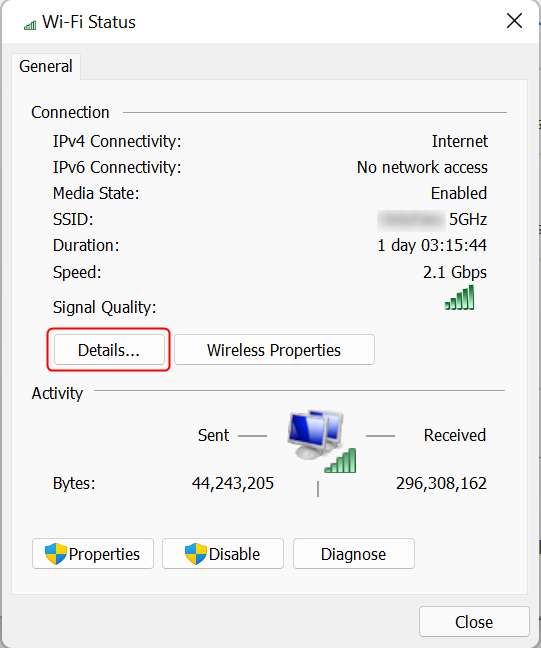
3. Click the «Details» button.
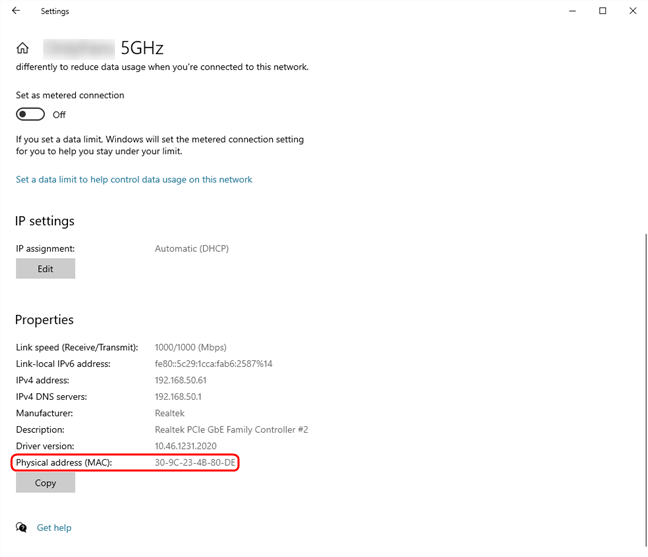
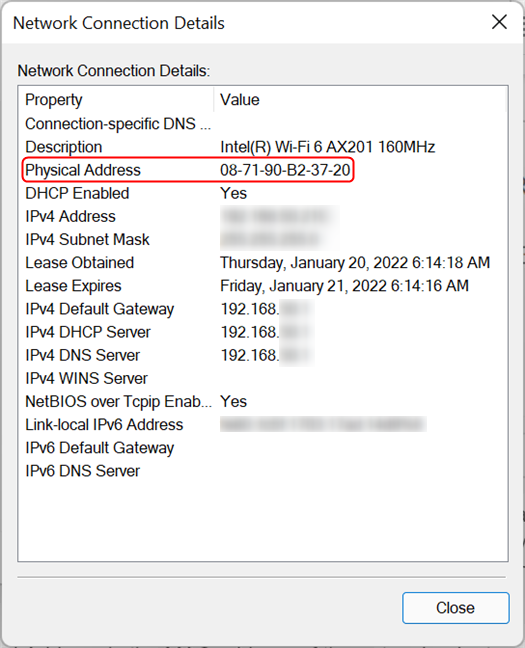
4. Locate the Physical Address. The value for the physical address in the Network Connection Details window is your MAC address.
Method 3: How to get your MAC address by accessing your taskbar
Another avenue that you can use to find your device’s MAC address is by clicking on an icon on your taskbar to quickly navigate to your PC’s hardware identifier.
1. Click on the network icon on your Windows 10 taskbar. It should be next to the clock.
2. Click on «Properties» on your connection. This will open your network’s settings window.
3. Scroll down to the Properties section. Your MAC address should be right next to the words «Physical address.»

Voila! You now know your MAC number. Upgraded to Windows 11? Check out how to check VRAM in Windows 11, how to move the Start Menu back to the left on Windows 11, and these handy Windows 11 tricks.
Если для тех или иных целей вам требуется посмотреть MAC-адрес в Windows 10, вы легко можете сделать это сразу несколькими способами: некоторые уникальны только для этой ОС, некоторые присутствовали и в предыдущих версиях Windows.
В этой инструкции подробно о том, как узнать MAC-адрес в Windows 10 и дополнительная информация, которая может быть полезной для начинающего пользователя. На близкую тему может быть полезным: Как изменить MAC-адрес компьютера.
- Как посмотреть MAC-адрес в параметрах Windows 10
- MAC-адрес в msinfo32
- Узнаем MAC-адрес в командной строке
- Просмотр MAC-адреса в свойствах подключения
- Видео инструкция
- Дополнительная информация
Как посмотреть MAC-адрес сетевой карты или Wi-Fi адаптера в параметрах Windows 10
Прежде всего обращаю внимание начинающих пользователей на следующий важный нюанс: MAC-адрес присутствует у сетевых адаптеров, у каждого свой, то есть не единственный для «всего компьютера». И если у вас на компьютере или ноутбуке есть как проводной Ethernet, так и беспроводной Wi-Fi адаптер, то MAC-адреса у них будут разные.
Как правило, требуется адрес для активного подключения. Вы можете посмотреть MAC-адрес активного Wi-Fi адаптера в интерфейсе «Параметры» с помощью следующих простых шагов:
- Откройте «Параметры» (для этого можно нажать клавиши Win+I на клавиатуре или использовать соответствующий элемент в меню Пуск).
- Перейдите в раздел «Сеть и Интернет».
- Справа выберите адаптер (Wi-Fi или Ethernet) для которого нужно определить MAC-адрес.

- Нажмите по «Свойства оборудования» и на следующем экране вы увидите сведения о вашем подключении и свойствах адаптера. Последний пункт «Физический адрес (MAC)» — это и есть MAC-адрес соответствующего сетевого адаптера.


Также обратите внимание на тот момент, что в свойствах подключений в параметрах Windows 10 последних версий есть пункт «Использовать случайные аппаратные адреса». Если этот пункт включен, то MAC-адреса будут автоматически меняться при каждом новом подключении.
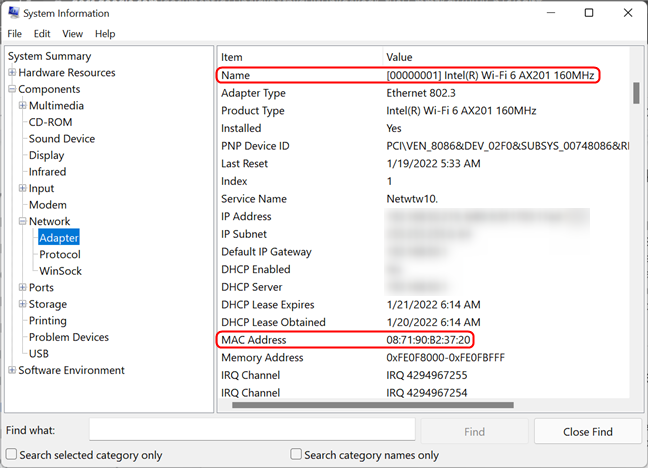
MAC-адрес в утилите «Сведения о системе» (msinfo32)
В Windows 10 есть встроенная утилита «Сведения о системе», позволяющая ознакомиться с основной информацией о компьютере, в том числе узнать MAC-адрес:
- Нажмите клавиши Win+R на клавиатуре, введите msinfo32 и нажмите Enter.
- В открывшемся окне перейдите в раздел «Компоненты» — «Сеть» — «Адаптер». Найдите в списке адаптеров нужный вам и посмотрите его MAC-адрес.


MAC-адрес в командной строке Windows 10
Еще один способ посмотреть MAC-адрес для любого сетевого адаптера в Windows 10 — командная строка:
- Запустите командную строку. Быстрее всего это сделать, используя поиск в панели задач.
- Введите команду ipconfig /all и нажмите Enter.
- Вы увидите список сетевых адаптеров (включая виртуальные при их наличии) с информацией о MAC-адресе для них в разделе «Физический адрес».

- В более удобном виде список MAC-адресов можно увидеть с помощью команды getmac /v /fo list

Просмотр MAC-адреса в свойствах подключения
Вы можете зайти в свойства Интернет-подключения и быстро посмотреть MAC-адрес адаптера там:
- Нажмите клавиши Win+R на клавиатуре, введите ncpa.cpl и нажмите Enter.
- В списке подключений нажмите правой кнопкой мыши по подключению и выберите пункт «Свойства» в контекстном меню.
- Подведите указатель мыши к имени сетевого адаптера в верхней части окна — в результате в сплывающем окне отобразится MAC-адрес устройства.
Также, если вы откроете не свойства, а «Состояние» активной сети (2-й шаг), а затем нажмете кнопку «Сведения», вы увидите следующее окно:
В нем также отображается MAC-адрес сетевой карты или Wi-Fi адаптера в строке «Физический адрес».
Видео инструкция
Дополнительная информация
В завершение два нюанса, которые могут оказаться полезными для начинающего пользователя:
- Если вам требуется MAC-адрес для предоставления его провайдеру, то учитывайте, что при подключении через роутер провайдер может «видеть» другой MAC-адрес — тот, который имеет сам Wi-Fi роутер. Его можно посмотреть в настройках роутера, также он обычно указывается на наклейке сзади (внизу) маршрутизатора.
- Если вам требуется ввести куда-либо ваш MAC-адрес, учитывайте, что в Windows 10 в качестве разделителей между каждыми двумя символами при просмотре могут выступать символы «-», а при вводе нужно использовать двоеточие или вводить MAC-адрес вообще без разделителей.
- В настройках роутера в списке подключенных клиентов вы можете посмотреть список устройств, которые подключены по Wi-Fi и LAN. Для них также указываются MAC-адреса.
Checking the MAC address on a Windows 10 computer is a straightforward task. The MAC address, short for Media Access Control address, is a unique identifier for your network device. You can find it using the Command Prompt or through the Settings app. In a few steps, you’ll be able to locate this important piece of information to help with network troubleshooting or setup.
To start, you’ll be accessing the Command Prompt or the Settings app on your Windows 10 computer. These are the main methods to find your MAC address, allowing you to easily identify your network adapter’s unique identifier.
Step 1: Open Command Prompt
First, press the Windows key and type “cmd” to open Command Prompt.
The Command Prompt is a handy tool for all kinds of tasks in Windows. By typing certain commands, you can retrieve detailed information about your computer, including the MAC address.
Step 2: Enter the Command
Type “ipconfig /all” and hit Enter.
This command reveals a lot of networking details. Among them, the MAC address is listed as the “Physical Address.” It’s like opening a treasure trove of network information.
Step 3: Locate Your Network Adapter
Look for the network adapter you are using, which might be Wi-Fi or Ethernet, depending on your connection.
Each network adapter listed will have its own MAC address. Make sure you’re looking at the right one to avoid confusion, especially if your computer has multiple connections.
Step 4: Use Windows Settings (Alternative)
Go to Settings > Network & Internet > Status > Network and Sharing Center.
If you prefer a more visual method, the Settings app provides an alternative route. It’s a user-friendly way to navigate through your network settings.
Step 5: Find Your Connection Details
Click on your network name, then Details, to find the MAC address listed as “Physical Address.”
This route lets you see your connection details without diving into the Command Prompt. It’s straightforward and ideal for users who like a graphical interface.
After completing these steps, you will have successfully located your MAC address. This address can be essential for setting up secure Wi-Fi networks, allowing only designated devices to connect, or troubleshooting networking issues.
Tips for Checking MAC Address on Windows 10
- Double-check the connection type if you have both Ethernet and Wi-Fi.
- Take a screenshot of your Command Prompt for future reference.
- Write down the MAC address if you need to input it elsewhere.
- Update your network drivers to ensure consistent MAC address display.
- Use the settings method if you’re not comfortable with Command Prompt.
Frequently Asked Questions
What is a MAC address used for?
A MAC address is used to identify a device on a network, allowing routers to direct data packets accurately.
Can a MAC address be changed?
Yes, it can be changed through software settings, but it is generally not recommended unless you have a specific reason.
Why does my device have multiple MAC addresses?
Your device might have multiple MAC addresses if you have more than one network adapter, such as Ethernet and Wi-Fi.
Is it safe to share my MAC address?
While a MAC address alone doesn’t reveal personal information, it’s best to keep it private to avoid potential security risks.
How do I know which MAC address is for my Wi-Fi?
In the Command Prompt, look for the adapter listed under “Wireless LAN adapter” to find your Wi-Fi MAC address.
Summary
- Open Command Prompt.
- Enter “ipconfig /all”.
- Locate your network adapter.
- Use Windows Settings as an alternative.
- Find your connection details.
Conclusion
In conclusion, understanding how to check your MAC address on Windows 10 is an essential skill for managing your network settings effectively. Whether you’re setting up a new router, troubleshooting network issues, or ensuring security, knowing your MAC address can be incredibly useful. It’s like having the key to your network’s identity, allowing you to ensure everything is running smoothly and securely.
Taking a few minutes to familiarize yourself with both the Command Prompt and the Settings method can save you a lot of time in the future. Plus, it empowers you to take control of your network settings without having to call tech support every time an issue arises.
As you grow more comfortable with these tools, you might even find yourself helping friends or family with their networking issues. So, go ahead and try it out. Master the process, and consider exploring further topics on home networking and security to enhance your technical prowess.
Matt Jacobs has been working as an IT consultant for small businesses since receiving his Master’s degree in 2003. While he still does some consulting work, his primary focus now is on creating technology support content for SupportYourTech.com.
His work can be found on many websites and focuses on topics such as Microsoft Office, Apple devices, Android devices, Photoshop, and more.
Do you want to know the MAC address of your Windows computer or device? To help you, this article describes seven different methods to get the MAC address of your network adapter. Some of them are quick, like the getmac command. Others, like the one using the Settings app, require a bit more clicking. If you want to know how to find the MAC address of your laptop or desktop PC in Windows 10 and Windows 11, read this guide and find the method that works best for you:
NOTE: The methods we show in this guide work in both Windows 10 and Windows 11. If you do not know what version of Windows you have, read this tutorial: How to tell what Windows I have (11 ways).
1. Find your MAC address using the getmac command in Terminal, PowerShell, or Command Prompt
This is the fastest method we know for finding the MAC addresses of all your network adapters in Windows, including virtual ones that are installed by virtualization software like VirtualBox or VMware. First, open Command Prompt, PowerShell, or Windows Terminal. Then, type in the command getmac and press Enter on your keyboard. The getmac command outputs a list of all your network adapters and their MAC addresses, which you can check in the Physical Address column highlighted below. Unfortunately, it’s relatively difficult to tell which adapter is which, as the command doesn’t display “friendly” names for them.
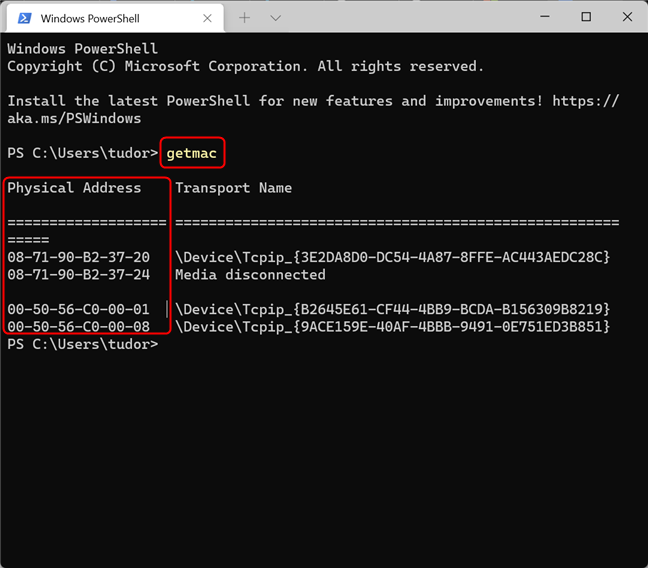
Find the MAC address with the getmac command
Please note that the getmac command can only show the MAC addresses for enabled network adapters. To find the MAC address of a disabled network adapter using getmac, you must first enable that network adapter.
TIP: If you want to know more about MAC addresses, here is an article about what the MAC address is and how it’s used.
2. How to find your MAC address with the “get-netadapter” command in PowerShell
Another quick way to find your MAC address in Windows is to open PowerShell (or a PowerShell tab in Windows Terminal) and type in the command below, followed by Enter.
get-netadapter
This command shows the basic properties of every visible network adapter available on your Windows PC. You can see the MAC addresses in the MacAddress column. Please note that, depending on your screen resolution, you might have to resize the text in the PowerShell or Terminal window by pressing Ctrl together with the minus sign (to make it smaller) or the plus sign (to make it larger) in order to be able to read the whole table. If you can’t see the MAC address, simply make the text smaller and run the command again.
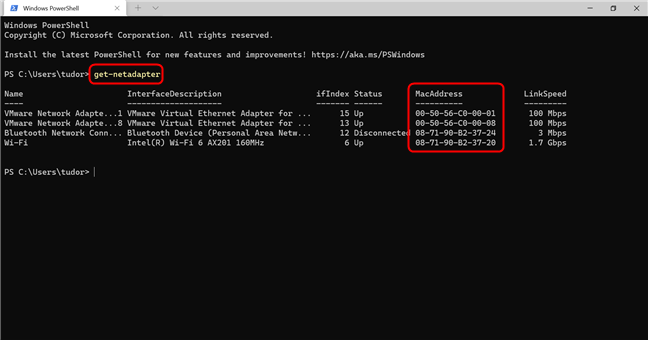
Identify the MAC address with the get-netadapter command in PowerShell
The advantage of the Get-NetAdapter command over the getmac command is that it shows the MAC addresses for all visible network adapters, including disabled ones. For each network adapter, you can view its current status, alongside its MAC address and other properties.
If you only want the name of the adapter and its MAC address, copy and paste the following command in the PowerShell window, then press Enter:
get-netadapter | Format-List -Property «Name», «InterfaceDescription», «MacAddress»
This displays a list that’s much easier to read:
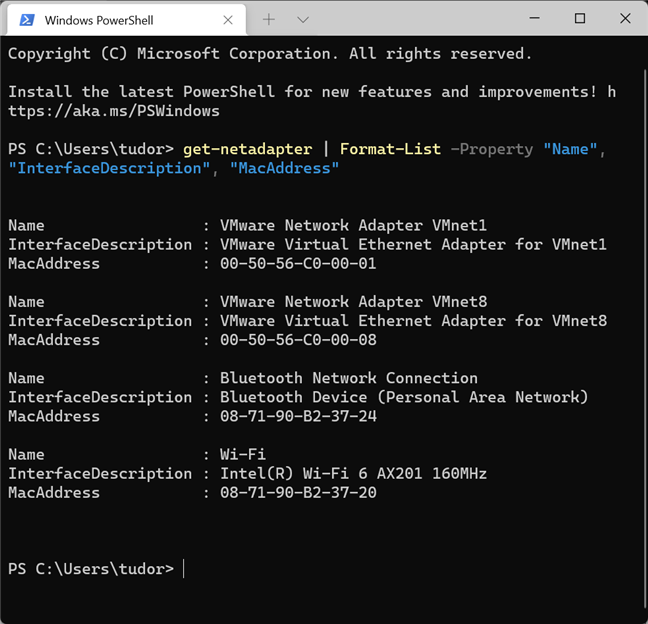
The command takes longer to input, but the result is easier to read
NOTE: The Get-NetAdapter command only works in PowerShell (or in Windows Terminal, if you open a PowerShell tab). It doesn’t work in Command Prompt.
3. Get your MAC address by running the ipconfig command in Windows Terminal, PowerShell, or Command Prompt
The ipconfig command is designed to provide detailed information about your network connections and network adapters, both physical and virtual. To run it, first launch Windows Terminal, PowerShell, or Command Prompt. Then, type the following command and press Enter on your keyboard:
ipconfig /all
The command displays all of the current TCP/IP network connections and detailed technical information about each. To find your network adapter’s MAC address, identify the network adapter’s name from the Description field and then check the Physical Address field, as illustrated in the screenshot below.
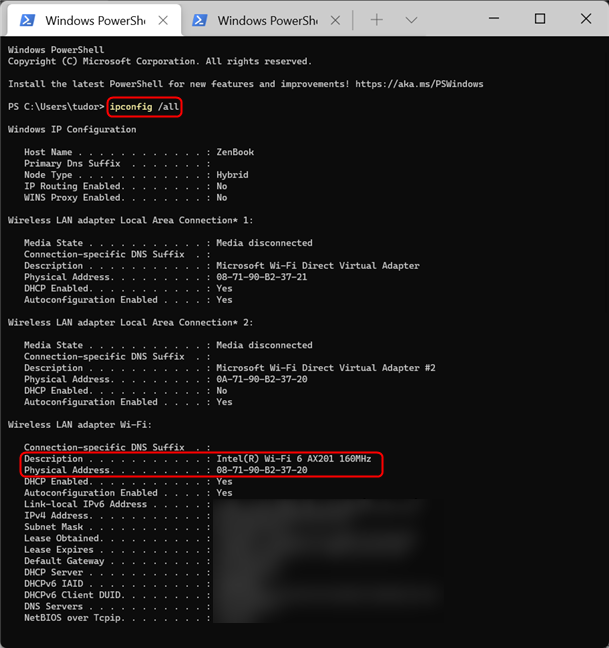
Run ipconfig /all to find your MAC address
As you can see, the ipconfig /all command outputs a lot of information. It can be cumbersome to find your MAC address that way. That’s why, next, we show you a way to extract only the MAC address from the flood of details shown by ipconfig. If you want to filter only the MAC addresses of your network adapters, run the following command:
ipconfig /all | findstr «Description Physical»
The command looks for and displays only the two lines that are relevant for our search: Physical Address and device Description, for each adapter. The result should look something like this:

Get MAC addresses only, with the command: ipconfig /all | findstr «Description Physical»
4. How to find your MAC address using the “wmic nic get” command in Windows Terminal, PowerShell, and Command Prompt
Another command that you can use in a command-line interface to find the MAC addresses of your physical network adapters is:
wmic nic where PhysicalAdapter=True get MACAddress,Name
Run it in Windows Terminal, PowerShell, or Command Prompt, and it tells you the MAC addresses of all your physical network adapters. This displays, thus far, the most easy-to-read result:
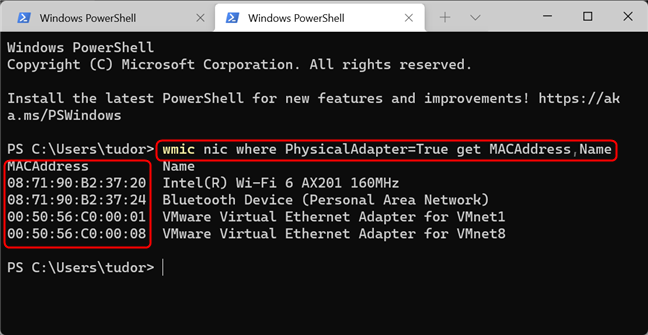
The displayed list is easier to read
5. How to get your MAC address in Windows using the Settings app
Let’s move away from command-line interfaces and describe a few methods of finding your MAC address from Windows itself. If you’re using Windows 10 or Windows 11, you can find your MAC address from the Settings app. Since the method is slightly different depending on the Windows version you’re using, we treat the two operating systems separately, starting with Windows 11.
Identify your MAC address using Settings in Windows 11
In Windows 11, open Settings (for example by pressing Windows + I on your keyboard) and then go to Network & Internet. Scroll down to Advanced Network Settings and click on it.
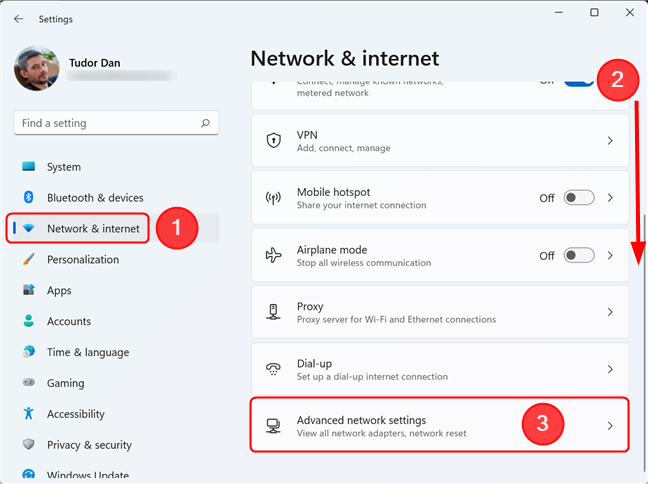
Click or tap on Advanced network settings to view all active network adapters and more
This presents you with a list of all network adapters on your device. Scroll down to Hardware and connection properties and click on it.
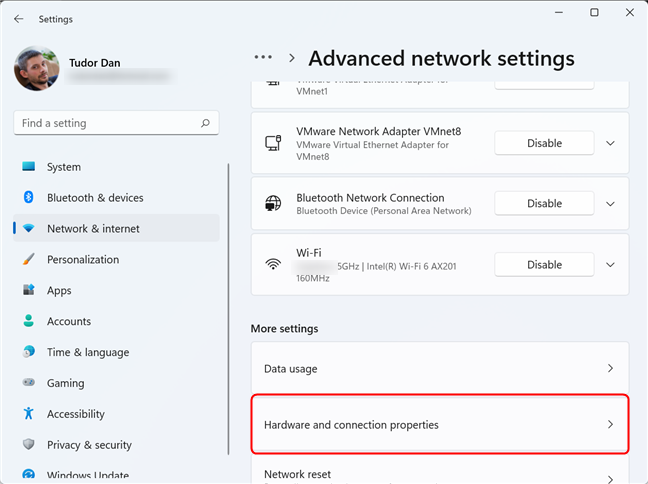
The Hardware and connection properties link displays useful information on all connections and adapters
The list that you now see contains detailed information on every single network adapter installed on your device. Scroll down to the one you’re interested in and check the value of its Physical Address (MAC) field. You can even select the value, then copy and paste it if needed.
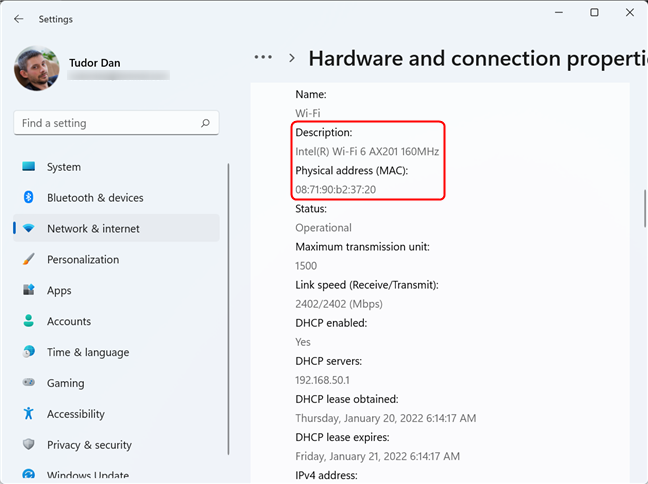
Scroll through the page and identify the adapter, then look for its MAC address
Alternatively, if you don’t want to scroll through the entire list, go back to the Advanced network settings page and click on the adapter you’re interested in, then click on View additional properties.
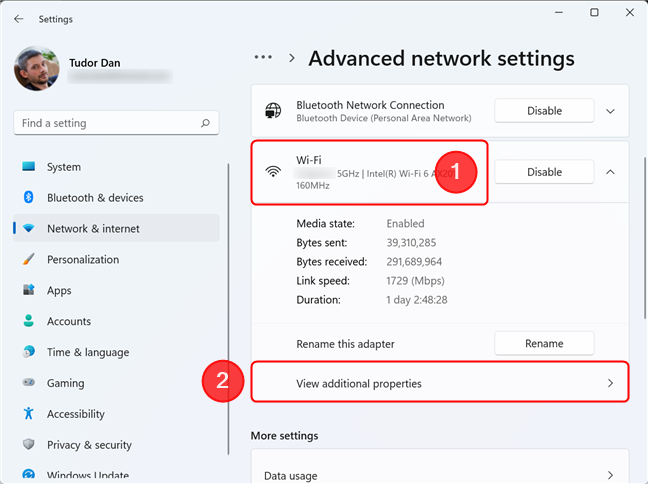
View additional properties for the selected network connection
Here, look for the field named Physical Address (MAC) and check its value.
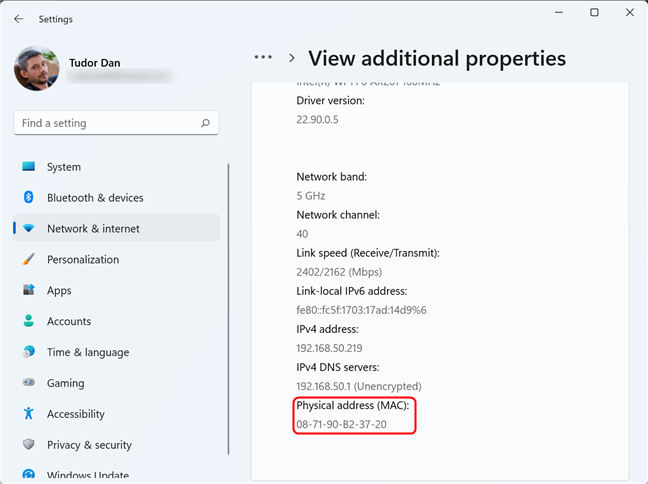
The MAC address should be towards the bottom of the page
Identify your MAC address using Settings in Windows 10
Just like in Windows 11, in Windows 10, you start by opening the Settings app and going to the Network & Internet section.
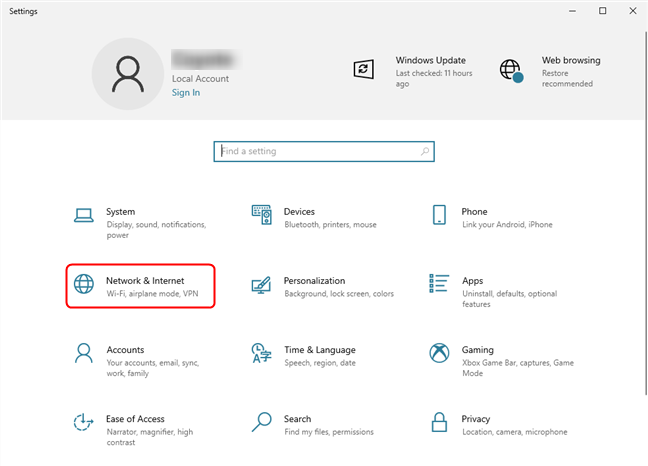
Access Network & Internet section of the Settings app in Windows 10
Now, look for the “View hardware and connection properties” link and click on it.
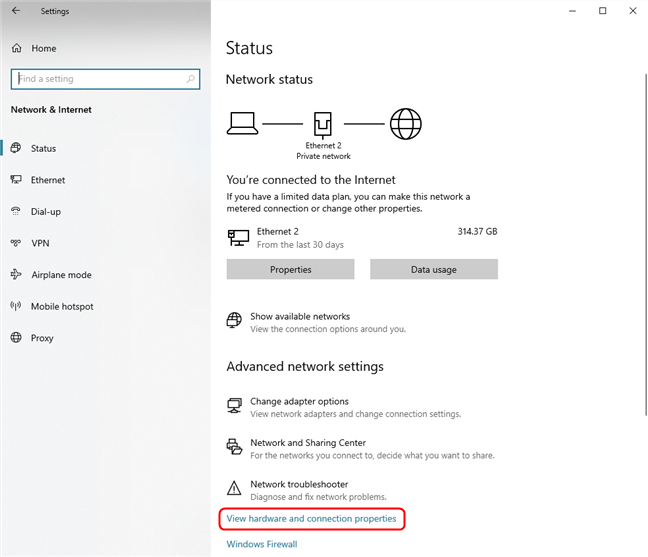
Scroll down and click/tap on the View hardware and connection properties link
This action displays detailed information about every network adapter found in the system. Locate the adapter you are interested in by looking at the Description field value, then check its Physical Address (MAC) field for the information you need.
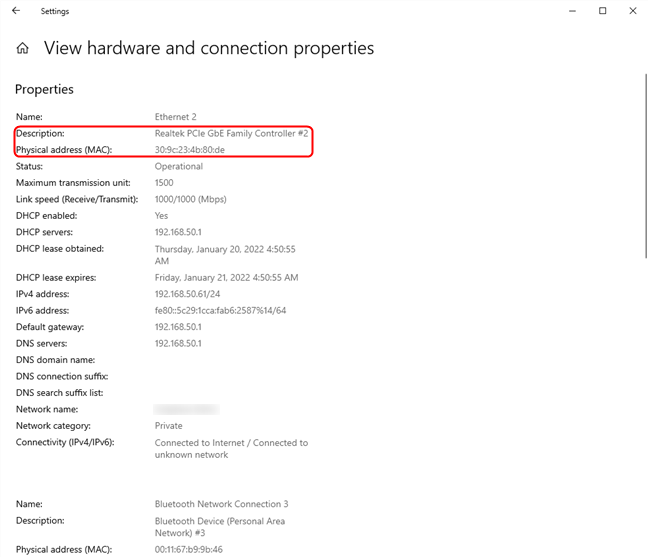
Identify the adapter, then look for the Physical address (MAC) field
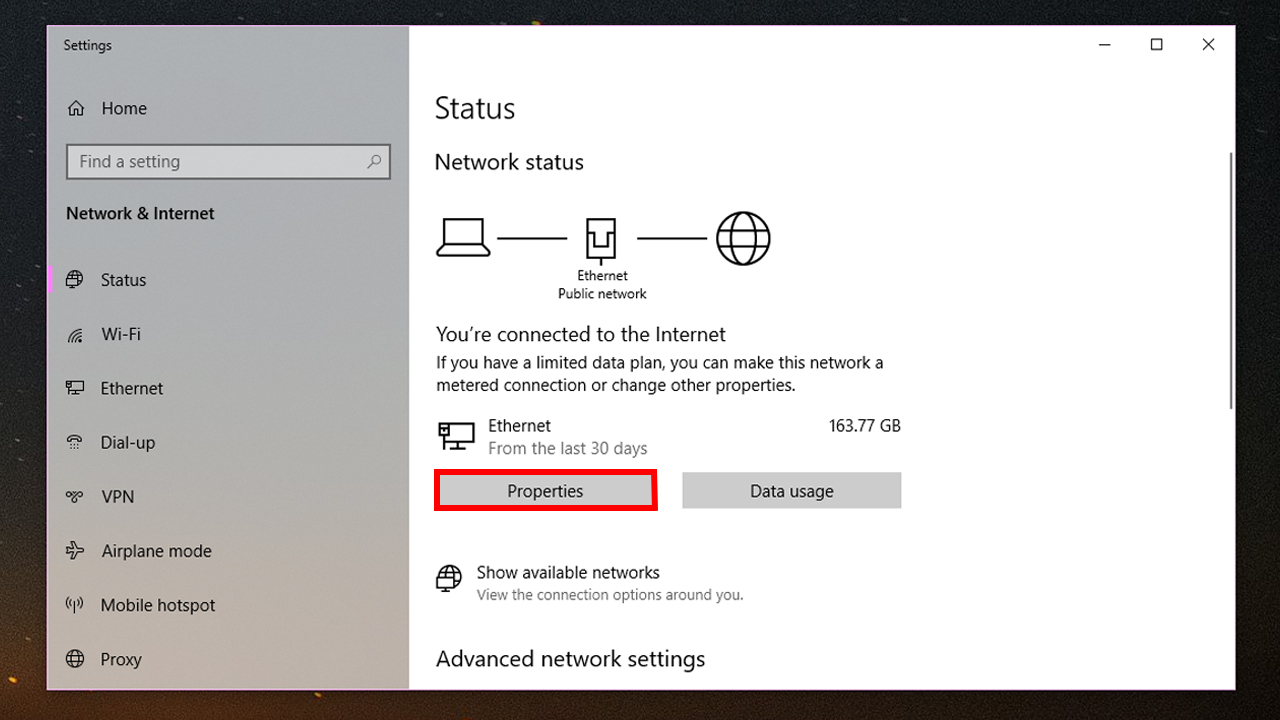
Alternatively, if you only want to know the MAC address of the network adapter that is currently connected, go back to the Network & Internet section and click on the Properties button for your active connection, as shown below.
Click on Properties to find the MAC address of your active network adapter
As always, look for the Physical Address (MAC) field to find the information you need.
You can find many details, including the MAC address, in the Properties section
TIP: In both operating systems, you can use the Win X menu to get to the Network & Internet section of the Settings app. Simply press Windows + X on your keyboard, then select Network Connections.
6. Find the MAC address of any of your network adapters using System Information
Another way to view the MAC address for any network adapter installed on your device is by opening System Information. One way to do it is by using Windows Search to look for sysinfo, then clicking or tapping on the System Information search result. After opening it, in the left pane, double-click or double-tap on Components, then on Network, and finally click or tap on Adapter. This displays a list of every adapter present on your system, along with detailed information for each. First, use the Name field value to identify the adapter you’re looking for, then look for the MAC Address field to find the address.
Get the MAC address of your network adapter using the System Information tool
7. How to find the MAC address of the active network adapter from the Control Panel
If you prefer the old way of doing things, you can find the MAC address of active network adapters from the venerable Control Panel. Open it and click or tap on the “View network status and tasks” under “Network and Internet.”
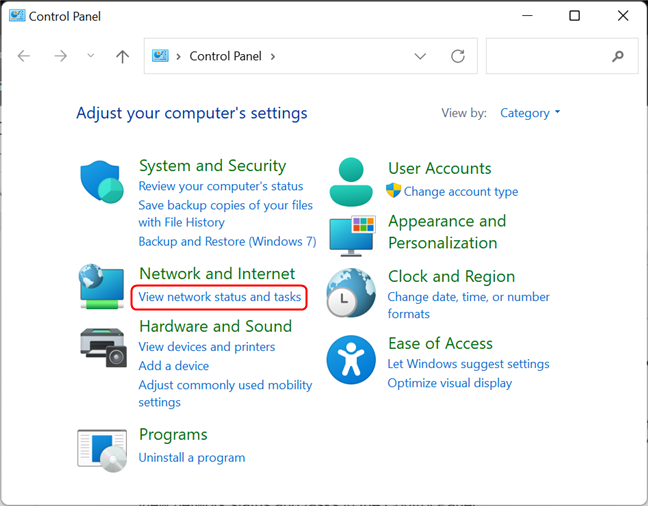
View network status and tasks in the Control Panel
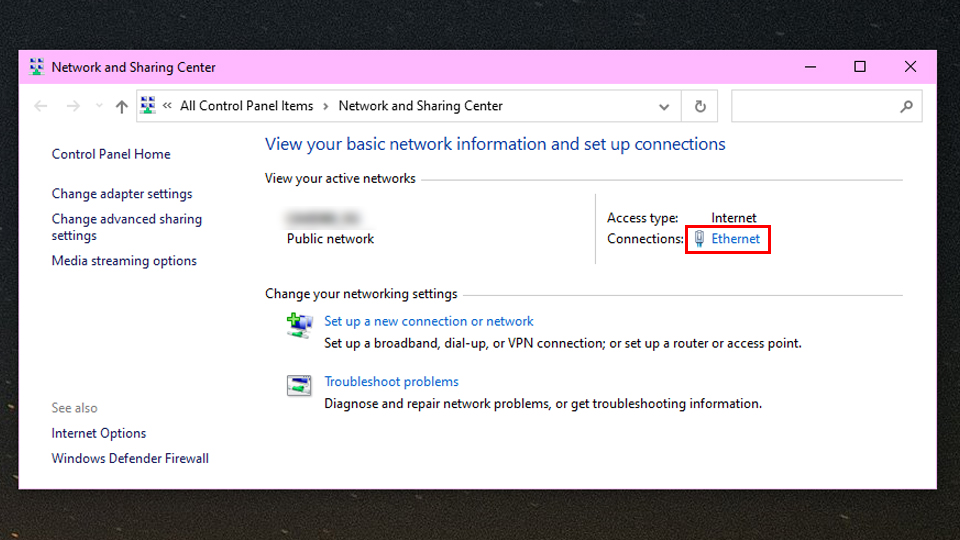
This opens the Network and Sharing Center. Look at the “View your active networks” section from the top-right area of the window. There, you should see the name of each of your active network connections and, on their right side, several details about them. The line named Connections shows Ethernet if you are using a wired network connection. If you’re using a wireless network connection, it says Wi-Fi, followed by the name of the network to which you are connected. Click on the link near Connections, as shown in the screenshot below.
The active network connections are shown in the Network and Sharing Center
The Status window for your network adapter is now displayed. Click or tap on the Details button.
Click on the Details button
The Network Connection Details window is displayed. Here, you can see extensive details about your network connection, including the IP address, DNS servers addresses, and more. The MAC address is displayed in the Physical Address line highlighted in the screenshot below. You can copy and paste all the information displayed in this window, using the Ctrl + C / Ctrl + V shortcuts on your keyboard.
The Physical Address is the MAC address of the network adapter
TIP: Did you know you can change (spoof) your MAC address? Here is an article showing you seven ways to change or spoof the MAC address in Windows and an article on how to restore the original MAC address of your network card.
Do you know other ways of finding the MAC address in Windows?
As you can see, Windows offers multiple methods for finding the MAC address of any network adapter. The methods shown in this article are the easiest we know, using only tools and commands that are available in Windows. If you know other ways to find the MAC address of a network adapter, do not hesitate to share them in the comments section.
Ever find yourself forgetting your zip code, even though it’s crucial for deliveries and billing? Your computer’s MAC address is kind of like that—essential, but easily forgotten. A MAC address is a unique combination of numbers and letters that identifies your device on a network. While it’s not always obvious where to locate it, checking your MAC address on your computer is quite simple. In this tutorial, we’ll walk you through how to find your MAC address on both Windows 10 and Windows 11. You’ll learn how to do it using the command prompt (get MAC address cmd) as well as through the Windows Settings menu. And if you’re looking for a shortcut, we’ve even got a little trick at the end to bypass all the steps. If you’re short on time, feel free to skip the “Overview” and dive straight into the instructions!
Contents
- Understanding Your MAC Address
- Finding Your MAC Address via Command Prompt on Windows 10
- Finding Your MAC Address via Network Settings on Windows 10
- Locating Your MAC Address on Windows 11
- summary
Understanding Your MAC Address
A Media Access Control (MAC) address serves as a unique identifier for your device on networks like WiFi, Ethernet, and Bluetooth. This address is typically linked to your device’s Network Interface Controller, which is the hardware that connects you to the Internet. While MAC addresses share similarities with IP addresses as both help identify devices on a network, there’s a key difference: your MAC address is set by the device’s manufacturer and remains constant, no matter which WiFi network you’re on. This makes it more secure, as it’s much harder for others to access or change your MAC address.
In most cases, you won’t need your MAC address for day-to-day activities like browsing the web. However, there are certain situations, such as connecting to a WiFi network with MAC filtering for enhanced security, where knowing this address becomes essential. When that moment comes, don’t worry—we’ve got you covered. Below, you’ll find step-by-step guides on how to locate your MAC address on both Windows 10 and Windows 11, whether you’re using a laptop or desktop PC.
Finding Your MAC Address via Command Prompt on Windows 10
If you’re looking for a fast way to find your MAC address on Windows 10, using the Command Prompt is your best bet. Although working with command lines can seem a bit daunting at first, it’s very straightforward. The key tool here is the built-in Command Line Interface (CLI) known as Command Prompt.
Step 1: Open the Command Prompt
You can launch the Command Prompt through the Run dialogue or directly from the Start menu.
Option 1: Using the Run Dialog
– Press the WIN key + R to bring up the Run dialog (or search for “Run” in the Start menu).
– In the dialog box that appears, type cmd and hit <Enter>.
Option 2: Using the Start Menu
– Open the Start menu or use the search bar.
– Search for “Command Prompt” and click the first result at the top.
Once you have Command Prompt open, you’re ready to find your MAC address in just a few easy steps!
Step 2: Retrieve Your MAC Address Using IPConfig
After opening the Command Prompt, you’re ready to find your MAC address. The tool we’ll be using is called ipconfig, a command that provides details about your network setup.
To get started, type the following command into the Command Prompt window:
“`bash
ipconfig /all
You can also copy and paste the command directly to avoid any errors. Once you run the command, a lot of detailed information about your network will appear. To locate your MAC address, look for the “Physical Address” entry. This will be a long sequence of numbers and letters—your unique MAC address.
Here’s an example of what the MAC address might look like (though yours will be different):
Physical Address: 00-1A-2B-3C-4D-5E
You can either write down this string or copy it for later use. That’s all it takes to find your MAC address using Command Prompt. Next, we’ll explore how to check it through Network Settings.
Finding Your MAC Address via Network Settings on Windows 10
If you’re more comfortable navigating through Windows’ graphical interface rather than using command lines, checking your MAC address through Network Settings might be the way to go. Though it involves a few extra clicks, it may feel more familiar for those who prefer working with the Windows GUI.
Here’s how you can do it:
- Right-click on the WiFi icon located at the bottom right corner of your taskbar.
- From the menu, select “Open Network & Internet Settings.”
- In the window that appears, you’ll see two large options: Data usage and Properties. Click on Properties.
- Scroll down to the very bottom of the Properties section, where you’ll find your Physical address (MAC).
To copy the MAC address, you can either:
– Highlight the string of numbers and letters in front of “Physical address (MAC)” by holding down your left mouse button and dragging over the text. Then, press Ctrl + C to copy.
– Alternatively, click the Copy button, but keep in mind that this will copy all the information in the Properties window, not just your MAC address. You’ll need to paste it somewhere and then select the MAC address from the pasted data.
That’s all there is to it—an easy, GUI-based method to find your MAC address!
Locating Your MAC Address on Windows 11
Although Windows 11 has a different appearance than Windows 10, finding your MAC address on Windows 11 is quite similar to the process in Windows 10. Let’s explore how to quickly find your MAC address on a laptop or PC using the getmac command.
Find Your MAC Address Using the getmac Command on Windows 11
The steps for finding the MAC address on Windows 11 are almost identical to those for Windows 10, but here we’ll focus on using the getmac command instead of ipconfig.
- Start by opening the Command Prompt. You can do this by pressing the Windows key + R on your keyboard.
- In the Run dialog box that appears, type cmd and press Enter to open the Command Prompt.
- Once the Command Prompt window is open, type the following command:
“`bash
getmac
- Press Enter, and your MAC address will appear under the section labelled Physical Address.
This method provides a quick and simple way to retrieve your MAC address on Windows 11 without much hassle!
If you prefer avoiding the command line altogether, no worries! You can easily find your MAC address through the Windows 11 Settings menu without having to use the getmac command.
Here’s how:
- Start by opening Settings by pressing the Windows key + I on your keyboard.
- In the Settings window, navigate to the Network & Internet section from the left-hand menu.
- Depending on whether you’re using a Wi-Fi or Ethernet connection, select Wi-Fi or Ethernet from the options in the Network & Internet section.
- Scroll down and click on the Hardware Properties option.
- In the Hardware properties window, locate the Physical address (MAC) field.
To copy the MAC address, simply highlight it by holding down your left mouse button and dragging over the address, then press Ctrl + C to copy it.
This method provides a user-friendly way to find your MAC address without using any command-line tools!
summary
The guide explains how to find your MAC address on Windows 10 and Windows 11, providing step-by-step instructions for both command-line and graphical methods. The MAC address is a unique identifier assigned to your device’s network hardware, similar to an IP address but constant across networks. For Windows 10, users can locate the MAC address using the Command Prompt with the “ipconfig” command or by navigating through the Network Settings menu. In Windows 11, the process is nearly identical, but the guide focuses on using the “getmac” command in Command Prompt. Additionally, for those who prefer not to use the command line, the MAC address can also be easily accessed through the system’s Network Settings, ensuring an accessible method for all users.