
Download Article
Uncomplicated ways to find the version number of your PC BIOS
Download Article
- Command Prompt (CMD)
- PowerShell
- MSInfo32
- UEFI Firmware Settings
- BIOS Menu
- DXDiag
- Registry Editor
- Expert Q&A
|
|
|
|
|
|
|
Do you need to find the version of your PC’s BIOS? Before you check for BIOS updates, it’s best to know which version of the firmware you already have installed. Whether you’re using Windows 11, Windows 10, or Windows 8.1, it only takes a few seconds to see your BIOS firmware version. This wikiHow article will teach you how to check the BIOS version in many ways, including using CMD (Command Prompt), PowerShell, and from within the BIOS itself.
How to Find Your BIOS Version
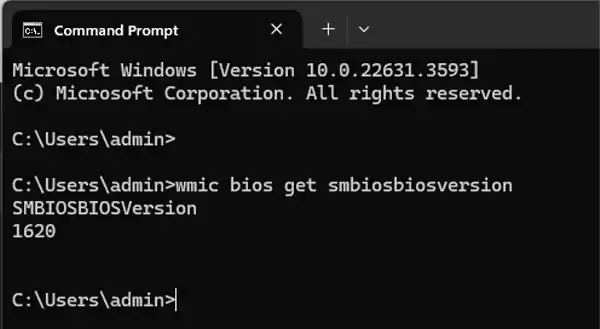
To see your BIOS version in Command Prompt, type «wmic bios get smbiosbiosversion» and press Enter. To check the BIOS version in PowerShell, open the application on your computer and type in «Get-WmiObject win32_bios».
-

You can use the Command Prompt in any version of Windows to quickly check the BIOS version. To open Command Prompt:
- Press the Windows key + S on your keyboard.
- Type cmd.
- Click Command Prompt in the search results.
-
The string of numbers (or a mix of letters and numbers) following SMBBIOSBIOSVersion is your current BIOS version.


Advertisement
-
You can open PowerShell in any version of Windows by pressing Windows key + S, typing powershell, and clicking Windows PowerShell in the search results.[1]
-
This displays your BIOS version and manufacturer in an easy-to-understand menu format.


Advertisement
-
You can use this tool on Windows 11, Windows 10, and Windows 8 to find your BIOS version without rebooting your PC. To open it:
- Press the Windows key + S on your keyboard.
- Type msinfo32.
- Click System Information in the search results.
-
You’ll see the name of the manufacturer, followed by the BIOS version number, and then the date the version was released.


Advertisement
-
If you’re using Windows 11, Windows 10, or Windows 8, you should be able to boot into the BIOS from your Windows Settings. To open your settings, press Windows key + i, or click Settings in your Start menu.
- If you can’t boot into Windows past the sign-in screen, you can still enter the UEFI firmware settings menu. On the sign-in screen, click the power icon, then hold down Shift as you click Restart. Once your computer reboots, skip to Step 4.
-
The steps are a little different depending on your version of Windows:
- Windows 11: Click System in the left panel, then click Recovery in the right panel.
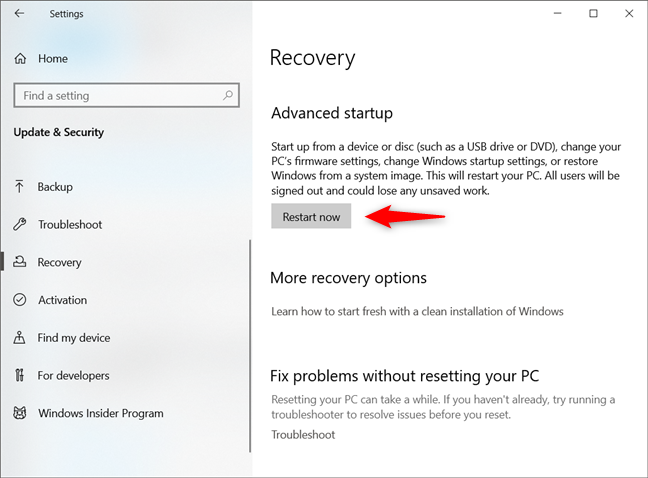
- Windows 10: Click Update & Security, then click Recovery in the left panel.
-
Windows 8: Click General in the left panel.[2]
-
You’ll see this in the right panel in all Windows versions. Your computer will reboot into the Advanced Options screen.
-
More options will appear.
-
Even more options will appear.
-
You’ll be prompted to restart your computer.
-
This boots your PC into the BIOS.
-
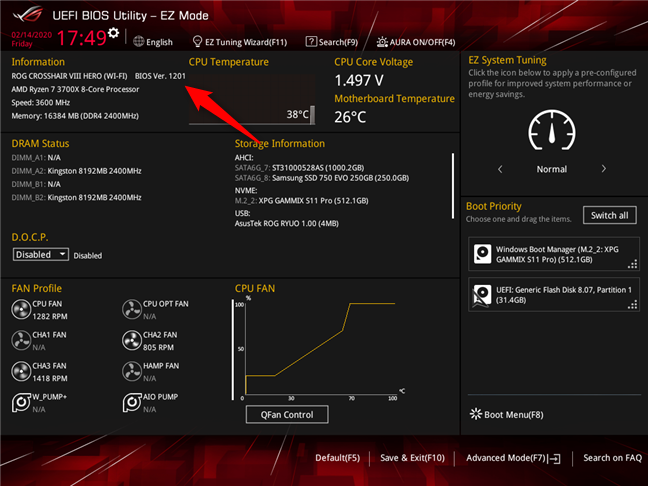
You’ll usually see this on the Main or startup tab, but the layout will be different on each motherboard. Look for «BIOS version,» «Firmware version,» or similar on the screen.


Advertisement
-
If you’re using an older PC running Windows 7 or Windows Vista, you can access the BIOS menu by pressing a specific key while your PC is starting up. Before you restart your PC, you’ll want to find the correct key to press. If you built your computer yourself, look up your motherboard model and «BIOS key.» If you bought your computer from a brand like HP, Dell, Asus, etc., look up your PC model and «BIOS key.» If you can’t find your BIOS key, try these popular options:
- Aorus: F2 or Del
- Asrock: F2 or Del
- Acer: F2 or Del
- ASUS: F2 (PCs) or Del (individual motherboards)
- Dell: F2 or F12[3]
- ECS: Del
- Gigabyte: F2 or Del
- HP: Esc or F10[4]
- Lenovo laptops: F2 or Fn + F2
- Lenovo desktops: F1
- Lenovo ThinkPads: Enter + F1.
- MSI: Del
- Microsoft Surface Tablets: Press and hold the volume-up button
- Origin PC: F2
- Samsung: F2
- Sony: F1, F2, or F3
- Toshiba: F1, Esc, or F12
-
Restart your PC now. As soon as it turns off, be ready to start pressing the BIOS setup key the second it turns back on.[5]
-
Keep pressing the key until you enter the BIOS menu.
-
In the BIOS menu, you should now see the version number near the top or bottom of the screen next to «BIOS version,» «Firmware version,» or «BIOS revision.[6]
»


Advertisement
-
This Direct X Diagnostic Tool will report your BIOS version on any version of Windows. To open the tool:
- Press Windows key + S.
- Type dxdiag.
- Click DxDiag.
-
This tab should open up by default. You’ll see the BIOS version next to «BIOS» in the System Information panel here.


Advertisement
-
No matter which version of Windows you’re using, you’ll find the BIOS version in your registry. To open the Registry Editor:
- Press the Windows key + S.
- Type regedit.
- Click Registry Editor.
- Click Yes.
-
To get there, just type or paste the path into the address bar at the top of the editor.
- If you don’t see an address bar, click the View menu, and select Address Bar.
-
It’ll be at the bottom of the right panel. A window will expand.
-
When you’re finished, click OK to close the window.


Advertisement
Add New Question
-
Question
Is there a way to do this without restating or using the command prompt?
Luigi Oppido is the Owner and Operator of Pleasure Point Computers in Santa Cruz, California. Luigi has over 25 years of experience in general computer repair, data recovery, virus removal, and upgrades. He is also the host of the Computer Man Show! broadcasted on KSQD covering central California for over two years.
Computer & Tech Specialist
Expert Answer
Yes, your BIOS version is listed in the device manager. So, go to your control panel or system preferences, open the device manager, and then scroll down and look for something called «firmware.» This will tell you your BIOS version.
-
Question
Can you look your BIOS up online?
Luigi Oppido is the Owner and Operator of Pleasure Point Computers in Santa Cruz, California. Luigi has over 25 years of experience in general computer repair, data recovery, virus removal, and upgrades. He is also the host of the Computer Man Show! broadcasted on KSQD covering central California for over two years.
Computer & Tech Specialist
Expert Answer
Yes! If you type in your operating system and the architecture you’re on (Dell, HP, etc.), you’ll be able to find your most recent BIOS version online.
-
Question
How can I update the BIOS on Windows XP?
sawyer bergeron
Community Answer
It relates less to what OS you have and more to what computer you have. Generally, the manufacturer will have a utility to update it. Only update if you have a real reason to (as in something isn’t working properly, and an update to the BIOS is known to fix it) as the process carries a non-zero chance of bricking your motherboard.
Ask a Question
200 characters left
Include your email address to get a message when this question is answered.
Submit
Advertisement
Thanks for submitting a tip for review!
About This Article
Thanks to all authors for creating a page that has been read 817,815 times.
Is this article up to date?
Download Windows Speedup Tool to fix errors and make PC run faster
This post shows you how to check the current BIOS version in a Windows 11/10/8/7 computer, using Windows Registry, WMI Command, System Information Tool (MSINFO32.exe) or DirectX Diagnostic Tool (DXDiag). BIOS stands for Basic Input/Output System and is a type of firmware that is built into the hardware, used during and for the booting process of a computer.
Read: Check if your PC uses UEFI or BIOS.
You may need to check your BIOS version if you plan to update the BIOS. Of course, whether you want to do it or whether you should do it is another question. Anyway, there are several ways you can do this. Lets us have a look at them.
1] Using WMI Commands
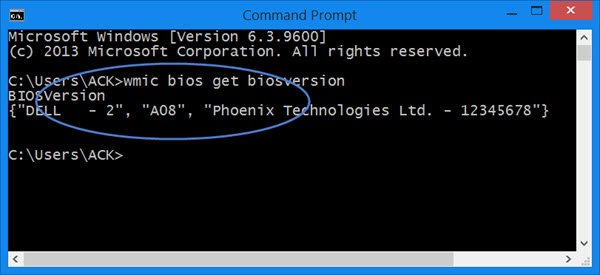
You can use Windows Management Instrumentation to find out the details of your BIOS. To do so, open an elevated command prompt windows, type the following and hit Enter:
wmic bios get biosversion
2] Using MSINFO32
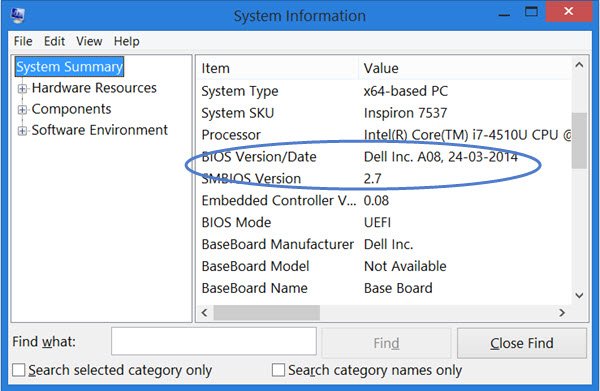
The built-in MSINFO32 or System Information Tool displays this information under System Summary. To open this tool, Run msinfo32 and hit Enter.
3] Using Registry Editor
When Windows loads, it stores the BIOS information and other details under the following registry key:
HKEY_LOCAL_MACHINE\HARDWARE\DESCRIPTION\System
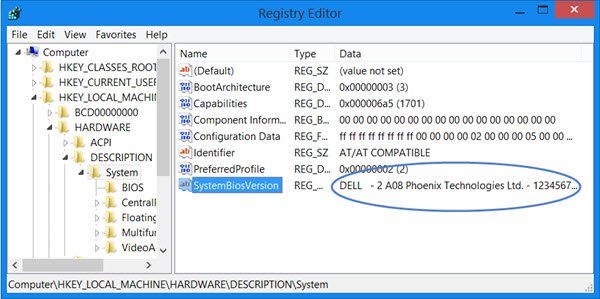
Here you will see the details under System. You will also see additional details under SystemBiosDate, SystemBiosVersion, VideoBiosDate and VideoBiosVersion subkeys.
To see the BIOS version Run regedit and navigate to the mentioned registry key.
4] Using DXDiag
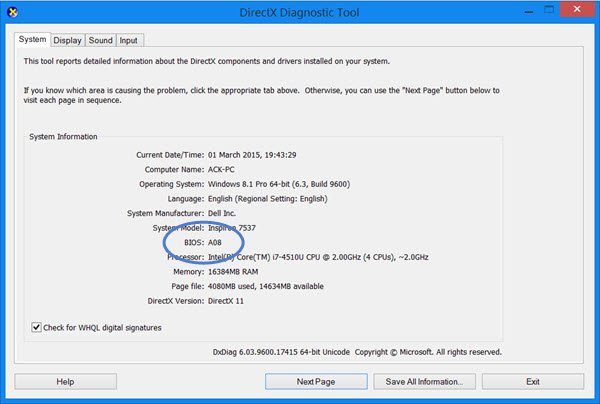
DirectX Diagnostic Tool or DXDiag.exe is basically meant to help you troubleshoot DirectX issues. But if you Run dxdiag to open it, you will see the BIOS version mentioned under the System tab.
Of course, apart from this, you can also use some 3rd-party system information tool like Speccy to see your BIOS version or see it when you enter your machine’s BIOS setup by pressing F10/F12 keys during boot-time.
Check this post if you want to find out Computer RAM, Graphics Card / Video memory of your Windows PC.
Anand Khanse is the Admin of TheWindowsClub.com, a 10-year Microsoft MVP (2006-16) & a Windows Insider MVP (2016-2022). Please read the entire post & the comments first, create a System Restore Point before making any changes to your system & be careful about any 3rd-party offers while installing freeware.
Все способы:
- Способ 1: MSinfo
- Способ 2: DirectX
- Способ 3: Консоль
- Способ 4: «Редактор реестра
- Способ 5: Сторонний софт
- Вариант 1: CPUID CPU-Z
- Вариант 2: AIDA64
- Вопросы и ответы: 1
Способ 1: MSinfo
Пожалуй, самый простой и быстрый способ выяснения версии BIOS управляемого Windows 11 компьютера заключается в просмотре характеристики через встроенное в операционку средство получения информации о компонентах системы, оборудовании и программной среде под названием MSinfo. Вызывать данный, как будто бы скрытый, инструментарий совсем несложно.
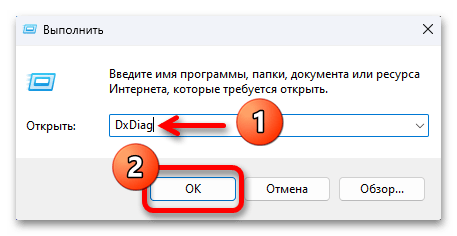
- Нажимаем одновременно клавиши «Windows»+«R» на клавиатуре компьютера или кликаем по элементу «Пуск» на Панели задач Win 11, а затем выбираем пункт «Выполнить» в отобразившемся поверх интерфейса ОС меню.
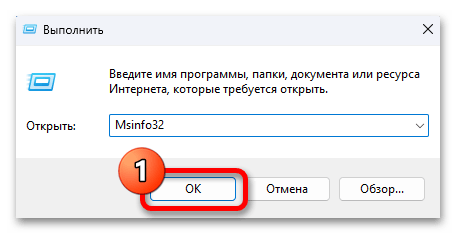
- В единственное поле открывшейся оснастки «Выполнить» вводим следующую команду:
Msinfo32 - Нажимаем «Enter» на клавиатуре или кликаем по кнопке «ОК» в окошке «Выполнить» мышкой –

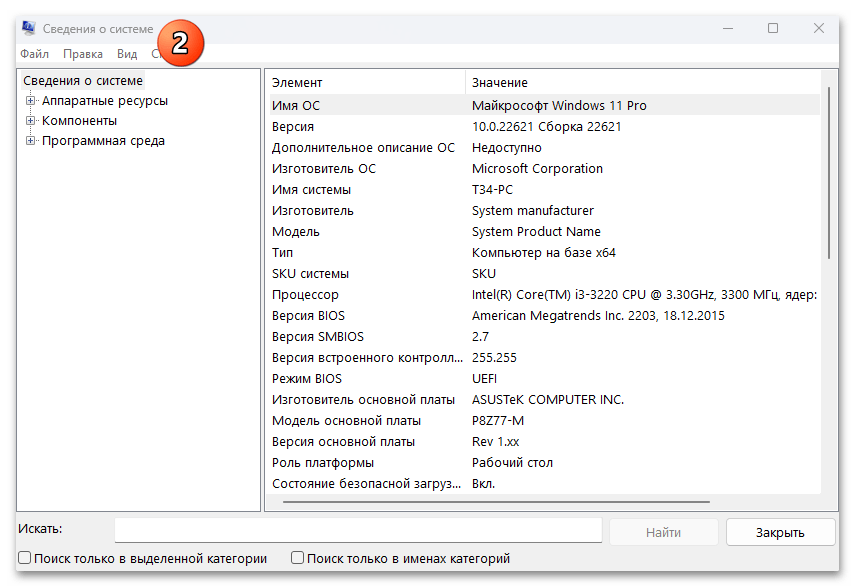
в результате откроется озаглавленное «Свойства системы» окно, что и является целевой в нашем случае программой MSinfo от Microsoft.
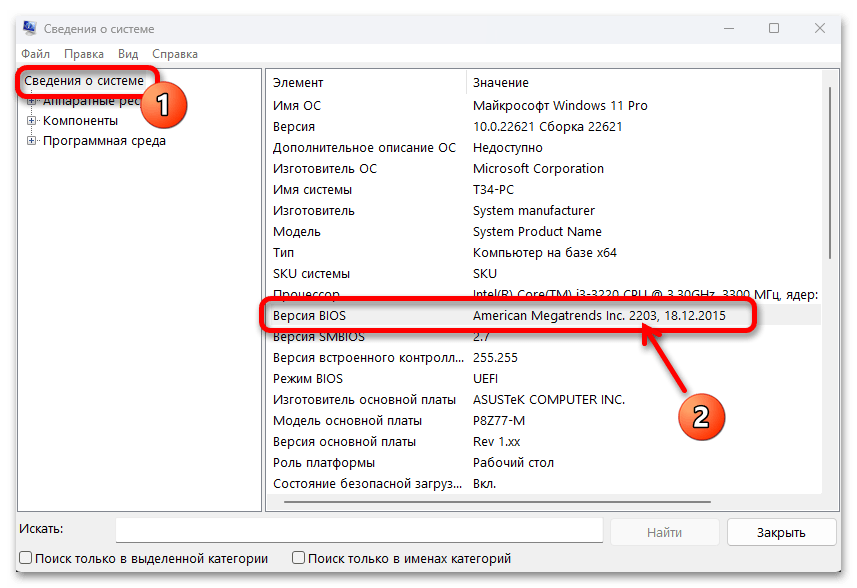
- Щёлкаем «Сведения о системе» в панели слева окна Msinfo, затем перемещаемся в его правую часть и ищем в отображающемся здесь перечне характеристик пункт «Версия BIOS». «Значение» указанного «Элемента» даёт полную информацию об искомой характеристике – состоит из наименования разработчика микропрограммы BIOS, номера её версии и даты выпуска.

Читайте также: Как открыть «Свойства системы» в Windows 11
Способ 2: DirectX
Ещё одно входящее в комплект поставки Windows 11 и эффективно решающее задачу определения версии BIOS средство используется по аналогии с предложенным выше приложением Msinfo, то есть так же просто и быстро (но стоит сразу отметить, что DxDiag менее информативен).
- Тем же путём, что описан в первом пункте предыдущей инструкции из этой статьи, вызываем на экран окошко «Выполнить».
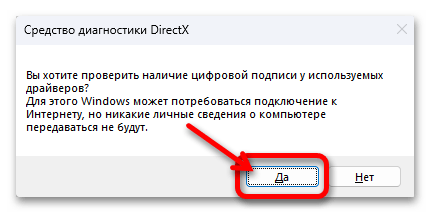
- В поле «Открыть» оснастки пишем указанную ниже команду запуска «Средства диагностики DirectX», после чего нажимаем «Enter» на клавиатуре либо щёлкаем по кнопке «ОК» мышью.
DxDiag - При своём первом открытии запустившаяся по результату выполнения предыдущего пункта этой инструкции утилита DxDiag.exe может запросить проверку цифровой подписи инсталлированных в системе драйверов – кликаем «Да» в окошке с таким требованием (если появится).
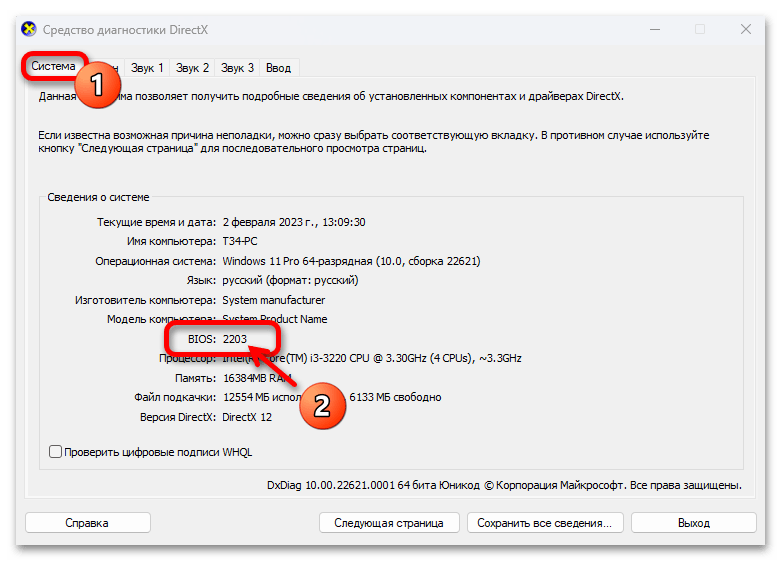
- На этом нашу цель фактически можно считать достигнутой. Никуда не переходя с вкладки «Система» окна «Средство диагностики DirectX», перемещаемся в область «Сведения о системе», смотрим на значение пункта «BIOS» демонстрируемого здесь перечня характеристик, – оно и является текущей версией микропрограммы управления базовой системой ввода-вывода компьютера.

Способ 3: Консоль
Следующий доступный в Win 11 вариант действий по определению версии BIOS ПК подразумевает эксплуатацию встроенной в ОС программы командной строки SystemInfo либо инструментария управления Windows (WMI). Объединяет эти решения тот факт, что для получения нужной нам информации потребуется запуск определённой консольной (текстовой) команды.
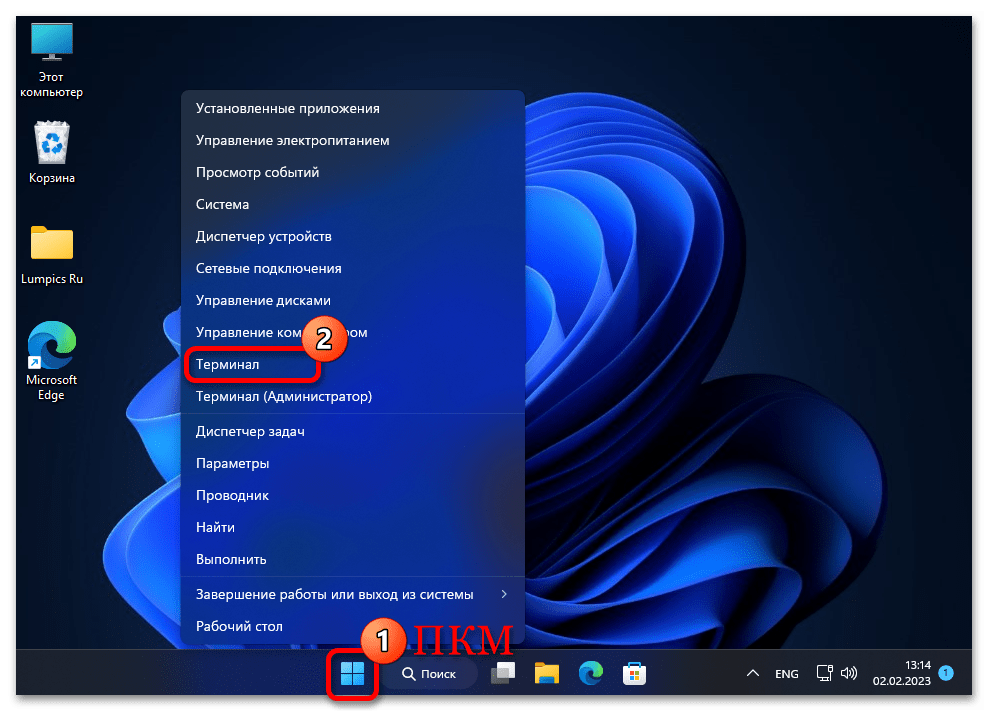
- Открываем появившееся в ОС от Майкрософт с выходом её 11-ой версии приложение «Терминал». С этой целью проще всего будет нажать «Win»+«X» на клавиатуре и затем кликнуть мышкой по наименованию средства в отобразившемся меню дополнительных функций кнопки «Пуск» на Панели задач Windows.

Подробнее: Как открыть «Терминал» в Windows 11

Примечание: Представленные далее команды при желании можно запускать и через классическую «Командную строку» Windows, эффективность при этом та же, что и в «Терминале» (т.е., по сути, — «PowerShell»).
Читайте также: Запуск «Командной строки» от имени Администратора в Windows 11
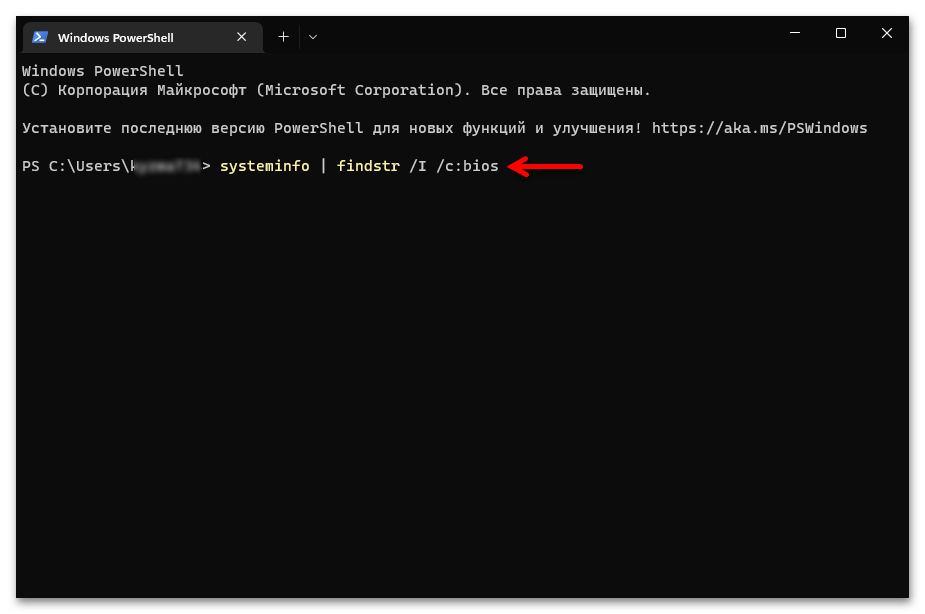
- Пишем в консоли (удобнее и «надёжнее» будет скопировать из текста этой статьи и вставить в окно «Терминала») одну из запрашивающих версию BIOS компьютера команд, затем отправляем её на выполнение путём нажатия кнопки «Enter» на клавиатуре:
systeminfo | findstr /I /c:bioswmic bios get smbiosbiosversion

или

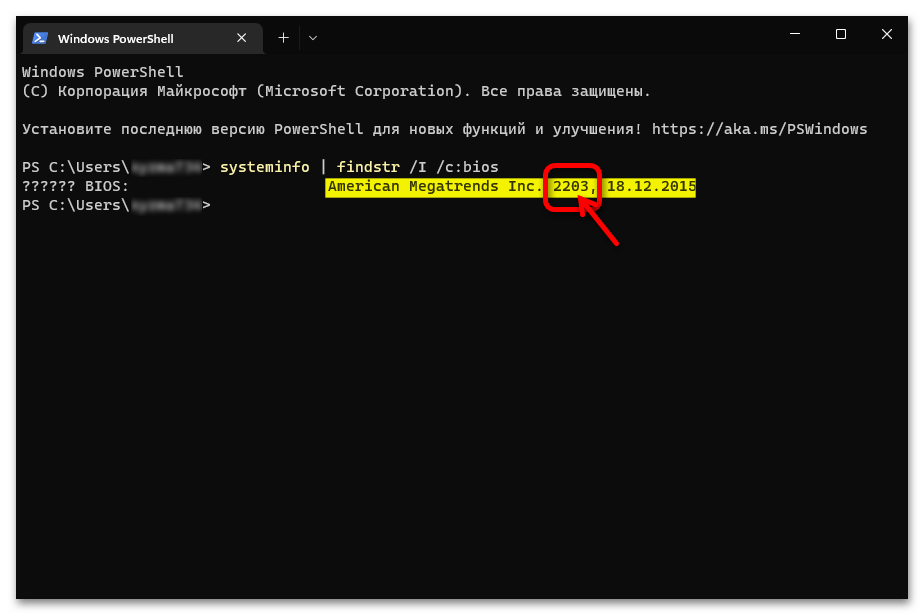
- При использовании Systeminfo в виде ответа консоли получаем расширенные сведения о микропрограмме управления BIOS ПК:
РАЗРАБОТЧИК ВЕРСИЯ, ДАТА_ВЫПУСКА.
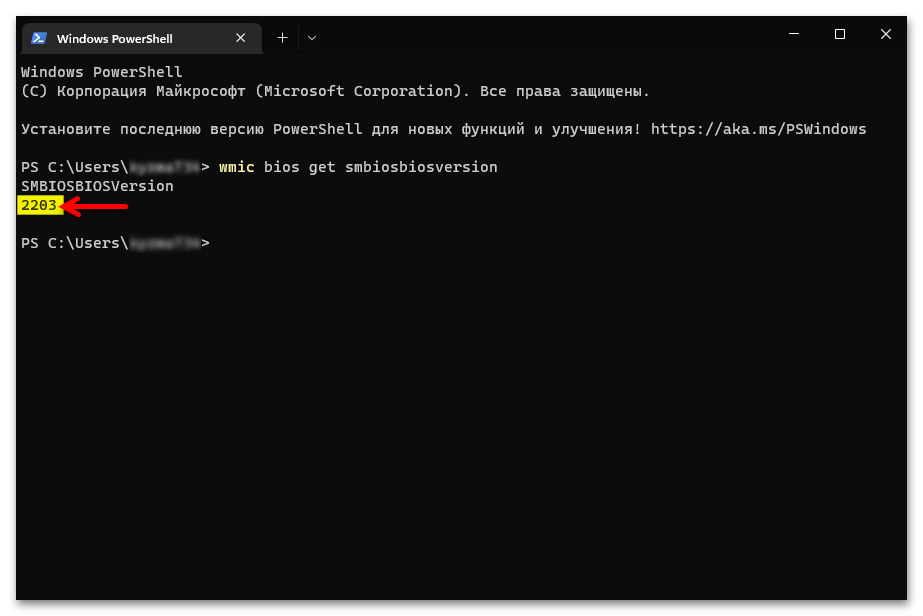
Если задействован инструментарий WMI, отобразится только целевой в нашем случае параметр — номер версии микропрограммы BIOS.

Способ 4: «Редактор реестра
Ещё одним «местом» в Виндовс 11, где хранятся данные БИОС компьютера, является главная база всех параметров и настроек операционной системы – реестр. Соответственно, получив доступ к просмотру системного реестра, можно выяснить и рассматриваемую в этой статье характеристику.
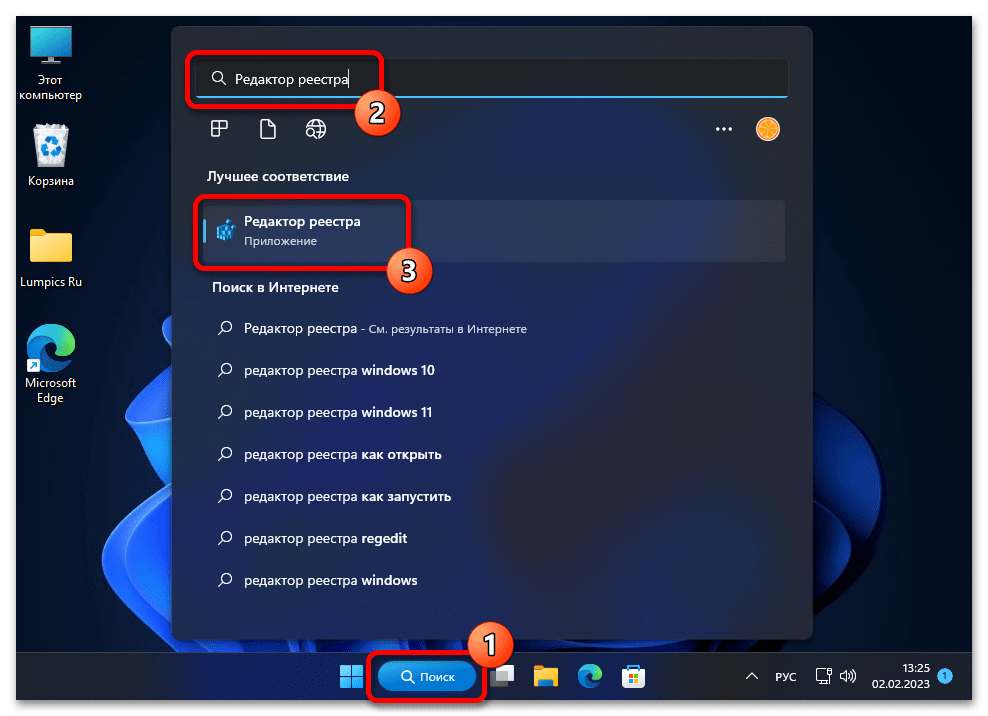
- Открываем приложение для просмотра и редактирования системного реестра Win 11. Проще всего с такой целью будет воспользоваться системным поиском: кликаем «Поиск» на Панели задач Windows 11 или нажимаем «Win»+«S» на клавиатуре, вводим запрос
Редактор реестрав поле вверху отобразившегося средства, кликаем по наименованию целевого инструмента (с отметкой «Приложение») в перечне поисковых результатов.Подробнее: Как открыть «Редактор реестра» в Windows 11
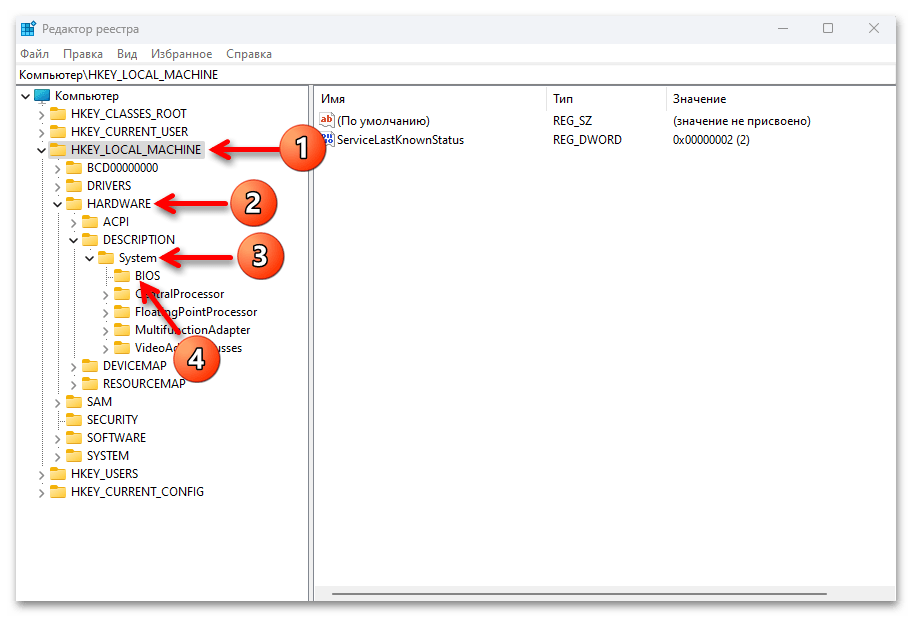
- В панели слева открывшегося «Редактора» по очереди двойным кликом разворачиваем директории: «HKEY_LOCAL_MACHINE», «HARDWARE», «DESCRIPTION», «System», «BIOS».

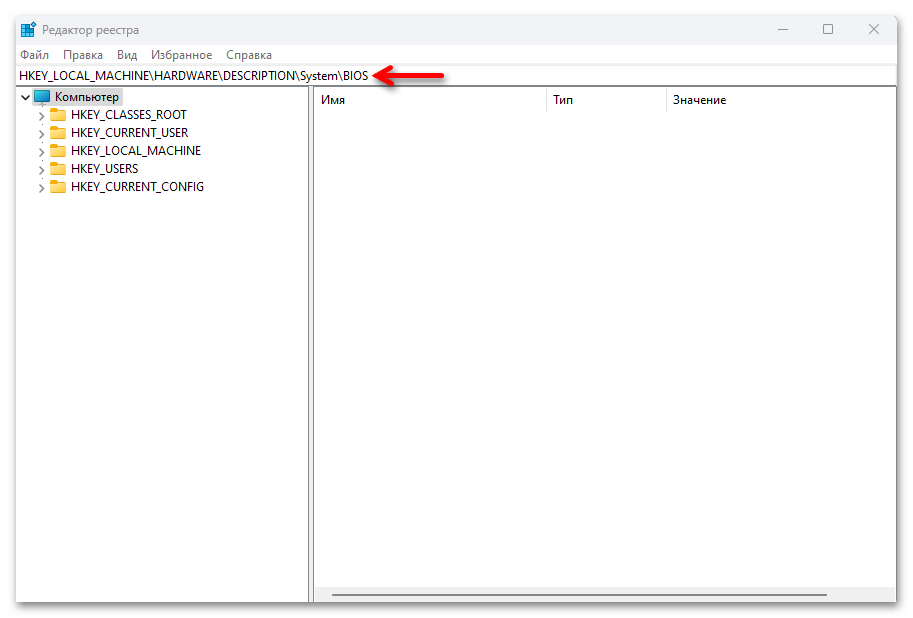
Другой вариант открытия целевого раздела в реестре Виндовс: копируем указанный далее путь в буфер обмена Windows, вставляем его в поле вверху окна «Редактора» под строкой меню, нажимаем «Ввод» на клавиатуре.
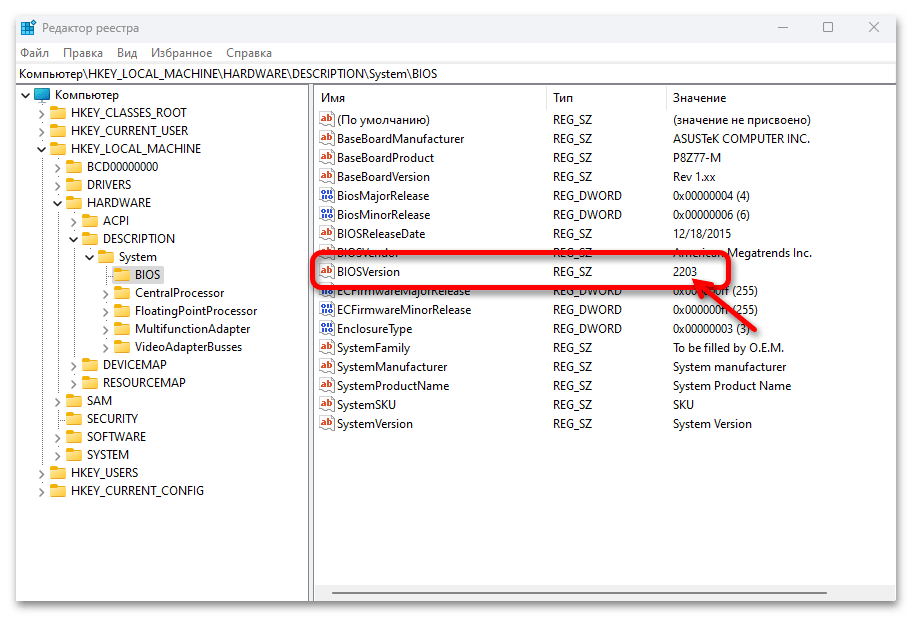
HKEY_LOCAL_MACHINE\HARDWARE\DESCRIPTION\System\BIOS - Далее перемещаемся в правую часть окна средства просмотра реестра, находим среди содержимого раздела «BIOS» носящий «Имя» BIOSVersion параметр – его «Значение» и является искомыми нами данными.
Способ 5: Сторонний софт
Конечно, версия управляющей БИОС микропрограммы – важная характеристика, знание которой позволяет в том числе определить возможность программного апгрейда системы, и поэтому её определение фактически обязательно включается в функциональность программ для получения сведений об аппаратных и программных компонентах компьютера, а также его диагностики.
Читайте также: Программы для определения аппаратных компонентов компьютера
Софта вышеуказанного типа сторонними разработчиками создано множество, а далее рассмотрим решение озвученной в заголовке этого материала задачи с помощью двух наиболее популярных его представителей.
Вариант 1: CPUID CPU-Z
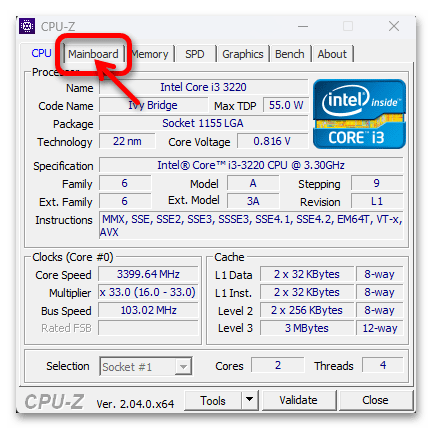
CPU-Z — очень компактный и простой, но при этом чрезвычайно эффективный в деле выяснения технической информации центрального процессора, материнской платы, памяти и других компонентов компьютера софт. С целью определения версии BIOS утилита задействуется следующим образом.
Скачать CPUID CPU-Z
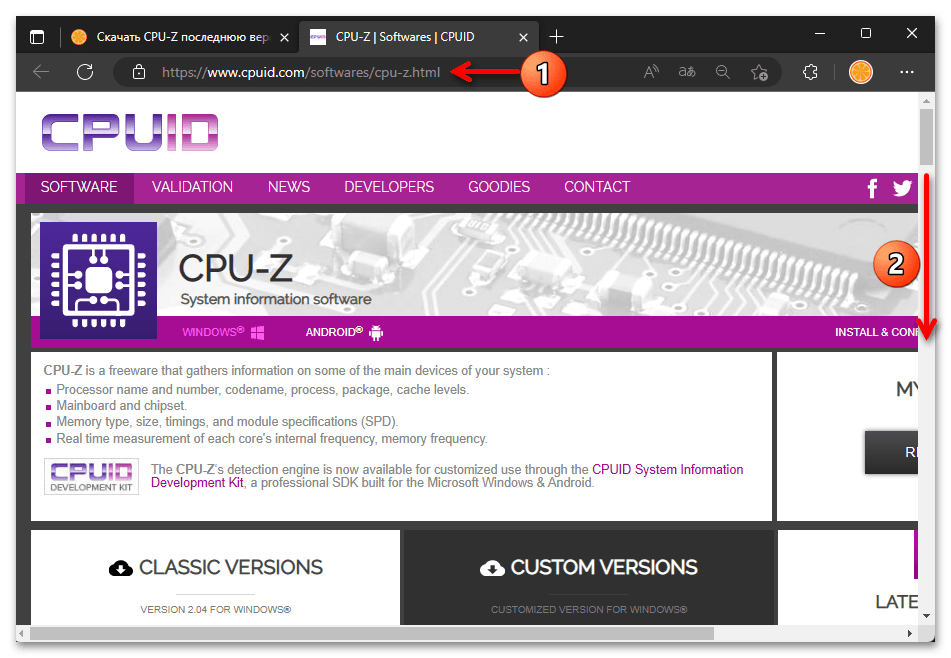
- Открываем (ссылка доступна в статье-обзоре приложения от авторов нашего сайта) страницу загрузки CPU-Z на официальном веб-ресурсе его разработчиков — компании CPUID.

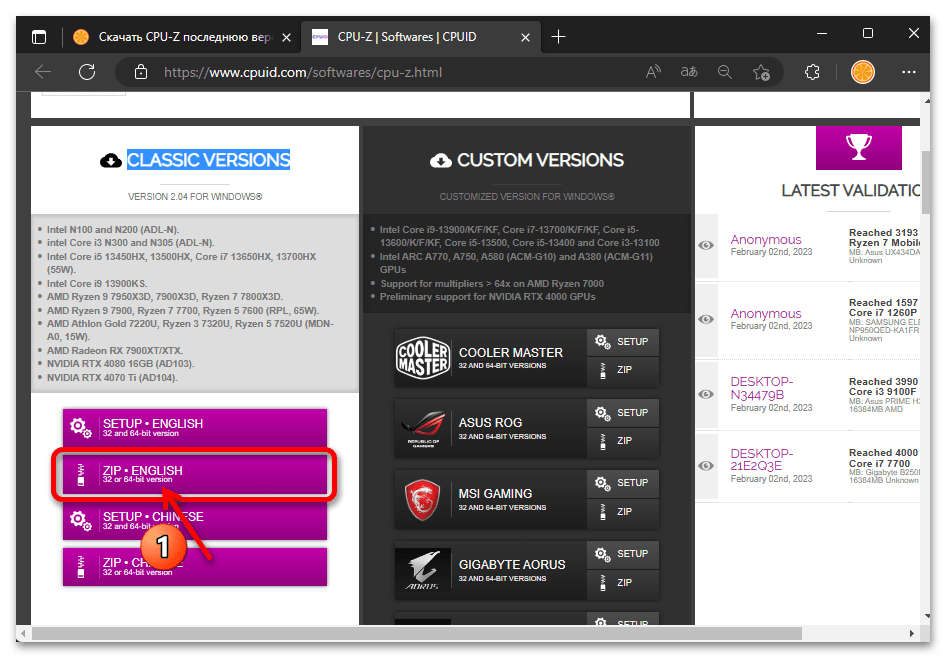
Далее можно скачать инсталлятор программы (кнопка «SETUP — ENGLISH» в блоке «CLASSIC VERSIONS»), но субъективно более предпочтительным будет получение не требующей установки на ПК версии CPU-Z: нажимаем «ZIP — ENGLISH»,

загружаем предоставляемый сайтом CPUID архив на диск ПК.
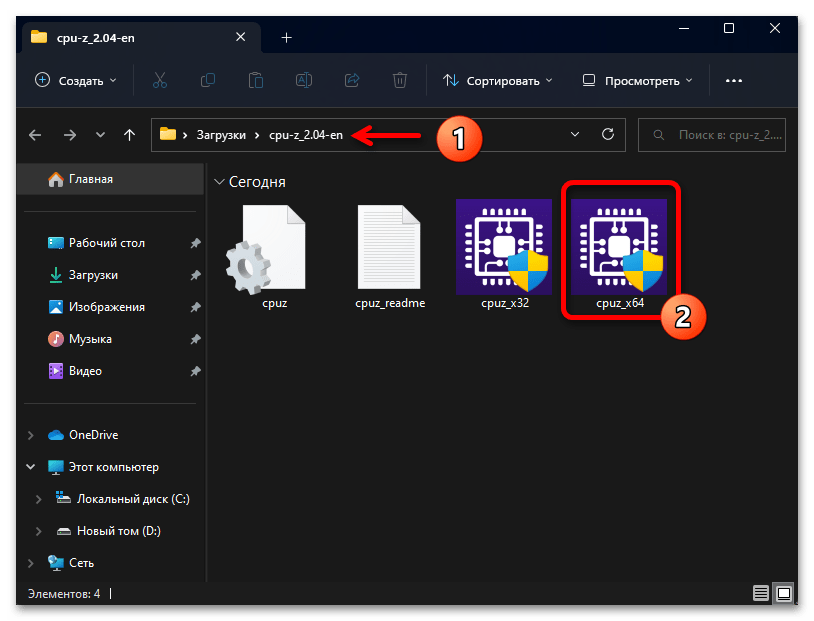
- Распаковываем содержащий софт ZIP-пакет, из получившейся папки открываем файл cpuz_x64.exe.
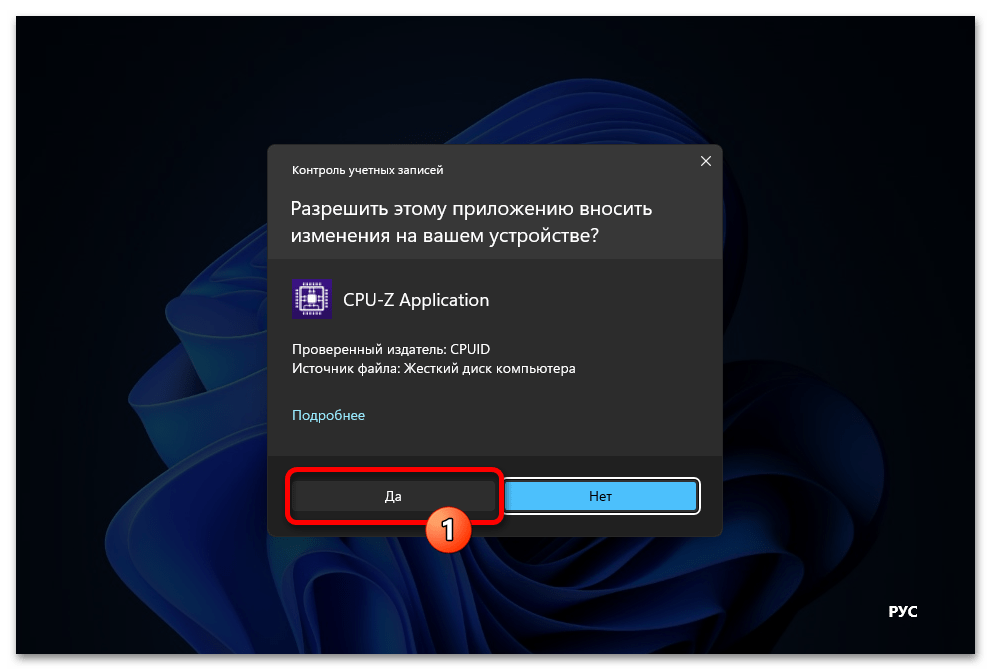
- Подтверждаем запрос системного «Контроля учётных записей»,

немного ожидаем, пока запущенное средство проанализирует систему.
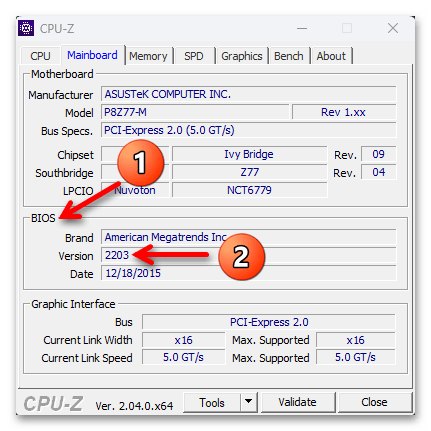
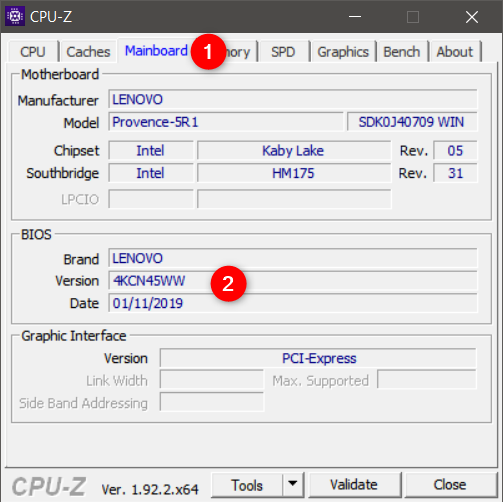
- В открывшемся по итогу окне CPU-Z переходим на вкладку «Mainboard».
- Далее перемещаемся в область «BIOS», смотрим на значение параметра «Version».

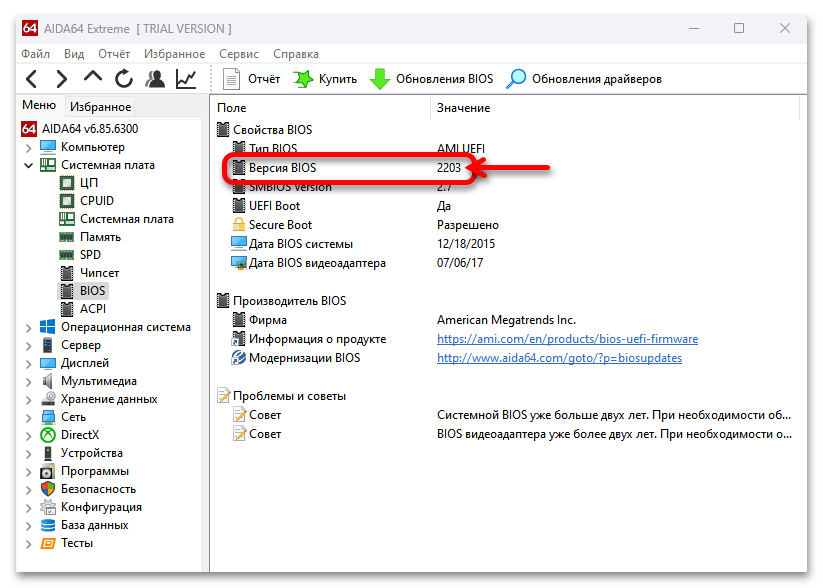
Вариант 2: AIDA64
Эта программа характеризуется коммерческой направленностью, но и значительно более широкими, нежели вышепредложенный CPU-Z, возможностями в плане определения технических характеристик компонентов компьютерных систем. По сути, использовать AIDA64 имеет смысл, когда требуется многофункциональный (а не для выяснения одной-единственной характеристики) инструмент диагностики и мониторинга ПК, но при этом определить версию BIOS с помощью данного продукта можно довольно коротким путём и в рамках бесплатного пробного периода его эксплуатации.
Скачать AIDA64
Читайте также: Использование программы AIDA64
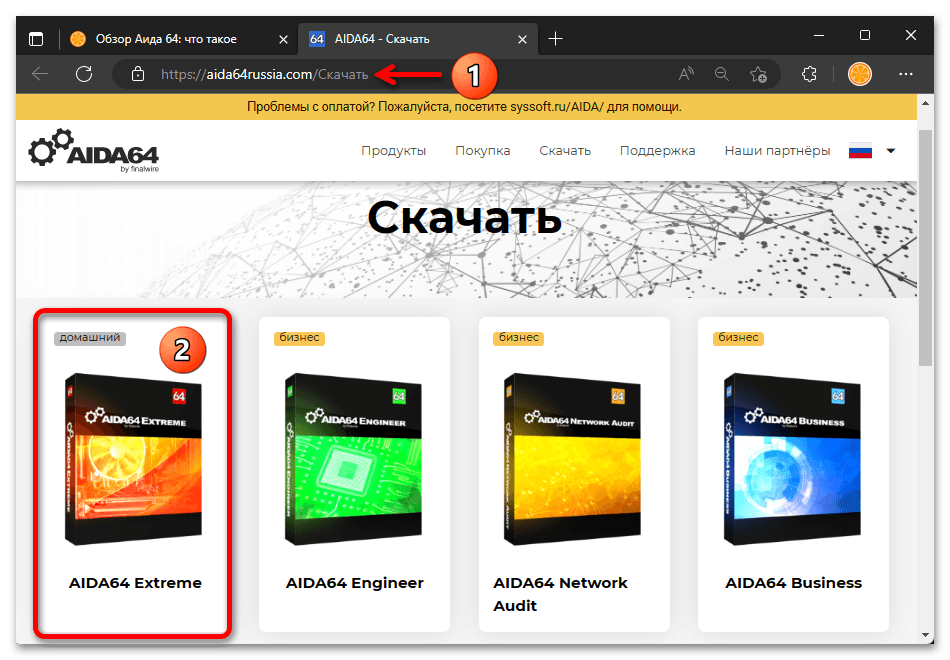
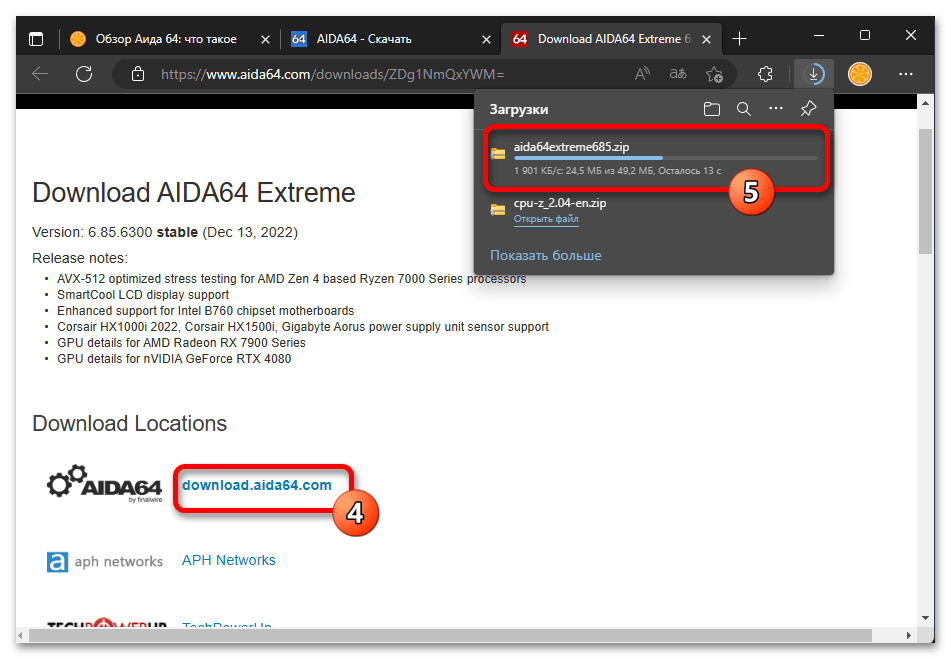
- По ссылке из обзора AIDA64 переходим на страницу загрузки продукта в рамках официального сайта его создателей, щёлкаем по блоку «AIDA64 Extreme»,

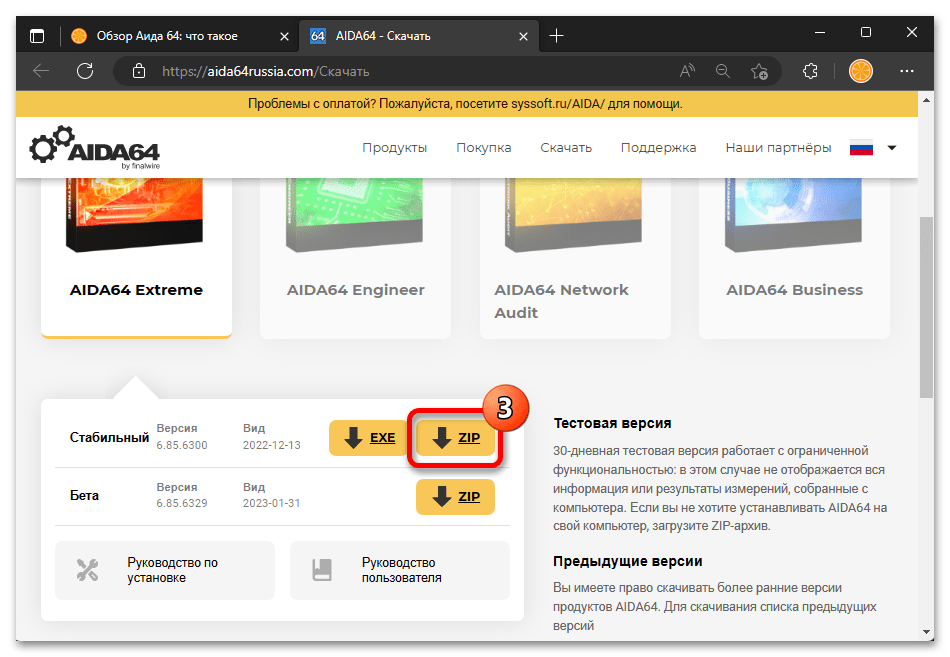
затем нажимаем на кнопку «ZIP» напротив пункта «Стабильный» отобразившейся области.

Предложенный путь приведёт к возможности скачивания архива с не требующей установки версией Аида64, – сохраняем его на диск ПК.
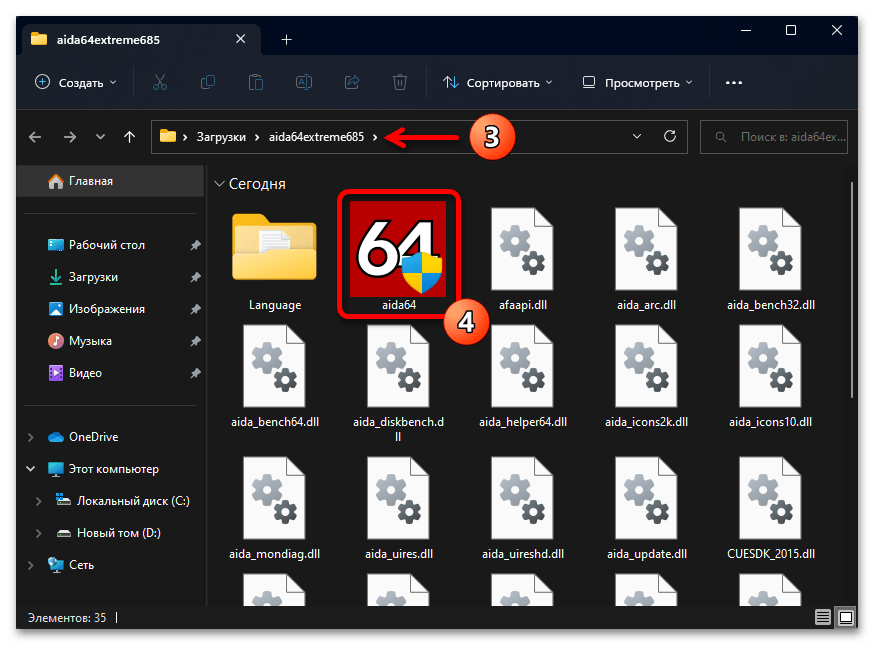
- Распаковываем скачанный ZIP-пакет,

находим в содержимом получившегося каталога и запускаем исполняемый файл программы — aida64.exe.
- Щёлкаем «Да» в окне с запросом «Контроля учётных записей»,

ожидаем открытия окна AIDA64 (программе потребуется некоторое время, чтобы проанализировать систему и «вычитать» её технические параметры).
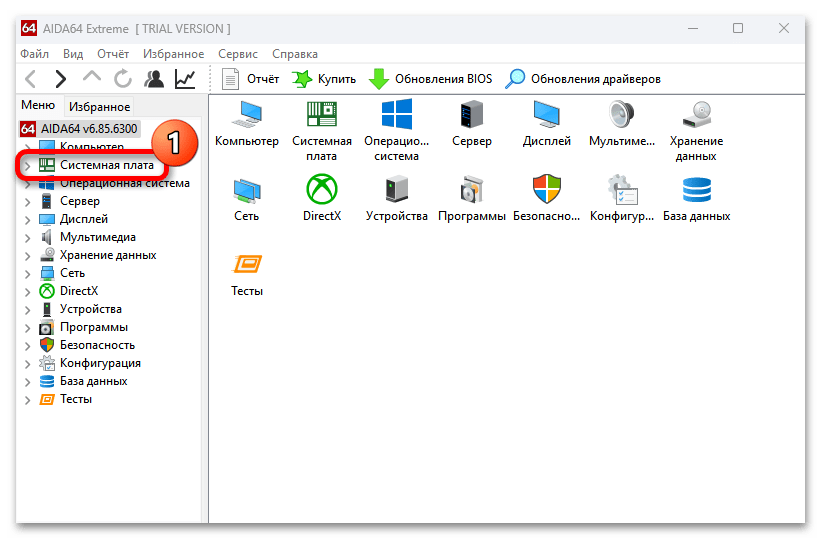
- В меню слева разворачиваем перечень «Системная плата»,

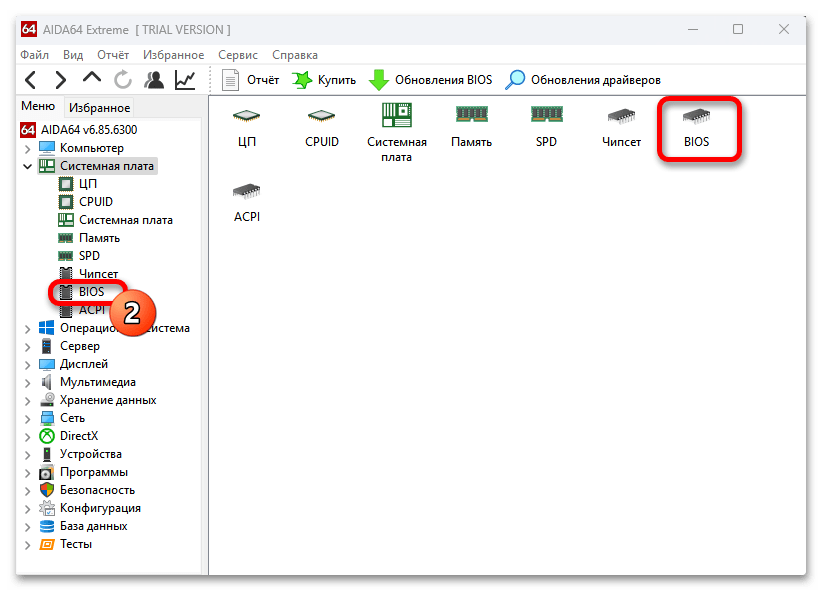
затем кликаем по имеющемуся в нём пункту «BIOS».
- Перемещаемся в правую часть окна средства диагностики, — в списке «Свойства BIOS» доступен целевой в нашем случае пункт – «Версия BIOS».


Наша группа в TelegramПолезные советы и помощь
If suddenly your computer becomes buggy and you constantly face hardware issues, chances are your BIOS is outdated. You might be wondering, what is BIOS and why it’s so important? Know how to check BIOS version to determine the real culprit and update it so you can have a smooth experience.
This could save you a couple of bucks and may even enhance your system’s performance. So, before you decide to replace your hardware, ensure your BIOS is up to date.
How do you check the BIOS version on Windows 11, 10, 8.1, 8, and 7?
The most familiar method to inspect the BIOS version is by booting the BIOS menu. Each system has a different process for entering BIOS on Windows 10 and other versions. The common way is to repeatedly click F2, which is a BIOS key, or follow the Windows Advanced Start Menu method to enter UEFI.
In laptops, the BIOS key depends upon the model; for example, Acer and Asus have the F2 or Del key, whereas Dell has the F12.
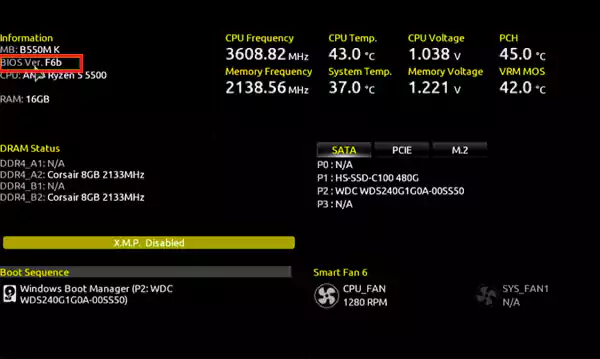
When you boot into the menu by using the key method, this is how you can check your BIOS version:
However, this process is time-consuming and a bit of a headache for those users who aren’t familiar with UEFI. To make it easy, there is a way around to find a BIOS version without requiring you to restart your system.
# Method 1: Run msinfo32 Method
- Open Run from Start or press Win + R.
- Type “msinfo32” in the search bar and press OK.

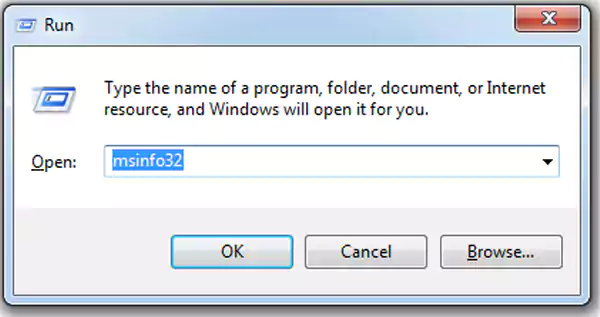
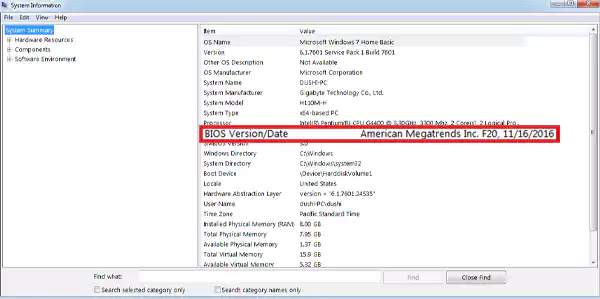
- A new window will be displayed that contains the entire blueprint of your computer. Under System Summary, you’ll have a BIOS Version/Date option showcasing your current version.

There is another method to check the BIOS version on Windows that is way simpler. With Windows Command Prompt commands, you can get the information with just a single prompt.
# Method 2: cmd Method
- Open cmd on your Windows.
- Type “wmic bios get smbiosbiosversion” and press enter. The current BIOS version will be displayed.

And these are the 2 prominent methods to check the current BIOS version. After this, you are required to ensure whether the version is up to date or requires updates.
Both methods are compatible with all versions of Windows, so you don’t have to worry about following a completely new process. Note down your current BIOS version and visit the manufacturer’s website to check whether the current patch is outdated or not.
If so, you should quickly update it to a newer version. But first, let’s understand what major difference we can witness before and after updating the BIOS to a newer version.
Why Update BIOS?
As we have mentioned earlier, the majority of hardware or boot-related issues are fixed through BIOS settings. Even the most common issue of “reboot and select proper boot device” can be fixed by updating BIOS.
So before you spend your money on purchasing or replacing your current hardware, try updating your BIOS first. The additional benefits of updating the BIOS version are:
- It becomes easy for you to install new hardware components like SSDs or hard drives. The updated BIOS can easily detect such upgrades.
- In some cases, users have witnessed enhanced system performance and faster boot speed.
- Motherboard or laptop manufacturers launch security patch updates to enhance safety protocols.
- Some updates bring enhanced features and fix bugs. Those additional features include reducing fan noise, improving overclocking speed, and adding settings options.
- The newer BIOS version lets you make the most out of it. For example, the newly added security patches and bug fixes updates make your CPU or GPU energy efficient. Resulting in lesser energy consumption and the ability to perform more productive tasks.
However, it is necessary to have proper guidance on updating BIOS to newer versions. Any sort of failure or wrong process can lead to distortion or may even brick the motherboard.
So without further ado, follow along to learn how to update BIOS on Windows.
How Do I Upgrade BIOS to the Newer Version?
Updating BIOS isn’t rocket science and requires minimal effort to do so. Here’s how to update BIOS to a newer version.
First, note down your current BIOS version and visit the website of your motherboard manufacturer. Try to find the support page of your existing motherboard model; there you should find the list of updated versions with dates.
To make this simple, just enter your motherboard’s model number BIOS update on the search engine, and you’ll get the current version.
For example, my current motherboard is a Gigabyte H110M-H. Simply search “Gigabyte H110M-H BIOS update” and click on the first link.
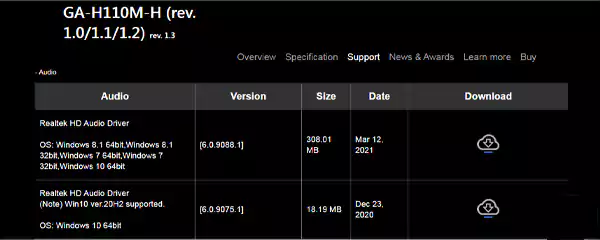
You’ll encounter an interface something similar to the above-shown image. Click on the download button, extract the ZIP file, and follow the steps mentioned in the README text file. Each update patch has a different method of installing them.
Copy the patch update to the USB drive and restart the computer to enter the BIOS menu by pressing the appropriate key. Otherwise, you can even access the BIOS menu through UEFI setup, then choose the BIOS updating option by selecting the file, and the newer version will be added.
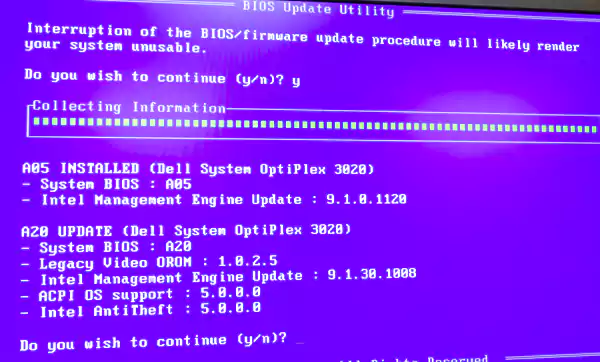
Another method that is suitable for an industrial-based setup where you have to update 10–20 PCs quickly is the DOS-based method, which would be more feasible.
- First, download Rufus and download its latest version.
- Plug in the USB, select that drive from Rufus, and choose FreeDOS in the boot selection option.
- Click Start and create a new folder on your drive. Then download the BIOS update file from the manufacturer’s website.
- Paste the file on the drive, enter the BIOS update menu, and select USB storage.
- Select the file by typing “cd and the name of your file,” where you have pasted the patch update, and type the name of the patch update.

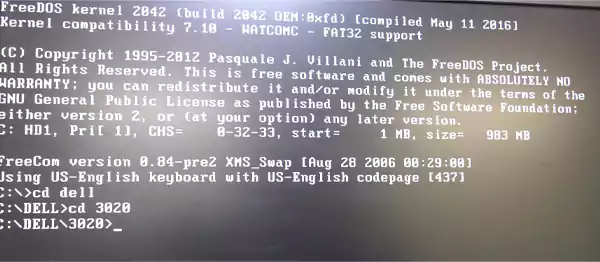
- Just hit the Tab button and your BIOS update will commence.

And that’s how a DOS-based BIOS update is done.
Final Verdict
Nevertheless, the importance of BIOS or UEFI cannot be ignored, as it holds the key to resolving several hardware issues. With this guide on how to check BIOS version and upgrade it, you can improve your system performance.
Whether it’s detecting drive-related issues or overclocking the CPU to boost performance. The BIOS is the core of your computer that has its strings all over the system to ensure smooth functioning.
Frequently Asked Questions
Mac systems are way different from Windows, and they don’t have BIOS. Instead, the devices are equipped with EFI (Extensible Firmware Interface).
Updating BIOS is essential for your Windows PCs and laptops. It makes it easy for you to install new hardware without compromising performance. Moreover, BIOS plays a crucial role in fixing improper boot-related issues.
There are several methods to reset the BIOS on your system. First and foremost, you can remove the CMOS battery and insert it back after a few minutes; this will reset your BIOS. Moreover, enter the UEFI menu by clicking the BIOS key during booting, navigate to “Load Default Options” and press “Enter.”
Your system will stop working, and the screen will remain black. This shows your BIOS firmware is corrupted.
Do you need to know the exact version of the firmware (BIOS or UEFI) installed on your computer’s motherboard? Traditionally, this means that you have to restart your computer, manually enter the BIOS and check the version information displayed there. It is one way of doing it, but it’s not the fastest, nor the easiest. Without further ado, here’s how to find your BIOS version in eight different ways:
NOTE: If you use a computer regularly, you probably heard about the term BIOS or UEFI BIOS. If you want to know more about them, read this article: What is BIOS? What does BIOS mean?. Also, if what you intend to do is update your BIOS, this tutorial can help you do it safely: How to update the BIOS of your motherboard.
1. How to check the BIOS version by restarting your computer and accessing the BIOS
Some devices show the version of the BIOS during the POST process that takes place as soon as you start your computer or device, while for others, you need to enter the BIOS to see it. Unfortunately, the POST process is fast, and you might not have the time to see anything, so you still need to enter the BIOS.
To access it, you have to press a key (or a combination of keys) on your keyboard while starting the computer. The manufacturer of your motherboard can choose whatever key it wants you to press, but commonly used keys include Delete, F1, F2, F10, and F12. You can find the right key to push in the manual of your motherboard, computer, or notebook.
Once inside the BIOS or UEFI BIOS, look for an information page. There, you find the version of the BIOS used by your computer’s motherboard.
2. How to check the BIOS version using Windows 10’s Advanced startup options
The firmware on motherboards has evolved from the early days of BIOS to a new version called UEFI. UEFI BIOS is faster, it allows more security, it offers better visual user interfaces and handles a mouse. It can also load operating systems from large drives (3 terabytes or more). One effect of making it faster is that it might not wait for any keyboard input, so it can be nearly impossible to catch a UEFI setup screen during boot by pressing a key on the keyboard.
If you need additional help to learn how to boot into UEFI BIOS, check this guide: How to enter BIOS in Windows 10. Once inside the UEFI BIOS, look for the information page. There, you should find the BIOS version your computer or device is using.
3. How to find the BIOS version from Windows’ System Information app
You can also easily find what BIOS version is used by your computer or device from Windows’ System Information tool. In the System Information app, select System Summary on the left panel. Then, on the right side of the window, look for an item called BIOS Version/Date. Its value shows the BIOS version and its release date.

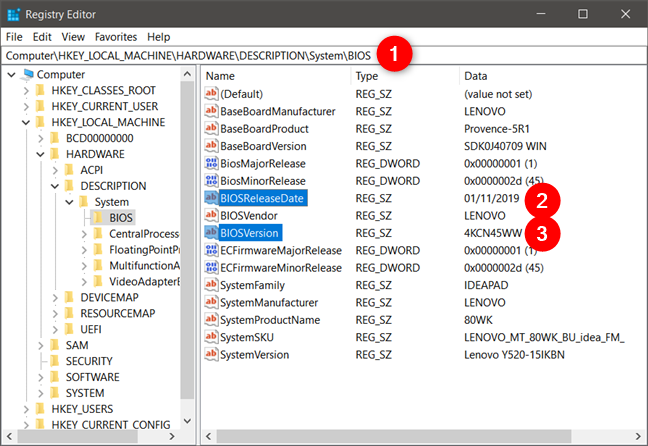
4. How to check the BIOS version from Windows’ Registry Editor
Windows’s Registry Editor offers another way of finding information about your BIOS. Open the Registry Editor and use it to navigate to this location:
Computer\HKEY_LOCAL_MACHINE\HARDWARE\DESCRIPTION\SystemBIOS. On the right panel, there are two registry keys called BIOSVersion and BIOSReleaseDate. The values assigned to these entries tell you what BIOS version you have and when it was launched.
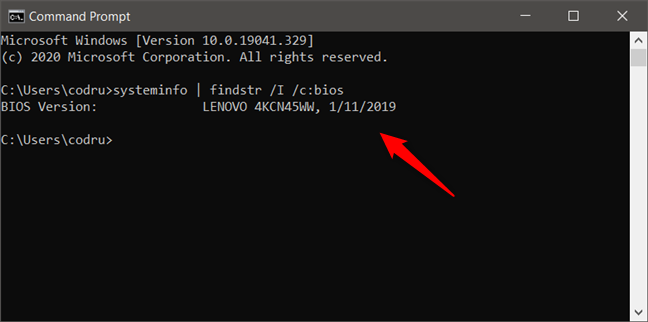
5. How to find the BIOS version using Command Prompt
You can also use the Command Prompt to check your BIOS version. To see the BIOS version and release date, run this command: systeminfo | findstr /I /c:bios. Note that we are using the capital letter I and not the lowercase letter L. Press Enter and the BIOS information is displayed.
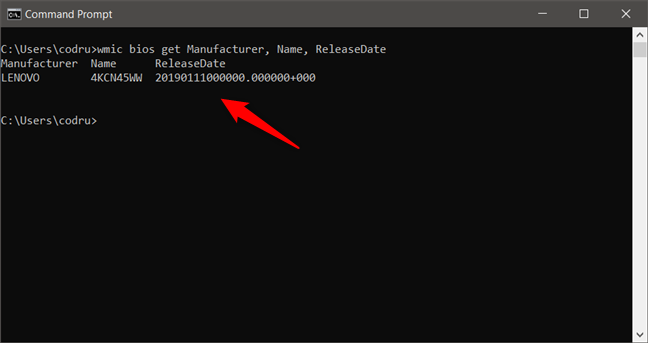
You can also run the following command: wmic bios get Manufacturer, Name, ReleaseDate. The data displayed should look similar to the screenshot below.
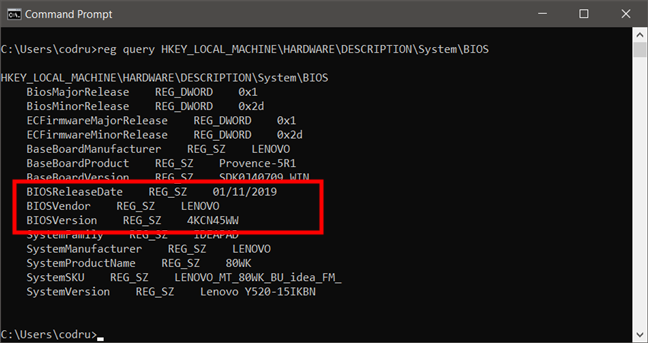
If you prefer, you can also read the Windows Registry from the Command Prompt, using the following command: reg query HKEY_LOCAL_MACHINE\HARDWARE\DESCRIPTION\SystemBIOS.
Running this command extracts all the BIOS information stored inside the Windows Registry and displays it in the Command Prompt window. Then, all you have to do is locate the BIOSVersion and BIOSReleaseDate entries.
6. How to check the BIOS version using PowerShell
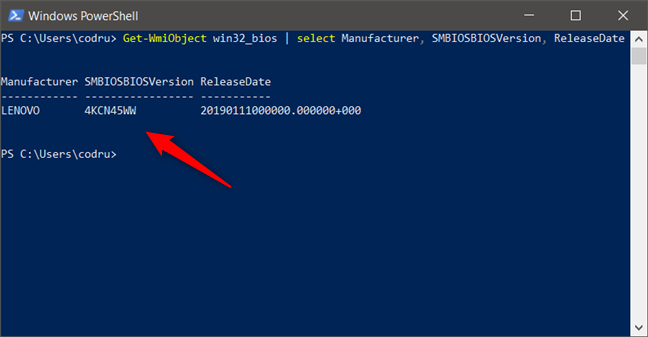
If you prefer to use Powershell to find your BIOS version, open it and run the following command: Get-WmiObject win32_bios | select Manufacturer, SMBIOSBIOSVersion, ReleaseDate.
7. How to find the BIOS version using the DirectX Diagnostic Tool
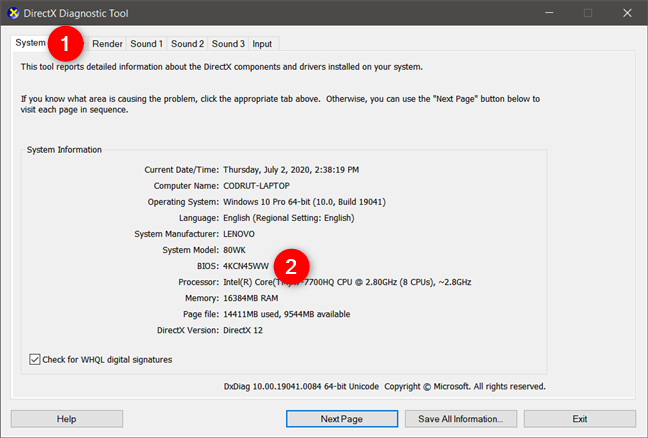
DirectX Diagnostic Tool or DXDiag.exe is a tool used to collect info about devices to help troubleshoot problems with DirectX sound, video, and input devices. Use the search term «dxdiag» in Windows and click or tap the dxdiag search result.

You can find the BIOS version of your computer or device on the System tab.
8. How to check your BIOS version using third-party apps
If none of the above methods suit you, you might prefer to use third-party applications that display this information. A good example is CPU-Z, a freeware app that gathers information about the main components of your system. In the Mainboard tab of this application, you can see the BIOS version of your computer’s motherboard.
Many similar applications can share this information. Other apps that we like are Speccy and Belarc Advisor.
Do you know other methods to check the BIOS version?
As you can see from this guide, there are many ways in which you can see the BIOS version of your computer or device. We generally prefer tools that easily share this information, like System Information, but we do not hesitate to use the Command Prompt or PowerShell when needed. Give our methods a try and, before closing this article, do share which way you like the most.