
Customizing the boot logo in Windows involves several steps and tools, depending on whether your system uses UEFI or BIOS firmware. Below are detailed instructions for enabling Unbranded Boot features, altering the boot logo, and managing crash screens.
How to Customize the Boot Logo in Windows?
Note: Get the image ready
- Right-click on the image you want to set as the boot logo, hover over Open with, and choose Paint from the list.
- Under the Image section, select Resize.
- Now, choose Pixels as the unit, enter 250 under both Horizontal and Vertical, and then click OK. Alternatively, you could use a third-party tool or website to resize the image.
- Once done, click on the File menu, hover the cursor over Save as, and select BMP picture.
- Navigate to the desired folder, enter splash as the file name, under Save as type, choose 24-bit Bitmap, and click on Save.
After the file is ready, let’s head to the next step, which is to get HackBGRT running to change the boot logo. It’s an open-source tool and easy to use.
1. Enable Unbranded Boot Using Control Panel
- Open Control Panel:
- Open the Start Menu by clicking on Start on the Taskbar.
- Type Control Panel in the search bar and press Enter.
- Navigate to Programs and Features:
- In Control Panel, select Programs.
- Click on Programs and Features.
- On the left pane, click Turn Windows features on or off.
- Enable Unbranded Boot:
- In the Windows Features window, expand the Device Lockdown node.
- Check the checkbox for Unbranded Boot.
- Click OK.
- Windows will search for the required files, apply necessary changes, and display a progress bar. Once completed, click Close.
Following these steps, Unbranded Boot will be enabled, allowing you to suppress Windows UI elements during startup. This helps create a cleaner and more professional boot experience.
2. Configure Unbranded Boot Using BCDEdit
- Open Command Prompt as Administrator:
- Press Win + X to open the Power User menu.
- Select Command Prompt (Admin) or Windows PowerShell (Admin).
- Disable Advanced Startup Options:
- Run the following commands one by one:bcdedit.exe -set {globalsettings} advancedoptions false
bcdedit.exe -set {globalsettings} optionsedit false
bcdedit.exe -set {globalsettings} bootuxdisabled on
bcdedit.exe -set {bootmgr} noerrordisplay on
- Run the following commands one by one:bcdedit.exe -set {globalsettings} advancedoptions false
These commands will disable the F8 and F10 keys during startup, suppress all Windows UI elements, and prevent error displays, resulting in a streamlined boot process.
3. Replace the Boot Logo Using HackBGRT
- Disable Secure Boot:
- Restart your computer and enter the UEFI firmware settings (usually by pressing F2, Delete, or Esc during boot).
- Navigate to the Secure Boot option and disable it.
- Prepare Your Custom Logo:
- Create an image no larger than 300px x 300px. Ensure it is not a GIF or transparent. If using a transparent image, change its background to black.
- Download HackBGRT:
- Download HackBGRT.
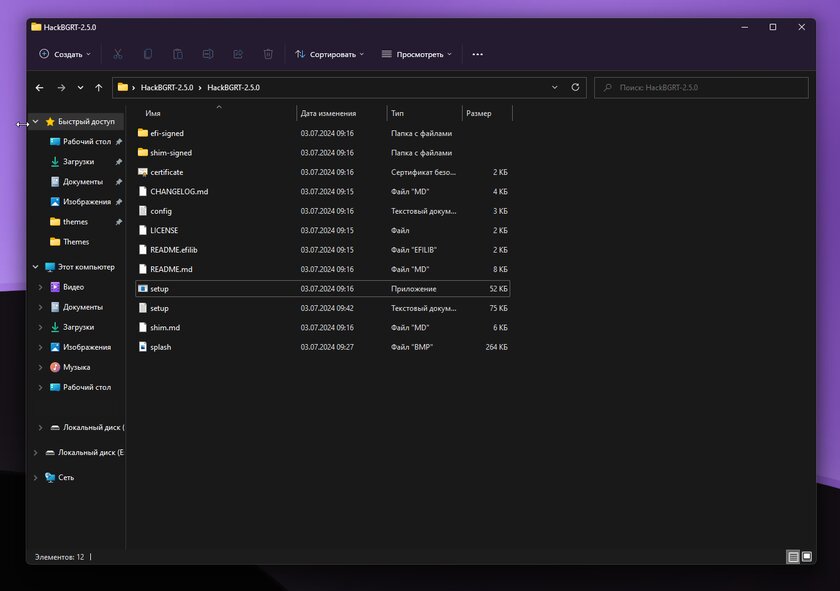
- Extract the downloaded folder.
- Run HackBGRT:
- Open the extracted folder and run the exe program as an administrator.
- Press the i key to open the config file in Notepad.
- Close Notepad to launch the Paint application with the default boot logo.
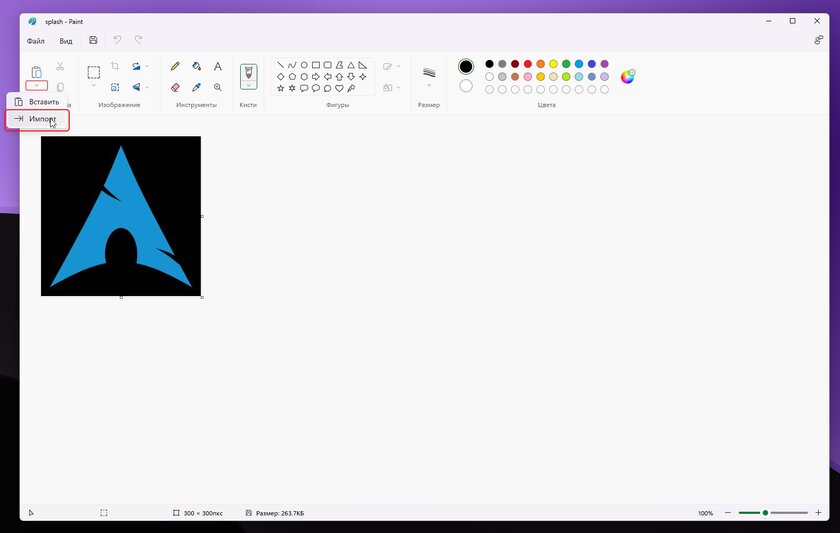
- Click Paste drop-down button, select Paste from, and choose your custom logo.
- Save the image by selecting File > Save.
This tool effectively replaces the Windows boot logo with your custom image, offering a personalized boot experience.
4. Restore Original Boot Logo
- Open HackBGRT Folder:
- Navigate to the HackBGRT folder and run the exe file as an administrator.
- Restore Original Logo:
- Press R to completely remove HackBGRT and restore the original boot logo.
- Alternatively, press D to disable the software and restore the original boot logo.
This ensures you can revert to the original Windows logo if desired.
By following these instructions, you can successfully customize your Windows boot logo and suppress unnecessary elements for a cleaner boot experience.
Changing the boot logo in Windows 10 can give your PC a personalized flair. To accomplish this, you’ll need to access your system settings, use third-party software, and replace the default logo with your desired image. While it sounds technical, it’s manageable with the right instructions. Follow the steps below to give your boot screen a fresh look.
Changing the boot logo in Windows 10 involves a few straightforward steps, allowing you to add a personal touch to your computer’s startup screen.
Step 1: Back Up Your System
Before making changes, create a backup of your system to prevent data loss.
It’s crucial to have a safety net. Use Windows built-in backup tools or third-party software to save your current settings and files. This way, you can restore your system if anything doesn’t go as planned.
Step 2: Download Boot Logo Changer Software
Find a trusted boot logo changer software online and download it.
There are several programs available that can modify the boot logo. Ensure you choose one that’s reputable to avoid malware. Some popular options include HackBGRT and Boot Animation Creator.
Step 3: Prepare Your Desired Image
Select the image you wish to display as your boot logo and ensure it’s in the correct format.
Images should typically be in BMP format and match the required size for your specific software. A square image often works best to prevent distortion during booting.
Step 4: Run the Boot Logo Changer
Open the boot logo changer software and follow the instructions to replace the default logo.
The software will guide you through the process, usually involving selecting the new image file and applying the change. Follow each prompt carefully to avoid errors.
Step 5: Reboot Your System
Restart your computer to apply the changes and see your new boot logo in action.
After rebooting, you should notice your chosen image displayed instead of the default Windows logo. If it doesn’t appear, double-check the steps or consult the software’s troubleshooting guide.
Once you complete these steps, your Windows 10 boot screen will feature a brand-new logo of your choice. This change is purely cosmetic and shouldn’t affect your system’s performance or functionality.
Tips for Changing Boot Logo in Windows 10
- Always ensure your backup is complete and recent before making system changes.
- Use high-quality images to ensure a sharp display on the boot screen.
- Follow the software’s instructions closely to avoid errors.
- Check for software updates regularly to maintain compatibility with Windows updates.
- If you encounter issues, consult online forums or the software’s support page for help.
Frequently Asked Questions
Can changing the boot logo harm my computer?
While unlikely, improper changes can cause boot issues. Always back up your system first.
What should I do if my computer won’t boot after changing the logo?
Use your backup to restore the system or boot into safe mode to fix the problem.
Is changing the boot logo legal?
Yes, it’s legal for personal use, but altering logos for commercial purposes may violate Windows terms.
Can I revert to the original boot logo?
Yes, most software allows you to restore the default logo if needed.
Do I need to pay for the boot logo changer software?
Some software may require payment, but free options are available and effective.
Summary
- Back up your system.
- Download boot logo changer software.
- Prepare your desired image.
- Run the boot logo changer.
- Reboot your system.
Conclusion
Personalizing your Windows 10 experience by changing the boot logo can be a fun and rewarding process. By following the outlined steps, you can safely and effectively give your computer a unique touch. Remember, the key to a smooth transition is preparation—back up your system, choose the right tools, and carefully follow each step.
While it’s exciting to dive into visual modifications, always prioritize your system’s safety. If you’re new to this process, don’t hesitate to reach out to online communities for support and advice. Experimenting with your computer’s appearance shouldn’t come at the expense of its functionality.
Finally, if you’re eager for more customization options, consider exploring other visual tweaks Windows 10 offers. From changing desktop themes to adding widgets, there’s a whole world of personalization waiting. Dive in, have fun, and make your Windows experience truly yours!
Matt Jacobs has been working as an IT consultant for small businesses since receiving his Master’s degree in 2003. While he still does some consulting work, his primary focus now is on creating technology support content for SupportYourTech.com.
His work can be found on many websites and focuses on topics such as Microsoft Office, Apple devices, Android devices, Photoshop, and more.
Windows has become synonymous with its modern blue-tiled logo. It can be seen in the black backdrop whenever PC is powered on. Windows gives tons of customization abilities to its users which include changing the default boot logo to any other picture. In this article, we bring to you a helpful guide that will teach you how to change Windows 10 boot logo, edit Windows startup and also look into Windows 10 boot screen changer.
Here are some necessary pre-requisites to change Windows 10 boot logo.
- Windows should be running on UEFI boot mode.
- Secure boot must be disabled.
- Administrative privileges are required.
Most modern Windows PC come with UEFI while older systems use Legacy BIOS. You can follow our guide below to check which one your system is running. Follow our guide to Check if your PC is using UEFI or Legacy BIOS.
Windows 10 doesn’t allow changing boot logo but there is a safe way to do it. HackBGRT is an open-source and free command-line tool used to change boot logo. Follow these steps to do so.
Note: Using HackBGRT, GIFs or transparent images cannot be used as the boot logo and the required image resolution is 300px x 300px.
1. Go to download page of HackBGRT and download zip file for the latest version (1.5.1).

2. Once downloaded, unzip HackBGRT – 1.5.1.zip using appropriate tool like 7-zip.

3. In the extracted folder, right–click on setup.exe file and select Run as administrator from context menu.

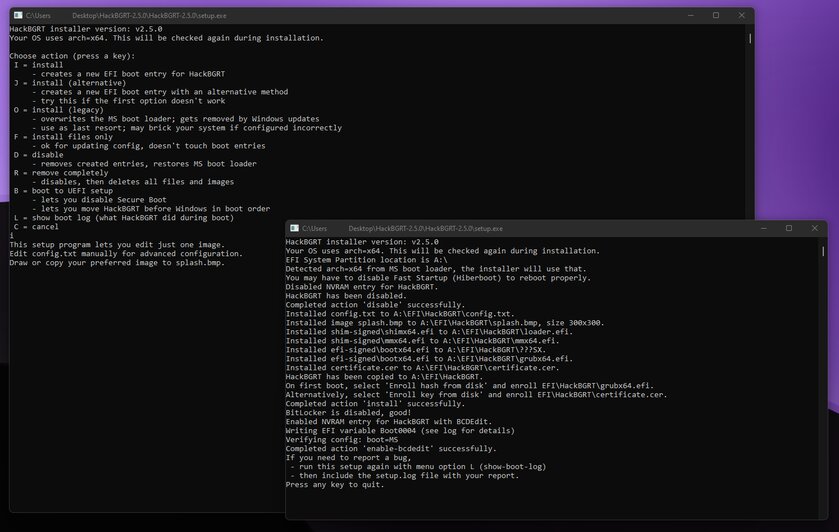
4. HackBGRT will open Command Prompt window. HackBGRT will detect location of UEFI System Partition and check if Secure Boot has been disabled. Information regarding the same will be displayed.

5. Install HackBGRT by pressing the I key.
6. After executing the install command HackBGRT config file will open up in Notepad. Close it by changing it.
7. HackBGRT will automatically launch the Paint application now with its logo on it.
8. To replace the boot logo with your preferred image, expand the Paste drop-down list and select Paste from the option.

9. Locate image file you wish to set as new boot logo, select it and click on Open.

10. Edit it as you wish and once satisfied, click on File > Save. Close the Paint application window.

11. Look for confirmation message HackBGRT is now installed and then close Command Prompt.

12. Finally, reboot the PC and you will see the new boot logo.
Also Read: What is Windows 10 Boot Manager?
How to Revert back to default Windows Boot Logo
If you wish to revert back to the original Windows 10 boot logo, you will need to remove the HackBGRT application. Follow these steps to do so.
1. Follow Step 3 from the previous method to open the HackBGRT setup file as administrator.
2. You will see additional options to remove and disable HackBGRT.
Note: If you want to keep the application, press the D key to disable it and it will restore the default boot logo.
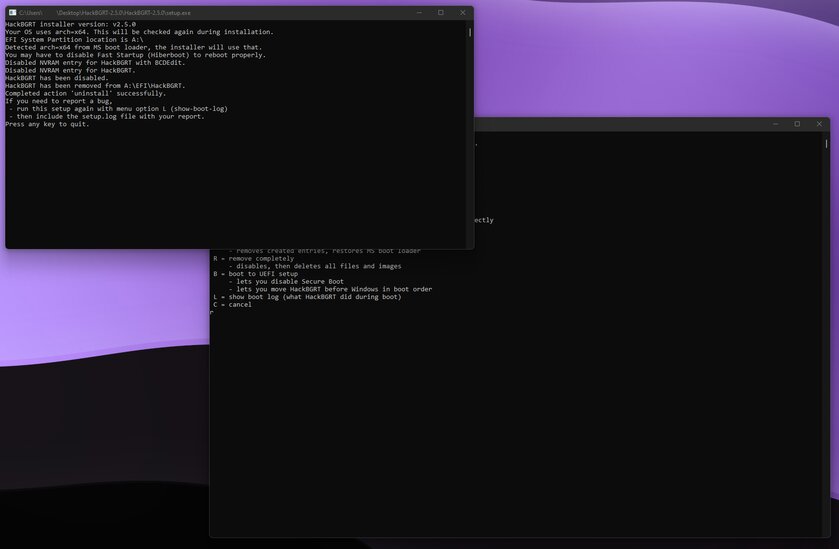
3. Press the R key to execute the remove command. It will remove HackBGRT completely from your System.

4. Once you receive HackBGRT has been removed confirmation message, press any key to quit the Command Prompt window.
The Default Windows logo will now be restored.
Also Read: How to Boot Windows 10 into Recovery Mode
How to Disable Secure Boot
If your Windows PC is running UEFI then you will need to disable Secure boot to change Windows 10 boot logo. Secure boot ensures that the device boots using only system-manufactured trusted software. If enabled, it will prevent the third-party applications from running and changing the boot logo. Follow these steps to check whether it is enabled.
1. Press the Windows key and type System Information, and click on Open.

2. Check whether Secure Boot State is On or Off.

If it is On, follow the steps below to disable it.
1. Launch Settings application by pressing Windows + I keys and clicking on Update & Security tile.

2. Move to Recovery tab and click on Restart now button under Advanced Startup.

3. On the Choose an Option screen, click on Troubleshoot.

4. Click on Advanced Options.

5. Select UEFI Firmware Settings and click on Restart on the next screen.

6. Your system will now boot into the BIOS menu.
Note: The placement of Secure Boot settings varies for each manufacturer. Read our article to access BIOS settings in Windows 10.
7. Using Arrow Keys go to the Boot tab and find the Secure Boot option.
8. Press Enter key or use + or – to change its status to Disabled, Press F10 to confirm changes.
Restart your PC and now you are ready to change the Windows 10 boot logo.
Recommended:
- Fix WaasMedicSVC.exe High Disk Usage in Windows 10
- How to Convert M4B to MP3 in Windows 10
- Fix Windows 10 Bluetooth Mouse Lag
- What is Test Mode in Windows 10?
We hope that this guide was helpful and you were able to change Windows 10 boot logo. We showed how to edit Windows startup using Windows 10 boot screen changer application, HackBGRT. If you have any queries or suggestions then feel free to drop them in the comments section.
Если вам надоел стандартный логотип Windows, появляющийся при загрузке ПК, его можно сменить с помощью утилиты HackBGRT. Поменять лого вручную, заменив один файл, не получится — всё намного сложнее. Поэтому лучше использовать именно сторонюю программу.
Стоит сразу сказать, что существуют ограничения: анимацию в высоком разрешении установить не получится. Программа позволяет поставить только статичное изображение размером 300 × 300 пикселей. В этой статье я объясню, как это сделать.
Требования
Описанный в этой статье способ сработает только для компьютеров с ОС Windows 10 или 11. Кроме того, нужно соблюсти ещё несколько условий. Во-первых, требуется загрузка компьютера в режиме UEFI. Также системный диск должен быть размечен в формат GPT, а технология шифрования накопителя BitLocker выключена. И наконец, следует отключить параметр Secure Boot в BIOS.
Чтобы проверить диск, нажмите сочетание клавиш Win+R и введите diskmgmt.msc. В открывшемся окне найдите диск, на который установлена система, нажмите на него правой клавишей мыши и откройте «Свойства». Перейдите в раздел «Тома» и убедитесь, что в строке «Стиль раздела» указано «Таблица с GUID» либо просто «GPT».
Для проверки того, используется ли UEFI, а также Secure Boot, достаточно нажать сочетание клавиш Win+R и ввести msinfo32. Найдите строки «Режим BIOS» и «Secure Boot». В первом случае значение должно быть «UEFI», во втором — «Отключено».
Шифрование BitLocker проверяется проще всего. Зайдите в «Проводник» и кликните правой клавишей мыши по системному диску. Если там будет доступен пункт «Включить BitLocker», значит эта опция выключена и всё в порядке.
Инструкция
Чтобы заменить логотип загрузки, надо повторить следующие шаги.
1) Скачайте HackBGRT и распакуйте архив в удобном месте.
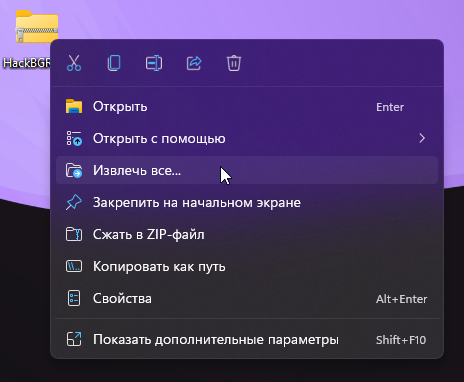
2) Запустите файл setup.exe из распакованного архива.
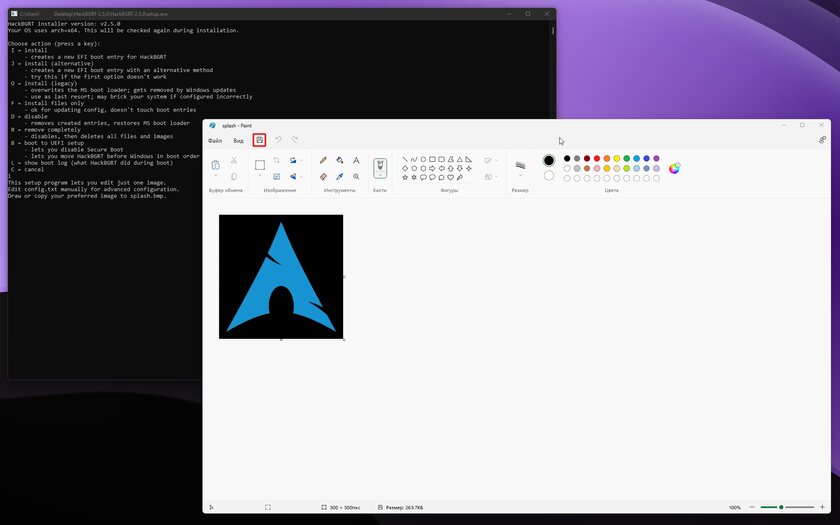
3) Откроется окно командной строки, где предложат выбрать один из пунктов. Нас интересует вариант Install. Впишите символ i и нажмите клавишу Enter.
4) Откроется программа Paint, в которой будет находиться стандартный логотип. Чтобы заменить его на свой собственный, нажмите на нижнюю часть кнопки «Вставить» и выберите пункт «Вставить из» или «Импорт» для Windows 10 или 11 соответственно.
5) После успешного переноса изображения убедитесь, что размер картинки составляет 300 на 300 пикселей. Если всё верно, сохраните файл кнопкой в верхней панели или сочетанием клавиш Ctrl-S. Окно Paint закройте. В случае, если картинка больше, чем нужно, достаточно воспользоваться встроенным в Paint инструментом. Потяните изображение за угол до тех пор, пока оно не станет необходимого размера.
6) Появится окно User Account Control, спрашивающее разрешение на работу программы. Выберите «Да».
7) В окне командной строки должны появиться новые строки. Надпись «Completed action ‘install’ successfully» означает успех операции. После сообщения «Press any key to quit» закройте окно программы нажатием любой клавиши.
Восстановление стандартного лого
Для того, чтобы вернуть стандартный логотип загрузки Windows, нужно снова воспользоваться утилитой HackBGRT.
1) Запустите файл setup.exe из распакованного архива.
2) В командной строке выберите пункт Uninstall. Для этого напишите символ r и нажмите клавишу Enter.
3) Появится окно User Account Control, спрашивающее разрешение на работу программы. Выберите «Да».
4) Откроется новое окно командной строки, и через несколько секунд появится сообщение «Completed action ‘uninstall’ successfully». Это означает успешное удаление нового логотипа. После этого закройте окно командной строки нажатием любой клавиши.
When it comes to customizing your Windows 10 experience, altering the boot logo is an often overlooked, yet incredibly impactful change. The boot logo, also known as the splash screen or startup image, is the first thing users see as they boot up their machines. By changing it, you can personalize the user experience or enhance your organization’s branding. In this guide, we’ll walk you through the steps involved in how to change the boot logo in Windows 10, the tools you’ll need, and how to achieve a fully customized startup sequence for your system.
Whether you’re an IT admin or a tech enthusiast looking to tweak your Windows 10 installation, this blog post will provide detailed instructions on how to boot Windows with a custom logo, along with the necessary considerations for a smooth, secure, and efficient process.
Understanding the Boot Logo and Its Importance
Before diving into the technicalities of how to change boot logo in Windows 10, it’s crucial to understand the role of the boot logo itself. The boot logo is displayed during the startup process of your computer before the operating system loads. It’s part of the boot graphics resource table (BGRt) that holds the necessary images for system startup.
What Does the Boot Logo Represent?
The boot logo is a visual representation of the system’s integrity and brand. For personal computers, it could simply be a logo of the manufacturer or a custom graphic. For enterprise environments, businesses often prefer a custom logo that represents their branding or simply a more professional or themed startup sequence. Customizing the boot logo can be a good way to improve the user experience, create a cohesive look, and impress stakeholders.
Why Change the Boot Logo in Windows 10?
There are many reasons you may want to customize the Windows 10 boot logo. For instance, when managing multiple devices across a network, a custom logo can help easily identify machines. Additionally, it adds an element of personalization or professionalism for users, particularly when utilizing devices for corporate environments.
How to Get a Custom Windows 10 Boot Logo
To customize the Windows 10 boot logo, you’ll need specialized tools and software to ensure the changes are made safely and effectively. In this section, we’ll introduce the tools you can use and provide a step-by-step walkthrough of the process to help you successfully customize your Windows 10 boot logo.
1. Using HackBGRT (Recommended for UEFI Systems)
HackBGRT is a popular and reliable tool for customizing the boot logo on Windows 10 systems with UEFI firmware. It modifies the Boot Graphics Resource Table (BGRT) to replace the default logo with a custom image.
Steps to Use HackBGRT:
- Download and install HackBGRT.
- Disable Secure Boot in the BIOS/UEFI settings.
- Choose a custom BMP or PNG image and apply it using the tool.
- Restart the system to see your custom logo.
Pros:
- Easy to use with a user-friendly interface.
- Reversible changes (includes backup functionality).
Cons:
- Only works on UEFI-based systems.
- Requires Secure Boot to be disabled.
2. OEM-Specific Firmware Tools
Some OEMs (e.g., Dell, Lenovo, HP) provide built-in options to change the boot logo via their BIOS or firmware interface. These tools are often found in the BIOS/UEFI settings and let you upload a custom image directly.
Steps:
- Enter BIOS/UEFI settings during startup (e.g., by pressing F2, F12, or DEL).
- Look for branding or logo customization options.
- Upload your custom image (format and size requirements vary).
- Save changes and restart.
Pros:
- Simple and secure process.
- No third-party software needed.
Cons:
- Only available for specific OEM devices.
- Limited customization options.
3. Third-Party Boot Customization Apps
Third-party tools like Boot Logo Changer or similar apps offer a more visual way to change the boot logo. These tools often have intuitive interfaces and additional features, such as resolution adjustments or pre-made logo libraries.
Steps:
- Download a trusted third-party boot customization app.
- Follow the app’s instructions to select and apply a custom boot logo.
- Restart the system to verify the changes.
Pros:
- Easy to use for beginners.
- May include additional customization features like multi-logo support.
Cons:
- Compatibility issues with some Windows updates.
- Potential security risks with unverified apps.
4. Manual Modification of BGRT
For advanced users, manually editing the BGRT is an option. This method involves extracting the UEFI firmware, replacing the logo image, and flashing the modified firmware back onto the system.
Steps:
- Use tools like UEFITool to extract the firmware image.
- Replace the default boot logo file with your custom image.
- Flash the modified firmware using a firmware update utility.
Pros:
- Total control over customization.
- Works on any UEFI system with supported firmware tools.
Cons:
- Complex and risky (high chance of bricking the device).
- Time-consuming and not recommended for casual users.
5. Using Group Policy Editor for Lock and Sign-in Screens (Partial Customization)
Although not a direct boot logo change, you can customize the lock screen image or the background shown during sign-in.
Steps:
- Open Group Policy Editor (gpedit.msc).
- Navigate to Computer Configuration > Administrative Templates > Control Panel > Personalization.
- Enable the policy to “Force a specific default lock screen and logon image” and specify your custom image.
Pros:
- Simple process for customizing user-facing screens.
- No third-party tools required.
Cons:
- Doesn’t change the actual boot logo.
- Limited to lock screen and sign-in background.
Summary of Methods
By selecting the method that aligns with your system and technical expertise, you can successfully customize your Windows 10 boot logo and enhance your boot experience.
Troubleshooting Common Issues
Sometimes, when altering the boot logo or other system components, issues can arise. Here’s a look at some common problems you might face and how to resolve them.
The Boot Logo Doesn’t Display Properly
If your boot logo doesn’t appear or is distorted, it might be due to incorrect image dimensions. Ensure that the image you’re using has the correct resolution for your system. Additionally, some systems might not support certain formats or large image sizes. Recheck your logo file’s specifications and try a smaller or different file type.
How to Restore the Default Boot Logo
If you decide you no longer want your custom boot logo, you can always revert to the default Windows 10 logo. HackBGRT makes it easy to restore the default logo by simply selecting the “Restore” option within the tool.
Trio’s MDM Solution: Managing Custom Boot Logos Across Devices
For businesses looking to apply custom boot logos on multiple devices, managing this change through a centralized solution is key. This is where an MDM (Mobile Device Management) solution like Trio becomes very important.
Streamlining IT Management with Trio
Trio offers a full suite of features to simplify IT management. By integrating Trio MDM into your operations, businesses can maintain consistency in device configurations, security settings, and even user experience across all Windows-based systems. Whether you’re applying a custom boot logo or ensuring other system settings are standardized, Trio’s MDM for Windows can make the process seamless and efficient.
If you’re interested in exploring how Trio can help with managing custom boot logos and more, sign up for a free demo today.
Conclusion
Customizing the boot logo in Windows 10 is a great way to personalize your system or reinforce company branding. Whether you’re an IT administrator or a tech enthusiast, changing the boot logo can be done easily with the right tools. By following the step-by-step instructions in this guide, you can change the default boot logo to something more fitting for your needs. Additionally, if you’re managing multiple devices, a solution like Trio can streamline this process and ensure consistency across your fleet of systems.
Get Ahead of the Curve
Every organization today needs a solution to automate time-consuming tasks and strengthen security.
Without the right tools, manual processes drain resources and leave gaps in protection. Trio MDM is designed to solve this problem, automating key tasks, boosting security, and ensuring compliance with ease.
Don’t let inefficiencies hold you back. Learn how Trio MDM can revolutionize your IT operations or request a free trial today!