How to change windows 10 icons

Applies ToWindows 11 Windows 10

Support for Windows 10 will end in October 2025

After October 14, 2025, Microsoft will no longer provide free software updates from Windows Update, technical assistance, or security fixes for Windows 10. Your PC will still work, but we recommend moving to Windows 11.

Learn more

Your desktop is the first thing you encounter when you sign in to Windows, and having it organized to your liking can significantly enhance your productivity and overall experience. This article describes how to customize the default desktop icons, add new shortcuts, adjust their size to suit your preferences, and show or hide all icons as needed.

Customize the default desktop icons

By default, Windows includes the Recycle Bin icon on the desktop. Essential icons that you can customize include:

  • This PC: Provides access to the computer’s drives and connected devices

  • Recycle Bin: Where deleted files are temporarily stored

  • Network: Allows you to view and connect to network resources

  • User’s Files: A shortcut to your personal folders

Additional shortcuts can be added to suit individual preferences and enhance productivity.

To customize the default desktop icons:

  1. In the Settings app  on your Windows device, ​​​​​​​select Personalization > Themes or use the following shortcut:

    Themes

  2. Select Desktop icon settings

  3. Select the icons you would like to have on your desktop, then select OK

Note: The option Allow themes to change desktop icons allows or prevents themes from changing the icons used for common desktop shortcuts such as This PC, User’s Files, Network, and Recycle Bin. By default, themes are allowed to change these icons. However, if you have customized these icons to your preference, you might not want them to be altered whenever you change your theme.

Screenshot of the desktop icon settings in Windows.

​​​​​​​

Add shortcuts to your desktop

By placing frequently used applications, files, and folders directly on your desktop, you can access them quickly without navigating through multiple menus or folders. This can save time and reduce the effort needed to perform routine tasks.

To add shortcuts to your desktop, you can use one of these options:

  1. Right-click on an empty area of the desktop

  2. Select New > Shortcut

  3. Follow the prompts to create a shortcut to a specific file, folder, or web page

Screenshot of right-click data-lazy-src=

​​​​​​​

  1. Select Start  and select All to display a list of all installed applications

  2. Scroll through the list to find the app for which you want to create a shortcut

  3. Drag and drop the app you want to create a shortcut for to the desktop

  1. Navigate to the file or folder you want to add

  2. Right-click on the file or folder and select Show more options > Send to > Desktop (create shortcut)

  1. Open your web browser and navigate to the web page you want to add

  2. Click and drag the padlock icon (next to the URL) to your desktop

Resize the desktop icons

Resizing desktop icons can be useful for improving accessibility and organization. For example, if you have a high-resolution monitor, the default icon size might appear too small, making it difficult to identify and click on the icons. By increasing the icon size, you can make them more visible and easier to interact with. Conversely, if you have many icons on your desktop and want to fit more on the screen without scrolling, reducing the icon size can help you manage your workspace more efficiently.

  1. Right-click on an empty area of the desktop

  2. Select View and then choose between Large icons, Medium icons, or Small icons to adjust their size.

Tip: You can also use the scroll wheel on your mouse to resize desktop icons. On the desktop, press and hold Ctrl while you scroll the wheel to make icons larger or smaller.

Screenshot of the contextual menu on the desktop that appears when you right-click.

​​​​​​​Show or hide all desktop icons

Hiding desktop icons can be useful in various scenarios. For instance, if you’re giving a presentation or sharing your screen during a meeting, hiding desktop icons can help create a cleaner and more professional appearance. It can also be beneficial if you want to focus on a specific task without the distraction of numerous icons cluttering your desktop.

  1. Right-click on an empty area of the desktop

  2. Select View, and then uncheck Show desktop icons. This will temporarily hide all icons, and you can easily show them again by rechecking the same option.

Screenshot of the contextual menu on the desktop that appears when you right-click.

Tip: If you hide your desktop icons and need to access the desktop, you can do so through File Explorer. Simply open File Explorer , and select Desktop in the navigation pane.

Need more help?

Want more options?

Explore subscription benefits, browse training courses, learn how to secure your device, and more.

Если вам потребовалось изменить значок «Этот компьютер», иконку корзины, папки и некоторых других системных расположений — сделать это просто встроенными средствами системы. Более того, существуют сторонние возможности изменения других системных значков Windows 10 на свои.

В этой инструкции — подробно как о простых встроенных методах для начинающих, так и о других, «продвинутых», методах изменить значки (иконки) в Windows 10 и установить их на свой вкус. См. также: Как изменить иконку диска или флешки в Windows.

Изменение значка «Компьютер», «Корзина» и некоторых других

Если вы хотите установить свои иконки для некоторых системных папок на рабочем столе, сделать это в Windows 10 можно следующим образом:

  1. Зайдите в Параметры — Персонализация — Темы.
  2. В панели справа выберите пункт «Параметры значков рабочего стола». 
    Параметры значков рабочего стола Windows 10

  3. В следующем окне вы можете включить или отключить отдельные значки рабочего стола, а также установить свои. 
    Изменить основные иконки рабочего стола

  4. Просто выбираете из системных библиотек или указываете собственный файл в формате .ico после нажатия кнопки «Обзор». 

На всякий случай привожу список встроенных библиотек Windows 10, где хранятся основные иконки системы (все находятся в C:\Windows\System32):

  • shell32.dll (выбран по умолчанию при смене значка).
  • imageres.dll
  • ddores.dll

Конечно, есть и другие, но всё основное, что использует операционная система, собрано именно в этих DLL.

Как изменить иконку папки Windows 10

Изменение значков отдельных папок в Windows 10 — очень простая задач, достаточно следующих шагов:

  1. Нажмите правой кнопкой мыши по любой папке и выберите пункт «Свойства».
  2. Перейдите на вкладку «Настройка» и нажмите «Сменить значок». 
  3. Как и в предыдущем способе, укажите желаемую иконку из библиотек Windows, exe-файлов программ или собственного .ico файла.
  4. Иногда после этого требуется закрыть и открыть заново окно с этой папкой или нажать F5, чтобы изменения вступили в силу.

Кстати, есть способы изменить цвет отдельных папок.

Программы для изменения системных значков Windows 10

В сети доступно достаточно много программ, способных изменять системные иконки Windows 10 путем редактирования файлов ресурсов.

Это не то, что я рекомендовал бы начинающему пользователю, так как потенциально способно привести к проблемам (например, при проверке целостности системных файлов, тест обнаружит, что она нарушена), но, просто для информации, продемонстрирую одну такую программу — CustomizerGod, доступную на сайте www.door2windows.com/customizergod/

Что может программа? Прежде всего, заменить основные системные иконки Windows 10 (в разделе «General Icons». Например, если вам потребовалось поменять значки сразу всех папок, сделать это можно именно в этом разделе. При этом принимаются не только файлы .ico, но и другие графические форматы (например, png с прозрачным фоном).

Изменение системных значков Windows 10 в CustomizerGod

Другие разделы программы позволяют изменить значки для специфичных индикаторов и панелей инструментов системы, например, ниже вы видите возможность изменения значка батареи (правда с ним не всё так просто: это не простые иконки, а графические файлы, содержащие сразу несколько индикаторов заряда).

Изменение отдельных системных значков

Само использование программы для большинства элементов простое: выбрали иконку, которую нужно поменять, нажали кнопку Change, указали свой файл и применили настройки. Для того, чтобы изменения вступили в силу, потребуется перезапустить проводник: сделать это можно прямо внутри программы: нажмите по кнопке меню и в разделе «Explorer» нажмите «Restart».

В этом же меню можно очистить кэш иконок, экспортировать ресурсы выбранной вкладки для редактирования (может пригодиться, например, когда меняем значок батареи), восстановить изначальные иконки, настроить параметры подгонки размера изображений.

Если у вас есть еще какие-то вопросы на тему смены значков/иконок Windows 10 — спрашивайте в комментариях, я постараюсь помочь.

Changing the desktop icons in Windows 10 is a straightforward process that lets you customize your desktop to better suit your preferences. To change your desktop icons in Windows 10, you’ll need to access the «Personalization» settings from the desktop, navigate to the «Themes» section, and then select «Desktop icon settings.» From there, you can customize the icons for This PC, Network, Recycle Bin, and more.

In this section, we’ll walk through the steps to change your desktop icons in Windows 10. By following these steps, you’ll be able to personalize the look and feel of your desktop quickly and easily.

Step 1: Right-click on the Desktop

Right-click on any empty space on your desktop to open a context menu.

This context menu gives you quick access to various settings, including the «Personalize» option, which we’ll use in the next step.

Step 2: Select «Personalize»

From the context menu, click on «Personalize.»

This will open the «Personalization» settings window, where you can change the overall look of your Windows interface, including the desktop icons.

Step 3: Click on «Themes»

In the «Personalization» settings window, navigate to the «Themes» tab on the left-hand side.

The «Themes» section helps you manage aspects of your theme, including colors, sounds, and, importantly, desktop icons.

Step 4: Click on «Desktop icon settings»

Under the «Related Settings» section in the «Themes» tab, click on «Desktop icon settings.»

This will open a new window specifically for managing which desktop icons appear on your screen and customizing their appearance.

Step 5: Select and Change Icons

In the «Desktop Icon Settings» window, select the icon you want to change, then click on the «Change Icon» button.

A new window will pop up with a selection of available icons. You can choose one from the list or browse for a custom icon file saved on your computer.

Step 6: Apply and Save Changes

After selecting your new icon, click «Apply,» then «OK» to save your changes.

Your desktop will refresh, and you’ll see the new icons in place of the old ones.

After completing these steps, your Windows 10 desktop icons will be updated to reflect your new choices. You can always return to the «Desktop Icon Settings» to make further changes as needed.

Tips for Changing Desktop Icons in Windows 10

  • Backup Icons: Always back up your existing icons before making any changes, just in case you want to revert back.
  • High-Resolution Icons: Use high-resolution icons to keep your desktop looking sharp and clear.
  • Custom Icons: Download custom icon packs from trusted websites to give your desktop a unique look.
  • Organize: Keep your desktop organized; only change icons for the most used shortcuts to avoid clutter.
  • Software Tools: Use third-party software tools for more advanced icon customization options.

Frequently Asked Questions about Changing Desktop Icons in Windows 10

How do I revert back to the default icons?

To revert back to the default icons, go to the «Desktop Icon Settings» window and click the «Restore Default» button.

Can I change the size of the desktop icons?

Yes, you can change the size by right-clicking on the desktop, selecting «View,» and then choosing either «Large icons,» «Medium icons,» or «Small icons.»

Why don’t my custom icons show up?

Ensure the icon file is in a compatible format (.ico) and stored in a location that Windows can access.

Can I change icons for folders too?

Yes, you can change folder icons by right-clicking the folder, selecting «Properties,» going to the «Customize» tab, and clicking «Change Icon.»

Do I need admin rights to change icons?

Yes, you usually need administrative rights to change system-wide settings, including desktop icons.

Summary of Steps to Change Desktop Icons in Windows 10

  1. Right-click on the desktop.
  2. Select «Personalize.»
  3. Click on «Themes.»
  4. Click on «Desktop icon settings.»
  5. Select and change icons.
  6. Apply and save changes.

Conclusion

In summary, changing desktop icons in Windows 10 is a simple yet effective way to personalize your computer. With just a few clicks, you can transform the look of your desktop, making it more functional and visually appealing. Whether you’re opting for a minimalistic design or something more vibrant, the choice is yours.

If you found this guide helpful, consider exploring other customization options within Windows 10 to further enhance your user experience. From changing your wallpaper to adjusting your system theme, the possibilities for personalization are nearly endless. Happy customizing!

Matt Jacobs has been working as an IT consultant for small businesses since receiving his Master’s degree in 2003. While he still does some consulting work, his primary focus now is on creating technology support content for SupportYourTech.com.

His work can be found on many websites and focuses on topics such as Microsoft Office, Apple devices, Android devices, Photoshop, and more.

Customizing your Windows 10 desktop with unique icons not only makes your desktop more visually appealing but also enhances your overall user experience. This detailed guide will show you how to change your desktop icons, including system icons like This PC, Recycle Bin, and more, as well as custom application and folder icons. Whether you’re looking to breathe new life into your workspace or simply make it more organized, changing icons can be a fulfilling experience.

Understanding Desktop Icons

Desktop icons serve as shortcuts to your files, applications, and system functions. By default, Windows 10 provides a set of standard icons, but you can change these icons to reflect your personality or create a more organized interface. There are basically two types of icons you can change:

  1. System Icons: These include the default icons for This PC, Recycle Bin, Network, and other built-in Windows functions.
  2. Custom Icons: These can be icons for folders, files, and applications that you create or download.

Why Customize Desktop Icons?

Customizing desktop icons can improve productivity, enhance your computer’s aesthetics, and help you easily distinguish between files and applications. Here are some reasons you might want to change your desktop icons:

  • Personalization: Altering icons is an easy way to make your computer feel more like your own space.
  • Organization: Unique icons can help you quickly identify different folders and applications.
  • Visual Appeal: Eye-catching icons can transform a dull desktop into a vibrant digital workspace.

Preparation: Finding the Right Icons

Before you start changing icons, you’ll need to find the icons that you want to use. Here are a few sources to find high-quality icons:

  1. Icon Websites: Websites like Icons8, Flaticon, and Iconfinder offer a variety of icons for free or at a small price.
  2. Custom Designs: You can create your own icons using graphic design software such as Adobe Illustrator or free alternatives like GIMP.
  3. Icon Packs: Several designers offer themed icon packs for download, allowing you to change multiple icons at once for a cohesive look.

Icon Format

Ensure that the icons you select are in the appropriate format. Windows primarily uses «.ico» files for icons, but you can use PNG files for some applications. If using other formats, you’ll likely need conversion software.

Step-by-Step Guide to Change Desktop Icons

Changing System Icons

Let’s start by changing system icons, such as This PC, Recycle Bin, and Network.

Step 1: Access Desktop Icon Settings

  1. Right-click on the Desktop:

    • From the desktop, right-click on an empty area.
  2. Select Personalize:

    • In the context menu that appears, click on ‘Personalize.’
  3. Navigate to Themes:

    • Once you’re in the Personalization window, look for the ‘Themes’ option in the left sidebar and select it.
  4. Desktop Icon Settings:

    • Scroll down and click on ‘Desktop icon settings.’ A new window will appear showing the icons currently available for customization.

Step 2: Change an Icon

  1. Select the Icon to Change:

    • In the Desktop Icon Settings window, select the icon you wish to change (e.g., This PC, Recycle Bin).
  2. Click on Change Icon:

    • Click the ‘Change Icon’ button at the bottom of the window. Another window will popup with default icons.
  3. Choose an Icon:

    • You can select one of the icons shown, or click ‘Browse’ to find your custom icon (.ico file) from your computer.
  4. Apply Changes:

    • Once you’ve chosen the desired icon, click ‘OK’ to confirm your selection, and then click ‘Apply’ and ‘OK’ on the Desktop Icon settings window.

Tips for System Icons

  • Make sure the icons are visually similar to what users would expect, especially for functionality-based icons.
  • Consider using icons that are easy to interpret—a styled Recycle Bin might look nice, but if it’s not immediately recognizable, it could confuse users.

Changing Folder and Application Icons

Next, we’ll look at how to change icons for specific folders and application shortcuts.

Step 1: Right-click on the Folder or Shortcut

  1. Select the Folder or Shortcut:

    • Right-click on the folder or application shortcut whose icon you want to change.
  2. Select Properties:

    • From the context menu, choose ‘Properties.’

Step 2: Change the Icon

  1. Go to the Shortcut Tab:

    • If you are changing a shortcut icon, navigate to the ‘Shortcut’ tab.
  2. Click Change Icon:

    • Click on the ‘Change Icon…’ button located in the lower section of the Shortcut tab.
  3. Choose Your New Icon:

    • As with system icons, you can select from available icons or browse for your custom icon.
  4. Apply Changes:

    • Hit ‘OK’ in the Change Icon window and then again in the Properties window to apply your changes.

Step 3: Refresh If Needed

Sometimes, the new icons may not appear immediately. If this happens, refreshing your desktop can help:

  • Right-click anywhere on the desktop and select ‘Refresh’, or simply press F5.

Bonus: Using Third-Party Software for Icon Management

If you want to dive deeper into customizing your Windows 10 experience, consider using third-party software. Programs like IconPackager allow you to change all system icons at once through pre-made skins. This software makes managing icon sets seamless and can provide a consistent aesthetic to your desktop.

Advantages of Third-Party Icon Management Software

  • Mass changes: Quickly change a large number of icons instead of one by one.
  • Consistent Styles: Find or create themed icons that share a design language.
  • Easy Switching: Switch back to the default or another icon pack effortlessly.

Troubleshooting Common Issues

  1. Icons Not Appearing: If your newly applied icons don’t display correctly, try clearing the icon cache. You can do this through Disk Cleanup or by using Command Prompt.

  2. Icons Changing Back: Sometimes, Windows updates or settings resets may cause icons to revert. Regularly back up your preferred icon files.

  3. Icons Look Blurry: Make sure that the icons are of high resolution. Low-resolution images will look blurry when scaled.

Keeping Your Icons Organized

Once you’ve curated an impressive collection of custom icons, it’s crucial to maintain your desktop organization. Here are some tips:

  • Group by Category: Keep similar applications or files clustered together.
  • Desktop Butler: Use tools like Fences to create sections on your desktop while still retaining a custom look.
  • Regular Maintenance: Periodically check for unused icons or folders, and clean up regularly.

Conclusion

Changing desktop icons in Windows 10 is a simple yet impactful approach to personalizing your computing experience. By following the steps outlined in this guide, you can successfully change your system icons and custom folder icons, giving your desktop a unique flair that reflects your personality.

Customization is not just aesthetic; it can also improve your interaction with your digital environment. So go ahead—explore different icon sets, create your designs, and transform your desktop into a functional yet attractive workspace.

Are you tired of looking at the same old icons on your Windows 10 desktop? Well, did you know that you can easily change them to add a personal touch and make your desktop more visually appealing? With just a few simple steps, you can give your desktop a whole new look and feel. Let’s explore how to change desktop icons on Windows 10.

Changing desktop icons on Windows 10 is a breeze. First, right-click anywhere on your desktop and select «Personalize» from the context menu. This will open the Settings app. Once in the Settings app, click on «Themes» in the left sidebar. Then, scroll down and click on «Desktop icon settings» under the «Related Settings» section. Here, you can choose from a variety of icons or browse for your own custom icons. Simply select the icon you want to change and click «OK.» Voila! Your desktop icons are now transformed.

To change desktop icons on Windows 10, follow these steps:

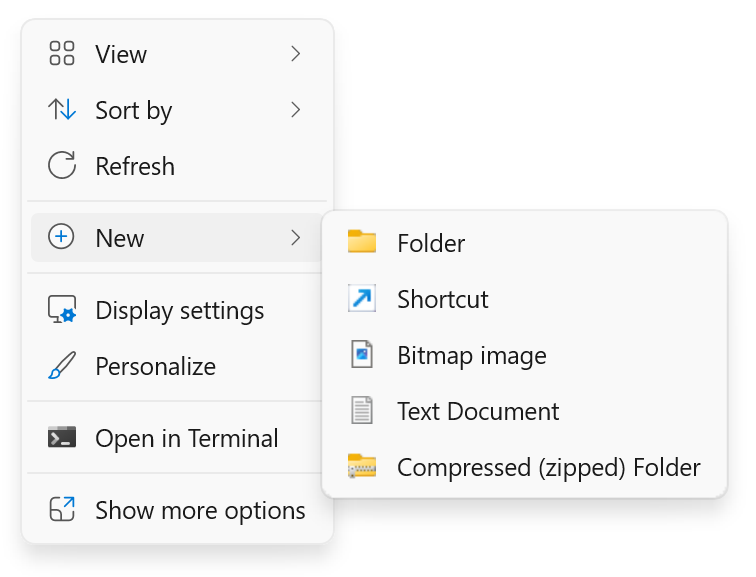
  1. Right-click on an empty area of the desktop and select «Personalize» from the context menu.
  2. In the Personalization settings, click on «Themes» in the left-hand sidebar.
  3. Scroll down and click on «Desktop icon settings» under the «Related Settings» section.
  4. Select the desktop icon you want to change (e.g., «This PC,» «Recycle Bin,» etc.) and click on the «Change Icon» button.
  5. Choose a new icon from the list or click «Browse» to select a custom icon from your computer.
  6. Once you’ve selected the new icon, click «OK» and then «Apply» to save the changes.

How To Change Desktop Icons On Windows 10

Understanding Desktop Icons on Windows 10

The desktop icons on your Windows 10 computer serve as shortcuts to files, folders, and programs. By default, Windows provides a set of pre-designed icons for different types of files and folders. However, you have the flexibility to personalize your desktop by changing these icons to ones that you find more visually appealing or indicative of the content they represent. In this article, we will guide you through the process of changing desktop icons on Windows 10.

Step 1: Accessing Desktop Icon Settings

To begin changing your desktop icons, right-click anywhere on the desktop background to open the context menu. From the options presented, choose «Personalize» to open the Settings app. In the Settings app, click on the «Themes» tab in the left sidebar, and then select «Desktop icon settings» located under the «Related Settings» section on the right side of the window.

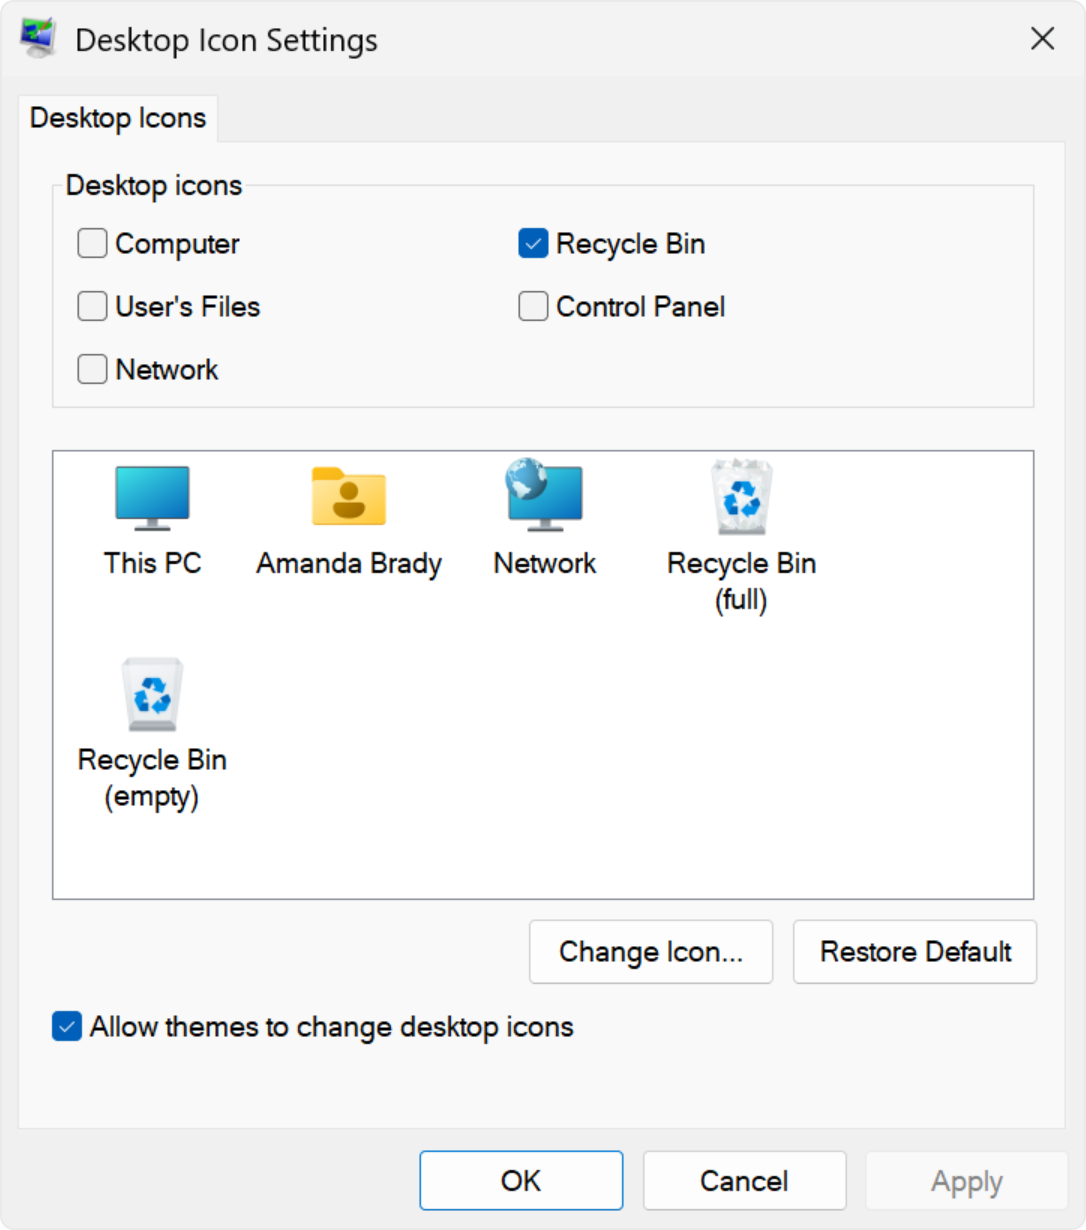
  • This will open the «Desktop Icon Settings» window, where you can customize your desktop icons.

In this window, you will see a list of icons that are commonly found on the desktop, such as «Computer,» «Recycle Bin,» and «Control Panel.» Each of these icons can be individually customized.

Step 1.1: Changing Icon Size and Spacing

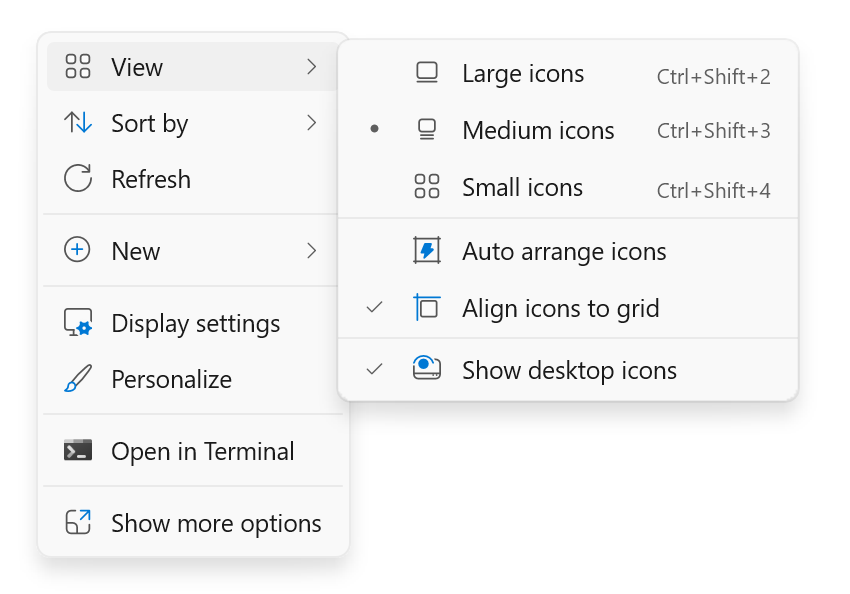
Before diving into changing the actual icons, let’s explore two additional settings that can affect the appearance of your desktop icons: icon size and icon spacing.

  • To adjust the icon size, use the slider under the «Desktop icons» section in the «Desktop Icon Settings» window.
  • To change the spacing between the icons, use the «Change Icon Spacing» button. This will open the «Spacing» window, where you can specify the horizontal and vertical spacing for your icons.

Step 2: Changing the Desktop Icons

Now that you have adjusted the icon size and spacing, let’s move on to actually changing the icons themselves.

Step 2.1: Selecting an Icon

To change a specific desktop icon, click on it in the «Desktop Icon Settings» window, and then select the «Change Icon» button.

  • This will open a new window that displays a selection of pre-installed icons that you can choose from.

Step 2.2: Browsing for Custom Icons

If you have custom icons that you would like to use, click on the «Browse» button in the «Change Icon» window.

  • Navigate to the location on your computer where the custom icons are saved.
  • Select the desired icon file and click «Open.»

Step 3: Applying the Changes

Once you have selected the new icon, click «OK» in the «Change Icon» window to confirm your selection. You will then see the updated icon displayed in the «Desktop Icon Settings» window. To apply the changes and see the new icon on your desktop, click «Apply» and then «OK» in the «Desktop Icon Settings» window.

Resetting Icons to Default

If you decide that you no longer want to use a custom icon and wish to revert to the default icon, you can do so by selecting the icon in the «Desktop Icon Settings» window and clicking the «Restore Default» button.

Changing Desktop Icons for Specific File Types

In addition to changing the icons for system icons like «Computer» or «Recycle Bin,» Windows 10 also allows you to customize the icons for specific file types.

Step 1: Accessing File Type Properties

To change the icon for a specific file type, right-click on any file of that type and select «Properties» from the context menu. In the «Properties» window, click on the «Change Icon» button.

Step 2: Selecting a Custom Icon

In the «Change Icon» window that appears, you can select a custom icon by clicking on the «Browse» button, similar to the process outlined in Step 2.2. Alternatively, you can choose from the pre-installed icons by clicking on the «Change Icon» button.

Step 3: Applying the Changes

After selecting the desired icon, click «OK» in the «Change Icon» window, and then click «Apply» and «OK» in the «Properties» window to save the changes. The new icon will now be associated with files of that specific type.

  • Repeat this process for any other file types that you want to customize.

Resetting File Type Icons to Default

To revert to the default icon for a specific file type, follow the steps outlined above, but in the «Change Icon» window, select the original default icon provided by Windows.

By following these steps, you can easily change the desktop icons on your Windows 10 computer and customize them to your liking. Whether you want to spruce up your desktop or make it easier to identify specific files or folders, customizing desktop icons can enhance your overall user experience.

How To Change Desktop Icons On Windows 10

Changing Desktop Icons on Windows 10

If you are a Windows 10 user and want to customize the look of your desktop icons, you can easily change them according to your preference. Here are two methods to change desktop icons on Windows 10:

Method 1: Using the Right-click Menu

  • Right-click anywhere on the desktop and select «Personalize» from the context menu.
  • In the Personalization settings, click on «Themes» on the left sidebar.
  • Scroll down and click on «Desktop icon settings» under the «Related Settings» section.
  • In the Desktop Icon Settings window, select the icon you want to change and click on the «Change Icon» button.
  • Browse and select a new icon from the available options.
  • Click «OK» to apply the new icon.

Method 2: Using the Control Panel

  • Open the Control Panel by typing «Control Panel» in the search bar and selecting it from the results.
  • In the Control Panel, navigate to «Appearance and Personalization» and click on «Change the theme».
  • On the left sidebar, click on «Desktop icon settings».
  • Choose the icon you want to change and click on the «Change Icon» button.
  • Key Takeaways for «How to Change Desktop Icons on Windows 10»

    • Changing desktop icons on Windows 10 is a simple process.
    • Right-click on the desktop and select «Personalize» from the context menu.
    • In the Personalization settings, click on «Themes» in the left sidebar.
    • Scroll down and click on «Desktop icon settings» under the «Related Settings» section.
    • In the Desktop Icon Settings window, choose the icons you want to change and click «Ok» to apply the changes.

    Frequently Asked Questions

    Here are some common questions related to changing desktop icons on Windows 10:

    1. How can I change the desktop icons on Windows 10?

    To change the desktop icons on Windows 10, follow these steps:

    1. Right-click on the desktop and select «Personalize».

    2. In the Settings window, click on «Themes» in the left sidebar.

    3. Scroll down and click on «Desktop icon settings» under the «Related settings» section.

    4. In the Desktop Icon Settings window, select the icons you want to change (e.g., «Computer», «Recycle Bin», etc.).

    5. Click on the «Change Icon» button and choose the new icon from the list or browse for a custom icon on your computer.

    6. Click «OK» to save the changes and apply the new icons to your desktop.

    2. Can I customize the icon for a specific file or folder?

    Yes, you can customize the icon for a specific file or folder on Windows 10. Here’s how:

    1. Right-click on the file or folder and select «Properties».

    2. In the Properties window, click on the «Customize» tab.

    3. Click on the «Change Icon» button.

    4. Choose a new icon from the list or browse for a custom icon on your computer.

    5. Click «OK» to save the changes and apply the new icon to that specific file or folder.

    3. Can I revert to the default icons on Windows 10?

    Yes, you can easily revert to the default icons on Windows 10 by following these steps:

    1. Right-click on the desktop and select «Personalize».

    2. In the Settings window, click on «Themes» in the left sidebar.

    3. Scroll down and click on «Desktop icon settings» under the «Related settings» section.

    4. In the Desktop Icon Settings window, select the icons you want to revert (e.g., «Computer», «Recycle Bin», etc.).

    5. Click on the «Restore Default» button.

    6. Click «OK» to save the changes and revert to the default icons on your desktop.

    4. Can I download new icons for my desktop on Windows 10?

    Yes, you can download new icons for your desktop on Windows 10 from various websites. Here’s how to do it:

    1. Search for «Windows 10 desktop icons» or «free desktop icons» on your preferred search engine.

    2. Browse through the search results and find a website that offers free icon downloads.

    3. Select the icon pack or individual icons you want to download.

    4. Click on the «Download» button or link.

    5. Once downloaded, extract the files (if necessary) and follow the instructions provided by the website to apply the new icons to your desktop.

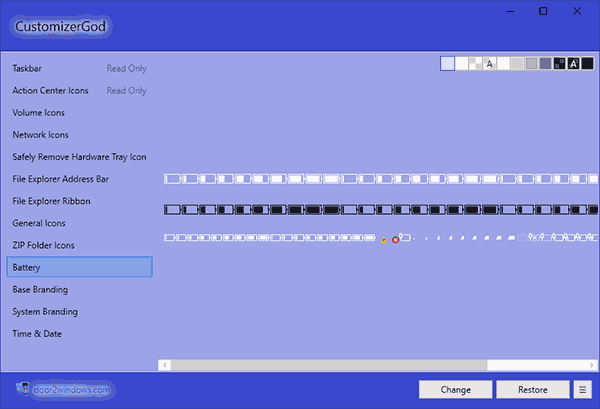
    5. Are there any third-party software options to change desktop icons on Windows 10?

    Yes, there are several third-party software options available to change desktop icons on Windows 10. Here are a few popular ones:

    To change desktop icons on Windows 10, simply right-click on an empty area of the desktop and select «Personalize» from the context menu. This will open the Settings app. From there, click on «Themes» in the left sidebar and then click on «Desktop icon settings» located under the «Related Settings» section on the right side. A «Desktop Icon Settings» window will appear where you can choose which icons you want to show or hide on your desktop.

    If you want to change the default icon associated with a desktop shortcut, right-click on the shortcut and select «Properties.» In the Properties window, click on the «Change Icon» button and browse for the desired icon file. Select the new icon and click «OK» to apply the changes. You can also customize icons by downloading icon packs from the internet and using third-party software like IconPackager or WinCustomize.

Понравилась статья? Поделить с друзьями:
0 0 голоса
Рейтинг статьи
Подписаться
Уведомить о
guest

0 комментариев
Старые
Новые Популярные
Межтекстовые Отзывы
Посмотреть все комментарии
  • Как изменить имя своей учетной записи в windows 10
  • Macbook air superdrive драйвер для windows
  • Почему не включается пространственный звук на windows 10
  • Windows 7 86x torrent
  • Windows поддержка всех версий