
Applies ToWindows 11 Windows 10
Various language and keyboard/input layout settings in Windows can be managed in the Settings app including:
-
Installing and removing languages.
-
Changing the Windows display language.
-
Changing the language used by Microsoft Store apps and websites.
-
Adding speech features to a language.
-
Adding and removing keyboard/input layouts.
-
Changing keyboard/input layouts.
This article covers these tasks.
Note: For the sake of simplicity, the rest of this article refers to keyboard/input layout as just keyboard layout.
Select the desired task from the following list:
To check what languages are currently installed in Windows:
-
In the Time & language > Language & region window, the currently installed languages are displayed in the Language section.
The first step in setting language settings in Windows is making sure that the desired language is installed. To install a language in Windows:
-
Since language packs are downloaded via the Internet, make sure that the Windows device is connected to the Internet.
-
Save all work and close out of any open apps.
-
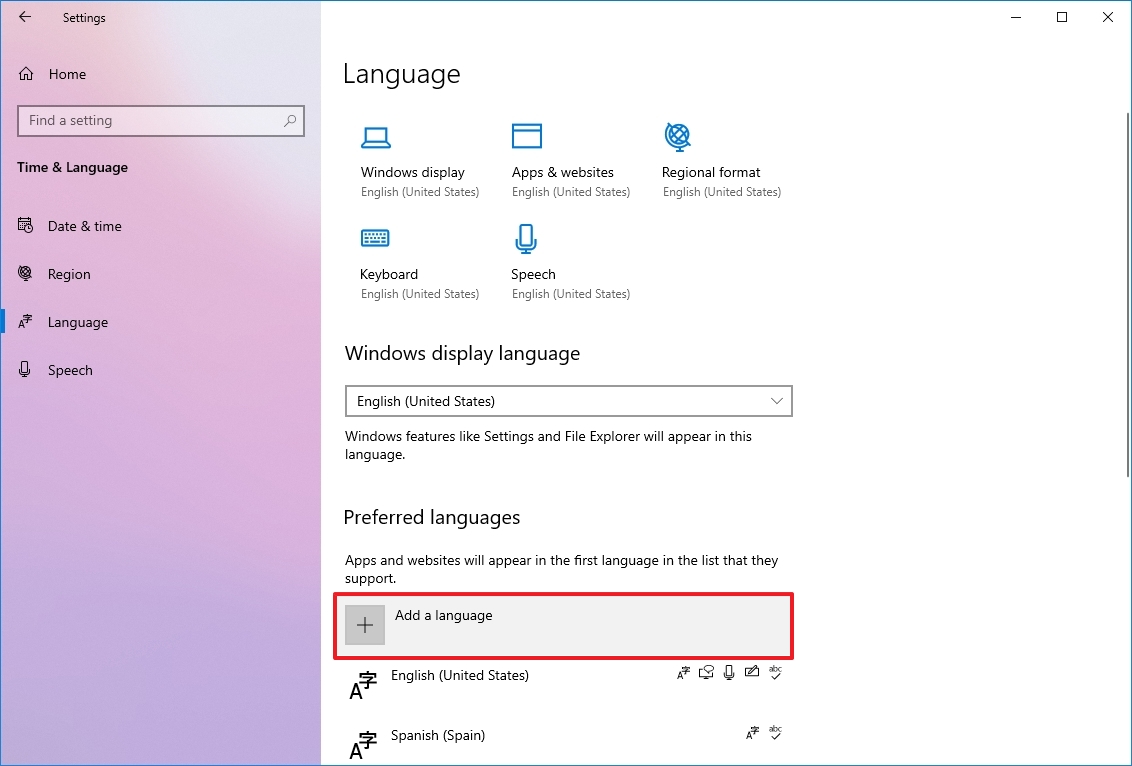
In the Time & language > Language & region window, under the Language section, select the Add a language button next to Preferred languages.
-
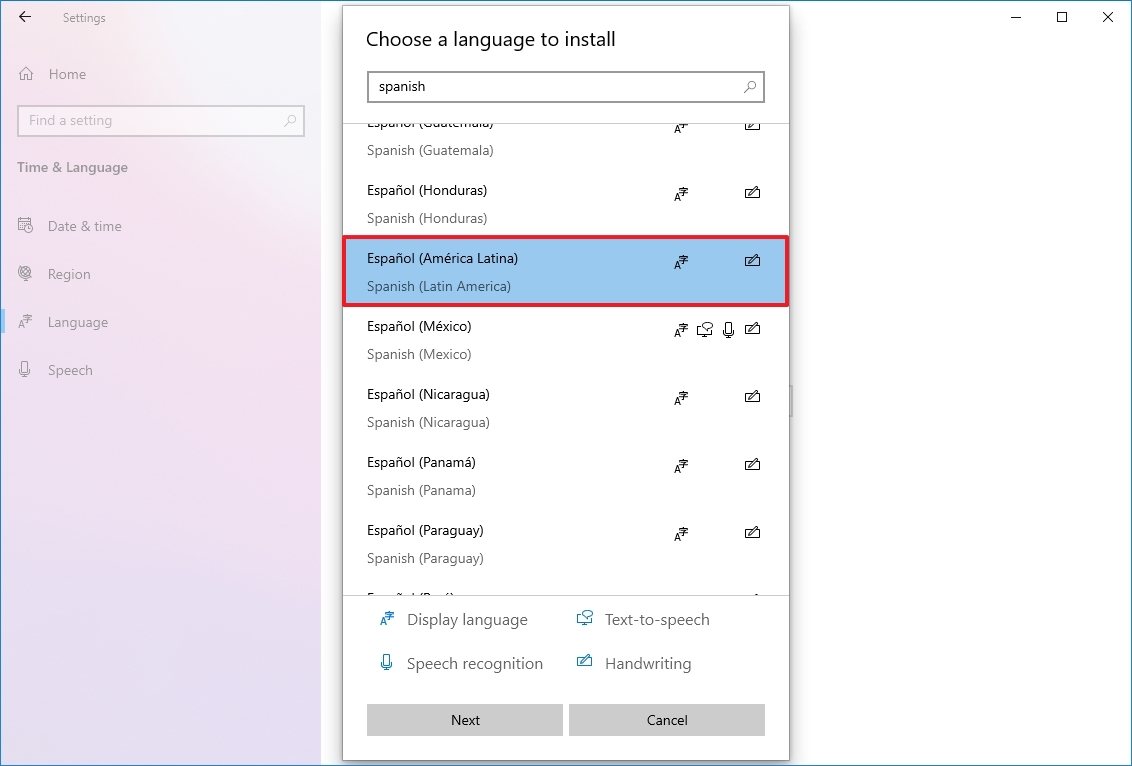
In the Choose a language to install window, enter in the name of the desired language in the Type a language name… text box or scroll through the list of available languages. Once the desired language is displayed, select it and then select the Next button.
-
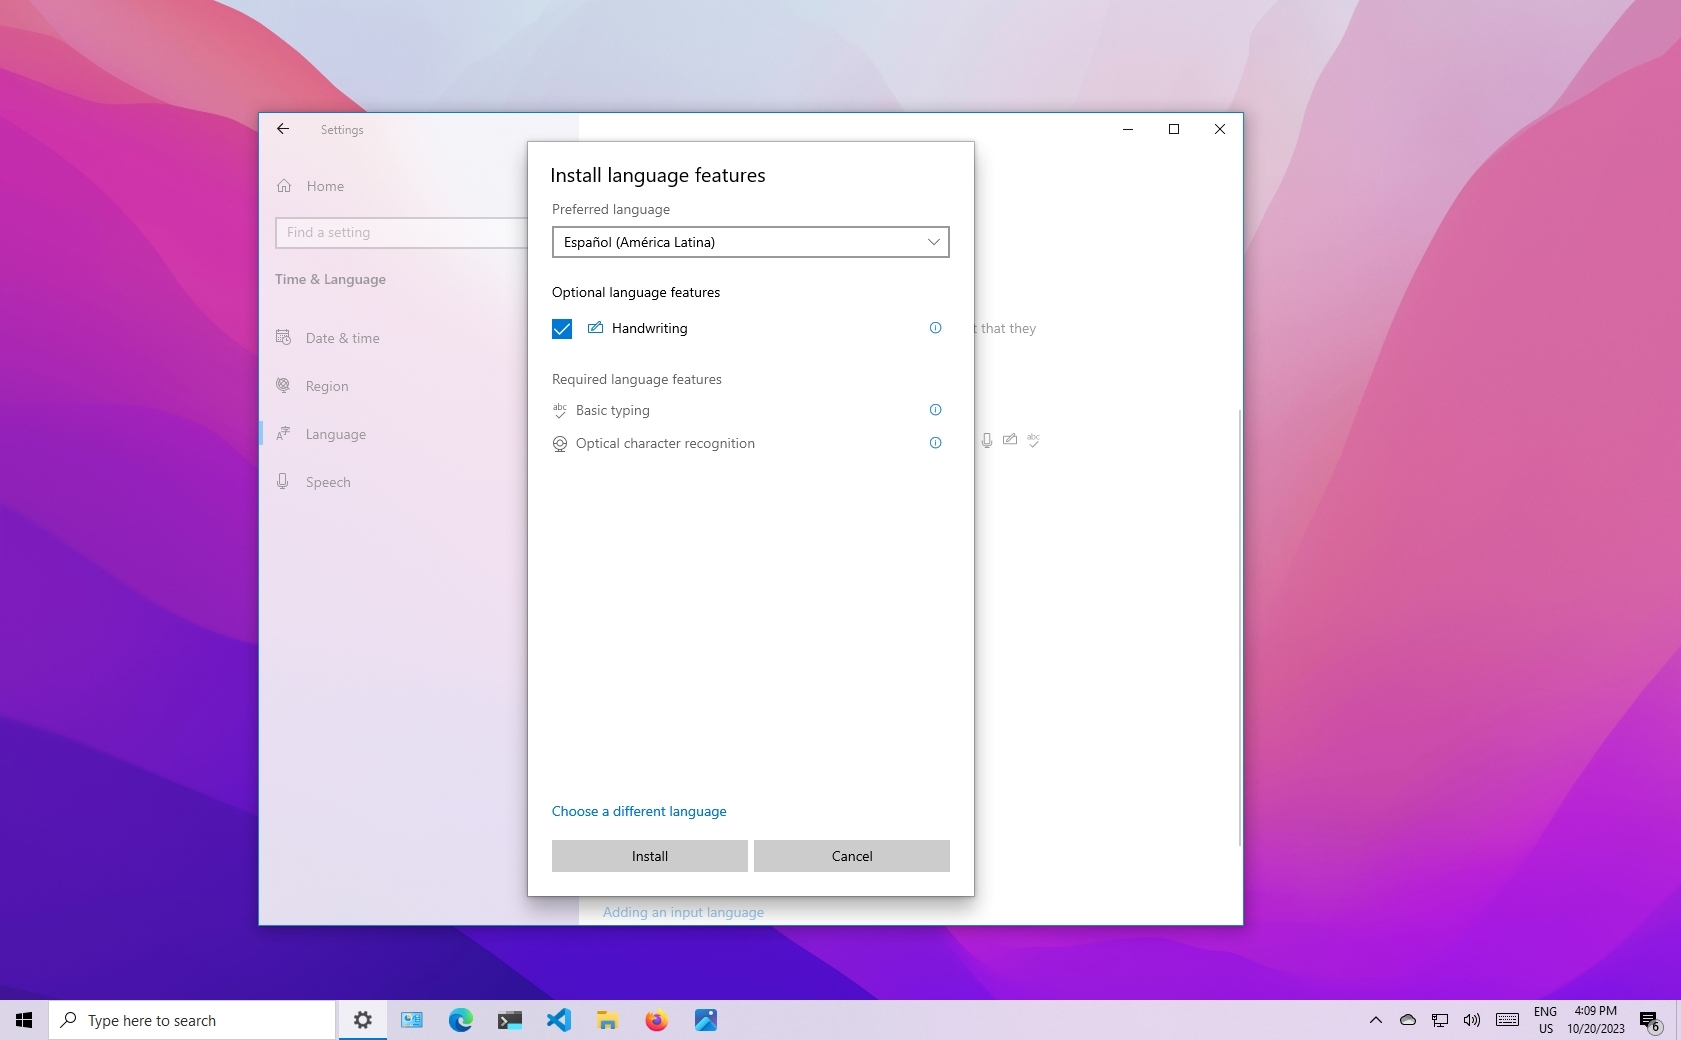
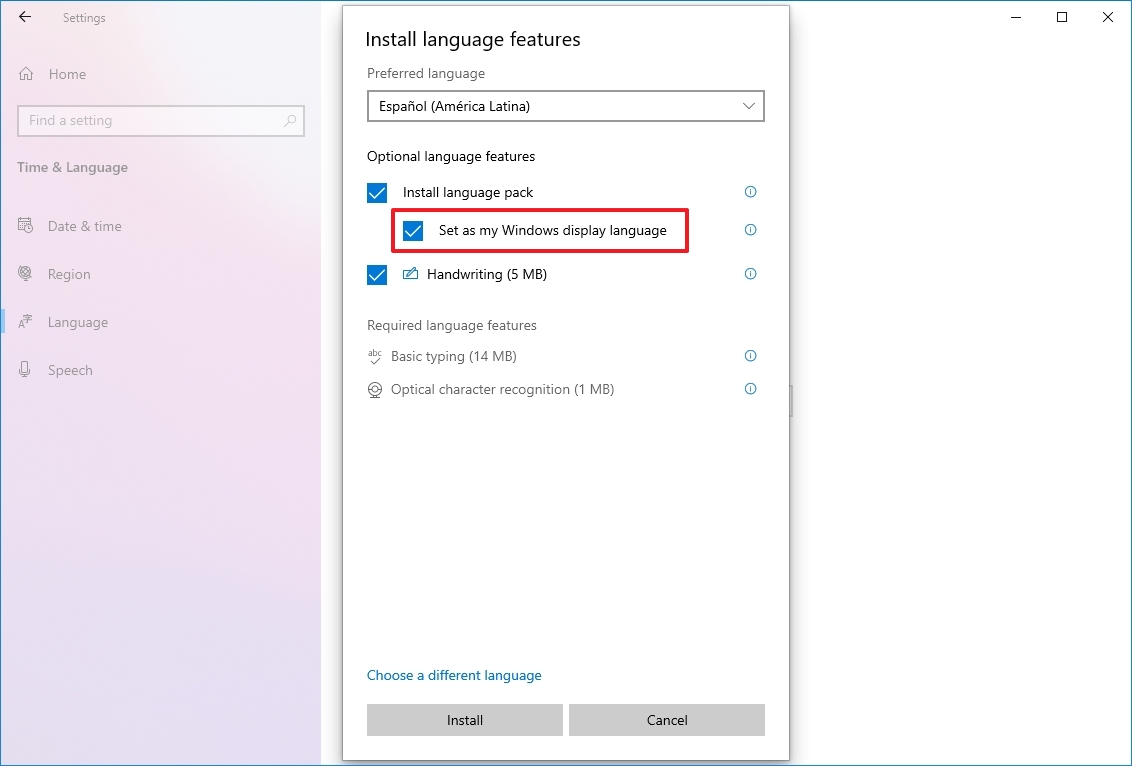
In the Install language features window:
-
Under Optional language features, make sure Language pack is selected.
-
Under Optional language features, select any additional desired features, such as speech recognition.
-
Under Language preferences, if the language being installed should be set as the Windows display language, select Set as my Windows display language. For more information, see the Change the Windows display language section in this article.
-
-
Once all the options are selected as desired in the Install language features window, select the Install button.
-
In the Time & language > Language & region window, the following message is displayed under the Language section:
Please wait while the language finishes installing. This could take a few minutes.
In the list of languages, the download and install progress of the selected language is also displayed.
-
Once the selected language is finished installing, the language is added as a language under the Language section in the Time & language > Language & region window.
-
If the option Set as my Windows display language was selected:
-
The following message is displayed under the Language section in the Time & language > Language & region window prompting to sign out of Windows:
Windows needs to sign you out in order to apply your new display language.
To sign out of Windows, select the Sign out button next to the message.
Note: If there’s no Sign out button next to the message, then manually sign out by right-clicking on the Start menu and then selecting Shutdown or sign out > Sign out.
-
At the Windows sign-on screen, sign back into Windows. The Windows display language is applied and changes the selected display language.
Warning: When the Windows display language is changed, it might also change the keyboard layout to match the language. The input language icon at the sign-on screen shows the currently selected keyboard layout. Be aware of the possible different keyboard layout when entering the username and password at the Windows sign-on screen.
If necessary, use the password reveal icon in the password box to verify that the password is being entered correctly with the current keyboard layout. The keyboard layout can be changed from the sign-on screen using the input language icon.
Changing the keyboard layout only changes the layout and doesn’t change the Windows display language.
-
Note: A single language edition of Windows might be installed if one of the following messages is displayed when trying to add a language pack:
Only one language pack allowed.
Your Windows license supports only one display language.
For more information, see Check whether a version of Windows supports multiple languages.
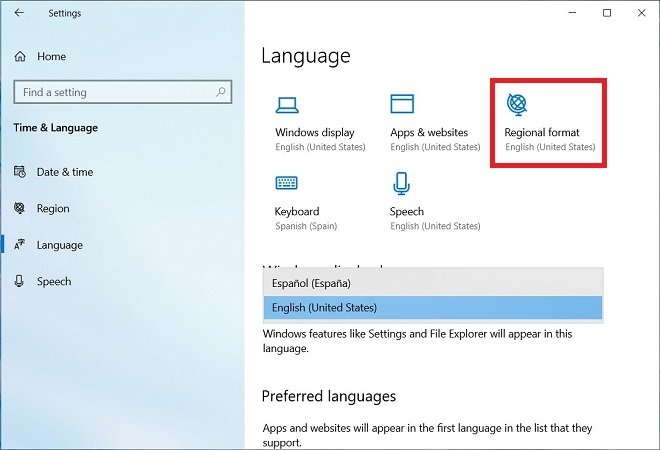
The Windows display language determines the language used by the Windows user interface. It also determines the language used by Windows features such as the Settings app and File Explorer.
Changing the Windows display language also causes the selected language to move to the top of Preferred languages list. The first supported language in the Preferred languages list determines the language used by Microsoft Store apps and websites.
Important: Some languages aren’t fully localized. For languages that aren’t fully localized, some elements in Windows might still appear in the first language that is fully localized in the Preferred languages list.
To change the Windows display language:
-
Ensure that Windows already has the desired language installed before switching to it. To check what languages are currently installed in Windows, follow the section Check what languages are installed in Windows in this article. If the desired language isn’t currently installed, follow the section Install a language pack in this article.
-
Save all work and close out of any open apps.
-
In the Time & language > Language & region window, under the Language section, select the desired Windows display language in the drop-down menu next to Windows display language.
Tip: If the desired display language isn’t displayed in the Windows display language drop-down menu, see the section Install a language pack in this article to install the language.
-
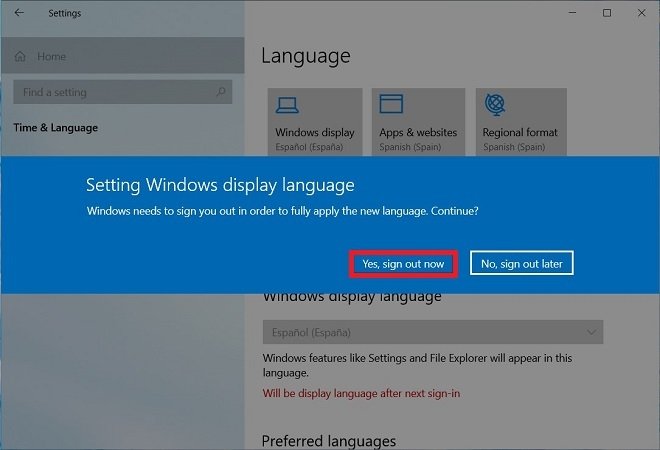
The following message is displayed under Windows display language:
Windows needs to sign you out in order to apply your new display language.
To sign out of Windows, select the Sign out button.
Note: If there’s no Sign out button next to the message, then manually sign out by right-clicking on the Start menu and then selecting Shutdown or sign out > Sign out.
-
At the Windows sign-on screen, sign back into Windows. The Windows display language is applied and changes to the selected display language.
Warning: When the Windows display language is changed, it might also change the keyboard layout to match the language. The input language icon at the sign-on screen shows the currently selected keyboard layout. Be aware of the possible different keyboard layout when entering the username and password at the Windows sign-on screen.
If necessary, use the password reveal icon in the password box to verify that the password is being entered correctly with the current keyboard layout. The keyboard layout can be changed from the sign-on screen using the input language icon.
Changing the keyboard layout only changes the layout and doesn’t change the Windows display language.
Changing the Windows display language changes the language used by the Windows user interface and Windows features such as the Settings app and File Explorer. By default, it also changes the language used by Microsoft Store apps and websites by moving the selected Windows display language to the top of the Preferred languages list. For more information, see the section Change the Windows display language in this article.
However, the language used by Microsoft Store apps or websites can be controlled independently of the Windows display language. For example, the Windows display language can be in one language, while the language used by Microsoft Store apps or websites can be in another. The first supported language in the Preferred languages list determines the language used by Microsoft Store apps and websites.
To change the language used by Microsoft Store apps and websites:
-
In the Time & language > Language & region window, the current preferred order of the installed languages is shown under Preferred languages in the Language section.
-
To move the desired language for Microsoft Store apps and websites to the top of the Preferred languages list, select the language and then drag it to the top of the list. Observe how moving the language to the top of the Preferred languages list doesn’t affect the language selected as the Windows display language.
-
If desired, reorder the preference of other installed languages by selecting the language and then dragging it to the desired location in the Preferred languages list.
To install speech features for a language:
-
Since speech features are downloaded via the Internet, make sure that the Windows device is connected to the Internet.
-
Make sure that the language where speech is going to be used is set as the display language.
-
In the Time & language > Language & region window, under the Language section, select the ellipses next to the current Windows display language and then select Language options.
-
In the Time & language > Language & region > Options window, under the Language Features section, select the Download button next to each desired speech features that should be installed. For example:
-
Text-to-speech.
-
Basic Speech recognition.
-
Enhanced speech recognition.
Note: Not all languages have speech features. If some or all of the above features aren’t available as an option, that language doesn’t have those speech features.
-
Adding a keyboard layout allows selection of an alternate keyboard layout for the current Windows display language. Alternate keyboard layouts allow directly entering of characters using the keyboard or input device that aren’t available in the current Windows display language’s keyboard layout. For example, characters only found in other languages.
Note: A full language pack that matches the language of the desired keyboard layout doesn’t always need to be installed to gain access to that keyboard layout. All languages, including the current Windows display language, have keyboard layouts in various different languages. The current Windows display language might have the keyboard layout of the desired keyboard layout in a different language.
To add a keyboard layout:
-
In the Time & language > Language & region window, under the Language section, select the ellipses next to the current Windows display language and then select Language options.
-
In the Time & language > Language & region > Options window, under the Keyboards section, verify that the desired keyboard layout isn’t already installed. If it’s not, then select the Add a keyboard button next to Installed keyboards.
-
In the pop-up menu that appears, scroll through the list of keyboard layouts and then select the desired keyboard layout. The list is sorted first with the keyboard layouts from the selected language, and then alphabetically.
Important: If the desired keyboard layout isn’t listed, start this section over, but instead of the current Windows display language, select the language that matches the desired keyboard layout.
If the language that matches the desired keyboard layout isn’t installed, then follow the section Install a language pack in this article to install the language of the desired keyboard layout.
-
Once the desired keyboard layout is selected, it should display in the Time & language > Language & region > Options window under the Keyboards section. To switch to the keyboard layout that was installed, see Change the keyboard layout section in this article.
A keyboard layout can be selected from the input language icon in the system tray area of the taskbar. The input language icon displays the currently selected keyboard layout. To select a different keyboard layout:
-
In the system tray area of the taskbar, select the input language icon.
-
A pop-up menu is displayed with the available keyboard layouts. Select the desired keyboard layout.
-
The input language icon changes to the selected keyboard layout.
Tips: A keyboard layout can also be selected by holding down the Windows logo key on the keyboard and then selecting the Spacebar. Each selection of the Spacebar while holding down the Windows logo key cycles through the installed keyboard layouts. If selecting the Spacebar doesn’t do anything, only one keyboard layout is installed. To see what languages and keyboard layouts are currently installed in Windows, see the following sections in this article:
-
Check what languages are installed in Windows.
-
Add a keyboard layout.
If the desired keyboard layout isn’t available, follow the section Add a keyboard layout in this article.
To remove a currently installed language pack:
-
In the Time & language > Language & region window, under the Language section, select the ellipses next to the language that needs to be removed and then select Remove.
Note: If the Remove button is greyed out, the selected language to be removed is the current Windows display language. Switch to another Windows display language before attempting to remove the language. For more information, see Change the Windows display language section in this article.
-
In the dialog box that appears, confirm removing the language by selecting the Yes button.
To remove a currently installed keyboard layout:
-
In the Time & language > Language & region window, under the Language section, select the ellipses next to the language that contains the keyboard that needs to be removed and then select Language options.
Note: Installed keyboard layouts aren’t always part of a matching language. The keyboard layout might be installed as part of the current Windows display language. Languages can contain keyboard layouts that aren’t the same language as the language pack.
For this reason, the keyboard layout can be located either under the current Windows display language or the language that matches the keyboard layout. If the keyboard layout to be removed isn’t under the current Windows display language, then check the language that matches the keyboard layout.
-
In the Time & language > Language & region > Options window, under the Keyboards section, select the ellipses next to the keyboard that needs to be removed and then select Remove.
Note: If the Remove button is greyed out, the selected keyboard layout is the only installed keyboard layout for the current Windows display language. Add another keyboard layout before attempting to remove the keyboard layout. For more information, see Add a keyboard layout section in this article.
The input language icon in the system tray area of the taskbar allows selection of keyboard layouts. By default, the input language icon is enabled and displays in the taskbar. For more information, see the Change the keyboard layout section of this article.
An alternative to the input language icon is the legacy language bar found in previous versions of Windows. If the legacy language bar is enabled, then the input language icon in the taskbar is disabled and no longer displays. To reenable the input language icon and display it in the taskbar, follow these steps:
-
Select Start and then select Settings > Time & language > Typing .
Or
Select the following Time & language > Typing shortcut:
Open Time & language > Typing
-
In the Time & language > Typing window, select Advanced keyboard settings.
-
In the Time & language > Typing > Advanced keyboard settings window, under Switching input methods, uncheck the option Use the desktop language bar when it’s available.
Warning: Unchecking the option Use the desktop language bar when it’s available causes the input language icon to display again in the taskbar. However, it causes the legacy language bar to no longer display. If the legacy language bar is preferred over the input language icon, then leave the option Use the desktop language bar when it’s available enabled.
Additional options for the legacy language bar can be found under the Language bar options link in the Time & language > Typing > Advanced keyboard settings window.
Need more help?
Want more options?
Explore subscription benefits, browse training courses, learn how to secure your device, and more.
(Image credit: Future)
Windows 10 will guide you through configuring your preferred language during the initial setup, but if you didn’t select the correct option or use a device already configured with a different language, you don’t have to struggle when your requirements are different, nor do you have to reinstall the operating system.
If you have to change the device’s default language settings, you can do this using the Settings app without reinstalling Windows 10.
In this how-to guide, I will walk you through the steps to change the system’s default language on Windows 10.
How to change default system language on Windows 10
If the incorrect language is configured on Windows 10, you can adjust the system settings to configure the correct language without reinstallation.
Disable language sync
On Windows 10, when using a Microsoft account, some of your preferences (including language) will sync across the device. If you only plan to change the settings on the computer, you should turn off the option to sync your language settings to prevent changing the same settings on other devices.
To disable language preference sync on Windows 10, use these steps:
- Open Settings.
- Click on Accounts.
- Click on Sync your settings.
- Under the «Individual sync settings» section, turn off the Language preferences toggle switch.
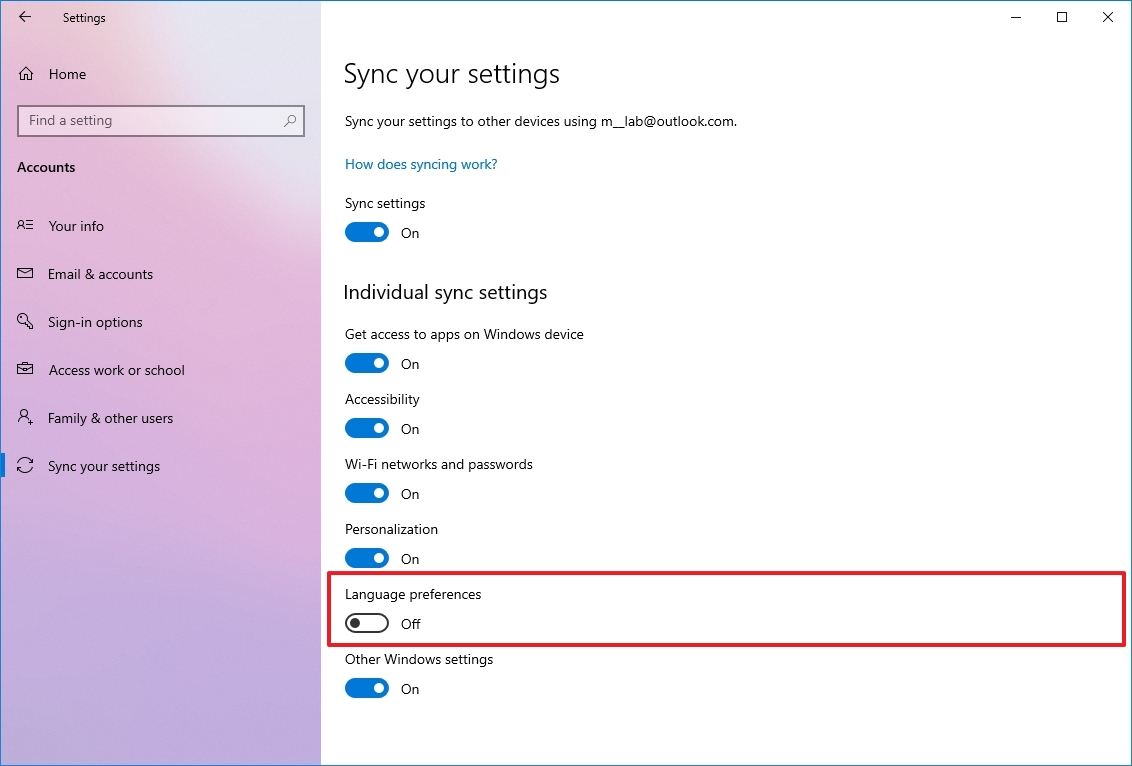
Once you complete the steps, you can change the language settings without affecting the other devices connected with the same Microsoft account.
All the latest news, reviews, and guides for Windows and Xbox diehards.
Change system language settings
To change the system default language, close your apps, and use these steps:
- Open Settings.
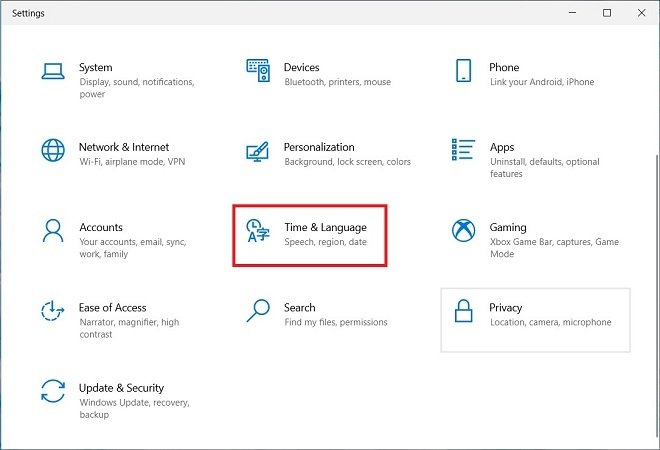
- Click on Time & Language.
- Click on Language.
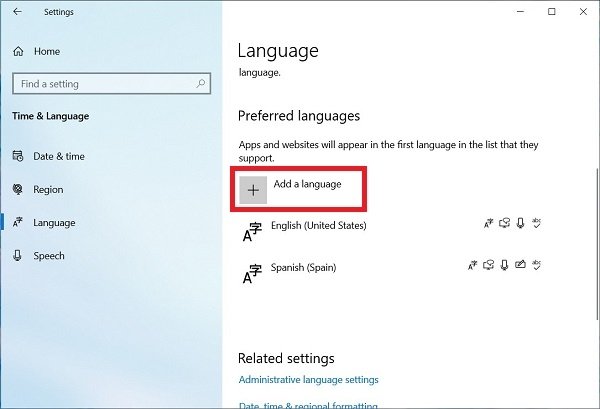
- Under the «Preferred languages» section, click the «Add a language» button.
- Search for the correct setting using the language or country name.
- Select the package from the result.
- Click the Next button.
- Check the «Install language pack» option.
- Check the «Set as my Windows display language» option.
- Check the additional features as needed — for example, «Text-to-speech» and «Handwriting.»
- Click the Install button.
- Click the «Yes, sign out now» button.
- Sign back into the account.
After you complete the steps, the Windows 10 language will change across the experience, including the Sign-in screen, Settings app, File Explorer, Desktop, apps, browser, and websites you visit.
Change system region settings
You will also have to change the region settings if you need to adjust the language settings because you are in a different region.
To change the local region settings, use these steps:
- Open Settings.
- Click on Time & Language.
- Click on Region.
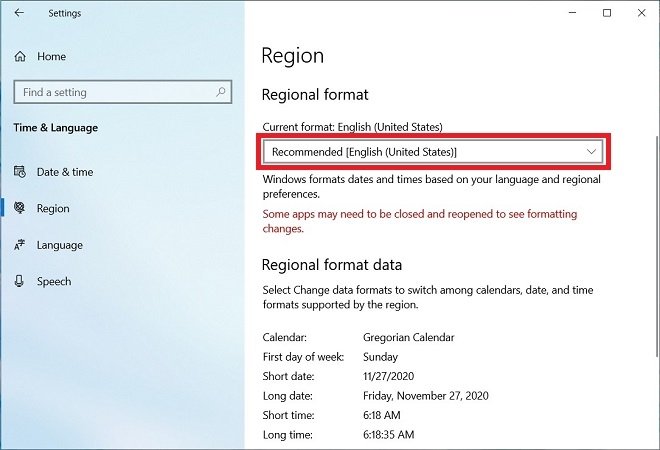
- Under the «Region» section, select the current location with the «Country or region» drop-down menu (if applicable).
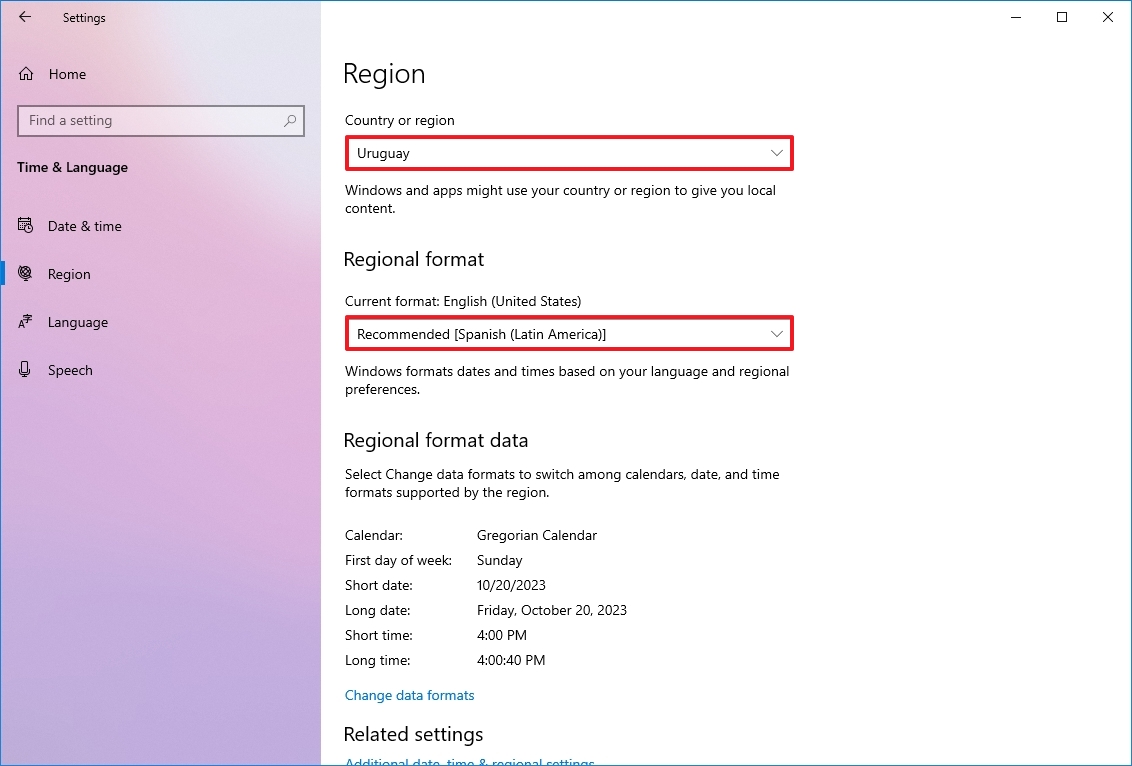
- Under the «Regional format» section, select the formats for the region’s date and time with the «Current format» drop-down menu (if applicable).
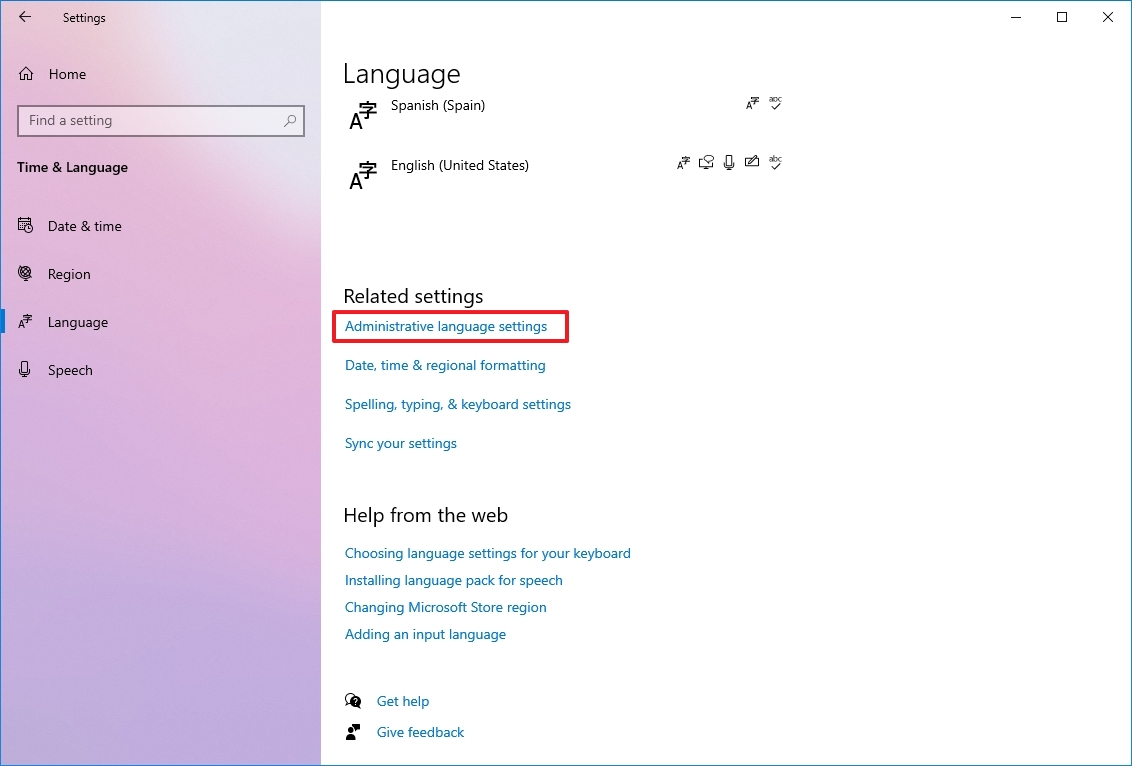
- Click on Language.
- Under the «Related settings» section, click the «Administrative language settings» option.
- Click the Administrative tab.
- Under the «Language for non-Unicode programs» section, click the «Change system locale» button.
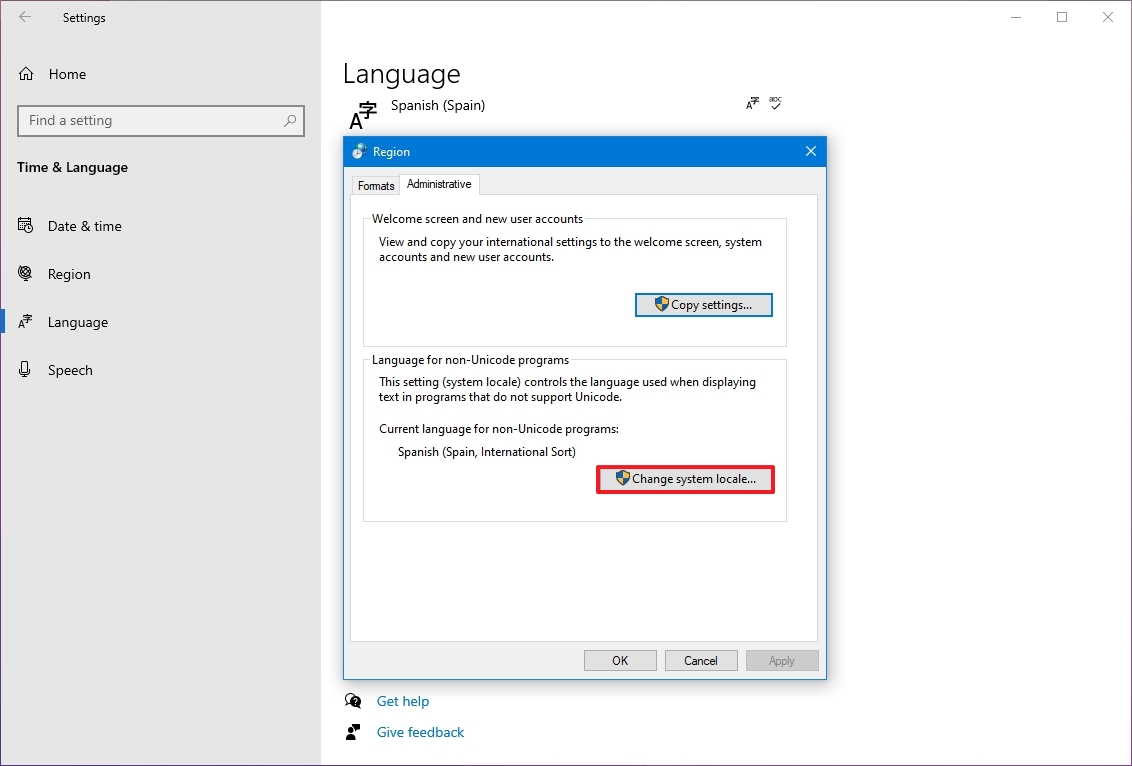
- Select the new system locale language with the «Current system locale» drop-down menu.
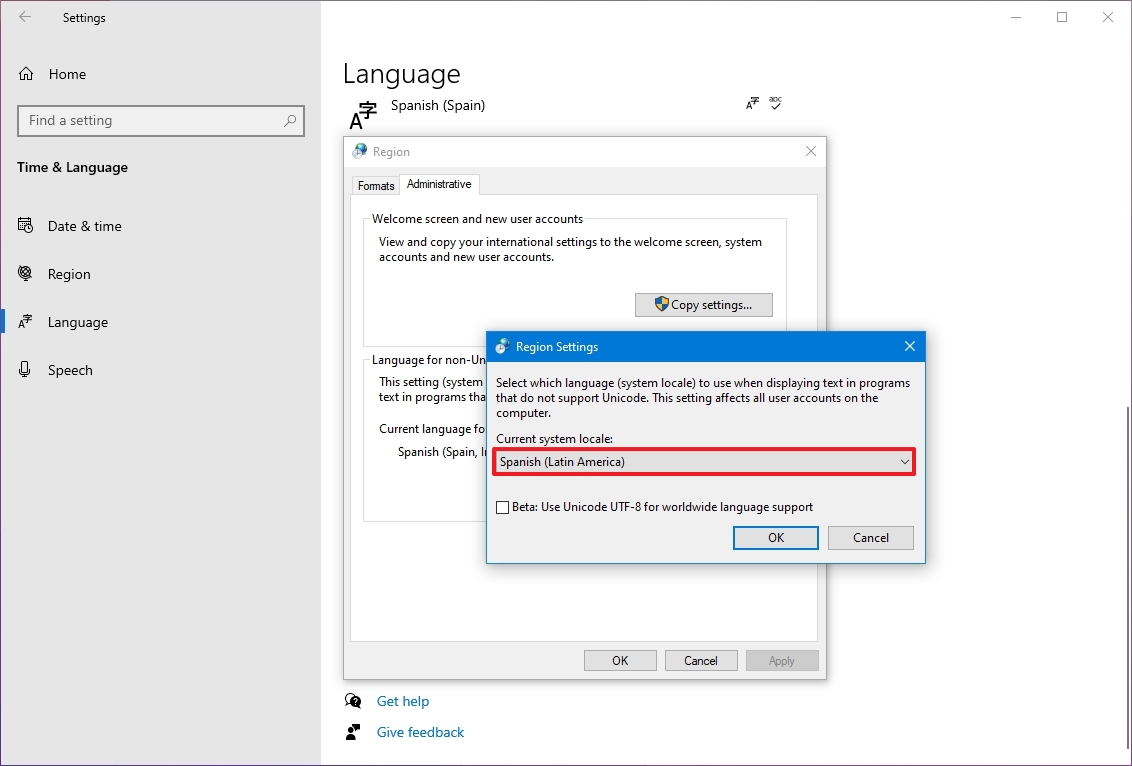
- Click the OK button.
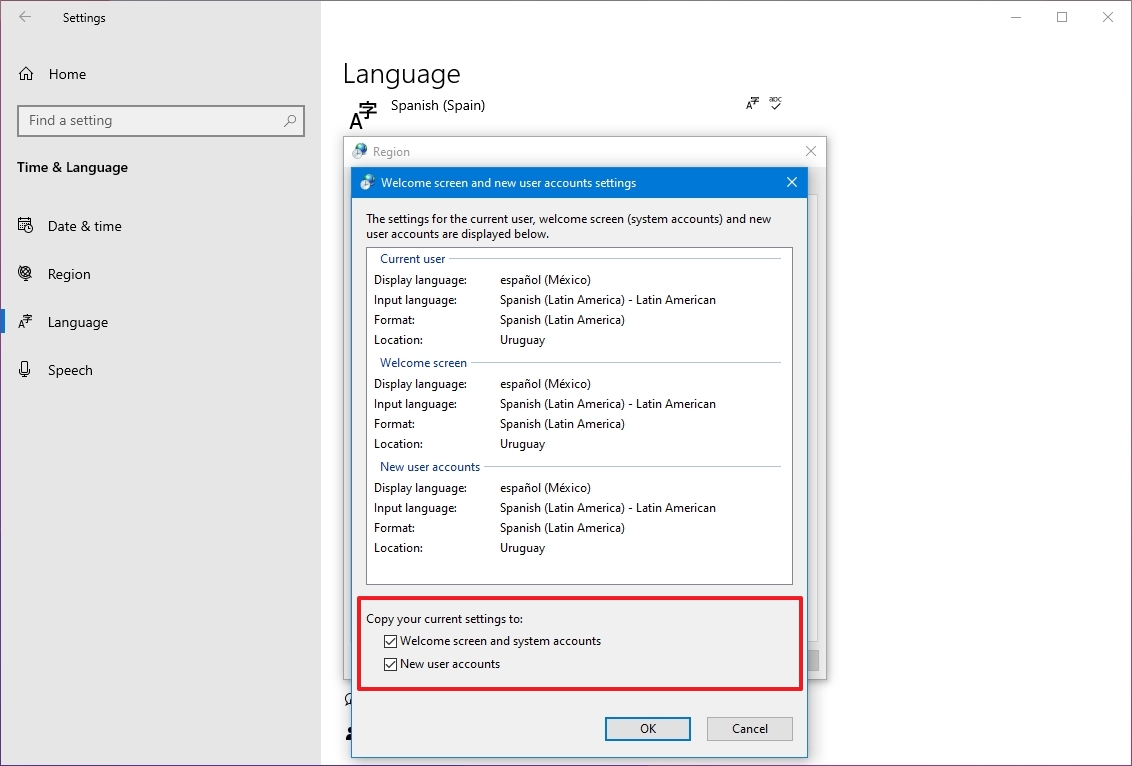
- Click the Copy settings button in the «Administrative» tab.
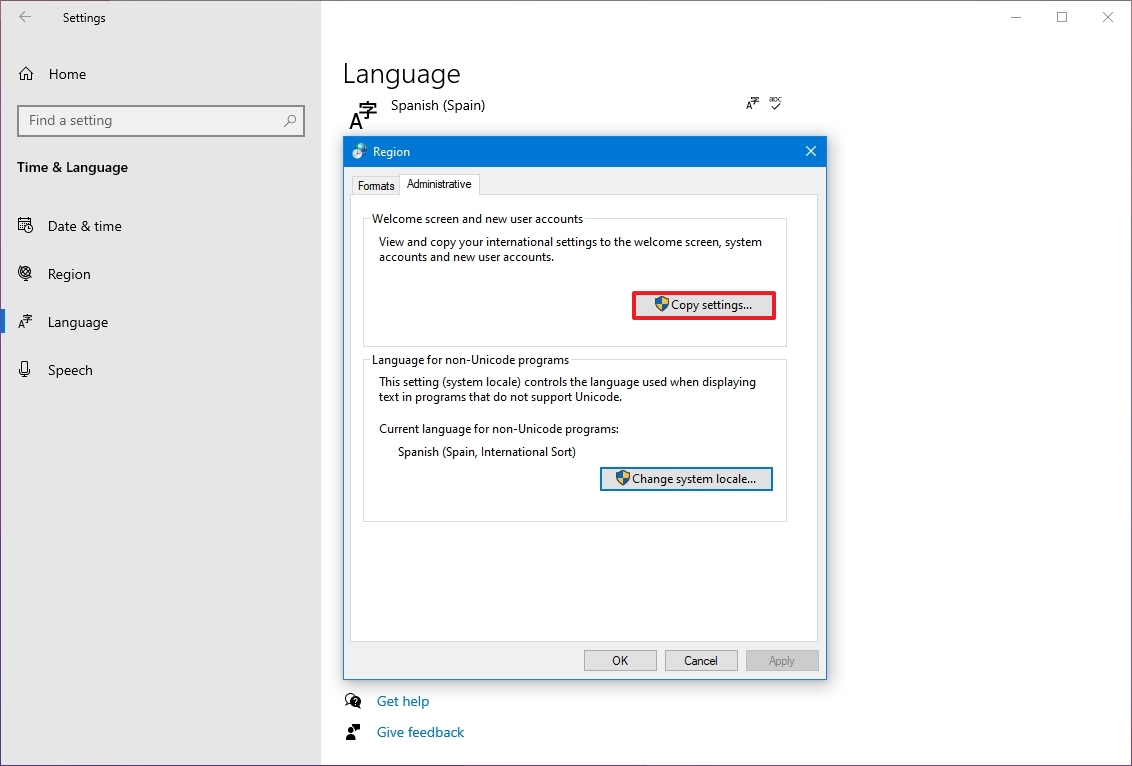
- Under the «Copy your current settings to» section, check the «Welcome screen and system accounts» and «New user accounts» options.
- Click the OK button.
- Click the OK button again.
- Click the Restart now button.
Once you complete the steps, the settings will apply, and the computer will use the correct region settings.
You rarely have to change or add other languages on Windows 10. However, changing these settings may come in handy in organizations working with people who need to use different preferences. It’s also a helpful feature to match the locale settings if you relocate to another region or when buying a new laptop that ships from a different country.
The only caveat with changing the region settings is that it will also change the settings for the Microsoft Store, which may block access to certain apps and services, depending on the location. In the same way, you can change the region settings to access an application from the Microsoft Store that is only available in a specific region.
More resources
For more helpful articles, coverage, and answers to common questions about Windows 10 and Windows 11, visit the following resources:
- Windows 11 on Windows Central — All you need to know
- Windows 10 on Windows Central — All you need to know
Mauro Huculak has been a Windows How-To Expert contributor for WindowsCentral.com for nearly a decade and has over 15 years of experience writing comprehensive guides. He also has an IT background and has achieved different professional certifications from Microsoft, Cisco, VMware, and CompTIA. He has been recognized as a Microsoft MVP for many years.
Windows 10 lets you customize the system language and other components without too much hassle. This is possible even when the installation has been done in a different language. To change this setting, open the configuration application. You can do this from the home menu.
Open the Windows configuration
Next, find the Time & Language section and click on it to open it.
Open the system’s regional settings
Open the Language section, located in the list of options that you will see on the left.
Open the language settings
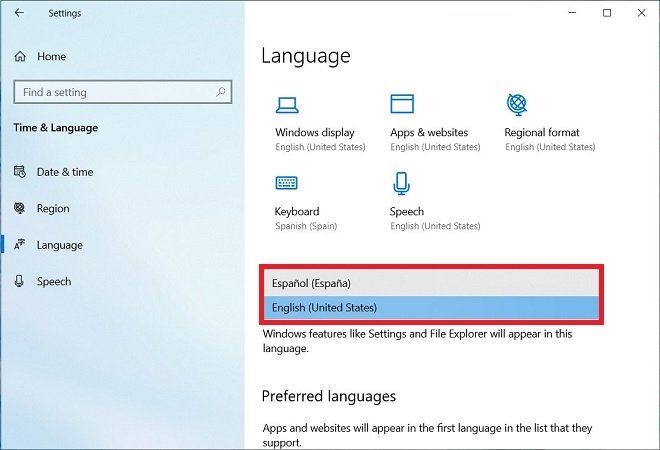
Now, select Windows display to change the system language. You can do this with the bottom selector. Additionally, you can modify the language of the applications and web navigation with the option Apps & websites, and the keyboard or voice recognition, with Keyboard and Speech, respectively.
Modify the default language
By scrolling down, you will find the Preferred languages option. From here, you can add additional regional packages. To do this, use the Add a language button.
Add other favorite language packs
Finally, it is important to modify other regional settings so that the system adapts, not only to your language but also to the customs of your region. Click on Regional format.
Change the regional details
Using the drop-down menu, choose the regional format of other elements of the system. Thus, a specific type of calendar will be used, one day or another will be used as the first day of the week or the dates will be shown most appropriately. Also, the 24 hours or 12-hour system will be used depending on where you are.
Modify the regional details
Changes will be applied after logging out and logging back in. That is why Windows will ask you if you want to do it immediately or not. Save all the data you do not want to lose and click on Yes, sign out now.
Close your session to apply the changes
When you log in again, Windows will be displayed in the language you have chosen.

Shutterstock
- You can change the language on a Windows 10 device at any time in just a few steps.
- You may need to change the language on Windows 10 if you chose the wrong one during initial setup or you’re using a device that has already been configured.
- Once you change the language in Windows 10 with these steps, it will be reflected across the entire system, from your sign-in screen to the File Explorer, to the websites you visit.
- Visit Business Insider’s homepage for more stories.
If you buy a brand new PC, you’ll be prompted during initial set-up to choose your default language.
Whether you accidentally chose the wrong language, simply want to change it to a different one, or your machine was already configured for you, it’s possible to change your language on Windows 10 at any time.
It should be noted that changing the default language in Windows 10 will mean the newly selected language will be everywhere on your computer, in its own settings and on the internet.
Here’s how to do it.
Check out the products mentioned in this article:
Windows 10 (From $139.99 at Best Buy)
How to change your language on Windows 10
1. Click on the Windows start menu and type «Settings,» selecting the top option that appears in the search result.
2. In the Settings app, click on «Time & Language,» then click on «Language.»
Jennifer Still/Business Insider
3. Under «Preferred Languages,» click on «Add a preferred language» and begin typing the name of the language you wish to use on your computer.
Jennifer Still/Business Insider
4. Once you’ve found your preferred language, click «Next» to install the language pack on your computer.
Jennifer Still/Business Insider
5. On the «Install language features» screen, make sure to check the «Set as my display language» option just under the selected language. Check the «Install language pack» option as well.
6. Click «Install» when finished and the pack will begin to download.
Jennifer Still/Business Insider
7. When finished, you will be prompted to sign out of your Windows 10 account. Do so, then sign back in to see your new language displayed.
Related coverage from How To Do Everything: Tech:
-
How to change your Windows password to protect your computer, or reset the password if you’ve forgotten it
-
How to speed up your Windows 10 computer in 7 different ways
-
How to turn off the touch screen on certain Windows 10 devices, or turn it back on
-
How to properly uninstall programs on Windows 10, to protect your computer and free up space
Jennifer is a writer and editor from Brooklyn, New York, who spends her time traveling, drinking iced coffee, and watching way too much TV. She has bylines in Vanity Fair, Glamour, Decider, Mic, and many more. You can find her on Twitter at @jenniferlstill.
Read more
Read less
Back to Top
A white circle with a black border surrounding a chevron pointing up. It
indicates ‘click here to go back to the top of the page.’
Read next

If you have ever purchased a computer in another country or are simply interested in setting your operating system to another language for work, education, or personal preference, knowing how to change the system language in Windows It is essential. Whether you use Windows 10 or Windows 11, the system offers quite intuitive tools to modify the main language, add new languages or delete those you no longer use.
In this article we are going to teach you How to change the system language step by step in Windows 10 and Windows 11, using official and secure methods, taking into account both the interface and the options available for each version of the operating system. We also explain how to manage the language bar, input methods, synchronization with your Microsoft account, and how to troubleshoot common issues that may arise during the process.
Change the system language in Windows 10
Windows 10 allows you to easily change the operating system language from the settings panel. Here’s how.
1. Access system settings
Click on the Home and then on the icon of the gear to open the window ConfigurationYou can also open it from the notification panel or using the keyboard shortcut Windows + I.
2. Go to the ‘Time and Language’ section
Once inside Settings, go to the section Time and language. From there, select Region and language or directly Language from the left side menu.
3. Add a new language
Click on the Add a language. This will take you to a screen with a list of available languages. Find the language you want to install, select it, and if required, choose the corresponding regional variant (for example, Spanish for Spain or Mexico). If you want to change the language of your choice, WhatsApp, you must follow a similar process, which you can consult here.
4. Install the language pack
After selecting the language, press NextThe system will ask you which components you want to install: display language, speech syntax, recognition, etc. Select the options you need and click on Install.
5. Set the new language as default
Once installed, the language will appear in the list. Click on it and select Set as defaultWindows will prompt you to log out to apply the changes. You can do so immediately or wait until the next startup.
6. Language not listed?
In some cases, the desired language may not be available directly and may need to be installed from the Microsoft Store. Find the language, access its file and press Get. Then go back to Settings to install it like any other. If you need to change the language in Adobe Illustrator, the process has its own specifics; you can see it here. here.
Change the system language in Windows 11
The process in Windows 11 is similar, although with slight changes to the interface and menu names.
1. Open settings
Click on Home and select Configuration or use the keyboard shortcut Windows + I.
2. Go to ‘Time and Language’
In the side menu, select Time and language and then enter Language and region.
3. Add a new language
Click on Add a languageA list will appear from which you can search and select the language you want to install. Click Next and then Install.
4. Set the language as default
Check the box Set as my Windows display language if you want to apply it immediately. As with Windows 10, you’ll need to log out to complete the change.
Manage multiple languages and input methods
Once you’ve installed multiple languages, you can easily switch between them. In both Windows 10 and 11, Windows display language You can choose the one you prefer. If you also need to change the language on your keyboard, you can check out how to do it. here.
In addition, the system allows you to add keyboard layouts and switch between them using the language bar or shortcuts like Alt+Shift o Windows + Space.
Recover the previous language

If you’ve changed your system language but want to go back to your previous one, you can do so without uninstalling anything. Simply repeat the steps above and set the previous language as your default; there’s no need to delete the newly installed language.
In case you have changed the language to one you do not master, you can always identify the icons (such as the Settings gear) or use keyboard shortcuts to move to the corresponding section.
Disable language synchronization
If you use a Microsoft accountLanguage preferences sync across all your devices. If you want to avoid this and change the language only on one device, follow these steps:
- Opens Configuration.
- Click on Accounts.
- Choose Synchronize settings.
- Disable the option Language preferences in the Individual Sync Settings section.
In Windows 11, this option is within Backup in Windows within the section of Accounts, where you can also manage which preferences are synchronized.
Advanced language options
Windows allows you to modify different parts of the system independently, not just the language itself. You can adjust:
- System language
- Language of the apps and websites
- Regional format (e.g. date, time, currency)
- Keyboard language
- Voice language (for attendees, dictation, and more)
For example, you can have the system in Spanish, but the applications in English, or vice versa. You can even activate non-native accent recognition if you’re using a foreign language. If you want to change the language in another specific program, such as Spotify, check out our guide here.
Important: Single language versions
On some devices (especially portable cheap or imported), you may come across a version of Single-language WindowsIn these cases, when you try to install a new language, you’ll see messages like:
- «Only one language pack is allowed»
- «His Windows license only supports one display language»
When this happens, the only way to change the language is upgrade to a higher edition, such as Windows 10 Pro or Windows 11 Home, which may require purchasing a new license.
How to remove installed languages
If you no longer need a language, you can delete it to save space and simplify setup:
- Go to Language settings.
- Click on More options next to the language you want to delete.
- press Remove. Both the language pack and its associated input methods will be removed.
This process is similar in both versions of Windows. Remember that you can’t delete the language currently set as the default; you’ll need to change it to another language first before removing it.
Changing the language in Windows 10 and 11 is a process accessible from System Preferences. It allows you to add, manage, or remove languages according to your needs, as long as your version of Windows allows it. Additionally, you can adjust other settings such as keyboard, regional format o voice languageAnd including avoid synchronizations between devices. With all these tools, you can customize the operating system experience to perfectly suit your language preferences.

Related article:
Complete guide to changing the language of WhatsApp
Passionate writer about the world of bytes and technology in general. I love sharing my knowledge through writing, and that’s what I’ll do on this blog, show you all the most interesting things about gadgets, software, hardware, tech trends, and more. My goal is to help you navigate the digital world in a simple and entertaining way.