
February 16, 2017 updated by
Leave a reply »
The system locale allows you to use the specified language for non-Unicode programs. If your Windows system uses a default en-US locale, the Japanese text in a game won’t display correctly. In this tutorial we’ll show you how to change system locale in Windows 10, using Control Panel or Command Prompt.
Note: You must log into Windows 10 as administrator to set a different system locale. Changing system locale doesn’t affect the language in menus & dialog boxes for Windows or other programs that do use Unicode.
Method 1: Change System Locale in Windows 10 Using Control Panel
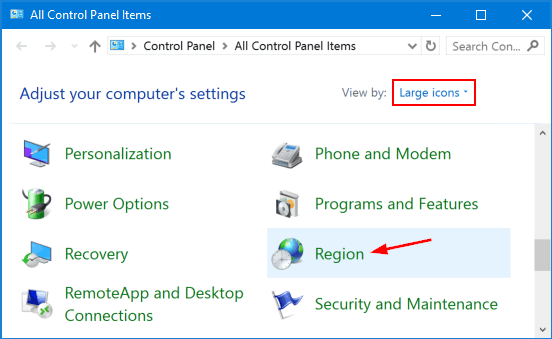
- Open the Control Panel in Large icons view, click Region.

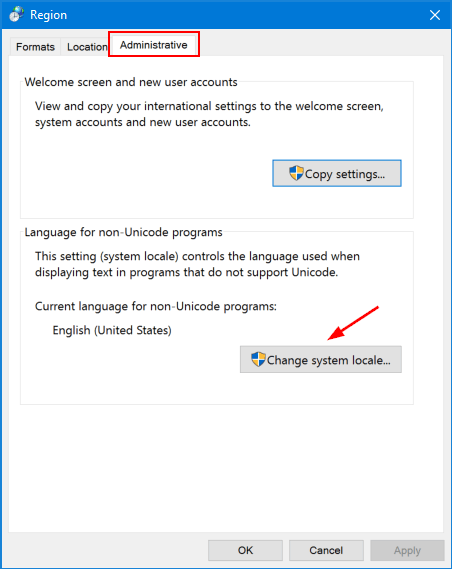
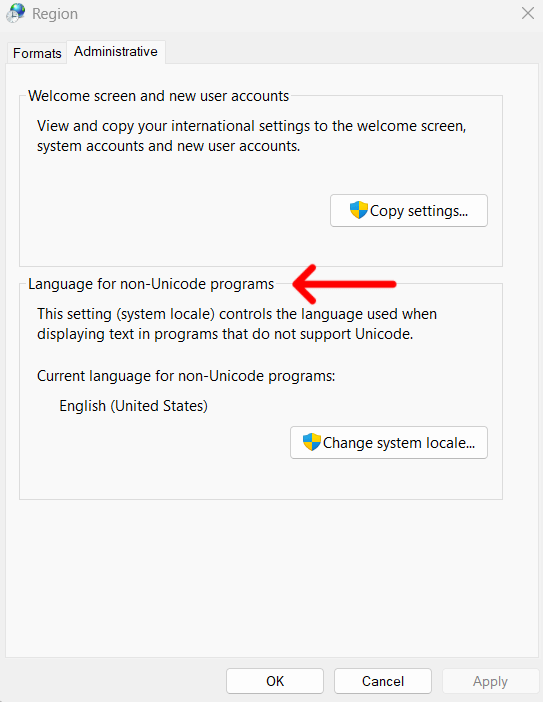
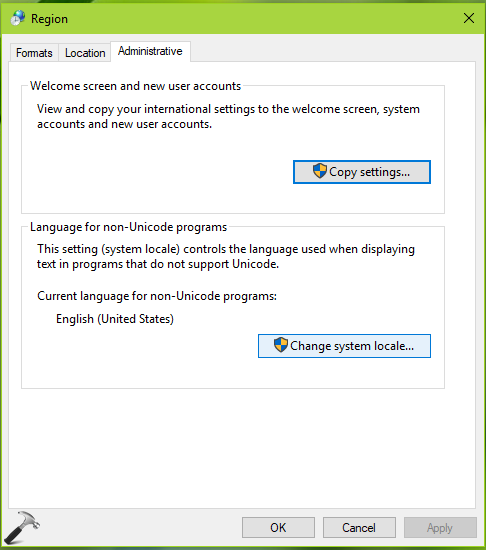
- In the Region dialog that opens, select the Administrative tab and then click Change system locale.

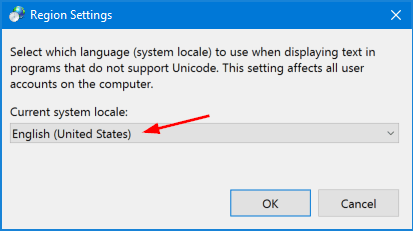
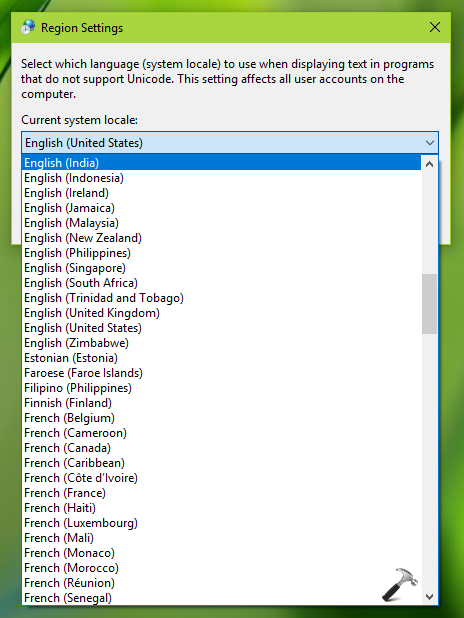
- Select the desired language from the Current system locale drop-down list, and click OK.

- Restart your computer for the changes to take effect.
Method 2: Change System Locale in Windows 10 Using Command Prompt
-
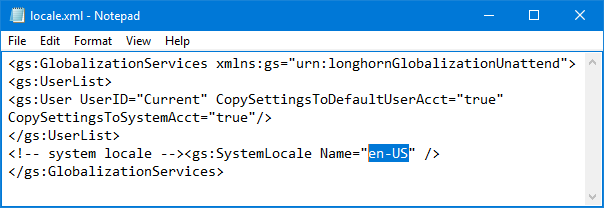
Open Notepad (or any other text editor), then copy and paste the following text into it. Replace en-US with the language tag for your desired system locale. To see all supported language tags in Windows, please refer to this article.
<gs:GlobalizationServices xmlns:gs="urn:longhornGlobalizationUnattend">

<gs:UserList>

<gs:User UserID="Current" CopySettingsToDefaultUserAcct="true" CopySettingsToSystemAcct="true"/>

</gs:UserList>

<!-- system locale --><gs:SystemLocale Name="en-US" />

</gs:GlobalizationServices>
- After editing, save the file as a .xml file. Let’s say D:\locale.xml.
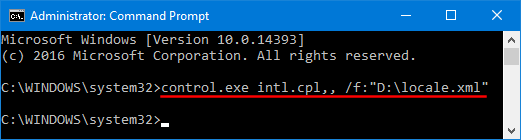
- Open the Command Prompt in administrator mode. Copy and paste the following command line and press Enter.
control.exe intl.cpl,, /f:"D:\locale.xml"
- Reboot your computer to apply the new system locale settings.
- Previous Post: Fix Error: “Windows cannot Change the Password” in Windows 10 / 8 / 7
- Next Post: Fix: System Cooling Policy Missing in Power Options
If you want to run a non-Unicode program using a specific input language, you will need to configure “Change system locale” in Windows settings. When the active encoding language doesn’t fully support a program, the application may run poorly or fail upon installation.
This guide will help you check your system locale and make swift adjustments as needed.
How to check your current system locale
If you’re unsure whether you have the correct locale, you can follow these steps to verify your active settings before making additional changes:
Method 1: Using Control Panel
- Open Control Panel.
- Then, select Clock and Region.
- Click Region to open a pop-up window.
- Go to the Administrative tab.
- Check the current locale language displayed under Language for non-Unicode programs.
Method 2: Using Command Prompt
- Open Windows Search, type cmd, and press Enter to open Command Prompt.
- Type systeminfo | findstr /B /C:“System Locale” and press Enter to run the command.
- The screen will display the active system locale.
Method 2: Using PowerShell
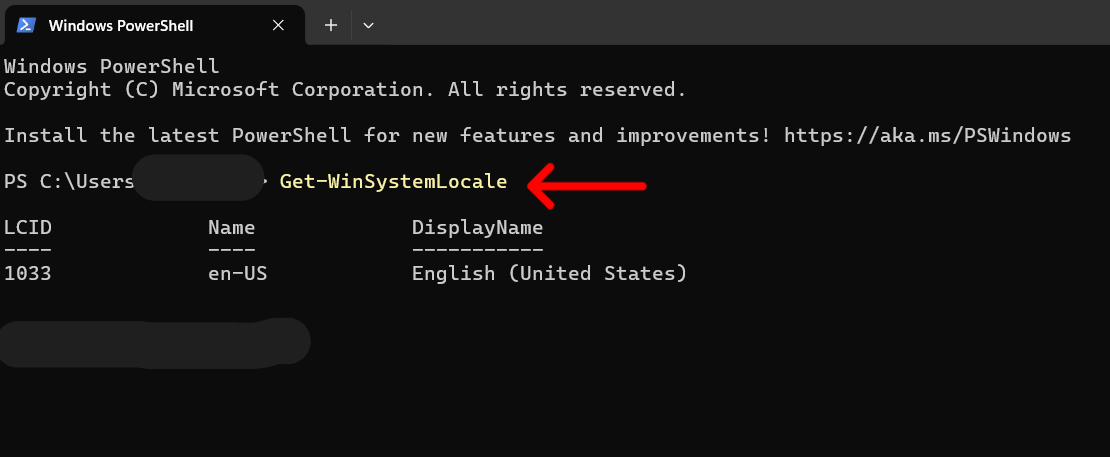
- Open PowerShell.
- Type Get-WinSystemLocale and press Enter to display the system locale.
In addition to character encoding, changing the system locale will update the time and date format to regional defaults.
After viewing the system locale, you’ll only need to take a few additional steps to update the settings to your preferred language.
Method 1: Using Control Panel
- Open the Control Panel and go to Clock and Region.
- Click Region to open a pop-up window.
- Select the Administrative tab.
- Under Language for non-Unicode programs, select your preferred language from the list.
- Click OK and restart your PC to apply changes.
Method 2: Using Command Prompt
- In Windows Search, type cmd and select open as Administrator.
- Type control.exe intl.cpl,,2 to open the Region settings dashboard.
- Under Language for non-Unicode programs, choose Change system locale.
- Choose your desired locale and click OK. Restart your PC to apply the changes.
Method 3: Using PowerShell
- Open PowerShell as Administrator.
- Use the cmdlet Set-WinSystemLocale -SystemLocale <LocaleName> and press Enter.
- Restart your computer to apply the changes.
Don’t forget to replace <LocaleName> with your desired language. For example, en-US (English, United States), de-DE German (Germany), or ja-JP (Japan). You may also get prompted to download additional language packs to complete the changes. For a complete set of country-region strings, you can visit the official Microsoft website.
Troubleshooting system locale issues
When a non-Unicode program is unsupported, you’ll likely be greeted with distorted characters and text in the program’s interface. To run the program as intended, try these basic troubleshooting steps.
The program still displays unreadable text
Verify if the system locale has been updated successfully and the necessary language packs have been installed. To check the active locale, open PowerShell and type Get-WinSystemLocale. You can also use the Control Panel to check the regional settings.
Additionally, check if the program you’re trying to run supports Unicode. Look for “UTF-8” or “UTF-16” support in the documentation. If the software is compatible with Unicode, the errors may be related to a different issue.
System locale settings are grayed out
If you’re sharing the device with other users or if it’s operating under a managed environment, you might not have the administrator privileges to make changes to update the system locale.
If you’re using a personal device, log in as Administrator instead of Guest.
Non-Unicode applications are not working as expected
Running an old program on Compatibility Mode may fix additional errors.
- Right-click the program icon and go to Properties.
- Select the Compatibility tab.
- Under Compatibility mode, tick the box next to Run this program in compatibility mode.
- Choose the recommended version of Windows from the drop-down list.
Alternatively, you can try reinstalling the software after updating the system locale.
Best practices for changing the system locale
Changing the locale settings is a relatively straightforward procedure. But if you encounter any errors, you can refer to these common troubleshooting steps to isolate and fix the issue:
Only change the system locale if necessary
You often only need to change the system locale for non-Unicode applications. Most apps have Unicode support, so your PC will be able to run them using its default settings. Hence, it’s best to avoid modifying the system locale unless prompted to make the changes.
Backup your data before making any changes to your computer
Updating the settings can sometimes disrupt a perfectly working system. Therefore, always consider backing up your files and settings before making significant modifications. You can manually create a backup using File History or Image Backup. If you need a nudge, we have a guide on when to use File Backup vs. Image Backup.
Restart your computer to update settings
If you missed the system prompt, you will need to restart your computer to apply the changes made to the system locale. Some programs need to read locale settings on startup to acknowledge the changes. Don’t forget to back up your work before rebooting the system.
Other non-Unicode apps are not functioning correctly
Changing the system locale for one program can compromise other apps that use the default settings. If you have trouble accessing or installing another software, you will have to manually switch between language packs to match the encoding for each program.
Frequently Asked Questions (FAQs)
1. Does changing the system locale affect the Windows display language?
The display language and all other programs that use Unicode will not be affected when changing the locale settings. On the other hand, non-Unicode apps using the default locale will be affected when switching locales. You can switch back between language packs to accommodate these programs.
2. Does changing the system locale affect the Windows display language?
You can switch between multiple locales without any issues. This is common practice for multilingual users or those who are handling reports and programs in multiple languages.
3. Will changing the locale affect installed programs?
Programs that use the default system locale will be affected when changing the locale settings. You will have to switch back between language packs as needed.
4. How can I reset the system locale to default?
You can reset to the default locale for your region in the Administrative language settings.
To recap, go to Control Panel > Clock and Region > Region > Select Administrative tab > Under Language for non-Unicode programs, click Change system locale. When selecting a language in the drop-down menu, select the default or the one that matches your display language.
5. Does changing the system locale impact keyboard settings?
Changing the system locale settings will not affect your keyboard input. You can configure your keyboard settings via Time and Language settings > Preferred languages.
When do you need to change the system locale?
To recap, you can change the system locale by going to the Control Panel and then the Administrative language settings.
Region-locked software, niche applications, and some legacy Windows programs may need you to change locale settings to run smoothly. If previous changes were made, you might also need to revert to the original locale setting.
In addition, users handling multilingual software or reports may need to switch between system locales more often. Others may do so when installing software not initially available in their region. With that in mind, we recommend only changing your system locale when necessary to avoid conflicts with existing non-Unicode apps.
If you are in a different country or region from the one that your PC is set to, you can change the system locale to change the way the computer displays date and time. To change your system locale, go to the Control Panel and click the regional or language button. There are several options to choose from, including system accounts and language settings. If you are unsure which option to choose, you can always choose it manually.
To change the system locale, you must be a system administrator. The Advanced tab is only accessible to users with administrative privileges. Select Change system locale from the Language for non-Unicode programs section. After making the change, restart your computer to see the changes. The language of the system won’t change in programs that use Unicode, but it will be displayed in the menu and in dialog boxes. To use the new system locale, you must install the appropriate language packs on your operating system.
What Does Changing the System Locale Do?
Changing the system locale allows you to use the language of your choice for non-Unicode programs. By default, Windows sets the locale to en-US, which makes it impossible to view Japanese text in a game, for example. By changing the system locale, you can enable or disable this setting. However, this setting will have no effect on the language used for dialog boxes and menus in Windows.
To change the system locale, go to Control Panel. Click on the Region and Language icon. Click the Administrative tab and select the language. Select the language from the drop-down menu. Click the Apply button to confirm the change. Then, restart your computer. The changes should take effect after you reboot it. If you don’t see a change after restarting the computer, the language isn’t set correctly.
The system locale controls the language used by programs without Unicode support. The changes you make here will not affect the language used for menus and dialog boxes. The system locale also specifies the default ANSI, OEM, MAC, and EBCDIC code pages, as well as font linking preferences for CJK fonts. When developers use this setting incorrectly, however, the system will act differently.
How Do I Change My Locale Settings?
To change the language and region of Windows, you have several options. These options include language, system accounts, and region. You can also change the date and time in your system and new user accounts. To change your system locale, follow these steps. First, find and select the Language and Region option under the Clock, Language, and Region pane. If you want to change the language of your computer for specific programs, click the Change system locale link in the drop-down menu.
After you have changed the language in your Windows computer, the next step is to restart your computer. If you have opened any programs while the system was still operating, you should restart your PC to make the changes take effect. If you’ve made other changes to the language, these settings will not affect these applications. However, changing the system locale will make non-Unicode programs work in the new language. If you’re not sure how to change your system locale, consult the documentation for your operating system.
How Do I Get to System Locale?
The first step to find out how to change your system locale in Windows 10 is to access the Classic Control Panel. Go to the Control Panel > Clock and Region. Next, click on the Administrative tab. Another way to change your system locale is by using PowerShell. Start PowerShell as Administrator and run the msinfo32 command. The result will be the system locale in your region. Once you’ve changed it, restart your computer.
If you’re not an administrator, you can also select the “Change system locale” option in the Settings window. If you’d like to switch your system locale to Japanese, you should use the Shift-JIS keyboard shortcut. You can change the language in Windows programs by pressing the Shift-JIS keyboard shortcut. Then, you’ll see a dialog box asking if you want to switch to Japanese. Click the “Yes” button to enable the Japanese locale. The Japanese locale will then be installed on your PC. This will make it easy for you to use the programs that support Japanese language.
To change your computer’s system locale, first log in as a user with administrative privileges. Go to the Regional and Language Options and double-click the language icon. From there, click on the Administrative tab. Click on Change system locale. After you’ve selected your new language, click OK to close the window and restart your computer. Your new language settings should take effect immediately. You can even continue to change the system locale later on.
How Do I Change My System Locale in CMD?
To change your system locale in Windows 10, first open the Control Panel. Then go to Region and Language. Click the Format drop-down menu, then select your current locale. Then click the Change system locale button to change your system language. Now, your system should be displayed in the correct language. If you want to change the language of non-Unicode programs, you must select the right language in the drop-down list.
To change the language of the command prompt, press the Win key and the spacebar. Once the language selector pops up, select the desired language. Make sure your keyboard is compatible with the desired language. If you do not, you can press the ALT key to type a four-digit number in the desired language. You can also try to change the language of the entire computer by using the CHCP syntax.
If you are unsure of which language is used by your system, you can select another one from the language list. You can also choose your system language for new user accounts. Just remember that you cannot change the language on your current user account. If you want to change your system language in Windows 10, you should follow the steps above. You must also restart your PC to apply the changes. After the restart, you can sign in again to apply the changes. This way, you can choose whichever language you want.
What is a Windows Locale?
The term “Locale” refers to a collection of language-related user preferences. Every operating system has at least one installed locale, though most systems have multiple, depending on the region of the world the user lives in. This information is used by applications to format data for different languages. Here’s a brief guide to Windows locales. This article provides an overview of the various components of the Windows locale, as well as how to use these settings to your benefit.
The System Locale specifies the default language for non-Unicode programs. It also defines bitmap fonts and code pages used by ANSI applications. System Locale is a per-system setting, found under “System Summary” on the left side of the Control Panel. The Locale value will be listed under this section. After you find the correct value, change the language setting in the application to ensure the application will be displayed properly.
How Do I Run Japanese Locale on Windows 10?
To play Japanese games on Windows 10, you need to install an application called Locale Emulator. This application simulates the language of the operating system. It is free and works well with games and programs developed for Windows. Visual Novels, for example, will not run properly on older operating systems. To install the Japanese localization, open the Control Panel. Click on the Regional and Language Options icon. Go to the Advanced tab and click the Japanese language icon. If you don’t want to install a Japanese language package, you can choose unchecking the box.
Another option is to install an app that emulates the Japanese language. This application will detect the current language of your system and run your apps in the appropriate language. This will prevent character-display errors and make the experience more seamless for you. Most new software is Unicode-encoded, but older ones may require installing the AppLocale. Then, you can run Japanese Visual Novels in your computer!
What is My System Locale?
If you’re confused about the language used on your computer, the first step is to know what your system locale is. System locale specifies the language that defaults to when your computer displays text from non-Unicode programs. This also affects the language of some applications, such as ANSI-based ones. To find out what your system locale is, open the Control Panel > Languages and Regions menu, and click the Language for non-Unicode programs option.
To change the system locale in Windows 10, you can use the classic Control Panel. To do this, navigate to Control Panel -Clock and Region – and click the Administrative tab. Another way to find the system locale is to run a PowerShell command. To run the command, open PowerShell as an administrator and then type the Get-WinSystemLocale command. This command will display the system locale in the msinfo32 file.
In Windows 7, you can change your system locale by following the same steps that are outlined above. First, click Start –> Control Panel. Select the Language and Region option. Click the “Advanced” tab. Next, click on Change system locale. Choose the language you want to use. You may need to enter an administrator password or confirm your selection. You’ll then need to restart your computer to apply the changes.
Learn More Here:
1.) Windows Help Center
2.) Windows – Wikipedia
3.) Windows Blog
4.) Windows Central
Generally, locale refers to language and region along with any special variant preference that a user suppose to see in the user interface. In Windows, system locale is there, which specifies the default language that will be used in non-unicode programs. Non-unicode programs uses American National Standards Institute (ANSI) Application Program Interface (API). This implies that any string Windows passes to such programs is a sequence of bytes and not of the unicode characters.
System locale defines which code pages and system fonts are to be used by default. Note the system locale is different than user locale. User locale setting is referred to time/date format, number currency and calendar settings. Hence, not be confused between these two locale terms.
Okay, so when you need to change system locale settings in Windows? Well under following situation, an user will need to change system locale setting:
- If the non-unicode program/application not working correctly in current system locale setting
- When you’ve to use different code pages other than default ones
Now let’s see how to actually change system locale settings in Windows 10.
How To Change System Locale In Windows 10
1. Right click Start Button or press + X keys and select Settings.
2. In the Settings app, navigate to Time & Language > Date & time.
3. Next, click on Additional date, time & regional settings link. Then in Control Panel window so open, click Change date, time, or number formats link under Region.
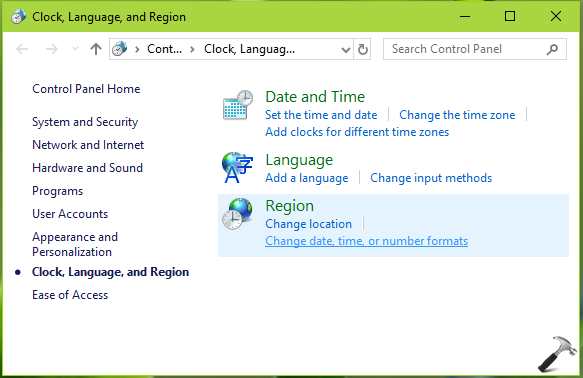
4. Moving on, in the Region window, switch to Administrative tab. Click Change system locale button. If you’re prompted for credentials, provide them.
5. Finally, in the Region Settings window, change the locale to that one, which you want to use. Click OK and then click Apply followed by OK in above shown window.
Though you may not be prompted to reboot, but still you must reboot at your end. After restarting the machine, new system locale settings should be in effect.
That’s it!
RELATED ARTICLES
(Image credit: Future)
Windows 10 will guide you through configuring your preferred language during the initial setup, but if you didn’t select the correct option or use a device already configured with a different language, you don’t have to struggle when your requirements are different, nor do you have to reinstall the operating system.
If you have to change the device’s default language settings, you can do this using the Settings app without reinstalling Windows 10.
In this how-to guide, I will walk you through the steps to change the system’s default language on Windows 10.
How to change default system language on Windows 10
If the incorrect language is configured on Windows 10, you can adjust the system settings to configure the correct language without reinstallation.
Disable language sync
On Windows 10, when using a Microsoft account, some of your preferences (including language) will sync across the device. If you only plan to change the settings on the computer, you should turn off the option to sync your language settings to prevent changing the same settings on other devices.
To disable language preference sync on Windows 10, use these steps:
- Open Settings.
- Click on Accounts.
- Click on Sync your settings.
- Under the «Individual sync settings» section, turn off the Language preferences toggle switch.
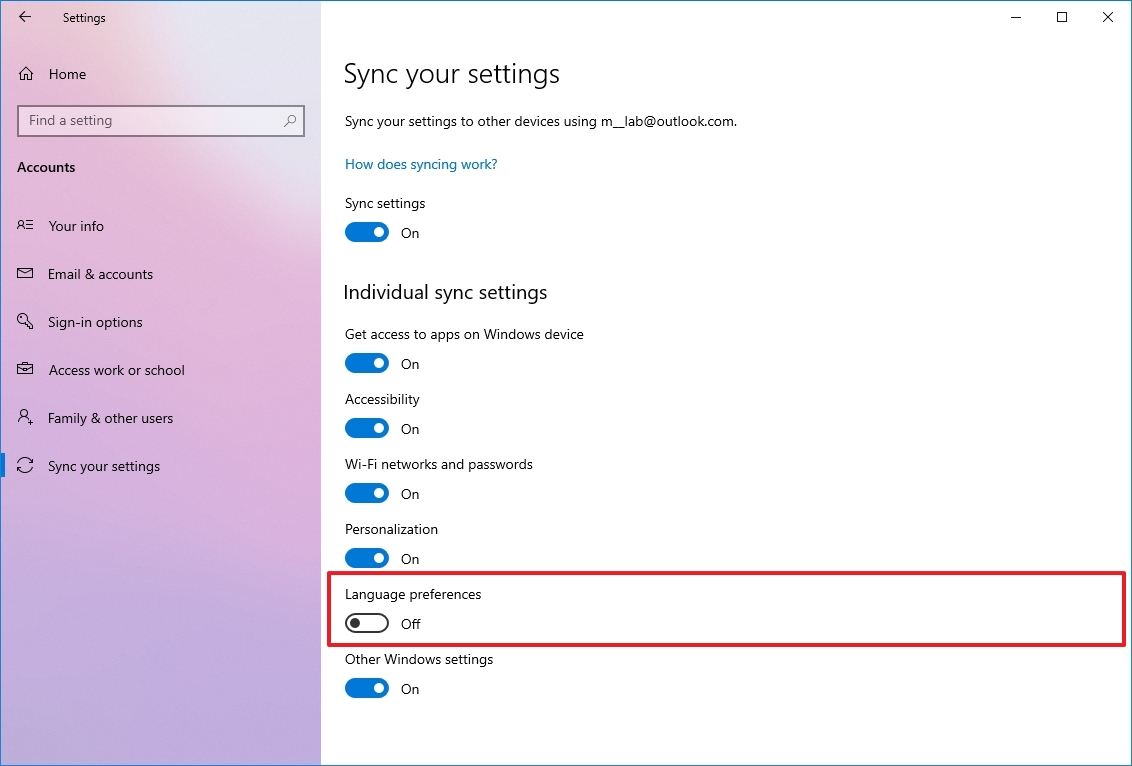
Once you complete the steps, you can change the language settings without affecting the other devices connected with the same Microsoft account.
All the latest news, reviews, and guides for Windows and Xbox diehards.
Change system language settings
To change the system default language, close your apps, and use these steps:
- Open Settings.
- Click on Time & Language.
- Click on Language.
- Under the «Preferred languages» section, click the «Add a language» button.
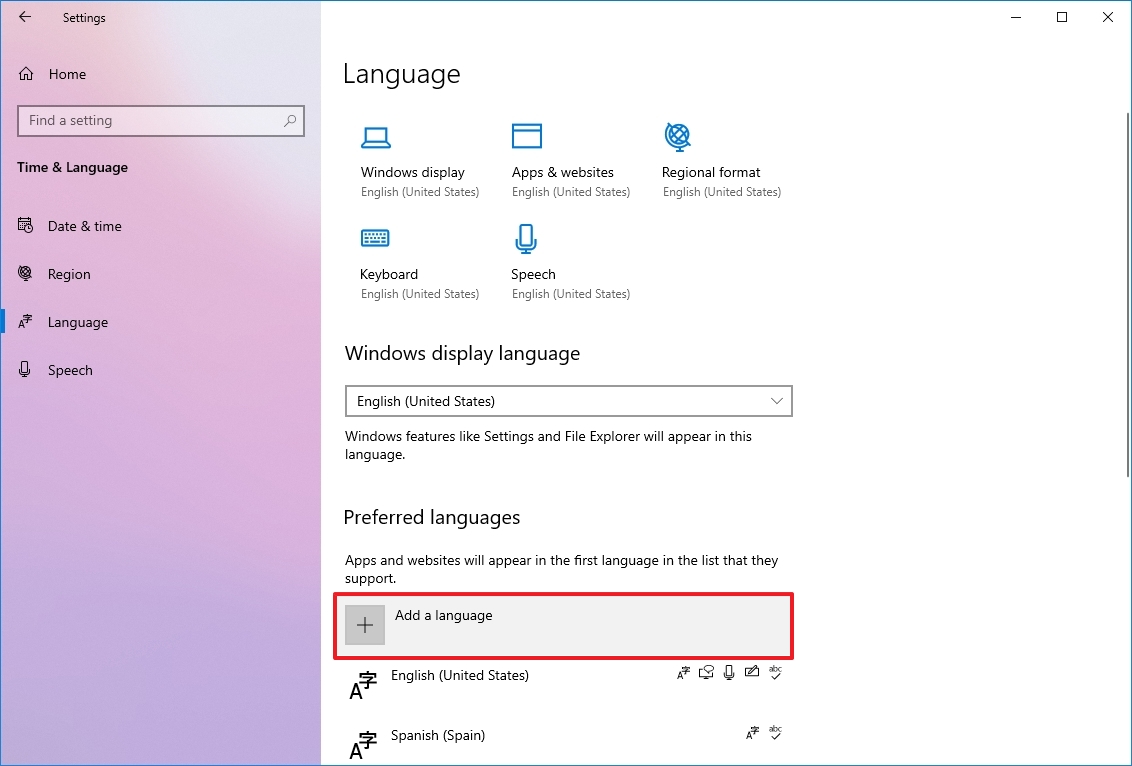
- Search for the correct setting using the language or country name.
- Select the package from the result.
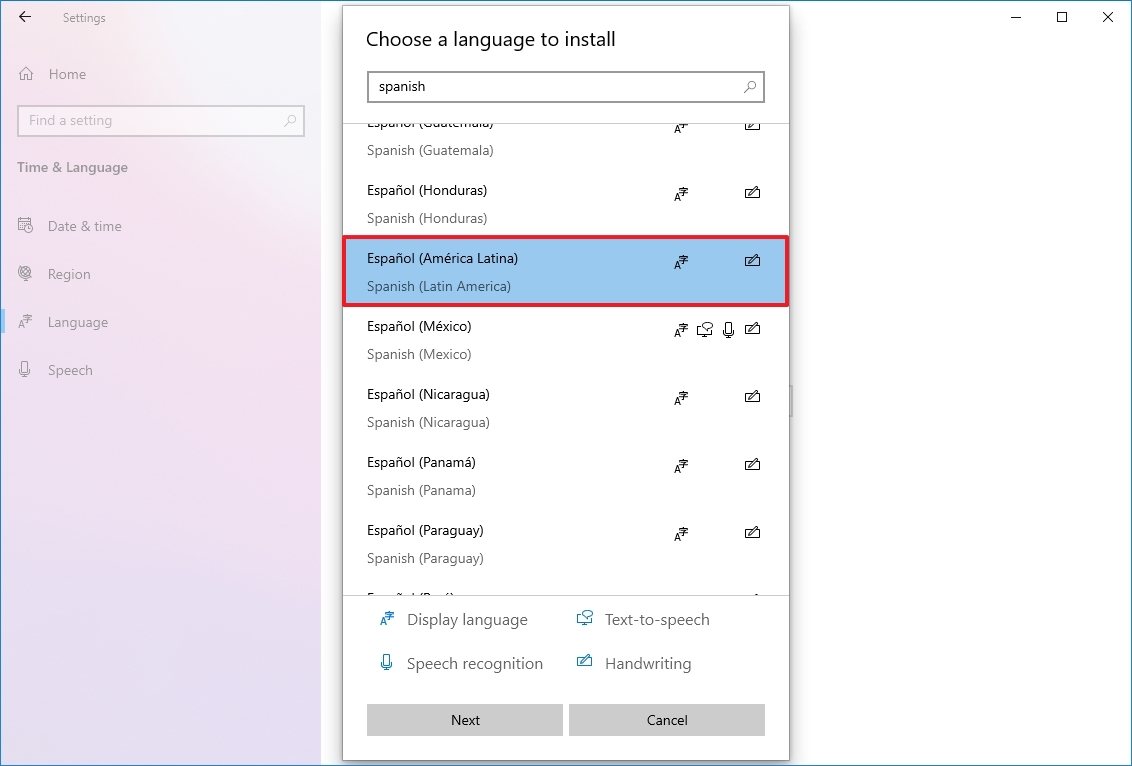
- Click the Next button.
- Check the «Install language pack» option.
- Check the «Set as my Windows display language» option.
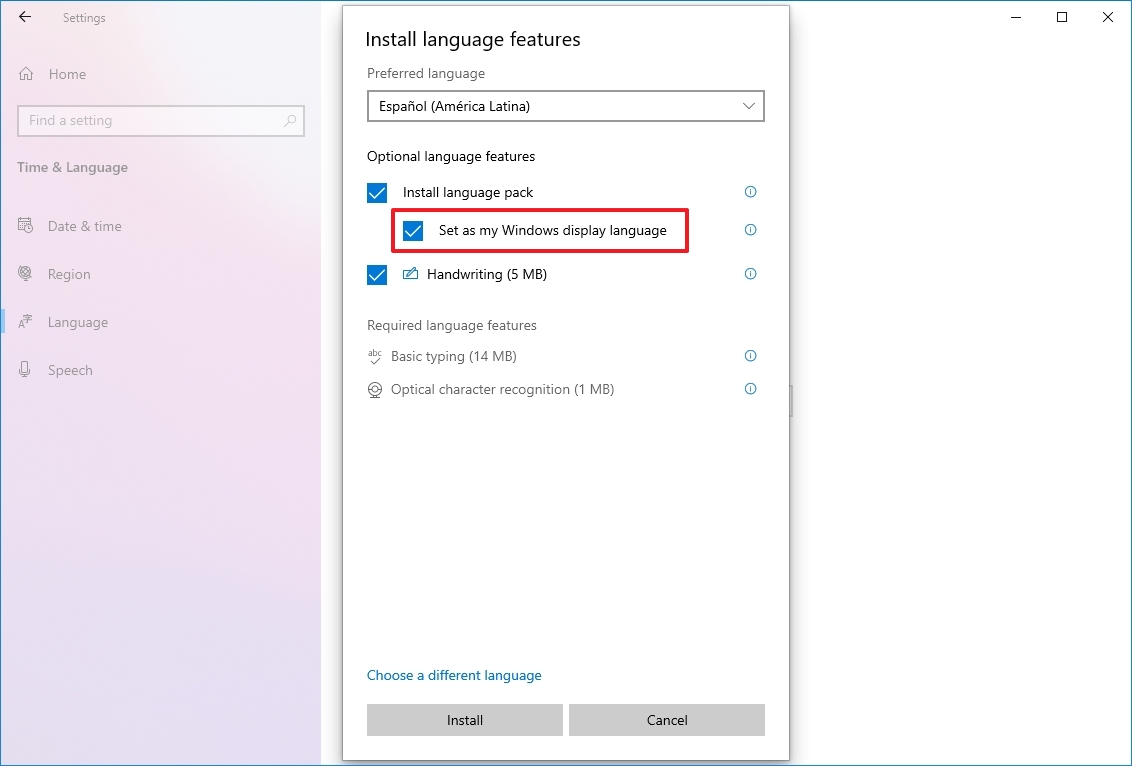
- Check the additional features as needed — for example, «Text-to-speech» and «Handwriting.»
- Click the Install button.
- Click the «Yes, sign out now» button.
- Sign back into the account.
After you complete the steps, the Windows 10 language will change across the experience, including the Sign-in screen, Settings app, File Explorer, Desktop, apps, browser, and websites you visit.
Change system region settings
You will also have to change the region settings if you need to adjust the language settings because you are in a different region.
To change the local region settings, use these steps:
- Open Settings.
- Click on Time & Language.
- Click on Region.
- Under the «Region» section, select the current location with the «Country or region» drop-down menu (if applicable).
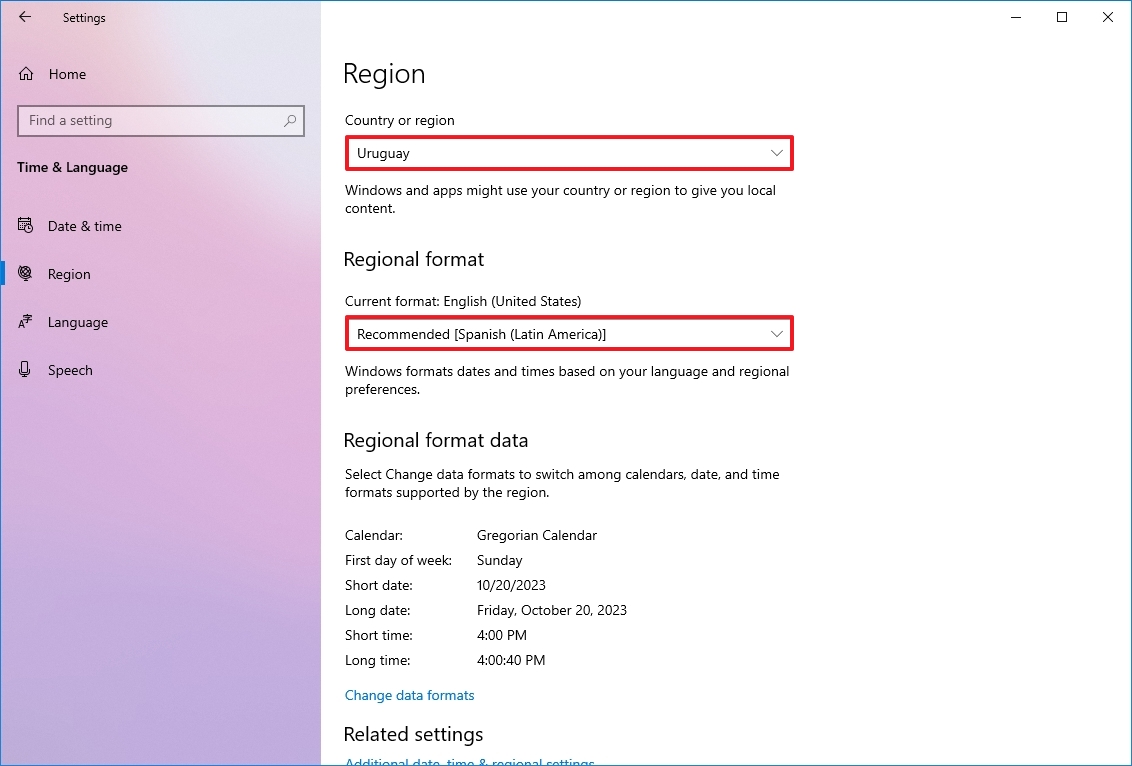
- Under the «Regional format» section, select the formats for the region’s date and time with the «Current format» drop-down menu (if applicable).
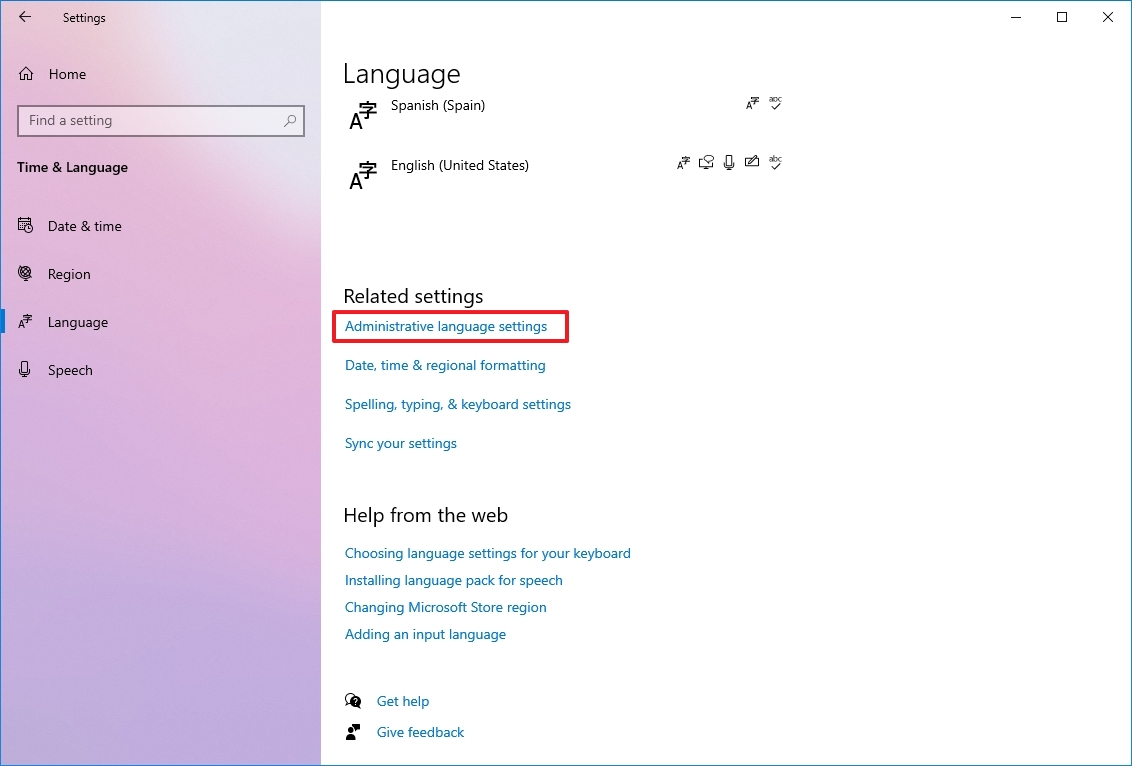
- Click on Language.
- Under the «Related settings» section, click the «Administrative language settings» option.
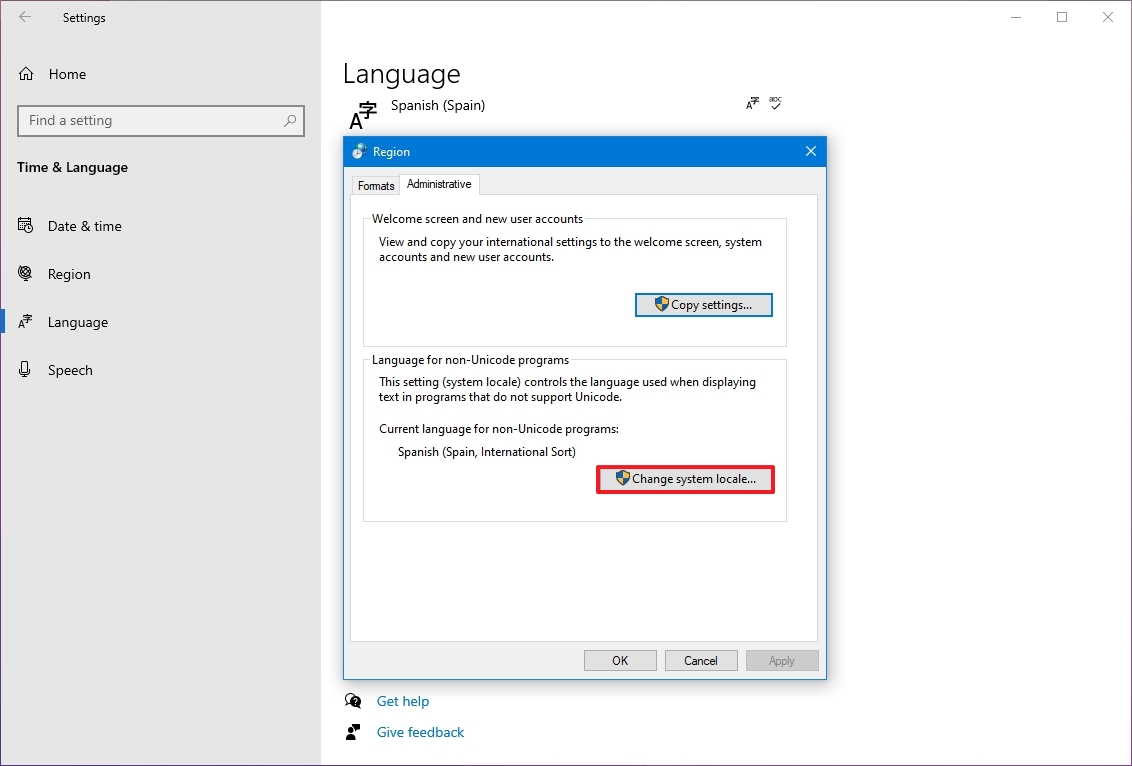
- Click the Administrative tab.
- Under the «Language for non-Unicode programs» section, click the «Change system locale» button.
- Select the new system locale language with the «Current system locale» drop-down menu.
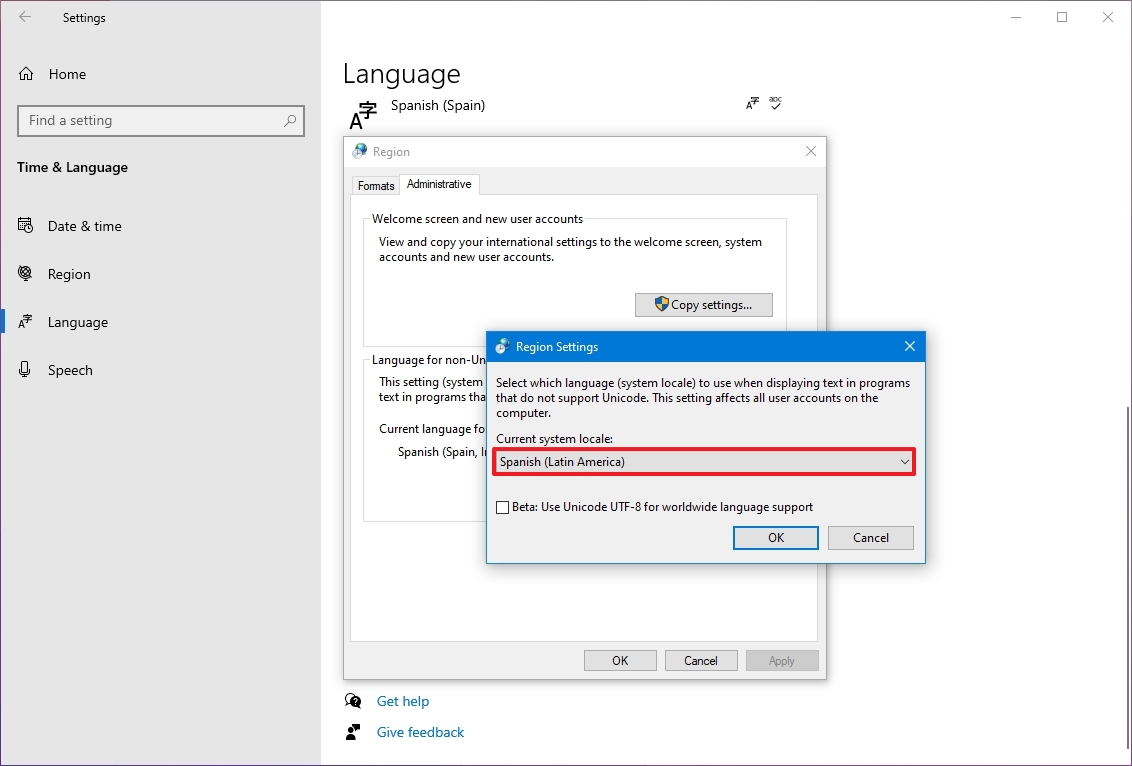
- Click the OK button.
- Click the Copy settings button in the «Administrative» tab.
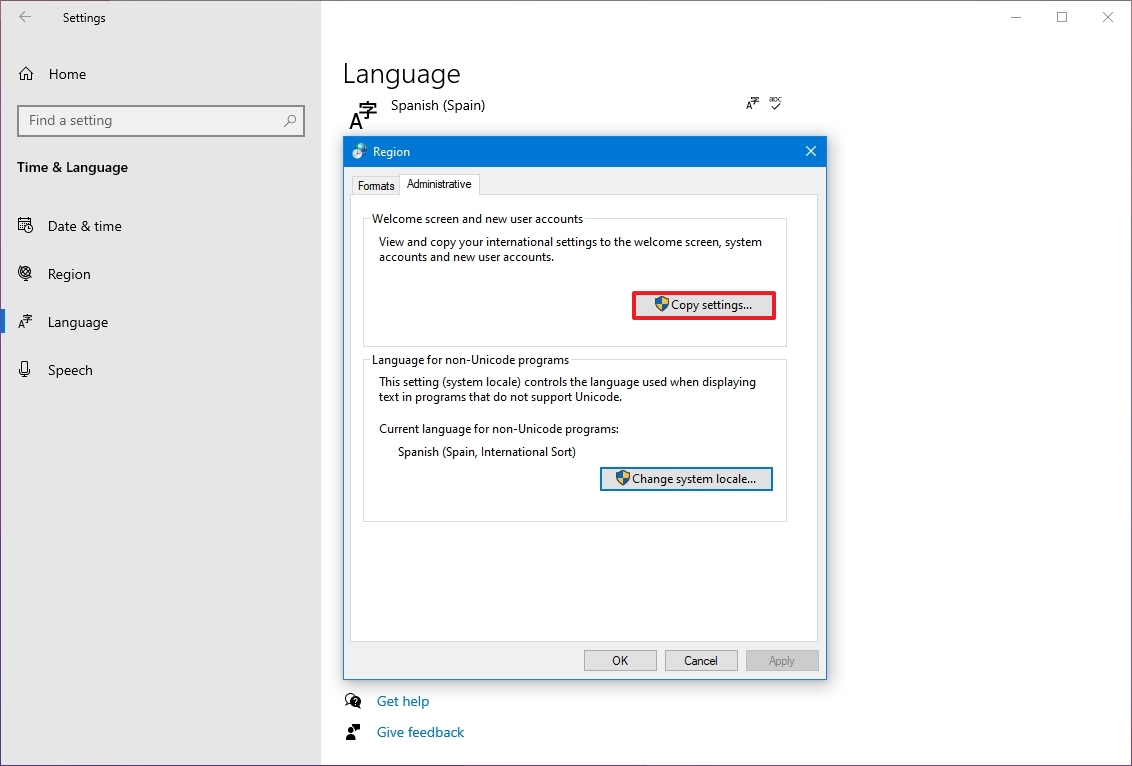
- Under the «Copy your current settings to» section, check the «Welcome screen and system accounts» and «New user accounts» options.
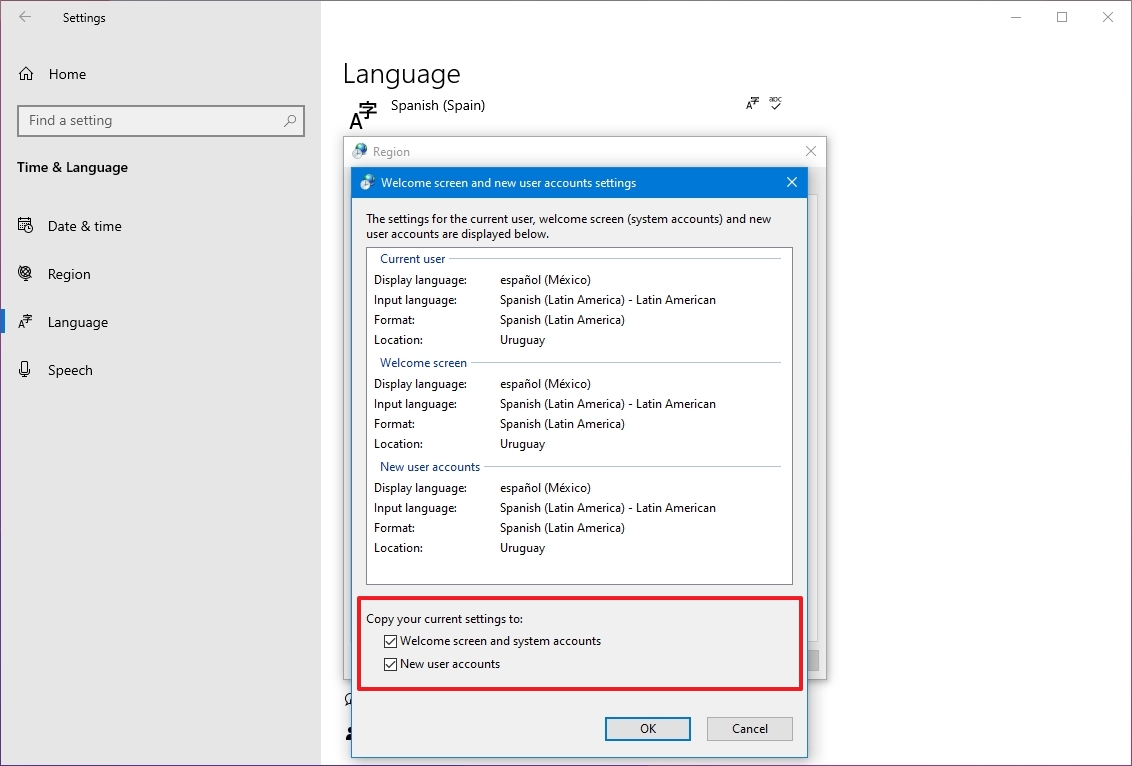
- Click the OK button.
- Click the OK button again.
- Click the Restart now button.
Once you complete the steps, the settings will apply, and the computer will use the correct region settings.
You rarely have to change or add other languages on Windows 10. However, changing these settings may come in handy in organizations working with people who need to use different preferences. It’s also a helpful feature to match the locale settings if you relocate to another region or when buying a new laptop that ships from a different country.
The only caveat with changing the region settings is that it will also change the settings for the Microsoft Store, which may block access to certain apps and services, depending on the location. In the same way, you can change the region settings to access an application from the Microsoft Store that is only available in a specific region.
More resources
For more helpful articles, coverage, and answers to common questions about Windows 10 and Windows 11, visit the following resources:
- Windows 11 on Windows Central — All you need to know
- Windows 10 on Windows Central — All you need to know
Mauro Huculak has been a Windows How-To Expert contributor for WindowsCentral.com for nearly a decade and has over 15 years of experience writing comprehensive guides. He also has an IT background and has achieved different professional certifications from Microsoft, Cisco, VMware, and CompTIA. He has been recognized as a Microsoft MVP for many years.