
Applies ToWindows 11 Windows 10
When you initially setup your Windows device, you might have opted to use a local account instead of a Microsoft account.
The main difference between a local account and a Microsoft account is that a local account is specific to one device, while a Microsoft account can be used across multiple devices and Microsoft services.
-
A local account is created on the device and doesn’t require Internet connectivity to sign in. It’s independent of other services, and it’s not connected to the cloud. Your settings, files, and applications are limited to that single device
-
A Microsoft account, on the other hand, is associated to an email address and password that you use with Outlook.com, Hotmail, Office, OneDrive, Skype, Xbox, and Windows. When you sign in to your PC with a Microsoft account, you’re connected to a Microsoft cloud service, and your settings and files can sync across various devices. You can also use it to access other Microsoft services
Tip: Discover the benefits of a Microsoft account and how it enhances your experience by visiting the What is a Microsoft account article.
Change from a local account to a Microsoft account
You can use the Settings app to switch your local account to a Microsoft account.
-
In the Settings app on your Windows device, select Accounts > Your info, or use the following shortcut:
Your info
-
Select Sign in with a Microsoft account instead. You’ll see this link only if you’re using a local account
-
Follow the prompts to switch to your Microsoft account
-
Select Next, then select Sign out and finish. Sign back in with your new local account
Change from a Microsoft account to a local account
You can use the Settings app to switch your Microsoft account to a local account.
Important: Microsoft recommends using a Microsoft account, not a local account, when signing in to Windows. Using a Microsoft account in Windows allows for seamless integration of Microsoft services, enhanced security, and sync across devices, unlike a local account.
-
In the Settings app on your Windows device, select Accounts > Your info, or use the following shortcut:
Your info
-
Select Sign in with a local account instead. You’ll see this link only if you’re using a Microsoft account
-
Type the username, password, and password hint. The username must be different than any others on the device
-
Select Next, then select Sign out and finish. Sign back in with your new local account
Warning: when using a local account, it’s a good idea to create a password reset disk. If you don’t do this and then forget your password, you won’t be able to recover it.
Need more help?
Want more options?
Explore subscription benefits, browse training courses, learn how to secure your device, and more.
All Microsoft products and services are connected to your Microsoft account. Even Windows offers the option to login using the
same account. That said, many users have multiple Microsoft accounts to separate their personal life from professional. Others like to use a local account instead. But, how do you change the Microsoft account on your Windows 10 computer when needed? How do you create/add a new account?

While a Microsoft account is not necessary to use Windows 10 computer, it is recommended nonetheless. There could be other reasons to update or change your Microsoft account details on your computer:
- You bought a second-hand computer and the last owner failed/forgot to format it.
- You lead a dual life and have multiple jobs requiring you to sign in to different accounts.
- You are an advanced user, enthusiast, or dev who loves tinkering around.
- You want to use two OneDrive accounts to maximize free storage space it offers.
Let’s find out how you can change Microsoft account on Windows 10 computer and what you need to keep in mind.
Add Email ID and Number to Same Microsoft Account
Many users wanted to change their Microsoft account’s sign-in email and phone number. No need to create a new account just for that. You can add up to 10 email IDs and numbers to the same account as ‘alias’ without creating a new account for each one. You can also replace old account details with a new one or make the new ID ‘primary’.
Step 1: Open your Microsoft Account manage area and under Account aliases where you can add a new email ID or number.

Step 2: Choose the first option if you want to create a new Outlook account right there and the second option if you are using a third-party email provider like Gmail.
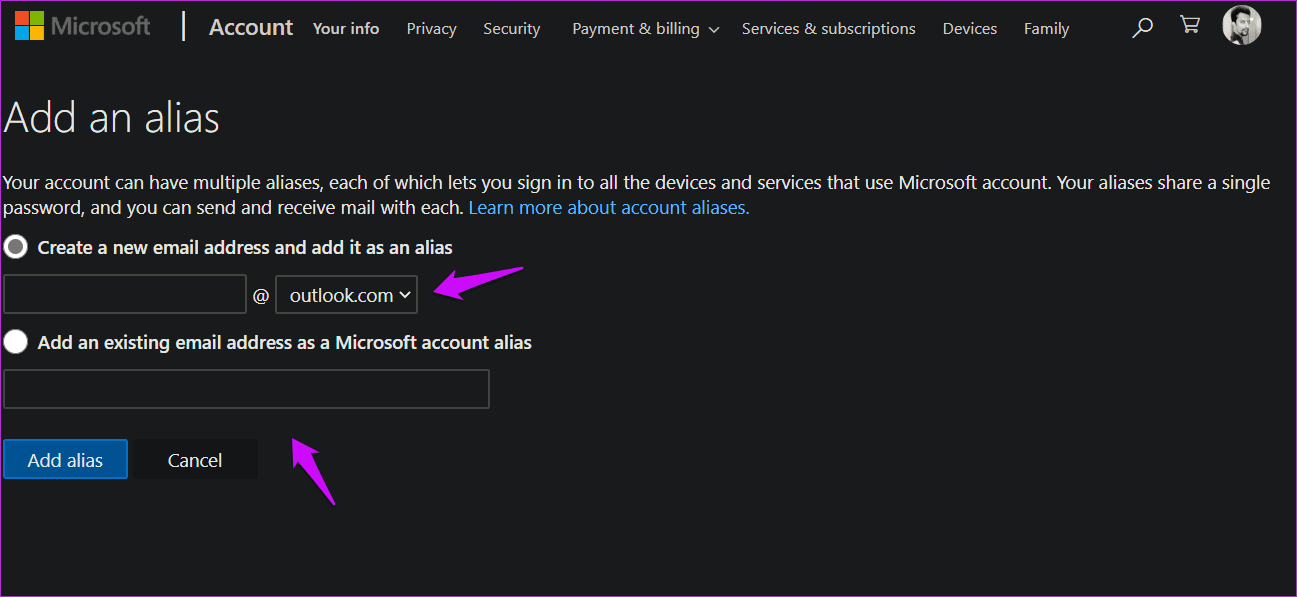
You must know that there is no way to move aliases from one Microsoft account to another. You can’t recover aliases either. If you delete an alias in one Microsoft account, it will be deleted from Microsoft servers forever, and you or anyone else can’t use it on another Microsoft account.
Change Microsoft Account to Local and Vice Versa
Other users wanted to get rid of their Microsoft account and go local or vice versa.
For the uninitiated, there are two types of accounts you can create on Windows-powered computers. You can either create a local account or a Microsoft account. A local account is one that does just requires a username and password. Also, you can remove your password later. None of your Microsoft data leaves your computer or synced to another Windows device. It stays offline and on a single device. Several Microsoft apps like Store, Skype, etc. won’t work or downloaded without a Microsoft account though.
On the other hand, a Microsoft account will sync all your activities across devices and keep all the data in the cloud on Microsoft’s servers. The benefit is obvious. Do you want to change between them?
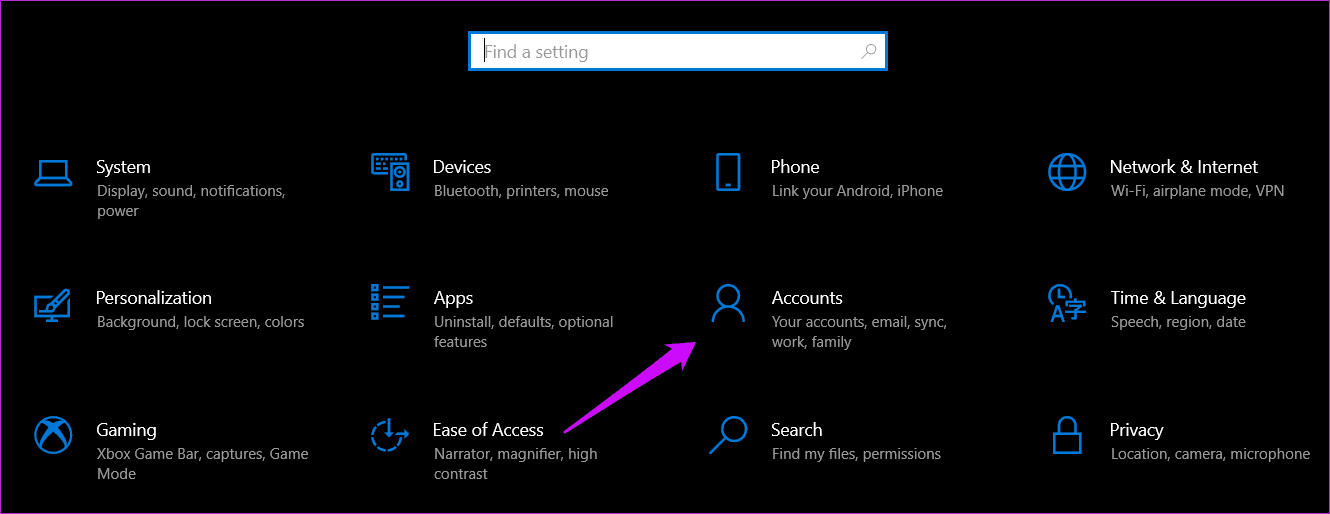
Step 1: Press Windows key+I to open Settings and click on Accounts.
Step 2: Click on ‘Sign in with a local account instead’ option to begin the process.

Follow on-screen instructions after that. You may have to enter your current Microsoft account’s password/PIN for verification.
To change from a local account to a Microsoft account, you will follow the same steps. This time, you will select ‘Sign in with a Microsoft account instead’ option that should be visible because you are using a local account instead.
You have a new Microsoft account with a different email ID (Outlook.com or Live.com, which is owned by Microsoft) and want to use this new account on your Windows 10 computer.
Step 1: Open Settings again (Windows key+I) and go to Accounts > Family & other users.
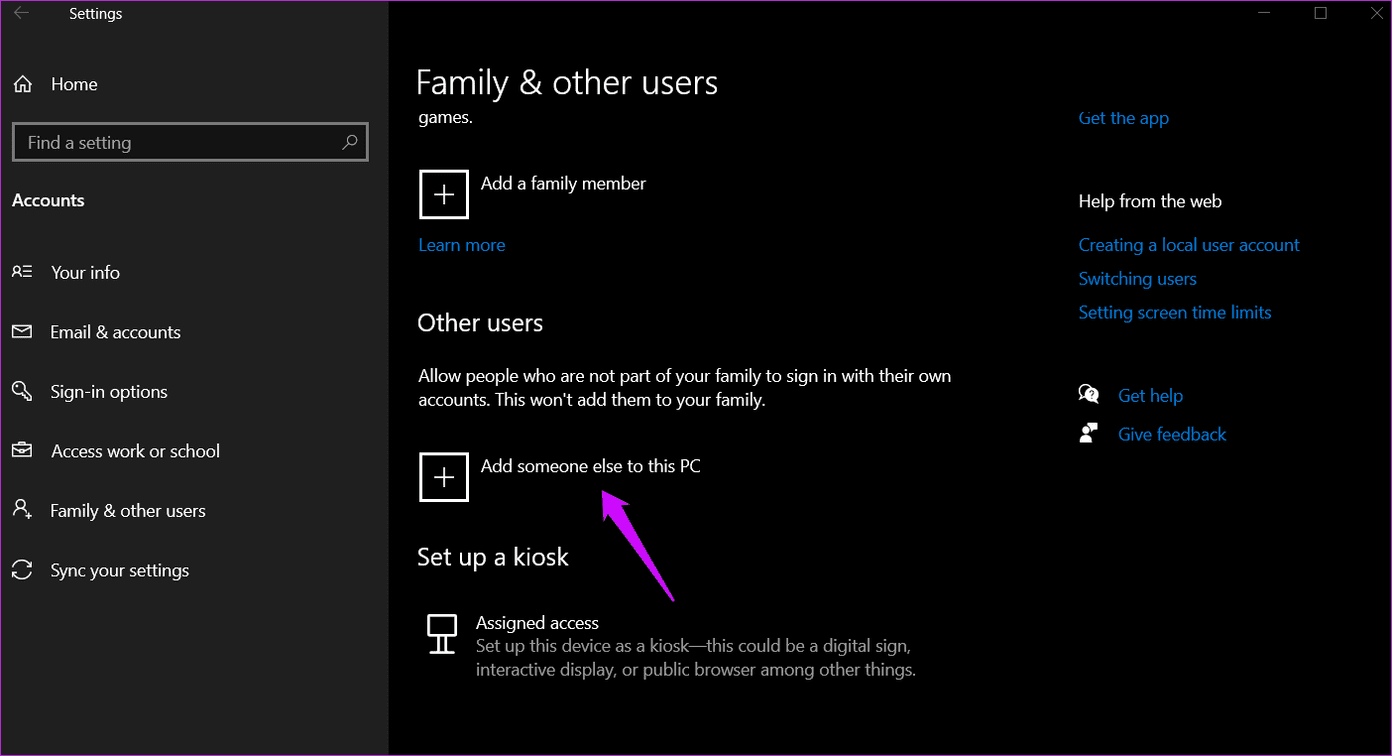
Step 2: Click on ‘Add someone else to this PC’ button.
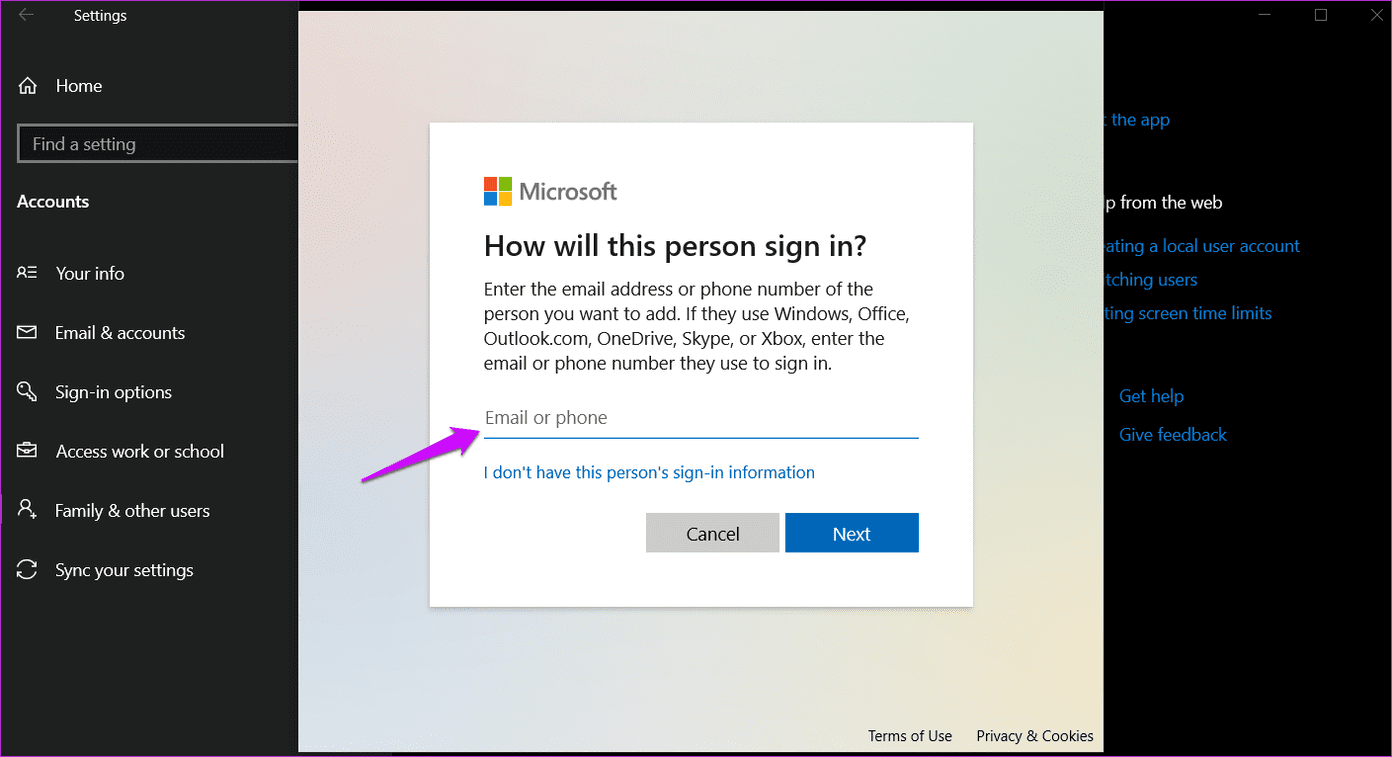
You will now follow on-screen instructions and enter the new Microsoft account ID and password to add that account to your computer. The setup instructions will include settings like 2FA and Windows Hello. Just like when you added your first Microsoft account.
What you are doing is creating a new user account on your computer with this new Microsoft account. You can switch between these two users like you normally do from the Start menu or reboot your computer.
Dual Accounting System
Microsoft allows a lot of ways to manage your Windows 10 computer. Unlike Windows 7 and earlier versions, you have more options like using a local or Microsoft account, opening up new possibilities. I suggest you take the time to think through what you want to do and how you want it done. That will save you the trouble of going back and forth between settings and accounts. Always protect your account with features like Hello or 2FA. Either will save you a lot of headaches someday.
Let us know if you have any questions in the comments section below.
Next up: Do you know the difference between a standard and administrator user on Windows 10? Click on the link below to learn the difference between two types of user accounts on Windows.
Was this helpful?
Thanks for your feedback!
The article above may contain affiliate links which help support Guiding Tech. The content remains unbiased and authentic and will never affect our editorial integrity.
Are you interested in changing your Microsoft account on Windows 10? If so, you’re not alone. Many users find themselves needing to switch to a different account for various reasons. Whether you’ve created a new account, merged accounts, or simply want to change the primary account associated with your Windows 10 device, the process can be straightforward. Let’s explore how you can make this change and ensure a seamless transition.
Changing your Microsoft account on Windows 10 is a task that can be accomplished with a few simple steps. First, it’s important to understand that your Microsoft account provides access to various services and settings across Windows devices. By altering the account, you have the opportunity to enhance your user experience. With over 1 billion people using Windows 10 worldwide, there’s a significant need for flexibility in managing accounts. Whether it’s for personal or professional reasons, being able to change your Microsoft account on Windows 10 can have a significant impact on how you interact with your device.
If you want to change your Microsoft account on Windows 10, follow these steps:
- Open the «Settings» menu by clicking on the Start button and selecting the gear icon.
- Click on «Accounts.»
- Under the «Your info» section, click on «Sign in with a local account instead.»
- Enter your current Microsoft account password.
- Follow the on-screen instructions to create a new local account for your Windows 10 device.
- Restart your computer.
- After restarting, go back to the «Settings» menu, click on «Accounts,» and choose «Sign in with a Microsoft account.»
- Enter your new Microsoft account credentials and follow any additional prompts.
By following these steps, you can easily change your Microsoft account on Windows 10.

Changing Your Microsoft Account on Windows 10
Windows 10 provides users with a seamless and convenient way to access their Microsoft services and products through a Microsoft account. However, there may be instances where you need to change your Microsoft account due to various reasons. Whether you want to switch to a different Microsoft account or update your existing account with new credentials, this guide will walk you through the step-by-step process of changing your Microsoft account on Windows 10.
1. Why Change Your Microsoft Account?
Before we delve into the steps of how to change your Microsoft account on Windows 10, it’s important to understand why you might need to make this change. There can be several reasons:
- You want to switch to a different Microsoft account that is associated with a different email address or username.
- You want to update your existing Microsoft account with a new email address or username.
- You want to improve the security of your Microsoft account by changing your login credentials.
Regardless of the reason, it’s essential to know the steps involved in changing your Microsoft account on Windows 10.
2. Steps to Change Your Microsoft Account on Windows 10
Here’s a step-by-step guide on how to change your Microsoft account on Windows 10:
Step 1: Sign in to Your Windows 10 Device
First, sign in to your Windows 10 device using your current Microsoft account credentials. Click on the «Start» button located at the bottom left corner of the screen and select the user account that you want to sign in with.
If you are already signed in, you can skip this step and proceed to the next one.
Step 2: Open Account Settings
Once you are signed in, click on the «Start» button and select the «Settings» gear icon located just above the «Power» button.
In the Settings window, click on the «Accounts» option to open the Accounts settings.
Step 3: Navigate to Your Account
In the Accounts settings, click on the «Your info» tab located on the left-hand side of the window. This will display your account details and profile picture.
Scroll down and click on the «Manage my Microsoft account» link. This will open a new tab in your web browser and take you to the Microsoft account login page.
Step 4: Sign in to Your Microsoft Account
In the Microsoft account login page, enter your current Microsoft account credentials (email address and password) and click on the «Sign In» button.
If you have enabled two-factor authentication for added security, you may be prompted to enter a verification code that will be sent to your registered phone number or email address.
Step 5: Update Your Account Details
Once you are signed in to your Microsoft account, you can update your account details, such as your email address or username.
Click on the «Edit name» link to change your name, and click on the «Edit» button next to your profile picture to update your profile picture.
If you want to change your email address associated with your Microsoft account, click on the «Manage how you sign in to Microsoft» option and follow the on-screen instructions to add a new email address or remove the existing one.
3. Considerations When Changing Your Microsoft Account
While changing your Microsoft account on Windows 10 is a simple process, there are a few important considerations to keep in mind:
- Changing your Microsoft account may require you to reconfigure some settings and re-download certain apps or games.
- If you have purchased apps, games, or subscriptions through your current Microsoft account, those purchases may not be transferable to a different account.
- Changing your Microsoft account while using Microsoft Office applications may require you to reactivate the software using the new account credentials.
Make sure to backup any important files and documents before changing your Microsoft account to avoid any data loss.
4. Benefits of Changing Your Microsoft Account
Changing your Microsoft account on Windows 10 can offer several benefits:
- Improved security by updating your login credentials.
- Access to different Microsoft services and products associated with a different account.
- Using a more personalized or professional email address or username.
- Syncing your account settings across multiple devices.
These benefits can enhance your overall experience and productivity when using Windows 10.
Changing Your Microsoft Account and Ensuring a Smooth Transition
Changing your Microsoft account on Windows 10 is a relatively straightforward process that can be done in a few simple steps. By understanding why you may need to change your Microsoft account and following the step-by-step instructions outlined in this guide, you can update your account with ease. Keep in mind the considerations and benefits associated with changing your Microsoft account to ensure a smooth transition and an enhanced Windows 10 experience.
Changing Microsoft Account on Windows 10
If you need to change your Microsoft account on Windows 10, follow these steps:
- Open the Settings app by clicking on the Start menu and selecting «Settings».
- In the Settings app, click on the «Accounts» option.
- In the Accounts settings, choose the «Your info» tab located on the left sidebar.
- Under the «Your info» tab, click on the «Sign in with a local account instead» link.
- Follow the on-screen instructions to switch from a Microsoft account to a local account.
- If you want to change back to a Microsoft account, go back to the «Your info» tab and click on the «Sign in with a Microsoft account» link.
By following these steps, you can easily change your Microsoft account on Windows 10 and manage your account settings effectively.
Key Takeaways:
- To change your Microsoft account on Windows 10, go to the «Settings» menu and select «Accounts.»
- Click on «Your Info» and then «Sign in with a Microsoft account instead.»
- Enter the email address and password for the new Microsoft account you want to use.
- If you already have a Microsoft account on your device, you can disconnect it before signing in with a new account.
- Changing your Microsoft account will affect various settings and services tied to your old account.
Frequently Asked Questions
Here are some common questions and answers about changing your Microsoft account on Windows 10:
1. How do I change my Microsoft account on Windows 10?
To change your Microsoft account on Windows 10, follow these steps:
1. Go to the Settings app by clicking on the Start menu and selecting «Settings».
2. In the Settings app, click on «Accounts».
3. Under the «Your info» section, click on «Sign in with a Microsoft account instead» link.
4. Follow the on-screen instructions to sign in with a new Microsoft account or create a new one if you don’t have an existing account.
5. Once you’ve signed in with the new Microsoft account, your account will be changed on Windows 10.
2. Can I change my Microsoft account without reinstalling Windows 10?
Yes, you can change your Microsoft account on Windows 10 without reinstalling the operating system. Follow the steps below:
1. Go to the Settings app by clicking on the Start menu and selecting «Settings».
2. In the Settings app, click on «Accounts».
3. Under the «Your info» section, click on «Sign in with a local account instead» link.
4. Follow the on-screen instructions to create a local account.
5. After creating a local account, repeat the steps mentioned in the previous question to sign in with a new Microsoft account.
3. Will changing my Microsoft account affect my files and settings?
Changing your Microsoft account on Windows 10 does not impact your files and settings. Your documents, pictures, and other personal files will remain intact. However, some settings, such as desktop background and theme preferences, may revert to default settings. It’s recommended to make note of your customized settings before making any changes.
4. Can I switch back to my previous Microsoft account after changing it?
Yes, you can switch back to your previous Microsoft account after changing it on Windows 10. Follow these steps:
1. Go to the Settings app by clicking on the Start menu and selecting «Settings».
2. In the Settings app, click on «Accounts».
3. Under the «Your info» section, click on «Sign in with a Microsoft account instead» link.
4. Sign in with your previous Microsoft account credentials.
5. Your account will be switched back to your previous Microsoft account.
5. What should I do if I forgot my Microsoft account password?
If you forgot your Microsoft account password, follow these steps to recover it:
1. Go to the Microsoft account recovery webpage in your web browser.
2. Enter the email address associated with your Microsoft account, then enter the characters shown on the screen for verification.
3. Select the method you prefer for receiving your security code (email or phone number) and follow the instructions to receive the code.
4. Enter the security code you received and follow the prompts to reset your Microsoft account password.
5. Once you’ve reset your password, you can use it to sign in to your Microsoft account on Windows 10.
To change your Microsoft account on Windows 10, simply follow the steps outlined in this article. First, go to the Start menu and click on «Settings». Then, select «Accounts» and click on «Your info». Here, you will see the option to «Sign in with a Microsoft account instead». Click on it and follow the prompts to enter your new Microsoft account credentials. Finally, restart your device to complete the process.
Changing your Microsoft account on Windows 10 is a straightforward process that can be done in just a few steps. By following these instructions, you can easily switch to a new Microsoft account and enjoy all the benefits it brings. Remember to sign out of your old account and restart your device to ensure that the changes take effect.
Changing the Microsoft Account on Windows 10 is a straightforward process that involves accessing your settings, selecting the relevant account options, and entering the new account details. In just a few steps, you’ll be able to switch to a different Microsoft account, giving you access to your personalized settings, apps, and files.
Changing the Microsoft account on Windows 10 will allow you to switch from one account to another, ensuring you have access to the correct settings and files associated with the new account. Follow these steps to make the switch.
Step 1: Open Settings
Click the Start menu and select the gear icon to open the Settings app.
Getting to the Settings app is essential as it houses all the controls you’ll need for changing your Microsoft account. The gear icon is often located near the bottom-left corner of the Start menu.
Step 2: Navigate to Accounts
In the Settings window, click on «Accounts.»
By navigating to the Accounts section, you’ll find all the user-related settings, including your email, app accounts, and sign-in options.
Step 3: Access Your Info
Select «Your info» from the left sidebar.
This section contains your current Microsoft account details, including your profile picture and email address. It’s the right place to start the switch.
Step 4: Click on «Sign in with a local account instead»
Choose the option to switch to a local account.
Switching to a local account first is necessary because Windows 10 doesn’t allow you to directly switch Microsoft accounts. This step essentially resets the account information.
Step 5: Follow the On-Screen Instructions
Complete the process by entering your current password and following the prompts.
The system will guide you through a series of prompts to confirm your current account password and set up a local account.
Step 6: Sign in with a New Microsoft Account
After switching to a local account, go back to «Your info» and click «Sign in with a Microsoft account instead.»
Once you complete the switch to a local account, you can now add your new Microsoft account. This option will be available in the same «Your info» section.
Step 7: Enter New Account Credentials
Enter the email and password for your new Microsoft account.
Inputting the new credentials will link your Windows 10 profile to the new Microsoft account, granting you access to all associated services and settings.
After completing these steps, your Windows 10 device will be linked to the new Microsoft account. This will transfer all settings, apps, and personalized configurations associated with the new account.
Tips for Changing Microsoft Account on Windows 10
- Make sure to back up any important data before switching accounts to avoid losing any files.
- Ensure you have the login details for both the old and new Microsoft accounts on hand.
- Use a local account temporarily to facilitate the switch between Microsoft accounts.
- Double-check that your new Microsoft account has the necessary permissions and settings configured.
- Log out of all Microsoft-related apps before making the switch to prevent any sync issues.
Frequently Asked Questions
Will I lose my files if I change my Microsoft account on Windows 10?
No, your files remain on your device. However, it’s a good idea to back them up before switching accounts.
Can I switch back to my old Microsoft account after changing it?
Yes, you can switch back by repeating the process and entering your old account details.
Do I need an internet connection to change my Microsoft account?
Yes, an internet connection is required to verify and sign in to the new Microsoft account.
What happens to my Microsoft Store apps when I change accounts?
Apps linked to your old account will no longer be accessible unless purchased or downloaded under the new account.
Is it possible to have multiple Microsoft accounts on Windows 10?
You can add multiple user accounts on a single device, each linked to different Microsoft accounts.
Summary
- Open Settings.
- Navigate to Accounts.
- Access Your Info.
- Click on «Sign in with a local account instead.»
- Follow the on-screen instructions.
- Sign in with a New Microsoft Account.
- Enter new account credentials.
Conclusion
Changing the Microsoft account on Windows 10 is a relatively simple task that can be accomplished with just a few steps. Whether you’re switching to a new account for work, personal use, or just need a change, the process is designed to be user-friendly and efficient. By following the provided steps, you ensure a smooth transition, retaining access to your personalized settings and files.
Remember to back up any important data before you start, and have your new account details ready. Switching accounts can seem daunting, but it’s just like changing the channel on your TV – quick and easy with the right remote (or in this case, the right steps). If you run into any issues, refer back to our tips and FAQs for extra guidance. Happy computing!
Matt Jacobs has been working as an IT consultant for small businesses since receiving his Master’s degree in 2003. While he still does some consulting work, his primary focus now is on creating technology support content for SupportYourTech.com.
His work can be found on many websites and focuses on topics such as Microsoft Office, Apple devices, Android devices, Photoshop, and more.
Changing the Microsoft account on a Windows 10 PC can seem tricky, but it’s quite straightforward with the right steps. To switch your primary Microsoft account on Windows 10, you need to add the new account, sign out from the current one, and then sign in to the new one. This allows you to sync your settings across various devices, from your work computer to your home laptop.

When we want to change our Microsoft account, it usually involves more than just our PC. Think about all the services linked with it like Outlook.com, Skype, or even our Xbox gamertag. It’s crucial to ensure all these services transition smoothly when we change the main account.
We might wonder when it’s best to use a local account versus a Microsoft account. Using a Microsoft account helps us keep everything in sync, from our school files to our favorite games. Plus, managing multiple user accounts is a breeze, allowing each family member to have their own space. Switching accounts isn’t just about convenience; it’s about making sure our digital life stays organized and secure.
Contents
- 1 How To Change Microsoft Account On Windows 10
- 2 Step-By-Step Guide
- 2.1 1. Open Settings
- 2.2 2. Go to Accounts
- 2.3 3. Sign In with a Local Account Instead
- 2.4 4. Enter Your Credentials
- 2.5 5. Create a Local Account
- 2.6 6. Sign Out and Finish
- 2.7 7. Sign In to Your Local Account
- 2.8 8. Add a New Microsoft Account
- 2.9 9. Complete Setup
- 3 Troubleshooting Tips
- 4 Conclusion
Changing your Microsoft account on Windows 10 can smooth out your workflow and ensure all your services stay connected. Let’s walk through it together.
First, we need to remove the existing Microsoft account. Head over to Settings > Accounts > Email & accounts. Find your current Microsoft account and select Remove.
Next, it’s time to add your new Microsoft account. Go to Settings > Accounts > Your info and select Sign in with a Microsoft account instead. Enter your new account details.
Don’t forget: Make sure you have your new account’s login info on hand!
Here’s a quick list to keep track:
- Remove old account
- Add new account
- Sign in
After signing in, you’ll notice that your files on OneDrive and other Microsoft services are now syncing with the new account. This is crucial for keeping your subscriptions and services up to date.
| Services Affected | Updates Needed |
| OneDrive | Reconnect |
| Set up new account | |
| Microsoft Store | Log in |
Remember, this change ensures seamless integration with Windows 10 and enhances security across all devices. It’s a bit like changing the gears on a bike—once you get the hang of it, it’s smooth sailing!
By keeping our Microsoft accounts synced, we can enjoy uninterrupted access to apps, documents, and the cloud. Keep these steps handy the next time you need to update your Microsoft account on Windows 10!
Step-By-Step Guide
Changing your Microsoft account on Windows 10 is simple. Let’s walk through the steps.
1. Open Settings
First, press the Windows key + I to open the Settings app. You can also click the Start menu and select the gear icon.
2. Go to Accounts
In Settings, select Accounts. This is where we manage user accounts, including email addresses and phone numbers.
3. Sign In with a Local Account Instead
Click on Your info. Look for Sign in with a local account instead. Click this option to start switching to a local account.
4. Enter Your Credentials
You will need to enter your current Microsoft account password. This is for security reasons. Don’t worry, it’s just a verification step.
5. Create a Local Account
Fill in the details like username and password for your new local account. Be sure to choose something you’ll remember!
6. Sign Out and Finish
Once done, click Next and then Sign out and finish. Now, you’re signed out of your Microsoft account.
7. Sign In to Your Local Account
Sign in to your new local account. Now, let’s add a new Microsoft account.
8. Add a New Microsoft Account
Go back to Settings > Accounts > Your info. Look for Sign in with a Microsoft account instead. Enter your new email address and follow the prompts.
9. Complete Setup
You’ll be asked to verify your new account, possibly through a code sent to your email or phone. Follow these steps, and you’re good to go.
| Step | Action |
| Open Settings | Windows key + I or Start menu -> Gear icon |
| Go to Accounts | Settings -> Accounts |
| Sign In with a Local Account Instead | Accounts -> Your info -> Sign in with a local account instead |
| Enter Credentials | Enter current Microsoft account password |
| Create Local Account | Enter new username and password |
| Sign Out and Finish | Click Next -> Sign out and finish |
| Sign In to Local Account | Use new local account credentials |
| Add New Microsoft Account | Accounts -> Your info -> Sign in with a Microsoft account instead |
| Complete Setup | Enter new email -> Verify |
That’s it! We’ve changed the Microsoft account on Windows 10. Simple, right? Now, go ahead and try it yourself.
Troubleshooting Tips
Oops! Changing your Microsoft account on your Windows 10 PC can sometimes lead to some hiccups. Here are some tips to help you troubleshoot:
Forgot Your Password?
Go to the Microsoft account recovery page and follow the steps. Make sure to set a strong password to secure your device.
Having Trouble Signing In?
- Double-check your email and password. Sometimes, it’s just a typo!
- Restart Your Computer. A simple restart can fix many issues.
- Check Your Internet Connection. Ensure you’re connected to the web.
Feeling stuck?
Our first-hand experience tells us that restarting often helps. If not, you might need expert help.
Security Concerns?
Double-check your account settings for security updates. Turn on two-factor authentication to make things even safer.
Need to access your files?
Keep your data safe by backing them up before making any big changes. This way, if something goes wrong, your important files are secure.
Still Have Questions?
- Visit Microsoft’s support page for more detailed guidance.
- Contact Microsoft Support for professional help.
- Reach out to our technical support team if your system acts up.
Got more issues?
By setting up a local account first, then switching back to a Microsoft account can solve some stubborn problems. Also, remember to restart your computer after making changes.
Tech problems can feel like hitting a brick wall. So, let’s make sure we’re protecting our data and getting help when we need it.
Conclusion
Changing your Microsoft account on Windows 10 can be done with just a few simple steps. Let’s break it down to stay on track.
First, we’ll want to open Settings by pressing the Windows key + I. From there, head over to the Accounts section. The option “Sign in with a local account instead” is your buddy here.
Switching to a local account first makes the transition smoother. Once done, signing back with the new Microsoft account is a piece of cake.
Sign out of your old account and into the new one to complete the switch.
It’s always good to hear from our community. Many users have found this method works well without hiccups. If you hit a snag, don’t sweat it. Just reach out in forums or support groups.
Feedback is crucial, so let us know how it went. The tech community is filled with folks eager to help, so don’t hesitate to ask questions.
For those of us managing multiple activities and needing seamless transitions, this method is a lifesaver. It keeps our digital organizational skills sharp and ensures our resources remain accessible.
The steps are simple:
- Open Settings
- Go to Accounts
- Choose “Sign in with a local account instead”
- Sign out and back in with the new account
Remember, this small change can enhance our Windows experience. Let’s make the most of it! 🚀