
Changing the MAC (Media Access Control) address of a network adapter in Windows 11 can be useful for various reasons, including enhancing privacy, overcoming certain network restrictions, or troubleshooting networking issues. Your MAC address is a unique identifier for your device on the network, so changing it can help obscure your identity or resolve conflicts with network devices. In this detailed guide, we will cover everything you need to know about changing the MAC address in Windows 11.
Understanding MAC Address
Before diving into the practical steps, let’s clarify what a MAC address is. A MAC address is a hardware identification number that uniquely identifies each device on a network. It consists of six pairs of hexadecimal digits, separated by colons or hyphens (e.g., 00:1A:2B:3C:4D:5E). It’s important to note that a MAC address is distinct from an IP address; the former is used at the data link layer, while the latter operates at the network layer.
Why Change Your MAC Address?
-
Privacy: Changing your MAC address can prevent your ISP or public Wi-Fi networks from tracking your digital footprint.
-
Bypass MAC Filters: Some networks restrict access based on MAC addresses. Changing your MAC address can allow you to bypass such restrictions.
-
Network Troubleshooting: If you’re facing connectivity issues, resetting your MAC address can sometimes resolve conflicts.
-
Security: Changing your MAC address can add an additional layer of security to your device by making it harder for malicious users to identify and exploit it.
Methods to Change MAC Address in Windows 11
There are different methods to change your MAC address in Windows 11, including using the Device Manager, Command Prompt, Registry Editor, or third-party software. We will cover each of these methods in detail.
Method 1: Using Device Manager
Using the Device Manager is the most user-friendly way to change your MAC address.
-
Open Device Manager:
- Right-click on the Start button or press
Windows + X. - Select Device Manager from the context menu.
- Right-click on the Start button or press
-
Locate Network Adapters:
- In the Device Manager window, scroll down and expand the Network adapters section.
-
Choose Your Network Adapter:
- Right-click on the network adapter you wish to change the MAC address for (this could be your Ethernet or Wi-Fi adapter).
- Select Properties.
-
Navigate to Advanced Tab:
- In the Properties window, click on the Advanced tab.
-
Select Network Address:
- In the Property list, scroll down and look for Network Address or Locally Administered Address.
-
Input New MAC Address:
- On the right side, under Value, select the Decimal option and input your new MAC address without any separators (e.g., 001A2B3C4D5E).
- Make sure the MAC address you enter is valid and unique on your network.
-
Apply Changes:
- Click OK to save your changes.
- You may need to disable and re-enable your network adapter for the changes to take effect.
Method 2: Using Command Prompt
For users comfortable with the command line, changing the MAC address via Command Prompt can be an efficient option.
-
Open Command Prompt:
- Press
Windows + S, typecmd, and select Run as Administrator.
- Press
-
Identify Your Network Adapter:
- Type the command
netsh interface show interfaceand press Enter. This will list all the network interfaces on your system. - Note the name of the interface whose MAC address you want to change.
- Type the command
-
Change MAC Address:
- Enter the following command, replacing
InterfaceNamewith your network adapter’s name andxx-xx-xx-xx-xx-xxwith your desired MAC address:
netsh interface set interface name="InterfaceName" newmac=xx-xx-xx-xx-xx-xx - Enter the following command, replacing
-
Restart Network Adapter:
- Disable and re-enable the network adapter for the change to take effect.
Method 3: Using Registry Editor
While the Registry Editor method is more advanced and should be done with caution, it provides another way to change your MAC address.
-
Open Registry Editor:
- Press
Windows + Rto open the Run dialog, typeregedit, and press Enter.
- Press
-
Navigate to Network Adapters:
- Go to the following path:
HKEY_LOCAL_MACHINESYSTEMCurrentControlSetControlClass- Under the Class folder, you will see several subkeys that correspond to your network adapters. They often have names like
{4D36E972-E325-11CE-BFC1-08002BE10318}.
-
Find Your Adapter:
- You can identify your network adapter by checking the DriverDesc key for each subkey until you find the correct adapter.
-
Create/Modify the Network Address Key:
- Right-click on the adapter key, select New, and then String Value. Name it
NetworkAddress. - Double-click on the
NetworkAddresskey and enter your desired MAC address without separators.
- Right-click on the adapter key, select New, and then String Value. Name it
-
Close Registry Editor:
- Exit the Registry Editor and restart your computer to apply the changes.
Method 4: Using Third-Party Software
If you prefer a more straightforward method, there are several third-party applications designed to allow users to change their MAC addresses easily. Programs like Technitium MAC Address Changer and SMAC MAC Address Changer can accomplish this in just a few easy steps.
-
Download and Install Software:
- Download a reputable MAC address changer from the internet. Make sure to choose software that is well-reviewed and requires minimal installation.
-
Open the Application:
- Launch the application once it’s installed.
-
Select Your Network Adapter:
- From the interface, select the network adapter whose MAC address you want to change.
-
Enter New MAC Address:
- Input your new MAC address in the designated field.
-
Apply Changes:
- Click “Change Now” or a similarly named button to apply the changes.
-
Restart Your Adapter:
- It’s good practice to disable and enable your network adapter to see the changes.
Verifying Your MAC Address Change
After changing your MAC address using any of the methods above, you want to confirm that the change took place successfully. Here’s how to do that:
-
Open Command Prompt:
- Press
Windows + S, typecmd, and select Run as Administrator.
- Press
-
Check Network Configuration:
- Type the command
getmac /vand press Enter. - This command will list all the network adapters and their associated MAC addresses.
- Type the command
-
Confirm the Change:
- Look for your modified adapter and verify that the MAC address matches what you set.
Things to Keep in Mind
-
Legal Considerations: Changing your MAC address may violate your ISP’s Terms of Service. Ensure you are aware of the implications if you are changing it for bypassing network restrictions.
-
Network Connectivity Issues: If you face connectivity problems after changing your MAC address, reverting back to the original MAC address may resolve these issues.
-
Back-Up Settings: Before making changes via the Registry Editor, it’s advisable to back up your registry to prevent accidental damage.
-
Device-Specific Instructions: Different manufacturers might have unique requirements for changing MAC addresses. Always check the documentation for your specific network adapter for any peculiarities.
-
Public Use: If you change your MAC address while connected to a public network, ensure that you adhere to ethical guidelines and the network’s policies.
-
Third-Party Program Safety: When using third-party software, be cautious of downloads. Ensure that the application is from a trusted source and does not contain malware.
Conclusion
Changing the MAC address of your network adapter in Windows 11 can be straightforward or complex, depending on the method you choose. Whether you opt for Device Manager, Command Prompt, Registry Editor, or a third-party application, understanding the implications and process involved is essential. By following the steps outlined in this guide, you can successfully change your MAC address whenever necessary while being mindful of legality and network policies.
With this comprehensive knowledge, you can now enhance your privacy, troubleshoot network issues, or overcome network restrictions effectively. Whether you’re a beginner or an experienced user, the methods provided here serve to empower you in managing your network settings confidently.
Обновлено:
Опубликовано:
Что такое MAC-адрес простыми словами.
Если Вы хотите узнать текущий физический адрес сетевой карты, воспользуйтесь статьей Как узнать mac-адрес.
Способ 1. Воспользоваться встроенными средствами
1. Открываем диспетчер устройств.
В Windows 11 / 10 / 8 нажимаем комбинацию клавиш Win + X и выбираем Диспетчер устройств:
В Windows 7 кликаем по Компьютер правой кнопкой мыши и выбираем Управление:

В открывшемся окне переходим на Диспетчер устройств:
2. Раскрываем группу устройств Сетевые адаптеры, кликаем правой кнопкой мыши по тому, для которого меняем mac адрес и выбираем Свойства:

3. Переходим на вкладку Дополнительно — кликаем по Network Address — меняем переключатель в положение Значение — вписываем новый MAC-адрес:
Способ 2. Использовать программу MACChange
Скачиваем программу MACChange и запускаем ее. Откроется мастер установки. Принимаем лицензионное соглашение и нажимаем несколько раз Next, принимая значения по умолчанию, и Install.
Процесс инсталляции займет несколько секунд. Теперь запускаем программу с рабочего стола.
В открывшемся окне выбираем сетевую карту для смены адреса, кликаем по значку генерирования нового mac-адреса и нажимаем по кнопке Change:

Если появилось сообщение «Updating MAC address. Completed», значит все прошло успешно.
Чтобы вернуть настройки, нажмите по кнопке Set Default.
Способ 3. С помощью реестра Windows
Запускаем реестр командой regedit.
Переходим в раздел HKEY_LOCAL_MACHINE\SYSTEM\CurrentControlSet\Control\Class\{4D36E972-E325-11CE-BFC1-08002BE10318}
* 4D36E972-E325-11CE-BFC1-08002BE10318 — это общий идентификатор класса сетевых устройств. Он одинаковый на всех компьютерах с операционной системой Windows.
Если сетевых адаптеров несколько, мы увидим пронумерованные разделы — 0000, 0001, 0002 и так далее. Необходимо пройти по всем в поисках нужного:

Если среди списка параметров нет «NetworkAddress», создаем строковый параметр:
Называем его NetworkAddress и присваиваем значение с новым mac-адресом:
Способ 4. Командная строка
Встроенными средствами Windows не предусмотрена смена MAC-адреса через командную строку. Но выход есть.
Скачиваем архив с программой macshift и распаковываем его в любую папку.
Открываем cmd.exe от администратора и при помощи команды cd переходим в папку, в которую распаковали архив.
Вводим следующую команду:
macshift -i «Ethernet» A1B2C3D4E5F6
* где Ethernet — имя сетевого соединения (его можно посмотреть командой getmac /v /fo list); A1B2C3D4E5F6 — mac-адрес.
Какой способ помог вам?
Если вам удалось решить задачу, поделитесь своим опытом для других. Что помогло:
* в процентах показаны результаты ответов других посетителей.
Changing the MAC address of a network card is not something most users have to do. However, some users may need to spoof the MAC address of their Windows computer to cope with different problems or network restrictions. To help you in such situations, we will share all the methods we know for changing the MAC address of a network card in Windows:
Why change the MAC address in Windows?
The reasons derive from the use of the MAC address in network management. The MAC address identifies the device connected to a network and allows the network to track, restrict or allow access based on it.
What a MAC address looks like
For example, if you need to assign a static IP address, your router identifies and gives the static IP address based on the MAC address. Changing the MAC address comes in handy when it is difficult or cumbersome to change the MAC address rules for your network. As another example, if you change your Windows computer, or only the network card, and your ISP restricts your access to the internet using your MAC address, it’s easy to change the MAC address to the old one and regain internet access just like before the change.
There are other situations too when you might want to change your MAC address, like when you connect to a work or school Wi-Fi network. If your organization’s network administrator restricts internet usage based on your MAC address, you can spoof the MAC address to attempt bypassing those restrictions.
If you need or want to know your current MAC address, before changing it, check these 7 ways to find your MAC address on Windows. Also, if you need to restore the original MAC address, here are six methods to do it. Keep in mind that after you change the MAC address in Windows 11 or Windows 10, the new one becomes active only after you restart your network card (you can disable and enable it) or restart your Windows computer.
1. How to change the MAC address in Windows 11 and Windows 10 using Device Manager
Regardless of whether you use Windows 11 or Windows 10, open the Device Manager on your computer or device. In the Device Manager window, expand the list of Network adapters by clicking or tapping on their entry. Then, right-click or press and hold the network card for which you intend to change the MAC address and select Properties in the contextual menu.
Open the Properties of your network adapter
In the network adapter’s Properties window, head to the Advanced tab. In the Property list, select Network Address, and then type the new MAC address inside the Value field on the right side of the window. When finished, press the OK button.
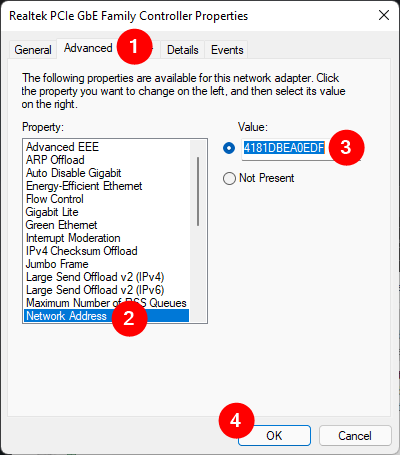
Set a MAC address for your network adapter
Windows changes the MAC address immediately, but you’ll need to reboot your PC to start using it.
NOTE: If you can’t find the Network Address property, the driver of your network adapter doesn’t support this field out of the box. In that case, follow the third or fourth methods from this guide.
2. How to change your MAC address in Windows 11 or 10 from the Control Panel
You can also use the Control Panel to change the MAC address, both in Windows 11 and Windows 10. Open it and search for “network connections.” Then, click or tap the “View network connections” link from the search results list.

Search and open network connections in Control Panel
This brings up the Network Connections window. Locate the network connection for which you want to change the MAC address, right-click or press and hold on it, and select Properties in the contextual menu.
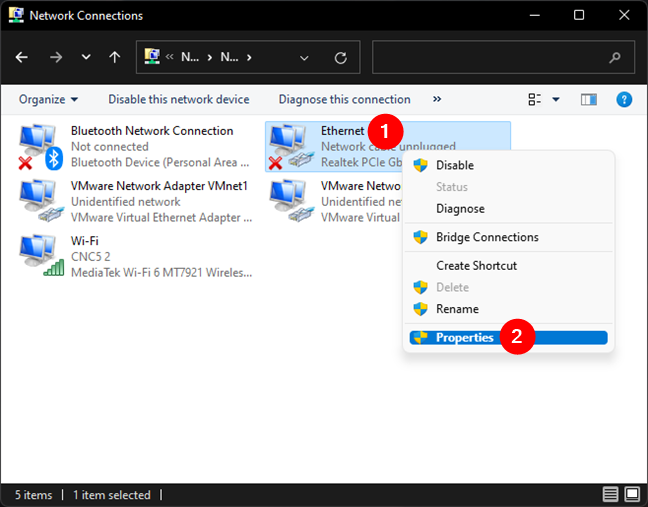
Open the Properties of your network connection
In the selected network connection’s Properties window, press the Configure button.
Click or tap Configure
In the Properties window of the network adapter, go to the Advanced tab. Locate and select Network Address in the Property list and type the new MAC address Value you want on the right side. Once you’re done, press the OK button.

Change the MAC address of a network adapter
The new MAC address value is stored in Windows, and after you reboot your PC, it’s ready to use.
NOTE: If you can’t find the Network Address property, it’s probably because your network card’s driver doesn’t support it out of the box. In that case, follow one of the next two methods in this tutorial.
3. How to change the MAC address in Windows using third-party software
We recommend using Technitium MAC Address Changer, a freeware utility that allows you to spoof the MAC address. Download, install and open this app. Then, in the Technitium MAC Address Changer window, select the network connection in the top list. Type the new MAC address in the Change MAC Address field and press the Change now button.
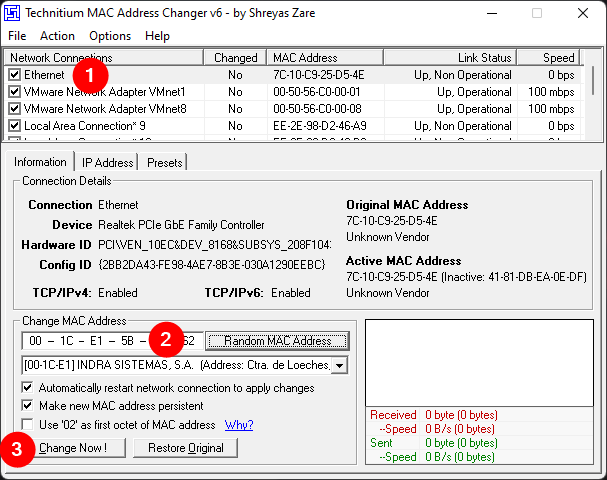
Change a MAC address using Technitium MAC Address Changer
NOTE: This app also allows you to spoof your MAC address by randomly generating new ones. To do that, click or tap the Random MAC Address button from the right side of the Change MAC Address field.
By default, Technitium MAC Address Changer instantly applies the new MAC address by automatically restarting your network connection. That means that you don’t need to reboot your PC to apply the change. However, you can modify this behavior by checking or unchecking the option called “Automatically restart network connection to apply changes.”
4. How to change the MAC address in Windows using the Registry Editor
Start the Registry Editor as administrator and use its address bar or its navigation panel on the left to get to this path:
Computer\HKEY_LOCAL_MACHINE\SYSTEM\CurrentControlSet\Control\Class\{4D36E972-E325-11CE-BFC1-08002BE10318}
Underneath this node, you should see the list of all the network interfaces found on your Windows PC. Browse through them and check the information displayed on the right panel to identify the one you need to change. The DriverDesc field is the most likely to help you pinpoint the right network card.
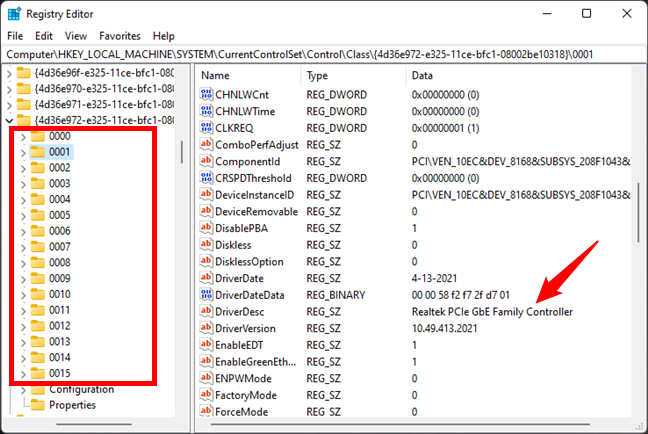
Locate the network connection node in Registry Editor
Right-click or press and hold on the network card node in the left panel, choose New, and select String Value in the contextual menu.
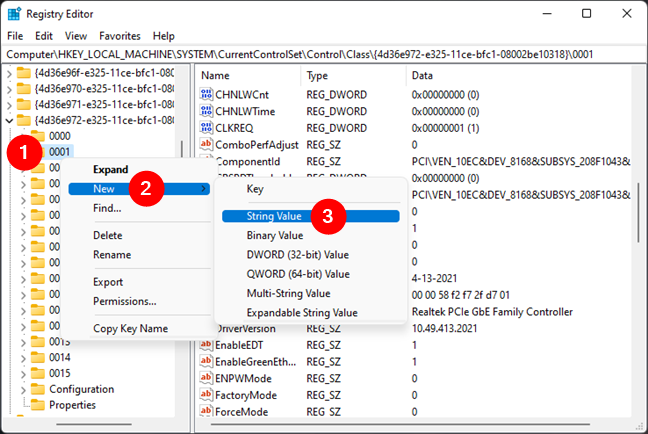
Add new string for a network adapter in Registry Editor
On the right panel, type in NetworkAddress as the name of the newly added string value. Then, double click or double-tap to edit the NetworkAddress.
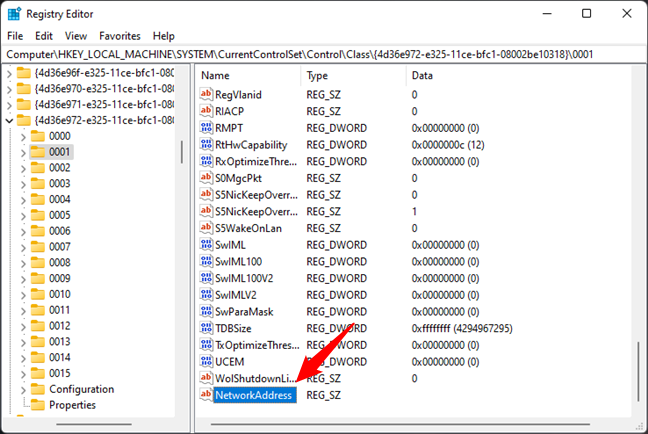
Name the new value NetworkAddress
In the Edit String window, type in the new MAC address that you want to apply to your network card.

Enter a new MAC address in Registry Editor
Finally, press OK and restart your computer to start using the newly set MAC address.
5. How to change the MAC address in Windows 11 or Windows 10 from the command line
Once we’ve learned how to change MAC addresses from the Registry Editor, we can now speed up this change using the reg command in the command line with Terminal, Command Prompt, or PowerShell. If you need to switch repeatedly between different MAC addresses on your Windows computer, you can store and run the command we describe in this section in a script file to speed up the procedure.
First, open the Terminal, Command Prompt, or PowerShell as administrator, depending on which app you prefer to use.
Before you execute the command in the screenshot below, you need to replace two strings that we have underlined. The first string is associated with the network card that you want to change in Windows Registry. Review the previous section to find out how to get this number from the Registry Editor. The second string is the new MAC address that you want to assign to the network card.
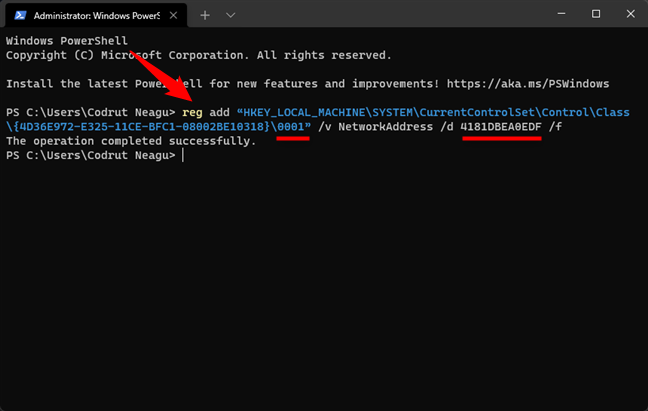
How to change the MAC address from command line
Below you find the command in plain text, so you can simply copy and paste it. Don’t forget to edit and change the values that apply to your Windows computer and the specific network card for which you want to change the MAC address:
reg add “HKEY_LOCAL_MACHINE\SYSTEM\CurrentControlSet\Control\Class\{4D36E972-E325-11CE-BFC1-08002BE10318}\0001” /v NetworkAddress /d 4181DBEA0EDF /f
6. How to spoof MAC address in Windows 11 (randomize Wi-Fi MAC)
Besides setting a static MAC address that you choose and specify, Windows 11 also allows you to randomize your MAC address each time you connect to a certain Wi-Fi network, as well as to all the wireless networks you will connect. This is probably the most effective way to spoof your MAC address in Windows 11.
However, note that this is something that’s possible only if your network card driver supports MAC randomization. Most network cards these days offer support for random hardware addresses, but there are some adapters, old and new, that don’t. If you don’t see the settings described in this article section or the next, the best thing you can do to spoof your MAC address is to use a third-party app like the one we talked about in the third chapter of this tutorial. And now, without further ado, here’s how to randomize your MAC address in Windows 11:
Launch the Settings app, select Network & internet on the left sidebar, and click or tap on Wi-Fi on the right.
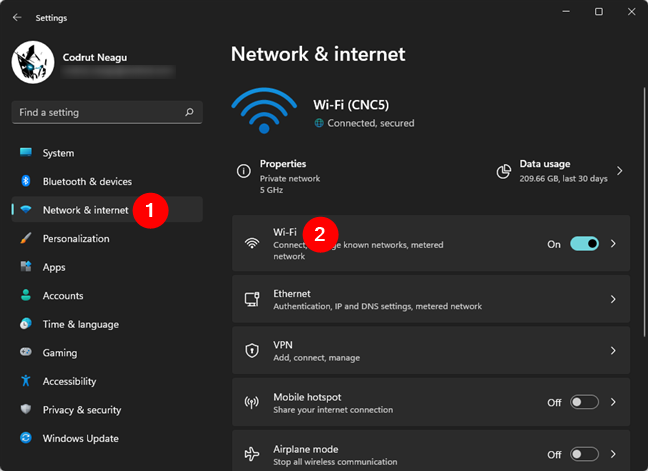
Access Wi-Fi in Windows 11’s Settings app
Next, if you want to spoof your MAC addresses for all the Wi-Fi networks, enable the switch called Random hardware addresses found at the bottom of the window.
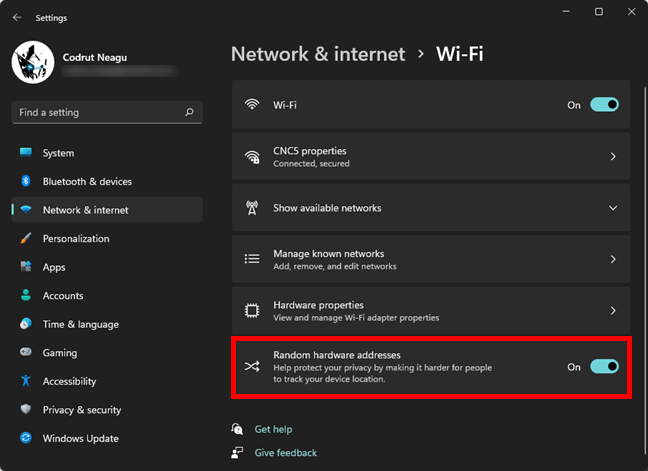
Spoof your MAC by enabling the Random hardware addresses switch
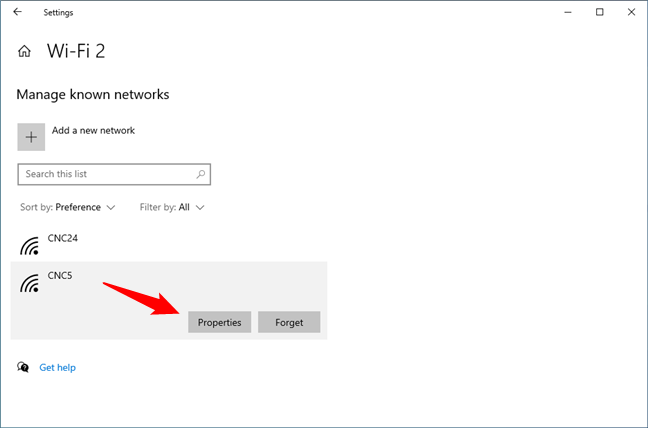
If you’d instead spoof the MAC address only for a specific Wi-Fi network, on the Wi-Fi page from the Settings app, click or tap on Manage known networks.
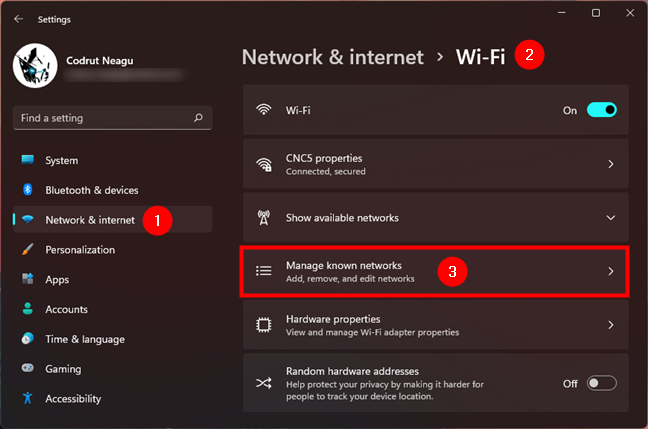
Go to Manage known networks in Windows 11
Then, choose a wireless network from the list by clicking or tapping on it.
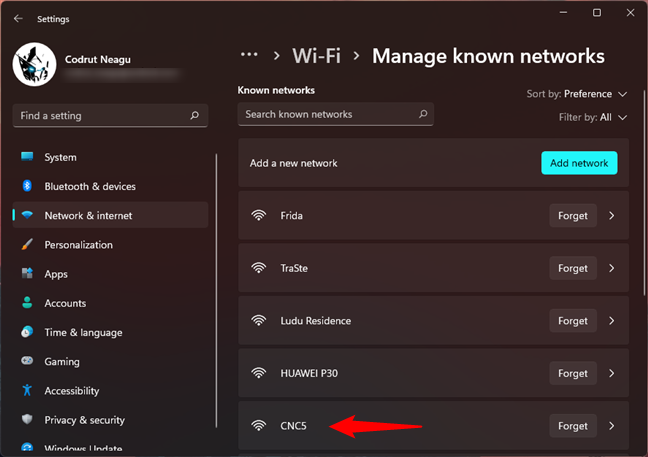
Select a Wi-Fi network
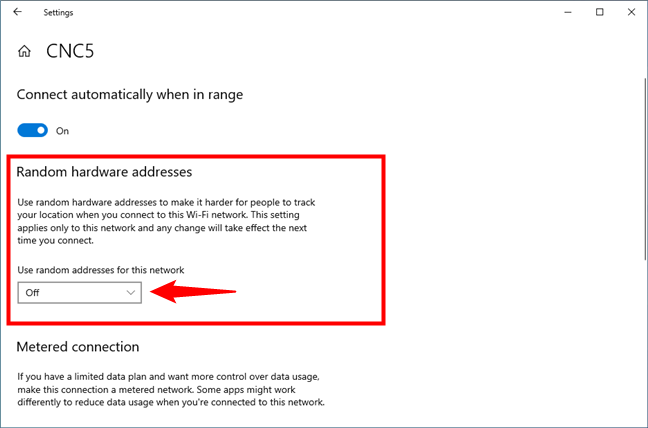
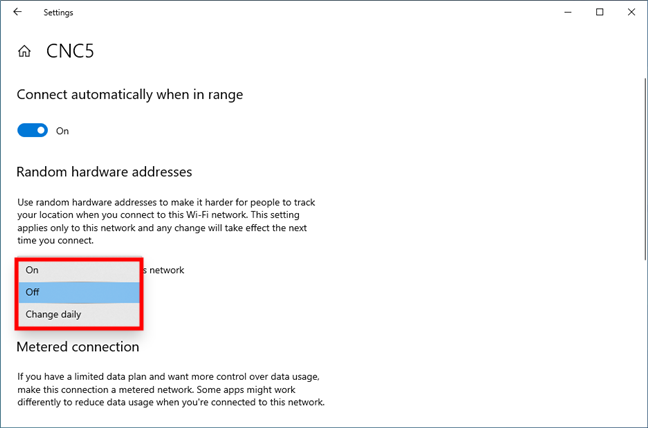
On that Wi-Fi network’s page, locate the Random hardware addresses setting, click or tap on the drop-down list on its right side, and select the option you prefer:
- Off: default setting, your computer uses the original MAC address when connecting to the selected Wi-Fi network
- On: spoofs your MAC address by randomizing it each time you connect to the selected Wi-Fi network
- Change daily: Windows 11 spoofs your MAC address when you connect to the chosen Wi-Fi network on a daily basis, even if you connect to it multiple times during the day.
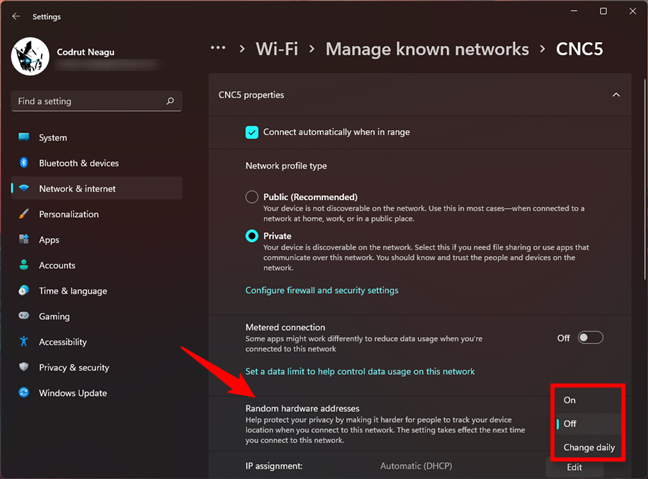
Spoof your MAC by turning on Random hardware addresses
Note that this setting applies the next time you connect to the selected Wi-Fi network. If you want to do that right now, you need to reconnect to your Wi-Fi or disable and re-enable Wi-Fi on your Windows 11 computer or device.
7. How to spoof MAC address in Windows 10 (randomize MAC)
Just like in Windows 11, Windows 10 also allows you to spoof your MAC address when connecting to Wi-Fi networks. However, this is possible only if your network adapter driver offers support for MAC randomization. Although most network cards today do, many older adapters, as well as some newer ones, don’t. If you can’t find the settings described in the next paragraphs, your network adapter can’t spoof your MAC out of the box. As an alternative, you might want to try using a third-party app like the one we presented in the third section of this tutorial. Now let’s see how to randomize your MAC address in Windows 10 if your drivers allow it:
If you want to spoof your MAC address on all the wireless connections, open the Settings app. In it, navigate to Network & Internet and select Wi-Fi on the left sidebar. On the right side of the window, turn on the switch called “Use random hardware addresses.”
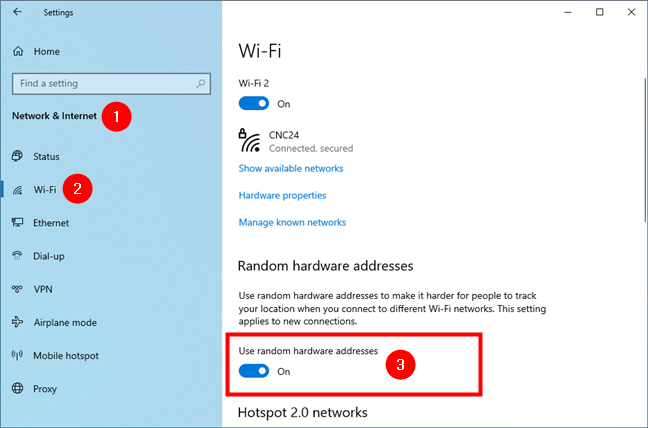
Spoof your MAC for all Wi-Fi by toggling Random hardware addresses
Or, if you only want to spoof the MAC address for a particular Wi-Fi network, click or tap the Manage known networks link.
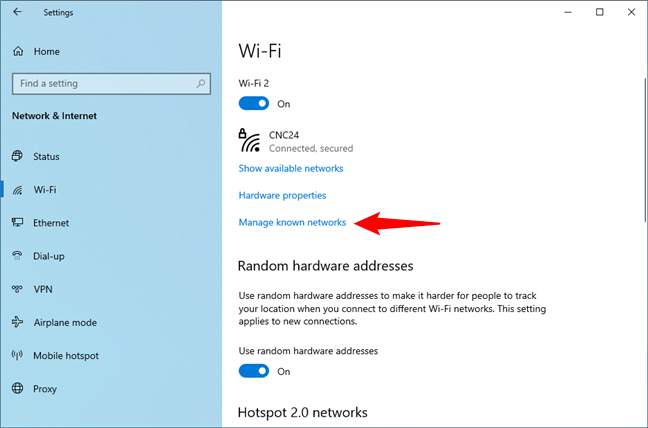
Access the Manage known networks section
On the Manage known networks page, select the Wi-Fi connection for which you want to spoof the MAC address.
Open the Properties of the selected Wi-Fi network
Locate the Random hardware addresses section and the setting named “Use random addresses for this network.” Then, click or tap the drop-down list under the latter.
Locate the Random hardware addresses settings
Windows 10 lets you choose one of three options to spoof your MAC address for the selected Wi-Fi network. Select the one you prefer:
- Off: it’s the standard setting, which makes your computer use its original MAC address when you connect to the selected Wi-Fi network
- On: spoofs the MAC address by setting a random one each time you connect to the selected Wi-Fi network
- Change daily: Windows 10 spoofs the MAC address daily for the chosen Wi-Fi network, so it uses the same random MAC address throughout the day but different ones every day.
Spoof your MAC by enabling Random hardware addresses in Windows 10
Note that this change applies the next time you connect to the chosen Wi-Fi network. If you want to force the MAC address spoofing in Windows 10 right now, you need to disconnect and reconnect to Wi-Fi.
Why did you change the MAC address?
Changing or spoofing the MAC address is not a common intervention. The security behind the MAC address is relatively poor because, as you’ve seen, it is easy to change it to any value you want. Keep in mind, though, that you cannot have two devices with the same MAC address active at the same time in a network. Before closing this tutorial, tell us why you want to change your MAC address. We are curious to know the situations in which our readers need to perform this operation. Comment below, and let’s talk about this subject.
Download Article
Easily modify the MAC address for your network card in Windows
Download Article
- Using Technitium
- Using Device Manager
- Editing the Registry
- Video
- Q&A
- Tips
- Warnings
|
|
|
|
|
|
There might be a time when you want to change the MAC address of your network adapter. The MAC address (Media Access Control address) is a unique identifier that is used to identify your computer in a network. Changing it can help you diagnose network issues, browse outside a school or your organization’s allowed list of sites, or just have a little fun with a silly name. This wikiHow article teaches you how to change a computer’s MAC address in Windows 10 and 11.
Things You Should Know
- Press «Win + X» to find Device Manager and click it.
- Right-click your network adapter and select «Properties > Advanced.»
- Select «Network Address/Locally Administered Address» and change the value to your other MAC address.
-

Go to https://technitium.com/tmac/ and download the software. Using this software, you don’t need to edit anything that you might not be comfortable with!
-

You’ll see more details for your network adapter at the bottom of the window.[1]
Advertisement
-

If you don’t see this, make sure the Information tab is active.[2]
- Click «Random MAC address» if you don’t know one and the field will fill automatically.
-
You’ll see this button become interactable once you enter a new MAC address.[3]
- You can easily return to your original MAC address by clicking the Restore Original button.[4]
- You can easily return to your original MAC address by clicking the Restore Original button.[4]


Advertisement
-

You can access the Device Manager from the Control Panel. It will be located in the System and Security section if you are using Category View.
- To find it easily on newer Windows computers, press Win + X and click «Device Manager».
-

In your Device Manager, you will see a list of all of the hardware installed on your computer. These are sorted into categories. Expand the Network Adapters section to see all of your installed network adapters.
- If you are not sure which adapter you are using, see Step 1 of the second method to find your device’s Description.
-
The network adapter’s Properties window will open.
-
You’ll see this tab along the top of the window.
-

The wording will depend on the type of network adapter you have.[5]
- Selecting it will reveal options on the right side of the window.
- Not all adapters can be changed this way. If you can’t find either of these entries, you need to use one of the other methods in this article.
-
-
MAC addresses are 12-digit values and should be entered without any dashes or colons. For example, if you want to make the MAC address «2A:1B:4C:3D:6E:5F», you would enter «2A1B4C3D6E5F».
-
Reboot your computer to enable the changes. You can also disable and re-enable your adapter within Windows for the change to become effective without rebooting. Just sliding the Wi-Fi’s On/Off switch like the slider found on ThinkPads and VaiOs won’t satisfactorily disable/re-enable the card.
-
Once you’ve rebooted the computer, open the Command Prompt and enter
ipconfig /all, and note the Physical Address of your adapter. It should be your new MAC address.[6]


Advertisement
-

In order to easily identify your network adapter in the Windows Registry, you’ll want to gather some basic information about it through the Command Prompt. You can open the Command Prompt by typing «cmd» into the Run box (Windows key + R).
- Type
ipconfig /alland press Enter. Note the Description and Physical Address for the active network device. Ignore devices that aren’t active (Media Disconnected).[7]
- Type
net config rdrand press Enter. Note the GUID, which is displayed between the «{}» brackets next to the Physical Address you recorded earlier.
- Type
-
You can start the Registry Editor by opening the Run dialog box (Windows key + R) and typing «regedit». This will open the Registry Editor, which will allow you to change the settings for your network card.
- Making incorrect changes to the registry can cause your system to malfunction.
-
Go to HKEY_LOCAL_MACHINE\SYSTEM\CurrentControlSet\Control\Class\{4D36E972-E325-11CE-BFC1-08002BE10318}. Expand it by clicking the arrow.
-
There will be several folders labeled «0000», «0001», etc. Open each of these and compare the DriverDesc field to the Description you noted in the first step. To be completely sure, check the NetCfgInstanceID field and match it with the GUID from the first step.[8]
-
For example, if the «0001» folder matches your device, right-click on the folder. Select New → String Value. Name the new value «NetworkAddress».[9]
-
In the «Value data» field, enter your new MAC address. MAC addresses are 12-digit values, and should be entered without any dashes or colons. For example, if you want to make the MAC address «2A:1B:4C:3D:6E:5F», you would enter «2A1B4C3D6E5F»..
-
Some adapters (especially Wi-Fi cards) are unforgiving of MAC addresses changes if the first octet’s 2nd half isn’t a 2,6,A,E or begins with a zero. This requirement has been observed as far back as Windows XP and is formatted as:
- D2XXXXXXXXXX
- D6XXXXXXXXXX
- DAXXXXXXXXXX
- DEXXXXXXXXXX
-
You can also disable and re-enable your adapter within Windows for the change to become effective without rebooting. Just sliding the Wi-Fi’s On/Off switch like the slider found on ThinkPads and VaiOs won’t satisfactorily disable/re-enable the card.
-
Once you’ve rebooted the computer, open the Command Prompt and enter
ipconfig /alland note the Physical Address of your adapter. It should be your new MAC address.[10]


Advertisement
Add New Question
-
Question
How do I know which MAC addrress can I use and is it safe ? Should I do a system backup ?
There are many MAC addresses in the world, so the chances of having the same one on the same network are slim. Don’t worry about it unless you have changed two devices to that MAC address. You don’t have to do a backup because it’s something that will reset if you delete the entry and then restart your computer.
-
Question
If I change this MAC address, will it change the MAC address on my iPad and iPhone?
Allan Cramer
Community Answer
No, the MAC address is unique to each device. I’m not even sure you can change Apple MAC addresses, but if you can, you’ll have to do that with each one.
-
Question
If I delete the new registry entry I create, will the original Mac address be used again?
No, the Mac address that you set is permanent and you’ll have to do a hard reset to get the original address back.
See more answers
Ask a Question
200 characters left
Include your email address to get a message when this question is answered.
Submit
Advertisement
Video
-
You can also have funny address names because hexadecimal numbers use the letters A-F
Thanks for submitting a tip for review!
Advertisement
-
Don’t use a MAC address that is already in use, as this will prevent one of the machines from connecting to the network.
Advertisement
About This Article
Thanks to all authors for creating a page that has been read 1,376,081 times.
Is this article up to date?
Every device that connects to the internet is required to provide or declare its IP Address and also its MAC (Media Access Control) Address to the Network.
While the IP Address of a computer is dynamically assigned by the Router, its MAC Address is assigned at Hardware level and remains the same for the entire life of your computer.
Since, the MAC Address of a device is coded at Hardware level, there is really no way to change the original MAC Address of a device.
However, it is possible mask or hide the real MAC Address of a computer by forcing the computer to declare or broadcast a different MAC Address to the Network.
Advertisement
Change MAC Address of Windows Computer
In general, users want to change the MAC Address of their computers to bypass blocked networks and also to test MAC Address filtering.
Before going ahead with the steps to change MAC Address, it is important that you note down the the actual MAC Address of your computer. This can be useful, if you run into problems after changing MAC Address and need to go back to the original or default MAC Address.
Also, if your Wi-Fi Network is using MAC Filtering, you need to make sure that the New MAC Address is white listed on the Modem/Router.
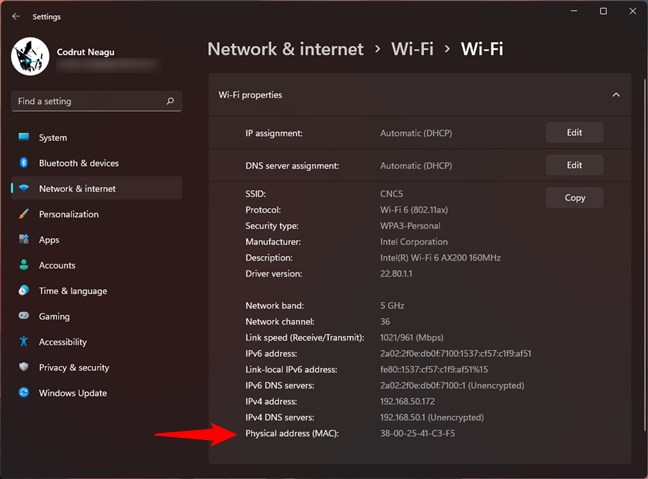
1. Find MAC Address of Computer Using Settings
Since, a computer can connect to the internet using both Wi-Fi and Ethernet, it will have two MAC Addresses, one for Ethernet and the other one for Wi-Fi.
1. Open Settings > click on Network & Internet Icon.
2. On the next screen, select your Network (Wi-Fi or Ethernet) in the left-pane. In the right-pane, double-click on your Network Name.

3. On the next screen, the MAC Address of your computer will be listed under “Properties” section, next to Physical Address (MAC) entry.

You can copy the MAC Address to a text file and keep the file at a safe location on your computer.
2. Change MAC Address Using Device Manager
If required, you can change the MAC Address of your computer using the following steps.
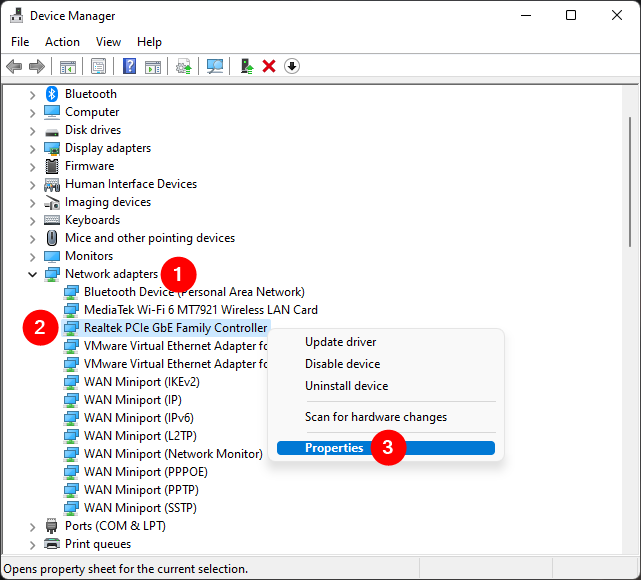
1. Right-click on the Start button and click on Device Manager.
Advertisement
2. On Device Manager screen, expand Network Adapters entry > right-click on the Network Adapter for your computer and click on Properties.

3. On properties screen, switch to Advanced Tab > select Network Address entry > check Value entry and type New MAC Address.

4. Click on OK to save the New MAC Address on your computer.
Note: Enter New MAC Address without using hyphens.
3. How to Confirm if NEW MAC Address is Working?
After changing MAC Address, you can follow the steps below to confirm if New MAC Address is working.
1. Open Command Prompt (Admin) > type ipconfig/all and press the Enter key.
2. Once the command is executed, you should find the NEW MAC Address listed under “Ethernet Adapter” or “Wireless Adapter” section next to Physical Address entry.

You should be able to use the New MAC Address without encountering any problems, unless you are using MAC filtering and the NEW MAC Address is not listed on your Router.