
(Image credit: Mauro Huculak)
As part of your internet service, the Internet Service Provider (ISP) also provides the local network with the necessary settings, including the Domain Name System (DNS) addresses, which allow you to access your favorite websites and online services and download files.
The only caveat is that the ISP’s DNS servers are usually not very private, slower than other services, and can be unreliable. However, you can always use different resolvers from third-party companies to improve your internet experience on Windows 10.
What’s DNS?
A Domain Name System is an internet service (usually at no cost to you) that allows you to type a friendly domain name in the web browser’s address bar to load a website. And without it, it’d be a nightmare to surf the web.
The issue is that every device requires an IP address (for example, 104.18.189.55) to communicate with other devices. However, these addresses are not easy for humans to remember, and DNS servers provide the mechanism to translate friendly domain names (for example, WindowsCentral.com) into IP addresses that computers can understand.
Although you can type «https://windowscentral.com» to access this website, in the background, the browser first sends a request to the DNS servers to resolve the IP address from the website’s name. Only when the address is found does the browser connect to the site and download the page’s contents.
Usually, you won’t notice this process because it’s automatic, and everything happens quickly, in milliseconds. However, if your resolvers are unreliable, they slow down your internet, or you want to use faster and more private servers, Windows 10 allows you to change these settings using Control Panel, Command Prompt, PowerShell, and Settings app.
In this how-to guide, I’ll outline the steps to change the DNS settings on Windows 10.
All the latest news, reviews, and guides for Windows and Xbox diehards.
Recent updates
These instructions has been updated to ensure accuracy and reflect changes to the process in the operating system.
How to change DNS settings using Control Panel on Windows 11
To change the DNS settings with Control Panel, use these steps:
- Open Control Panel.
- Click on Network and Internet.
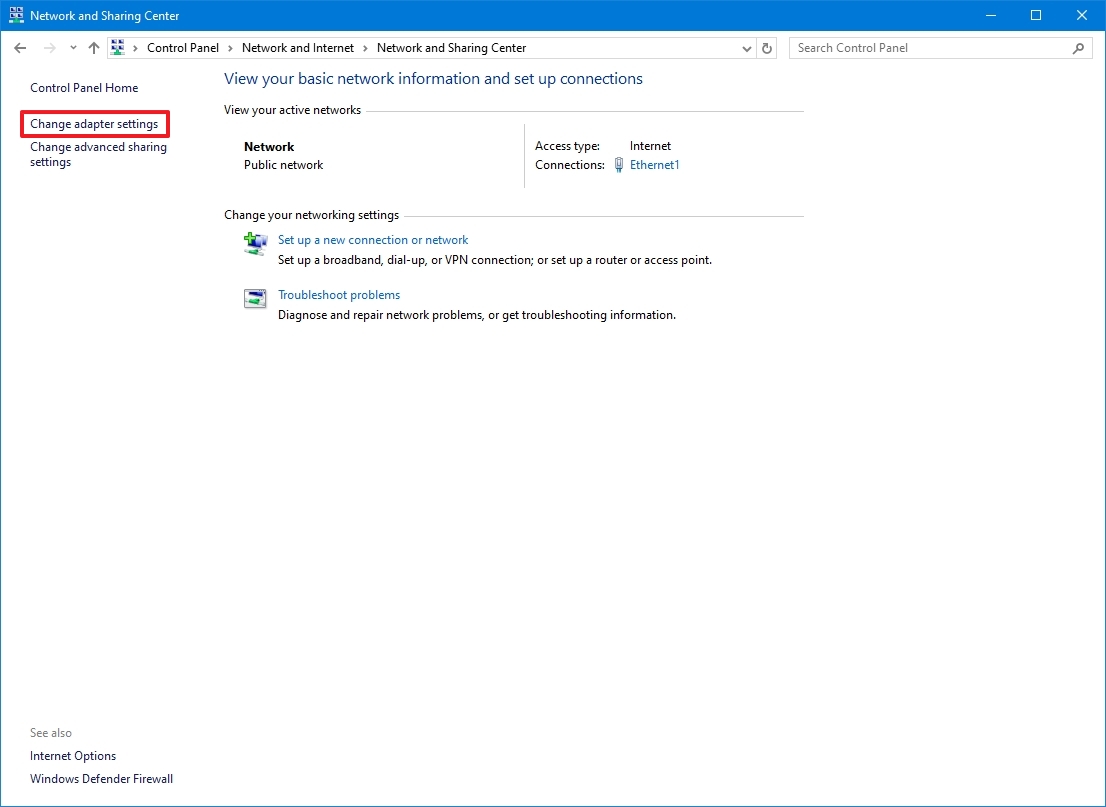
- Click on Network and Sharing Center.
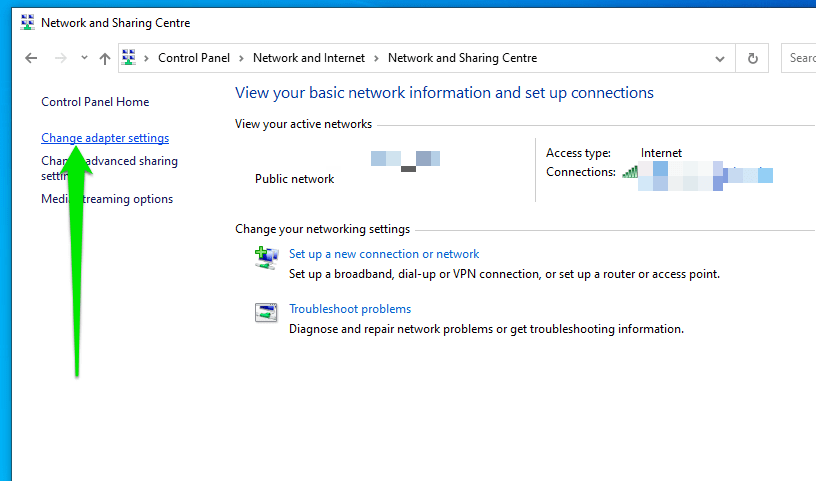
- Click the «Change adapter settings» option in the left pane.
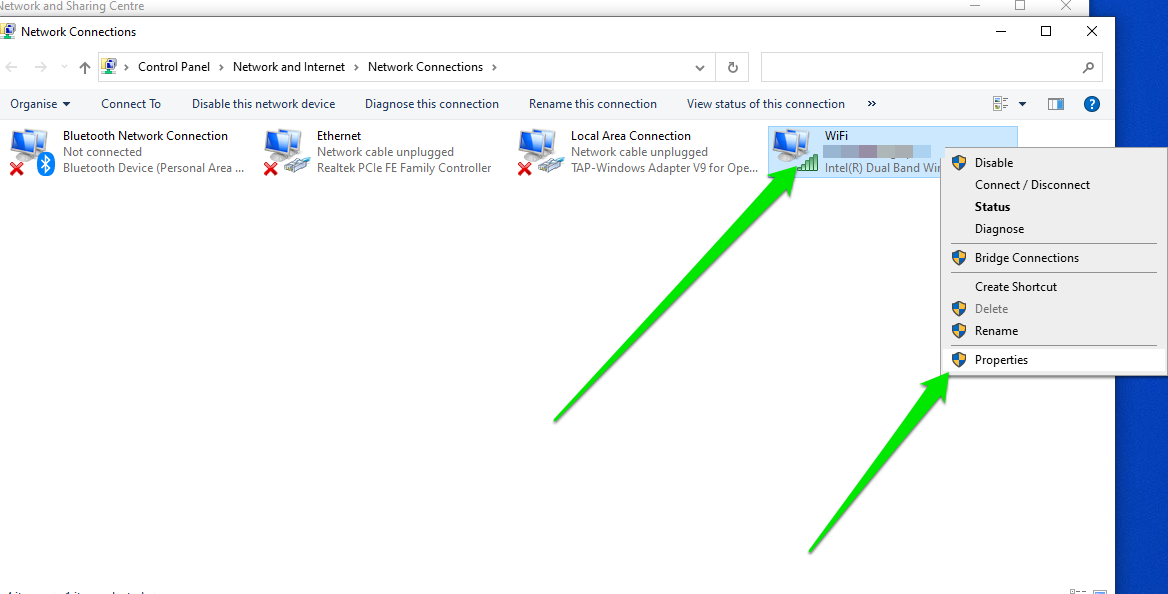
- Right-click the active network interface and select the Properties option.
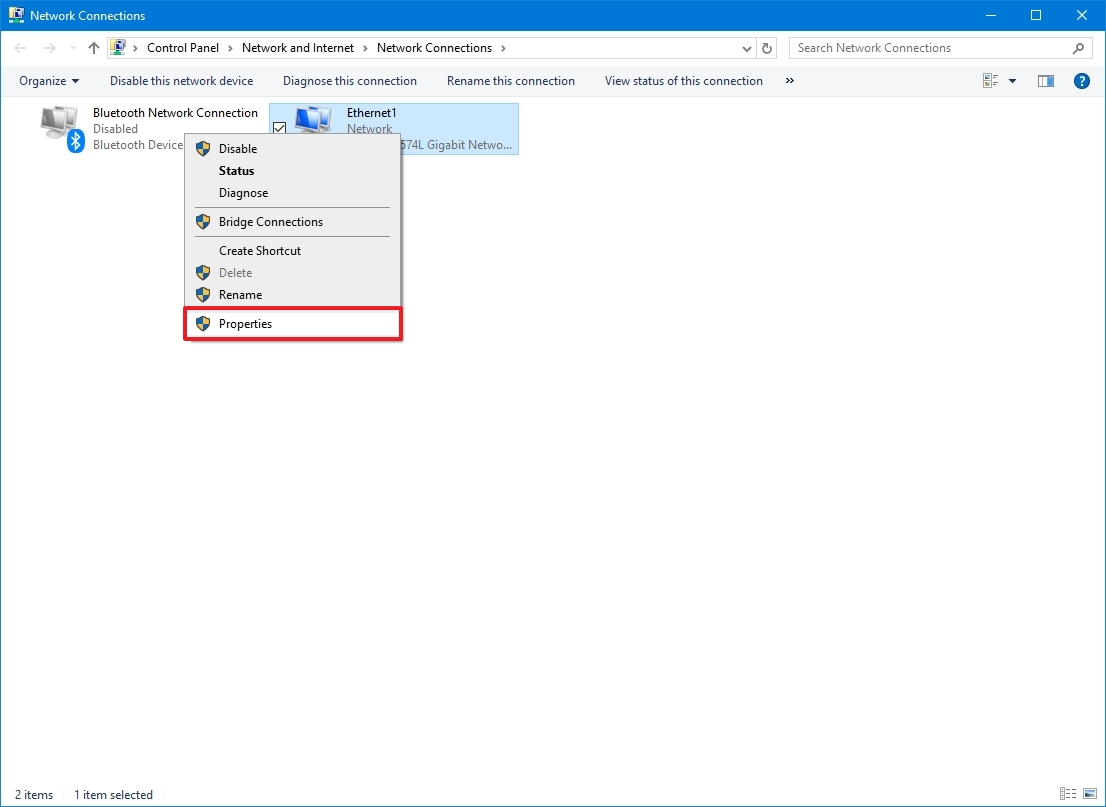
- Quick tip: You’ll know which adapter is connected to the network because it won’t have a «Disabled» or «Network cable unplugged» label.
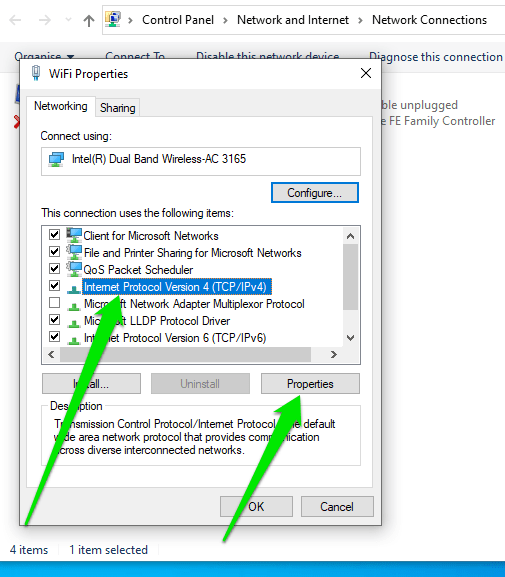
- Select and check the «Internet Protocol Version 4 (TCP/IPv4)» option.
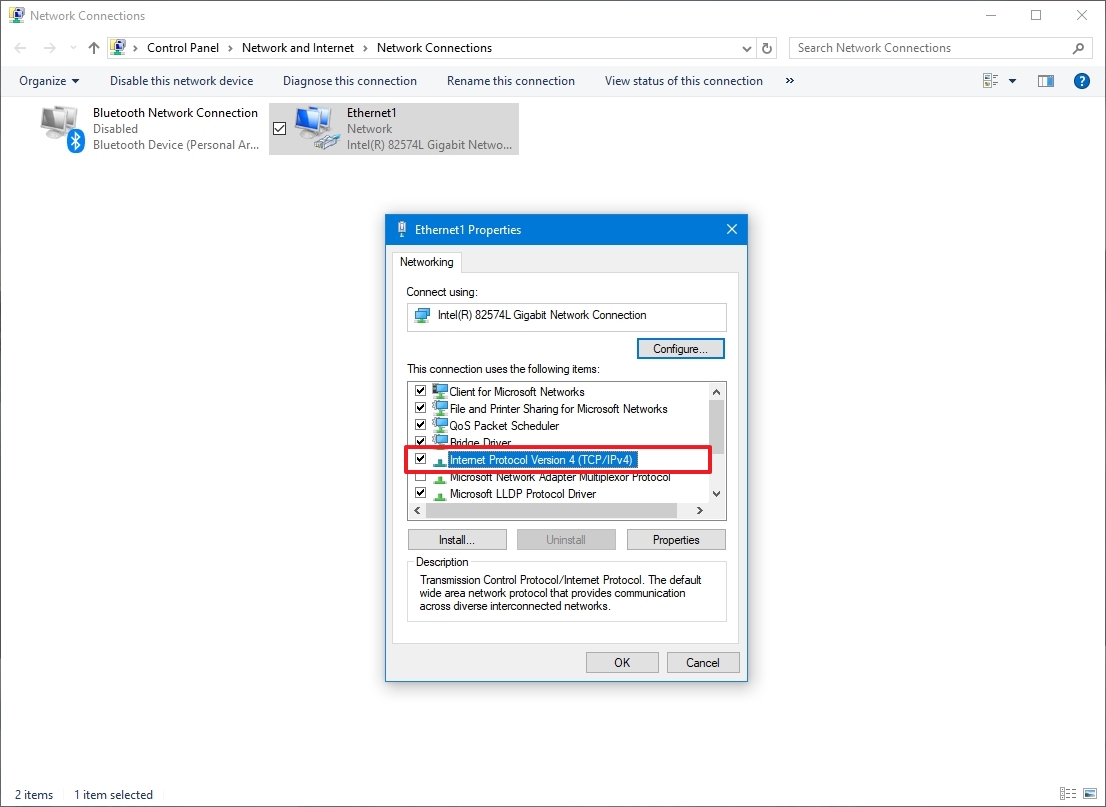
- Click the Properties button.
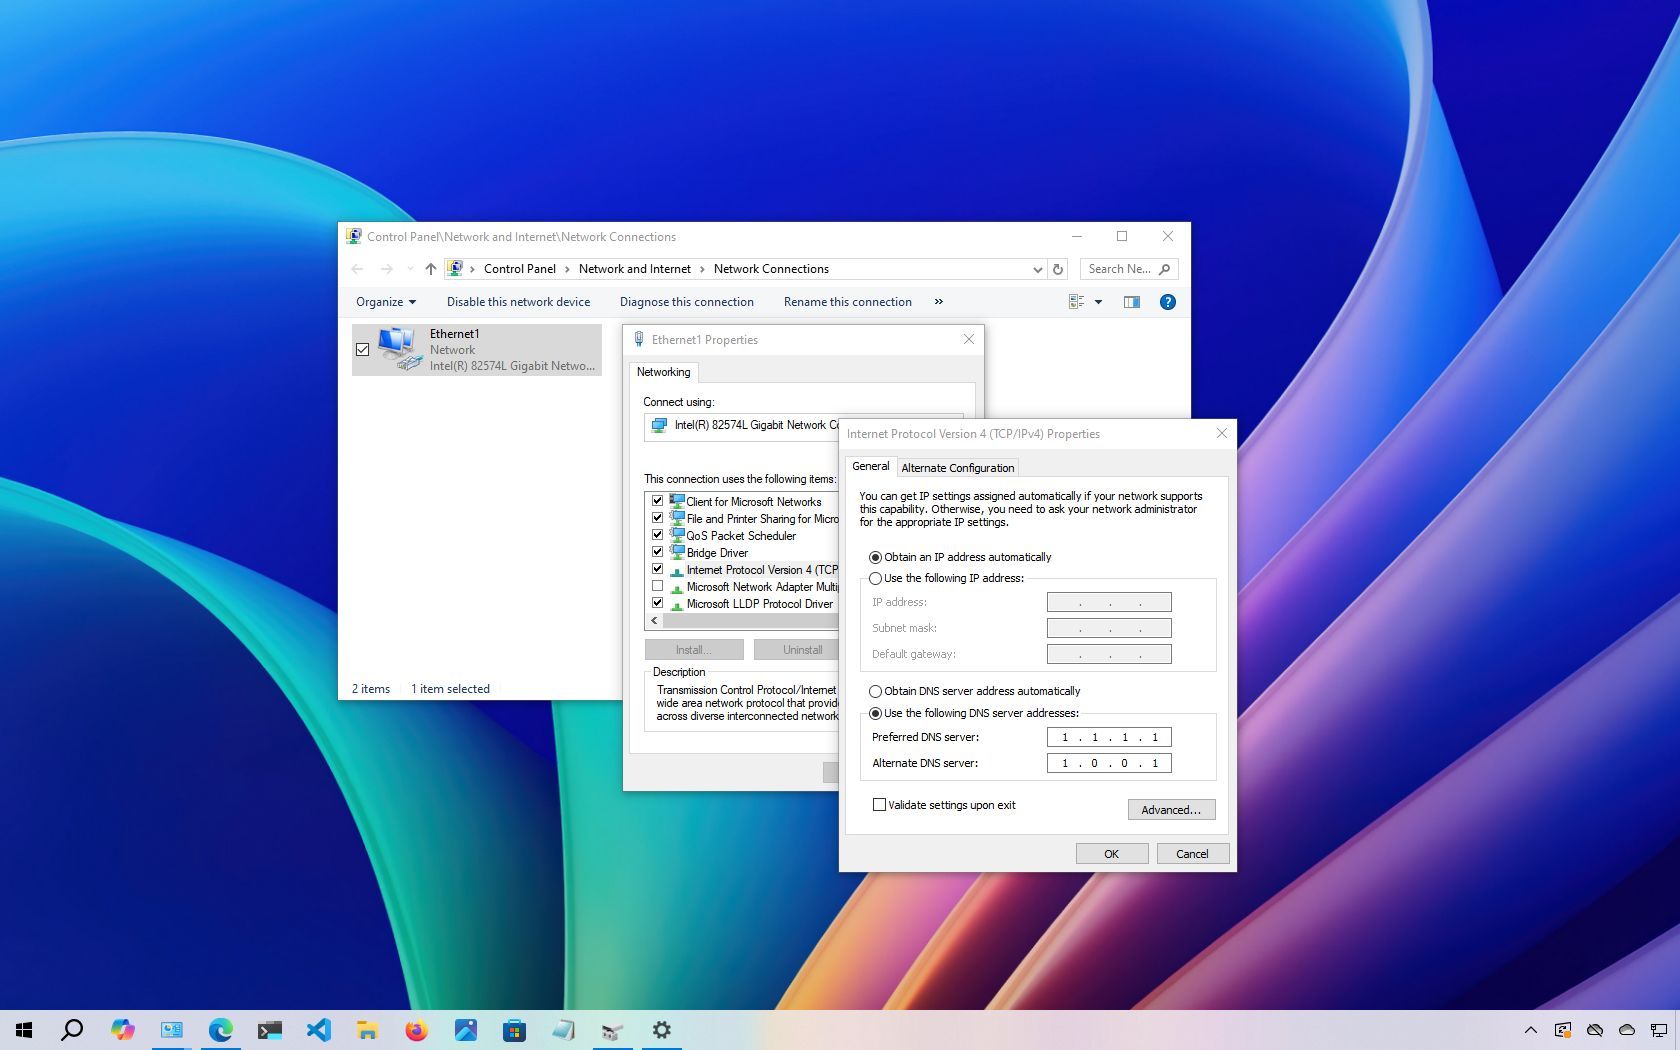
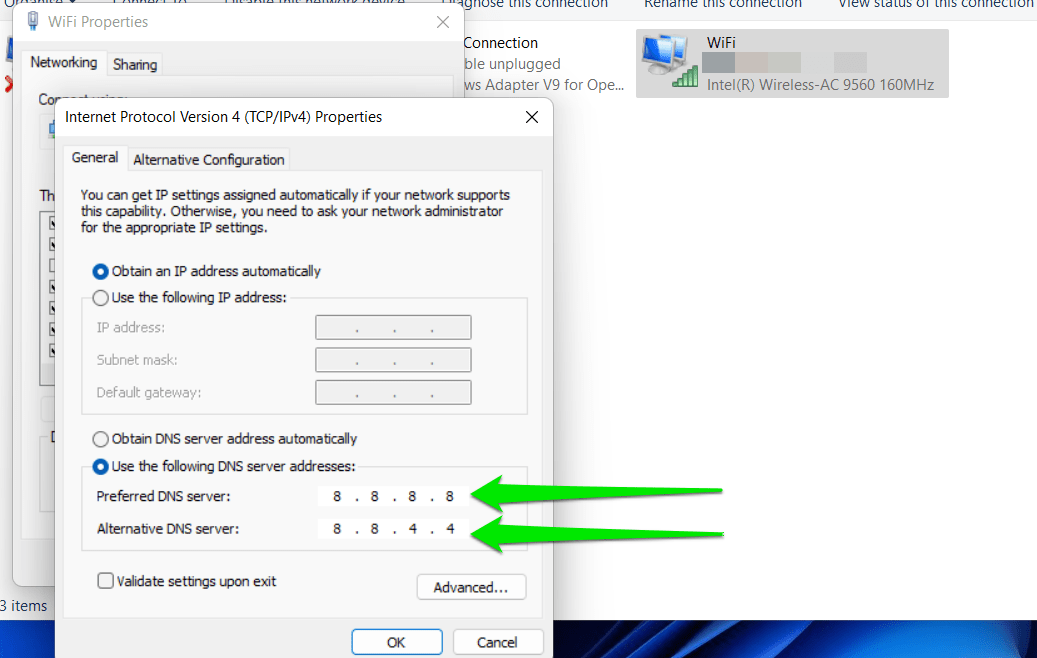
- Select the «Use the following DNS server addresses» option.
- Quick note: When you select the option to specify the DNS settings manually, the computer will continue to receive the TCP/IP address from the DHCP server (router).
- Confirm the primary DNS address under the «Preferred DNS server» section. For example:
- Cloudflare: 1.1.1.1
- Google Public DNS: 8.8.8.8
- OpenDNS: 208.67.222.222
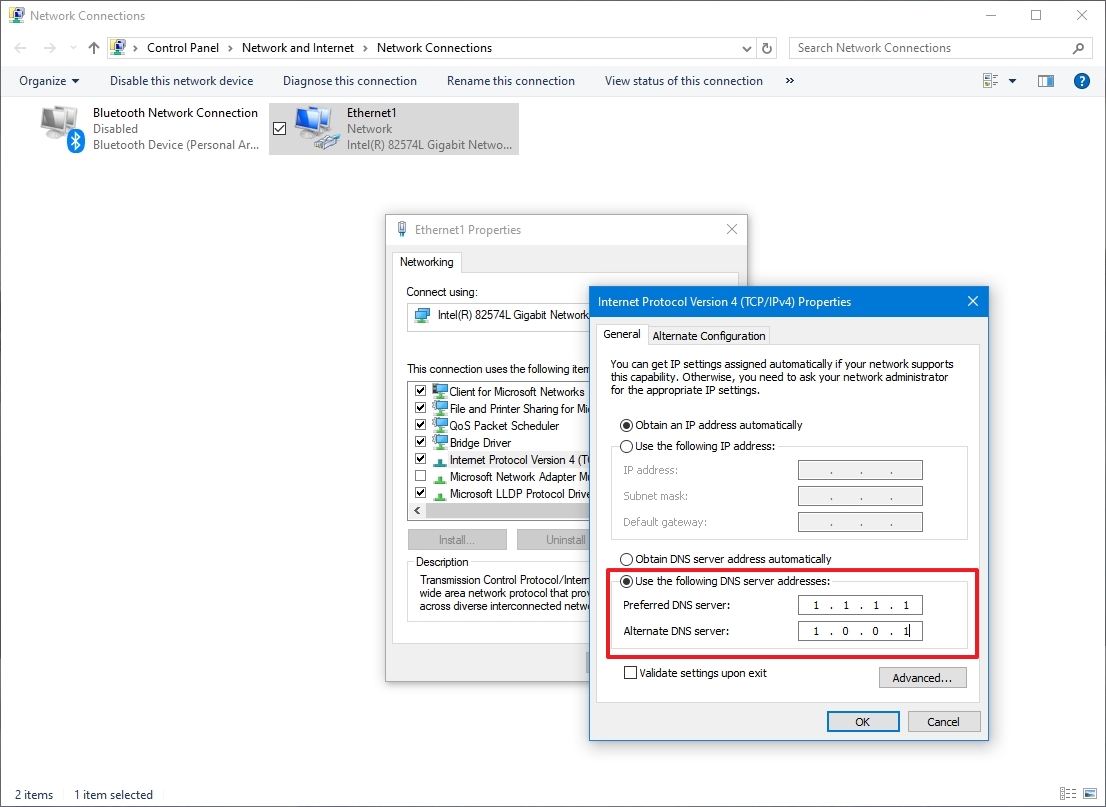
- Confirm the secondary DNS address the computer will use if the primary is not reachable under the «Alternate DNS server» section. For example:
- Cloudflare: 1.0.0.1
- Google Public DNS: 8.8.4.4
- OpenDNS: 208.67.220.220
- (Optional) Click the Advanced button.
- Click the DNS tab.
- Click the Add button.
- Confirm additional alternate DNS server addresses (as necessary).
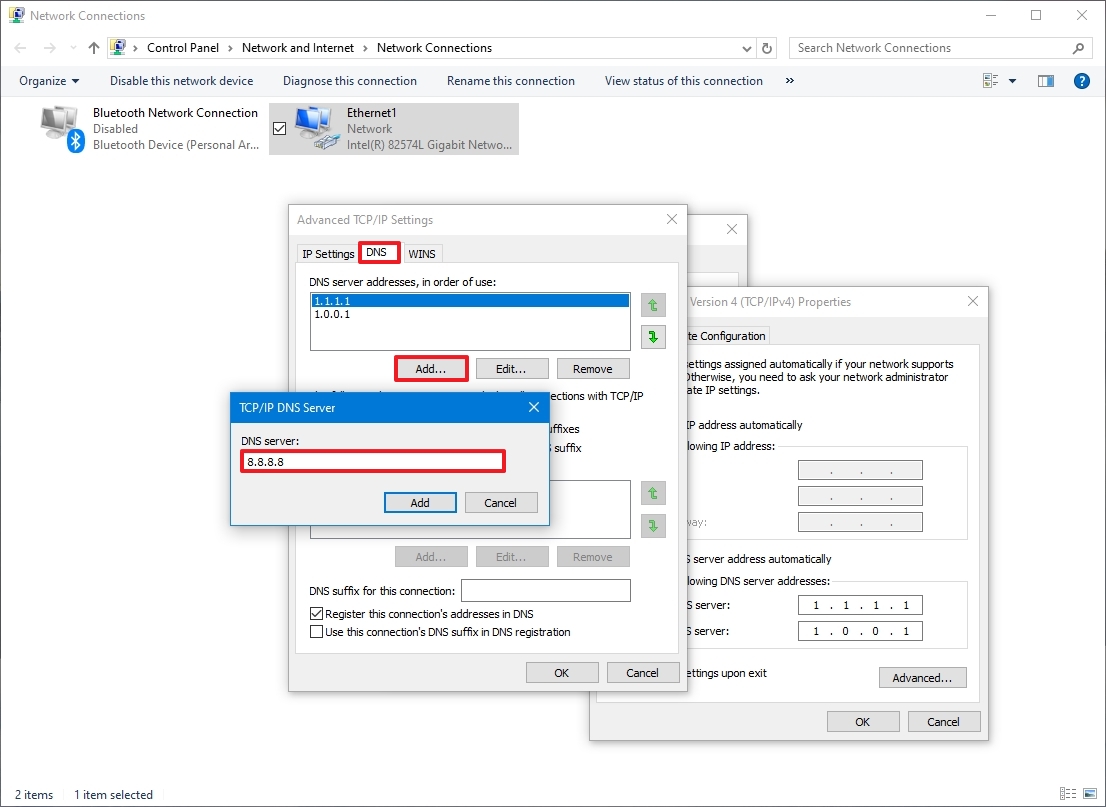
- Click the Add button.
- Quick tip: In addition to adding more addresses, you can edit and remove resolvers, and adjust their priority.
- Click the OK button.
- Click the Close button.
Once you complete the steps, the device will start using the specified DNS settings immediately.
How to change DNS settings using Settings on Windows 10
To change the DNS addresses through the Settings app, use these steps:
- Open Settings.
- Click on Network & Internet.
- Click on Ethernet or Wi-Fi.
- Select the active network connection.
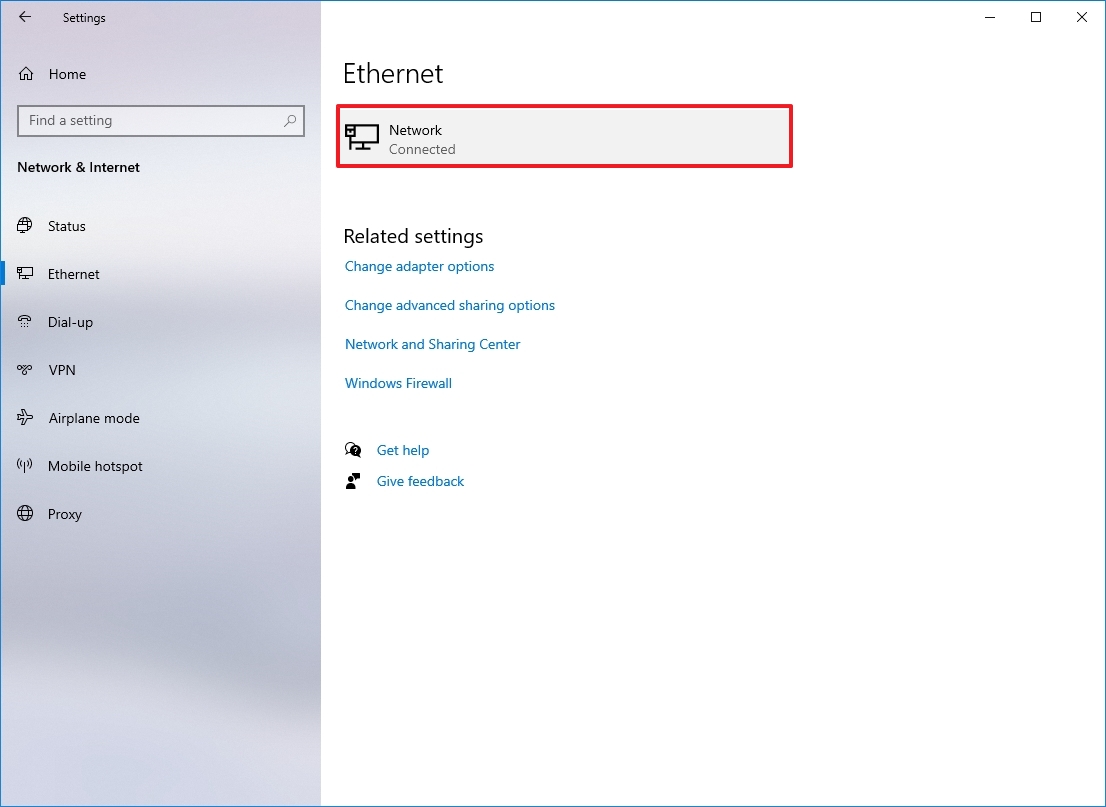
- Click the Edit button under the «IP settings» section
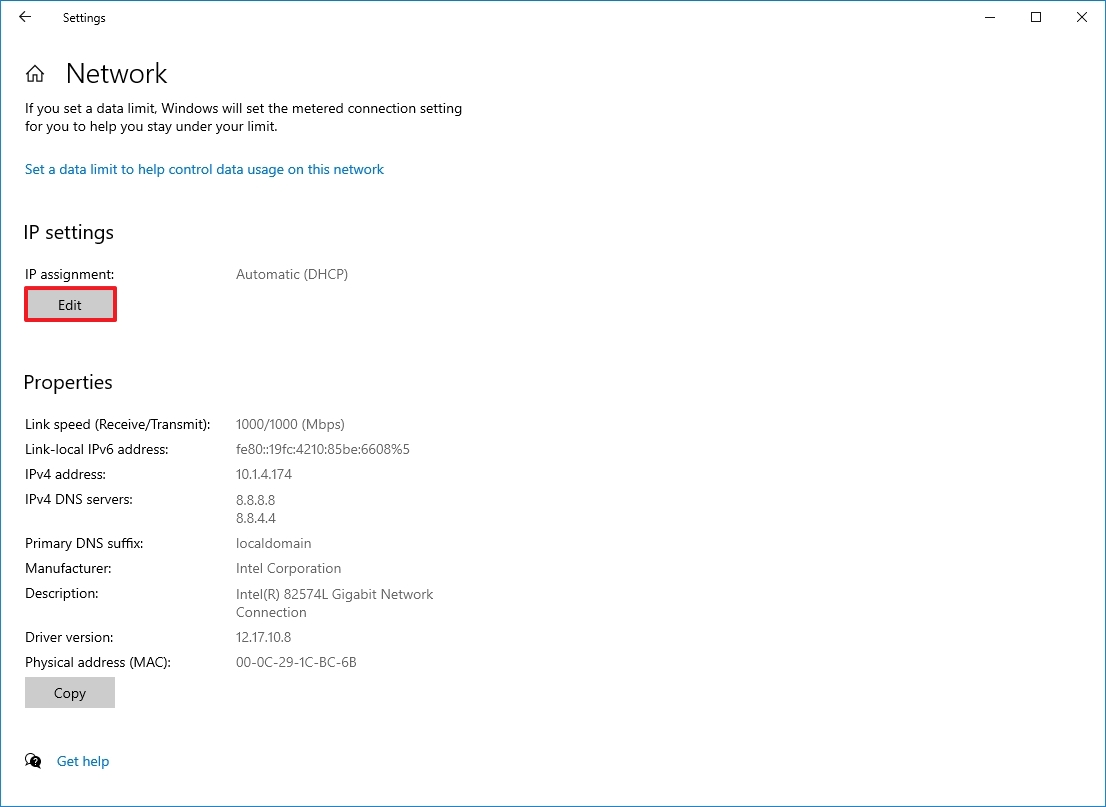
- Select the Manual option in the «Edit IP settings» section.
- Turn on the IPv4 toggle switch.
- Confirm the primary DNS address under the «Preferred DNS server» section. For example:
- Cloudflare: 1.1.1.1
- Google Public DNS: 8.8.8.8
- OpenDNS: 208.67.222.222

- Confirm the secondary DNS address under the «Alternate DNS server» section. You can use one of these secondary addresses:
- Cloudflare: 1.0.0.1
- Google Public DNS: 8.8.4.4
- OpenDNS: 208.67.220.220
- Click the Save button.
- Restart the device.
After you complete the steps, the computer should connect to the internet using the new resolvers. Although it’s not a requirement, changing the DNS configuration from the Settings app may cause the system to lose connectivity. As a result, I commend restarting the computer after making these changes.
Although the Settings app is the recommended option to change DNS settings on your computer, I’m not listing it first because this method can be confusing for some people.
How to change DNS settings using Command Prompt on Windows 10
To change the computer’s DNS settings through the Command Prompt, use these steps:
- Open Start.
- Search for Command Prompt, right-click the top result, and select the Run as administrator option.
- Type the following command to launch the tool to change the networking settings and press Enter: netsh
- Type the following command to identify the names of the network adapters and press Enter: interface show interface
- Type the following command to set the primary DNS IP address and press Enter: interface ip set dns name=»ADAPTER-NAME» source=»static» address=»X.X.X.X»
In the command, change «ADAPTER-NAME» with the name of the network adapter you identified in step 4, and change «X.X.X.X» with the IP address you want to use. For example:
- Cloudflare: 1.1.1.1 and 1.0.0.1
- Google Public DNS: 8.8.8.8 and 8.8.4.4
- OpenDNS: 208.67.222.222 and 208.67.220.220
This example sets the primary DNS address to 1.1.1.1: interface ip set dns name=»Ethernet1″ source=»static» address=»1.1.1.1″
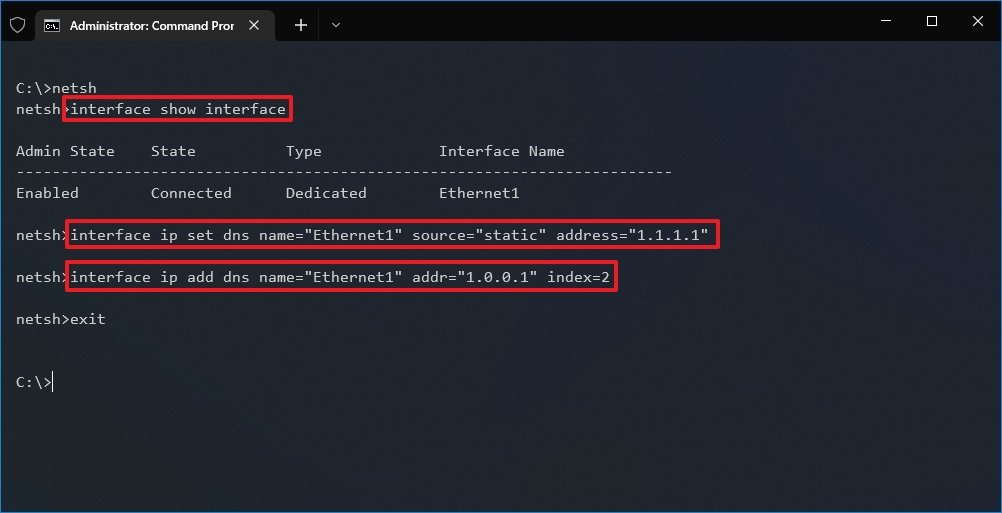
- Type the following command to add an alternative DNS IP address and press Enter: interface ip add dns name=»ADAPTER-NAME» addr=»X.X.X.X» index=2
In the command, change «ADAPTER-NAME» with the name of the network adapter you identified in step 4, and change «X.X.X.X» with the secondary address. This example sets the secondary DNS address to 1.0.0.1: interface ip add dns name=»Ethernet1″ addr=»1.0.0.1″ index=2
- Quick tip: You can repeat the above steps to add more addresses if necessary. However, in the command, you must increase the number of the index option by «1.» For instance, interface ip add dns name=»Ethernet1″ addr=»8.8.8.8″ index=3
Once you complete the steps, Windows 10 will start using the new DNS server addresses to resolve domain names to numeric addresses that your device can understand.
How to change DNS settings using PowerShell on Windows 10
To change the computer’s DNS settings through PowerShell, use these steps:
- Open Start.
- Search for PowerShell, right-click the top result, and select the Run as administrator option.
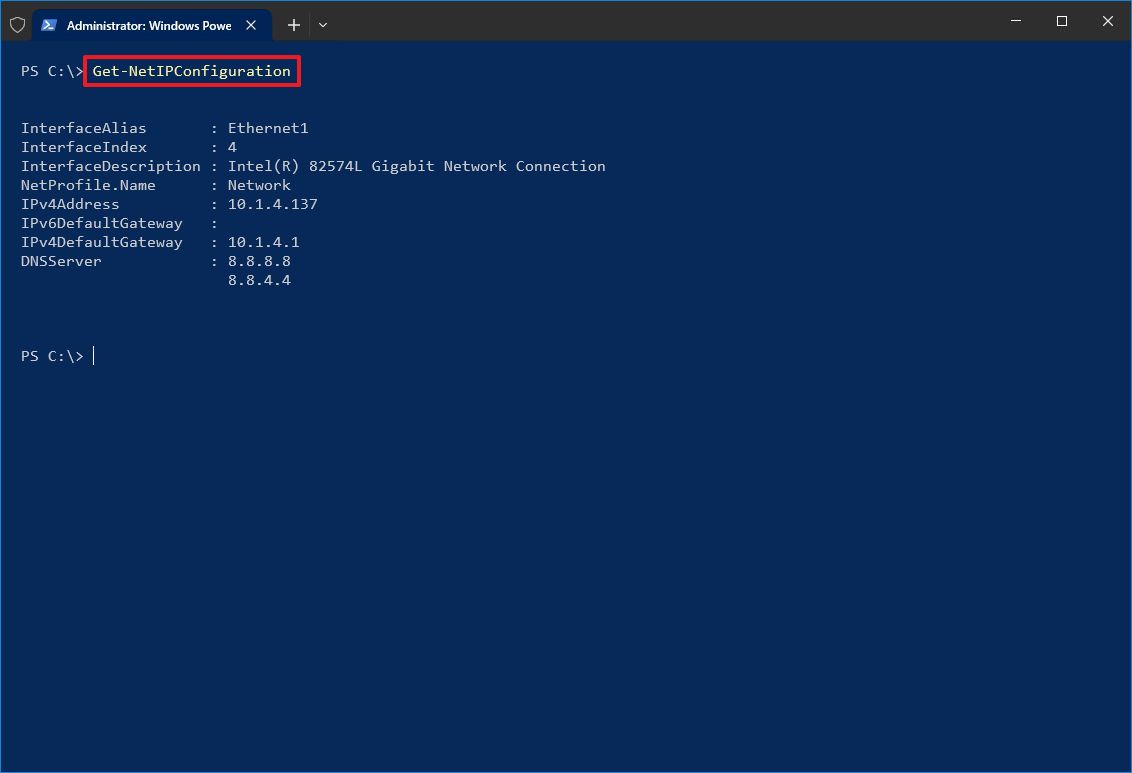
- Type the following command and note the «InterfaceIndex» and «DNSServer» settings from the current configuration, and press Enter: Get-NetIPConfiguration
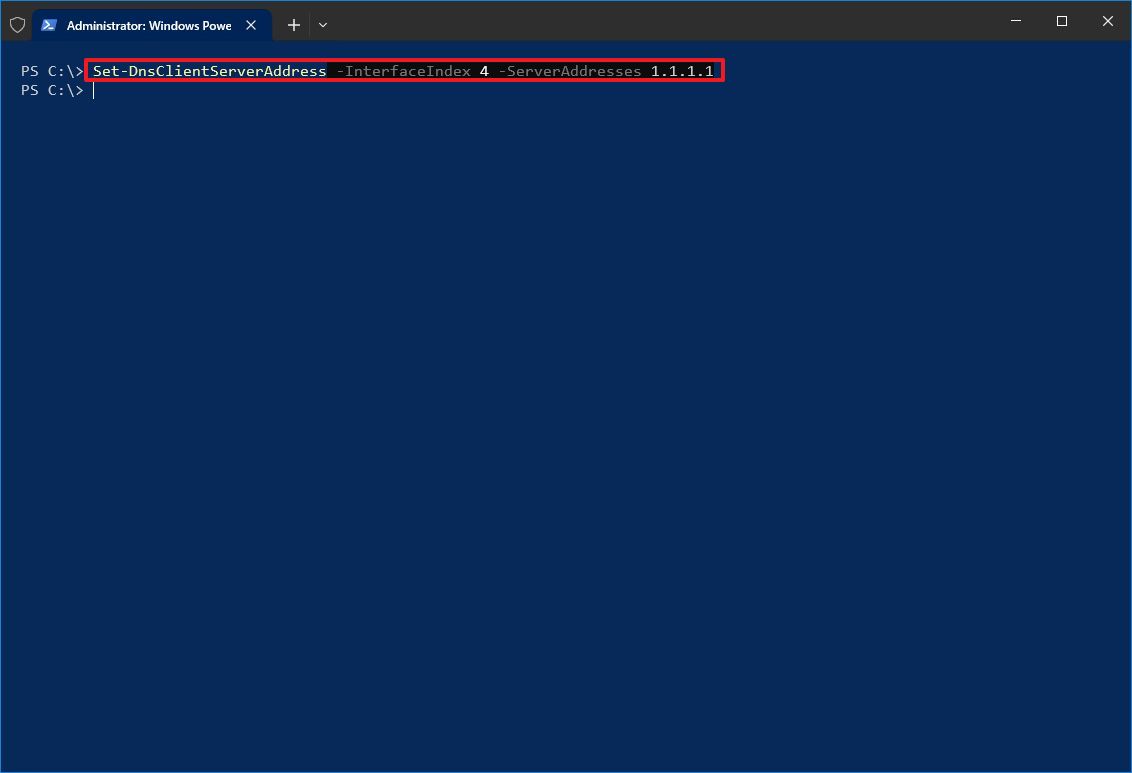
- Type the following command to configure a primary DNS address and press Enter: Set-DnsClientServerAddress -InterfaceIndex ADAPTER-INDEX -ServerAddresses X.X.X.X
In the command, change «ADAPTER-INDEX» with the number of the network adapter you identified in step 4, and change «X.X.X.X» with the IP address you want to use. For example:
- Cloudflare: 1.1.1.1 and 1.0.0.1
- Google Public DNS: 8.8.8.8 and 8.8.4.4
- OpenDNS: 208.67.222.222 and 208.67.220.220
This example sets the primary DNS address to 1.1.1.1: Set-DnsClientServerAddress -InterfaceIndex 4 -ServerAddresses 1.1.1.1
- Type the following command to configure primary and secondary DNS addresses and press Enter: Set-DnsClientServerAddress -InterfaceIndex ADAPTER-INDEX -ServerAddresses X.X.X.X, X.X.X.X
In the command, change «ADAPTER-INDEX» with the number of the network adapter you identified in step 4, and change «X.X.X.X» with the IP addresses you want to use. For example:
This example sets the primary DNS address to 1.1.1.1: Set-DnsClientServerAddress -InterfaceIndex 4 -ServerAddresses 1.1.1.1, 1.0.0.1

After you complete the steps, the device will start using the new DNS server addresses.
Finally, it’s worth noting that support for Windows 10 will end on October 14, 2025. After this date, Microsoft will no longer release security or maintenance updates and will also cease to provide any support.
You can use these instructions to prepare your device and upgrade from Windows 10 to 11.
More resources
For more helpful articles, coverage, and answers to common questions about Windows 10 and Windows 11, visit the following resources:
- Windows 11 on Windows Central — All you need to know
- Windows 10 on Windows Central — All you need to know
Mauro Huculak has been a Windows How-To Expert contributor for WindowsCentral.com for nearly a decade and has over 15 years of experience writing comprehensive guides. He also has an IT background and has achieved different professional certifications from Microsoft, Cisco, VMware, and CompTIA. He has been recognized as a Microsoft MVP for many years.
Способы изменения DNS в OC Windows
DNS (Domain Name System) — это своего рода «телефонная книга» интернета, которая преобразует понятные человеку доменные имена (например, selectel.ru) в понятные компьютерам IP-адреса. Вместо запоминания сложных комбинаций чисел мы просто вводим название сайта и оказываемся там, где нужно.
Если вы хотите глубже разобраться в работе DNS, прочитайте статью, которая объясняет основные понятия и принципы.
Стандартные настройки DNS от провайдера порой оказываются неэффективными: медленная загрузка сайтов, ограничения доступа к некоторым ресурсам и недостаточный уровень защиты. В таких ситуациях можно вручную задать альтернативные DNS, чтобы улучшить работу сети.
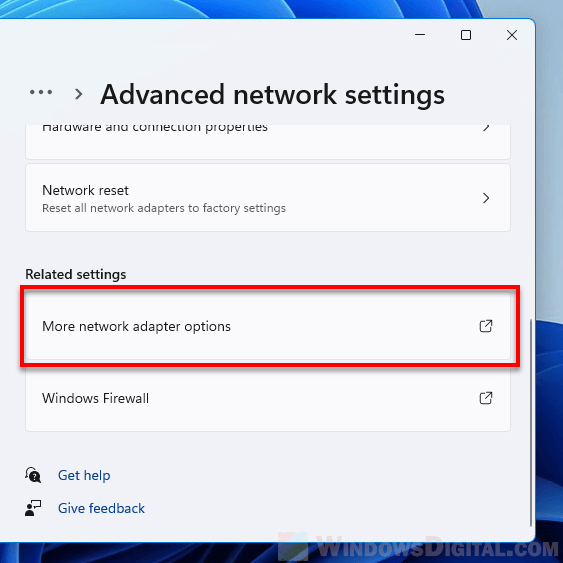
В Windows доступно несколько способов изменения настроек DNS: через современный раздел «Параметры», классическую «Панель управления» и с помощью консольных команд. Кроме того, в новых версиях ОС Windows можно устанавливать настройки для конкретной Wi-Fi сети. Для автоматического изменения DNS существуют сторонние программы, например, DNS Jumper или YogaDNS.
Популярные DNS-серверы
Некоторые компании предоставляют собственные DNS-серверы для общего пользования. Выбор сервера зависит от того, какого результата необходимо добиться: улучшение безопасности или ускорение обработки запросов. Можно выделить следующие известные DNS-серверы:
- Google Public DNS: IPv4: 8.8.8.8, 8.8.4.4 и IPv6: 2001:4860:4860::8888, 2001:4860:4860::8844.
- Cloudflare DNS: IPv4: 1.1.1.1, 1.0.0.1 и IPv6: 2606:4700:4700::1111, 2606:4700:4700::1001.
- Quad9 DNS: IPv4: 9.9.9.9, 149.112.112.112 и IPv6: 2620:fe::fe, 2620:fe::9
- Яндекс DNS: Стандартный: 77.88.8.8, 77.88.8.1; Безопасный (с блокировкой вредоносных сайтов): 77.88.8.88, 77.88.8.2.
- AdGuard DNS: Стандартный: IPv4: 94.140.14.140, 94.140.14.141 и IPv6: 2a10:50c0::1:ff, 2a10:50c0::2:ff; Безопасный: IPv4: 94.140.14.14, 94.140.15.15 и IPv6: 2a10:50c0::ad1:ff, 2a10:50c0::ad2:ff.
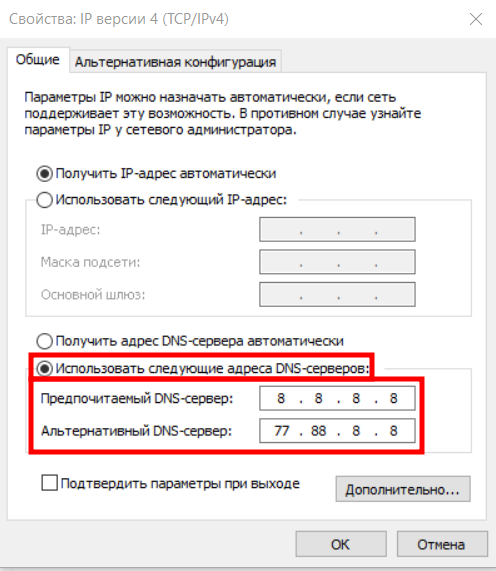
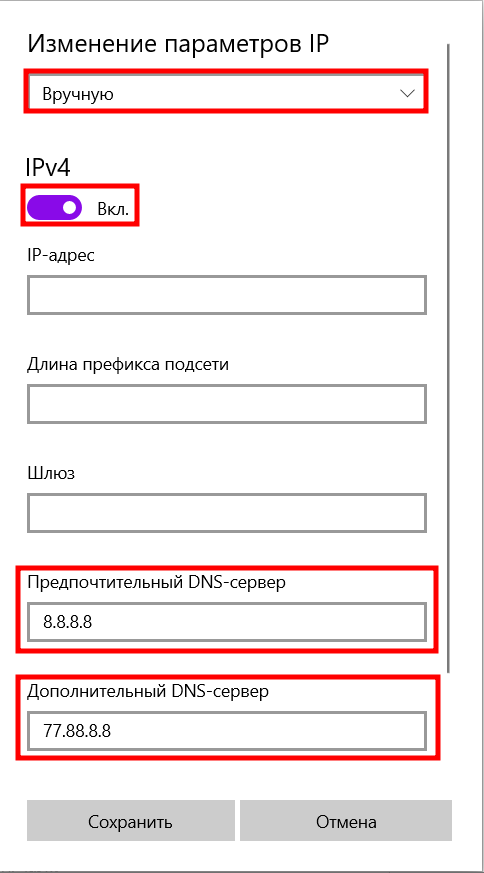
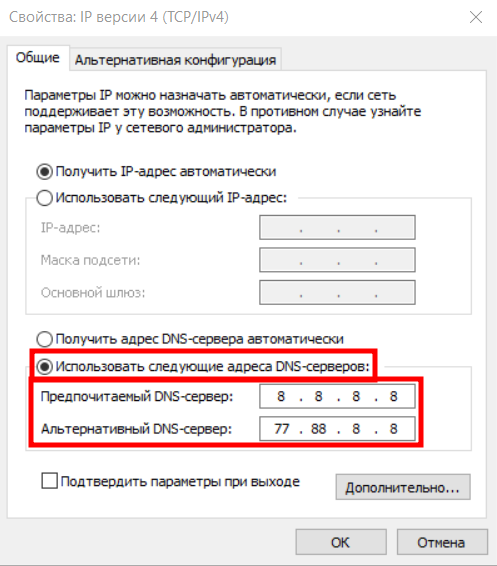
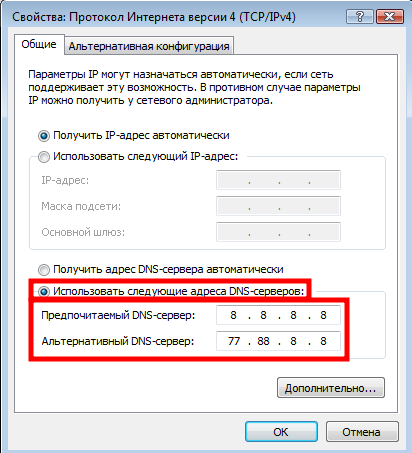
В статье для настроек DNS применяются адреса Google 8.8.8.8 и Яндекс 77.88.8.8. Адреса приведены в качестве примера.
Изменение DNS для сетевого адаптера компьютера
Настройка сетевых адаптеров позволяет задать параметры DNS-серверов как для проводных, так и для беспроводных подключений. Рассмотрим способы изменения DNS-серверов на примере Windows 11.
Настройки из панели управления
Панель управления — универсальный инструмент в любой версии Windows.
Для настройки DNS-серверов:
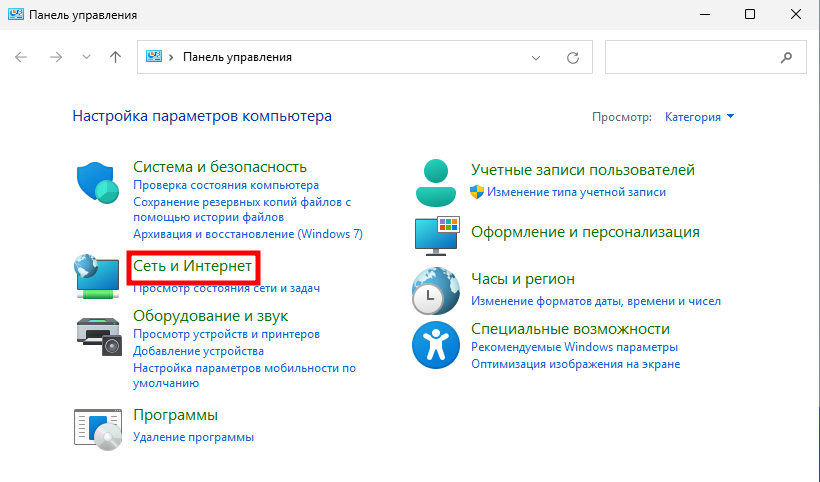
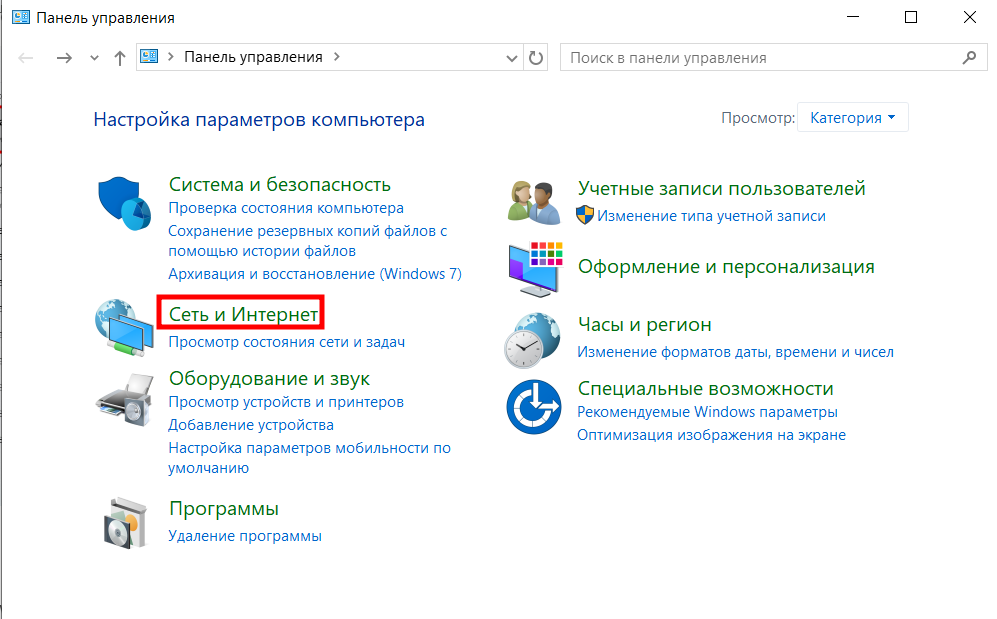
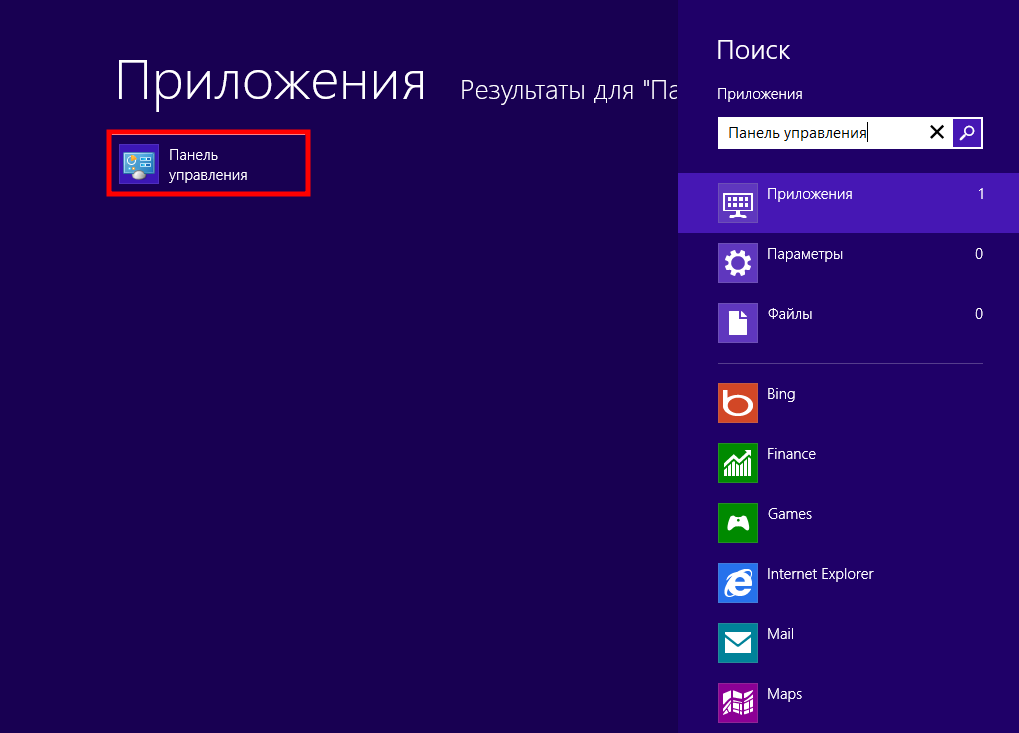
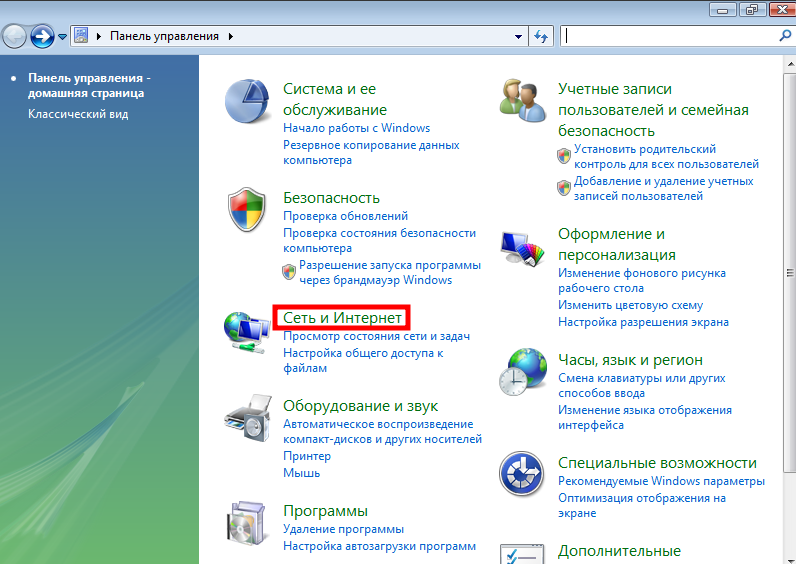
Откройте меню Пуск и перейдите в Панель управления. Или нажмите Win + R и выполните команду control.
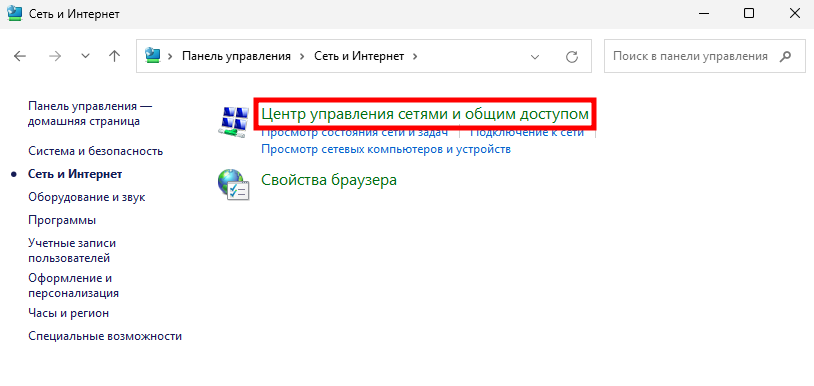
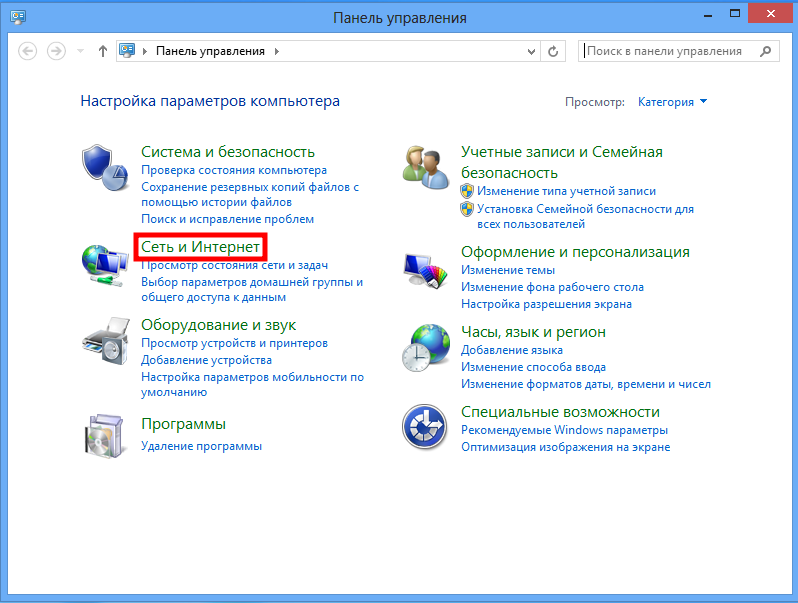
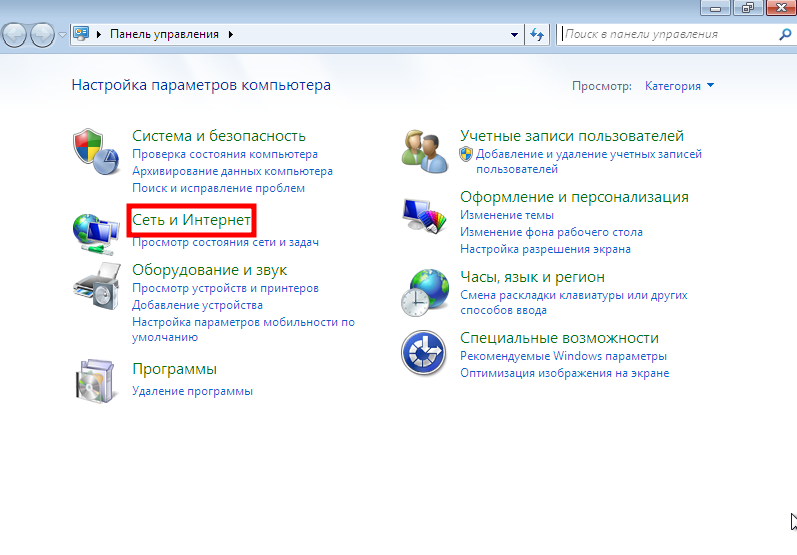
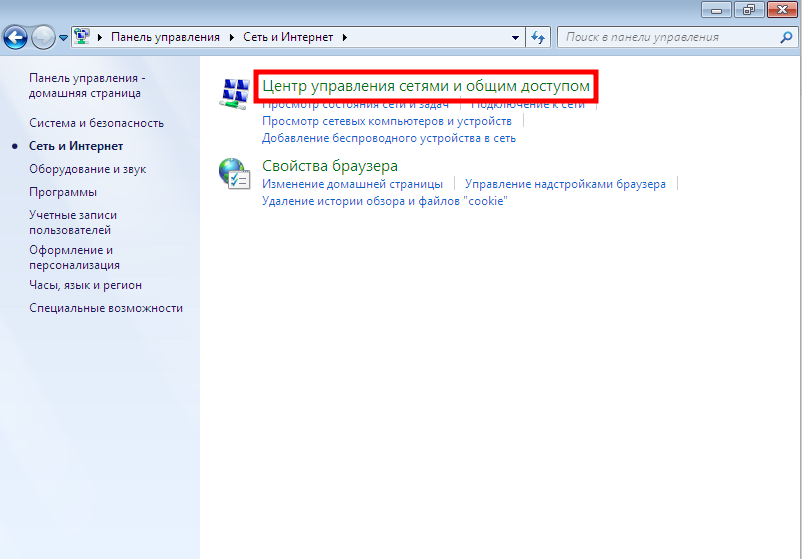
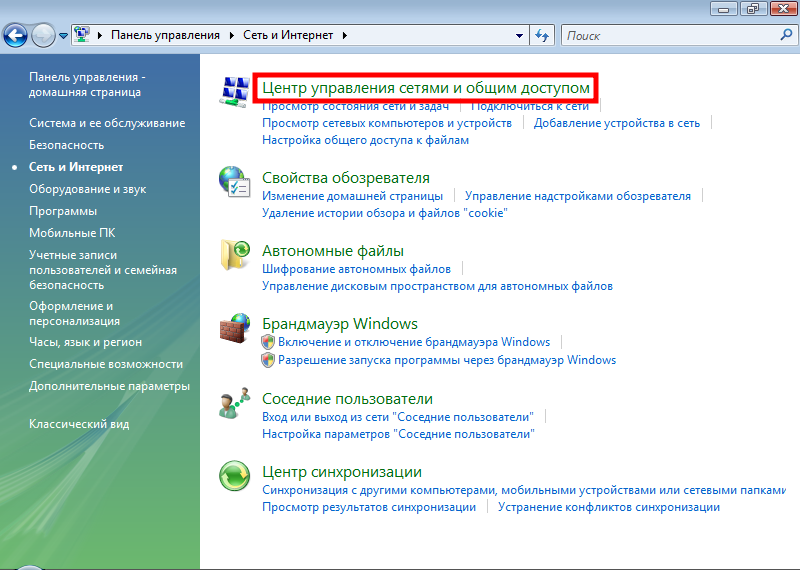
В открывшемся окне выберите Сеть и Интернет.
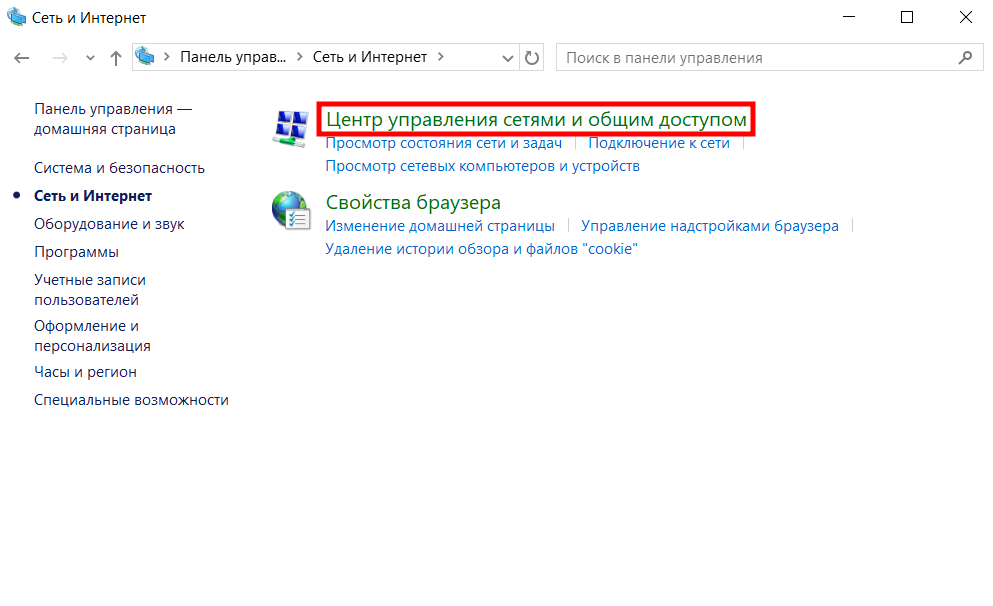
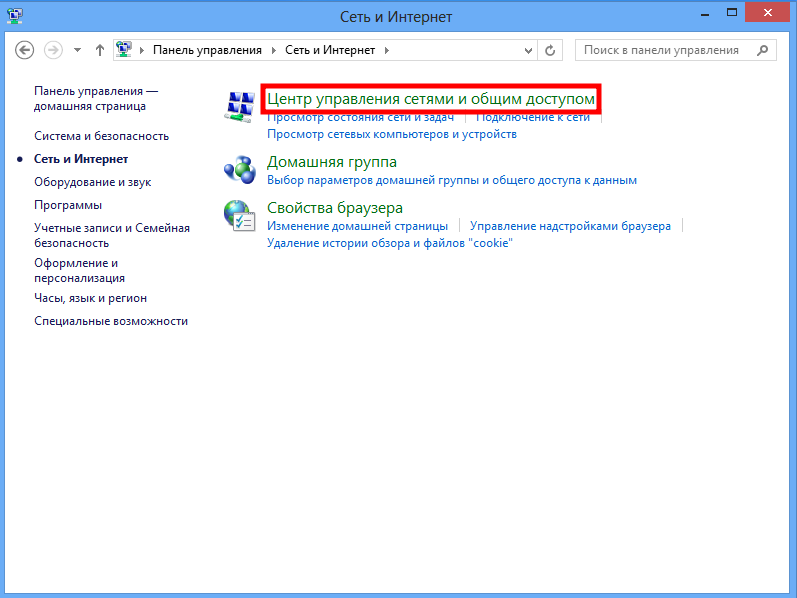
Далее нажмите Центр управления сетями и общим доступом.
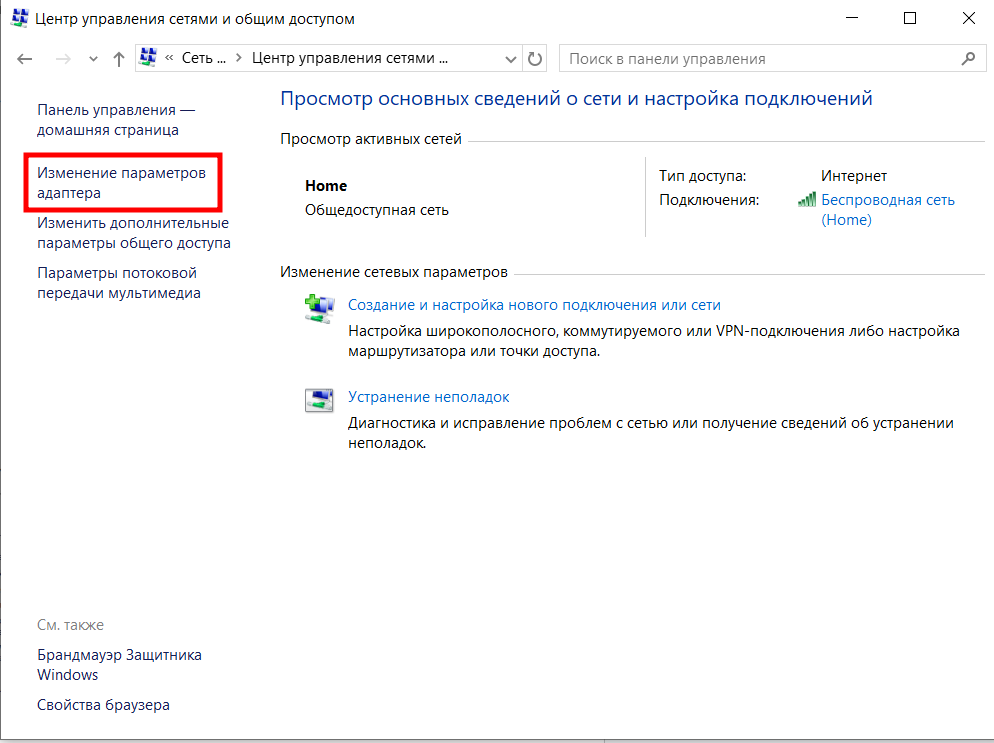
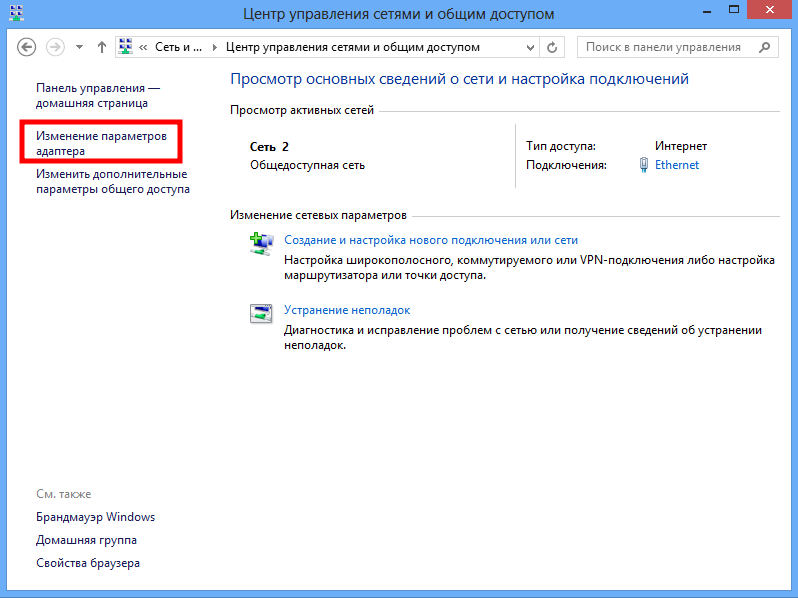
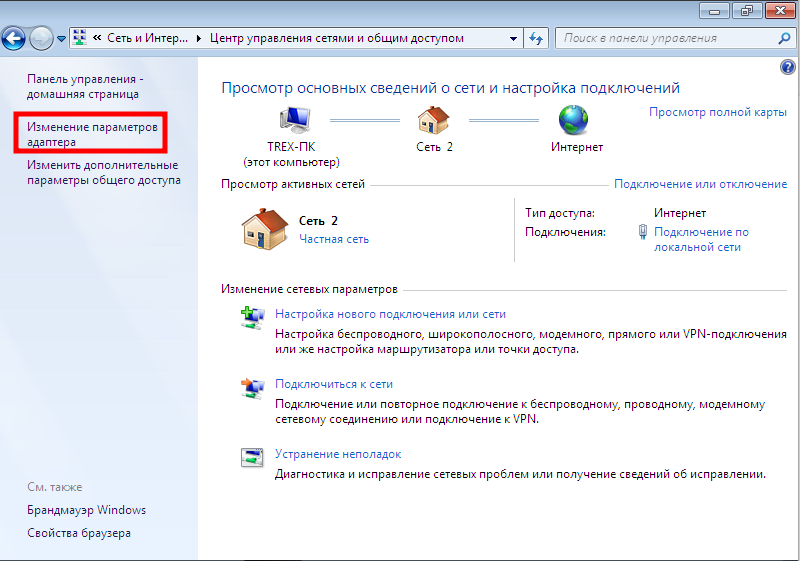
В левой части окна выберите Изменение параметров адаптера.

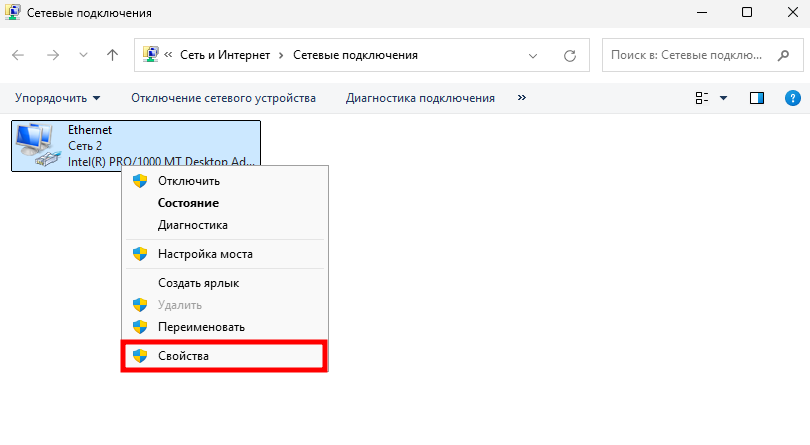
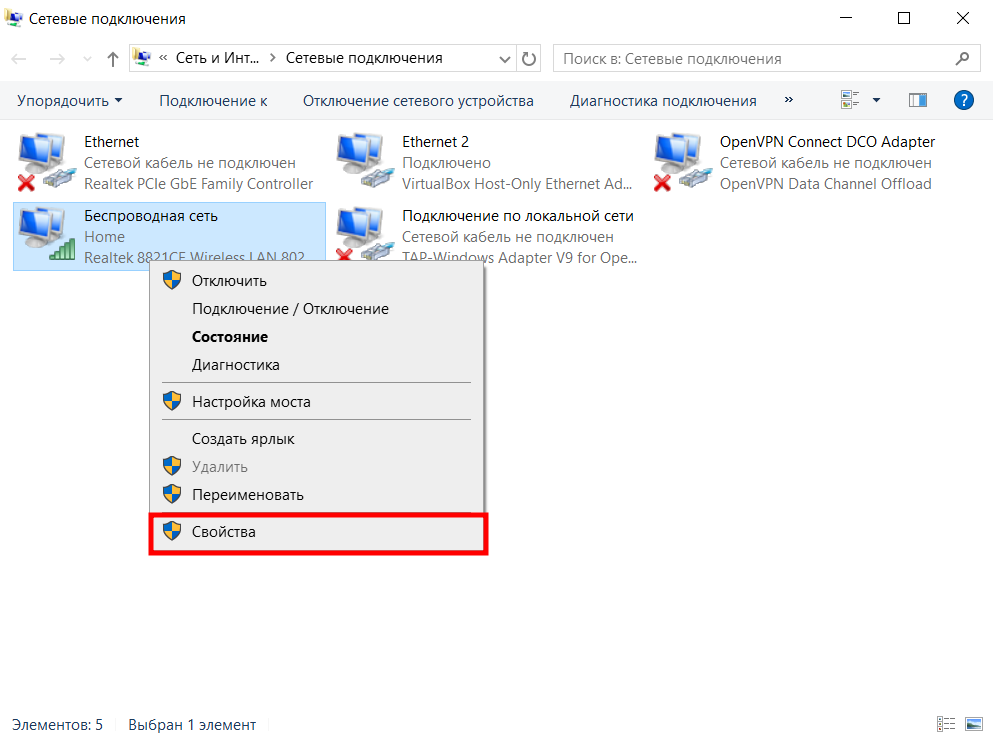
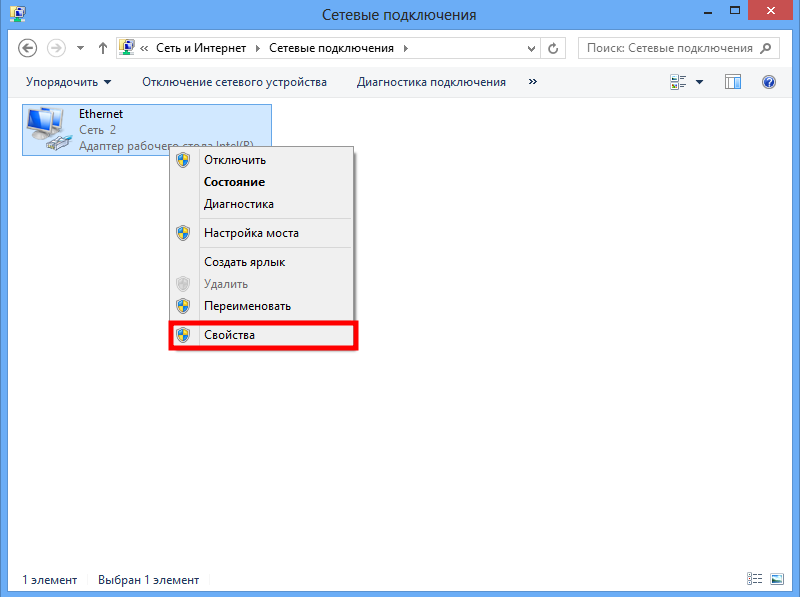
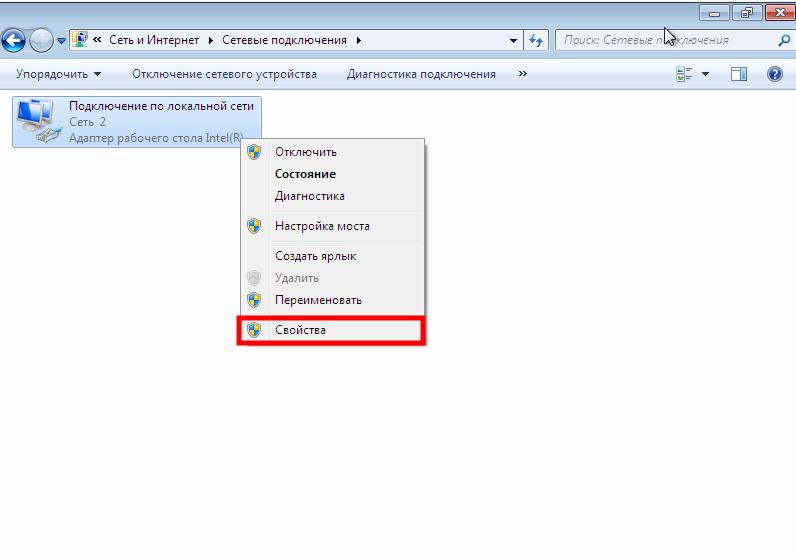
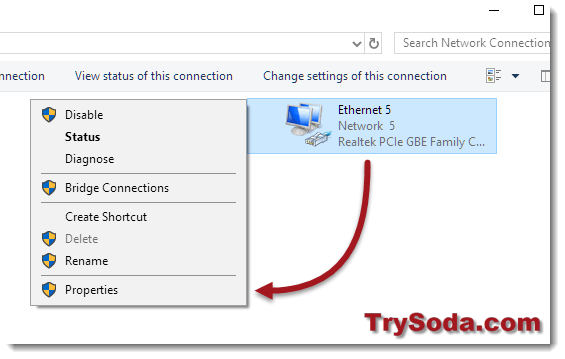
Здесь вы увидите список всех доступных сетевых подключений: Ethernet, Wi-Fi и других. Найдите нужный адаптер, нажмите по нему правой кнопкой мыши и выберите Свойства.
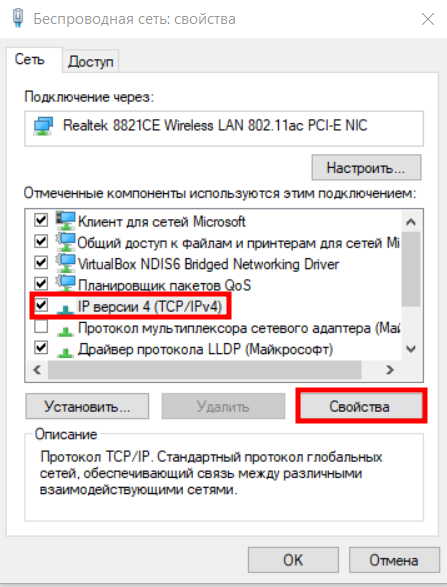
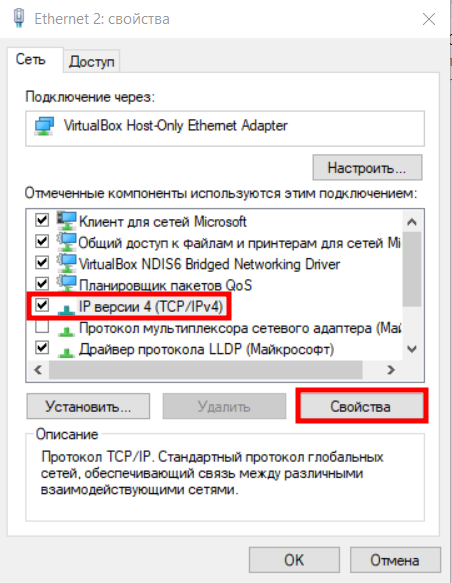
Откройте Свойства для компонента IP версии 4 (TCP/IPv4).
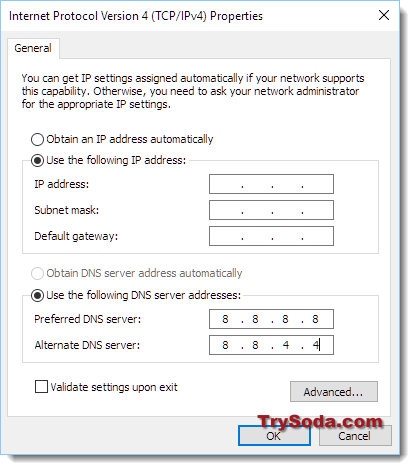
В нижней части окна выберите Использовать следующие адреса DNS-серверов и укажите предпочитаемый и альтернативный DNS-серверы.
Нажмите ОК для сохранения настроек и закройте все окна. Чтобы изменения вступили в силу, может потребоваться перезапуск соединения или компьютера.
Настройка из параметров
Этот способ позволяет быстро и удобно настроить DNS для активного подключения по Ethernet. Настройка параметров для определенной сети Wi-Fi описана в следующем разделе.
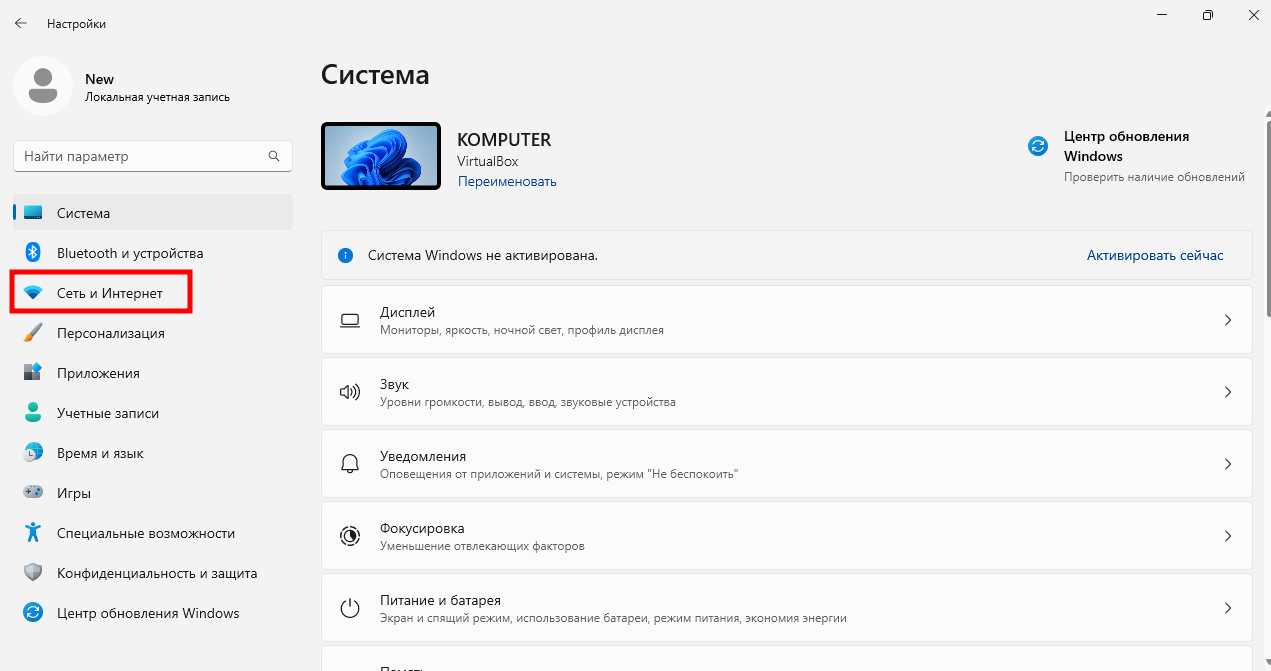
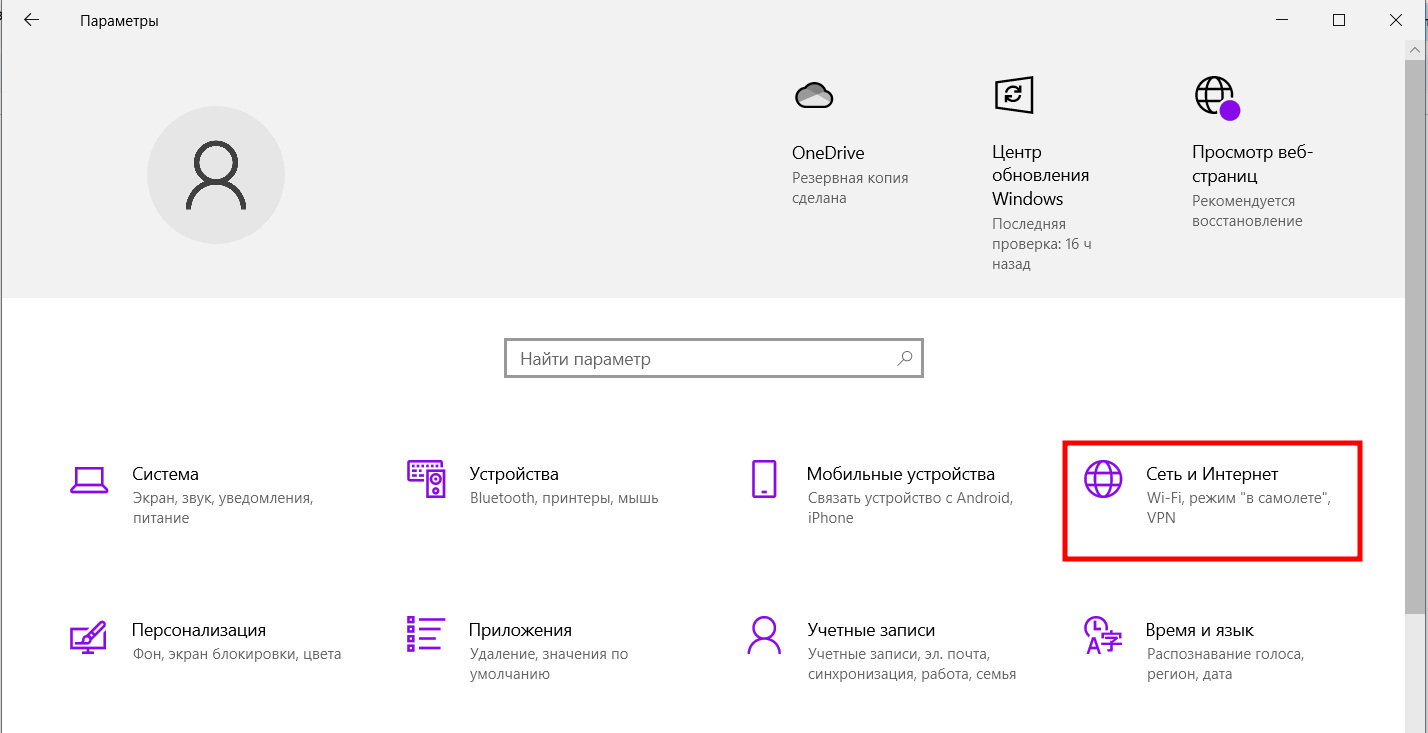
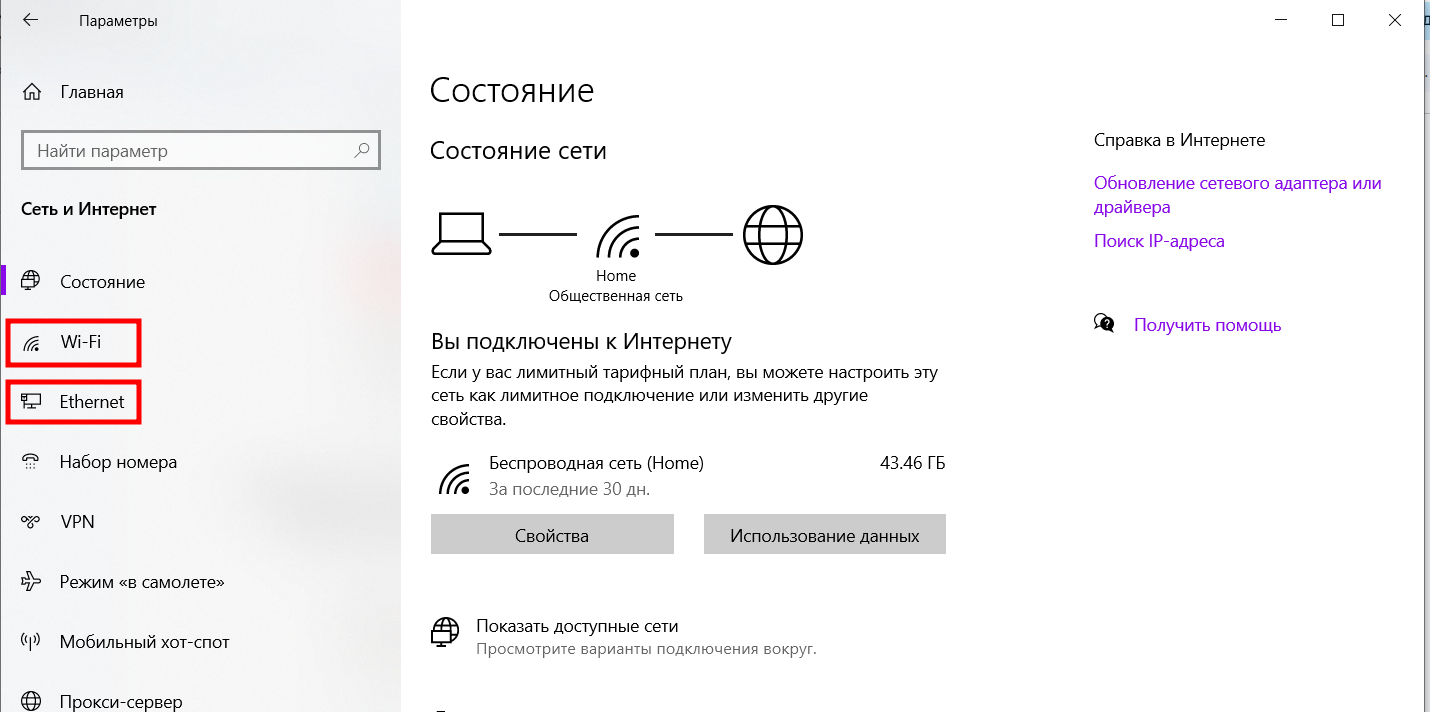
Откройте меню Пуск и перейдите в Параметры.
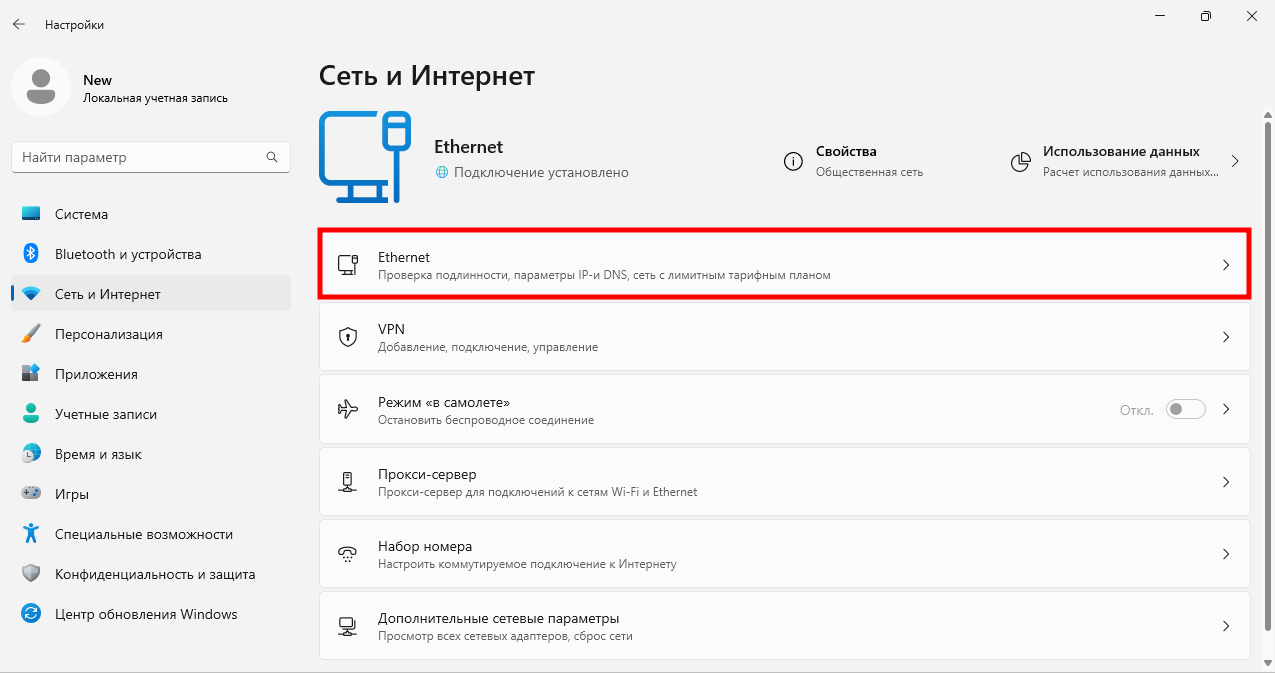
Далее в раздел Сеть и Интернет.
Нажмите на активное подключение.
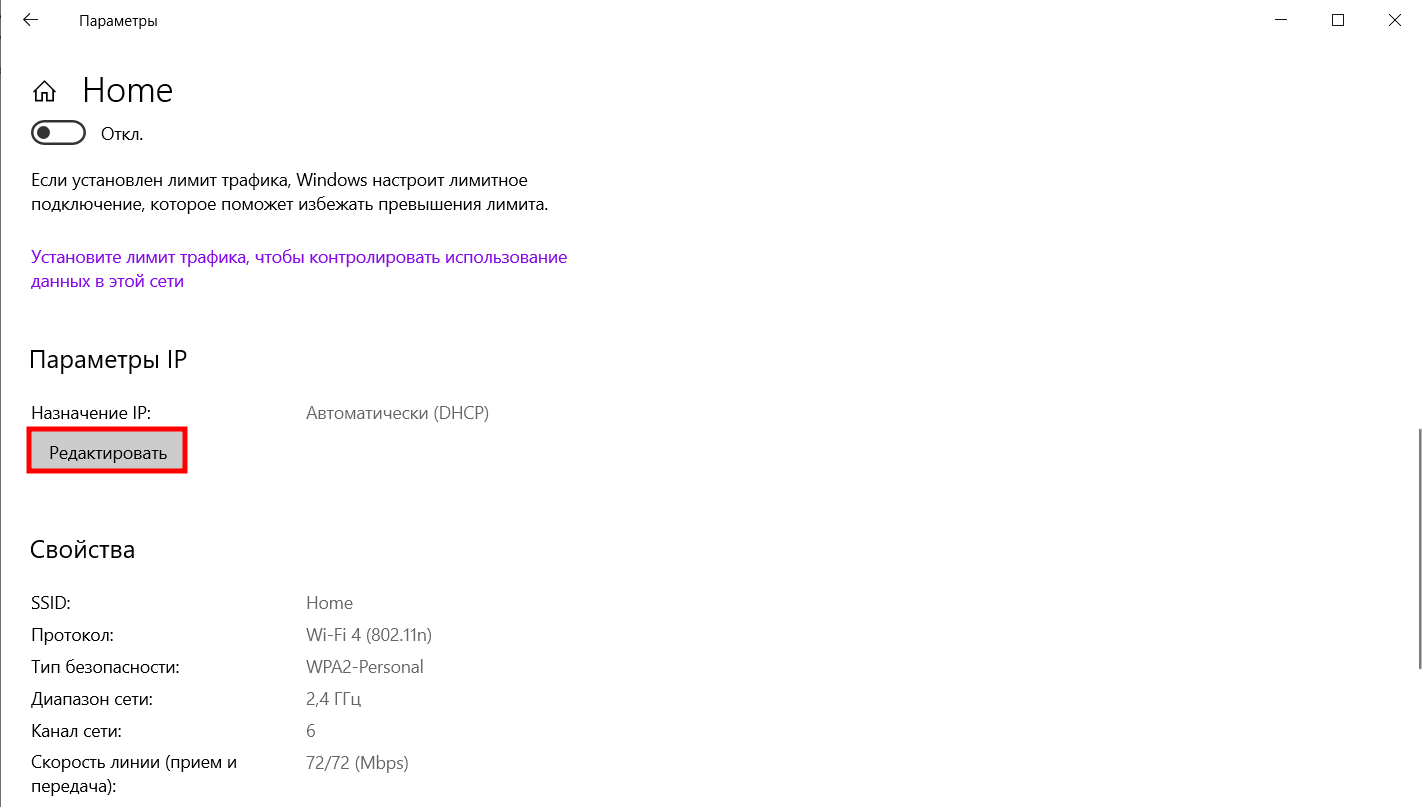
В открывшемся меню найдите пункт Назначение DNS-сервера. Нажмите кнопку Изменить.
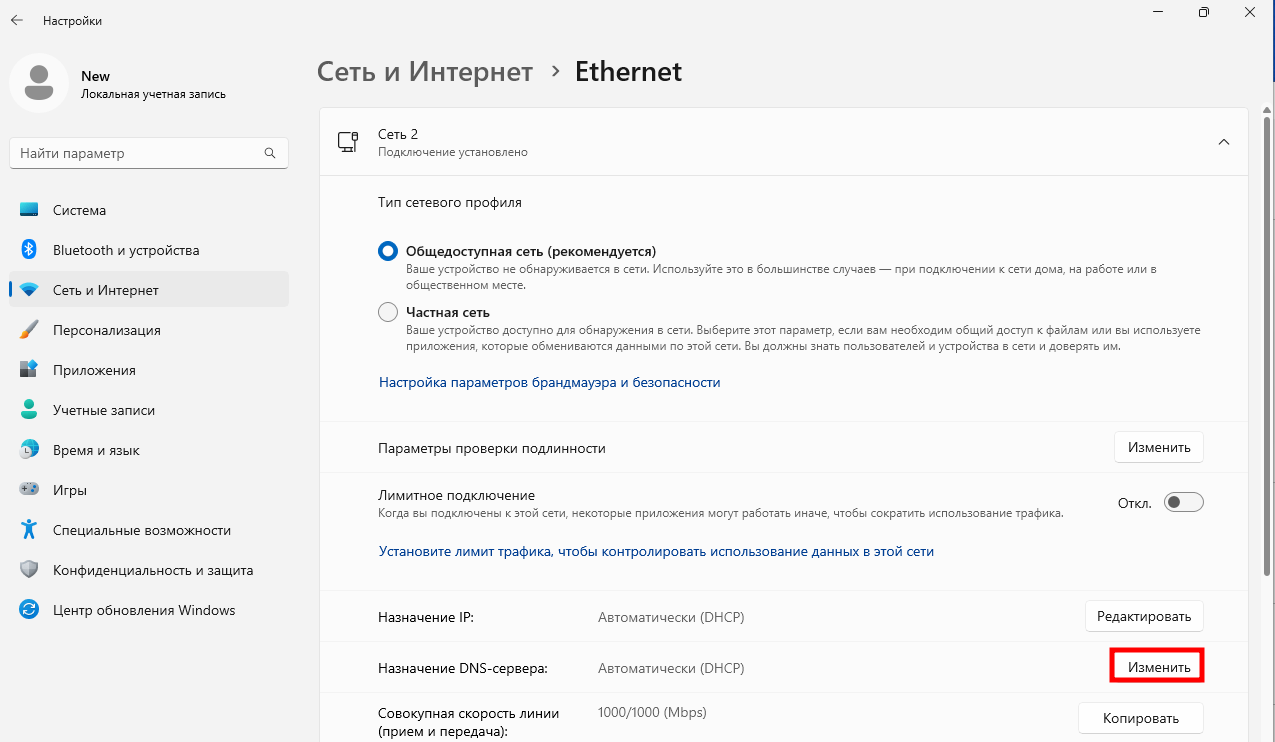
Выберите тип настроек Вручную, включите протокол IPv4 и введите адреса DNS-серверов.
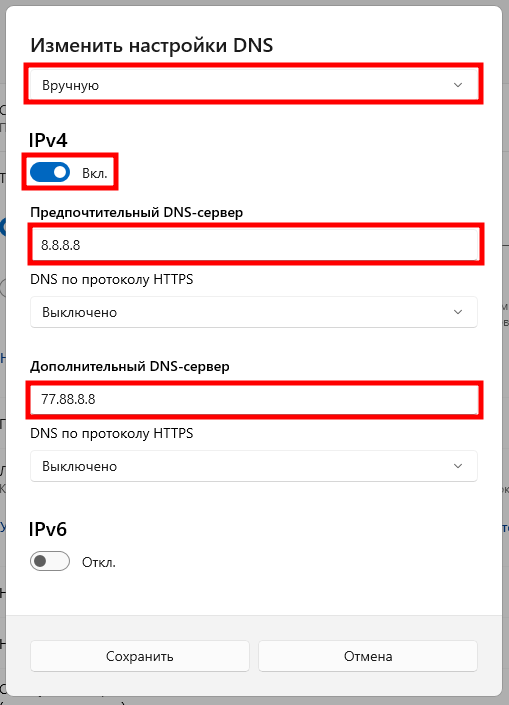
Нажмите Сохранить.
Изменение DNS для конкретной Wi-Fi сети
В Windows 10 и 11 можно задать уникальные параметры DNS-серверов для конкретной Wi-Fi сети.
Подключитесь к нужной Wi-Fi сети.
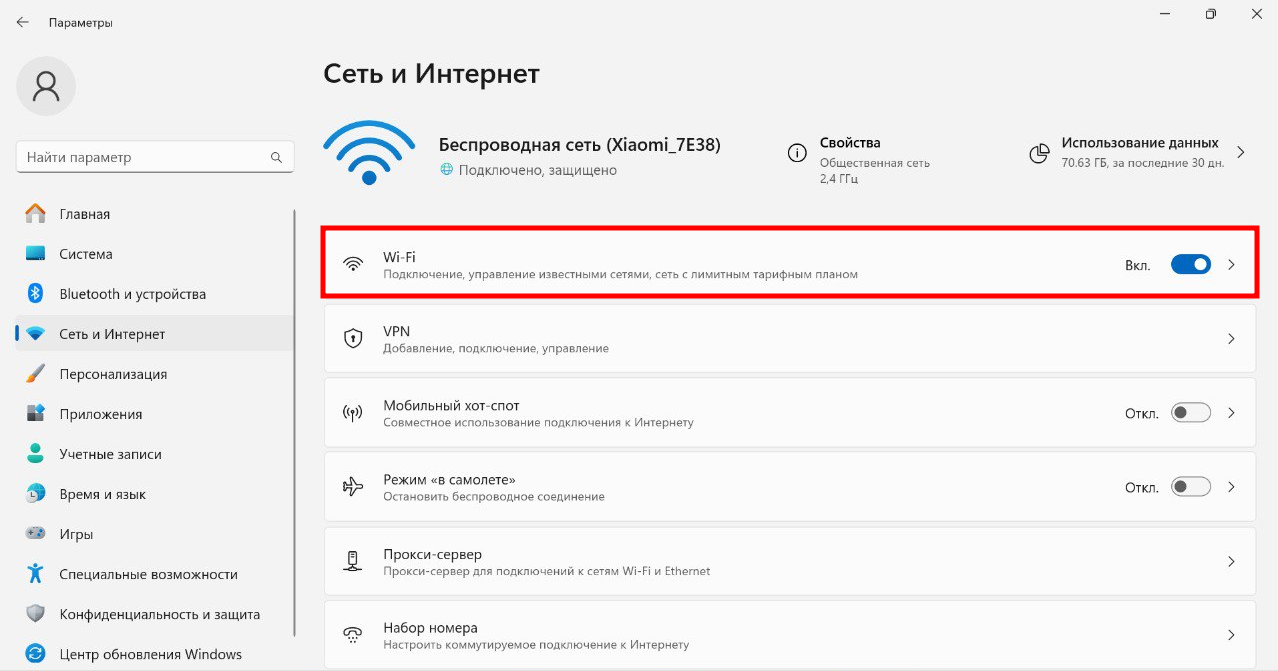
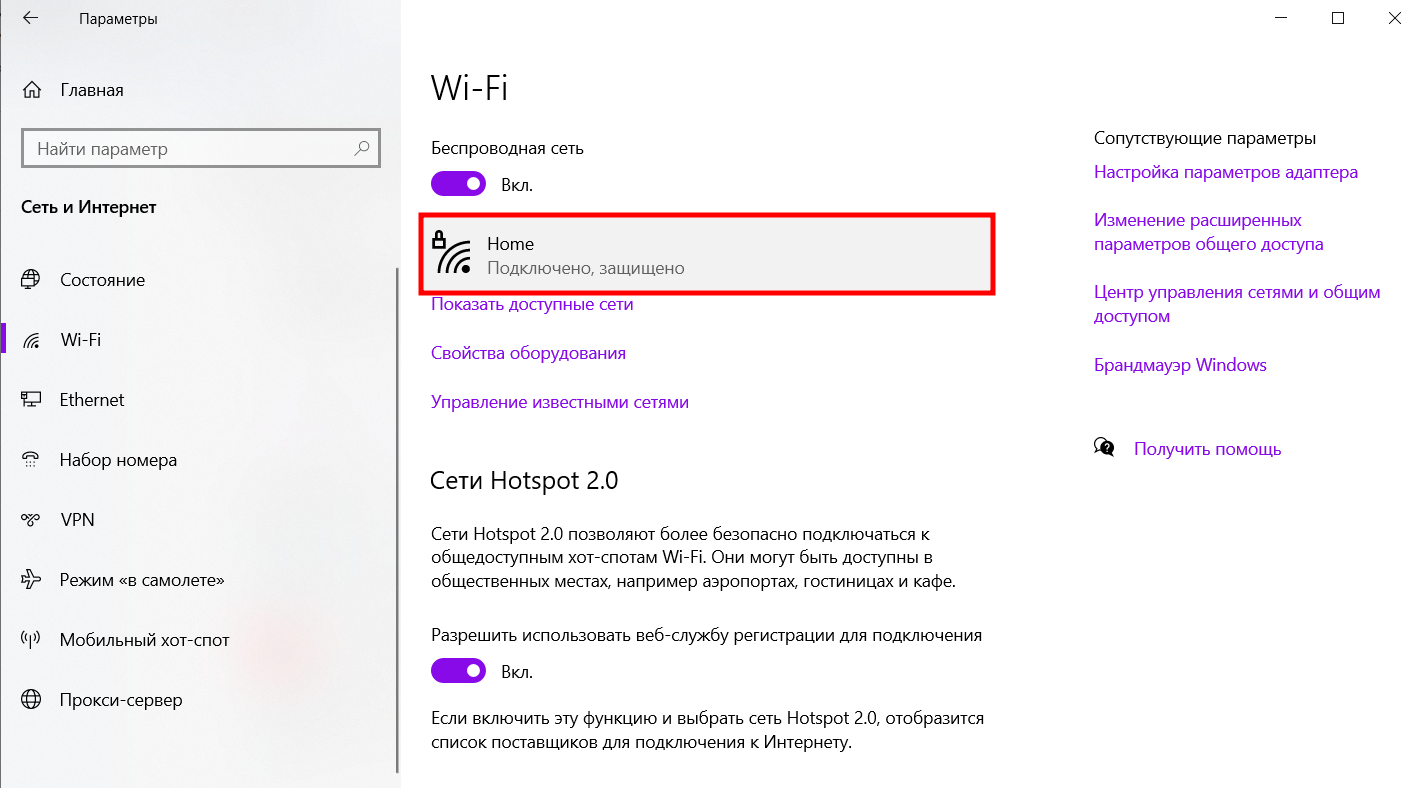
Зайдите в Параметры -— Сеть и Интернет и нажмите на Wi-Fi.
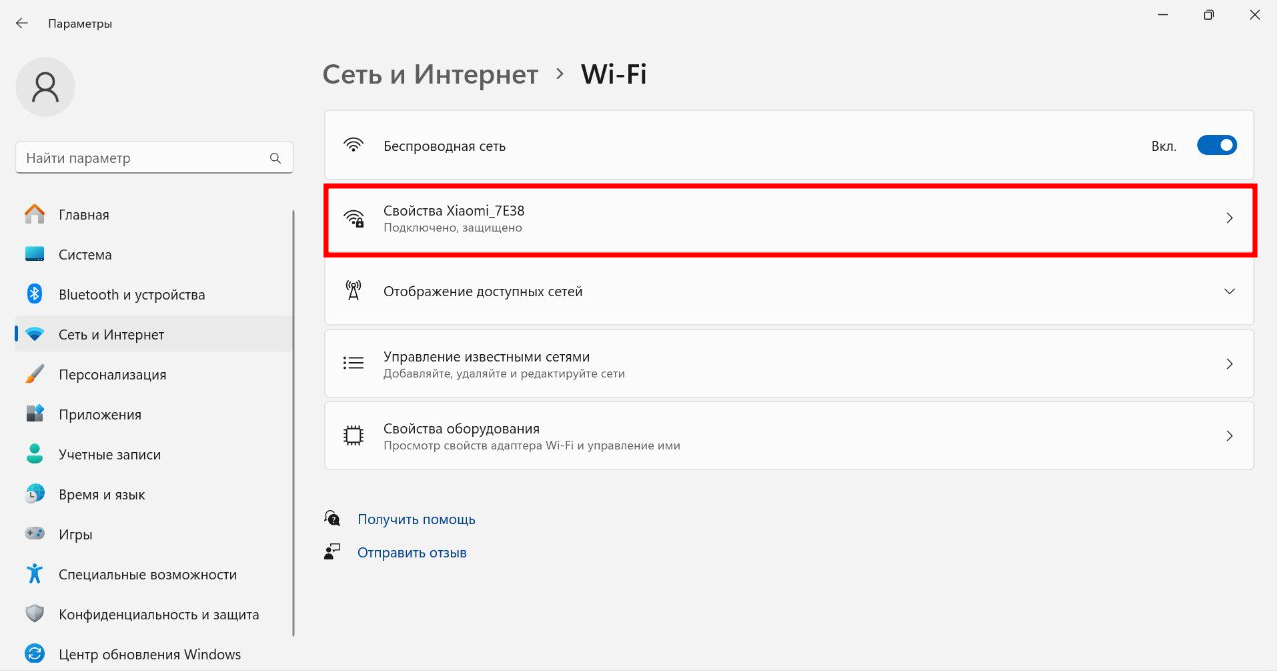
Перейдите в Свойства вашей сети.
В открывшемся меню найдите пункт Назначение DNS-сервера. Нажмите кнопку Изменить.
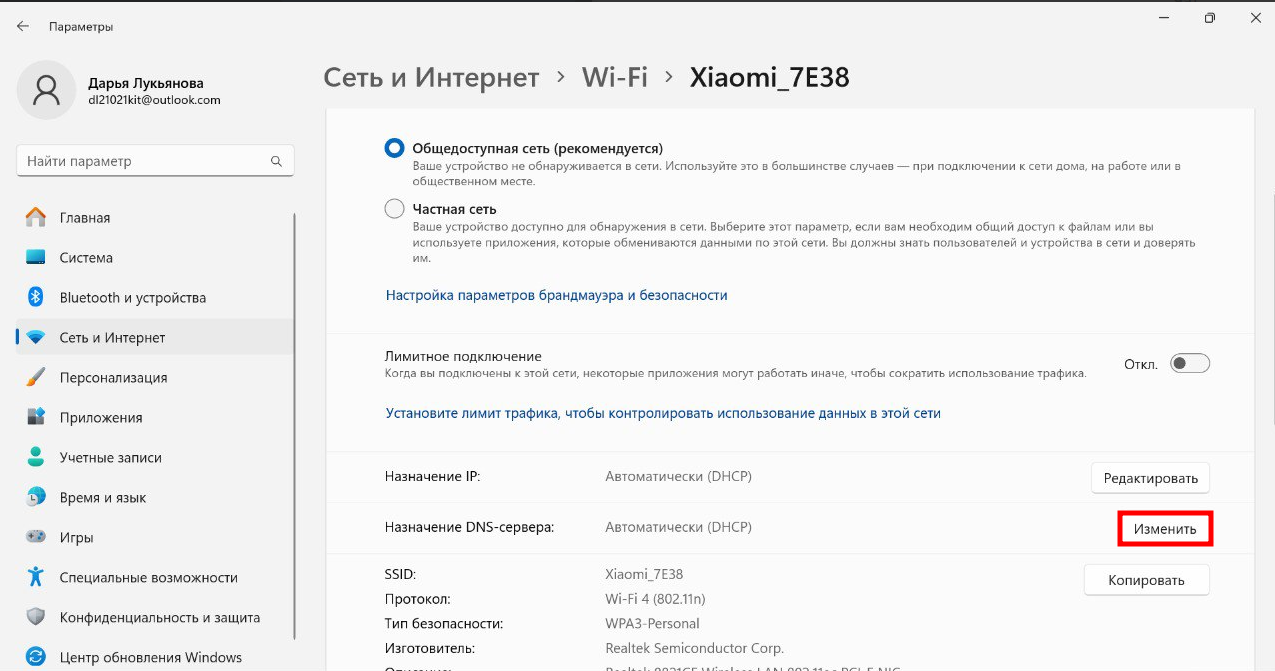
Выберите тип настроек Вручную, включите протокол IPv4 и введите адреса DNS-серверов.
Сохраните настройки.
Консольные команды для работы с DNS
Для пользователей, предпочитающих работать с системой через командную строку, Windows предоставляет возможность изменения настроек DNS через консоль. Этот метод удобен для автоматизации процессов с использованием скриптов.
Командную строку рекомендуется запускать от имени Администратора.
Основные команды для работы с DNS
- Просмотр текущих настроек сети:
ipconfig /all
Просмотр имени и состояния интерфейсов:
netsh interface show interface
Изменение DNS для подключения:
netsh interface ipv4 add dnsservers "Имя интерфейса" [Адрес сервера] [Приоритет]
Пример команды:
netsh interface ipv4 add dnsservers "Ethernet" 8.8.8.8 1
Сброс DNS-кэша:
ipconfig /flushdns
Проверка подключения к DNS:
nslookup example.com
Если DNS настроен правильно, вы увидите IP-адрес сайта.
Автоматическое получение DNS:
netsh interface ip set dns "Имя интерфейса" dhcp
Пример команды:
netsh interface ip set dns "Ethernet" dhcp
Как поменять DNS сервер в разных версиях Windows
Windows 11
Возможные способы настройки DNS-серверов в Windows 11 описаны в разделах выше: Изменение DNS для сетевого адаптера и Изменение DNS для конкретной Wi-Fi сети.
Windows 10
Настройка DNS-серверов в Windows 10 доступна двумя способами: через Панель управления и Параметры.
Настройки из Панели управления
Откройте меню Пуск и перейдите в Панель управления. Или нажмите Win + R и выполните команду control.
В открывшемся окне выберите Сеть и Интернет.
Далее нажмите Центр управления сетями и общим доступом.
В левой части окна выберите Изменение параметров адаптера.
Нажмите правой кнопкой мыши на адаптер, который используется для подключения к интернету, и выберите Свойства.
Откройте Свойства для компонента IP версии 4 (TCP/IPv4).
В нижней части окна выберите Использовать следующие адреса DNS-серверов и укажите предпочитаемый и альтернативный DNS-серверы.
Нажмите ОК для сохранения изменений и закройте все окна.
Настройки из параметров
Откройте меню Пуск и перейдите в Параметры.
Далее в раздел Сеть и Интернет.
Перейдите на вкладку Wi-Fi или Ethernet в зависимости от способа подключения устройства к интернету.
Нажмите на активное подключение.
Нажмите Редактировать в разделе Параметры IP.
Выберите тип настроек Вручную, включите протокол IPv4 и введите адреса DNS-серверов.
Нажмите Сохранить.
Windows 8, 8.1
Для настройки DNS-серверов на Windows 8 и 8.1:
Откройте меню Пуск нажатием клавиши Windows и выберите Панель управления.
В открывшемся окне выберите Сеть и Интернет.
Далее нажмите Центр управления сетями и общим доступом.
В левой части окна выберите Изменение параметров адаптера.
Нажмите правой кнопкой мыши на адаптер, который используется для подключения к интернету, и выберите Свойства.
Откройте Свойства для компонента IP версии 4 (TCP/IPv4).
В нижней части окна выберите Использовать следующие адреса DNS-серверов и укажите предпочитаемый и альтернативный DNS-серверы.
Нажмите ОК для сохранения изменений и закройте все окна.
Windows 7
Для настройки DNS-серверов на Windows 7 выполните следующее.
Откройте меню Пуск и перейдите в Панель управления. Или нажмите Win + R и выполните команду control.
В открывшемся окне выберите Сеть и Интернет.
Далее нажмите Центр управления сетями и общим доступом.
В левой части окна выберите Изменение параметров адаптера.
Нажмите правой кнопкой мыши на адаптер, который используется для подключения к интернету, и выберите Свойства.
Откройте Свойства для компонента Протокол Интернета версии 4 (TCP/IPv4).
В нижней части окна выберите Использовать следующие адреса DNS-серверов и укажите предпочитаемый и альтернативный DNS-серверы.

Нажмите ОК для сохранения изменений и закройте все окна.
Windows Vista
Для настройки DNS-серверов на Windows Vista:
Откройте меню Пуск и перейдите в Панель управления. Или нажмите Win + R и выполните команду control.
В открывшемся окне выберите Сеть и Интернет.
Далее откройте Центр управления сетями и общим доступом.
Нажмите Просмотр состояния у сети, которая используется для подключения к интернету.

Откройте Свойства выбранного соединения.
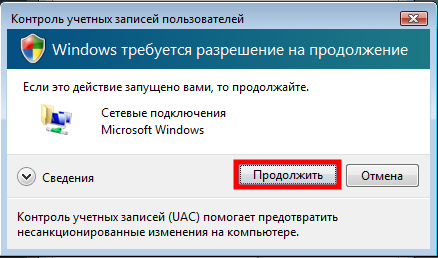
Нажмите Продолжить для подтверждения действий.
Откройте Свойства для компонента Протокол Интернета версии 4 (TCP/IPv4).
В нижней части окна выберите Использовать следующие адреса DNS-серверов и укажите предпочитаемый и альтернативный DNS-серверы.
Нажмите ОК для сохранения изменений и закройте все окна.
Windows XP
Для настройки DNS-серверов на Windows XP:
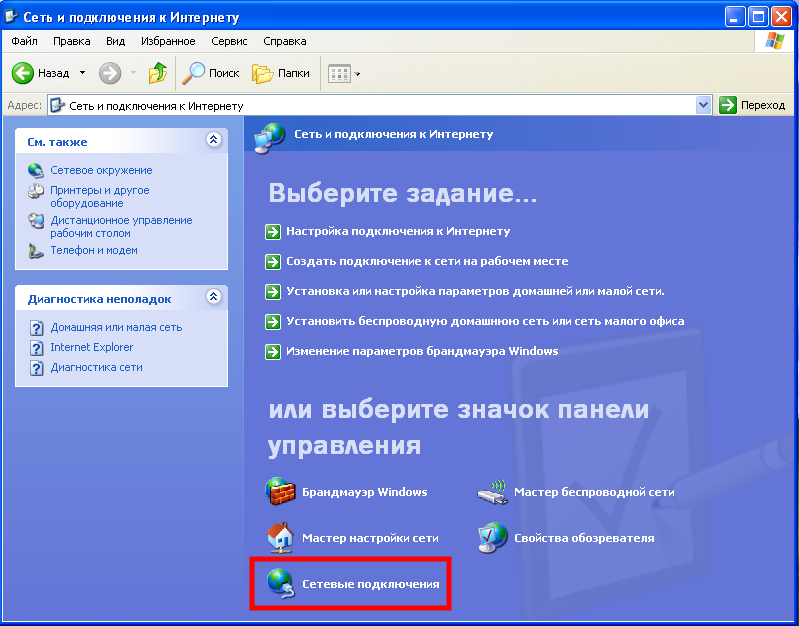
Откройте меню Пуск и перейдите в Панель управления. Или нажмите Win + R и выполните команду control.
В открывшемся окне выберите Сеть и подключения к Интернету.
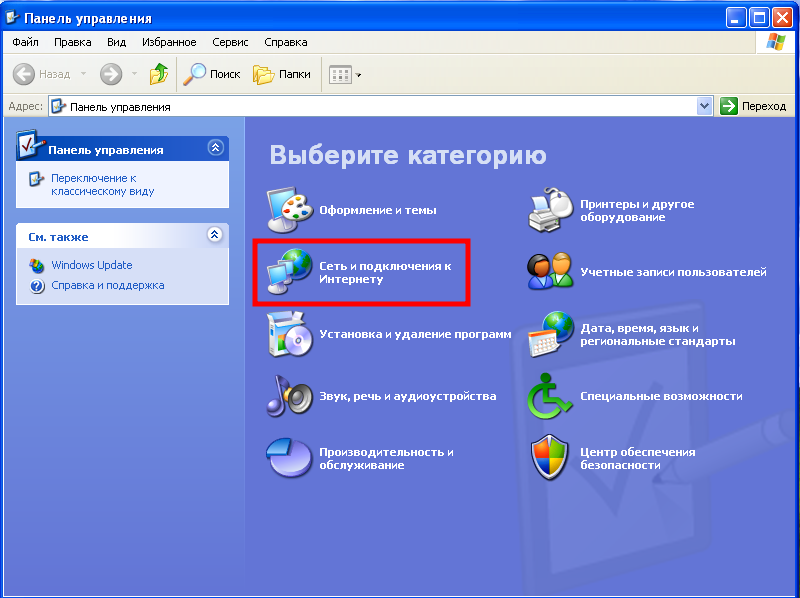
Далее перейдите в Сетевые подключения.
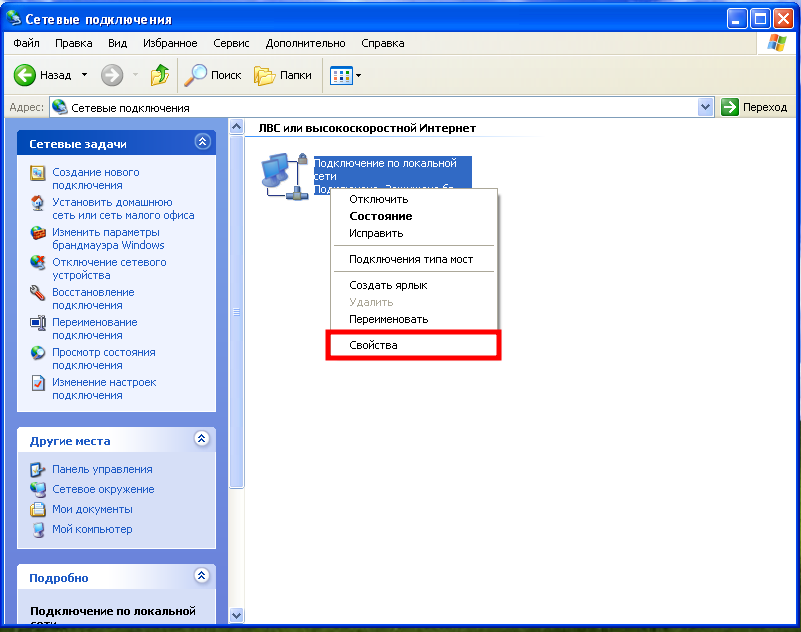
Нажмите правой кнопкой мыши на адаптер, который используется для подключения к интернету, и выберите Свойства.
Откройте Свойства для компонента Протокол Интернета (TCP/IP).
В нижней части окна выберите Использовать следующие адреса DNS-серверов и укажите предпочитаемый и альтернативный DNS-серверы.
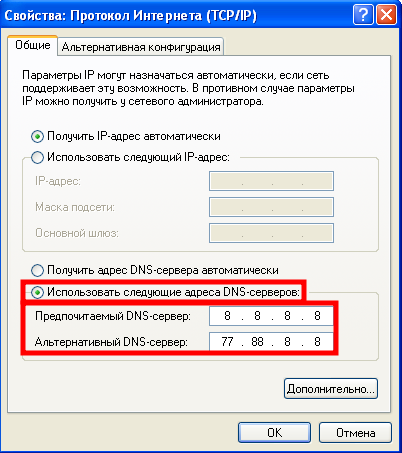
Нажмите ОК для сохранения изменений и закройте все окна.
Использование программ для настроек подключения DNS
Для упрощения процесса настройки DNS можно воспользоваться специализированными программами. Они позволяют быстро и удобно изменять параметры, а также использовать дополнительные функции, например, тестирование скорости серверов или автоматическое переключение между конфигурациями.
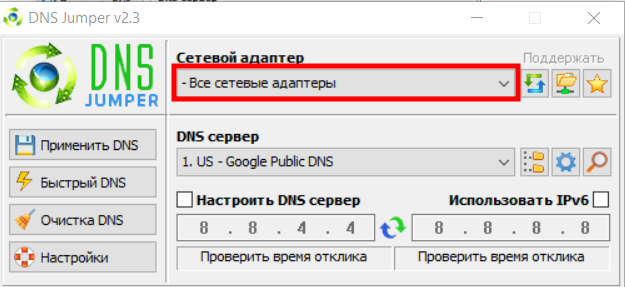
DNS Jumper
DNS Jumper — это бесплатная утилита, предназначенная для быстрого изменения DNS-серверов. Она проста в использовании и не требует установки.
В DNS Jumper есть функция Быстрый DNS, которая выполняет поиск самого быстрого DNS-сервера.
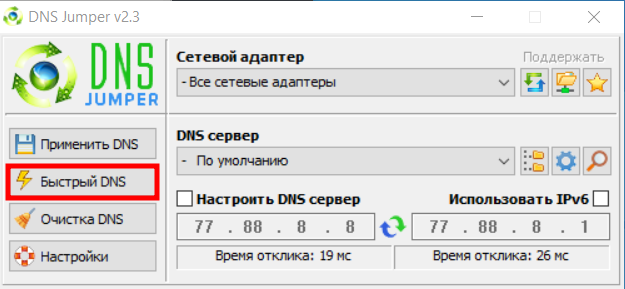
После того как поиск будет завершен, можно сразу же автоматически назначить два наиболее быстрых DNS-сервера на свои сетевые адаптеры, просто нажав кнопку Применить DNS сервер.
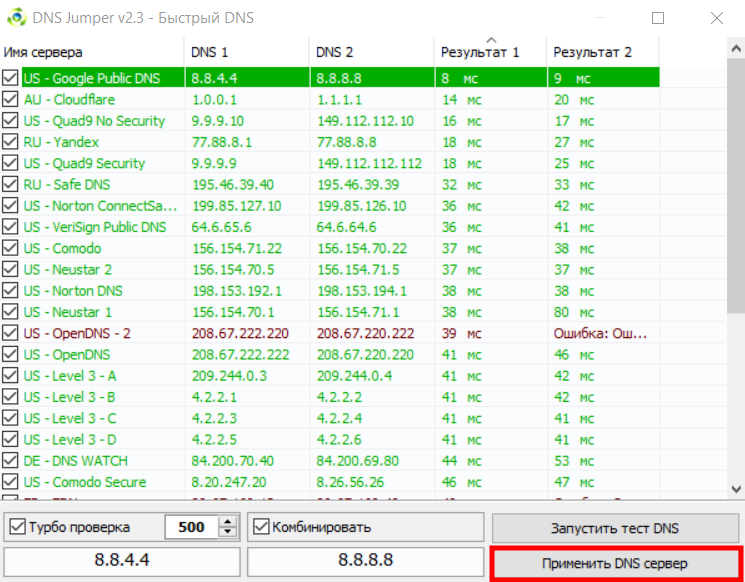
DNS будут назначены на адаптеры, которые выбраны в главном меню утилиты.
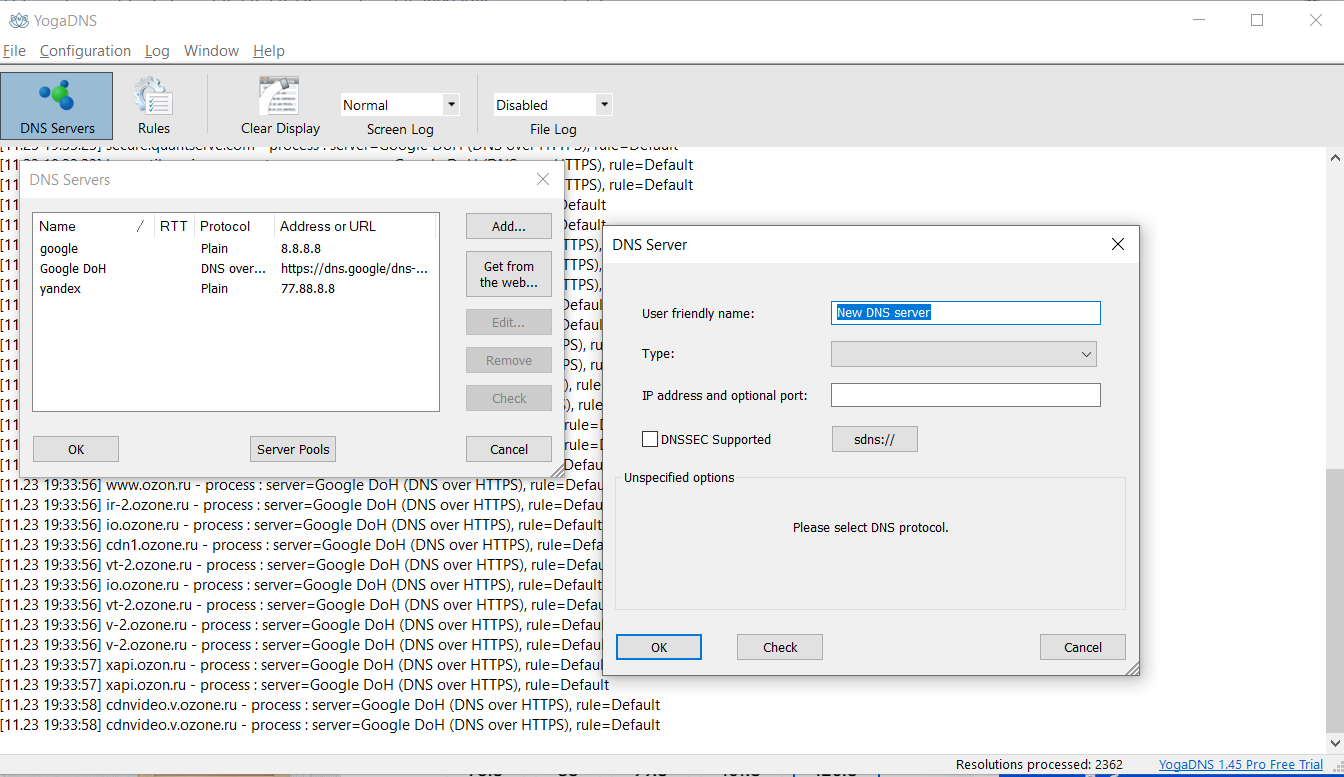
YogaDNS
YogaDNS работает на системном уровне, благодаря чему не нужно вручную менять настройки DNS для каждого сетевого адаптера или подключения. Программа автоматически перехватывает все DNS-запросы устройства и обрабатывает их согласно заданным правилам.
В отличие от стандартных методов изменения DNS, программа поддерживает современные протоколы DoH и DoT, поддерживающие шифрование и повышающие безопасность.
С помощью правил в YogaDNS можно гибко настраивать маршруты DNS-запросов для отдельных сайтов или приложений. Например, часть запросов можно направить через безопасный сервер, а остальные — через более быстрый.
Дополнительно YogaDNS предоставляет функцию журнала запросов, где можно отслеживать в трафике все отправленные доменные имена и использованные серверы.
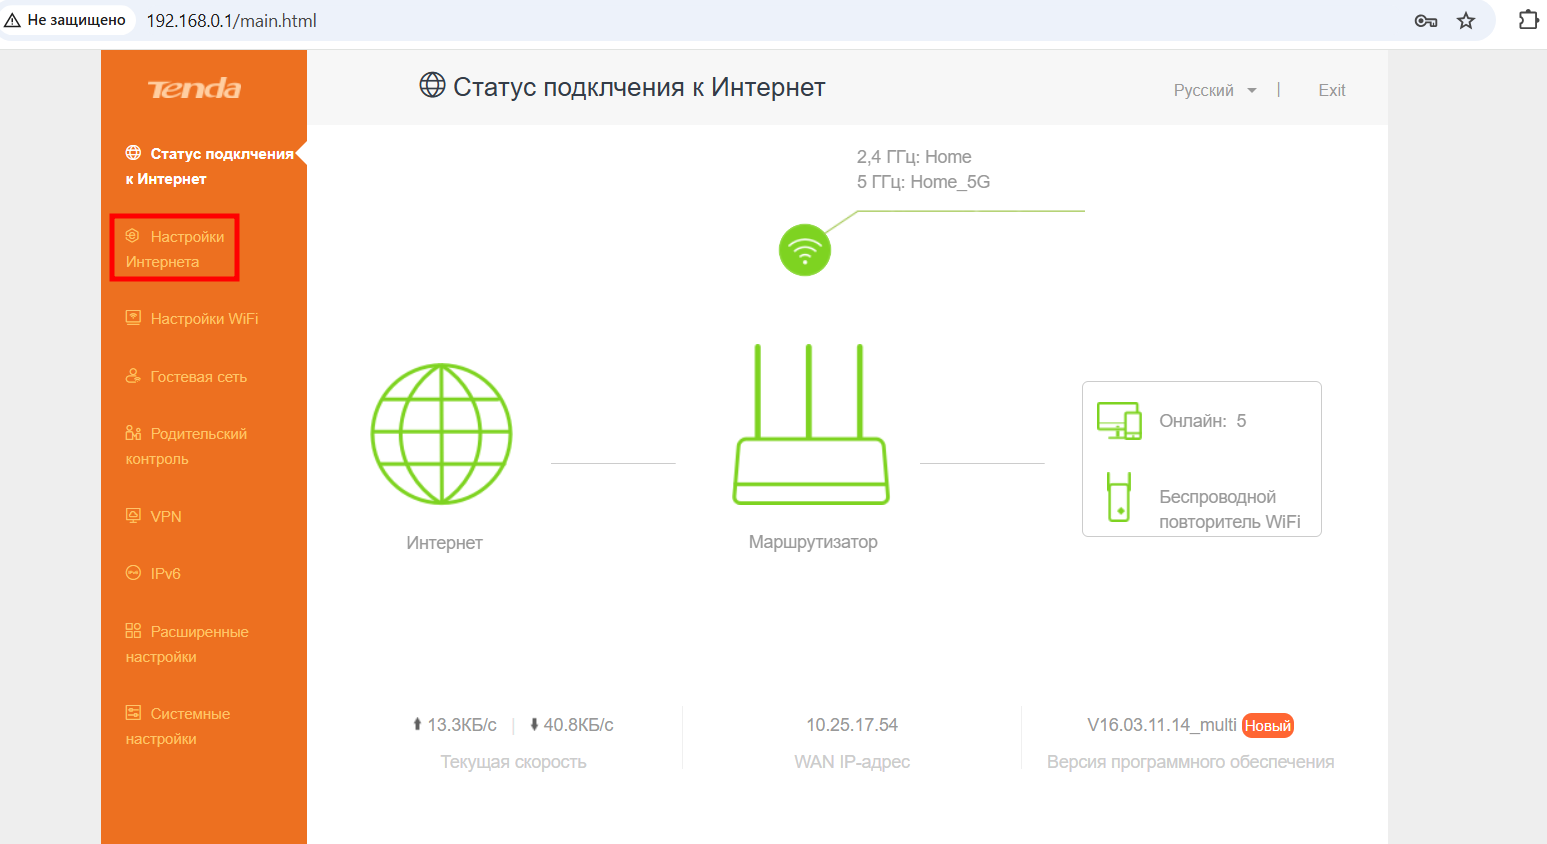
Изменение параметров маршрутизатора
Если вы хотите, чтобы новые настройки DNS применялись сразу ко всем устройствам в вашей сети, проще всего изменить их на уровне маршрутизатора. Это избавит вас от необходимости отдельно настраивать каждый компьютер или смартфон. Достаточно один раз указать нужные серверы в настройках роутера. Для этого:
- Подключитесь к своей сети.
- Откройте браузер и введите IP-адрес маршрутизатора. Чаще всего используются адреса 192.168.0.1 или 192.168.1.1 (точный адрес указан на самом устройстве или в инструкции).
- Войдите в интерфейс управления, указав имя пользователя и пароль.
- В интерфейсе маршрутизатора найдите настройки WAN (иногда называемые «Интернет»).
- Выберите опцию ручного ввода DNS.
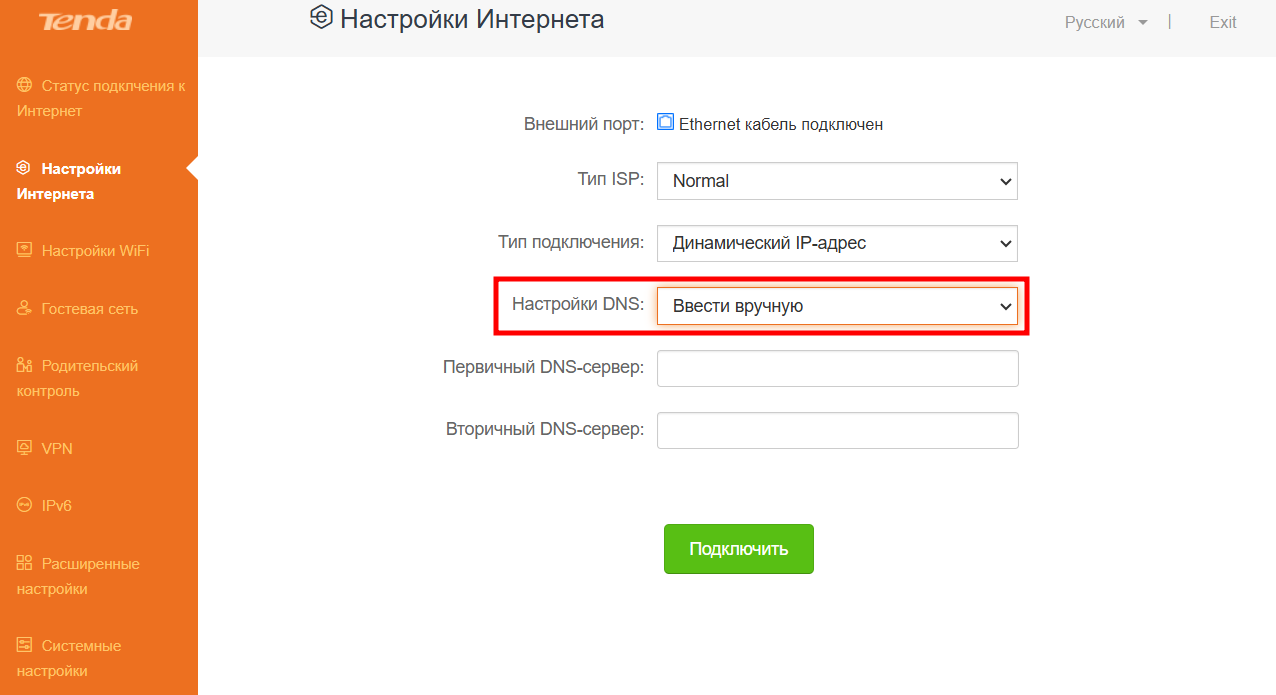
- Укажите адреса новых серверов.
- Сохраните изменения.
- Перезапустите маршрутизатор, чтобы обновить и применить конфигурацию.
При настройке на уровне маршрутизатора лучше заранее убедиться, что вы вводите корректные адреса. Также обязательно сохраните доступ к панели управления, чтобы при необходимости вернуть настройки к исходному состоянию.
Заключение
В этой статье мы рассмотрели разные способы изменения DNS в Windows: через параметры системы, панель управления, командную строку, маршрутизатор, а также специальные программы. Правильная настройка DNS-серверов способна улучшить качество интернет-соединения, сделав его быстрым, надежным и безопасным.
Table of contents
- What Is a DNS Server?
- Why Should You Change Your DNS Server?
- How to Change DNS Server on Windows 10
- Changing Your DNS Server through the Windows GUI
- How to Change Your DNS Server With Command Prompt
- Changing Your Browser’s DNS Server
- Flush your DNS Cache
- Conclusion
- FAQ
Entering a web address is the first step of opening a website. It triggers another set of processes that must be completed before you can view the webpage. Your browser has to understand what you typed to connect to the website.Web browsers do not see web addresses the same way we do.
While humans use a combination of numbers and alphabets, called domain names, to identify websites, browsers rely on number-based IP addresses.
Thanks to DNS servers, we do not have to worry about how our computers understand and fetch the information we want so easily. The DNS server works as the Internet’s interpreter, translating those domain names we type to IP addresses.
Just like traditional language interpreters, DNS servers offer different services. At some point, you may need to change your DNS.
In this article we’ll talk about changing DNS servers: why you should switch and all the different ways you can do it.
What Is a DNS Server?
DNS is short for Domain Name System. It is a database that matches IP addresses to hostnames (domain names). Every device connected to the Internet is assigned an IP address, which other devices (and web browsers) use to find and connect to it. Since memorizing – and calling out – IP addresses is difficult for humans, domain names were introduced to make things easier.
So, each domain name is tied to an IP address, which can be found on the DNS database. DNS servers host these databases, and there are different servers out there offering different services.
Some DNS servers focus on speed and stability, while others specialize in security and safety.
Why Should You Change Your DNS Server?
Sometimes, it’s difficult to realize you need to change your DNS server. So, let’s point out what to look out for to know when the time is right.
As mentioned earlier, some DNS servers offer specialized services. So, it depends on what you’re looking for and how well your current server is working for you.
But how do you know whether something else will work better? Here are some pointers:
- Internet speed: Some DNS servers resolve domain names faster than others. If you notice that your browser is taking time to load websites when you know for sure that it should be faster, your DNS might be the reason.
- Content regulation: You can use DNS servers to filter internet content. Some of these services block offensive and inappropriate content so they don’t load on your website. So, if you’re looking for a way to block adult content, gambling websites, and offensive internet pages for parental control or discipline, you can change your DNS to achieve that.
- Security: Some DNS servers can identify and block sites that distribute malicious programs and steal information. If you notice that malware has somehow found its way to your system, it’s time to think about changing your DNS.
PRO TIP
It’s important that you use competent malware removal tools like Auslogics Anti-Malware to get rid of these malicious applications whenever they make it to your computer.
- Internet Connection issues: If your browser keeps returning DNS errors, such as ” Your DNS server might be unavailable,” it’s time for a change.
Once you change DNS servers Windows 10 and your web applications will go through the new server whenever they want to resolve any hostname.
How to Change DNS Server on Windows 10
Now that you know why and when to change your DNS server, it’s time to show you how to do it on Windows 10.
You can go through your user interface or use the Command Prompt to change DNS Windows 10 settings. Both methods allow you to change your primary DNS server and add an alternate one, whether you use Internet Protocol Version 4 or 6.
Changing Your DNS Server through the Windows GUI
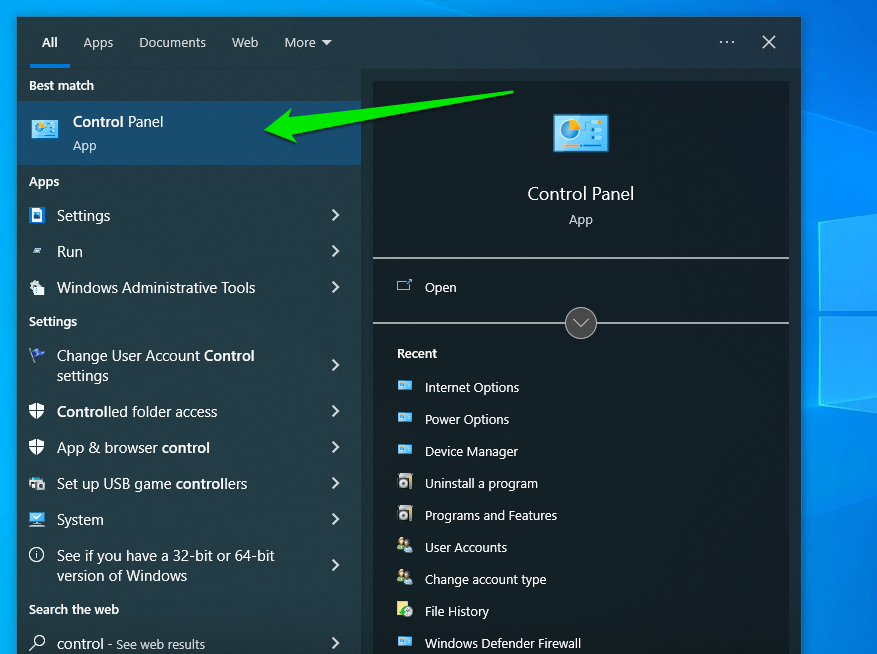
- Open the Start menu and type
Control. - Click Control Panel when it appears in the Start search results.
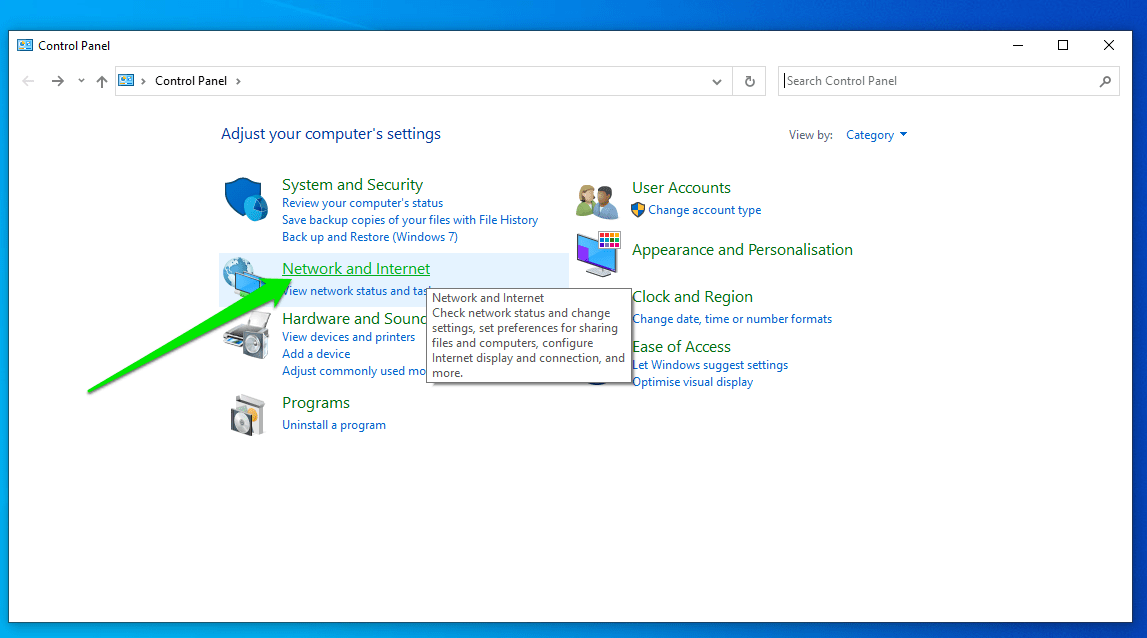
- After the Control Panel window appears, select Network And Internet.
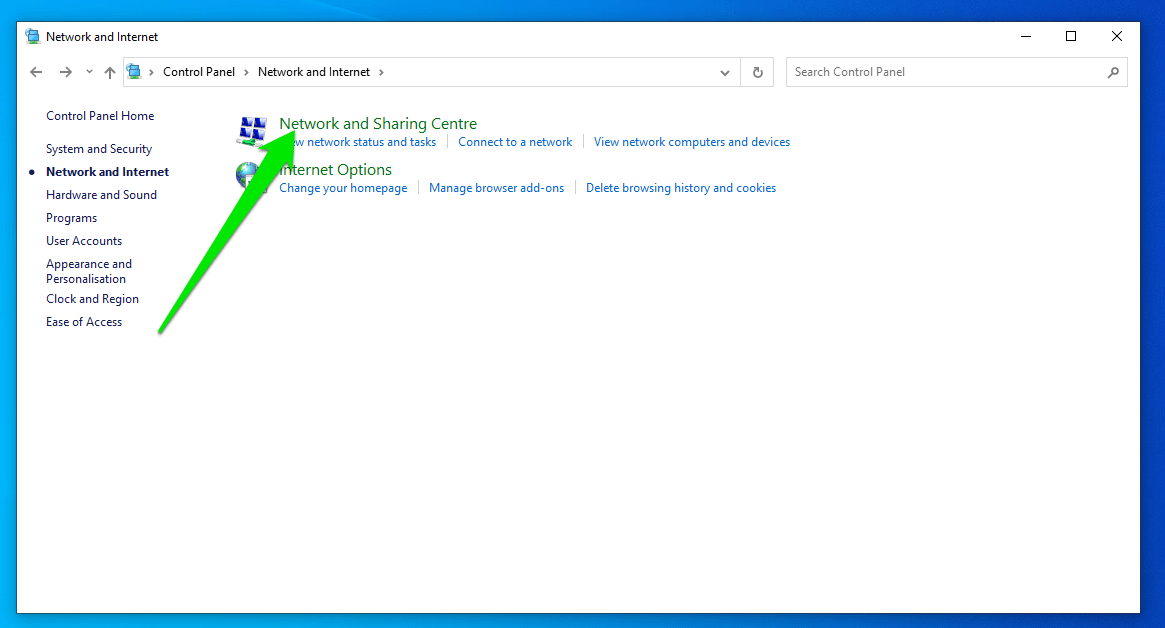
- Click Network and Sharing Center after the Network and Internet page appears.
- Switch to the left side of the next page and click Change Adapter Settings.
- Now, right-click the device that provides your internet access and select Properties in the context menu.
- After the Properties dialog of your internet device appears, scroll through the items below “The connection uses the following items” and click Internet Protocol Version 4 (TCP/IPv4) once to select it.
- Click on Properties right under the list after selecting the item.
- Select “Use the following DNS server addresses” when the TCP/IPv4 Properties dialog appears.
- Enter the following digits to use Google’s Public DNS:
8.8.8.8 (preferred DNS server)

8.8.4.4 (alternate DNS server)
- Enter the following digits to use Cloudflare’s DNS resolver:
1.1.1.1 (Preferred DNS server)

1.0.0.1 (Alternate DNS Server)
- Click on the OK button.
- If you use IPv6, return to your internet device’s Properties dialog, select Internet Protocol Version 6 (TCP/IPv6), and click Properties.
- Select “Use the following DNS server addresses.”
- Enter the following addresses to use Google’s Public DNS:
2001:4860:4860::8888 (Preferred DNS server)

2001:4860:4860::8844 (Alternate DNS server)
- Enter the following addresses to use Cloudflare’s DNS resolver:
2606:4700:4700::1111 (Preferred DNS server)

2606:4700:4700::1001 (Alternate DNS server)
- Click the OK button in both dialog boxes.
How to Change Your DNS Server With Command Prompt
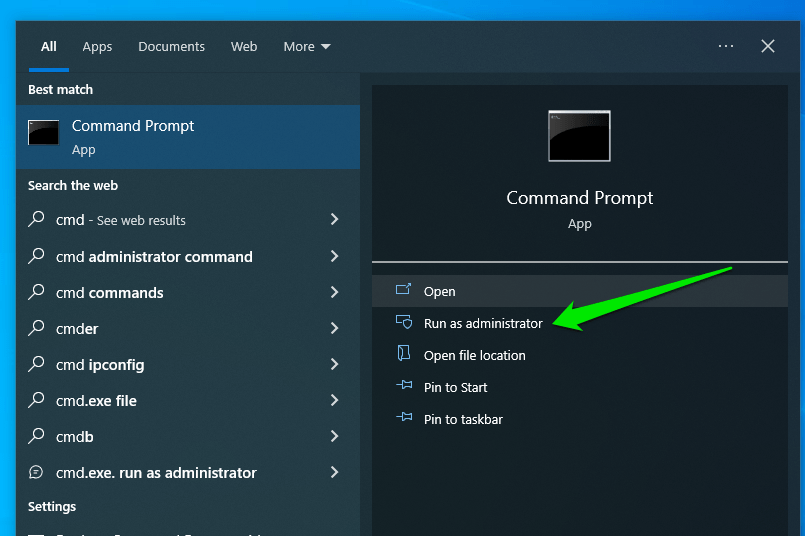
- Open the Start menu and type
commandorcmd. - Click Run as Administrator on the right side of the Start search results under Command Prompt.
- Click Yes under the UAC prompt.
- After the elevated Command Prompt window appears, type
netshand hit theEnterkey.
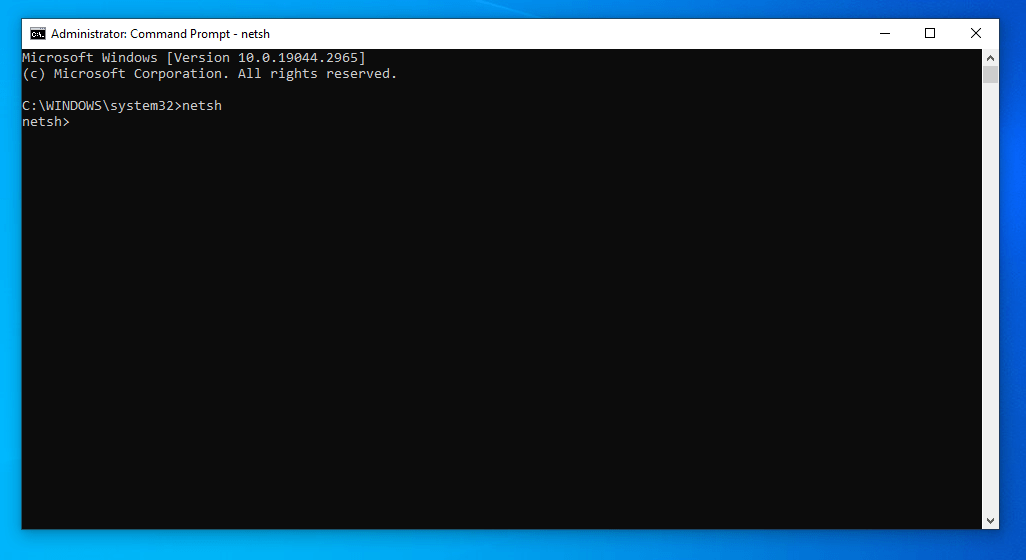
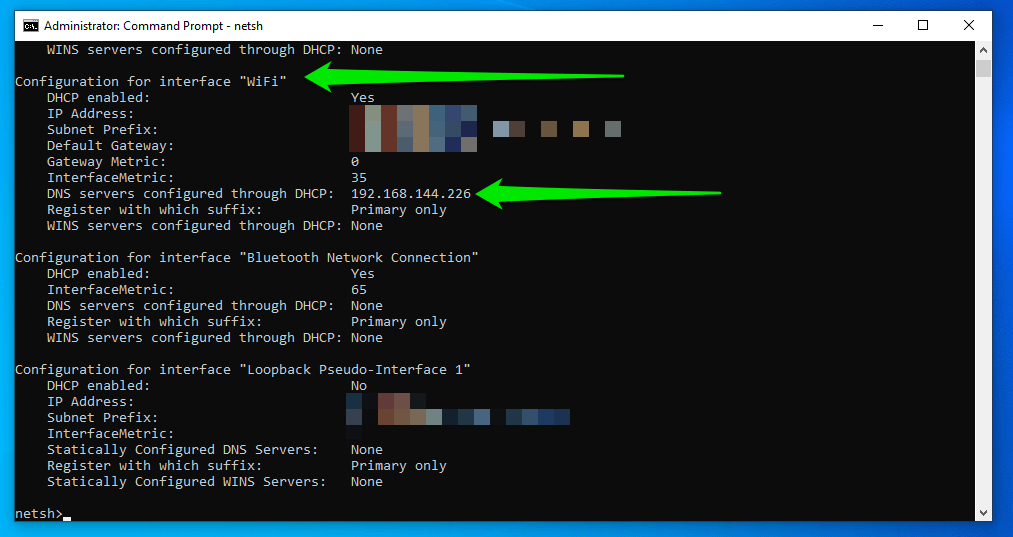
- Go to the netsh> line and type
interface ip show configand hit theEnterkey. - This command will display your current connections. Identify the connection you want to modify and take note of its name, as you’ll be using it for the next command. In our case, it’s “WiFi,” and you’ll find that our current DNS address is 192.168.144.226.
- Now, type
interface ipv4 set dns "ConnectionName" static 8.8.8.8and hitEnter. This will change your current DNS server address to Google’s Public DNS (8.8.8.8). - Ours will look like this:
interface ipv4 set dns "WiFi" static 8.8.8.8

- If you want to add a secondary (alternate) DNS server address, type
interface ipv4 add dns "ConnectionName" 8.8.8.8 index=2, and hitEnter. - In our case, it will be:
interface ipv4 add dns "WiFi" 8.8.4.4 index=2

- For IPv6, type
interface ipv6 add dns "ConnectionName" 2001:4860:4860::8888, and pressEnter. - Type
interface ipv6 add dns "ConnectionName" 2001:4860:4860::8844 index=2, and hitEnterto add the secondary (alternate) DNS server. - After changing or adding your new DNS server, check to see if your DNS server settings changed correctly. To do that, type
byein the netsh> line to exit the program. - After that, type
ipconfig /alland hitEnter.
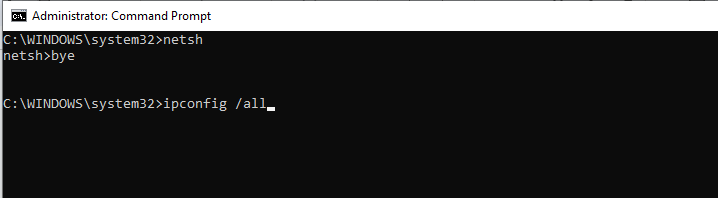
- The command will display your network configuration.

Changing Your Browser’s DNS Server
While your browsers use your operating system’s DNS server to resolve domain names, you can choose another DNS server in most modern web browsers. This way, you can enjoy different DNS services, especially if you use multiple web browsers. Using a browser-based DNS server means you don’t have to modify the DNS settings that Windows 10 may need to perform some operations, such as updating the operating system.
Download Auslogics Anti-Malware
Detects malware, spyware and viruses, then safely removes them from your PC to help keep it as secure as possible. The program is made to complement your main antivirus.
Follow these steps to use a custom DNS in Mozilla Firefox:
- Launch Mozilla Firefox.
- Go to the top-right corner and click the three lines.
- Select Settings from the menu.
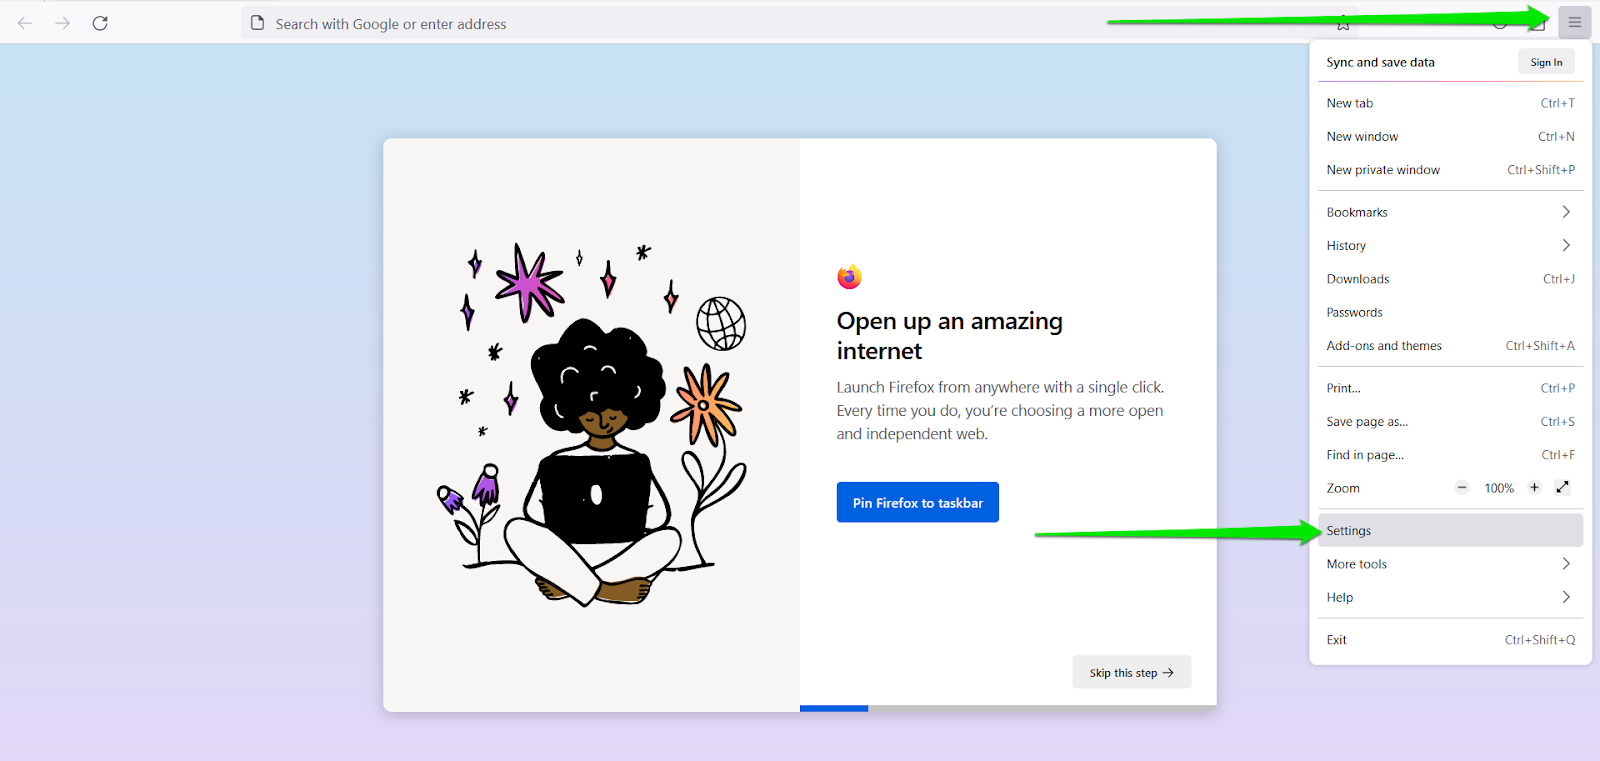
- After the Settings page appears, go to the left side of the screen and click Privacy & Security.
- Scroll down to the DNS over HTTPS section and select Increased Protection under “Enable Secure DNS Using.”

- You can then enter a custom provider in the text bar or use Firefox’s default, which is CloudFlare, if that is your choice.
- Note that this option allows the browser to use your system’s default DNS server if your custom server encounters a problem.
- If you do not want Firefox to ever use your system’s default DNS, choose Max Protection and enter your custom DNS.
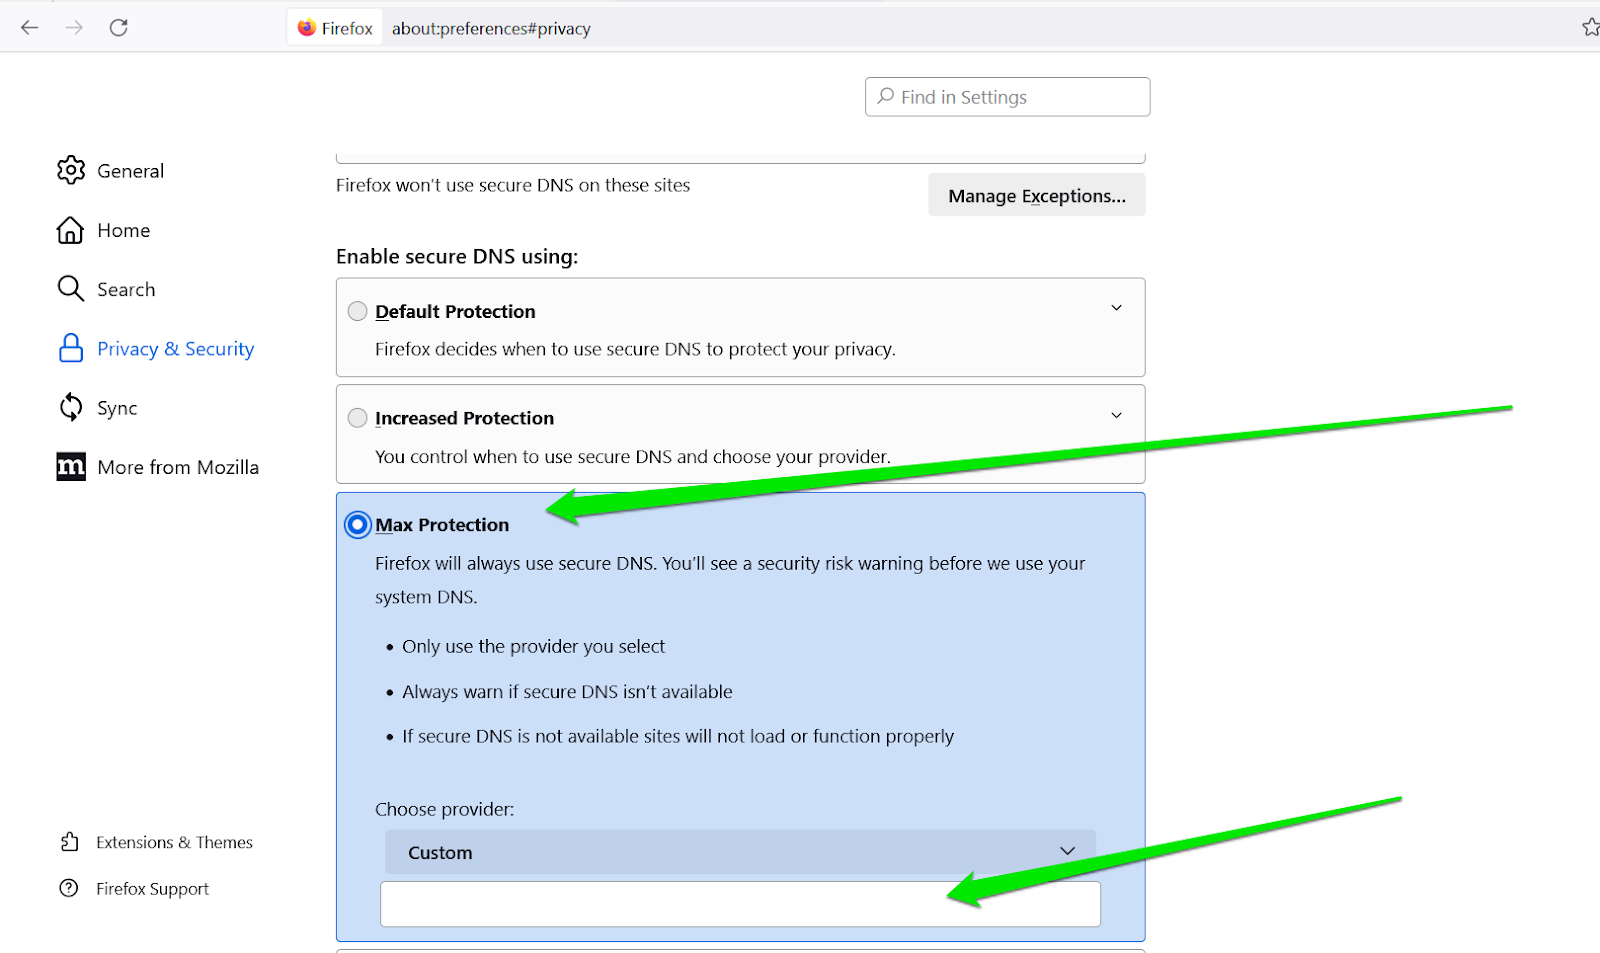
- You can go back to Default Protection or select Off if you want the browser to start using your DNS again.
Follow these steps to use a custom DNS in Google Chrome:
- Launch Google Chrome.
- Click the three dots in the top-right area and click Settings in the menu.
- Click Privacy and Security on the left side of the Settings page.
- Go to the right side of the screen and click Security.
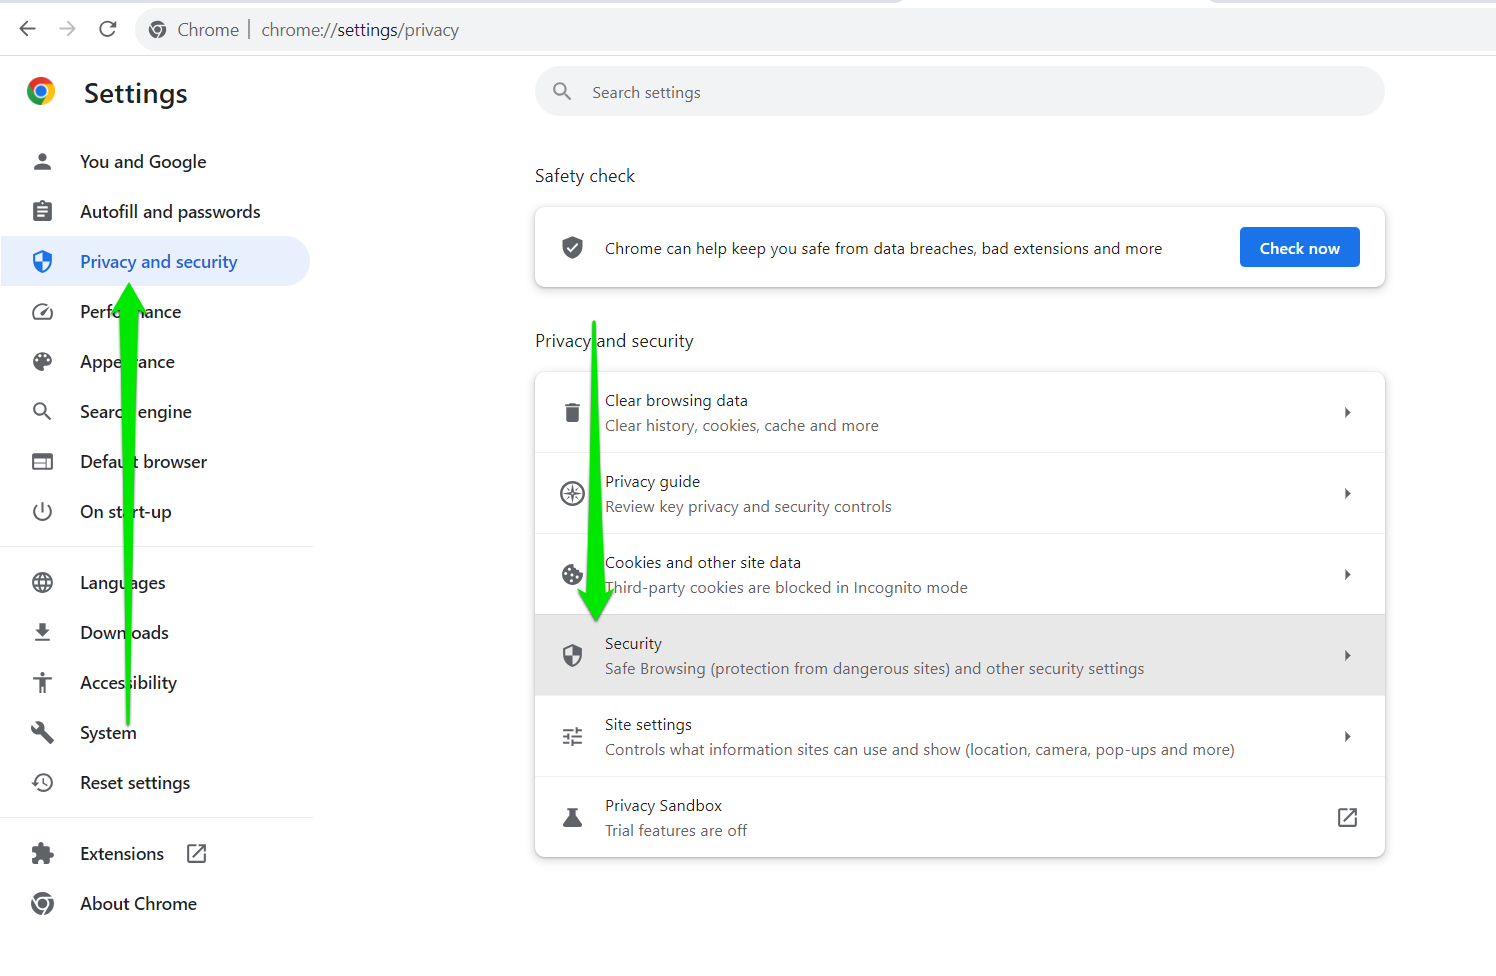
- Scroll through the Settings page until you see the Advanced section.
- Under Use Secure DNS, select the radio button next to “With” and choose an option from the drop-down menu. You can choose Customized if you have a DNS you want to use that isn’t on the list.
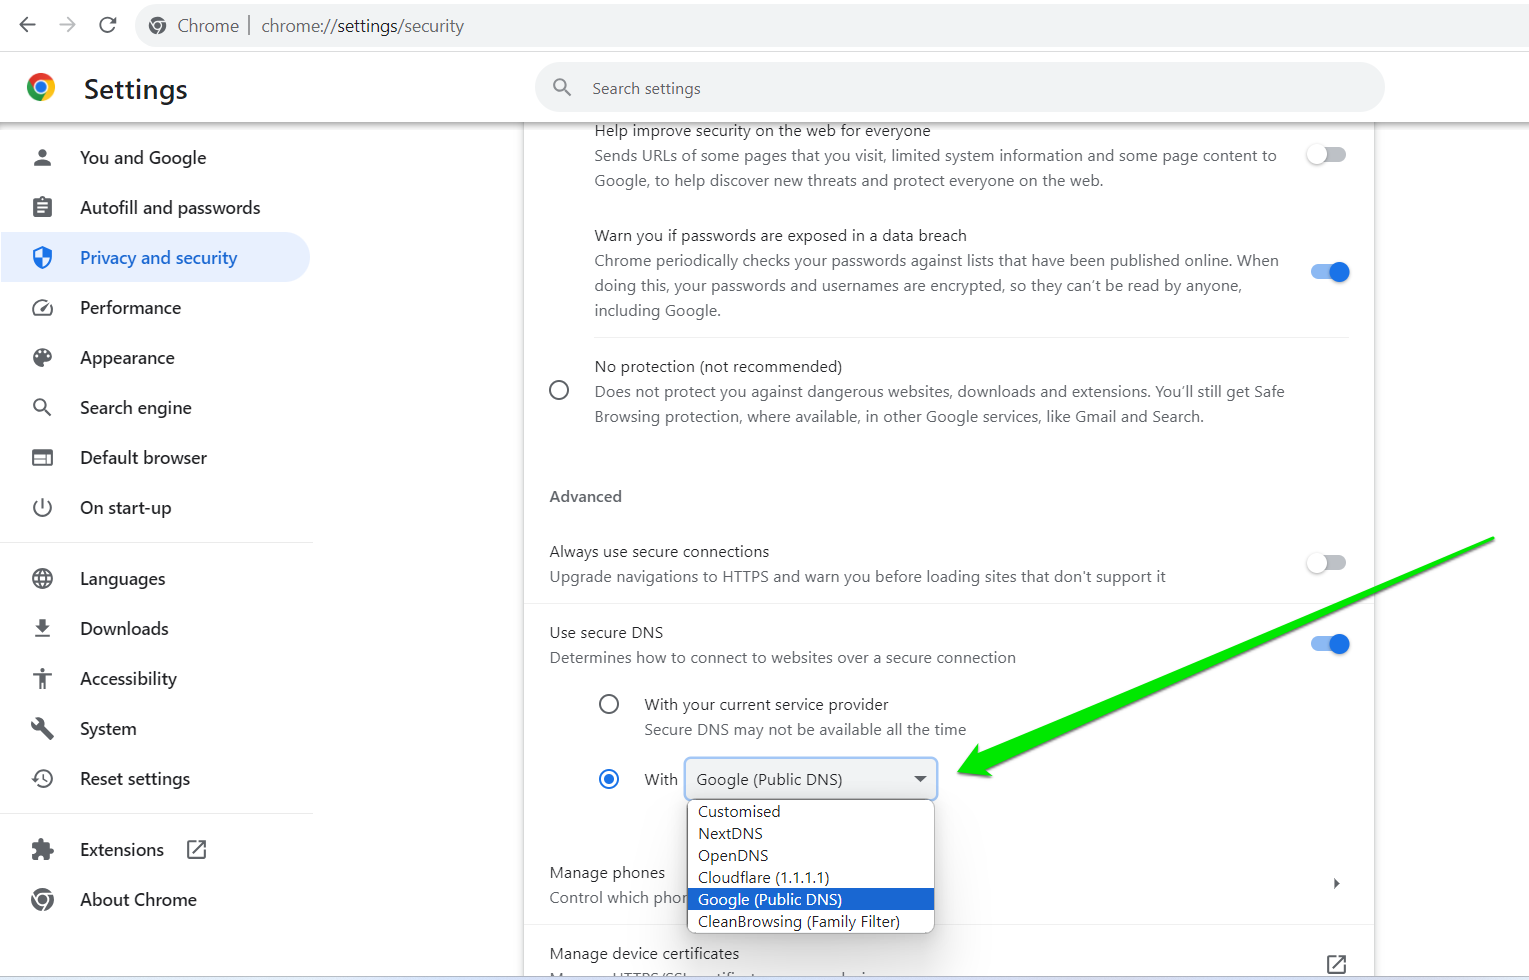
- You can choose “With your current service provider” whenever you want to switch back to your system’s default DNS.
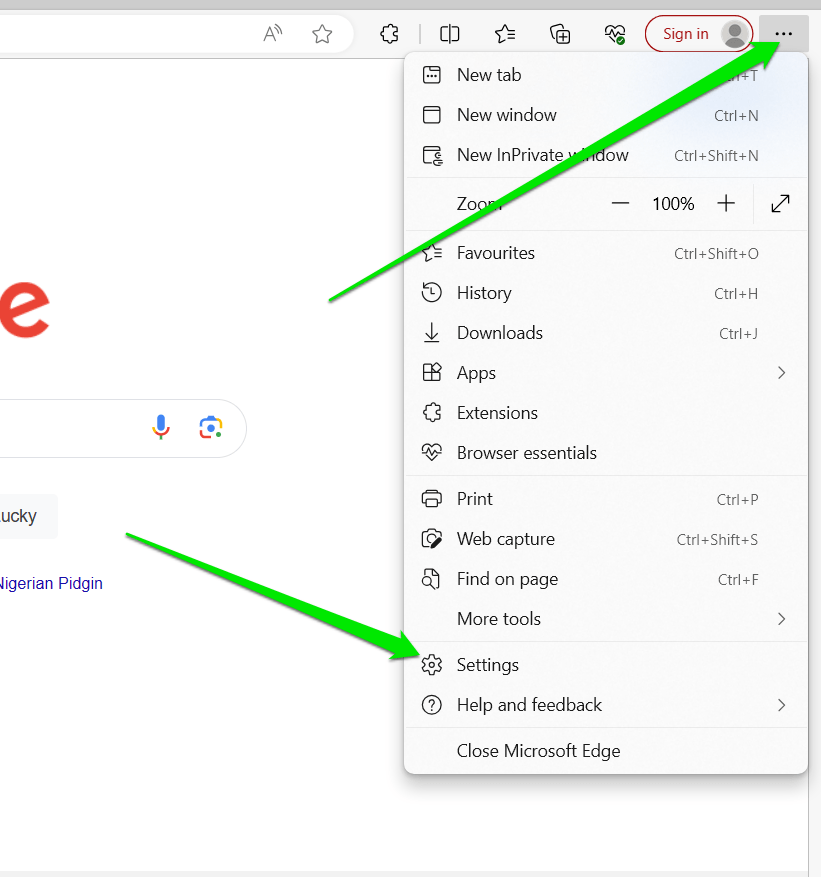
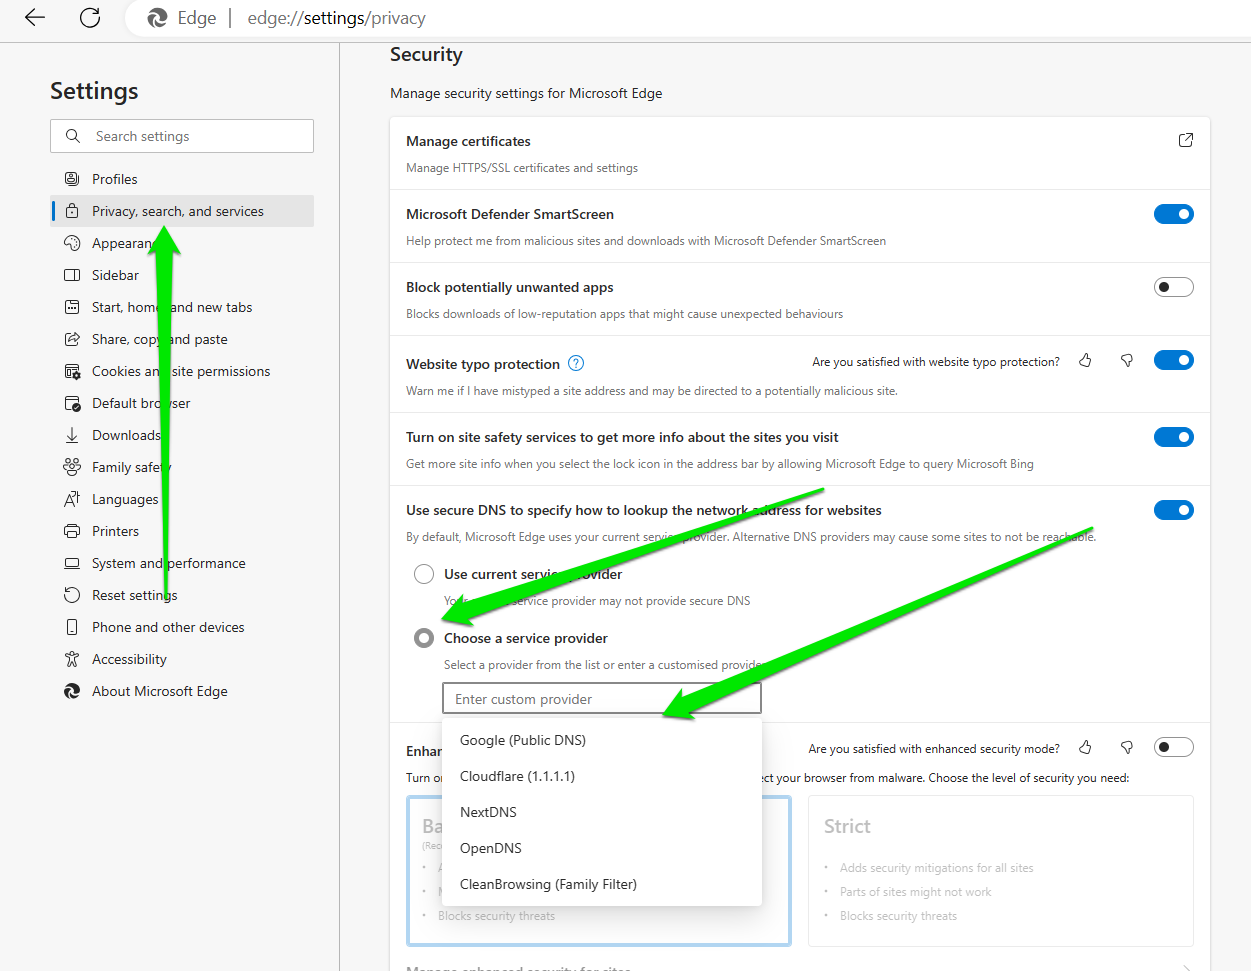
Follow these steps to use a custom DNS in Microsoft Edge:
- Open Microsoft Edge.
- Go to the top-right corner, click the three dots, and select Settings.
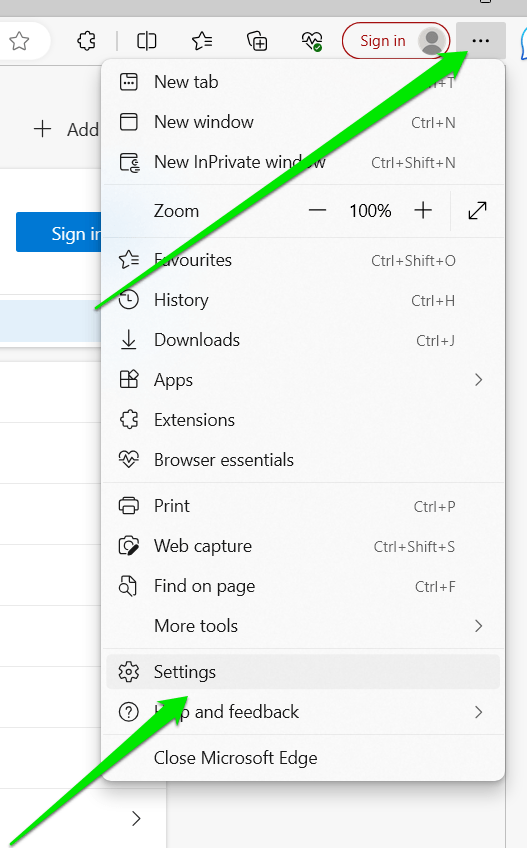
- After Settings opens, click “Privacy, search, and services.”
- Go to the right side of the screen and scroll to Security.
- Select “Choose a service provider” and pick a DNS server.
Flush your DNS Cache
Applying your DNS settings may not be complete without flushing your DNS cache . Your system’s DNS cache is a temporary storage area that stores recently accessed domain names and their corresponding IP addresses. The cache helps to speed up the process of resolving domain names to IP addresses, as the device can quickly access the cached information instead of querying a DNS server every time. Flushing your DNS cache gives it a clean slate and allows it to rebuild information using your current DNS. Follow these steps to flush the cache:
- Open the Start menu and type
commandorcmd. - Click Run as Administrator on the right side of the Start search results under Command Prompt.
- Click Yes under the UAC prompt.
- After the elevated Command Prompt window appears, type
ipconfig /flushdnsand hit theEnterkey.
Follow these steps to change your DNS in the Brave Browser:
- Launch Brave.
- Go to the top-right corner, click the three lines, and select Settings from the menu.
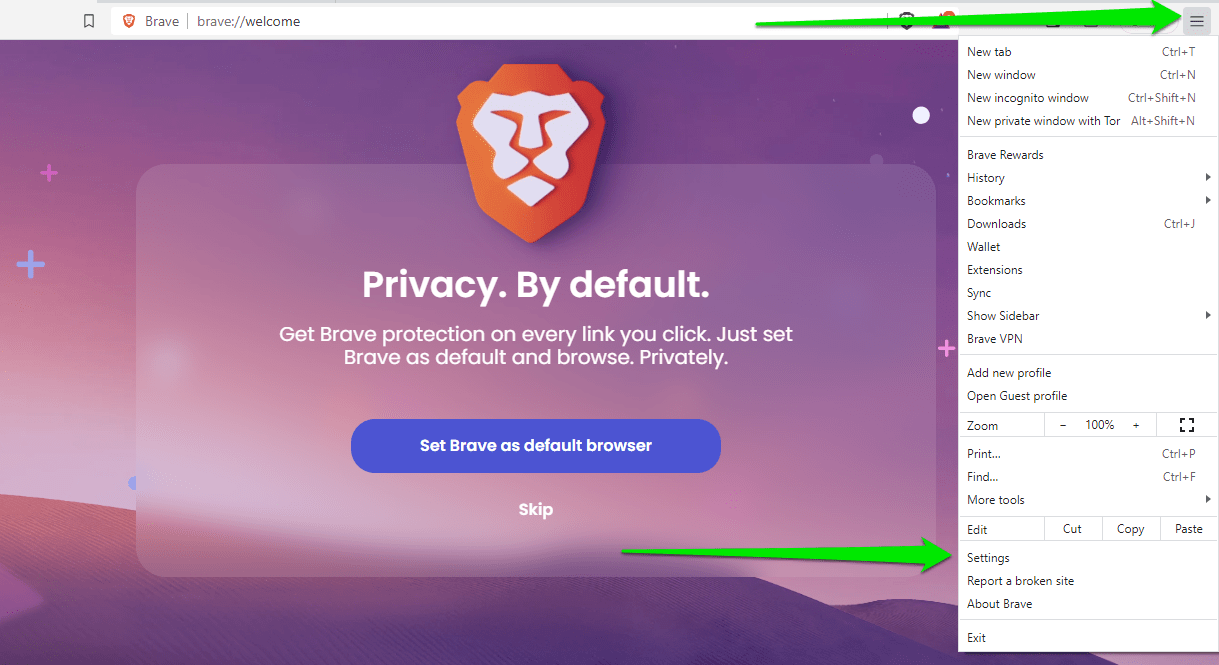
- After the Settings page appears, go to the left side of the screen and click Privacy and Security.
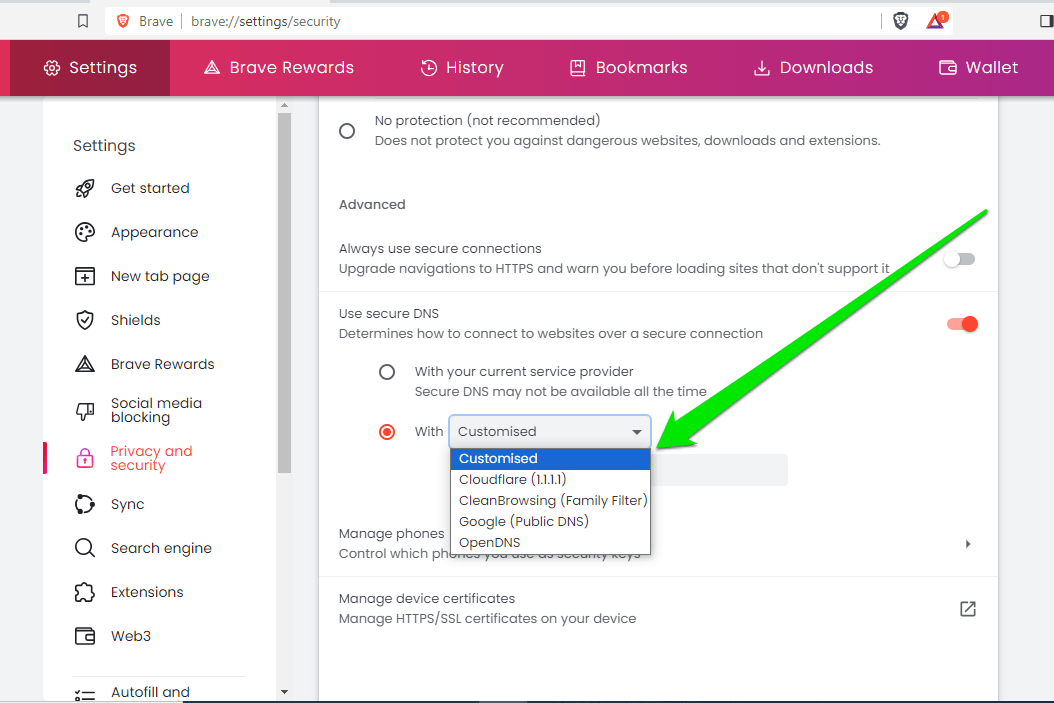
- Click on Security.
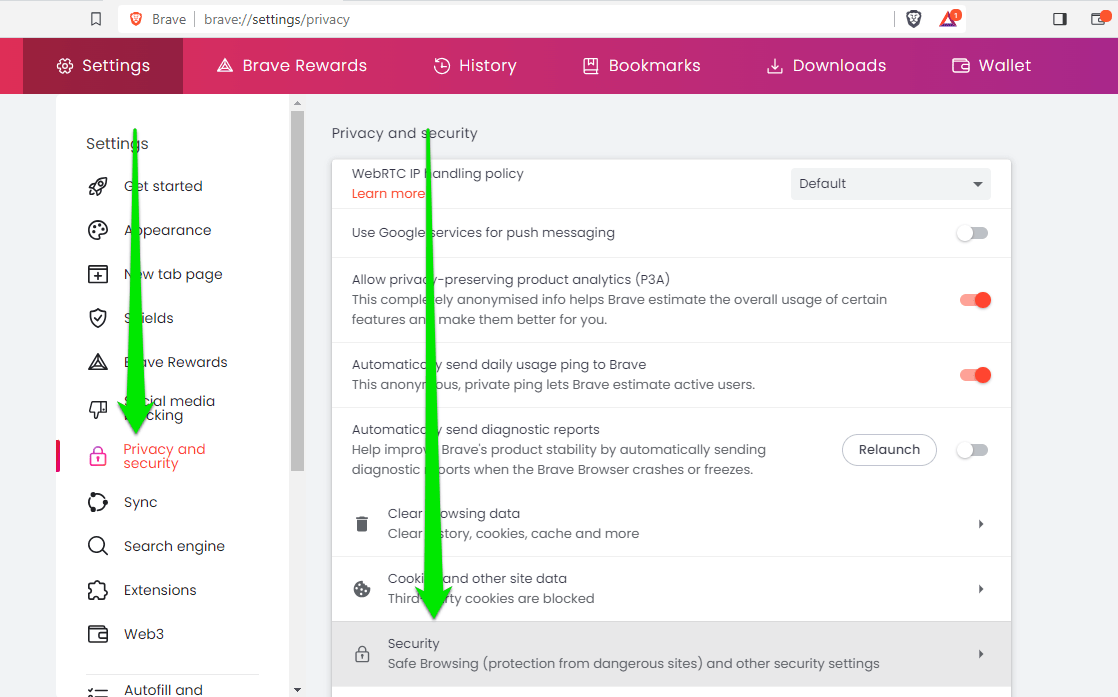
- Scroll down to Advanced, select “With,” and choose an option from the drop-down menu.
Conclusion
After changing DNS servers Windows 10 will route your internet traffic through your preferred domain name system, allowing you to enjoy a smoother service or cleaner internet browsing experience, depending on what you choose.
Let us know in the comments section if you’ve had any issues with your DNS and how you solved them.
FAQ
You can flush your DNS on Windows by opening an elevated Command Prompt window and executing the following code: ipconfig /flushdns
Clearing your DNS cache is the same as flushing your DNS. It ensures you set DNS Windows 10 changes properly.
DNS Unlocker is a type of malicious program known as adware. It works by hijacking your internet browser and populating it with ads. Cybercriminals use it to increase their advertising revenue by forcing users to click on unwanted ads.
You can remove the adware application by going to the Control Panel, clicking on Uninstall a Program, and removing the application.
You can also run a full scan using your antivirus program.
What is DNS and why should you change it? There has always been a debate about whether you should change the DNS for every device you own. Well, first, you will have to know what DNS actually is and why changing it would benefit you.
In simple words, DNS works like a directory on the internet. When you go to a webpage, send an email, or open an app, the very first thing your device would do is to ask the directory: “Where can I find this”? We call this a DNS request.
Also see: DNS Servers to Unblock Websites and Possibly Everything
Some DNS providers, particularly your ISP (the company that provides you internet service), can see what sites you visit and what you do on the internet, even if the content is well-encrypted. Most of these DNS providers also sell the data about your activity on the internet to companies that need them, especially advertising companies, to target you with ads.
DNS provided by your ISP is usually much slower when requested, which means it takes a longer time to find the webpage you are looking for. By default, you are set to use your ISP’s DNS if you have not changed it.
Why should you change your DNS?
Well, when we talk about DNS, you might certainly have heard people keep saying that, for example, changing to Google DNS, is a must do thing when it comes to going online. There are a few reasons why most people thought so:
- When you connect to the internet and browse the web, your ISP (the company that provides you internet service) usually has their own DNS server that resolves websites for you. Some of these servers can actually keep tabs on what you do online, even when you think your connection is private. If you pick a different DNS server yourself, you can keep your activities private (almost) and stop your ISP from watching what you do online.
- Different DNS servers have different speeds. A faster DNS can make websites load slightly quicker and possible resolve some issues where you can’t visit to certain sites.
- Some good DNS servers have extra safety measures. They can block known bad websites that might try to harm your computer or steal your info. This means better protection against viruses and other dangers on the internet.
Google Public DNS vs Cloudflare DNS
Among all the public DNS providers, we recommend Google Public DNS or Cloudflare DNS. They are both as good and free to use. You might want to try Cloudflare as they are new to the market and proven faster.
Google DNS, aka 8.8.8.8 and 8.8.4.4, has always been the best and most widely used DNS in the world. People use it to better protect their privacy from their ISP, and sometimes to bypass some websites that have been blocked by their default DNS provider.
Cloudflare DNS, aka 1.1.1.1 and 1.0.0.1, is new to the market and they are fast, much faster than Google DNS based on our test. Whoever used it before would know it. Cloudflare also committed that they will never sell your data to anyone. Your privacy is guaranteed with them.
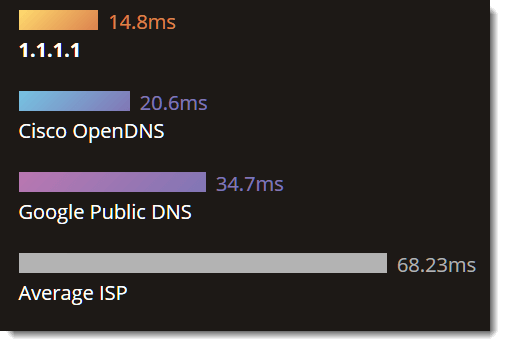
The screenshot above is a chart made by Cloudflare to compare its DNS speed with Google DNS, Cisco OpenDNS, and the general DNS providers.
How to Change DNS in Windows 11 or 10
The instructions below show you how to change DNS in Windows 11 or Windows 10 without going into your modem or router settings.
- Go to Start menu.
- Type Control Panel and click on it.
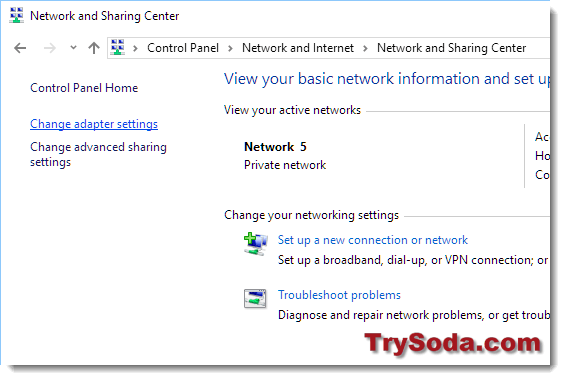
- Go to View network status and tasks.
- In the left panel, click on Change adapter settings.

Windows 10

Windows 11
- Right click the network you are currently using, be it an Ethernet cable network or an Wi-Fi network, then click Properties.

- Select Internet Protocol Version 4, then click Properties.
- At the bottom part of the window, click on Use the following DNS server addresses.
- Replace or enter the following DNS addresses:
- For Google DNS, enter 8.8.8.8 and 8.8.4.4.
- For Cloudflare DNS, enter 1.1.1.1 and 1.0.0.1.

- Click OK, then OK again.
- Restart your computer.
- That’s it. You can now surf faster and more securely.
Doing the above will only change the DNS for that particular Windows 10/11 PC. If you have multiple computers in your home network, you will have to repeat the method above for each PC you want to have their DNS changed.
For a computer at work in your office network, changing the DNS may cause connectivity issues and other problems. Consult your IT department before doing so.
Changing the DNS settings on Windows 10 is a straightforward process that involves accessing the network settings and inputting new DNS server addresses. By following a few simple steps, you can switch from your default DNS provider to another, such as Google’s or Cloudflare’s, for potentially faster browsing or enhanced security. This guide will walk you through each step, ensuring you can make the change with ease.
Changing the DNS settings on your Windows 10 computer can help improve your internet speed and security. The steps below will guide you through the process.
Step 1: Open Network Connections
First, you need to open the ‘Network Connections’ panel.
To do this, press the Windows key and type «Control Panel.» Click on «Control Panel,» then navigate to «Network and Internet,» and select «Network and Sharing Center.» From here, click on «Change adapter settings» on the left sidebar.
Step 2: Choose Your Network Adapter
Next, select the network adapter you’re currently using.
This is usually labeled as «Wi-Fi» for wireless connections or «Ethernet» for wired connections. Right-click on the appropriate adapter and select «Properties» from the dropdown menu.
Step 3: Access the Internet Protocol Version 4 Settings
Now, access the settings for the Internet Protocol Version 4 (TCP/IPv4).
In the «Networking» tab, scroll down and double-click on «Internet Protocol Version 4 (TCP/IPv4).» This will open a new window where you’ll make the DNS change.
Step 4: Enter New DNS Server Addresses
Enter the DNS server addresses of your choice.
Select «Use the following DNS server addresses,» and type in the preferred and alternate DNS server addresses. Popular choices include Google’s DNS (8.8.8.8 and 8.8.4.4) or Cloudflare’s DNS (1.1.1.1 and 1.0.0.1).
Step 5: Confirm and Save Changes
Finally, confirm and save your new DNS settings.
Click «OK» to save your changes, then close out of all open windows. You may need to restart your computer for the new settings to take effect.
Once you’ve completed these steps, your computer will start using the new DNS servers you’ve entered, which can lead to faster and more secure browsing experiences.
Tips for Changing DNS on Windows 10
- Always write down your original DNS settings before making changes, in case you need to revert.
- Consider using a well-known DNS provider to ensure reliability and security.
- Check your internet connection after making changes to ensure everything is working correctly.
- Restart your router if you experience any issues after changing DNS settings.
- Regularly review your DNS settings as part of your general computer maintenance routine.
Frequently Asked Questions
What is a DNS server?
A DNS server translates domain names into IP addresses, allowing browsers to load Internet resources.
Why would I want to change my DNS settings?
Changing DNS settings can improve security, speed up browsing, or bypass geo-restrictions.
Is it safe to change DNS settings on my computer?
Yes, it is safe as long as you use reputable DNS services like Google or Cloudflare.
Can changing DNS settings affect my internet speed?
Yes, switching to a faster DNS provider can potentially improve your internet speed.
How do I revert to my original DNS settings?
Simply follow the same steps and select «Obtain DNS server address automatically» to revert to your original settings.
Summary
- Open Network Connections
- Choose Your Network Adapter
- Access Internet Protocol Version 4 Settings
- Enter New DNS Server Addresses
- Confirm and Save Changes
Conclusion
Changing your DNS settings on Windows 10 is like giving your internet a fresh pair of running shoes, ready to zip through cyberspace with newfound speed and agility. Not only does it have the potential to accelerate your browsing, but it can also fortify your online security and privacy. Just like swapping out a dusty old map for a GPS, it guides your data more efficiently to its destination.
While shifting DNS settings may seem like a small tweak, it can have a significant impact on your daily digital routine. Whether you’re streaming a video, gaming online, or simply surfing the web, every millisecond counts. Furthermore, if you’re exploring beyond the regular internet boundaries, a DNS switch might just be the key to unlocking new content.
Give these steps a try and see the difference for yourself. If you encounter any hiccups, don’t worry. Just follow the tips and FAQs provided, which are there to lend a helping hand. So, why not take the plunge and change DNS on Windows 10? Your internet experience might just thank you for it.
Kermit Matthews is a freelance writer based in Philadelphia, Pennsylvania with more than a decade of experience writing technology guides. He has a Bachelor’s and Master’s degree in Computer Science and has spent much of his professional career in IT management.
He specializes in writing content about iPhones, Android devices, Microsoft Office, and many other popular applications and devices.
Read his full bio here.