Безопасный режим Windows 10 может быть полезен при решении самых различных проблем с компьютером: для удаления вирусов, исправления ошибок драйверов, в том числе вызывающих синий экран смерти, сброса пароля Windows 10 или активации учетной записи администратора, запуска восстановления системы из точки восстановления. Отдельная инструкция: Как зайти в безопасный режим Windows 11.
В этой инструкции — несколько способов зайти в безопасный режим Windows 10 в тех случаях, когда система запускается и вы можете в нее зайти, а также когда запуск или вход в ОС по тем или иным причинам невозможен. К сожалению, знакомый многим путь запуска безопасного режима через F8 больше не работает (но вы можете сделать, чтобы работала: Как включить вход в безопасный режим клавишей F8 в Windows 10), а потому придется пользоваться иными методами. В конце руководства имеется видео, в котором наглядно показаны способы входа в безопасный режим.
- Как запустить безопасный режим Windows 10 через msconfig
- Вход в безопасный режим через особые варианты загрузки
- Добавление пункта «Безопасный режим» в меню загрузки
- Как зайти в безопасный режим Windows 10 с использованием загрузочной флешки
- Другие способы запуска безопасного режима
- Видео инструкция
Вход в безопасный режим через конфигурацию системы msconfig
Первый, и, наверное, многим знакомый способ запустить безопасный режим Windows 10 (он работает и в предыдущих версиях ОС) — использовать встроенную утилиту конфигурации системы. Минус метода — невозможность попасть в безопасный режим, если система не запускается. Необходимые шаги:
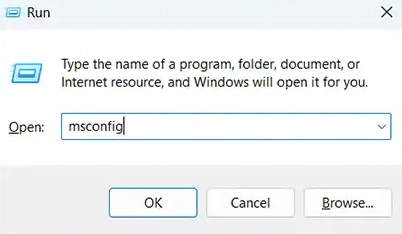
- Нажмите клавиши Win+R на клавиатуре (Win — клавиша с эмблемой Windows), введите msconfig в окно «Выполнить» и нажмите Enter.
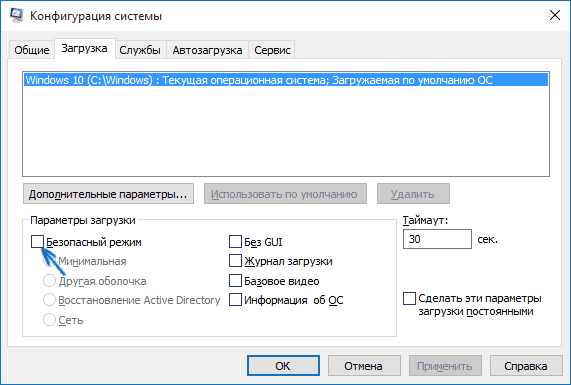
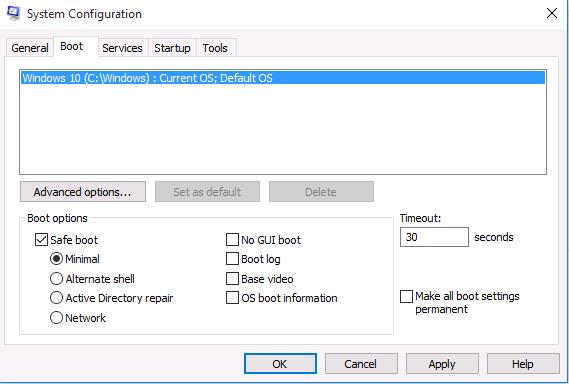
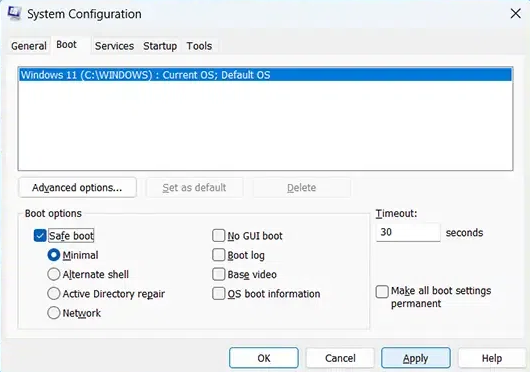
- В открывавшемся окне «Конфигурация системы» перейдите на вкладку «Загрузка», выберите ту ОС (обычно присутствует лишь один пункт меню и выбирать не требуется), которая должна запускаться в безопасном режиме и отметьте пункт «Безопасный режим».
- При этом, для него существуют несколько вариантов безопасного режима загрузки: минимальная — запуск «обычного» безопасного режима, с рабочим столом и минимальным набором драйверов и служб; другая оболочка — безопасный режим с поддержкой командной строки; сеть — запуск с поддержкой сети.
По завершении, нажмите «Ок» и перезагрузите компьютер, Windows 10 запустится в безопасном режиме.
Затем, чтобы вернуть обычный режим запуска, тем же методом снова используйте msconfig, но в этот раз снимите установленную ранее отметку запуска безопасного режима, примените настройки и перезагрузите ПК или ноутбук.
Запуск безопасного режима через особые варианты загрузки
Данный способ запуска безопасного режима Windows 10 в общем случае также требует, чтобы ОС на компьютере запускалась. Однако, есть две вариации этого способа, позволяющие зайти в безопасный режим, даже если вход в систему или ее запуск невозможен, которые я также опишу.
В общем случае способ подразумевает выполнение следующих простых шагов:
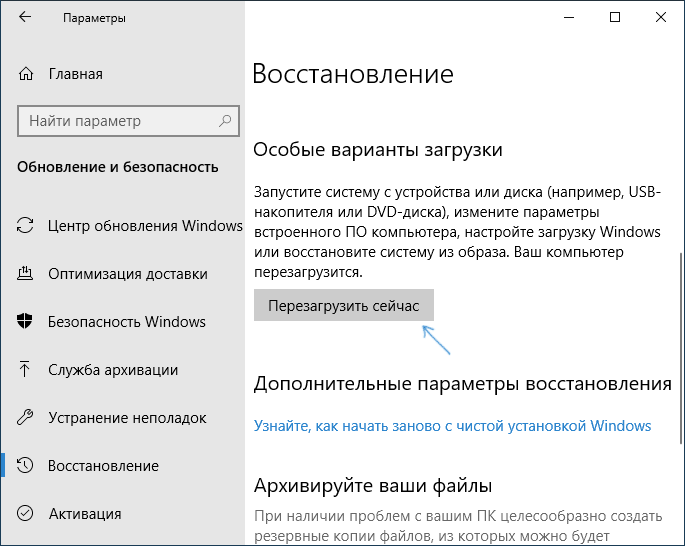
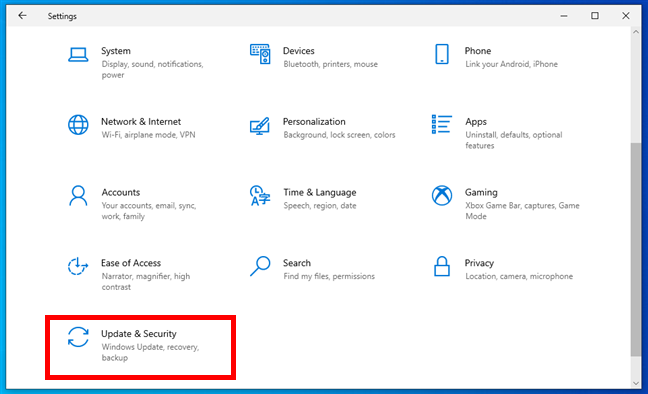
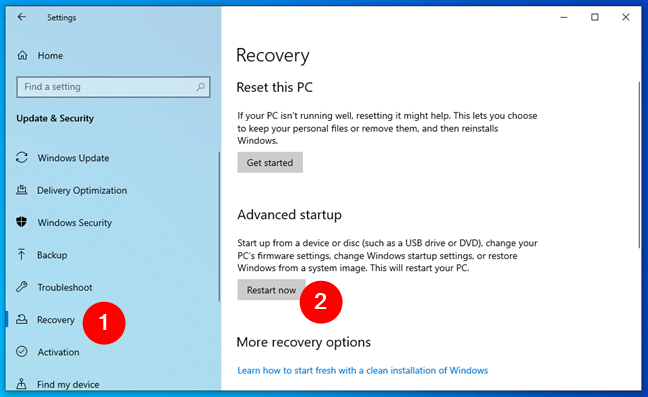
- Открыть Параметры (значок шестеренки в меню Пуск или клавиши Win+I), зайти в пункт «Обновление и безопасность», выбрать «Восстановление» и в пункте «Особые варианты загрузки» нажать «Перезагрузить сейчас». (В некоторых системах данный пункт может отсутствовать. В этом случае, для входа в безопасный режим используйте следующий способ).

- На экране особых вариантов загрузки выбрать «Поиск и устранение неисправностей» — «Дополнительные параметры» — «Параметры загрузки». Если пункт «Параметры загрузки» отсутствует, нажмите «Дополнительные параметры восстановления». На более ранних версиях Windows 10 путь такой: «Диагностика» — «Дополнительные параметры» — «Параметры загрузки». И нажать кнопку «Перезагрузить».

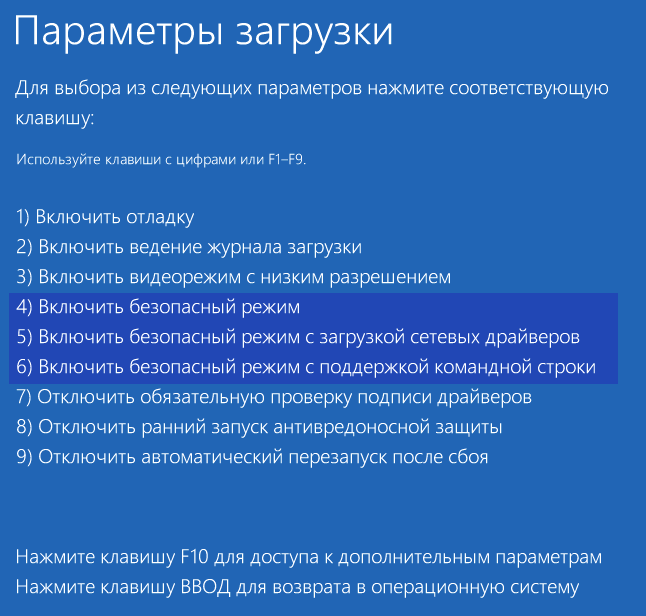
- На экране параметров загрузки, которые появятся после перезапуска системы, нажать клавиши от 4 (или F4) до 6 (или F6) для запуска соответствующего варианта безопасного режима.


Как добавить пункт «Безопасный режим» в меню загрузки Windows 10
При необходимости обезопасить себя от возможных проблем или если вы часто используете безопасный режим Windows 10, вы можете добавить его в меню загрузки вашего компьютера или ноутбука:
- Запустите командную строку от имени администратора и используйте следующие команды, нажимая Enter после каждой из них. После выполнения первой команды отобразится идентификатор GUID, который нужно будет использовать во второй команде.
-
bcdedit /copy {default} /d "Безопасный режим"
bcdedit /set {отобразившийся_GUID} safeboot minimal
- Готово, теперь при включении компьютера у вас будет отображаться меню, в котором, помимо простого запуска Windows 10 можно будет запустить и безопасный режим.


При необходимости, вы можете изменить время ожидания в меню загрузки (то есть то время, по истечении которого произойдет автоматическая загрузка Windows 10 в обычном режиме). Для этого используйте команду
bcdedit /timeout Время_в_секундах
Как зайти в безопасный режим Windows 10 с помощью загрузочной флешки или диска восстановления
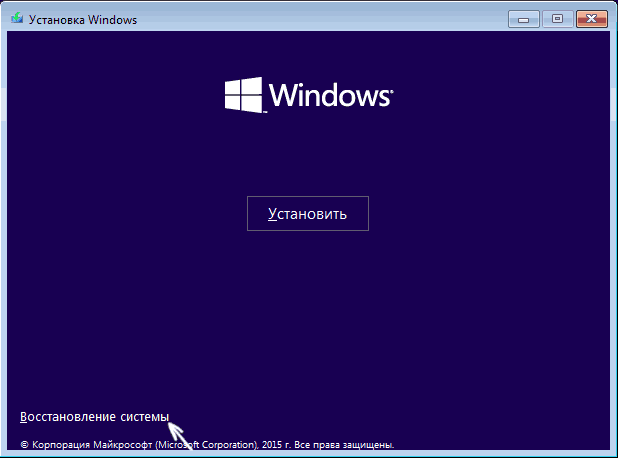
И, наконец, если не удается попасть даже на экран входа в систему, то есть и еще один способ, но вам потребуется загрузочная флешка или диск с Windows 10 (которые можно легко создать на другом компьютере). Загрузитесь с такого накопителя, а затем либо нажмите клавиши Shift + F10 (это откроет командную строку), либо после выбора языка, в окне с кнопкой «Установить» нажмите «Восстановление системы», затем Диагностика — Дополнительные параметры — Командная строка. Также для этих целей можно использовать не дистрибутив, а диск восстановления Windows 10, который легко делается через панель управления в пункте «Восстановление».
В командной строке введите (безопасный режим будет применен к ОС, загружаемой на вашем компьютере по умолчанию, на случай, если таких систем несколько):
- bcdedit /set {default} safeboot minimal — для следующей загрузки в безопасном режиме.
- bcdedit /set {default} safeboot network — для безопасного режима с поддержкой сети.
Если требуется запуск безопасного режима с поддержкой командной строки, используйте сначала первую из перечисленных выше команд, а затем: bcdedit /set {default} safebootalternateshell yes

После выполнения команд, закройте командную строку и перезагрузите компьютер, он автоматически загрузится в безопасном режиме.
В дальнейшем, чтобы включить обычный запуск компьютера, используйте в командной строке, запущенной от имени администратора (или же способом, описанным выше) команду:
bcdedit /deletevalue {default} safeboot
Еще один вариант почти же способа, но запускающий не сразу безопасный режим, а различные варианты загрузки, из которых можно выбрать, при этом применяет это ко всем совместимым ОС, установленным на компьютере. Запустите командную строку с диска восстановления или загрузочной флешки Windows 10, как это уже было описано, затем введите команду:
bcdedit /set {globalsettings} advancedoptions true
И после успешного ее выполнения, закройте командную строку и перезагрузите систему (можно нажать «Продолжить. Выход и использование Windows 10». Система загрузится с предложением нескольких вариантов загрузки, как и в способе, описанном выше, и вы сможете войти в безопасный режим.
В дальнейшем, чтобы отключить особые варианты загрузки, используйте команду (можно из самой системы, используя командную строку от имени администратора):
bcdedit /deletevalue {globalsettings} advancedoptions
Дополнительные способы запустить безопасный режим
В дополнение к вышеизложенным методам, ещё два способа, позволяющих запустить Windows 10 в безопасном режиме, оба также показаны в видео ниже:
- Если вы можете попасть на экран блокировки, но не можете зайти в систему, нажмите по изображению кнопки питания справа внизу экрана блокировки, а затем, удерживая Shift, нажмите «Перезагрузка». Компьютер выполнит перезагрузку в среде восстановления, где как и в способе с особыми вариантами загрузки вы сможете попасть в безопасный режим.
- Этот метод я не могу рекомендовать, так как он потенциально может привести к проблемам с накопителями, но: если при начале загрузки Windows 10 дважды неправильно выключить компьютер или ноутбук (долгим удержанием кнопки питания), то вы попадете в окно «Автоматическое восстановление», где, нажав кнопку «Дополнительные параметры» и перейдя к пункту «Параметры загрузки» вы также сможете зайти в безопасный режим.
Безопасный режим Windows 10 — видео
И в завершение видео руководство, в котором наглядно показаны способы зайти в безопасный режим различными способами.
Думаю, какой-то из описанных способов вам непременно подойдет. Также в данном контексте может оказаться полезным руководство Восстановление Windows 10.
Windows 10 унаследовала все особенности системы загрузки у Windows 8, предоставляя такую же графическую среду для выполнения задач восстановления системы. Предполагается, что операции восстановления системы после сбоев будут преимущественно выполняться системой автоматического восстановления. В том случае, если Windows 10 не загружается корректно, запускается система автоматического восстановления, которая без участия пользователя пытается найти и исправить проблемы, мешающие нормальной загрузке системы. Однако это не означает, что в Windows 10 отсутствует безопасный режим (Safe mode), просто по умолчанию этот режим загрузки скрыт от пользователей.
В некоторых случаях необходимо запустить систему в безопасном режиме, например чтобы отладить или удалить службу, драйвер или приложение. Посмотрим как включить безопасный режим в Windows 10.
Windows 10 можно загрузить в безопасном режиме несколькими разными способами.
Содержание:
- Утилита MSConfig (Конфигурация системы)
- Сочетание Shift + Restart
- Запуск режим диагностики из интерфейса новой Панели управления
- Запуск безопасного режима из командой строки
- Возвращаем старое текстовое меню загрузки
- Запуск Safe Mode из режима восстановления
Утилита MSConfig (Конфигурация системы)
Самый простой способ загрузить Windows 10 в безопасном режиме, как и в предыдущих версиях Windows, воспользоваться утилитой msconfig.exe. Для этого:
- Нажмите сочетание клавиш Win+R и наберите msconfig
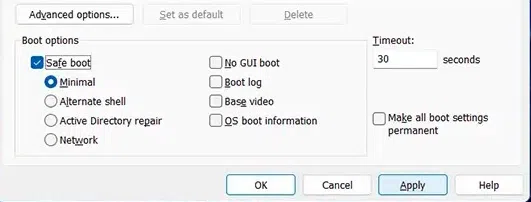
- В открывшемся окне перейдите на вкладку Boot
- В разделе Boot options поставьте флажок у пункта Safe boot

- Сохраните изменения (OK), согласитесь с предложением перезагрузить систему (Restart)
- После перезагрузки системы, Windows 10 загрузится в безопасном режиме (о чем свидетельствует надпись Safe Mode во всех углах экрана)

Совет. Отключить загрузку в безопасном режиме нужно также с помощью msconfig, сняв флажок у пункта Safe boot.
Сочетание Shift + Restart
В стартовом меню нажмите кнопку Power и, зажав Shift на клавиатуре, выберите пункт перезагрузки системы (Restart)
Примечание. Эту же комбинацию Shift+Перезагрузка можно использовать на экране входа в систему.
В появившемся диалоге последовательно выберите пункты Troubleshoot (Диагностика) -> Advanced options (Дополнительные параметры)-> Startup Settings (Параметры загрузки).
Перезагружаем компьютер, нажав кнопку Restart.
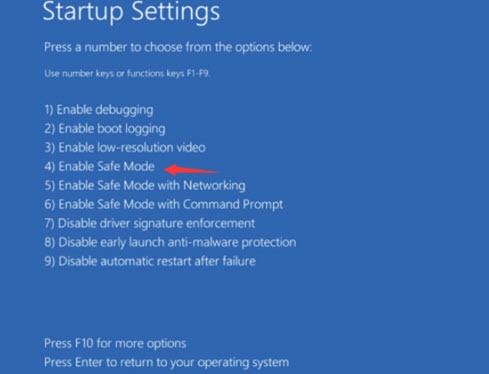
После перезагрузки появится окно с доступными опциями загрузки системы ( 9 вариантов, включая три вида безопасного режима). Для загрузки в безопасном режиме, нажмите клавишу F4 или 4 (или F5/F6 для загрузки в безопасном режиме с поддержкой сети или командной строки соответственно).
Запуск режим диагностики из интерфейса новой Панели управления
Для запуска новой современной Панели управления Windows 10, нажмите кнопку Start и выберите меню Settings. Затем перейдите в раздел Update & security.
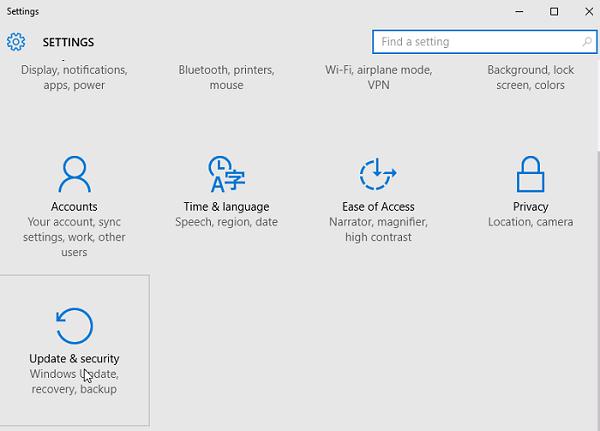
Перейдите в раздел Recovery и в секции Advanced Startup нажмите Restart now.

Далее все аналогично предыдущему способу.
Запуск безопасного режима из командой строки
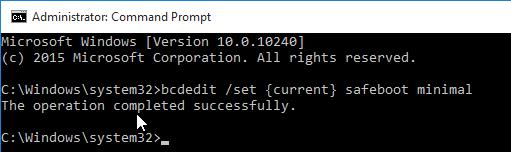
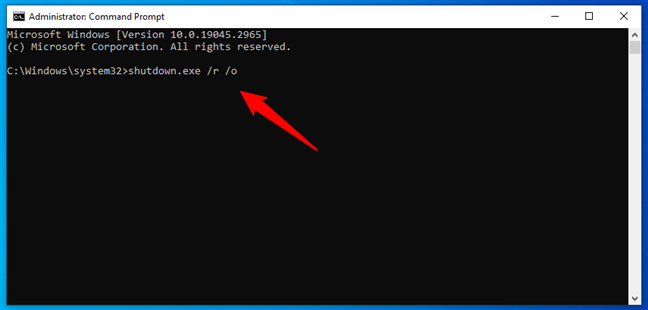
Возможно также настроить запуск Windows 10 в безопасном режиме и из командной строки. Для этого откройте командную строку (cmd) с правами администратора и выполните команду:
bcdedit /set {current} safeboot minimal
Затем перезагрузите компьютер командой:
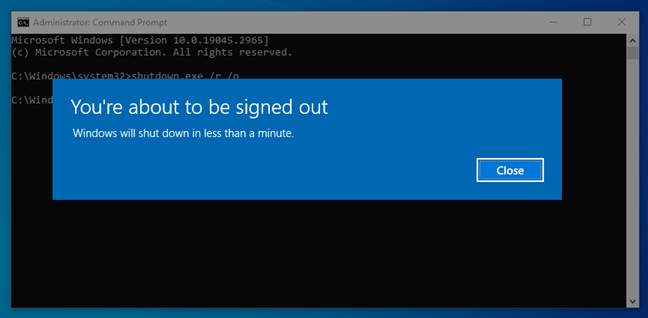
Shutdown –f –r –t 0
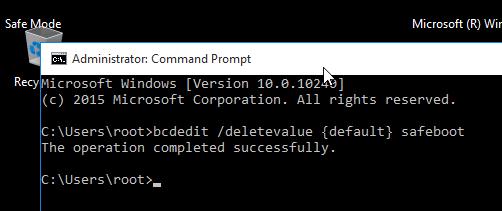
Теперь Windows 10 всегда будет загружаться в безопасном режиме. Чтобы вернуть обычный режим загрузки:
bcdedit /deletevalue {default} safeboot
Возвращаем старое текстовое меню загрузки
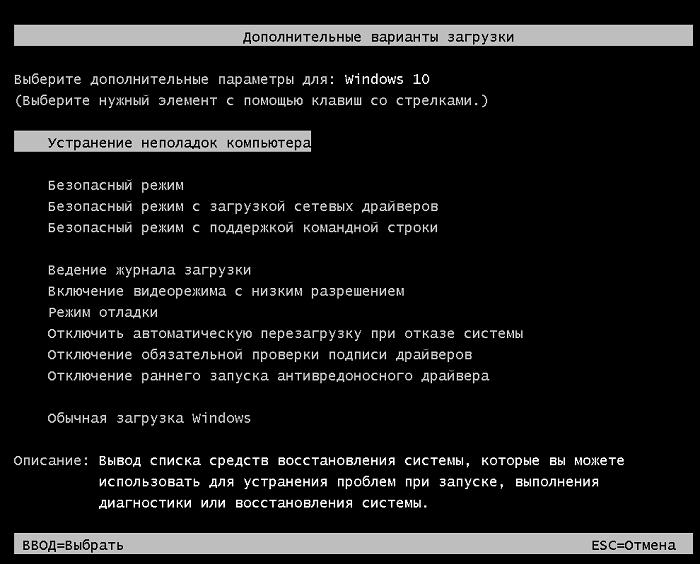
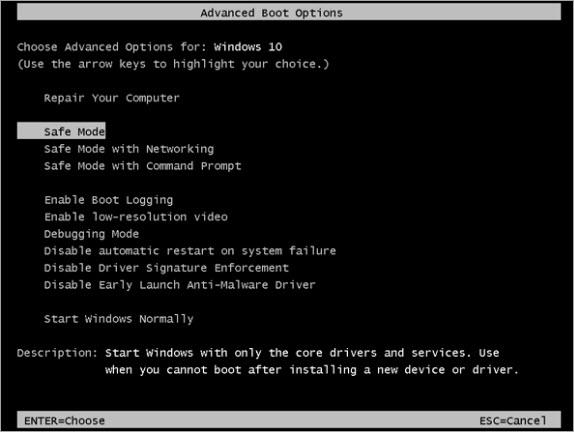
В Windows 10/8 возможно вернуться к старому текстовому загрузчику Windows, поддерживающего клавишу F8 (Shift+F8) и возможность выбора параметров запуска системы.
Примечание. Скорость загрузки системы с таким загрузчиком будет ниже.
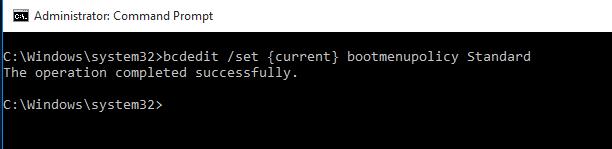
Чтобы вернуть тестовый загрузчик, выполните в командной строке с правами администратора:
bcdedit /set {default} bootmenupolicy legacy
Теперь при загрузке компьютера после стадии самотестирования (POST) , нужно несколько раз нажать клавишу F8. Должно появится старое-доброе текстовое меню с параметрами загрузки системы.
Чтобы отключить текстовый режим загрузчика, и вернуться к быстрой загрузке, выполните:
bcdedit /set {default} bootmenupolicy standard
Запуск Safe Mode из режима восстановления
Мало кто знает, что, чтобы включить безопасный режим и прочие параметры восстановления в Windows 10, достаточно 3 раза подряд прервать загрузку системы кнопкой отключения питания.
На 4 раз запустится среда восстановления системы (Recovery mode), из которой можно выбрать загрузку в безопасном режиме или другие варианты загрузки системы.
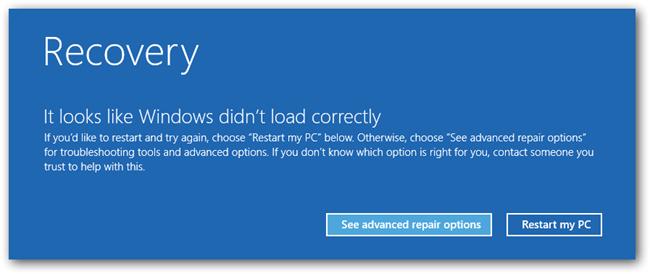
Выберите пункт See advanced repair options и следуйте инструкциям из второго пункта нашей статьи.
Last Updated :
06 Feb, 2025
Safe Mode is a diagnostic mode in Windows 10 that helps enable system diagnostic and troubleshooting. Safe Mode has been designed to use minimal drivers and services and spot the issues caused by any software, virus or hardware. In addition to this, you must know how to turn on safe boot mode in Windows 10 when you encounter any issue with your Windows computer.
In this guide, we’ll explore various methods to easily boot your Windows 10 in Safe Mode, ensuring you can get back to a fully functioning state as quickly as possible.
Table of Content
- Method 1: Using System Configuration (msconfig)
- Method 2: Using Shift + Restart
- Method 3: Using the Sign-in Screen
- Method 4: Advanced Startup (WinRE)
- Method 5: Using Windows 10 Installation USB/DVD
Boot Into Safe Mode in Windows 10 — 5 Methods
Windows 10 grants you multiple pathways to reach Safe Mode. Familiarise yourself with these techniques to select the one that aligns with your specific situation:
Method 1: Using System Configuration (msconfig)
You can use the default method to boot your Windows PC safely in just a few steps. Here’s how you can boot Windows 10 in Safe Mode using msconfig:
Step 1: Open System Configuration
Open the Run dialog by pressing Win + R and type msconfig and hit Enter.
Step 2: Enable Safe Mode
Go to the Boot tab and check the Safe boot option.
Step 3: Apply Changes & Restart
Check the «Safe boot» option in the Boot options section. Pick your preferred Safe Mode variant (Minimal, Network, etc.)
Method 2: Using Shift + Restart
You can use the Windows Settings to boot your Windows PC during startup. Here’s how you can boot Windows 10 in Safe Mode using Windows Settings option:
Step 1: Open Settings
Tap the Start button and select Power.
Step 2: Restart Your Computer
Press and keep the Shift key down as you click on Restart.

Step 3: Navigate to Recovery
Your PC will reboot, under the Advanced Startup Options.

Step 4: Select Startup Settings
Navigate to Troubleshoot > Advanced options > Startup Settings > Restart
After the reboot, press 4 or F4 to Enable Safe Mode.
Method 3: Using the Sign-in Screen
Windows Sign-in Screen can be the best method to perform a Safe boot for Windows 10 users as it does not require any additional technicality. Here’s what you need to do to for Windows 10 Safe Mode booting:
Step 1: Access the Power Options
Click the Power button from the sign-in screen of Windows 10 PC.
Step 2: Restart with Shift
Keep the «Shift» key pressed while you click on «Restart.»
Step 3: Access the Startup Settings
Navigate to Troubleshoot > Advanced options > Startup Settings > Restart
After the reboot, press 4 or F4 to Enable Safe Mode.
Method 4: Advanced Startup (WinRE)
This is an uncommon method to slide your Windows 10 PC into the Safe mode option. Here’s what you can do in this method:
Step 1: Interrupt Boot Process
Make a force interrupt during Windows Startup (up to 3 times) & this will automatically land your Windows System into the Safe Mode option.

Step 2: Access Advanced Startup
Navigate to Troubleshoot > Advanced options > Startup Settings > Restart
Step 3: Choose Safe Mode
After the reboot, press 4 or F4 to Enable Safe Mode.
Method 5: Using Windows 10 Installation USB/DVD
If none of these methods works, then you might consider to use Windows 10 Installation media to fix this error. Here’s what you need to do:
Step 1: Create Installation Media
Use the Windows 10 Media Creation Tool to create a bootable USB.
Step 2: Boot from USB/DVD
Insert the USB drive and restart the computer and boot from the USB.

Step 3: Access Repair Options
Navigate to Troubleshoot > Advanced options > Startup Settings > Restart
Step 4: Choose Safe Mode
After the reboot, press 4 or F4 to Enable Safe Mode.
How to Exit Safe Mode
Exiting the Safe Mode is as important as entering it & that’s why once you’re done with the troubleshooting, you can get follow the below outlined steps to exit from the Safe Mode.
- Press Win + R & type msconfig & hit the enter button.
- In the System Configuration, go to the Boot tab.
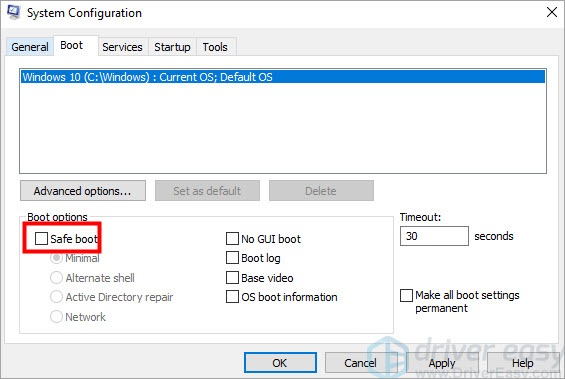
- Uncheck the box for Safe Boot.
- Click Apply and Restart your computer will initiate a reboot into the Normal Mode.
Following these simple steps will take your computer out of Safe Mode and bring it back to normal mode, allowing you to resume your regular tasks.
Conclusion
Booting Windows 10 into the Safe Mode is a powerful and the most effective method of resolving and troubleshooting system related issues. Whether your system encounters any malware issue, or having any conflicts with software or driver, choosing the Safe Mode option is always the best method to encounter such issues. By following the above-mentioned 5 steps, you can easily boot into the Safe Mode and make your system smooth and secure.
Also Read
- How to Start Your Mac in Safe Mode?
- How to Fix System Errors in Windows Safe Mode?
- How to Boot Into Safe Mode on Windows 11?
One of the best ways to troubleshoot Windows 10 issues is to use Safe Mode, a minimal environment that allows you to run the operating system with only the essential drivers and services. However, the old methods of pressing F8 or SHIFT + F8 during boot are no longer effective because Windows 10 boots too fast, and Microsoft disabled them. Instead, you have to use other ways to boot into Safe Mode in Windows 10. Here are eight methods you can try:
How to start Windows 10 in Safe Mode (video tutorial)
Safe Mode is a Windows feature that allows you to start the operating system with minimal functionality, only running the essential services and drivers. This helps to isolate and fix problems, as it prevents Windows from loading anything that could cause it to crash. For more details on what you can do with Safe Mode, read this separate article we published some time ago: What is Safe Mode?

A Windows 10 computer in Safe Mode
So, do you want to know how to start Windows 10 in Safe Mode? You’ve come to the right place. In this tutorial, I’ll show you all the tips and tricks you can use to boot into Safe Mode. However, it all depends on whether you can log in to Windows 10 or not.
If you need to enter Safe Mode without logging in, try methods 1 to 4. If you can boot Windows 10 and sign in with a user account, try methods 5 to 8.
Oh, and for those who prefer a visual guide over text, we have a video that shows four of these ways to boot a Windows 10 computer into Safe Mode:
And now, without further ado, here’s…
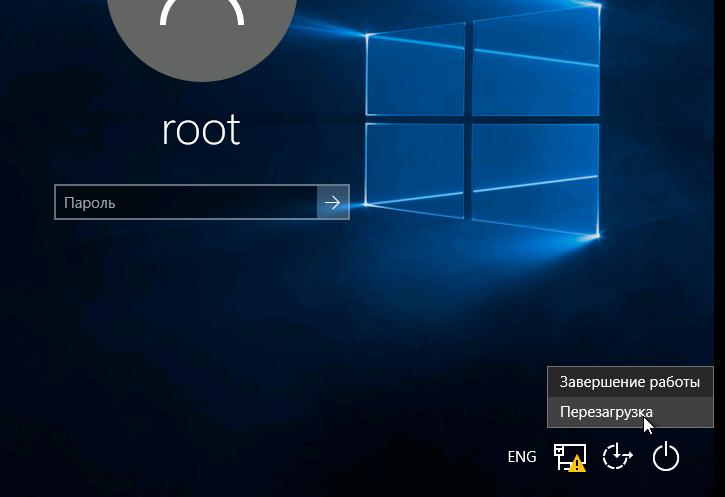
1. How to boot in Safe Mode without logging into Windows 10 (Shift + Restart)
If you can’t log into Windows 10, but you can get to the sign-in screen, press and hold the SHIFT key on the keyboard. With this key still pressed, click or tap the Power button and, in the menu that opens, click Restart.

How to boot Windows 10 in Safe Mode without login
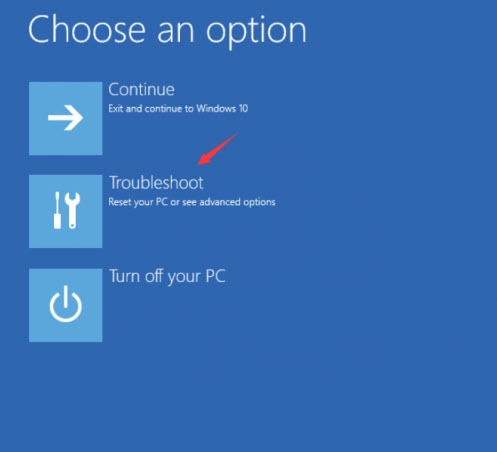
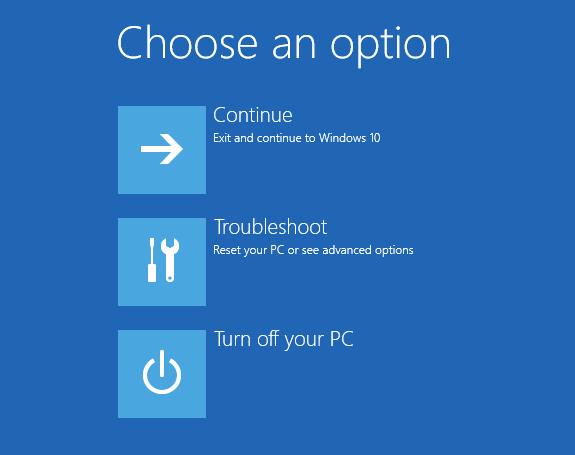
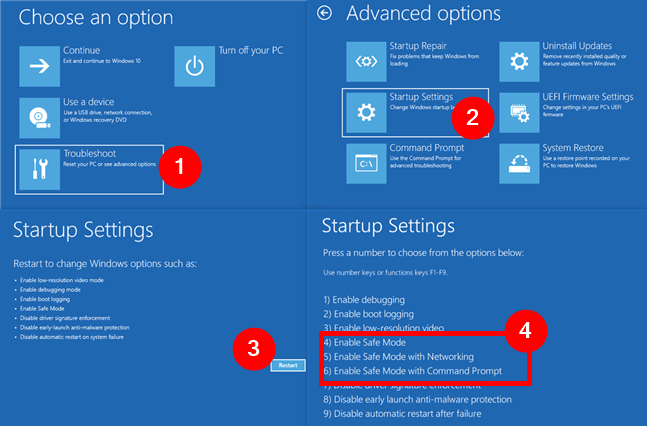
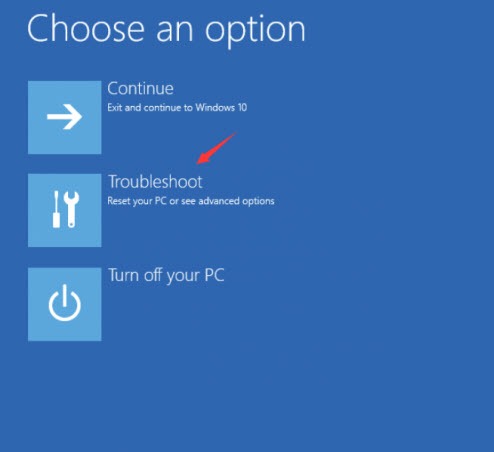
Windows 10 restarts and asks you to select an option. Choose Troubleshoot.
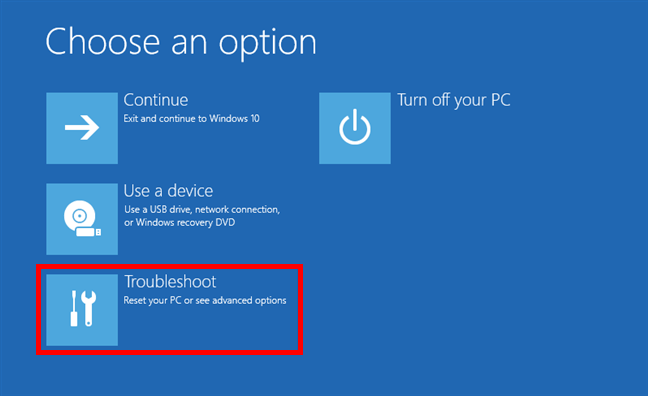
Click Troubleshoot (Reset your PC or see advanced options)
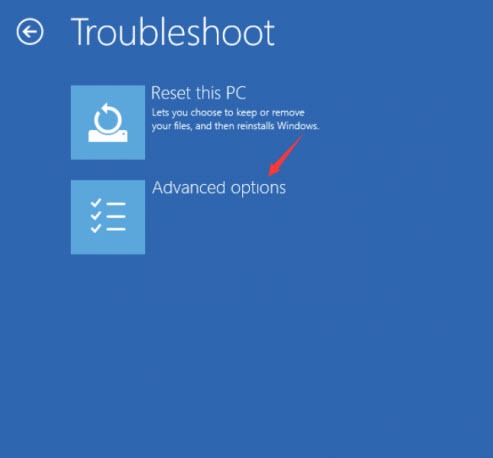
On the Troubleshoot screen, go to Advanced options.
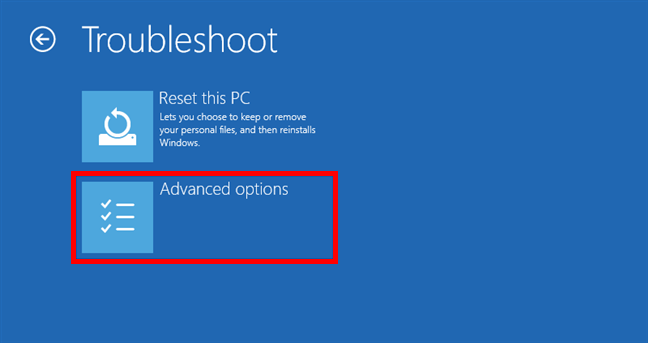
Accessing the advanced troubleshooting options
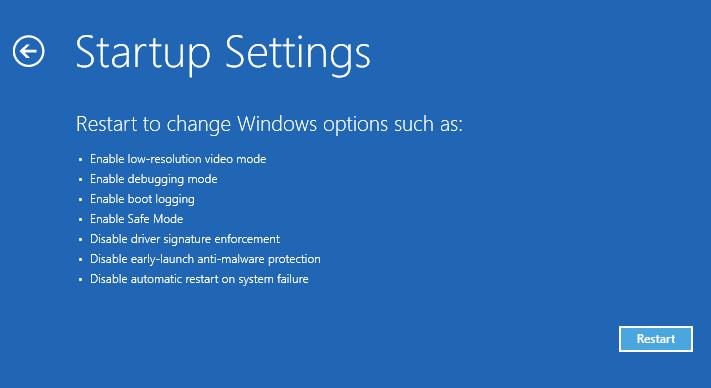
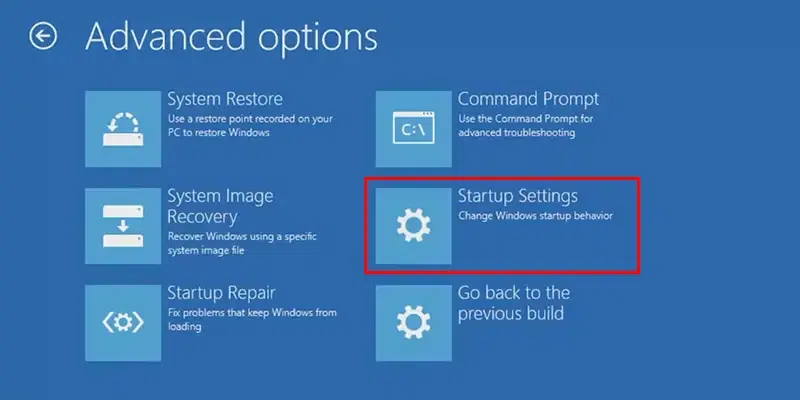
On the Advanced options screen, choose Startup Settings. Depending on your Windows 10 computer, you may not see this option at first. If you do not, click or tap the “See more recovery options” link and then on the Startup Settings option.
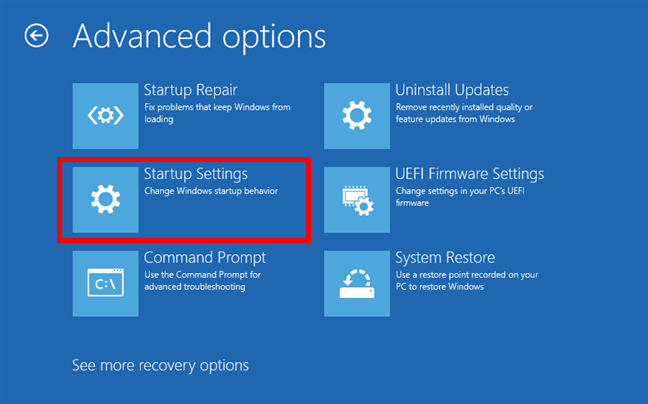
Click the Startup Settings option
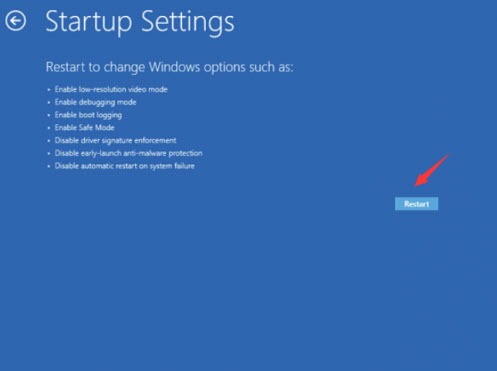
Windows 10 says that you can restart your device to change advanced boot options, including enabling Safe Mode. Press Restart.
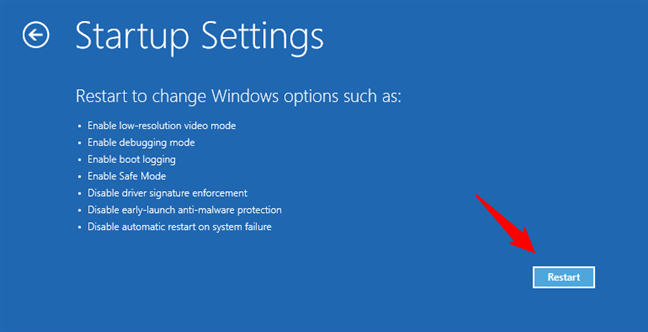
Startup Settings: Choose Restart for Windows 10 Safe Mode options
After Windows 10 restarts one more time, you can choose which boot options you want to enable. You have three different options to get into Safe Mode:
- Standard Safe Mode — press the 4 or the F4 key on your keyboard to start it
- Safe Mode with Networking — press 5 or F5
- Safe Mode with Command Prompt — press either 6 or F6
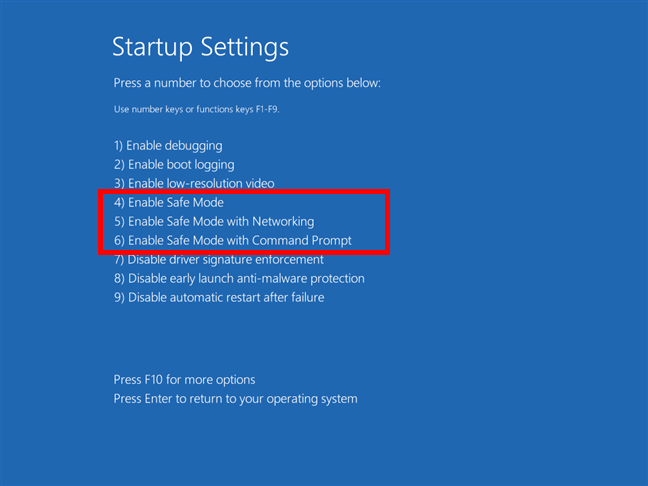
How to boot in Safe Mode on a Windows 10 computer
Log into Windows 10 Safe Mode with a user account that has administrator permissions, and perform the changes you want.
2. How to start Windows 10 in Safe Mode from a black screen by interrupting the boot sequence
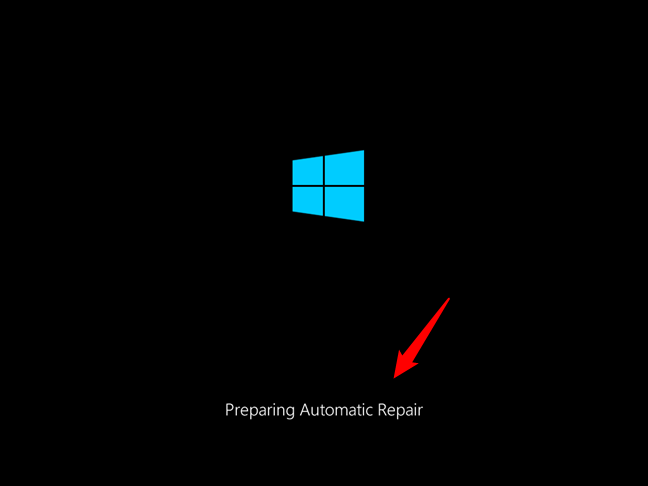
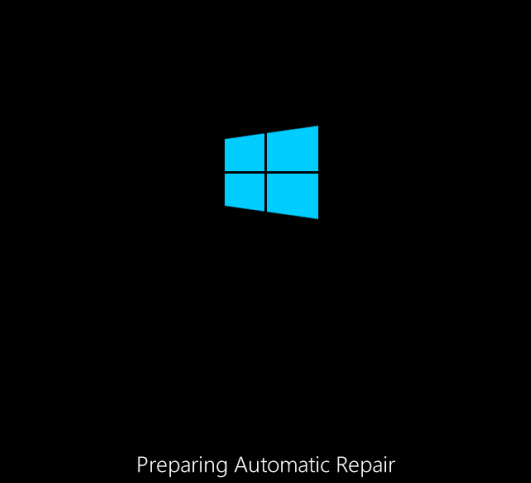
If Windows 10 fails to boot normally three times over, it enters by default in an Automatic Repair mode the fourth time. Using this mode, you can boot into Safe Mode.
To trigger the Automatic Repair mode, you must interrupt the normal boot process three consecutive times: use the Restart or the Power button on your Windows 10 PC or laptop to stop it during boot before it finishes loading the operating system. If you use the Power button, you might have to keep it pressed for at least 4 seconds to force the power off. When Windows 10 enters the Automatic Repair mode, the first thing you see is a screen that tells you that the operating system is Preparing Automatic Repair. You’re on the right path!
How to boot into Safe Mode from a black screen
Wait for Windows 10 to try to make an automatic diagnosis of your PC.
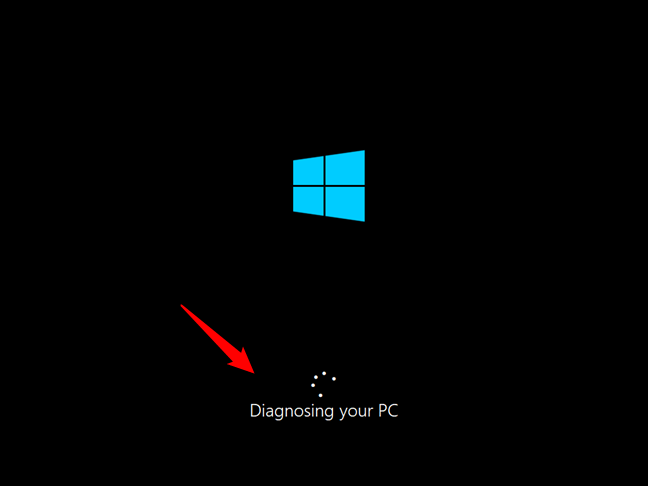
Diagnosing your Windows 10 PC
On the Automatic Repair screen, press the Advanced options button.
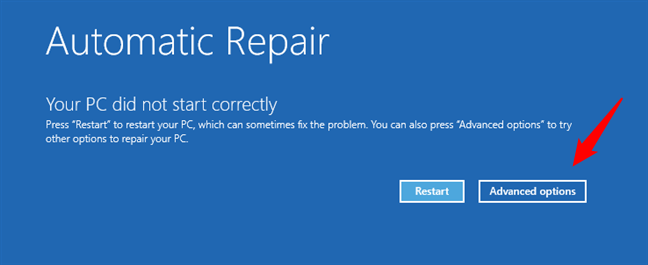
Accessing the advanced troubleshooting options
From here on, the steps you have to take are the same as those shown in the first method from this guide. Follow the path Troubleshoot > Advanced options > Startup Settings > Restart. Then, press the 4 or the F4 key on your keyboard to boot into Safe Mode, press 5 or F5 to boot into Safe Mode with Networking, or press 6 or F6 to go into Safe Mode with Command Prompt.

Go to Troubleshoot > Advanced options > Startup Settings > Restart > Enable Safe Mode
3. How to boot in Safe Mode using a Windows 10 installation media and the Command Prompt
If you have a Windows 10 setup DVD or USB memory stick lying around, or if you can create one right now, you can use it to start your Windows 10 PC into Safe Mode. Boot your broken computer from the installation media and wait for the Windows 10 install wizard to load. Choose the language and keyboard layout you prefer and click or tap Next.
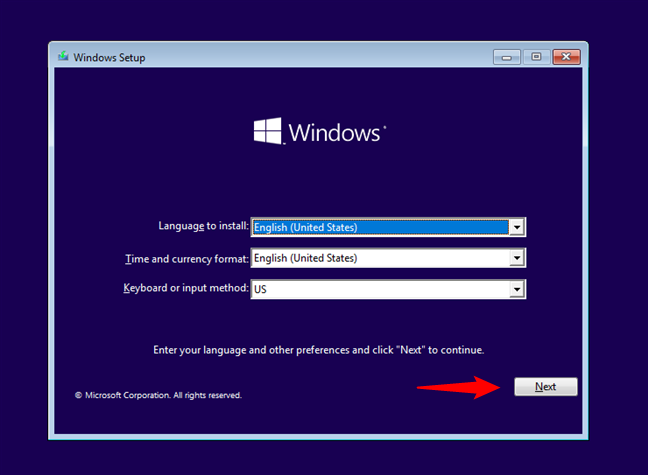
The Windows 10 Setup
Click or tap on the Repair your computer link, found in the bottom left corner of the screen.
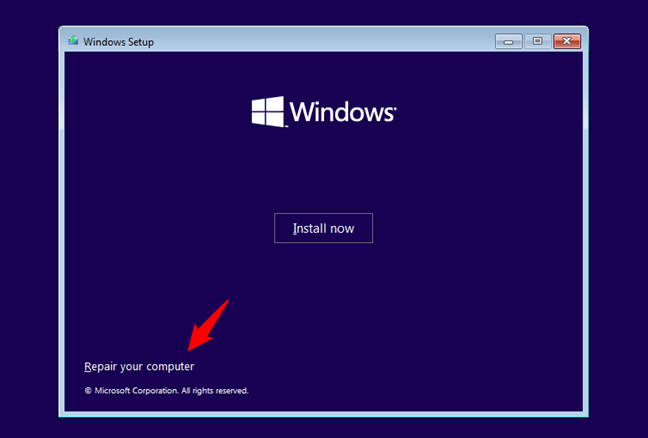
Click on Repair your computer
When asked what option you prefer, choose Troubleshoot.
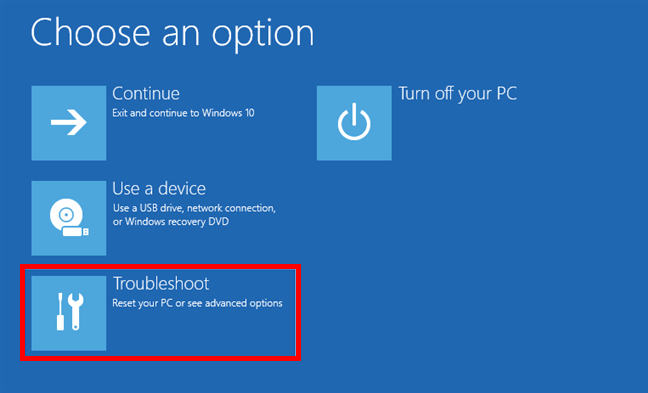
Select Troubleshoot to get to Windows 10 Safe Mode
On the Advanced options screen, click or tap Command Prompt (Use the Command Prompt for advanced troubleshooting).
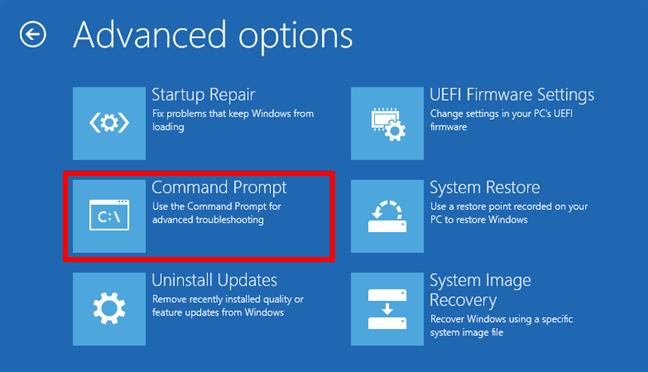
Starting the Command Prompt
Inside the Command Prompt window, type the command:
bcdedit /set {default} safeboot minimal
Then, press Enter on your keyboard, and after a moment, it will tell you that “The operation completed successfully.”
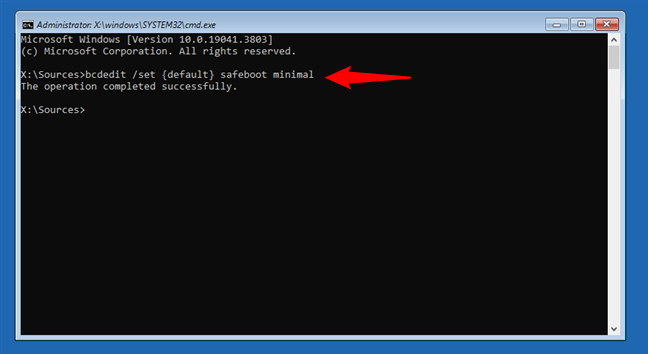
How to boot in Safe Mode from the Command Prompt
Close the Command Prompt and choose to Continue on the next screen.
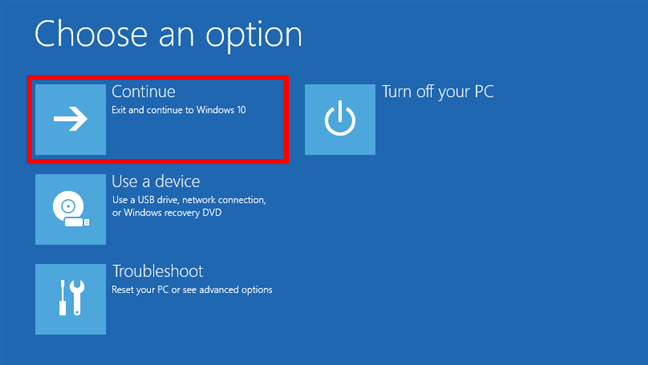
Choose Continue to start Windows 10 in Safe Mode
After your PC reboots, Windows 10 starts into Safe Mode. Log in with a user account that has administrator permissions, and perform the changes you want.
IMPORTANT: The problem with this method is that it tells Windows 10 to enter Safe Mode automatically every time you start it and will continue to do so until instructed otherwise. To disable this setting and get Windows 10 to boot normally again, run the same procedure one more time and type the command:
bcdedit /deletevalue {default} safeboot
4. How to start Windows 10 in Safe Mode with a recovery drive
In Windows 10, you can create a system recovery USB drive. Since your PC may not be working, create this USB recovery drive on another computer with Windows 10.
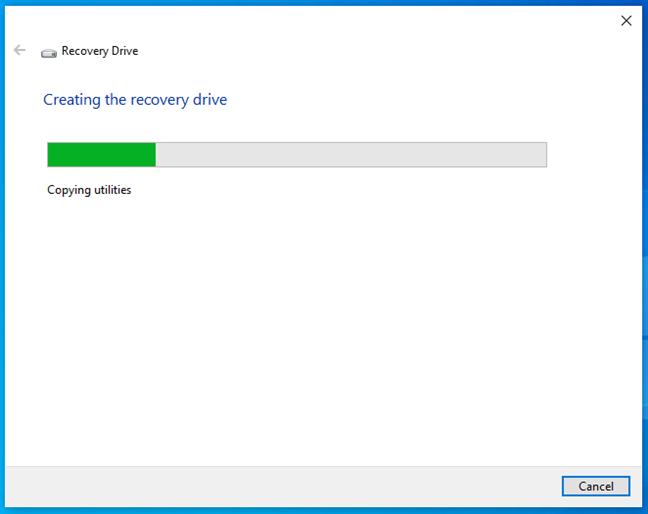
Creating a Windows 10 Recovery Drive
Once you have created a USB recovery drive, use it to boot your Windows 10 PC or device, and when you are asked to load its content, do so. The first screen asks you to choose the layout for the keyboard. Select the one you want to use, or if you do not see it listed, click or tap the “See more keyboard layouts” link to get the complete list of available layouts.

Choose the keyboard layout for the recovery drive
After choosing the keyboard layout that you want to use, click or tap on Troubleshoot and follow the same steps shown in the first method of this guide to boot into Safe Mode. In short, follow this path: Advanced options > Startup Settings > Restart. Then, press the 4 or the F4 key on your keyboard to boot into Safe Mode, press 5 or F5 to boot into Safe Mode with Networking, or press 6 or F6 to go into Safe Mode with Command Prompt.

Go to Troubleshoot > Advanced options > Startup Settings > Restart > Enable Safe Mode
5. How to use msconfig to boot into Safe Mode on Windows 10
If you can log in to Windows 10, one of the easiest methods to boot into Safe Mode is to use the System Configuration tool, which users know by its file name:
msconfig.exe
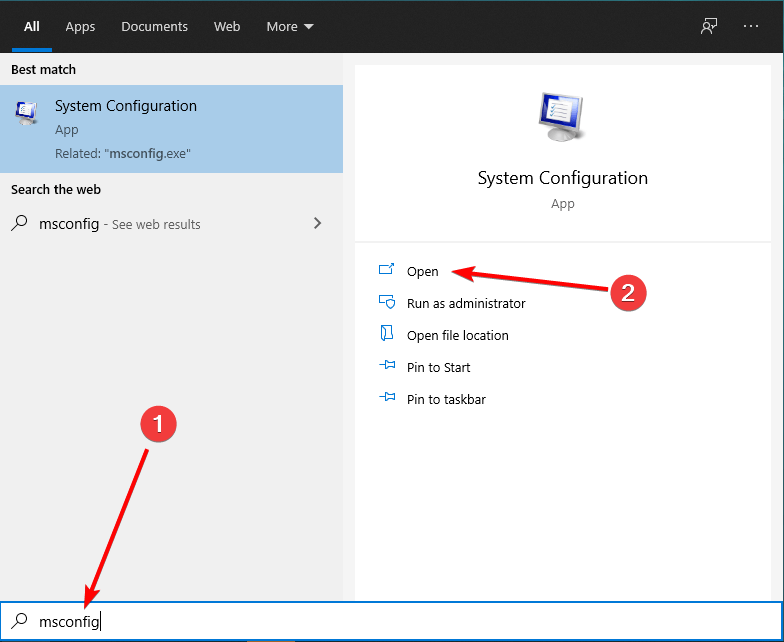
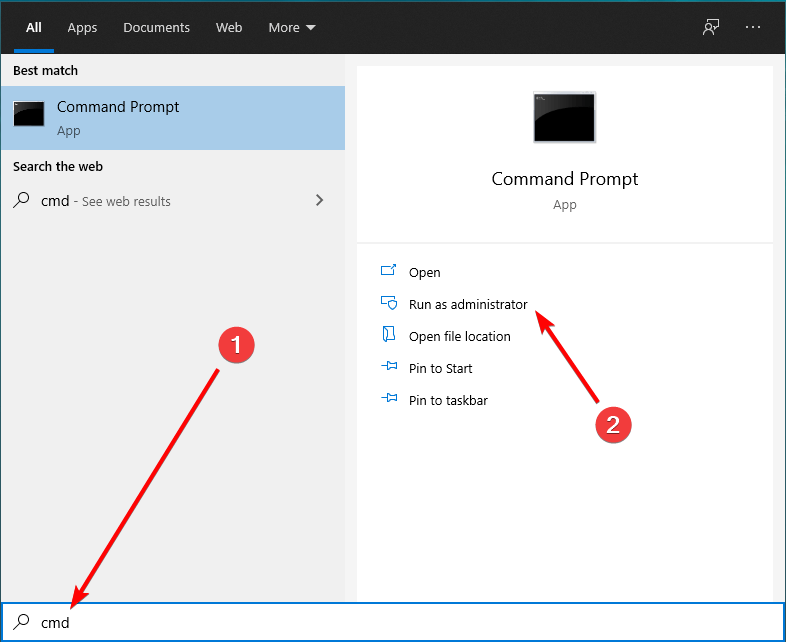
Open System Configuration: a quick way to do that is to enter the words “system configuration” in the taskbar search field and then click or tap the System Configuration shortcut.
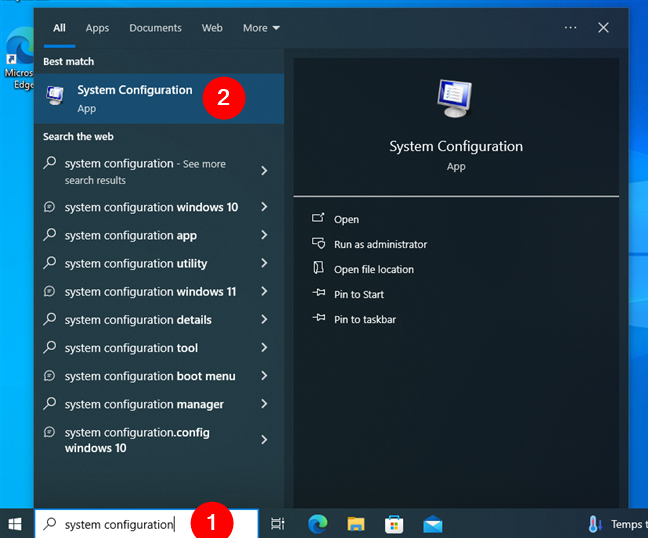
Open System Configuration (msconfig)
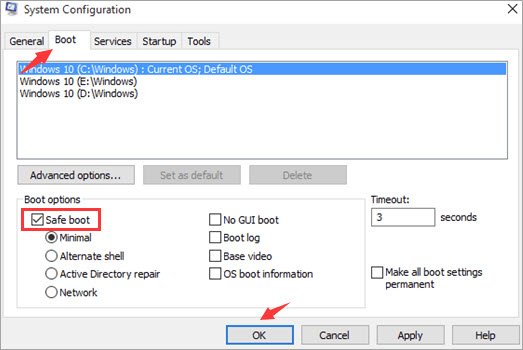
In the System Configuration window, click or tap the Boot tab. In the Boot options section, select the Safe boot option. Finally, click or tap OK.
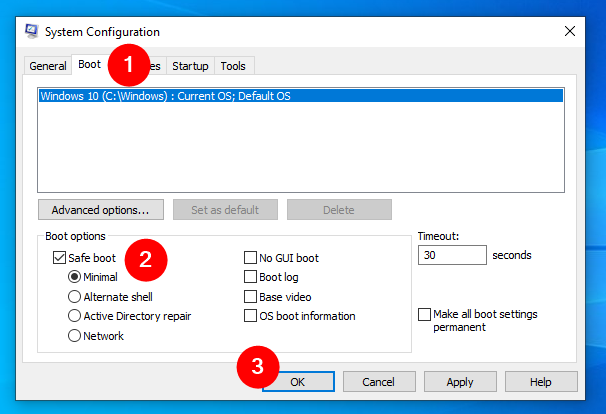
How to boot Windows 10 in Safe Mode using System Configuration (msconfig)
Windows 10 tells you that you need to restart your computer for the new setting to take effect. If you still have work to do, you can choose to Exit without restart. If not, click or tap Restart to reboot Windows 10 in Safe Mode.
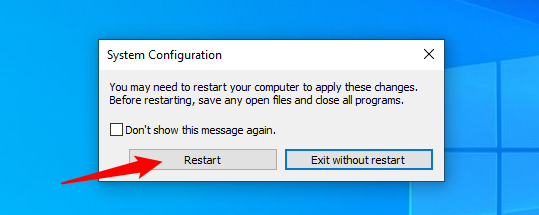
Restart Windows 10 in Safe Mode
Then, you get straight into Windows 10 Safe Mode.
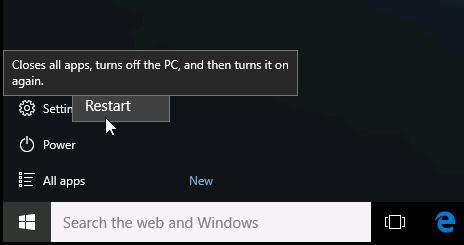
6. How to start Windows 10 in Safe Mode from the Start Menu (Shift + Restart)
Another way of booting into Safe Mode in Windows 10 is to use the Start Menu. First, press and hold the SHIFT key on the keyboard. With the key still pressed, click the Start button, then Power, followed by Restart.
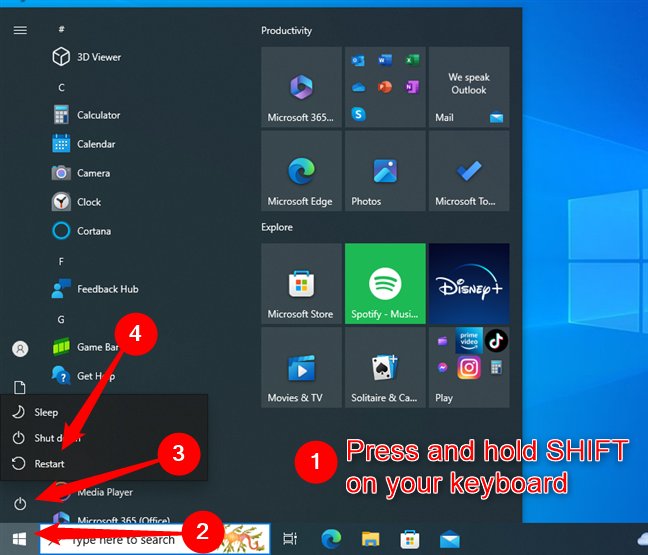
How to start Windows 10 in Safe Mode from the Start Menu
Wait for Windows 10 to reboot. When it starts again, it will ask you to select an option. Choose Troubleshoot and then follow the same steps shown in this guide’s first method. In short, go to Advanced options > Startup Settings > Restart. Then, press 4 or F4 on your keyboard to start Windows 10 in Safe Mode, press 5 or F5 to boot into Safe Mode with Networking, or press 6 or F6 to go into Safe Mode with Command Prompt.


 Click Restart.