
Download Article
Prevent apps on your PC from getting through your firewall with this simple guide
Download Article
- Blocking a Program
- Using Advanced Settings
- Video
- Q&A
- Tips
|
|
|
|
This wikiHow article teaches you how to prevent a program from accessing your Windows computer network by blocking it in Windows Firewall. You must have administrator privileges to access Windows Firewall and block programs. Keep in mind that blocking a program from using Firewall doesn’t usually prevent the program from running on your computer.
Quick Steps
- Open Windows Defender Firewall in Control Panel.
- Select Allow an app or feature through Windows Firewall.
- Click Change settings.
- Find the program you want to block or add it to the list.
- Uncheck the box next to the program and click OK.
-

Press the Win key, type in Windows Defender Firewall, then click Windows Defender Firewall at the top of the Start window.
-

This link is at the top-left side of the Firewall window.
Advertisement
-
It’s at the upper-right side of the window, just above the list of programs on your computer.
- You may have to click Yes on a pop-up window after doing this before you can continue.
- If you don’t have administrator privileges on your computer, you won’t be able to do this.
-
The list of programs in the middle of the page displays all programs that Windows Firewall is blocking or allowing; you can scroll down to find your specific program.
-

If you can’t find your program in the list, you can add it by doing the following:
- Click Allow another app… below the list.
- Click Browse….
- Go to the location of the app or program file (usually an EXE) you want to block.
- Select the app or program file.
- Click Open, then select the program’s name in the window and click Add if it doesn’t automatically add.
-

Doing so should remove the checkmark, thereby blocking the program through Windows Firewall.
- If there is no checkmark to the left of the program, Windows Firewall is already blocking the program.
- Leave the two checkboxes to the right of the program («Home/Work (Private)» and «Public») alone.
-
It’s at the bottom of the window. This will both save your changes and prevent the program from connecting through the network (and/or from running properly on your computer).[1]


Advertisement
-
Press the Win key, then type in Windows Defender Firewall, then click Windows Defender Firewall at the top of the Start window.
- You can also block a port this way if you don’t want data to be sent or received.
-
It’s a link in the menu on the left side of the window.
-
This tab is on the left side of the window.
-
It’s in the upper-right corner of the window. Doing so opens a new window in which you’ll create your Firewall rule.
-

You’ll find this option at the top of the page.
- Click Next to continue.
- If you’d rather close a port, you can select that option instead.
-

Before you can block a program, you’ll need to select the program to find its path:
- Check the «This program path» box and click Browse….
- Click This PC on the left side of the window.
- Scroll down and double-click your hard drive’s name (e.g., OS (C:)).
- Double-click the Program Files folder.
- If the program you want to block is elsewhere, go to the program’s folder instead.
- Find the folder for your program, then double-click the folder.
- Select the program file by clicking it once.
-
Click the address bar at the top of the window to select the path there, then press Ctrl+C to copy the path.
- This is necessary because Windows will restructure the path to the file once you open the file in Firewall, thus breaking your outbound rule. You can bypass this problem by manually pasting the path to the file.
-
It’s in the bottom-right corner of the window.
-

Highlight the path in the «This program path» text box all the way up to the last backslash before the app’s name, then press Ctrl+V to paste in your copied path.
- For example, if you wanted to block Chrome in the path «C:\Program Files\Google\Application\chrome.exe», you would select all but the «\chrome.exe» section and replace it with your copied text.
- Leaving the app’s name and extension at the end of the path is crucial, as failing to do so will leave you with a rule that doesn’t block anything.
-
You can add and create conditions and parameters to your rule, but if you’re simply blocking a program, ignore these pages and press Next until you have to name the rule.
- Type whatever you want to name your rule into the top text box on the page. For example, if you’re blocking Google Chrome on your computer, you might name your rule «Chrome Block» here.
-

It’s at the bottom of the window. Doing so saves and applies your rule; from now until you delete or disable the rule, your program will not be able to access the Internet.


Advertisement
Add New Question
-
Question
What do I do if the name of the program doesn’t appear on the list?
Choose the option «Allow another app,» and find your program on the computer.
-
Question
I unchecked the program, but soon it is checked again. Why is that?
When the program is unchecked, it means it’s only temporarily blocked. It will unblock after a certain period of time. If you wish to fully block it, remove it from the list.
-
Question
How do I block cookies?
Cookies can be blocked via your browser settings. Additionally you can deselect the option to store cookies on your computer, and clear existing ones by getting a legitimate anti-malware program.
See more answers
Ask a Question
200 characters left
Include your email address to get a message when this question is answered.
Submit
Advertisement
Video
-
Blocking a program through Windows Firewall is a good way to prevent persistent malware or bloatware from slowing down your network.
-
If you don’t know where the program you want to block is, you can find it by right-clicking the program’s shortcut, clicking Open file location, and repeating until you get to the program’s folder.
Thanks for submitting a tip for review!
Advertisement
-
Blocking a Windows program through Windows Firewall may cause some Windows processes to stop working.
Advertisement
References
About This Article
Article SummaryX
1. Type «defender» into the Windows Search bar.
2. Click Windows Defender Firewall.
3. Click Advanced settings.
4. Click Outbound rules.
5. Click New rule.
6. Select Program and click Next.
7. Select the program.
8. Follow the on-screen instructions.
To learn how to temporarily disable a program, keep reading!
Did this summary help you?
Thanks to all authors for creating a page that has been read 1,962,840 times.
Reader Success Stories
-
Chathura Madushanka
Sep 3, 2016
«It helped. I studied how to block programs in Firewall. I wish to do more programs like this. Thank you so much. »
Is this article up to date?
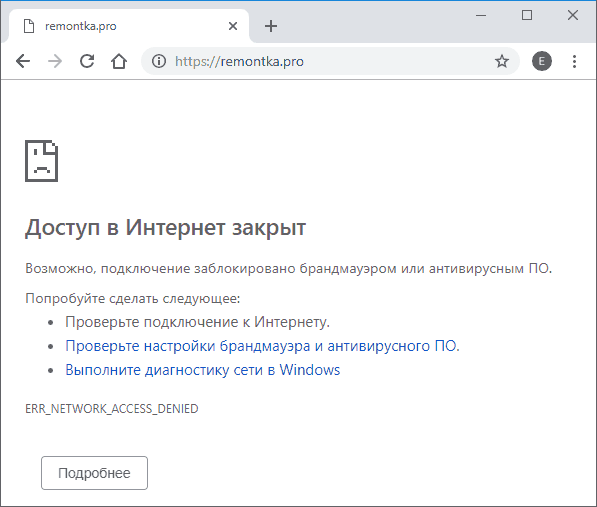
Как заблокировать программе доступ в Интернет
Если по какой-либо причине вам потребовалось заблокировать определенной программе Windows 10, 8.1 или Windows 7 доступ в Интернет, сделать это сравнительно просто, причем возможно использование как встроенных функций системы, так и сторонних бесплатных утилит для установки соответствующих ограничений.
В этой инструкции несколько способов запретить доступ к Интернету выбранных программ Windows: с помощью брандмауэра Windows вручную и простой утилиты для автоматизации этого процесса, а также с использованием стороннего файрвола. Также может быть интересно: Как разрешить программе доступ в Интернет, Как заблокировать запуск программы в Windows.
Блокировка доступа программы в Интернет в брандмауэре Windows
Брандмауэр Windows — один из самых простых способов заблокировать программе доступ к Интернету, не требующий установки каких-либо сторонних средств. Шаги для блокировки будут следующими:
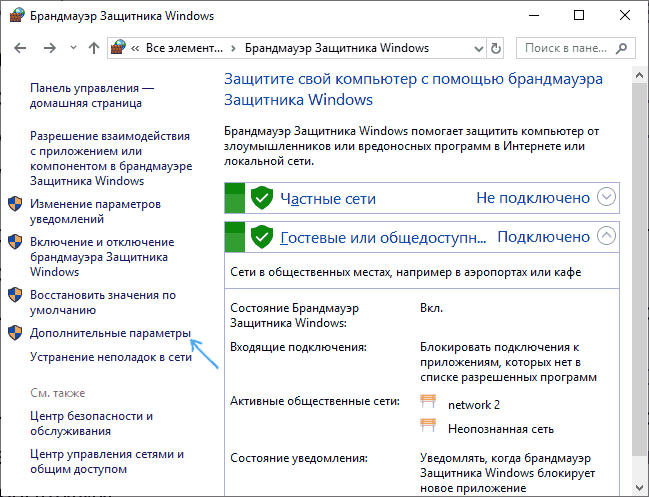
- Откройте панель управления (в Windows 10 это можно сделать, используя поиск в панели задач), переключите поле просмотр на «Значки», а затем откройте пункт «Брандмауэр Защитника Windows» или просто «Брандмауэр Windows».

- В открывшемся окне, слева, нажмите «Дополнительные параметры».

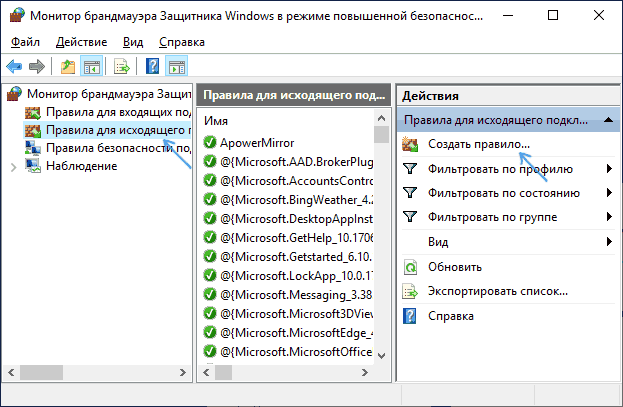
- Откроется окно брандмауэра в режиме повышенной безопасности. В левой панели выберите «Правило для исходящего подключения», а в правой — «Создать правило».

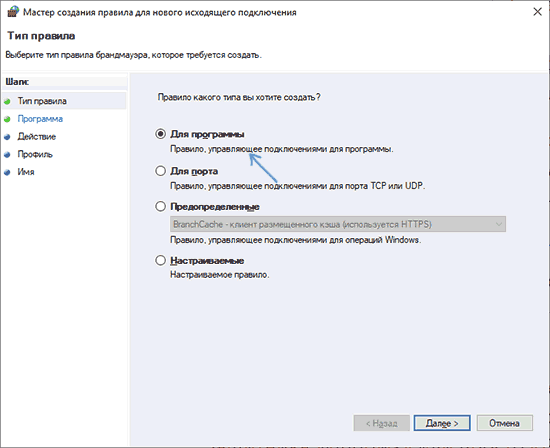
- Выберите «Для программы» и нажмите «Далее».

- Укажите путь к исполняемому файлу программы, которой нужно запретить доступ в Интернет.
- В следующем окне оставьте отмеченным пункт «Блокировать подключение».
- В следующем окне отметьте, для каких сетей выполнять блокировку. Если для любых — оставьте отмеченными все пункты.
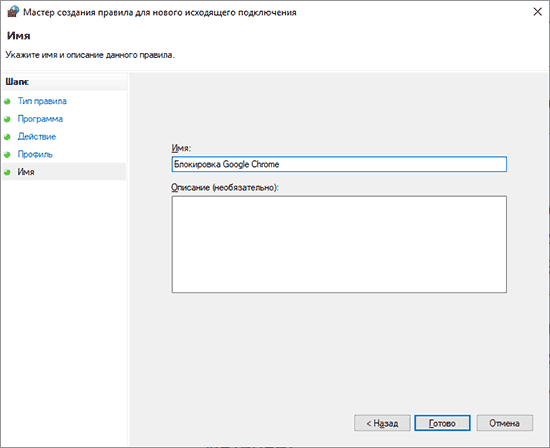
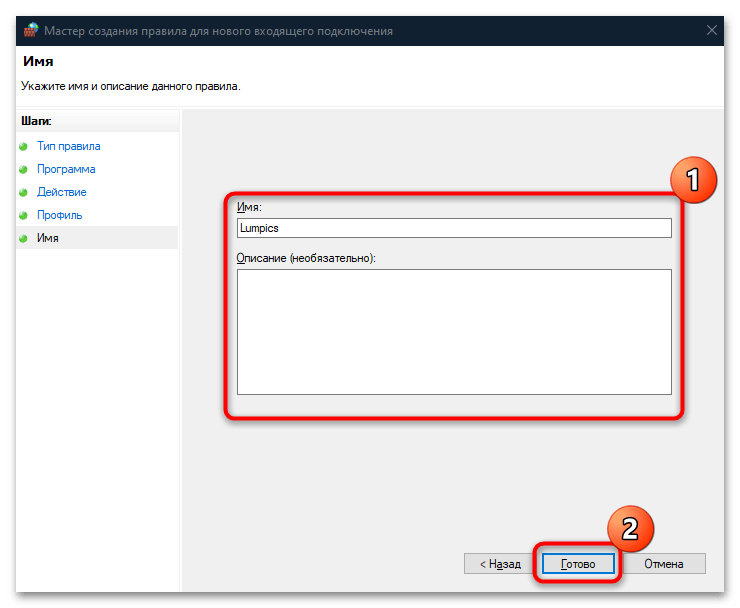
- Укажите понятное для вас имя правила (это поможет его найти, если в будущем вы захотите снять блокировку) и нажмите «Готово».
- При желании можно проверить, сработала ли блокировка: как видите, у меня сработало.


Это не единственный возможный метод с помощью встроенного брандмауэра. Есть ещё один подход, который позволит легко заблокировать доступ в Интернет выбранным приложениям из Магазина Windows 10, не вводя вручную пути к ним:
- Создайте правило для всех программ, выбрав соответствующий пункт на 5-м шаге вышеприведенной инструкции.
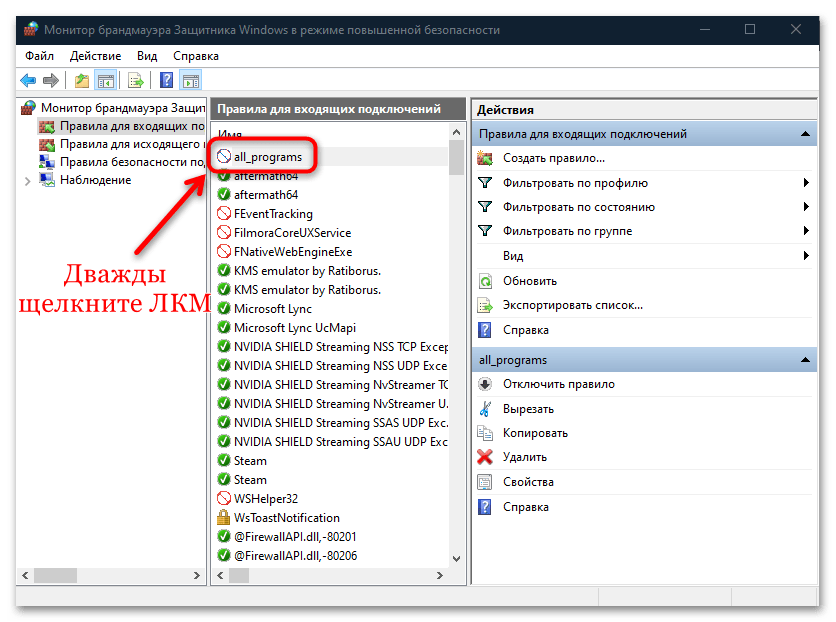
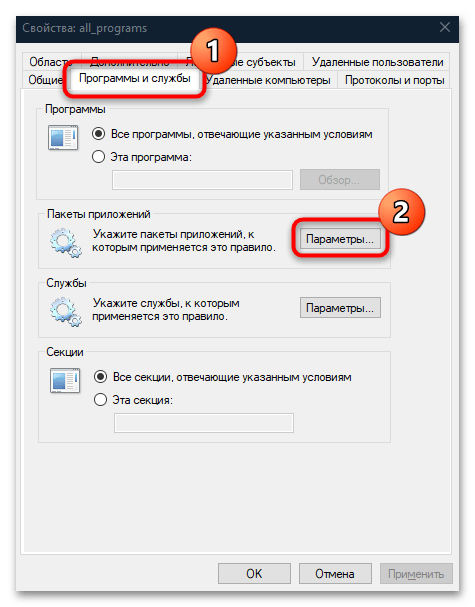
- После создания правила, найдите его в списке, нажмите по нему мышью дважды, а затем на вкладке «Программы и службы» нажмите по кнопке «Параметры» в пункте «Пакеты приложений», отметьте «Применять к следующему пакету приложений» и укажите в списке то приложение, для которого нужно заблокировать доступ в Интернет. Например, у меня на скриншоте блокируется Edge.

- Примените сделанные настройки и проверьте их работоспособность.

В целом всё очень просто, но существует возможность даже более быстрой настройки запрета.
Автоматическое создание правил брандмауэра в Winaero OneClickFirewall
Winaero OneClickFirewall — простая бесплатная утилита для Windows, которая упрощает включение и отключение блокировки доступа программ к Интернету:
- Скачайте программу с официального сайта https://winaero.com/download.php?view.1886 и установите её на компьютер.
- Сразу после этого в контекстном меню ярлыков и программ появятся пункты «Block Internet Access» (заблокировать доступ в Интернет) и «Restore Internet Access» (восстановить доступ).

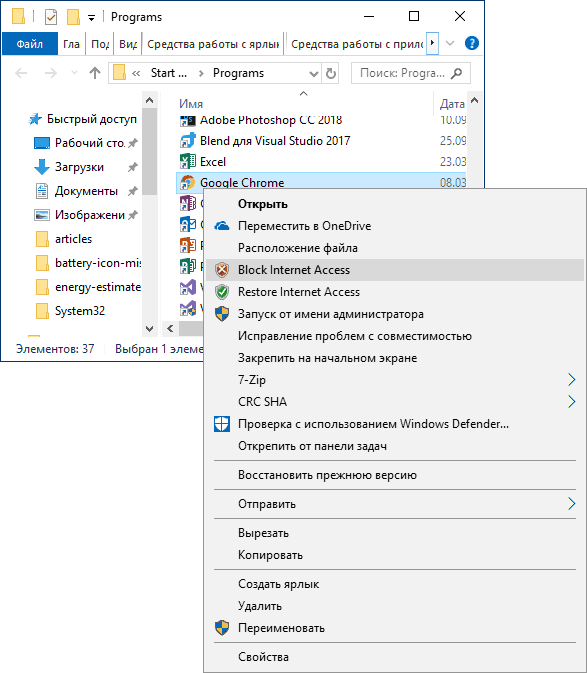
При этом, блокируя доступ, эта утилита использует тот же механизм, что и при ручном создании правил в брандмауре Windows, просто автоматизирует это.
Comodo Firewall
Помимо встроенных системных утилит Windows, вы можете воспользоваться и сторонними решениями, одно из них — Comodo Firewall, доступный в том числе и в бесплатной версии на официальном сайте https://personalfirewall.comodo.com/ (если у вас есть сторонний антивирус, будьте осторожны, он может конфликтовать с продуктом от Comodo, лучше воспользуйтесь уже имеющимися возможностями).
После установки файрвола, выполните следующие шаги для блокировки программе доступа к сети:
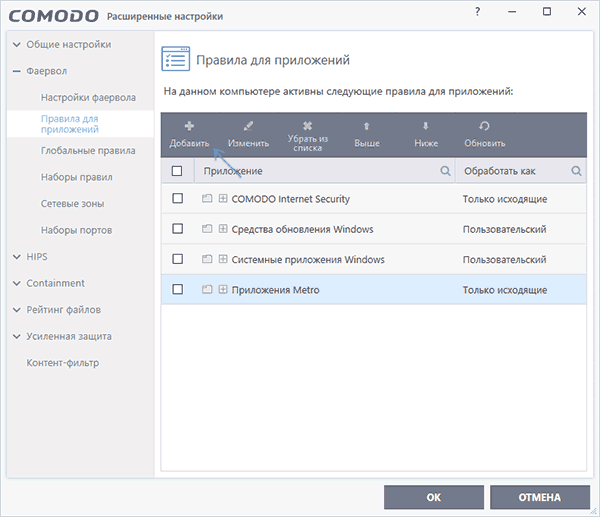
- Зайдите в настройки и откройте пункт Фаервол — Правила для приложений. Нажмите кнопку «Добавить».

- Нажмите «Обзор» и укажите файл программы или группу файлов (например, все приложения Metro/UWP, все браузеры) для которых нужно создать правило.
- Выберите пункт «Использовать набор правил», а затем — «Заблокированное приложение».


Примените настройки, после этого выбранная программа будет заблокирована. При необходимости разблокировать доступ, нажмите кнопку «Разблокировать приложение» в главном окне Comodo Firewall, отметьте программу и нажмите «Разблокировать».
В завершение ещё два нюанса:
- Если вы блокируете программе доступ к сети с целью отключения обновлений или каких-то функций, учитывайте, что у некоторого ПО для этих целей служит не основной исполняемый файл, который вы запускаете, а вспомогательные .exe файлы или отдельные службы. Часть для них уже есть правила в брандмауэре Windows и их достаточно найти и изменить.
- Если вы устанавливаете запреты в целях родительского контроля, возможно, лучше будет использовать иные средства, см. Родительский контроль Windows 10.
eSecurity Planet content and product recommendations are editorially independent. We may make money when you click on links to our partners. Learn More.
Blocking a program in a firewall is a security measure that protects systems from unwanted access. This process monitors resource consumption, limits internet access, blocks inbound access from malicious sources, and prevents outbound access from installed apps. Learn how to block a program in a firewall by exploring when to allow or block programs, methods to permanently or temporarily block in Windows or MacOS, and the common troubleshooting tips.
Table of Contents
When to Allow or Block a Program in a Firewall
When deciding whether to allow or block a program in a firewall, assess its legitimacy and potential risks of controlled system access. Your network firewall automatically prevents unauthorized access, but new apps may require manual or prompted exception additions to manage communication and handle blocking issues.
Consider the following:
- Automatic allowance: If the program is a system service or app automatically recognized by Windows, then allow it through the firewall to maintain seamless system functionality. If not recognized, then block it to prevent potential network security risks.
- New app installation: If the program is a newly installed app verified by the user, enable its intended functionalities by allowing the app. Block it if it’s not verified or deemed suspicious.
- Manual exception: If the program requires internet access for legitimate purposes and has been manually approved by the user, allow it to facilitate its communication. If not approved or its purpose is unclear, block it to prevent unauthorized access.
- User verification: If the program prompts the user for internet access and is confirmed as legitimate by the user, then enable its functionality by allowing it through the firewall. Block it if it’s not confirmed or if you’re not sure of its legitimacy.
- Customized network settings: If the program needs internet access while connected to a trusted network (private), then maintain its functionality. If connected to a public network, block it to prevent potential security threats.
7 Steps to Block a Program in a Firewall on Windows
This method for blocking a program in the firewall works for Windows 11, but the process is similar for Windows 10 and previous versions. You can successfully restrict a specific software from accessing the internet by navigating to the advanced settings of Windows Defender Firewall. Follow the steps below.
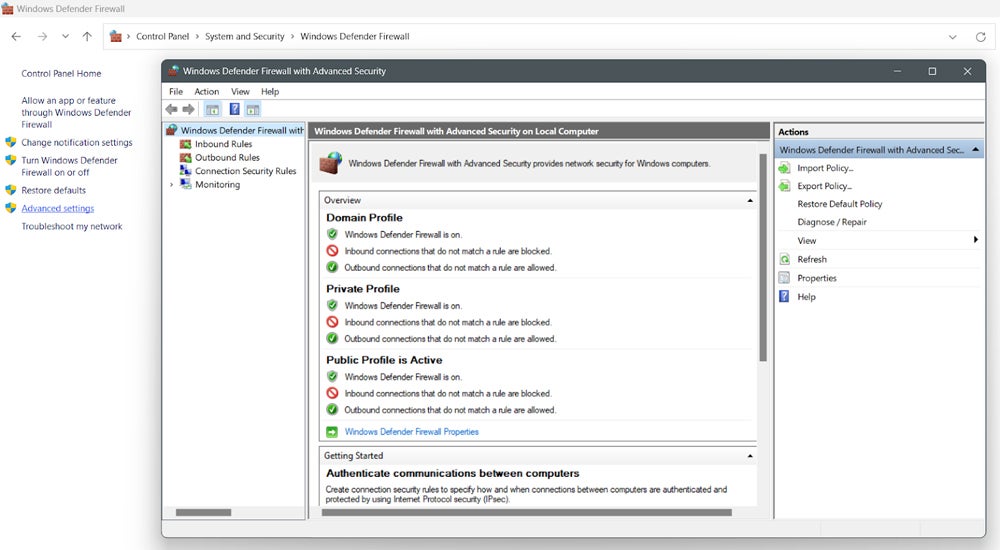
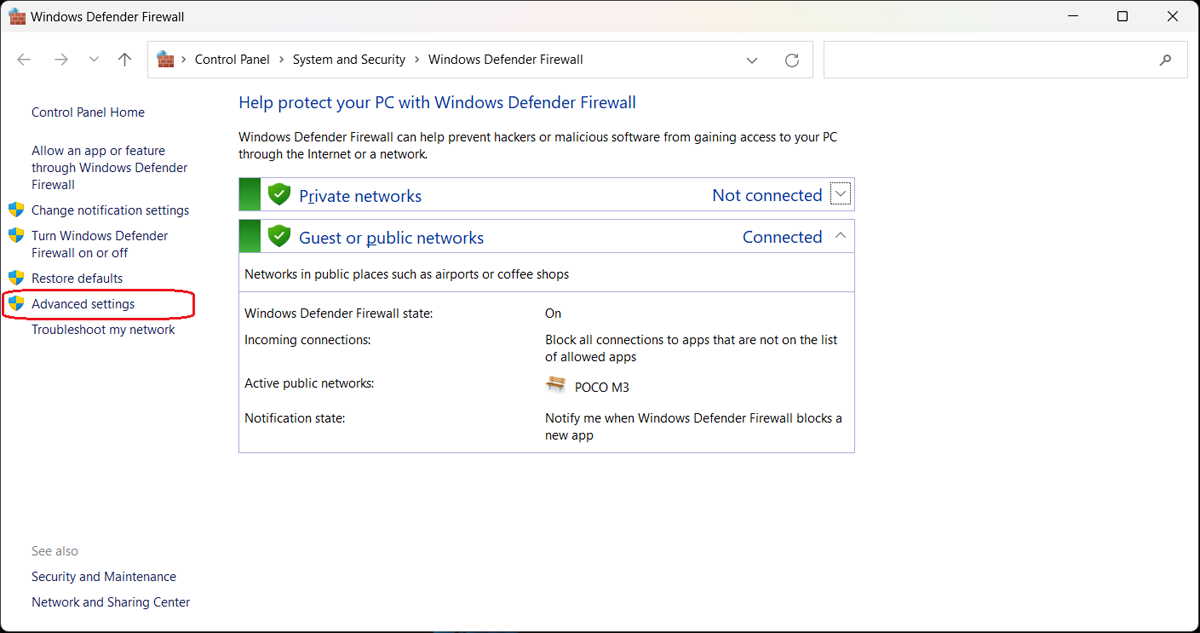
1. Access the Windows Defender Firewall
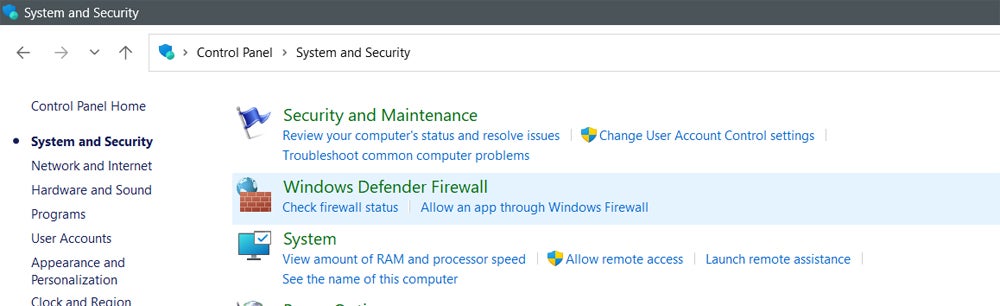
There are various ways to open Windows Defender Firewall. To get started, go to System and Security in the Control Panel and pick Windows Defender Firewall. You can also type Windows Defender Firewall in the search bar or locate it in the Windows Security folder in the Start menu. Another method is to find it in Settings under Update and Security, or by using the command control firewall.cpl.
2. Launch the Windows Defender Firewall’s Advanced Security
Click Advanced settings to pull up the Windows Defender Firewall with the Advanced Security panel. This provides detailed configuration choices for managing firewall rules. You can use this to establish rules that allow or restrict individual programs or services, giving you fine-grained control over network access. This interface allows you to customize firewall settings based on your security requirements.
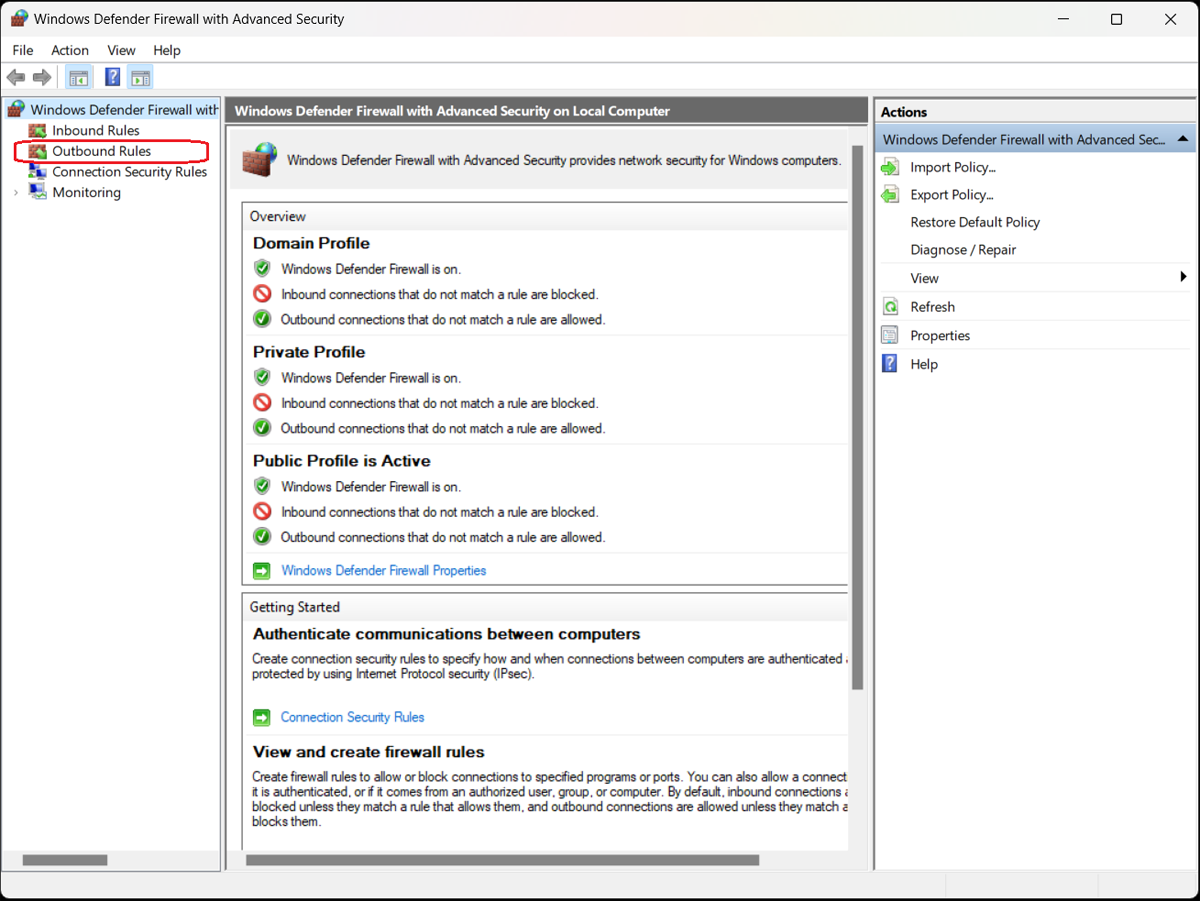
3. Select Outbound Rules
In the Windows Defender Firewall with Advanced Security console, select Outbound Rules from the left pane. This section contains a comprehensive set of outbound firewall rules that control the outgoing traffic from your machine. You can access these rules to monitor and change the permissions issued to programs and services for outbound communication.

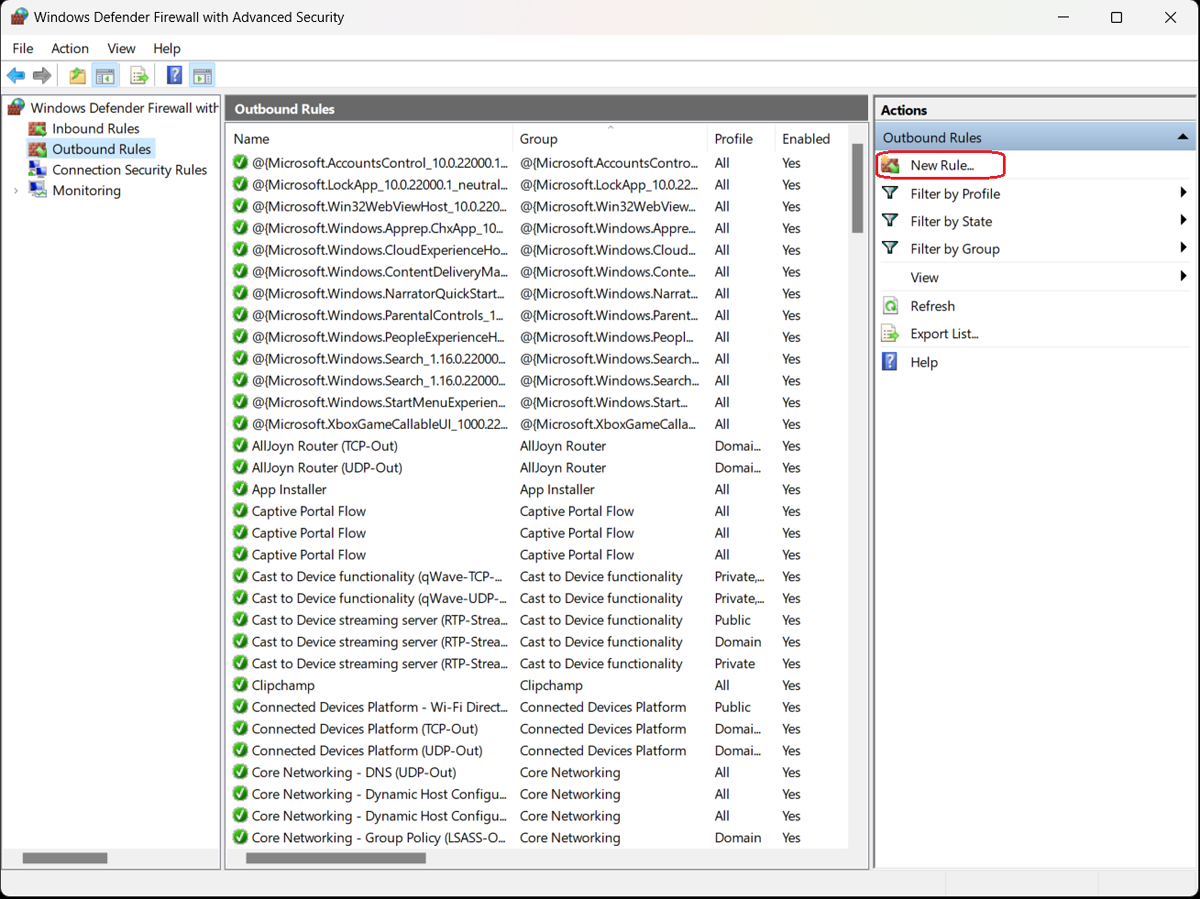
4. Click New Rule
Under Outbound Rules Actions, select New Rule. This action initiates the outbound rule development process, allowing you to provide the criteria and conditions for managing outgoing traffic. With this step, you can modify firewall settings to your security preferences.
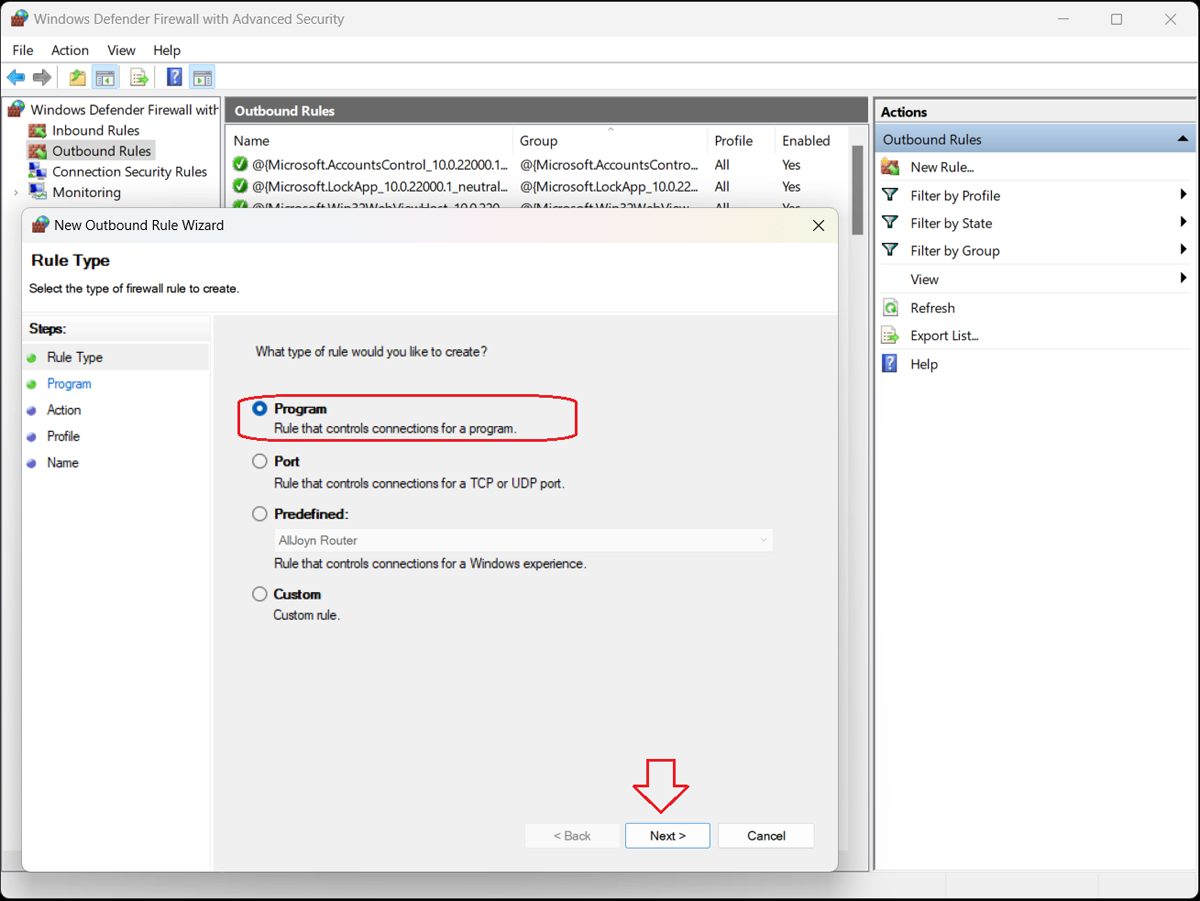
5. Select a Program
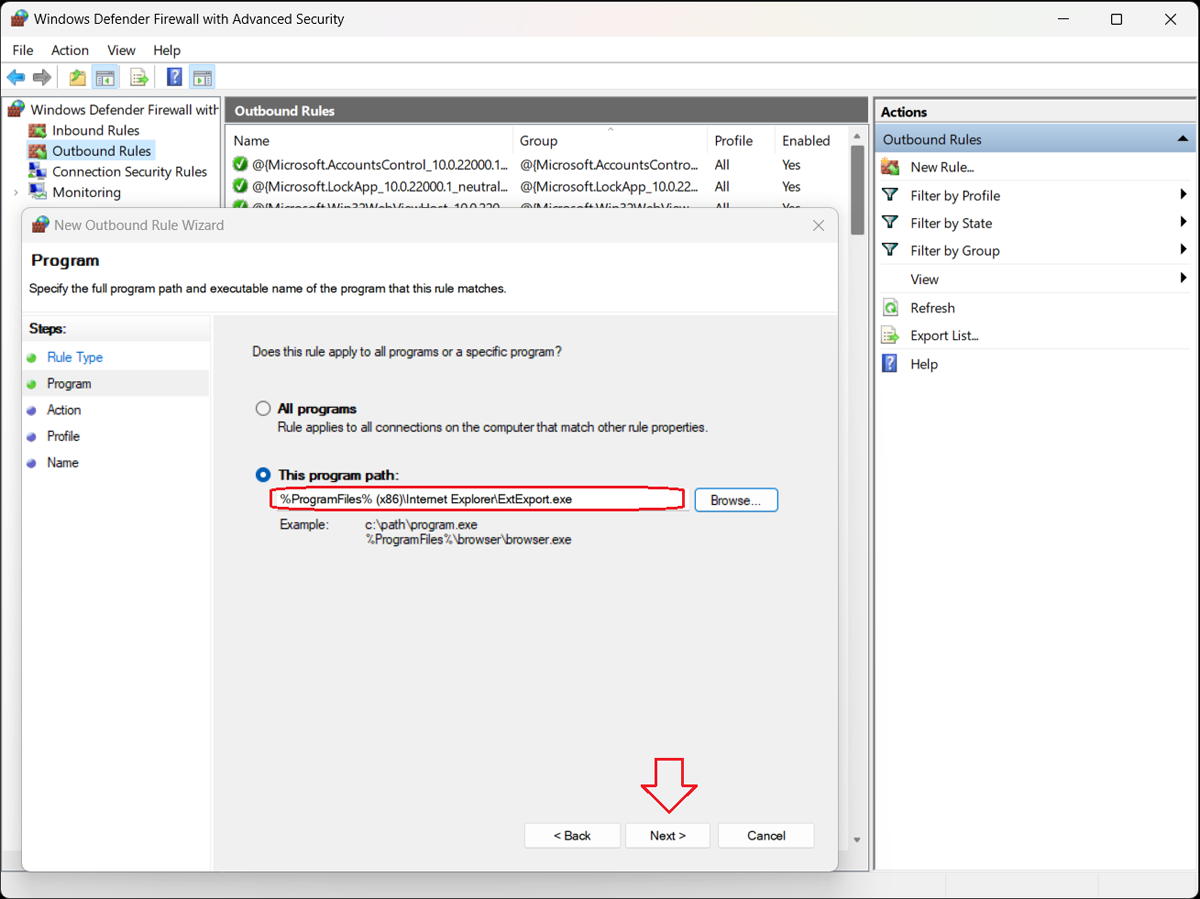
In the New Outbound Rule Wizard, select Create a Rule Based on a Program. Use the Browse button to find the program’s executable (.exe) file on your system. You can set the program’s path to define precise firewall regulations, permitting or prohibiting outbound network communication based on your security protocols and preferences.
6. Proceed Through the Next Pages
Once the program has been selected, proceed through the New Outbound Rule Wizard by clicking Next on each successive page. These procedures can involve adding conditions or parameters for the new firewall rule, such as defining when the rule applies or creating exceptions, to ensure exact control over outbound traffic management and firewall security setups.
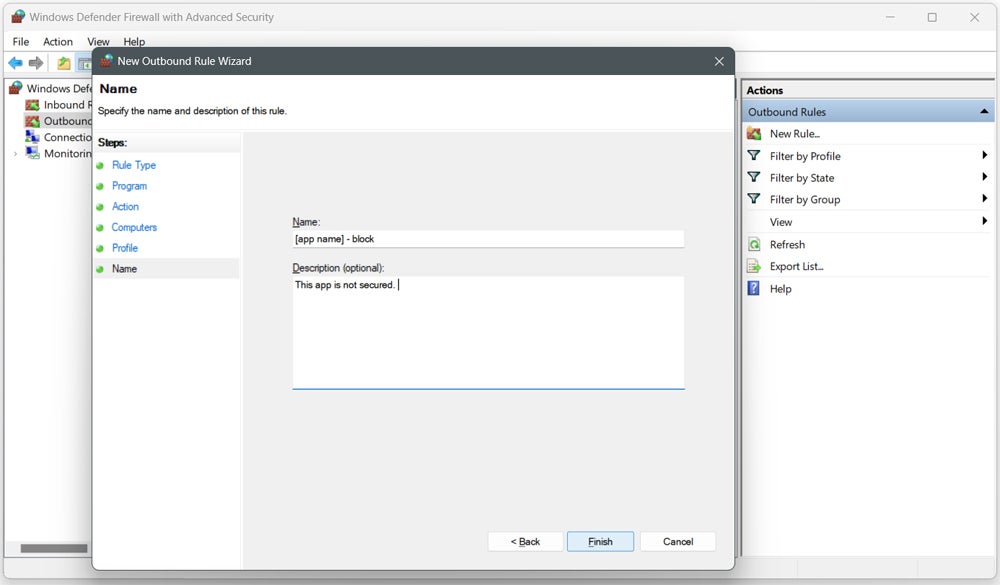
7. Enter the Rule Name & Click Finish
Provide the new firewall rule a descriptive name that clearly identifies its purpose. After naming, click the Finish button to complete the rule creation process. This step effectively enforces the rule by blocking the selected program from making outbound connections to the Internet.
Once you’ve created a rule, confirm that your new rule is included in the list. Then, repeat the process above if you need to block more programs. To unblock a program, simply select and delete the rule in the Advanced Security box lists.
Temporarily Blocking a Program via Windows Firewall
If you need flexible testing or troubleshooting without requiring permanent alterations, temporarily blocking a program is an ideal method for short-term adjustments or diagnostics. This method quickly addresses network security concerns or suspicious activity associated with a program, preventing potential risks until the issue is dealt with. Here’s how to do it:
- Access the Windows Defender Firewall.
- Select Allow an app or feature through Windows Firewall from the left pane.
- Click Change Settings.
- If the program in question isn’t listed, select Allow another app instead.
- To go to the program, select Browse.
- Select the program you want, and then click Add.
- Make sure the checkbox next to the program’s name is unchecked.
- Click OK to confirm.
- To allow the app later, check the box.
3 Steps to Block a Program in a Firewall on MacOS
Due to differences in OS architecture and UI, the method of blocking apps in the macOS firewall differs from that in Windows. Both strive to increase security, but macOS offers a shorter technique that differs from Windows firewall configuration in language, layout, and user experience. To block programs in the firewall on macOS, activate your firewall protection, configure the firewall access settings for the programs, and manage alerts.
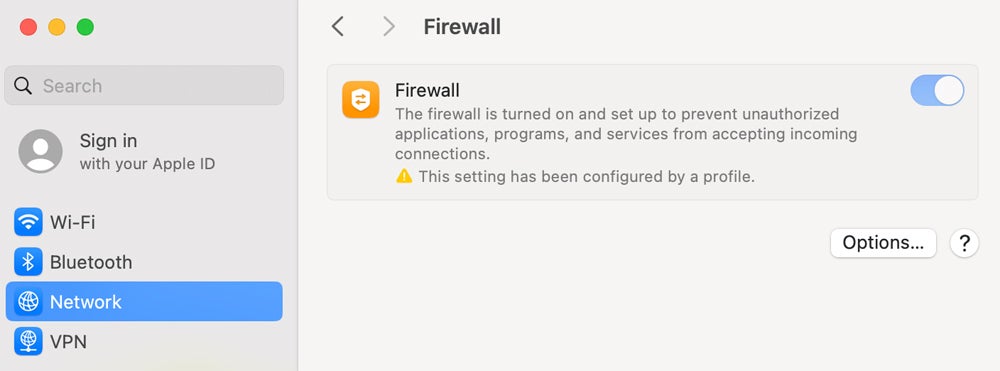
1. Turn on Firewall Protection
Start by enabling firewall protection on your Mac. Access System Preferences/System Settings from the Apple menu, then navigate to Network in the sidebar and pick Firewall. Toggle the switch to enable the firewall.
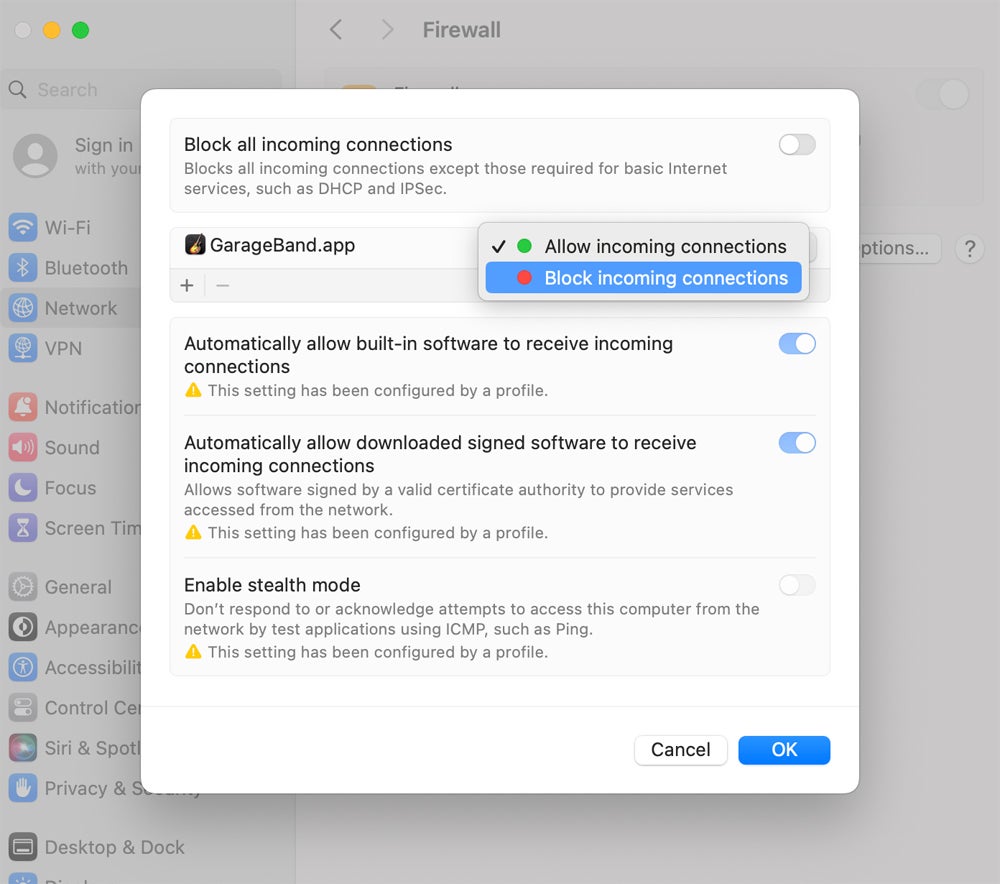
2. Set Firewall Access for Services & Apps
After you’ve enabled the firewall, you can configure its settings to control access to different services and applications. To access advanced settings, click on Options. If the option is disabled, turn on the firewall first. Then, click Add to indicate which apps or services the firewall should protect. Adjust their access rights with the given toggles, allowing or blocking programs as needed, then click OK.
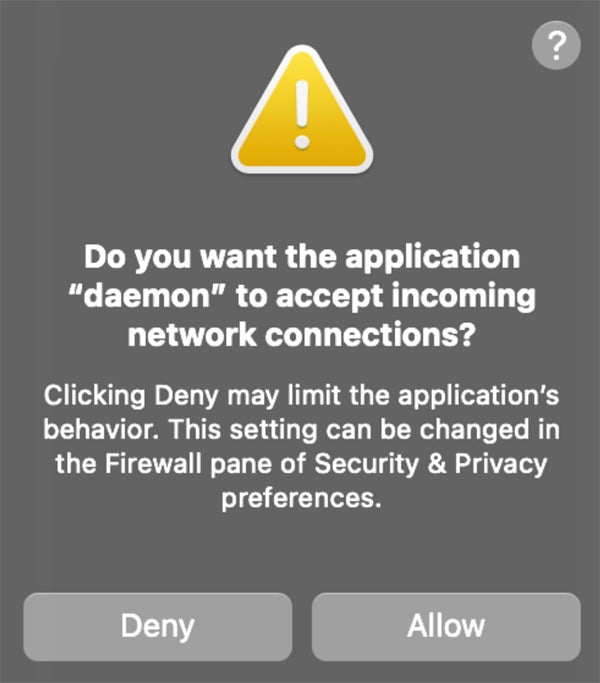
3. Manage Alerts
Limiting an app’s access through the firewall may have an impact on its performance and functioning, as well as any other software that relies on it. In addition, certain apps, such as system apps and digitally signed applications, may have firewall access by default. As a best practice while using firewalls, respond promptly to any alert messages that come up, as they indicate attempts by unrecognized apps to connect to the network.
Confirm if you’ve successfully added the blocked programs under Block all incoming connections. To add more programs in the list, simply click the + button, then select Allow or Block incoming connections.
Common Issues in Blocking Programs & Troubleshooting Tips
When encountering common issues like unlisted programs, features blocking, third party software interference, group policy blocking, and competing firewall rules, you may have to perform manual checking. Below are some troubleshooting tips so you can guarantee a proper management of the important programs within your firewall.
Unlisted Programs
If you can’t locate the program you want to block, browse the available options in the firewall settings, then add the program. The system allows users to identify and restrict certain programs to provide them exact control over firewall configurations.
Automatically Blocked Program Features
When an alert appears indicating that Windows Defender Firewall has disabled specific features of an application, go to Settings and select the Privacy and Security tab. From there, navigate to Windows Security and select Firewall and Network Protection. Users can enable the program via the Firewall by modifying the appropriate settings.
Third-Party Software Interference with the Firewall Rules
If a third-party software, such as an antivirus product, interferes with firewall rules, reset them to their default settings. Disable any third-party software modules that have an impact on firewall functionality. This enables appropriate firewall operation and resolves conflicts caused by intervention from external applications, preserving system security and stability.
Group Policy Blockage
If a software is being blocked by group policy, check the registry settings and disable any software restriction policies causing the blockage. Adjusting these settings allows you to fix issues caused by group policy constraints, ensuring unlimited access to desired programs while retaining system operation.
Firewall Rules Not Running Properly
To diagnose firewall rules that aren’t working properly, prioritize knowing their precedence and checking the settings. When a network packet matches several firewall rules, the rule selection is done in a certain order of precedence. First, the firewall prioritizes rules using the Allow if Secure and Block Override actions. Next, it considers rules that include Block actions. Finally, it applies rules with Allow actions if no competing rules exist.
Bottom Line: Boost Your Network Defense with Firewall Blocking
Firewall configuration and rule setups optimize network security defense techniques. However, this is only the first measure for securing your network. To achieve holistic protection, combine these procedures with advanced tools like intrusion detection systems, antivirus software, and next-generation firewalls. Using many layers of defense improves overall security against cyber threats.
Explore how next-generation firewalls (NGFWs) complement your network security strategies by offering advanced threat detection capabilities.
Enterprise Storage Forum content and product recommendations are editorially independent. We may make money when you click on links to our partners. Learn More.
A firewall protects computer systems from unwanted contact initiated by other computers connected over the internet or a network by blocking harmful programs based on user-defined rules. Individual services and applications can be granted access to pass through the firewall. This article explains how to block a program in a firewall to help you protect your system from unwanted access.
Table of Contents
Steps to Block a Program in a Firewall
This tutorial on how to block a program in a firewall applies to computers running Microsoft Windows 11 operating system. Some details might vary slightly for Windows 10 or older versions, but the procedure is essentially the same.
1. Open the Settings for Windows Defender Firewall with Advanced Security
Use one of the following methods to open the Windows Defender Firewall with Advanced Security.
Method 1
- Press the Windows key and the R key at the same type to open the Run dialog box.
- Type “WF.msc” into the box.
- Hit the “OK” button or Enter.
Method 2
- Press the Windows key to open the search function.
- Start typing “Windows Defender Firewall” and select the application when it appears.
- From the Windows Defender Firewall screen, select Advanced Settings in the left sidebar.
2. Select Inbound Rules or Outbound Rules
Choose whether you want to set an inbound rule allowing access to your computer for an external application or program, or an outbound rule allowing an application or program installed on your computer external access through the firewall.
The program-blocking process is similar for both types of rules—for this example, we’ll choose Outbound Rules to block a program in the firewall.
Select the appropriate option from the left sidebar of the Windows Defender Firewall with Advanced Security screen. A list of outbound rules appears detailing their names, groups, profiles, and status (enabled/disabled).
3. Create a New Rule
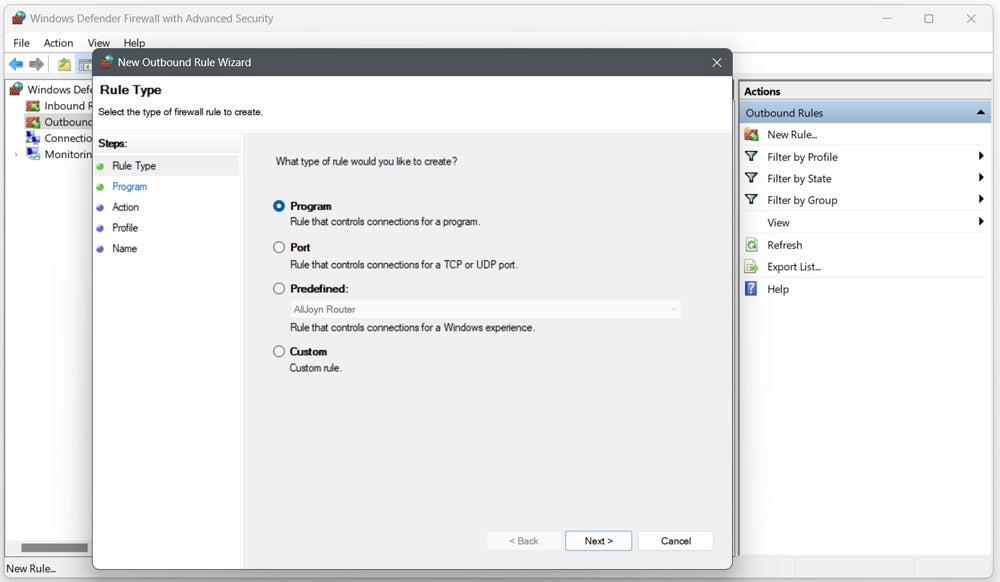
In the sidebar to the right of the list of existing outbound rules, click the “New Rule…” option. The New Outbound Rule Wizard opens, presenting four options for type of outbound rule:
- Program
- Port
- Predefined
- Custom
4. Select “Program”
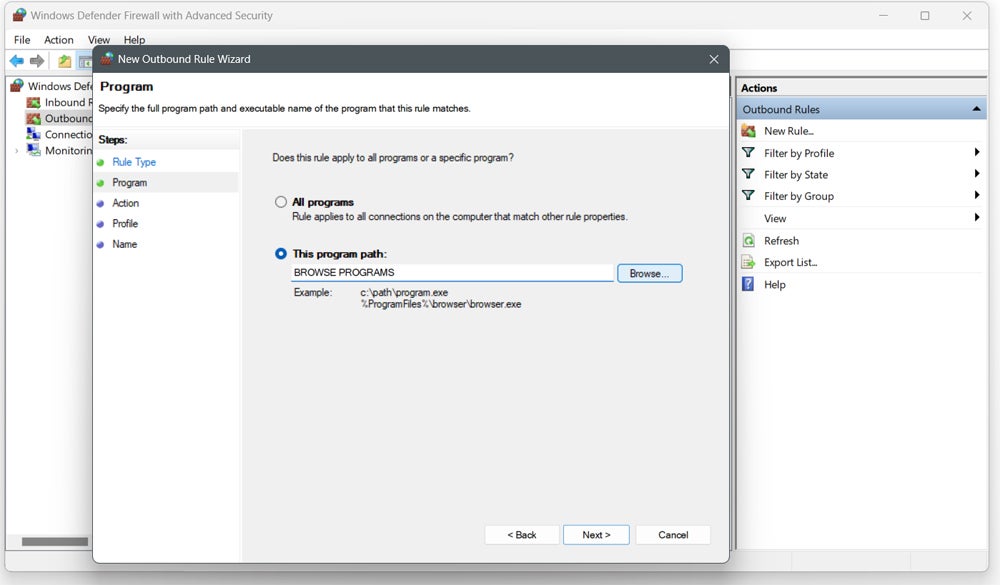
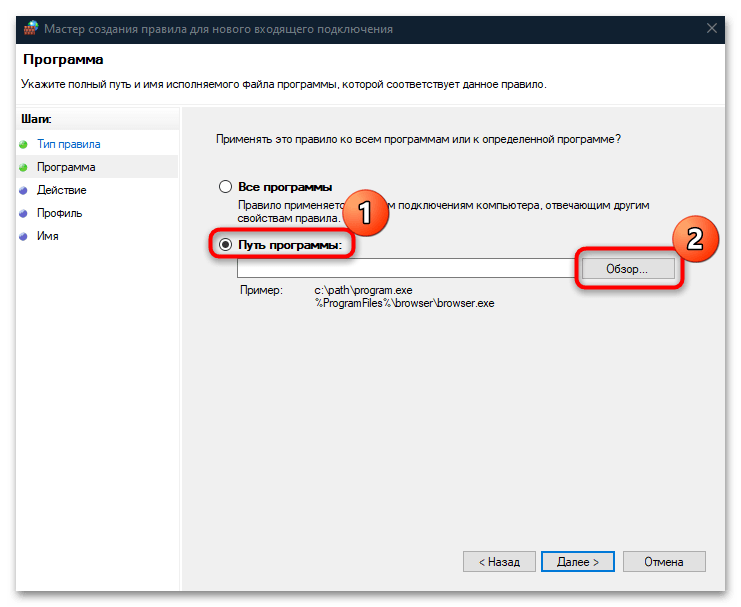
Select Program and click the “Next>” button. The Program dialog box opens to ask whether you want this rule to apply to all programs or just one specific program.
To block a specific program, select the “This program path” option and click the “Browse…” button to open the program folder.
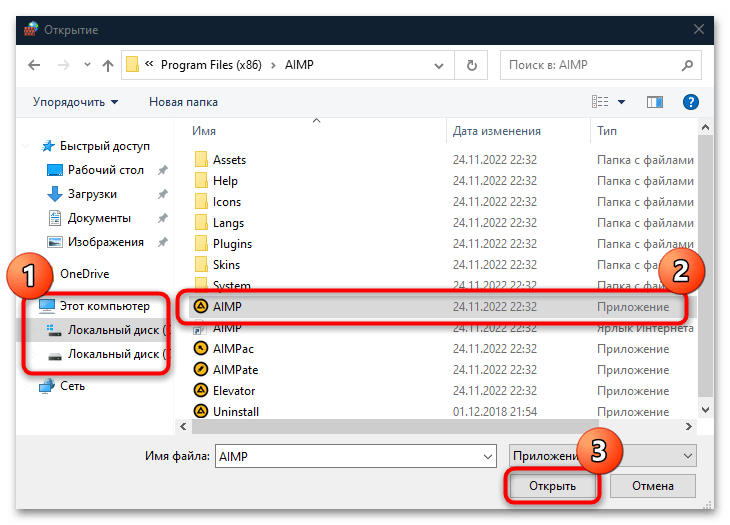
Locate and select the executable file (.exe) for the program you want to block.
Click the “Next>” button.
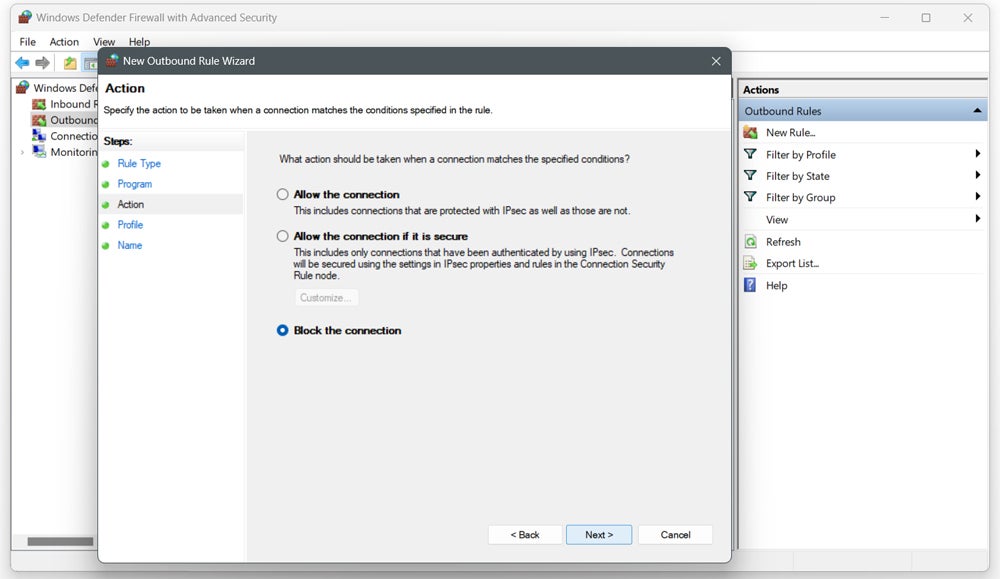
5. Block the Connection
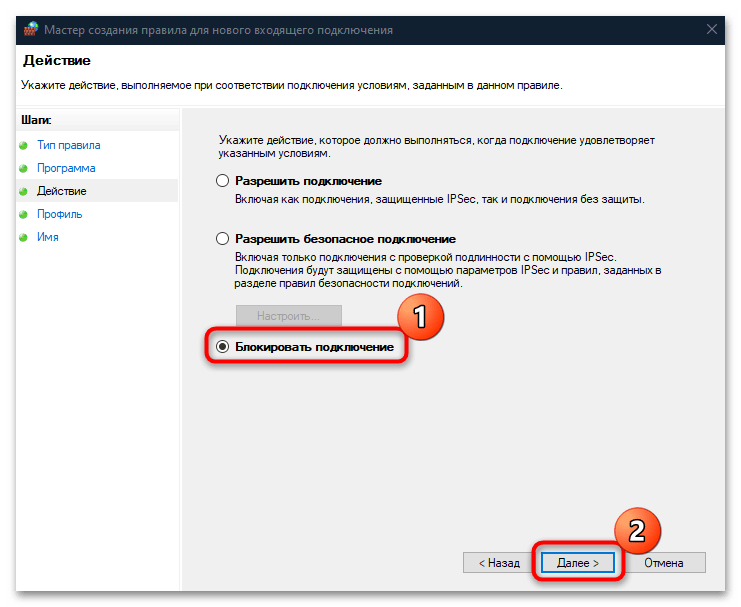
The Action window of the New Outbound Rule Wizard opens, presenting three options:
- Allow the connection. This includes connections that are protected with IPsec and well as those that are not.
- Allow the connection if it is secure. This includes only connections that have been authenticated by using IPsec. Connections will be secured using the settings in IPsec properties and rules in the Connection Security Rule node.
- Block the connection. This blocks the connection.
Select “Block the connection” and click the “Next>” button.

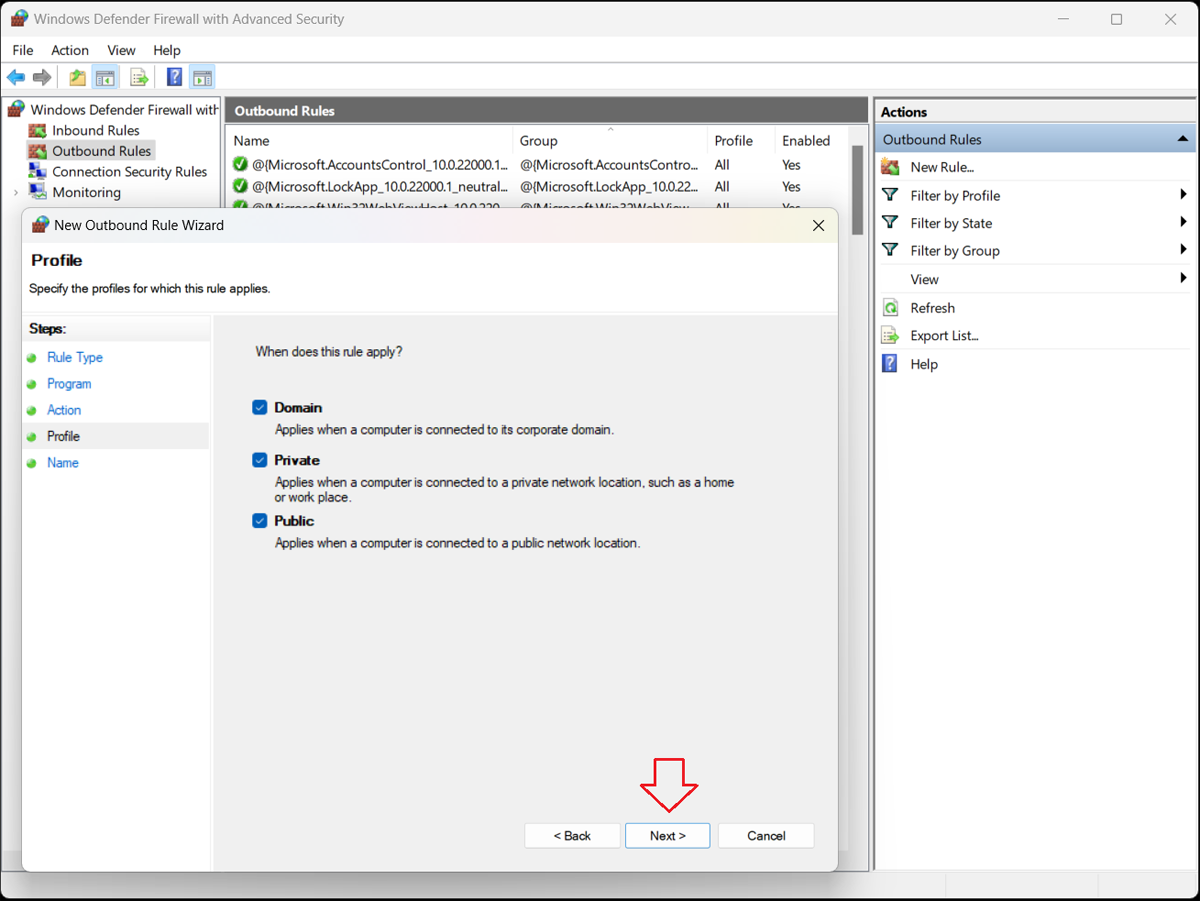
6. Specify the Profiles
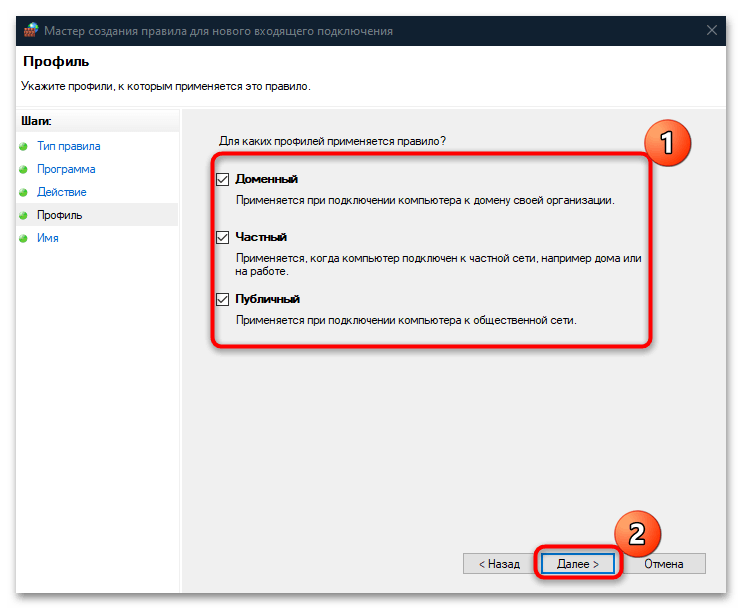
The Profile window of the New Outbound Rule Wizard opens, presenting three options:
- Domain–Applies when a computer is connected to its corporate domain.
- Private–Applies when a computer is connected to a private network location, such as a home or workplace.
- Public–Applies when a computer is connected to a public network location.
Specify when the rule will apply and click the “Next>” button.
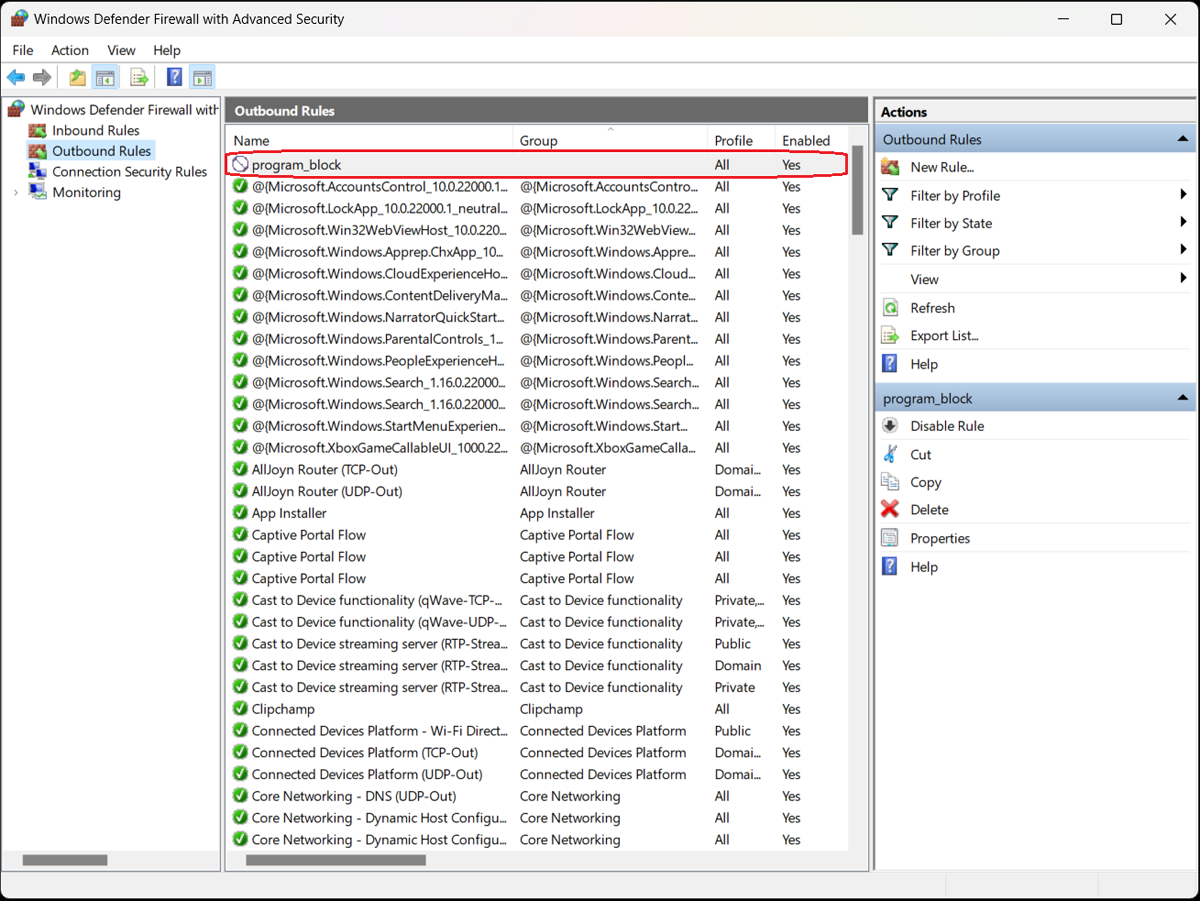
7. Assign the Rule a Name and Description
The Name window of the New Outbound Rule Wizard opens. In the empty fields, assign a name and description for the rule. Click the “Finish” button.

The Windows Defender Firewall with Advanced Security box lists all the existing outbound rules. Confirm that your new rule is included in the list. The program is now blocked; to unblock it, simply select and delete the rule.
You can unblock other programs the same way—to find them, sort the list by name, profile, state (enabled/disabled), or group and click Disable Rule in the right sidebar. You can also perform cut, copy, and delete rules or view their properties.
Are These Steps the Same for Other Firewalls?
Firewalls are essential for controlling traffic in networks and ensuring protection against hackers, malware, and ransomware attacks. Most computer operating systems (OS) include built-in firewalls, and many cybersecurity vendors offer third-party firewalls with context-aware network security features that integrate with other services.
The process involved in blocking a program in a firewall can vary based on the firewall and operating system, but the steps are similar to those modeled here.
Bottom Line: Optimize Your Firewall
While the steps covered here apply to blocking a program in a firewall for an individual computer, enterprise-scale firewalls can be deployed to protect entire networks of computers. These enterprise-class products perform the same functions as an individual firewall by using rules to determine whether to allow access to programs and apps.
Firewalls are a critical part of network security, blocking inbound access for harmful programs and applications and preventing outbound access for installed applications and services. When configured properly and used appropriately, a firewall can safeguard your data against today’s threats.
Learn more about where to place firewalls in your network.
Al Mahmud Al Mamun
Al Mahmud Al Mamun is a writer for TechnologyAdvice. He earned his B.S. in computer science and engineering from Prime University, Bangladesh. He attained more than 25 diploma courses and 100 certificate courses. His expertise and research interests include artificial intelligence (AI), artificial neural networks, and convolutional neural networks.
Вариант 1: Правило для одной программы
Заблокировать любому установленному на компьютер приложению доступ в интернет можно вручную, используя встроенные возможности брандмауэра «Защитника Windows»:
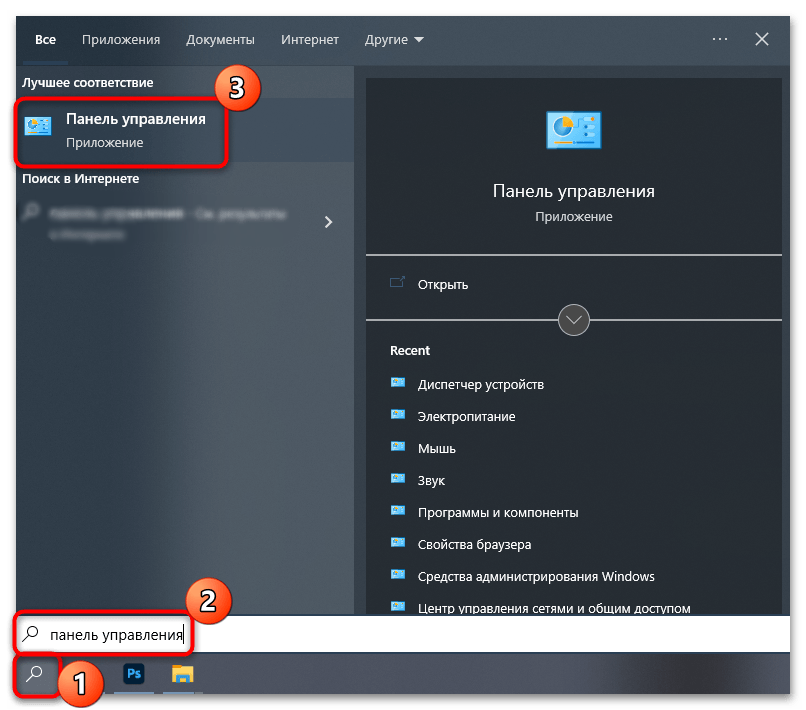
- Запустите «Панель управления», отыскав средство через системную поисковую строку.
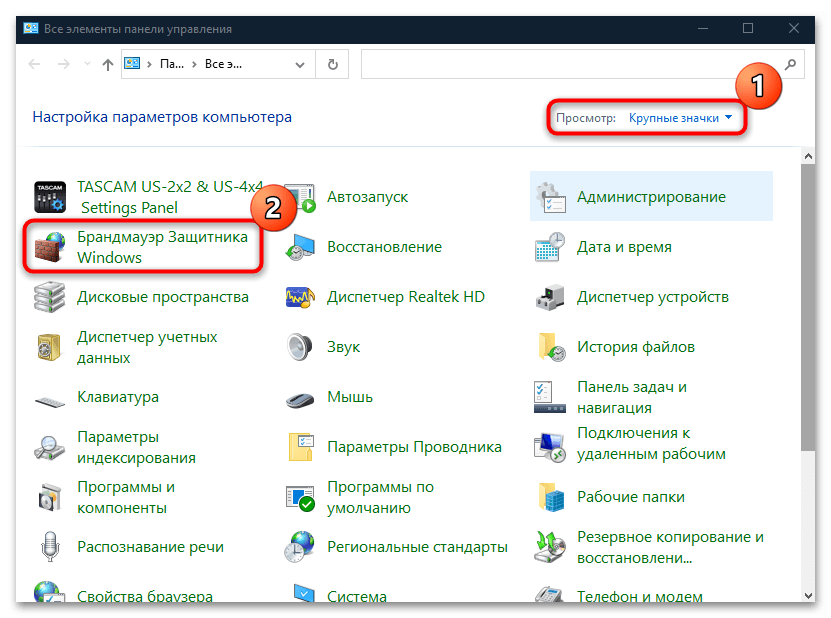
- Нажмите на выбор вида разделов в строке «Просмотр» и кликните по пункту «Крупные значки». Среди списка параметров нажмите на раздел «Брандмауэр Защитника Windows».
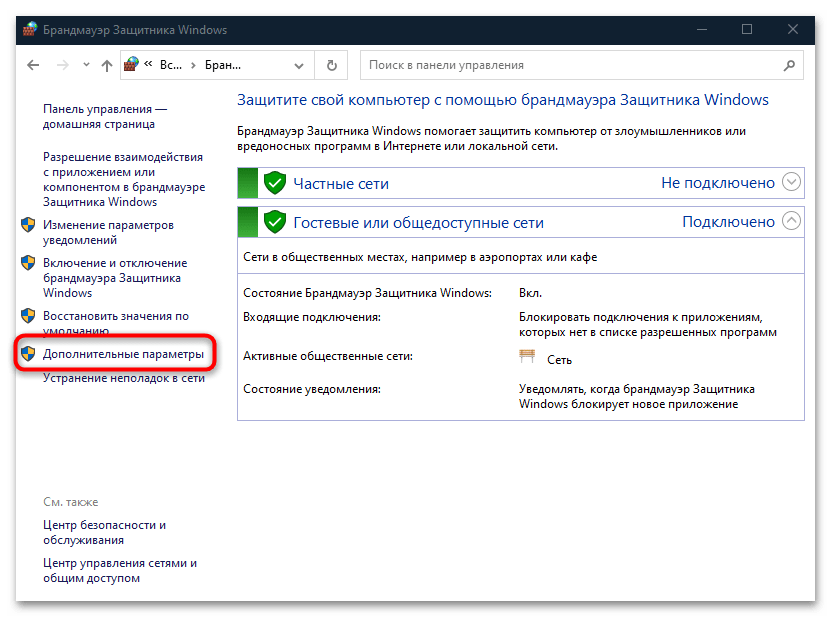
- Отобразится новое окно, где на панели слева кликните по строчке «Дополнительные параметры».
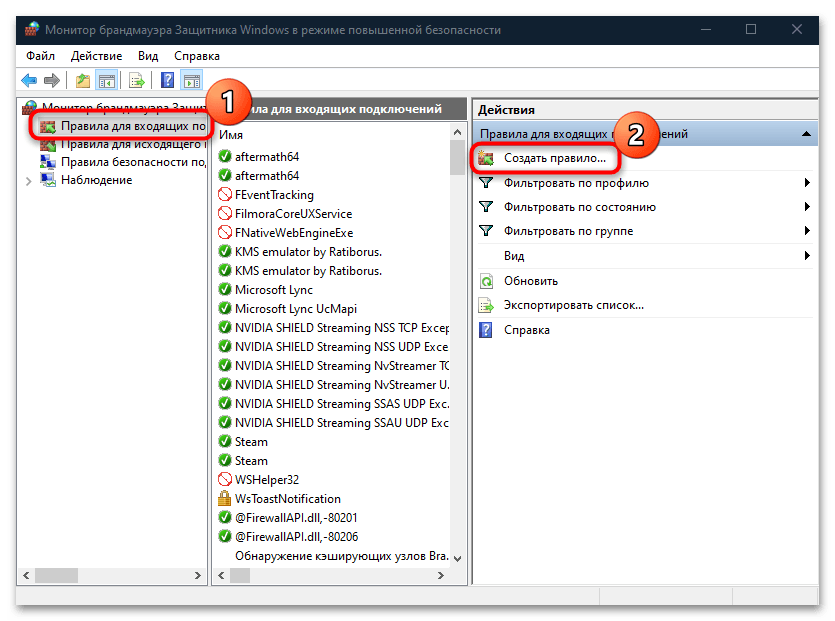
- Далее слева выберите раздел «Правило для исходящего подключения». На правой стороне окна также есть дополнительная панель, где нужно нажать на кнопку «Создать правило».
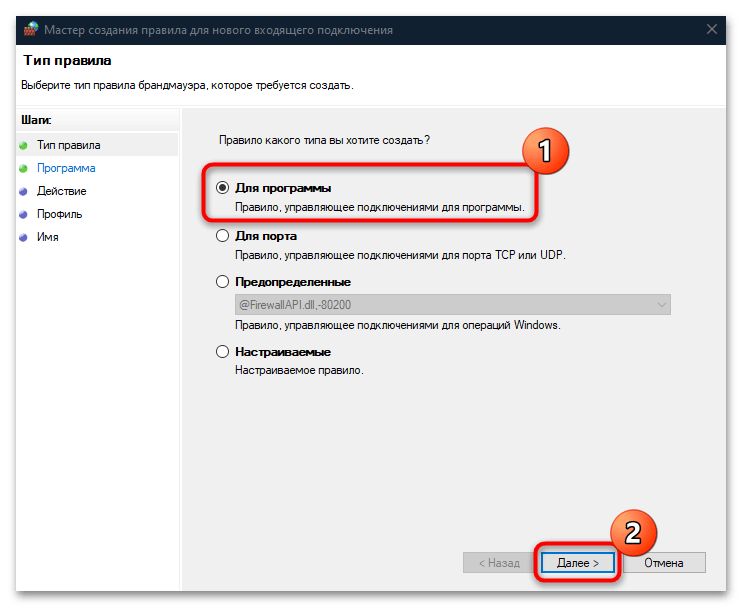
- Затем приступаем к настройке правила. В первом шаге оставьте отмеченным пункт «Для программы», а потом кликните по кнопке продолжения.
- Поставьте отметку у опции «Путь программы» и выберите «Обзор».
- Откроется штатный «Проводник», через который укажите путь к исполняемому файлу приложения, нуждающееся в блокировке в Windows 10.
- На следующем этапе выберите блокировку подключения.
- Потом будет предложено, для каких сетей предполагается применять правило для программы. Если для всех, то отметьте все пункты и продолжите настройку.
- На завершающем этапе останется задать имя новому правилу. Рекомендуем использовать такое, которое потом будет просто отыскать, например для того, чтобы убрать ограничение для приложения. Кликните по кнопке «Готово», чтобы закрыть окно с настройкой.
То же самое можно проделать и для входящего подключения: тогда программа не сможет принимать никакие данные из сети.
Вариант 2: Правило для всех программ
Есть еще один способ, который позволяет заблокировать приложение в брандмауэре в Windows 10. Он подойдет, если проделать это нужно сразу с несколькими программами. В этом случае следуйте инструкции, описанной выше, но в Шаге 6 Способа 1 нужно выбрать пункт «Все программы», а в остальном действуйте по аналогии.
- Когда правило для всех программ создано, найдите его в списке основного окна «Монитора брандмауэра Защитника Windows» и дважды кликните по нему левой кнопкой мыши.
- Перейдите на вкладку «Программы и службы». В блоке «Программы» выберите приложение, для которого будет применяться правило, через «Проводник», кликнув по кнопке «Обзор». Если нужно задать его для пакетов приложений, то в соответствующем разделе кликните по кнопке «Параметры».
- В новом окне отметьте «Применять к следующему пакету приложения». Ниже станет доступен список классического софта — отыщите нужное, выделите и нажмите на кнопку «ОК».

То же самое можно проделать и с другими программами, настраивая созданное правило. Это проще, чем создавать отдельное для каждого из приложений.
Наша группа в TelegramПолезные советы и помощь