Applies ToWindows 11 Windows 10
Ваш компьютер с Windows поставляется с единым решением для резервного копирования программа архивации данных, которое помогает создавать резервные копии многих наиболее важных для вас вещей. В файлах, темах и параметрах во многих установленных приложениях и Wi-Fi сведения программа архивации данных защищает все, что важно, и упрощает переход на новый компьютер.
В этом руководстве описывается использование программа архивации данных и различных параметров для резервного копирования и восстановления ключевых элементов на компьютере с Windows.
Резервное копирование компьютера

Это учетная запись, связанная с Windows, Microsoft 365, OneDrive, Xbox и т. д. Данные, для которых создана резервная копия, будут храниться в вашей учетной записи Майкрософт, поэтому получить доступ к вашим элементам на новом компьютере так же просто, как войти в систему.
-
В приложении «Параметры» на устройстве с Windows выберите Учетные записи > сведения или используйте следующее сочетание клавиш:
Ваши сведения
-
Выберите Войти вместо этого с учетной записью Майкрософт. Этот параметр отображается, только если вы используете локальную учетную запись. Если вместо этого отображается элемент Вход с локальной учетной записью, вы уже используете свою учетную запись Майкрософт.
Важно: В настоящее время приложение программа архивации данных ориентировано на потребительские устройства, например устройства, которые можно использовать, выполнив вход в личную учетную запись Майкрософт (MSA), например *@outlook.com , *@live.com и т. д. Рабочие или учебные учетные записи Майкрософт не будут работать.
Создание учетной записи Майкрософт
программа архивации данных — это простой и единый останов для всех ваших потребностей в резервном копировании. Ваша бесплатная учетная запись Майкрософт поставляется с 5 ГБ облачного хранилища OneDrive (при необходимости доступно дополнительное хранилище), а резервное копирование папок синхронизирует указанные папки с вашей учетной записью OneDrive, что делает их мгновенным доступом на всех компьютерах, которые вы используете с этой учетной записью Майкрософт. Так как они синхронизируются с OneDrive, после входа в OneDrive на новом компьютере эти файлы снова станут доступны.
Чтобы открыть программа архивации данных, найдите его в меню Пуск:
-
Нажмите кнопку «Пуск»
-
Введите backup и выберите программа архивации данных в результатах.
-
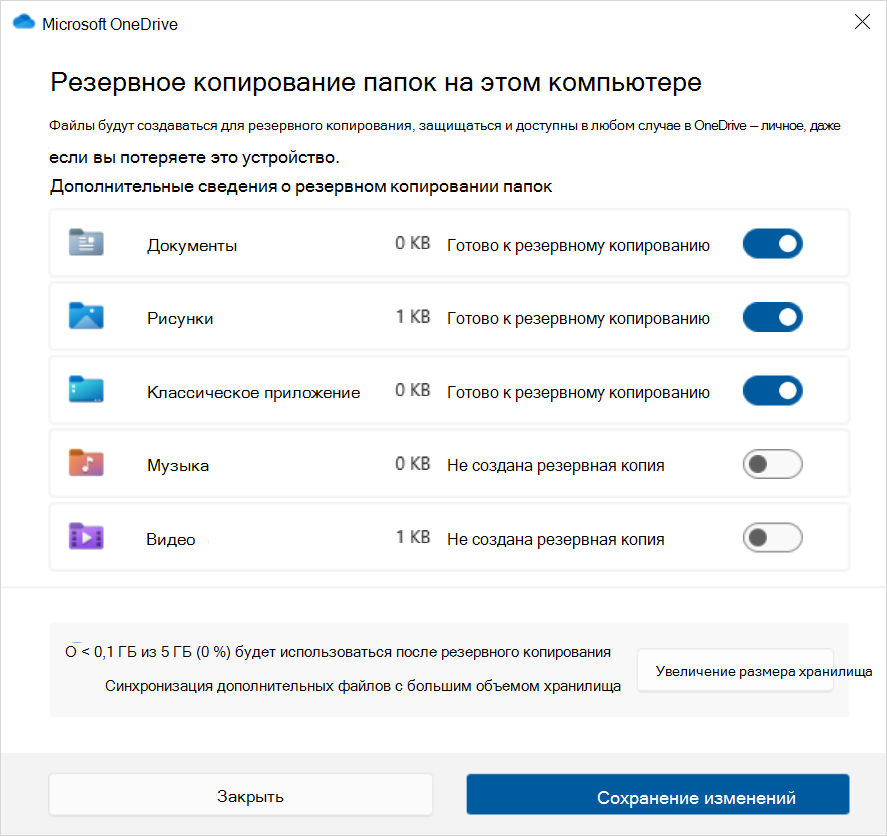
Разверните узел Папки и выберите, какие папки пользователей нужно создать в OneDrive. Вы можете создать резервную копию папок «Рабочий стол«, «Документы«, «Изображения«, «Видео» и «Музыка», переключив переключатель для каждой папки в положение Включено.
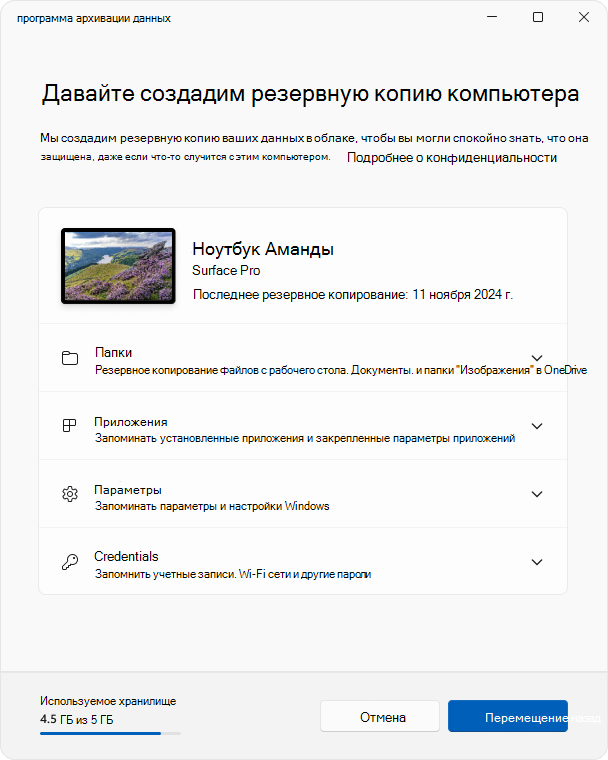
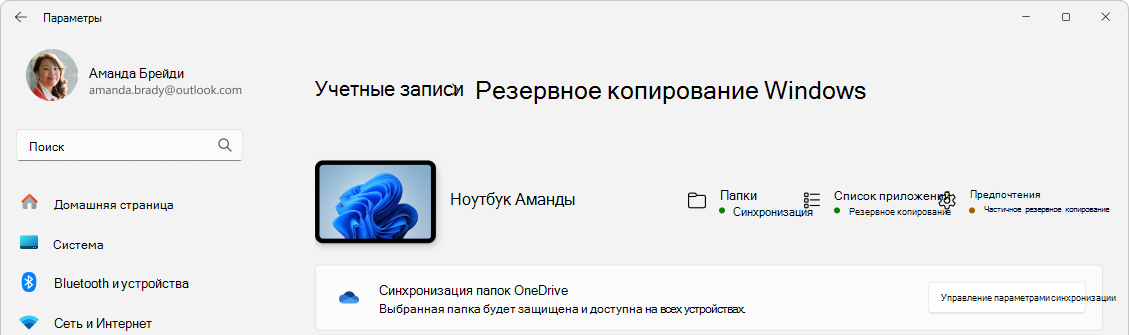
Совет: вы также можете управлять конфигурацией программа архивации данных в разделе Параметры. В приложении «Параметры» на устройстве с Windows выберите Учетные записи > резервное копирование Windows.
С помощью программа архивации данных вы также можете создавать резервные копии параметров Windows, в том числе:
-
Установленные приложения
-
Специальные возможности, языковые параметры и другие параметры, такие как обои и цвета
-
Wi-Fi сети и паролей
Чтобы проверка состояние всех этих параметров из программа архивации данных, разверните каждый элемент. Чтобы создать резервную копию параметра, установите переключатель Вкл.
Примечание: Если резервное копирование этих параметров было выполнено в прошлом (а некоторые из них по умолчанию), они будут отображаться как Резервные копии, а переключатель будет недоступен. Если вы хотите прекратить резервное копирование, см. статью Изменение конфигурации резервного копирования.
Когда все будет настроено так, как вы хотите, выберите Создать резервную копию.
Если при попытке создать резервную копию из OneDrive появляется сообщение об ошибке, возможно, вы не вошли в OneDrive или возникла другая проблема с OneDrive, которую необходимо устранить, чтобы программа архивации данных работали. Дополнительные сведения см. в статье Устранение проблем приложение синхронизации OneDrive.
Все готово! Создаются резервные копии папок и параметров, и вы можете получить доступ к файлам на всех компьютерах, на которые вы входите с помощью этой учетной записи Майкрософт.
Если вы хотите проверка и убедиться, что резервная копия по-прежнему создана, вы можете открыть приложение программа архивации данных, и в нем отобразится текущее состояние резервной копии.
Вы также можете проверка состояние в приложении «Параметры», выберите Учетные записи > резервное копирование Windows
Как насчет моих настроек Microsoft Edge?
Чтобы легко просматривать веб-страницы с любого своего устройства и упорядочить избранное, войдите в Microsoft Edge и включите синхронизацию.
Вход для синхронизации данных Microsoft Edge на разных устройствах
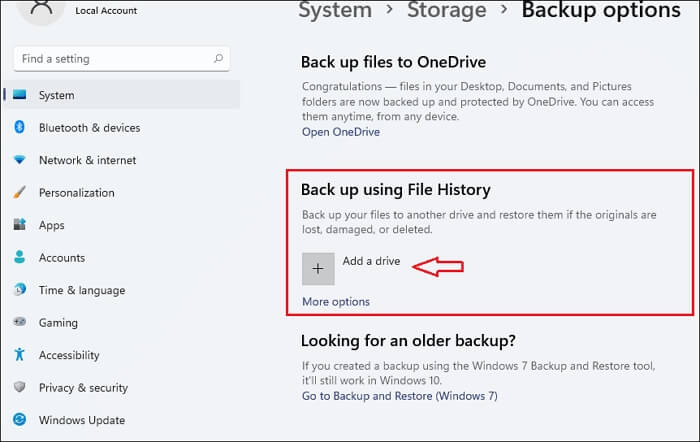
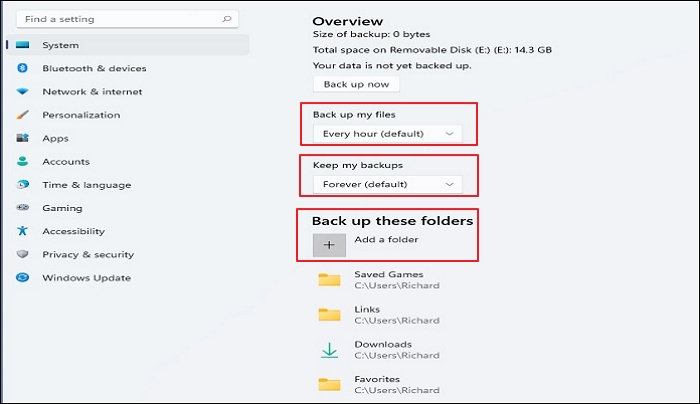
Изменение конфигурации резервного копирования
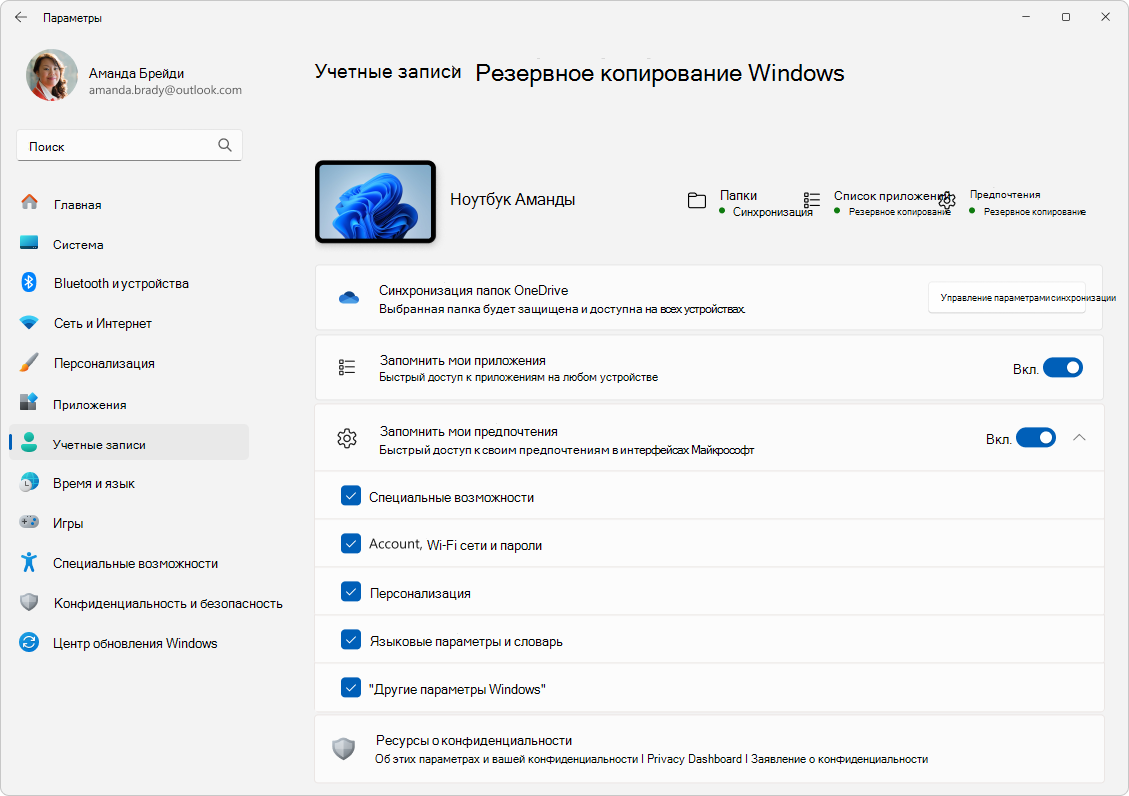
Если вы хотите изменить конфигурацию резервного копирования, откройте раздел Параметры > Учетные записи > резервное копирование Windows или используйте следующее сочетание клавиш:
Резервное копирование Windows
-
Чтобы изменить синхронизацию папок в OneDrive, выберите Управление параметрами синхронизации в разделе Синхронизация папок OneDrive и переключите папки, для которого требуется создать резервную копию.

-
Чтобы изменить резервную копию приложений, используйте переключатель Запомнить мои приложения. Этот параметр недоступен для рабочих или учебных учетных записей, и Windows не запоминает приложения для рабочих или учебных учетных записей.
-
Чтобы изменить резервную копию параметров, используйте флажки, указанные в разделе Запомнить мои настройки, и убедитесь, что флажки для любого из элементов, для которых требуется создать резервную копию. Если включить параметр Другие параметры Windows, Windows также будет синхронизировать некоторые параметры устройств (например, настройки принтера и мыши), параметры проводника и настройки уведомлений. Этот параметр доступен для рабочей или учебной учетной записи, если это разрешено вашей организацией. Дополнительные сведения см. в статье Включение enterprise State Roaming в Microsoft Entra ID
Если вы отключили резервное копирование и хотите удалить данные, которые были ранее созданы в вашей учетной записи Майкрософт, перейдите на страницу Устройства учетной записи Майкрософт, найдите раздел Параметры облачной синхронизации в нижней части страницы и выберите и выберите Очистить сохраненные параметры.
Восстановление компьютера
Разделы справки восстановить резервную копию?
У нас есть твоя спина! При получении нового компьютера или при необходимости переустановки Windows при его настройке просто войдите в систему с той же учетной записью Майкрософт, которая использовалась для создания резервной копии. Мы увидим, что у вас есть резервные копии, и спросим, хотите ли вы восстановить их.
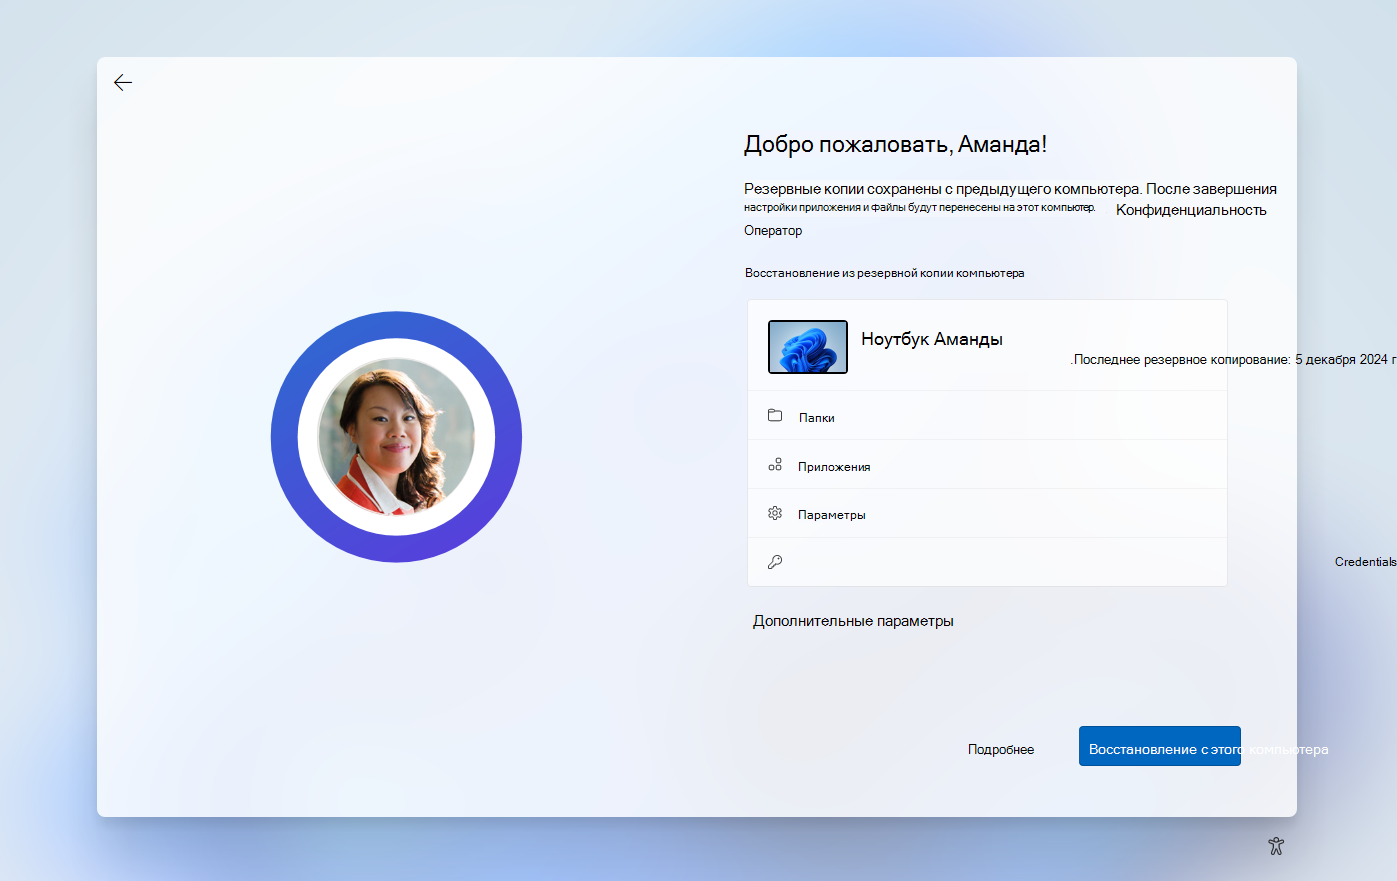
Если у вас есть несколько компьютеров с резервными копиями, можно выбрать Дополнительные параметры и выбрать резервную копию, из которой вы хотите восстановить. Когда вы вернетесь к вашему рабочему столу, все будет прямо там ждет вас!
-
Контакты приложений восстанавливаются там, где вы их оставили. Приложения, доступные в Microsoft Store, можно восстановить, щелкнув значок приложения, чтобы начать работу. Для приложений, недоступных в Магазине, вы будете перенаправлены в Интернет, чтобы скачать установщик.
-
Ваши самые важные параметры также будут восстановлены на новом устройстве. Полный список поддерживаемых параметров см. в разделе Каталог параметров программа архивации данных.
-
Файлы можно восстановить в любое время, войдя в OneDrive с той же учетной записью Майкрософт, которая использовалась для создания исходной резервной копии.
Статьи по теме
Каталог параметров программа архивации данных
Страница main учетной записи Майкрософт
Нужна дополнительная помощь?
Нужны дополнительные параметры?
Изучите преимущества подписки, просмотрите учебные курсы, узнайте, как защитить свое устройство и т. д.