
Applies ToWindows 11 Windows 10
Поддержка Windows 10 прекратится в октябре 2025 г.
После 14 октября 2025 г. корпорация Майкрософт больше не будет предоставлять бесплатные обновления программного обеспечения из Центра обновления Windows, техническую помощь и исправления безопасности для Windows 10. Ваш компьютер по-прежнему будет работать, но мы рекомендуем перейти на Windows 11.
Подробнее
Шрифты играют важную роль в общей эстетике и удобочитаемости документов и презентаций. Независимо от того, являетесь ли вы дизайнером, который хочет добавить уникальные штрихи к своей работе, или просто кто-то, кто хочет расширить свой творческий набор инструментов, важно знать, как управлять шрифтами в Windows.
В этой статье описаны действия по просмотру, установке и удалению шрифтов на устройстве с Windows. Вы узнаете, как изучить шрифты, доступные на вашем компьютере, добавить новые шрифты для улучшения проектов и удалить те, которые больше не нужны для поддержания системы в упорядочении и эффективности.
Проверьте, какие шрифты доступны на вашем устройстве
-
В приложении «Настройки» на устройстве с Windows, выберите Персонализация > Шрифты или используйте следующий ярлык:
Шрифты
-
Шрифты перечислены в разделе Доступные шрифты.
Примечание: Не все приложения поддерживают пользовательские шрифты. Если шрифт не отображается в приложении или программе, попробуйте другое приложение, чтобы проверка и проверить, установлен ли шрифт и работает ли он правильно.
В разделе Доступные шрифты предлагается несколько вариантов, которые помогут вам эффективно управлять шрифтами. Ниже приведены основные доступные функции:
-
Поиск и фильтрация. Вы можете легко найти конкретный шрифт, введя его имя в строке поиска. Это помогает быстро найти нужный шрифт, не прокручивая весь список.
-
Просмотр предварительного просмотра. Вы можете просмотреть предварительный просмотр каждого шрифта, который включает в себя различные размеры и грани. Это позволяет увидеть, как будет выглядеть шрифт в различных стилях и размерах, прежде чем использовать его.
-
Скрыть. Если у вас есть шрифты, которые вы не используете часто, но не хотите удалять, их можно скрыть. Это позволяет упорядочить список шрифтов без окончательного удаления шрифтов.
-
Удаление. Вы можете удалить шрифты, которые больше не нужны. Это помогает освободить место и обеспечить порядок в системе, удаляя ненужные шрифты
Общие операции
Разверните следующие разделы, чтобы узнать больше о распространенных операциях со шрифтами в Windows:
-
В приложении «Настройки» на устройстве с Windows, выберите Персонализация > Шрифты или используйте следующий ярлык:
Шрифты
-
Выберите Получить дополнительные шрифты в Microsoft Store или используйте следующий ярлык.
Изучение шрифтов в Microsoft Store
-
Выберите шрифт, который нужно добавить, а затем выберите Получить или Купить. Шрифт будет скачан и установлен автоматически.
-
Получите или скачайте файл шрифта и убедитесь, что файл имеет значение True Type (.ttf) или Файл OpenType (.otf)
-
Если файл сжат в файл.zip , щелкните его правой кнопкой мыши и выберите команду Извлечь , чтобы извлечь файлы.
-
-
Щелкните правой кнопкой мыши файл шрифта и выберите Установить. Чтобы установить для всех пользователей на компьютере, выберите Установить для всех пользователей.
-
Если вам будет предложено разрешить программе вносить изменения на компьютер, убедитесь, что вы доверяете источнику скачаемого файла, а затем нажмите кнопку Да.
-
В приложении «Настройки» на устройстве с Windows, выберите Персонализация > Шрифты или используйте следующий ярлык:
Шрифты
-
Выберите шрифт, который требуется удалить.
-
Нажмите Удалить
-
В приложении «Настройки» на устройстве с Windows, выберите Персонализация > Шрифты или используйте следующий ярлык:
Шрифты
-
В разделе Связанные параметры выберите Скачать fornts для всех языков и подтвердите, нажав кнопку ОК.
Нужна дополнительная помощь?
Нужны дополнительные параметры?
Изучите преимущества подписки, просмотрите учебные курсы, узнайте, как защитить свое устройство и т. д.
Adding new fonts to Windows 10 can make your documents and presentations stand out, adding a personal touch to your projects. It’s a simple process that involves downloading a font file and installing it through the Windows settings. With just a few clicks, you can expand your font library and customize your text with new styles.
Adding fonts to your Windows 10 system can enhance your design work, spruce up your documents, and more. Here’s a simple guide to help you through the process.
Step 1: Download the Font
Find and download the font file you wish to use on your computer.
There are many websites offering free and paid font downloads. Popular formats include TTF (TrueType Font) and OTF (OpenType Font). Make sure the font file is saved in a location where you can easily find it, like your Downloads folder.
Step 2: Extract the Font Files
If your font file is zipped, right-click it and select “Extract All.”
Sometimes fonts are downloaded as a compressed file, especially if there are multiple styles or weights in one package. Extract the files to access the individual font files.
Step 3: Open the Font File
Locate and double-click the extracted font file to open it.
Opening the font file will display a preview of the font, showing what the characters look like. This helps you ensure that you’re installing the right typeface.
Step 4: Click the “Install” Button
In the font preview window, click the “Install” button to add the font.
Once you click install, Windows will automatically add the font to your system’s font library. This process typically takes just a few seconds.
Step 5: Verify the Font Installation
Open any program that uses text (like Word) and check the font list to ensure your new font appears.
If you see your font in the list, congratulations—it’s ready to use! If not, you may need to restart your computer to complete the installation.
After completing these steps, you’ll have successfully added a new font to your Windows 10 system. You can now use it in any program that supports text formatting, such as Microsoft Word, PowerPoint, or Adobe Photoshop. This new font will be available in all software that accesses the system fonts until you decide to remove it.
Tips for Adding Fonts in Windows 10
- Always download fonts from a reputable source to avoid malware.
- Organize your font files into folders if you plan to add multiple fonts at once.
- Check the font license if you intend to use it for commercial purposes.
- Consider using a font manager if you frequently install and manage fonts.
- Keep your fonts backed up in case you need to reinstall them later.
Frequently Asked Questions
How can I remove a font from Windows 10?
To remove a font, navigate to Settings > Personalization > Fonts, click on the font you wish to remove, and select “Uninstall.”
Can I use downloaded fonts in all programs?
Yes, once installed, the font should be available in any program that allows text formatting.
What if my downloaded font isn’t showing up?
Try restarting your computer or the program you’re using to refresh the font list.
Are all fonts compatible with Windows 10?
Most TTF and OTF fonts are compatible. Some older or obscure fonts may not work properly.
Is it legal to download fonts for free?
Many fonts are available for free, but always check the license for any restrictions on use, especially for commercial purposes.
Summary
- Download the font file.
- Extract the font files if needed.
- Open the font file.
- Click the “Install” button.
- Verify the font installation.
Conclusion
Adding a new font to Windows 10 is a straightforward process that can significantly enhance your creative toolkit. With a few simple steps—downloading, extracting, opening, and installing—you can introduce a world of typography to your documents, presentations, and designs. Remember, while the installation process is quick and easy, the impact is long-lasting.
Using unique fonts can be like adding spices to a recipe—they give your work flavor and character. Whether you’re crafting a professional report, designing a poster, or jazzing up a personal project, the right font can make all the difference. So, don’t shy away from exploring new typefaces. Embrace the variety, and let your creativity flow through every letter and word.
For those who relish variety in their digital workspace, regularly adding new fonts is a must. Explore, experiment, and elevate your text today with new fonts on Windows 10. And remember, the world of typography is vast and full of surprises, waiting for you to dive in!
Matt Jacobs has been working as an IT consultant for small businesses since receiving his Master’s degree in 2003. While he still does some consulting work, his primary focus now is on creating technology support content for SupportYourTech.com.
His work can be found on many websites and focuses on topics such as Microsoft Office, Apple devices, Android devices, Photoshop, and more.
Установить новый шрифт в Windows довольно просто — после этого вы получите новый красивый вариант для оформления текстов в разных программах. Это будет полезно при работе с документацией или верстке крупных графических проектов.
Расширение шрифта для Windows
Шрифты в Windows — это самые обычные файлы, которые содержат информацию об оформлении текста. Как правило, они имеют формат ttf или otf, что расшифровывается как TrueType и OpenType. Иногда встречается тип woff — его можно конвертировать в более популярный формат с помощью онлайн-конвертеров.
Оригинальные и пользовательские шрифты также могут иметь тип PostScript Type 1 — это набор файлов (до 4 штук) с расширениями pfm, p, afm и inf. Для установки такого комбинированного шрифта надо выбрать файл pfm. Однако встречается Type 1 очень редко — и скорее всего вы не будете с ним работать.
Папка со шрифтами Windows 10
Все установленные шрифты Windows 10 находятся в одноименной папке по адресу C:\Windows\Fonts. Можете скопировать его в адресную строку проводника или забить в поиске ключевое слово «Шрифты» — нужная папка будет первой в списке.
Где скачать новый шрифт для Windows
Перед установкой шрифт надо скачать. Для этого подходят как специализированные сайты, так и магазин Microsoft Store, доступный в Windows 10.
Чтобы загрузить шрифты из магазина, надо открыть «Пуск» и перейти к разделу «Параметры» — «Персонализация» — «Шрифты». Если нажать на кнопку «получить дополнительные шрифты в Microsoft Store», то попадете к списку доступных для загрузки вариантов.
Если хотите загрузить шрифт из интернета, загляните на сайт www.fonts-online.ru. У него понятный интерфейс, почти нет рекламы и большой выбор бесплатных и красивых шрифтов.
Как установить шрифт на компьютере Windows 10
Для примера мы скачали красивый шрифт Courier Prime. Его можно установить тремя способами.
Скачанный на компьютер шрифт легко установить прямо из папки с загрузками, не открывая файл. Достаточно кликнуть по нему правой кнопкой мыши и выбрать пункт «Установить».
Также это можно сделать, открыв шрифт. Он отобразится в виде отдельного окна с примерами фраз — можно сразу оценить, как они будут выглядеть в текстовом редакторе и при печати. В левом верхнем углу будет кнопка «Установить» — кликните на нее, и за пару секунд шрифт пропишется в системе.
Еще один способ установки — простой перенос файла шрифта в папку Fonts. Зацепите его мышкой и перетащите в раздел со шрифтами — и он установится автоматически.
После этого установленный шрифт появится во всех программах, которые позволяют работать с текстом: Word, Excel, Photoshop. Однако для отображения новых шрифтов их придется перезапустить.
Читайте также:
- Лайфхаки для Windows: создаем идеальную систему=«content_internal_link»>
- CCleaner удаляет данные Firefox — что делать? =«content_internal_link»>
Редактор направлений «Мобильные устройства» и «Техника для дома»
While Windows 11 has gotten a major overhaul, that has not impacted the default fonts currently available. This can mean a sigh of relief to those who dislike too many changes. However, it can also mean a carryover of monotony for some who like to add a little twist to things. If you belong to the latter, here are 2 ways you can install fonts in Windows 11.
Do the fonts automatically get installed once they’re downloaded? Or are there other steps involved to install these fonts? In this article, we will address these questions and go one step further by giving step-by-step ways to install and download fonts in Windows 11 using third-party sites as well. Let’s get right into it.
Method 1: Add Fonts to Windows 11 Using Microsoft Store
While Windows 11 comes with its set of fonts, you can get more fonts straight from the Microsoft Store. This helps in making sure you’re downloading fonts from a secure source. To do this, simply open the Microsoft Store and install the required fonts.
Follow the below steps to do it.
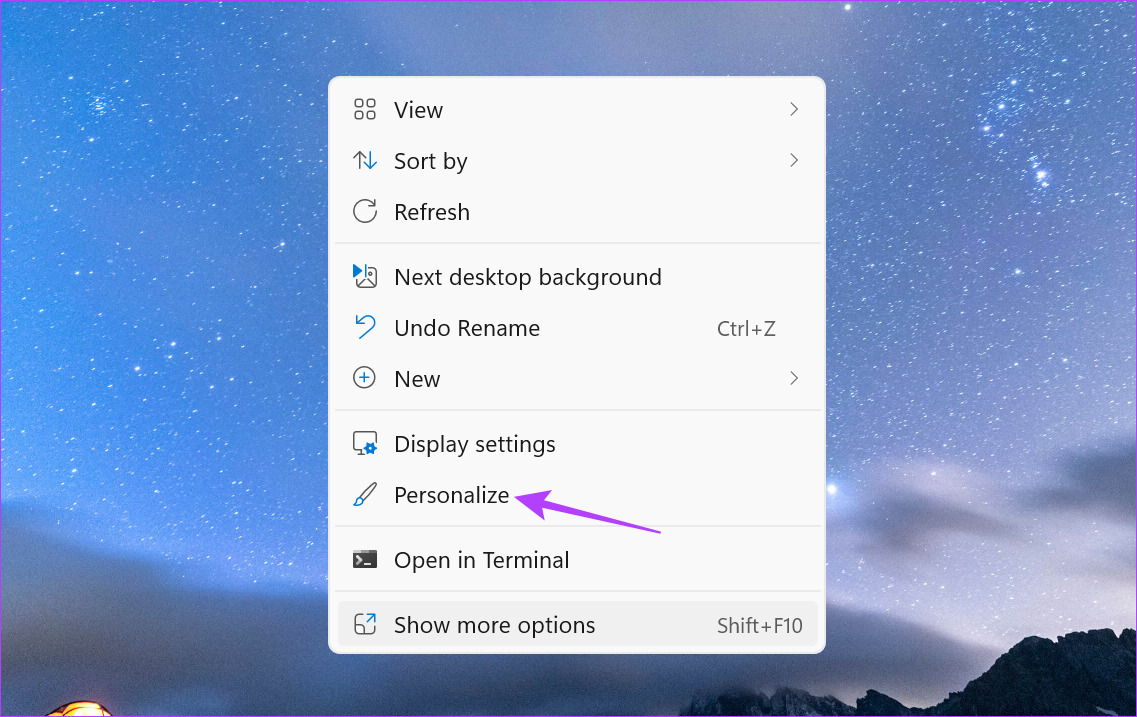
Step 1: Right-click on your desktop.
Step 2: Then, click on Personalize.
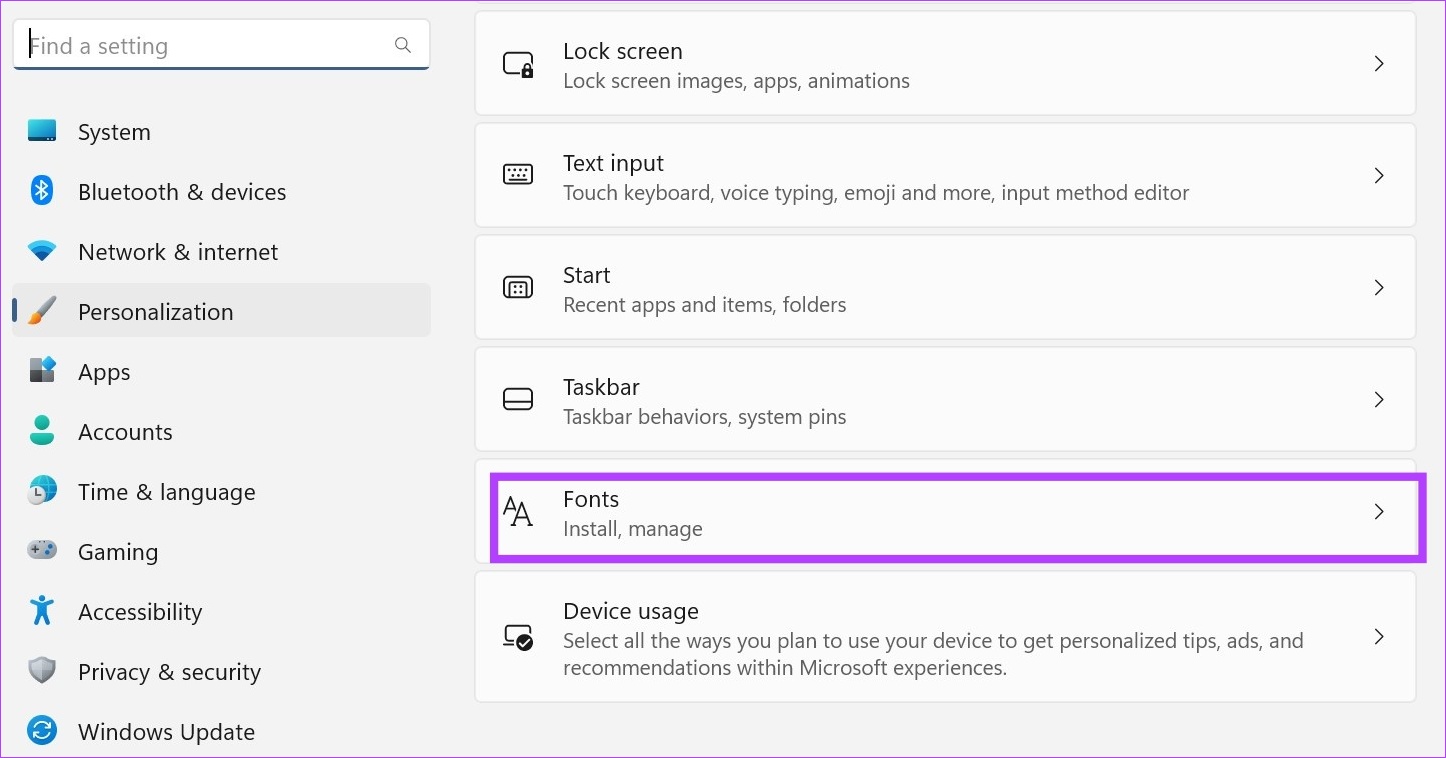
Step 3: Once the Personalization page opens, scroll down and click on Fonts.
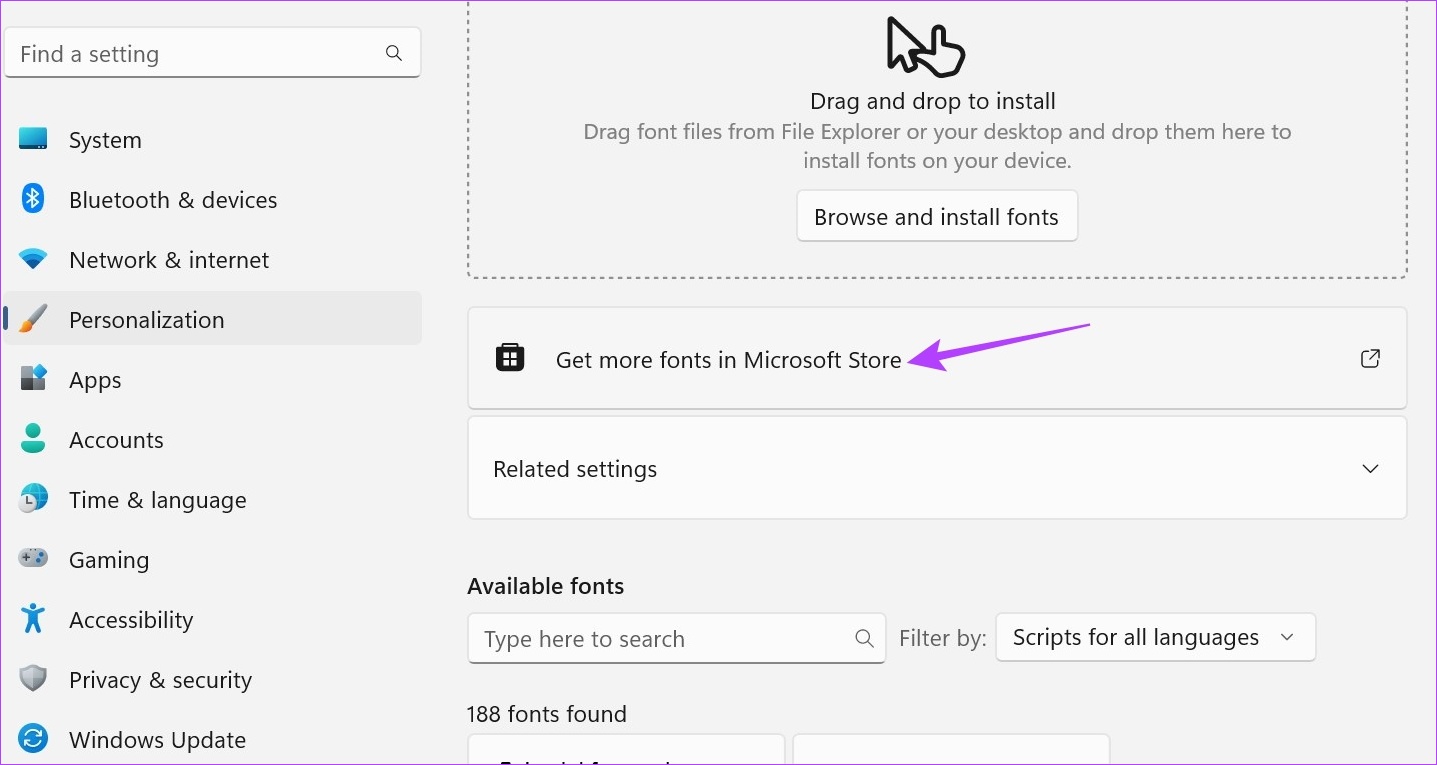
Step 4: Here, click on ‘Get more fonts in Microsoft Store’. This will launch the Microsoft Store in a separate window.
Note: You can also open the Microsoft Store using the Windows search bar. Simply type Microsoft Store in the search bar and click on the relevant search result.
Step 5: While some fonts are available, all search results might not be visible on this page. So, go to the Microsoft Store search bar and type Fonts. Then, press enter. This will open the fonts page.
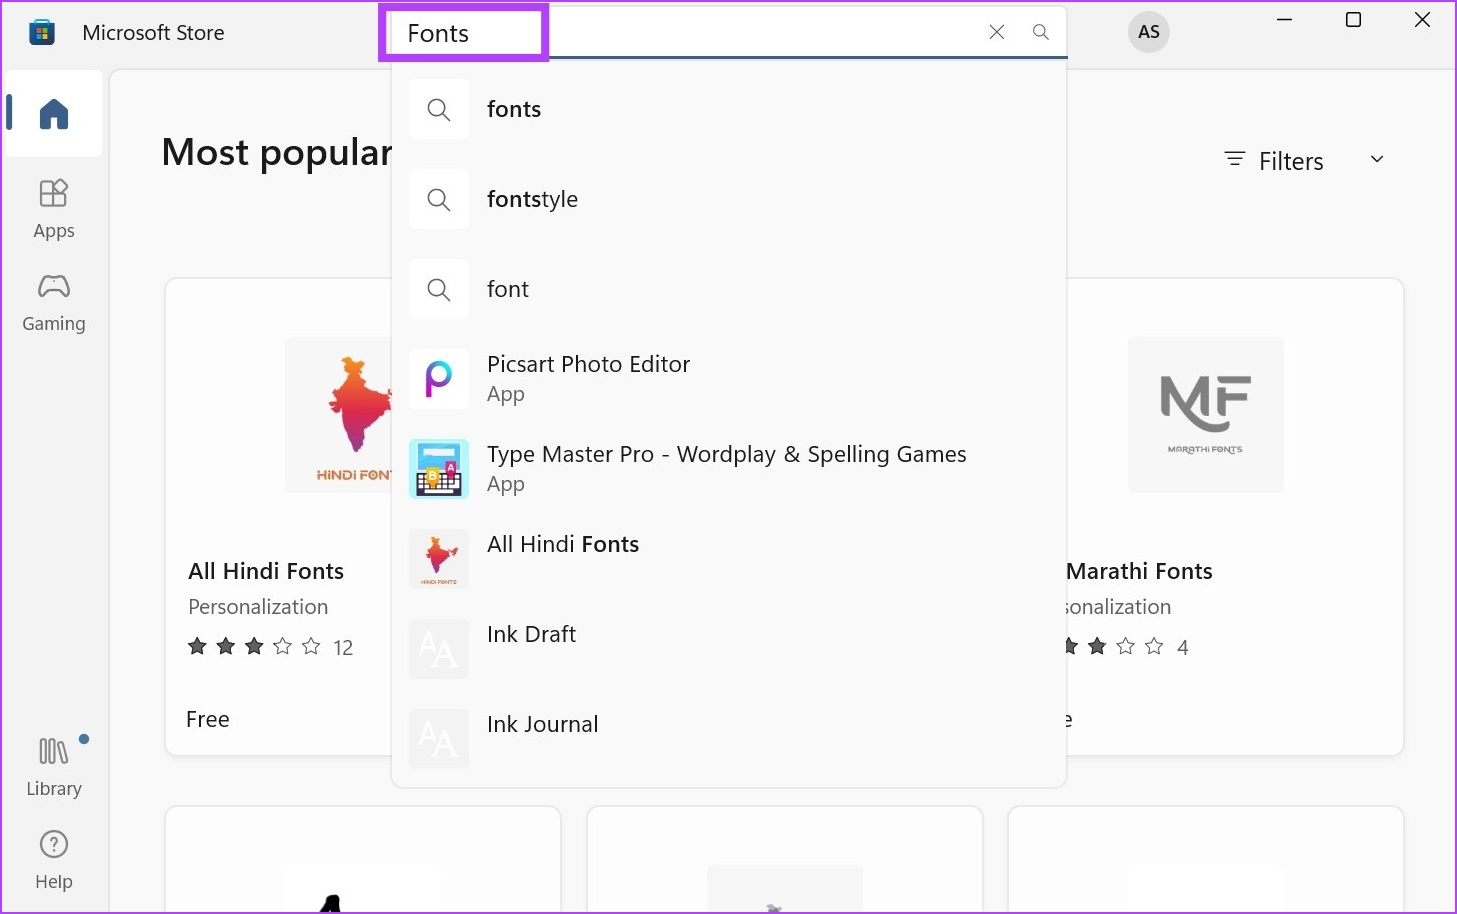
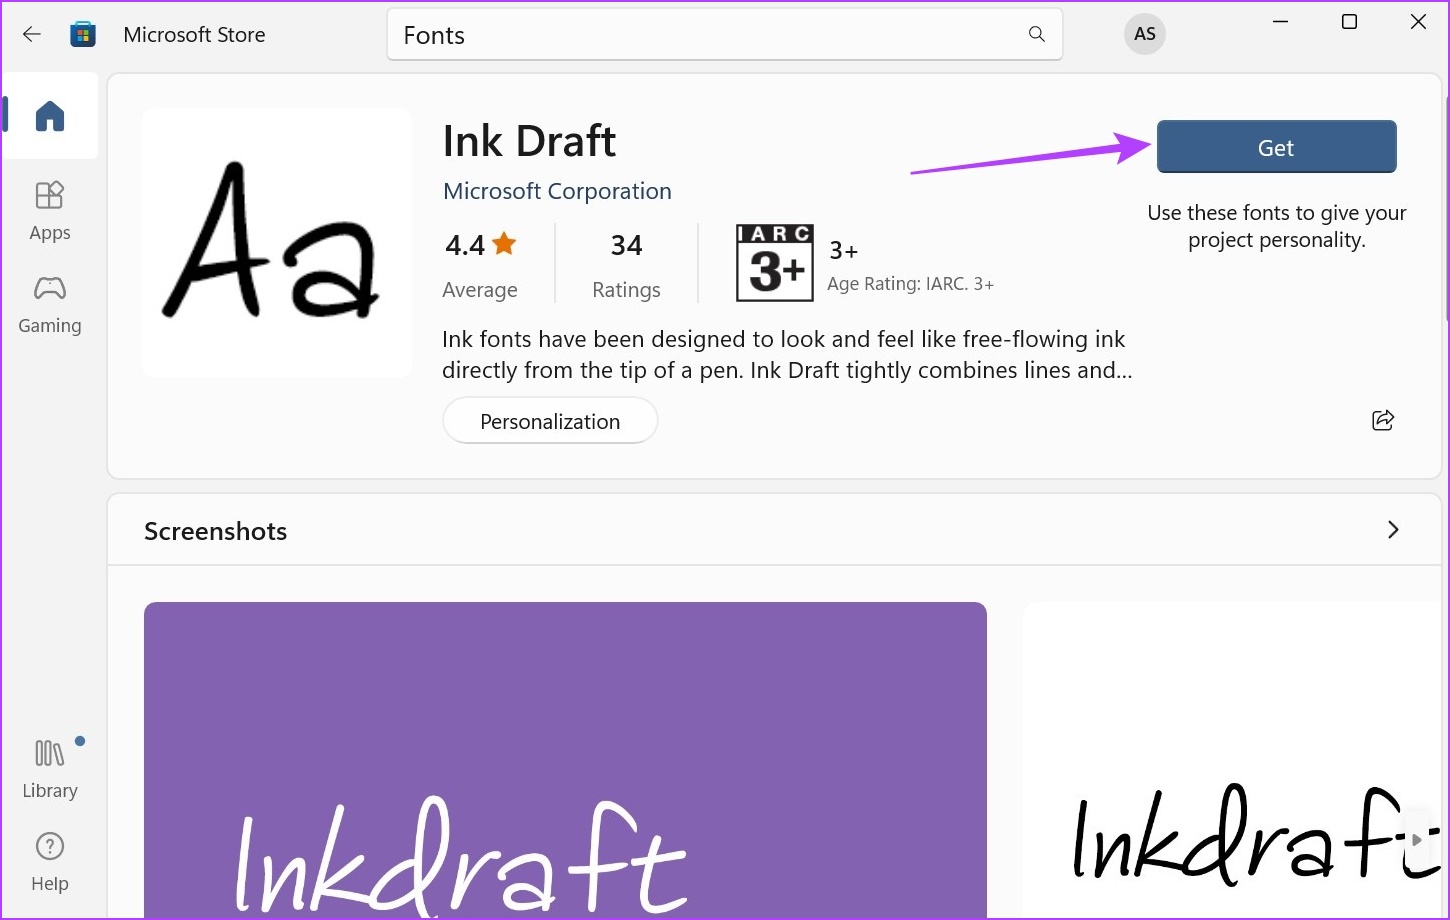
Step 6: From this page, click on the font that you want to add to Windows.

Step 7: Then, click on Get.
Step 8: Once downloaded, click on Open.

This will open the Fonts window once again. You can also check out our other article to know how to use these downloaded fonts as your system default.
Method 2: Install Windows 11 Fonts Using Third-Party Sites
While the Microsoft Store has a decent collection of fonts available, there are bound to be some fonts missing. To make up for that, you can use third-party sites to download and install fonts in Windows 11. Here’s how to do it.
Note: You can use different third-party sites like Google Fonts, DaFont, Ttf Fonts, and SkyFonts to install fonts in Windows 11. For demonstration purposes, we will be using Google Fonts.
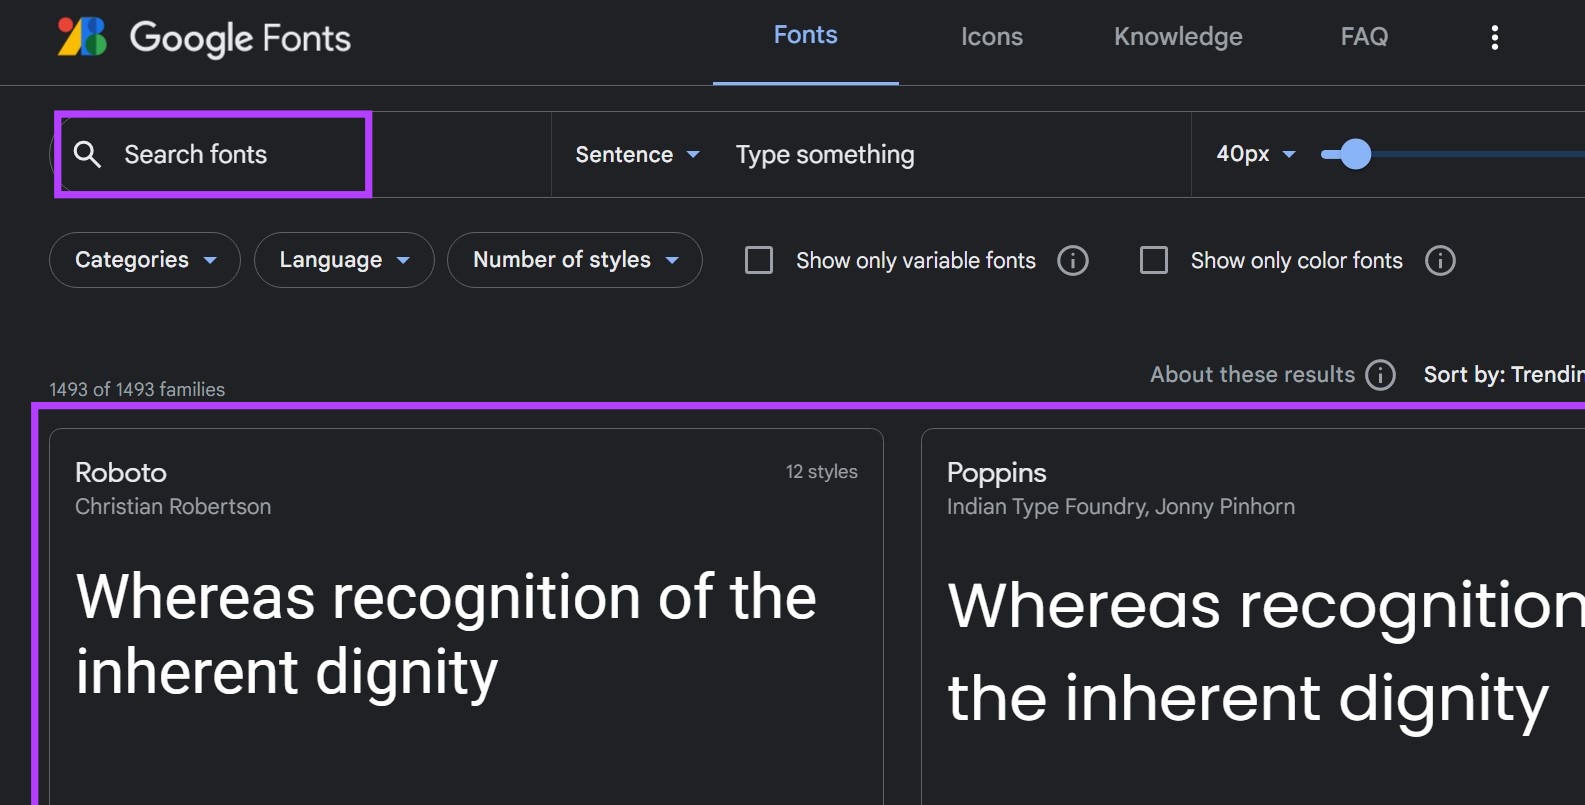
Step 1: Open Google Fonts on any browser.
Open Google Fonts
Step 2: Here, either use the search bar to look for a specific font or click on it if it’s available on the main page.
Step 3: Once the relevant font opens, click on Download family.

Step 4: Go to the file download location and, if it’s a .zip file, extract its contents first. To do this, right-click on the .zip file.
Step 5: Then, click on Extract All.

Step 6: Select the destination and click on Extract. A separate window might open with the file contents.
Note: If a separate window does not open, go back to the download location page and manually click on the extracted file to open it.

Step 7: Now, minimize this window and go to your desktop. Right-click and select Personalize.
Step 8: In the Personalization page, scroll down and click on Fonts.
Step 9: Here, you can drag and drop fonts from the other window.

This will install the font in Windows 11 and make it available in the fonts setting.
How to Delete Installed Fonts in Windows 11
If your Fonts page is too overcrowded or you simply wish to do away with some fonts, you can also delete the installed fonts. Here’s how.
Step 1: Right-click on your desktop and click on Personalize.
Step 2: Then, scroll down and click on Fonts.
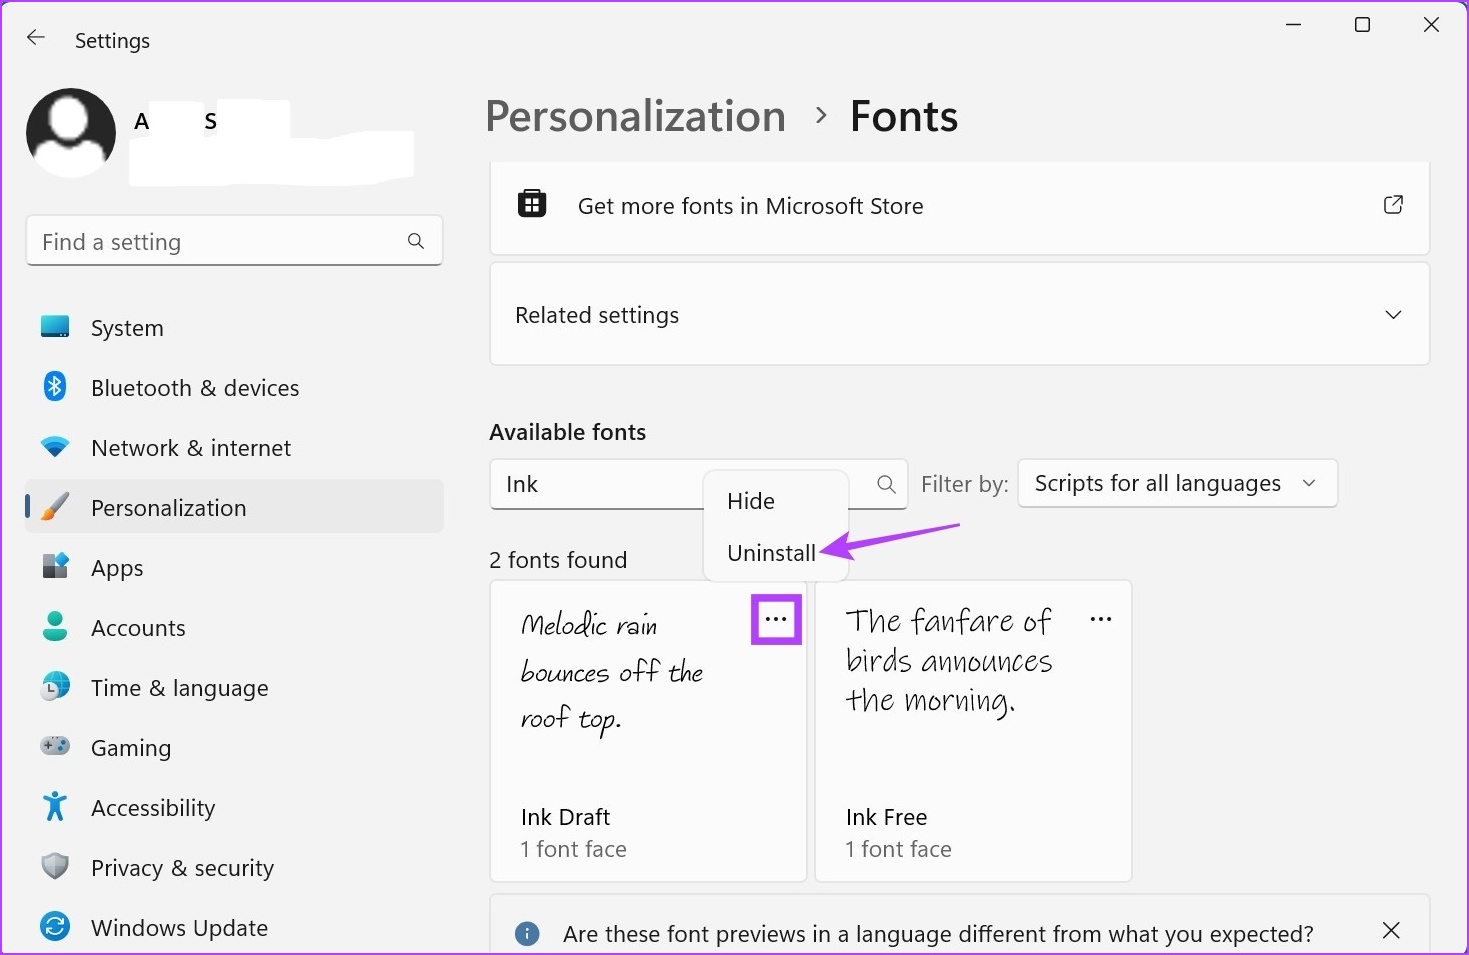
Step 3: Here, click on the search bar and type the name of the font you wish to delete. You can even scroll through this page to look for the relevant font.

Step 4: Once the font appears, click on the three-dot icon.
Step 5: Then, select Uninstall.
Step 6: Again, click on Uninstall.

This will delete the downloaded font from Windows 11.
FAQs for Installing Fonts in Windows 11
1. Can I install multiple fonts at once in Windows 11?
Yes, you can install multiple fonts at once in Windows 11. Simply bulk download the fonts from your preferred site and then use the Control + A keyboard shortcut to select all the fonts at once. Then, open the Fonts window using the above steps and drag and drop all the fonts into the ‘Browser and install fonts’ window. This will display all the fonts in the menu options. Then, select the fonts and change them as you deem fit.
2. Where are downloaded fonts stored in Windows 11?
While downloaded fonts are usually stored in the Windows 11 Downloads folder, they can be someplace else if the default download location has been previously changed. In this case, you can open the download list in your browser and manually go to the windows 11 font folder.
These are all the ways you can install fonts in Windows 11. Use this to further personalize your Windows experience. If you want to further customize Windows, you can also check out how to change screen resolution in Windows 11.
Was this helpful?
Thanks for your feedback!
The article above may contain affiliate links which help support Guiding Tech. The content remains unbiased and authentic and will never affect our editorial integrity.
Adding fonts to Windows can enhance your document design and creativity, providing more options for personalized text styles. Whether you’re a graphic designer, a writer, or someone who enjoys customizing their digital environment, knowing how to add fonts to Windows is an essential skill.
Types of Fonts Available
Before diving into the installation process, it’s important to recognize the types of font files you might encounter. The two most common formats are TrueType (.ttf) and OpenType (.otf) fonts. TrueType fonts are widely used due to their compatibility and ease of use, while OpenType fonts can support advanced typographic features, making them suitable for professional design work.
Where to Find Fonts
Numerous sources offer a variety of fonts that you can download and install on your Windows computer. Websites like Google Fonts, Adobe Fonts, and DaFont provide extensive libraries of free and paid fonts. Be sure to check the license agreement for any font you wish to use, especially if it’s for commercial purposes.
How To Add Fonts To Windows: Step-by-Step Instructions
-
Download the Font:
Start by navigating to your chosen font provider’s website. Once you find a font you like, look for a download button. The font file will typically be compressed in a .zip format, which may contain the .ttf or .otf file. -
Extract the Font Files:
After the download is complete, locate the.zipfile in your Downloads folder. Right-click on the file and select «Extract All» to unzip it. This will create a new folder containing the font files. -
Install the Font:
With the font files extracted, navigate to the folder that contains them. Right-click on the specific font file you want to install and select «Install.» Alternatively, you can use «Install for all users» if elevated permissions are available and you want the font to be available for all user accounts on the system. -
Access Your Fonts:
To see your newly installed font, open any text-editing program, such as Microsoft Word or Notepad. Click on the font drop-down menu and scroll through the list to locate your new font. - Using the Font:
You can start using the font in your documents immediately. Customize text by selecting the font and adjusting size, color, and other formatting options as desired.
Verifying Installation of Installed Fonts
If you are unsure whether the font was installed correctly, there are several ways to verify:
-
Using the Font Settings: Open the Control Panel and navigate to the Fonts settings. You can access this by typing «Fonts» in the search bar. Here you can see a list of all installed fonts.
- Create a Test Document: As an additional method, you can create a test document in a word processor and search for the font in the font selection menu.
Removing Fonts from Windows
At times, old or unused fonts may clutter your font library. Removing an unwanted font is straightforward:
- Open the Font settings through the Control Panel.
- Browse the list of fonts.
- Right-click on the font you wish to uninstall and select «Delete.»
- Confirm your choice when prompted.
Frequently Asked Questions
1. Can I use downloaded fonts in any application?
Yes, once a font is installed, it becomes available in all applications that allow font selection, such as Microsoft Office, Adobe Creative Cloud, and similar software.
2. Are all fonts free to use?
Not all fonts are free. Some fonts come with licensing fees, especially those intended for commercial use. Always check the licensing information before using any font.
3. What should I do if a font doesn’t appear after installation?
If a font doesn’t appear, ensure that you extracted it properly and installed the correct file. You can also try restarting your computer, as this can resolve display issues with newly installed fonts.
About the author
Raj Singh is an expert in operating systems such as Android, Ms Windows, Mac OS, Linux, and more. He simplifies complex system management tasks, offering guidance on optimizing and troubleshooting these platforms. With a focus on efficiency and customization, Raj helps individuals and businesses make the most of their operating environments. His technical expertise extends to creating tailored solutions for diverse needs, ensuring seamless operations and problem-solving across various platforms. Passionate about technology and innovation, Raj is dedicated to helping users unlock the full potential of their systems.