
Windows 10 updates are essential for keeping your system secure and up-to-date. However, frequent updates can sometimes be disruptive, especially when they occur at inconvenient times. If you prefer to have more control over when and how updates are applied, you might want to learn how to stop Windows 10 updates permanently.
This article will walk you through the steps to disable Windows 10 updates forever, ensuring that you can work uninterrupted without unexpected updates. So, there is no doubt that you might think of Windows 10 updates on the machine. By following our methods, you can prevent automatic updates and ensure your system remains stable and uninterrupted.
Methods To Stop Windows Update Permanently
To permanently turn off updates on Windows, the following guidelines should be used. We will start with the service application first.
Method 1: Stop Windows Update Permanently using Services
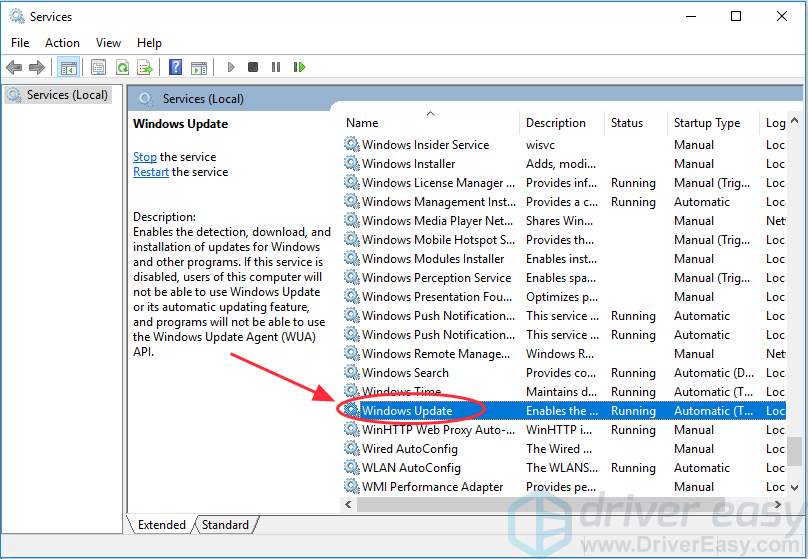
Step 1: At first, open the search box & write down services there. Now, the service option will be available, & click on it.
Step 2: A big list will appear in the next window. Search for the Windows Update option & right-click over there.
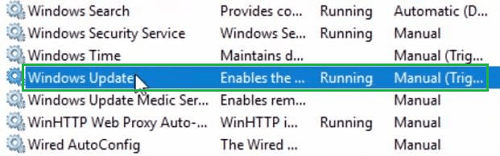
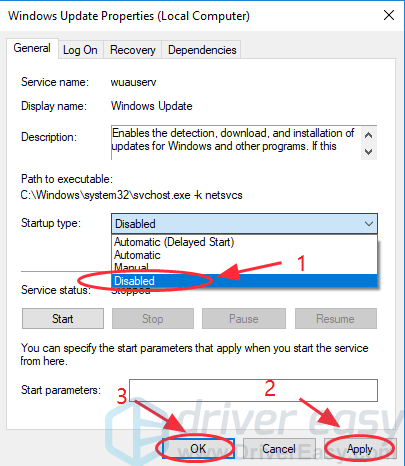
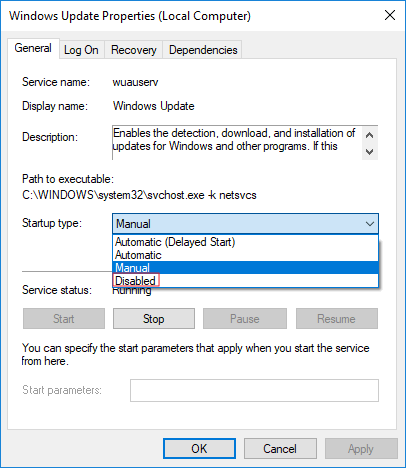
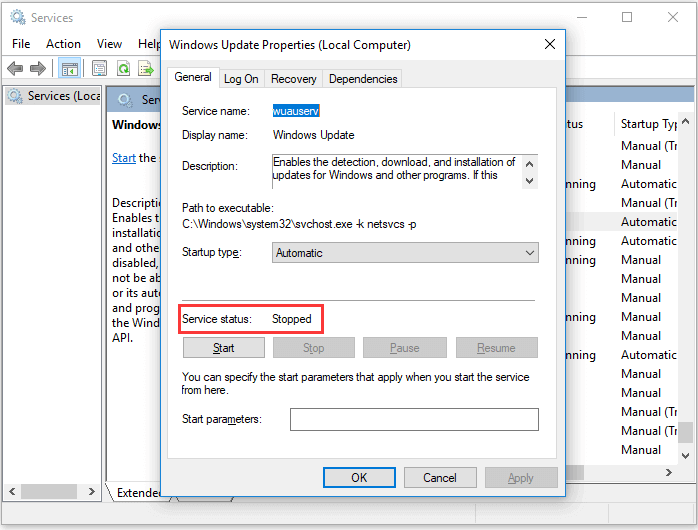
Step 3: A new popup window will be opened. From the Startup Type dropdown menu, select the Disable option. And just below it, click on the Stop button. In the end, click on the Apply button to save the changes.

Hence, we have successfully stopped Windows 10 updates using the Services on the device.
Method 2: Stop Windows Update Permanently using Group Policy
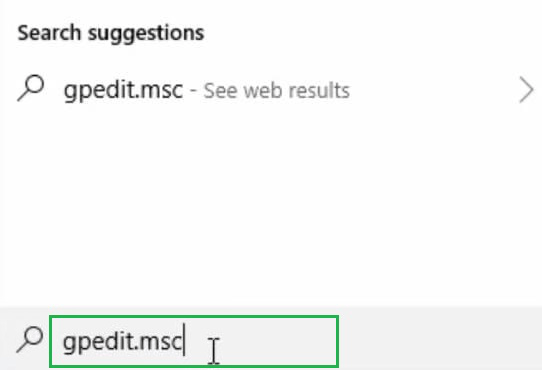
Step 1: Agin open the Search bar in Windows 10 & Search for the “gpedit.msc”. Just press Enter to move ahead.
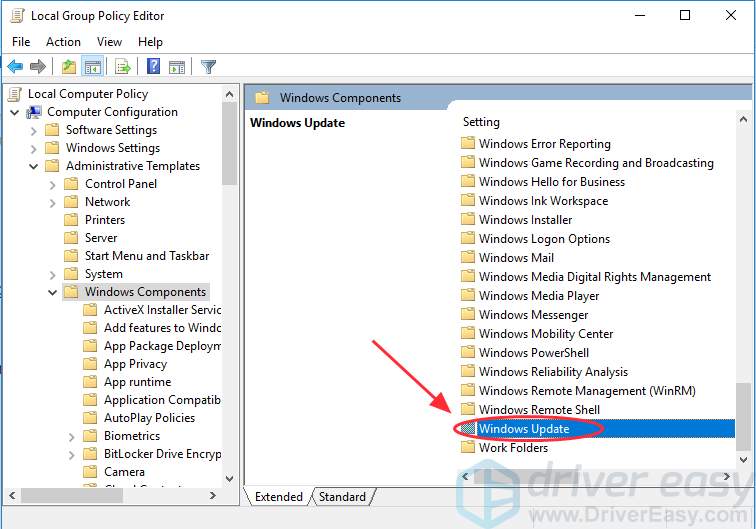
Step 2: Now, the window for the Group Policy will be opened. In the left sidebar, first, expand the Administrative Templates. And inside that, again expand the folder Windows Components.
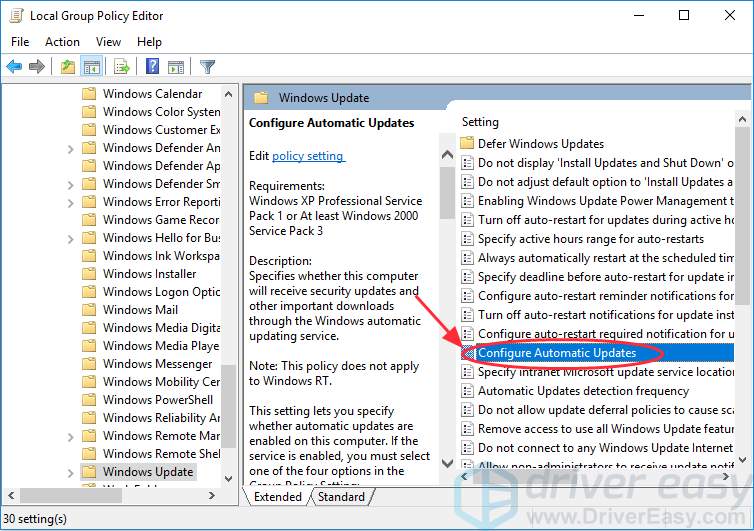
Step 3: Now, on the right-hand side of the screen, double-click on the option Configure Automatic Update
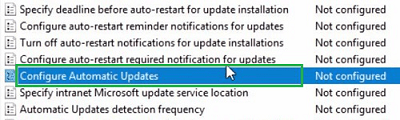
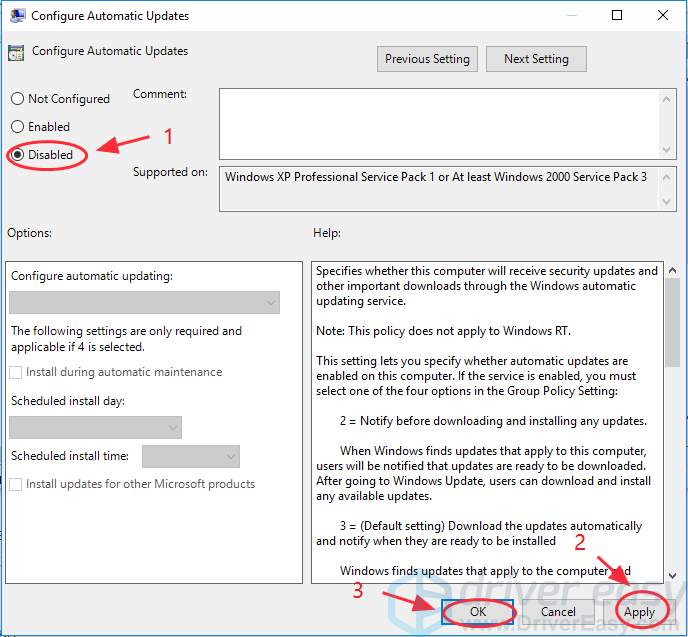
Step 4: On the left-hand side of the screen, three-button options are present. Click on the option Disable & close the windows.
Hence, we have successfully stopped Windows 10 updates using the Group Policy on the device.
Method 3: Stop Windows Update Permanently using Register Policy
Step 1: To Stop Windows 10 from updating, run the “regedit” command in the Search Box on the device. Press Enter to move ahead.

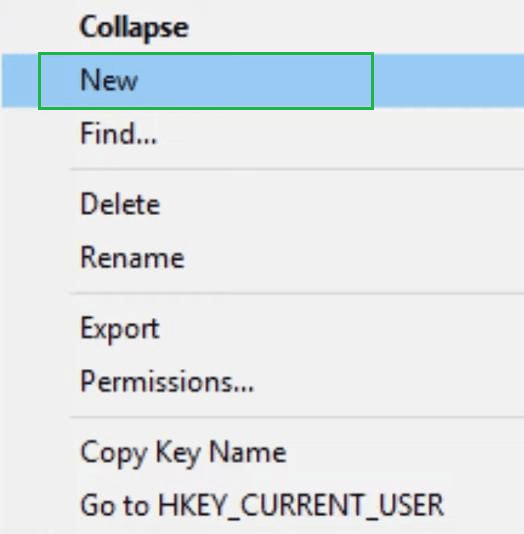
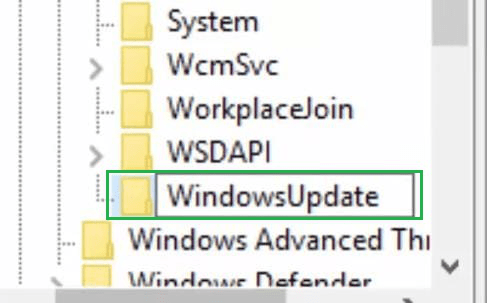
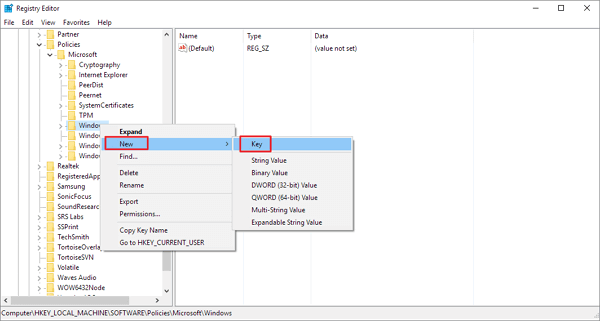
Step 2: Now, a new window will be opened & the below-mentioned path should be followed by expanding folders on the Left Hand Side of the Screen. After reaching the endpoint of the path, Right-click on the folder Windows. Some more options will be available. Among them click on the New option.
Path: HKEY_LOCAL_MACHINE\SOFTWARE\Policies\Microsoft\Windows
Step 3: A new subfolder will be created inside the Windows folder. Give the name “WindowsUpdate”.
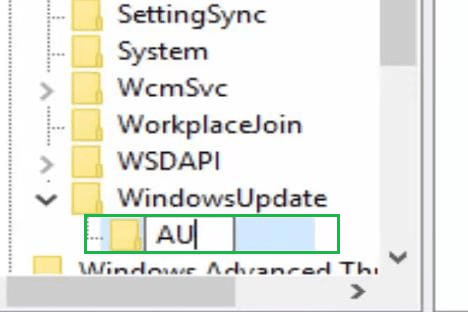
Step 4: Inside the “WindowsUpdate” using the same process create another subfolder. And provide its name as “AU”.
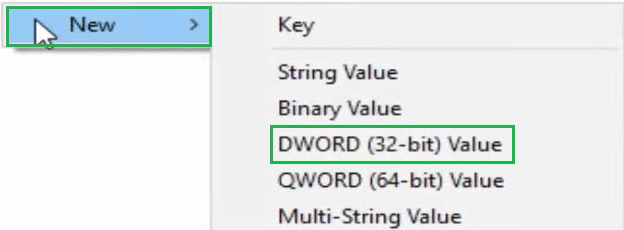
Step 5: On the right-hand side of the screen, right-click anywhere. Under the New option, select the option DWORD (32-bit) Value.
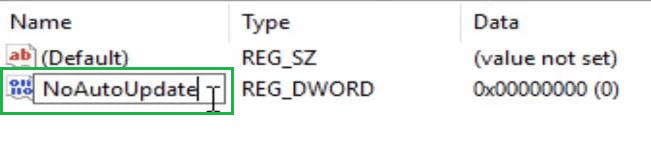
Step 6: Now, a new value will be added there & the value will be “NoAutoUpdate”. Then press Enter to save the changes & close all the windows.
Hence, we have successfully stopped Windows 10 updates using the Register Policy on the device.
Method 4: Stop Windows Update Permanently using Task Scheduler
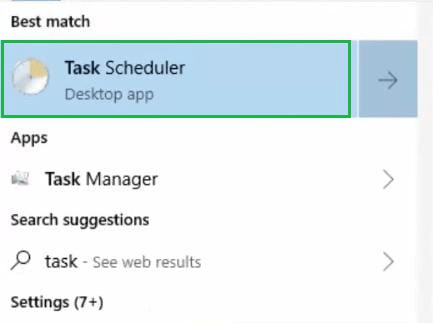
Step 1: To Stop Updating Windows 10, search for the Task Scheduler in the Search bar on the device. One option will be available with the same name, click on that to move ahead.
Step 2: On the left-hand side of the screen, expand the folder Task Scheduler Library. Under such folder, again expand the folder Microsoft. Inside the Microsoft folder, the Windows folder will be available.
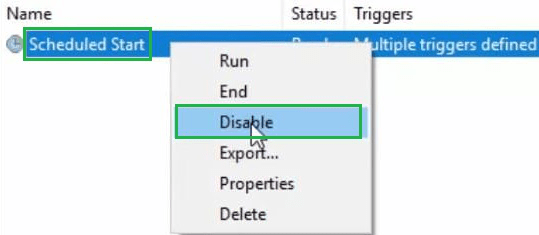
Step 3: In the right-hand side window, a Schedule Start option is present. Right-click on the option & click on the Disable option to complete the process.
Hence, we have successfully stopped Windows 10 updates using the Task Scheduler on the device.
Method 5: Stop Windows Update Permanently by Pausing Updates
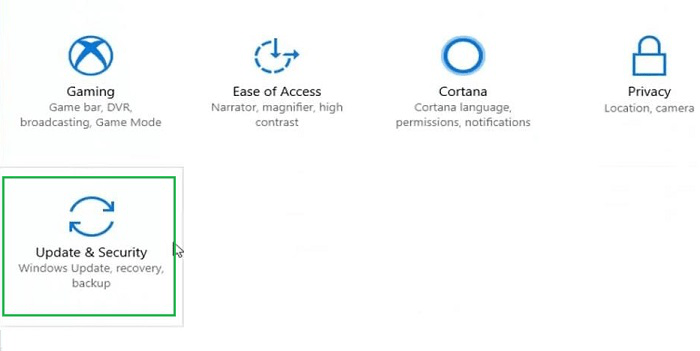
Step 1: Open the Settings. Inside the Setting window, click on the Update & Security option.
Step 2: In the next window, click on Advanced Options under the Update Settings.
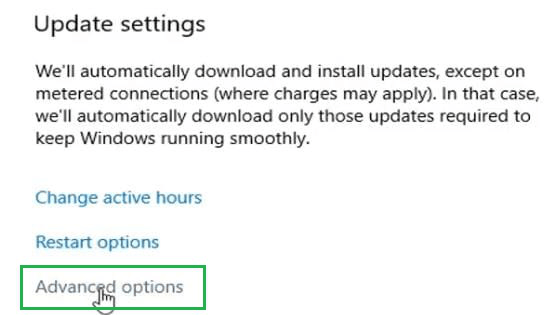
Step 3: Inside the next window, the Pause Updates option will be available & enable the button. It will pause the updates in Windows 10 for 35 days.

Hence, we have successfully stopped Windows 10 updates using the Pause method on the device.
Method 6: Stop Windows Update Permanently using Metered Connection
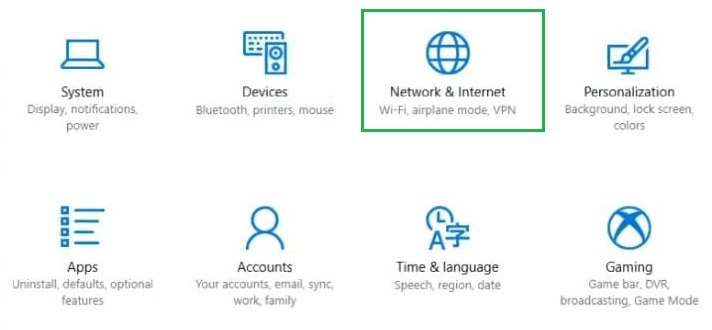
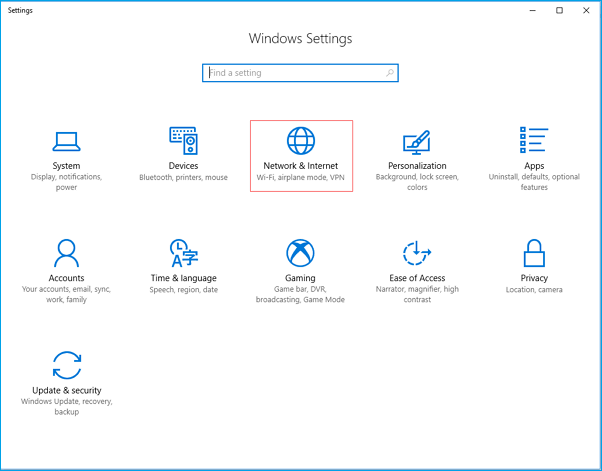
Step 1: At first, the Settings window will be opened. Then among so many options move for the Network & Internet option. Click on it to open.
Step 2: In the next window, from the left-hand side click on the option Ethernet.
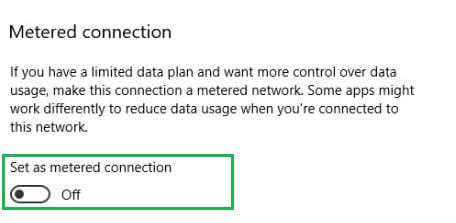
Step 3: On the next window, an option will be present as the Metered Connection. Enable the button present below.
Hence, we have successfully stopped Windows 10 updates using the Metered Connection method on the device.
Method 7: Stop Windows Update Permanently by Uninstalling Updates
Step 1: In this case also, the Setitngs of the Windows will be opened. In that window, click on the Update & Security option.

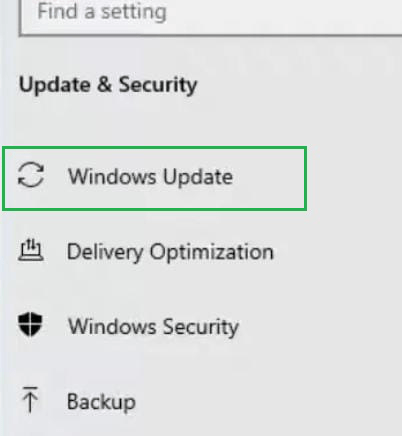
Step 2: In the next window, in the left-hand sidebar, click on the option Windows Update from so many options present there.
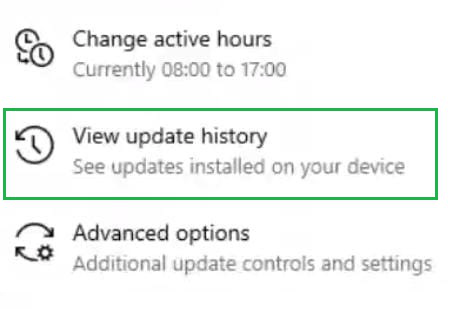
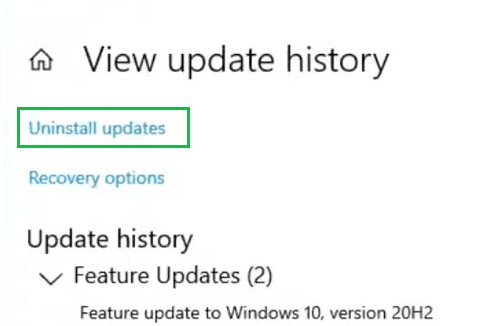
Step 3: After that, click on the View Update History option to move ahead.
Step 4: In the next window, click on Uninstall Updates to remove the installed updates from the device.
Hence, we have successfully stopped Windows 10 updates by Uninstalling Updates from the device.
Conclusion
By following the methods outlined above, you can stop Windows 10 updates permanently and gain greater control over your system. Whether you choose to use the Group Policy Editor, Services Manager, or a third-party tool, these solutions allow you to disable Windows 10 updates effectively. Keep in mind, however, that while disabling updates can prevent disruptions, it’s important to manually check for and install security updates to keep your system protected.
INTRODUCTION
The Windows Update Web site provides security updates for Microsoft Windows operating systems. The Microsoft Update Web site provides these updates in addition to updates for other Microsoft programs, such as Microsoft Office. By default, your Microsoft Windows 2000-based, Microsoft Windows Server 2003-based or Microsoft Windows XP-based computer will access the Windows Update Web site. If you would like to receive updates for other Microsoft programs please perform the steps that are listed below.
More Information
I am currently using Windows Update. How can I access Microsoft Update?
To use Microsoft Update instead of Windows Update, follow these steps:
-
Visit the following Microsoft Web site:
http://update.microsoft.com/microsoftupdate
-
Click Start Now.
-
On the Review the license agreement page, click Continue.
-
Click Install.
Note You may not be prompted to install the Microsoft Update software if this software is already available on the computer.
After you successfully install the software, a Microsoft Update shortcut is added to the All Programs menu on the Start menu.
I am currently using Microsoft Update. How can I access Windows Update?
To stop using the Microsoft Update Web site and start using the Windows Update Web site, follow these steps:
-
On the Microsoft Update site, click Change Settings.
-
Scroll down the page, click to select the Disable Microsoft Update software and let me use Windows Update only check box, and then click Apply changes now.
-
You receive the following message:
Windows Automatic Updates will not be able to deliver updates from Microsoft Update Service.
Are you sure you want to continue?Click Yes.
For more information about a related topic, click the following article number to view the article in the Microsoft Knowledge Base:
327838 How to schedule automatic updates in Windows Server 2003, in Windows XP, and in Windows 2000
Need more help?
Want more options?
Explore subscription benefits, browse training courses, learn how to secure your device, and more.
As a Windows 10 user, you may have noticed you’re always forced to install the Windows automatic updates (whether you like it or not). Whenever you’re working on your computer, Windows automatically updates the system, and you have to restart the system very often, spending so much time on updating and restarting. This’s frustrating, isn’t it?
Don’t worry, this article introduces the easy methods to stop Windows 10 update completely.
How Can I Disable Windows 10 Update?
Here are the methods you can try. You don’t need to try them all; just work your way down the list until you find the one that works for you.
- Meter your network connection to stop Windows 10 update
- Disable Windows Update service to stop Windows 10 update
- Change Group Policy Settings to stop Windows 10 update
- Change Device Installation Settings to stop Windows 10 update
- Bonus Tip
Why I can’t stop Windows 10 auto update?
As indicated by Microsoft, for Home edition users, Windows updates will be pushed to the users’ computer and automatically installed. So if you’re using Windows 10 Home version, you can’t stop Windows 10 update.
With Windows 8.1 and earlier versions, you can choose to update your Windows in the following four options:
1. Install updates automatically (Recommended)
2. Download Updates but choose when to install them
3. Check for updates but let me choose whether to download and install them
4. Never check for updates (Not Recommended)
However, in Windows 10, these options have been removed and you can disable Windows 10 update at all.
Completely uninstall Windows 10 Update Assistant
Sometimes you’ve tried the solutions below to stop Windows 10 update, but it fails to work in times. one of the possible reasons is that Windows 10 Update Assistant modifies the settings in your computer and Windows 10 auto update starts to work again.
If you have Windows 10 Update Assistant installed in your computer, you should uninstall it completely.
Note: if you don’t want to uninstall Windows 10 Update Assistant, you can disable it from Task Scheduler. Go to Task Scheduler >Task Scheduler Library > Microsoft > Windows > UpdateOrchestrator, then click Update Assistant in the right pane. Make sure to disable each trigger in Triggers tab.
1) Press the Windows logo keyand R at the same time, type appwiz.cpl, and click OK.
2) Find the Windows 10 Update Assistant in the listed programs, and right click on it, then select Uninstall.
3) Confirm the delete.
4) Open File Explorer, and click This PC.
5) If the Windows Update Assistant is installed by default when you install your Windows OS, go to the file where your system is installed, normally it’s This PC > C drive > Windows > Windows10Upgrade, then delete the Windows10Upgrade folder.
If the Windows 10 Update Assistant is installed separately, you can go to the location where the Windows 10 Update Assistant is saved, and delete the installation folder. It’s normally named as Windows10Upgrade.
6) Go to This PC > Windows, delete the folders named UpdateAssistantV2 and UpdateAssistant.
After the full uninstallation of Windows 10 Update Assistant, restart your computer.
Then you can try the methods below to stop Windows 10 update and it should work.
Way 1: Meter your network connection to stop Windows 10 update
Many people may not notice that there is a simple way to stop Windows 10 automatic updates. You can set your WiFi network as metered connection. So if your computer is connecting to WiFi, you can try this:
1) Click the Start button at the bottom left on your desktop, then click the Settings app.
2) Click Network & Internet.

3) Click WiF on the left pane, then click the name of your Wi-Fi connection.
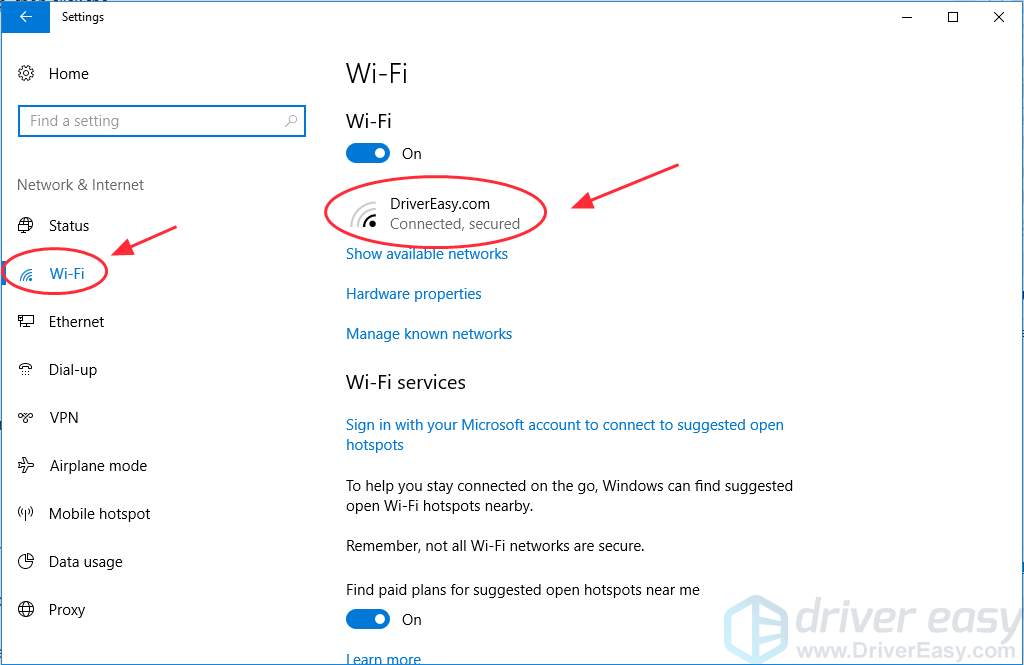
4) Click to turn on Set as metered connection.
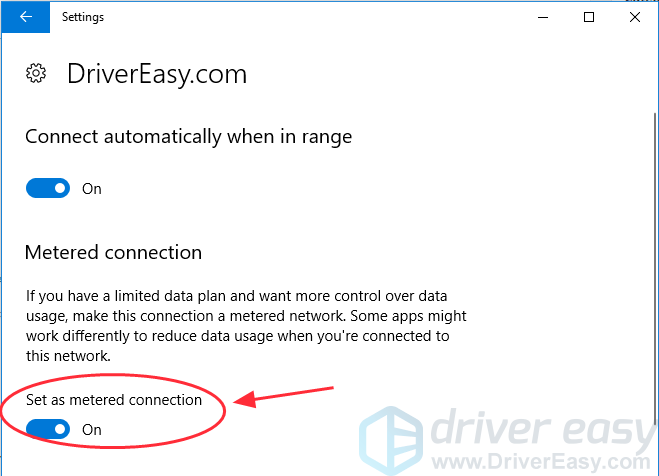
In doing this, Windows will assume that you have limited data plan when using WiFi. So it won’t push installing updates in your computer. However, if your computer is connecting to Ethernet, Windows will assume that you have unlimited data plan, and this method will not work. But you can also try the following methods to turn off Windows 10 update.
Way 2: Disable Windows Update service to stop Windows 10 update
Windows Update service can detect, download and install the Windows updates and programs. Once disabled, you can not use the Windows automatic update feature, and programs will not be able to automatic download and install.
Some people find it impossible to disable Windows 10 update in the Windows Update service, and the settings changes every time your computer starts installing the Windows update. It’s likely caused by Windows 10 Update Assistant. If that’s your case, you should completely uninstall Windows 10 Update Assistant in your computer first.
Once uninstall Windows 10 Update Assistant, you can start the steps below:
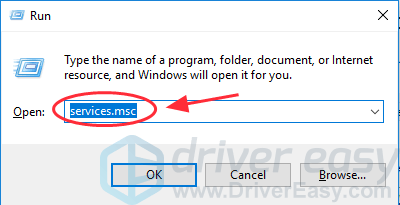
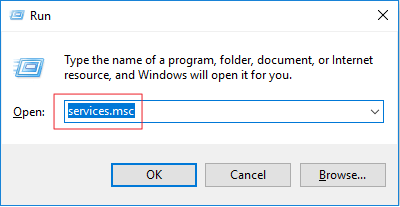
1) On your keyboard, press the Windows logo key + R at the same time to invoke the Run box.
2) Type services.msc and press Enter.
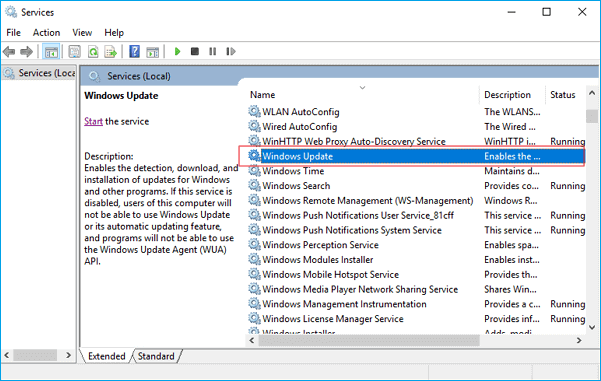
3) Scroll down to Windows Update, and double click it.
4) In Startup type, select Disabled. Then click Apply and OK to save the settings.
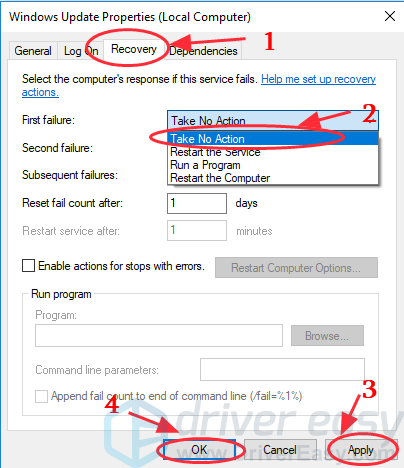
5) If it’s the first time that you stop the Windows Update service, you may also need to take one more step:
Still on the Windows Update Properties pane, click the Recovery tab, select Take No Action in the First failure section, then click Apply and OK to save the setting.
6) Restart your PC to make it take effect.
Note: If you disable the Windows Update service, your computer will not be able to download the updates. When you manually click to update, you will see a message that updates were not installed because computer was stopped. So if you want to update your Windows 10, you can go to the Windows Update service, and select Automatic to enable the service. Then you will be able to update your Windows.
Way 3: Change Group Policy Settings to stop Windows 10 update
You can also use the Group Policy Editor to change the settings to prevent Windows 10 from automatically updating.
Kindly note that Group Policy is available in Windows 10 Pro and Enterprise, so if you’re using Windows 10 Home, Group Policy is not available in your computer, and you can try other methods.
1) On your keyboard, press the Windows logo key + R at the same time to invoke the Run box.
2) Type gpedit.msc and click OK.
3) Go to Computer Configuration > Administrative Templates > Windows Components > Windows Update.
4) Double click Configure Automatic Updates.
5) Select Disabled in Configured Automatic Updates on the left, and click Apply and OK to disable the Windows automatic update feature.
Tips: When you need to update your Windows version later, you can repeat the steps above, then select Enabled to turn on this feature, so that you can continue to download the updates.
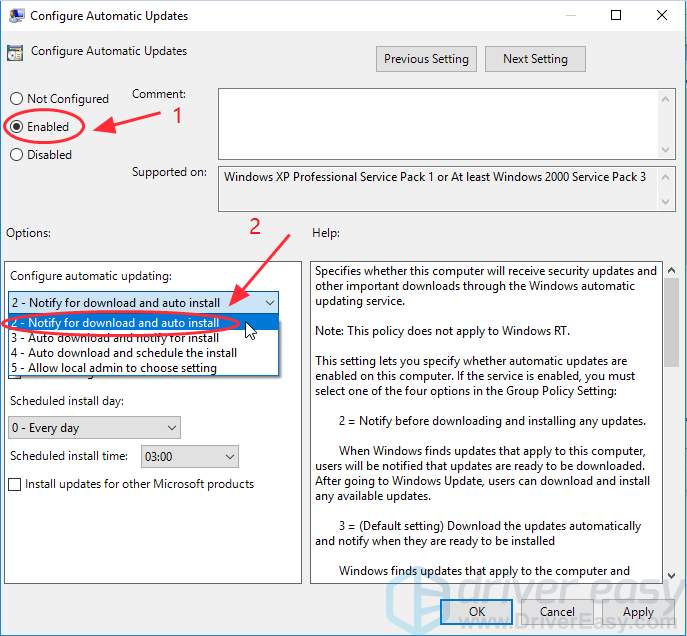
Note: It’s not recommended to disable it because you may sometimes miss the important Windows update. It’d better to select Enabled, then choose: 2 – Notify for download and auto install. In doing so, you will receive notifications about new Windows update, and you can to choose when to download the update as you wish.
Way 4: Change Device Installation Settings to stop Windows 10 update
If you don’t want to automatically update your device drivers in your computer, you can try these steps:
1) Type control panel in the search box, and click Control Panel.
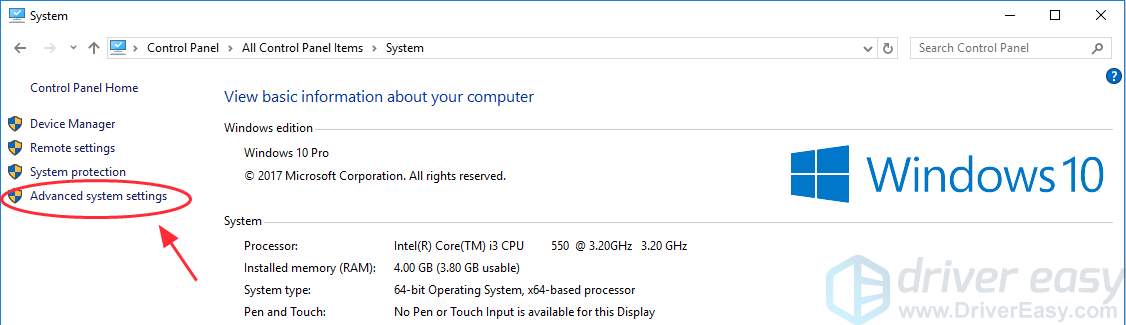
2) Click System.
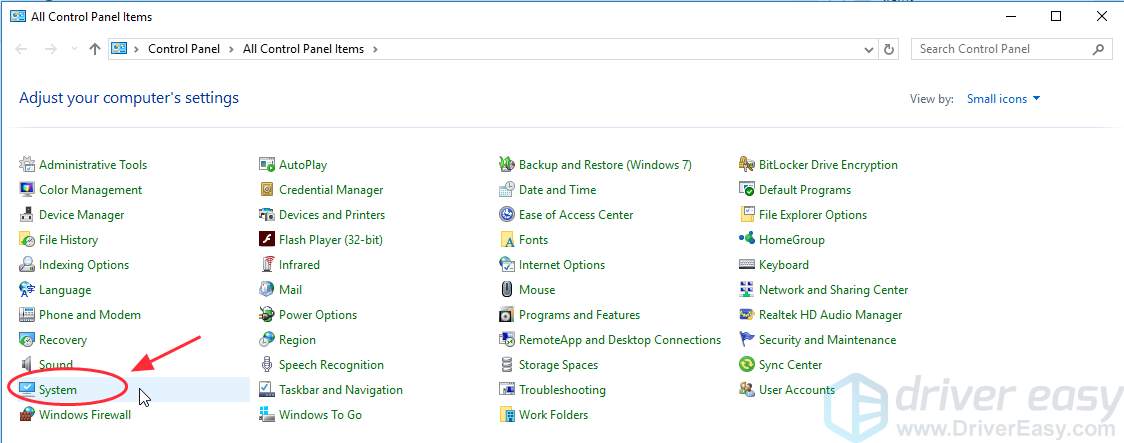
3) Click Advanced system settings on the left.
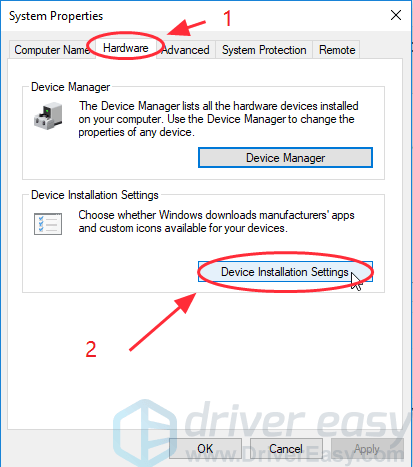
4) Click the Hardware tab, then click Device Installation Settings.
5) Select No (your device might not work as expected) and click Save changes.
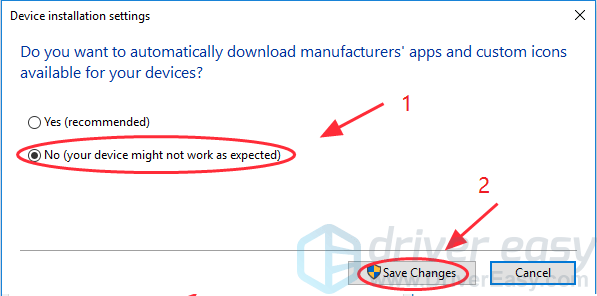
6) Click OK to finish the settings. Then your device drivers will not automatically download from the manufacturers.
Bonus Tip
Windows Update updates your computer, so you can enhance your system performance and fix some issues. Since Windows 10 update has been disabled in your computer, you should consider updating your device drivers in your computer, with the attempt to keep your computer hardware in good condition and improve the performance.
Tips: It’s possible there are problems with some drivers, as the outdated or missing drivers can cause problems as well. So you should keep your device drivers up to date.
There are two ways to update your device drivers: manually and automatically.
Update your drivers manually – You can update all available drivers manually ONE BY ONE until you pin down the exact driver at fault. Firstly you’ll have to go to the manufacturer’s website, search for the most recent correct driver for the devices. Be sure to choose only drivers that are compatible with your variant of Windows system versions. Then download & update them all by yourself.
OR
Update your drivers automatically – If you are not familiar with playing around with drivers, it’s recommended to do it with Driver Easy. With Driver Easy, you don’t need to know exactly what system your computer is running, you don’t need to risk downloading and installing the wrong driver, and you don’t need to worry about making a mistake when installing.
You can update your drivers automatically with either the FREE or the Pro version of Driver Easy. But with the Pro version it takes just 2 clicks (and you get full support and a 30-day money back guarantee):
1) Download and install Driver Easy.
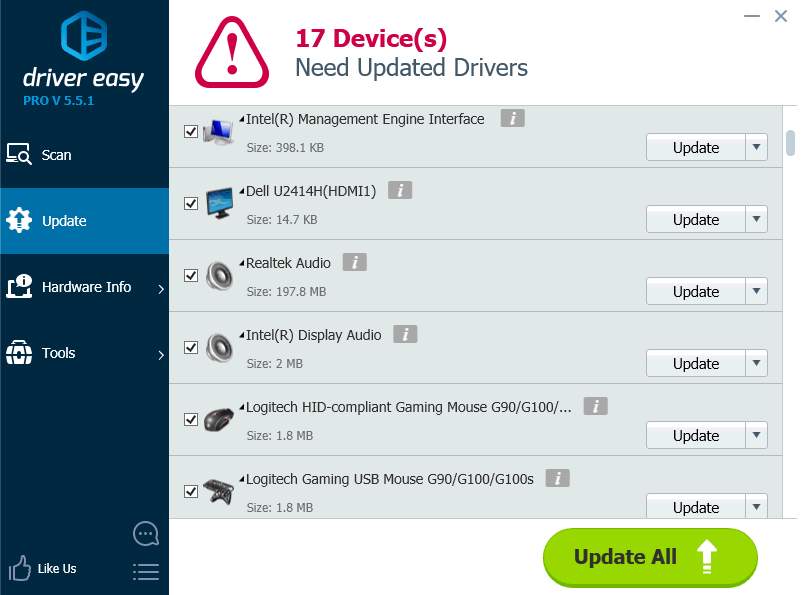
2) Run Driver Easy and click the Scan Now button. Driver Easy will then scan your computer and detect any problem drivers.

3) Click the Update button next to a flagged device to automatically download and install the correct version of this driver (you can do this with the FREE version).
Or click Update All to automatically download and install the correct version of all the drivers that are missing or out of date on your system (this requires the Pro version – you’ll be prompted to upgrade when you click Update All).
4) After updating, restart your computer to make it take effect.
There are the helpful methods to stop Windows 10 update. Hope it works for you. If you have any questions, feel free to comment below and we will see what more we can do to help.
Key Points
- Pause Updates Temporarily: Go to Settings > Windows Update > Pause updates for up to 5 weeks.
- Disable via Group Policy (Windows Pro & Enterprise): Open gpedit.msc, navigate to Computer Configuration > Administrative Templates > Windows Components > Windows Update, then enable Configure Automatic Updates and select Disabled.
- Turn Off via Registry Editor: Open regedit, navigate to
HKEY_LOCAL_MACHINE\SOFTWARE\Policies\Microsoft\Windows\WindowsUpdate\AU, create or modify NoAutoUpdate (DWORD) and set it to1. - Disable Windows Update Service: Open Services (
services.msc), find Windows Update, set Startup type to Disabled, and stop the service.
Are you searching for how to disable Windows updates in Windows 10 or 11? This guide can help.
Windows updates are essential to keeping your system safe with access to the latest tools and features. Updates provide bug fixes, performance improvements, and, perhaps most importantly, security patches that protect your device from potential threats.
Still, there are a few reasons why you may want to disable Windows updates—either temporarily or permanently.
Automate Windows Update Management
Managing Windows updates can be complex and time-consuming. Try NinjaOne for free and automate your update processes to ensure your systems are always up-to-date and secure.
How to disable Windows update in Windows 10
Windows 10 offers several methods to disable Windows updates. Let’s explore four of the most effective ways:
Option 1: Disable the Windows update service
One way to disable Windows updates is by stopping the Windows Update service. Here’s how you can do it:
- Press the Windows key + R on your keyboard to open the Run dialog box.
- Type “services.msc” and press Enter to open the Services window.
- Scroll down and locate the “Windows Update” service.
- Right-click on the service and select “Properties.”
- In the Properties window, change the “Startup type” to “Disabled.”
- Click on “Apply” and then “OK” to save the changes.
By disabling the Windows Update service, you prevent Windows from automatically checking for and installing updates. However, remember that this method only disables the service temporarily and will not prevent updates from being installed when the service is enabled again.
Option 2: Change Group Policy Editor settings
Learning to stop Windows Updates through the Group Policy Editor is also helpful. Here’s how you can use this method:
- Press the Windows key + R on your keyboard to open the Run dialog box.
- Type “gpedit.msc” and press Enter to open the Group Policy Editor.
- Navigate to “Computer Configuration” > “Administrative Templates” > “Windows Components” > “Windows Update.”
- Double-click on “Configure Automatic Updates” to open the settings.
- Select the “Disabled” option to turn off automatic updates.
- Click on “Apply” and then “OK” to save the changes.
Using the Group Policy Editor allows you to have more granular control over Windows updates. You can choose to disable automatic updates entirely or configure specific update settings according to your preferences.
Option 3: Meter your network connection
Windows 10 includes a feature called “Metered Connection,” which can be used to limit the data usage of certain network connections. By setting your network connection as metered, you can effectively prevent Windows from automatically downloading and installing updates. Here’s how you can do it:
- Open the “Settings” app by pressing the Windows key + I on your keyboard.
- Click on “Network & Internet” and select “Wi-Fi” or “Ethernet,” depending on your connection type.
- Scroll down and click on “Advanced Options.”
- Toggle the switch under “Metered Connection” to turn it on.
When your network connection is set as metered, Windows will not automatically download or install updates. However, keep in mind that this method can also prevent other apps from downloading updates or syncing data, so use it judiciously.
Option 4: Use the Windows Registry
The Windows Registry allows you to turn off automatic updates by modifying various system settings. Here’s how you can disable Windows updates using the Registry Editor:
- Press the Windows key + R on your keyboard to open the Run dialog box.
- Type “regedit” and press Enter to open the Registry Editor.
- Navigate to the following key: HKEY_LOCAL_MACHINE\SOFTWARE\Policies\Microsoft\Windows\WindowsUpdate
- Right-click on the “WindowsUpdate” folder and select “New” > “DWORD (32-bit) Value.”
- Name the new value “AUOptions” and set it to “2” to disable automatic updates.
- Click on “OK” to save the changes.
Using the Windows Registry to disable Windows updates provides a more advanced method for controlling update behavior. However, modifying the Registry can be risky if not done correctly, so exercise caution and create a backup of your Registry before making any changes.
Need Help with Windows Update Management?
Have questions about managing Windows updates or how NinjaOne can help? Our experts are here to assist you. Schedule a demo today to learn more.
How to disable Windows update in Windows 11
Option 1: Using Windows services (services.msc)
If you want to permanently stop Windows updates from running in the background, disabling the Windows Update service is one of the most effective methods.
- Press the Windows key + R, type services.msc, and press Enter.
- Scroll down and locate Windows Update in the list.
- Double-click on Windows Update to open its properties.
- Under Startup type, select Disabled from the dropdown menu.
- Click Stop if the service is currently running.
- Click Apply and then Ok to save the changes.
Option 2: Using Group Policy Editor (for Windows 11 Pro & Enterprise)
This method is useful for users with Windows 11 Pro or Enterprise editions. The Group Policy Editor allows you to disable automatic updates through system policies.
- Press the Windows key + R, type gpedit.msc, and press Enter.
- Navigate to
sql
Computer Configuration → Administrative Tempates → Windows Components → Windows Update
- Double-click Configure Automatic Updates on the right panel.
- Select Disabled, then click Apply and Ok.
- Restart your computer for changes to take effect.
Option 3: Using Registry Editor (for all editions)
For Windows 11 Home users, disabling updates via the Registry Editor is an alternative since the Group Policy Editor isn’t available. A word of caution, though: Incorrect registry changes can cause system issues.
⚠️ Take note: Editing the registry is risky. Make sure to backup your registry before proceeding.
- Press the Windows key + R, type regedit, and press Enter.
- Navigate to:
HKEY_LOCAL_MACHINE\SOFTWARE\Policies\Microsoft\Windows\WindowsUpdate\AU
- If the WindowsUpdate and AU keys don’t exist, create them.
- Inside AU, right-click and choose New → DWORD (32-bit) Value.
- Name it NoAutoUpdate and set its value to 1.
- Close Registry Editor and restart your PC.
Option 4: Using metered connection (prevents auto updates)
If you don’t want to fully disable updates but want to limit automatic downloads, setting your network as metered will prevent Windows from downloading updates automatically.
- Open Settings (Win + I)
- Go to Network & Internet.
- Select Wi-Fi or Ethernet, depending on your connection type.
- Click on your connected network.
- Toggle Metered connection to On.
Additional option: Using Windows Update pause feature (temporary solutions)
If you just need to delay updates for a few weeks, Windows 11 has a built-in pause feature that temporarily stops updates.
- Open Settings (Win + I).
- Go to Windows Update.
- Click Pause updates and select a duration.
Why disable Windows updates?
Windows updates are important for security and performance—and having them automated provides a lot of convenience. While keeping your Windows updates on is generally recommended, there are valid reasons why you may want to disable them. For example:
- Higher stability: If you rely on specific applications or devices that aren’t fully compatible with the latest Windows updates, you may run into instability or functionality problems. Disabling Windows updates can help your system run smoothly and without disruption.
- Greater convenience: Windows updates often require system restarts, which can interrupt your workflow and lead to productivity losses—especially if you’re working on a critical project or in a time-sensitive environment. By disabling Windows updates, at least temporarily, you can have more control over when and how your system installs new upgrades.
- Avoid unexpected restarts: Windows may restart your PC at inconvenient times after an update. If an update is installed in the background, Windows may schedule an automatic restart without warning, forcing your system to reboot even if you’re in the middle of a task. This can be particularly disruptive for professionals who rely on uninterrupted access to their devices.
- Prevent compatibility issues: Some updates can break compatibility with older software or hardware. If your business relies on legacy applications, certain updates may lead to software unusable, requiring workarounds or even rollbacks. By disabling updates, you ensure your setup remains stable and fully operational without unexpected compatibility problems.
- Save data on limited internet plans: Automatic updates can consume a lot of bandwidth. Large updates, which can exceed several gigabytes, can quickly eat up your monthly data allowances, leading to additional costs or reduced internet speeds due to throttling.
- Prevent buggy updates: Some updates may introduce new bugs or system instability. To clarify: Windows updates are designed to improve functionality, but not all updates are thoroughly tested for every hardware configuration. This may lead to issues, such as system crashes or even the dreaded blue screen of death.
- Full control: Some users have specific reasons for not wanting to install updates automatically, such as concerns about data usage or privacy. In these cases, disabling Windows updates provides the freedom to choose which updates to install manually, giving users greater control over system maintenance.
Should I permanently disable Windows updates?
Permanently disabling Windows updates is generally not recommended. Windows updates are crucial for maintaining your device’s security and stability. Permanently disabling updates exposes your system to potential security vulnerabilities, and your system misses out on important bug fixes and performance improvements.
This means you’ll need to balance controlling system updates and ensuring your computer’s security. Consider reenabling updates during non-working hours or using tools with more granular control over the update process.
In most cases, reenabling Windows updates is as simple as disabling them in the first place. For example, when changing the Group Policy Editor settings, you should select the “Enabled” option rather than “Disabled.” You can adapt the instructions above depending on your preferred method to turn on Windows updates.
Some other downsides to permanently disabling Windows updates include:
- Security risks: Disabling updates exposes your system to potential security vulnerabilities, as you miss out on crucial security patches and bug fixes. Without regular updates, your computer becomes an easy target for malware, ransomware, and other malicious attacks.
- Performance slowdowns: Windows updates often include performance improvements that can enhance the overall functionality and speed of your computer. Failing to install the latest upgrades will mean that your system won’t be getting a boost.
- Compatibility issues: Compatibility can be a problem for systems running software that is too new and too old. Outdated systems may face compatibility issues with newer software or hardware that require updated Windows versions.
Temporarily switching off Windows updates can help you deal with issues like program incompatibility and productivity concerns. For most users, however, there is little to no benefit from permanently disabling Windows updates. Instead, these users will likely want to turn off Windows updates temporarily by following one of the four methods in the next section.
🔔 Not sure how a new update will impact your systems? Check out our KB Catalog for hundreds of KB articles, each with public sentiment analysis, so you can make informed decisions before updates roll out.
Manage Windows updates efficiently with NinjaOne
Rather than permanently disabling Windows updates, consider utilizing tools like NinjaOne to manage your updates effectively. NinjaOne provides Windows patch management software that offers a robust suite of features, including automated remote patch management, a patch status dashboard, and compliance reporting. Watch a demo or sign up for a free trial.
«Every time I try to shut down my computer, I was forced to update my Windows 10. But I really don’t want to update my operating system because the automatic update might take up the system and network resources. Is there anybody who can help me solve this problem and disable Windows 10 update? Thanks in advance.»
All solutions to disable Windows 10 update:
| Solutions | Step-by-step Troubleshooting |
|---|---|
| 1. Manually Disable Windows Update | Press the Windows key + R to open the Run box…Full steps |
| 2. Change the Settings of the Group Policy Editor | Go to Computer Configuration > Administrative Templates…Full steps |
| 3. Meter Your Network Connection | Click «Network & Internet» in the Settings app…Full steps |
| 4. Change Update Settings using Registry | Type regedit, and click OK to open the Registry…Full steps |
Whenever you are faced with Windows’ automatic update notifications like:
- Install updates automatically
- Download Updates but choose when to install them
- Check for updates but let me choose whether to download and install them
What would you do? Here, we have the following solutions.
- Tip
- Before proceeding with the four solutions to fully stop Windows 10 updates, check your own Windows 10 edition (Home, Professional, Education, or Enterprise) by going to Settings -> System -> About so that you can find the most appropriate solution. Besides, the fourth way of trying to control the Windows 10 update by using Registry is somewhat risky, do remember to backup Windows 10 to external hard drive and the details will be shown in the extra tips section.
How to Disable Windows 10 Update
Applies to: Windows 11, Windows 10, and Windows 8. For different system versions, the operation steps may be slightly different.
Solution 1. Disable Windows Update Service
Understand the limitations of this method. While disabling the automatic update service will temporarily halt any Windows 10 cumulative updates, the service will re-enable itself after a certain amount of time. Here are the directions:
1. Press the Windows logo key + R at the same time to invoke the Run box.
2. Type services.msc and press Enter.
3. Scroll down to Windows Update, and double-click it.
4. In Startup type, select «Disabled». Then click «Apply» and «OK» to save the settings.
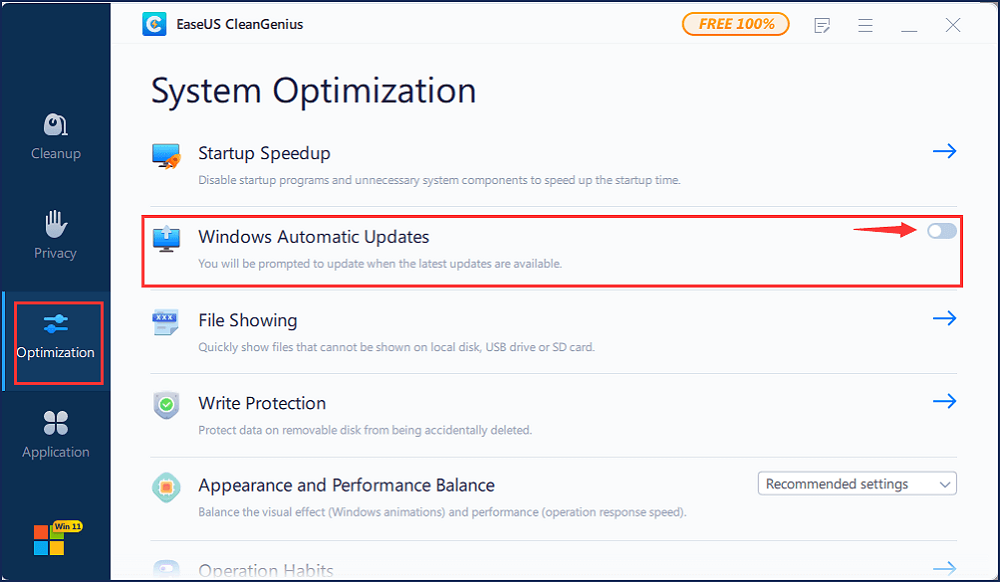
Do you prefer a one-click solution to disable the Windows automatic update feature? If so, get the versatile toolkit — EaseUS CleanGenius to help you. With it, you can disable/enable Windows Update, repair hard drives, remove/enable write-protection, and more within seconds.
To disable Windows Update:
Step 1. DOWNLOAD EaseUS CleanGenius for free and install it on your computer.
Step 2. Launch EaseUS CleanGenius and go to «Optimization».
Step 3. The tool will detect the status of the Windows Update service automatically. If Windows Update is currently enabled, click the switch to stop the service.
Step 4. If you want to check whether you have disabled the service automatically, go to «Start» > type «Services» > right-click «Services» and choose «Run as administrator».
Step 5. In the list of services, find and right-click «Windows Update» > «Properties». In the «Service status» section, you should see the service has been stopped.
Solution 2. Change the Setting of the Group Policy Editor
The Group Policy feature is not available in the Home edition. So, only when you run Windows 10 Professional, Enterprise, or Education, you can use the Group Policy Editor to change the settings to prevent Windows 10 from automatically updating. The group policy editor will notify you of new updates without automatically installing them.
- Press the Windows logo key + R then type gpedit.msc and click OK.
- Go to «Computer Configuration» > «Administrative Templates» > «Windows Components» > «Windows Update».
- Double-click «Configure Automatic Updates».
- Select «Disabled» in Configured Automatic Updates on the left, and click Apply and «OK» to disable the Windows automatic update feature.
Note: If you need to update your Windows version later, you can repeat the steps above, then select Enabled to turn on this feature, so that you can continue to download the updates.
Solution 3. Meter Your Network Connection
Understand that this method won’t work for Ethernet connections. You can only disable automatic updates by using this method on a Wi-Fi connection. If your computer is connected to WiFi, you can try this to stop Windows 10 automatic updates.
1. Click the Start button at the bottom left on your desktop, then click the «Settings» app.
2. Click «Network & Internet».
3. Click WiF in the left pane, then click the name of your Wi-Fi connection.
4. Click to turn on Set as metered connection.
Solution 4. Change the way of Windows 10 Updates Using Registry
Extra Tips: Editing the registry is risky, and it can cause irreversible damage to your installation if you don’t do it correctly. It’s recommended that you make a full backup of your computer before proceeding. All you need to do is use this backup software to back up your data in three steps:
Step 1. Click «Select backup contents» to initiate a backup.

Step 2. There are four data backup categories, File, Disk, OS, and Mail, click File.

Step 3. Local and network files will be displayed on the left side. You may extend the directory to choose which files to back up.

Step 4. Select the location where you want to store the backup by following the on-screen instructions.

Click «Options» to encrypt the backup with a password in «Backup Options,» and to setup a backup schedule and choose to initiate a backup at a certain event in «Backup Scheme.» There are a variety of other customization options available for the backup process.

Step 5. You may save the backup to a local disk, EaseUS’ online service, or a NAS.

Step 6. EaseUS Todo Backup enables customers to back up data to a third-party cloud drive and its own cloud drive.
If you want to back up data to a third-party cloud drive, choose Local Drive, scroll down to add Cloud Device, add your account, and then log in.

You can also save backups to EaseUS’s cloud storage service. Sign up for an EaseUS Account and log in after clicking EaseUS Cloud.

Step 7. To begin backup, click «Backup Now» Once the backup process has been finished, it will be shown as a card on the panel’s left side. To further manage a backup job, right-click it.

With a backup at hand, now it’s safe to customize a Windows 10 update without receiving any forced updates on your computer. Here’s how to make the change in Registry:
1. Press the Windows key + R key to open the Run command.
2. Type regedit, and click OK to open the Registry.
Browse the following path:
HKEY_LOCAL_MACHINE\SOFTWARE\Policies\Microsoft\Windows
3. Right-click the Windows folder, select «New» and then click «Key».
4. Name the new key «WindowsUpdate» and press «Enter».
5. Right-click the newly created key, select «new», and click «Key».
6. Name the new key AU and press Enter.
Inside the newly created key, right-click on the right side, select «New», and click on «DWORD (32-bit) Value».
7. Name the new key AUOptions and press Enter.
Double-click the newly created key and change its value to 2. It’s for «Notify for download and notify for install». Click «OK».
8. Close the Registry to complete the task.
Using this value prevents Windows 10 from downloading updates automatically, and you’ll get a notification when new updates are available. In this way, you can avoid any auto Windows 10 update effectively.
That’s how you could make an attempt to disable Windows 10/11 updates in every way. Each method has been proved to work as long as you wish to turn off all the automatic updates in Windows 10.
FAQ on How to Disable Windows 10 Update
1. Should I stop automatic updates on Windows 10?
Automatic updates help keep your computer safe and secure by downloading and installing the latest security patches as soon as they’re released. If you disable automatic updates, you’ll need to remember to manually update your computer regularly to ensure that it remains secure. So, we suggest not stopping it, but you can pause it.
2. How do I stop Windows 10 from automatically updating?
To stop Windows 10 from automatically updating, you can manually disable Windows update, change the settings of the Group Policy editor, meter your network connection, or change update settings using Registry. You can refer to the post for detailed steps.