
Applies ToWindows 7 Starter Windows 7 Home Premium Windows 7 Home Basic Windows 7 Professional Windows 7 Enterprise Windows 7 Ultimate Windows Server 2008 R2 Standard Windows Server 2008 R2 Foundation Windows Server 2008 R2 Enterprise Windows Server 2008 R2 Datacenter Windows Server 2008 R2 for Itanium-Based Systems
INTRODUCTION
By default, the maximum USB transfer size for USB storage devices is 64 kilobytes (KB). This default setting is configured in the USB port driver (Usbport.sys) in Windows 7 and Windows Server 2008 R2. An update is now available that lets you increase the maximum USB transfer size to as much as 2 megabytes (MB). See the «More Information» section for details about how to do this after you install the update.
Note For some USB storage devices, performance can be improved when you increase the maximum USB transfer size beyond the default setting of 64 KB. This update is supported when the hardware vendor provides a device information file (.inf) to set this value for USB storage devices.
Resolution
Hotfix information
A supported hotfix is available from Microsoft. However, this hotfix is intended to correct only the problem that described in this article. Apply this hotfix only to systems that are experiencing the problem described in this article. This hotfix might receive additional testing. Therefore, if you are not severely affected by this problem, we recommend that you wait for the next software update that contains this hotfix.
If the hotfix is available for download, there is a «Hotfix download available» section at the top of this Knowledge Base article. If this section does not appear, contact Microsoft Customer Service and Support to obtain the hotfix.
Note If additional issues occur or if any troubleshooting is required, you might have to create a separate service request. The usual support costs will apply to additional support questions and issues that do not qualify for this specific hotfix. For a complete list of Microsoft Customer Service and Support telephone numbers or to create a separate service request, visit the following Microsoft website:
http://support.microsoft.com/contactus/?ws=supportNote The «Hotfix download available» form displays the languages for which the hotfix is available. If you do not see your language, it is because a hotfix is not available for that language.
Prerequisites
To apply this hotfix, you must be running one of the following operating systems:
-
Windows 7
-
Windows 7 Service Pack 1 (SP1)
-
Windows Server 2008 R2
-
Windows Server 2008 R2 Service Pack 1 (SP1)
For more information about how to obtain a Windows 7 or Windows Server 2008 R2 service pack, click the following article number to view the article in the Microsoft Knowledge Base:
976932 Information about Service Pack 1 for Windows 7 and for Windows Server 2008 R2
Registry information
To use the hotfix in this package, you do not have to make any changes to the registry.
Restart requirement
You must restart the computer after you apply this hotfix.
Hotfix replacement information
This hotfix does not replace a previously released hotfix.
File information
The global version of this hotfix installs files that have the attributes that are listed in the following tables. The dates and the times for these files are listed in Coordinated Universal Time (UTC). The dates and the times for these files on your local computer are displayed in your local time together with your current daylight saving time (DST) bias. Additionally, the dates and the times may change when you perform certain operations on the files.
Windows 7 and Windows Server 2008 R2 file information notes
Important Windows 7 hotfixes and Windows Server 2008 R2 hotfixes are included in the same packages. However, hotfixes on the Hotfix Request page are listed under both operating systems. To request the hotfix package that applies to one or both operating systems, select the hotfix that is listed under «Windows 7/Windows Server 2008 R2» on the page. Always refer to the «Applies To» section in articles to determine the actual operating system that each hotfix applies to.
-
The files that apply to a specific product, SR_Level (RTM, SPn), and service branch (LDR, GDR) can be identified by examining the file version numbers as shown in the following table.
Version
Product
SR_Level
Service branch
6.1.760 0. 16xxx
Windows 7 and Windows Server 2008 R2
RTM
GDR
6.1.760 0. 21xxx
Windows 7 and Windows Server 2008 R2
RTM
LDR
6.1.760 1. 17xxx
Windows 7 and Windows Server 2008 R2
SP1
GDR
6.1.760 1. 21xxx
Windows 7 and Windows Server 2008 R2
SP1
LDR
-
The MANIFEST files (.manifest) and the MUM files (.mum) that are installed for each environment are listed separately in the «Additional file information for Windows Server 2008 R2 and for Windows 7» section. MUM and MANIFEST files, and the associated security catalog (.cat) files, are extremely important to maintain the state of the updated components. The security catalog files, for which the attributes are not listed, are signed with a Microsoft digital signature.
For all supported x86-based versions of Windows 7
|
File name |
File version |
File size |
Date |
Time |
|---|---|---|---|---|
|
Usbstor.sys |
6.1.7600.16849 |
75,776 |
15-Jul-2011 |
03:01 |
|
Usbstor.sys |
6.1.7600.21009 |
75,776 |
15-Jul-2011 |
02:58 |
|
Usbstor.sys |
6.1.7601.17650 |
76,288 |
15-Jul-2011 |
02:55 |
|
Usbstor.sys |
6.1.7601.21771 |
76,288 |
15-Jul-2011 |
03:53 |
For all supported x64-based versions of Windows 7 and of Windows Server 2008 R2
|
File name |
File version |
File size |
Date |
Time |
|---|---|---|---|---|
|
Usbstor.sys |
6.1.7600.16849 |
91,136 |
15-Jul-2011 |
03:30 |
|
Usbstor.sys |
6.1.7600.21009 |
91,136 |
15-Jul-2011 |
03:34 |
|
Usbstor.sys |
6.1.7601.17650 |
91,648 |
15-Jul-2011 |
03:39 |
|
Usbstor.sys |
6.1.7601.21771 |
91,648 |
15-Jul-2011 |
03:23 |
For all supported IA-64–based versions of Windows Server 2008 R2
|
File name |
File version |
File size |
Date |
Time |
|---|---|---|---|---|
|
Usbstor.sys |
6.1.7600.16849 |
238,592 |
15-Jul-2011 |
02:43 |
|
Usbstor.sys |
6.1.7600.21009 |
239,104 |
15-Jul-2011 |
02:43 |
|
Usbstor.sys |
6.1.7601.17650 |
238,592 |
15-Jul-2011 |
02:37 |
|
Usbstor.sys |
6.1.7601.21771 |
239,616 |
15-Jul-2011 |
02:42 |
Status
Microsoft has confirmed that this is a problem in the Microsoft products that are listed in the «Applies to» section.
More Information
For more information about software update terminology, click the following article number to view the article in the Microsoft Knowledge Base:
824684 Description of the standard terminology that is used to describe Microsoft software updates
After you install this update, to increase the maximum transfer size of USB storage devices, follow these steps:
-
Click Start , type regedit in the Start Search box, and then press Enter.
-
Locate and then click the following registry subkey:
HKEY_LOCAL_MACHINE\SYSTEM\CurrentControlSet\Control\usbstor\VVVVPPPP
-
Click Edit, point to New, and then click DWORDValue.
-
Type MaximumTransferLength, and then press Enter.
-
Click Edit, and then click Modify.
-
In the Value data box, type a value in the 64 KB-to-2 MB range. For example, select Decimal,and type a value in the range of 65535 (64 KB) to 2097120 (2 MB).
-
Exit Registry Editor.
Notes
-
VVVV represents device descriptor idVendor in hexadecimal.
-
PPPP represents device descriptor idProduct in hexadecimal.
Additional file information
Additional file information for Windows 7 and for Windows Server 2008 R2
Additional files for all supported x86-based versions of Windows 7
|
File name |
X86_usbstor.inf_31bf3856ad364e35_6.1.7600.16849_none_488bef2ff902980f.manifest |
|
File version |
Not applicable |
|
File size |
2,087 |
|
Date (UTC) |
15-Jul-2011 |
|
Time (UTC) |
05:08 |
|
File name |
X86_usbstor.inf_31bf3856ad364e35_6.1.7600.21009_none_4940a3cd11fffb57.manifest |
|
File version |
Not applicable |
|
File size |
2,087 |
|
Date (UTC) |
15-Jul-2011 |
|
Time (UTC) |
08:00 |
|
File name |
X86_usbstor.inf_31bf3856ad364e35_6.1.7601.17650_none_4a5e79aff6393bdd.manifest |
|
File version |
Not applicable |
|
File size |
2,087 |
|
Date (UTC) |
15-Jul-2011 |
|
Time (UTC) |
04:58 |
|
File name |
X86_usbstor.inf_31bf3856ad364e35_6.1.7601.21771_none_4ad376ed0f662ce0.manifest |
|
File version |
Not applicable |
|
File size |
2,087 |
|
Date (UTC) |
15-Jul-2011 |
|
Time (UTC) |
06:12 |
Additional files for all supported x64-based versions of Windows 7 and of Windows Server 2008 R2
|
File name |
Amd64_usbstor.inf_31bf3856ad364e35_6.1.7600.16849_none_a4aa8ab3b1600945.manifest |
|
File version |
Not applicable |
|
File size |
2,091 |
|
Date (UTC) |
15-Jul-2011 |
|
Time (UTC) |
06:04 |
|
File name |
Amd64_usbstor.inf_31bf3856ad364e35_6.1.7600.21009_none_a55f3f50ca5d6c8d.manifest |
|
File version |
Not applicable |
|
File size |
2,091 |
|
Date (UTC) |
15-Jul-2011 |
|
Time (UTC) |
08:49 |
|
File name |
Amd64_usbstor.inf_31bf3856ad364e35_6.1.7601.17650_none_a67d1533ae96ad13.manifest |
|
File version |
Not applicable |
|
File size |
2,091 |
|
Date (UTC) |
15-Jul-2011 |
|
Time (UTC) |
06:03 |
|
File name |
Amd64_usbstor.inf_31bf3856ad364e35_6.1.7601.21771_none_a6f21270c7c39e16.manifest |
|
File version |
Not applicable |
|
File size |
2,091 |
|
Date (UTC) |
15-Jul-2011 |
|
Time (UTC) |
06:59 |
Additional files for all supported IA-64–based versions of Windows Server 2008 R2
|
File name |
Ia64_usbstor.inf_31bf3856ad364e35_6.1.7600.16849_none_488d9325f900a10b.manifest |
|
File version |
Not applicable |
|
File size |
2,089 |
|
Date (UTC) |
15-Jul-2011 |
|
Time (UTC) |
06:05 |
|
File name |
Ia64_usbstor.inf_31bf3856ad364e35_6.1.7600.21009_none_494247c311fe0453.manifest |
|
File version |
Not applicable |
|
File size |
2,089 |
|
Date (UTC) |
15-Jul-2011 |
|
Time (UTC) |
08:44 |
|
File name |
Ia64_usbstor.inf_31bf3856ad364e35_6.1.7601.17650_none_4a601da5f63744d9.manifest |
|
File version |
Not applicable |
|
File size |
2,089 |
|
Date (UTC) |
15-Jul-2011 |
|
Time (UTC) |
05:53 |
|
File name |
Ia64_usbstor.inf_31bf3856ad364e35_6.1.7601.21771_none_4ad51ae30f6435dc.manifest |
|
File version |
Not applicable |
|
File size |
2,089 |
|
Date (UTC) |
15-Jul-2011 |
|
Time (UTC) |
07:25 |
Need more help?
Want more options?
Explore subscription benefits, browse training courses, learn how to secure your device, and more.
This post has been republished via RSS; it originally appeared at: Microsoft USB Blog articles.
First published on MSDN on Nov 13, 2009
Hello, my name is Don Miller. I am a software developer on the Windows USB team. In this post my goal is to provide a USB end-user with a way to view the most recent USB public hotfixes for the below Windows releases:
Windows 2000 Service Pack 4
Windows XP Service Pack 3
Windows 2003 Service Pack 2
Windows Vista Service Pack 2
Windows 7 RTM
As most Windows users know, Microsoft releases public hotfixes for various Windows components after a new Windows version or service pack is released. A hotfix will contain a fix to a specific problem found in that Windows component. Multiple hotfixes can occur to the same Windows component over a period of time and it can be confusing to know what fixes have occurred for a specific Windows USB component. Each Windows hotfix has a version assigned to it in order for the hotfix installer to not install older versions of a Windows USB component over the top of a newer version. A newer version hotfix will contain all the previous version’s fixes meaning that a USB end-user will only have to install the latest hotfix version for a Windows component and have all the fixes done for that Windows component relative to the Windows OS version.
If a USB end-user is experiencing a USB issue, he/she can look at the below list and see if any of the KB’s description of the issue is similar to what he/she is experiencing. If a KB description matches then a USB end-user can download the hotfix the KB references and see if the issue is resolved. The below list will list all the public hotfixes to each USB core component in release date order for the above Windows releases. Note that for best results, for example, if you are running Vista Service Pack 1, you will need to download install Vista Service Pack 2 from
http://www.microsoft.com/downloads/en/default.aspx
before installing any of the Vista Service Pack 2 hotfixes. The same recommendation applies to all the other above Windows releases. Also, the best time to use the below list is when a USB end-user is troubleshooting a USB issue. If a USB end-user’s system is running fine it is recommended that the USB end-user not install any USB hotfixes.
Note: WINUSB.SYS became a Windows inbox driver starting with Vista.
|
|
|
||||
|
|
|
|
|
||
|
USBPORT.SYS |
4/28/2003 |
818129 |
You Must Restart Your Computer After You Reinstall the USB |
||
|
OPENHCI.SYS |
5/13/2003 |
819895 |
STOP 0x0000000A Error When Computer Performs Intensive Operations on USB Drives |
||
|
USBEHCI.SYS |
5/13/2003 |
820759 |
Problems occur when you run a program that accesses a USB 2.0 DVD drive or CD-RW drive |
||
|
OPENHCI.SYS |
7/23/2003 |
823715 |
Computer Does Not Resume from Standby When You Click a USB Mouse |
||
|
USBEHCI.SYS |
9/19/2003 |
827675 |
«Unsafe Removal of Device» error message when you use the Safe Hardware Removal tool |
||
|
USB.INF |
10/10/2003 |
829759 |
USB devices are not detected or use 100 percent CPU time after you apply the hotfix that is described in article 810090 |
||
|
USBD.SYS,USBHUB.SYS |
5/27/2004 |
838921 |
Stop error 0x1E occurs in the Usbhub.sys driver when you install Windows 2000 SP4 from a USB CD drive |
||
|
USBD.SYS,USBHUB.SYS |
6/1/2004 |
838417 |
Stop error 0x0000001E is logged when you restart the computer to complete the installation of Windows 2000 |
||
|
USBPORT.SYS |
6/2/2004 |
838989 |
A USB device may not be redetected after a power cycle in Windows XP or in Windows 2000 |
||
|
OPENHCI.SYS |
6/11/2004 |
843540 |
Computer stops responding when you shut down Windows 2000 |
||
|
USBPORT.SYS |
6/16/2004 |
843503 |
Computer with an Intel ICH6-based platform may stop responding during DVD playback if a high-speed USB 2.0 storage device is attached and if the computer is running Win 2000 |
||
|
|
|||
|
|
|
|
|
|
USBOHCI.SYS |
2/27/2008 |
948101 |
A USB keyboard does not work after you restart a Windows XP-based computer that has an NVIDIA 680i motherboard installed |
|
USBPORT.SYS |
2/28/2008 |
949764 |
A USB device no longer works after you resume a Windows XP-based computer from hibernation (S4) |
|
USBCCGP.SYS |
4/24/2008 |
945436 |
Error message when you try to uninstall or unload the driver for a multifunction USB device on a Windows XP-based computer: «STOP: 0x000000D1 DRIVER_IRQL_NOT_LESS_OR_EQUAL» |
|
USBEHCI.SYS |
4/25/2008 |
949033 |
You may experience severe video degradation and a Stop error when you connect a USB Webcam to a Windows XP-based computer |
|
USBPORT.SYS |
3/19/2009 |
968764 |
Streaming USB 1.1 devices that are connected to an external USB 2.0 hub behave incorrectly on a Windows XP-based, Windows Vista-based, or Windows Server 2008-based computer |
|
USBEHCI.SYS |
6/9/2009 |
969238 |
A data transfer is corrupted when you transfer data from or to a USB device on a computer that is running Windows XP |
|
|
|||
|
|
|
|
|
|
USBPORT.SYS |
2/21/2007 |
925528 |
Stop errors occur on a Windows-based computer that has 2GB or more of RAM and is using an NVIDIA nForce USB controller |
|
USBUHCI.SYS |
6/1/2007 |
938136 |
Recording quality is poor when you use a USB microphone on a Windows Server 2003-based computer that has 4 GB of RAM or more |
|
USBHUB.SYS |
6/12/2007 |
936641 |
You do not receive notification when the USB bus is overloaded on a Windows Server 2003-based or a Windows XP Professional x64-based computer |
|
USBEHCI.SYS |
6/12/2007 |
918005 |
Power consumption may be more than you expect on a computer that is running Windows XP or Windows Server 2003 |
|
USBPORT.SYS,USBEHCI.SYS |
9/3/2007 |
908673 |
Problems may occur when you try to transfer files to or from a device that is connected to a USB 2.0 hub in Windows XP or Windows Vista |
|
USBHUB.SYS |
9/19/2007 |
941716 |
You do not receive an overcurrent notification when the USB bus becomes overloaded on a computer that is running Windows Server 2003 or Windows XP Professional x64 Edition and that is using an NVIDIA USB controller |
|
USBPORT.SYS |
11/14/2007 |
944704 |
When you try to shut down or to restart a Windows Server 2003-based computer that has USB devices connected, the computer stops responding and displays a black screen |
|
USBPORT.SYS |
3/16/2008 |
949764 |
A USB device no longer works after you resume a Windows XP-based computer from hibernation (S4) |
|
USBHUB.SYS |
5/16/2008 |
949483 |
Stop error when you resume a computer that is running Windows XP or a 64-bit version of Windows Server 2003 from hibernation: «STOP 0x1000007E» |
|
USBEHCI.SYS |
7/17/2009 |
973618 |
Stop error when a surprise removal of a USB host controller occurs on a computer that is running Windows Server 2003: «Stop 0x00000050» |
|
USBHUB.SYS |
7/20/2009 |
972659 |
USB devices do not respond when you resume a computer that is running Windows Server 2003 from sleep or hibernation |
|
|
|||
|
|
|
|
|
|
USBPORT.SYS,USBEHCI.SYS |
5/2/2009 |
968764 |
Streaming USB 1.1 devices that are connected to an external USB 2.0 hub behave incorrectly on a Windows XP-based, Windows Vista-based, or Windows Server 2008-based computer |
|
USBPORT.SYS |
5/22/2009 |
971171 |
A computer that is running Windows Vista or Windows Server 2008 restarts automatically and generates a Stop error after you repeatedly plug and hot-unplug a USB device: «0x000000FE» |
|
USBPORT.SYS |
6/5/2009 |
972109 |
The shutdown process does not finish, and you receive an error message on a computer that is running Windows Vista or Windows Server 2008: «Stop 0x0000009F» |
|
USBPORT.SYS |
7/24/2009 |
972485 |
USB 2.0 high-speed devices are recognized as full-speed after you hibernate and then resume a computer that is running Windows Vista or Windows Server 2008 |
|
|
|||
|
|
|
|
|
|
N/A |
N/A |
N/A |
N/A |
|
|
|||
|
|
|
|
|
|
USBHUB.SYS |
9/8/2009 |
974476 |
The computer stops responding when an USB device resumes from the USB Selective Suspend state in Windows 7 or in Windows Server 2008 R2 |
|
USBPORT.SYS |
10/26/2009 |
976972 |
You encounter problems when you move data over USB from a Windows 7 or Windows Server 2008 R2-based computer that has an NVIDIA USB EHCI chipset and at least 4GB of RAM |
|
|
|||
|
|
|
|
|
|
WINUSB.SYS |
9/11/2009 |
975599 |
WinUSB causes a 9F bugcheck — KB coming soon |
- Содержание статьи
- Общая информация
- Утилита от ASRock — Win 7 USB Patcher
- Утилита от Gigabyte — Windows Image Tool
- Утилита от MSI — MSI Smart Tool
- Комментарии к статье ( 81 шт )
- Добавить комментарий
Те люди, которые решили поставить Windows 7 на компьютеры, выпущенные на чипсетах, которые были выпущены после 2015 года, могут столкнуться с весьма неприятным явлением в виде отсутствия возможности установить данную операционную систему с USB носителя — будь то флешка, или же подключенный через USB оптический привод.
Общая информация
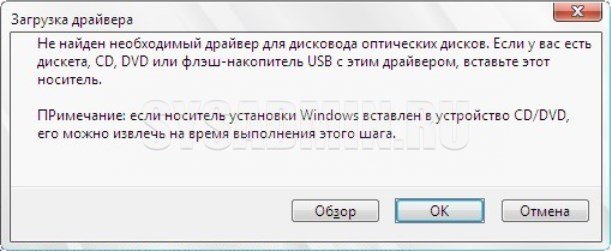
Связано это с тем, что в новых чипсетах Intel, начиная с 100 серии (B150, H110, H170, Q150, Q170, Z170) убрана поддержка Enhanced Host Controller Interface, и поэтому USB разъемы любой версии попросту не работают в установщике Windows. Выражается это в следующем сообщении:
Не найден необходимый драйвер для дисковода оптических дисков. Если у вас есть дискета, CD, DVD или флеш-накопитель USB с этим драйвером, вставьте этот носитель.
Примечение: если носитель установки Windows вставлен в устройство CD/DVD его можно извлечь на время выполнение этого шага.
Тем не менее, многие производители материнских плат решили позаботиться о своих пользователях, и выпустили соответствующие утилиты, которые интегрируют драйвера в установщик Windows 7.
Утилита от ASRock — Win 7 USB Patcher
Поддерживаются материнские платы на следующих чипсетах AMD*:
A320, B350, B450, X370, X470, X570
Поддерживаются материнские платы на следующих чипсетах Intel*:
B150, H110, H170, Q150, Q170, Z170
B250, H270, Q250, Q270, Z270
X299
B360, H310, H370, Q360, Q370
Система на кристалле (SoC) Intel:
J3000, N3000
* По информации производителя программного обеспечения.
Компания ASRock специально выпустила утилиту «Win 7 USB Patcher», которая добавляет в образ установщика Windows все необходимые драйвера. Скачать её можно либо с сайта ASRock, выбрав один из вариантов под нужную вам платформу — Intel 100, 200/AMD AM4 или Intel N3000, J3000.
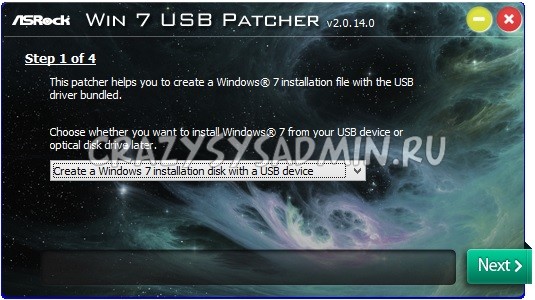
Пользоваться данной утилитой достаточно легко:
- Запускаем исполняемый файл, и выбираем нужное действие:
- Create a Windows 7 installation disk with a USB device — Создать установочный диск Windows 7 для USB устройства;
- Create a Windows 7 installation disk with a CD — Создать установочный диск Windows 7 для CD;
- Create a Windows 7 installation ISO file for CD — Создать установочный ISO образ для CD;
Выбрав нужный пункт, отправляемся дальше, нажав кнопку «Next».

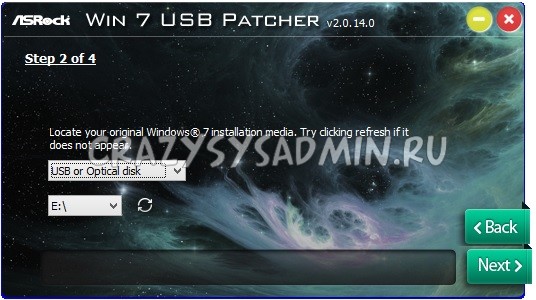
- Теперь предстоит задача выбрать источник с установочными файлами Windows, с которым будет работать программа. На выбор доступно:
- USB or Optical disk — USB или оптический диск;
- Source Directory — Папка Source из установочных файлы Windows;
- ISO File — файл образа ISO

После указания установочных файлов нужно нажать кнопку «Next».
- В следующем шаге нужно указать место, куда произойдет сохранение модифицированных файлов установщика Windows 7. Выбрав нужный диск, USB накопитель или ISO файл (предложенные варианты зависят от сделанного выбора в шаге 1, который можно изменить, перейдя к нему путем нажатия кнопки «Back»), нажимаем кнопку «Next».
- Теперь осталось только нажать кнопку «Start» и ждать завершения процедуры модификации файлов Windows.
- После завершения достаточно лишь только начать установку Windows 7 на проблемном компьютере — теперь установщик видит как и USB 2.0 порты, так и USB 3.0.
Поддерживаются материнские платы на следующих чипсетах Intel*:
B150, H110, H170, Q150, Q170, Z170
B250, H270, Q250, Q270, Z270
X299
* По информации производителя программного обеспечения.
Кампания Gigabyte так же выпустила утилиту под названием «Windows Image Tool», скачать которую можно по этой ссылке.
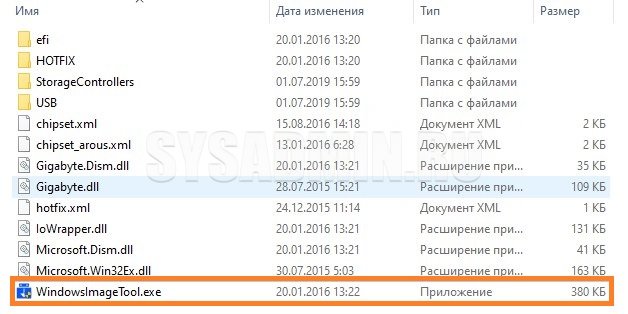
Для её использования, достаточно просто распаковать содержимое архива в любую папку, и запустить исполняемый файл под названием WindowsImageTool.
Запуск программы потребует права администратора, так что если она их затребует, разрешите их.
К сожалению, программа не умеет работать с ISO образами напрямую, и требует либо оптический привод и/или наличие USB накопителя.
Интерфейс программы довольно просто — в первом выпадающем списке нужно выбрать исходный установочный образ Windows 7 (который может быть, как на DVD диске, так и на USB), во втором выпадающем списке нужно выбрать «пунк назначения», куда будет сформирован новый установочный образ Windows 7, при этом это может быть только USB носитель (флешка).
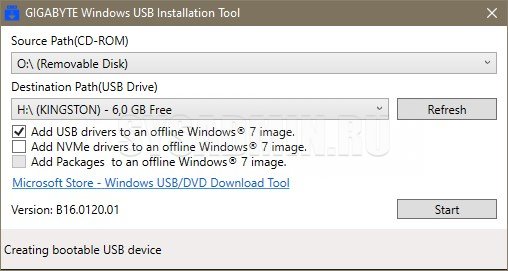
Как только будут выбраны все нужные диски, нужно обязательно убедится, что стоит галочка у пункта «Add USB drivers to an offline Windows 7 image», и нажать на кнопку «Start».
По завершению процесса вместо кноки «Start» станет активна кнопка «Close». После этого, нужно извлечь флешку и приступать к установке Windows на нужном компьютере.
Поддерживаются материнские платы на следующих чипсетах AMD:
X399
Поддерживаются материнские платы на следующих чипсетах Intel*:
B150, H110, H170, Q150, Q170, Z170
* По информации производителя программного обеспечения.
MSI в свою очередь подготовила утилиту «MSI Smart Tool», которая может выполнять множество полезных для обладателя плат MSI действий, и среди них — подготовка образа Windows 7 для установки на материнские платы Intel с последним версиями чипсетов серий 1ХХ/2XX.
Скачать её можно в разделе загрузок нужной материнской платы MSI (Раздел «Утилиты»), или же с нашего сайта (см. ниже).
Скачать MSI Smart Tool (v1.0.0.25)
Скачать MSI Smart Tool (v1.0.0.37)
После скачивания запускаем исполняемый файл, и устанавливаем программу.
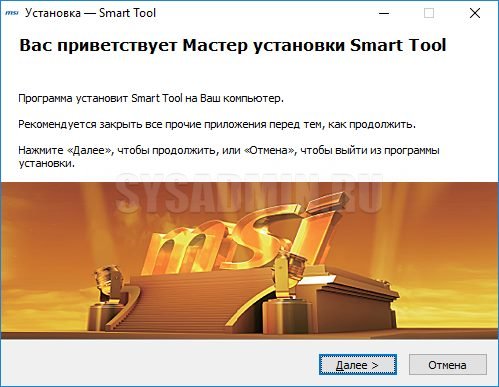
После установки запускаем её, и видим перед собой предупреждающее сообщение, в котором говориться для какой цели была создана данная программа, а так же указание не вытаскивать флешку во время работы программы.

В программе выбираем пункт «Win7 Smart Tool».
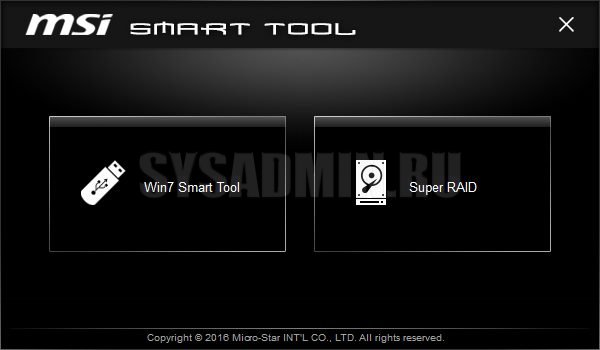
Затем задаем в пункте Source Folder путь к файлу образа, или же к папке с распакованным образом. В разделе «Choose storage device» выбираем либо флеш-носитель («USB Storage»), либо создание образа ISO («ISO Destination»). По завершению указания всех нужных путей нажимем кнопку Start, и ждем завершения процедуры.
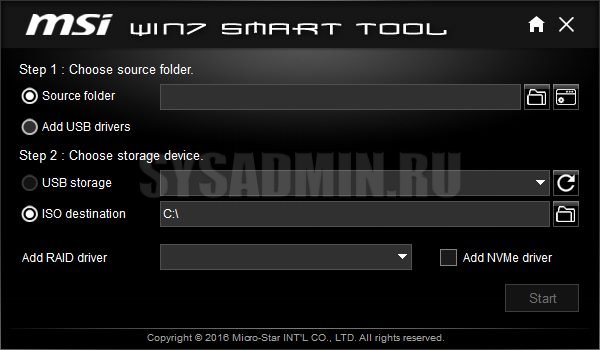
По окончанию процедуры появится соответствующее уведомление:
,
Several times I have faced problems with USB devices in all Windows versions. For instance a USB device (e.g. printer, scanner or webcam) is not functioning or a USB storage device (e.g. USB flash disk) is not detected at all. USB devices issues can occur for different reasons.
For example, when you eject a USB storage device without using the “Safely Remove hardware” option or after a program or Windows Update or after a virus attack. If you face problems with USB devices, then you can use this troubleshooting guide to resolve your USB problems.
USB Errors – Symptoms that can fixed using this guide:
– USB Device not recognized
– USB Printer not recognized or not printing
– USB Storage device cannot be recognized or ejected through “Safely Remove” option.
– USB device driver not successfully installed or Windows cannot install USB device error.
– Unrecognized USB device in Device Manager (error code 43)
How to Troubleshoot & Solve USB device recognition issues.
Before continuing to apply the solutions given below perform these steps:
1. Completely Shutdown your computer and remove the power cable. (Also remove the battery if you own a laptop). Leave it unplugged for about 5-10 minutes and then re-plug the power cord (and the battery). Turn On your computer and check if your USB devices are working.
2. If you own a laptop:
- Turn off your laptop.
- Unplug the AC power adapter and the battery.
- Leave your computer without power for about 15 minutes.
- Reinsert the battery
- Turn on your laptop.
- Plug one by one all USB devices.
- Check if the USB not recognized problem is solved and the USB devices are working.
- Plug the AC power adapter.
3. Change the USB cable that connects your computer with the USB device.
4. Download Hirens BootCd and boot your computer in MiniXP environment. Plug a USB flash stick on an empty port. Open Windows Explorer and check if you can access USB stick’s contents. (Instructions on how to download and start your computer from HirensCD MiniXP can be found at the steps 1,2 & 3 on this tutorial). If you cannot access USB stick’s contents, then probably your motherboard’s USB ports are damaged.
5. Scan your computer for malware by using the instructions in this guide: Quick Malware Scan and Removal Guide.
Solution 1: Diagnose and Resolve USB problems with Microsoft USB Fix It utility
Solution 2: Use the Windows Troubleshooter to diagnose and fix USB errors
Solution 3: Change USB Suspend settings
Solution 4: Change USB Power Management Settings
Solution 5. Install the latest Intel Drivers by using the Intel® Driver Update Utility.
Solution 6: Completely Remove and Re-Install all Universal Serial Bus Controllers & USB Devices
Solution 1: Solve USB problems with Microsoft USB Fix It utility.
1. First download the Microsoft Fix It utility to your computer.*
* Notes:
– Windows 8 & 8.1 users must download the Windows 8 USB Hotfix.
– Windows 7 USB Fix it Utility can work also for Windows Vista & Windows XP.
– Windows Vista users can try also the USB Devices Fix It utility for Windows Vista.
– Windows XP users can also try the USB Fix it for Windows XP.
- Windows 8, 8.1, Server 2012: USB Hotfix (https://support.microsoft.com/kb/2830154).
- Windows 7, Vista & XP: USB Fix It utility (https://support.microsoft.com/mats/windows_usb_diagnostics).
- Windows Vista (alternative): USB Devices Fix It for Windows Vista (http://windows.microsoft.com/en-us/windows-vista/tips-for-solving-problems-with-usb-devices)
- Windows XP (alternative): USB Fix It for Windows XP (https://support.microsoft.com/kb/817900)
2. Run Microsoft Fix It tool and press “Accept”.

3. Select “Detect problems and apply the fixes for me (Recommended)” option.

4. Let the troubleshooter to fix USB problems and press “Next”.

If your problem is fixed, close the troubleshooter and check your USB devices functionality.
Solution 2: Diagnose & Solve USB problems with Windows Troubleshooter
1. Open “Troubleshooting” from Control Panel. To do that:
- Press “Windows” + “R” keys to load the Run dialog box.
- Type “control panel” and press Enter.
2. Change the “View By” option to “Small icons” and click “Troubleshooting”.

3. Under “Hardware and Sound” section, click “Configure a device”.

4. When Hardware and Devices troubleshooter appears on your screen, press “Next”.

5. When troubleshooter diagnose is completed, apply all fixes prompted and then check USB functionality.
Solution 3: Change USB Suspend settings.
1. Open Power Options from Control Panel. To do that:
- Press “Windows” + “R” keys to load the Run dialog box.
- Type “control panel” and press Enter.
2. Double-click to open “Power Options”.*
* Notice: If you don’t see “Power Options” change the “View By”: “Small Icons”.

3. Click “Change plan settings”.

4. Click “Change advanced power settings”.

5. At Advanced power settings, expand “USB Settings” and set “USB selective suspend setting” to “Disabled”.*
* Notice: For laptop computers you have to change this setting in both fields there: On Battery & Plugged in.
6. Press “OK” and restart your computer.
Solution 4: Change USB Power Management Settings.
1. Unplug all USB devices and open Device Manager. To do that:
- Press “Windows” + “R” keys to load the Run dialog box.
- Type “devmgmt.msc” and press Enter.
2. In device manager, double-click to expand “Universal Serial Bus controllers”.

3. Double-click to “USB Root Hub” to open its properties.

4. Click “Power Management”.
5. Uncheck (Deselect) the “Allow the computer to turn off this device to save power” option and press “OK”.
6. You must perform the same operation (steps 3, 4 & 5) for all “USB Root Hub” devices.
7. Close “Device Manager” and plug all your USB Devices again.
Solution 5: Install the latest Intel Drivers by using the Intel® Driver Update Utility.
1. Download the install the Intel® Driver Update Utility.
2. When the installation is completed, press the Start Scan button and let the program to detect and find the latest drivers for your Intel devices.

3. After scan, Download the drivers found.

4. Finally press Install and follow all the prompts, to install the latest Intel drivers found and restart your computer.

Solution 6: Completely Uninstall and Re-Install all Universal Serial Bus Controllers & USB Devices.
1. Unplug all USB devices and open Device Manager. To do that:
- Press “Windows” + “R” keys to load the Run dialog box.
- Type “devmgmt.msc” and press Enter.
2. In device manager, double-click to expand “Universal Serial Bus controllers”.

3. Right-click on every USB device found there and select “Uninstall”.
* Note: If you lose the connectivity with your USB Keyboard or the USB Mouse, during uninstall, then unplug & plug them again on the computer.
4. Restart your computer.
5. After restart wait until Windows automatically install all USB Serial Bus controllers again.
6. Now plug your USB devices (one by one) and see if your computer can recognize them properly and without errors.
Attention: At this point, if a USB device is still not recognized by Windows, then you must uninstall the specific USB device using Device Manager and install it again.
7. Uninstall USB unrecognized devices.
Example 1: If you plug your USB flash disk (USB Storage device) and it doesn’t appear on Windows Explorer, then find this storage device in Device Manager and uninstall it. After uninstalling, unplug the storage device from your computer and plug it again.

Example 2: If you plug your mobile phone (by using a USB cable) and it is not recognized by Windows, then find your mobile phone in Device Manager (usually it is under “Portable Devices) and uninstall it. After uninstalling, unplug the Mobile’s USB cable from your computer and plug it again.

Good Luck!
If this article was useful for you, please consider supporting us by making a donation. Even $1 can a make a huge difference for us in our effort to continue to help others while keeping this site free:
- Author
- Recent Posts
Konstantinos is the founder and administrator of Wintips.org. Since 1995 he works and provides IT support as a computer and network expert to individuals and large companies. He is specialized in solving problems related to Windows or other Microsoft products (Windows Server, Office, Microsoft 365, etc.).
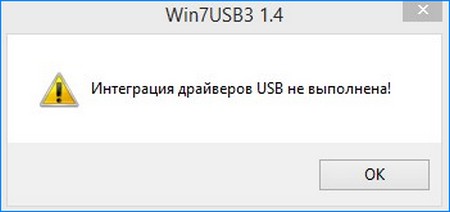
Здравствуйте админ! Часто приходится устанавливать семёрку на новые компьютеры, поэтому решил интегрировать в дистрибутив Windows 7 Максимальная (Ultimate) драйвера USB 3.0-3.1 с помощью пакета Win7USB3, но у меня выходит ошибка «Интеграция драйверов USB не выполнена».
Задал вопрос разработчику (simplix) и он сказал, что я в процессе интеграции где-то допускаю ошибку. К сожалению, подробной инструкции по работе с утилитой на оф. сайте разработчика нет, есть только ссылка на страницу документации инструмента обслуживания образов Dism (docs.microsoft.com). Ладно, думаю, задам этот вопрос на сайте сообщества Майкрософт, может там что толковое подскажут, но к моему удивлению меня обвинили в нарушении лицензионного соглашения, мол я хочу модифицировать оригинальный дистрибутив Win 7 какой-то пиратской «какашкой» и всё в таком духе, блин, еле ноги оттуда унёс! Вам админ, может приходилось работать с этим пакетом?
Интеграция драйверов USB 3.0-3.1 в дистрибутив Windows 7 при помощи Win7USB3
Привет друзья! На нашем сайте есть подробные статьи на тему интеграции драйверов USB 3.0-3.1 в дистрибутив Windows 7. В первой статье мы используем тот самый Dism, а во второй статье описан очень интересный способ модификации дистрибутива Windows 7. Если вас эти способы не устраивают, то давайте рассмотрим вопрос интеграции драйверов USB 3.0-3.1 в дистрибутив Windows 7 пакетом Win7USB3.
{banner_google1}
Первым делом скачиваем ISO-образ Windows 7, в моём случае на диск (G:),
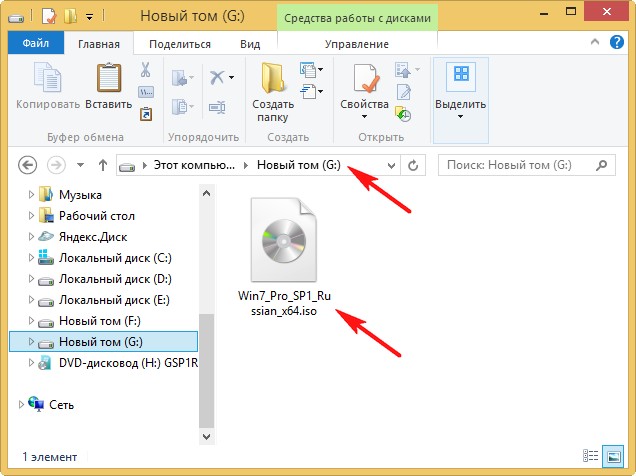
открываем образ, происходит присоединение образа к виртуальному дисководу (H:). Заходим в папку «sources»
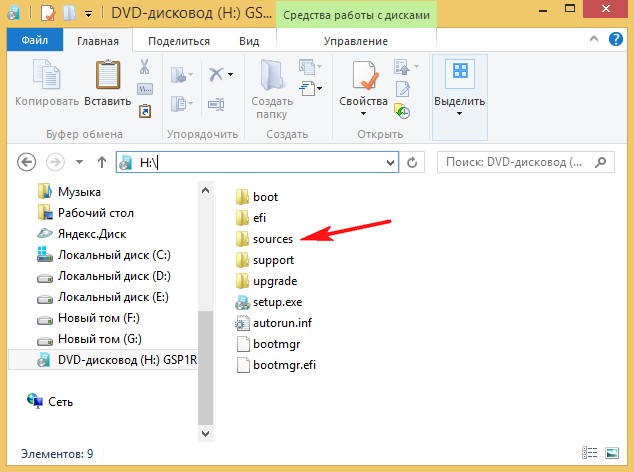
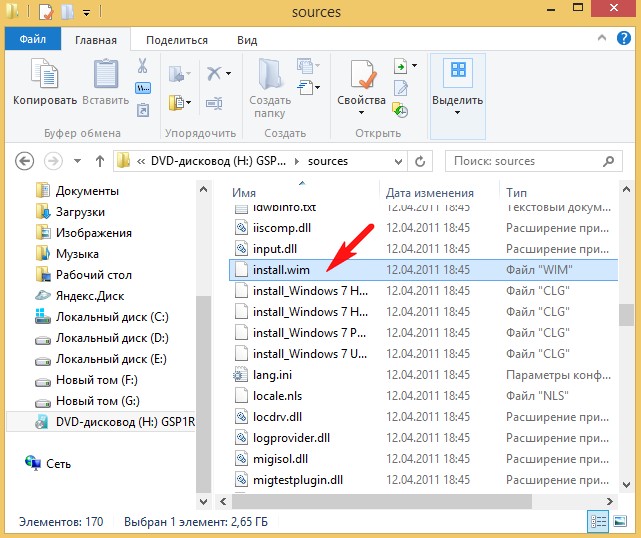
и копируем файл install.wim на диск (G:).
Файлы с расширением (WIM или ESD) — представляет из себя архивы, в которых в сжатом состоянии находятся файлы операционной системы Windows 7, 8.1, 10, данный формат был разработан компанией Microsoft и используется для развертывания OS.
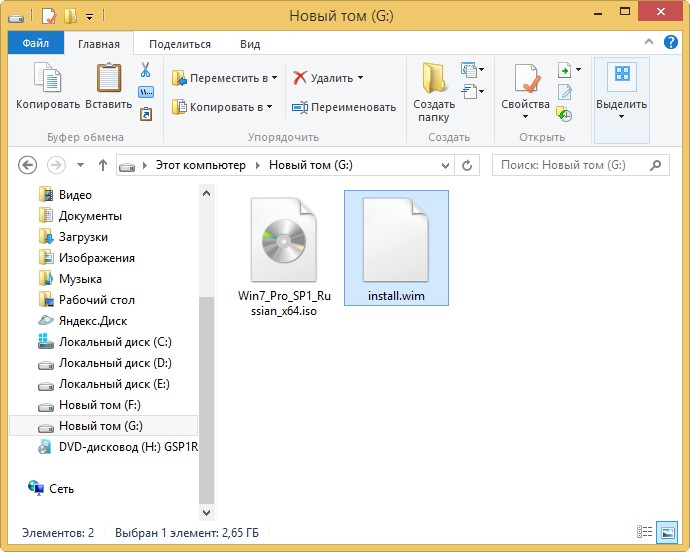
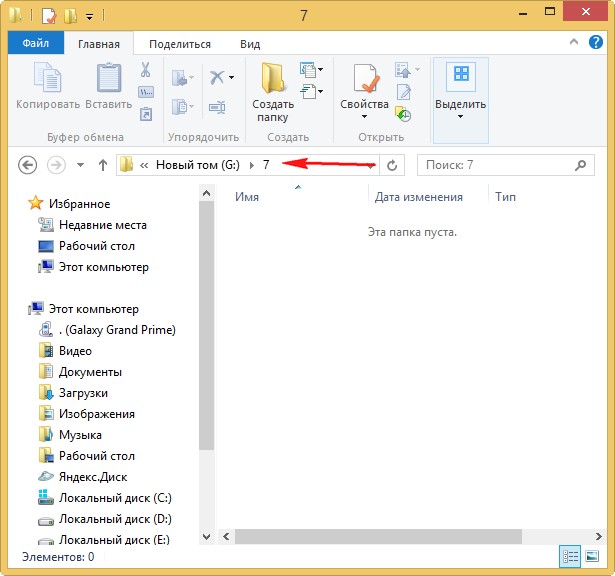
Ещё в корне диска (G:) создаём пустую папку с названием «7».
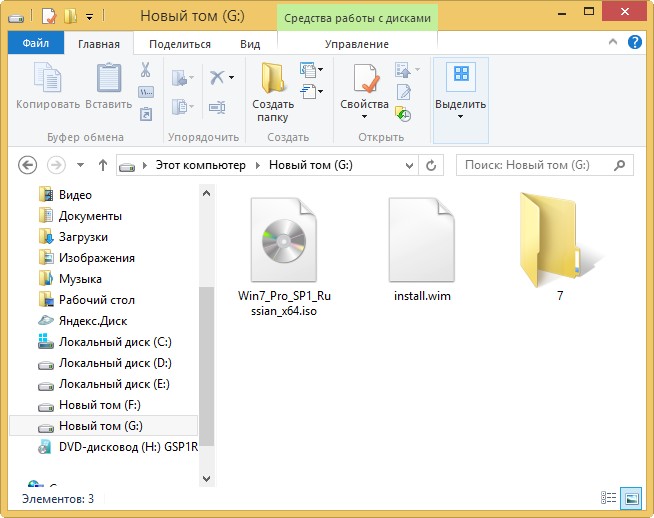
При помощи системы обслуживания образов (Dism), мы подключим содержимое образа install.wim к папке 7, затем с помощью пакета Win7USB3 интегрируем в образ драйвера USB 3.0-3.1 и отключим образ, после этого соберём дистрибутив Windows 7 с новым файлом install.wim, содержащим драйвера USB 3.0-3.1. Вот и всё!
{banner_google1}
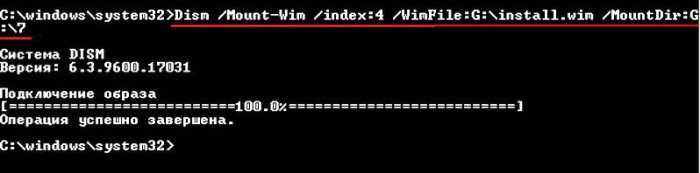
Открываем командную строку от имени администратора и вводим команду:
Dism /Get-WimInfo /WimFile:G:\install.wim (видим, что в файле-образе install.wim, находящемся на диске G:\, индекс образа релиза Windows 7 Максимальная (Ultimate) имеет номер 4 и именно она нужна нашему читателю.
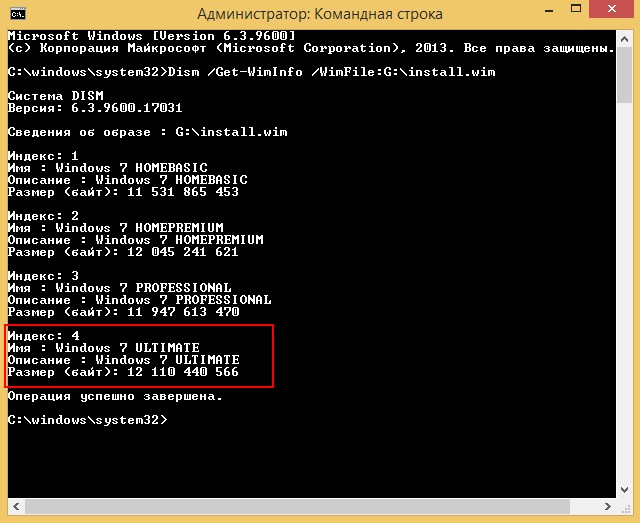
Примечание: Если вам нужно интегрировать драйвера USB 3.0-3.1 в другой релиз Windows 7, то выберите в последующей команде номер соответствующего индекса (1, 2 или 3).
При помощи системы обслуживания образов (Dism) подключаем содержимое образа install.wim к папке «7» на диске (G:).
Вводим в командной строке администратора команду:
Dism /Mount-Wim /index:4 /WimFile:G:\install.wim /MountDir:G:\7
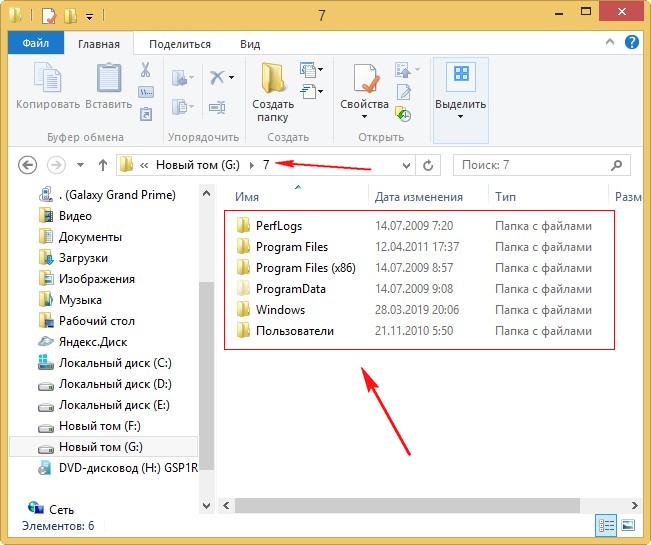
Если открыть папку «7», то вы увидите в ней файлы Win 7.
Теперь настала очередь пакета Win7USB3, скачиваем его по ссылке https://blog.simplix.info/win7usb3/

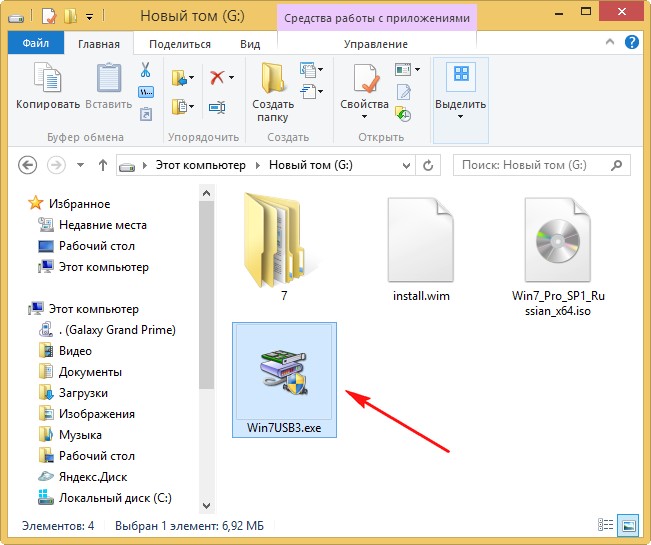
Запускаем Win7USB3.exe и в открывшемся проводнике находим папку «7» с подключенным образом install.wim, выделяем её и жмём ОК.
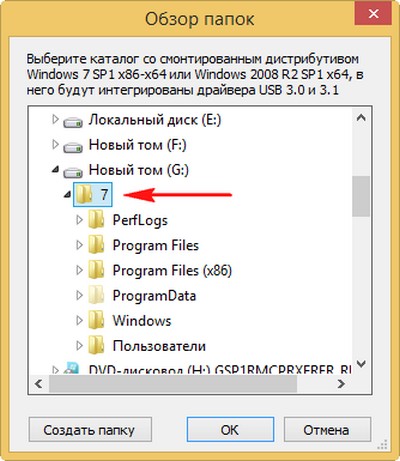
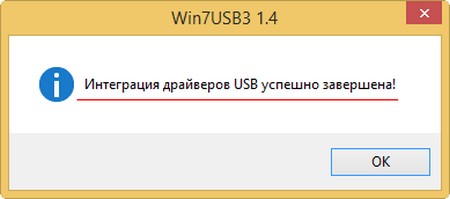
Интеграция драйверов USB успешно завершена!
Закрываем папку «7». если она у вас была открыта.
Затем в командной строке вводим команду:
Dism /Unmount-Wim /MountDir:G:\7 /Commit (данная команда отключает образ install.wim от папки «7»).

{banner_google1}
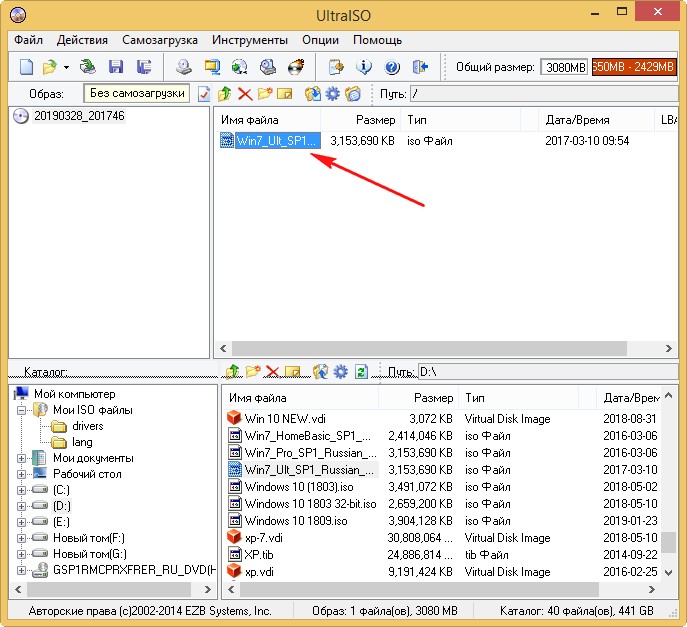
Осталось собрать дистрибутив Windows 7 с новым файлом install.wim, содержащим драйвера USB 3.0-3.1. Сделаем это в программе UltraISO
В главном окне программы UltraISO открываем ISO-образ Win 7.
Открываем папку «sources».
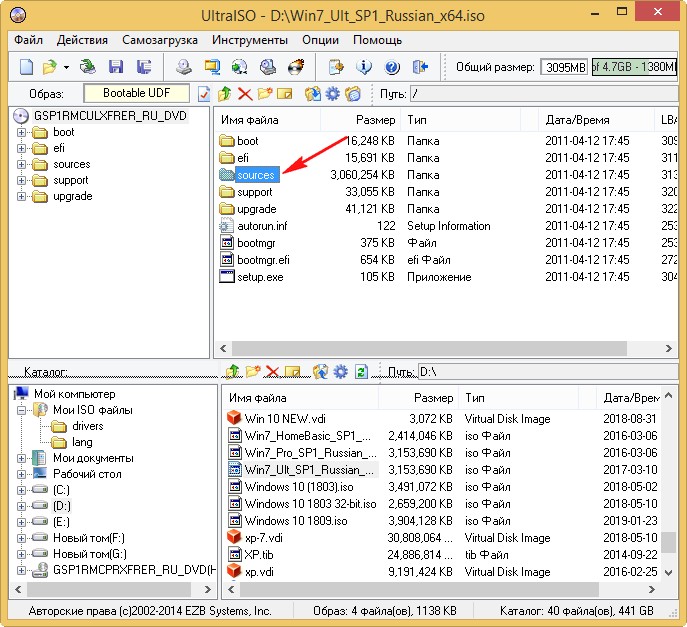
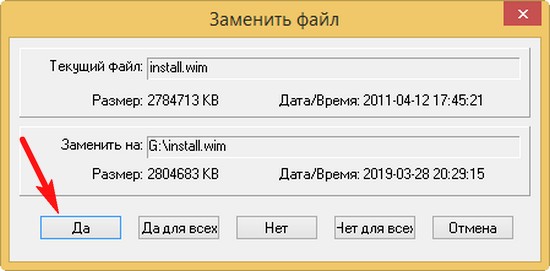
Заменяем в папке «sources» файл install.wim на новый с интегрированными драйверами USB 3.0-3.1, находящийся на диске (G:).
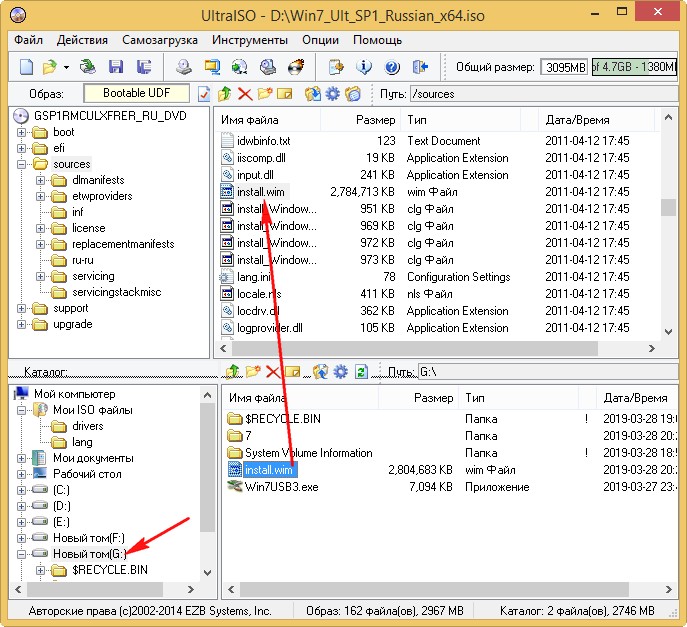
Да.
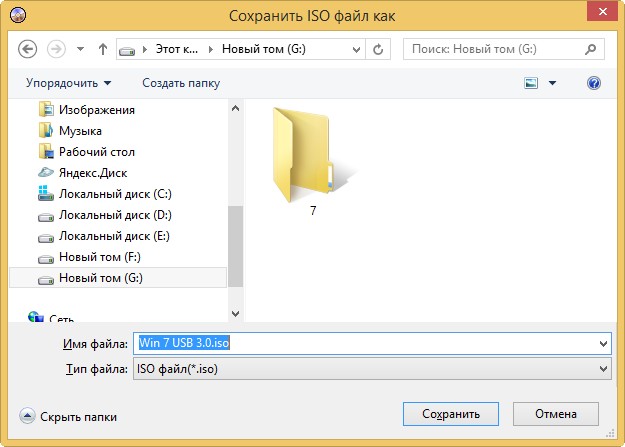
Сохраняем ISO-образ Win 7 с любым именем.
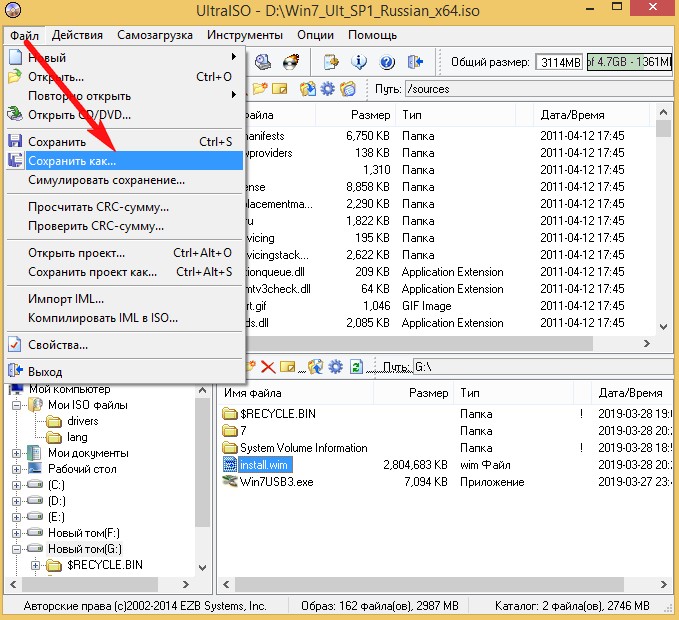
Сохранить.

Создаём из ISO-образа загрузочную флешку и устанавливаем Windows 7 на новый ноутбук или ПК.